

Figures
Figures are canonical images referenced throughout the archive as part of the official record. They include original artworks, design materials, and supporting visuals used to contextualize portfolio entries, projects, and written work.
Items
Abundance Emblem

- Abundance Emblem, study for Kingdom of Flowers
- Artwork by Alex Stevovich
- © Alex Stevovich
- Visit figure page
- Type: portfolio
- Portfolio Type: advertising
- Portfolio Role: design_layout
- Portfolio Original Art: true
Adelson Galleries Boston Brand Brandmark

- Adelson Galleries Boston brandmark
- Client: Adelson Galleries Boston
- Visit figure page
- Type: portfolio
- Portfolio Type: advertising
- Portfolio Role: design_layout
Adelson Galleries Boston Brand Iconmark

- Adelson Galleries Boston brand iconmark
- Client: Adelson Galleries Boston
- Visit figure page
- Type: portfolio
- Portfolio Type: advertising
- Portfolio Role: design_layout
Adelson Galleries Boston Web Exhibitions Page
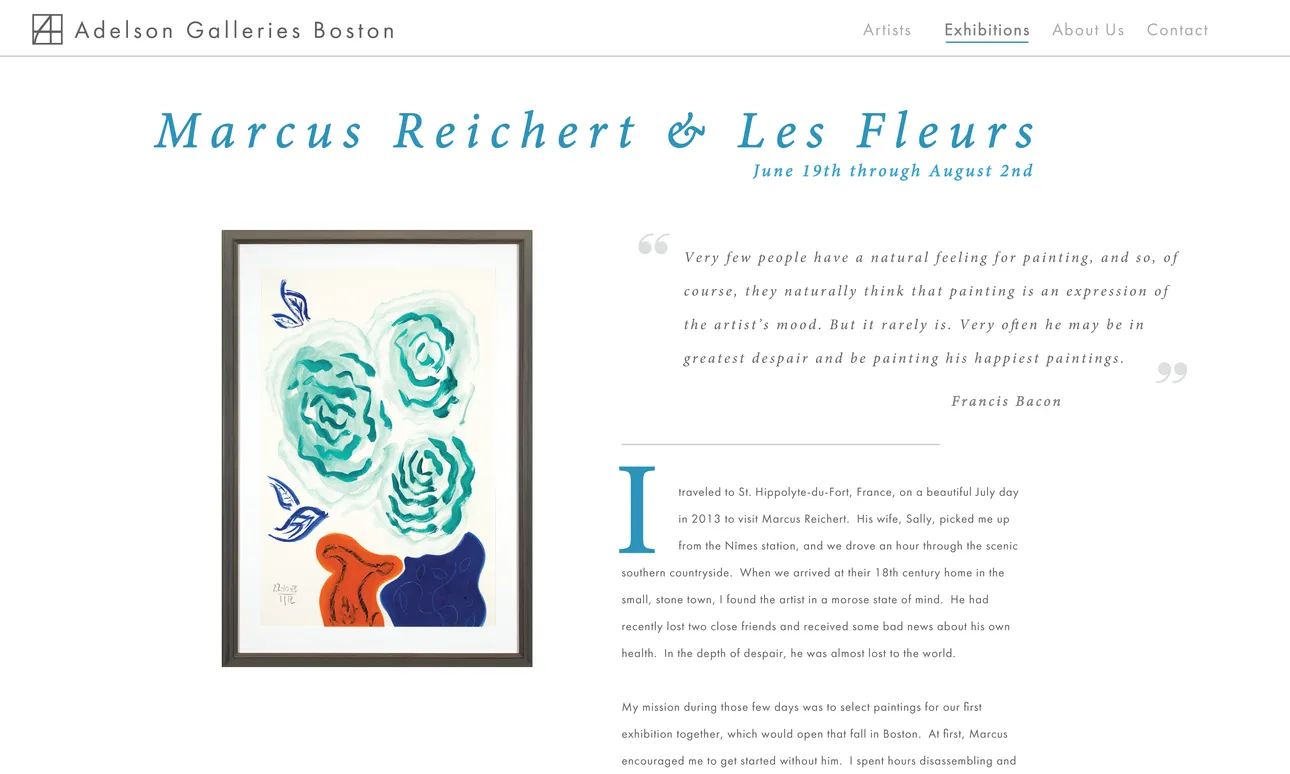
- Adelson Galleries Boston Website — Home Page
- Client: Adelson Galleries
- Visit figure page
- Type: portfolio
- Portfolio Type: advertising
- Portfolio Role: design_layout
Adelson Galleries Web Artists Prendergast Page

- Adelson Galleries Website — Artist (Maurice Brazil Prendergast) Page
- Client: Nielsen Gallery
- Visit figure page
- Type: portfolio
- Portfolio Type: advertising
- Portfolio Role: design_layout
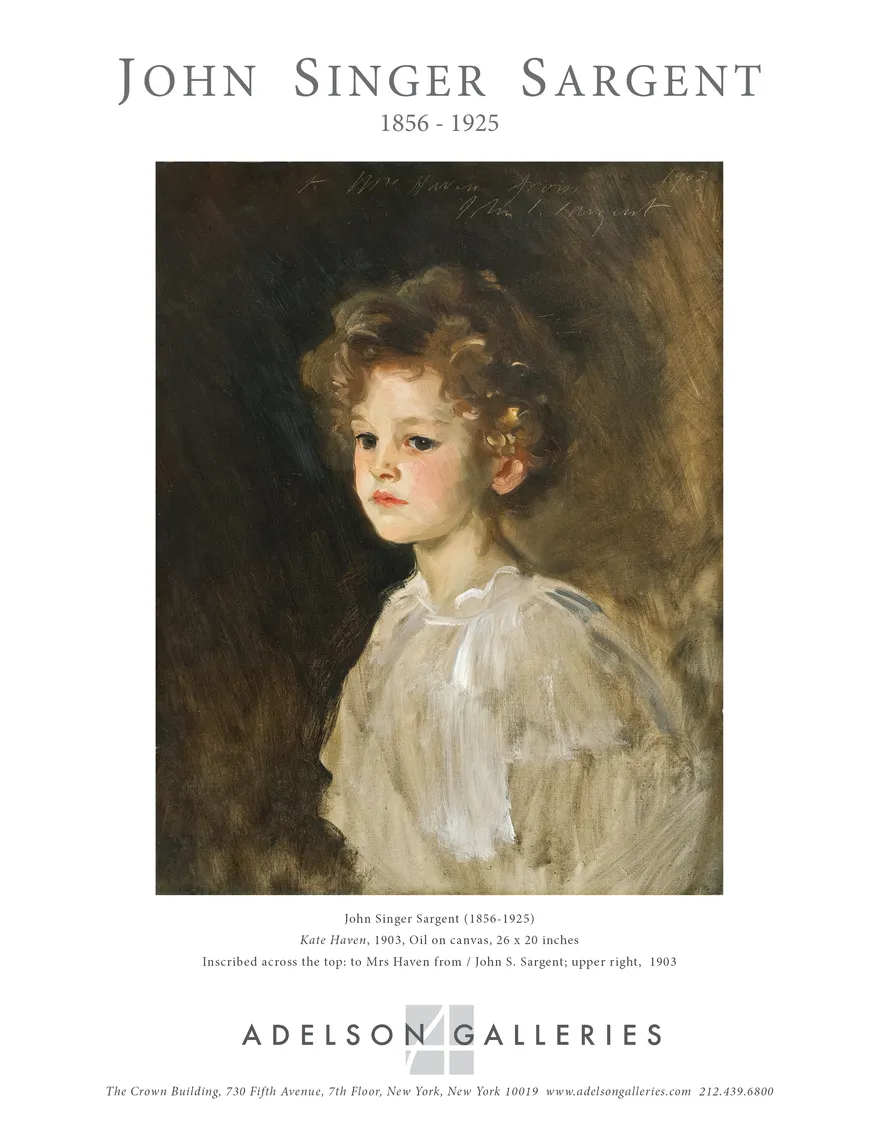
Adelson Galleries Winter Show 2014 Ad

- Advertisement for Adelson Galleries’ 2014 Winter Show presentation
- Client: Adelson Galleries
- Visit figure page
- Type: portfolio
- Portfolio Type: advertising
- Portfolio Role: design_layout
Adelson Galleries Winter Show 2015 Ad
- Advertisement for Adelson Galleries’ 2015 Winter Show presentation
- Client: Adelson Galleries
- Visit figure page
- Type: portfolio
- Portfolio Type: advertising
- Portfolio Role: design_layout
Adelson Galleries Winter Show 2016 Ad
- Winter Show 2016 — full-page advertisement
- Client: Adelson Galleries
- Visit figure page
- Type: portfolio
- Portfolio Type: advertising
- Portfolio Role: design_layout
Adelson Galleries Winter Show 2016 Ad Full Bleed
- Winter Show 2016 — full-bleed variant advertisement
- Client: Adelson Galleries
- Visit figure page
- Type: portfolio
- Portfolio Type: advertising
- Portfolio Role: design_layout
Adelson Galleries Winter Show 2017 Ad
- Winter Show 2017 — full-page advertisement
- Client: Adelson Galleries
- Visit figure page
- Type: portfolio
- Portfolio Type: advertising
- Portfolio Role: design_layout
Adelson Galleries Winter Show 2017 Ad Full Bleed

- Winter Show 2017 — full-bleed variant advertisement
- Client: Adelson Galleries
- Visit figure page
- Type: portfolio
- Portfolio Type: advertising
- Portfolio Role: design_layout
Adrien Broom Envy Exhibition Brochure Presentation
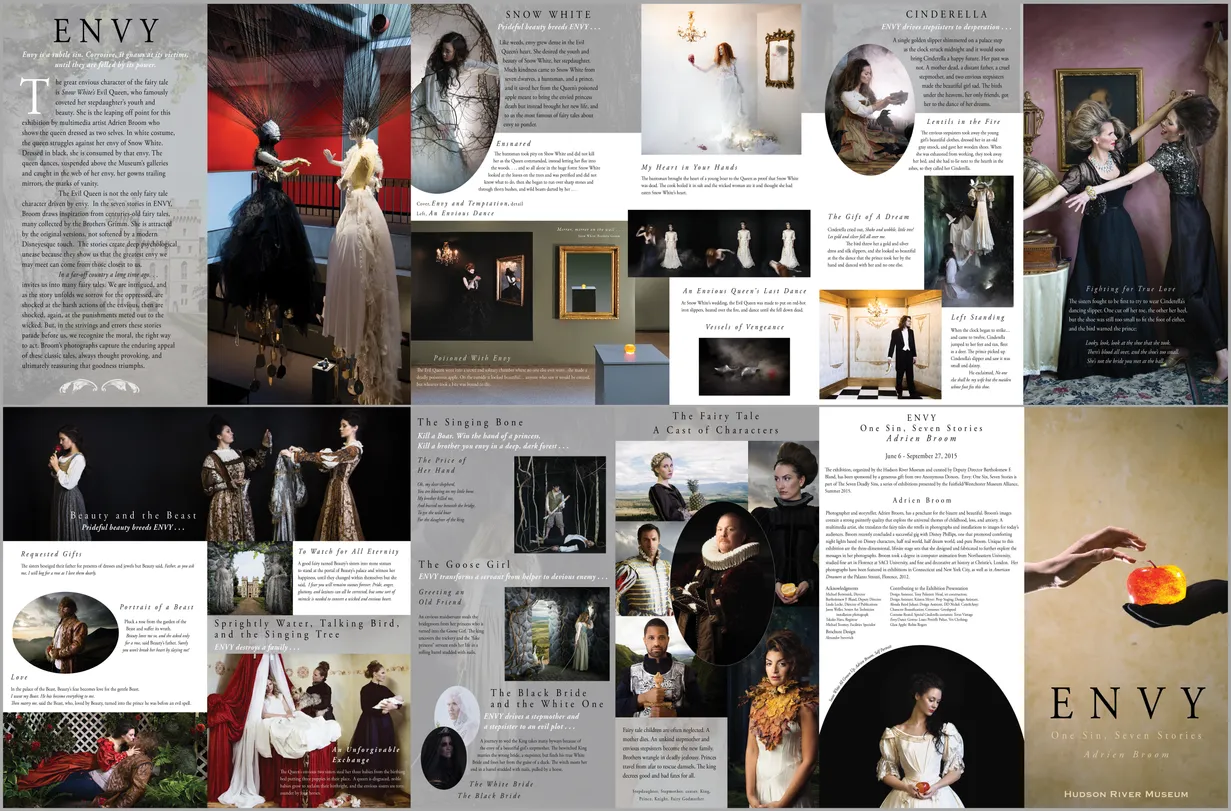
- 6-panel folding brochure for the Adrien Broom: Envy exhibition
- Client: Hudson River Museum
- Visit figure page
- Type: portfolio
- Portfolio Type: advertising
- Portfolio Role: design_layout
Adrien Broom Envy Exhibition Mta Poster

- Adrien Broom: Envy MTA promotional poster
- Client: Hudson River Museum
- Visit figure page
- Type: portfolio
- Portfolio Type: advertising
- Portfolio Role: design_layout
Alex Stevovich Artwork Signature

- Alex Stevovich signature graphic
- Client: Alex Stevovich
- Artwork by Alex Stevovich
- © Alex Stevovich
- Visit figure page
- Type: portfolio
- Portfolio Type: advertising
- Portfolio Role: design_layout
- Portfolio Original Art: true
Alex Stevovich Brand Brandmark

- Alex Stevovich brandmark
- Client: Alex Stevovich
- Visit figure page
- Type: portfolio
- Portfolio Type: advertising
- Portfolio Role: design_layout
Alex Stevovich Web Home Page Scroll Super Miko
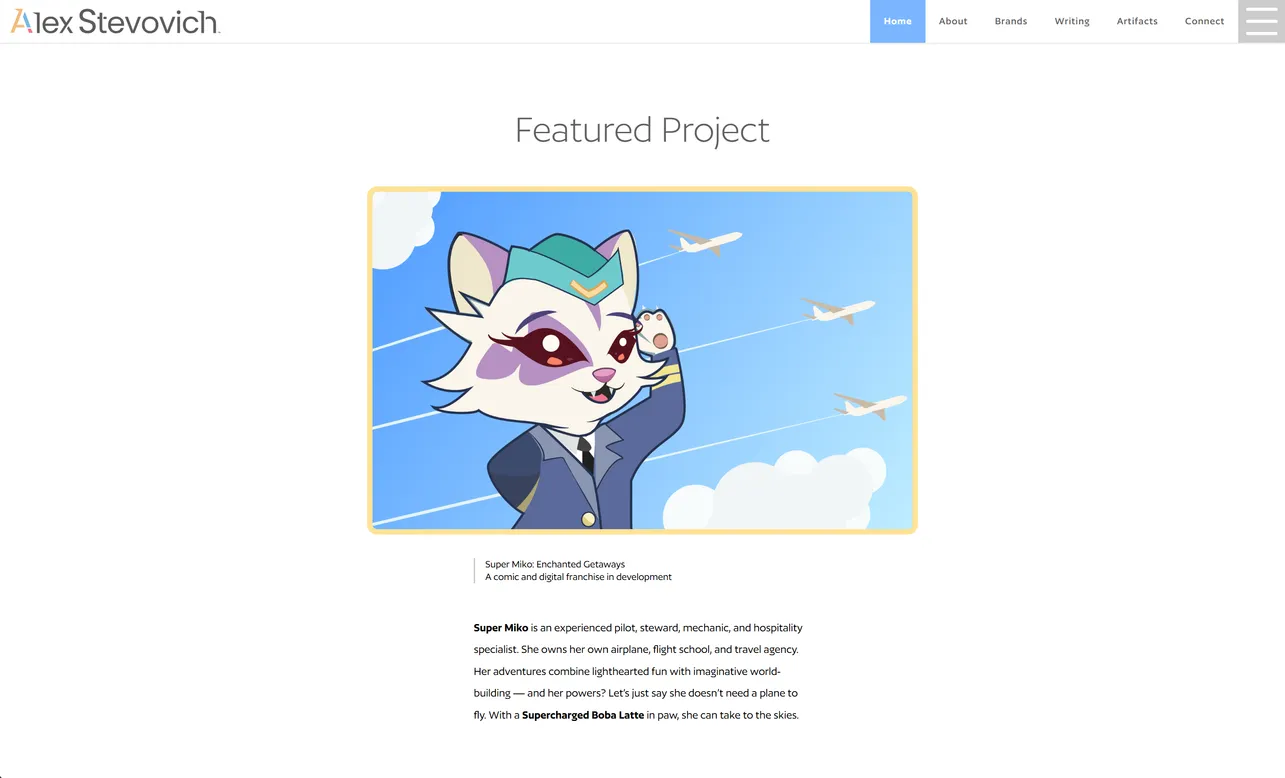
- Alex Stevovich Website — Home Page (Super Miko Scroll)
- Client: Alex Stevovich
- Visit figure page
- Type: portfolio
- Portfolio Type: advertising
- Portfolio Role: design_layout
Alex Stevovich Web Writing Page
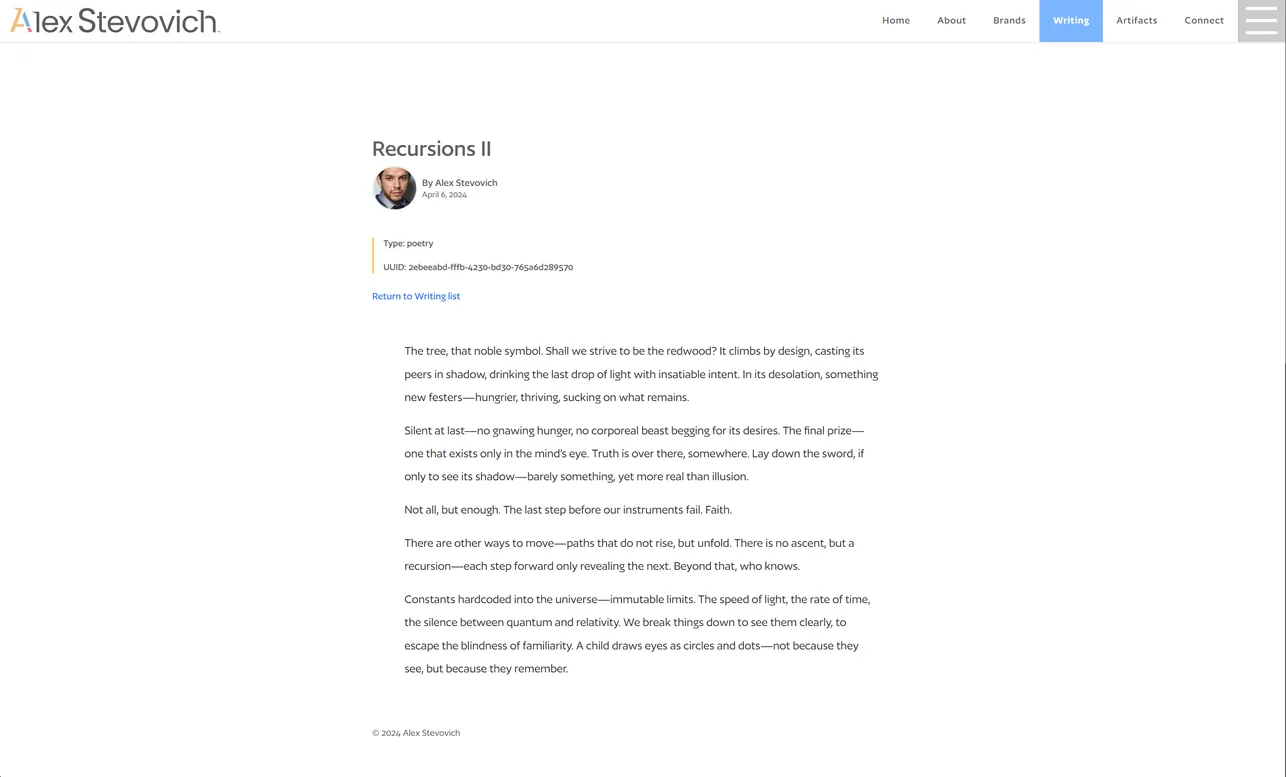
- Alex Stevovich Website — Writing Page
- Client: Alex Stevovich
- Visit figure page
- Type: portfolio
- Portfolio Type: advertising
- Portfolio Role: design_layout
Alien Nations: 2017 — Cover
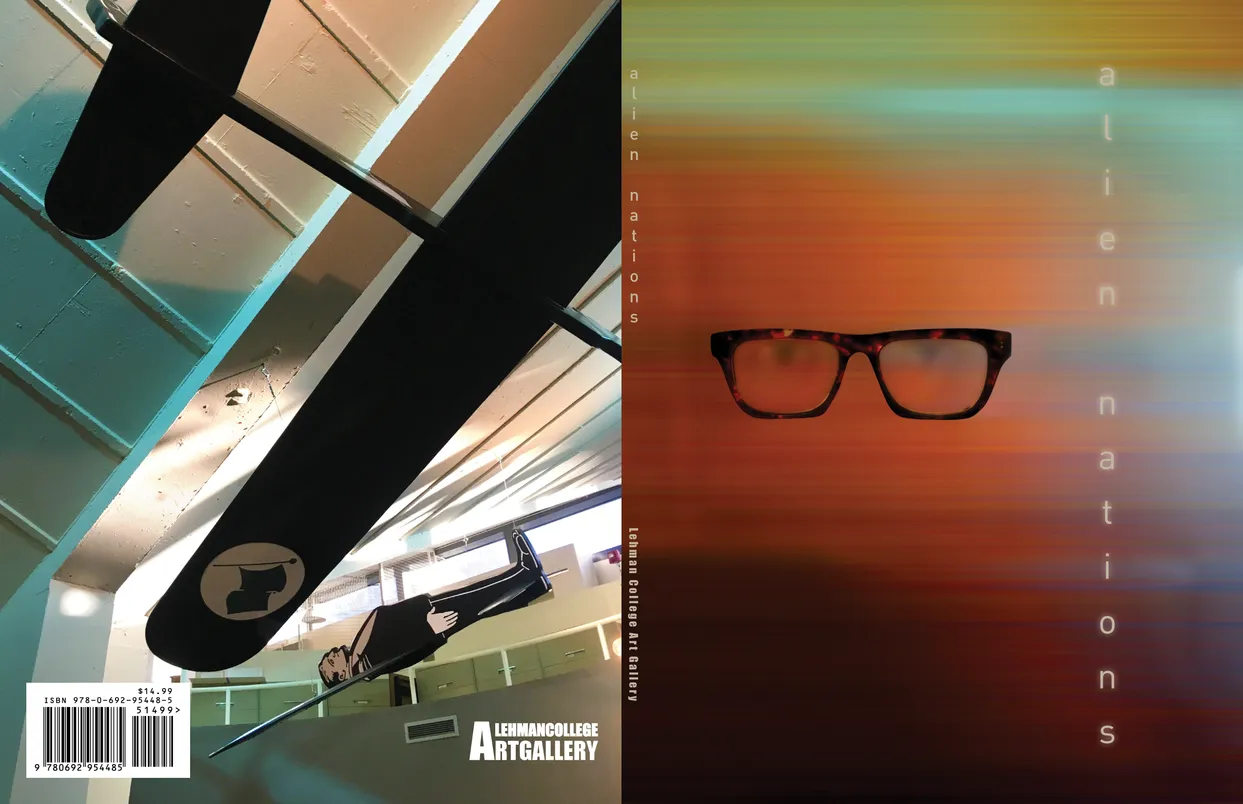
- Alien Nations (2017) exhibition catalog, cover
- Client: Lehman College Art Gallery
- Visit figure page
- Type: portfolio
- Portfolio Type: publication_design
- Portfolio Role: design_layout
Alien Nations: 2017 — Inside Front Cover
- Alien Nations (2017) exhibition catalog, inside front cover
- Client: Lehman College Art Gallery
- Visit figure page
- Type: portfolio
- Portfolio Type: publication_design
- Portfolio Role: design_layout
Alien Nations: 2017 — Inside Front Cover
- Alien Nations (2017) exhibition catalog, inside back cover
- Client: Lehman College Art Gallery
- Visit figure page
- Type: portfolio
- Portfolio Type: publication_design
- Portfolio Role: design_layout
Alien Nations: 2017 — Pages 10–11
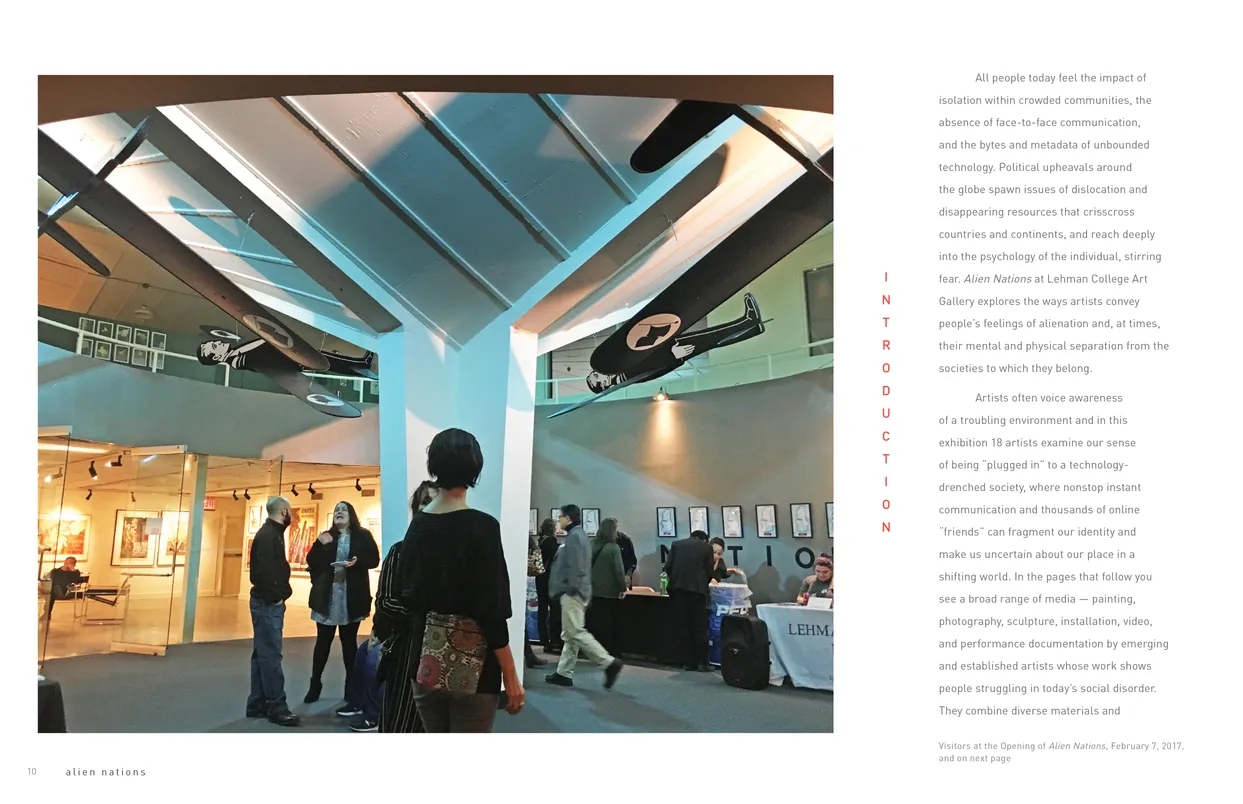
- Alien Nations (2017) exhibition catalog, pages 10-11
- Client: Lehman College Art Gallery
- Visit figure page
- Type: portfolio
- Portfolio Type: publication_design
- Portfolio Role: design_layout
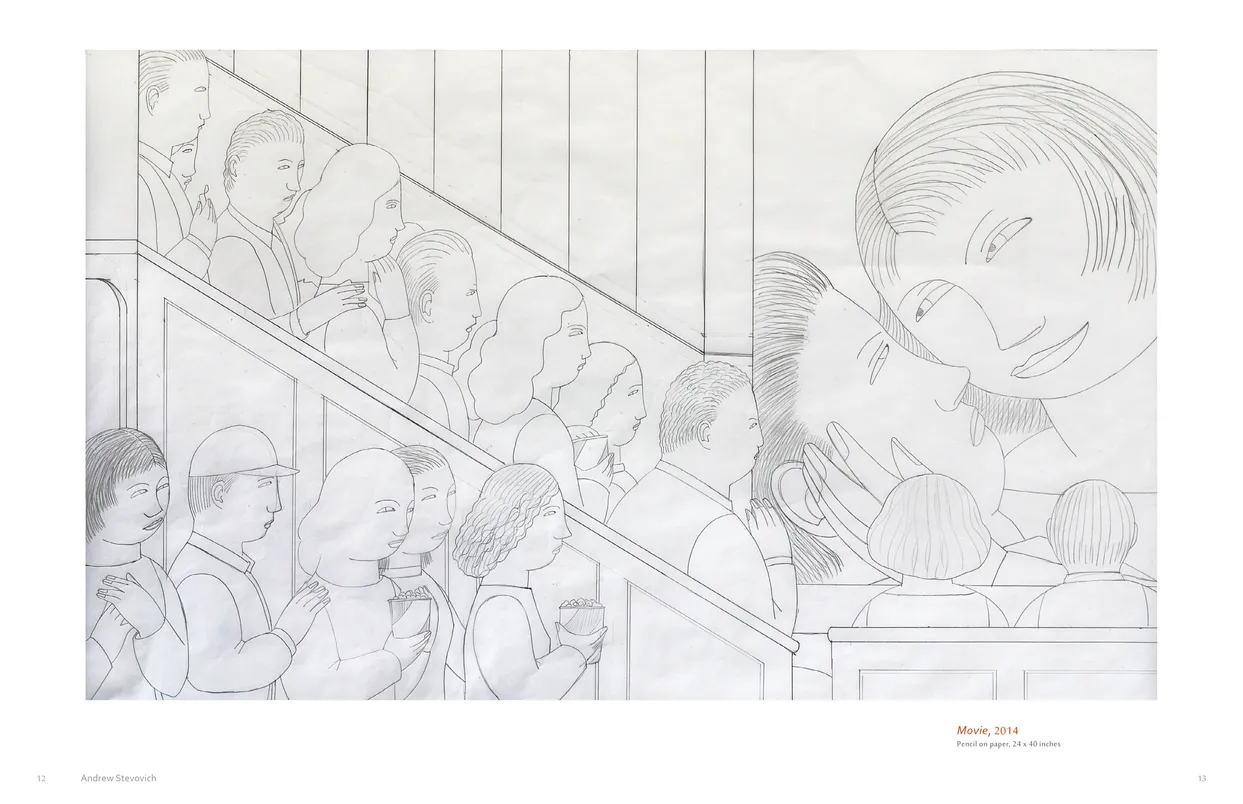
Alien Nations: 2017 — Pages 12–13
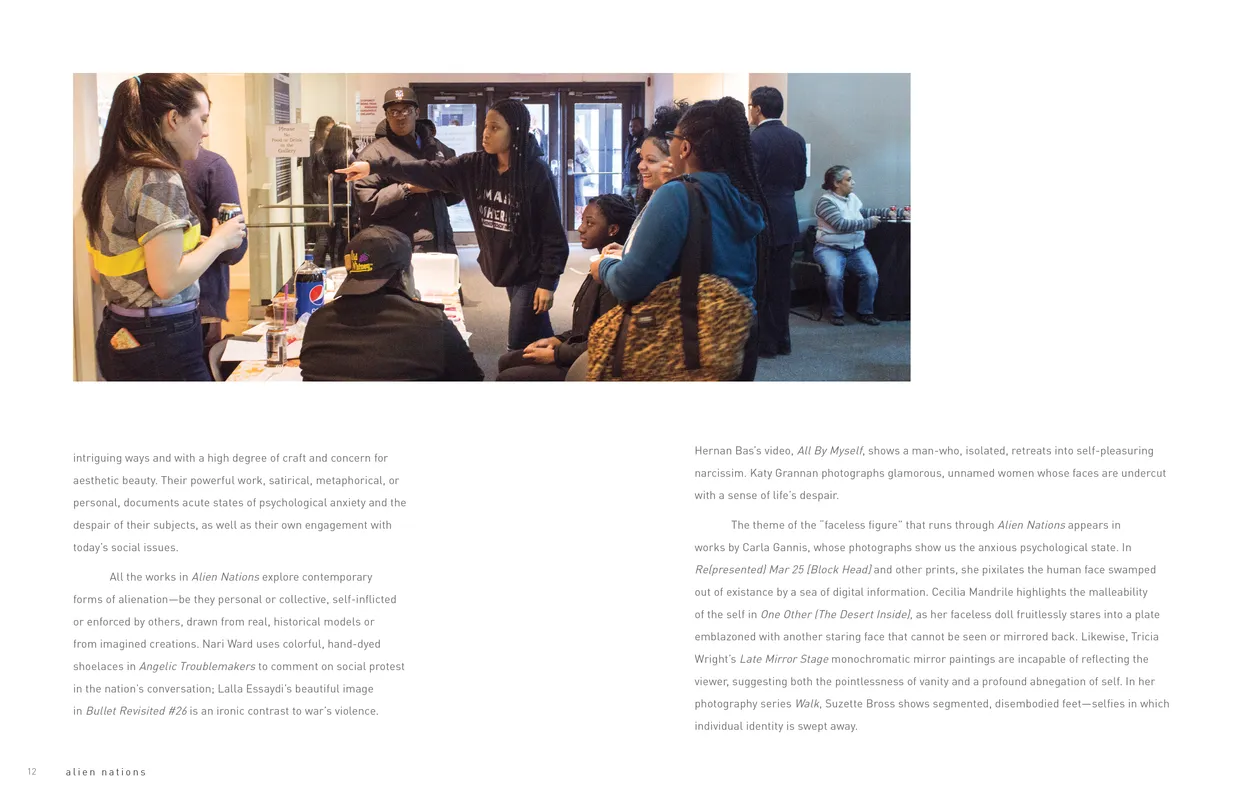
- Alien Nations (2017) exhibition catalog, pages 12-13
- Client: Lehman College Art Gallery
- Visit figure page
- Type: portfolio
- Portfolio Type: publication_design
- Portfolio Role: design_layout
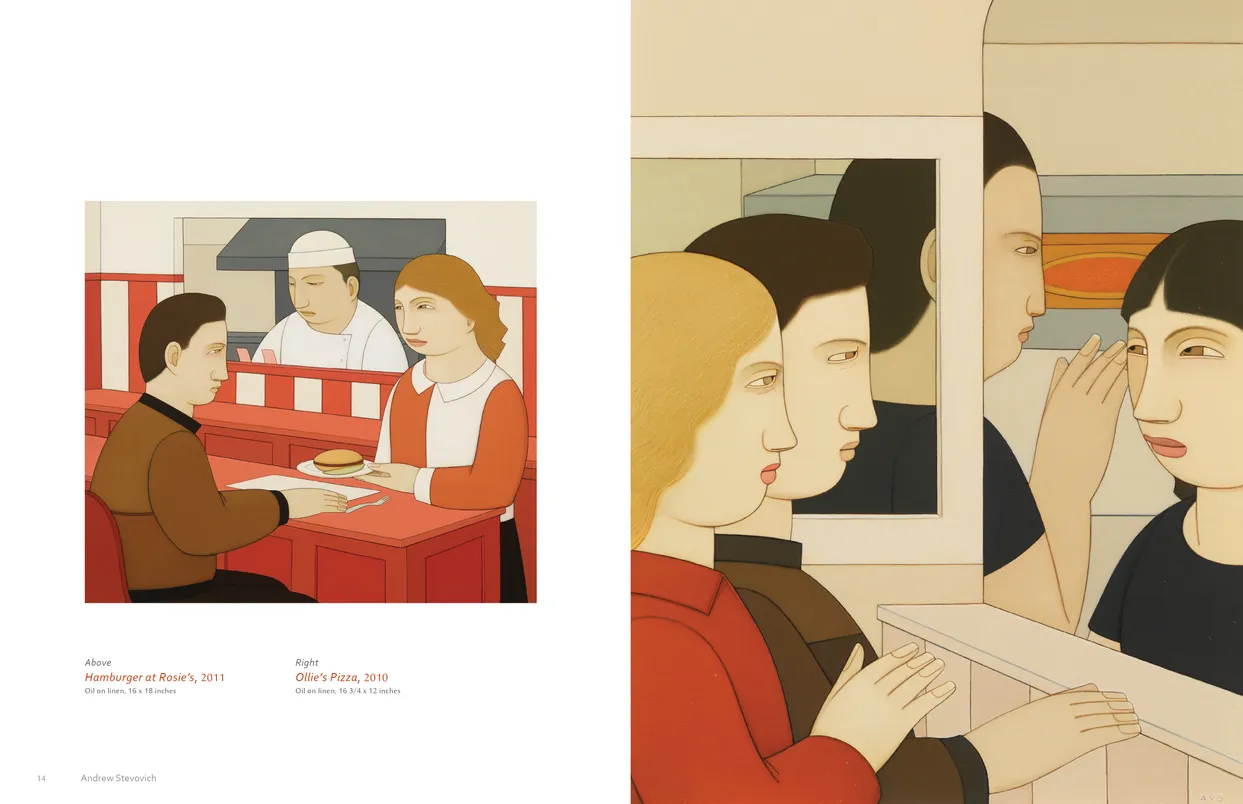
Alien Nations: 2017 — Pages 14–15

- Alien Nations (2017) exhibition catalog, pages 14-15
- Client: Lehman College Art Gallery
- Visit figure page
- Type: portfolio
- Portfolio Type: publication_design
- Portfolio Role: design_layout
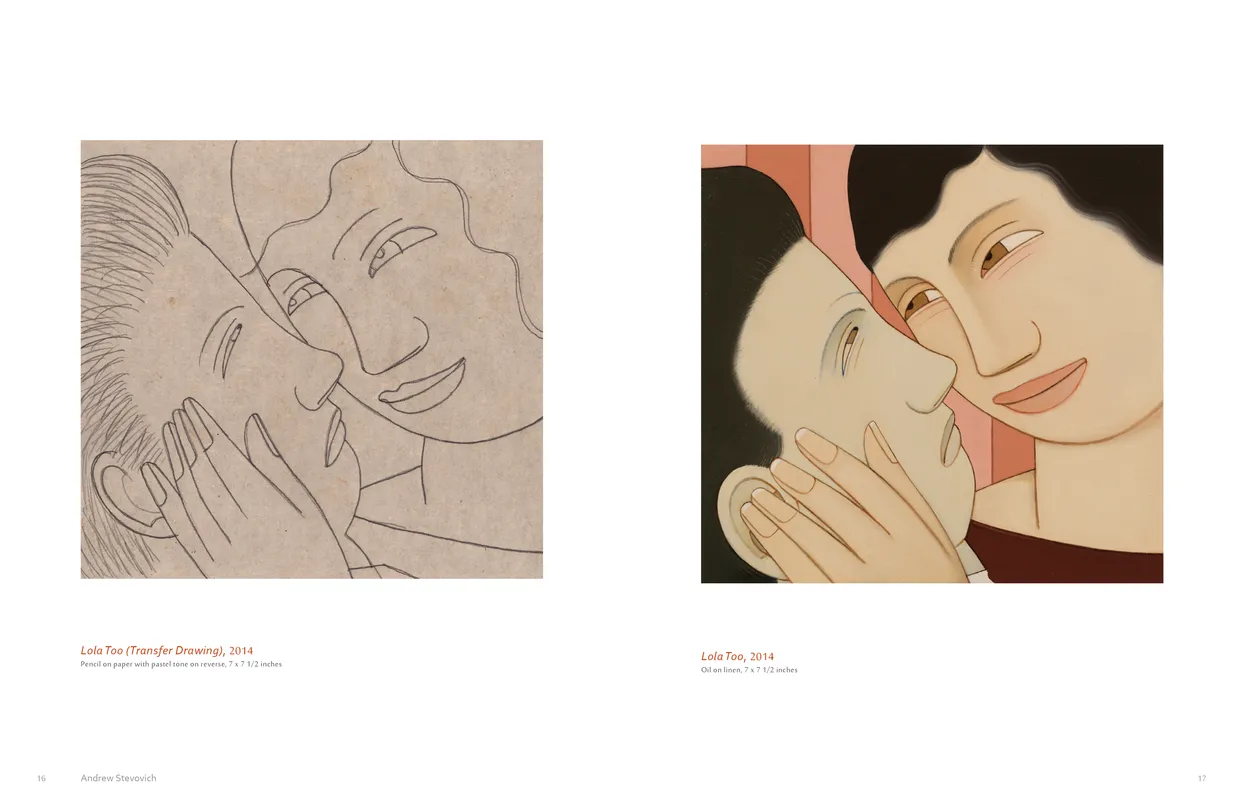
Alien Nations: 2017 — Pages 16–17
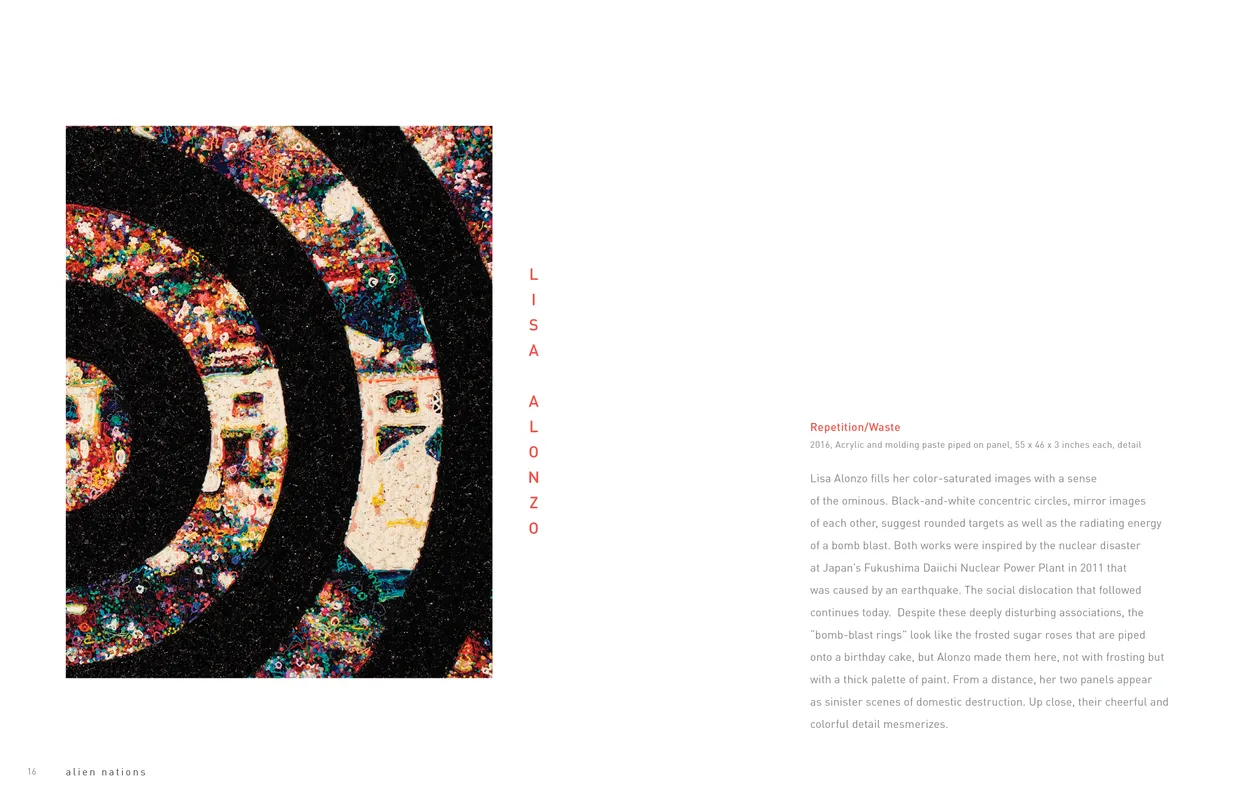
- Alien Nations (2017) exhibition catalog, pages 16-17
- Client: Lehman College Art Gallery
- Visit figure page
- Type: portfolio
- Portfolio Type: publication_design
- Portfolio Role: design_layout
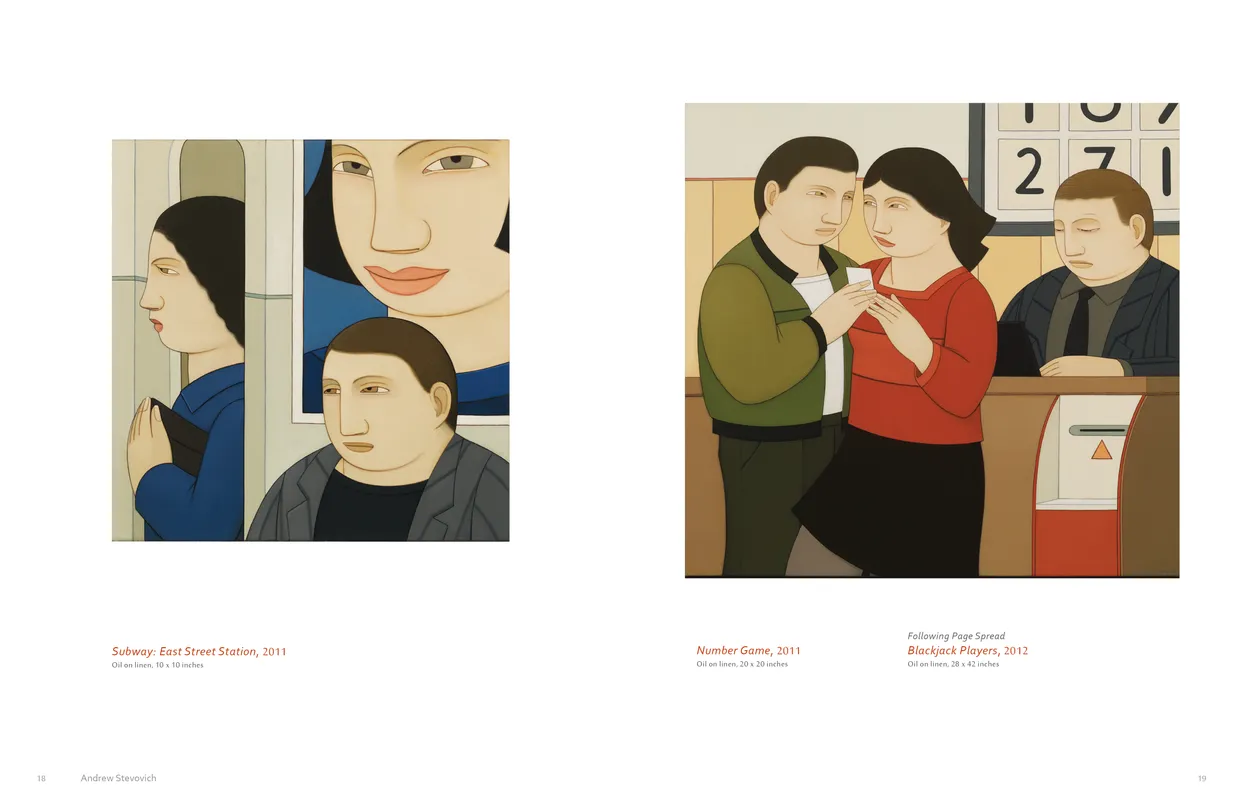
Alien Nations: 2017 — Pages 18–19
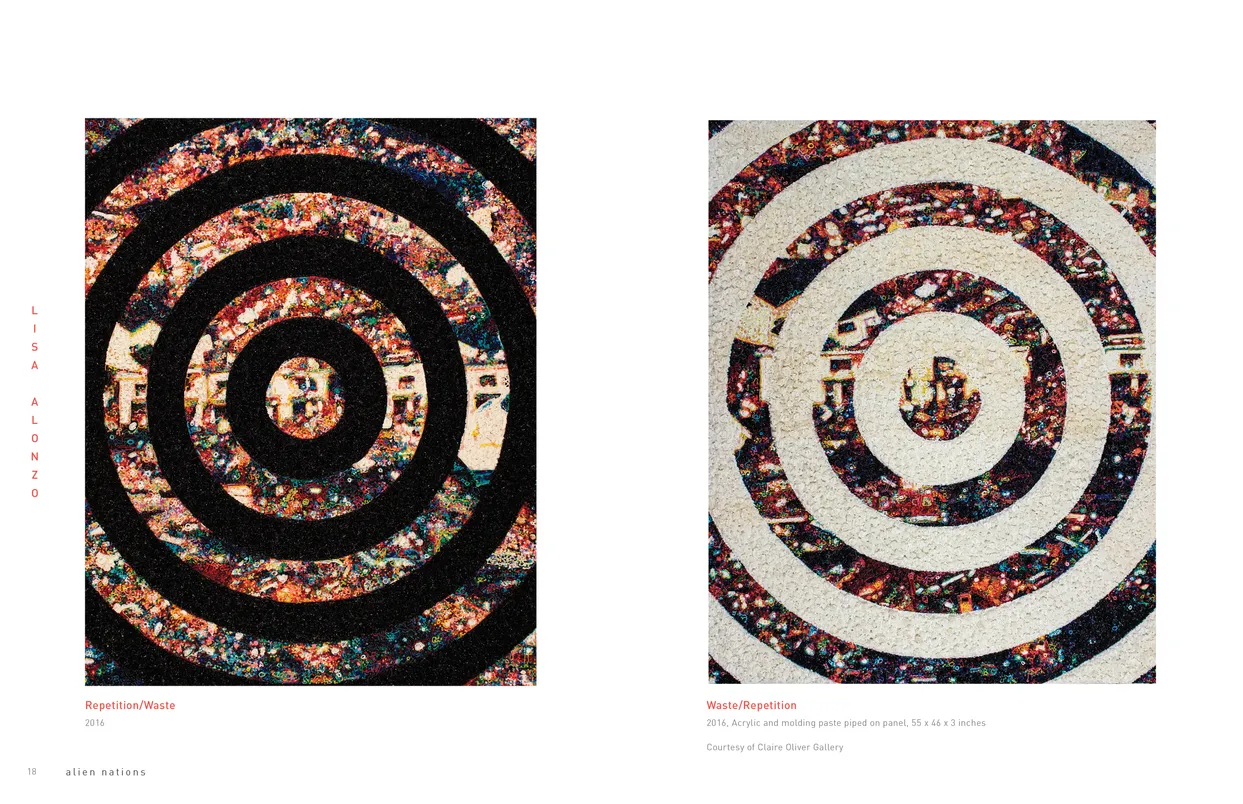
- Alien Nations (2017) exhibition catalog, pages 18-19
- Client: Lehman College Art Gallery
- Visit figure page
- Type: portfolio
- Portfolio Type: publication_design
- Portfolio Role: design_layout
Alien Nations: 2017 — Pages 2–3

- Alien Nations (2017) exhibition catalog, pages 2-3
- Client: Lehman College Art Gallery
- Visit figure page
- Type: portfolio
- Portfolio Type: publication_design
- Portfolio Role: design_layout
Alien Nations: 2017 — Pages 20–21
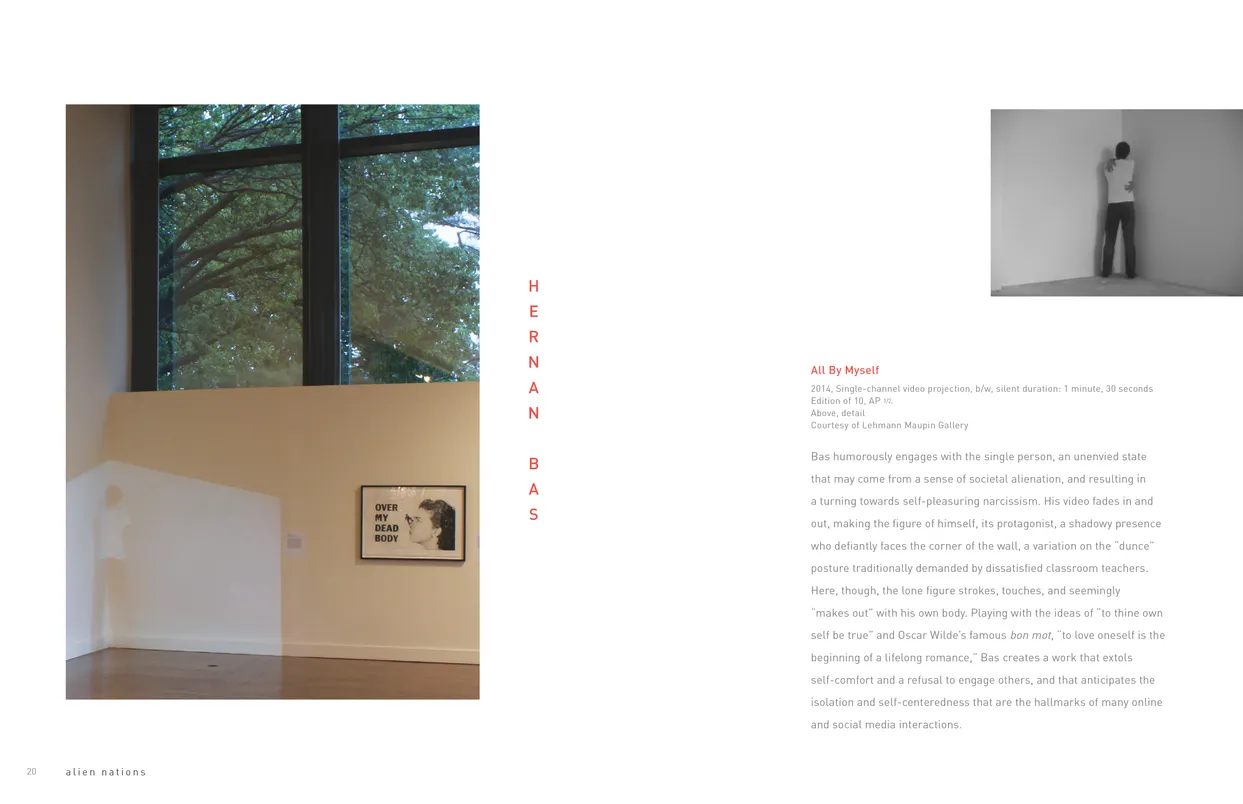
- Alien Nations (2017) exhibition catalog, pages 20-21
- Client: Lehman College Art Gallery
- Visit figure page
- Type: portfolio
- Portfolio Type: publication_design
- Portfolio Role: design_layout
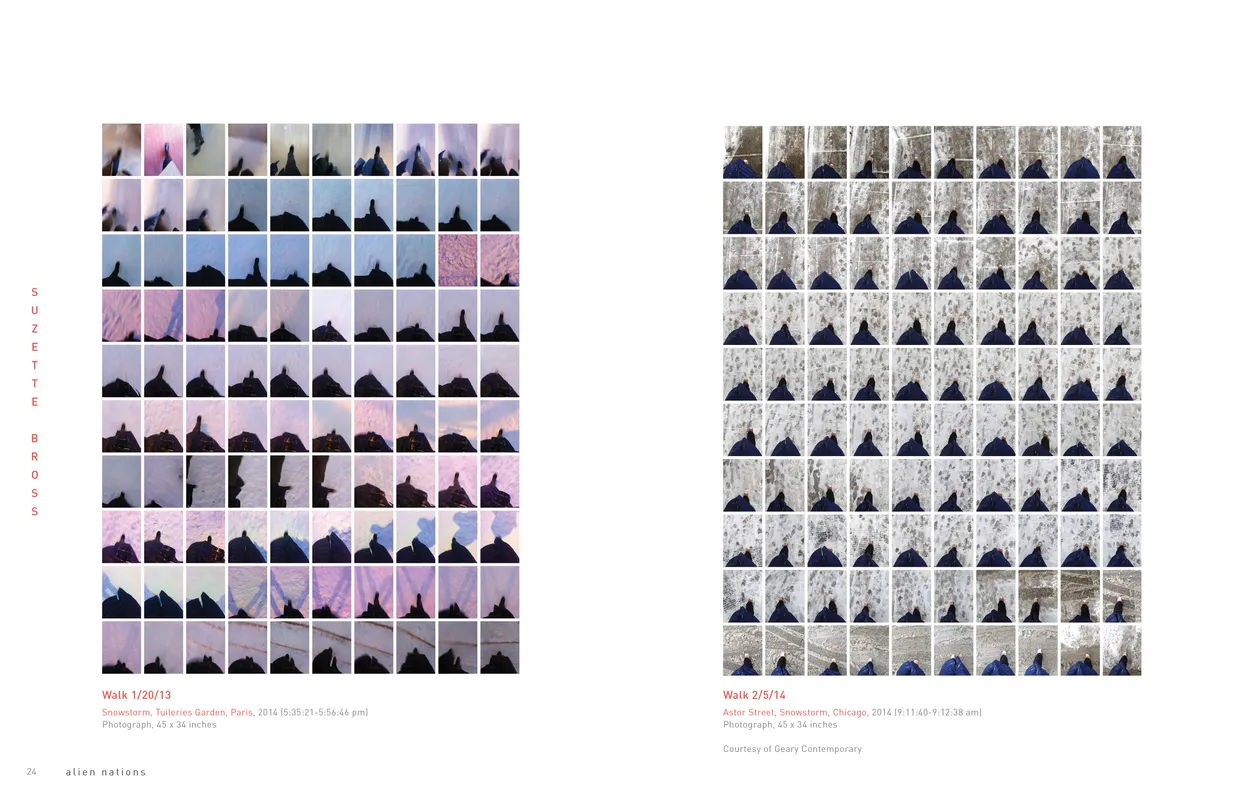
Alien Nations: 2017 — Pages 22–23
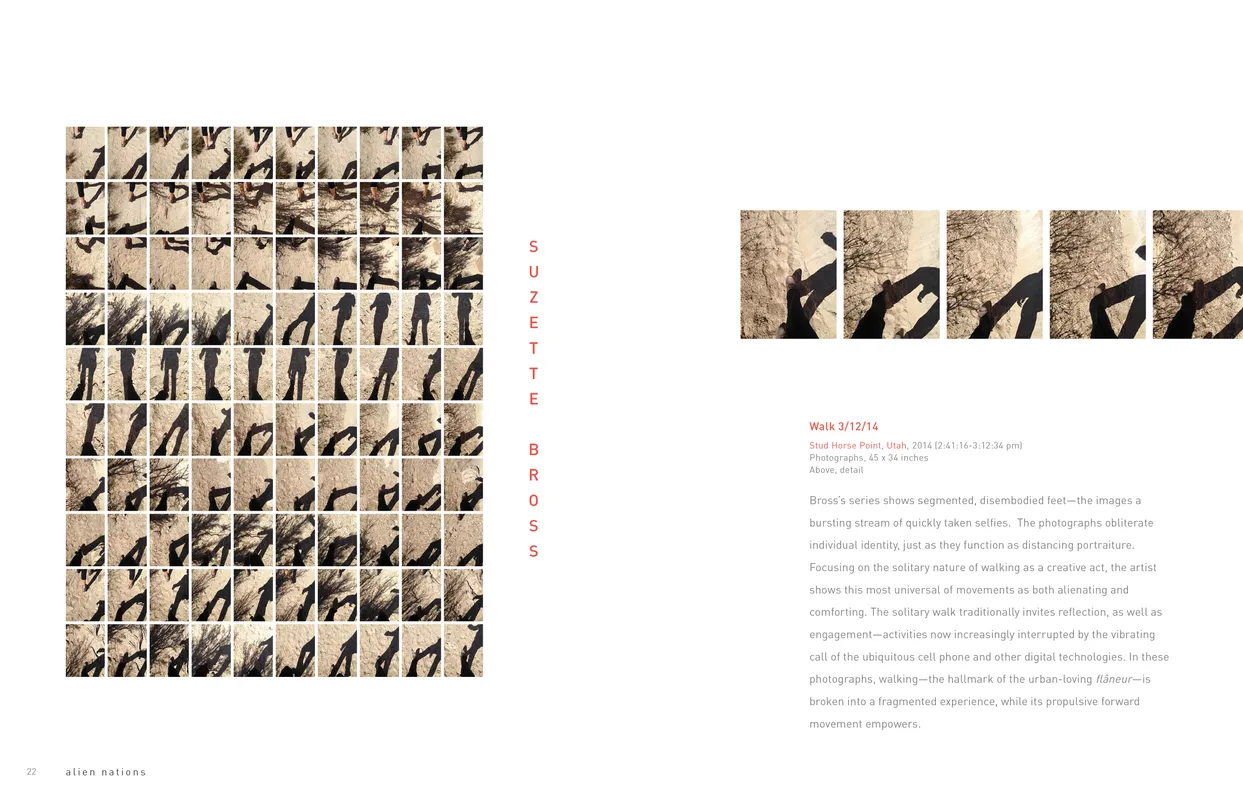
- Alien Nations (2017) exhibition catalog, pages 22-23
- Client: Lehman College Art Gallery
- Visit figure page
- Type: portfolio
- Portfolio Type: publication_design
- Portfolio Role: design_layout
Alien Nations: 2017 — Pages 24–25
- Alien Nations (2017) exhibition catalog, pages 24-25
- Client: Lehman College Art Gallery
- Visit figure page
- Type: portfolio
- Portfolio Type: publication_design
- Portfolio Role: design_layout
Alien Nations: 2017 — Pages 26–27
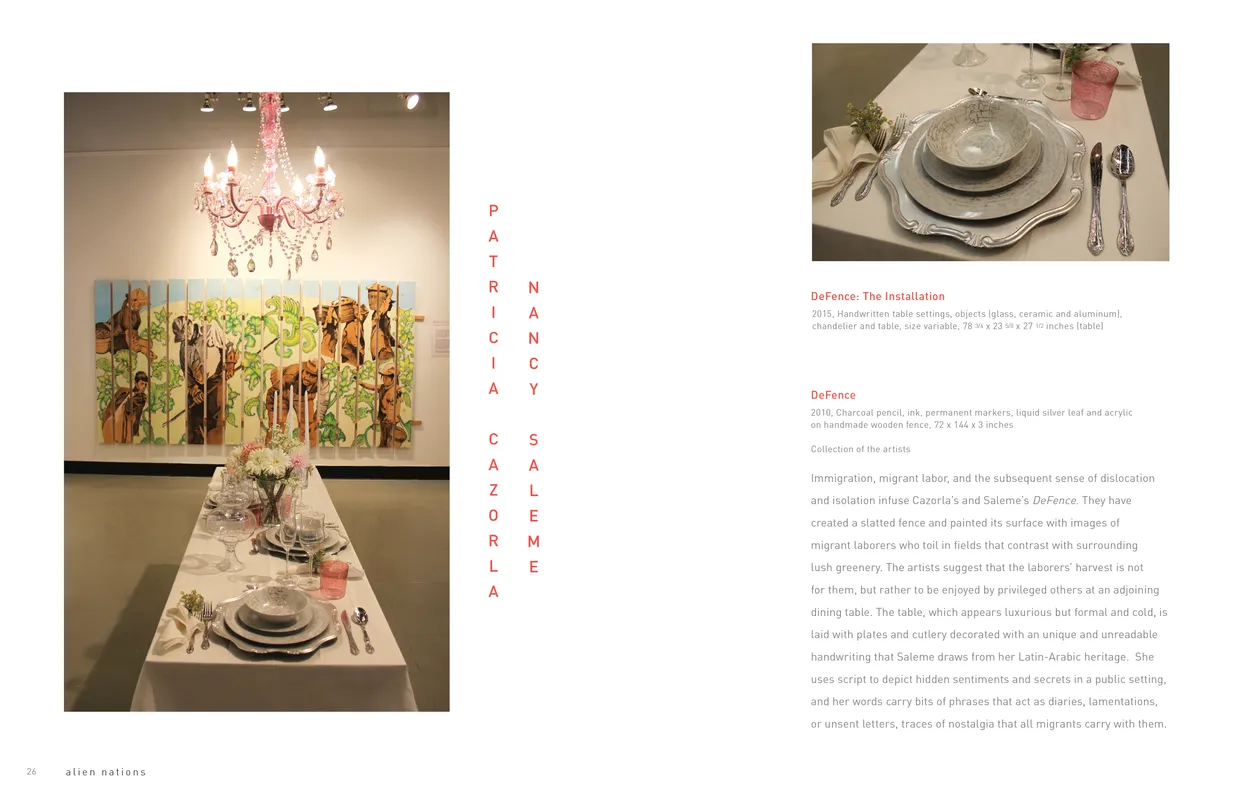
- Alien Nations (2017) exhibition catalog, pages 26-27
- Client: Lehman College Art Gallery
- Visit figure page
- Type: portfolio
- Portfolio Type: publication_design
- Portfolio Role: design_layout
Alien Nations: 2017 — Pages 28–29
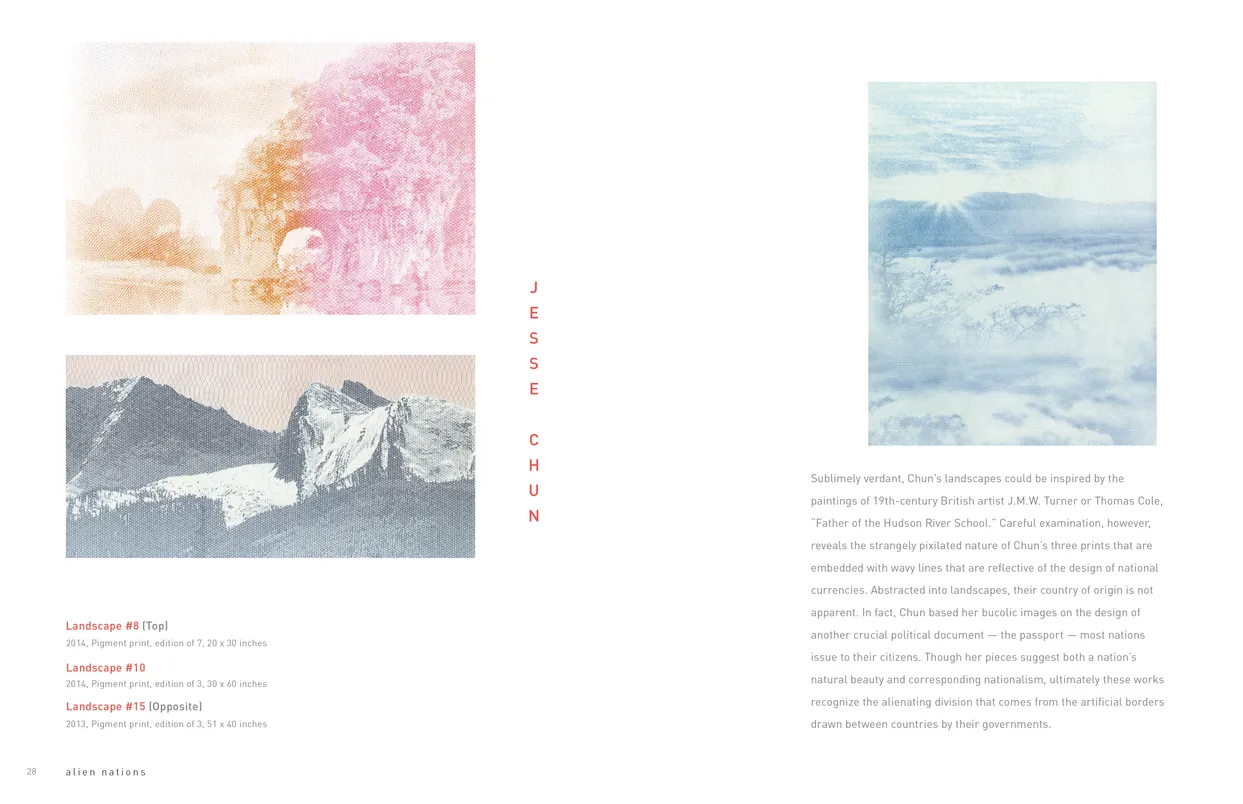
- Alien Nations (2017) exhibition catalog, pages 28-29
- Client: Lehman College Art Gallery
- Visit figure page
- Type: portfolio
- Portfolio Type: publication_design
- Portfolio Role: design_layout
Alien Nations: 2017 — Pages 30–31
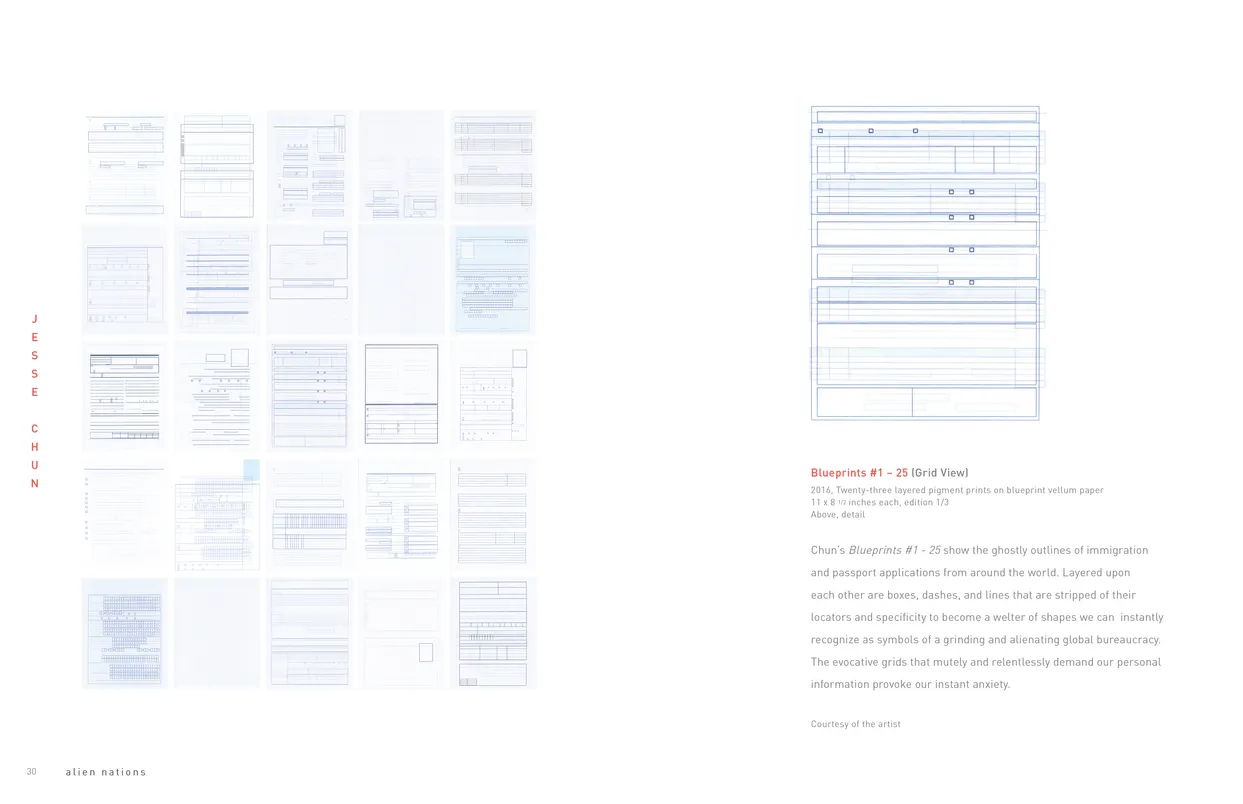
- Alien Nations (2017) exhibition catalog, pages 30-31
- Client: Lehman College Art Gallery
- Visit figure page
- Type: portfolio
- Portfolio Type: publication_design
- Portfolio Role: design_layout
Alien Nations: 2017 — Pages 32–33
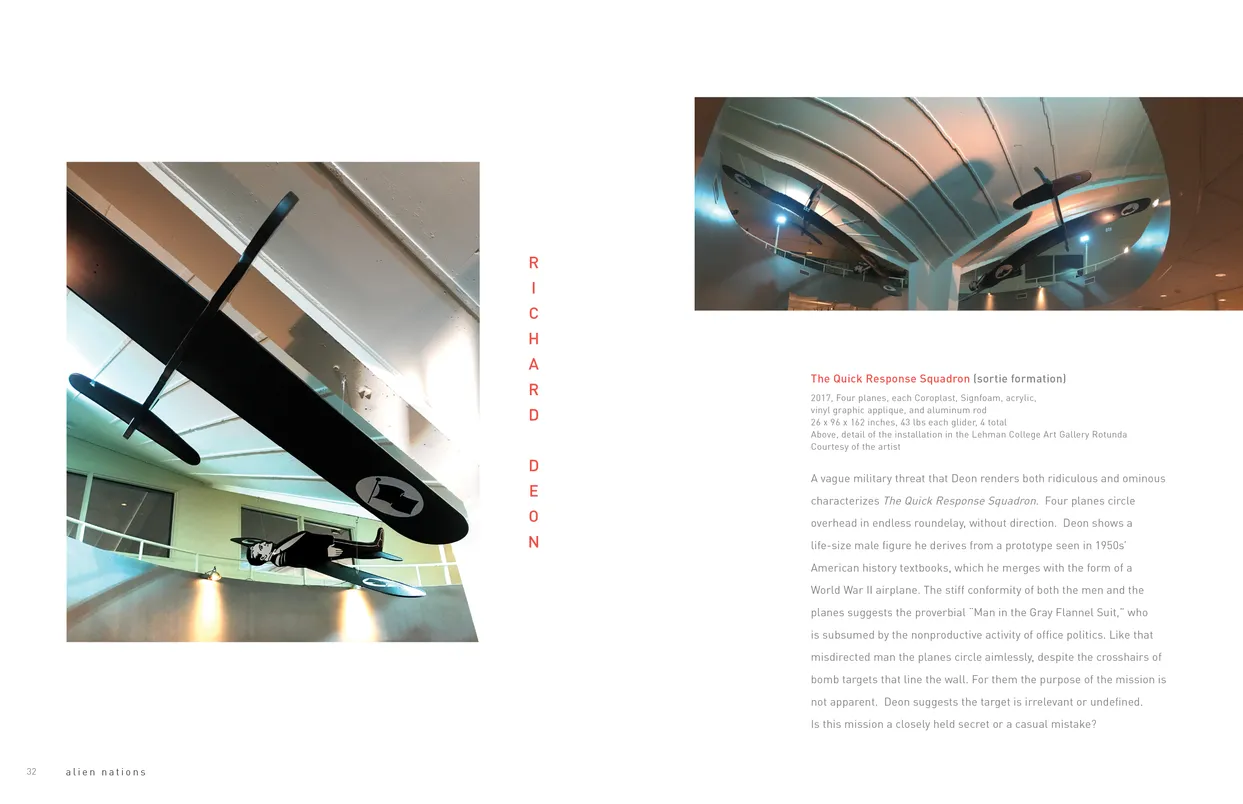
- Alien Nations (2017) exhibition catalog, pages 32-33
- Client: Lehman College Art Gallery
- Visit figure page
- Type: portfolio
- Portfolio Type: publication_design
- Portfolio Role: design_layout
Alien Nations: 2017 — Pages 34–35
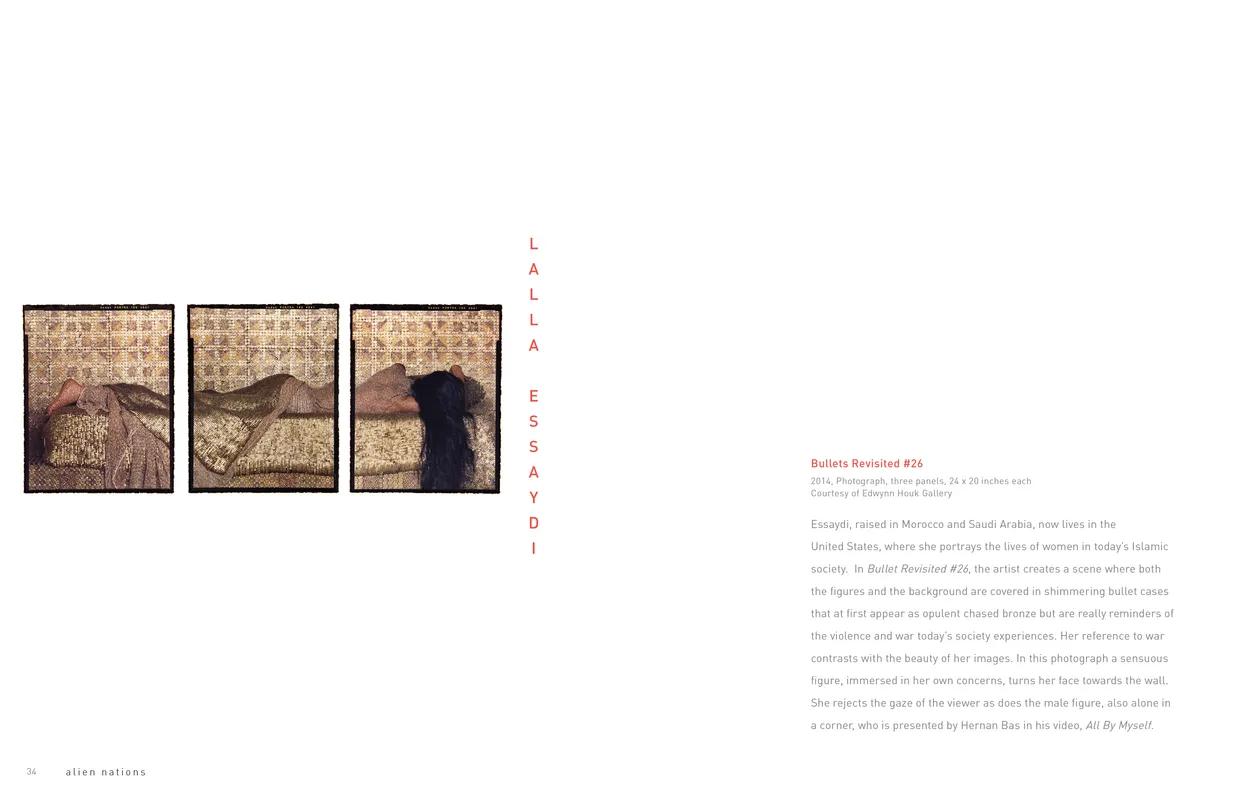
- Alien Nations (2017) exhibition catalog, pages 34-35
- Client: Lehman College Art Gallery
- Visit figure page
- Type: portfolio
- Portfolio Type: publication_design
- Portfolio Role: design_layout
Alien Nations: 2017 — Pages 36–37
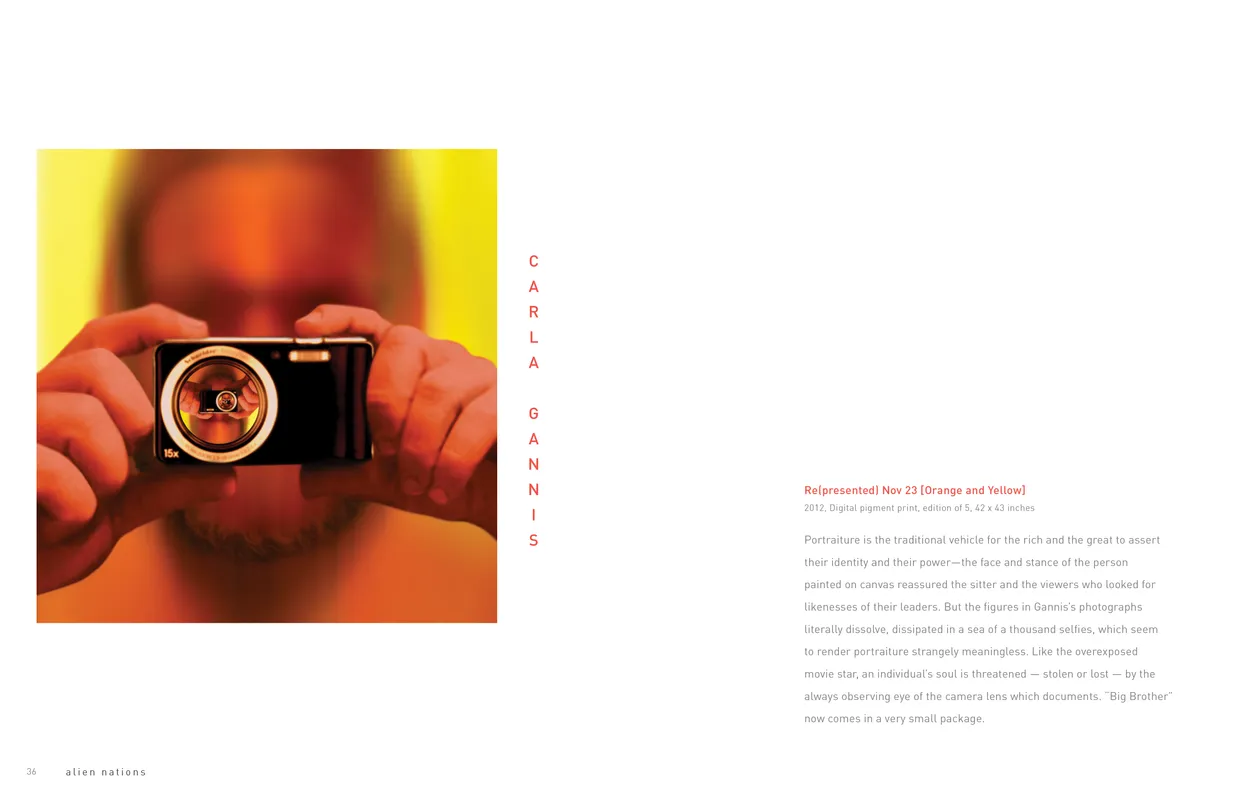
- Alien Nations (2017) exhibition catalog, pages 36-37
- Client: Lehman College Art Gallery
- Visit figure page
- Type: portfolio
- Portfolio Type: publication_design
- Portfolio Role: design_layout
Alien Nations: 2017 — Pages 38–39
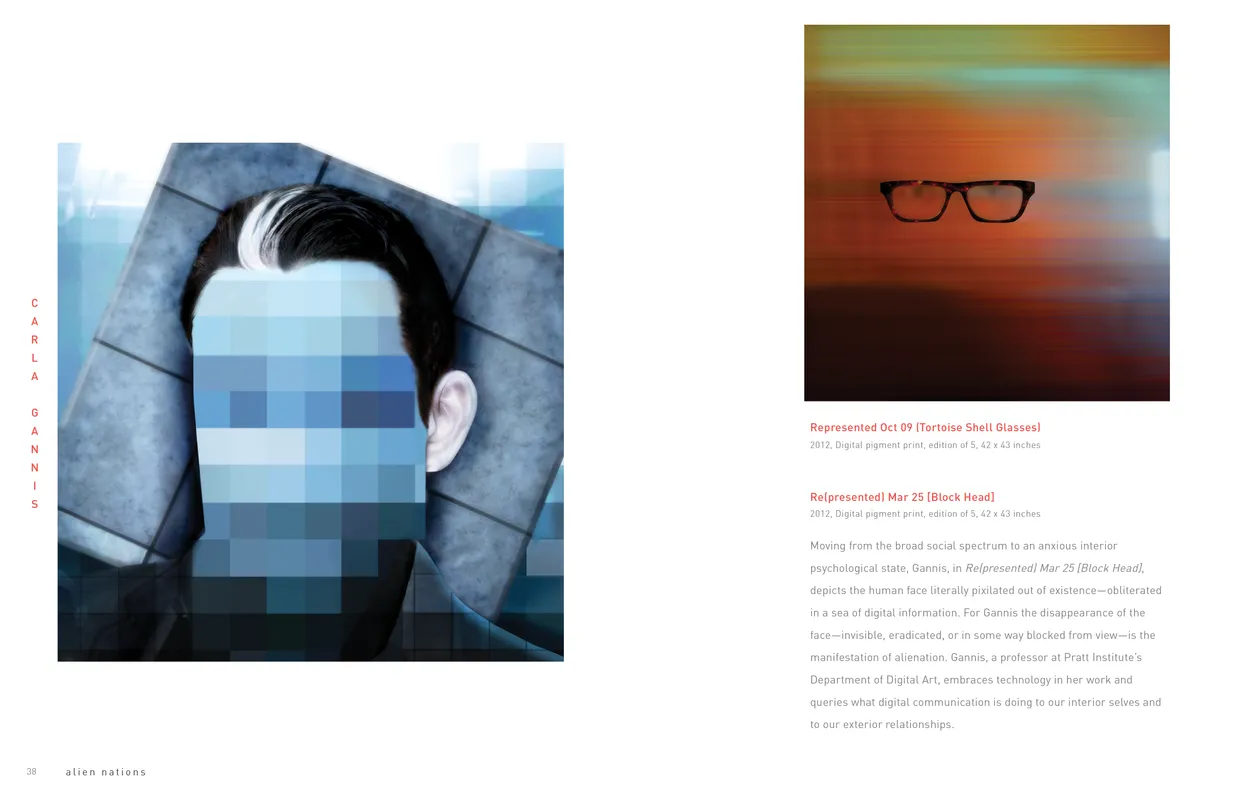
- Alien Nations (2017) exhibition catalog, pages 38-39
- Client: Lehman College Art Gallery
- Visit figure page
- Type: portfolio
- Portfolio Type: publication_design
- Portfolio Role: design_layout
Alien Nations: 2017 — Pages 4–5

- Alien Nations (2017) exhibition catalog, pages 4-5
- Client: Lehman College Art Gallery
- Visit figure page
- Type: portfolio
- Portfolio Type: publication_design
- Portfolio Role: design_layout
Alien Nations: 2017 — Pages 40–41
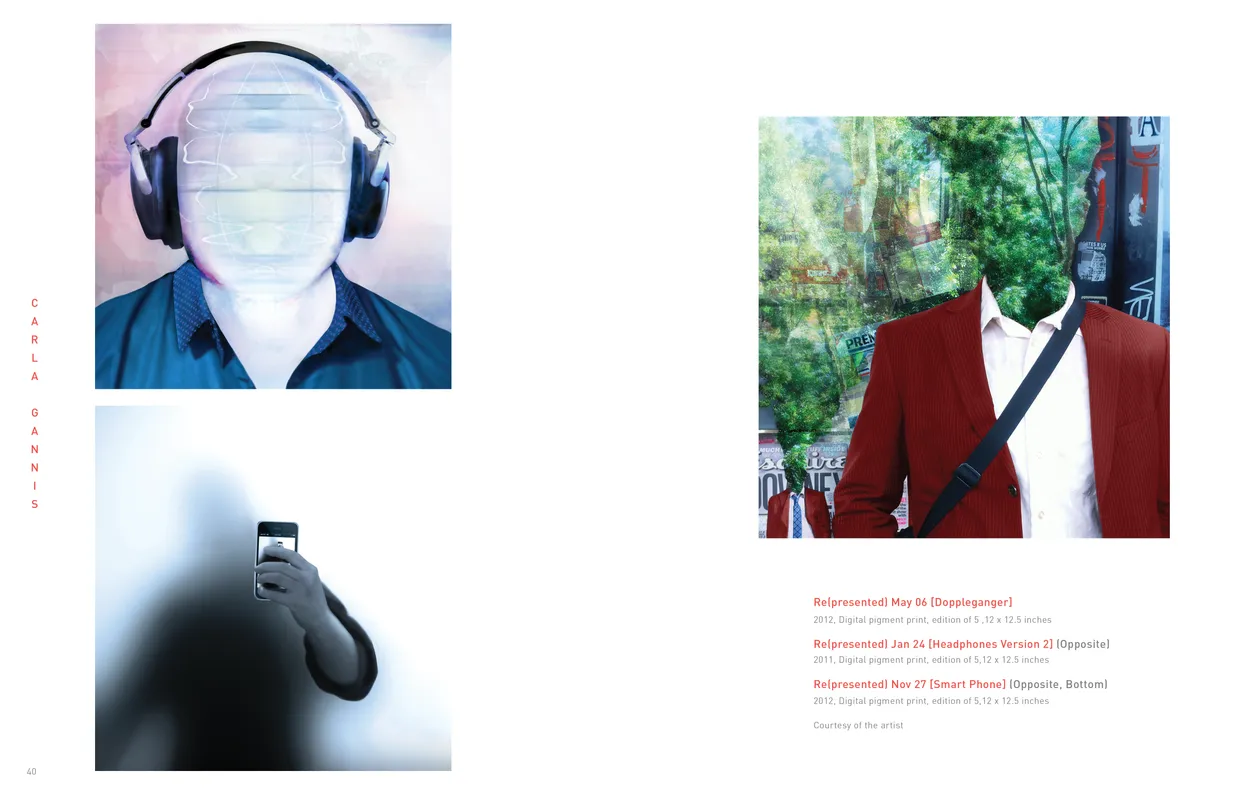
- Alien Nations (2017) exhibition catalog, pages 40-41
- Client: Lehman College Art Gallery
- Visit figure page
- Type: portfolio
- Portfolio Type: publication_design
- Portfolio Role: design_layout
Alien Nations: 2017 — Pages 42–43
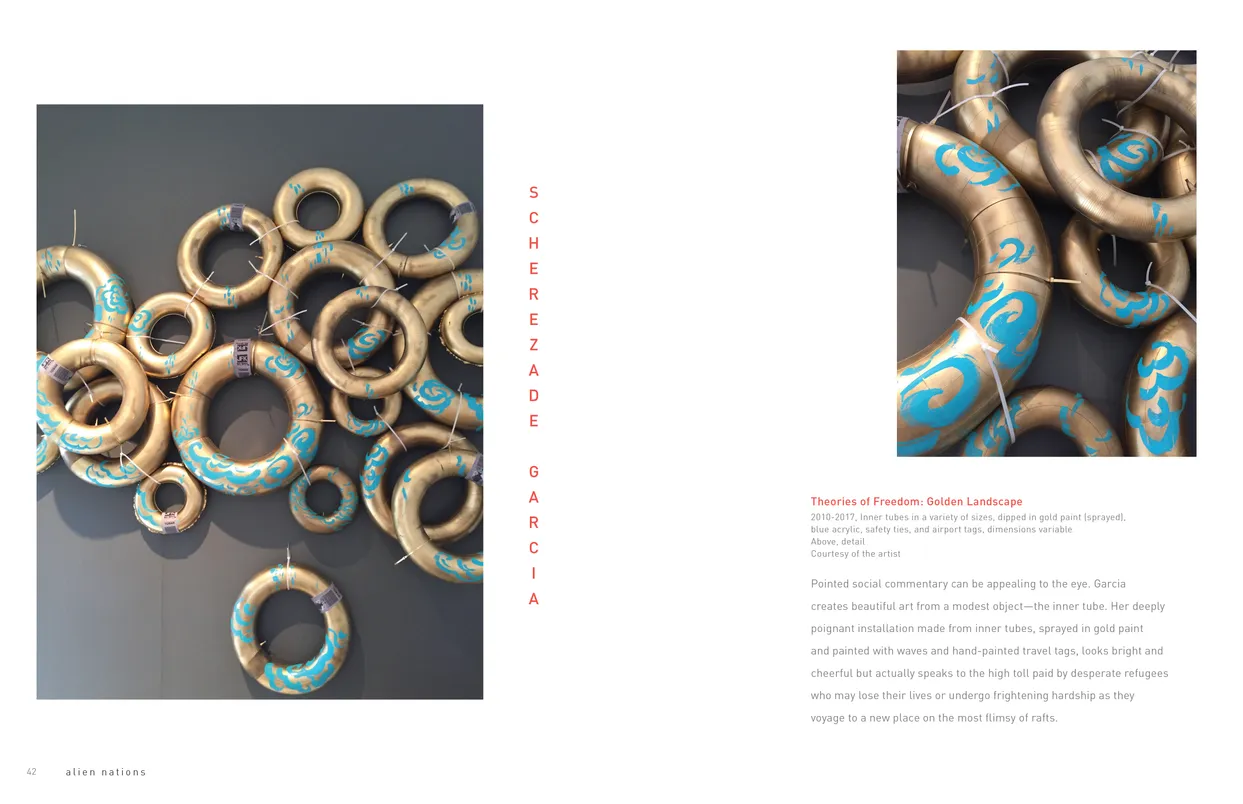
- Alien Nations (2017) exhibition catalog, pages 42-43
- Client: Lehman College Art Gallery
- Visit figure page
- Type: portfolio
- Portfolio Type: publication_design
- Portfolio Role: design_layout
Alien Nations: 2017 — Pages 44–45
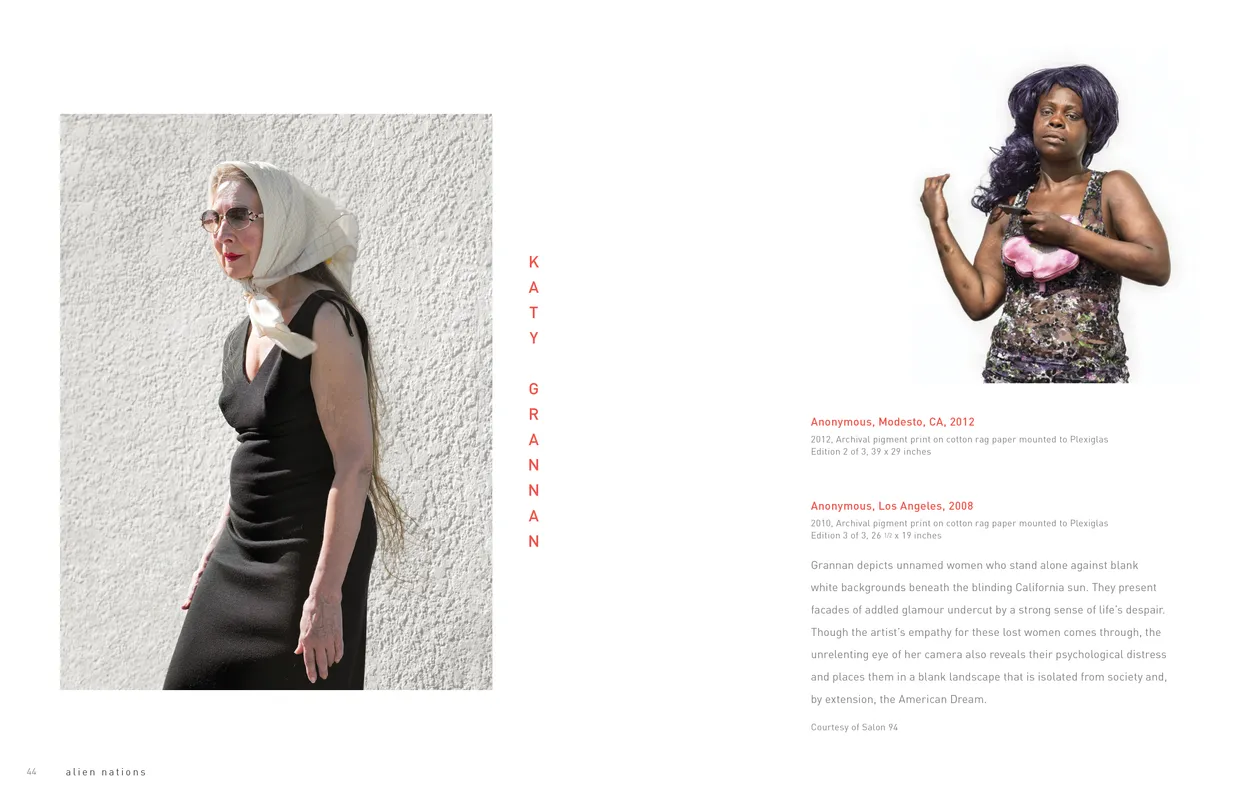
- Alien Nations (2017) exhibition catalog, pages 44-45
- Client: Lehman College Art Gallery
- Visit figure page
- Type: portfolio
- Portfolio Type: publication_design
- Portfolio Role: design_layout
Alien Nations: 2017 — Pages 46–47
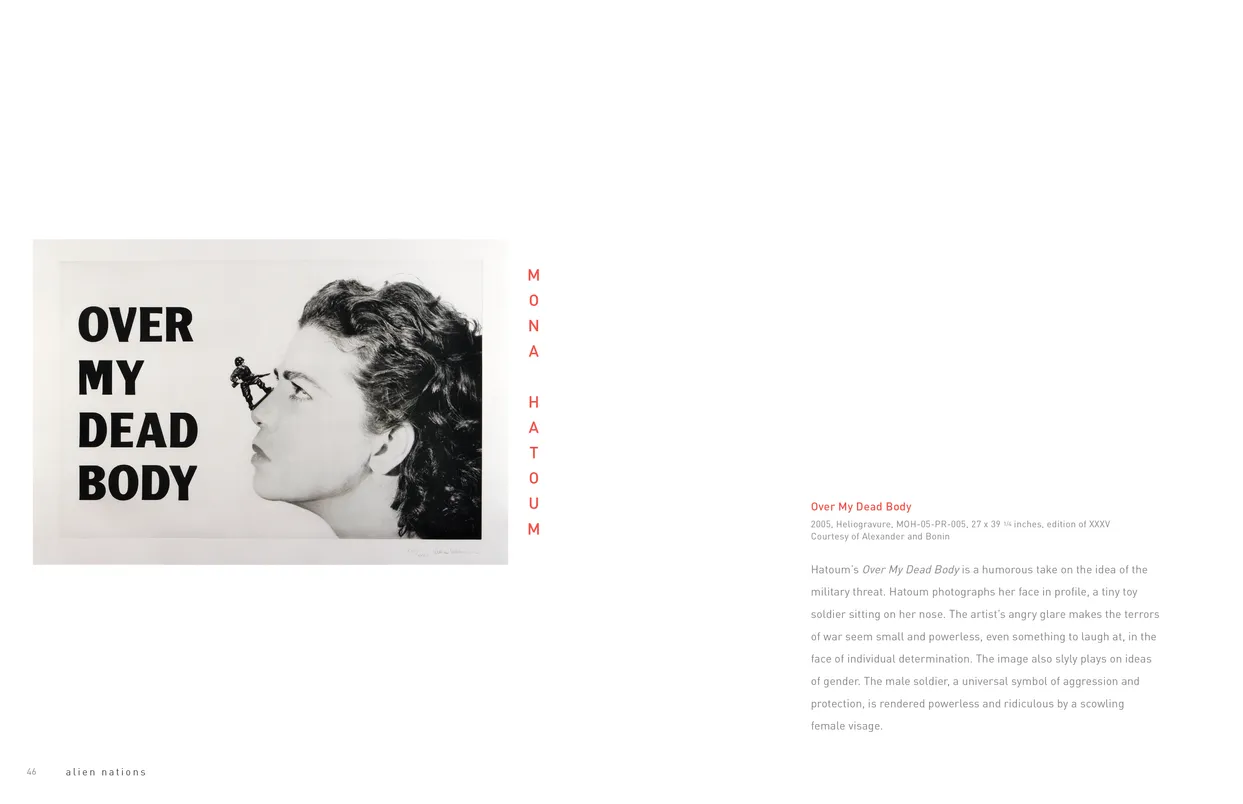
- Alien Nations (2017) exhibition catalog, pages 46-47
- Client: Lehman College Art Gallery
- Visit figure page
- Type: portfolio
- Portfolio Type: publication_design
- Portfolio Role: design_layout
Alien Nations: 2017 — Pages 48–49
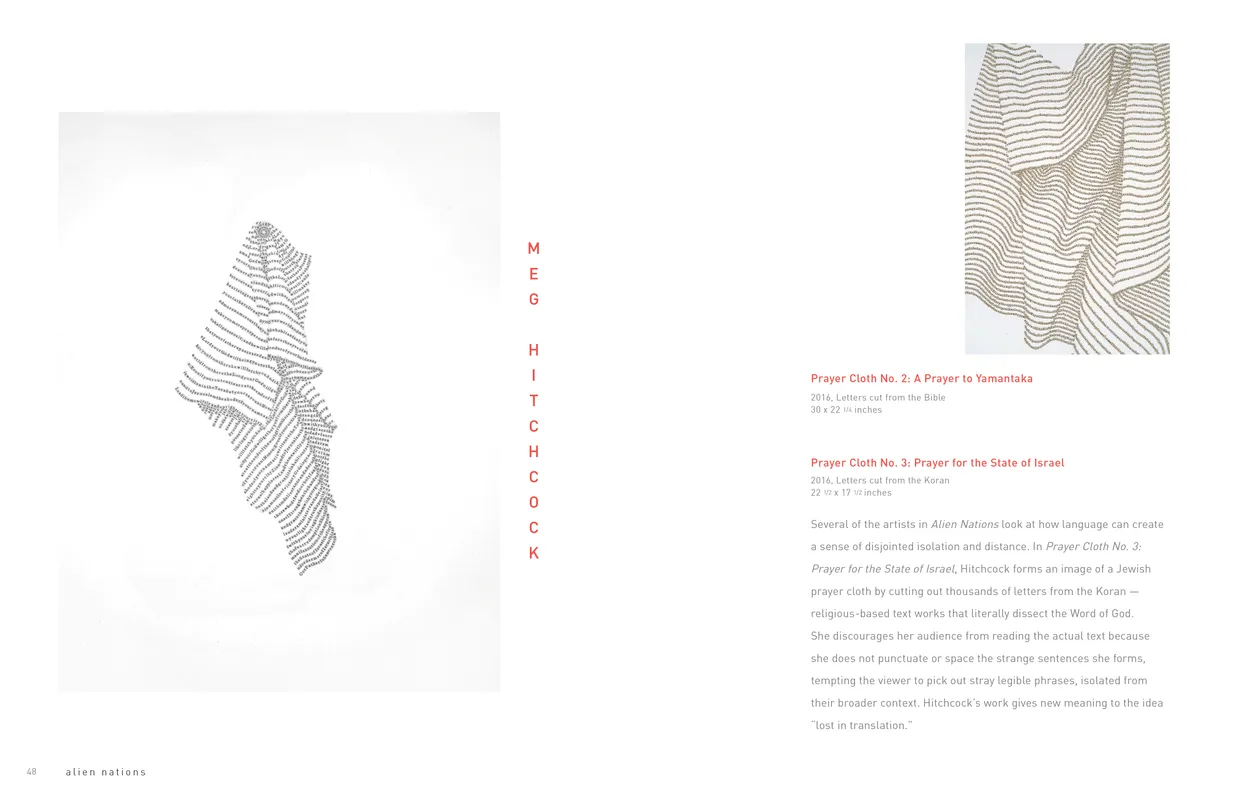
- Alien Nations (2017) exhibition catalog, pages 48-49
- Client: Lehman College Art Gallery
- Visit figure page
- Type: portfolio
- Portfolio Type: publication_design
- Portfolio Role: design_layout
Alien Nations: 2017 — Pages 50–51
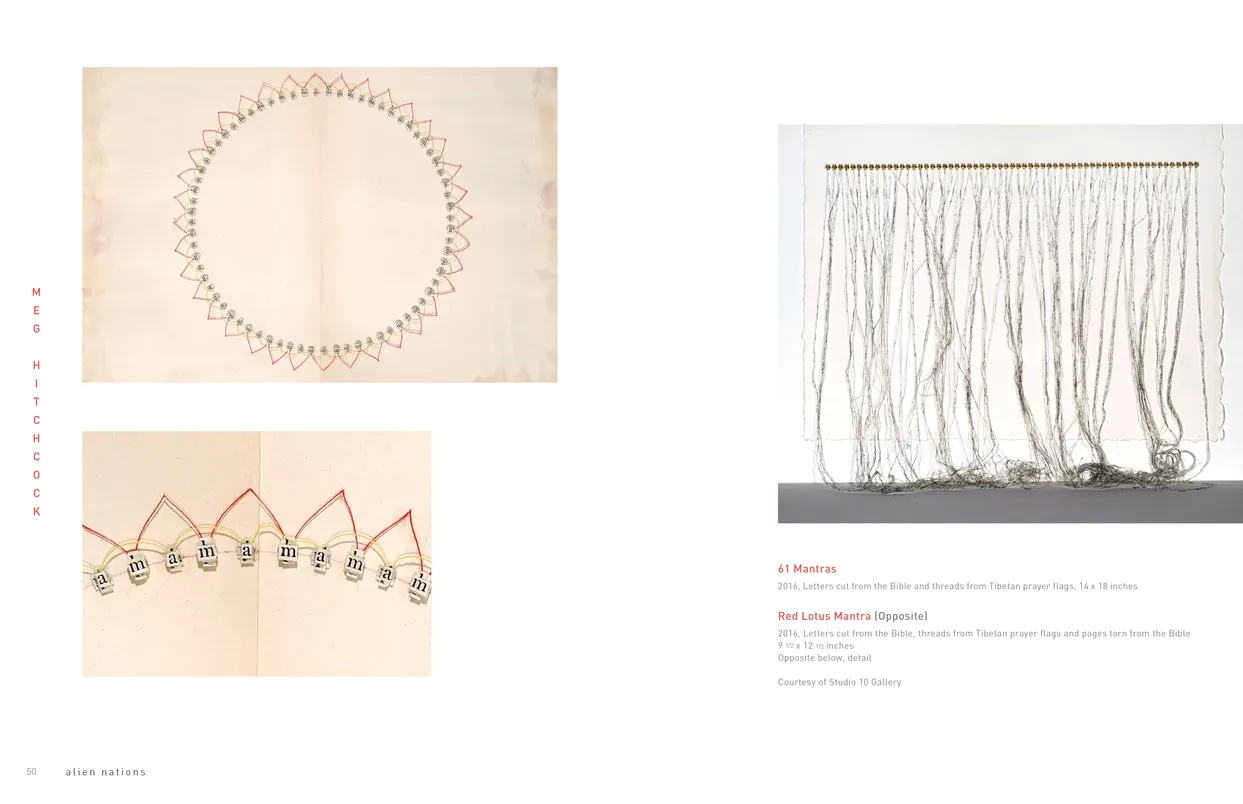
- Alien Nations (2017) exhibition catalog, pages 50-51
- Client: Lehman College Art Gallery
- Visit figure page
- Type: portfolio
- Portfolio Type: publication_design
- Portfolio Role: design_layout
Alien Nations: 2017 — Pages 52–53
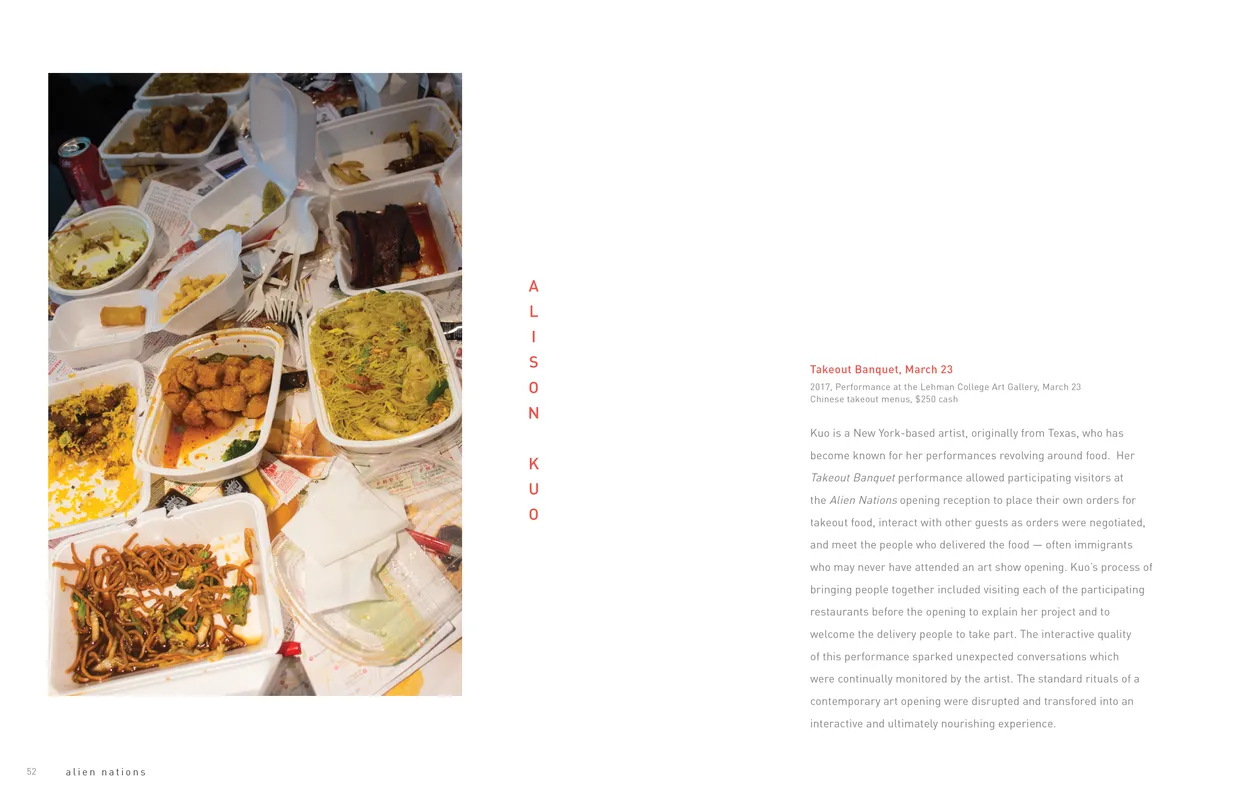
- Alien Nations (2017) exhibition catalog, pages 52-53
- Client: Lehman College Art Gallery
- Visit figure page
- Type: portfolio
- Portfolio Type: publication_design
- Portfolio Role: design_layout
Alien Nations: 2017 — Pages 54–55
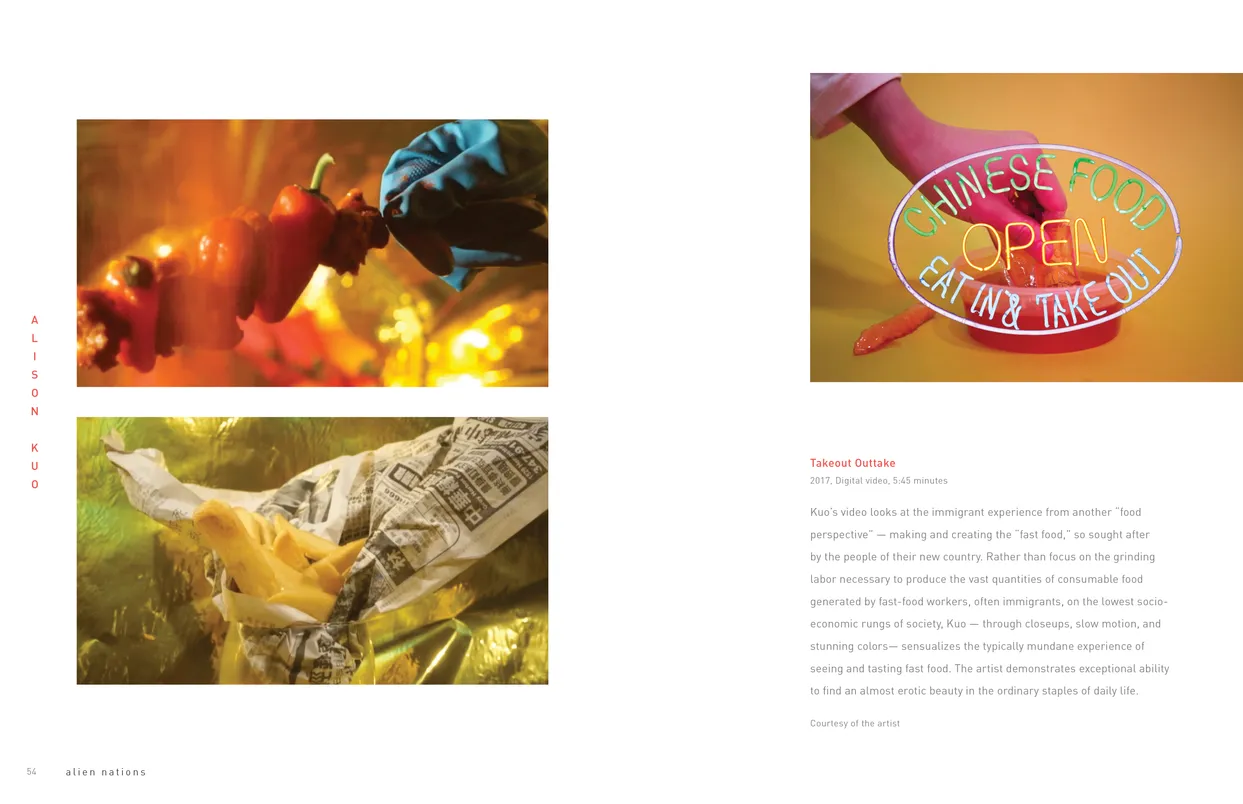
- Alien Nations (2017) exhibition catalog, pages 54-55
- Client: Lehman College Art Gallery
- Visit figure page
- Type: portfolio
- Portfolio Type: publication_design
- Portfolio Role: design_layout
Alien Nations: 2017 — Pages 56–57
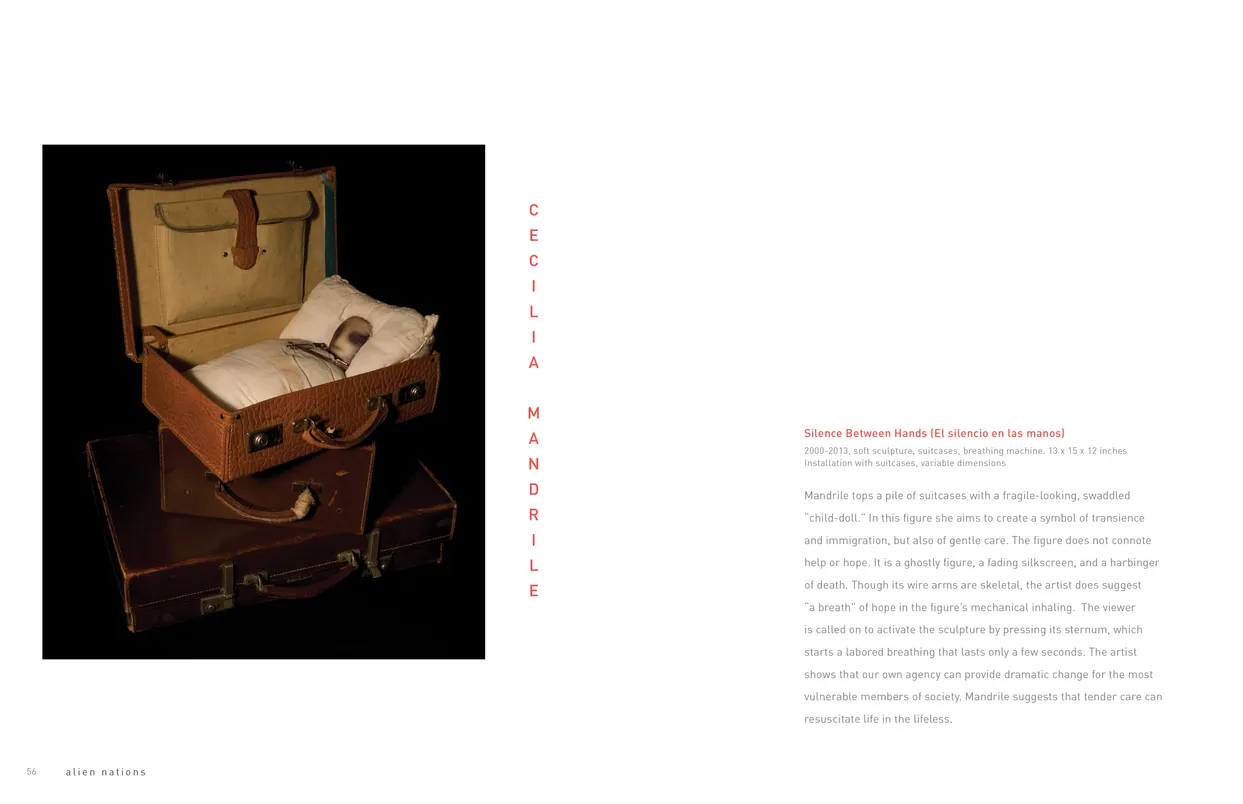
- Alien Nations (2017) exhibition catalog, pages 56-57
- Client: Lehman College Art Gallery
- Visit figure page
- Type: portfolio
- Portfolio Type: publication_design
- Portfolio Role: design_layout
Alien Nations: 2017 — Pages 58–59
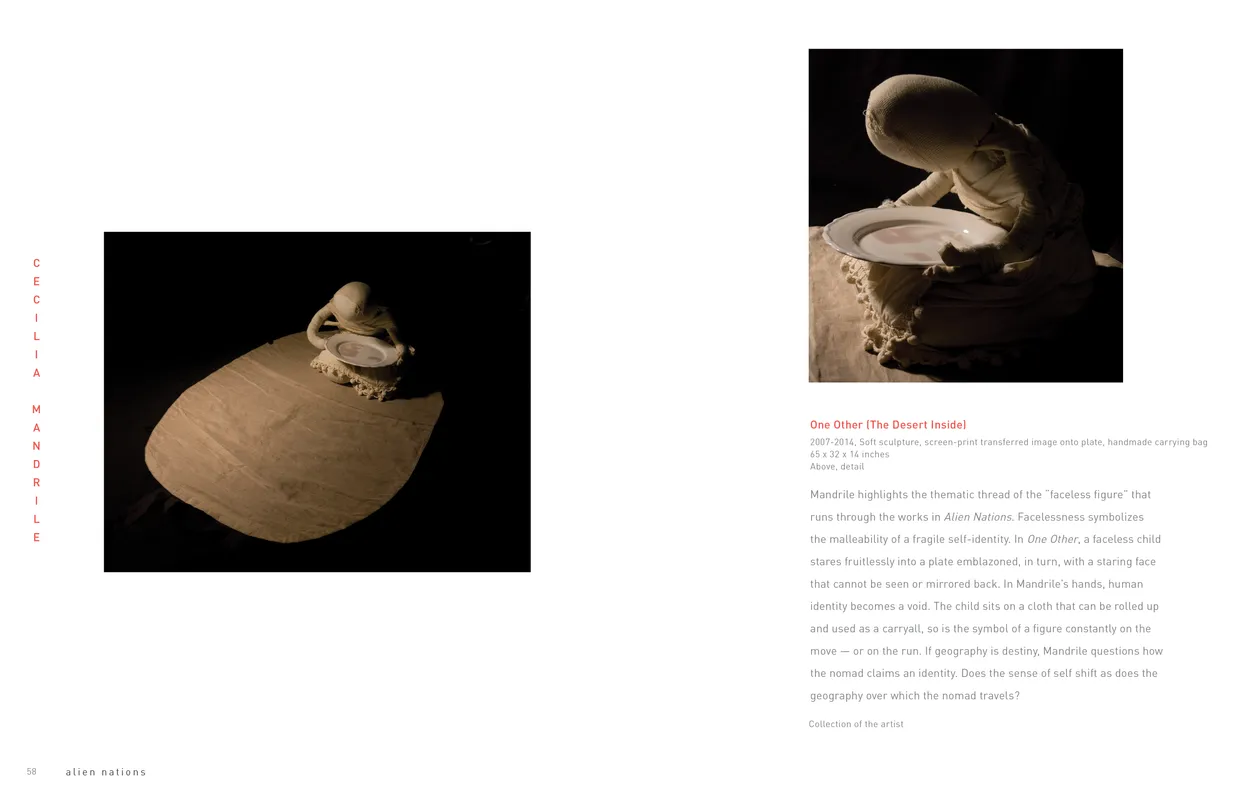
- Alien Nations (2017) exhibition catalog, pages 58-59
- Client: Lehman College Art Gallery
- Visit figure page
- Type: portfolio
- Portfolio Type: publication_design
- Portfolio Role: design_layout
Alien Nations: 2017 — Pages 6–7
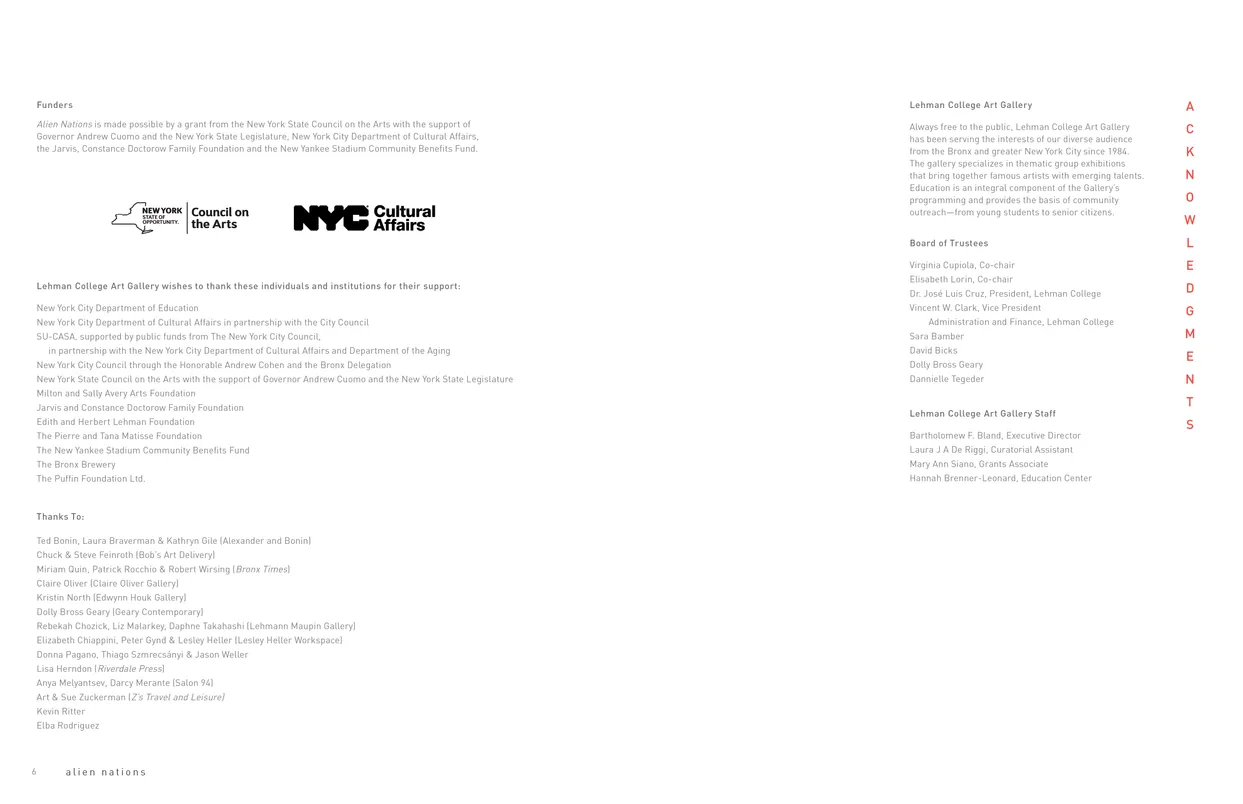
- Alien Nations (2017) exhibition catalog, pages 6-7
- Client: Lehman College Art Gallery
- Visit figure page
- Type: portfolio
- Portfolio Type: publication_design
- Portfolio Role: design_layout
Alien Nations: 2017 — Pages 60–61
- Alien Nations (2017) exhibition catalog, pages 60-61
- Client: Lehman College Art Gallery
- Visit figure page
- Type: portfolio
- Portfolio Type: publication_design
- Portfolio Role: design_layout
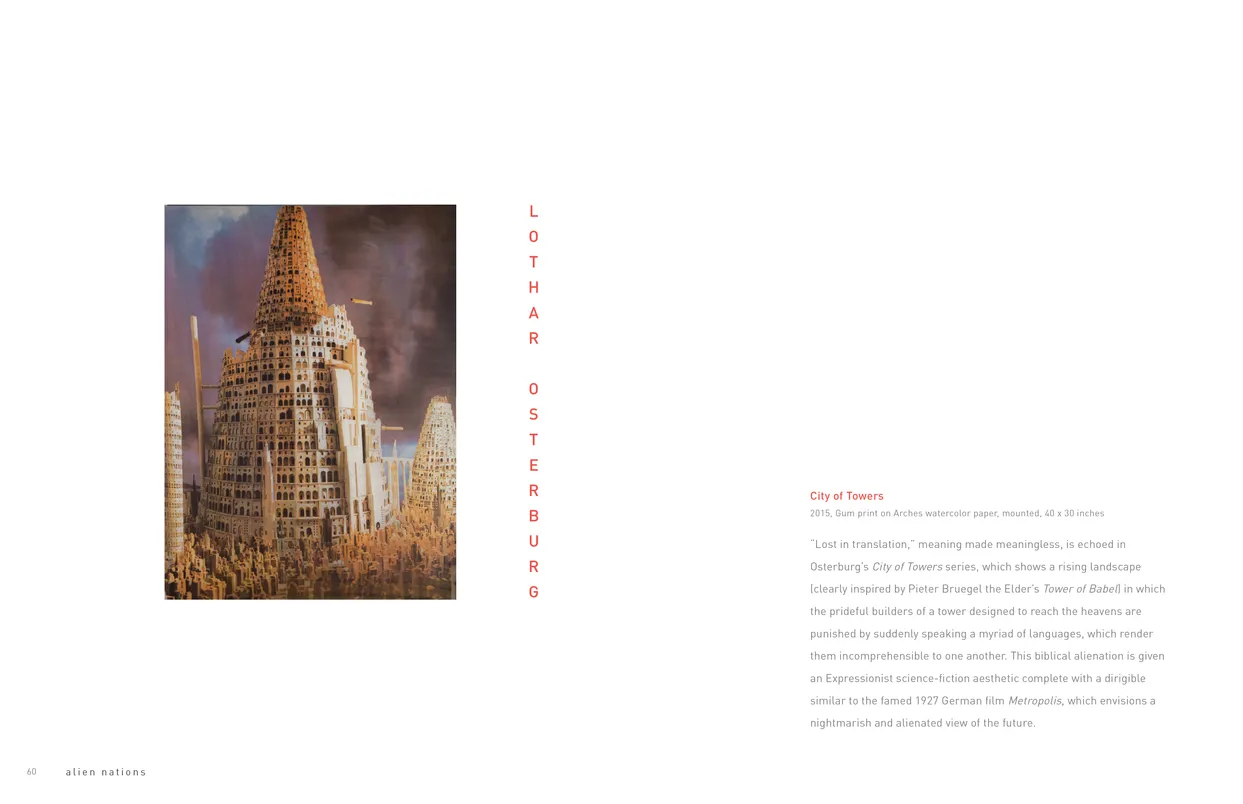
Alien Nations: 2017 — Pages 62–63
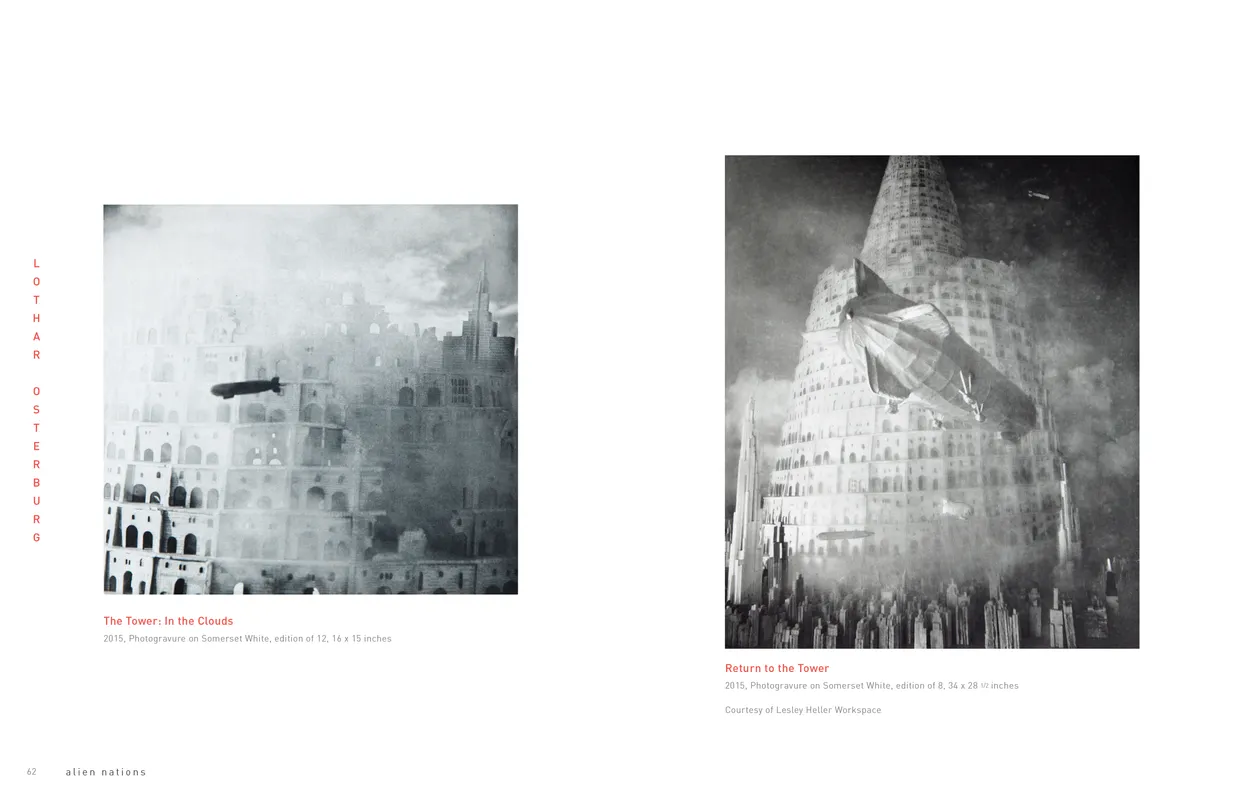
- Alien Nations (2017) exhibition catalog, pages 62-63
- Client: Lehman College Art Gallery
- Visit figure page
- Type: portfolio
- Portfolio Type: publication_design
- Portfolio Role: design_layout
Alien Nations: 2017 — Pages 64–65
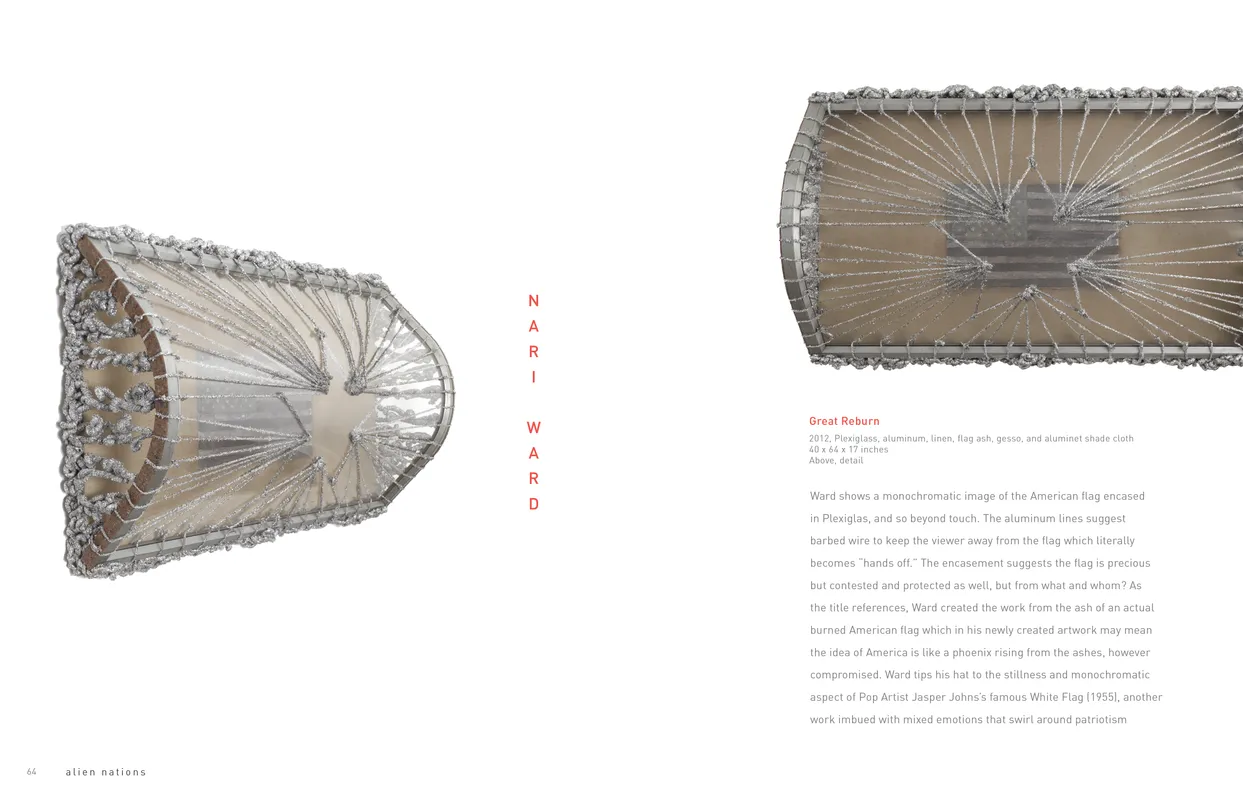
- Alien Nations (2017) exhibition catalog, pages 64-65
- Client: Lehman College Art Gallery
- Visit figure page
- Type: portfolio
- Portfolio Type: publication_design
- Portfolio Role: design_layout
Alien Nations: 2017 — Pages 66–67
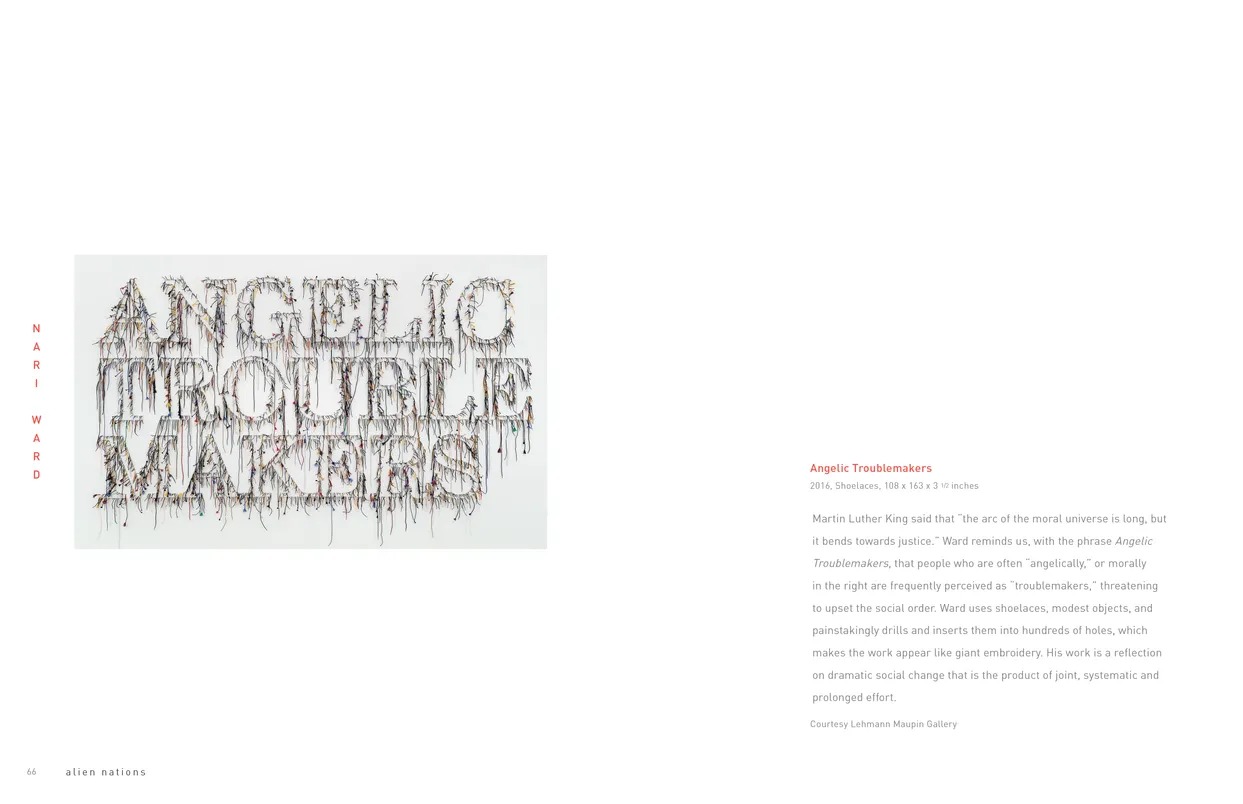
- Alien Nations (2017) exhibition catalog, pages 66-67
- Client: Lehman College Art Gallery
- Visit figure page
- Type: portfolio
- Portfolio Type: publication_design
- Portfolio Role: design_layout
Alien Nations: 2017 — Pages 68–69
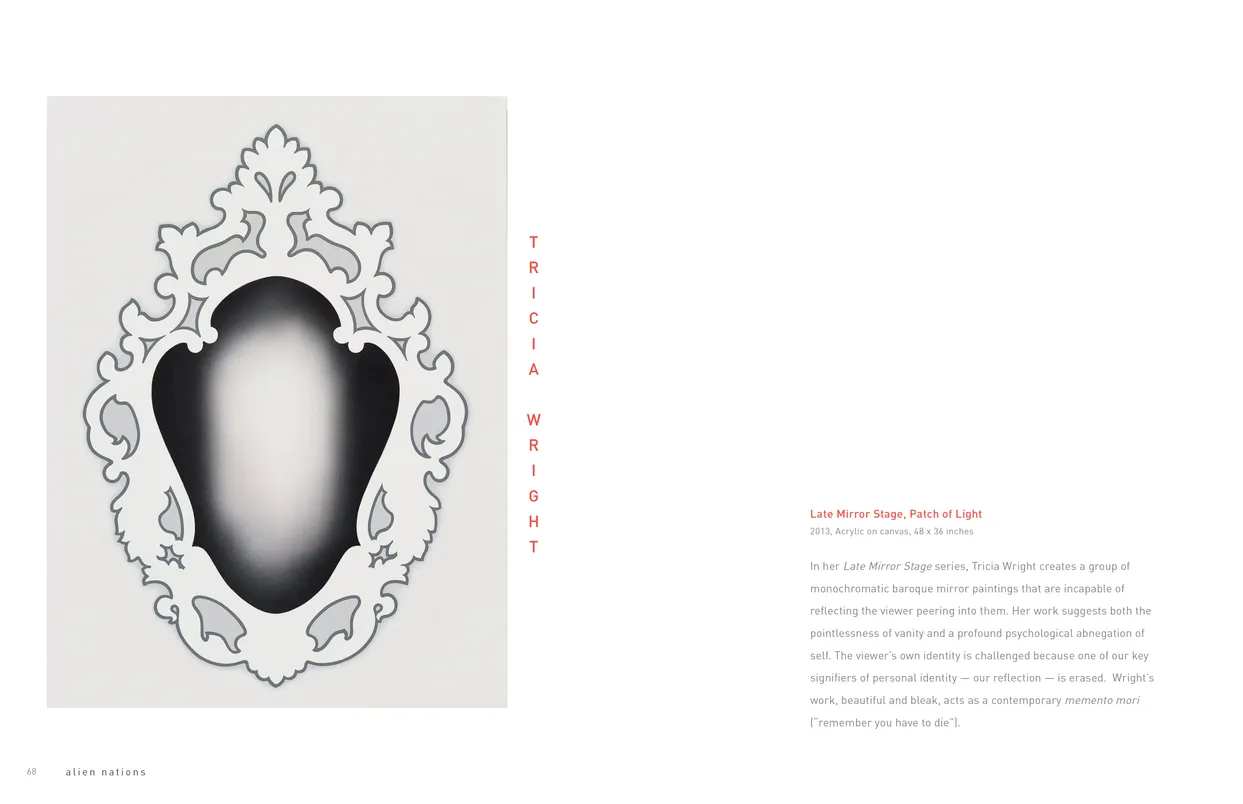
- Alien Nations (2017) exhibition catalog, pages 68-69
- Client: Lehman College Art Gallery
- Visit figure page
- Type: portfolio
- Portfolio Type: publication_design
- Portfolio Role: design_layout
Alien Nations: 2017 — Pages 70–71

- Alien Nations (2017) exhibition catalog, pages 70-71
- Client: Lehman College Art Gallery
- Visit figure page
- Type: portfolio
- Portfolio Type: publication_design
- Portfolio Role: design_layout
Alien Nations: 2017 — Pages 8–9
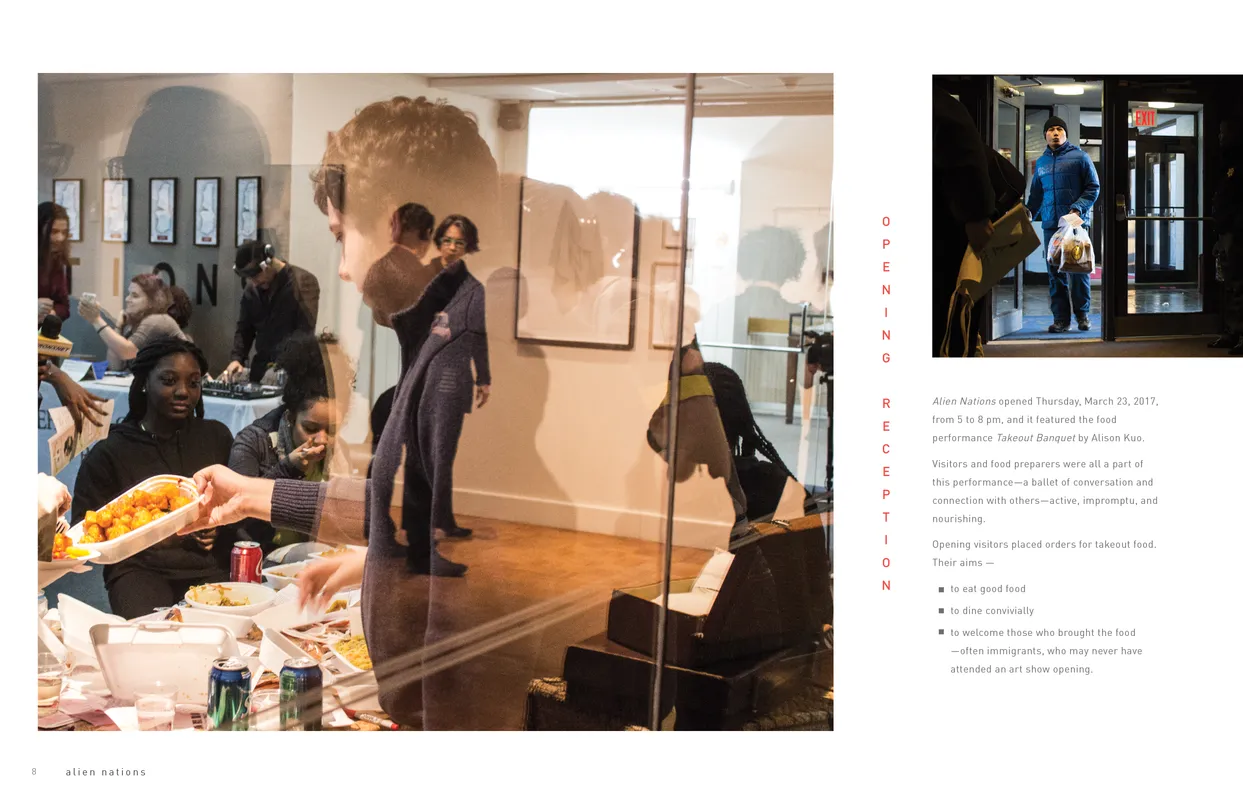
- Alien Nations (2017) exhibition catalog, pages 8-9
- Client: Lehman College Art Gallery
- Visit figure page
- Type: portfolio
- Portfolio Type: publication_design
- Portfolio Role: design_layout
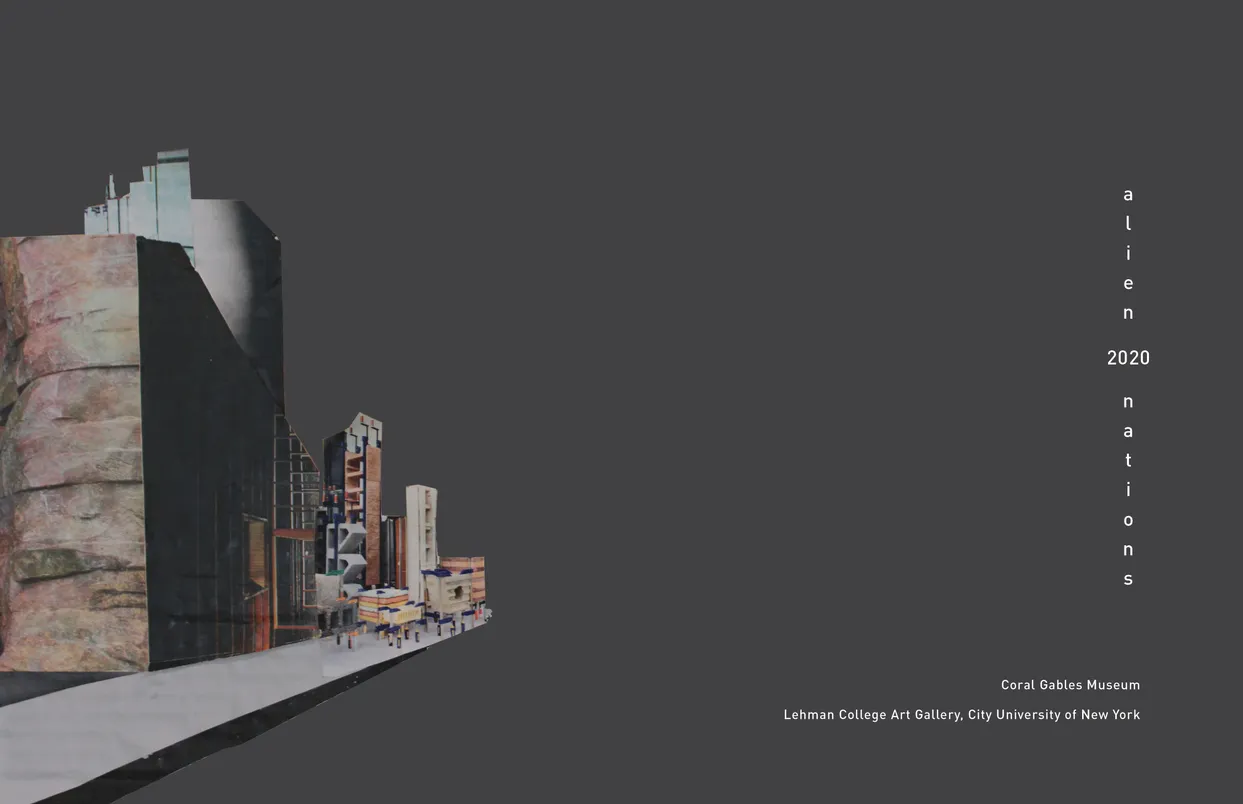
Alien Nations: 2020 — Cover
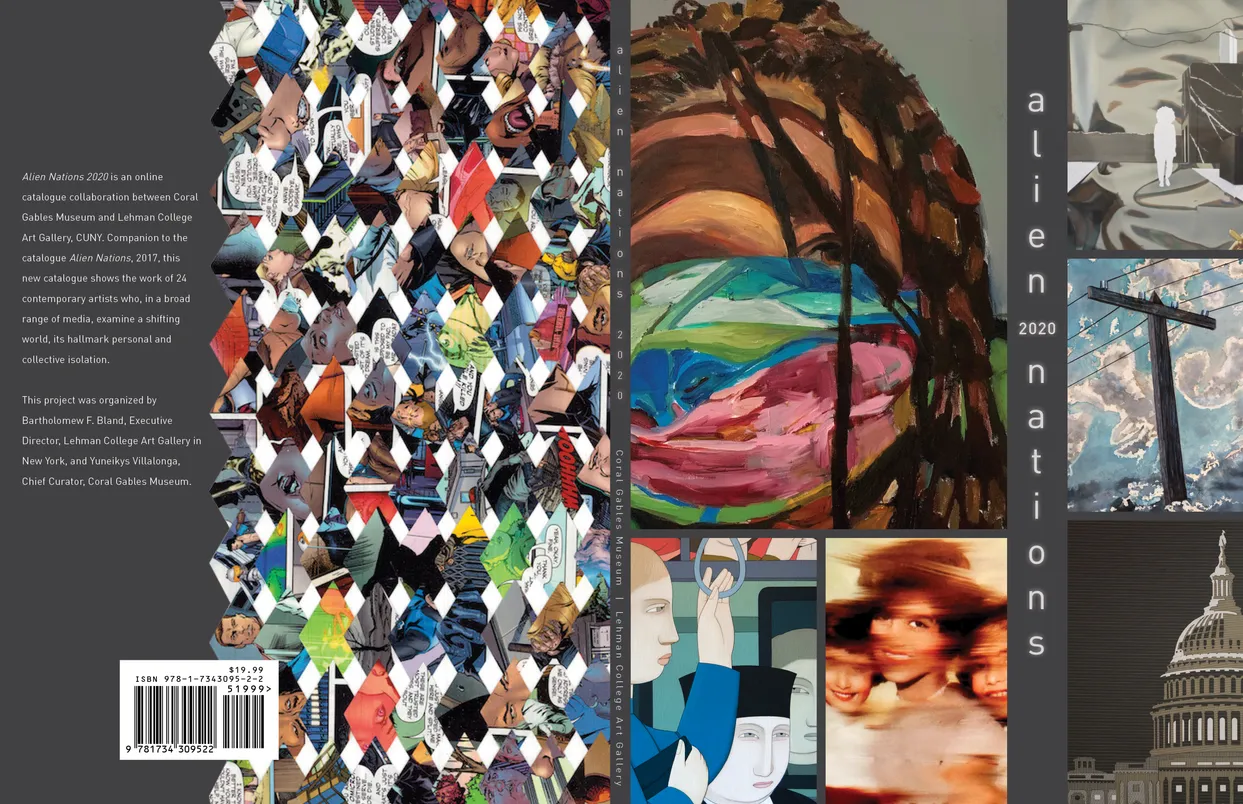
- Alien Nations 2020 exhibition catalog, cover
- Client: Lehman College Art Gallery
- Visit figure page
- Type: portfolio
- Portfolio Type: publication_design
- Portfolio Role: design_layout
Alien Nations: 2020 — Inside Front Cover
- Alien Nations 2020 exhibition catalog, inside front cover
- Client: Lehman College Art Gallery
- Visit figure page
- Type: portfolio
- Portfolio Type: publication_design
- Portfolio Role: design_layout
Alien Nations: 2020 — Inside Front Cover

- Alien Nations 2020 exhibition catalog, inside back cover
- Client: Lehman College Art Gallery
- Visit figure page
- Type: portfolio
- Portfolio Type: publication_design
- Portfolio Role: design_layout
Alien Nations: 2020 — Pages 10–11
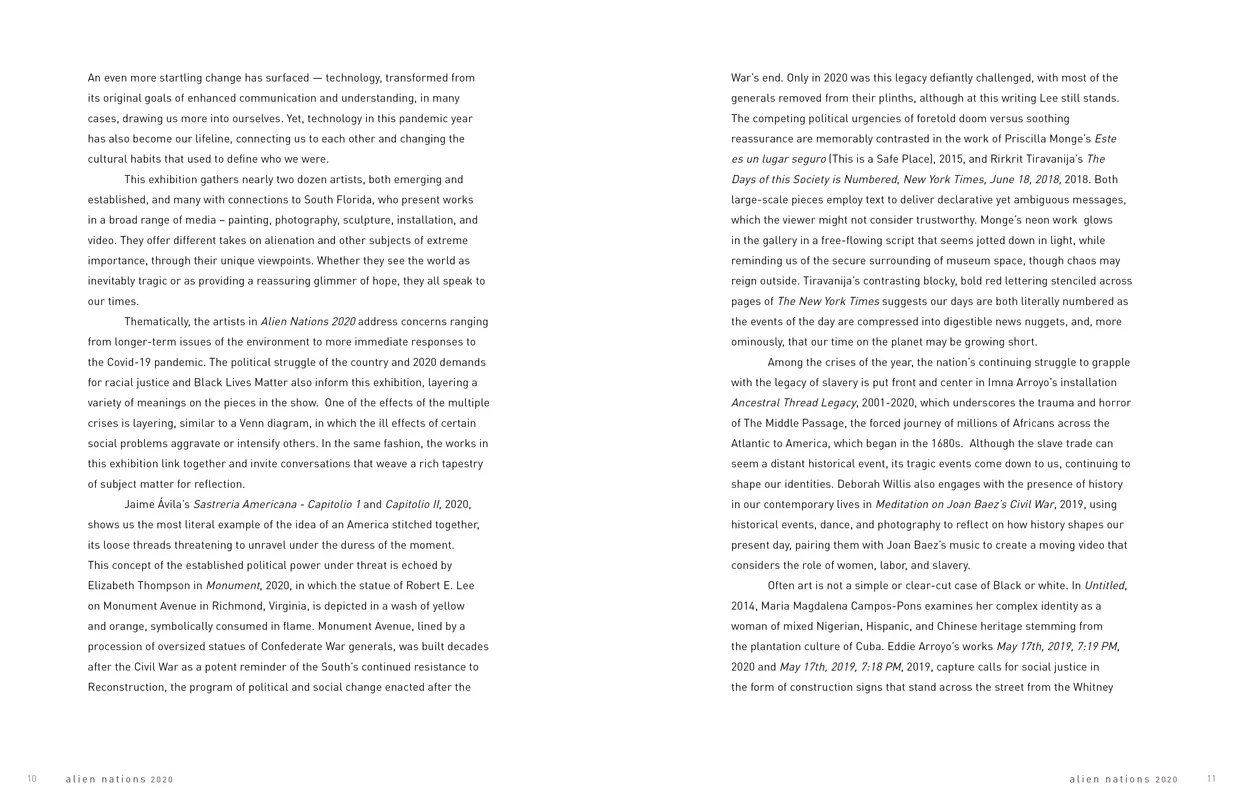
- Alien Nations 2020 exhibition catalog, pages 10-11
- Client: Lehman College Art Gallery
- Visit figure page
- Type: portfolio
- Portfolio Type: publication_design
- Portfolio Role: design_layout
Alien Nations: 2020 — Pages 12–13

- Alien Nations 2020 exhibition catalog, pages 12-13
- Client: Lehman College Art Gallery
- Visit figure page
- Type: portfolio
- Portfolio Type: publication_design
- Portfolio Role: design_layout
Alien Nations: 2020 — Pages 14–15
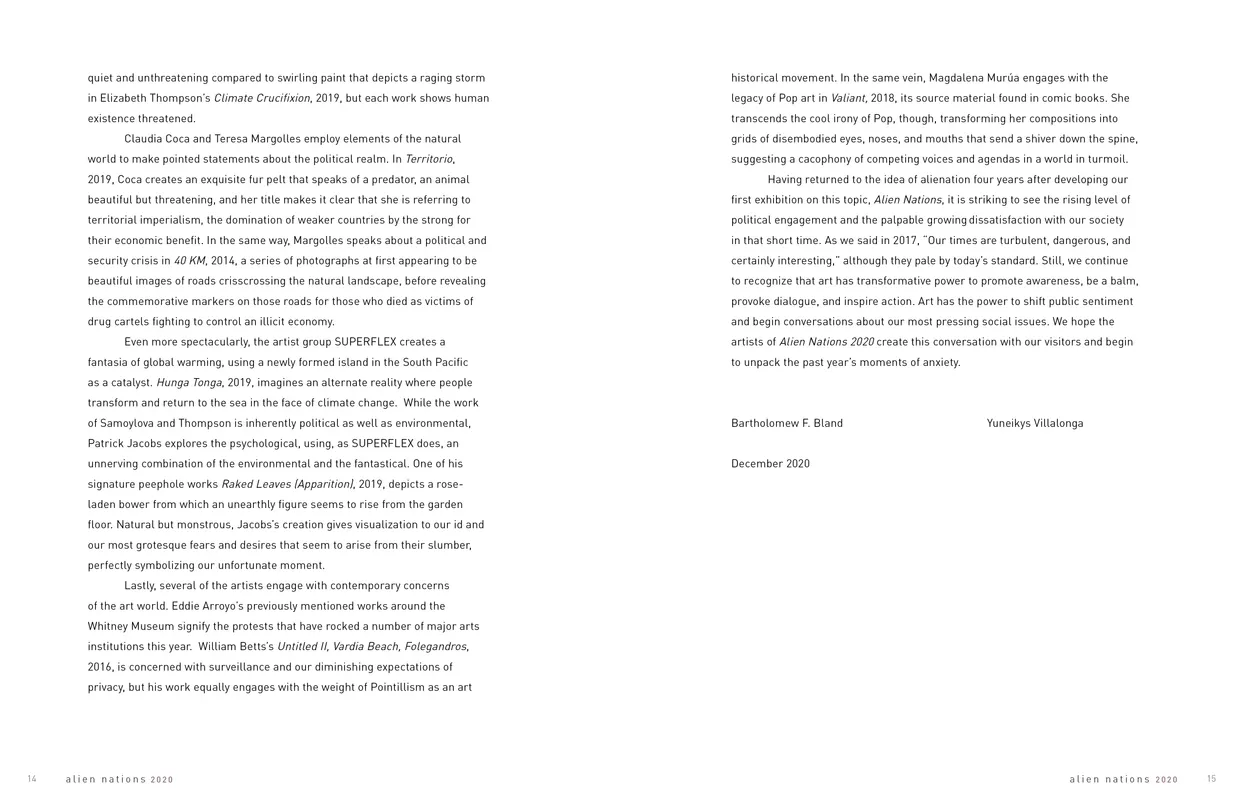
- Alien Nations 2020 exhibition catalog, pages 14-15
- Client: Lehman College Art Gallery
- Visit figure page
- Type: portfolio
- Portfolio Type: publication_design
- Portfolio Role: design_layout
Alien Nations: 2020 — Pages 16–17
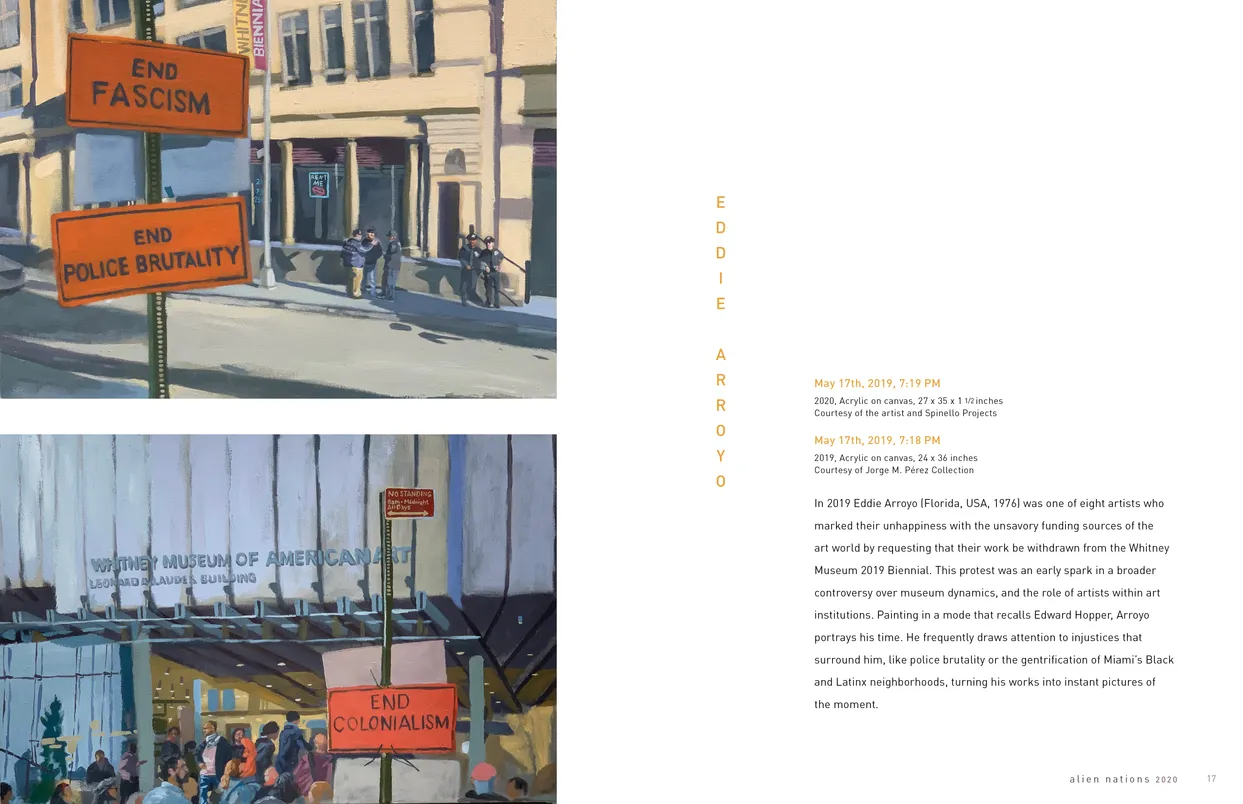
- Alien Nations 2020 exhibition catalog, pages 16-17
- Client: Lehman College Art Gallery
- Visit figure page
- Type: portfolio
- Portfolio Type: publication_design
- Portfolio Role: design_layout
Alien Nations: 2020 — Pages 18–19
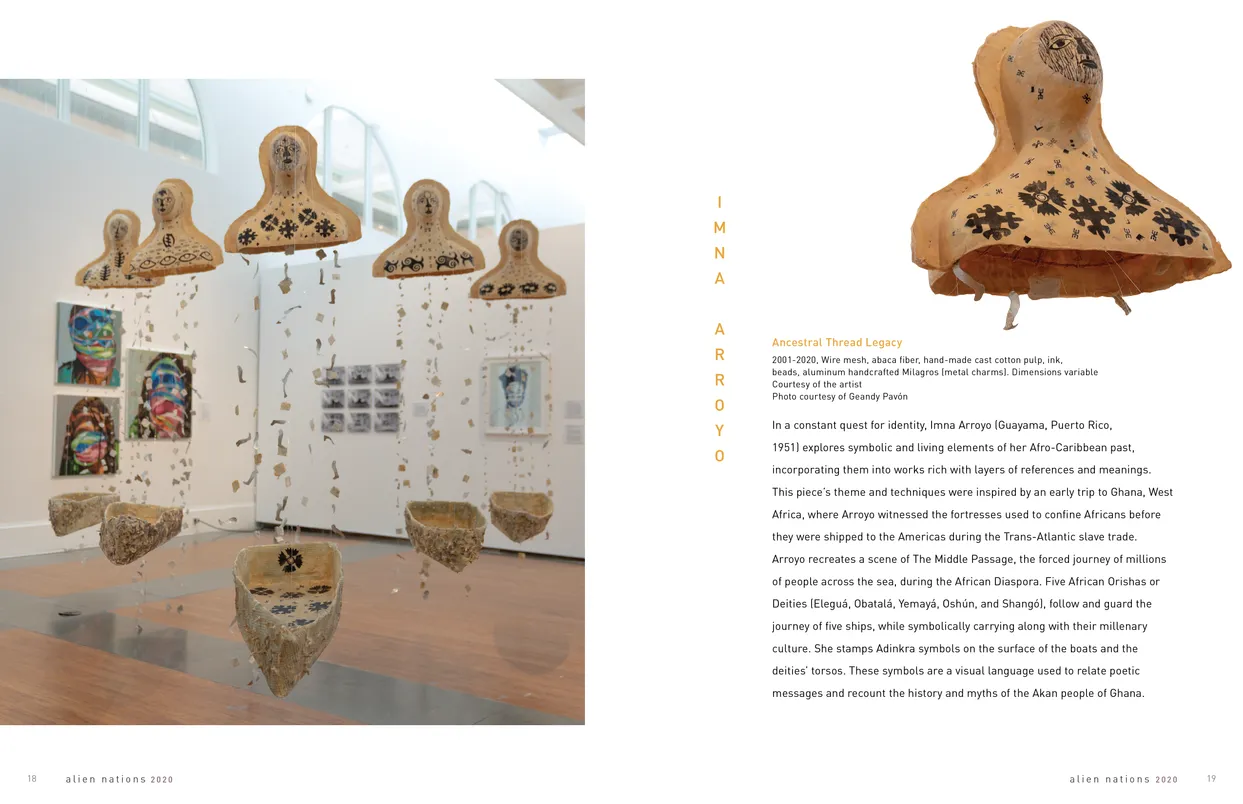
- Alien Nations 2020 exhibition catalog, pages 18-19
- Client: Lehman College Art Gallery
- Visit figure page
- Type: portfolio
- Portfolio Type: publication_design
- Portfolio Role: design_layout
Alien Nations: 2020 — Pages 2–3
- Alien Nations 2020 exhibition catalog, pages 2-3
- Client: Lehman College Art Gallery
- Visit figure page
- Type: portfolio
- Portfolio Type: publication_design
- Portfolio Role: design_layout
Alien Nations: 2020 — Pages 20–21

- Alien Nations 2020 exhibition catalog, pages 20-21
- Client: Lehman College Art Gallery
- Visit figure page
- Type: portfolio
- Portfolio Type: publication_design
- Portfolio Role: design_layout
Alien Nations: 2020 — Pages 22–23
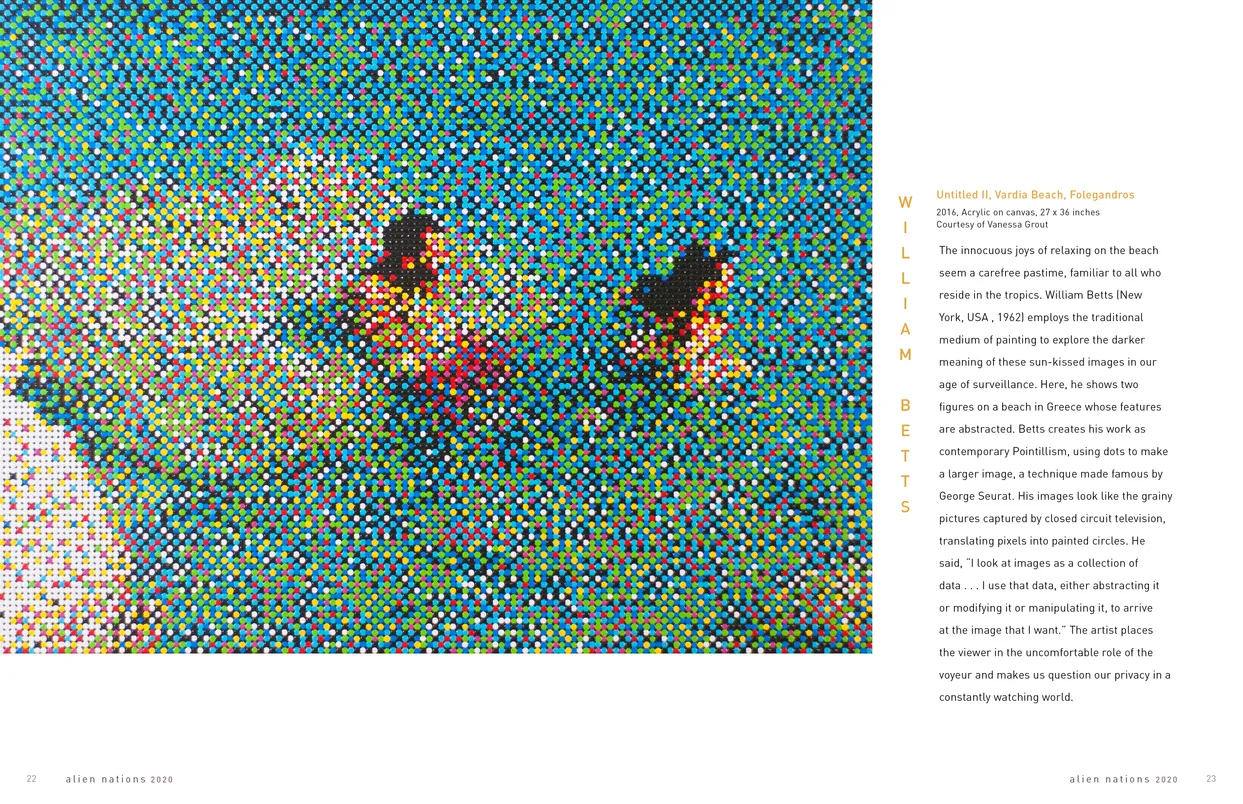
- Alien Nations 2020 exhibition catalog, pages 22-23
- Client: Lehman College Art Gallery
- Visit figure page
- Type: portfolio
- Portfolio Type: publication_design
- Portfolio Role: design_layout
Alien Nations: 2020 — Pages 24–25
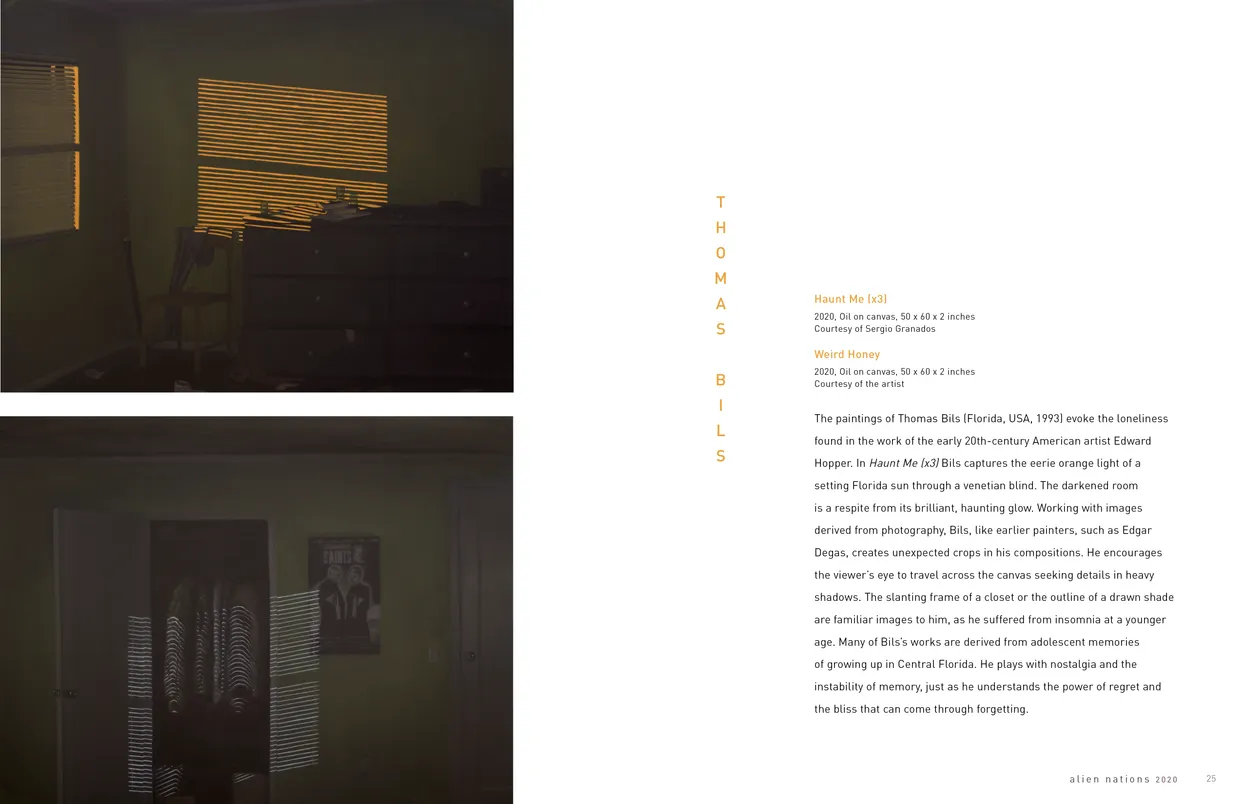
- Alien Nations 2020 exhibition catalog, pages 24-25
- Client: Lehman College Art Gallery
- Visit figure page
- Type: portfolio
- Portfolio Type: publication_design
- Portfolio Role: design_layout
Alien Nations: 2020 — Pages 26–27
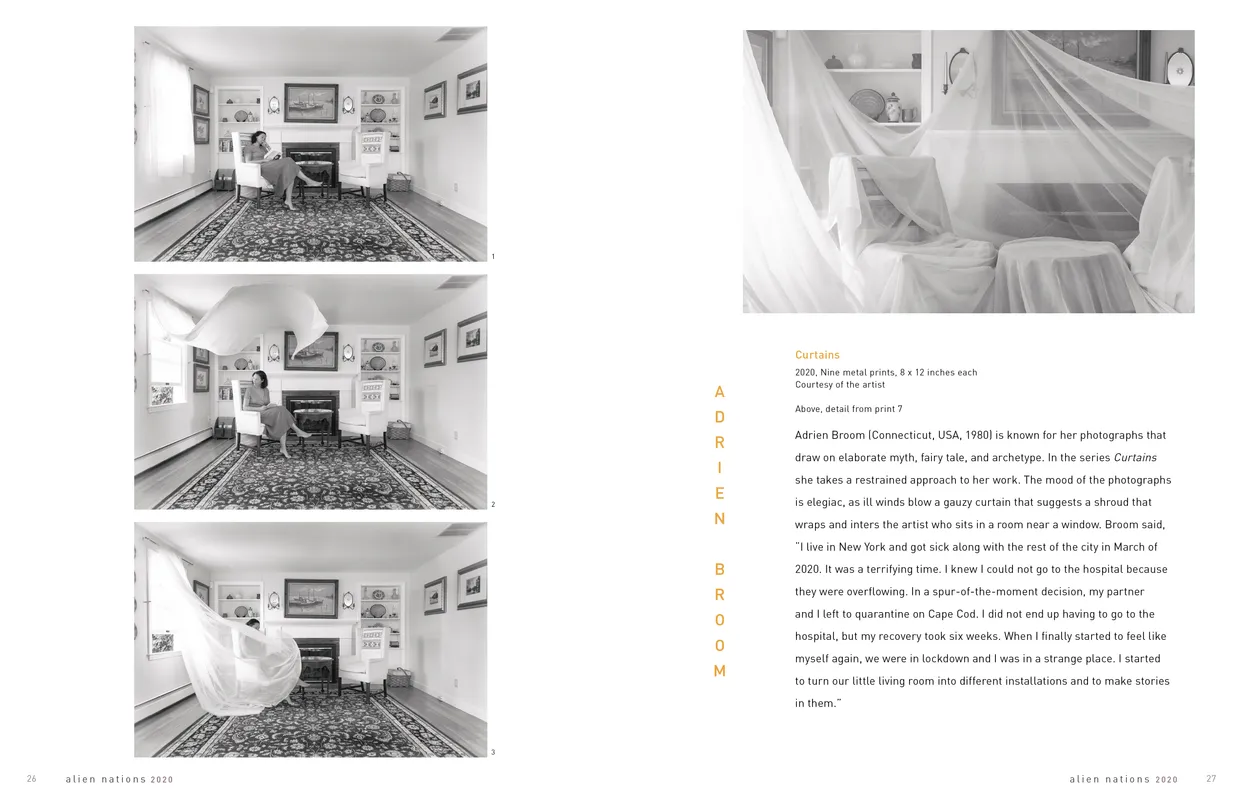
- Alien Nations 2020 exhibition catalog, pages 26-27
- Client: Lehman College Art Gallery
- Visit figure page
- Type: portfolio
- Portfolio Type: publication_design
- Portfolio Role: design_layout
Alien Nations: 2020 — Pages 28–29
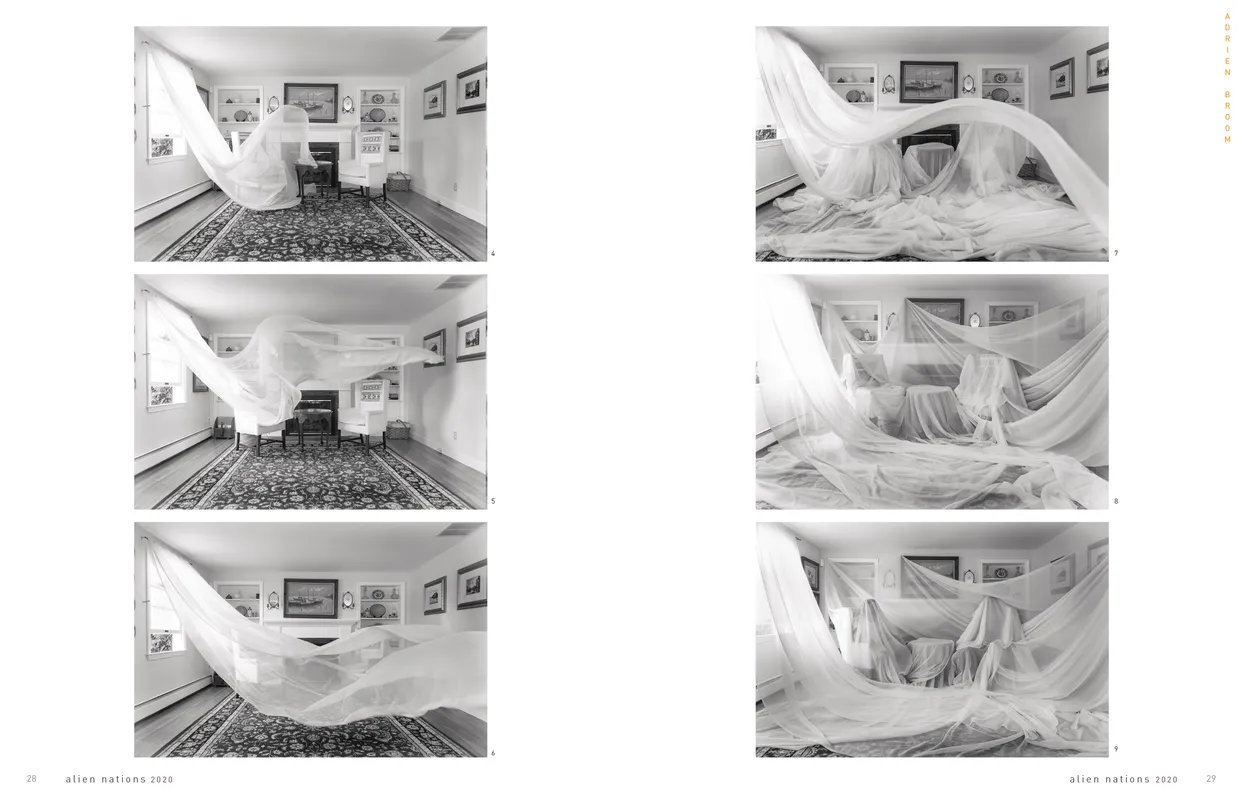
- Alien Nations 2020 exhibition catalog, pages 28-29
- Client: Lehman College Art Gallery
- Visit figure page
- Type: portfolio
- Portfolio Type: publication_design
- Portfolio Role: design_layout
Alien Nations: 2020 — Pages 30–31

- Alien Nations 2020 exhibition catalog, pages 30-31
- Client: Lehman College Art Gallery
- Visit figure page
- Type: portfolio
- Portfolio Type: publication_design
- Portfolio Role: design_layout
Alien Nations: 2020 — Pages 32–33
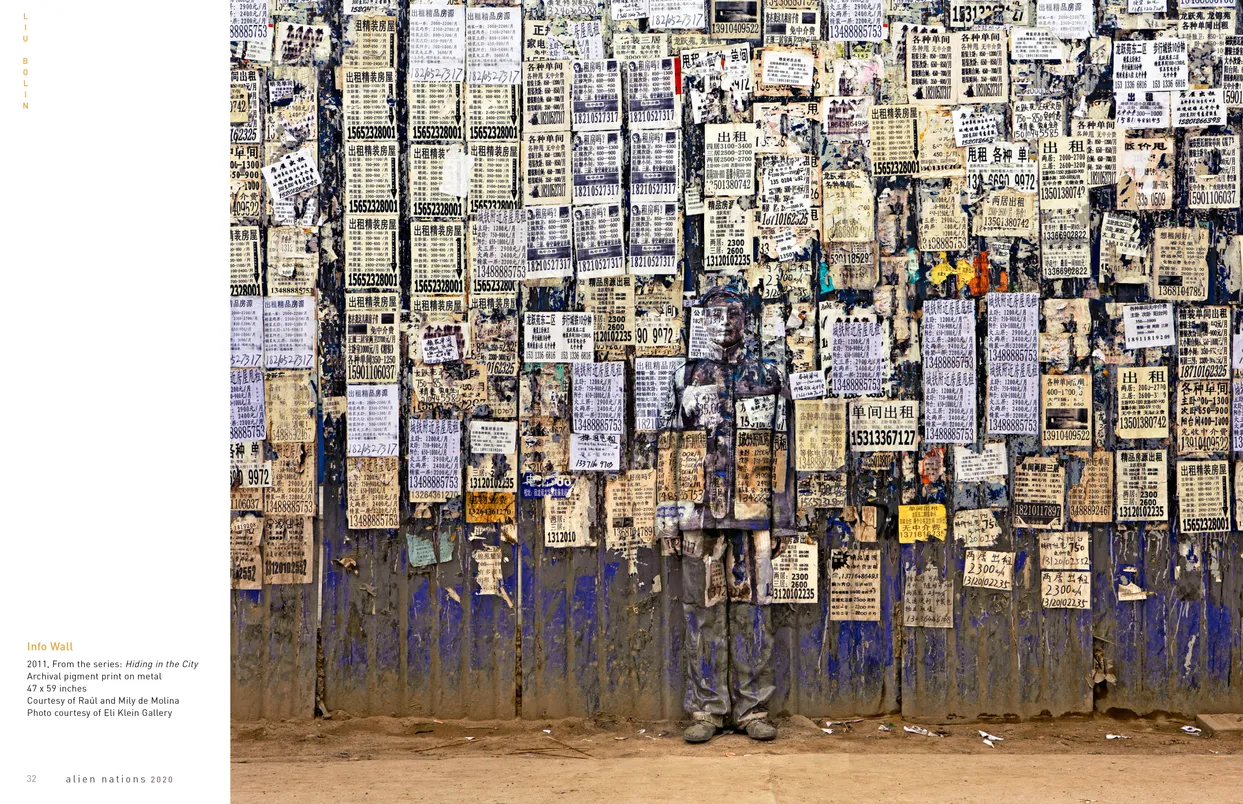
- Alien Nations 2020 exhibition catalog, pages 32-33
- Client: Lehman College Art Gallery
- Visit figure page
- Type: portfolio
- Portfolio Type: publication_design
- Portfolio Role: design_layout
Alien Nations: 2020 — Pages 34–35
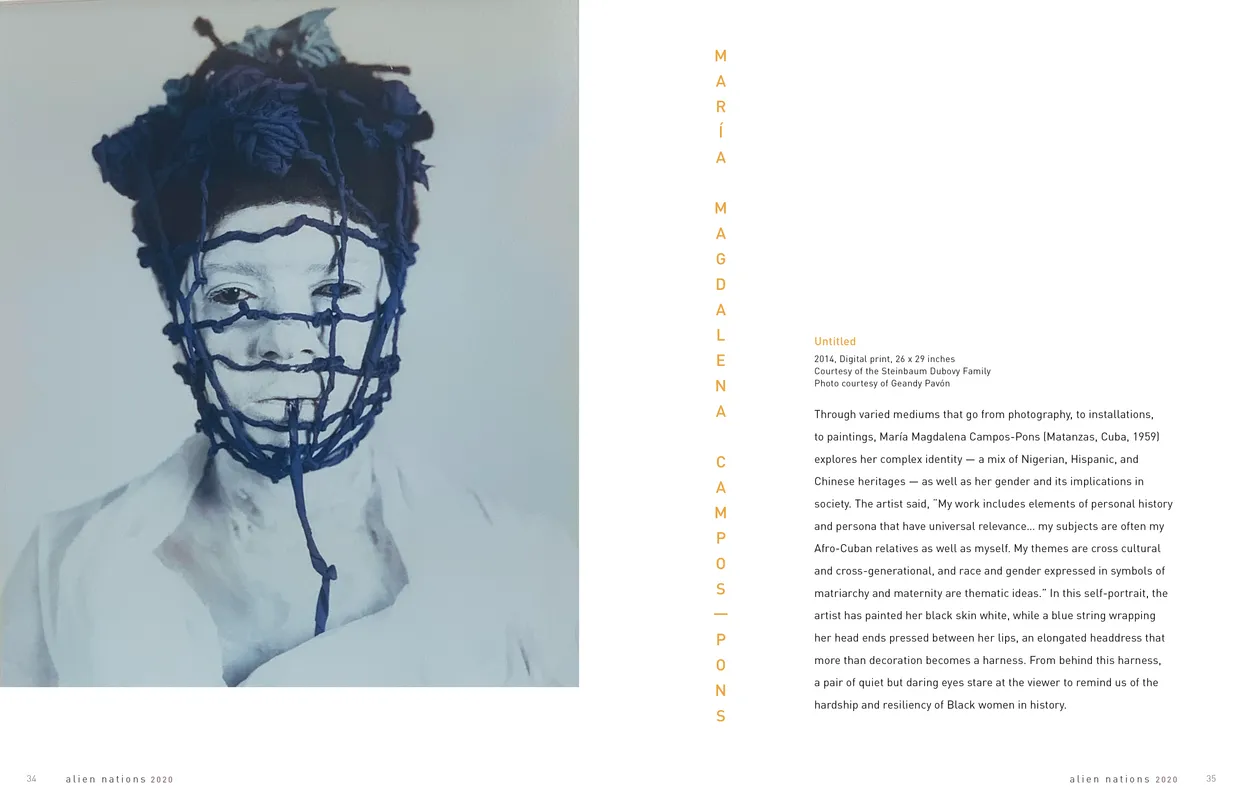
- Alien Nations 2020 exhibition catalog, pages 34-35
- Client: Lehman College Art Gallery
- Visit figure page
- Type: portfolio
- Portfolio Type: publication_design
- Portfolio Role: design_layout
Alien Nations: 2020 — Pages 36–37
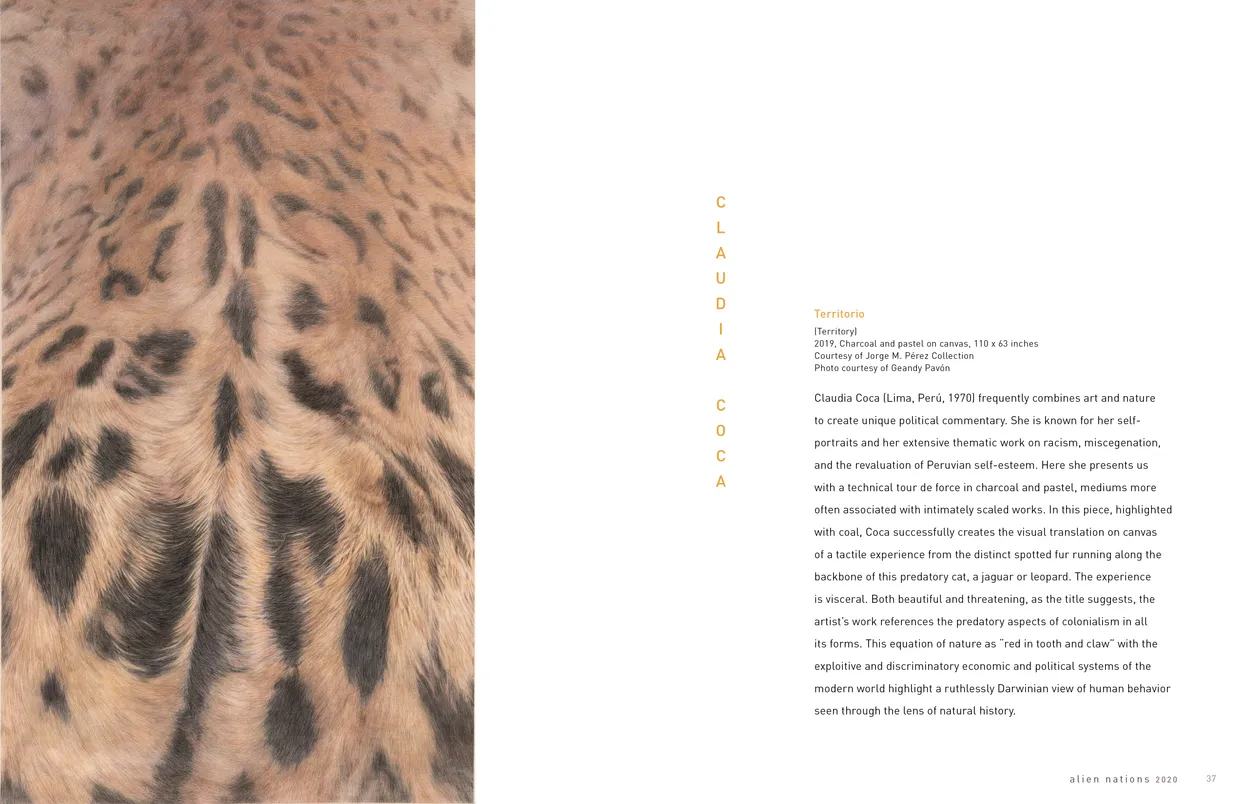
- Alien Nations 2020 exhibition catalog, pages 36-37
- Client: Lehman College Art Gallery
- Visit figure page
- Type: portfolio
- Portfolio Type: publication_design
- Portfolio Role: design_layout
Alien Nations: 2020 — Pages 38–39
- Alien Nations 2020 exhibition catalog, pages 38-39
- Client: Lehman College Art Gallery
- Visit figure page
- Type: portfolio
- Portfolio Type: publication_design
- Portfolio Role: design_layout
Alien Nations: 2020 — Pages 4–5

- Alien Nations 2020 exhibition catalog, pages 4-5
- Client: Lehman College Art Gallery
- Visit figure page
- Type: portfolio
- Portfolio Type: publication_design
- Portfolio Role: design_layout
Alien Nations: 2020 — Pages 40–41
- Alien Nations 2020 exhibition catalog, pages 40-41
- Client: Lehman College Art Gallery
- Visit figure page
- Type: portfolio
- Portfolio Type: publication_design
- Portfolio Role: design_layout
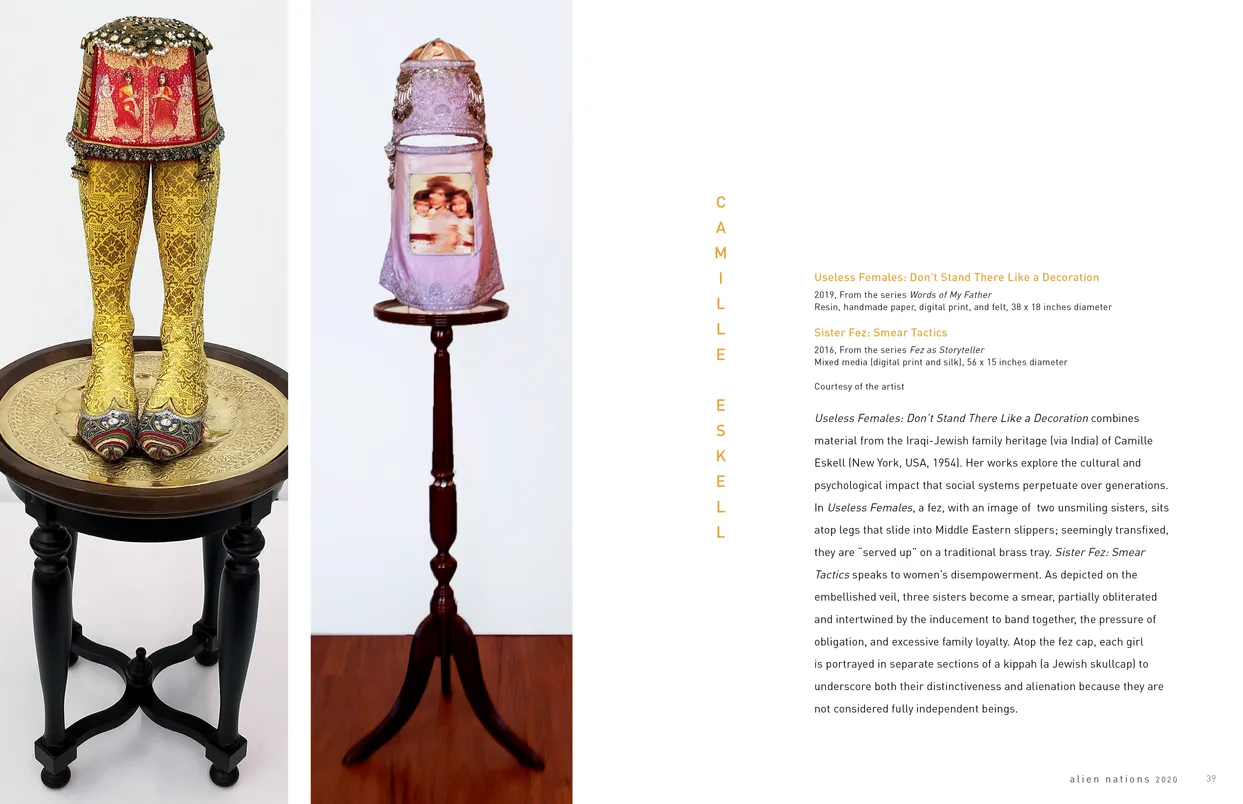
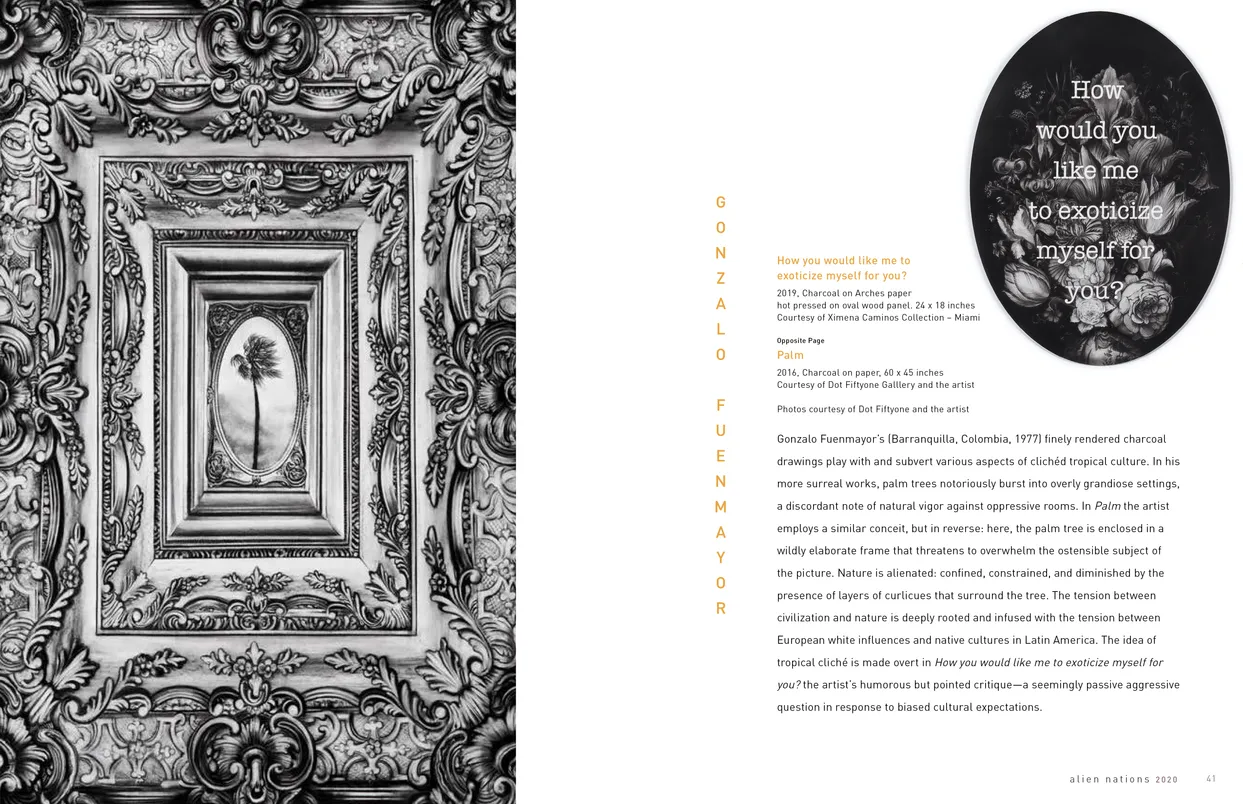
Alien Nations: 2020 — Pages 42–43
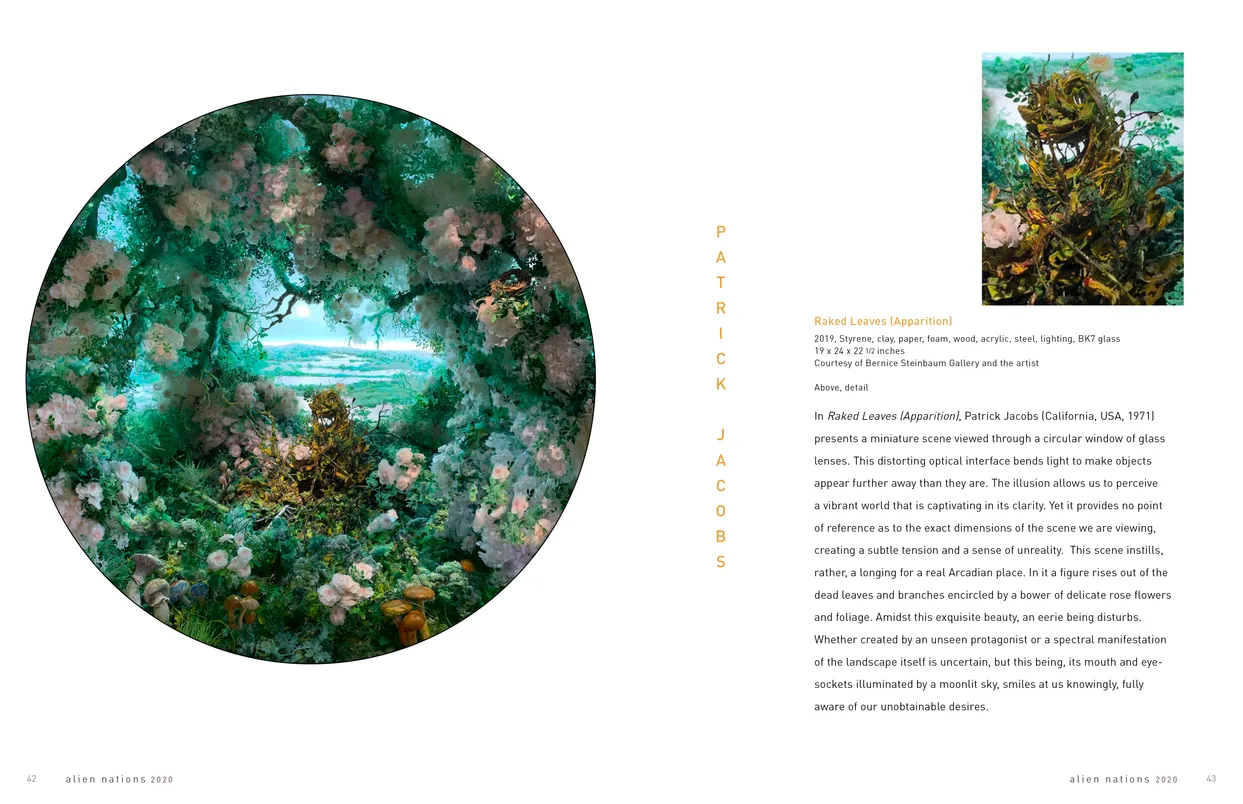
- Alien Nations 2020 exhibition catalog, pages 42-43
- Client: Lehman College Art Gallery
- Visit figure page
- Type: portfolio
- Portfolio Type: publication_design
- Portfolio Role: design_layout
Alien Nations: 2020 — Pages 44–45
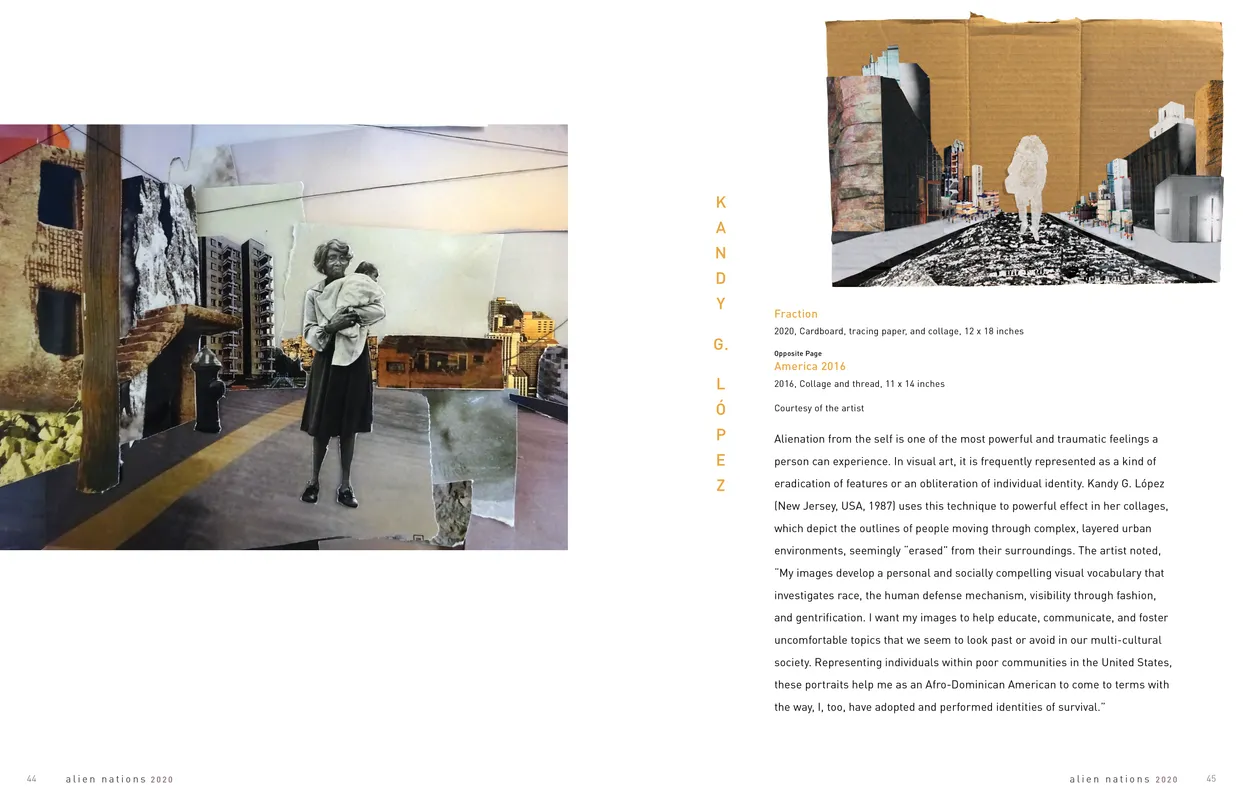
- Alien Nations 2020 exhibition catalog, pages 44-45
- Client: Lehman College Art Gallery
- Visit figure page
- Type: portfolio
- Portfolio Type: publication_design
- Portfolio Role: design_layout
Alien Nations: 2020 — Pages 46–47
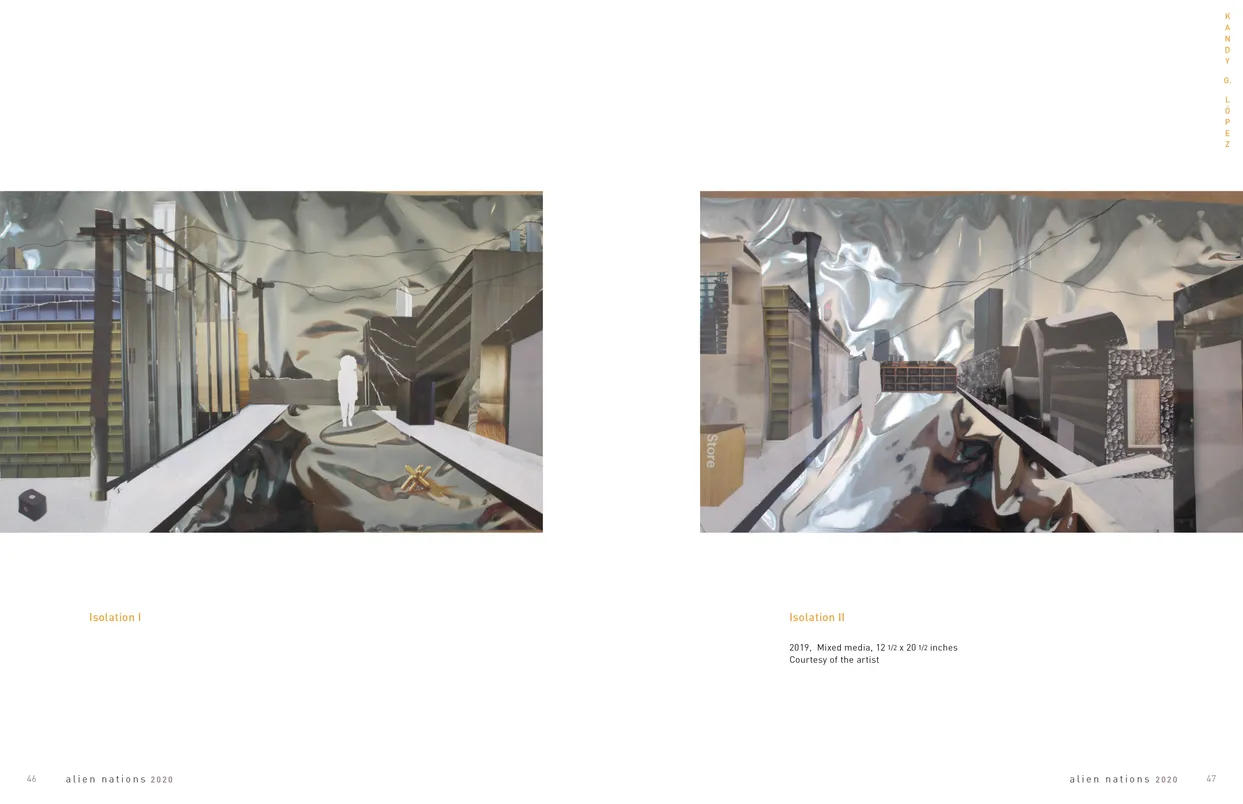
- Alien Nations 2020 exhibition catalog, pages 46-47
- Client: Lehman College Art Gallery
- Visit figure page
- Type: portfolio
- Portfolio Type: publication_design
- Portfolio Role: design_layout
Alien Nations: 2020 — Pages 48–49
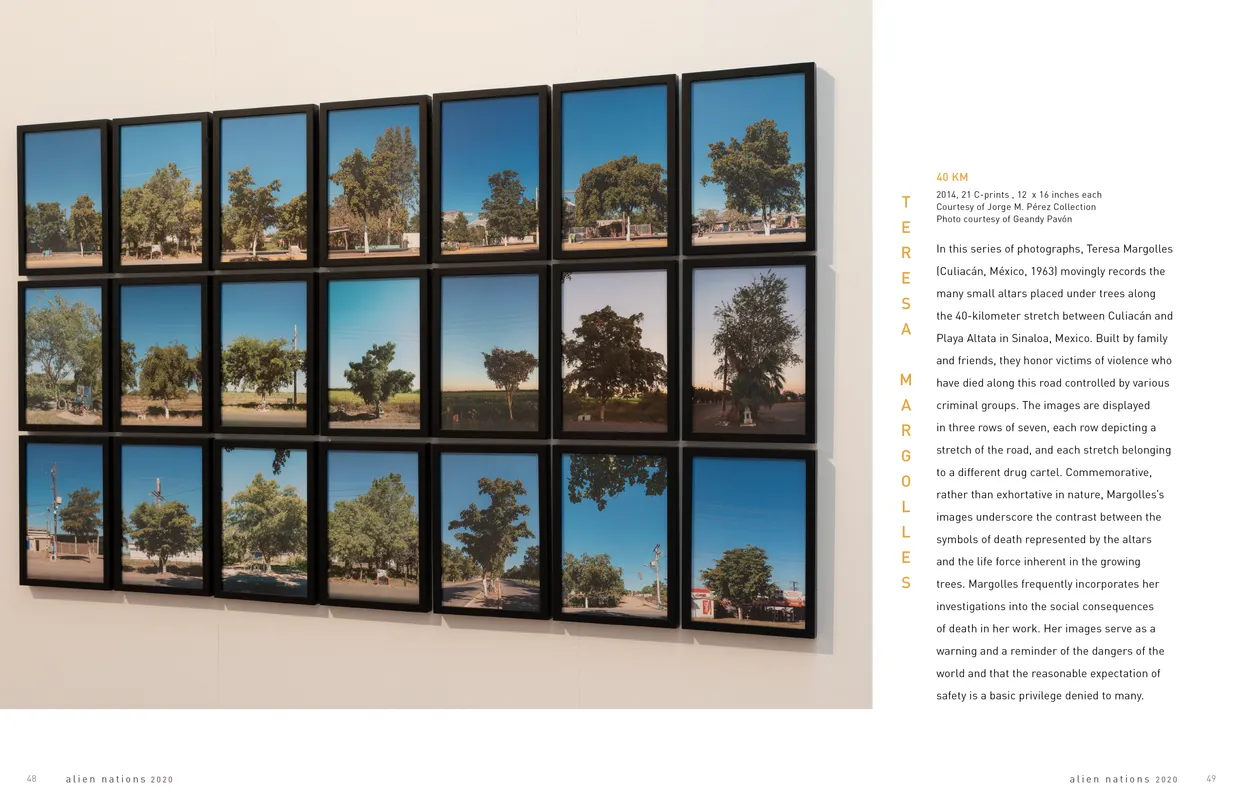
- Alien Nations 2020 exhibition catalog, pages 48-49
- Client: Lehman College Art Gallery
- Visit figure page
- Type: portfolio
- Portfolio Type: publication_design
- Portfolio Role: design_layout
Alien Nations: 2020 — Pages 50–51
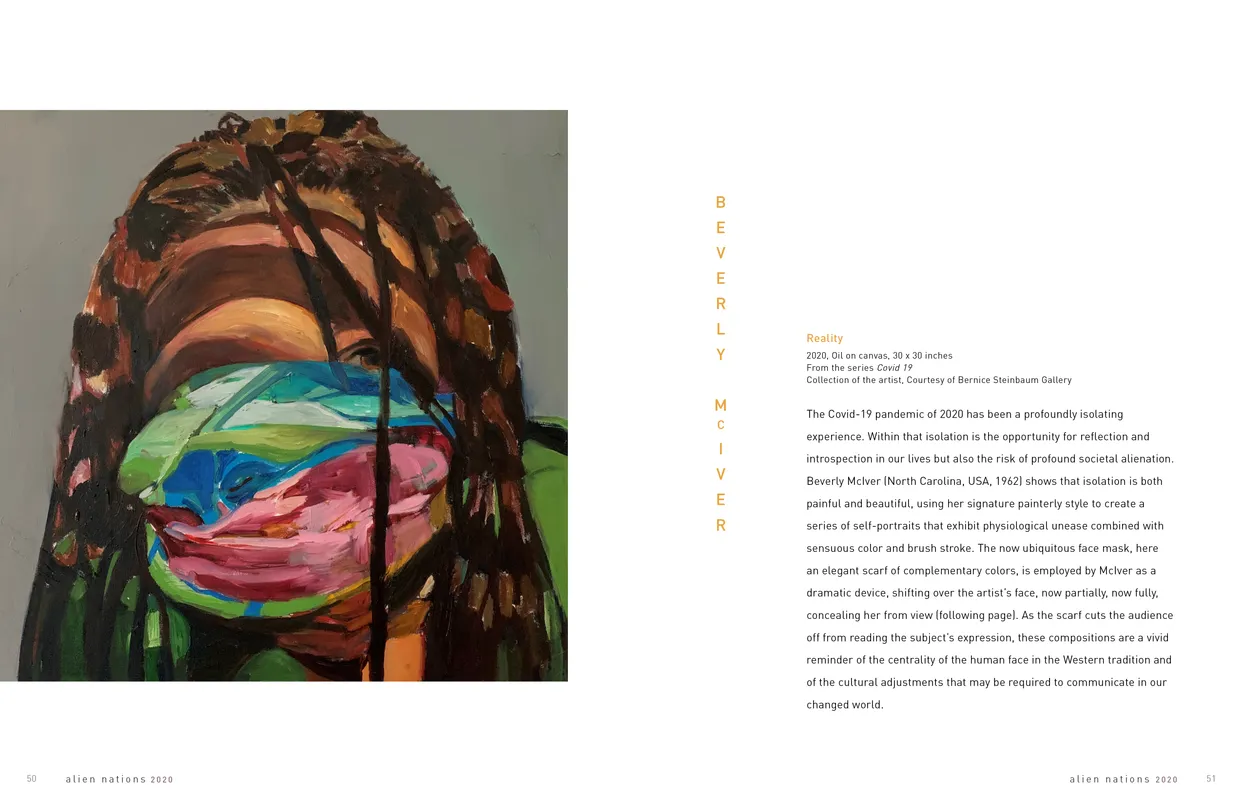
- Alien Nations 2020 exhibition catalog, pages 50-51
- Client: Lehman College Art Gallery
- Visit figure page
- Type: portfolio
- Portfolio Type: publication_design
- Portfolio Role: design_layout
Alien Nations: 2020 — Pages 52–53
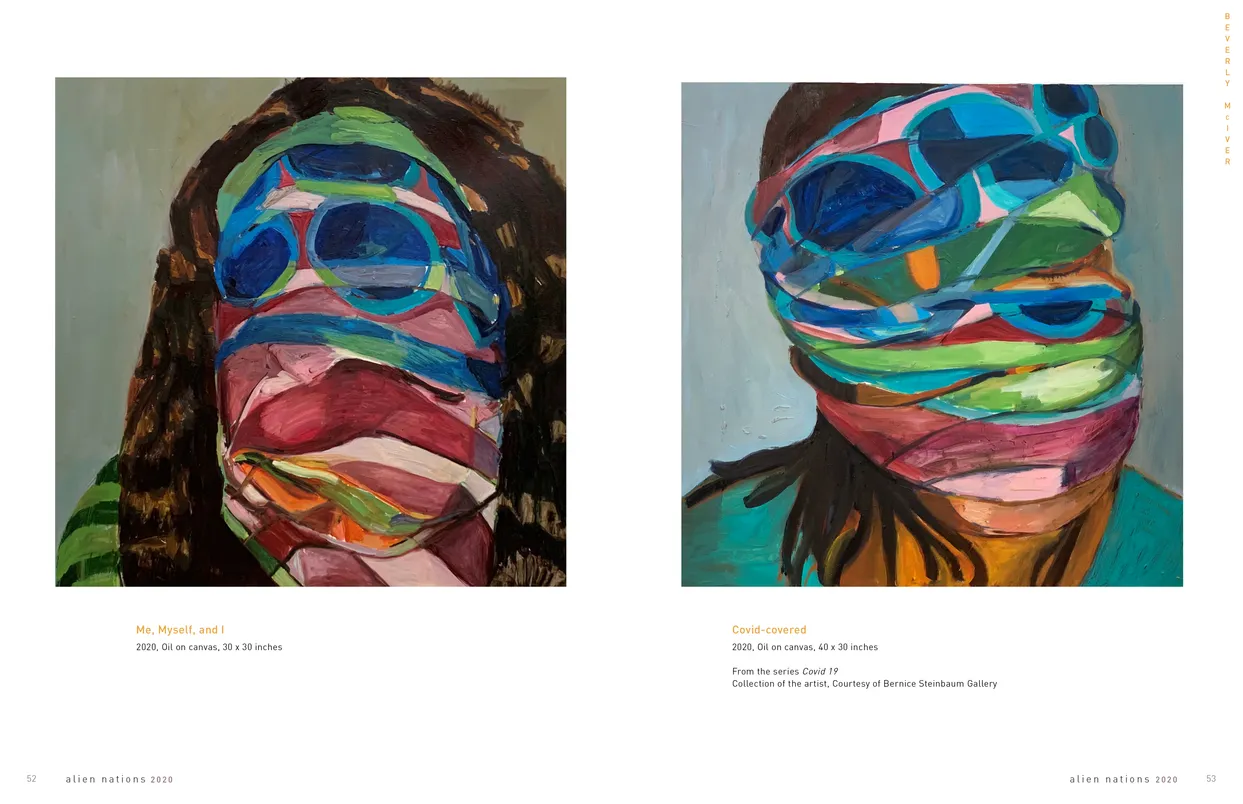
- Alien Nations 2020 exhibition catalog, pages 52-53
- Client: Lehman College Art Gallery
- Visit figure page
- Type: portfolio
- Portfolio Type: publication_design
- Portfolio Role: design_layout
Alien Nations: 2020 — Pages 54–55

- Alien Nations 2020 exhibition catalog, pages 54-55
- Client: Lehman College Art Gallery
- Visit figure page
- Type: portfolio
- Portfolio Type: publication_design
- Portfolio Role: design_layout
Alien Nations: 2020 — Pages 56–57
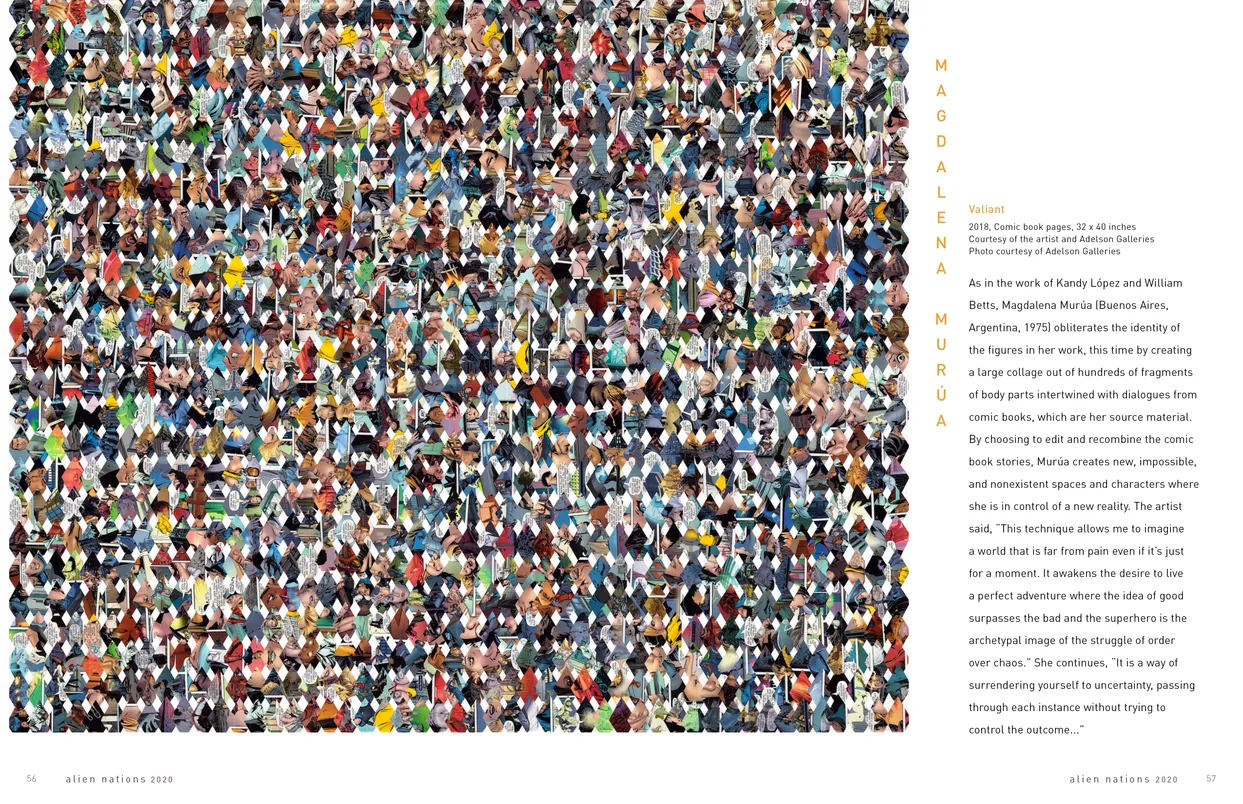
- Alien Nations 2020 exhibition catalog, pages 56-57
- Client: Lehman College Art Gallery
- Visit figure page
- Type: portfolio
- Portfolio Type: publication_design
- Portfolio Role: design_layout
Alien Nations: 2020 — Pages 58–59
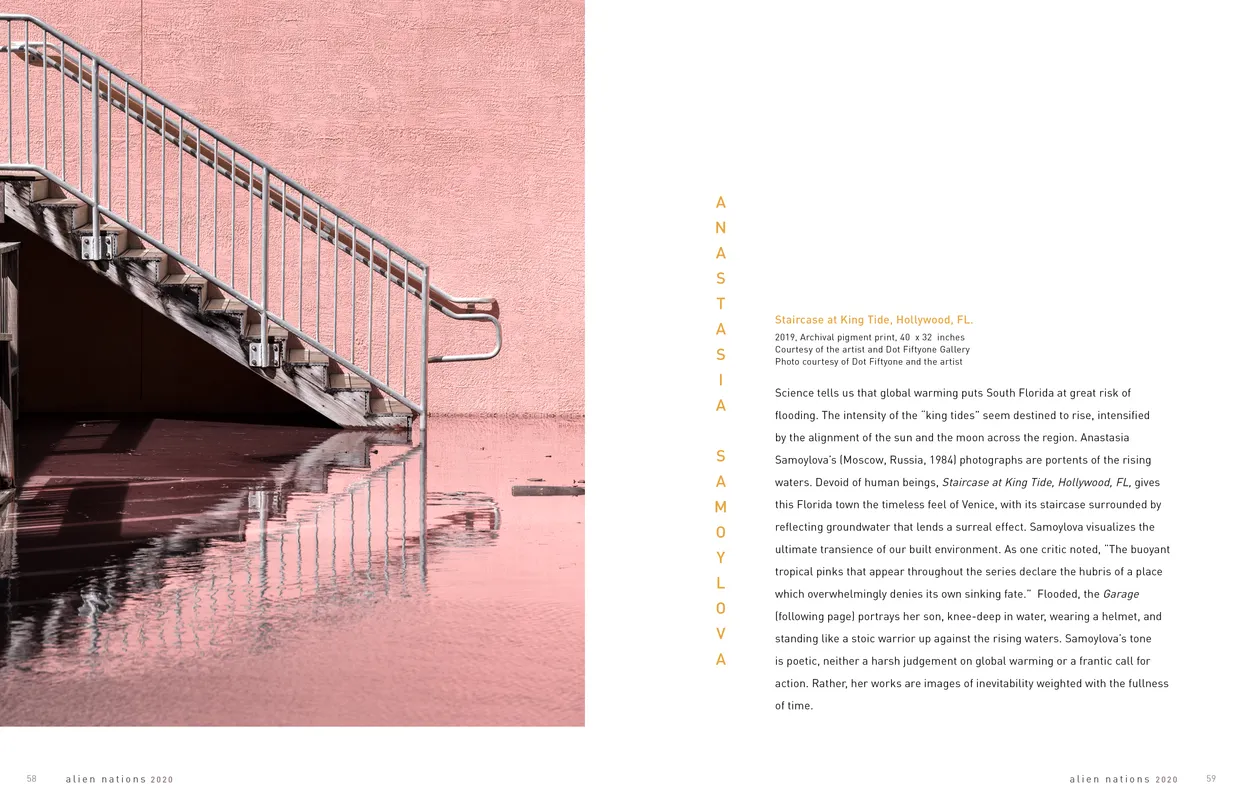
- Alien Nations 2020 exhibition catalog, pages 58-59
- Client: Lehman College Art Gallery
- Visit figure page
- Type: portfolio
- Portfolio Type: publication_design
- Portfolio Role: design_layout
Alien Nations: 2020 — Pages 6–7
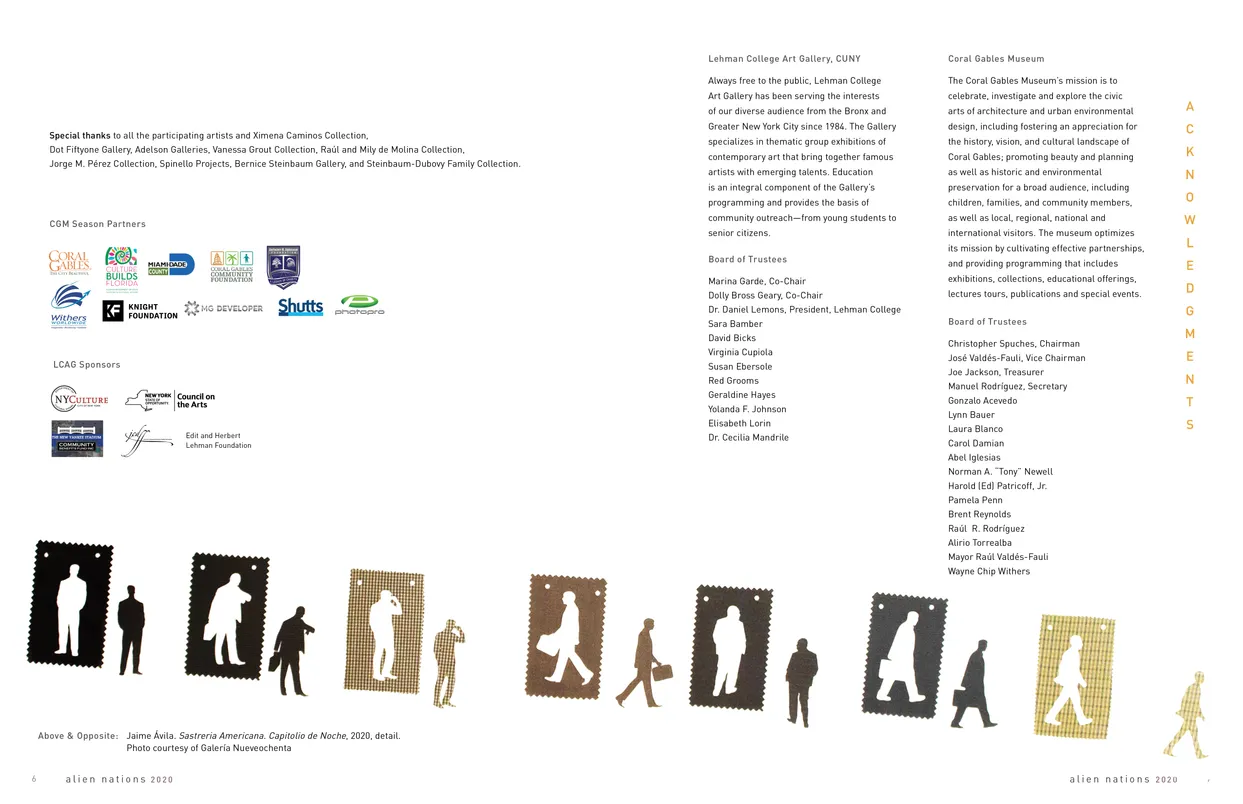
- Alien Nations 2020 exhibition catalog, pages 6-7
- Client: Lehman College Art Gallery
- Visit figure page
- Type: portfolio
- Portfolio Type: publication_design
- Portfolio Role: design_layout
Alien Nations: 2020 — Pages 60–61
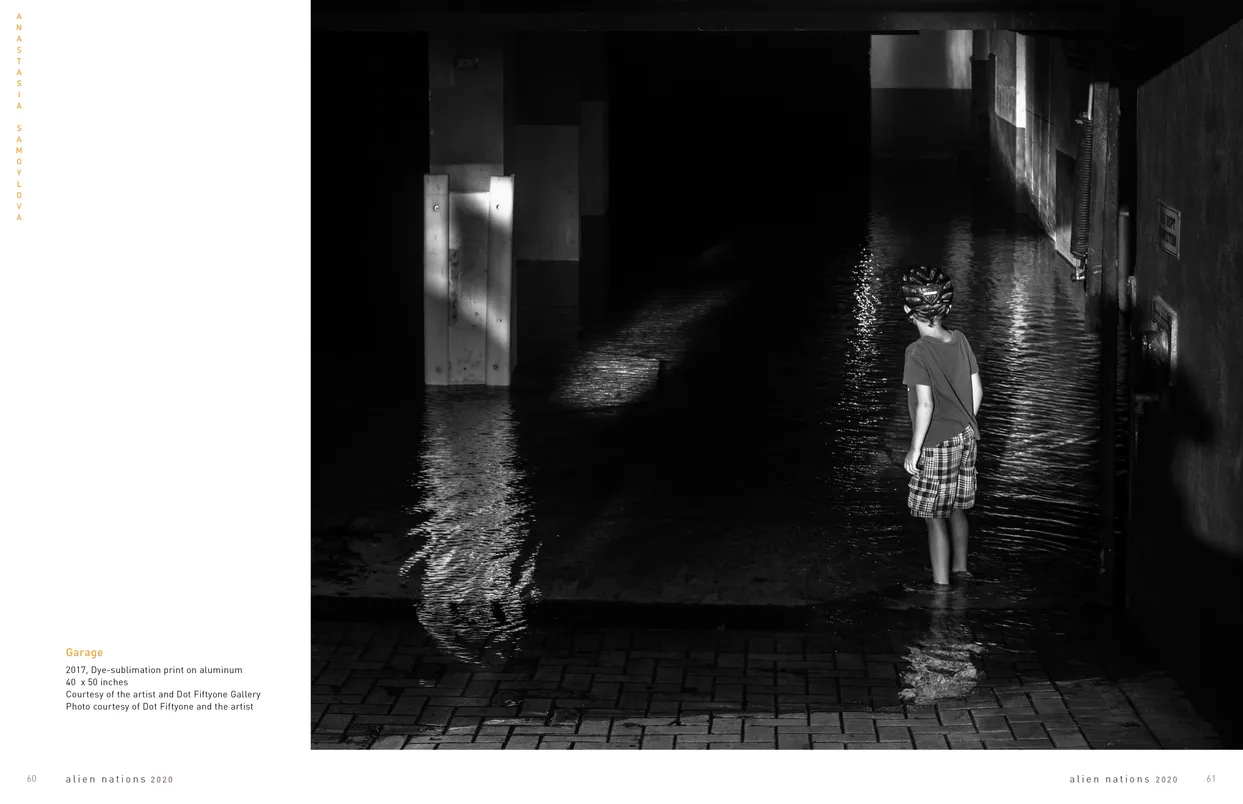
- Alien Nations 2020 exhibition catalog, pages 60-61
- Client: Lehman College Art Gallery
- Visit figure page
- Type: portfolio
- Portfolio Type: publication_design
- Portfolio Role: design_layout
Alien Nations: 2020 — Pages 62–63
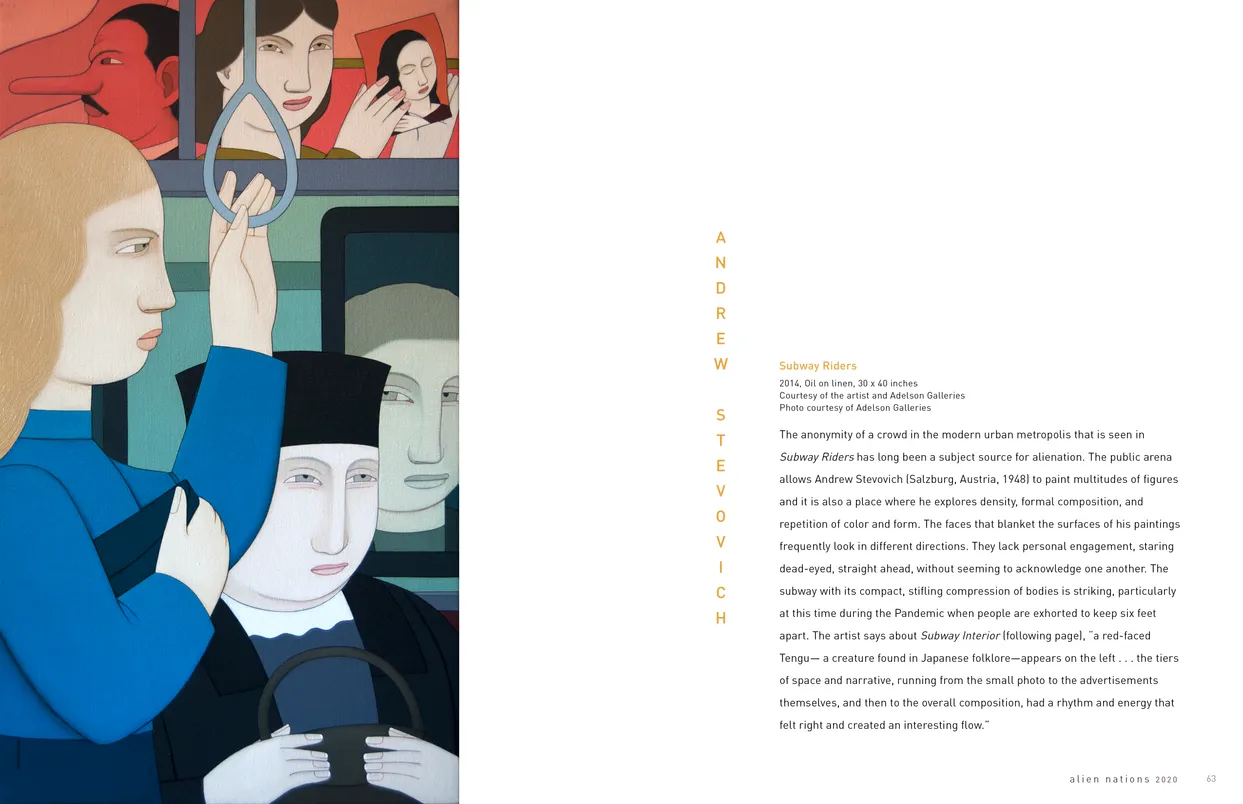
- Alien Nations 2020 exhibition catalog, pages 62-63
- Client: Lehman College Art Gallery
- Visit figure page
- Type: portfolio
- Portfolio Type: publication_design
- Portfolio Role: design_layout
Alien Nations: 2020 — Pages 64–65
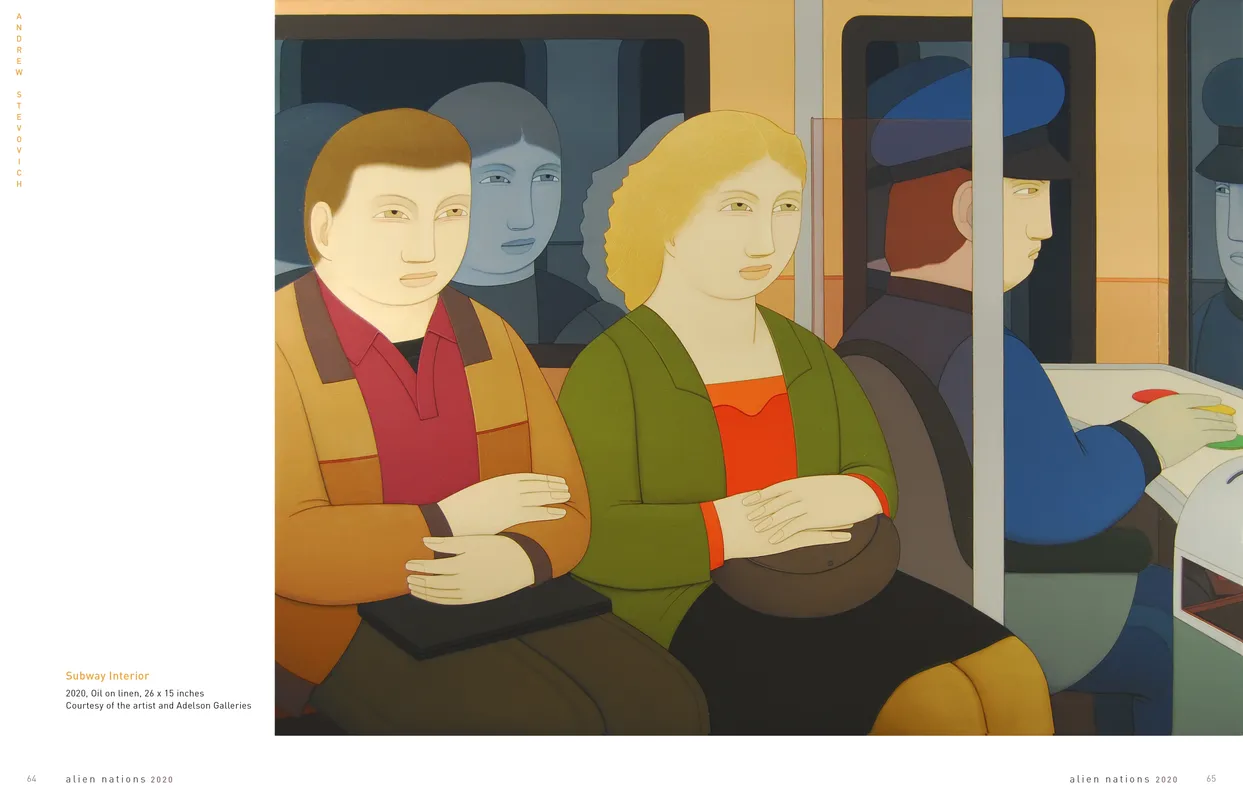
- Alien Nations 2020 exhibition catalog, pages 64-65
- Client: Lehman College Art Gallery
- Visit figure page
- Type: portfolio
- Portfolio Type: publication_design
- Portfolio Role: design_layout
Alien Nations: 2020 — Pages 66–67
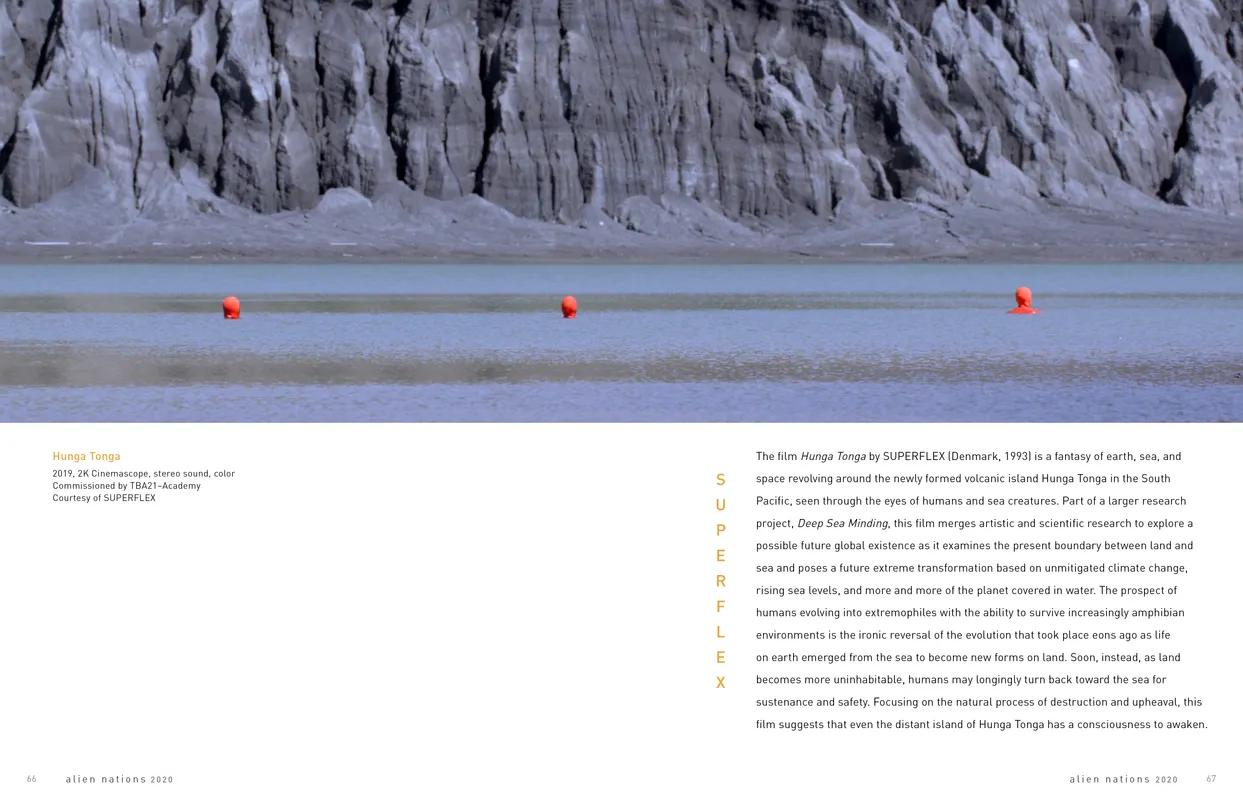
- Alien Nations 2020 exhibition catalog, pages 66-67
- Client: Lehman College Art Gallery
- Visit figure page
- Type: portfolio
- Portfolio Type: publication_design
- Portfolio Role: design_layout
Alien Nations: 2020 — Pages 68–69
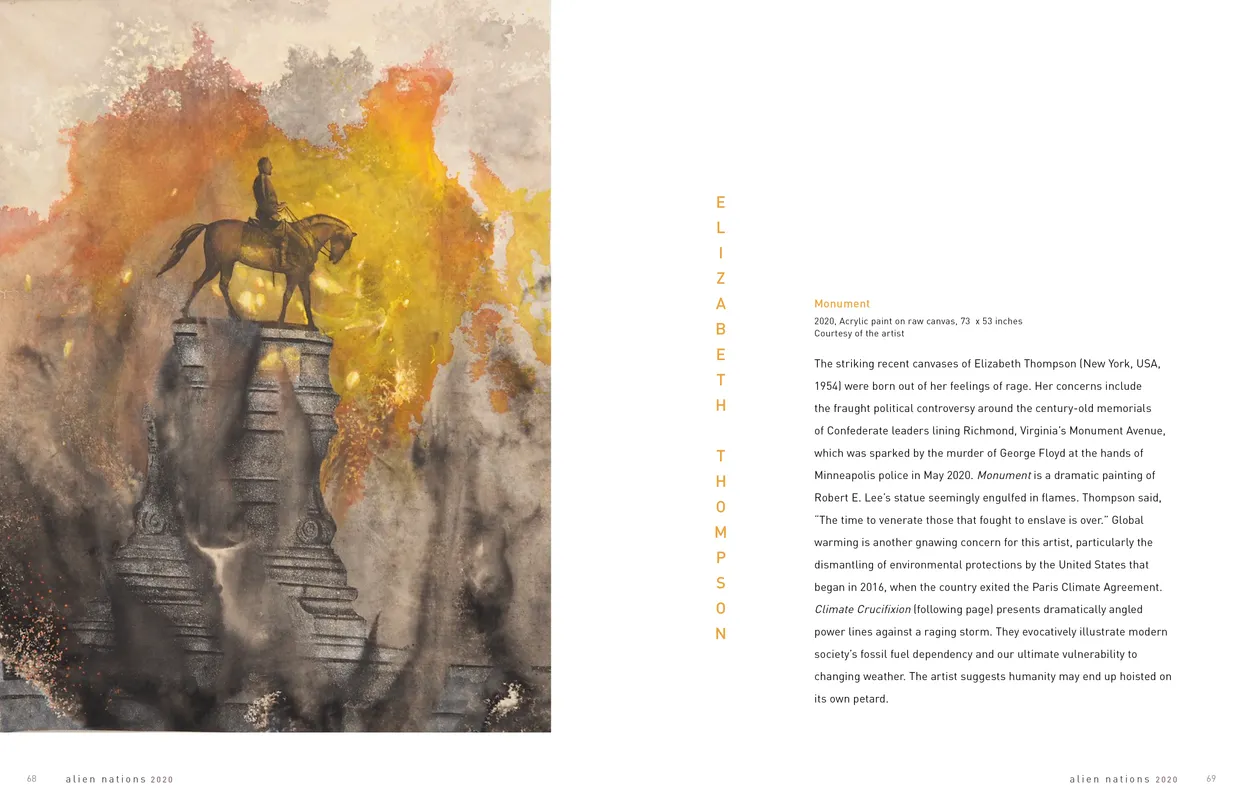
- Alien Nations 2020 exhibition catalog, pages 68-69
- Client: Lehman College Art Gallery
- Visit figure page
- Type: portfolio
- Portfolio Type: publication_design
- Portfolio Role: design_layout
Alien Nations: 2020 — Pages 70–71
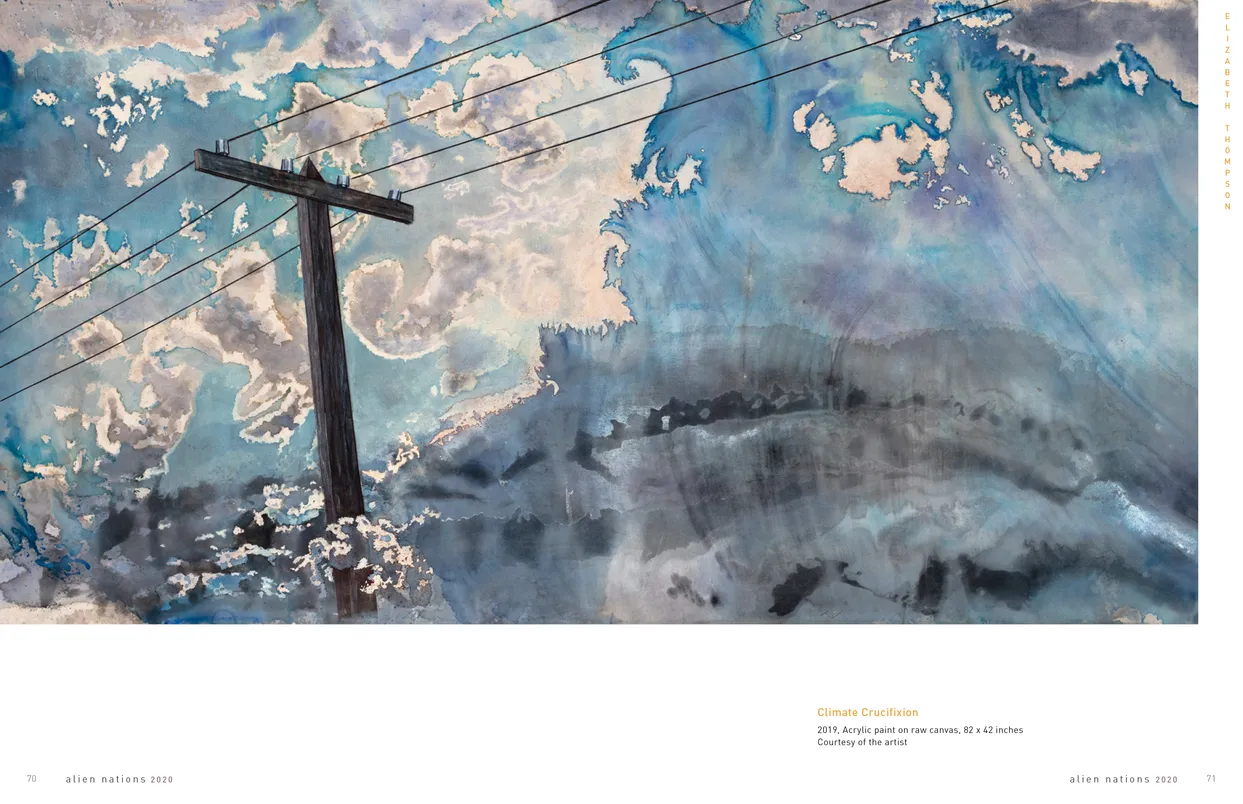
- Alien Nations 2020 exhibition catalog, pages 70-71
- Client: Lehman College Art Gallery
- Visit figure page
- Type: portfolio
- Portfolio Type: publication_design
- Portfolio Role: design_layout
Alien Nations: 2020 — Pages 72–73
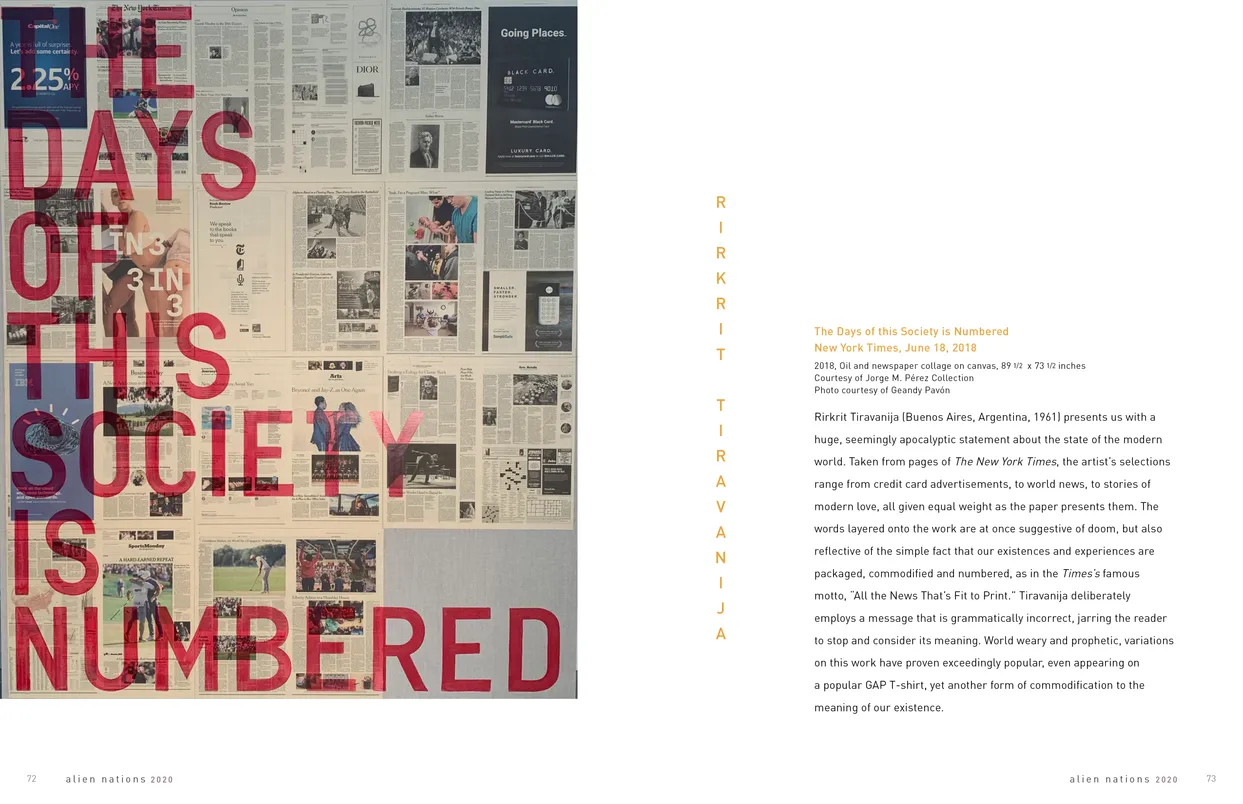
- Alien Nations 2020 exhibition catalog, pages 72-73
- Client: Lehman College Art Gallery
- Visit figure page
- Type: portfolio
- Portfolio Type: publication_design
- Portfolio Role: design_layout
Alien Nations: 2020 — Pages 74–75
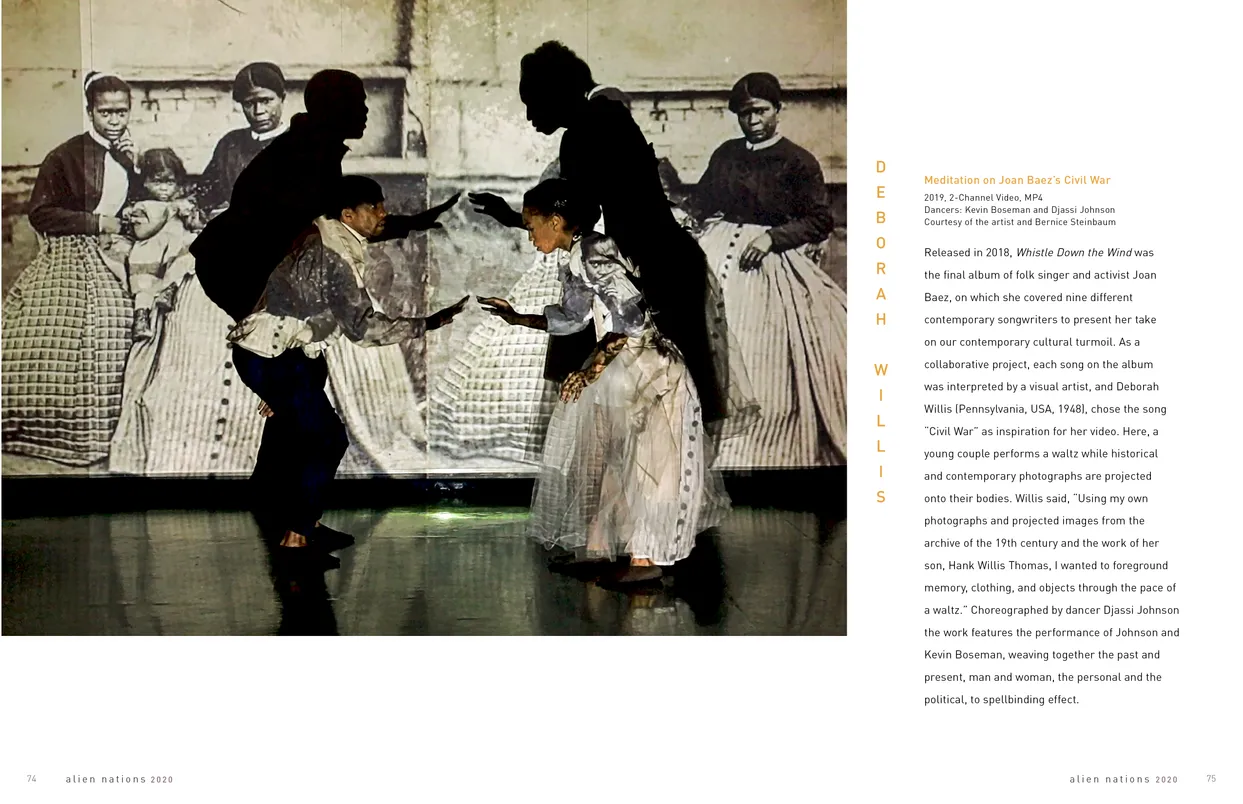
- Alien Nations 2020 exhibition catalog, pages 74-75
- Client: Lehman College Art Gallery
- Visit figure page
- Type: portfolio
- Portfolio Type: publication_design
- Portfolio Role: design_layout
Alien Nations: 2020 — Pages 76–77
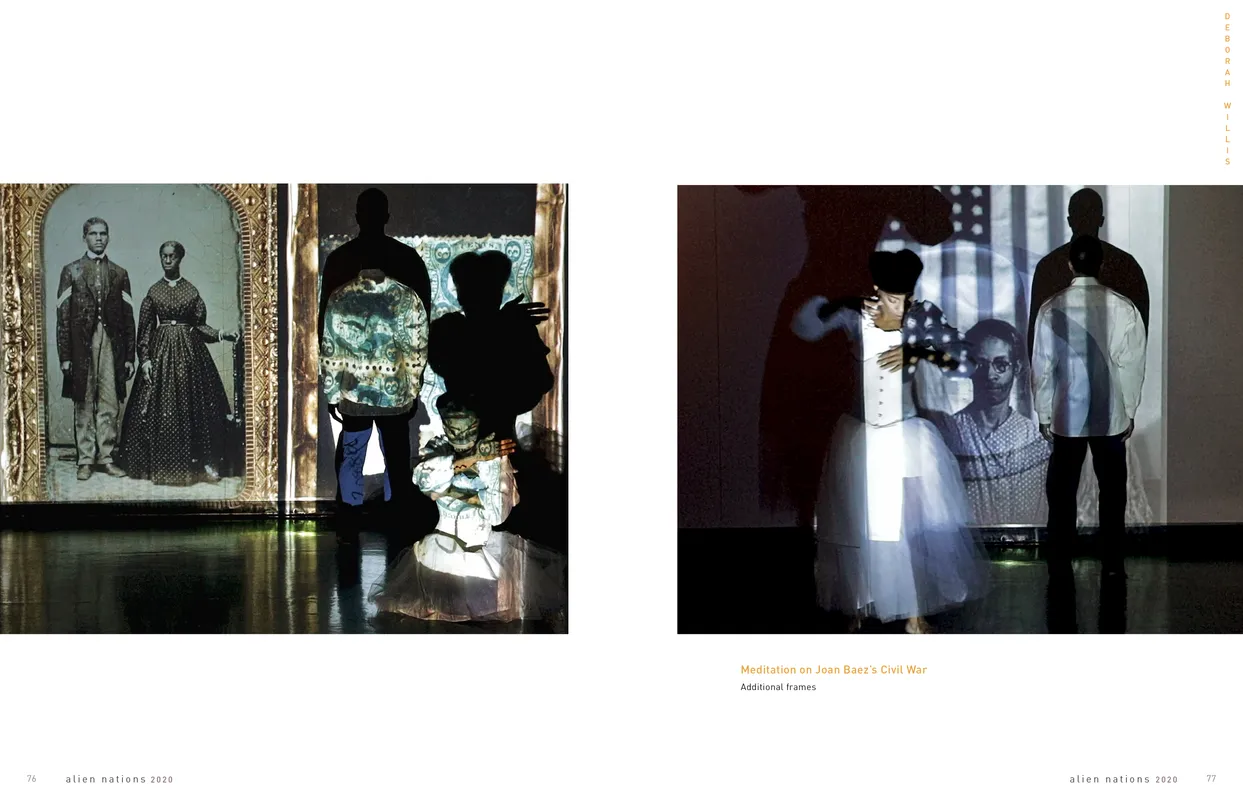
- Alien Nations 2020 exhibition catalog, pages 76-77
- Client: Lehman College Art Gallery
- Visit figure page
- Type: portfolio
- Portfolio Type: publication_design
- Portfolio Role: design_layout
Alien Nations: 2020 — Pages 78–79
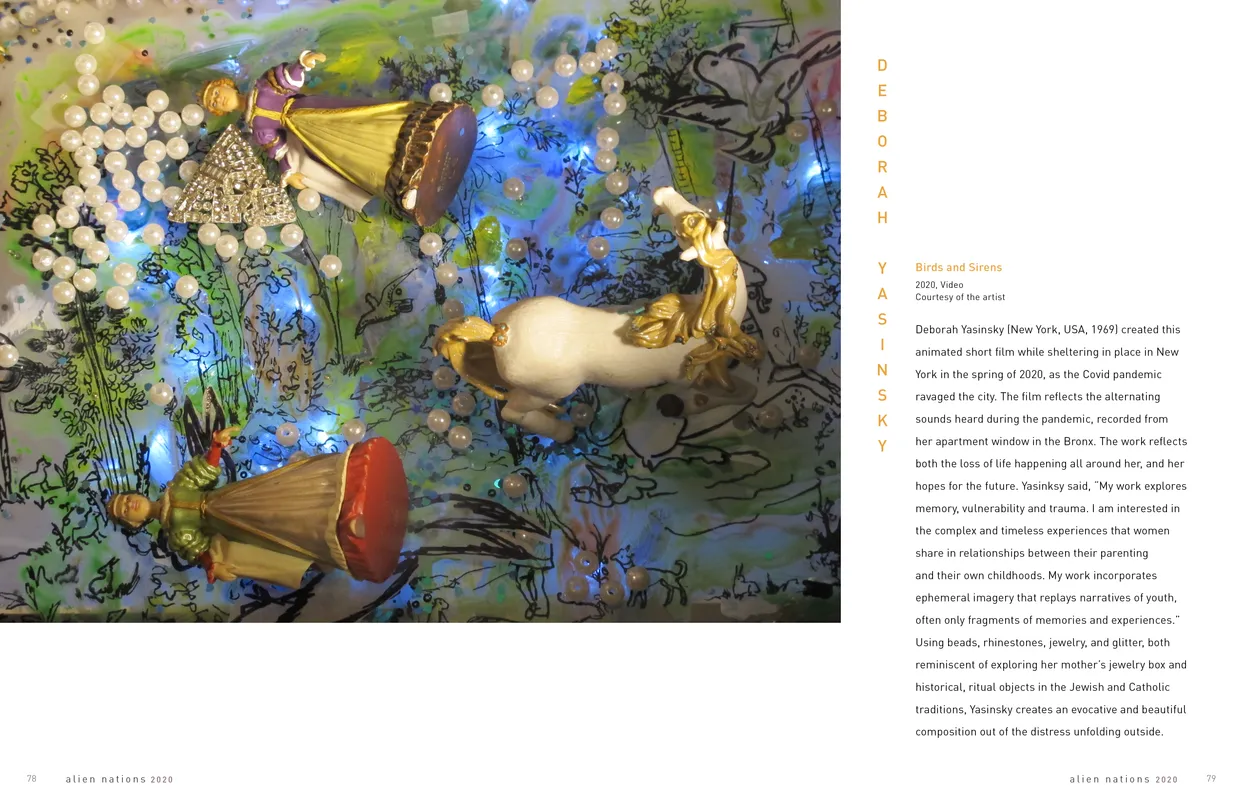
- Alien Nations 2020 exhibition catalog, pages 78-79
- Client: Lehman College Art Gallery
- Visit figure page
- Type: portfolio
- Portfolio Type: publication_design
- Portfolio Role: design_layout
Alien Nations: 2020 — Pages 8–9
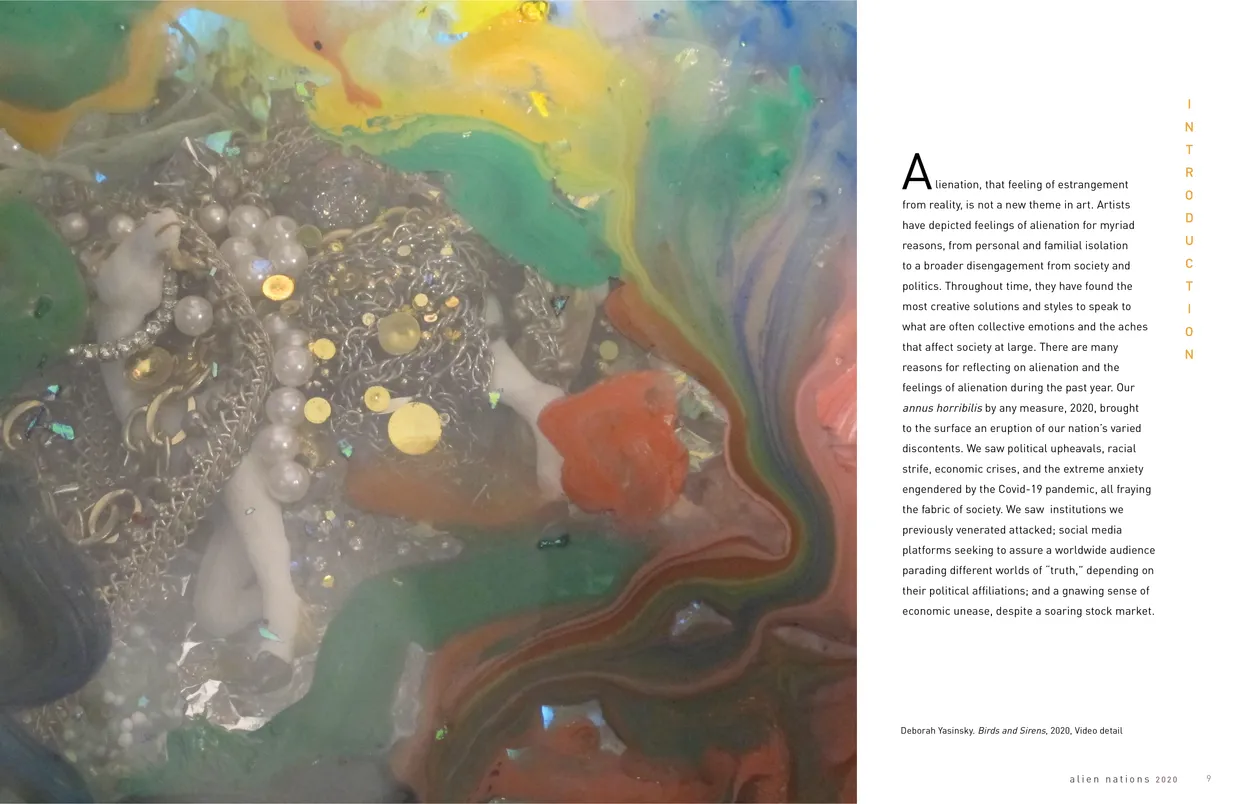
- Alien Nations 2020 exhibition catalog, pages 8-9
- Client: Lehman College Art Gallery
- Visit figure page
- Type: portfolio
- Portfolio Type: publication_design
- Portfolio Role: design_layout
Allston Village Street Fair Web Home Page

- Allston Village Street Fair Website — Home Page
- Client: Adelson Galleries
- Visit figure page
- Type: portfolio
- Portfolio Type: advertising
- Portfolio Role: design_layout
Allston Village Street Fair Web Home Page
- Allston Village Street Fair Website — Home Page
- Client: Adelson Galleries
- Visit figure page
- Type: portfolio
- Portfolio Type: advertising
- Portfolio Role: design_layout
Ancient Iba Script

- Ancient Iba Script
- Client: Kingdom of Flowers
- Visit figure page
- Type: portfolio
- Portfolio Type: advertising
- Portfolio Role: design_layout
Andrew Stevovich Familiar Faces Exhibition Invitation Presentation
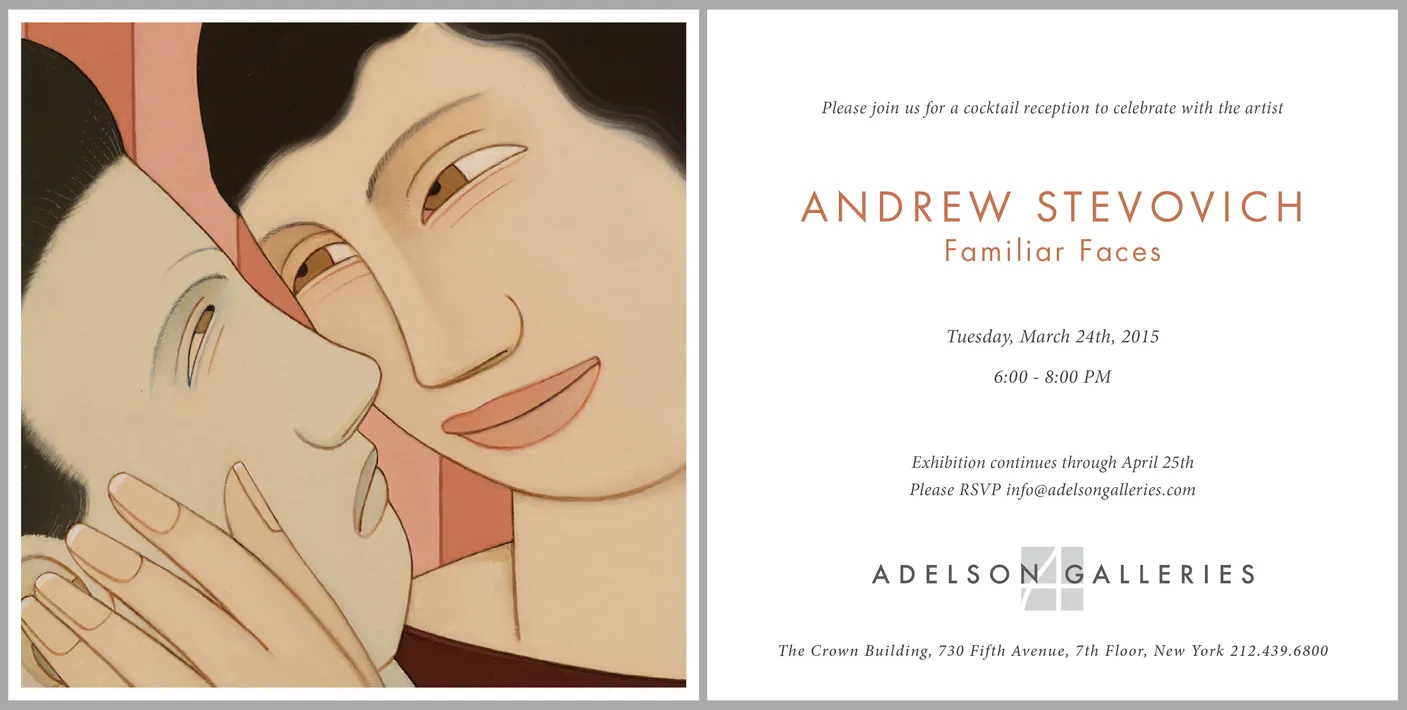
- Invitation for the Andrew Stevovich: Familiar Faces exhibtion
- Client: Adelson Galleries
- Visit figure page
- Type: portfolio
- Portfolio Type: advertising
- Portfolio Role: design_layout
Andrew Stevovich Familiar Faces Exhibition Wordmark

- Wordmark for Andrew Stevovich: Familiar Faces exhibition
- Client: Adelson Galleries
- Visit figure page
- Type: portfolio
- Portfolio Type: advertising
- Portfolio Role: design_layout
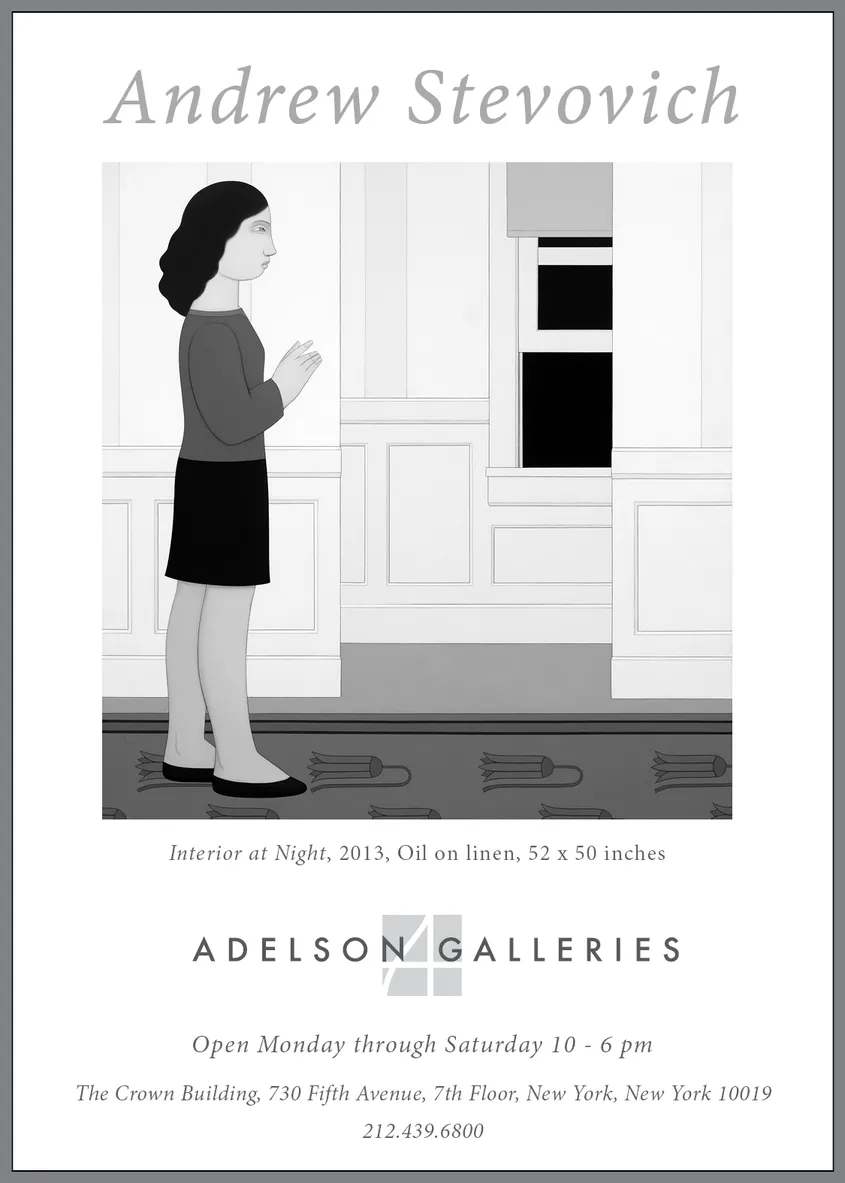
Andrew Stevovich Familiar Faces Gallery Guide Ad

- Familiar Faces Gallery Guide advertisement
- Client: Adelson Galleries
- Visit figure page
- Type: portfolio
- Portfolio Type: advertising
- Portfolio Role: design_layout
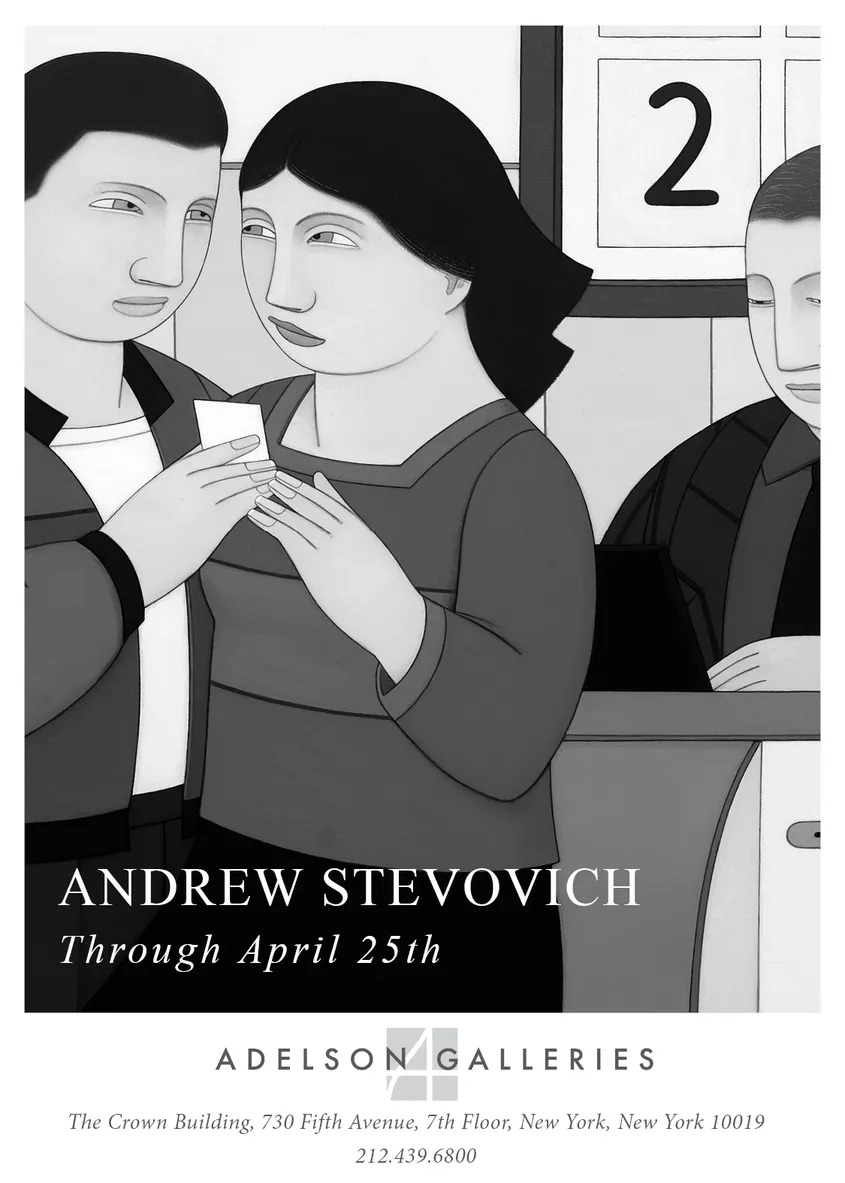
Andrew Stevovich Familiar Faces Nyt Ad 01
- Andrew Stevovich: Familiar Faces exhibition New York Times print advertisement #1
- Client: Adelson Galleries
- Visit figure page
- Type: portfolio
- Portfolio Type: advertising
- Portfolio Role: design_layout
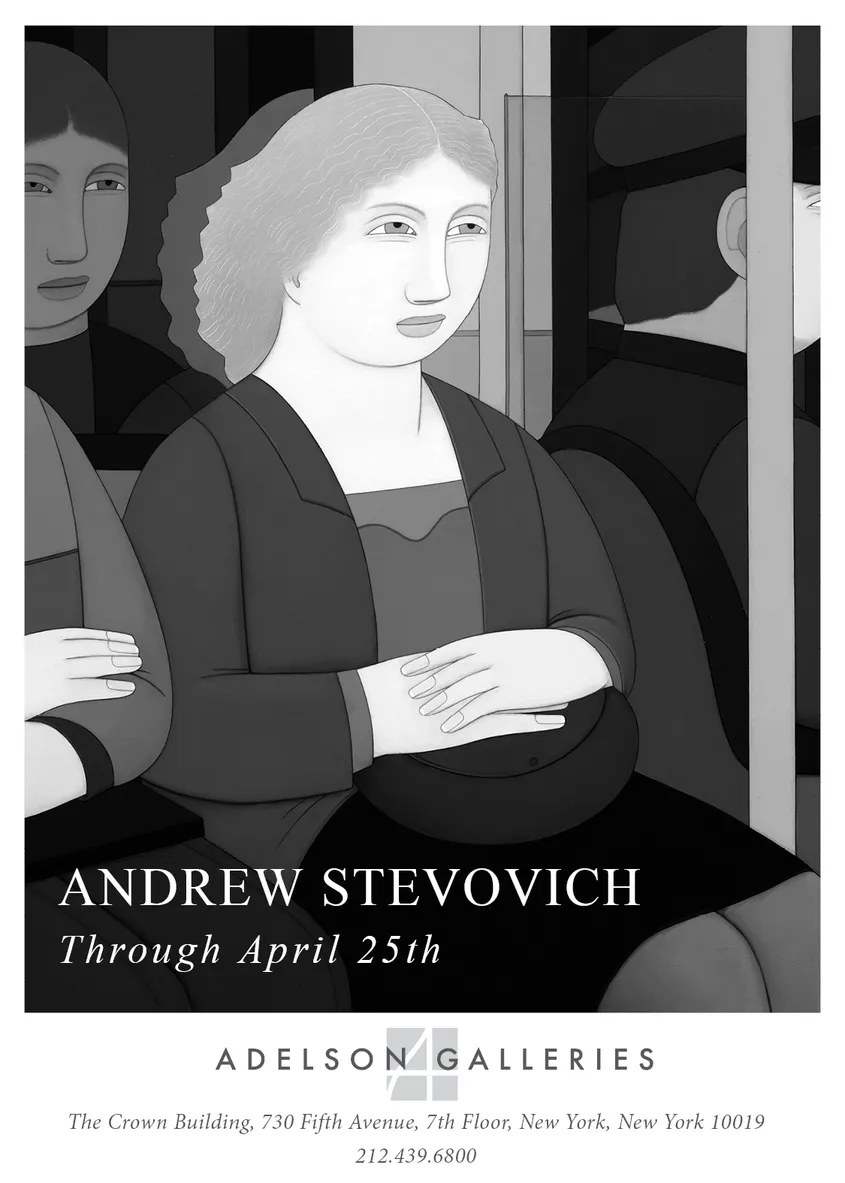
Andrew Stevovich Familiar Faces Nyt Ad 02
- Andrew Stevovich: Familiar Faces exhibition New York Times print advertisement #2
- Client: Adelson Galleries
- Visit figure page
- Type: portfolio
- Portfolio Type: advertising
- Portfolio Role: design_layout
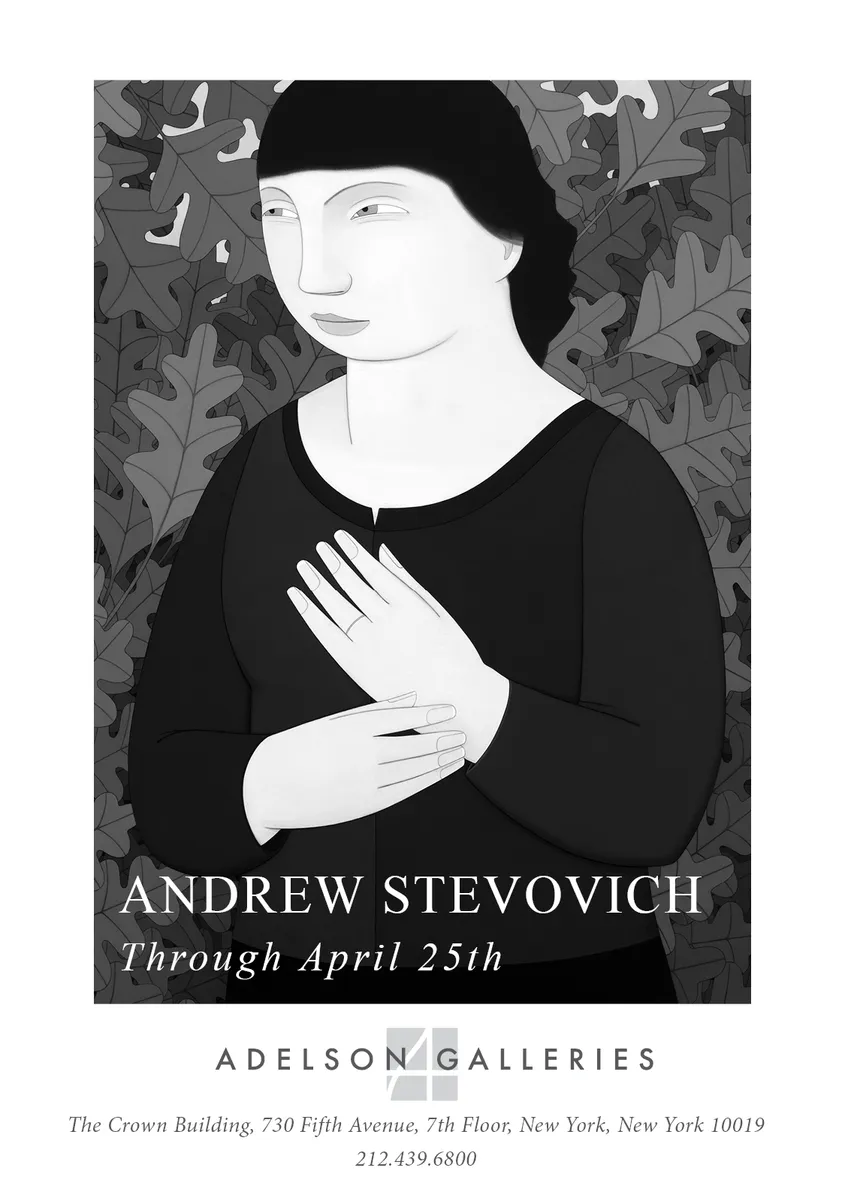
Andrew Stevovich Familiar Faces Nyt Ad 03
- Andrew Stevovich: Familiar Faces exhibition New York Times print advertisement #3
- Client: Adelson Galleries
- Visit figure page
- Type: portfolio
- Portfolio Type: advertising
- Portfolio Role: design_layout
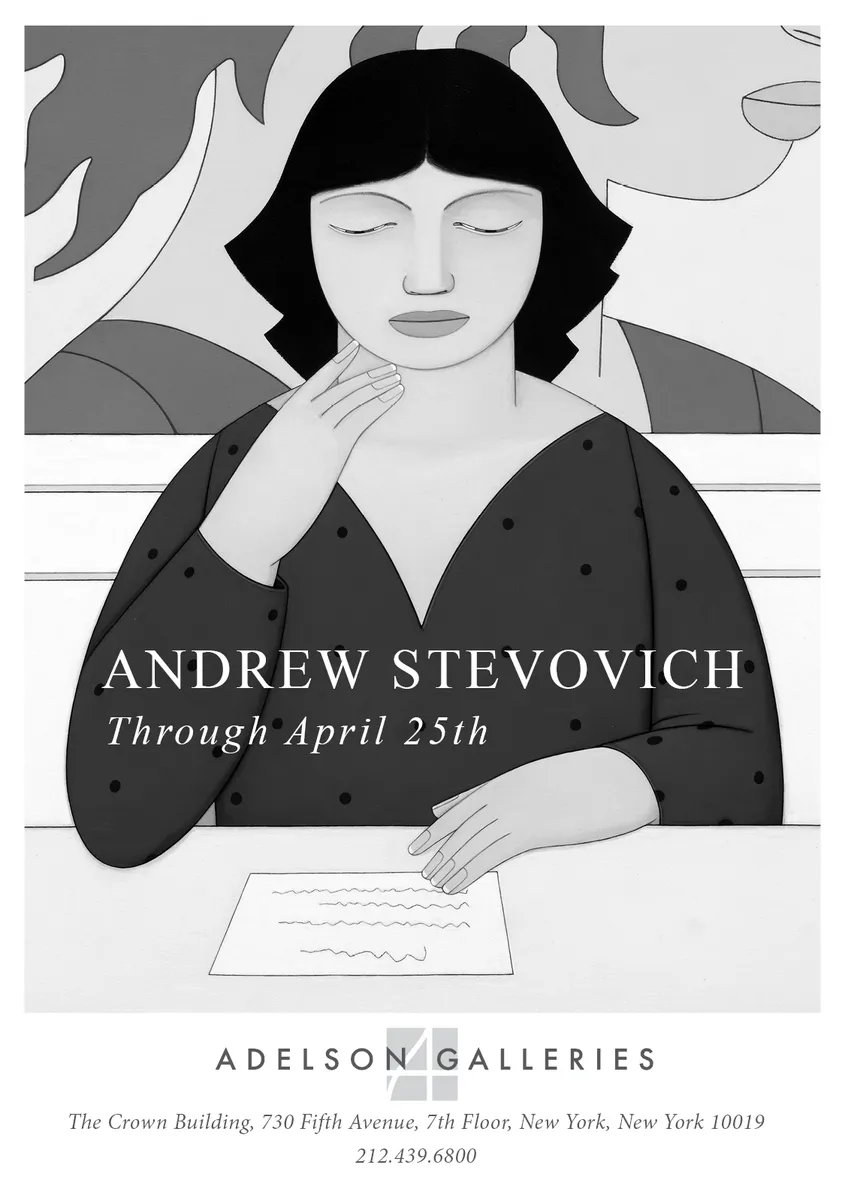
Andrew Stevovich Familiar Faces Nyt Ad 04
- Andrew Stevovich: Familiar Faces exhibition New York Times print advertisement #4
- Client: Adelson Galleries
- Visit figure page
- Type: portfolio
- Portfolio Type: advertising
- Portfolio Role: design_layout
Andrew Stevovich Familiar Faces Nyt Ad 05
- Andrew Stevovich: Familiar Faces exhibition New York Times print advertisement #5
- Client: Adelson Galleries
- Visit figure page
- Type: portfolio
- Portfolio Type: advertising
- Portfolio Role: design_layout
Andrew Stevovich Web About Page
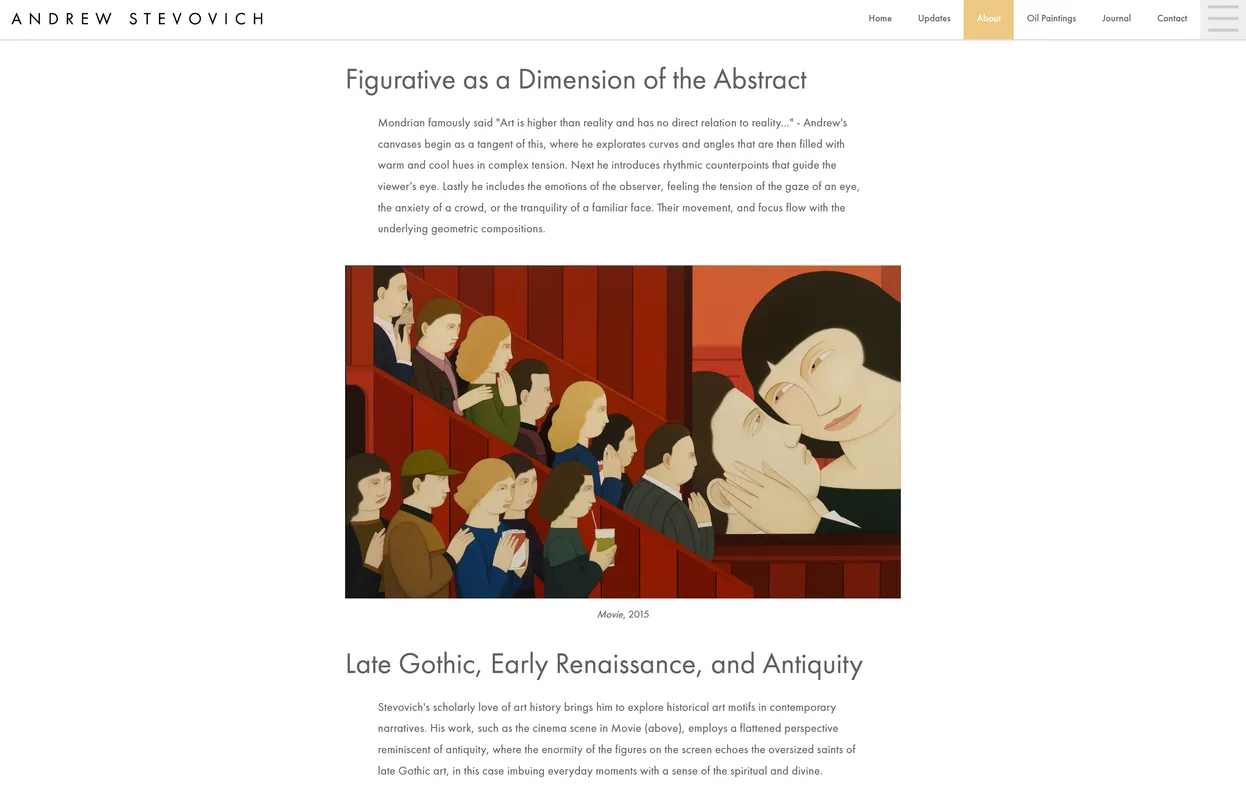
- Andrew Stevovich Website — About Page
- Client: Andrew Stevovich
- Visit figure page
- Type: portfolio
- Portfolio Type: advertising
- Portfolio Role: design_layout
Andrew Stevovich Web Artwork Page
- Andrew Stevovich Website — Artwork Page
- Client: Andrew Stevovich
- Visit figure page
- Type: portfolio
- Portfolio Type: advertising
- Portfolio Role: design_layout
Andrew Stevovich Web Artwork Page Related Drawings
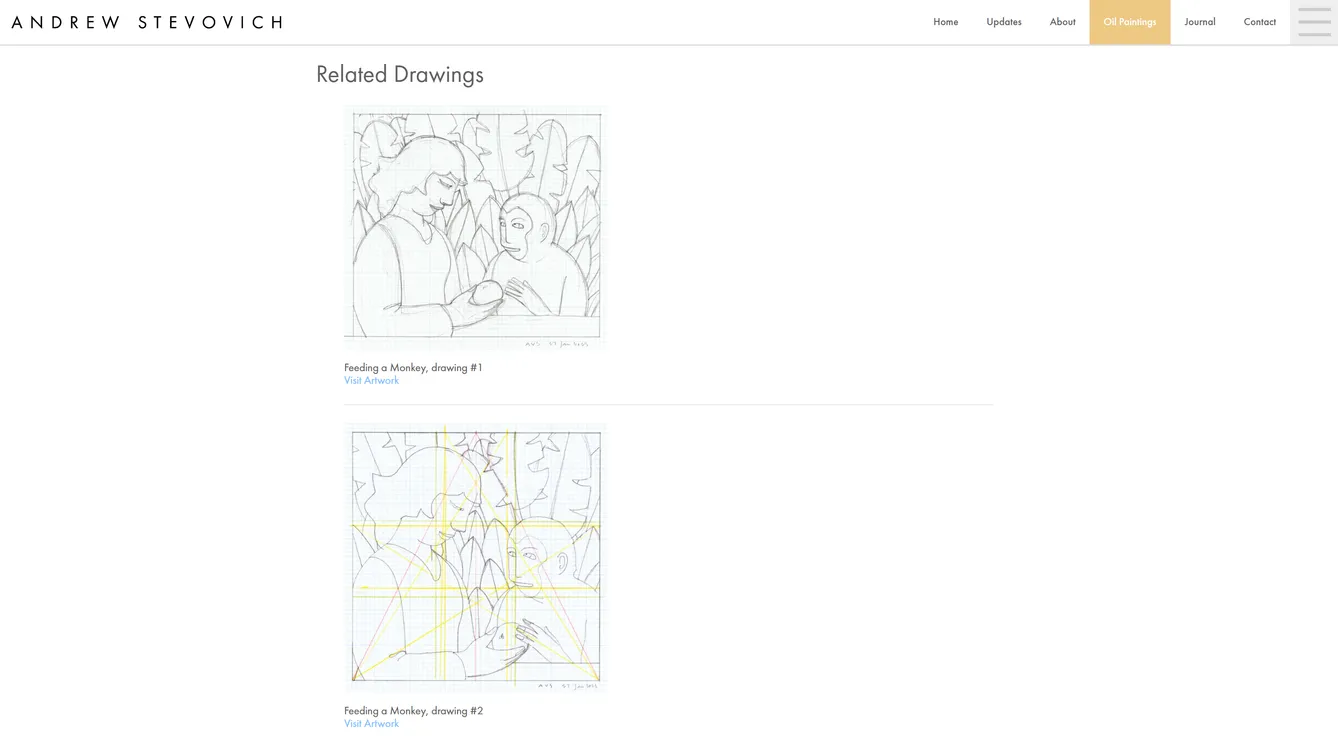
- Andrew Stevovich Website — Artwork Page (Releated Drawings)
- Client: Andrew Stevovich
- Visit figure page
- Type: portfolio
- Portfolio Type: advertising
- Portfolio Role: design_layout
Andrew Stevovich Web Blog Entry Page
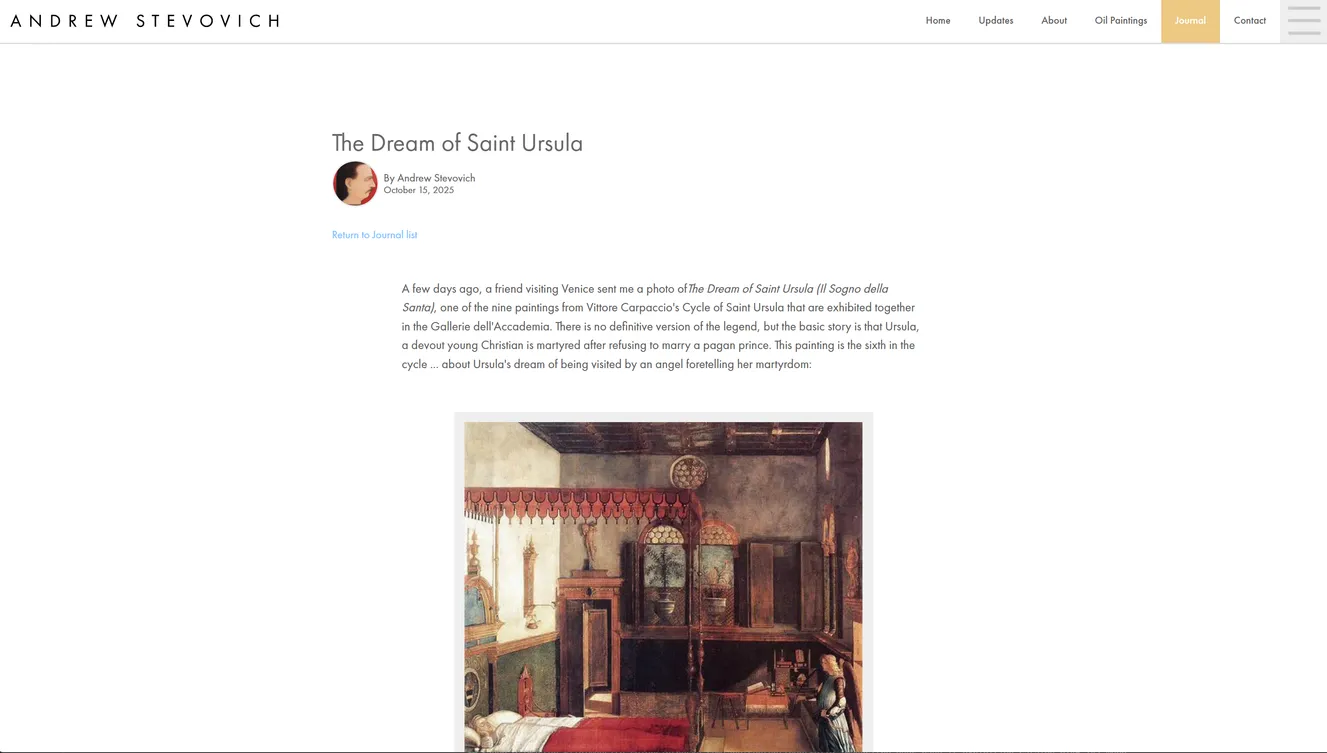
- Andrew Stevovich Website — Blog Entry Page
- Client: Andrew Stevovich
- Visit figure page
- Type: portfolio
- Portfolio Type: advertising
- Portfolio Role: design_layout
Andrew Stevovich Web Home Page
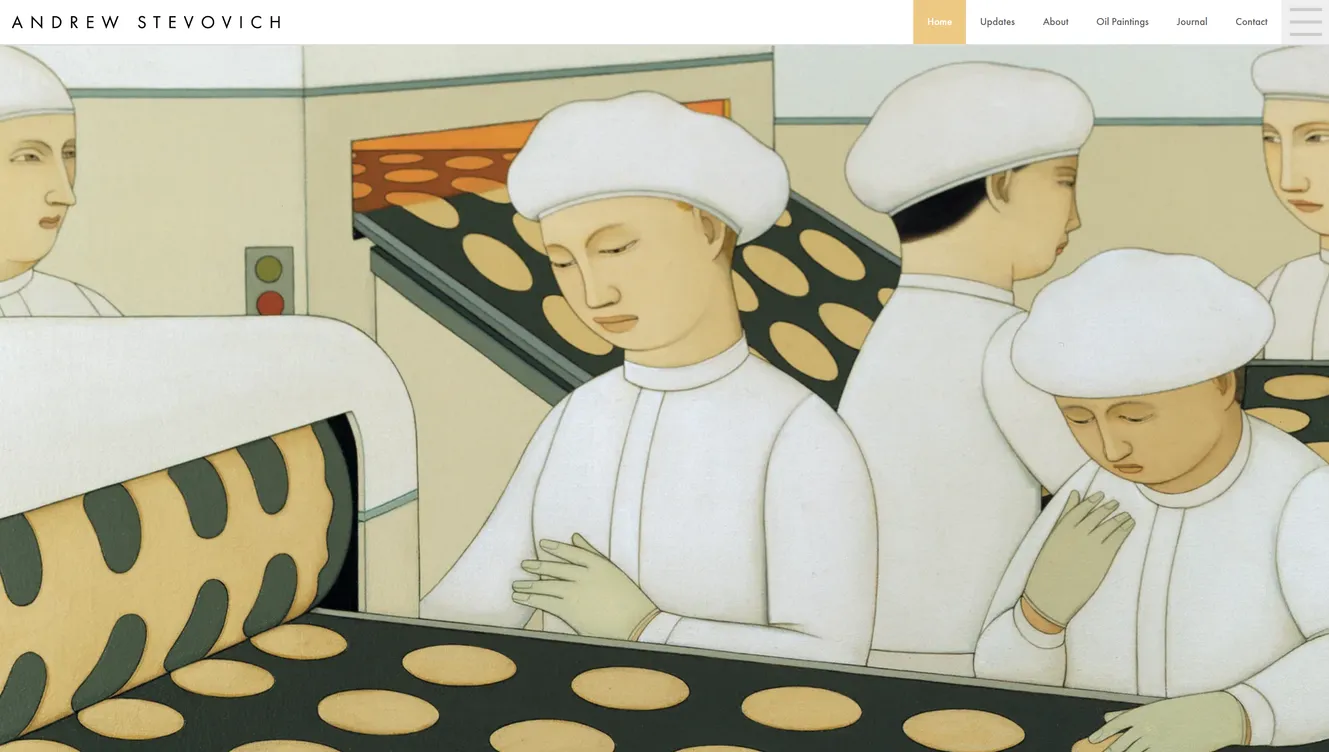
- Andrew Stevovich Website — Home Page
- Client: Andrew Stevovich
- Visit figure page
- Type: portfolio
- Portfolio Type: advertising
- Portfolio Role: design_layout
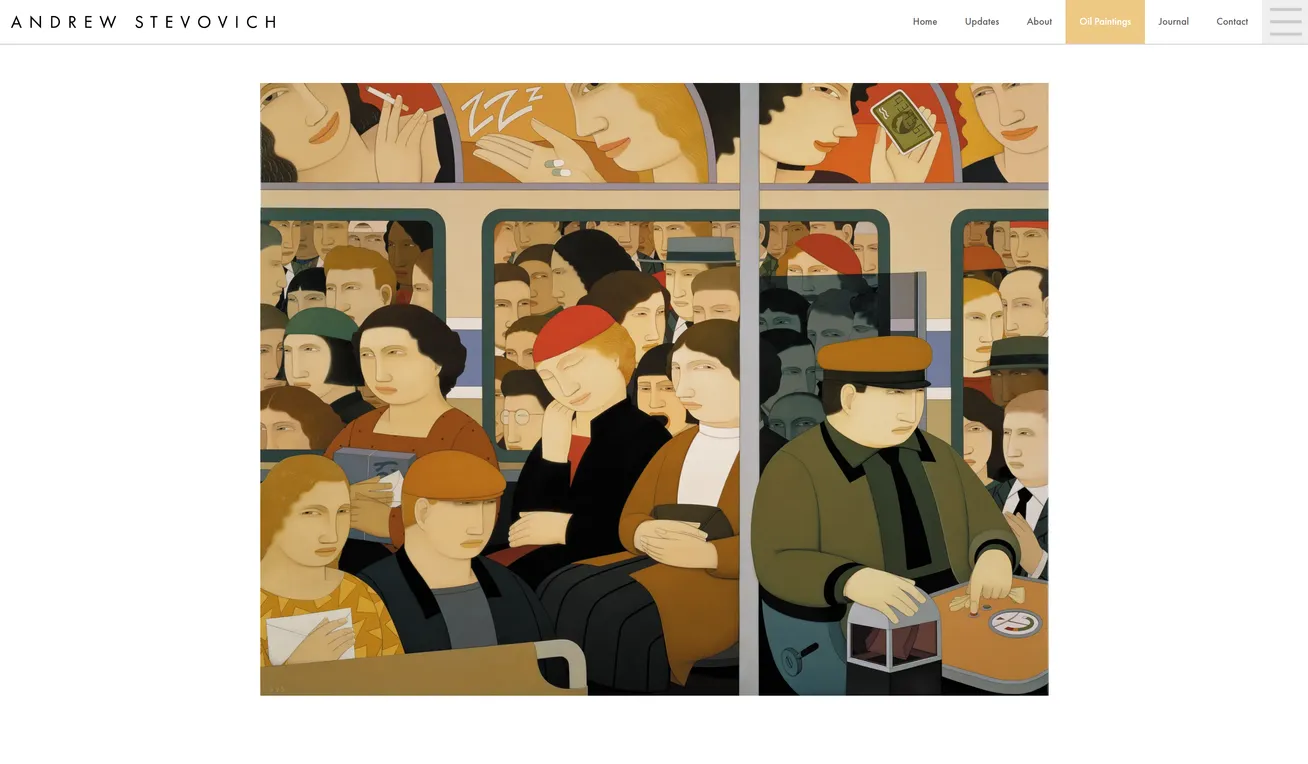
Andrew Stevovich Web Oil Paintings Page Scroll 1990
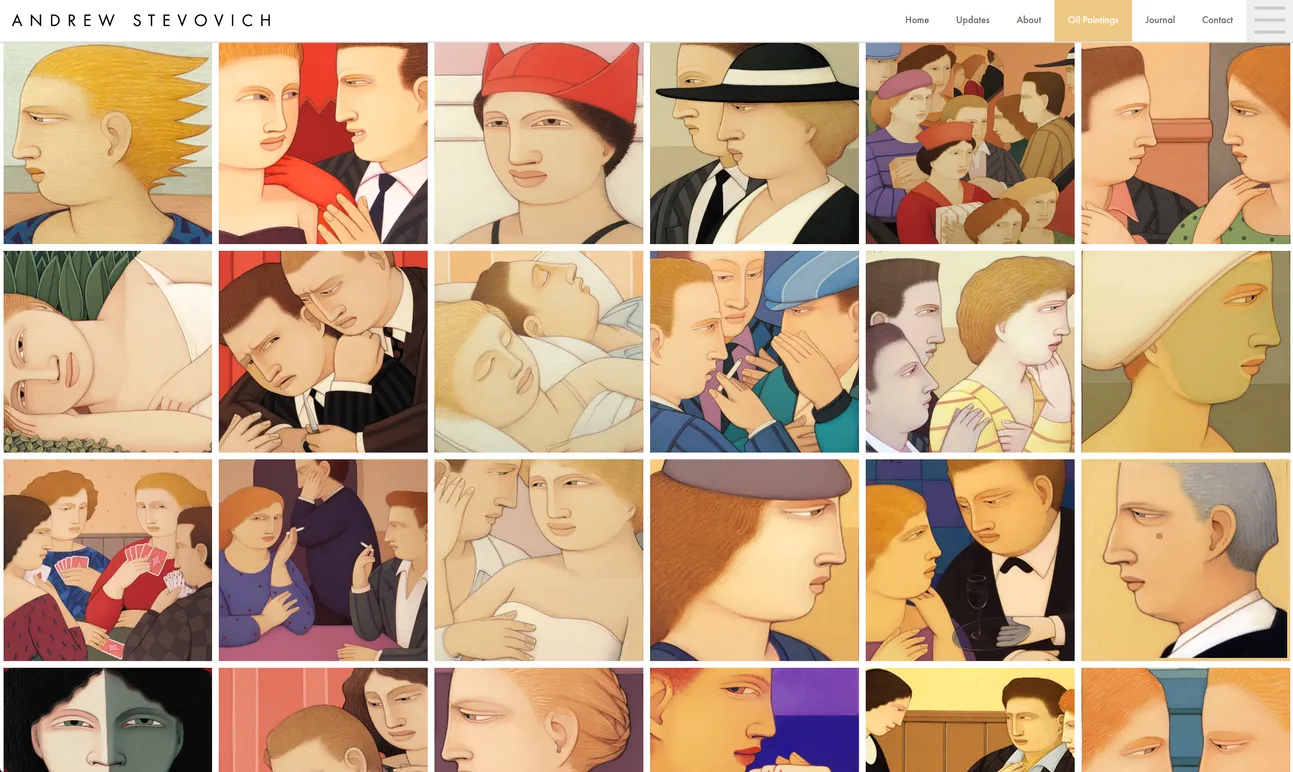
- Andrew Stevovich Website — Oil Paintings Page
- Client: Andrew Stevovich
- Visit figure page
- Type: portfolio
- Portfolio Type: advertising
- Portfolio Role: design_layout
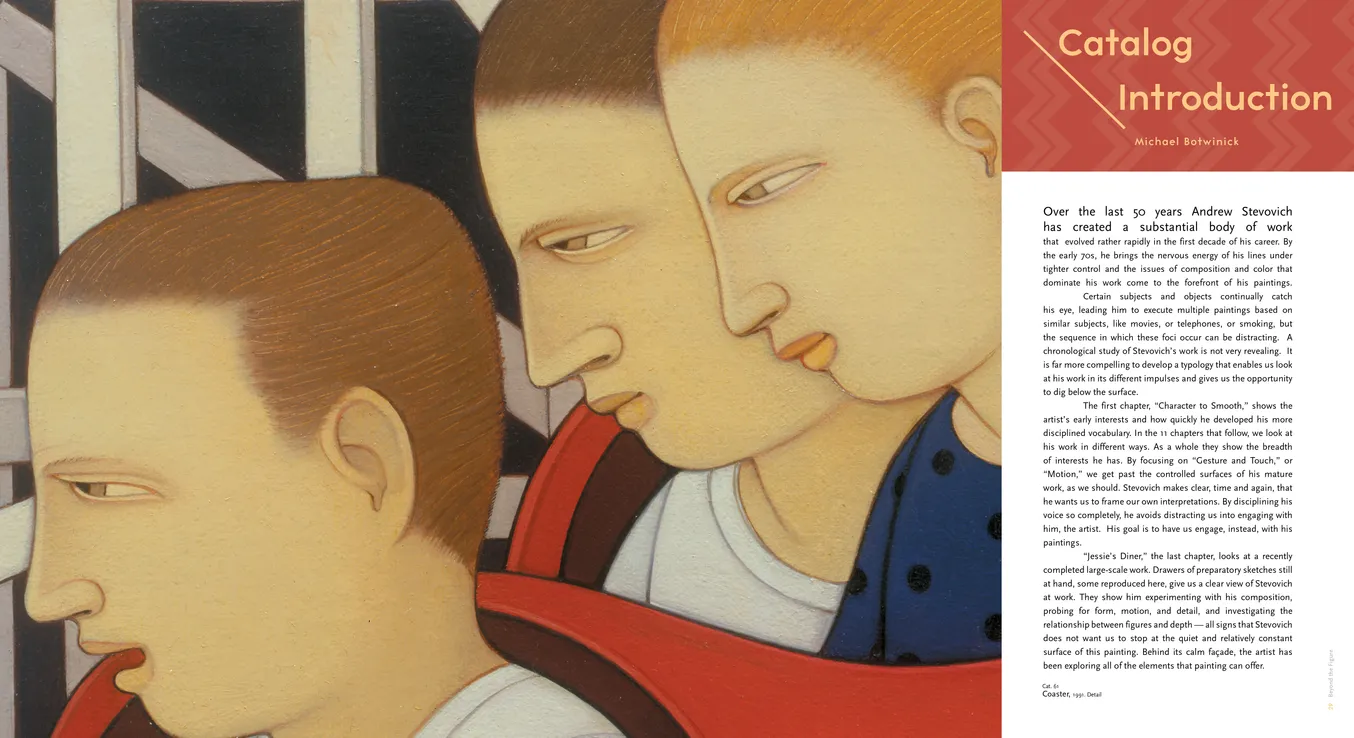
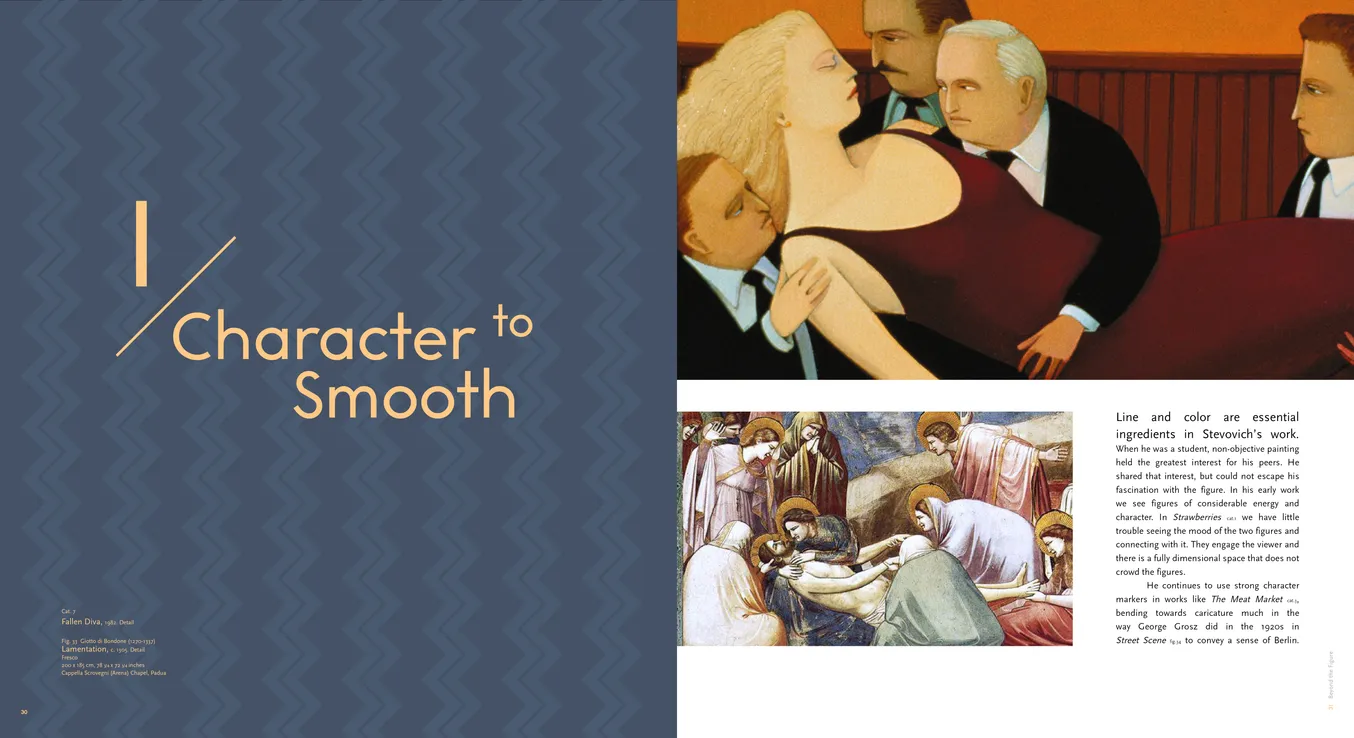
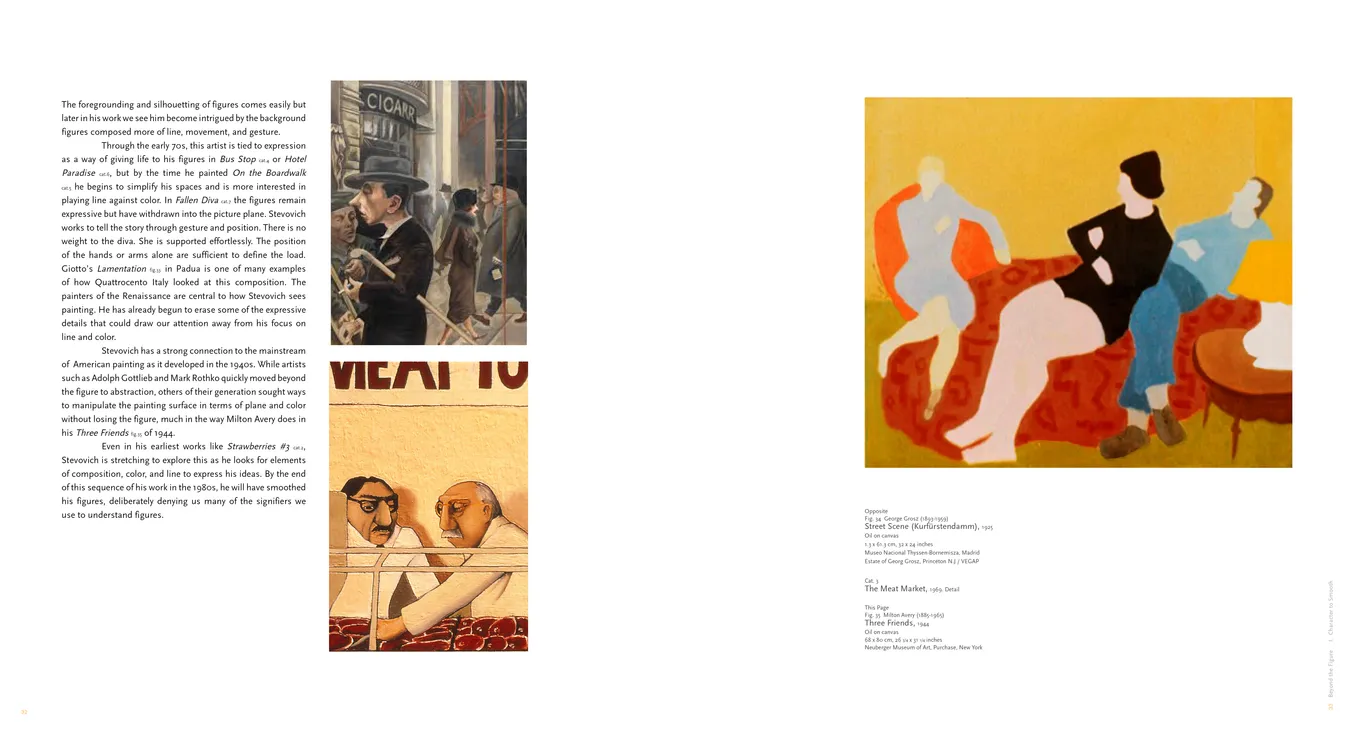
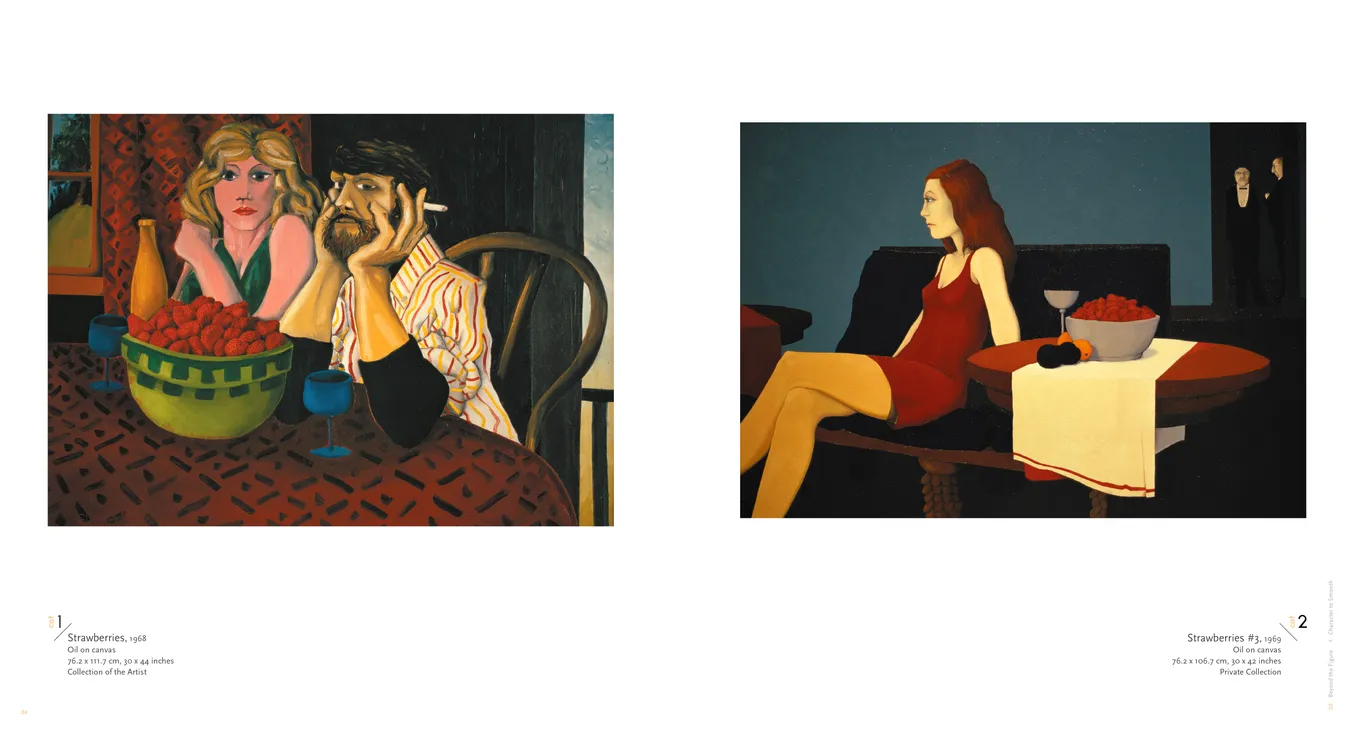
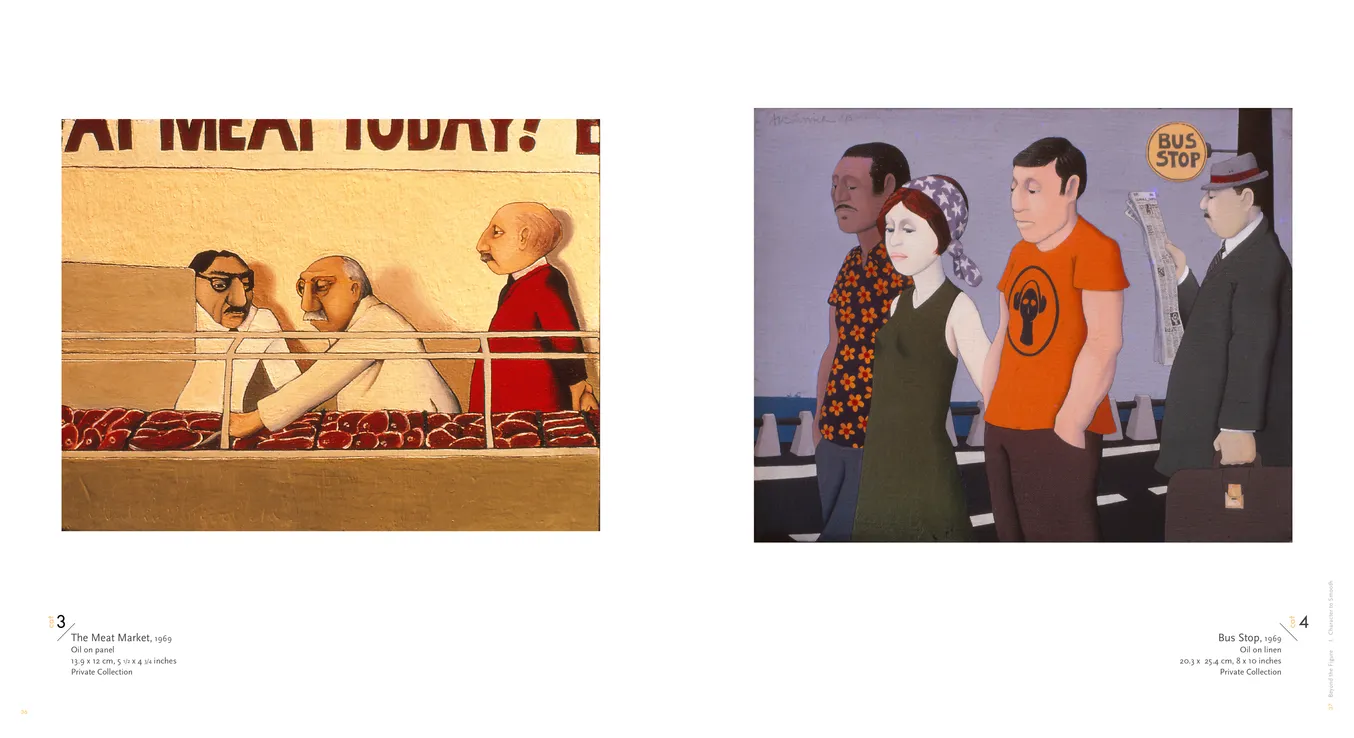
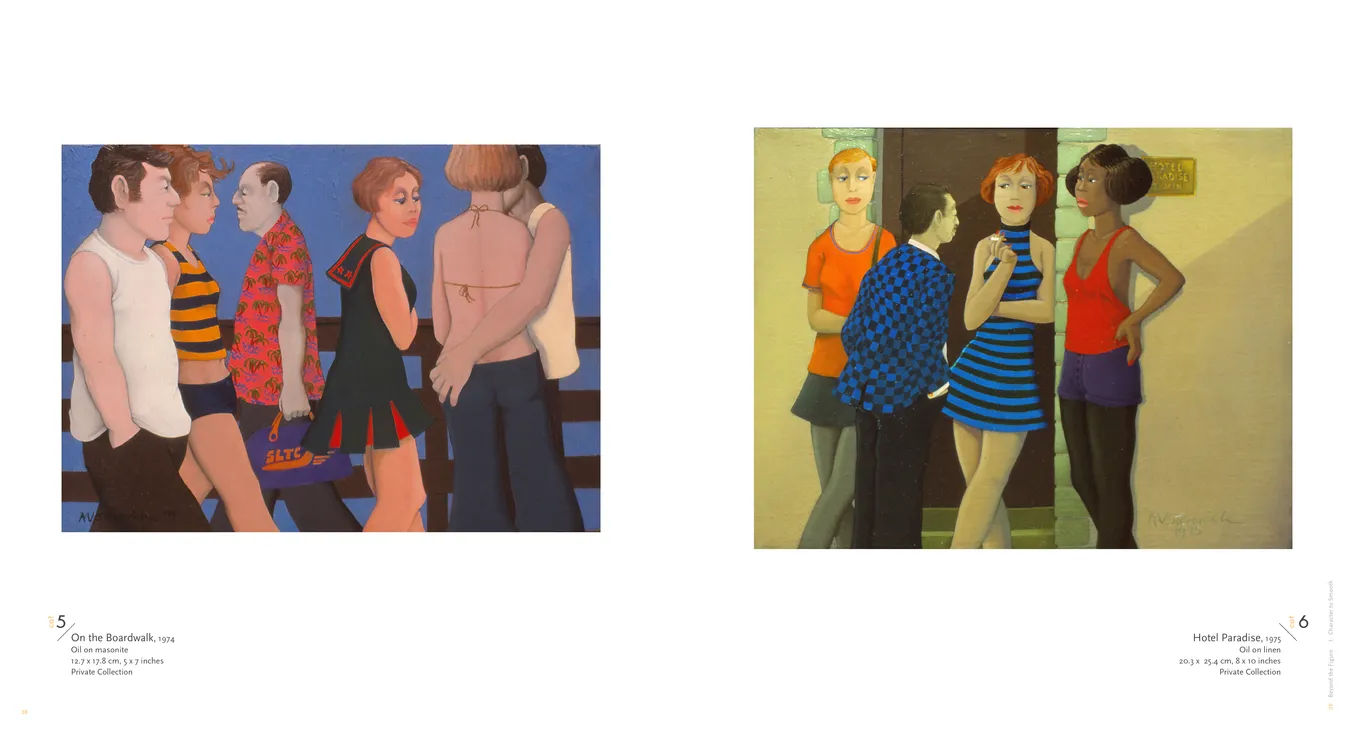
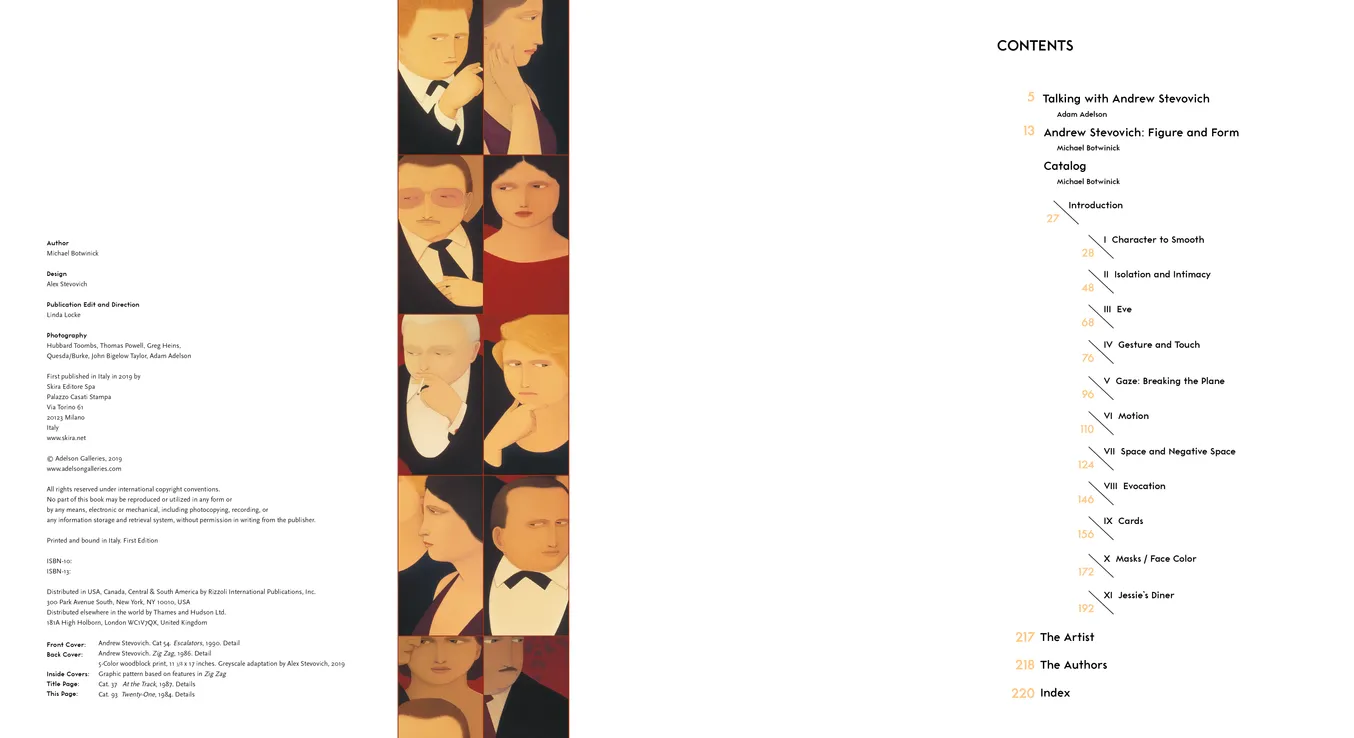
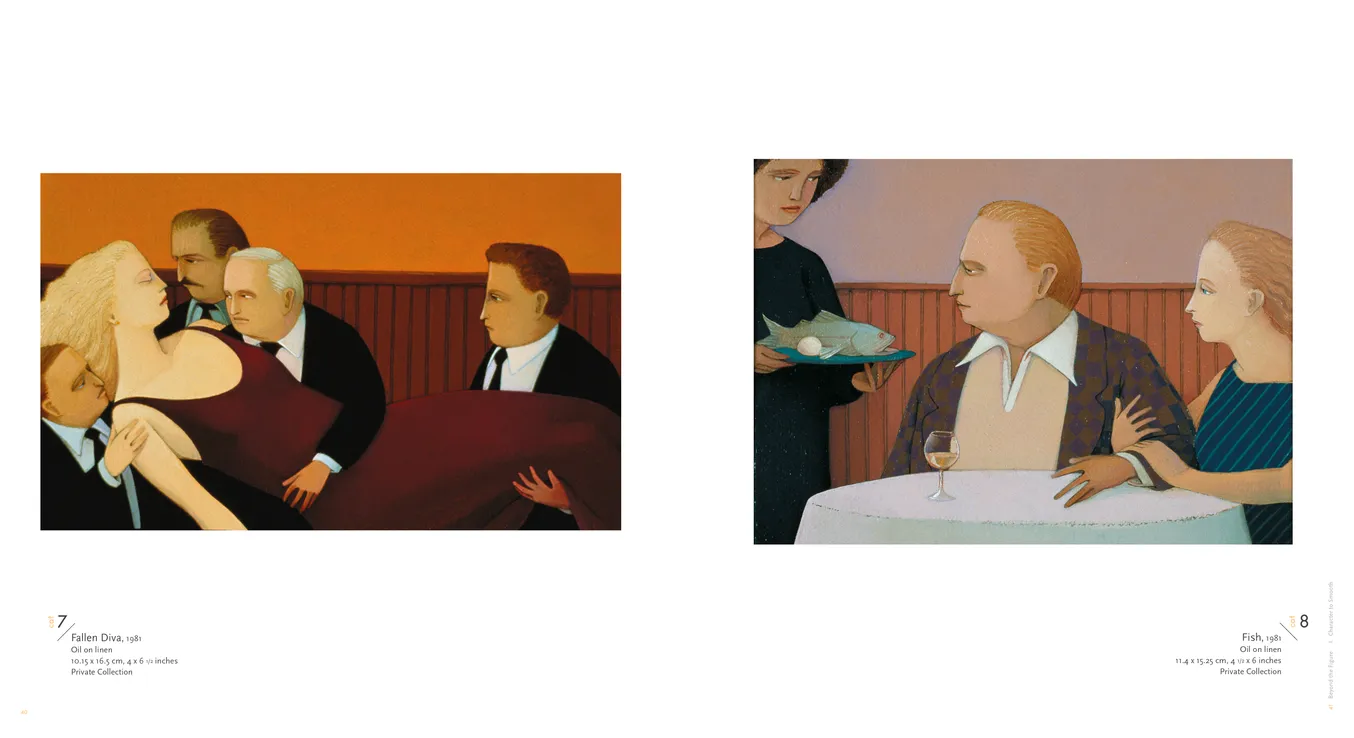
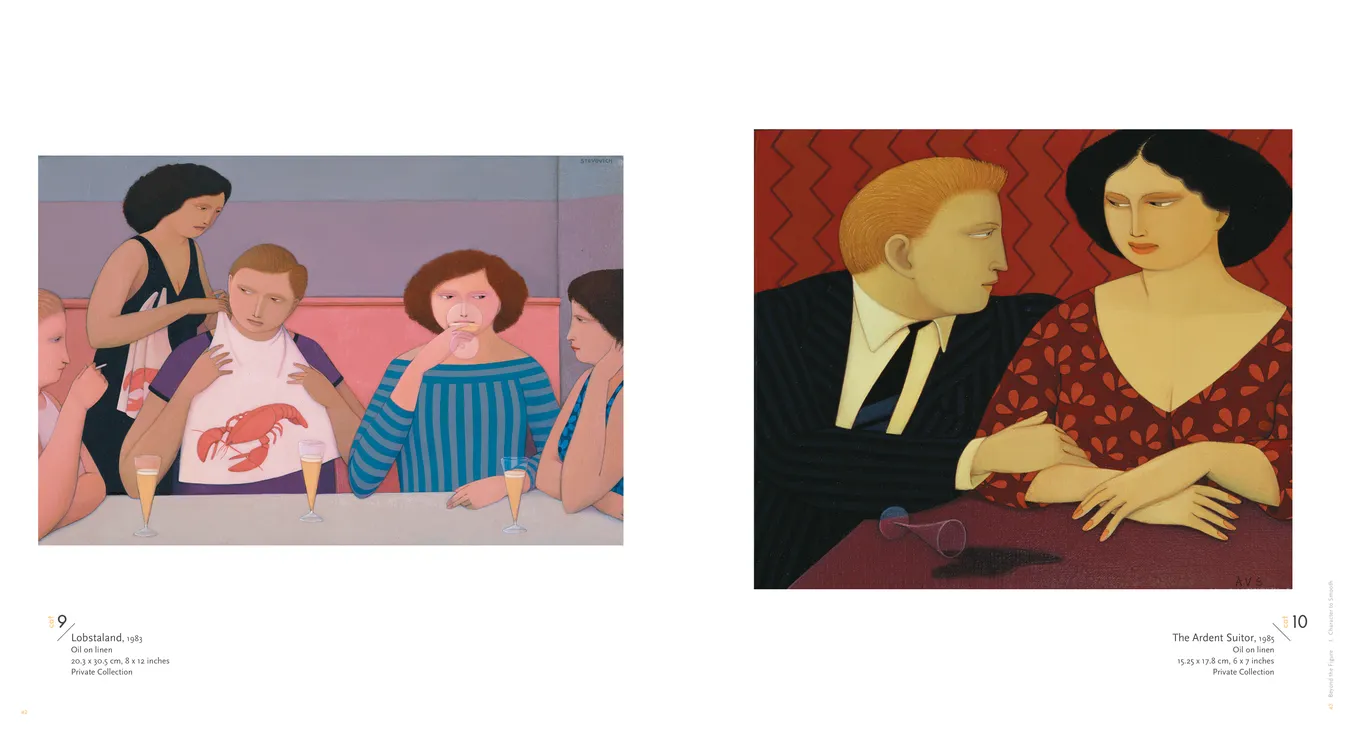
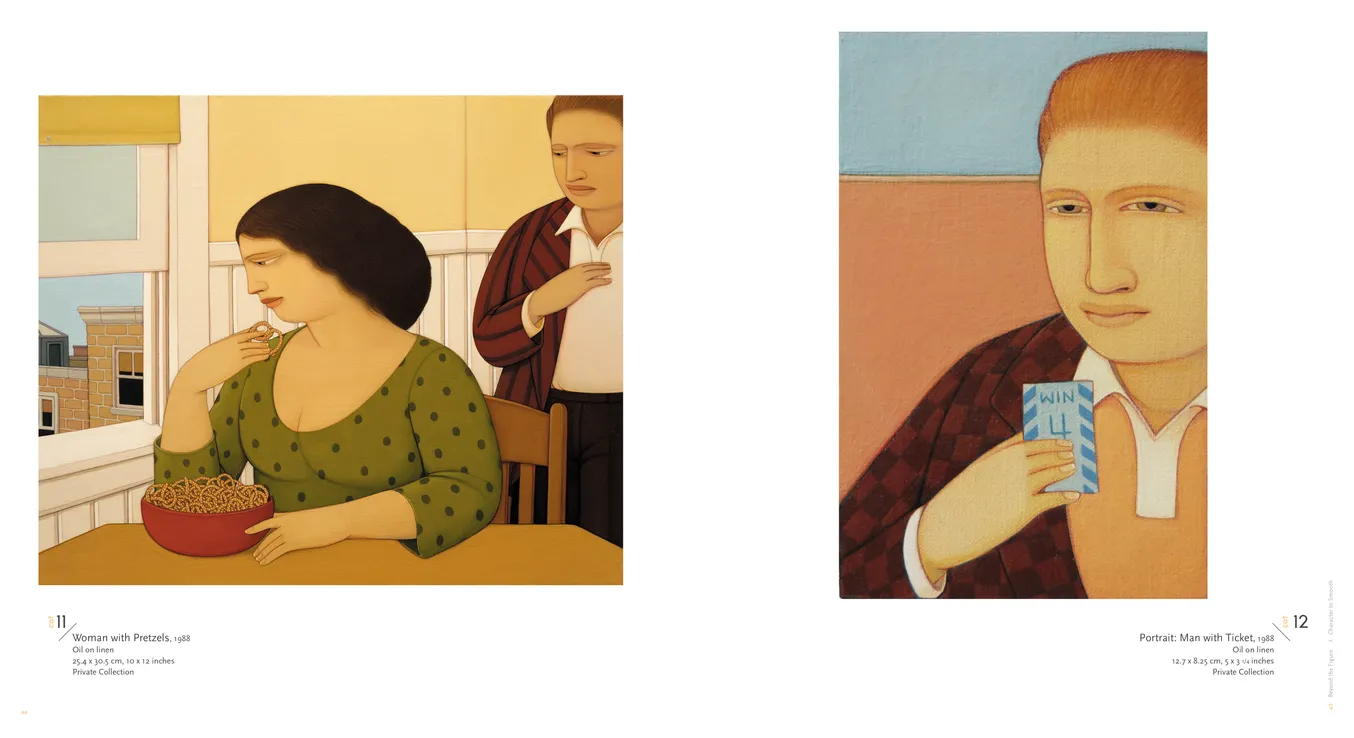
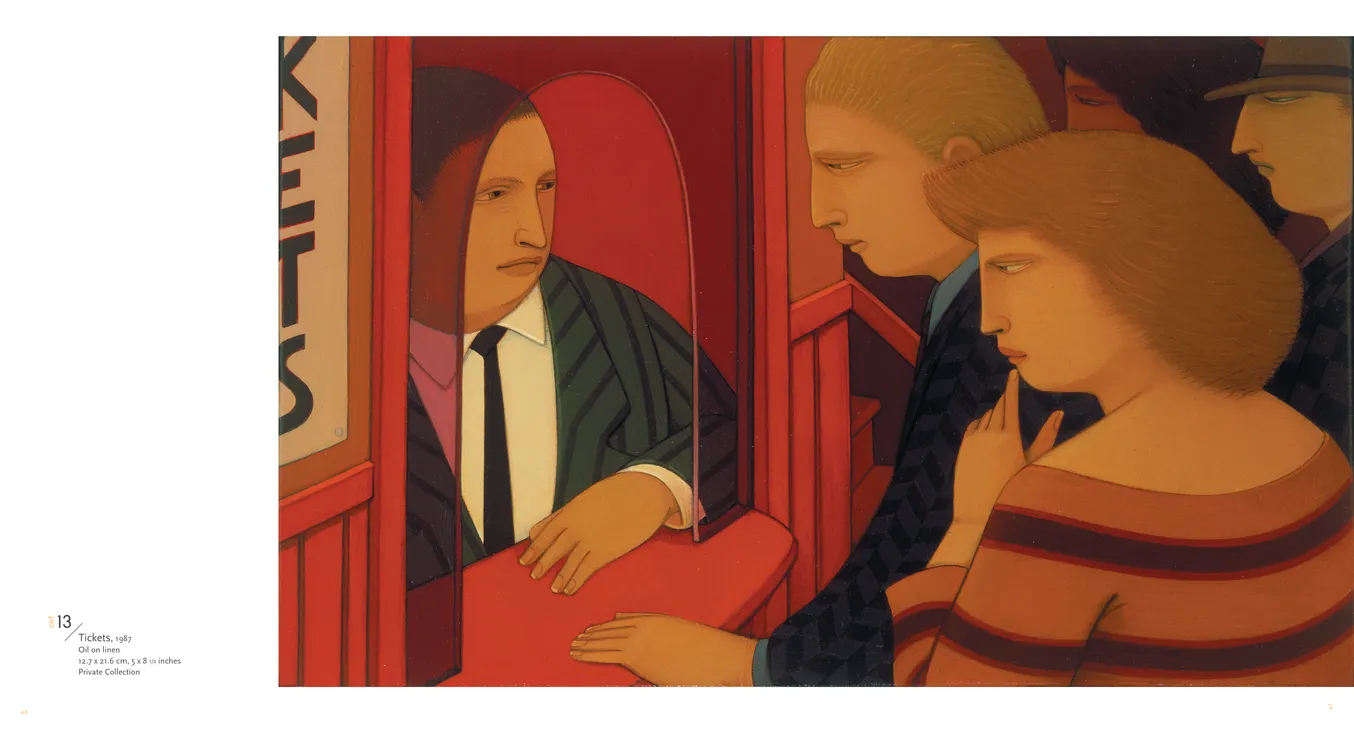
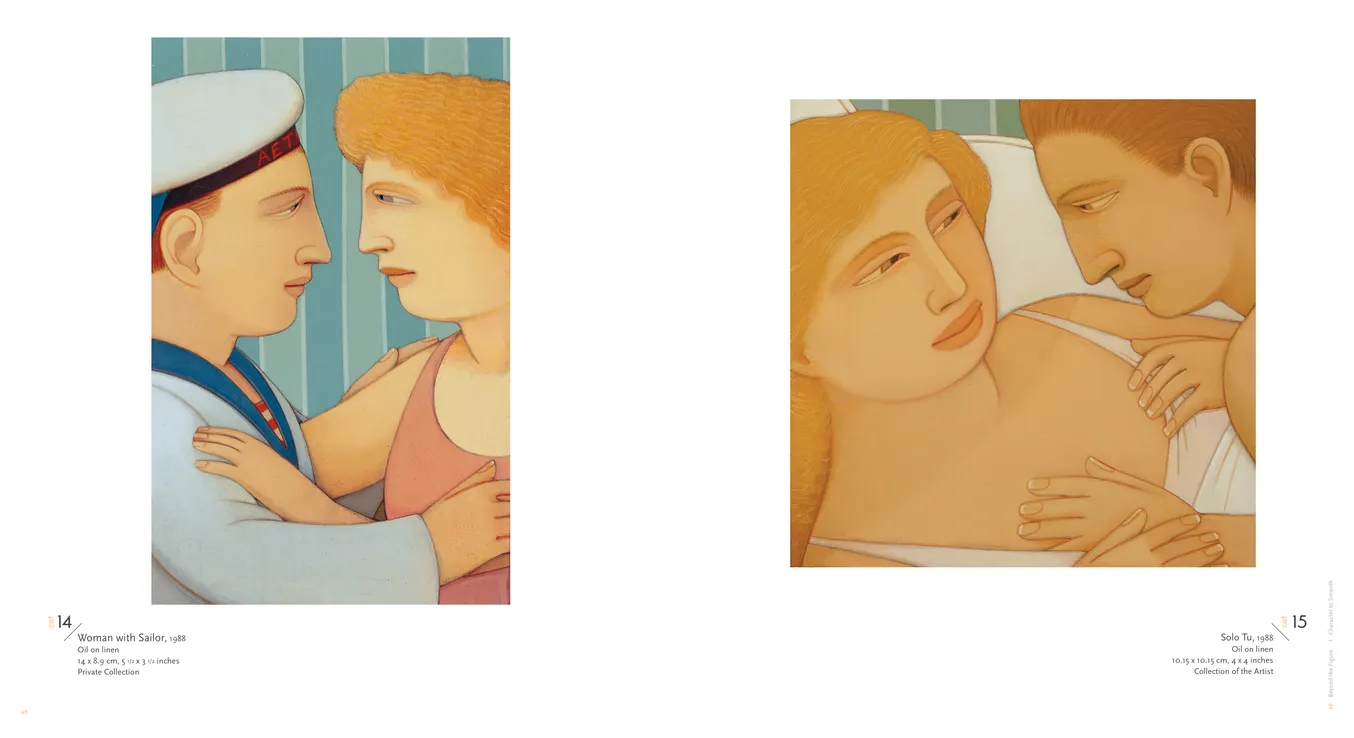
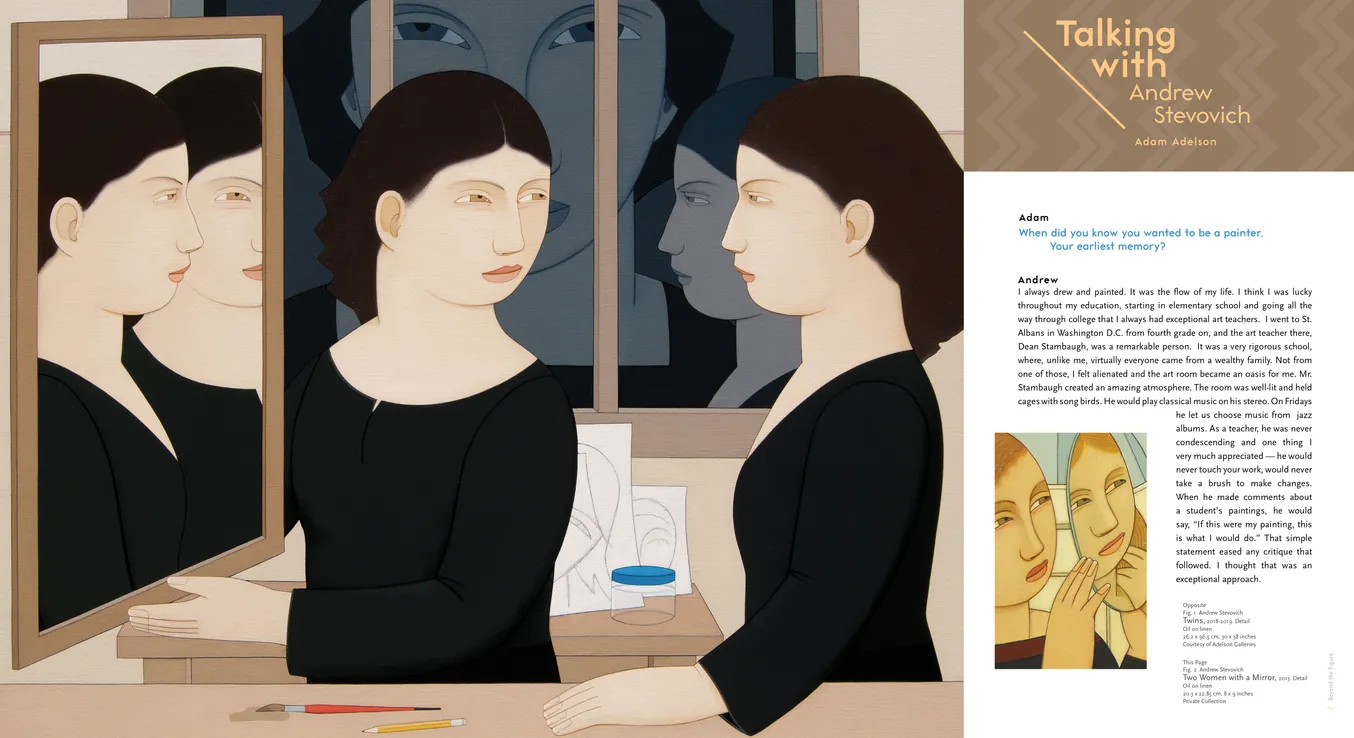
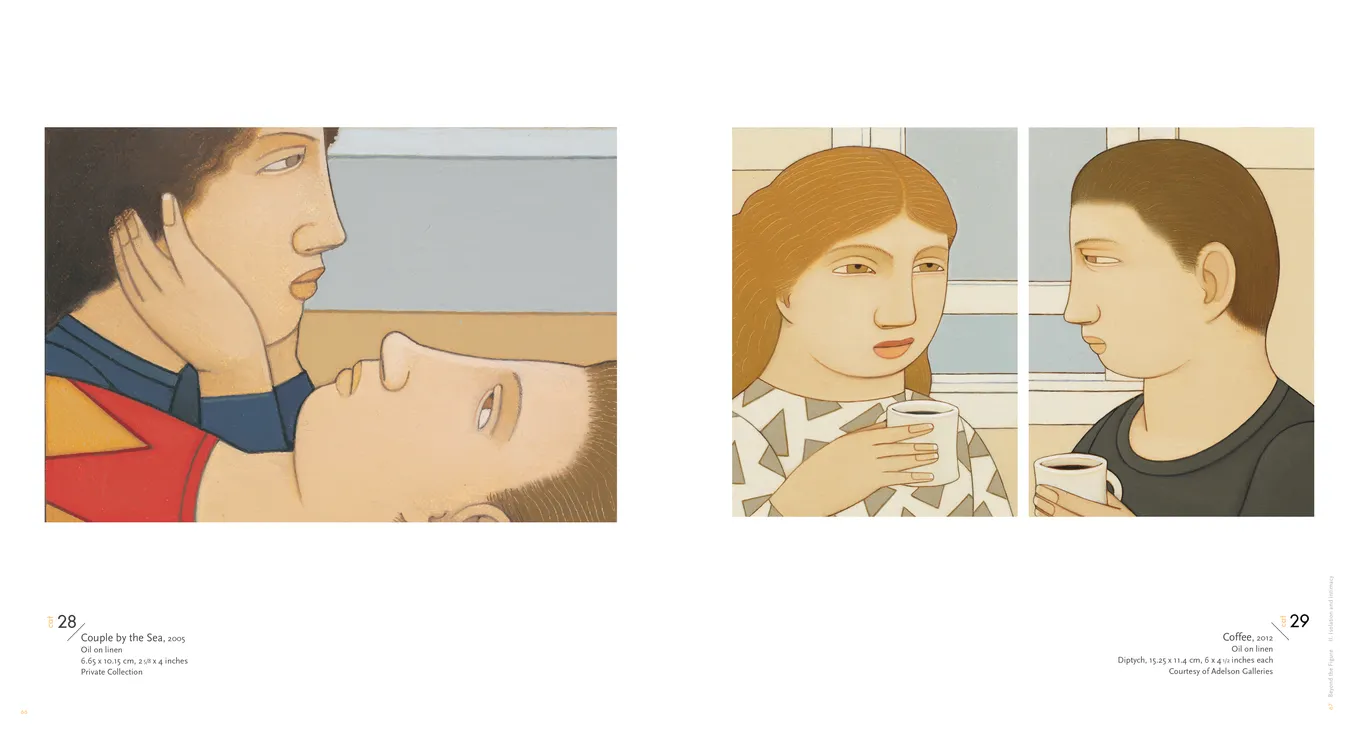
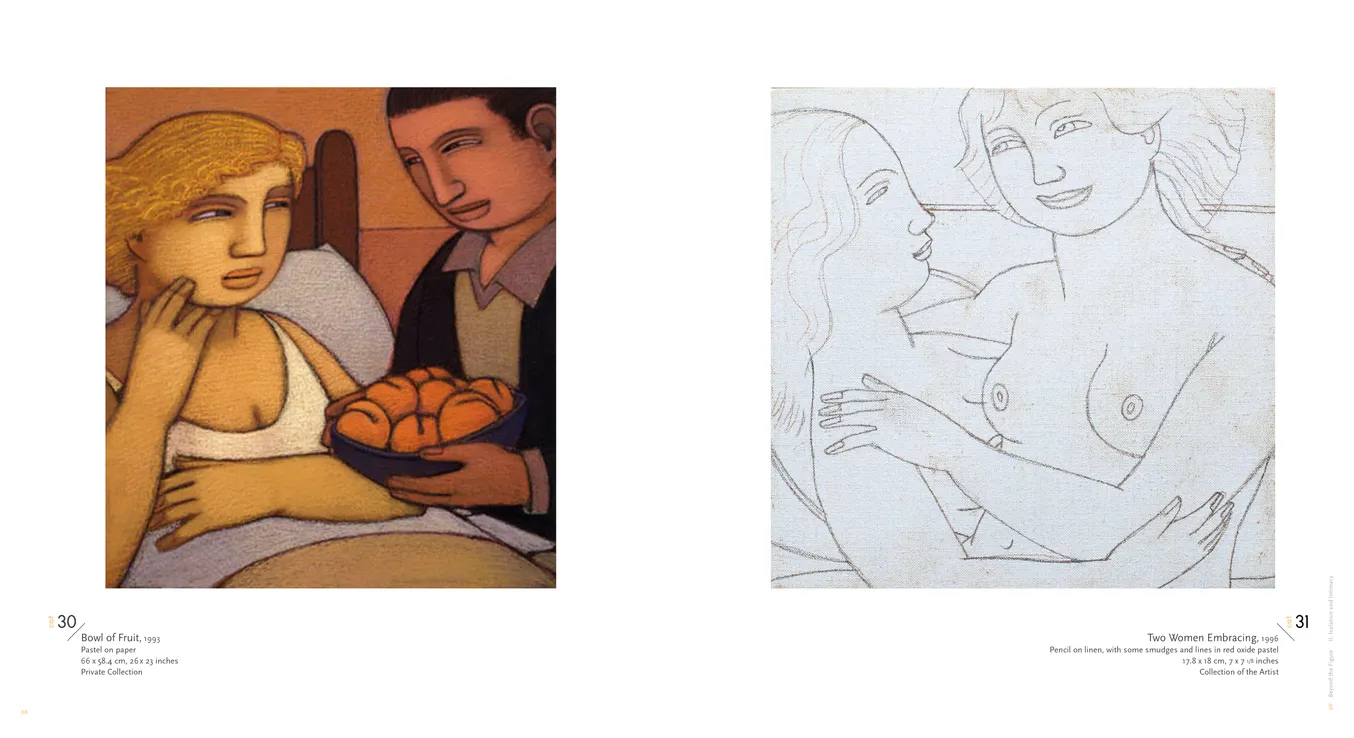
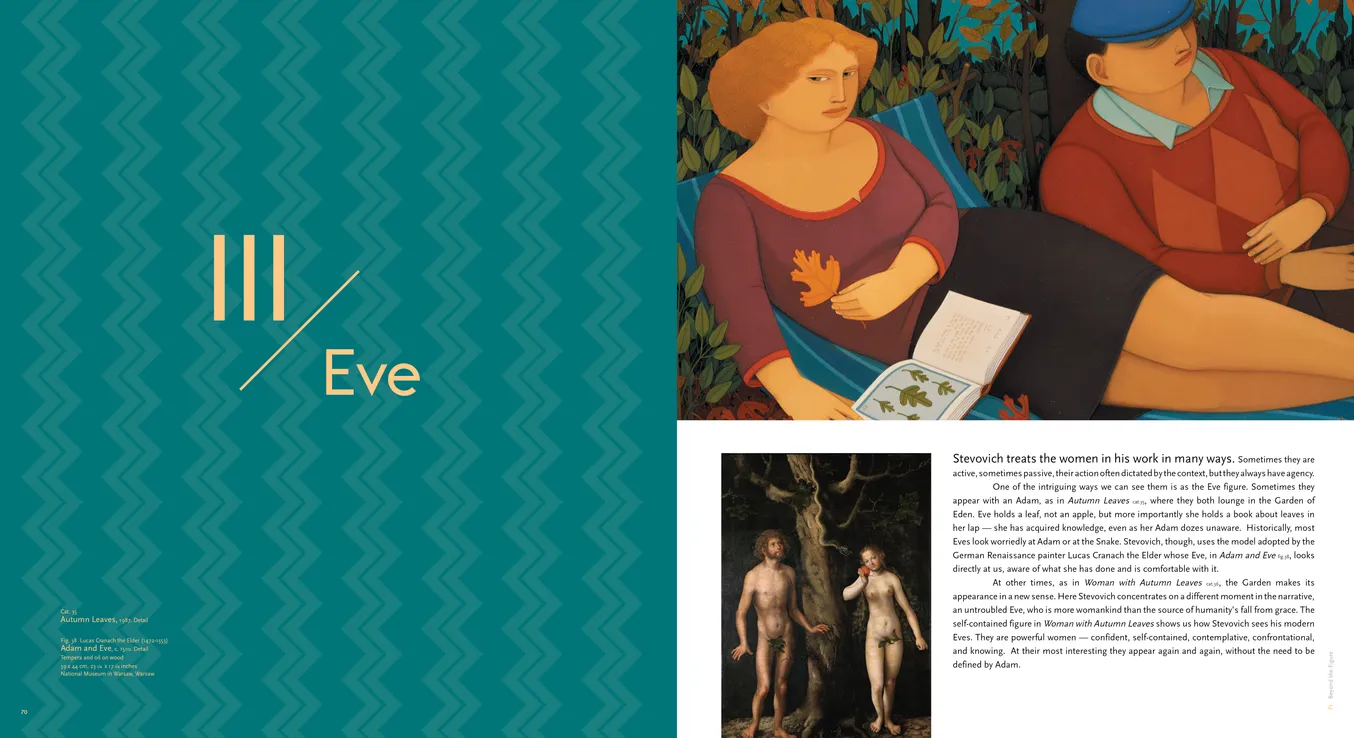
Andrew Stevovich: Beyond The Figure — Cover
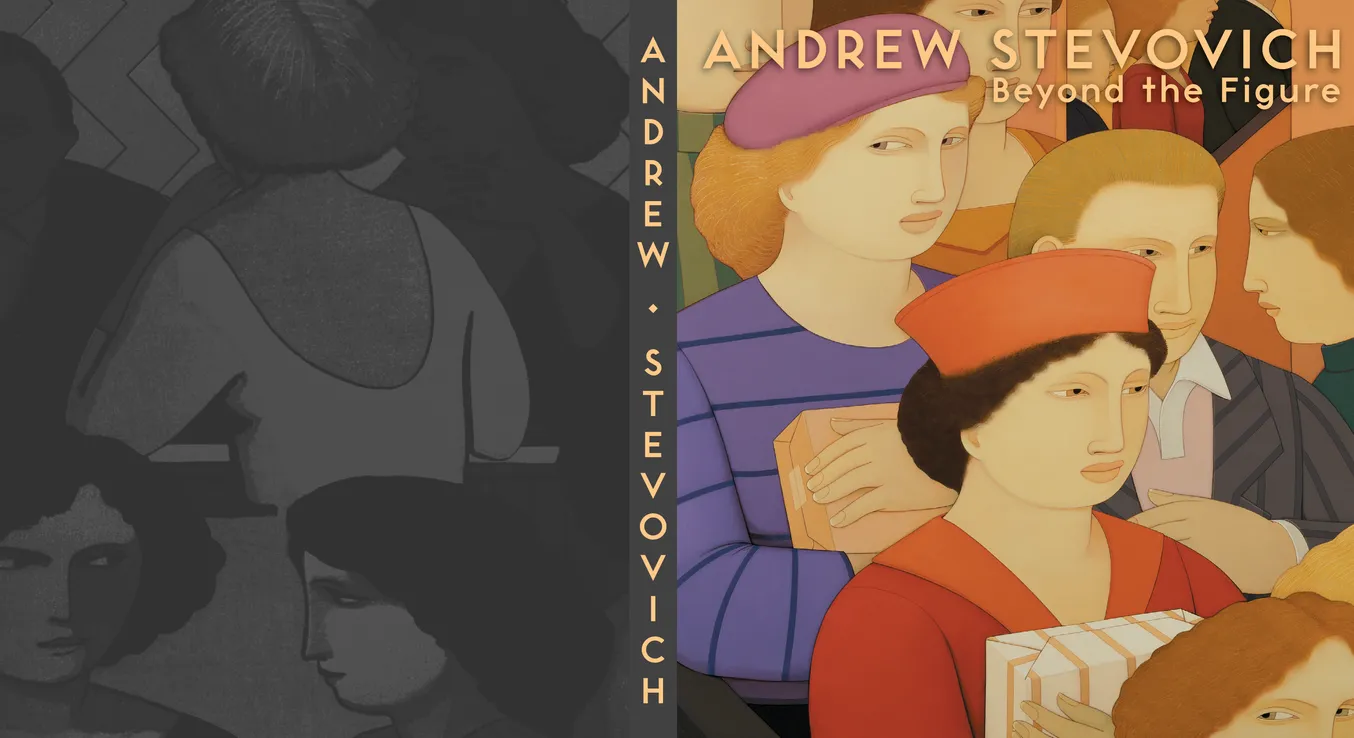
- Andrew Stevovich: Beyond the Figure book, cover
- Client: Adelson Galleries
- Visit figure page
- Type: portfolio
- Portfolio Type: publication_design
- Portfolio Role: design_layout
Andrew Stevovich: Beyond The Figure — Inside Front Cover

- Andrew Stevovich: Beyond the Figure book, inside front cover
- Client: Adelson Galleries
- Visit figure page
- Type: portfolio
- Portfolio Type: publication_design
- Portfolio Role: design_layout
Andrew Stevovich: Beyond The Figure — Pages 10–11
- Andrew Stevovich: Beyond the Figure book, pages 10-11
- Client: Adelson Galleries
- Visit figure page
- Type: portfolio
- Portfolio Type: publication_design
- Portfolio Role: design_layout
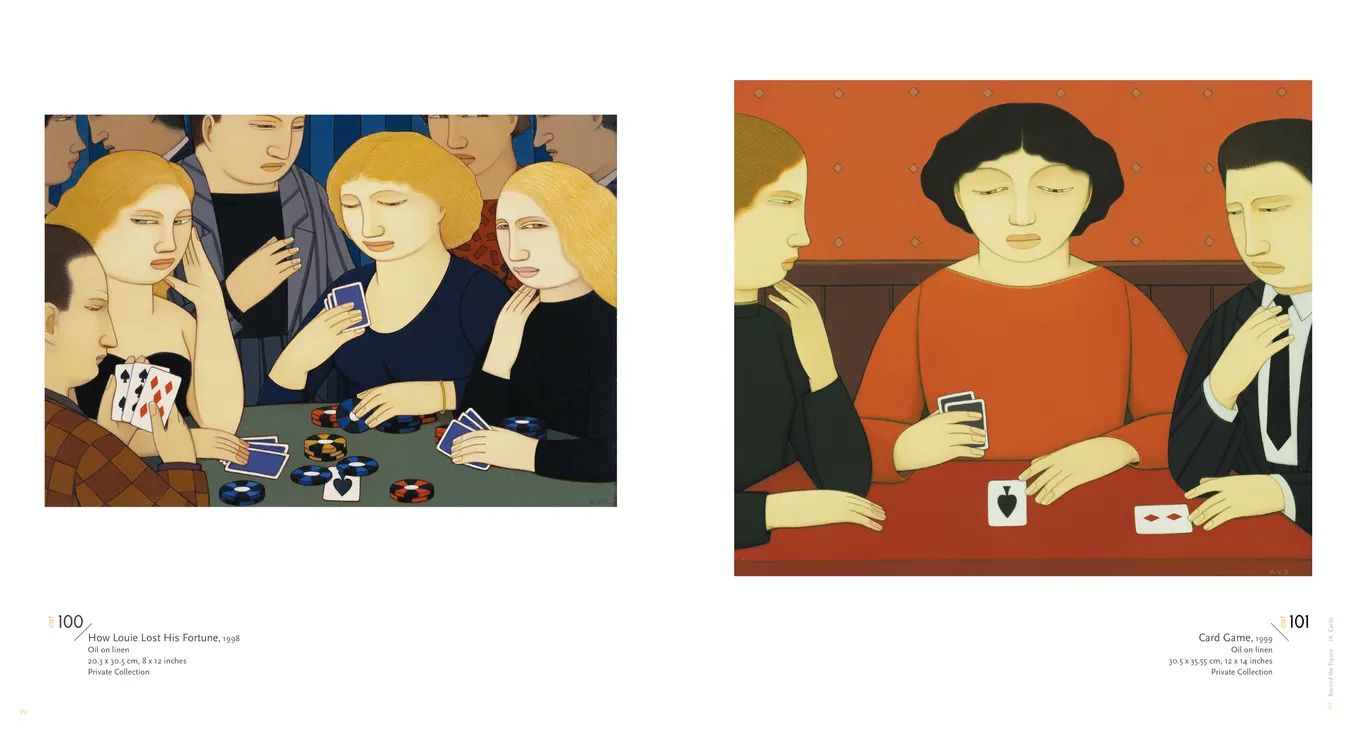
Andrew Stevovich: Beyond The Figure — Pages 100–101
- Andrew Stevovich: Beyond the Figure book, pages 100-101
- Client: Adelson Galleries
- Visit figure page
- Type: portfolio
- Portfolio Type: publication_design
- Portfolio Role: design_layout
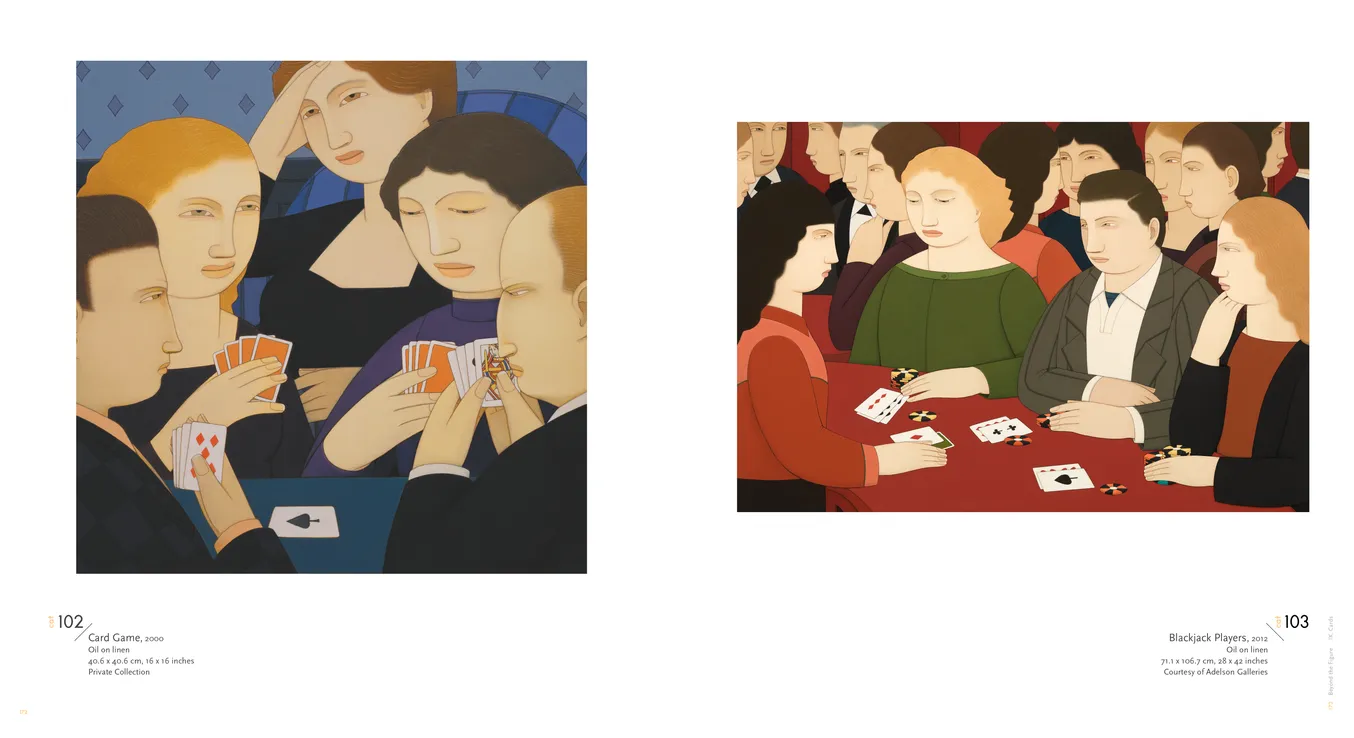
Andrew Stevovich: Beyond The Figure — Pages 102–103
- Andrew Stevovich: Beyond the Figure book, pages 102-103
- Client: Adelson Galleries
- Visit figure page
- Type: portfolio
- Portfolio Type: publication_design
- Portfolio Role: design_layout
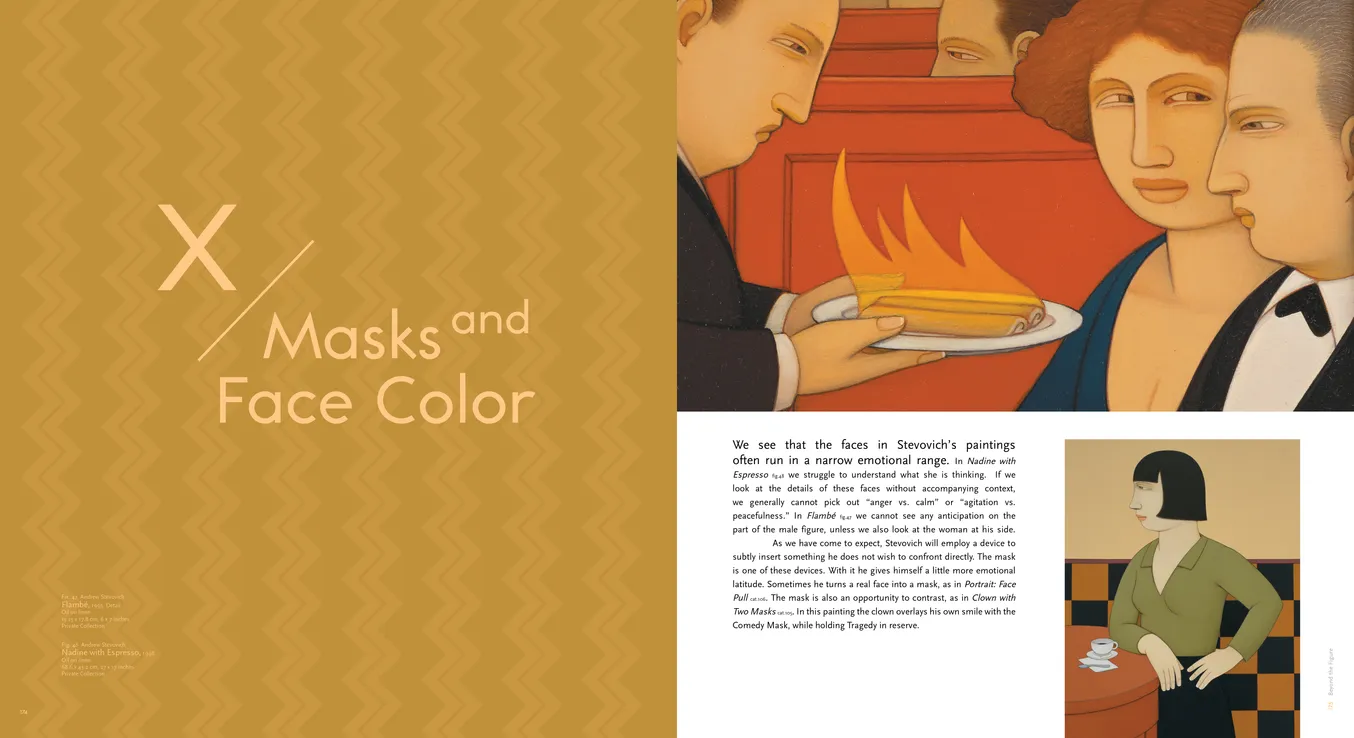
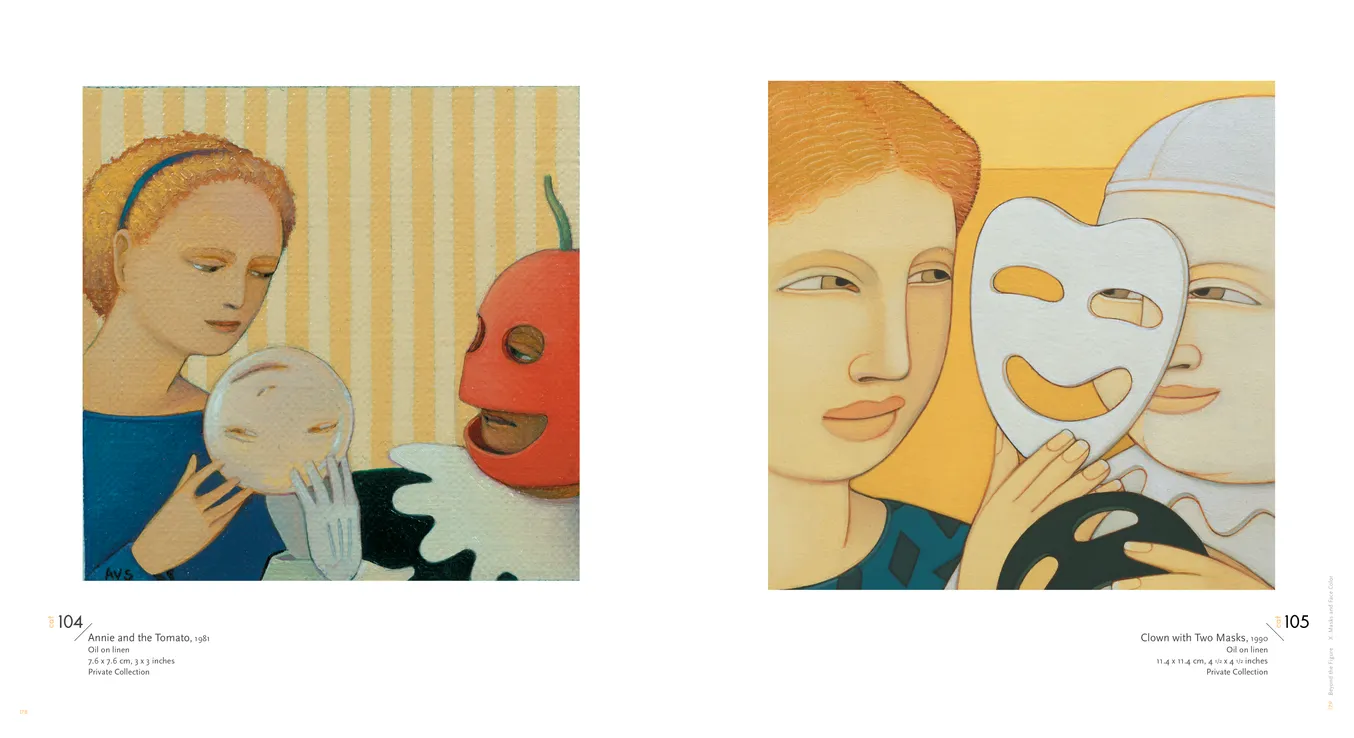
Andrew Stevovich: Beyond The Figure — Pages 104–105
- Andrew Stevovich: Beyond the Figure book, pages 104-105
- Client: Adelson Galleries
- Visit figure page
- Type: portfolio
- Portfolio Type: publication_design
- Portfolio Role: design_layout
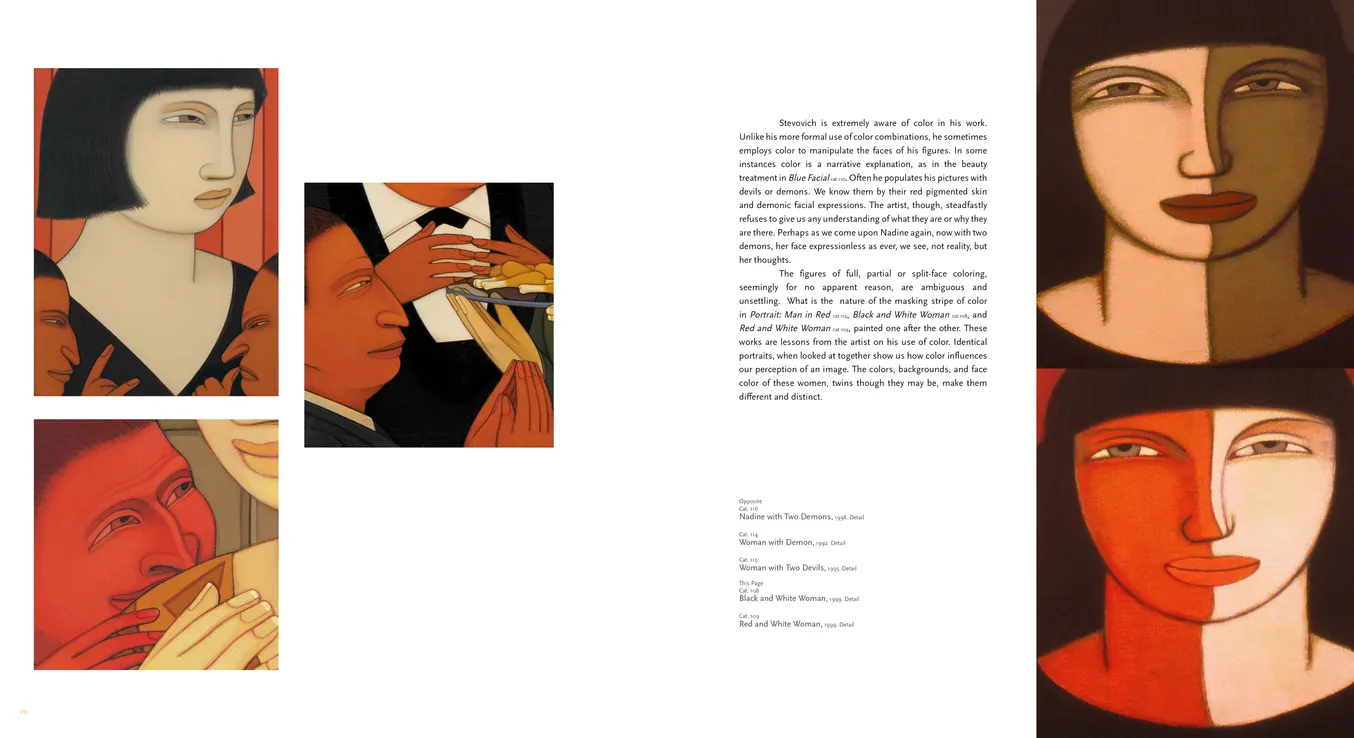
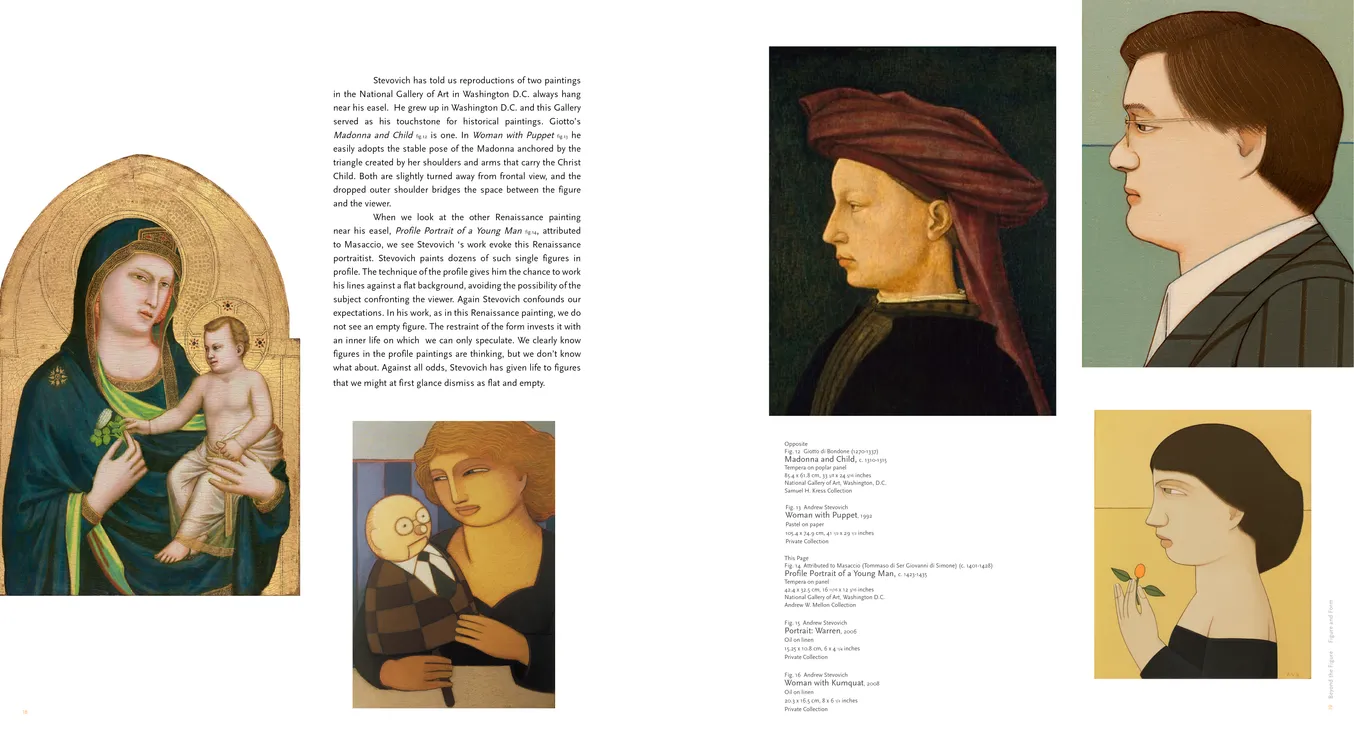
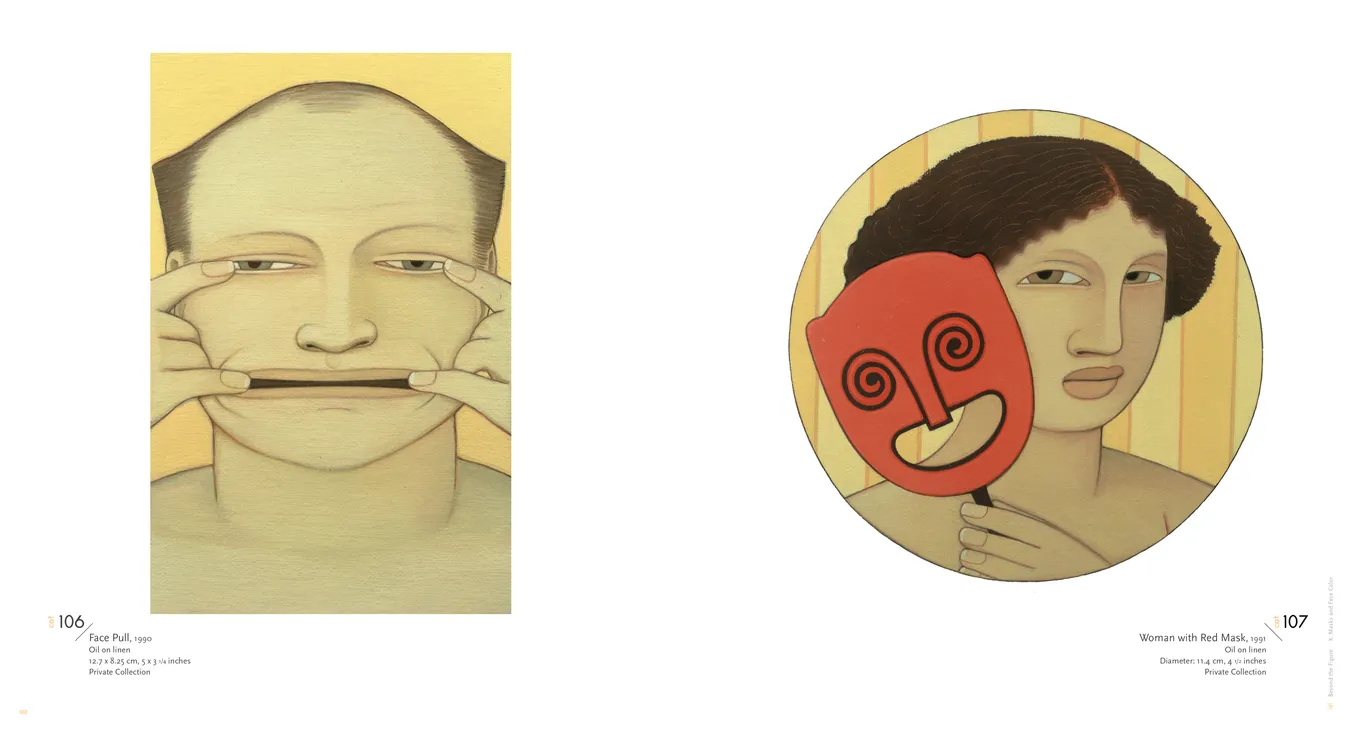
Andrew Stevovich: Beyond The Figure — Pages 106–107

- Andrew Stevovich: Beyond the Figure book, pages 106-107
- Client: Adelson Galleries
- Visit figure page
- Type: portfolio
- Portfolio Type: publication_design
- Portfolio Role: design_layout
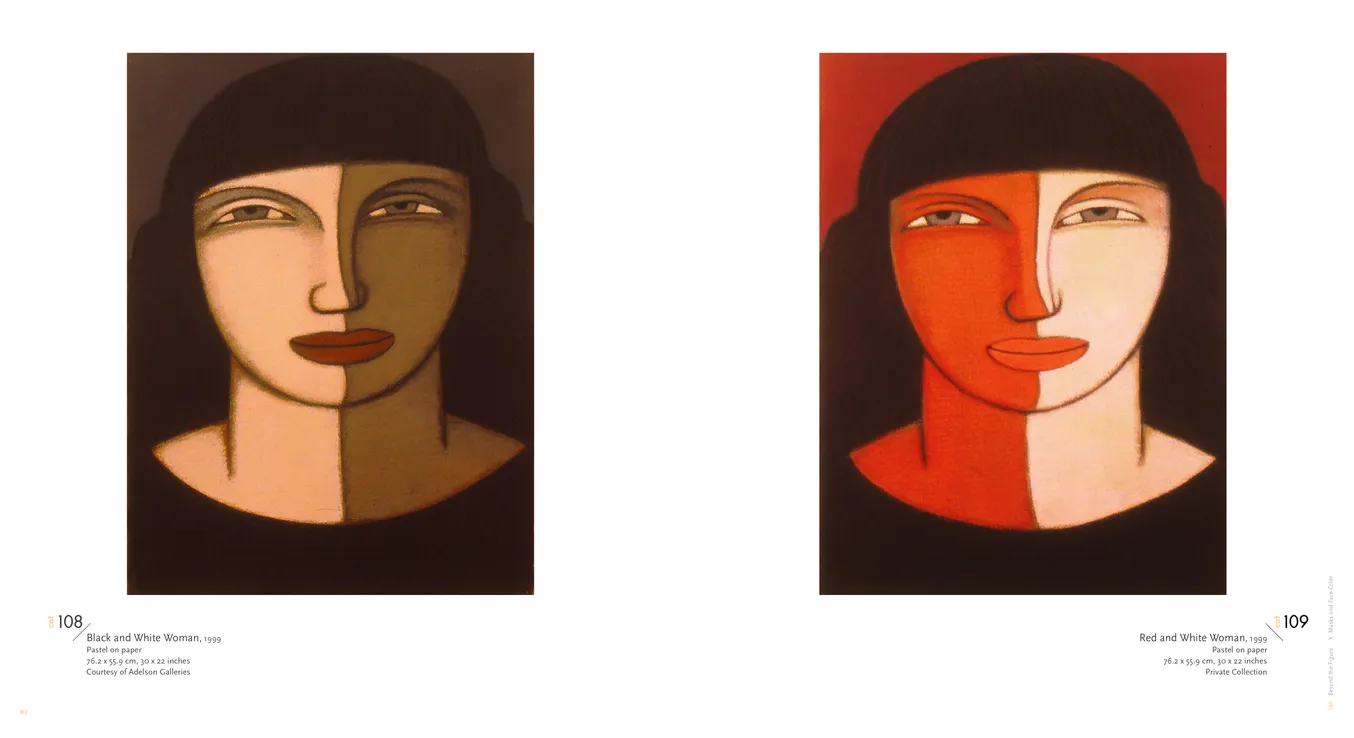
Andrew Stevovich: Beyond The Figure — Pages 108–109
- Andrew Stevovich: Beyond the Figure book, pages 108-109
- Client: Adelson Galleries
- Visit figure page
- Type: portfolio
- Portfolio Type: publication_design
- Portfolio Role: design_layout
Andrew Stevovich: Beyond The Figure — Pages 110–111
- Andrew Stevovich: Beyond the Figure book, pages 110-111
- Client: Adelson Galleries
- Visit figure page
- Type: portfolio
- Portfolio Type: publication_design
- Portfolio Role: design_layout
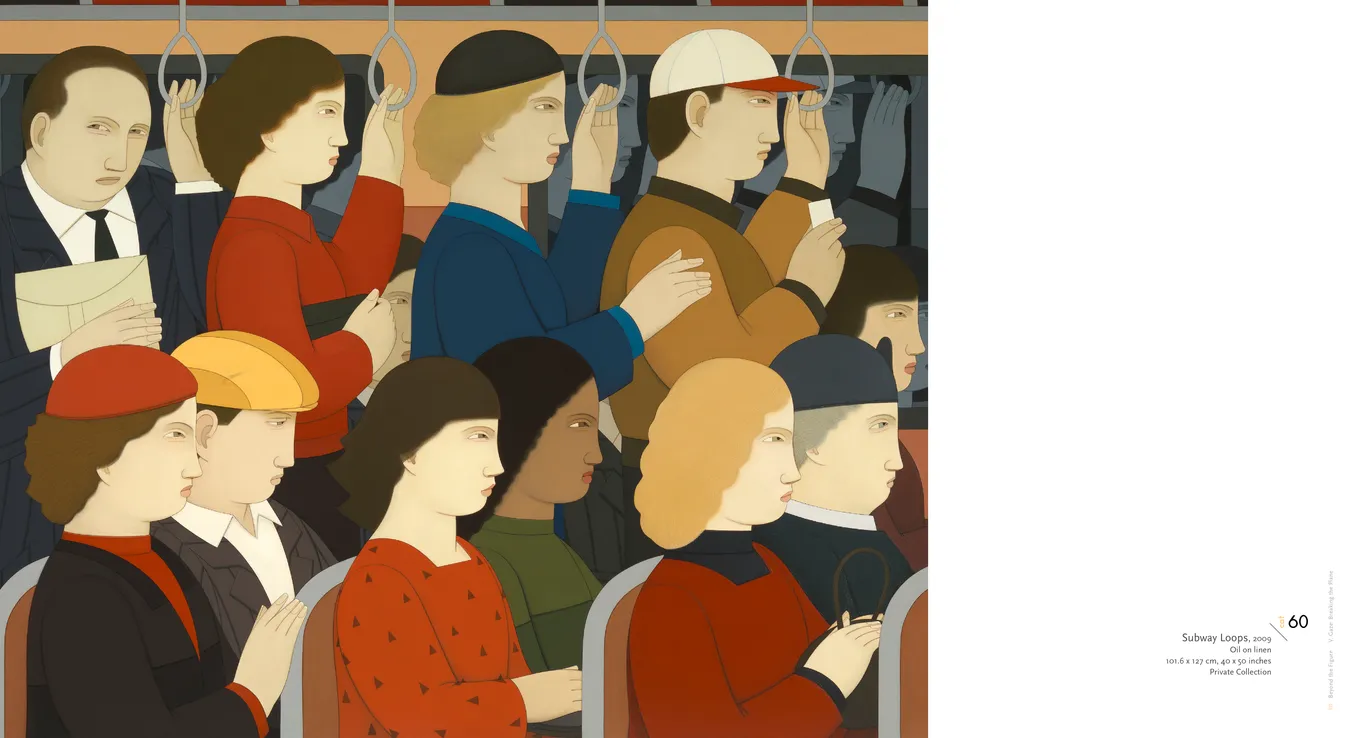
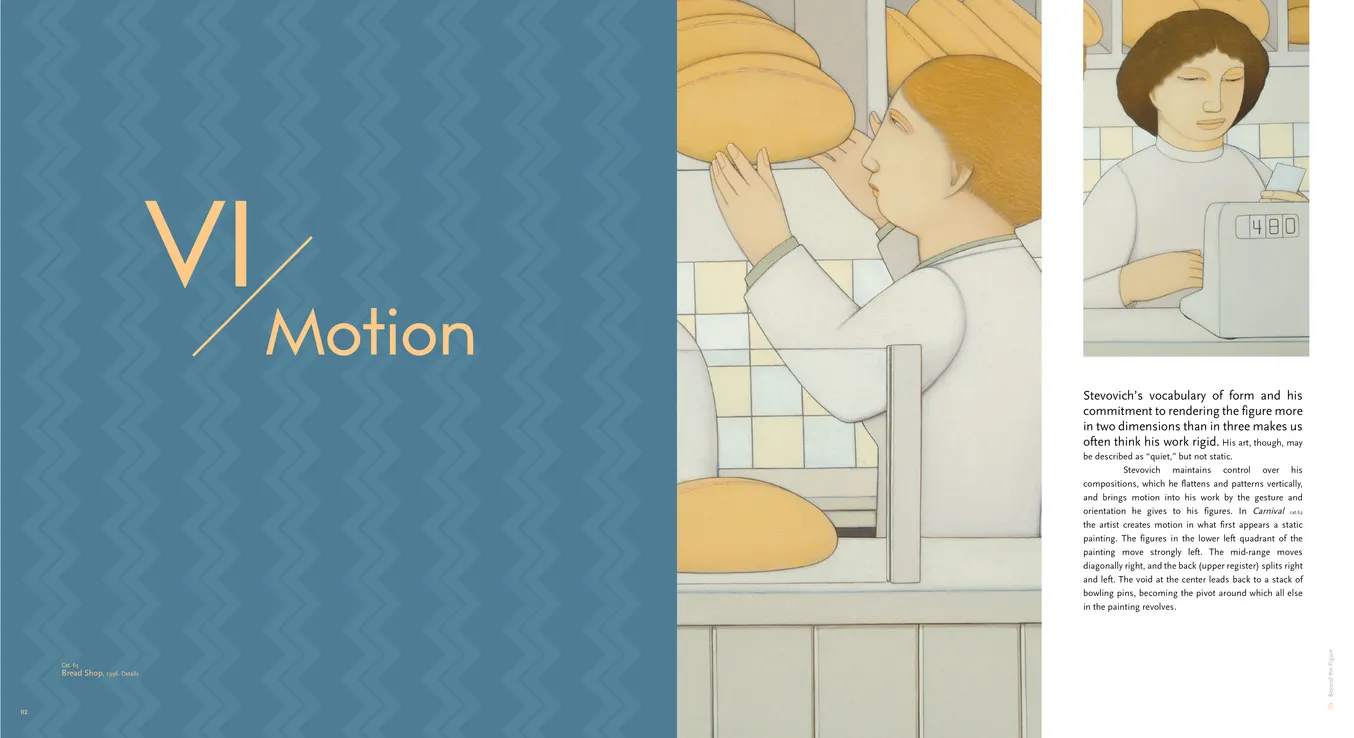
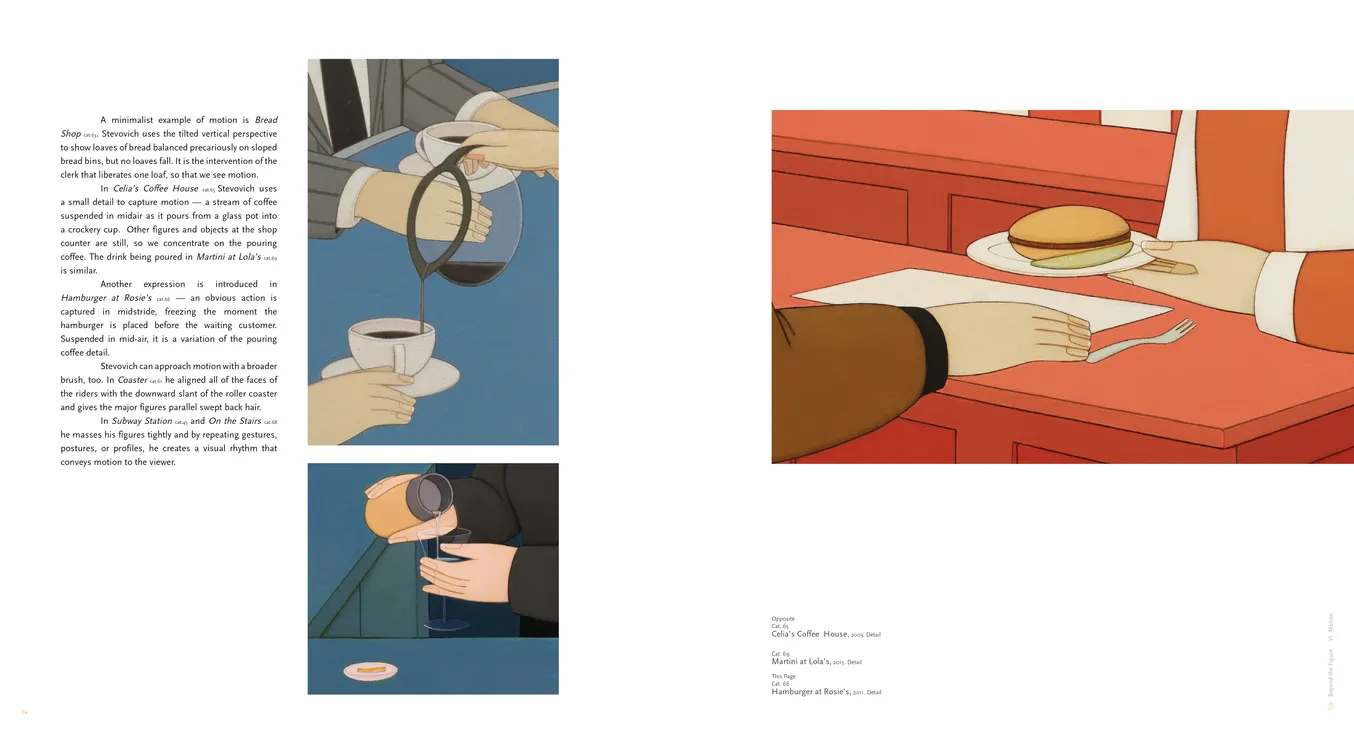
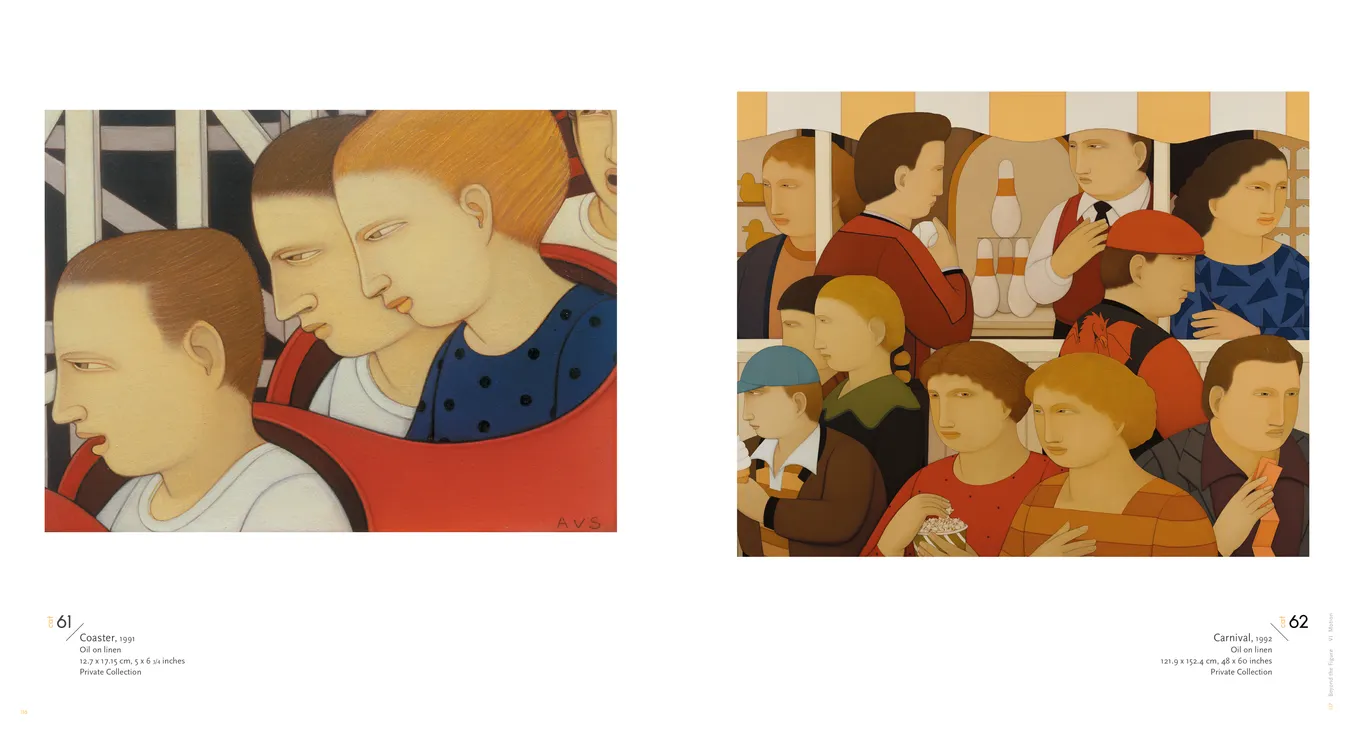
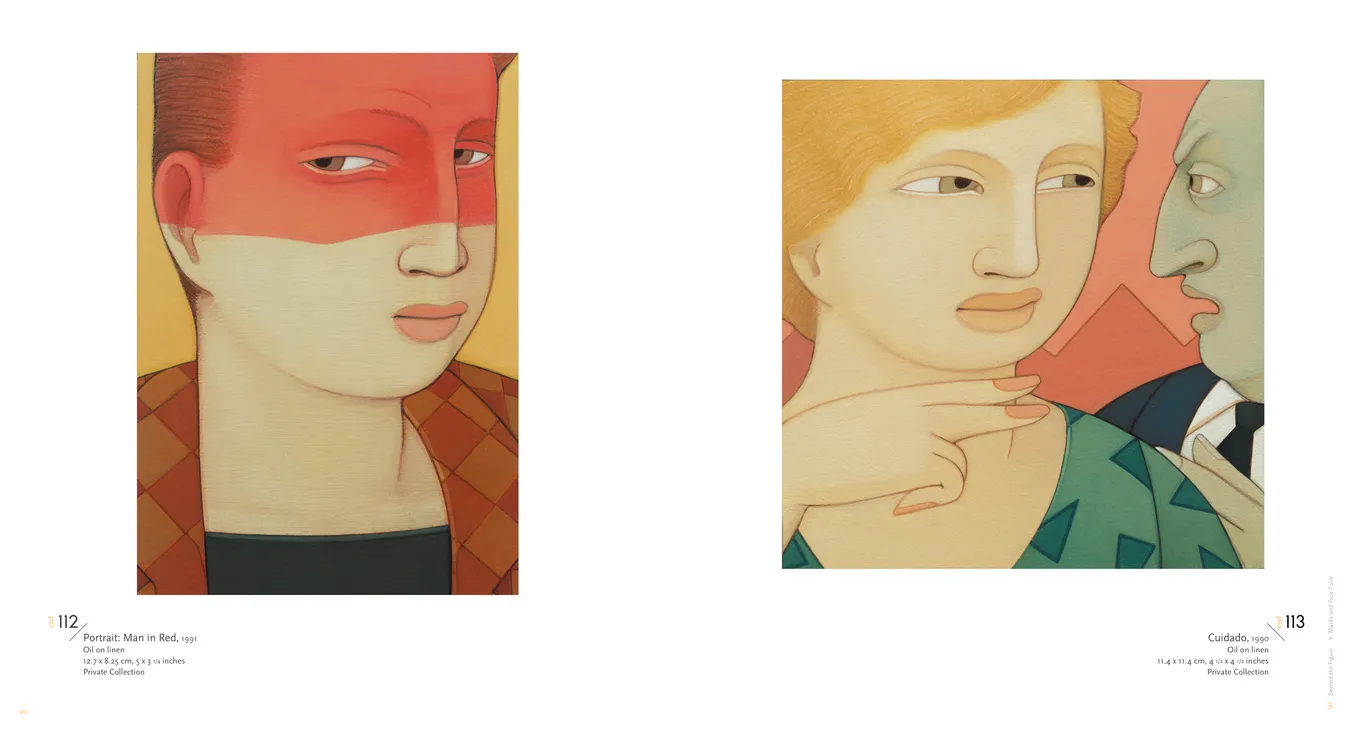
Andrew Stevovich: Beyond The Figure — Pages 112–113
- Andrew Stevovich: Beyond the Figure book, pages 112-113
- Client: Adelson Galleries
- Visit figure page
- Type: portfolio
- Portfolio Type: publication_design
- Portfolio Role: design_layout
Andrew Stevovich: Beyond The Figure — Pages 114–115
- Andrew Stevovich: Beyond the Figure book, pages 114-115
- Client: Adelson Galleries
- Visit figure page
- Type: portfolio
- Portfolio Type: publication_design
- Portfolio Role: design_layout
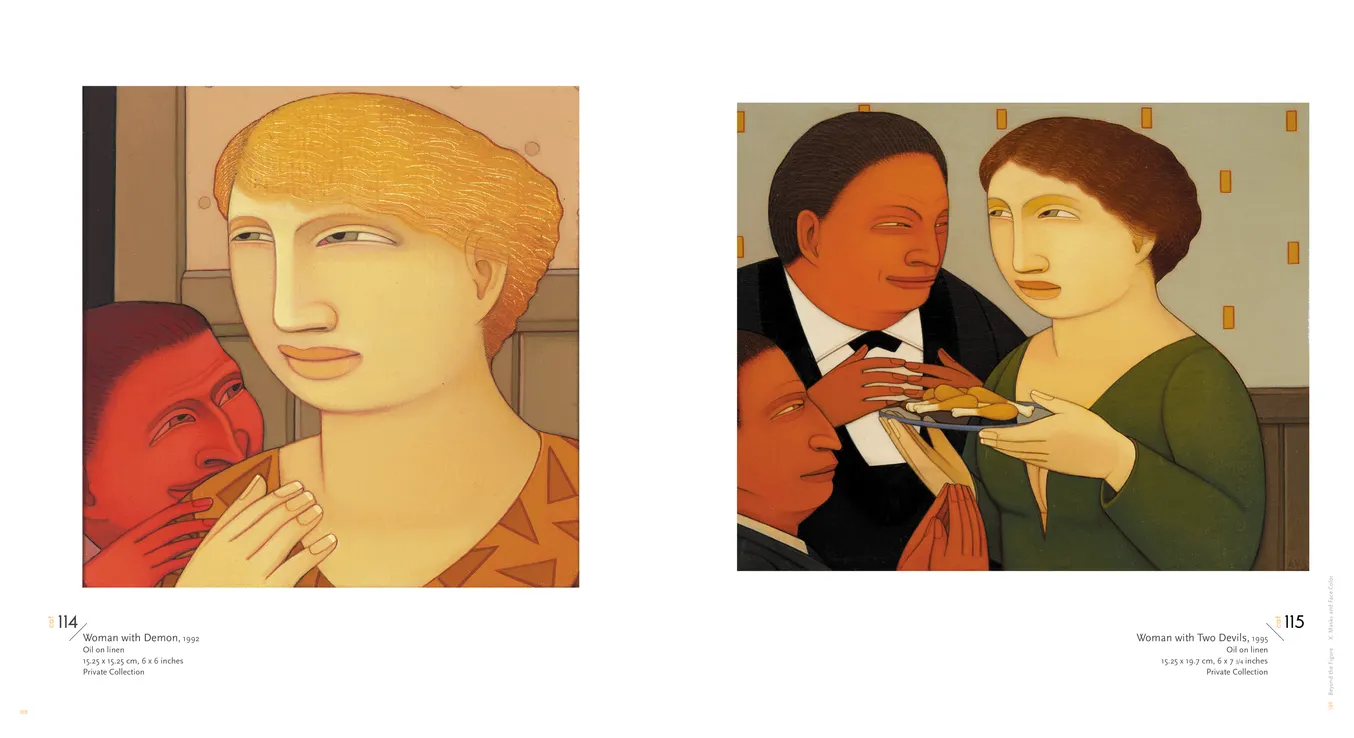
Andrew Stevovich: Beyond The Figure — Pages 116–117
- Andrew Stevovich: Beyond the Figure book, pages 116-117
- Client: Adelson Galleries
- Visit figure page
- Type: portfolio
- Portfolio Type: publication_design
- Portfolio Role: design_layout
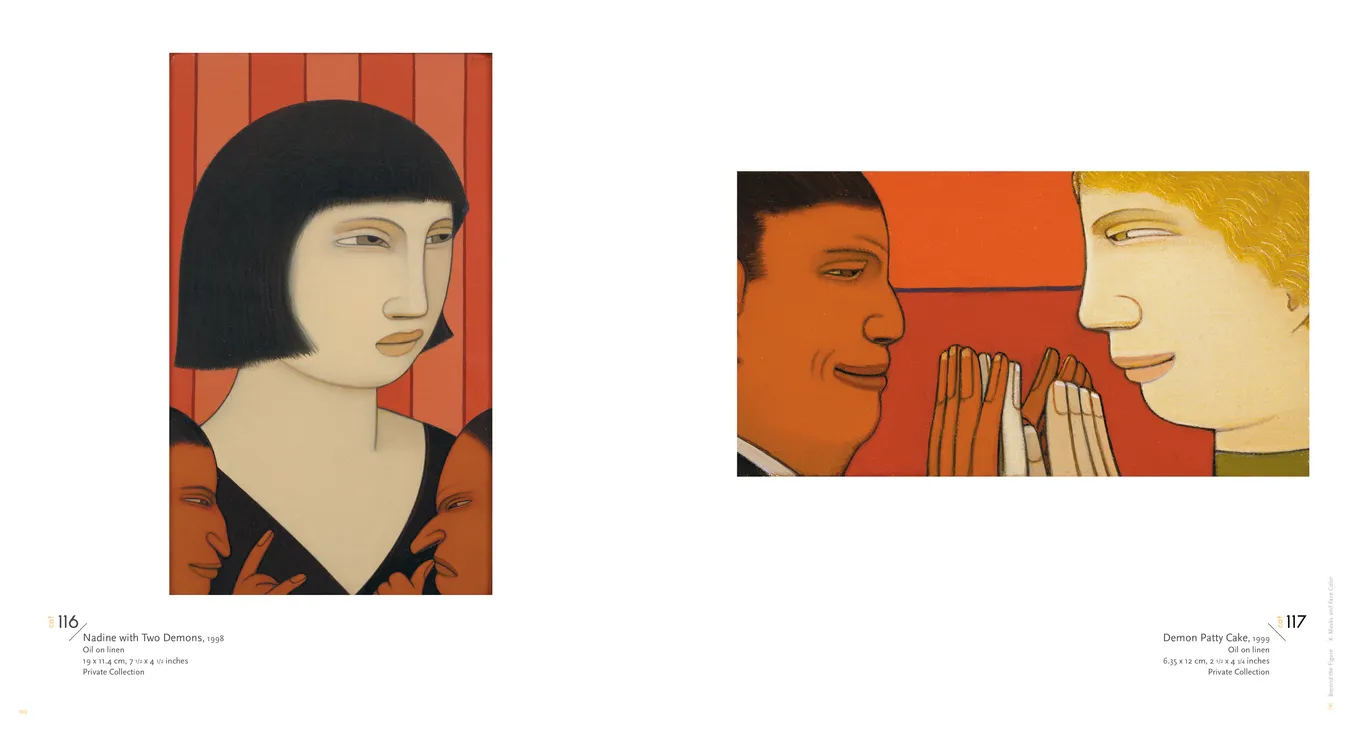
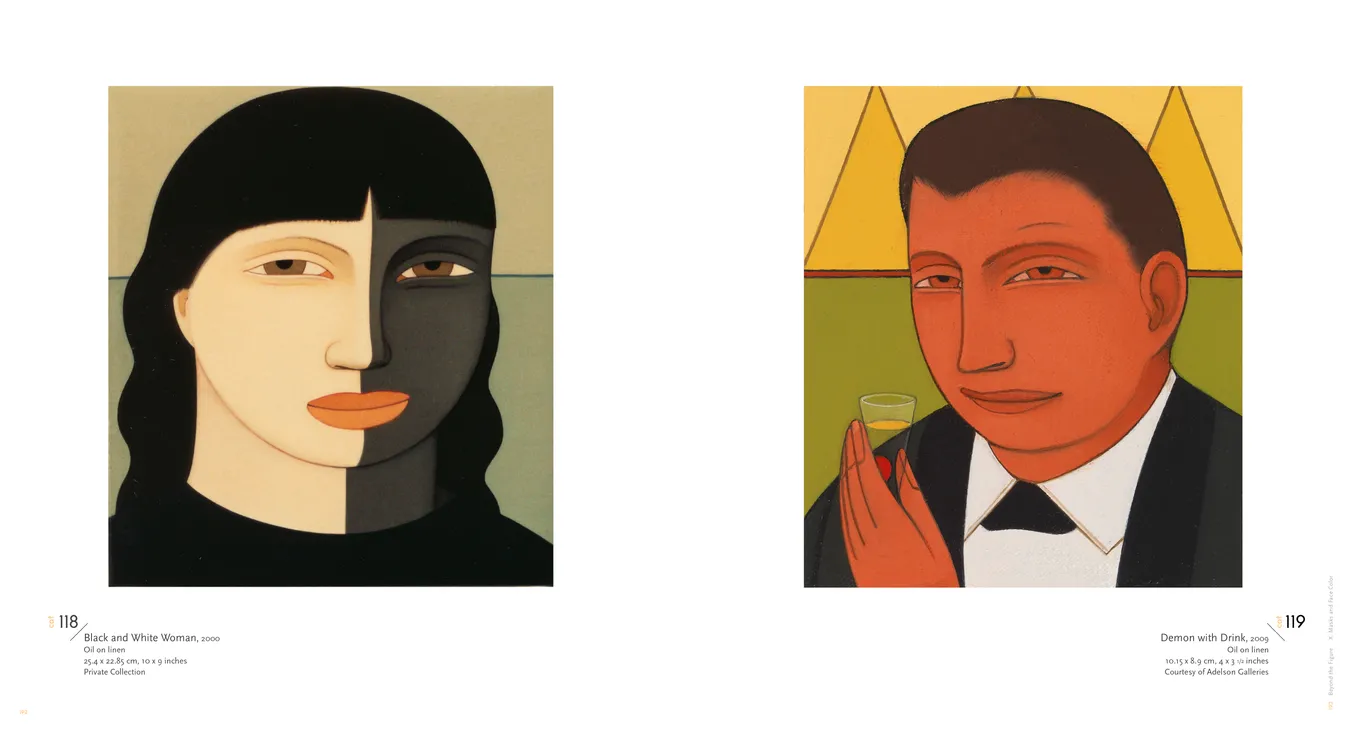
Andrew Stevovich: Beyond The Figure — Pages 118–119
- Andrew Stevovich: Beyond the Figure book, pages 118-119
- Client: Adelson Galleries
- Visit figure page
- Type: portfolio
- Portfolio Type: publication_design
- Portfolio Role: design_layout
Andrew Stevovich: Beyond The Figure — Pages 12–13
- Andrew Stevovich: Beyond the Figure book, pages 12-13
- Client: Adelson Galleries
- Visit figure page
- Type: portfolio
- Portfolio Type: publication_design
- Portfolio Role: design_layout
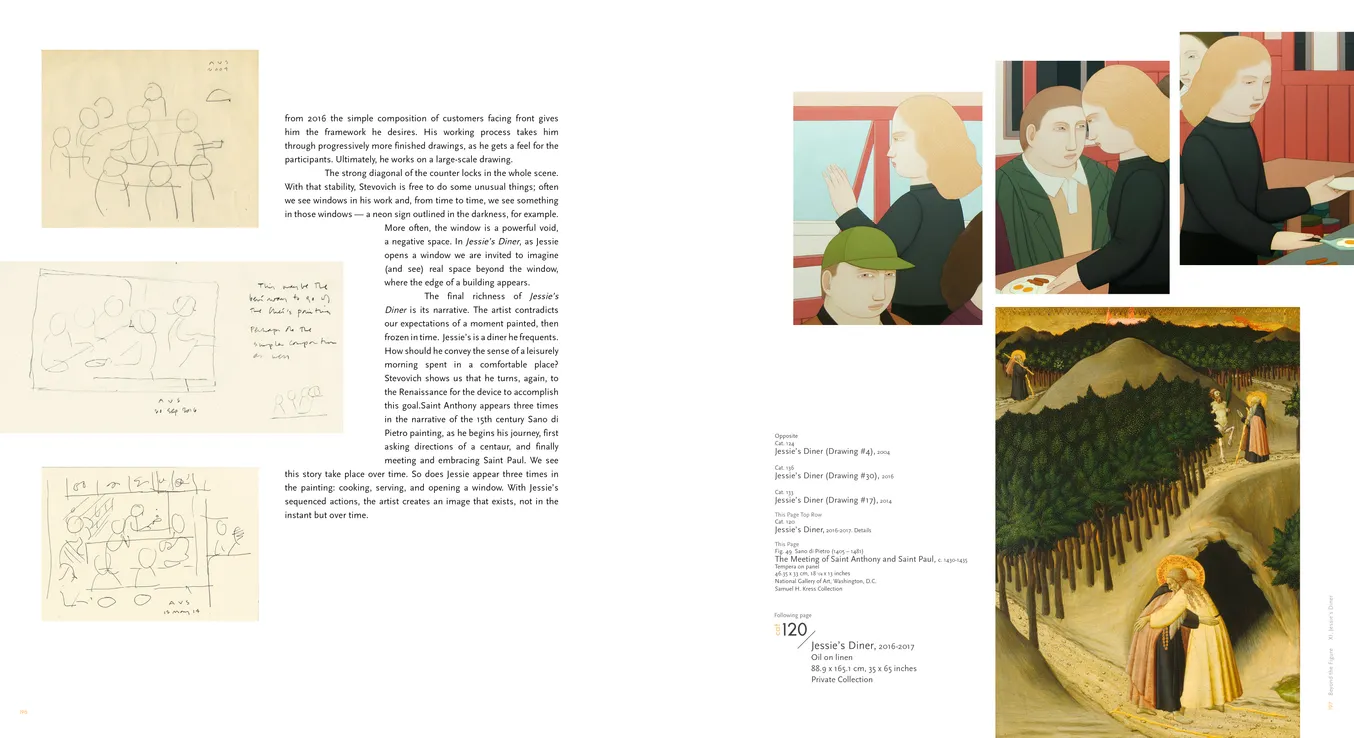
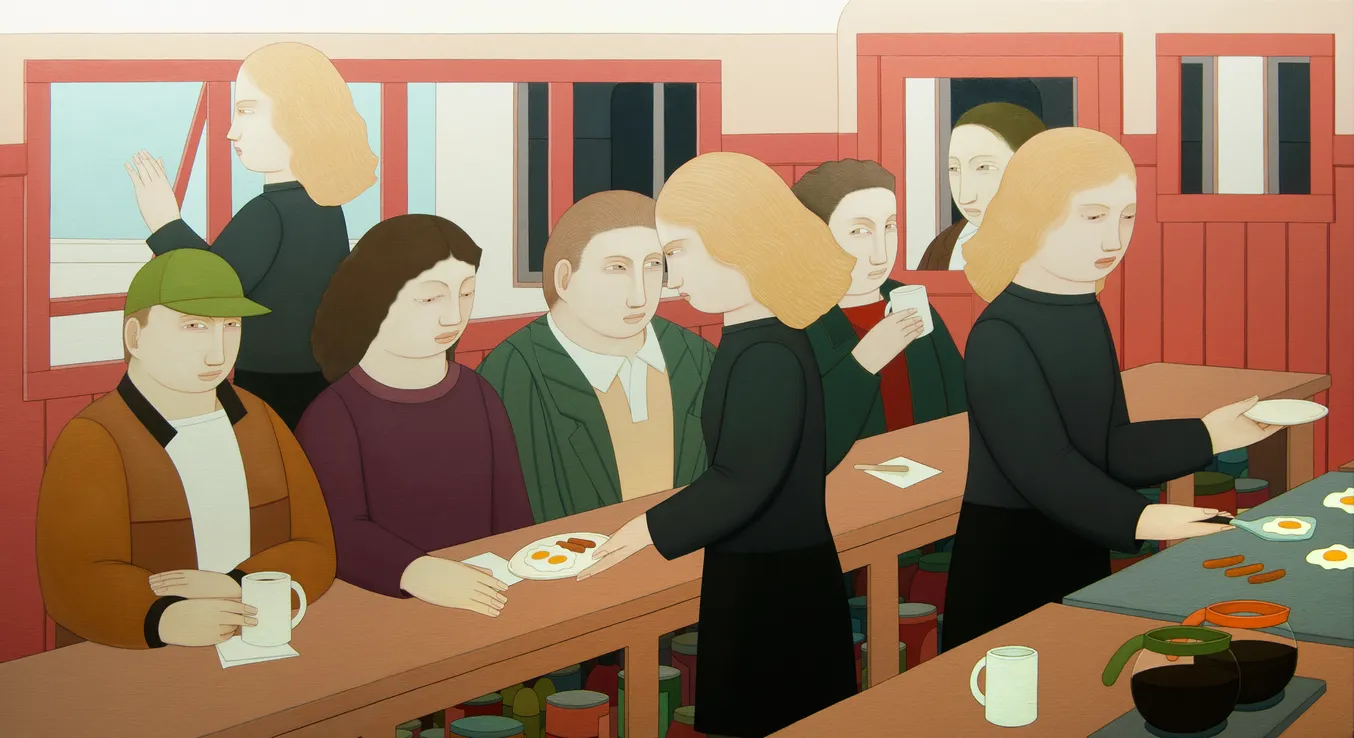
Andrew Stevovich: Beyond The Figure — Pages 120–121
- Andrew Stevovich: Beyond the Figure book, pages 120-121
- Client: Adelson Galleries
- Visit figure page
- Type: portfolio
- Portfolio Type: publication_design
- Portfolio Role: design_layout
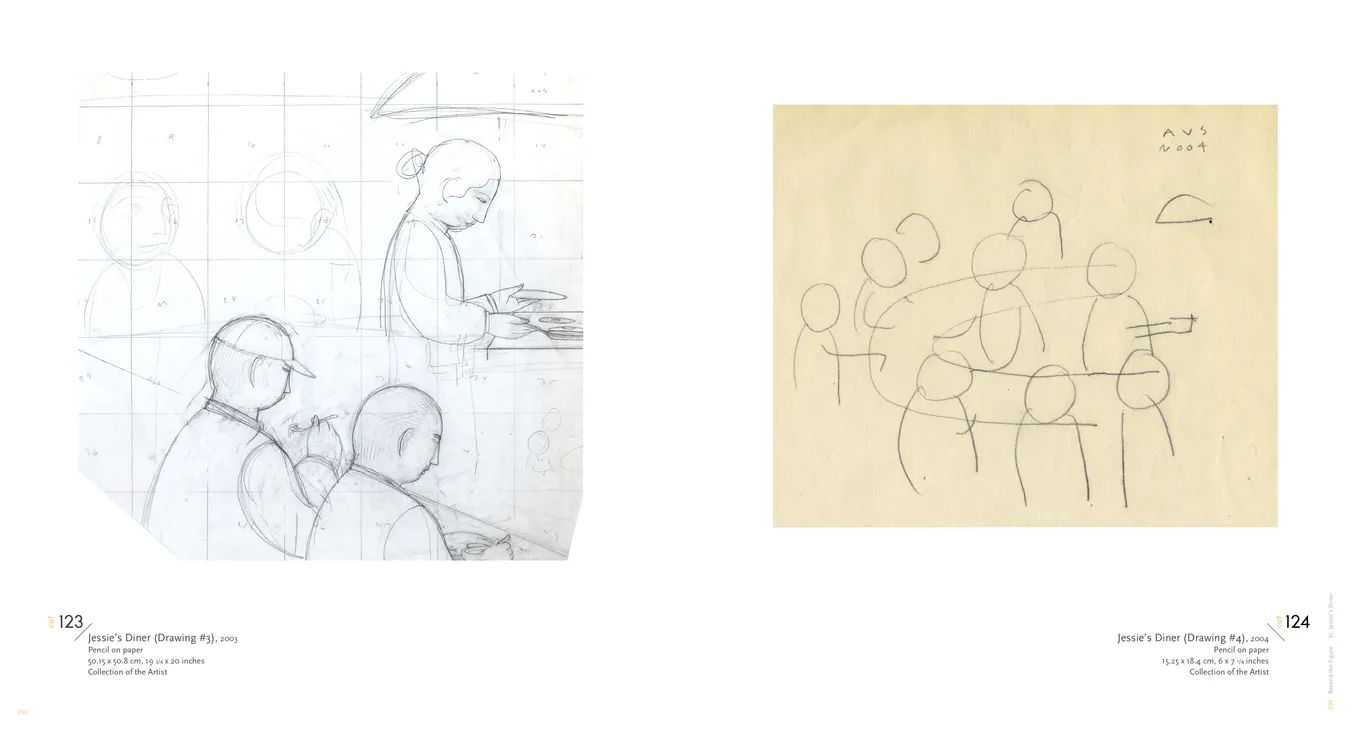
Andrew Stevovich: Beyond The Figure — Pages 122–123
- Andrew Stevovich: Beyond the Figure book, pages 122-123
- Client: Adelson Galleries
- Visit figure page
- Type: portfolio
- Portfolio Type: publication_design
- Portfolio Role: design_layout
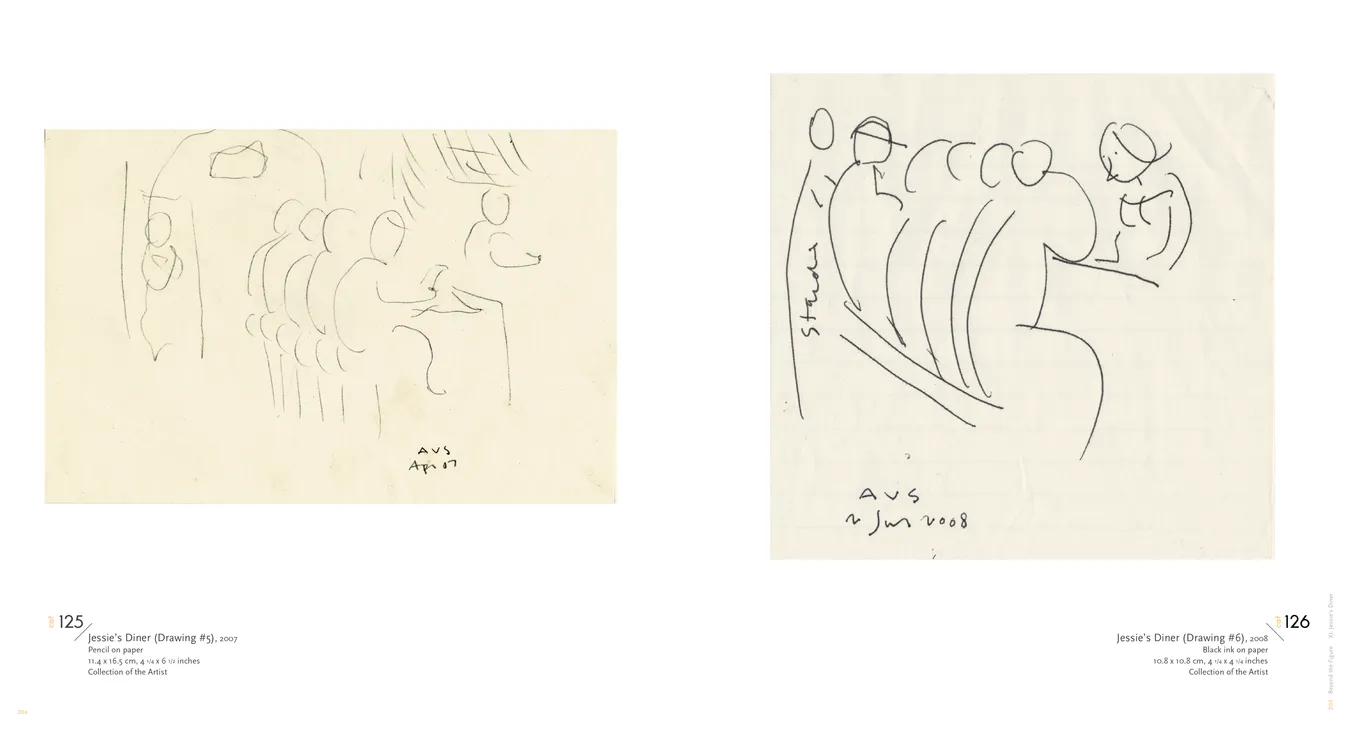
Andrew Stevovich: Beyond The Figure — Pages 124–125
- Andrew Stevovich: Beyond the Figure book, pages 124-125
- Client: Adelson Galleries
- Visit figure page
- Type: portfolio
- Portfolio Type: publication_design
- Portfolio Role: design_layout
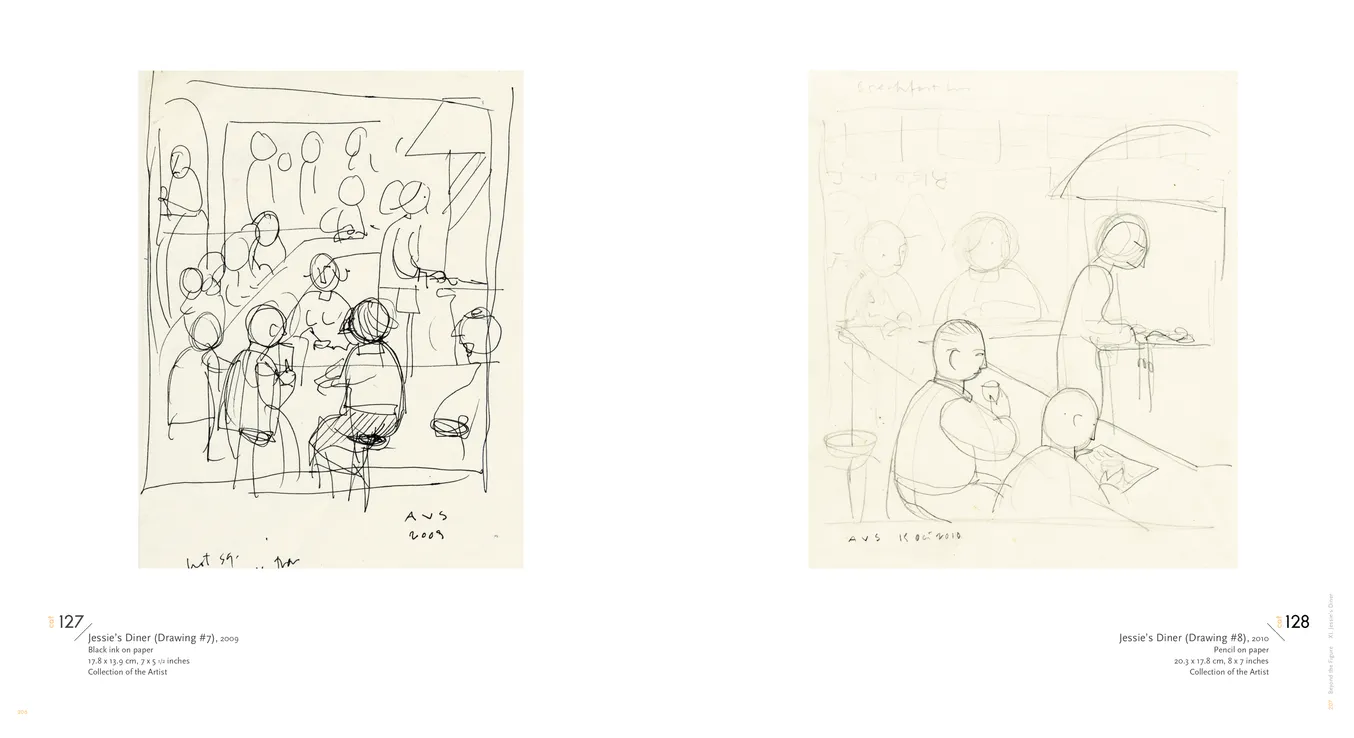
Andrew Stevovich: Beyond The Figure — Pages 126–127
- Andrew Stevovich: Beyond the Figure book, pages 126-127
- Client: Adelson Galleries
- Visit figure page
- Type: portfolio
- Portfolio Type: publication_design
- Portfolio Role: design_layout
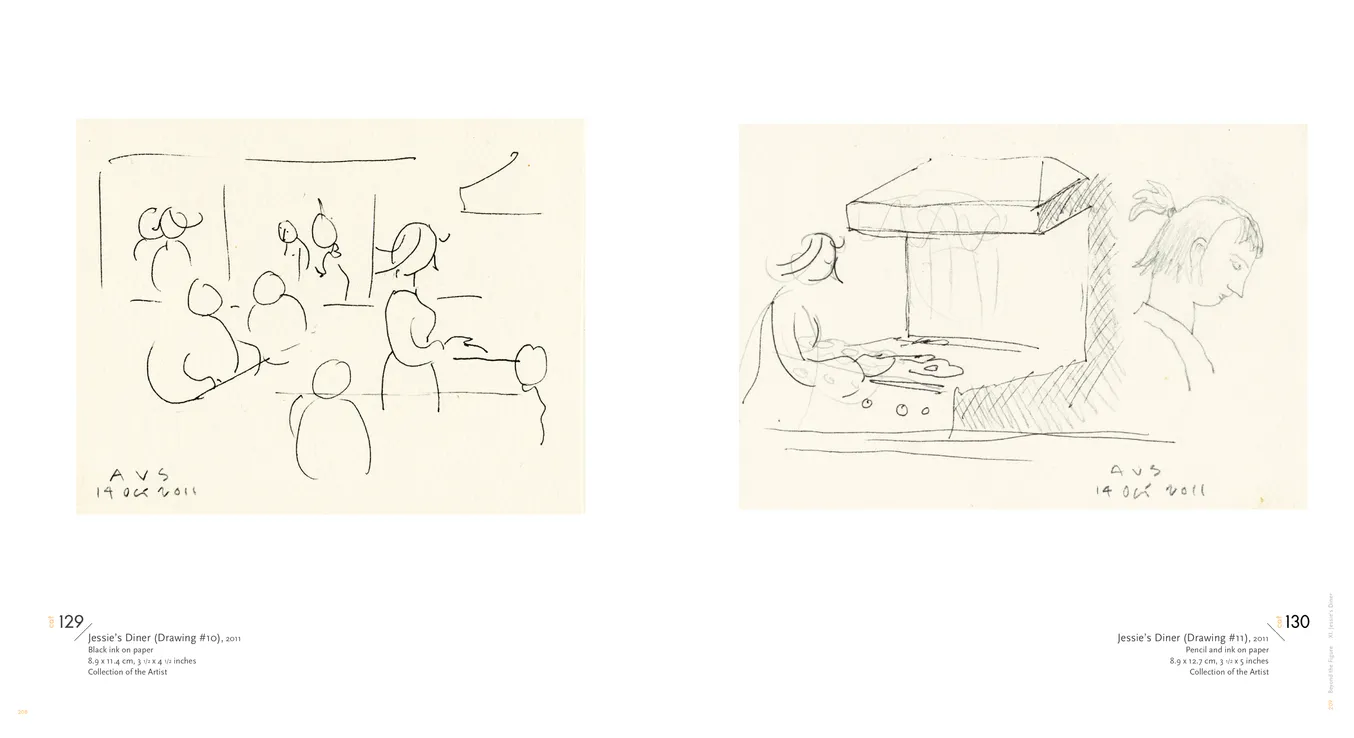
Andrew Stevovich: Beyond The Figure — Pages 128–129
- Andrew Stevovich: Beyond the Figure book, pages 128-129
- Client: Adelson Galleries
- Visit figure page
- Type: portfolio
- Portfolio Type: publication_design
- Portfolio Role: design_layout
Andrew Stevovich: Beyond The Figure — Pages 130–131
- Andrew Stevovich: Beyond the Figure book, pages 130-131
- Client: Adelson Galleries
- Visit figure page
- Type: portfolio
- Portfolio Type: publication_design
- Portfolio Role: design_layout
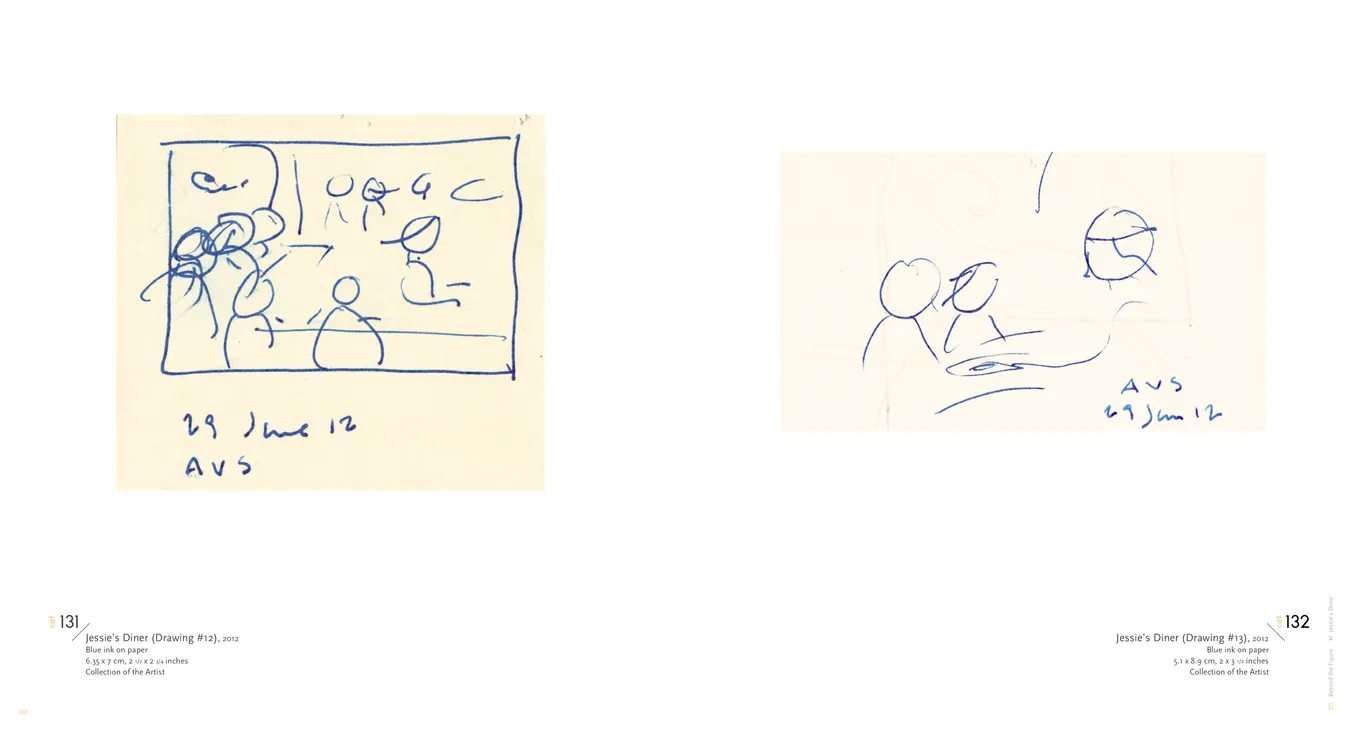
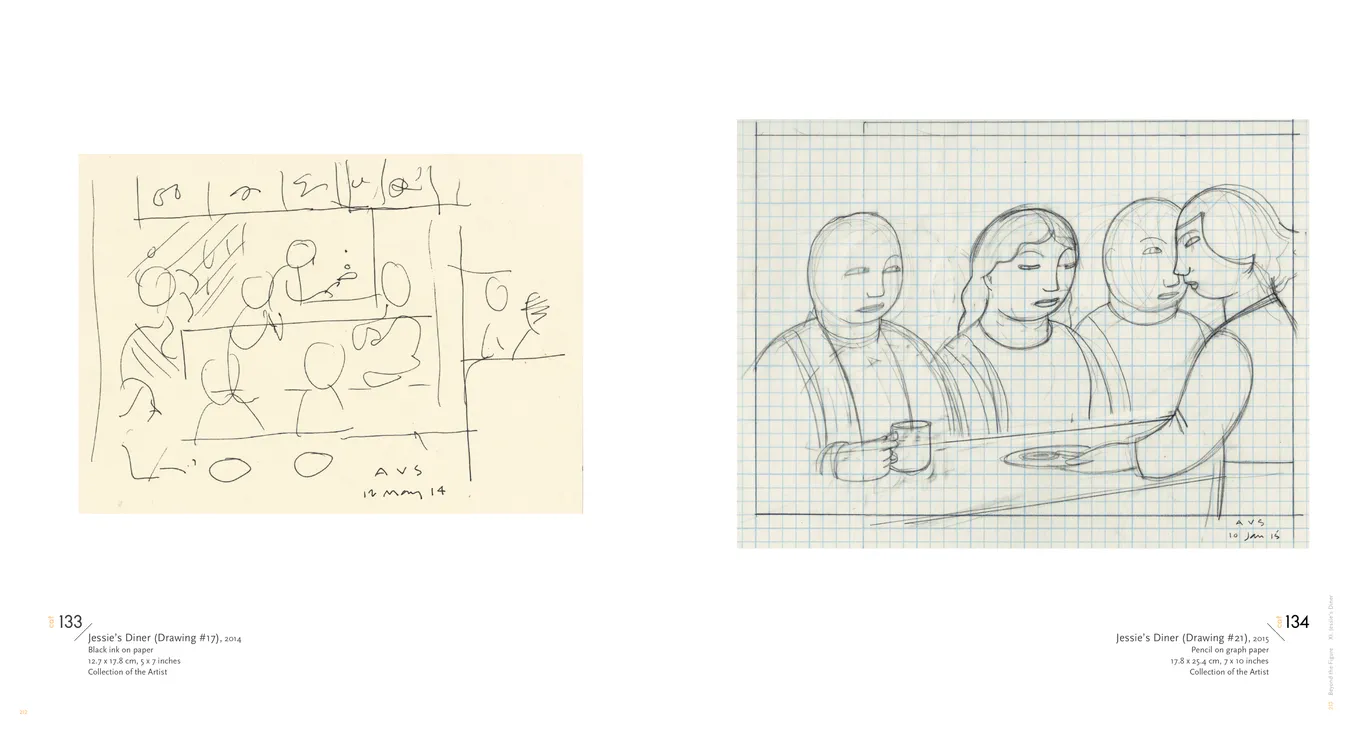
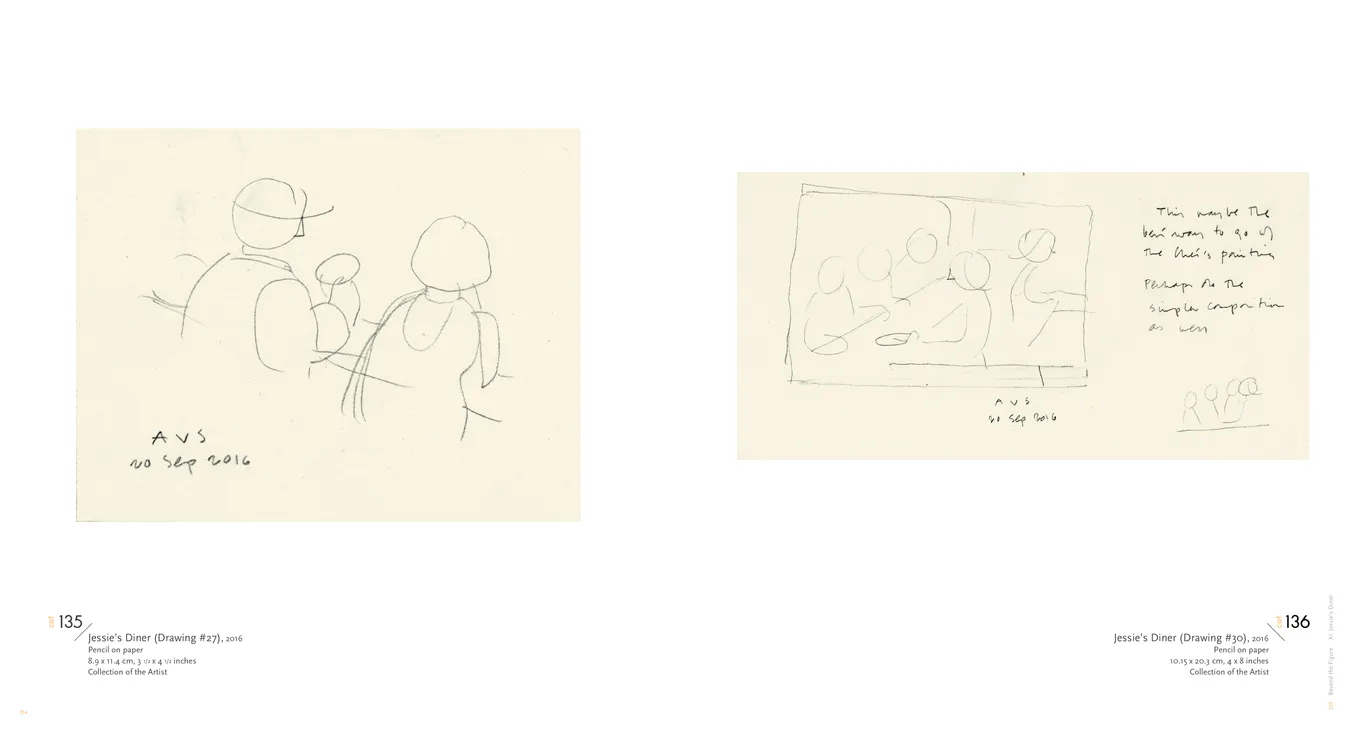
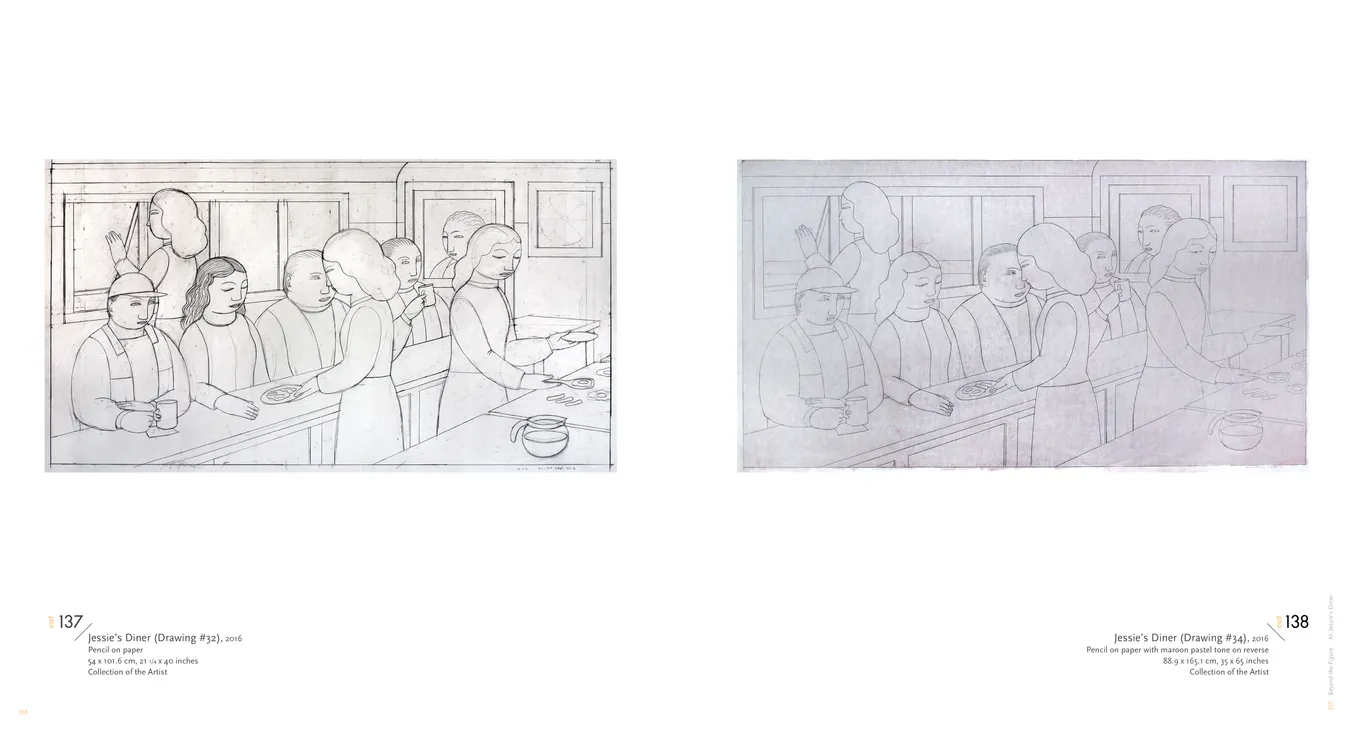
Andrew Stevovich: Beyond The Figure — Pages 132–133
- Andrew Stevovich: Beyond the Figure book, pages 132-133
- Client: Adelson Galleries
- Visit figure page
- Type: portfolio
- Portfolio Type: publication_design
- Portfolio Role: design_layout
Andrew Stevovich: Beyond The Figure — Pages 134–135
- Andrew Stevovich: Beyond the Figure book, pages 134-135
- Client: Adelson Galleries
- Visit figure page
- Type: portfolio
- Portfolio Type: publication_design
- Portfolio Role: design_layout
Andrew Stevovich: Beyond The Figure — Pages 136–137

- Andrew Stevovich: Beyond the Figure book, pages 136-137
- Client: Adelson Galleries
- Visit figure page
- Type: portfolio
- Portfolio Type: publication_design
- Portfolio Role: design_layout
Andrew Stevovich: Beyond The Figure — Pages 138–139
- Andrew Stevovich: Beyond the Figure book, pages 138-139
- Client: Adelson Galleries
- Visit figure page
- Type: portfolio
- Portfolio Type: publication_design
- Portfolio Role: design_layout
Andrew Stevovich: Beyond The Figure — Pages 14–15
- Andrew Stevovich: Beyond the Figure book, pages 14-15
- Client: Adelson Galleries
- Visit figure page
- Type: portfolio
- Portfolio Type: publication_design
- Portfolio Role: design_layout
Andrew Stevovich: Beyond The Figure — Pages 140–141
- Andrew Stevovich: Beyond the Figure book, pages 140-141
- Client: Adelson Galleries
- Visit figure page
- Type: portfolio
- Portfolio Type: publication_design
- Portfolio Role: design_layout
Andrew Stevovich: Beyond The Figure — Pages 142–143
- Andrew Stevovich: Beyond the Figure book, pages 142-143
- Client: Adelson Galleries
- Visit figure page
- Type: portfolio
- Portfolio Type: publication_design
- Portfolio Role: design_layout
Andrew Stevovich: Beyond The Figure — Pages 144–145
- Andrew Stevovich: Beyond the Figure book, pages 144-145
- Client: Adelson Galleries
- Visit figure page
- Type: portfolio
- Portfolio Type: publication_design
- Portfolio Role: design_layout
Andrew Stevovich: Beyond The Figure — Pages 146–147
- Andrew Stevovich: Beyond the Figure book, pages 146-147
- Client: Adelson Galleries
- Visit figure page
- Type: portfolio
- Portfolio Type: publication_design
- Portfolio Role: design_layout
Andrew Stevovich: Beyond The Figure — Pages 148–149
- Andrew Stevovich: Beyond the Figure book, pages 148-149
- Client: Adelson Galleries
- Visit figure page
- Type: portfolio
- Portfolio Type: publication_design
- Portfolio Role: design_layout
Andrew Stevovich: Beyond The Figure — Pages 150–151
- Andrew Stevovich: Beyond the Figure book, pages 150-151
- Client: Adelson Galleries
- Visit figure page
- Type: portfolio
- Portfolio Type: publication_design
- Portfolio Role: design_layout
Andrew Stevovich: Beyond The Figure — Pages 152–153
- Andrew Stevovich: Beyond the Figure book, pages 152-153
- Client: Adelson Galleries
- Visit figure page
- Type: portfolio
- Portfolio Type: publication_design
- Portfolio Role: design_layout
Andrew Stevovich: Beyond The Figure — Pages 154–155
- Andrew Stevovich: Beyond the Figure book, pages 154-155
- Client: Adelson Galleries
- Visit figure page
- Type: portfolio
- Portfolio Type: publication_design
- Portfolio Role: design_layout
Andrew Stevovich: Beyond The Figure — Pages 156–157
- Andrew Stevovich: Beyond the Figure book, pages 156-157
- Client: Adelson Galleries
- Visit figure page
- Type: portfolio
- Portfolio Type: publication_design
- Portfolio Role: design_layout
Andrew Stevovich: Beyond The Figure — Pages 158–159
- Andrew Stevovich: Beyond the Figure book, pages 158-159
- Client: Adelson Galleries
- Visit figure page
- Type: portfolio
- Portfolio Type: publication_design
- Portfolio Role: design_layout
Andrew Stevovich: Beyond The Figure — Pages 16–17
- Andrew Stevovich: Beyond the Figure book, pages 16-17
- Client: Adelson Galleries
- Visit figure page
- Type: portfolio
- Portfolio Type: publication_design
- Portfolio Role: design_layout
Andrew Stevovich: Beyond The Figure — Pages 160–161
- Andrew Stevovich: Beyond the Figure book, pages 160-161
- Client: Adelson Galleries
- Visit figure page
- Type: portfolio
- Portfolio Type: publication_design
- Portfolio Role: design_layout
Andrew Stevovich: Beyond The Figure — Pages 162–163
- Andrew Stevovich: Beyond the Figure book, pages 162-163
- Client: Adelson Galleries
- Visit figure page
- Type: portfolio
- Portfolio Type: publication_design
- Portfolio Role: design_layout
Andrew Stevovich: Beyond The Figure — Pages 164–165
- Andrew Stevovich: Beyond the Figure book, pages 164-165
- Client: Adelson Galleries
- Visit figure page
- Type: portfolio
- Portfolio Type: publication_design
- Portfolio Role: design_layout
Andrew Stevovich: Beyond The Figure — Pages 166–167

- Andrew Stevovich: Beyond the Figure book, pages 166-167
- Client: Adelson Galleries
- Visit figure page
- Type: portfolio
- Portfolio Type: publication_design
- Portfolio Role: design_layout
Andrew Stevovich: Beyond The Figure — Pages 168–169
- Andrew Stevovich: Beyond the Figure book, pages 168-169
- Client: Adelson Galleries
- Visit figure page
- Type: portfolio
- Portfolio Type: publication_design
- Portfolio Role: design_layout
Andrew Stevovich: Beyond The Figure — Pages 170–171
- Andrew Stevovich: Beyond the Figure book, pages 170-171
- Client: Adelson Galleries
- Visit figure page
- Type: portfolio
- Portfolio Type: publication_design
- Portfolio Role: design_layout
Andrew Stevovich: Beyond The Figure — Pages 172–173
- Andrew Stevovich: Beyond the Figure book, pages 172-173
- Client: Adelson Galleries
- Visit figure page
- Type: portfolio
- Portfolio Type: publication_design
- Portfolio Role: design_layout
Andrew Stevovich: Beyond The Figure — Pages 174–175
- Andrew Stevovich: Beyond the Figure book, pages 174-175
- Client: Adelson Galleries
- Visit figure page
- Type: portfolio
- Portfolio Type: publication_design
- Portfolio Role: design_layout
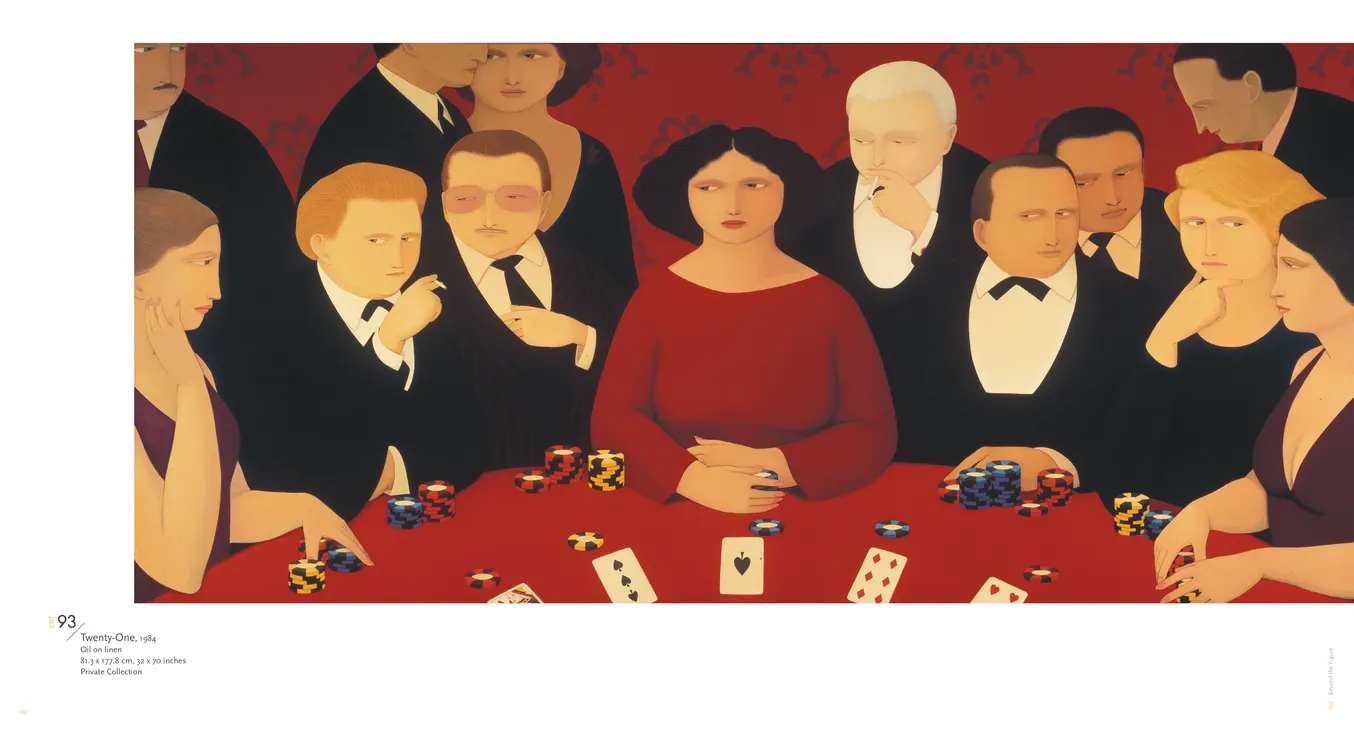
Andrew Stevovich: Beyond The Figure — Pages 176–177
- Andrew Stevovich: Beyond the Figure book, pages 176-177
- Client: Adelson Galleries
- Visit figure page
- Type: portfolio
- Portfolio Type: publication_design
- Portfolio Role: design_layout
Andrew Stevovich: Beyond The Figure — Pages 178–179
- Andrew Stevovich: Beyond the Figure book, pages 178-179
- Client: Adelson Galleries
- Visit figure page
- Type: portfolio
- Portfolio Type: publication_design
- Portfolio Role: design_layout
Andrew Stevovich: Beyond The Figure — Pages 18–19
- Andrew Stevovich: Beyond the Figure book, pages 18-19
- Client: Adelson Galleries
- Visit figure page
- Type: portfolio
- Portfolio Type: publication_design
- Portfolio Role: design_layout
Andrew Stevovich: Beyond The Figure — Pages 180–181
- Andrew Stevovich: Beyond the Figure book, pages 180-181
- Client: Adelson Galleries
- Visit figure page
- Type: portfolio
- Portfolio Type: publication_design
- Portfolio Role: design_layout
Andrew Stevovich: Beyond The Figure — Pages 182–183
- Andrew Stevovich: Beyond the Figure book, pages 182-183
- Client: Adelson Galleries
- Visit figure page
- Type: portfolio
- Portfolio Type: publication_design
- Portfolio Role: design_layout
Andrew Stevovich: Beyond The Figure — Pages 184–185

- Andrew Stevovich: Beyond the Figure book, pages 184-185
- Client: Adelson Galleries
- Visit figure page
- Type: portfolio
- Portfolio Type: publication_design
- Portfolio Role: design_layout
Andrew Stevovich: Beyond The Figure — Pages 186–187
- Andrew Stevovich: Beyond the Figure book, pages 186-187
- Client: Adelson Galleries
- Visit figure page
- Type: portfolio
- Portfolio Type: publication_design
- Portfolio Role: design_layout
Andrew Stevovich: Beyond The Figure — Pages 188–189
- Andrew Stevovich: Beyond the Figure book, pages 188-189
- Client: Adelson Galleries
- Visit figure page
- Type: portfolio
- Portfolio Type: publication_design
- Portfolio Role: design_layout
Andrew Stevovich: Beyond The Figure — Pages 190–191
- Andrew Stevovich: Beyond the Figure book, pages 190-191
- Client: Adelson Galleries
- Visit figure page
- Type: portfolio
- Portfolio Type: publication_design
- Portfolio Role: design_layout
Andrew Stevovich: Beyond The Figure — Pages 192–193
- Andrew Stevovich: Beyond the Figure book, pages 192-193
- Client: Adelson Galleries
- Visit figure page
- Type: portfolio
- Portfolio Type: publication_design
- Portfolio Role: design_layout
Andrew Stevovich: Beyond The Figure — Pages 194–195
- Andrew Stevovich: Beyond the Figure book, pages 194-195
- Client: Adelson Galleries
- Visit figure page
- Type: portfolio
- Portfolio Type: publication_design
- Portfolio Role: design_layout
Andrew Stevovich: Beyond The Figure — Pages 196–197
- Andrew Stevovich: Beyond the Figure book, pages 196-197
- Client: Adelson Galleries
- Visit figure page
- Type: portfolio
- Portfolio Type: publication_design
- Portfolio Role: design_layout
Andrew Stevovich: Beyond The Figure — Pages 198–199
- Andrew Stevovich: Beyond the Figure book, pages 198-199
- Client: Adelson Galleries
- Visit figure page
- Type: portfolio
- Portfolio Type: publication_design
- Portfolio Role: design_layout
Andrew Stevovich: Beyond The Figure — Pages 2–3

- Andrew Stevovich: Beyond the Figure book, pages 2-3
- Client: Adelson Galleries
- Visit figure page
- Type: portfolio
- Portfolio Type: publication_design
- Portfolio Role: design_layout
Andrew Stevovich: Beyond The Figure — Pages 20–21
- Andrew Stevovich: Beyond the Figure book, pages 20-21
- Client: Adelson Galleries
- Visit figure page
- Type: portfolio
- Portfolio Type: publication_design
- Portfolio Role: design_layout
Andrew Stevovich: Beyond The Figure — Pages 200–201
- Andrew Stevovich: Beyond the Figure book, pages 200-201
- Client: Adelson Galleries
- Visit figure page
- Type: portfolio
- Portfolio Type: publication_design
- Portfolio Role: design_layout
Andrew Stevovich: Beyond The Figure — Pages 202–203
- Andrew Stevovich: Beyond the Figure book, pages 202-203
- Client: Adelson Galleries
- Visit figure page
- Type: portfolio
- Portfolio Type: publication_design
- Portfolio Role: design_layout
Andrew Stevovich: Beyond The Figure — Pages 204–205
- Andrew Stevovich: Beyond the Figure book, pages 204-205
- Client: Adelson Galleries
- Visit figure page
- Type: portfolio
- Portfolio Type: publication_design
- Portfolio Role: design_layout
Andrew Stevovich: Beyond The Figure — Pages 206–207
- Andrew Stevovich: Beyond the Figure book, pages 206-207
- Client: Adelson Galleries
- Visit figure page
- Type: portfolio
- Portfolio Type: publication_design
- Portfolio Role: design_layout
Andrew Stevovich: Beyond The Figure — Pages 208–209
- Andrew Stevovich: Beyond the Figure book, pages 208-209
- Client: Adelson Galleries
- Visit figure page
- Type: portfolio
- Portfolio Type: publication_design
- Portfolio Role: design_layout
Andrew Stevovich: Beyond The Figure — Pages 210–211
- Andrew Stevovich: Beyond the Figure book, pages 210-211
- Client: Adelson Galleries
- Visit figure page
- Type: portfolio
- Portfolio Type: publication_design
- Portfolio Role: design_layout
Andrew Stevovich: Beyond The Figure — Pages 212–213
- Andrew Stevovich: Beyond the Figure book, pages 212-213
- Client: Adelson Galleries
- Visit figure page
- Type: portfolio
- Portfolio Type: publication_design
- Portfolio Role: design_layout
Andrew Stevovich: Beyond The Figure — Pages 214–215
- Andrew Stevovich: Beyond the Figure book, pages 214-215
- Client: Adelson Galleries
- Visit figure page
- Type: portfolio
- Portfolio Type: publication_design
- Portfolio Role: design_layout
Andrew Stevovich: Beyond The Figure — Pages 216–217
- Andrew Stevovich: Beyond the Figure book, pages 216-217
- Client: Adelson Galleries
- Visit figure page
- Type: portfolio
- Portfolio Type: publication_design
- Portfolio Role: design_layout
Andrew Stevovich: Beyond The Figure — Pages 218–219
- Andrew Stevovich: Beyond the Figure book, pages 218-219
- Client: Adelson Galleries
- Visit figure page
- Type: portfolio
- Portfolio Type: publication_design
- Portfolio Role: design_layout
Andrew Stevovich: Beyond The Figure — Pages 22–23

- Andrew Stevovich: Beyond the Figure book, pages 22-23
- Client: Adelson Galleries
- Visit figure page
- Type: portfolio
- Portfolio Type: publication_design
- Portfolio Role: design_layout
Andrew Stevovich: Beyond The Figure — Pages 220–221

- Andrew Stevovich: Beyond the Figure book, pages 220-221
- Client: Adelson Galleries
- Visit figure page
- Type: portfolio
- Portfolio Type: publication_design
- Portfolio Role: design_layout
Andrew Stevovich: Beyond The Figure — Pages 222–223
- Andrew Stevovich: Beyond the Figure book, pages 222-223
- Client: Adelson Galleries
- Visit figure page
- Type: portfolio
- Portfolio Type: publication_design
- Portfolio Role: design_layout
Andrew Stevovich: Beyond The Figure — Pages 224–225

- Andrew Stevovich: Beyond the Figure book, pages 224-225
- Client: Adelson Galleries
- Visit figure page
- Type: portfolio
- Portfolio Type: publication_design
- Portfolio Role: design_layout
Andrew Stevovich: Beyond The Figure — Pages 24–25
- Andrew Stevovich: Beyond the Figure book, pages 24-25
- Client: Adelson Galleries
- Visit figure page
- Type: portfolio
- Portfolio Type: publication_design
- Portfolio Role: design_layout
Andrew Stevovich: Beyond The Figure — Pages 26–27
- Andrew Stevovich: Beyond the Figure book, pages 26-27
- Client: Adelson Galleries
- Visit figure page
- Type: portfolio
- Portfolio Type: publication_design
- Portfolio Role: design_layout
Andrew Stevovich: Beyond The Figure — Pages 28–29
- Andrew Stevovich: Beyond the Figure book, pages 28-29
- Client: Adelson Galleries
- Visit figure page
- Type: portfolio
- Portfolio Type: publication_design
- Portfolio Role: design_layout
Andrew Stevovich: Beyond The Figure — Pages 30–31
- Andrew Stevovich: Beyond the Figure book, pages 30-31
- Client: Adelson Galleries
- Visit figure page
- Type: portfolio
- Portfolio Type: publication_design
- Portfolio Role: design_layout
Andrew Stevovich: Beyond The Figure — Pages 32–33
- Andrew Stevovich: Beyond the Figure book, pages 32-33
- Client: Adelson Galleries
- Visit figure page
- Type: portfolio
- Portfolio Type: publication_design
- Portfolio Role: design_layout
Andrew Stevovich: Beyond The Figure — Pages 34–35
- Andrew Stevovich: Beyond the Figure book, pages 34-35
- Client: Adelson Galleries
- Visit figure page
- Type: portfolio
- Portfolio Type: publication_design
- Portfolio Role: design_layout
Andrew Stevovich: Beyond The Figure — Pages 36–37
- Andrew Stevovich: Beyond the Figure book, pages 36-37
- Client: Adelson Galleries
- Visit figure page
- Type: portfolio
- Portfolio Type: publication_design
- Portfolio Role: design_layout
Andrew Stevovich: Beyond The Figure — Pages 38–39
- Andrew Stevovich: Beyond the Figure book, pages 38-39
- Client: Adelson Galleries
- Visit figure page
- Type: portfolio
- Portfolio Type: publication_design
- Portfolio Role: design_layout
Andrew Stevovich: Beyond The Figure — Pages 4–5
- Andrew Stevovich: Beyond the Figure book, pages 4-5
- Client: Adelson Galleries
- Visit figure page
- Type: portfolio
- Portfolio Type: publication_design
- Portfolio Role: design_layout
Andrew Stevovich: Beyond The Figure — Pages 40–41
- Andrew Stevovich: Beyond the Figure book, pages 40-41
- Client: Adelson Galleries
- Visit figure page
- Type: portfolio
- Portfolio Type: publication_design
- Portfolio Role: design_layout
Andrew Stevovich: Beyond The Figure — Pages 42–43
- Andrew Stevovich: Beyond the Figure book, pages 42-43
- Client: Adelson Galleries
- Visit figure page
- Type: portfolio
- Portfolio Type: publication_design
- Portfolio Role: design_layout
Andrew Stevovich: Beyond The Figure — Pages 44–45
- Andrew Stevovich: Beyond the Figure book, pages 44-45
- Client: Adelson Galleries
- Visit figure page
- Type: portfolio
- Portfolio Type: publication_design
- Portfolio Role: design_layout
Andrew Stevovich: Beyond The Figure — Pages 46–47
- Andrew Stevovich: Beyond the Figure book, pages 46-47
- Client: Adelson Galleries
- Visit figure page
- Type: portfolio
- Portfolio Type: publication_design
- Portfolio Role: design_layout
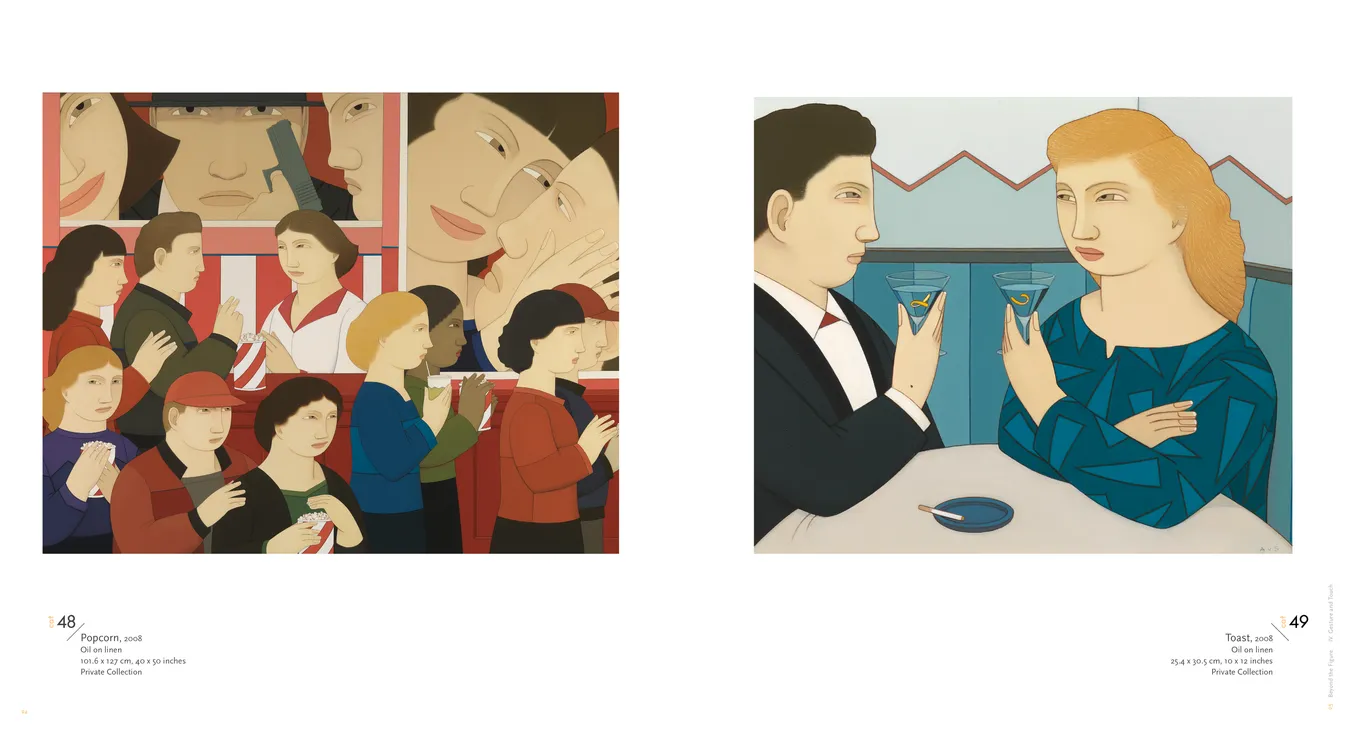
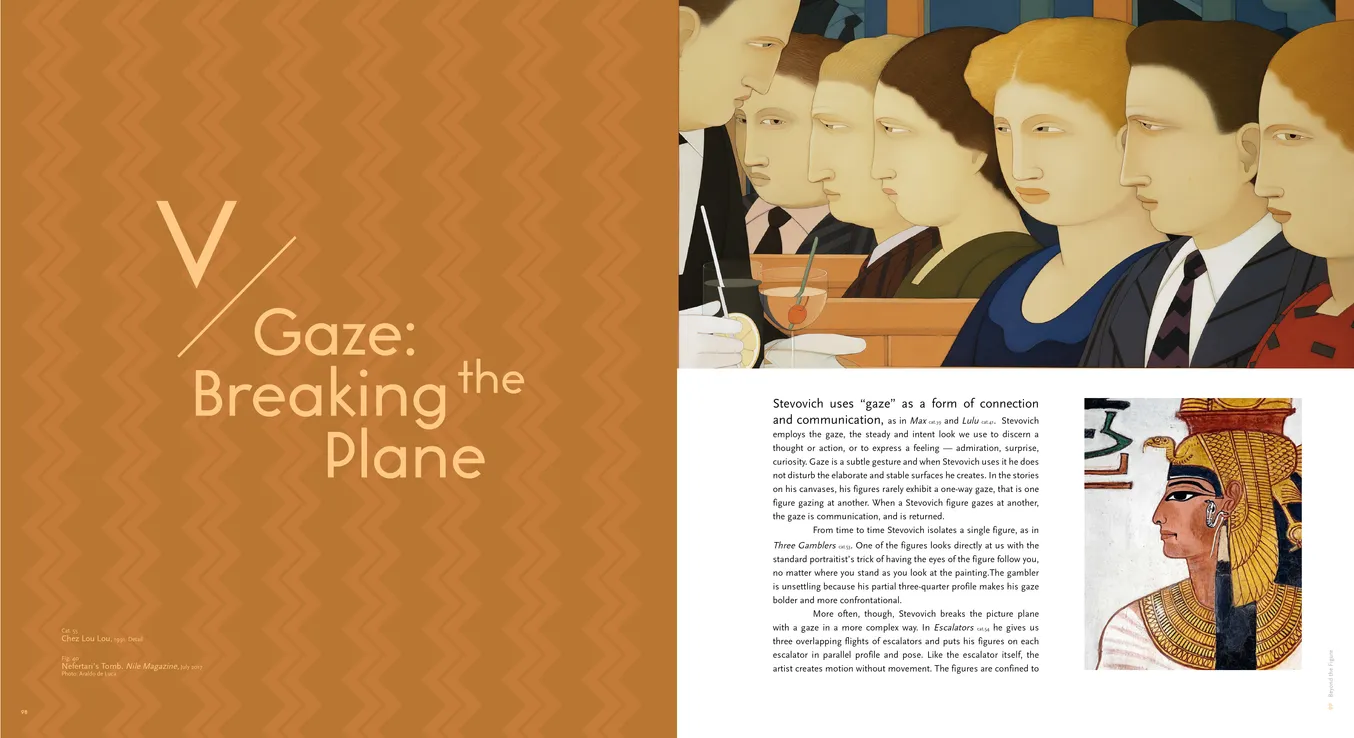
Andrew Stevovich: Beyond The Figure — Pages 48–49
- Andrew Stevovich: Beyond the Figure book, pages 48-49
- Client: Adelson Galleries
- Visit figure page
- Type: portfolio
- Portfolio Type: publication_design
- Portfolio Role: design_layout
Andrew Stevovich: Beyond The Figure — Pages 50–51
- Andrew Stevovich: Beyond the Figure book, pages 50-51
- Client: Adelson Galleries
- Visit figure page
- Type: portfolio
- Portfolio Type: publication_design
- Portfolio Role: design_layout
Andrew Stevovich: Beyond The Figure — Pages 52–53
- Andrew Stevovich: Beyond the Figure book, pages 52-53
- Client: Adelson Galleries
- Visit figure page
- Type: portfolio
- Portfolio Type: publication_design
- Portfolio Role: design_layout
Andrew Stevovich: Beyond The Figure — Pages 54–55
- Andrew Stevovich: Beyond the Figure book, pages 54-55
- Client: Adelson Galleries
- Visit figure page
- Type: portfolio
- Portfolio Type: publication_design
- Portfolio Role: design_layout
Andrew Stevovich: Beyond The Figure — Pages 56–57

- Andrew Stevovich: Beyond the Figure book, pages 56-57
- Client: Adelson Galleries
- Visit figure page
- Type: portfolio
- Portfolio Type: publication_design
- Portfolio Role: design_layout
Andrew Stevovich: Beyond The Figure — Pages 58–59
- Andrew Stevovich: Beyond the Figure book, pages 58-59
- Client: Adelson Galleries
- Visit figure page
- Type: portfolio
- Portfolio Type: publication_design
- Portfolio Role: design_layout
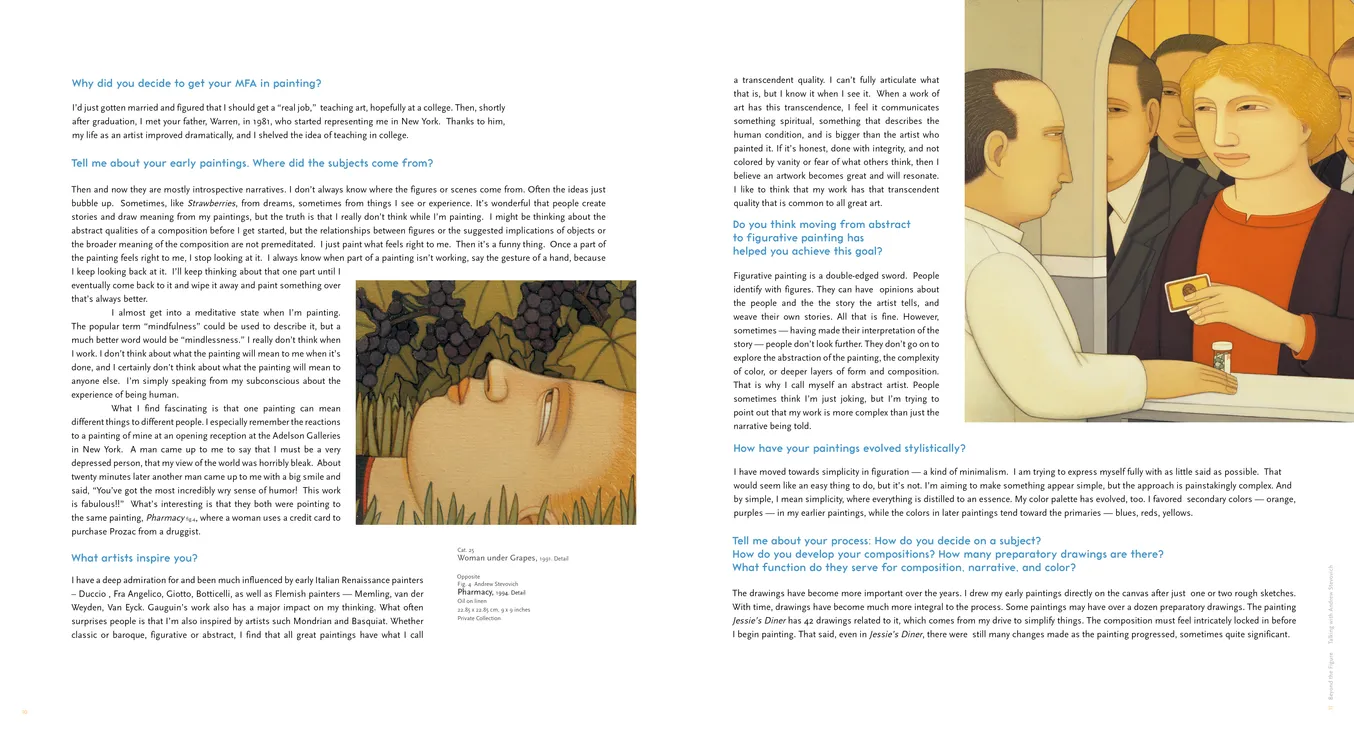
Andrew Stevovich: Beyond The Figure — Pages 6–7
- Andrew Stevovich: Beyond the Figure book, pages 6-7
- Client: Adelson Galleries
- Visit figure page
- Type: portfolio
- Portfolio Type: publication_design
- Portfolio Role: design_layout
Andrew Stevovich: Beyond The Figure — Pages 60–61

- Andrew Stevovich: Beyond the Figure book, pages 60-61
- Client: Adelson Galleries
- Visit figure page
- Type: portfolio
- Portfolio Type: publication_design
- Portfolio Role: design_layout
Andrew Stevovich: Beyond The Figure — Pages 62–63

- Andrew Stevovich: Beyond the Figure book, pages 62-63
- Client: Adelson Galleries
- Visit figure page
- Type: portfolio
- Portfolio Type: publication_design
- Portfolio Role: design_layout
Andrew Stevovich: Beyond The Figure — Pages 64–65

- Andrew Stevovich: Beyond the Figure book, pages 64-65
- Client: Adelson Galleries
- Visit figure page
- Type: portfolio
- Portfolio Type: publication_design
- Portfolio Role: design_layout
Andrew Stevovich: Beyond The Figure — Pages 66–67
- Andrew Stevovich: Beyond the Figure book, pages 66-67
- Client: Adelson Galleries
- Visit figure page
- Type: portfolio
- Portfolio Type: publication_design
- Portfolio Role: design_layout
Andrew Stevovich: Beyond The Figure — Pages 68–69
- Andrew Stevovich: Beyond the Figure book, pages 68-69
- Client: Adelson Galleries
- Visit figure page
- Type: portfolio
- Portfolio Type: publication_design
- Portfolio Role: design_layout
Andrew Stevovich: Beyond The Figure — Pages 70–71
- Andrew Stevovich: Beyond the Figure book, pages 70-71
- Client: Adelson Galleries
- Visit figure page
- Type: portfolio
- Portfolio Type: publication_design
- Portfolio Role: design_layout
Andrew Stevovich: Beyond The Figure — Pages 72–73
- Andrew Stevovich: Beyond the Figure book, pages 72-73
- Client: Adelson Galleries
- Visit figure page
- Type: portfolio
- Portfolio Type: publication_design
- Portfolio Role: design_layout
Andrew Stevovich: Beyond The Figure — Pages 74–75
- Andrew Stevovich: Beyond the Figure book, pages 74-75
- Client: Adelson Galleries
- Visit figure page
- Type: portfolio
- Portfolio Type: publication_design
- Portfolio Role: design_layout
Andrew Stevovich: Beyond The Figure — Pages 76–77
- Andrew Stevovich: Beyond the Figure book, pages 76-77
- Client: Adelson Galleries
- Visit figure page
- Type: portfolio
- Portfolio Type: publication_design
- Portfolio Role: design_layout
Andrew Stevovich: Beyond The Figure — Pages 78–79
- Andrew Stevovich: Beyond the Figure book, pages 78-79
- Client: Adelson Galleries
- Visit figure page
- Type: portfolio
- Portfolio Type: publication_design
- Portfolio Role: design_layout
Andrew Stevovich: Beyond The Figure — Pages 8–9
- Andrew Stevovich: Beyond the Figure book, pages 8-9
- Client: Adelson Galleries
- Visit figure page
- Type: portfolio
- Portfolio Type: publication_design
- Portfolio Role: design_layout
Andrew Stevovich: Beyond The Figure — Pages 80–81
- Andrew Stevovich: Beyond the Figure book, pages 80-81
- Client: Adelson Galleries
- Visit figure page
- Type: portfolio
- Portfolio Type: publication_design
- Portfolio Role: design_layout
Andrew Stevovich: Beyond The Figure — Pages 82–83
- Andrew Stevovich: Beyond the Figure book, pages 82-83
- Client: Adelson Galleries
- Visit figure page
- Type: portfolio
- Portfolio Type: publication_design
- Portfolio Role: design_layout
Andrew Stevovich: Beyond The Figure — Pages 84–85
- Andrew Stevovich: Beyond the Figure book, pages 84-85
- Client: Adelson Galleries
- Visit figure page
- Type: portfolio
- Portfolio Type: publication_design
- Portfolio Role: design_layout
Andrew Stevovich: Beyond The Figure — Pages 86–87
- Andrew Stevovich: Beyond the Figure book, pages 86-87
- Client: Adelson Galleries
- Visit figure page
- Type: portfolio
- Portfolio Type: publication_design
- Portfolio Role: design_layout
Andrew Stevovich: Beyond The Figure — Pages 88–89
- Andrew Stevovich: Beyond the Figure book, pages 88-89
- Client: Adelson Galleries
- Visit figure page
- Type: portfolio
- Portfolio Type: publication_design
- Portfolio Role: design_layout
Andrew Stevovich: Beyond The Figure — Pages 90–91
- Andrew Stevovich: Beyond the Figure book, pages 90-91
- Client: Adelson Galleries
- Visit figure page
- Type: portfolio
- Portfolio Type: publication_design
- Portfolio Role: design_layout
Andrew Stevovich: Beyond The Figure — Pages 92–93
- Andrew Stevovich: Beyond the Figure book, pages 92-93
- Client: Adelson Galleries
- Visit figure page
- Type: portfolio
- Portfolio Type: publication_design
- Portfolio Role: design_layout
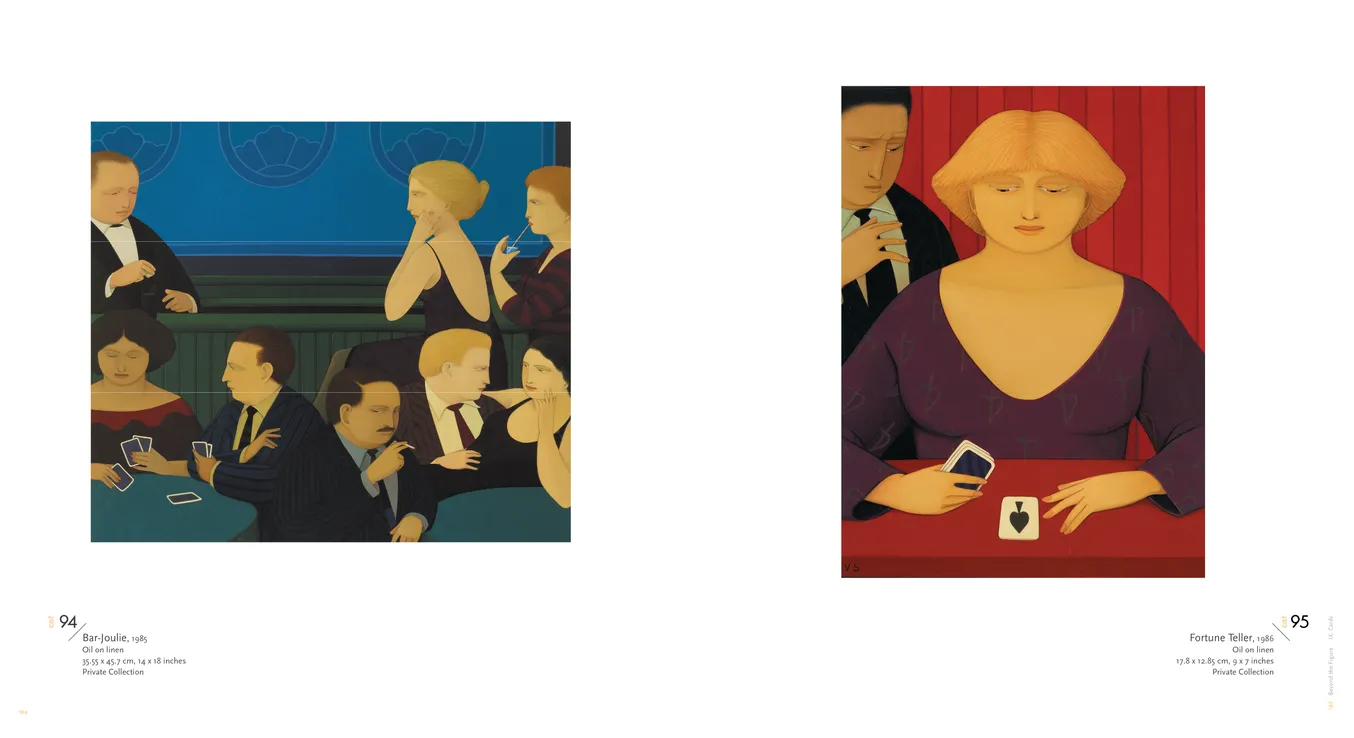
Andrew Stevovich: Beyond The Figure — Pages 94–95
- Andrew Stevovich: Beyond the Figure book, pages 94-95
- Client: Adelson Galleries
- Visit figure page
- Type: portfolio
- Portfolio Type: publication_design
- Portfolio Role: design_layout
Andrew Stevovich: Beyond The Figure — Pages 96–97

- Andrew Stevovich: Beyond the Figure book, pages 96-97
- Client: Adelson Galleries
- Visit figure page
- Type: portfolio
- Portfolio Type: publication_design
- Portfolio Role: design_layout
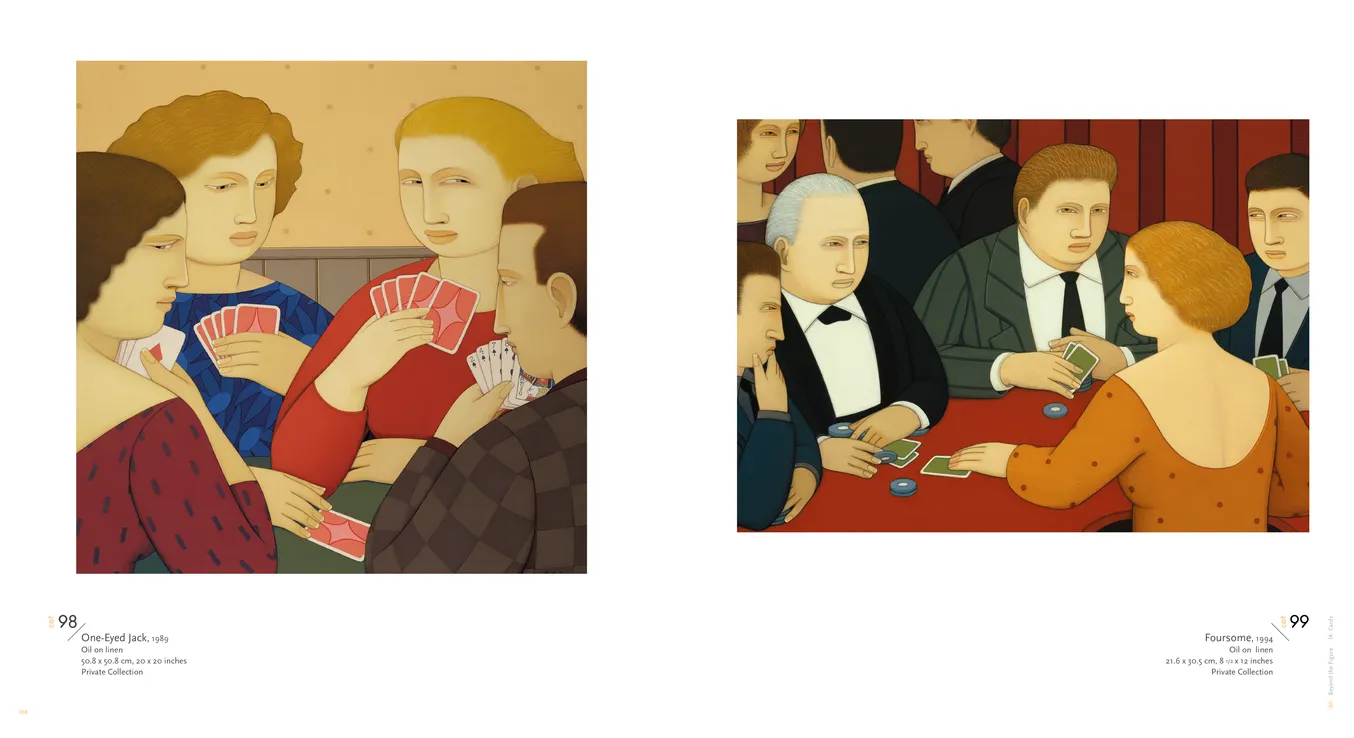
Andrew Stevovich: Beyond The Figure — Pages 98–99
- Andrew Stevovich: Beyond the Figure book, pages 98-99
- Client: Adelson Galleries
- Visit figure page
- Type: portfolio
- Portfolio Type: publication_design
- Portfolio Role: design_layout
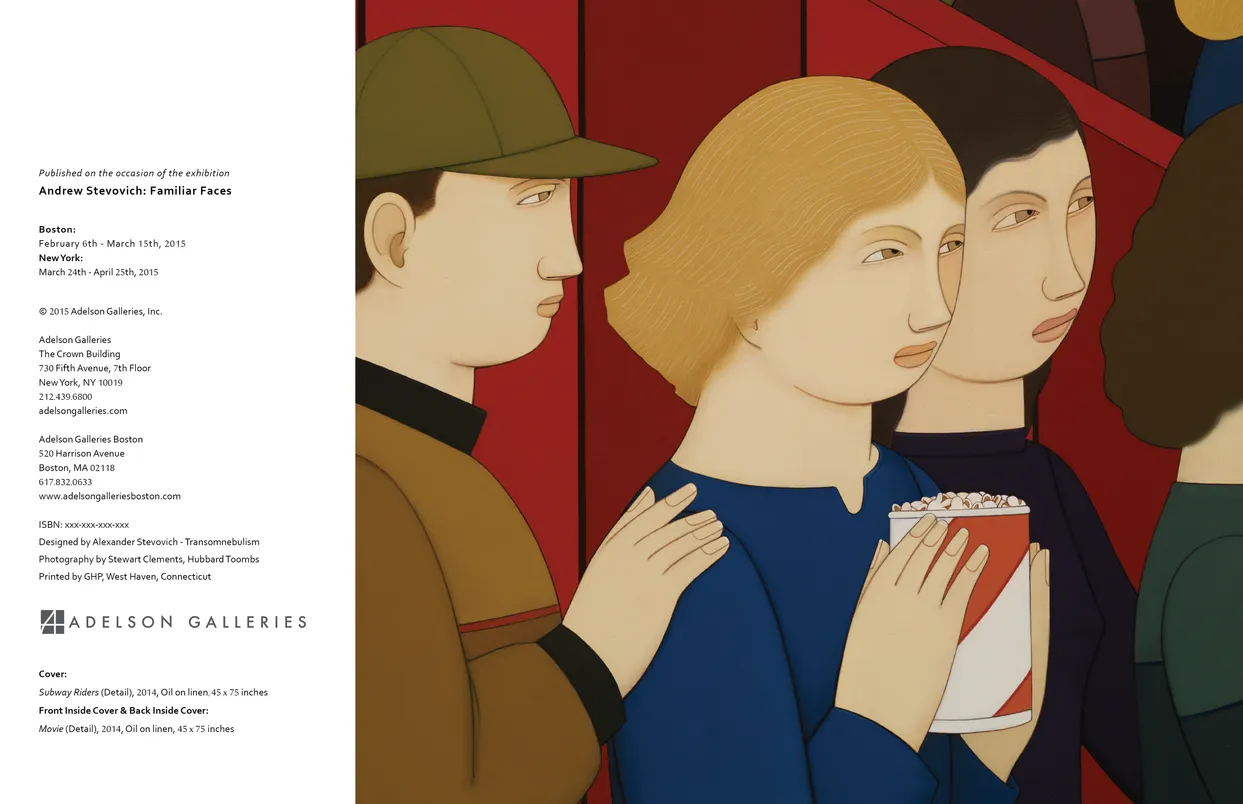
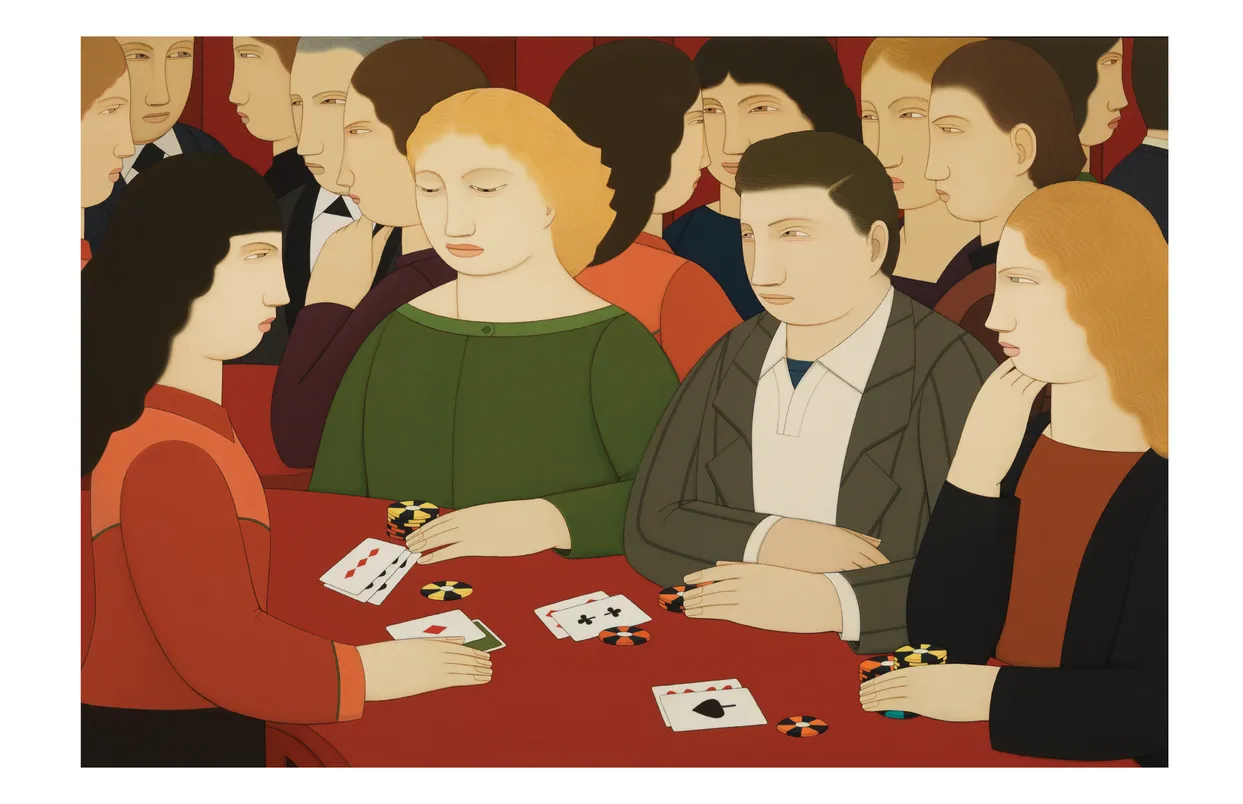
Andrew Stevovich: Familiar Faces — Cover
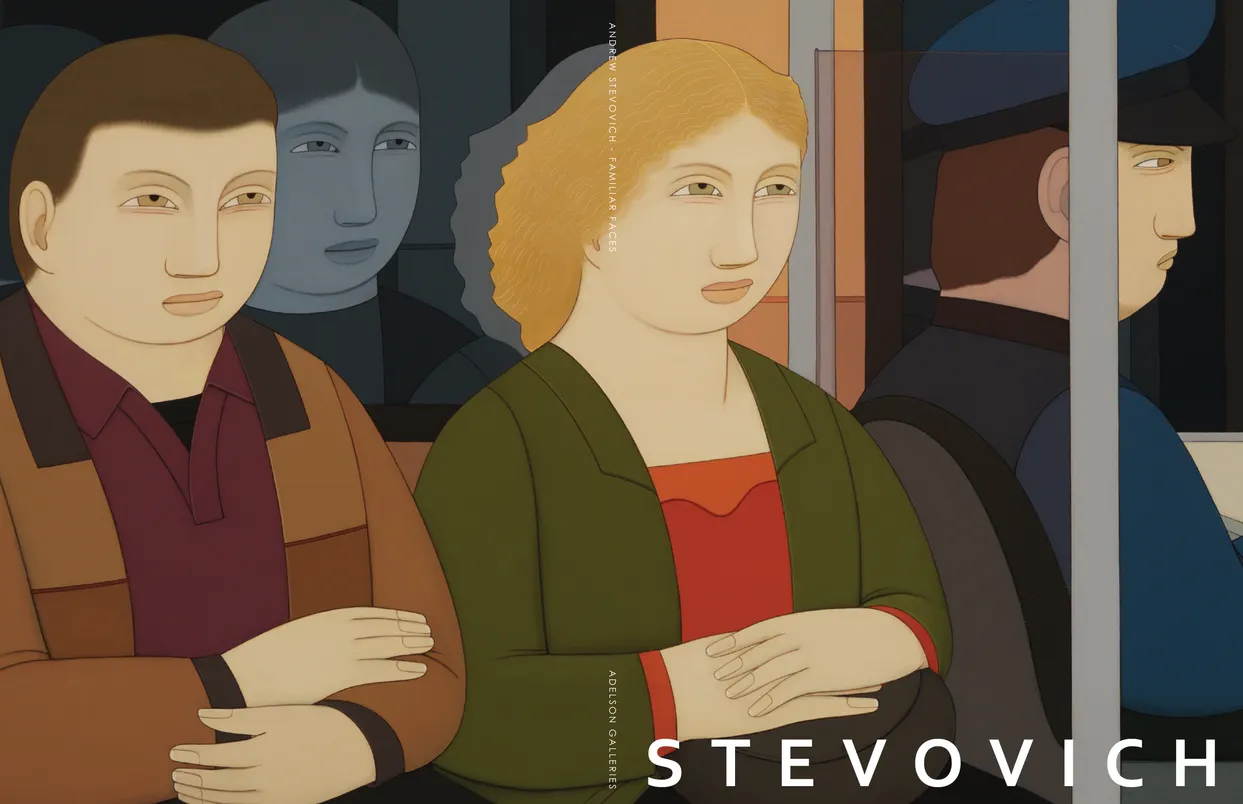
- Andrew Stevovich Familiar Faces exhibition catalog, cover
- Client: Adelson Galleries
- Visit figure page
- Type: portfolio
- Portfolio Type: publication_design
- Portfolio Role: design_layout
Andrew Stevovich: Familiar Faces — Inside Front Cover

- Andrew Stevovich Familiar Faces exhibition catalog, inside front cover
- Client: Adelson Galleries
- Visit figure page
- Type: portfolio
- Portfolio Type: publication_design
- Portfolio Role: design_layout
Andrew Stevovich: Familiar Faces — Inside Front Cover
- Andrew Stevovich Familiar Faces exhibition catalog, inside back cover
- Client: Adelson Galleries
- Visit figure page
- Type: portfolio
- Portfolio Type: publication_design
- Portfolio Role: design_layout
Andrew Stevovich: Familiar Faces — Pages 10–11

- Andrew Stevovich Familiar Faces exhibition catalog, pages 10-11
- Client: Adelson Galleries
- Visit figure page
- Type: portfolio
- Portfolio Type: publication_design
- Portfolio Role: design_layout
Andrew Stevovich: Familiar Faces — Pages 12–13
- Andrew Stevovich Familiar Faces exhibition catalog, pages 12-13
- Client: Adelson Galleries
- Visit figure page
- Type: portfolio
- Portfolio Type: publication_design
- Portfolio Role: design_layout
Andrew Stevovich: Familiar Faces — Pages 14–15
- Andrew Stevovich Familiar Faces exhibition catalog, pages 14-15
- Client: Adelson Galleries
- Visit figure page
- Type: portfolio
- Portfolio Type: publication_design
- Portfolio Role: design_layout
Andrew Stevovich: Familiar Faces — Pages 16–17
- Andrew Stevovich Familiar Faces exhibition catalog, pages 16-17
- Client: Adelson Galleries
- Visit figure page
- Type: portfolio
- Portfolio Type: publication_design
- Portfolio Role: design_layout
Andrew Stevovich: Familiar Faces — Pages 18–19
- Andrew Stevovich Familiar Faces exhibition catalog, pages 18-19
- Client: Adelson Galleries
- Visit figure page
- Type: portfolio
- Portfolio Type: publication_design
- Portfolio Role: design_layout
Andrew Stevovich: Familiar Faces — Pages 2–3
- Andrew Stevovich Familiar Faces exhibition catalog, pages 2-3
- Client: Adelson Galleries
- Visit figure page
- Type: portfolio
- Portfolio Type: publication_design
- Portfolio Role: design_layout
Andrew Stevovich: Familiar Faces — Pages 20–21
- Andrew Stevovich Familiar Faces exhibition catalog, pages 20-21
- Client: Adelson Galleries
- Visit figure page
- Type: portfolio
- Portfolio Type: publication_design
- Portfolio Role: design_layout
Andrew Stevovich: Familiar Faces — Pages 22–23
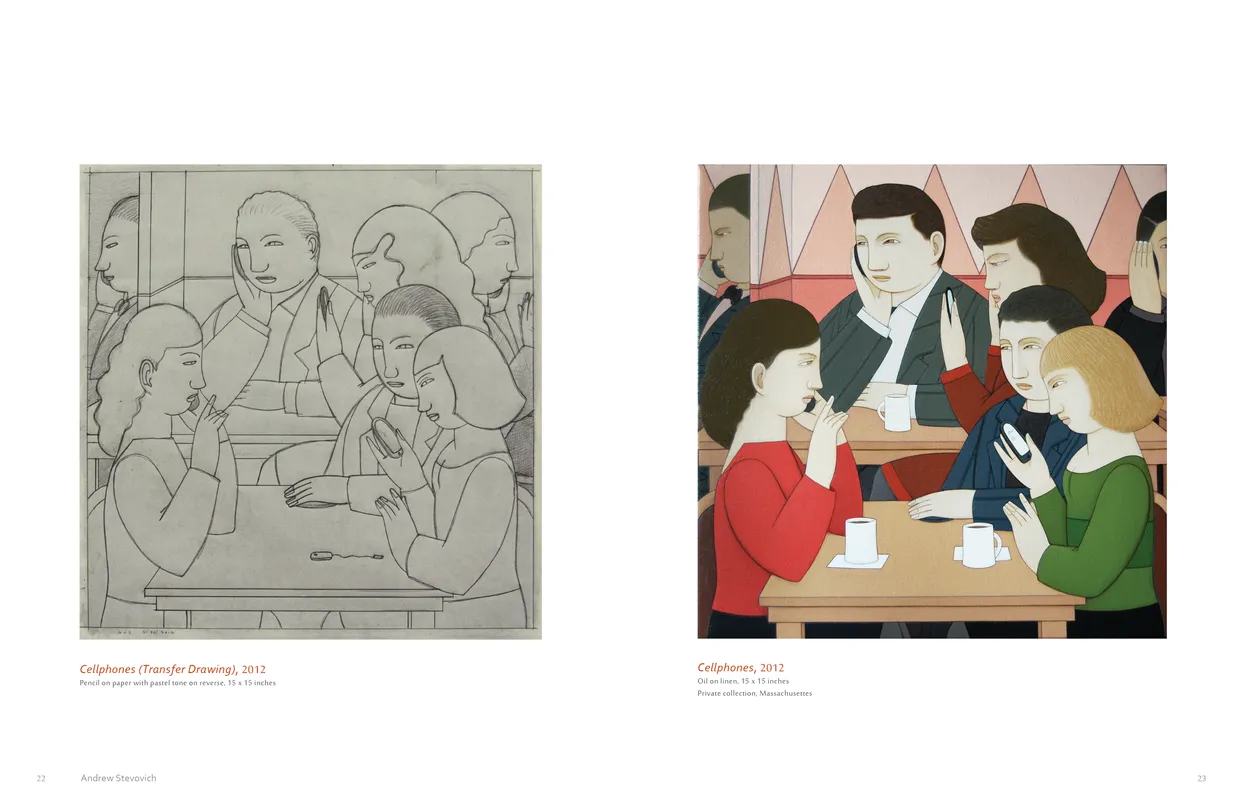
- Andrew Stevovich Familiar Faces exhibition catalog, pages 22-23
- Client: Adelson Galleries
- Visit figure page
- Type: portfolio
- Portfolio Type: publication_design
- Portfolio Role: design_layout
Andrew Stevovich: Familiar Faces — Pages 24–25
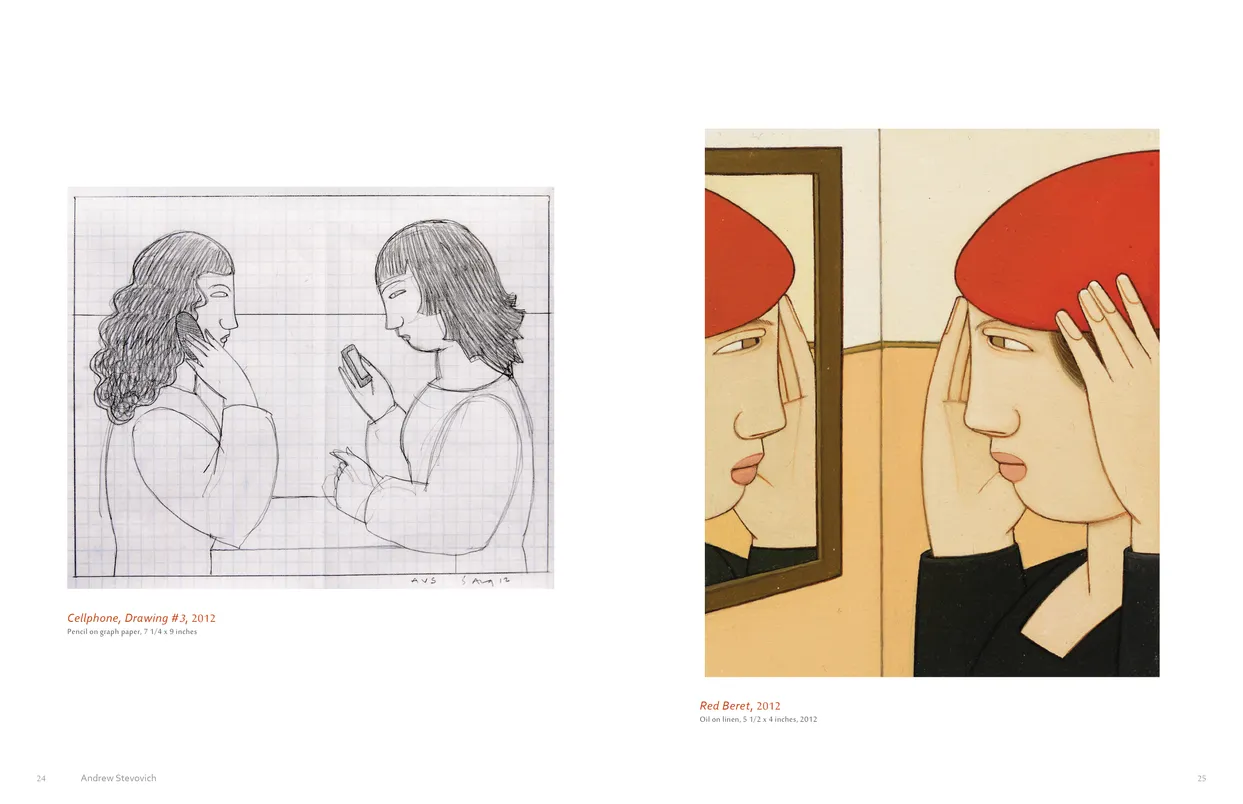
- Andrew Stevovich Familiar Faces exhibition catalog, pages 24-25
- Client: Adelson Galleries
- Visit figure page
- Type: portfolio
- Portfolio Type: publication_design
- Portfolio Role: design_layout
Andrew Stevovich: Familiar Faces — Pages 26–27

- Andrew Stevovich Familiar Faces exhibition catalog, pages 26-27
- Client: Adelson Galleries
- Visit figure page
- Type: portfolio
- Portfolio Type: publication_design
- Portfolio Role: design_layout
Andrew Stevovich: Familiar Faces — Pages 28–29
- Andrew Stevovich Familiar Faces exhibition catalog, pages 28-29
- Client: Adelson Galleries
- Visit figure page
- Type: portfolio
- Portfolio Type: publication_design
- Portfolio Role: design_layout
Andrew Stevovich: Familiar Faces — Pages 30–31

- Andrew Stevovich Familiar Faces exhibition catalog, pages 30-31
- Client: Adelson Galleries
- Visit figure page
- Type: portfolio
- Portfolio Type: publication_design
- Portfolio Role: design_layout
Andrew Stevovich: Familiar Faces — Pages 32–33
- Andrew Stevovich Familiar Faces exhibition catalog, pages 32-33
- Client: Adelson Galleries
- Visit figure page
- Type: portfolio
- Portfolio Type: publication_design
- Portfolio Role: design_layout
Andrew Stevovich: Familiar Faces — Pages 34–35
- Andrew Stevovich Familiar Faces exhibition catalog, pages 34-35
- Client: Adelson Galleries
- Visit figure page
- Type: portfolio
- Portfolio Type: publication_design
- Portfolio Role: design_layout
Andrew Stevovich: Familiar Faces — Pages 36–37

- Andrew Stevovich Familiar Faces exhibition catalog, pages 36-37
- Client: Adelson Galleries
- Visit figure page
- Type: portfolio
- Portfolio Type: publication_design
- Portfolio Role: design_layout
Andrew Stevovich: Familiar Faces — Pages 38–39
- Andrew Stevovich Familiar Faces exhibition catalog, pages 38-39
- Client: Adelson Galleries
- Visit figure page
- Type: portfolio
- Portfolio Type: publication_design
- Portfolio Role: design_layout
Andrew Stevovich: Familiar Faces — Pages 4–5
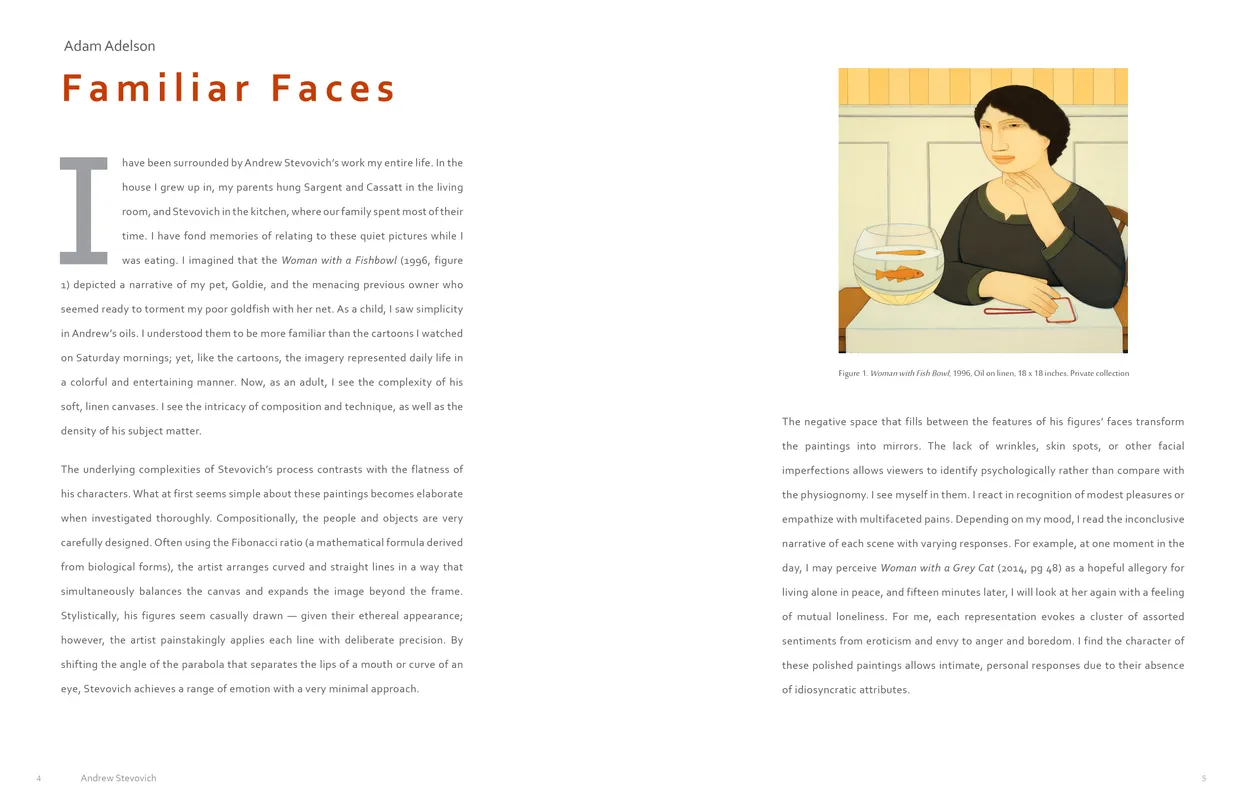
- Andrew Stevovich Familiar Faces exhibition catalog, pages 4-5
- Client: Adelson Galleries
- Visit figure page
- Type: portfolio
- Portfolio Type: publication_design
- Portfolio Role: design_layout
Andrew Stevovich: Familiar Faces — Pages 40–41
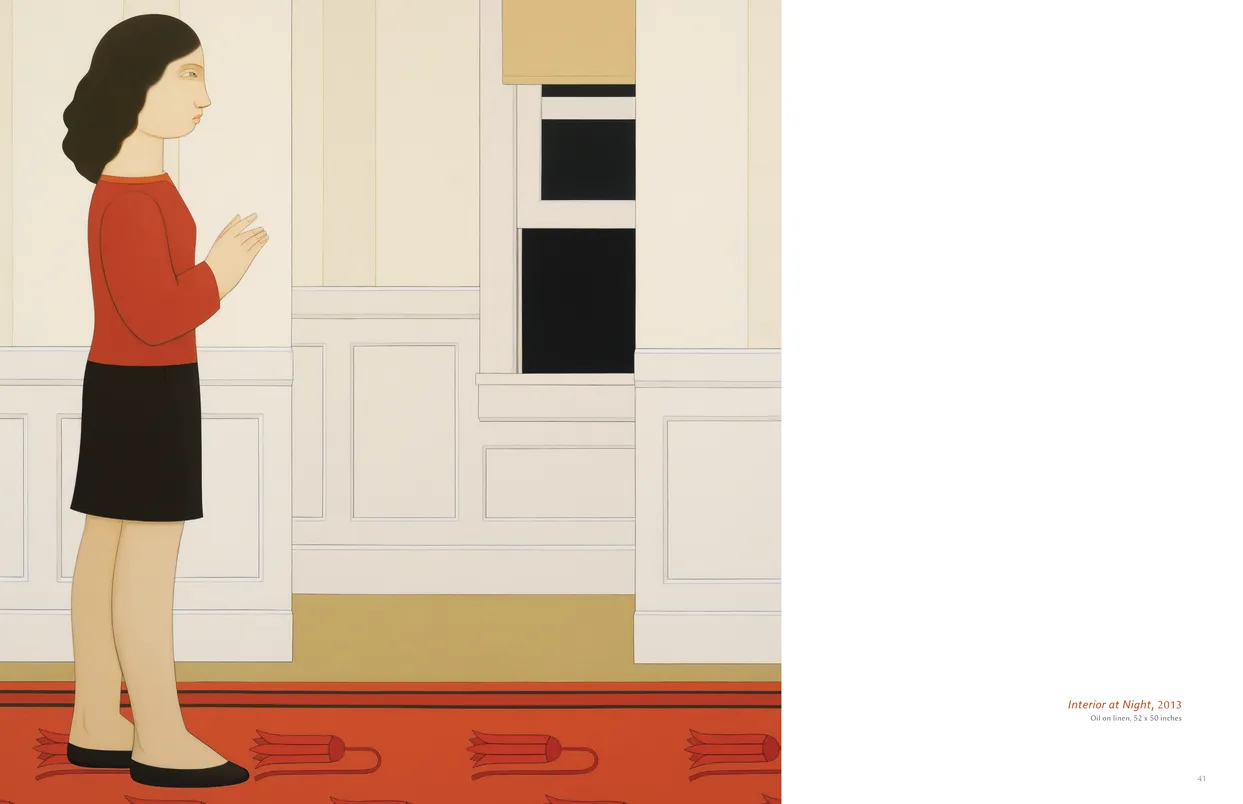
- Andrew Stevovich Familiar Faces exhibition catalog, pages 40-41
- Client: Adelson Galleries
- Visit figure page
- Type: portfolio
- Portfolio Type: publication_design
- Portfolio Role: design_layout
Andrew Stevovich: Familiar Faces — Pages 42–43
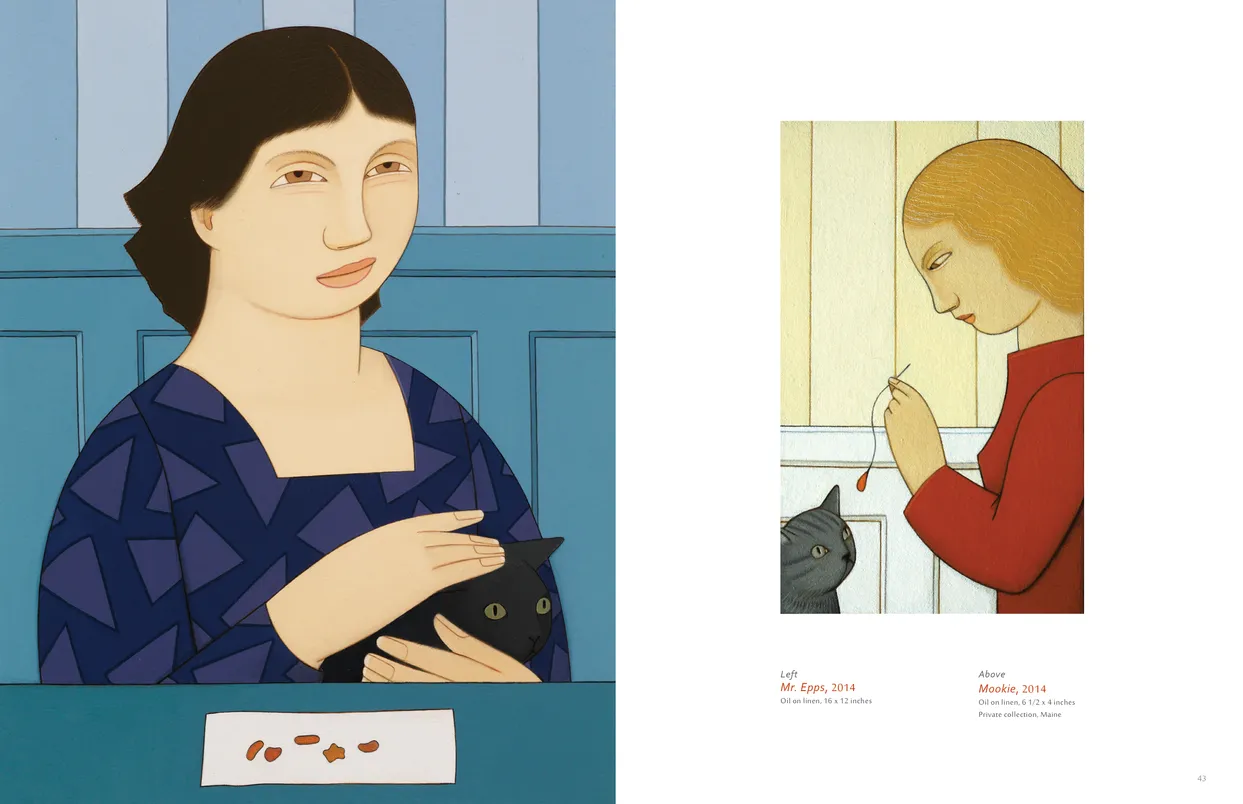
- Andrew Stevovich Familiar Faces exhibition catalog, pages 42-43
- Client: Adelson Galleries
- Visit figure page
- Type: portfolio
- Portfolio Type: publication_design
- Portfolio Role: design_layout
Andrew Stevovich: Familiar Faces — Pages 44–45
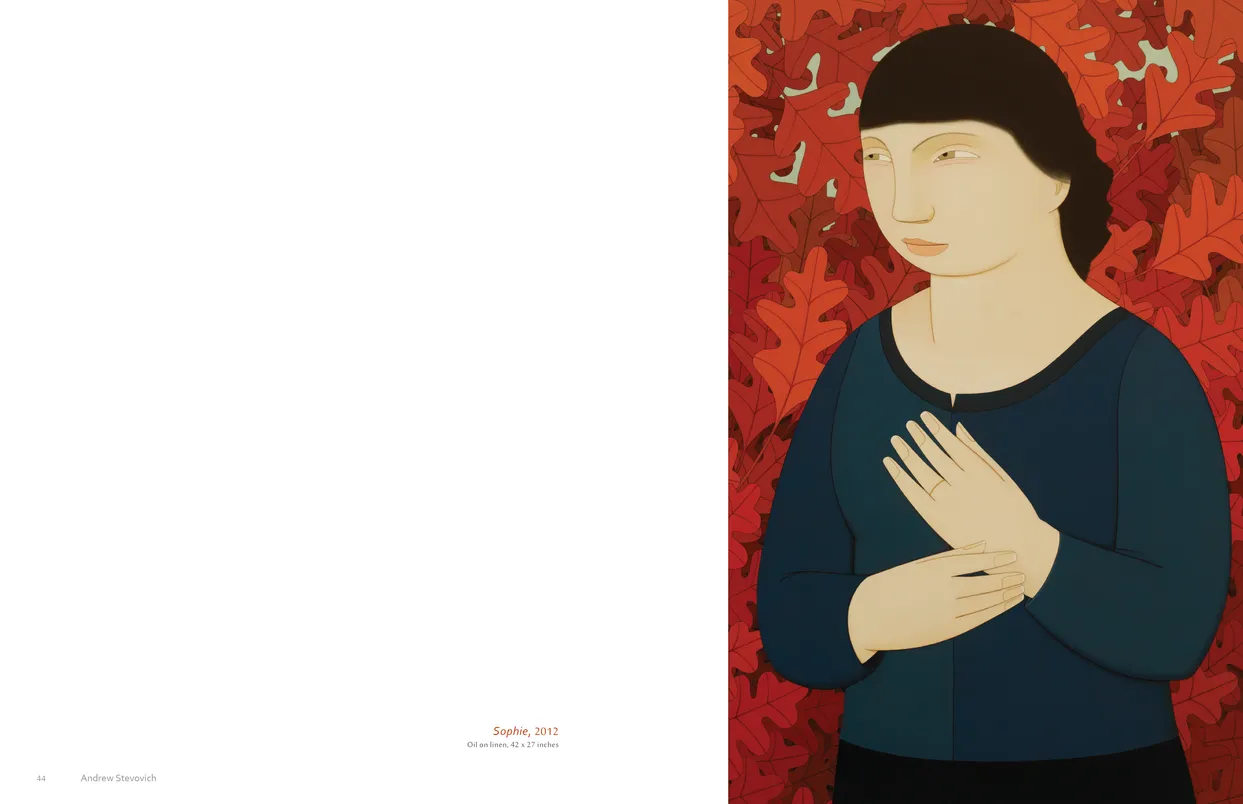
- Andrew Stevovich Familiar Faces exhibition catalog, pages 44-45
- Client: Adelson Galleries
- Visit figure page
- Type: portfolio
- Portfolio Type: publication_design
- Portfolio Role: design_layout
Andrew Stevovich: Familiar Faces — Pages 46–47
- Andrew Stevovich Familiar Faces exhibition catalog, pages 46-47
- Client: Adelson Galleries
- Visit figure page
- Type: portfolio
- Portfolio Type: publication_design
- Portfolio Role: design_layout
Andrew Stevovich: Familiar Faces — Pages 48–49
- Andrew Stevovich Familiar Faces exhibition catalog, pages 48-49
- Client: Adelson Galleries
- Visit figure page
- Type: portfolio
- Portfolio Type: publication_design
- Portfolio Role: design_layout
Andrew Stevovich: Familiar Faces — Pages 50–51
- Andrew Stevovich Familiar Faces exhibition catalog, pages 50-51
- Client: Adelson Galleries
- Visit figure page
- Type: portfolio
- Portfolio Type: publication_design
- Portfolio Role: design_layout
Andrew Stevovich: Familiar Faces — Pages 52–53
- Andrew Stevovich Familiar Faces exhibition catalog, pages 52-53
- Client: Adelson Galleries
- Visit figure page
- Type: portfolio
- Portfolio Type: publication_design
- Portfolio Role: design_layout
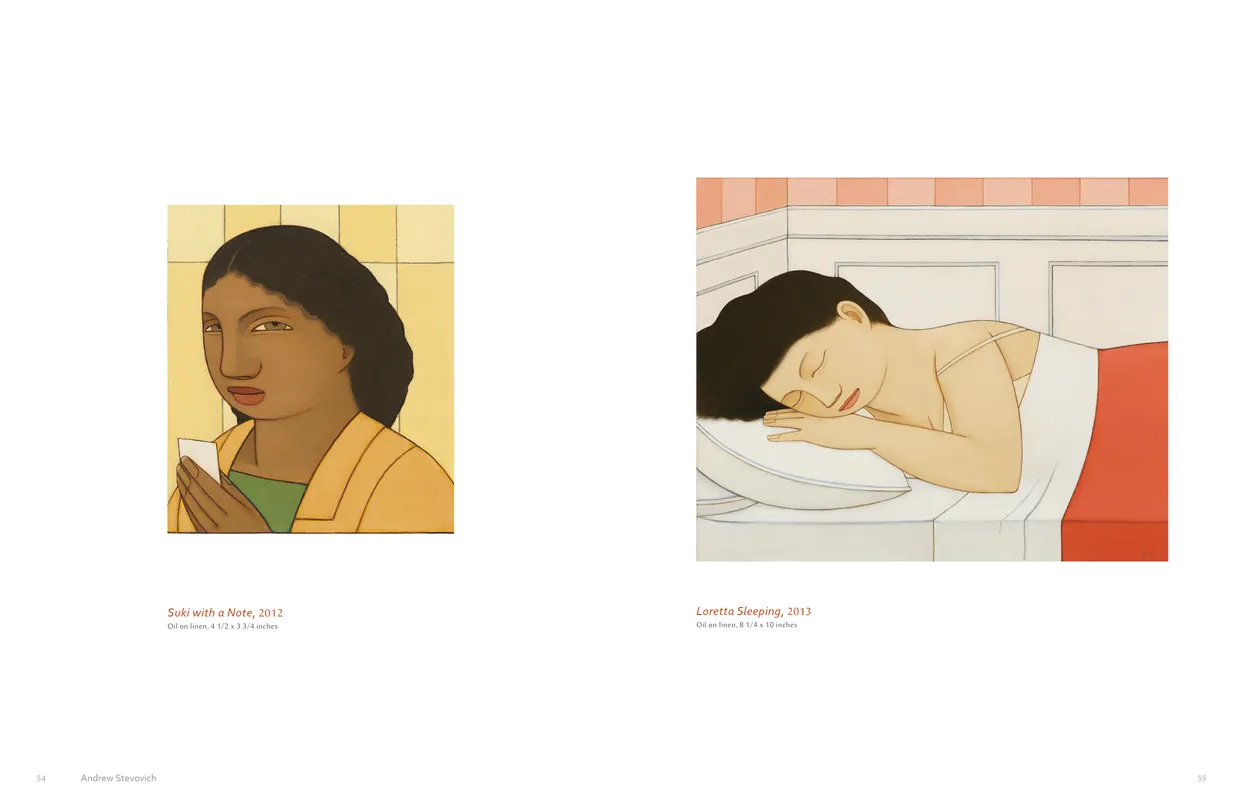
Andrew Stevovich: Familiar Faces — Pages 54–55
- Andrew Stevovich Familiar Faces exhibition catalog, pages 54-55
- Client: Adelson Galleries
- Visit figure page
- Type: portfolio
- Portfolio Type: publication_design
- Portfolio Role: design_layout
Andrew Stevovich: Familiar Faces — Pages 56–57

- Andrew Stevovich Familiar Faces exhibition catalog, pages 56-57
- Client: Adelson Galleries
- Visit figure page
- Type: portfolio
- Portfolio Type: publication_design
- Portfolio Role: design_layout
Andrew Stevovich: Familiar Faces — Pages 58–59

- Andrew Stevovich Familiar Faces exhibition catalog, pages 58-59
- Client: Adelson Galleries
- Visit figure page
- Type: portfolio
- Portfolio Type: publication_design
- Portfolio Role: design_layout
Andrew Stevovich: Familiar Faces — Pages 6–7
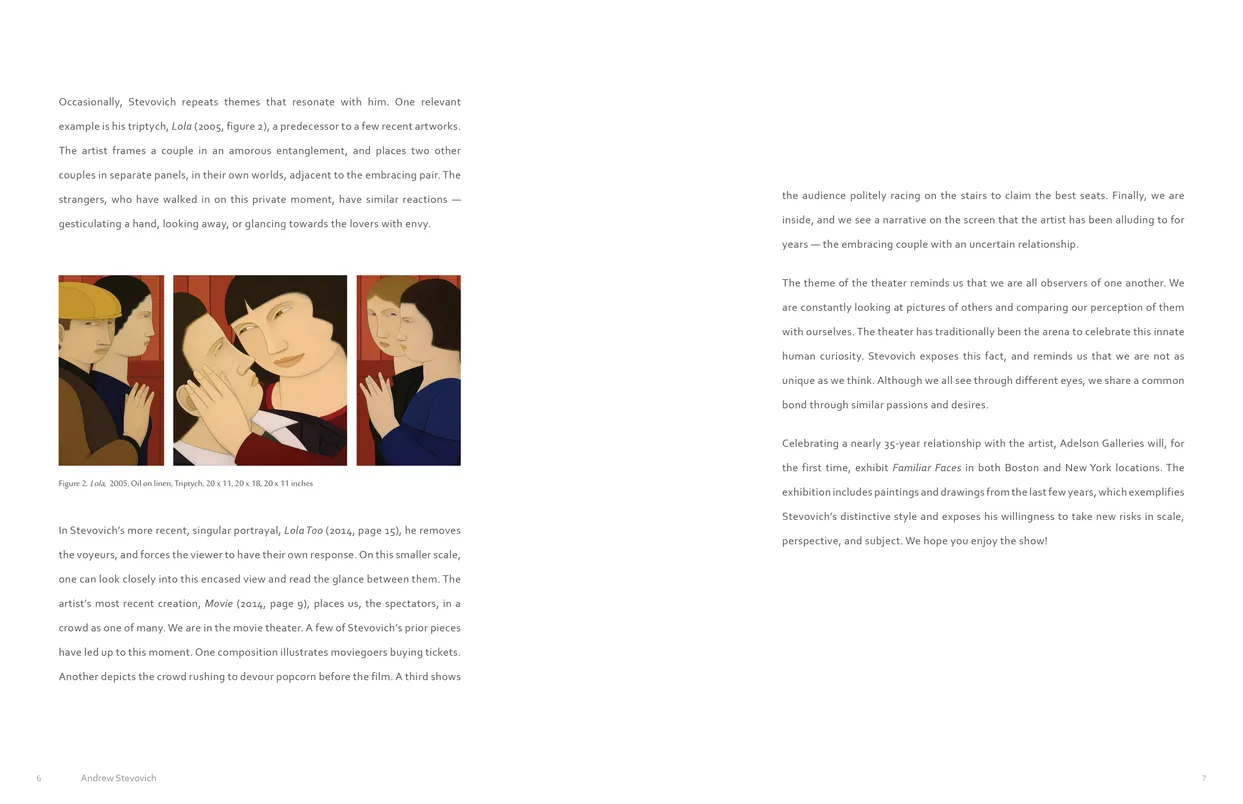
- Andrew Stevovich Familiar Faces exhibition catalog, pages 6-7
- Client: Adelson Galleries
- Visit figure page
- Type: portfolio
- Portfolio Type: publication_design
- Portfolio Role: design_layout
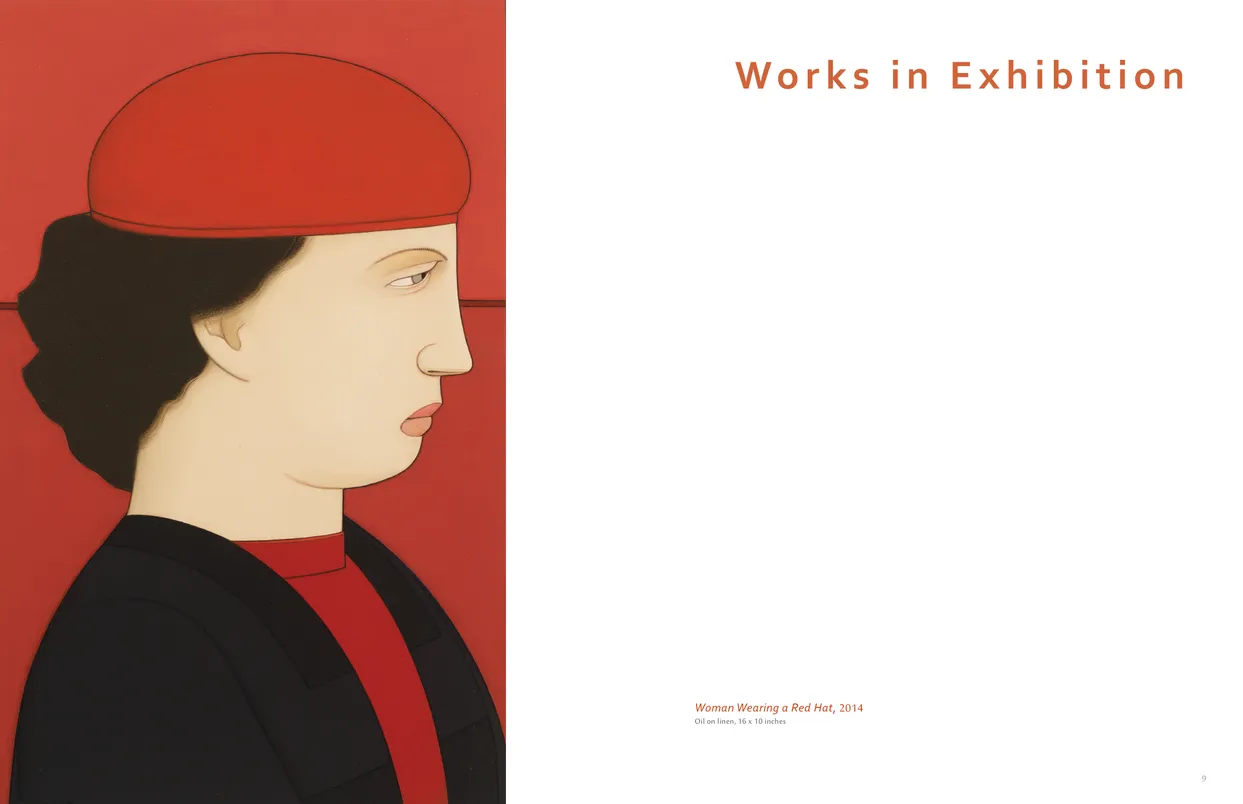
Andrew Stevovich: Familiar Faces — Pages 8–9
- Andrew Stevovich Familiar Faces exhibition catalog, pages 8-9
- Client: Adelson Galleries
- Visit figure page
- Type: portfolio
- Portfolio Type: publication_design
- Portfolio Role: design_layout
Andrew Wyeth Seven Decades Art And Antiques Ad 2014
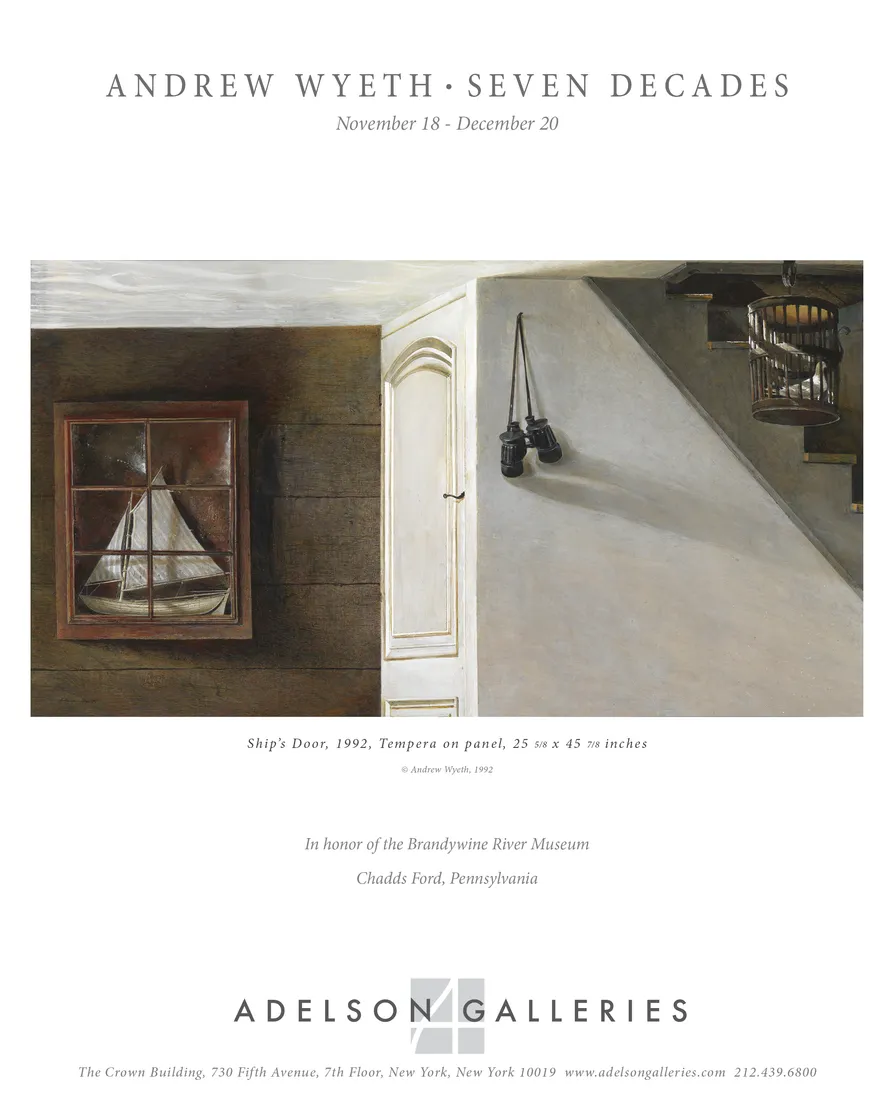
- Andrew Wyeth · Seven Decades — Full-page advertisement for Art & Antiques magazine
- Client: Adelson Galleries
- Visit figure page
- Type: portfolio
- Portfolio Type: advertising
- Portfolio Role: design_layout
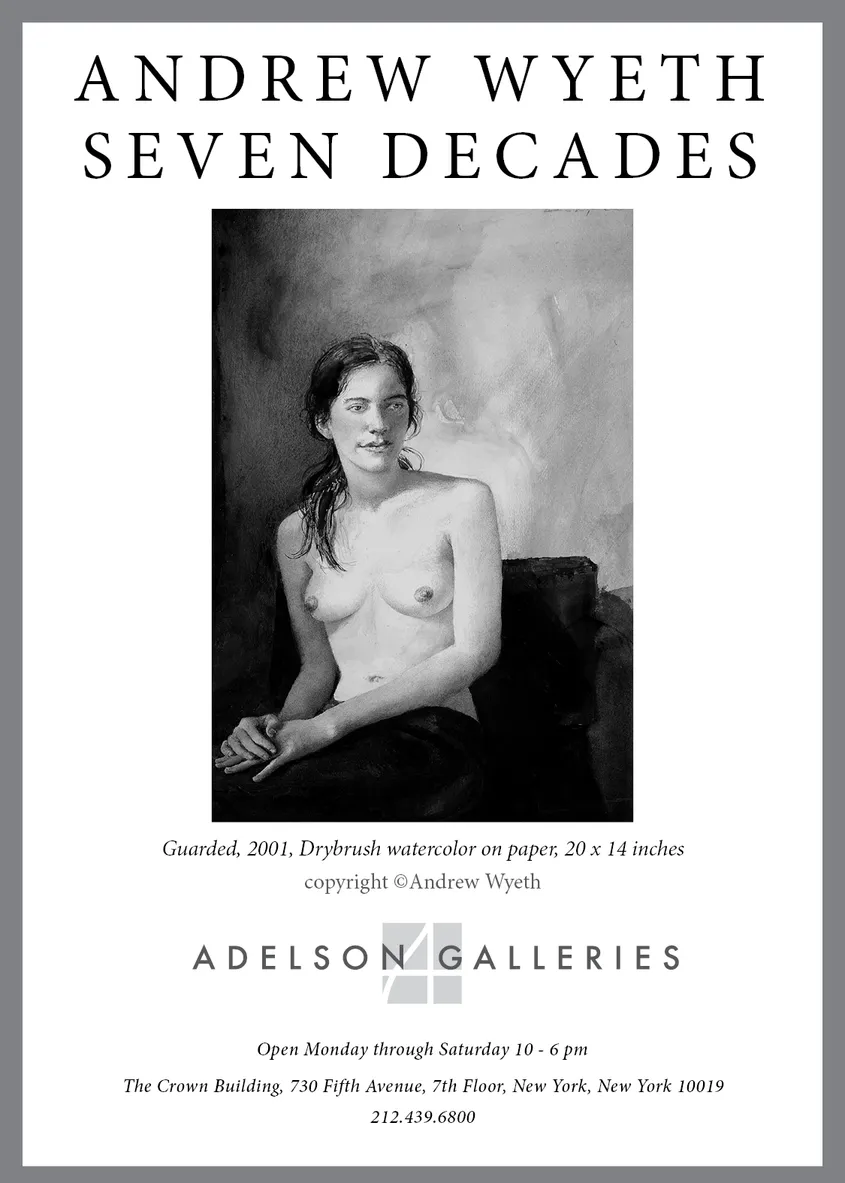
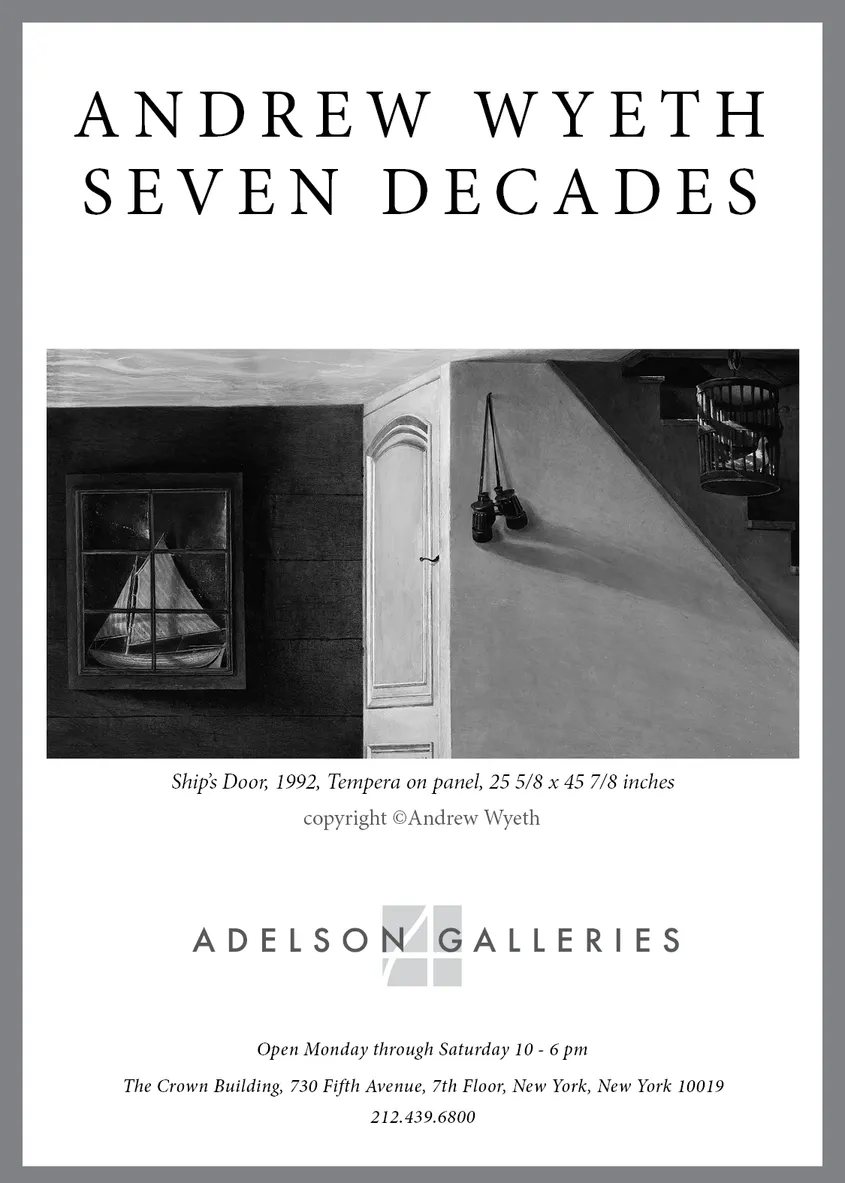
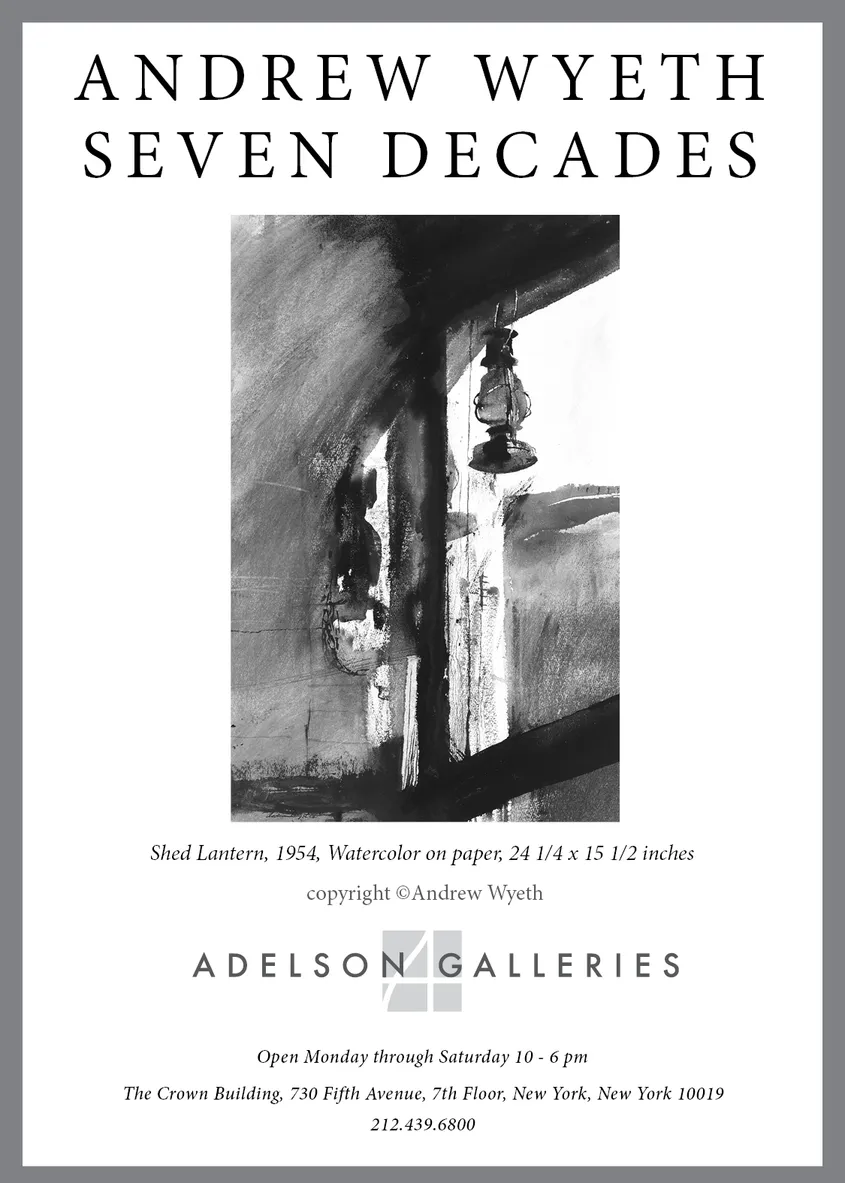
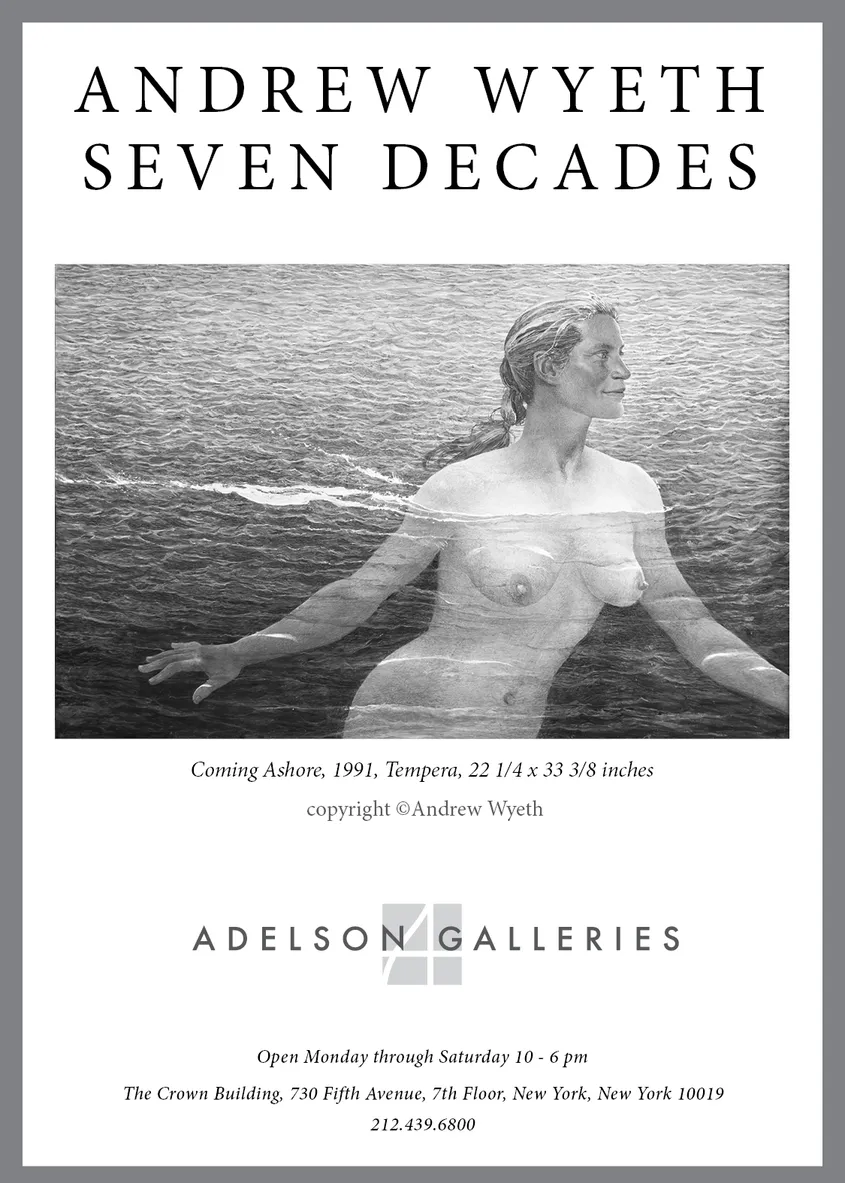
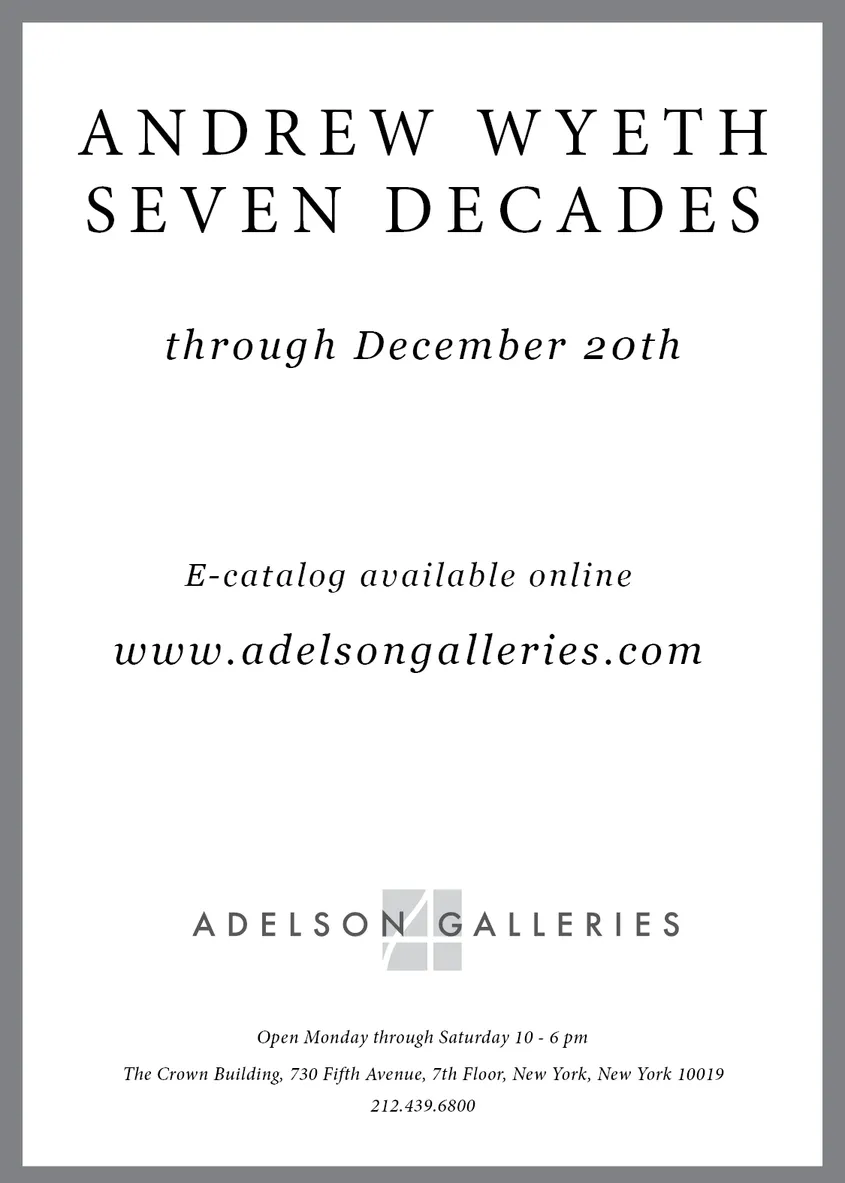
Andrew Wyeth Seven Decades Exhibition Brochure Presentation
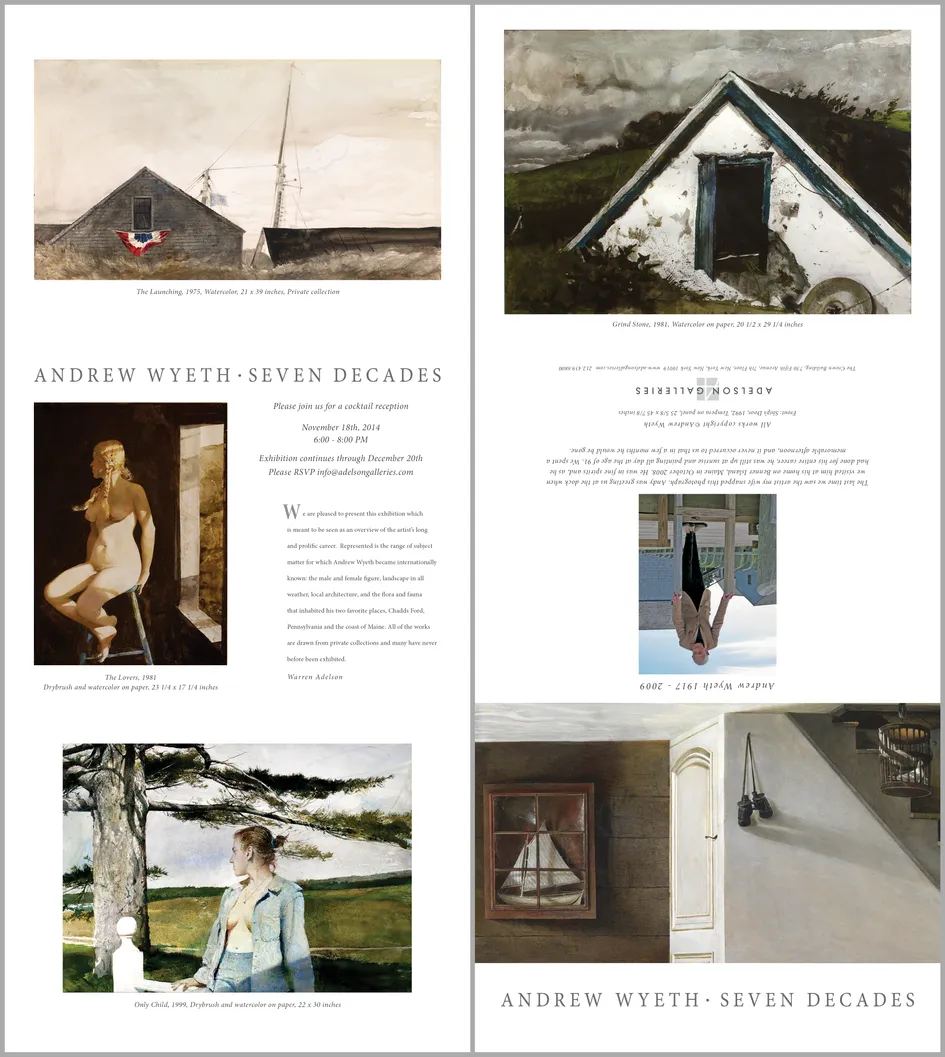
- Folding brochure for the Andrew Wyeth: Seven Decades exhibition
- Client: Adelson Galleries
- Visit figure page
- Type: portfolio
- Portfolio Type: advertising
- Portfolio Role: design_layout
Andrew Wyeth Seven Decades Exhibition Wordmark

- Wordmark for Andrew Wyeth: Seven Decades exhibition
- Client: Adelson Galleries
- Visit figure page
- Type: portfolio
- Portfolio Type: advertising
- Portfolio Role: design_layout
Andrew Wyeth Seven Decades Nyt Ad 01
- Andrew Wyeth: Seven Decades — New York Times print advertisement #1
- Client: Adelson Galleries
- Visit figure page
- Type: portfolio
- Portfolio Type: advertising
- Portfolio Role: design_layout
Andrew Wyeth Seven Decades Nyt Ad 02
- Andrew Wyeth: Seven Decades — New York Times print advertisement #2
- Client: Adelson Galleries
- Visit figure page
- Type: portfolio
- Portfolio Type: advertising
- Portfolio Role: design_layout
Andrew Wyeth Seven Decades Nyt Ad 03
- Andrew Wyeth: Seven Decades — New York Times print advertisement #3
- Client: Adelson Galleries
- Visit figure page
- Type: portfolio
- Portfolio Type: advertising
- Portfolio Role: design_layout
Andrew Wyeth Seven Decades Nyt Ad 04
- Andrew Wyeth: Seven Decades — New York Times print advertisement #4
- Client: Adelson Galleries
- Visit figure page
- Type: portfolio
- Portfolio Type: advertising
- Portfolio Role: design_layout
Andrew Wyeth Seven Decades Nyt Ad 05
- Andrew Wyeth: Seven Decades — New York Times print advertisement #5
- Client: Adelson Galleries
- Visit figure page
- Type: portfolio
- Portfolio Type: advertising
- Portfolio Role: design_layout
Andrew Wyeth: Seven Decades — Cover

- Andrew Wyeth: Seven Decades exhibition catalog, cover
- Client: Adelson Galleries
- Visit figure page
- Type: portfolio
- Portfolio Type: publication_design
- Portfolio Role: design_layout
Andrew Wyeth: Seven Decades — Inside Front Cover
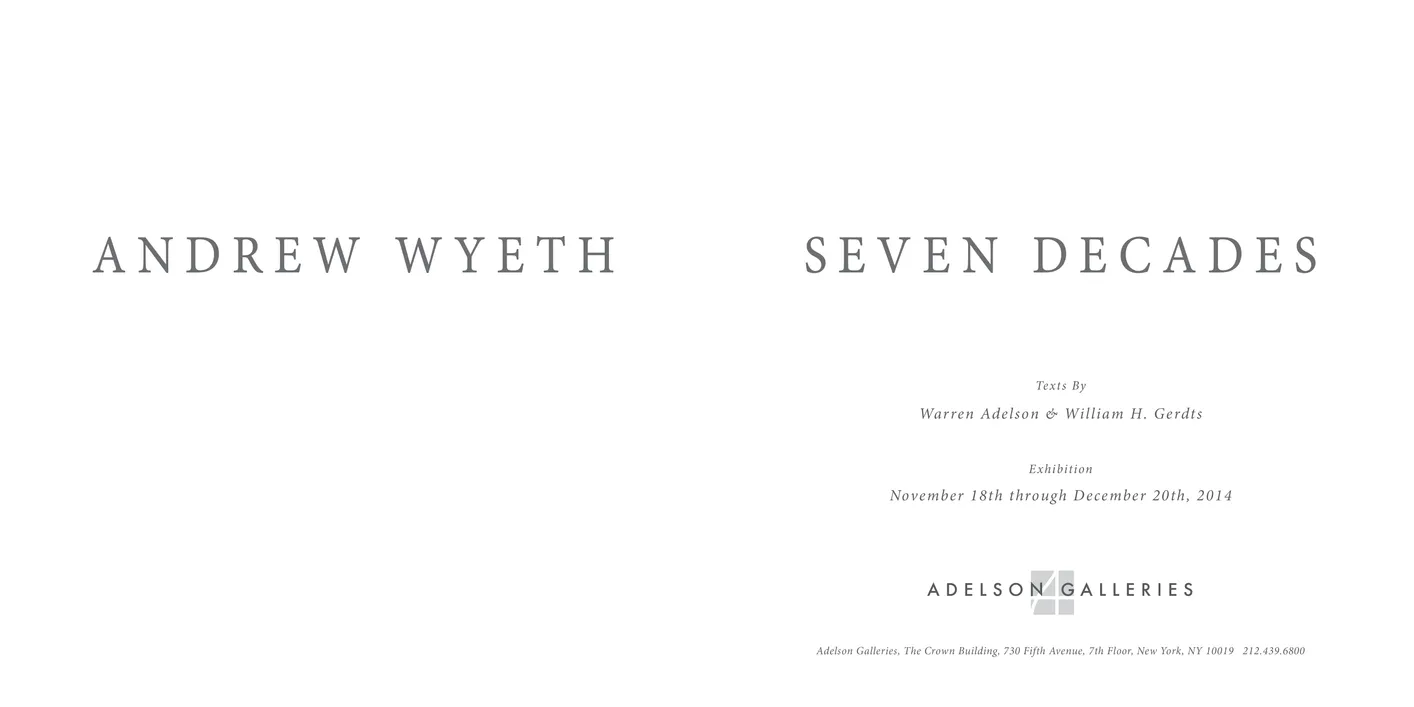
- Andrew Wyeth: Seven Decades exhibition catalog, inside front cover
- Client: Adelson Galleries
- Visit figure page
- Type: portfolio
- Portfolio Type: publication_design
- Portfolio Role: design_layout
Andrew Wyeth: Seven Decades — Pages 10–11
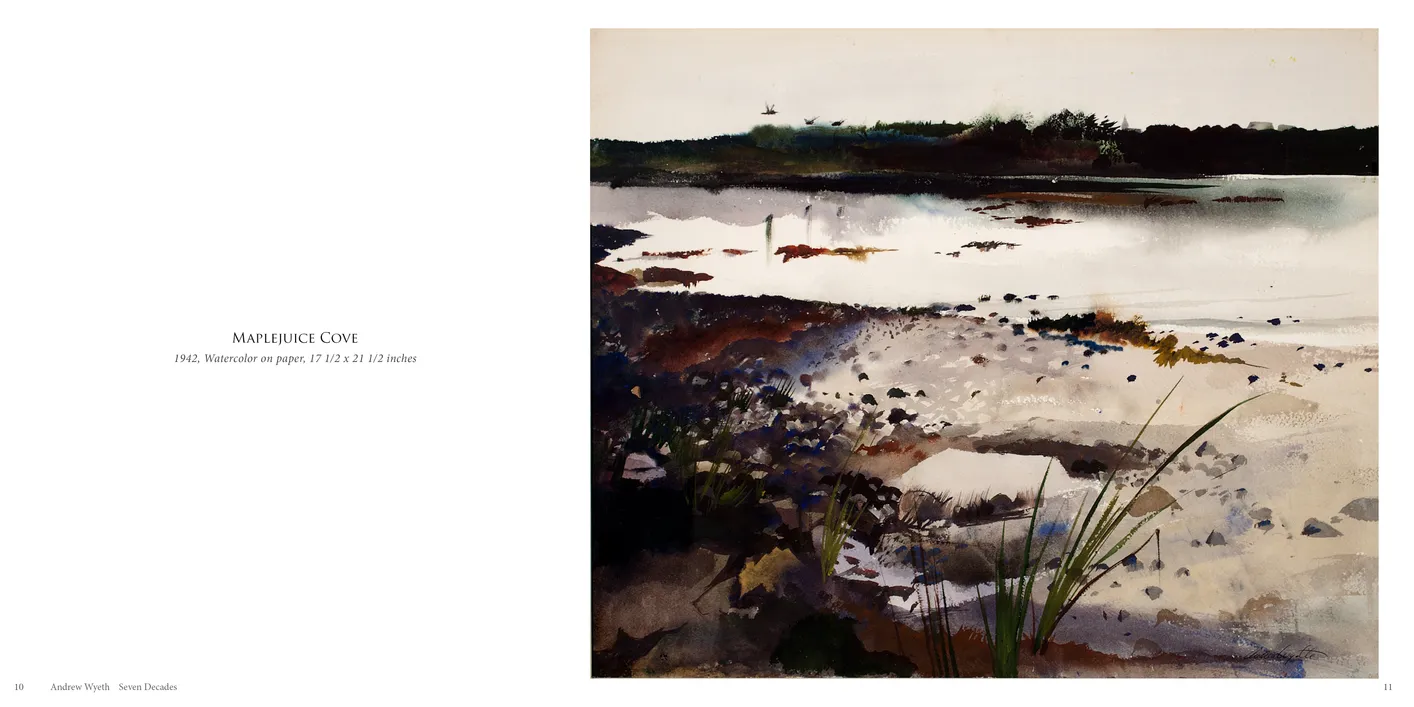
- Andrew Wyeth: Seven Decades exhibition catalog, pages 10-11
- Client: Adelson Galleries
- Visit figure page
- Type: portfolio
- Portfolio Type: publication_design
- Portfolio Role: design_layout
Andrew Wyeth: Seven Decades — Pages 12–13
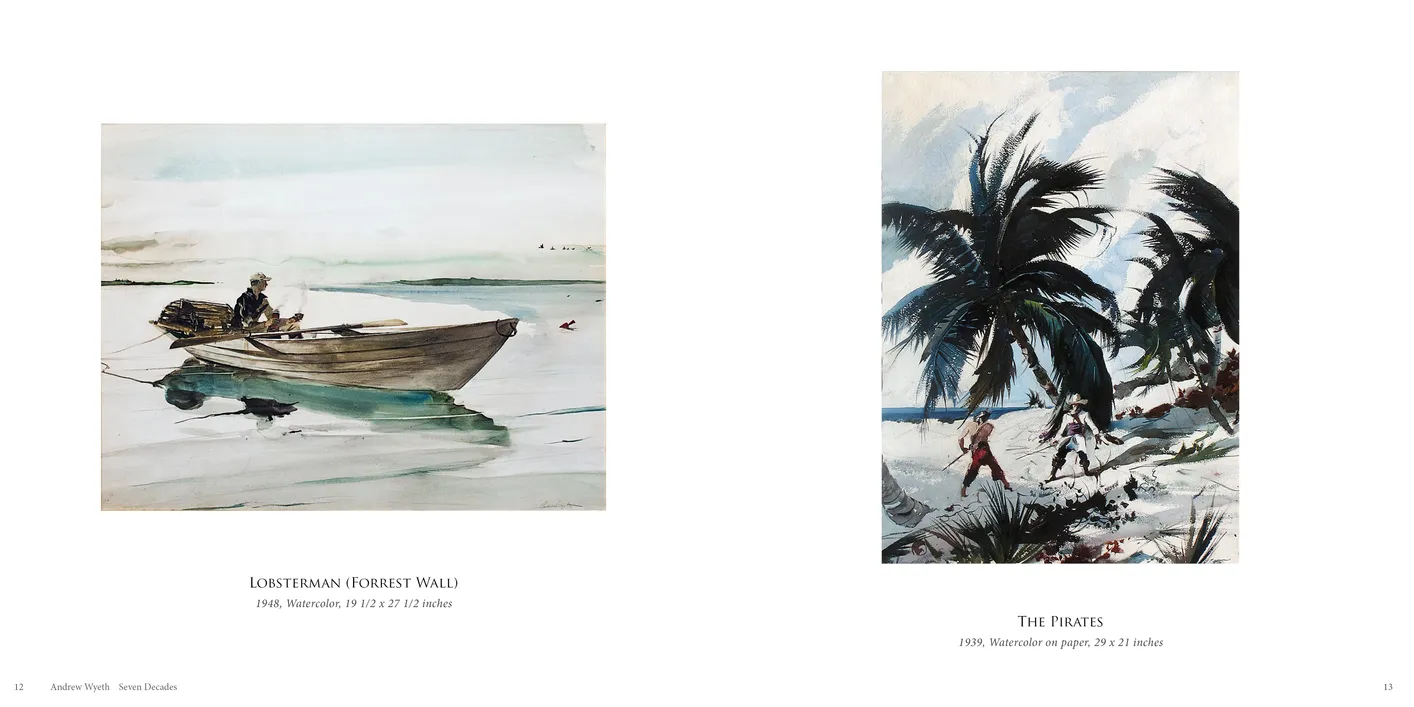
- Andrew Wyeth: Seven Decades exhibition catalog, pages 12-13
- Client: Adelson Galleries
- Visit figure page
- Type: portfolio
- Portfolio Type: publication_design
- Portfolio Role: design_layout
Andrew Wyeth: Seven Decades — Pages 14–15
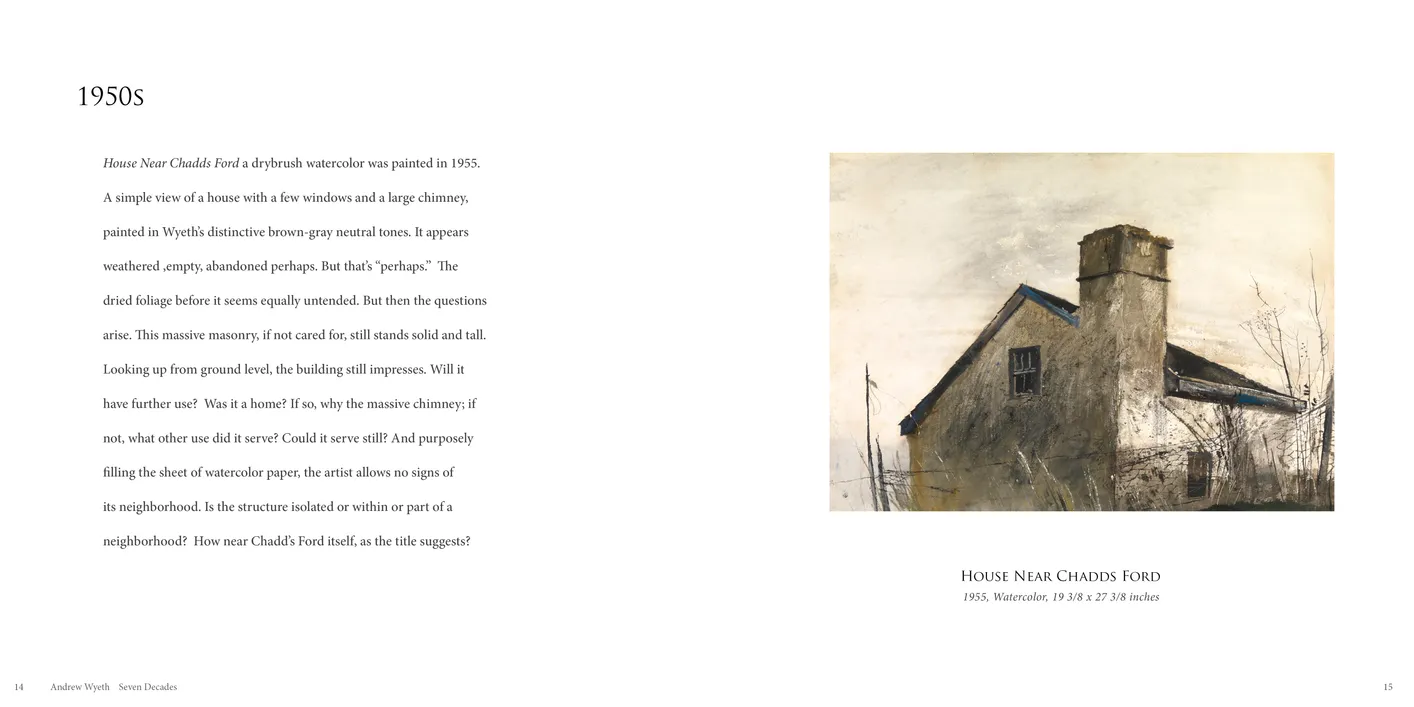
- Andrew Wyeth: Seven Decades exhibition catalog, pages 14-15
- Client: Adelson Galleries
- Visit figure page
- Type: portfolio
- Portfolio Type: publication_design
- Portfolio Role: design_layout
Andrew Wyeth: Seven Decades — Pages 16–17
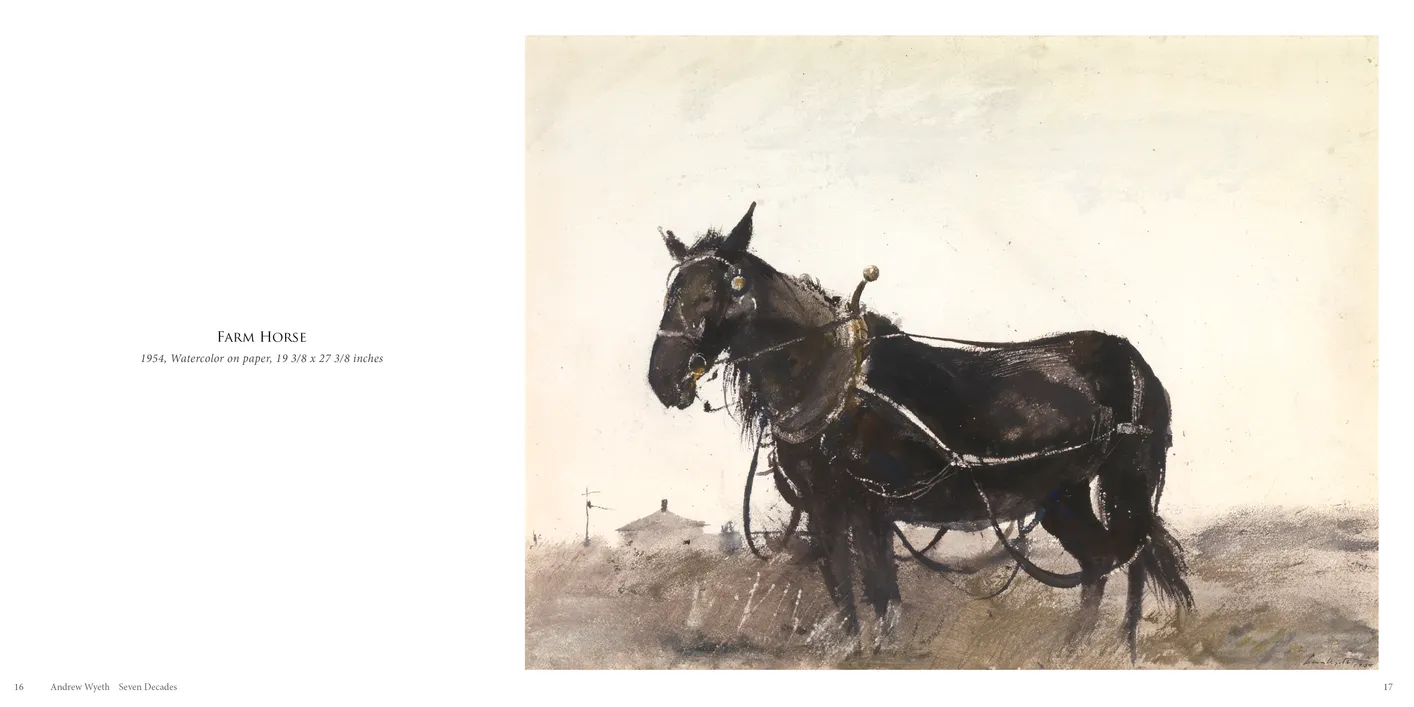
- Andrew Wyeth: Seven Decades exhibition catalog, pages 16-17
- Client: Adelson Galleries
- Visit figure page
- Type: portfolio
- Portfolio Type: publication_design
- Portfolio Role: design_layout
Andrew Wyeth: Seven Decades — Pages 18–19

- Andrew Wyeth: Seven Decades exhibition catalog, pages 18-19
- Client: Adelson Galleries
- Visit figure page
- Type: portfolio
- Portfolio Type: publication_design
- Portfolio Role: design_layout
Andrew Wyeth: Seven Decades — Pages 2–3
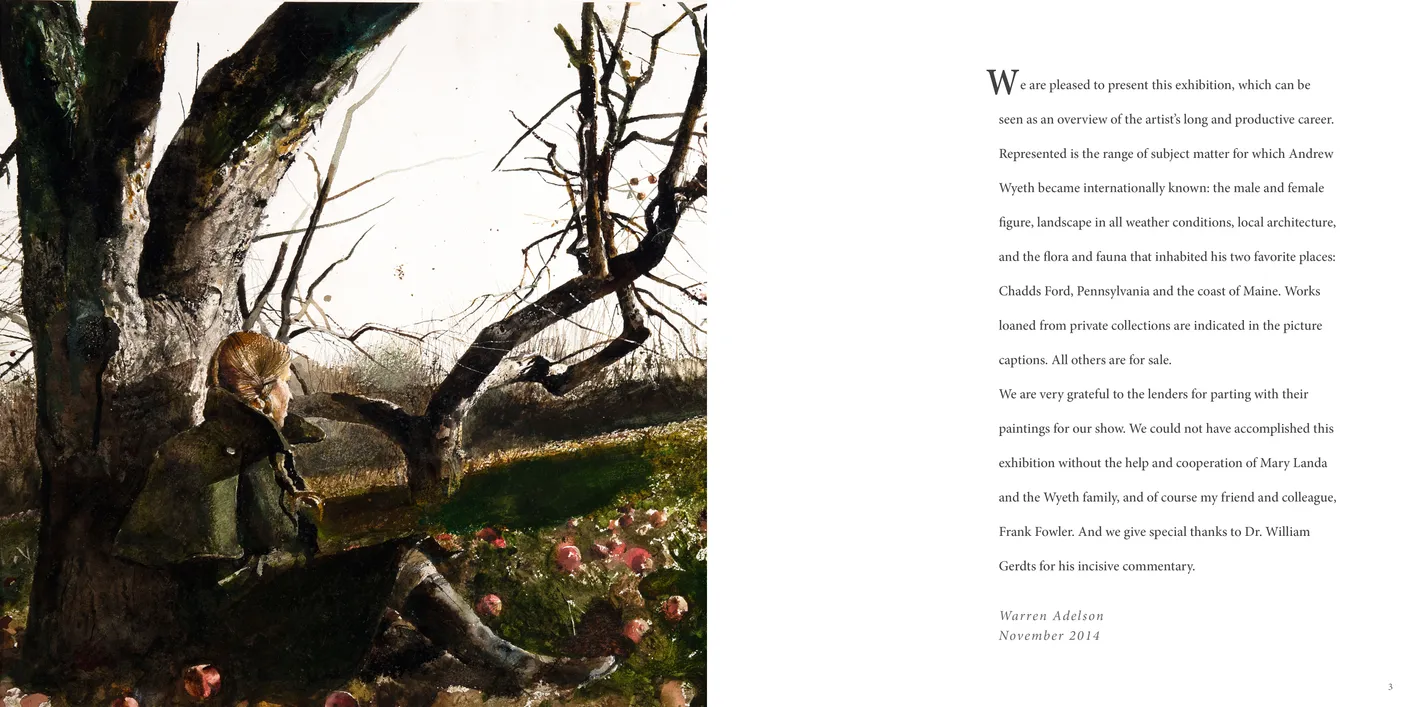
- Andrew Wyeth: Seven Decades exhibition catalog, pages 2-3
- Client: Adelson Galleries
- Visit figure page
- Type: portfolio
- Portfolio Type: publication_design
- Portfolio Role: design_layout
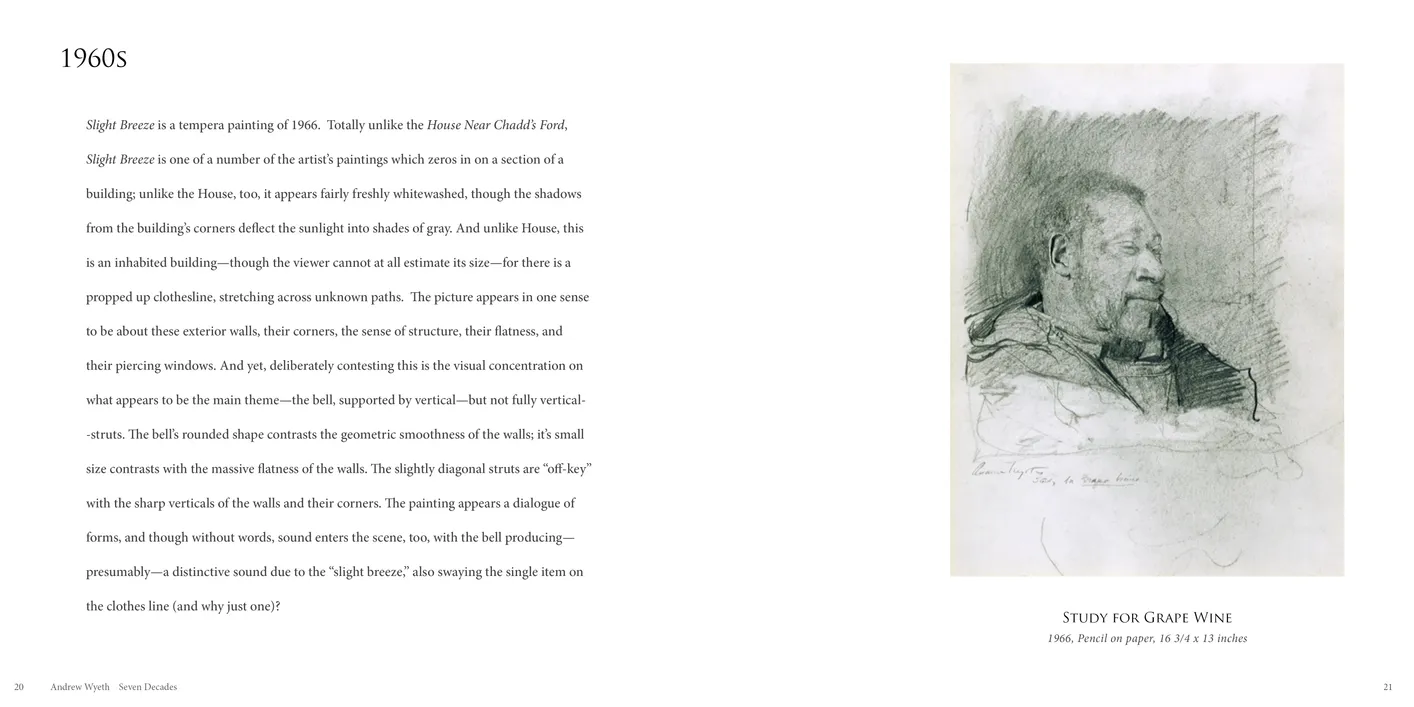
Andrew Wyeth: Seven Decades — Pages 20–21
- Andrew Wyeth: Seven Decades exhibition catalog, pages 20-21
- Client: Adelson Galleries
- Visit figure page
- Type: portfolio
- Portfolio Type: publication_design
- Portfolio Role: design_layout
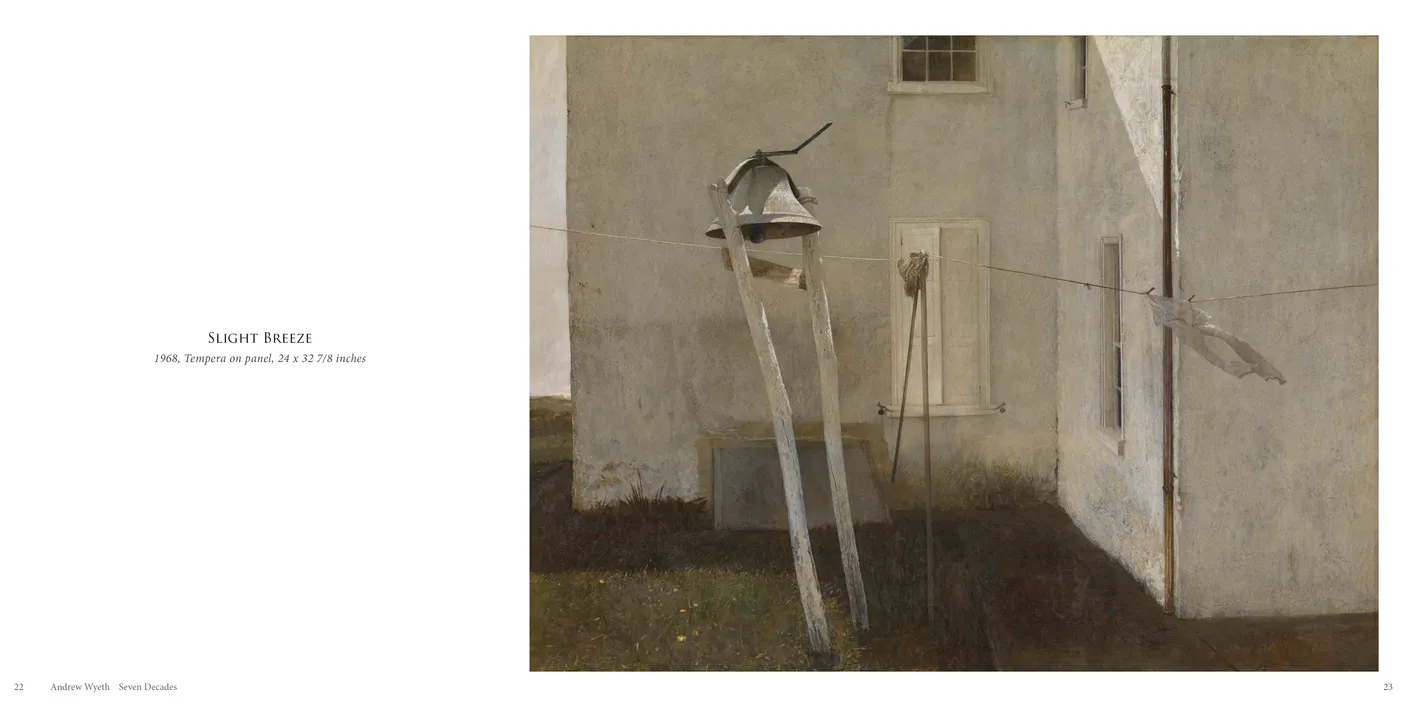
Andrew Wyeth: Seven Decades — Pages 22–23
- Andrew Wyeth: Seven Decades exhibition catalog, pages 22-23
- Client: Adelson Galleries
- Visit figure page
- Type: portfolio
- Portfolio Type: publication_design
- Portfolio Role: design_layout
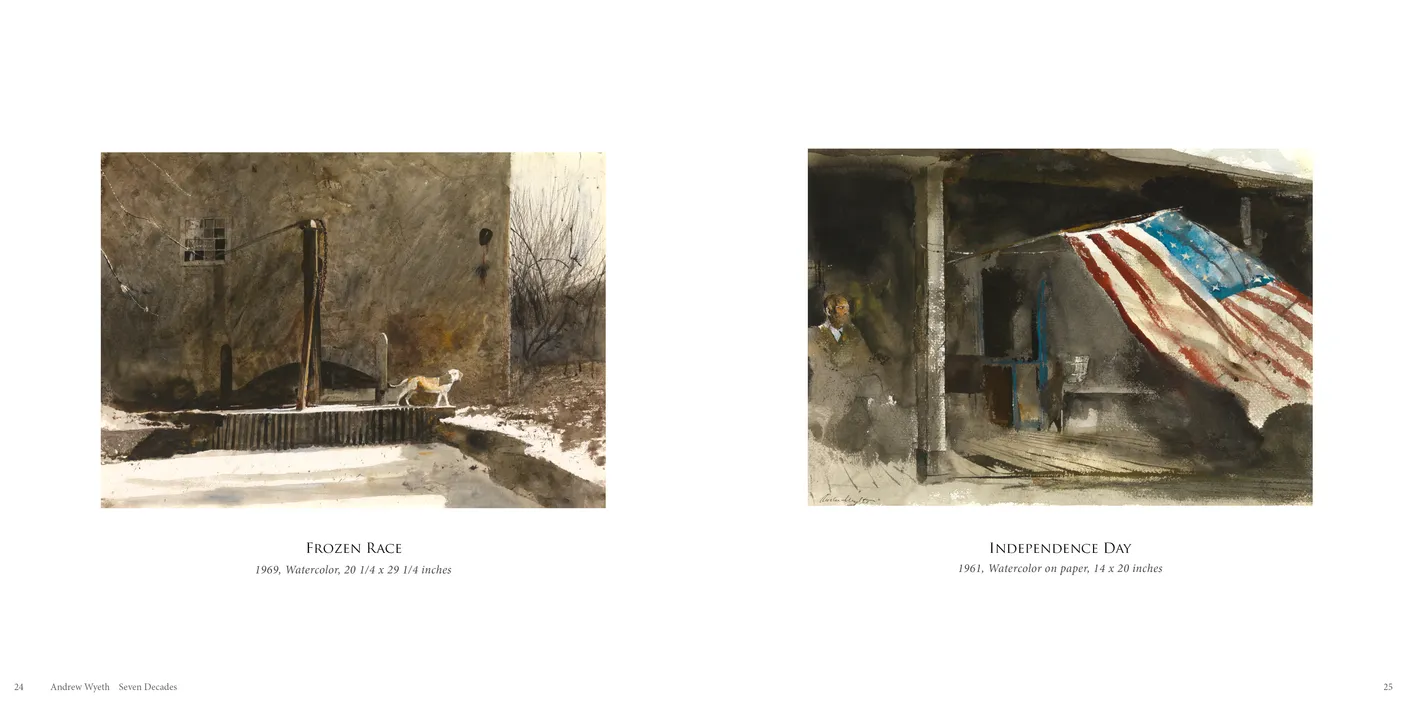
Andrew Wyeth: Seven Decades — Pages 24–25
- Andrew Wyeth: Seven Decades exhibition catalog, pages 24-25
- Client: Adelson Galleries
- Visit figure page
- Type: portfolio
- Portfolio Type: publication_design
- Portfolio Role: design_layout
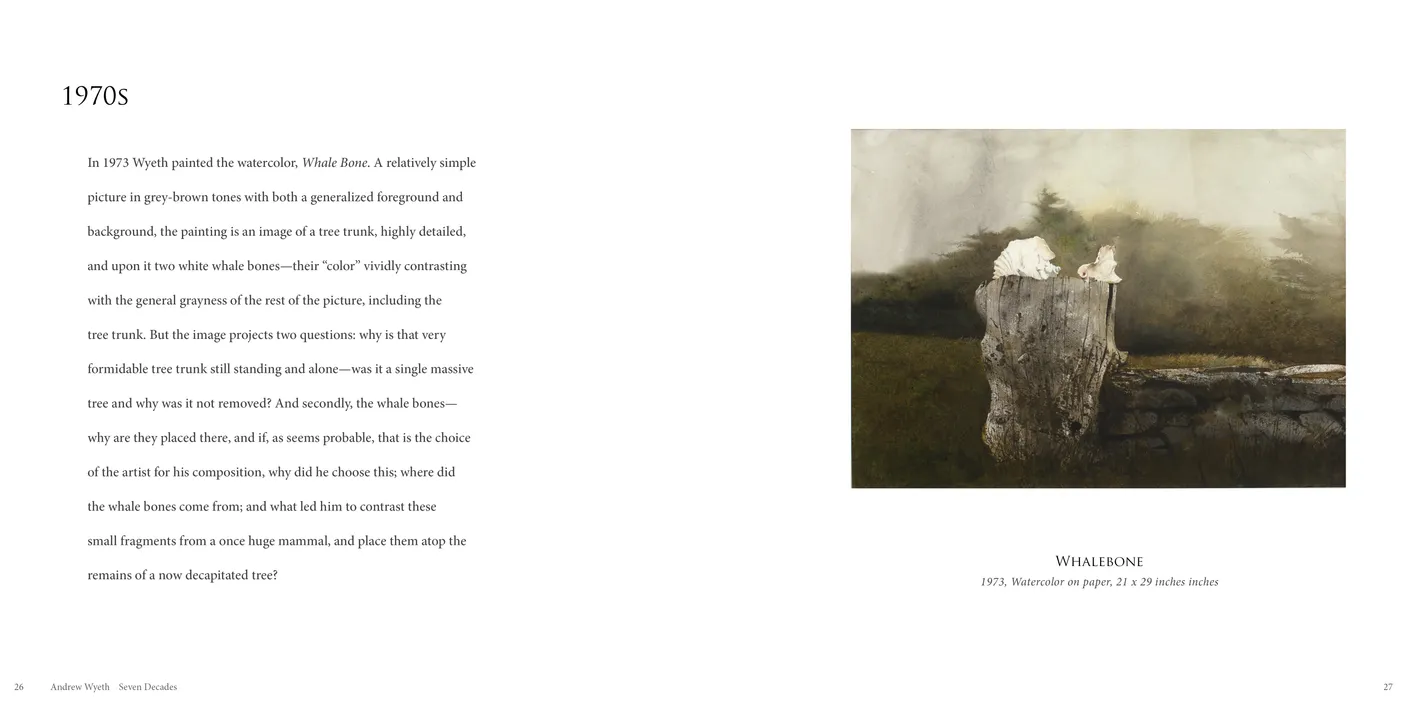
Andrew Wyeth: Seven Decades — Pages 26–27
- Andrew Wyeth: Seven Decades exhibition catalog, pages 26-27
- Client: Adelson Galleries
- Visit figure page
- Type: portfolio
- Portfolio Type: publication_design
- Portfolio Role: design_layout
Andrew Wyeth: Seven Decades — Pages 28–29
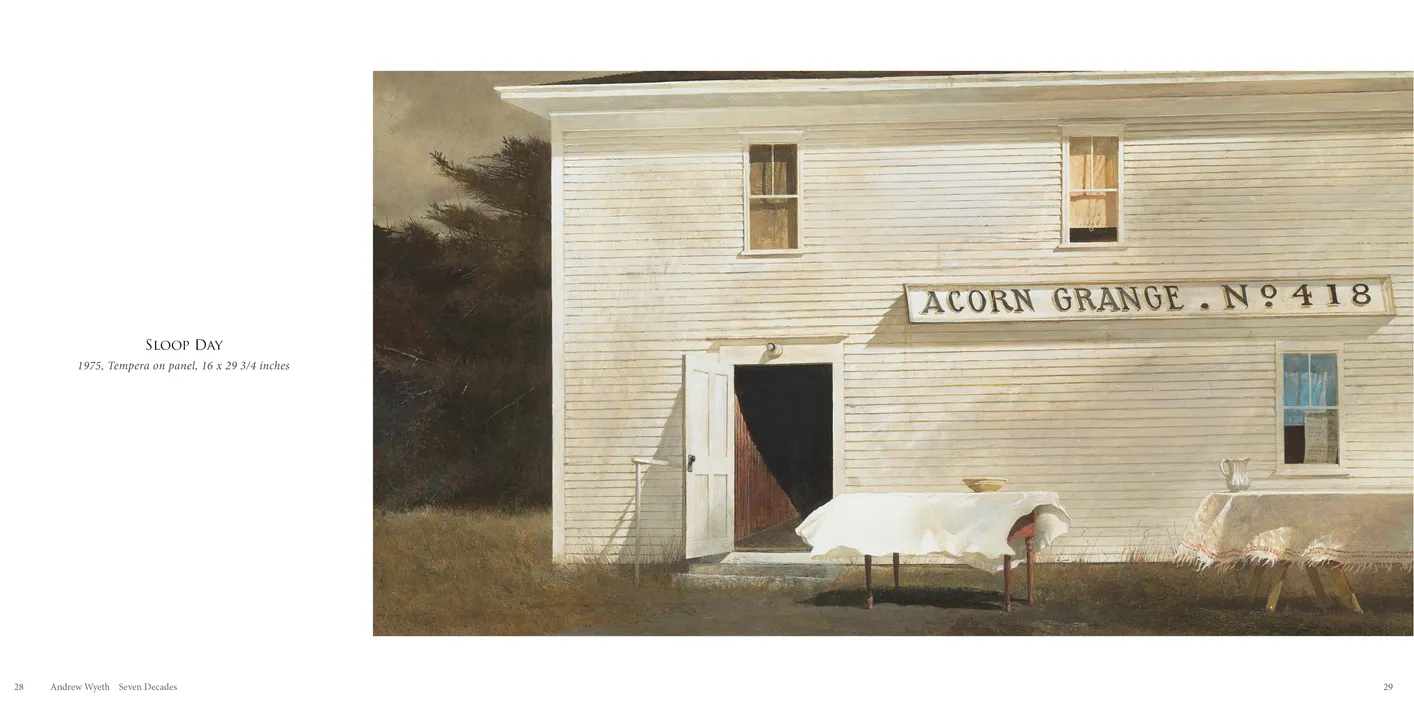
- Andrew Wyeth: Seven Decades exhibition catalog, pages 28-29
- Client: Adelson Galleries
- Visit figure page
- Type: portfolio
- Portfolio Type: publication_design
- Portfolio Role: design_layout
Andrew Wyeth: Seven Decades — Pages 30–31
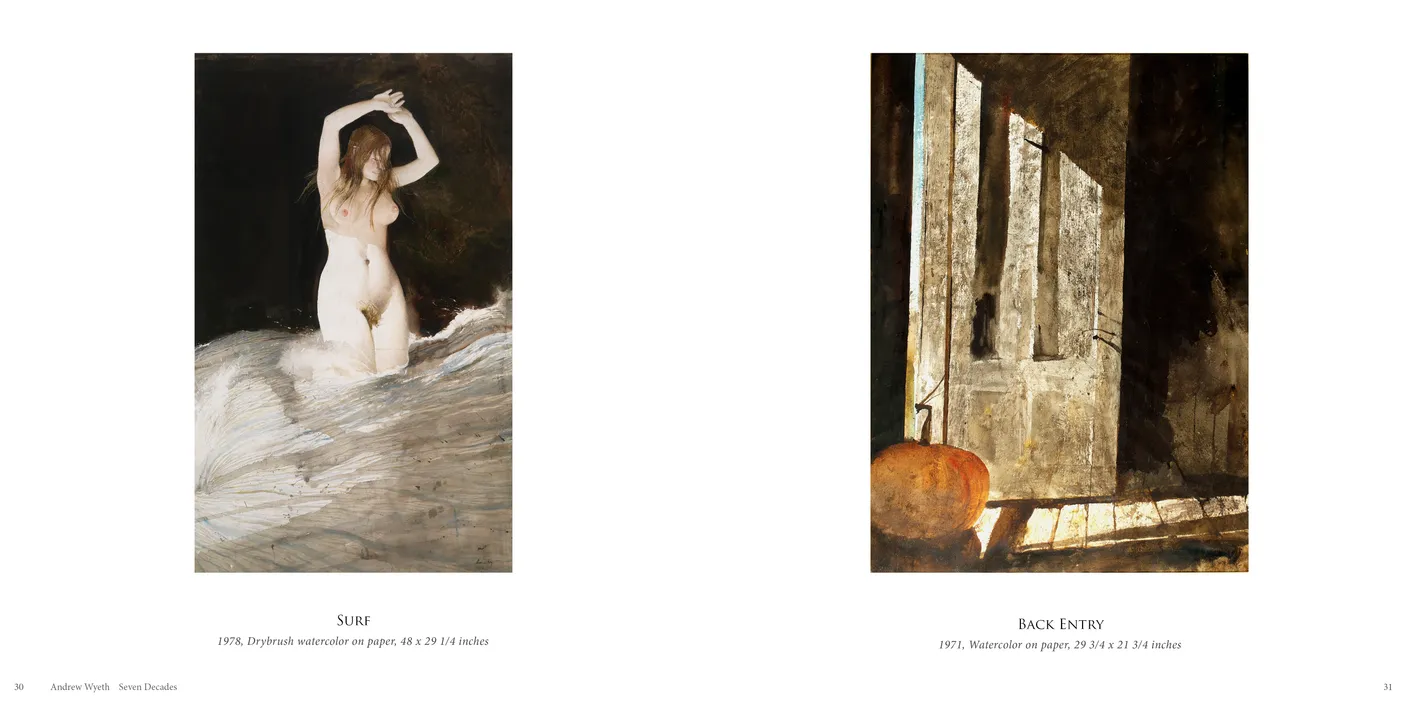
- Andrew Wyeth: Seven Decades exhibition catalog, pages 30-31
- Client: Adelson Galleries
- Visit figure page
- Type: portfolio
- Portfolio Type: publication_design
- Portfolio Role: design_layout
Andrew Wyeth: Seven Decades — Pages 32–33
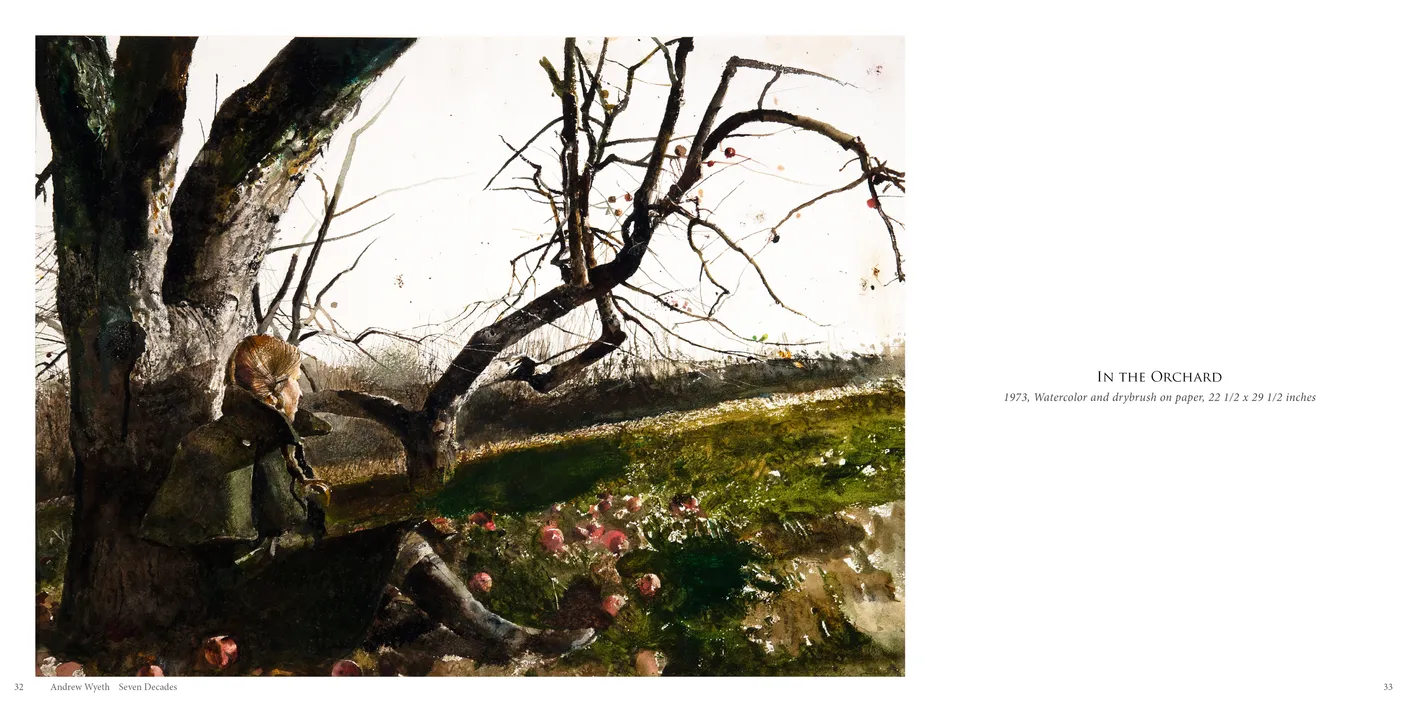
- Andrew Wyeth: Seven Decades exhibition catalog, pages 32-33
- Client: Adelson Galleries
- Visit figure page
- Type: portfolio
- Portfolio Type: publication_design
- Portfolio Role: design_layout
Andrew Wyeth: Seven Decades — Pages 34–35
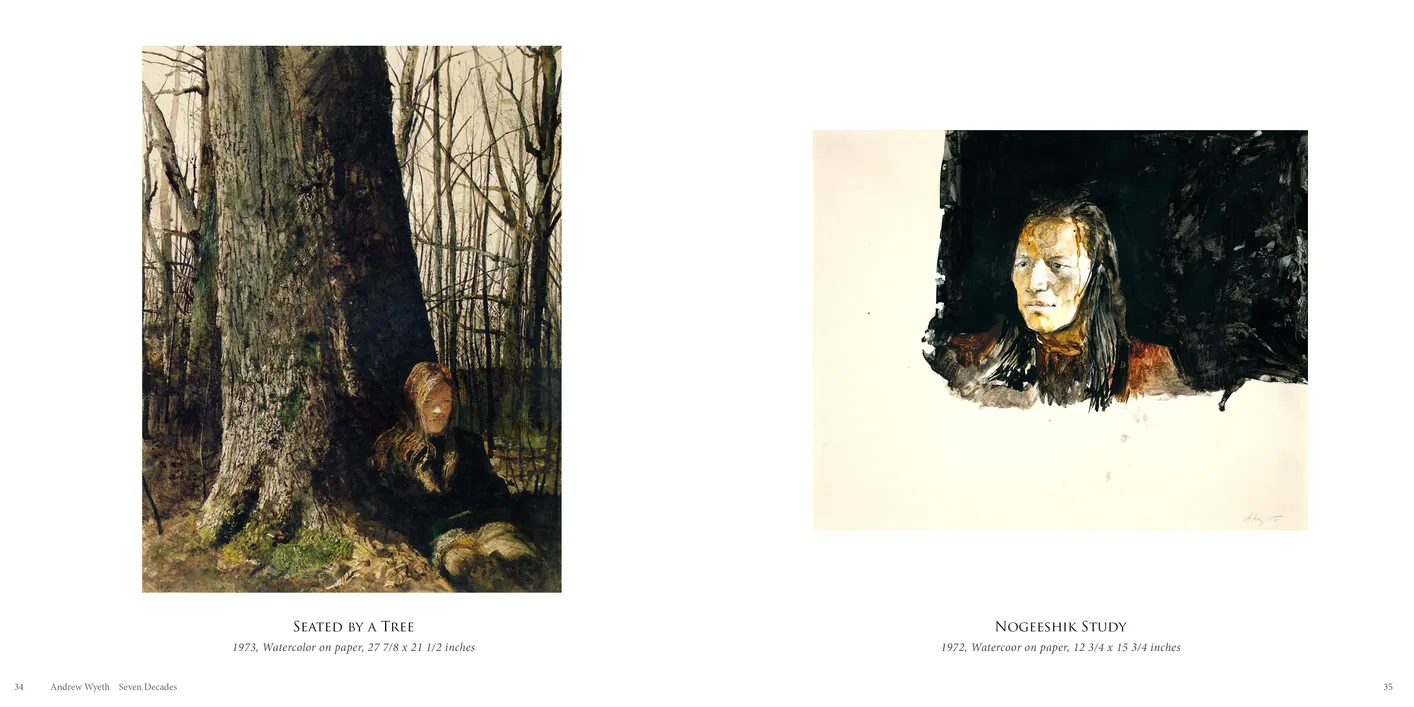
- Andrew Wyeth: Seven Decades exhibition catalog, pages 34-35
- Client: Adelson Galleries
- Visit figure page
- Type: portfolio
- Portfolio Type: publication_design
- Portfolio Role: design_layout
Andrew Wyeth: Seven Decades — Pages 36–37
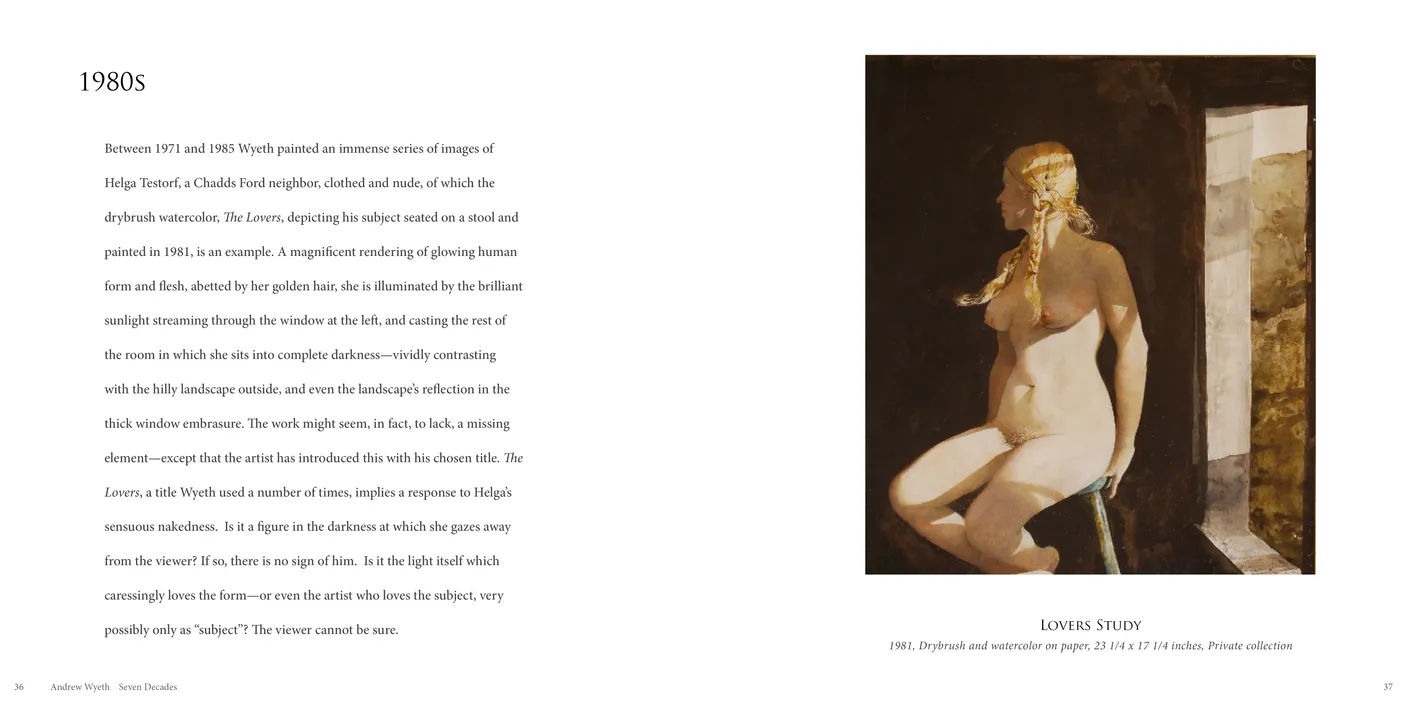
- Andrew Wyeth: Seven Decades exhibition catalog, pages 36-37
- Client: Adelson Galleries
- Visit figure page
- Type: portfolio
- Portfolio Type: publication_design
- Portfolio Role: design_layout
Andrew Wyeth: Seven Decades — Pages 38–39
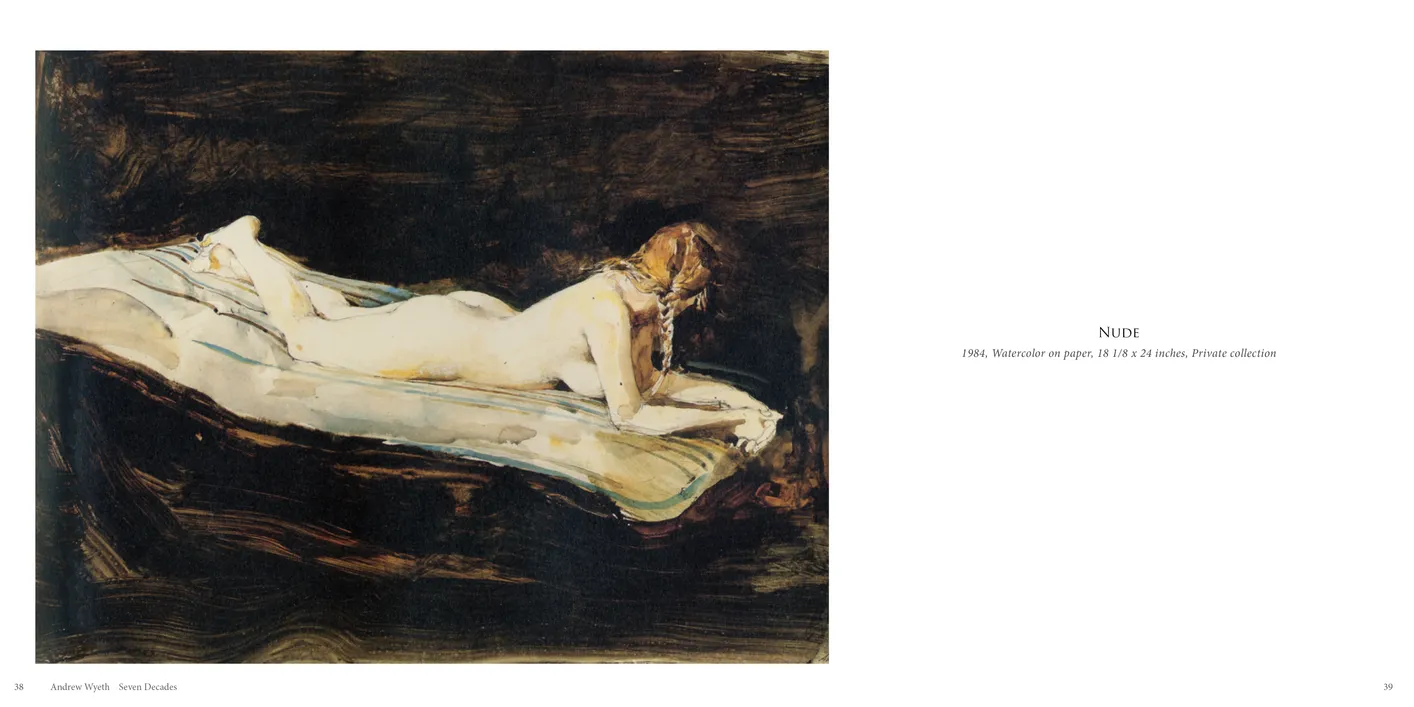
- Andrew Wyeth: Seven Decades exhibition catalog, pages 38-39
- Client: Adelson Galleries
- Visit figure page
- Type: portfolio
- Portfolio Type: publication_design
- Portfolio Role: design_layout
Andrew Wyeth: Seven Decades — Pages 4–5
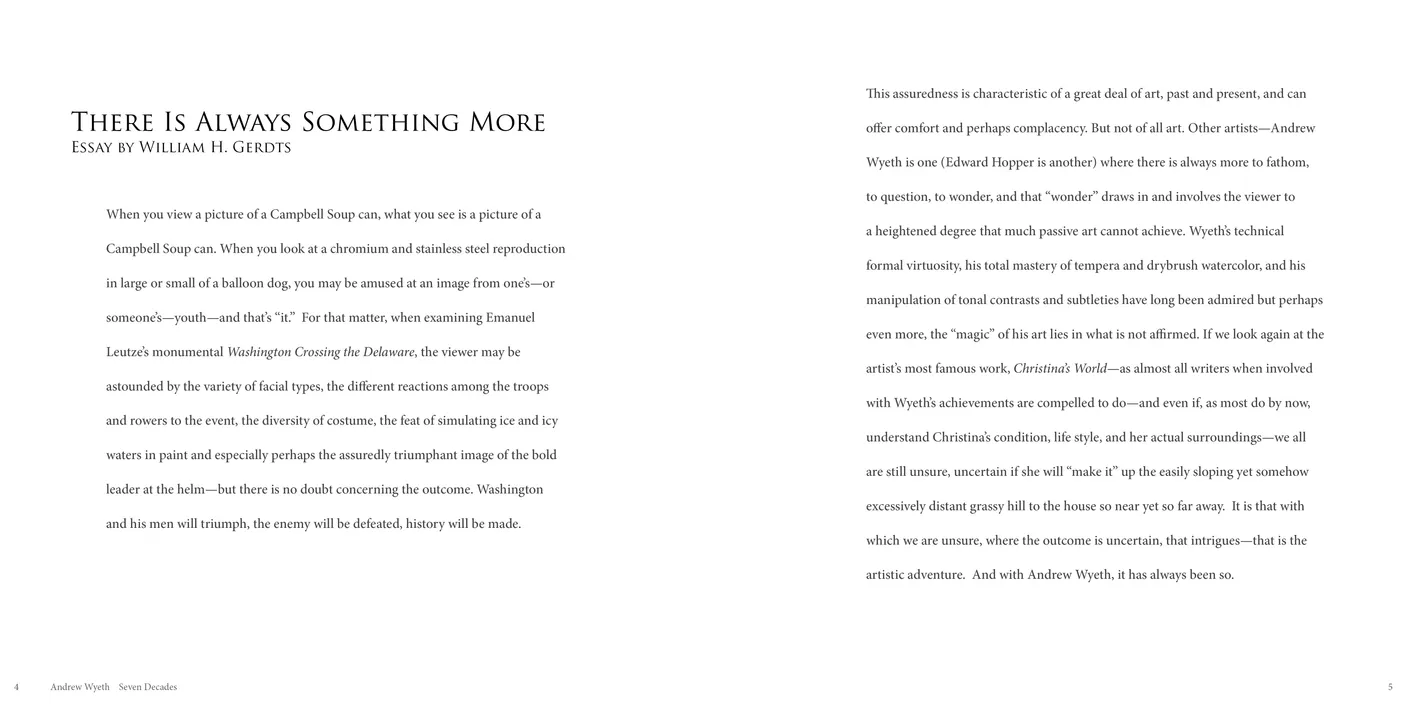
- Andrew Wyeth: Seven Decades exhibition catalog, pages 4-5
- Client: Adelson Galleries
- Visit figure page
- Type: portfolio
- Portfolio Type: publication_design
- Portfolio Role: design_layout
Andrew Wyeth: Seven Decades — Pages 40–41
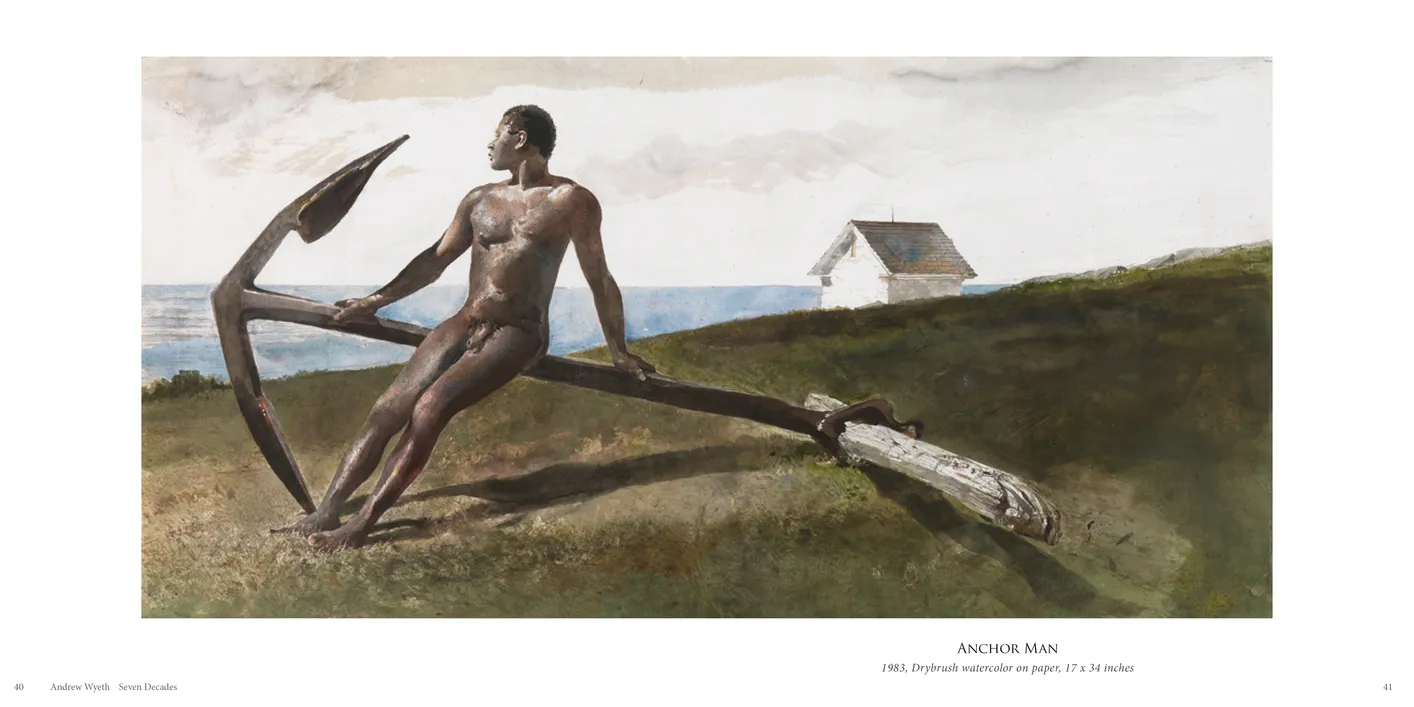
- Andrew Wyeth: Seven Decades exhibition catalog, pages 40-41
- Client: Adelson Galleries
- Visit figure page
- Type: portfolio
- Portfolio Type: publication_design
- Portfolio Role: design_layout
Andrew Wyeth: Seven Decades — Pages 42–43
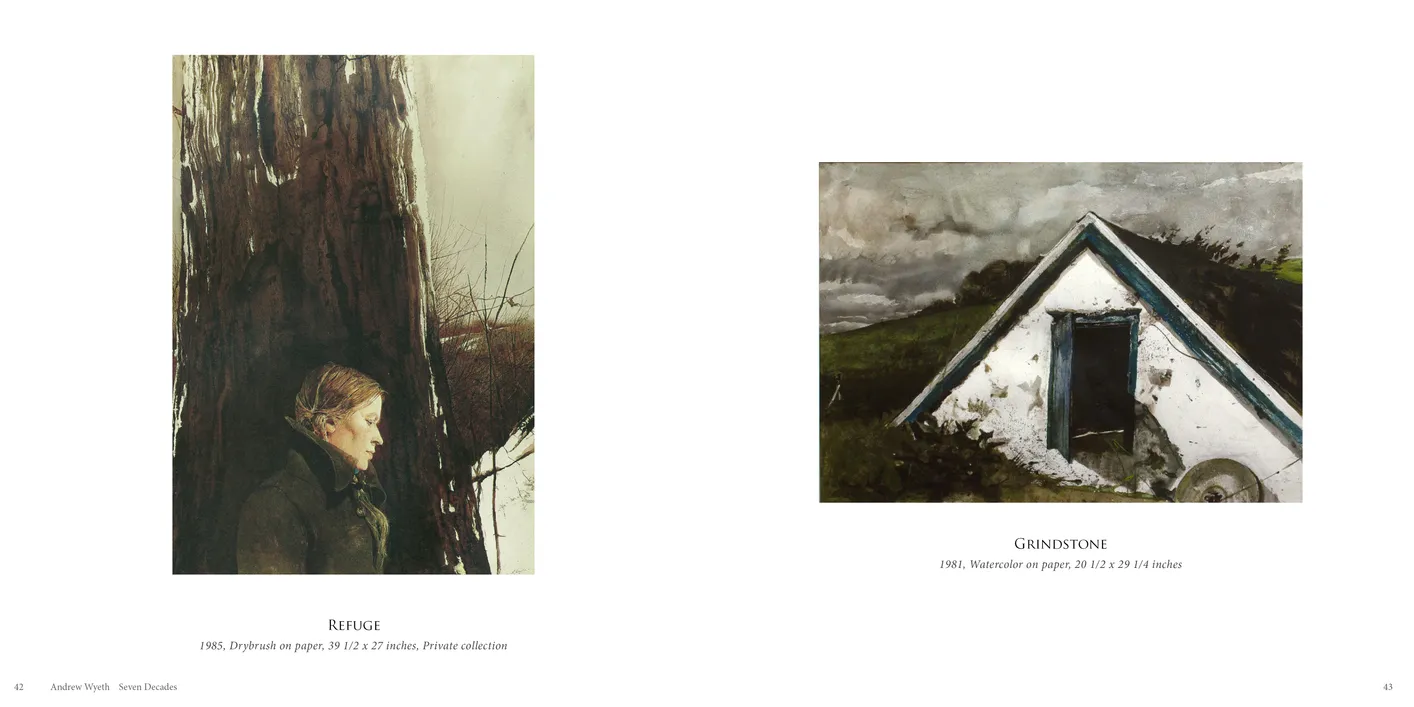
- Andrew Wyeth: Seven Decades exhibition catalog, pages 42-43
- Client: Adelson Galleries
- Visit figure page
- Type: portfolio
- Portfolio Type: publication_design
- Portfolio Role: design_layout
Andrew Wyeth: Seven Decades — Pages 44–45
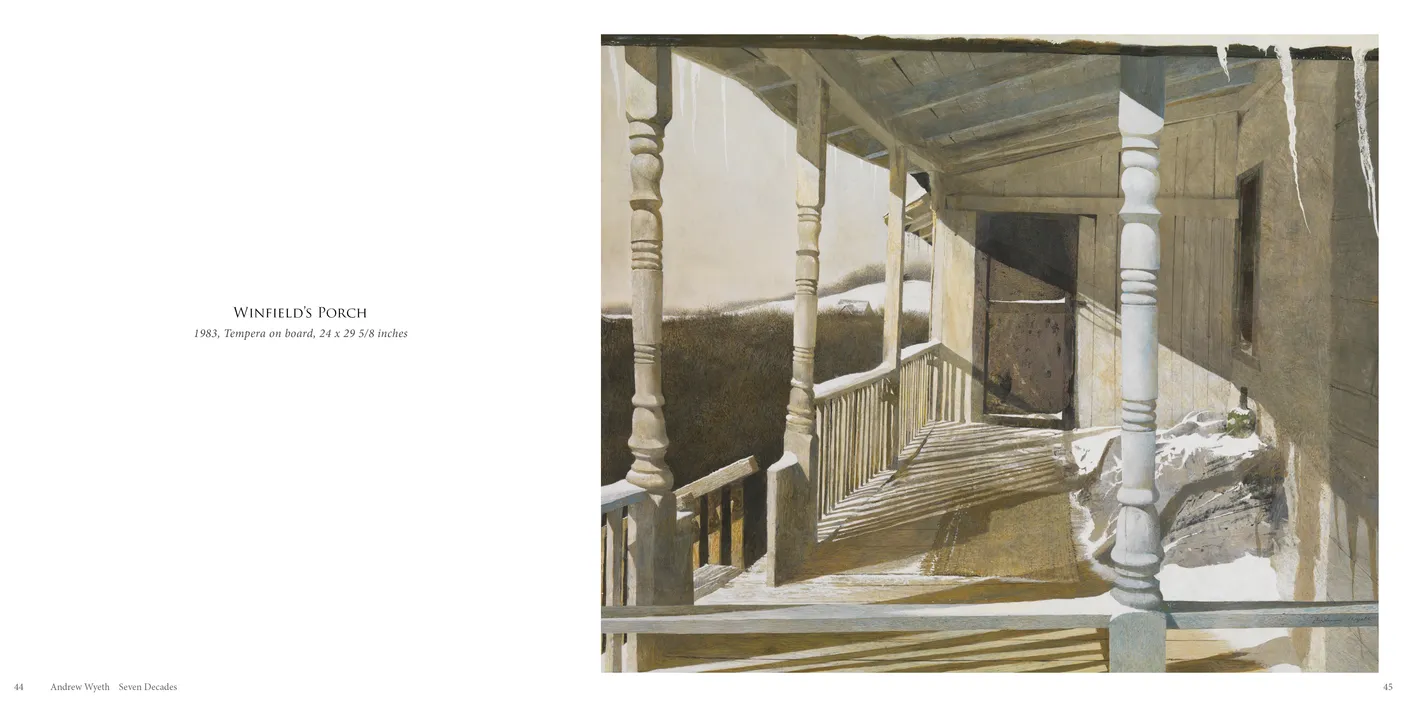
- Andrew Wyeth: Seven Decades exhibition catalog, pages 44-45
- Client: Adelson Galleries
- Visit figure page
- Type: portfolio
- Portfolio Type: publication_design
- Portfolio Role: design_layout
Andrew Wyeth: Seven Decades — Pages 46–47
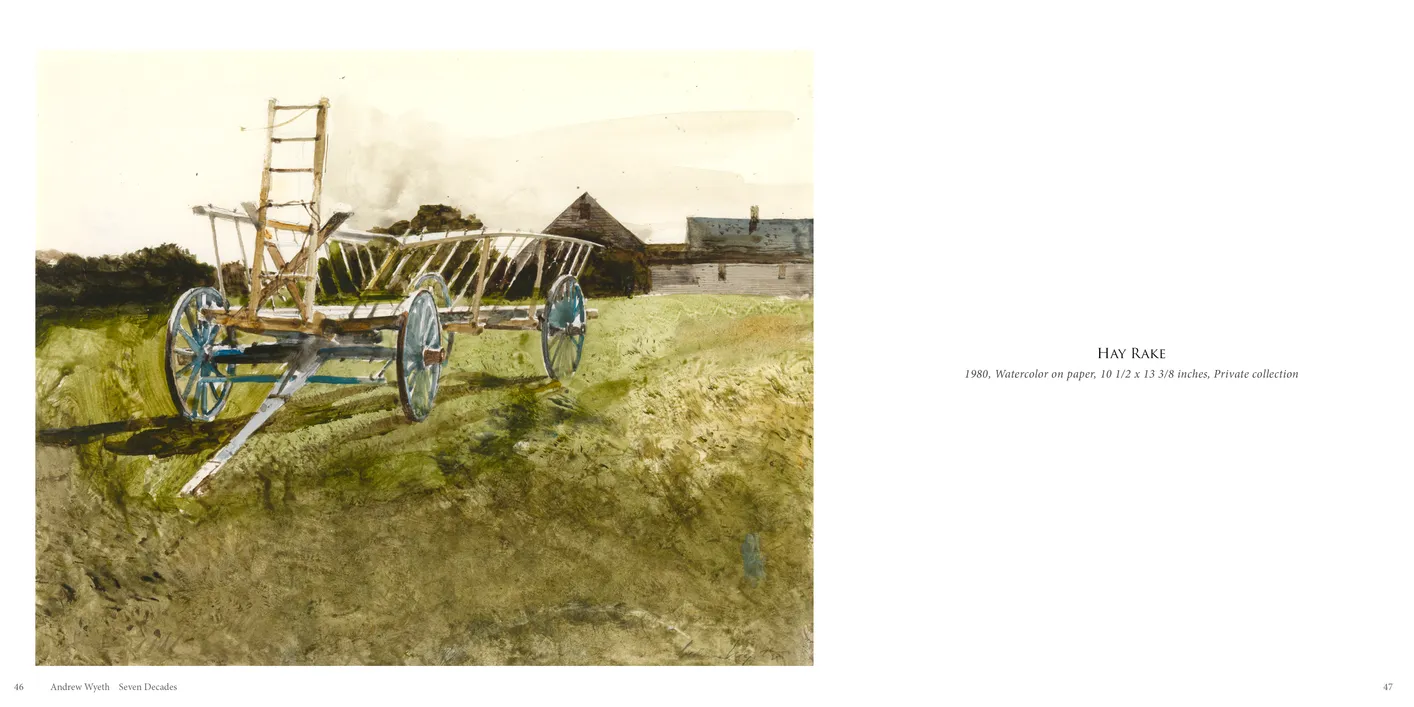
- Andrew Wyeth: Seven Decades exhibition catalog, pages 46-47
- Client: Adelson Galleries
- Visit figure page
- Type: portfolio
- Portfolio Type: publication_design
- Portfolio Role: design_layout
Andrew Wyeth: Seven Decades — Pages 48–49
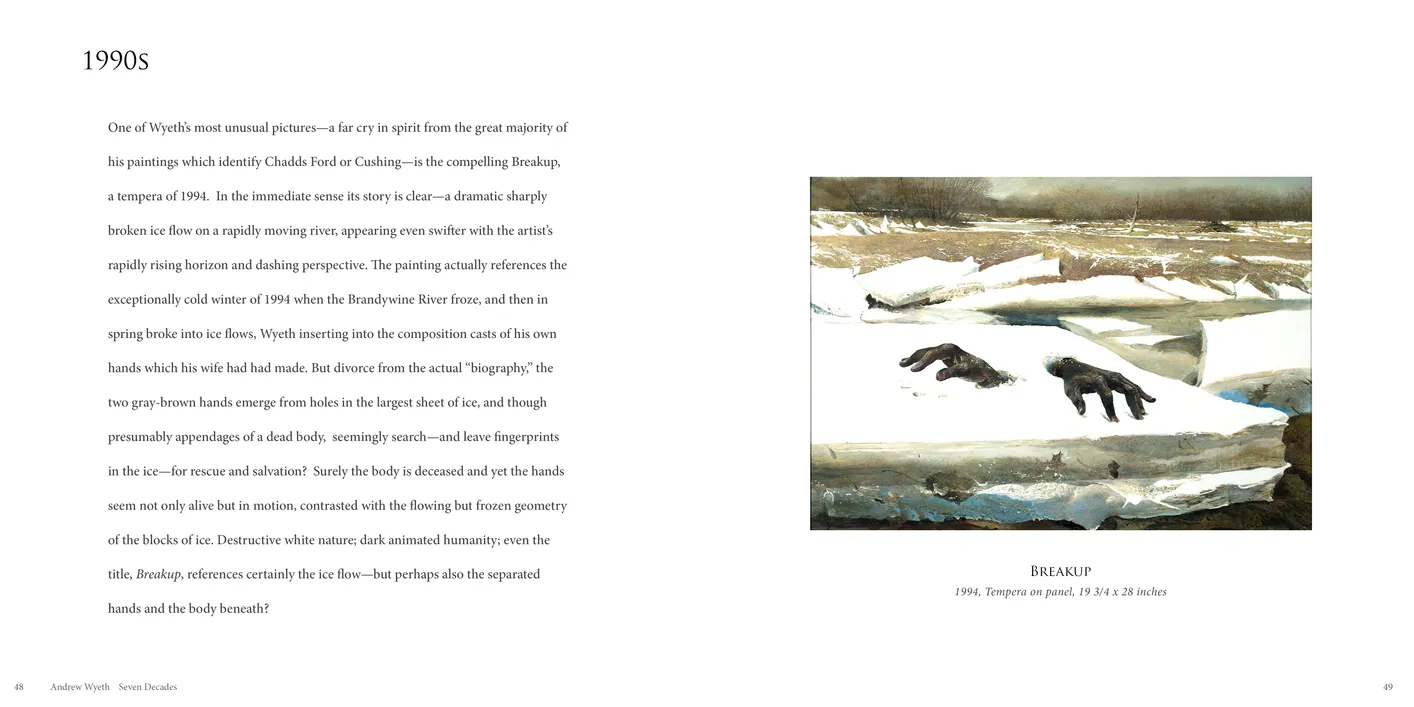
- Andrew Wyeth: Seven Decades exhibition catalog, pages 48-49
- Client: Adelson Galleries
- Visit figure page
- Type: portfolio
- Portfolio Type: publication_design
- Portfolio Role: design_layout
Andrew Wyeth: Seven Decades — Pages 50–51
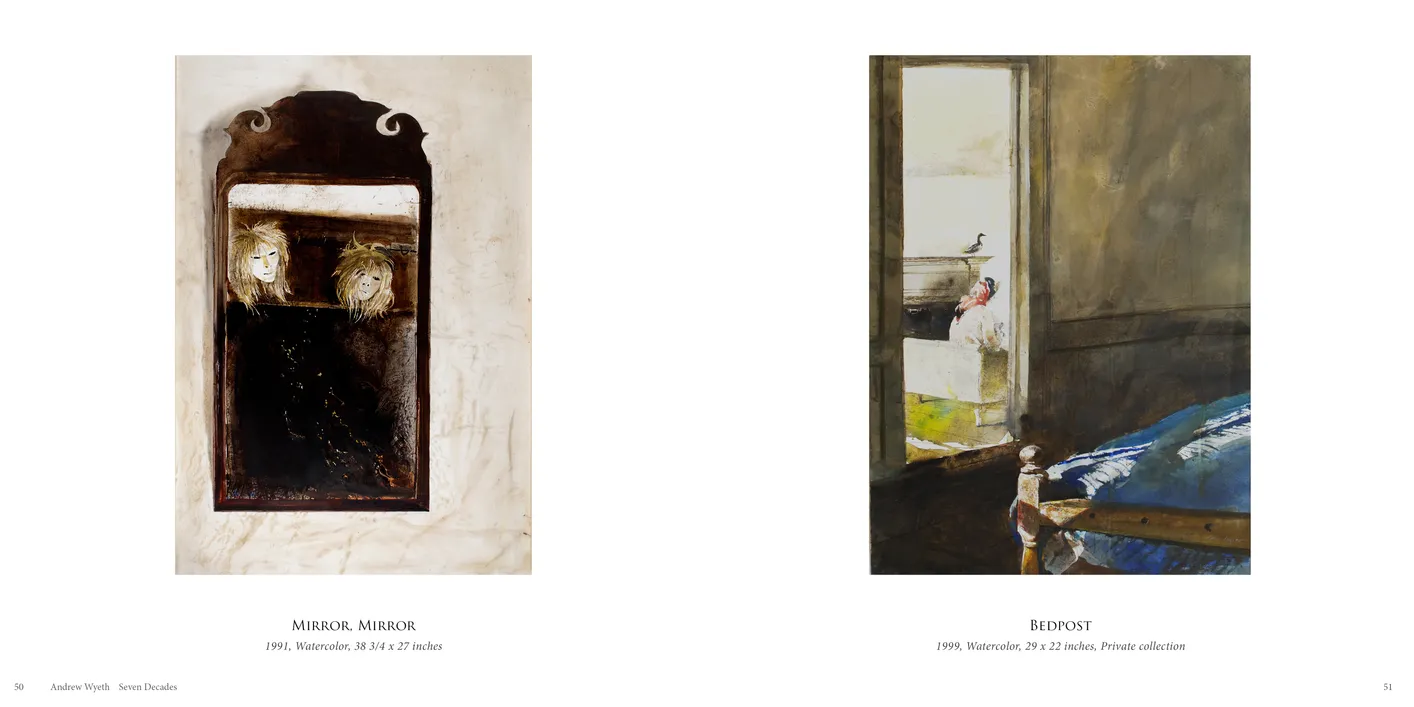
- Andrew Wyeth: Seven Decades exhibition catalog, pages 50-51
- Client: Adelson Galleries
- Visit figure page
- Type: portfolio
- Portfolio Type: publication_design
- Portfolio Role: design_layout
Andrew Wyeth: Seven Decades — Pages 52–53
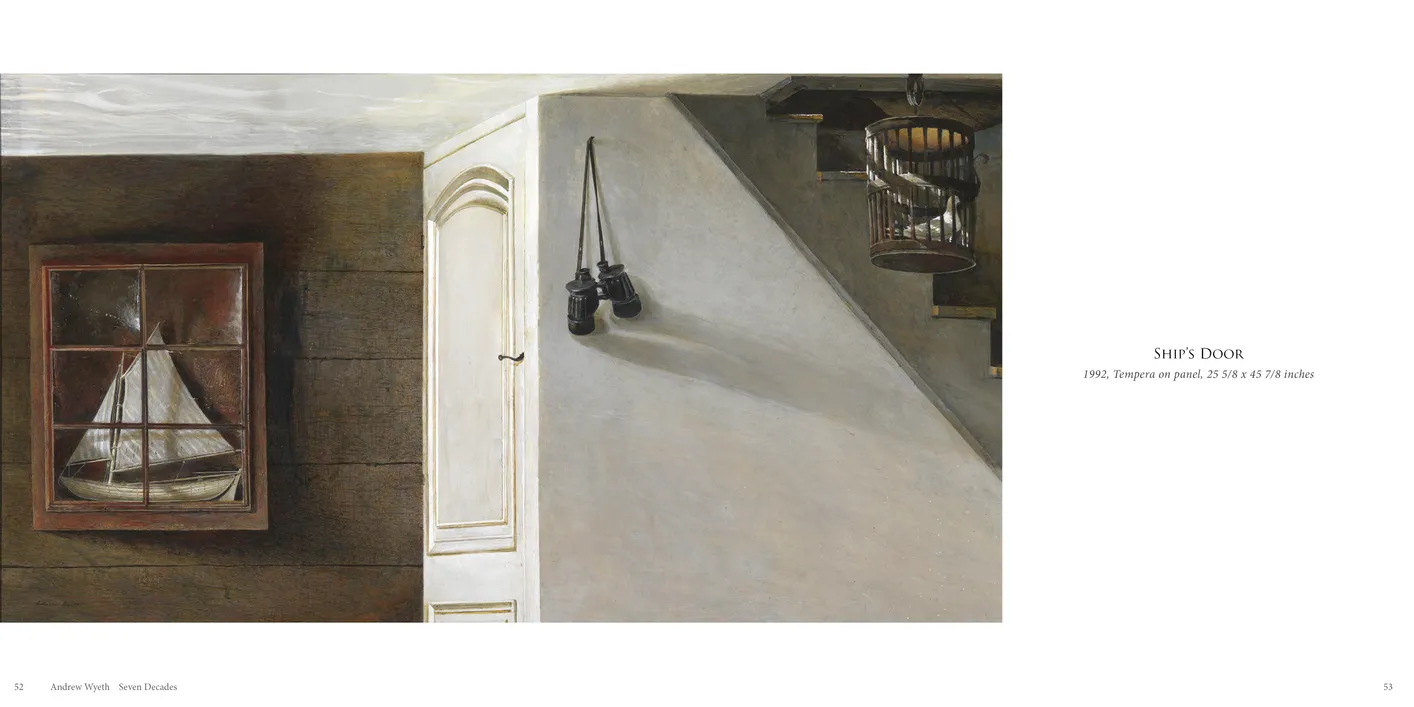
- Andrew Wyeth: Seven Decades exhibition catalog, pages 52-53
- Client: Adelson Galleries
- Visit figure page
- Type: portfolio
- Portfolio Type: publication_design
- Portfolio Role: design_layout
Andrew Wyeth: Seven Decades — Pages 54–55
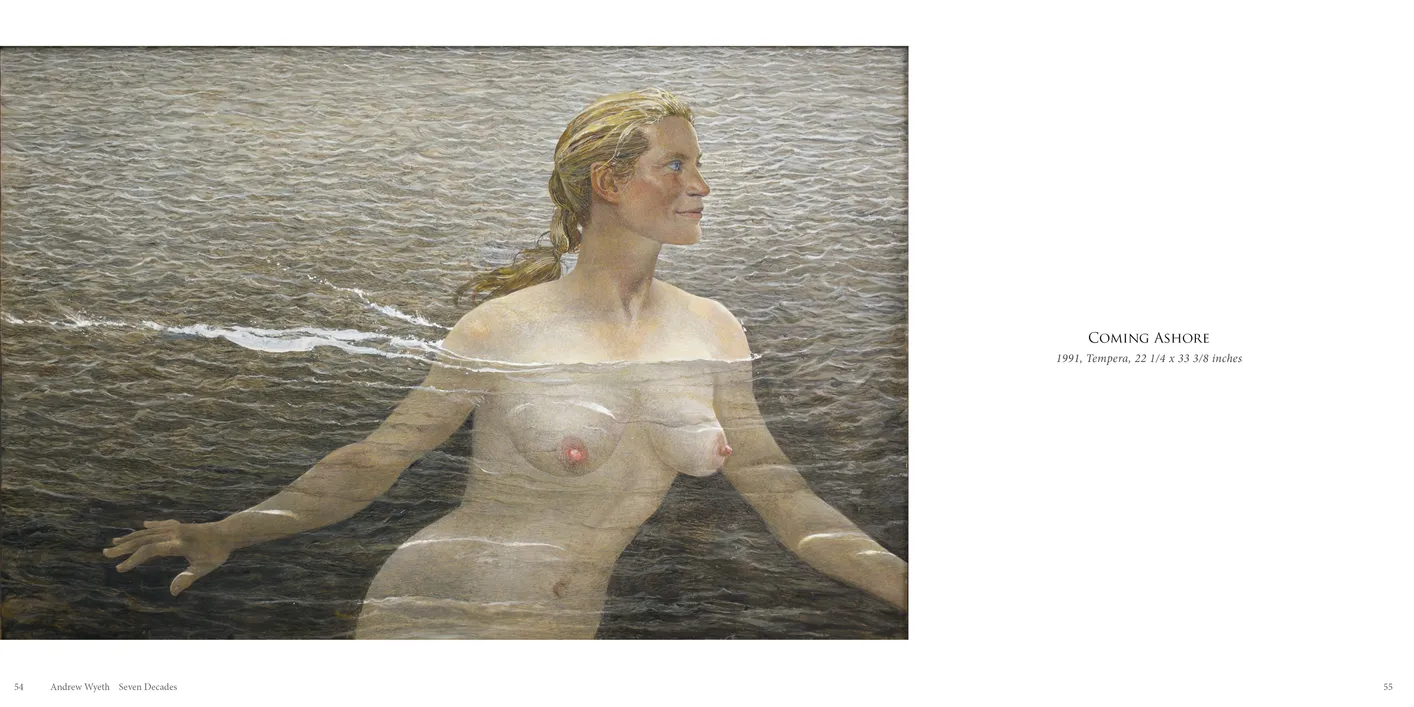
- Andrew Wyeth: Seven Decades exhibition catalog, pages 54-55
- Client: Adelson Galleries
- Visit figure page
- Type: portfolio
- Portfolio Type: publication_design
- Portfolio Role: design_layout
Andrew Wyeth: Seven Decades — Pages 56–57
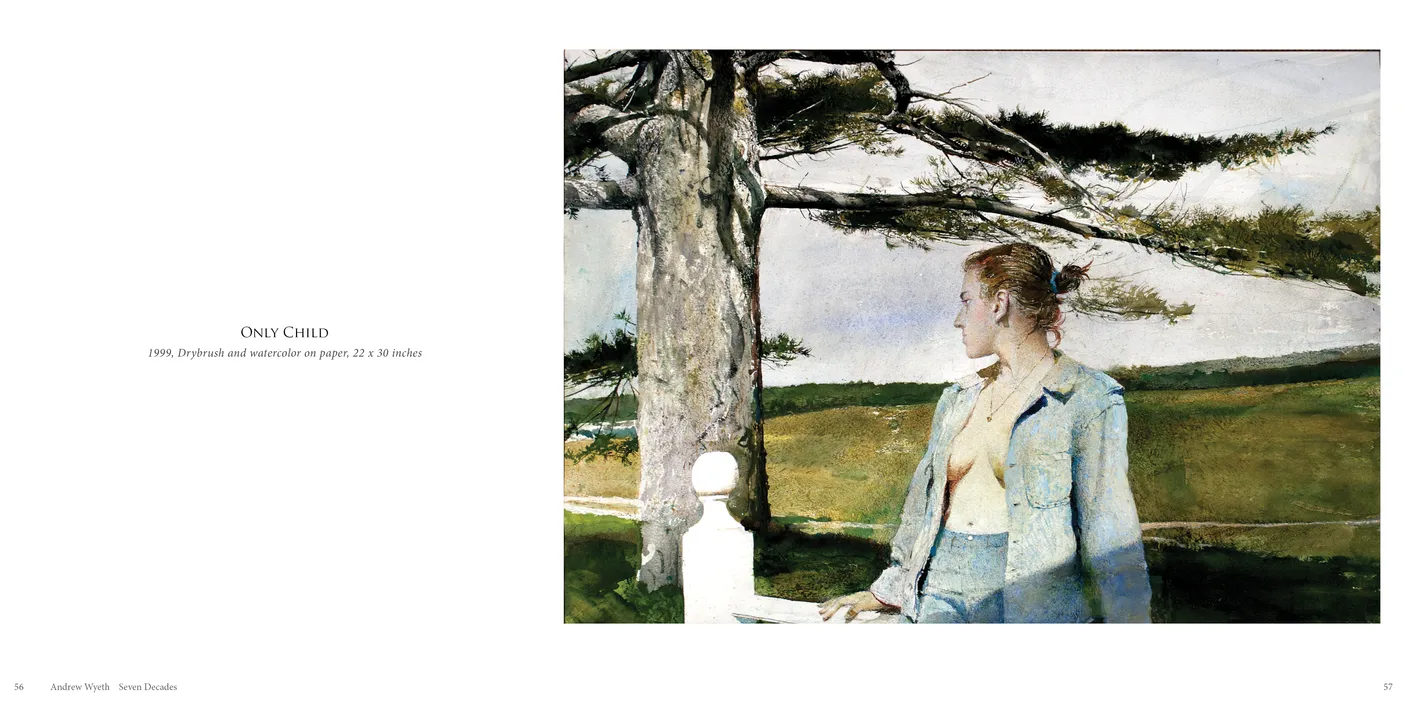
- Andrew Wyeth: Seven Decades exhibition catalog, pages 56-57
- Client: Adelson Galleries
- Visit figure page
- Type: portfolio
- Portfolio Type: publication_design
- Portfolio Role: design_layout
Andrew Wyeth: Seven Decades — Pages 58–59
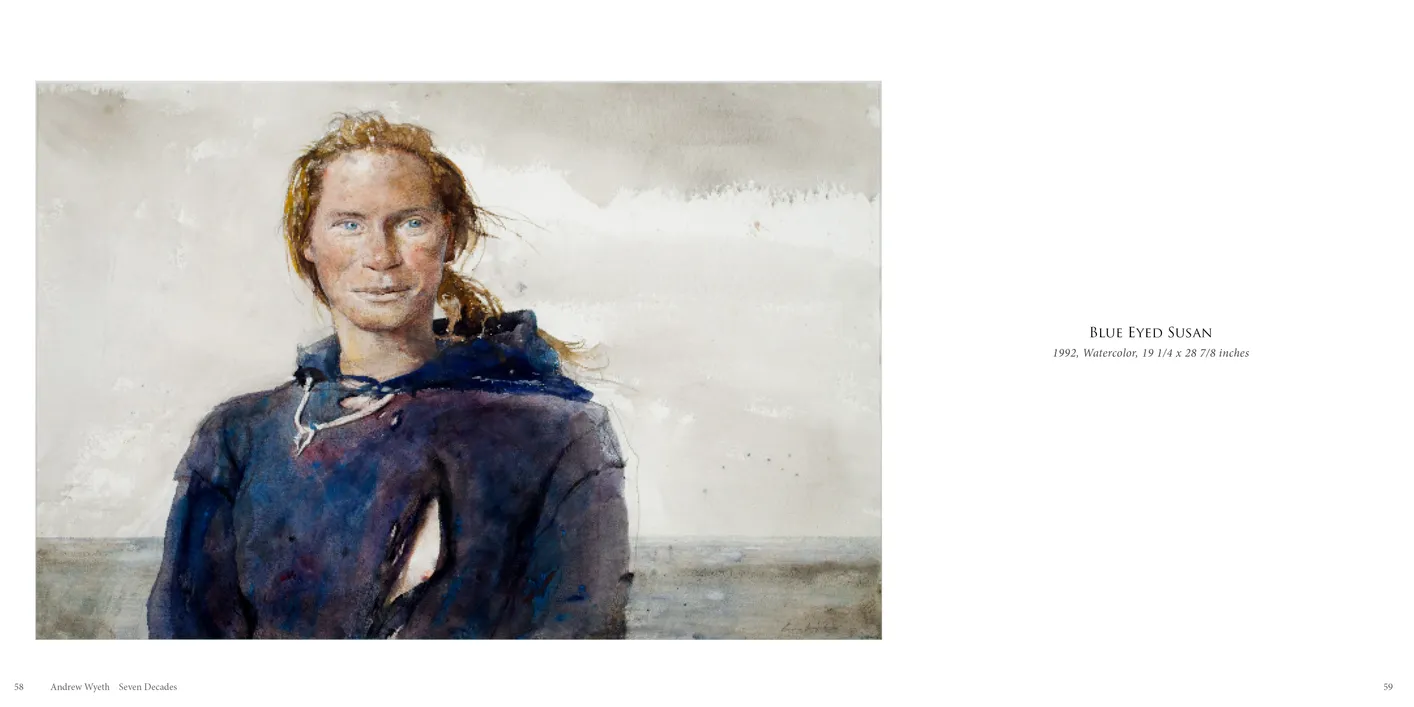
- Andrew Wyeth: Seven Decades exhibition catalog, pages 58-59
- Client: Adelson Galleries
- Visit figure page
- Type: portfolio
- Portfolio Type: publication_design
- Portfolio Role: design_layout
Andrew Wyeth: Seven Decades — Pages 6–7

- Andrew Wyeth: Seven Decades exhibition catalog, pages 6-7
- Client: Adelson Galleries
- Visit figure page
- Type: portfolio
- Portfolio Type: publication_design
- Portfolio Role: design_layout
Andrew Wyeth: Seven Decades — Pages 60–61
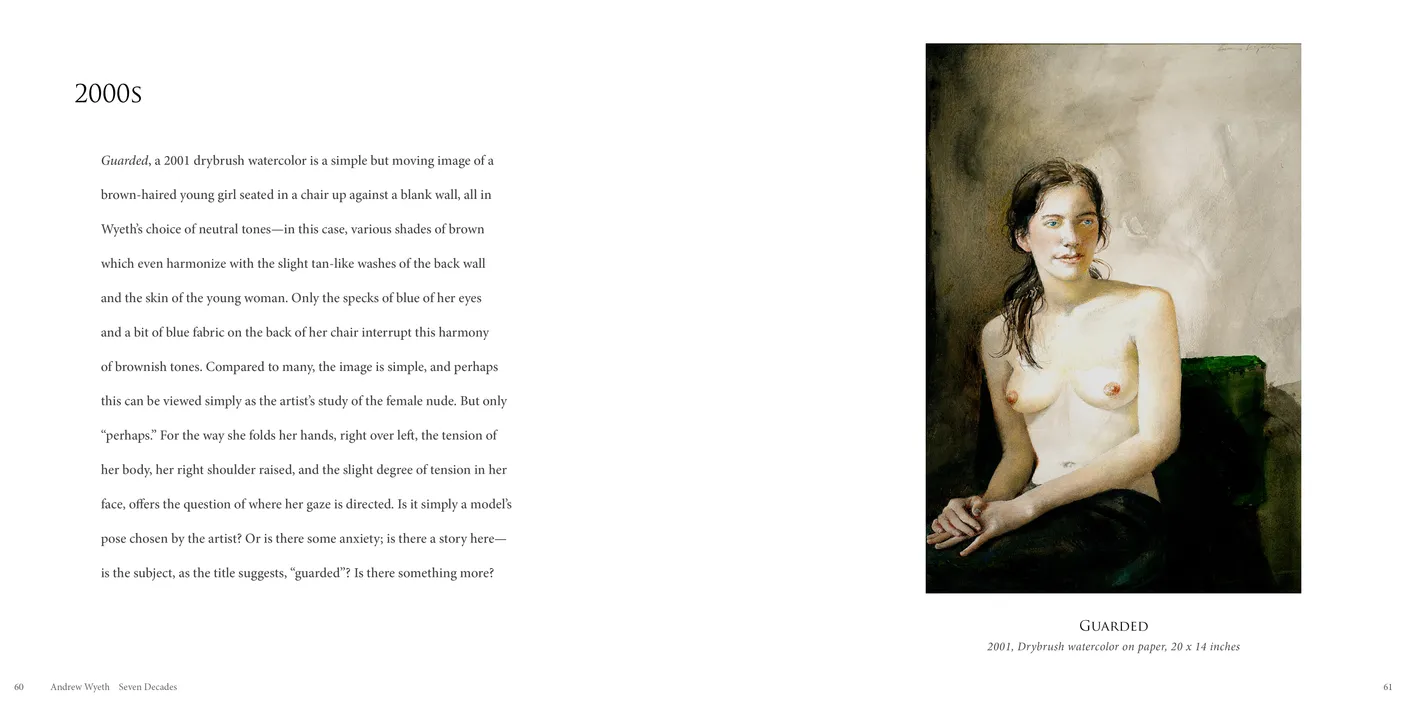
- Andrew Wyeth: Seven Decades exhibition catalog, pages 60-61
- Client: Adelson Galleries
- Visit figure page
- Type: portfolio
- Portfolio Type: publication_design
- Portfolio Role: design_layout
Andrew Wyeth: Seven Decades — Pages 62–63

- Andrew Wyeth: Seven Decades exhibition catalog, pages 62-63
- Client: Adelson Galleries
- Visit figure page
- Type: portfolio
- Portfolio Type: publication_design
- Portfolio Role: design_layout
Andrew Wyeth: Seven Decades — Pages 64–65
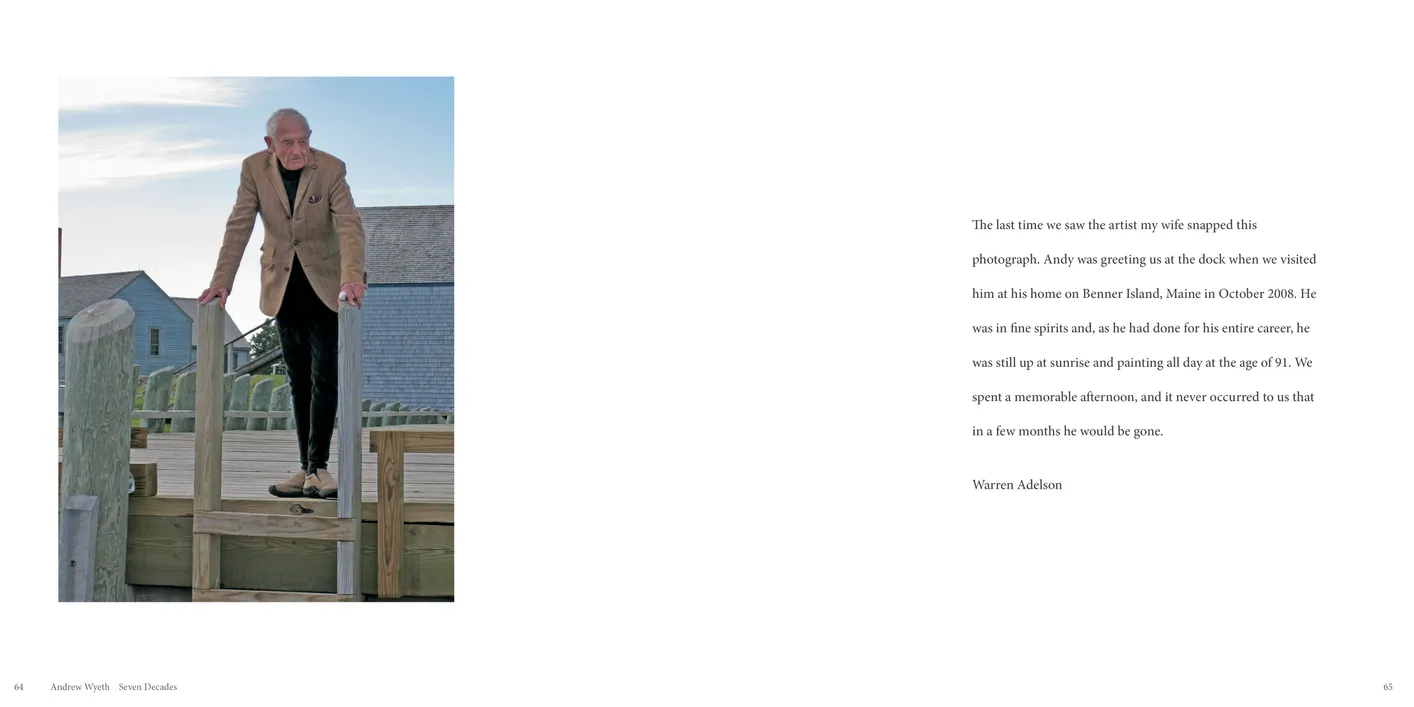
- Andrew Wyeth: Seven Decades exhibition catalog, pages 64-65
- Client: Adelson Galleries
- Visit figure page
- Type: portfolio
- Portfolio Type: publication_design
- Portfolio Role: design_layout
Andrew Wyeth: Seven Decades — Pages 66–67

- Andrew Wyeth: Seven Decades exhibition catalog, pages 66-67
- Client: Adelson Galleries
- Visit figure page
- Type: portfolio
- Portfolio Type: publication_design
- Portfolio Role: design_layout
Andrew Wyeth: Seven Decades — Pages 8–9
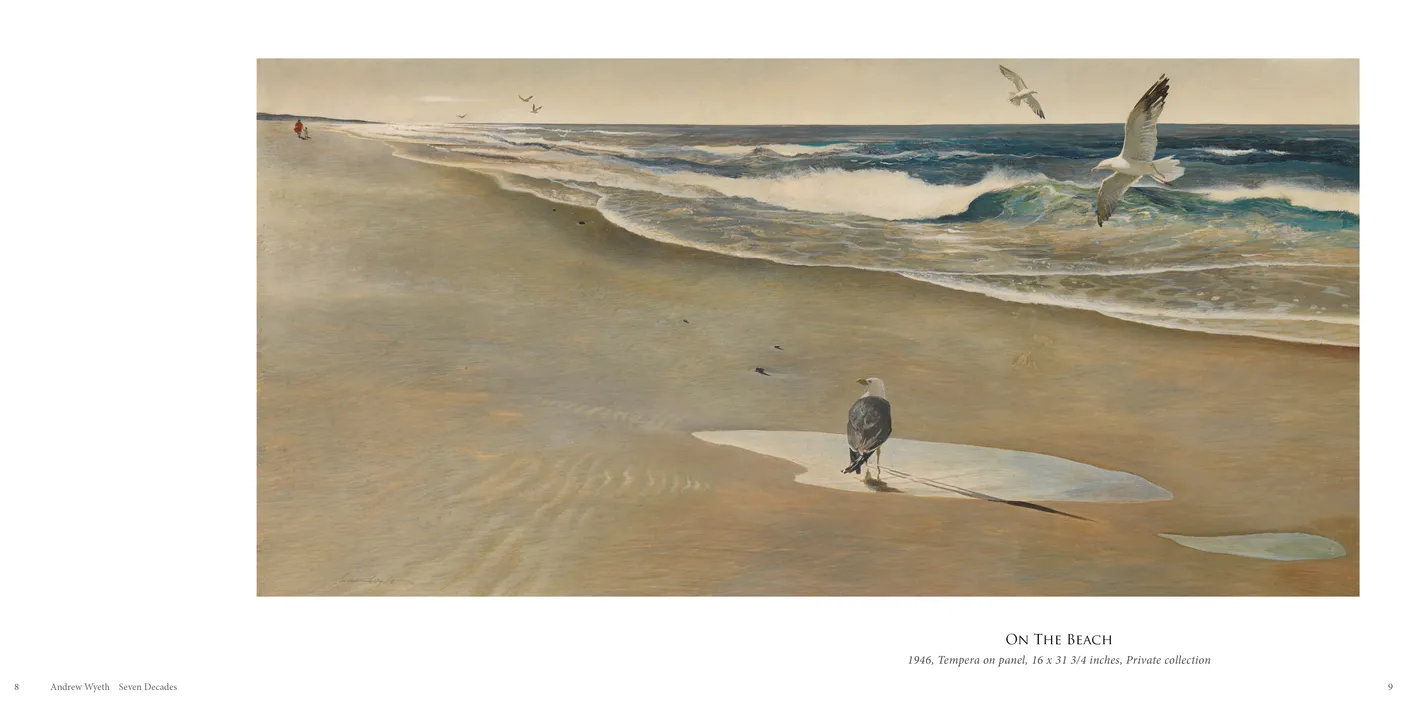
- Andrew Wyeth: Seven Decades exhibition catalog, pages 8-9
- Client: Adelson Galleries
- Visit figure page
- Type: portfolio
- Portfolio Type: publication_design
- Portfolio Role: design_layout
Bastion Rhu Sigil
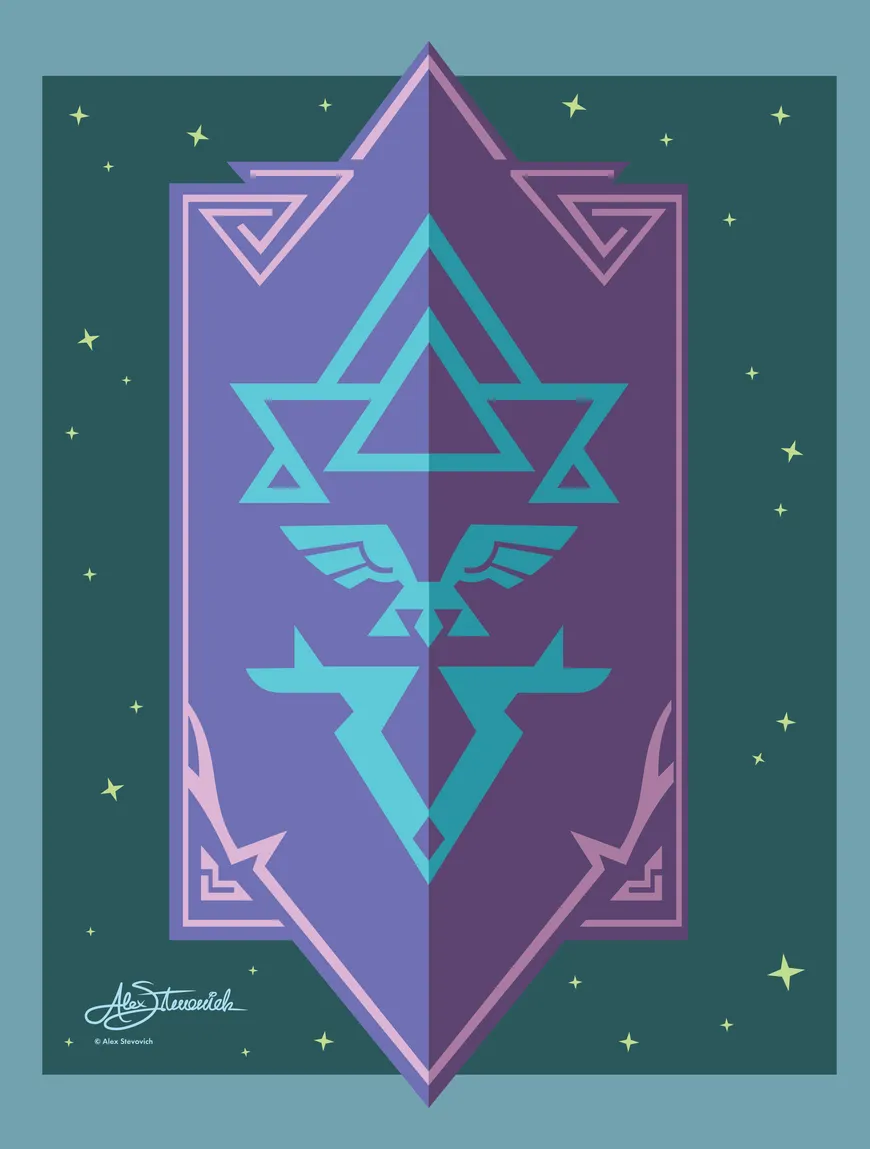
- Bastion Rhu sigil
- Artwork by Alex Stevovich
- © Alex Stevovich
- Visit figure page
- Type: portfolio
- Portfolio Type: advertising
- Portfolio Role: design_layout
- Portfolio Original Art: true
Bedazzled Exhibition Poster

- Poster for the Bedazzled exhibition
- Client: Lehman College Art Gallery
- Visit figure page
- Type: portfolio
- Portfolio Type: advertising
- Portfolio Role: design_layout
Betty Bressi Retrospective Exhibition Brochure Presentation
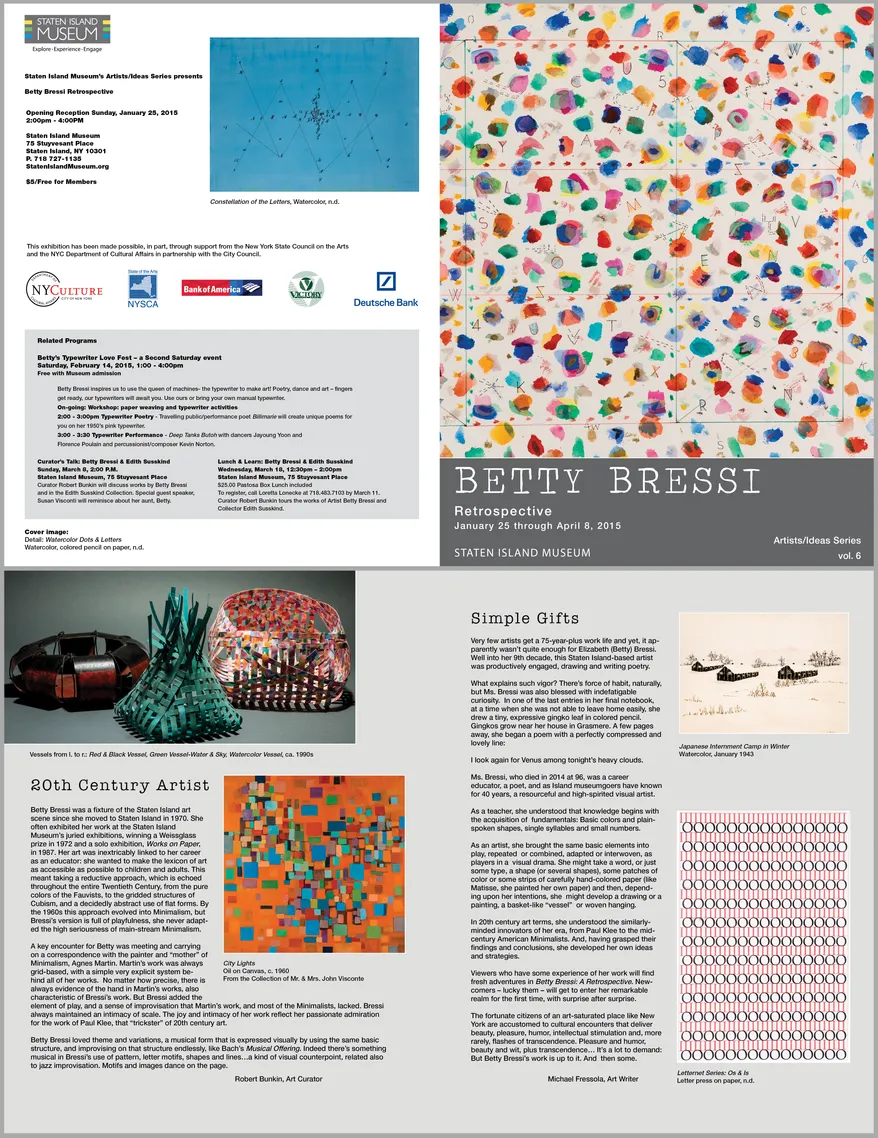
- 5-panel folding brochure for the Betty Bressi: Retrospective exhibition
- Client: Staten Island Museum
- Visit figure page
- Type: portfolio
- Portfolio Type: advertising
- Portfolio Role: design_layout
Castles In The Sky Exhibition Invitation Presentation
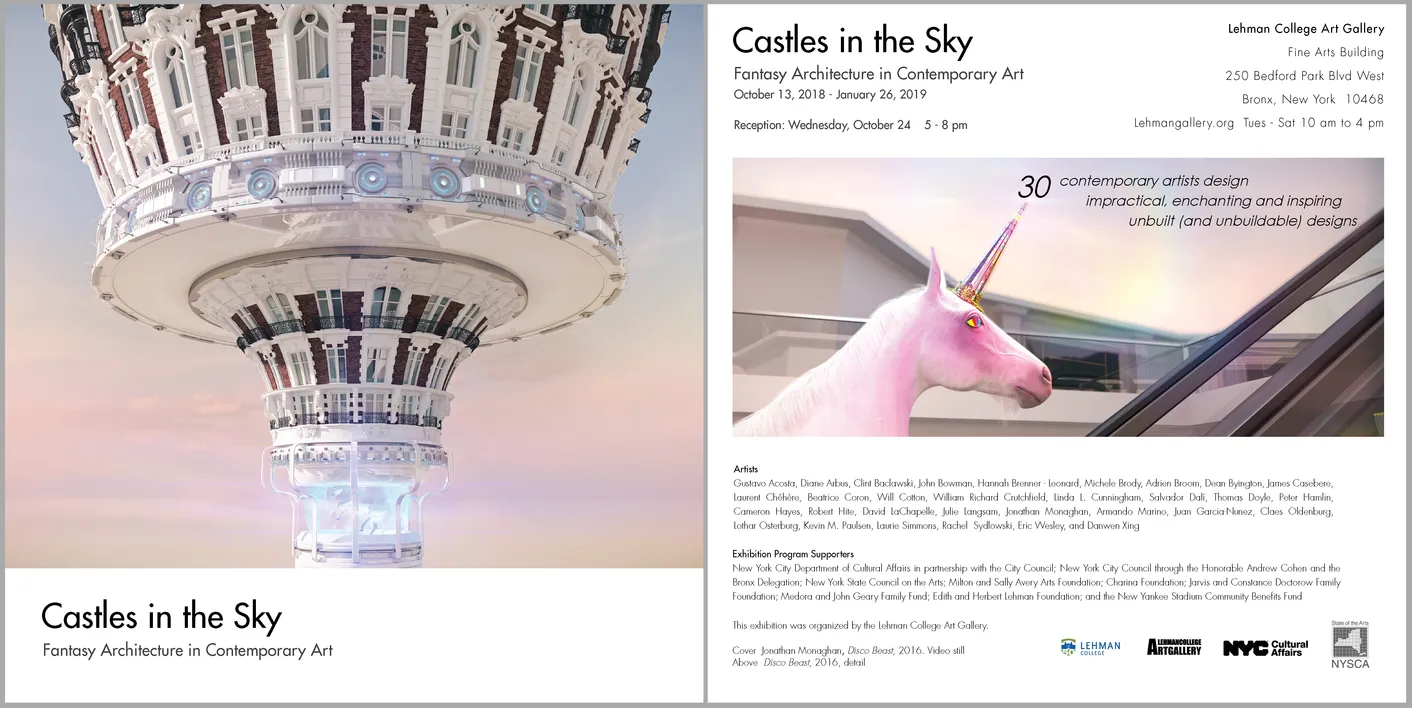
- Invitation for the Castles in the Sky exhibition
- Client: Lehman College Art Gallery
- Visit figure page
- Type: portfolio
- Portfolio Type: advertising
- Portfolio Role: design_layout
Castles In The Sky Exhibition Poster
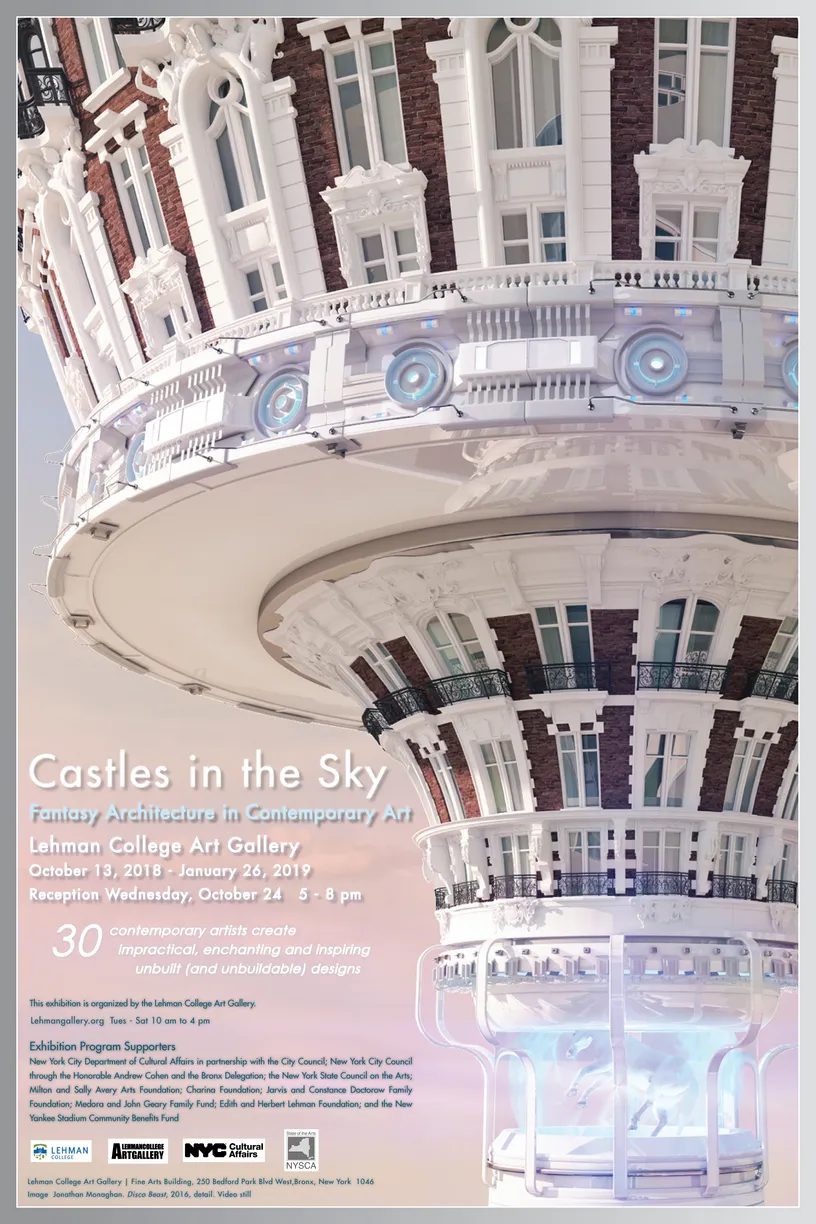
- Poster for the Castles in the Sky exhibition
- Client: Lehman College Art Gallery
- Visit figure page
- Type: portfolio
- Portfolio Type: advertising
- Portfolio Role: design_layout
Castles In: The Sky — Cover
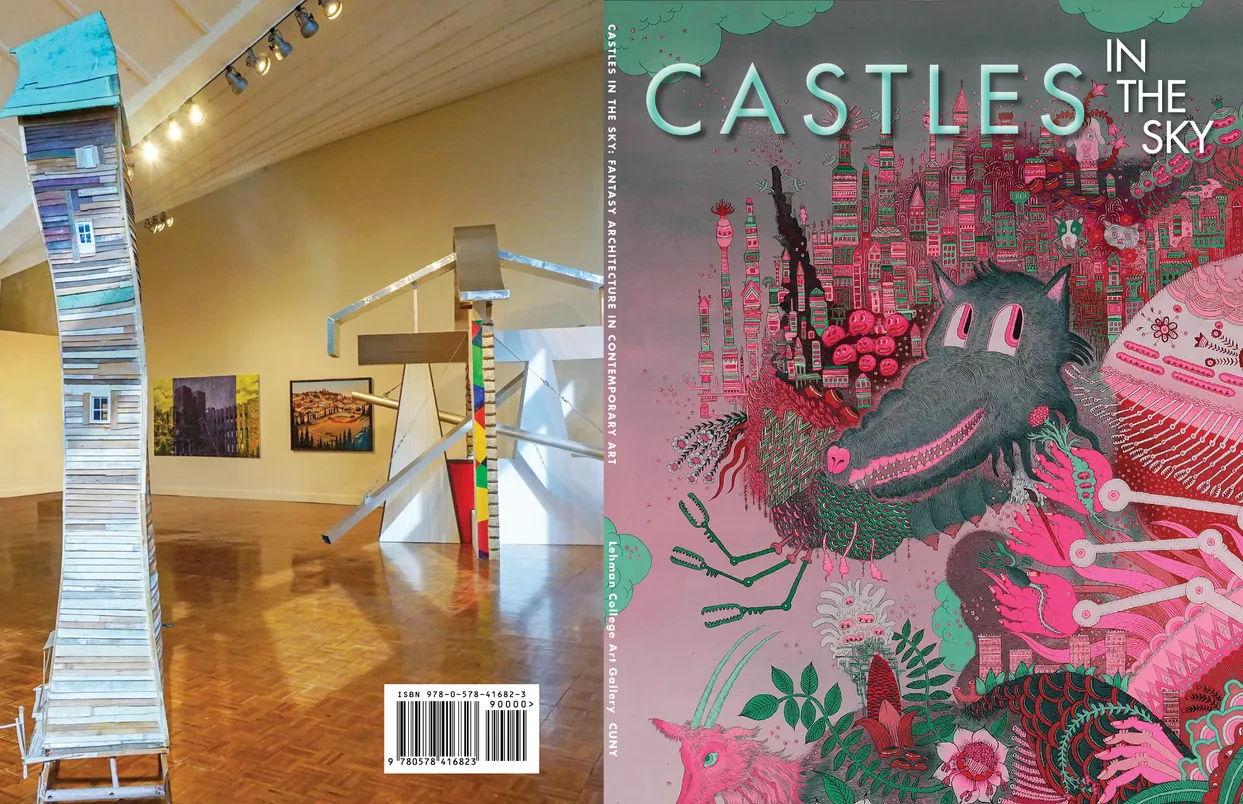
- Castles in the Sky: Fantasy Architecture in Contemporary Art exhibition catalog, cover
- Client: Lehman College Art Gallery
- Visit figure page
- Type: portfolio
- Portfolio Type: publication_design
- Portfolio Role: design_layout
Castles In: The Sky — Inside Front Cover

- Castles in the Sky: Fantasy Architecture in Contemporary Art exhibition catalog, inside front cover
- Client: Lehman College Art Gallery
- Visit figure page
- Type: portfolio
- Portfolio Type: publication_design
- Portfolio Role: design_layout
Castles In: The Sky — Pages 10–11
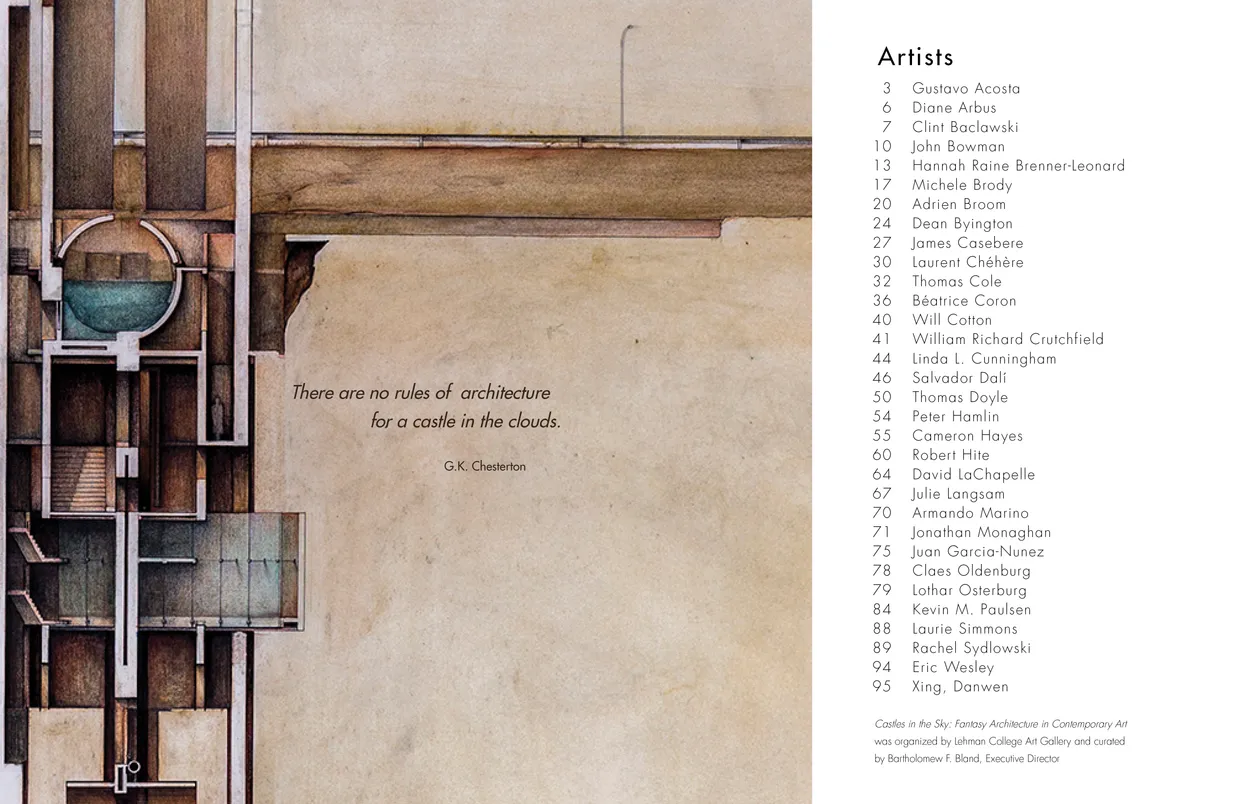
- Castles in the Sky: Fantasy Architecture in Contemporary Art exhibition catalog, pages 10-11
- Client: Lehman College Art Gallery
- Visit figure page
- Type: portfolio
- Portfolio Type: publication_design
- Portfolio Role: design_layout
Castles In: The Sky — Pages 100–101
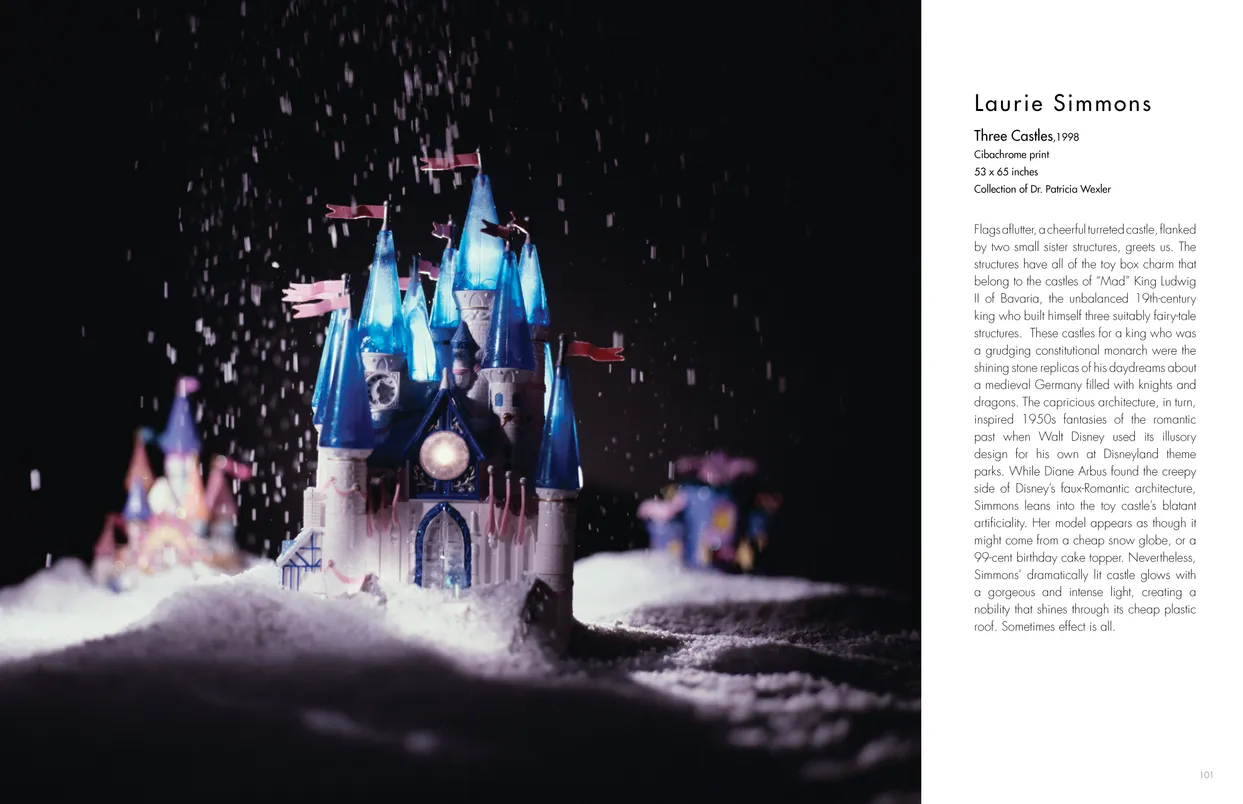
- Castles in the Sky: Fantasy Architecture in Contemporary Art exhibition catalog, pages 100-101
- Client: Lehman College Art Gallery
- Visit figure page
- Type: portfolio
- Portfolio Type: publication_design
- Portfolio Role: design_layout
Castles In: The Sky — Pages 102–103
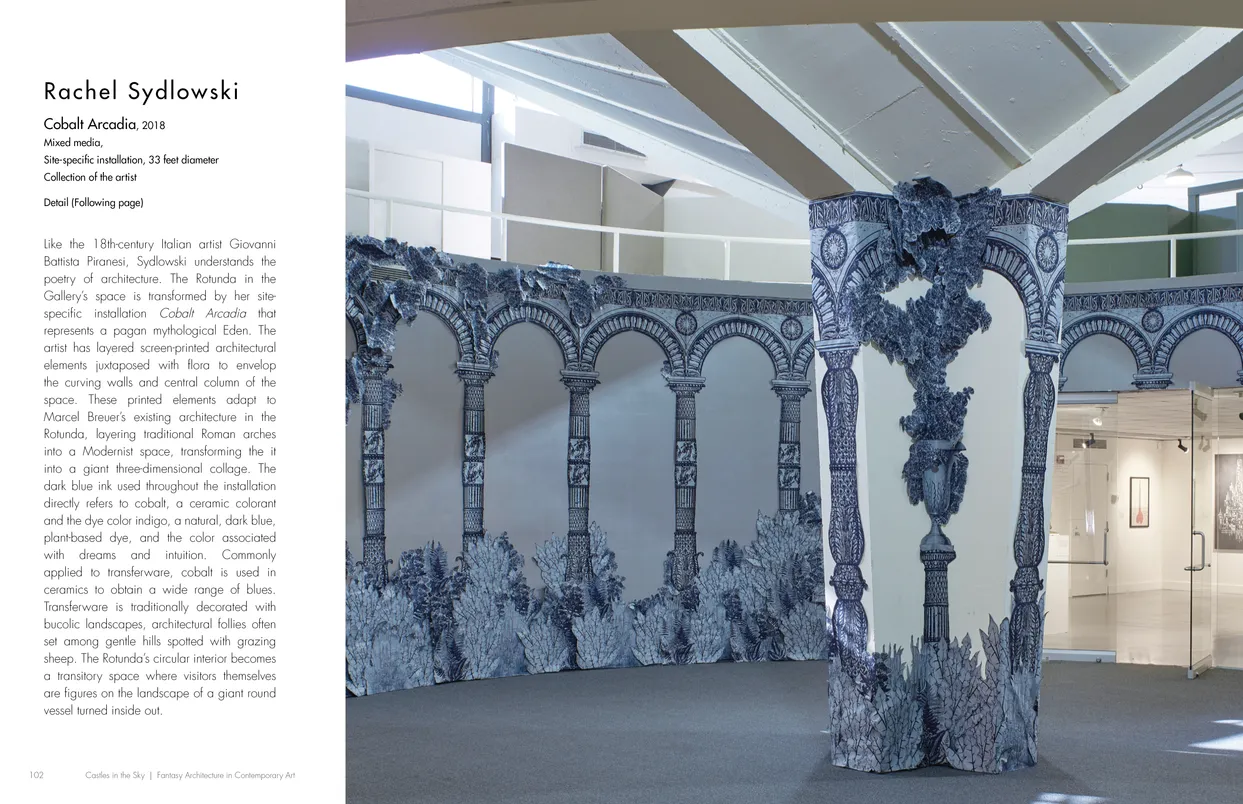
- Castles in the Sky: Fantasy Architecture in Contemporary Art exhibition catalog, pages 102-103
- Client: Lehman College Art Gallery
- Visit figure page
- Type: portfolio
- Portfolio Type: publication_design
- Portfolio Role: design_layout
Castles In: The Sky — Pages 104–105
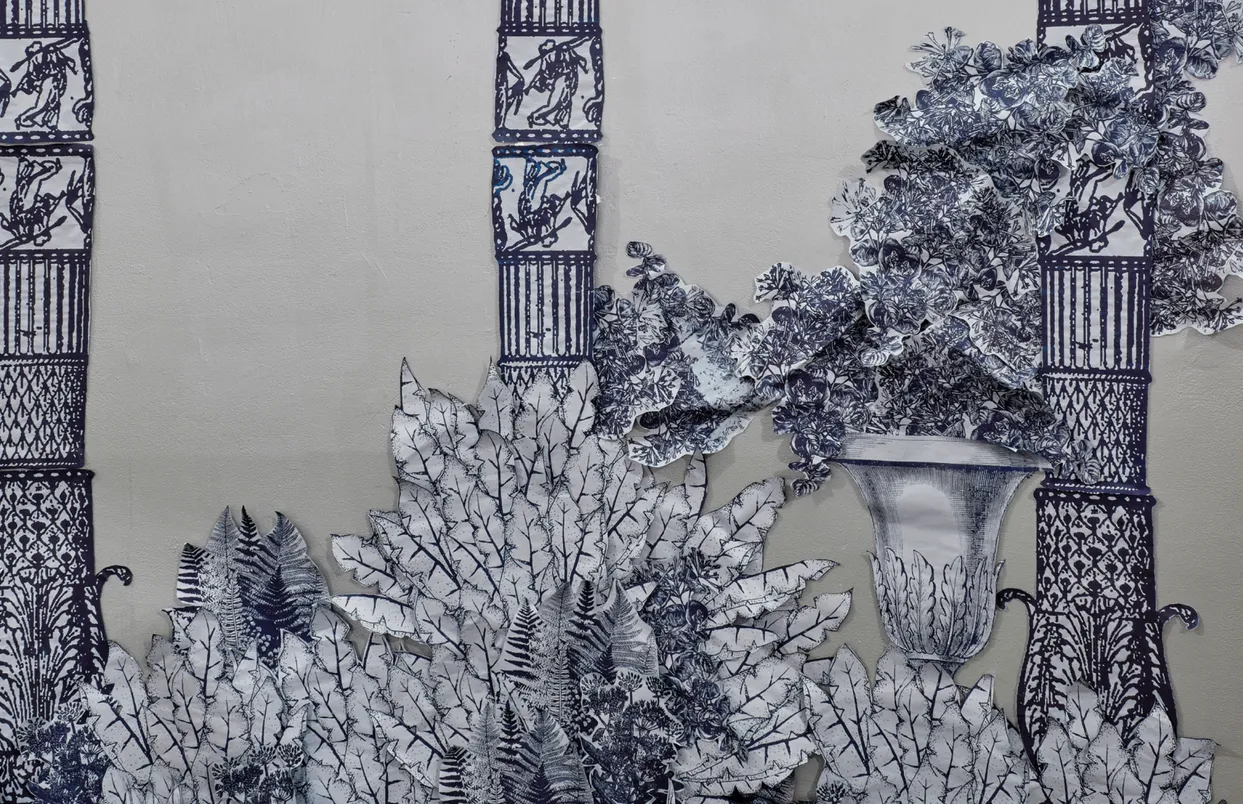
- Castles in the Sky: Fantasy Architecture in Contemporary Art exhibition catalog, pages 104-105
- Client: Lehman College Art Gallery
- Visit figure page
- Type: portfolio
- Portfolio Type: publication_design
- Portfolio Role: design_layout
Castles In: The Sky — Pages 106–107
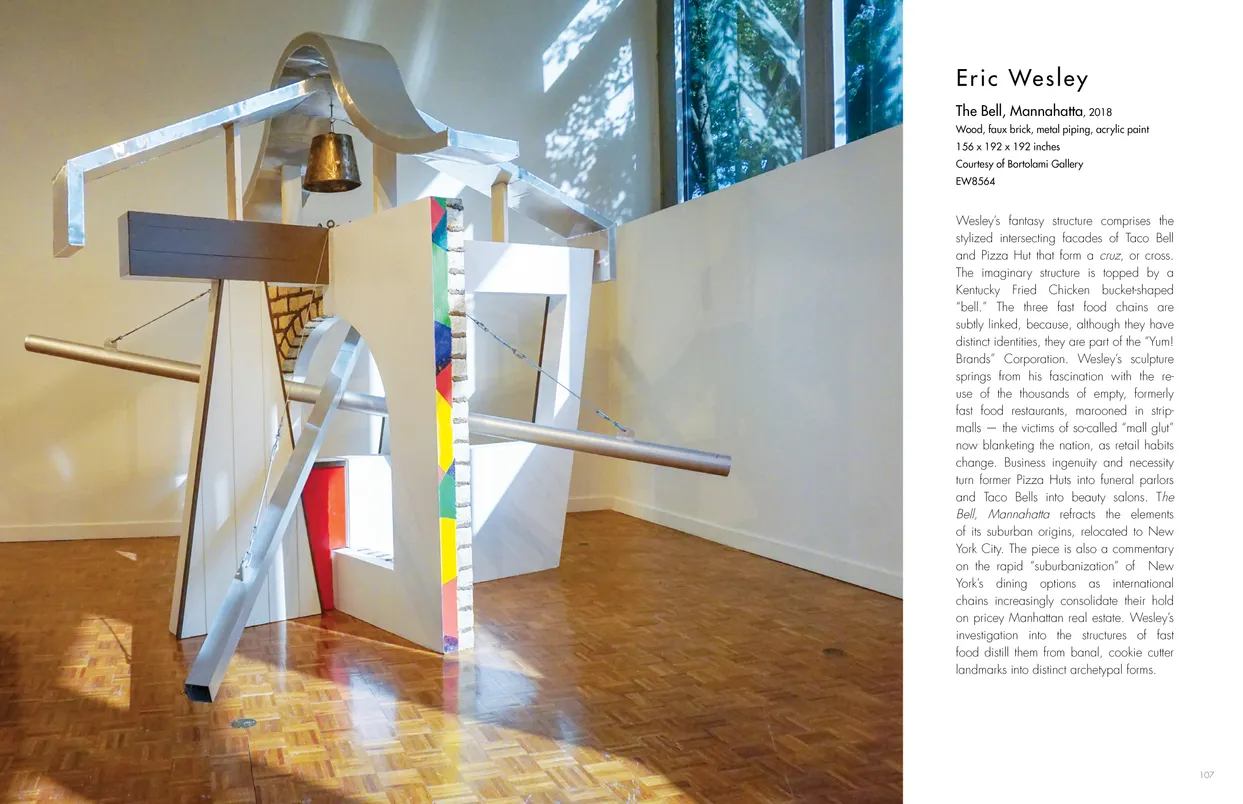
- Castles in the Sky: Fantasy Architecture in Contemporary Art exhibition catalog, pages 106-107
- Client: Lehman College Art Gallery
- Visit figure page
- Type: portfolio
- Portfolio Type: publication_design
- Portfolio Role: design_layout
Castles In: The Sky — Pages 108–109
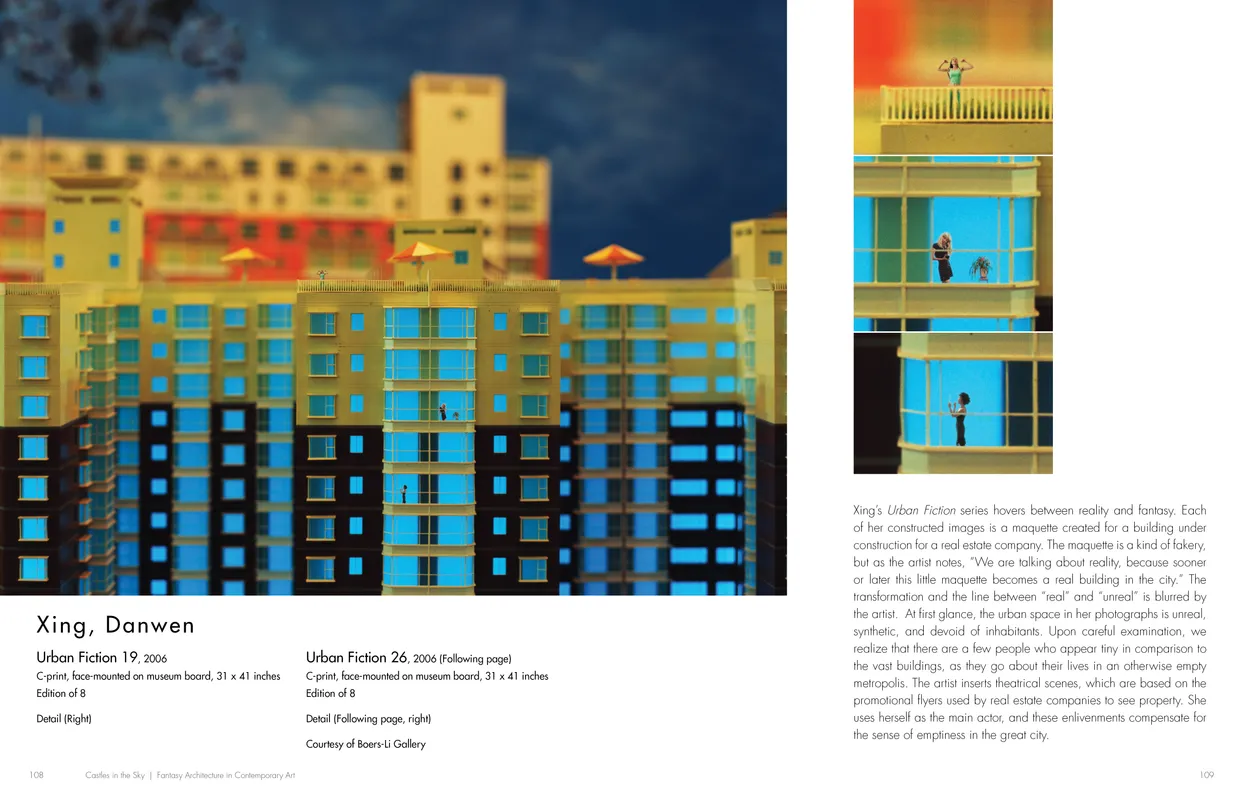
- Castles in the Sky: Fantasy Architecture in Contemporary Art exhibition catalog, pages 108-109
- Client: Lehman College Art Gallery
- Visit figure page
- Type: portfolio
- Portfolio Type: publication_design
- Portfolio Role: design_layout
Castles In: The Sky — Pages 110–111

- Castles in the Sky: Fantasy Architecture in Contemporary Art exhibition catalog, pages 110-111
- Client: Lehman College Art Gallery
- Visit figure page
- Type: portfolio
- Portfolio Type: publication_design
- Portfolio Role: design_layout
Castles In: The Sky — Pages 112–113

- Castles in the Sky: Fantasy Architecture in Contemporary Art exhibition catalog, pages 112-113
- Client: Lehman College Art Gallery
- Visit figure page
- Type: portfolio
- Portfolio Type: publication_design
- Portfolio Role: design_layout
Castles In: The Sky — Pages 12–13
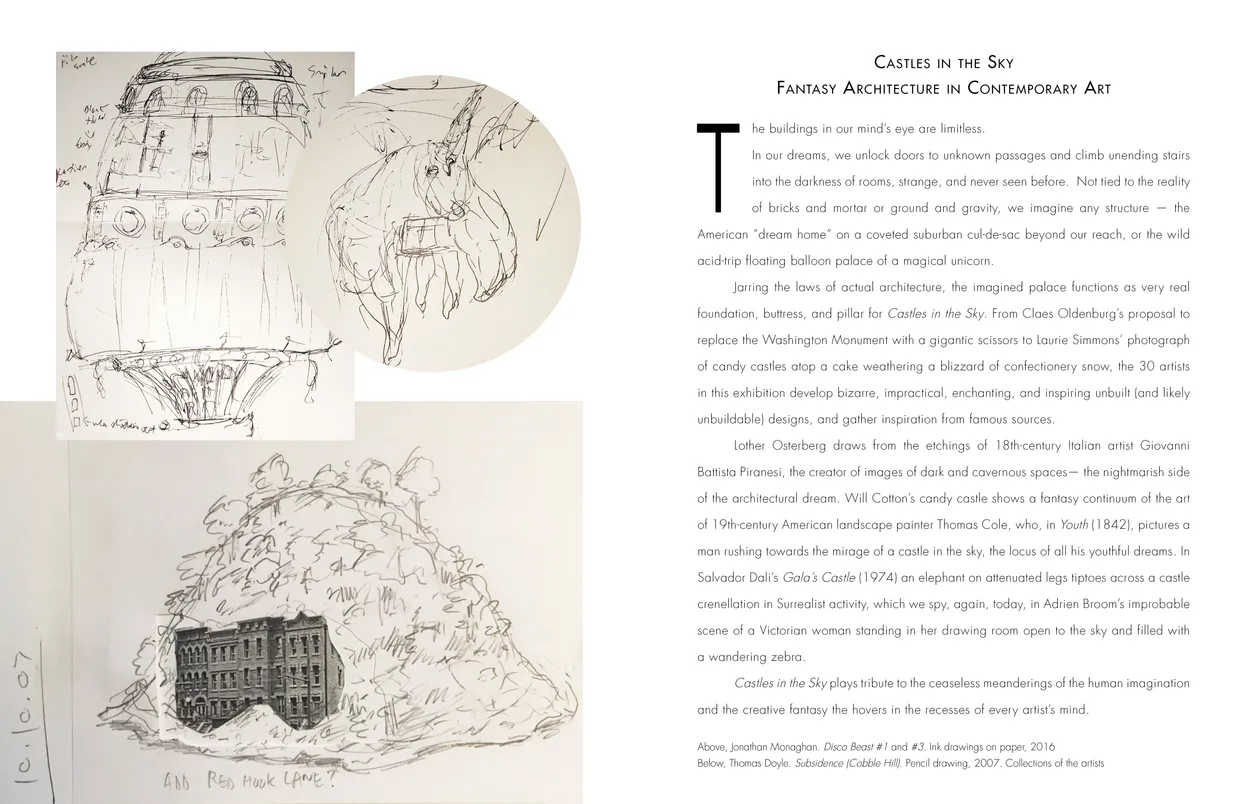
- Castles in the Sky: Fantasy Architecture in Contemporary Art exhibition catalog, pages 12-13
- Client: Lehman College Art Gallery
- Visit figure page
- Type: portfolio
- Portfolio Type: publication_design
- Portfolio Role: design_layout
Castles In: The Sky — Pages 14–15
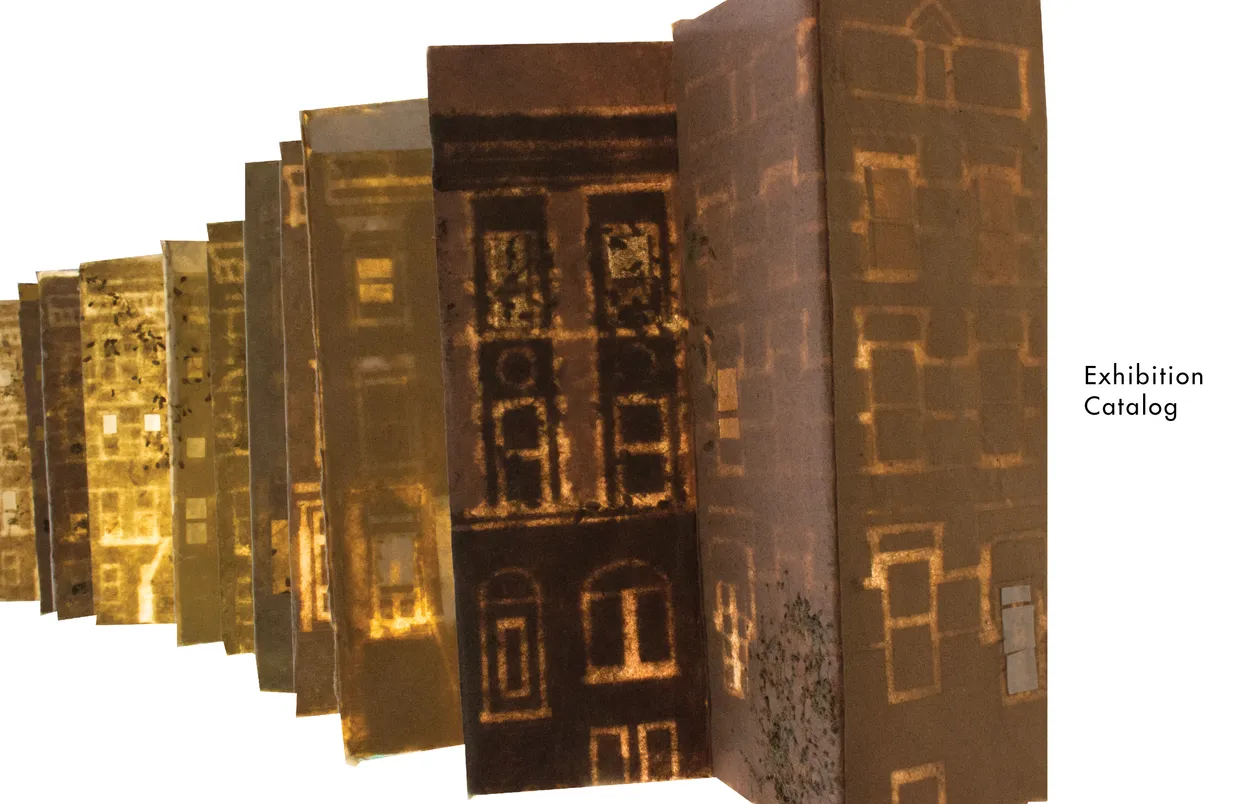
- Castles in the Sky: Fantasy Architecture in Contemporary Art exhibition catalog, pages 14-15
- Client: Lehman College Art Gallery
- Visit figure page
- Type: portfolio
- Portfolio Type: publication_design
- Portfolio Role: design_layout
Castles In: The Sky — Pages 16–17
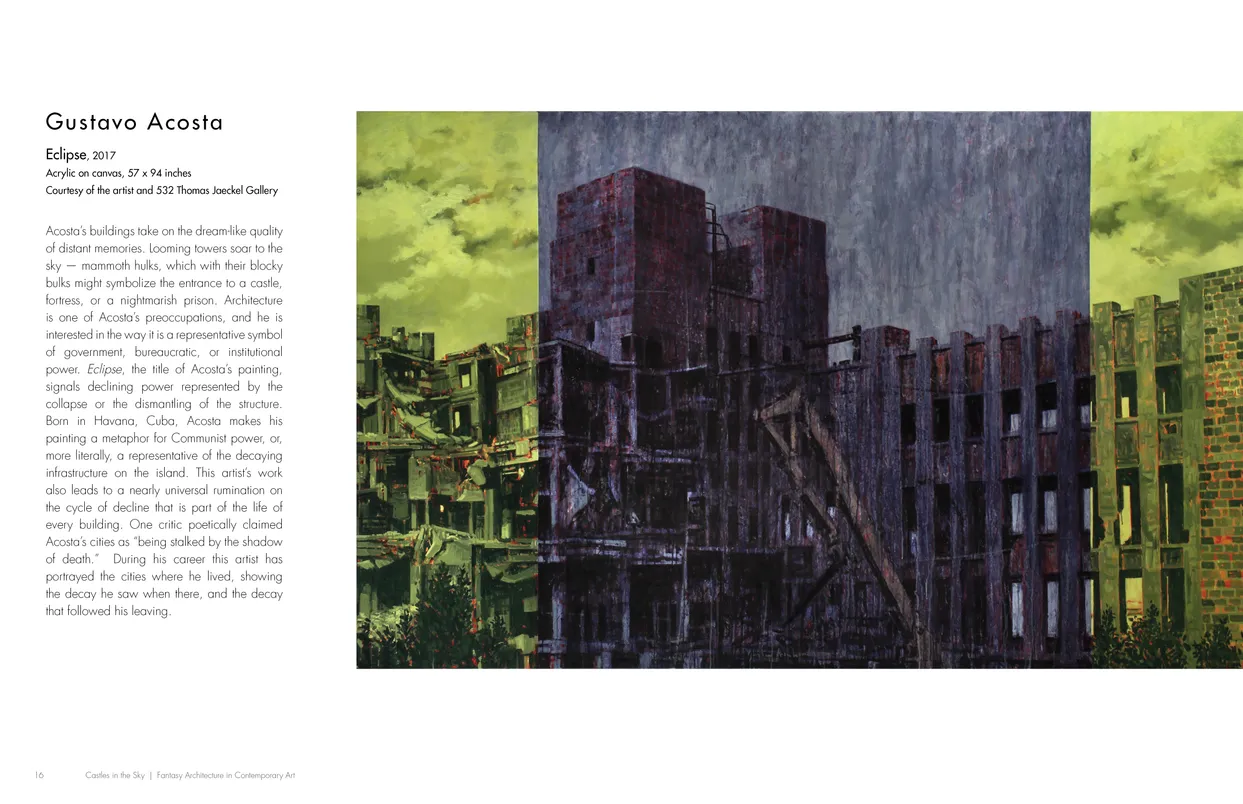
- Castles in the Sky: Fantasy Architecture in Contemporary Art exhibition catalog, pages 16-17
- Client: Lehman College Art Gallery
- Visit figure page
- Type: portfolio
- Portfolio Type: publication_design
- Portfolio Role: design_layout
Castles In: The Sky — Pages 18–19
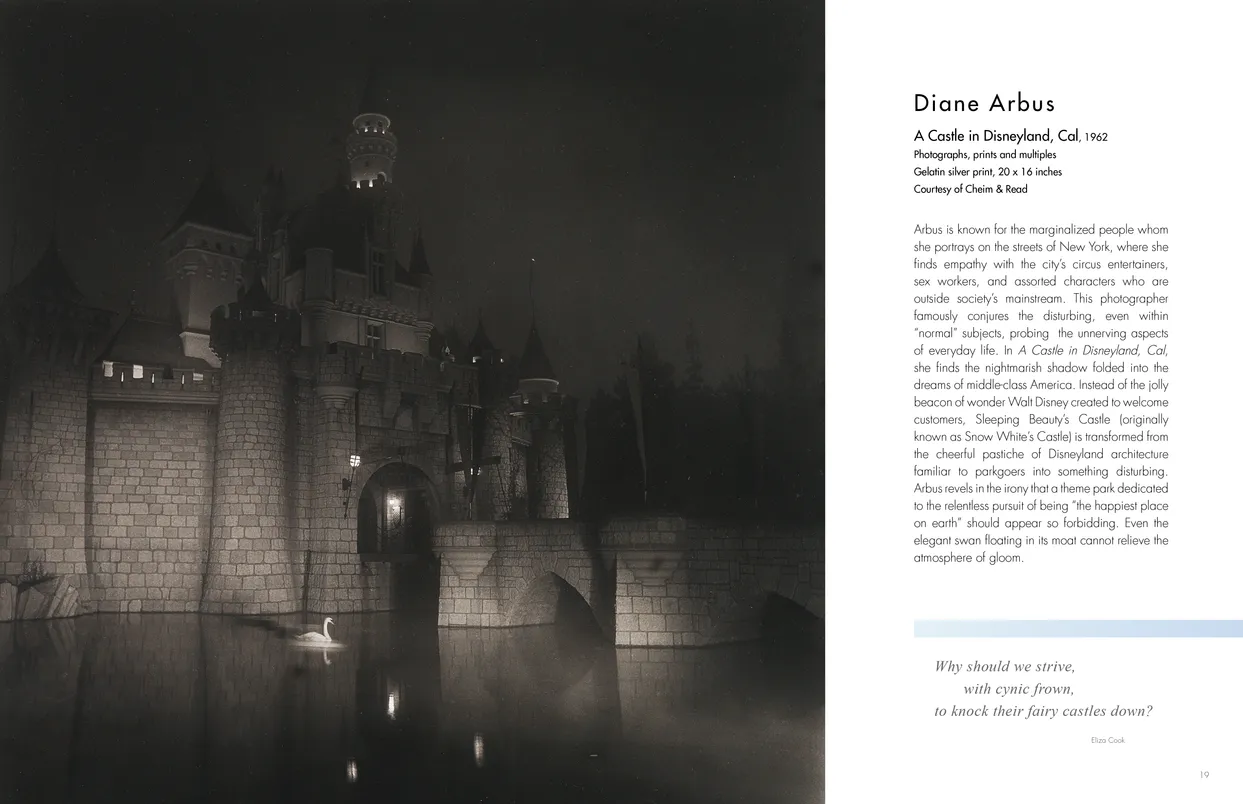
- Castles in the Sky: Fantasy Architecture in Contemporary Art exhibition catalog, pages 18-19
- Client: Lehman College Art Gallery
- Visit figure page
- Type: portfolio
- Portfolio Type: publication_design
- Portfolio Role: design_layout
Castles In: The Sky — Pages 2–3
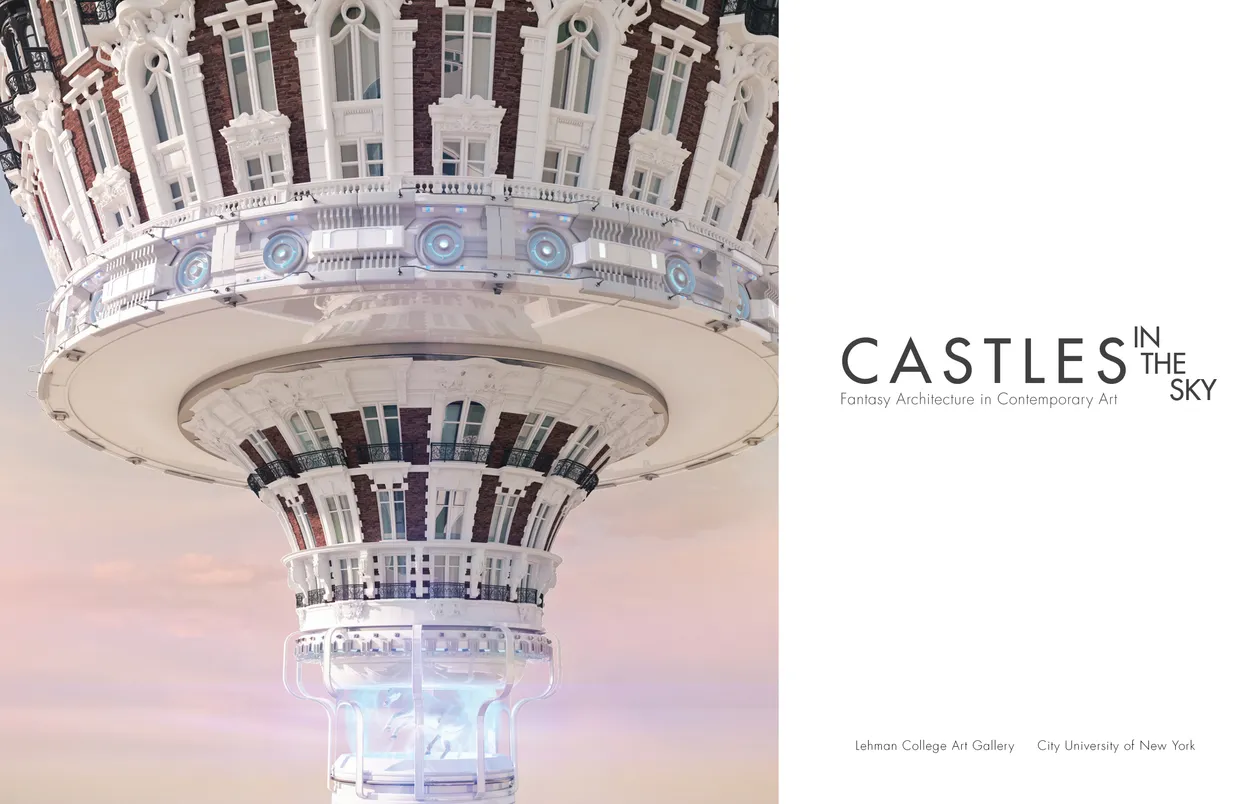
- Castles in the Sky: Fantasy Architecture in Contemporary Art exhibition catalog, pages 2-3
- Client: Lehman College Art Gallery
- Visit figure page
- Type: portfolio
- Portfolio Type: publication_design
- Portfolio Role: design_layout
Castles In: The Sky — Pages 20–21
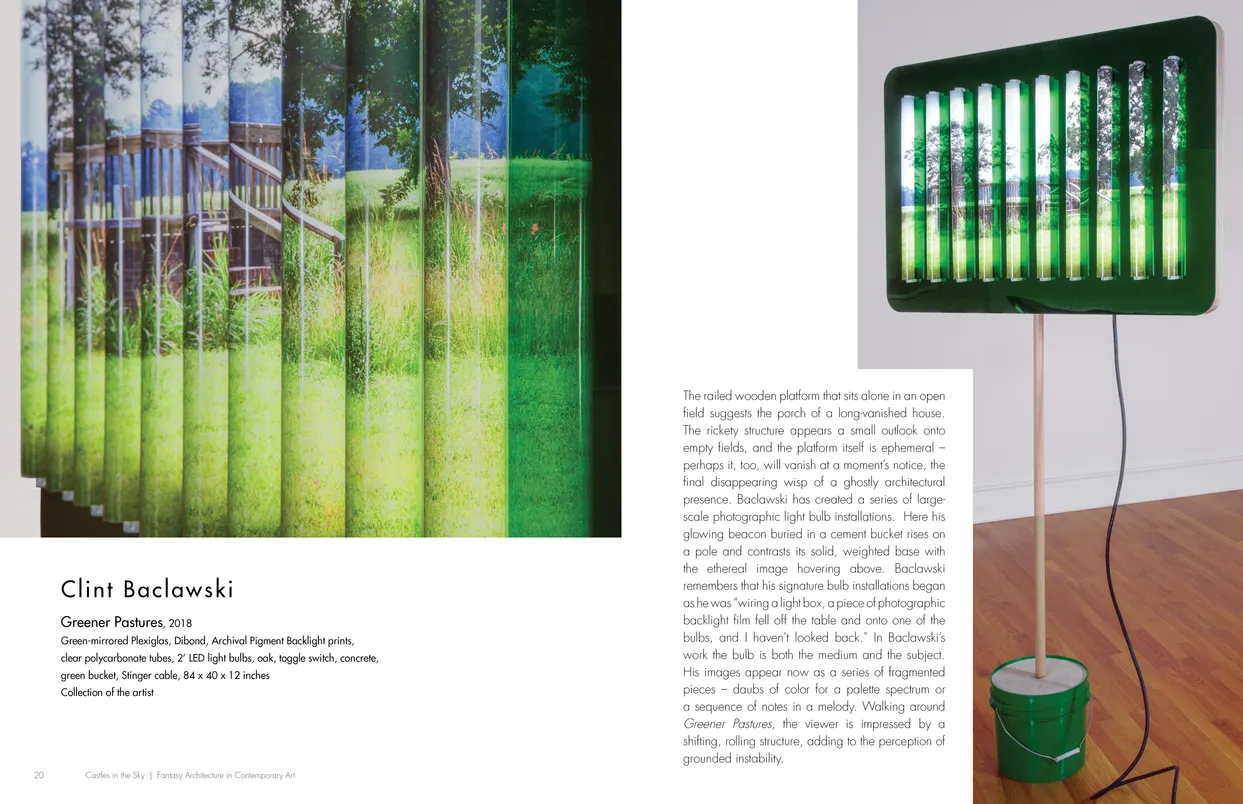
- Castles in the Sky: Fantasy Architecture in Contemporary Art exhibition catalog, pages 20-21
- Client: Lehman College Art Gallery
- Visit figure page
- Type: portfolio
- Portfolio Type: publication_design
- Portfolio Role: design_layout
Castles In: The Sky — Pages 22–23
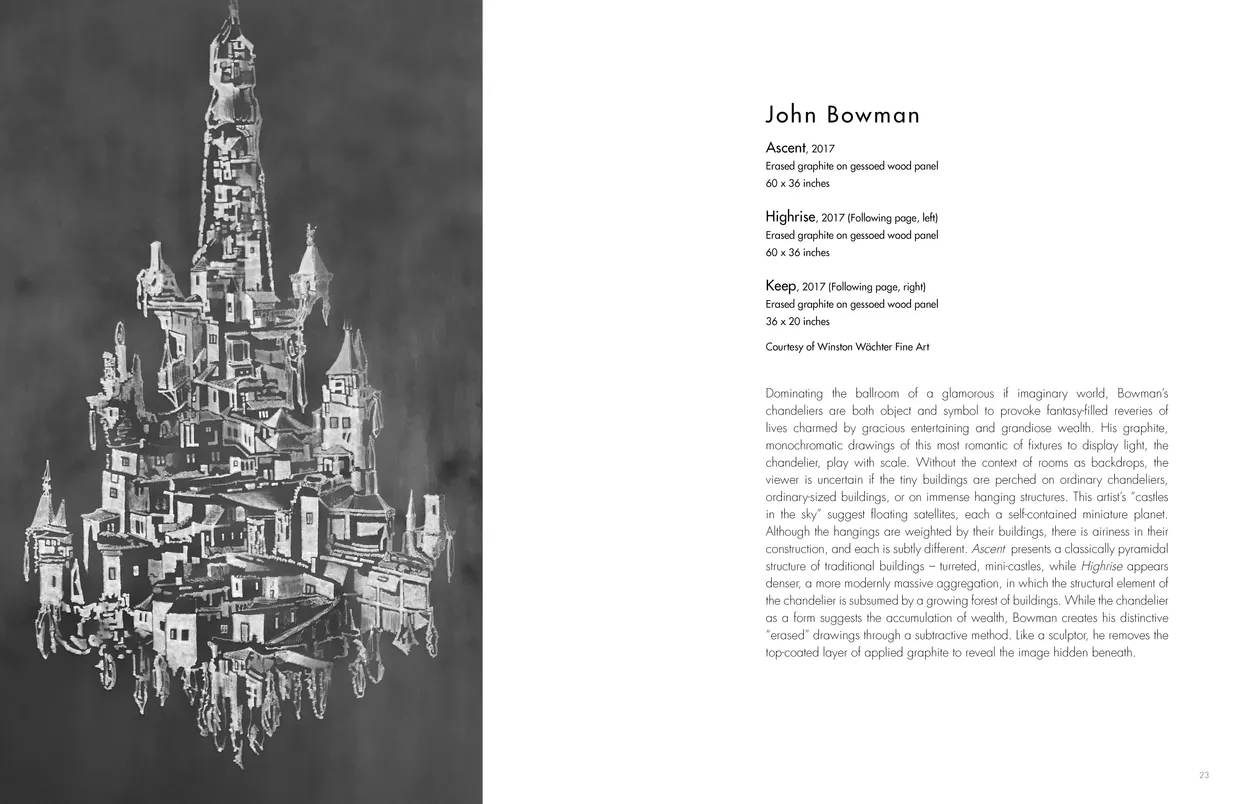
- Castles in the Sky: Fantasy Architecture in Contemporary Art exhibition catalog, pages 22-23
- Client: Lehman College Art Gallery
- Visit figure page
- Type: portfolio
- Portfolio Type: publication_design
- Portfolio Role: design_layout
Castles In: The Sky — Pages 24–25
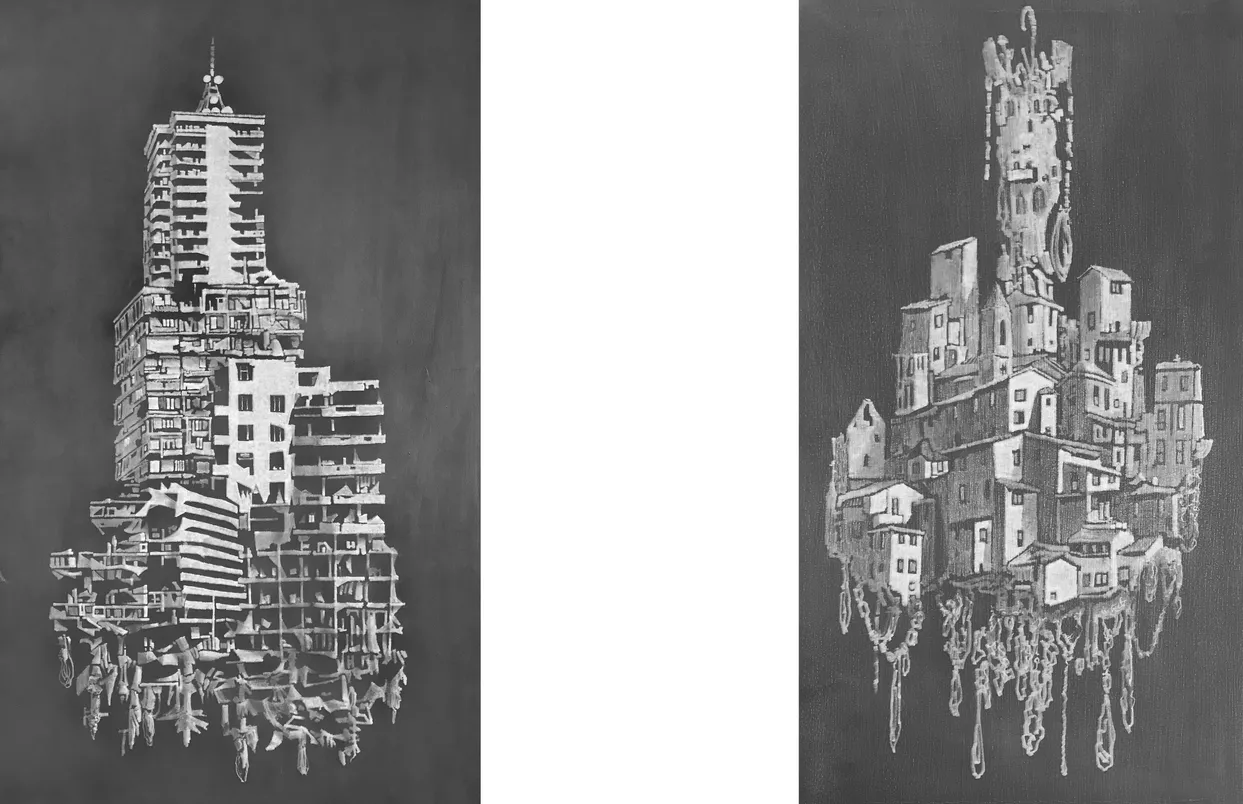
- Castles in the Sky: Fantasy Architecture in Contemporary Art exhibition catalog, pages 24-25
- Client: Lehman College Art Gallery
- Visit figure page
- Type: portfolio
- Portfolio Type: publication_design
- Portfolio Role: design_layout
Castles In: The Sky — Pages 26–27
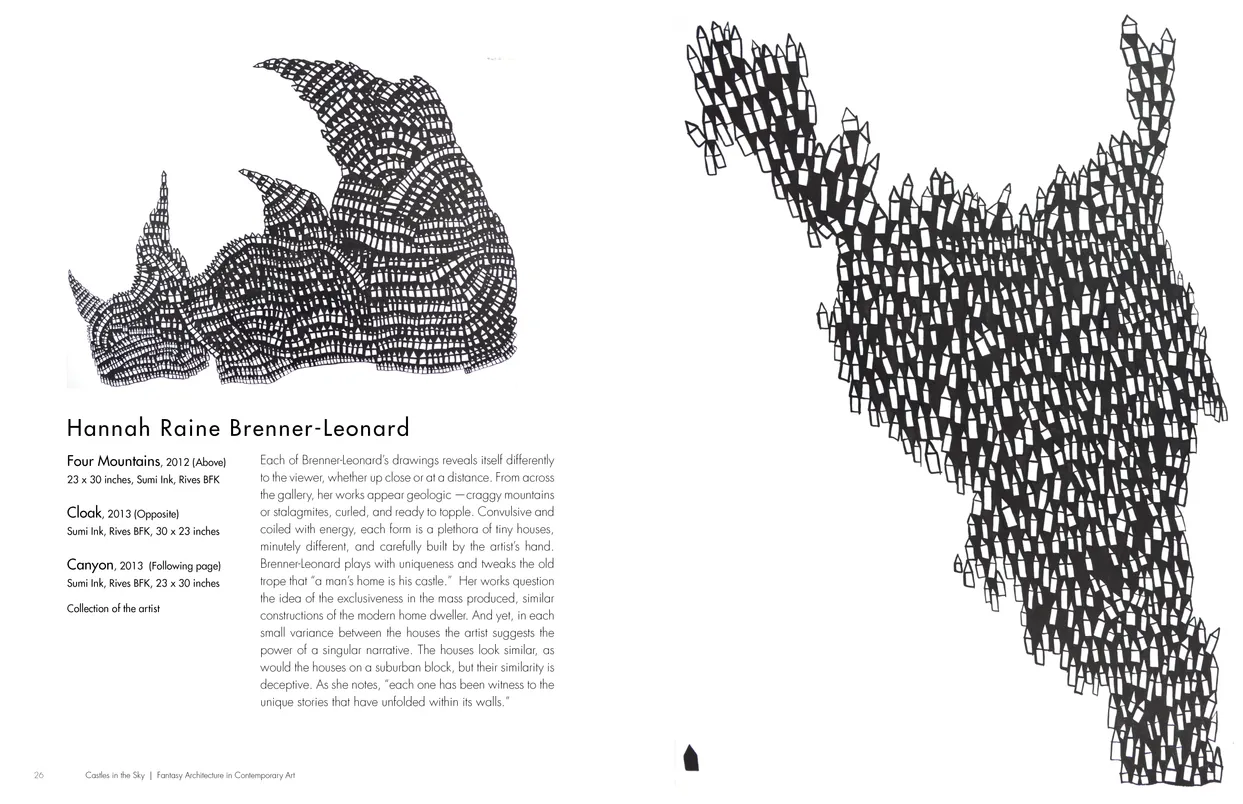
- Castles in the Sky: Fantasy Architecture in Contemporary Art exhibition catalog, pages 26-27
- Client: Lehman College Art Gallery
- Visit figure page
- Type: portfolio
- Portfolio Type: publication_design
- Portfolio Role: design_layout
Castles In: The Sky — Pages 28–29
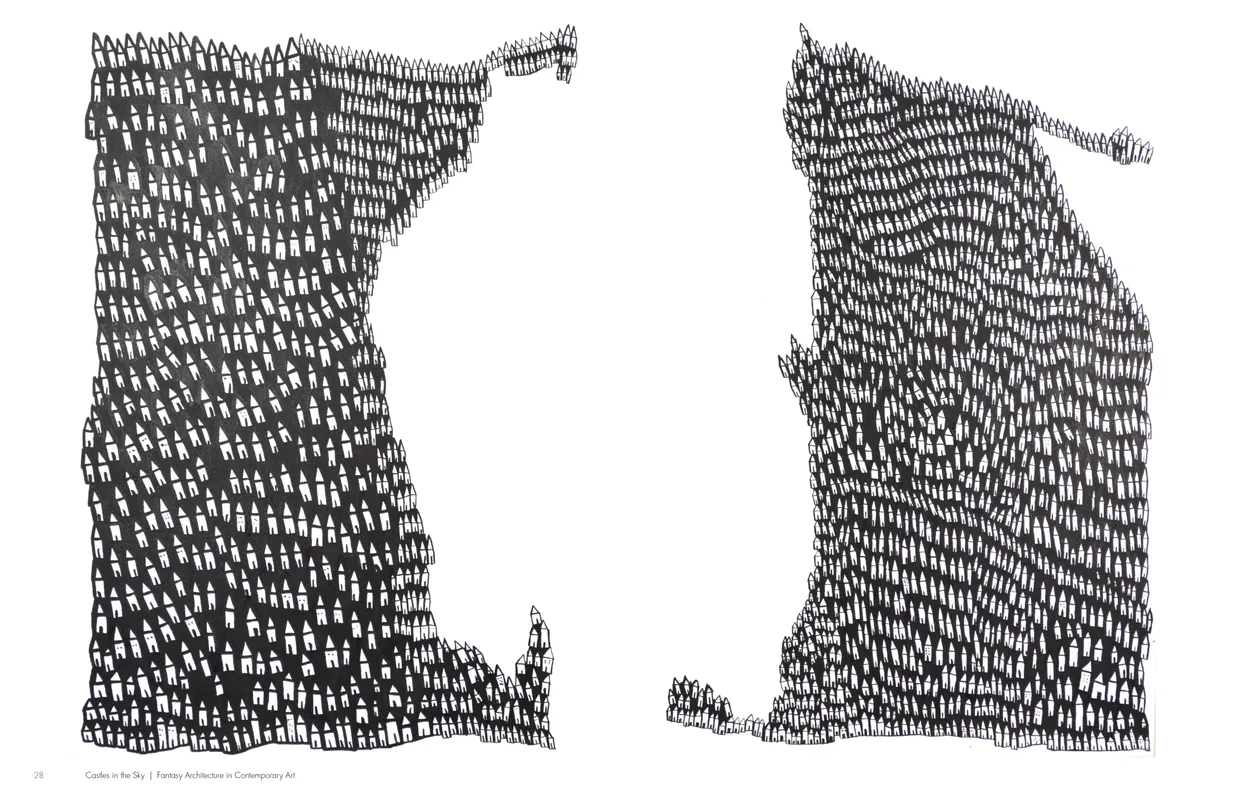
- Castles in the Sky: Fantasy Architecture in Contemporary Art exhibition catalog, pages 28-29
- Client: Lehman College Art Gallery
- Visit figure page
- Type: portfolio
- Portfolio Type: publication_design
- Portfolio Role: design_layout
Castles In: The Sky — Pages 30–31
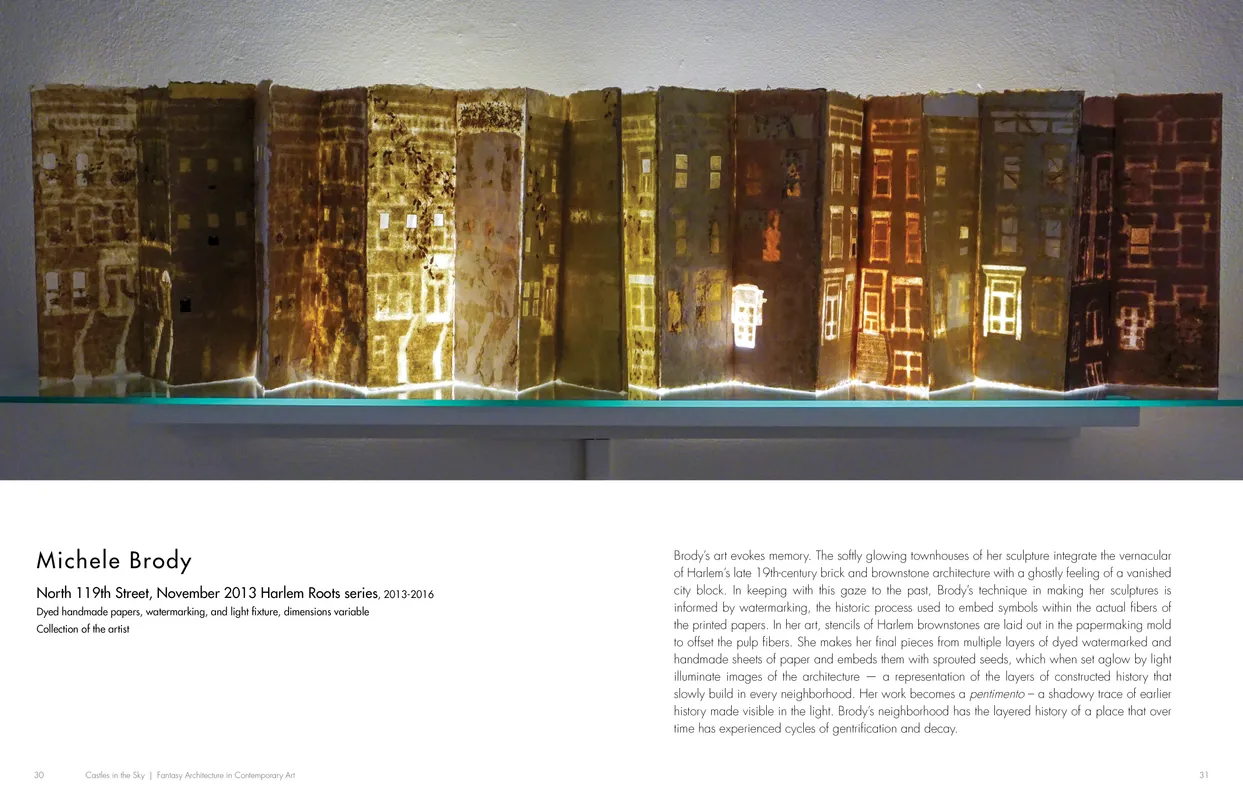
- Castles in the Sky: Fantasy Architecture in Contemporary Art exhibition catalog, pages 30-31
- Client: Lehman College Art Gallery
- Visit figure page
- Type: portfolio
- Portfolio Type: publication_design
- Portfolio Role: design_layout
Castles In: The Sky — Pages 32–33
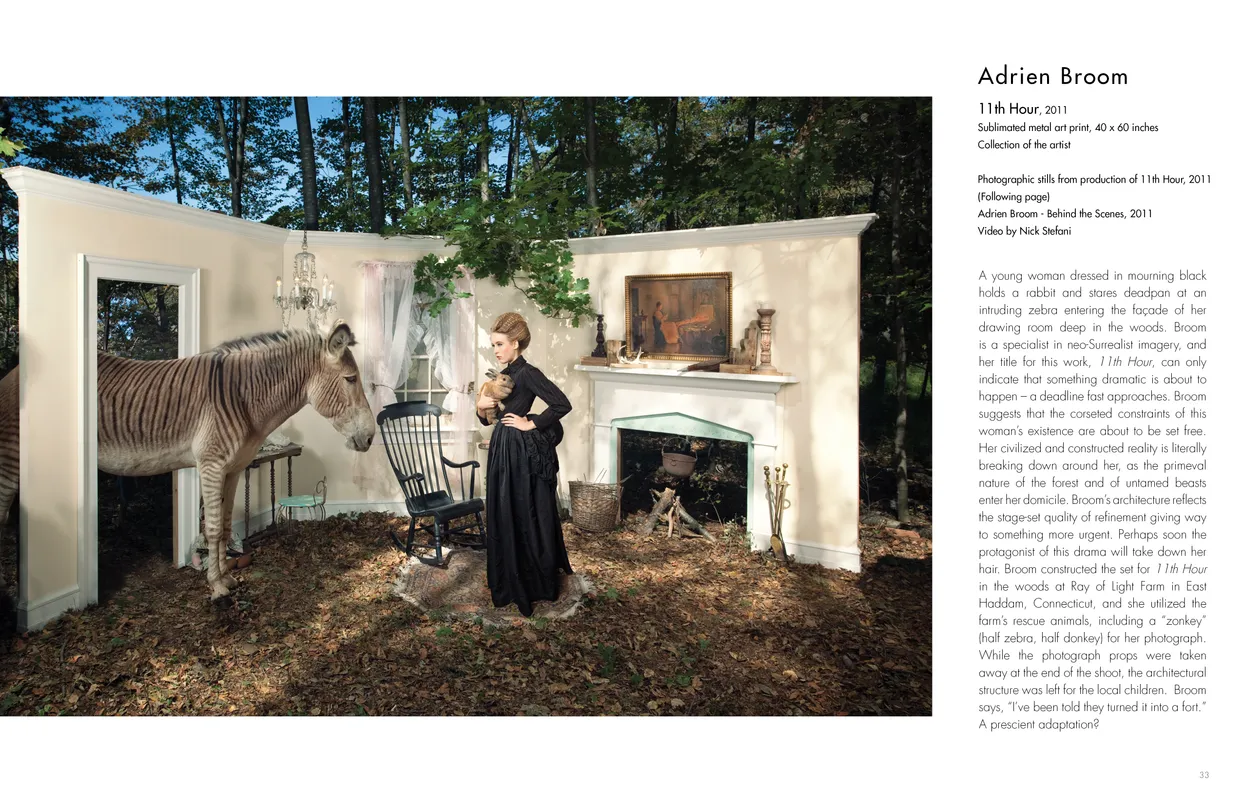
- Castles in the Sky: Fantasy Architecture in Contemporary Art exhibition catalog, pages 32-33
- Client: Lehman College Art Gallery
- Visit figure page
- Type: portfolio
- Portfolio Type: publication_design
- Portfolio Role: design_layout
Castles In: The Sky — Pages 34–35

- Castles in the Sky: Fantasy Architecture in Contemporary Art exhibition catalog, pages 34-35
- Client: Lehman College Art Gallery
- Visit figure page
- Type: portfolio
- Portfolio Type: publication_design
- Portfolio Role: design_layout
Castles In: The Sky — Pages 36–37
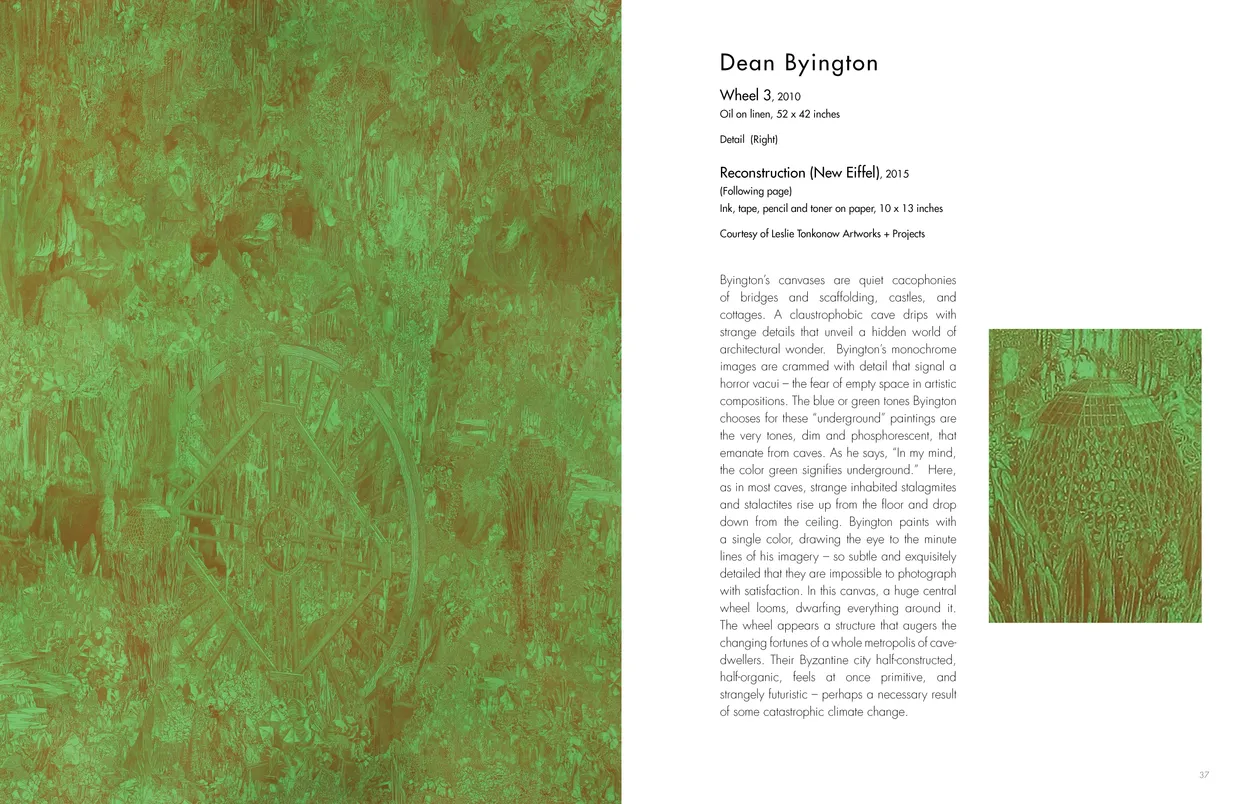
- Castles in the Sky: Fantasy Architecture in Contemporary Art exhibition catalog, pages 36-37
- Client: Lehman College Art Gallery
- Visit figure page
- Type: portfolio
- Portfolio Type: publication_design
- Portfolio Role: design_layout
Castles In: The Sky — Pages 38–39
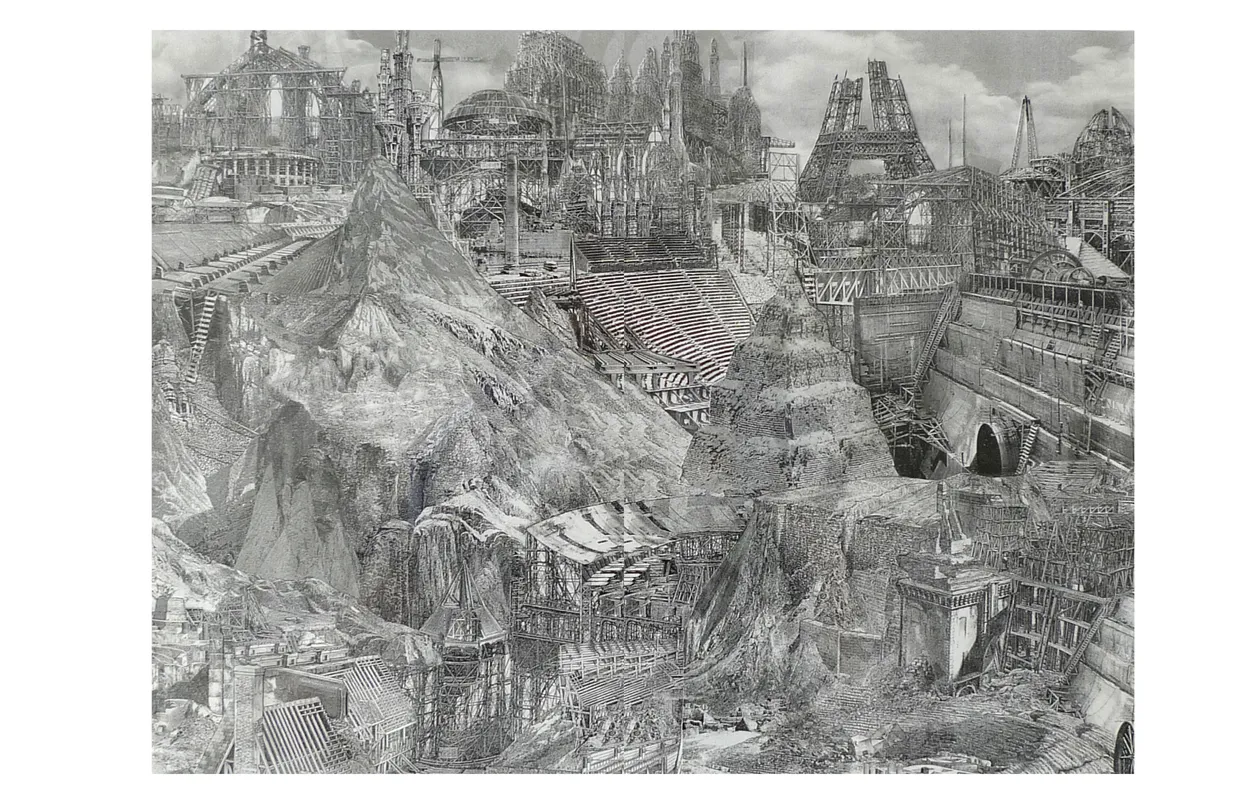
- Castles in the Sky: Fantasy Architecture in Contemporary Art exhibition catalog, pages 38-39
- Client: Lehman College Art Gallery
- Visit figure page
- Type: portfolio
- Portfolio Type: publication_design
- Portfolio Role: design_layout
Castles In: The Sky — Pages 4–5

- Castles in the Sky: Fantasy Architecture in Contemporary Art exhibition catalog, pages 4-5
- Client: Lehman College Art Gallery
- Visit figure page
- Type: portfolio
- Portfolio Type: publication_design
- Portfolio Role: design_layout
Castles In: The Sky — Pages 40–41
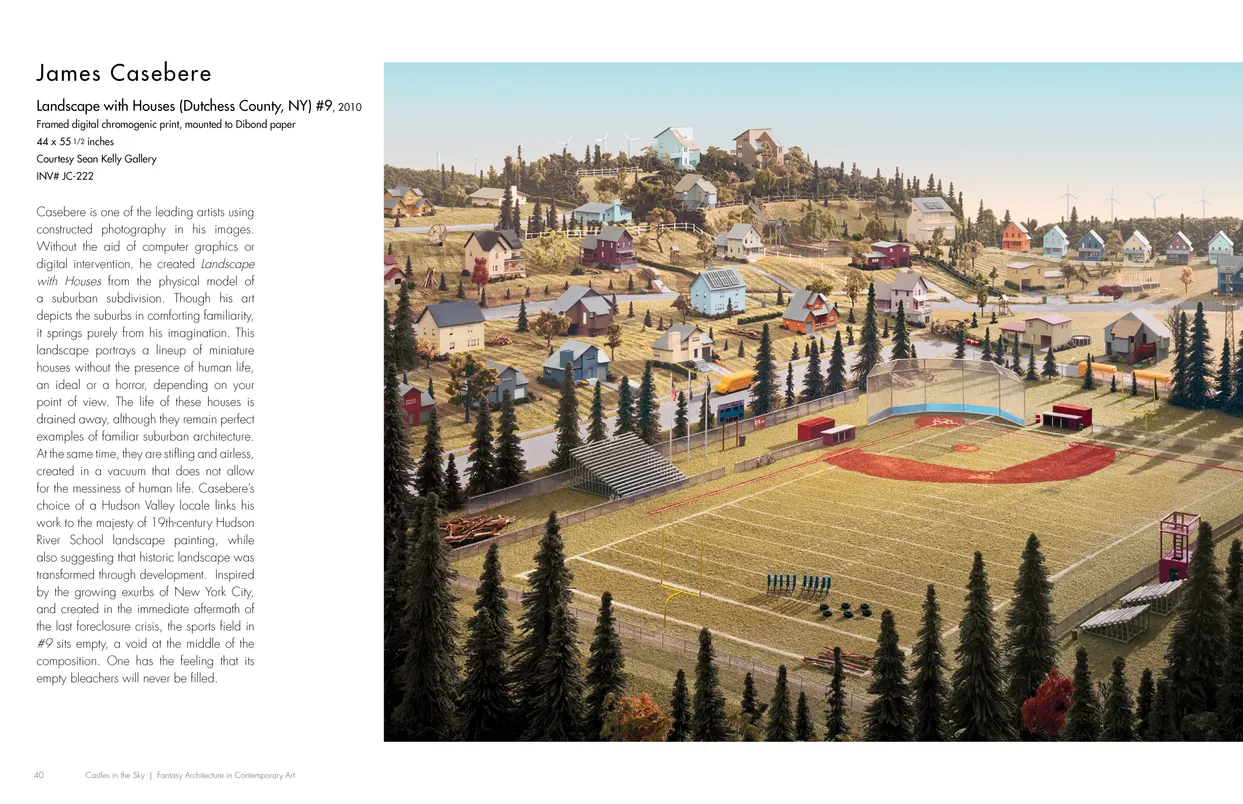
- Castles in the Sky: Fantasy Architecture in Contemporary Art exhibition catalog, pages 40-41
- Client: Lehman College Art Gallery
- Visit figure page
- Type: portfolio
- Portfolio Type: publication_design
- Portfolio Role: design_layout
Castles In: The Sky — Pages 42–43
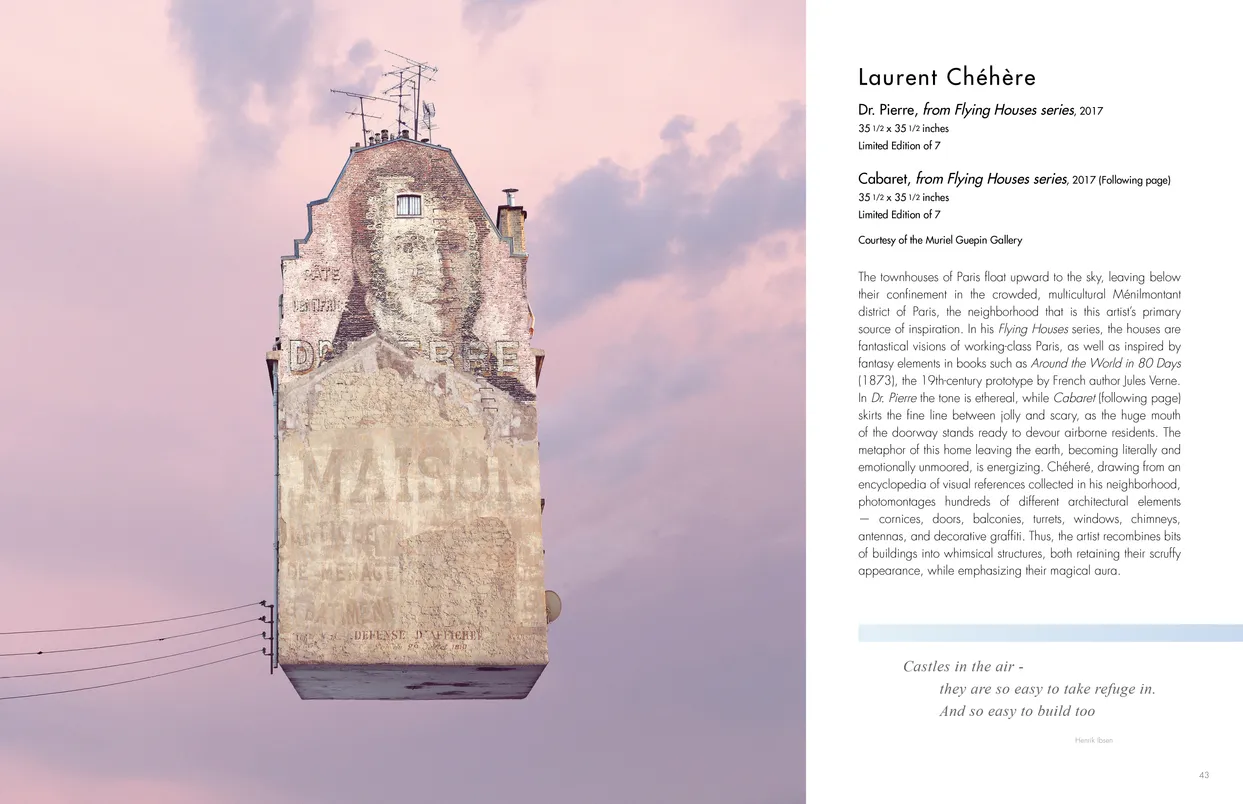
- Castles in the Sky: Fantasy Architecture in Contemporary Art exhibition catalog, pages 42-43
- Client: Lehman College Art Gallery
- Visit figure page
- Type: portfolio
- Portfolio Type: publication_design
- Portfolio Role: design_layout
Castles In: The Sky — Pages 44–45
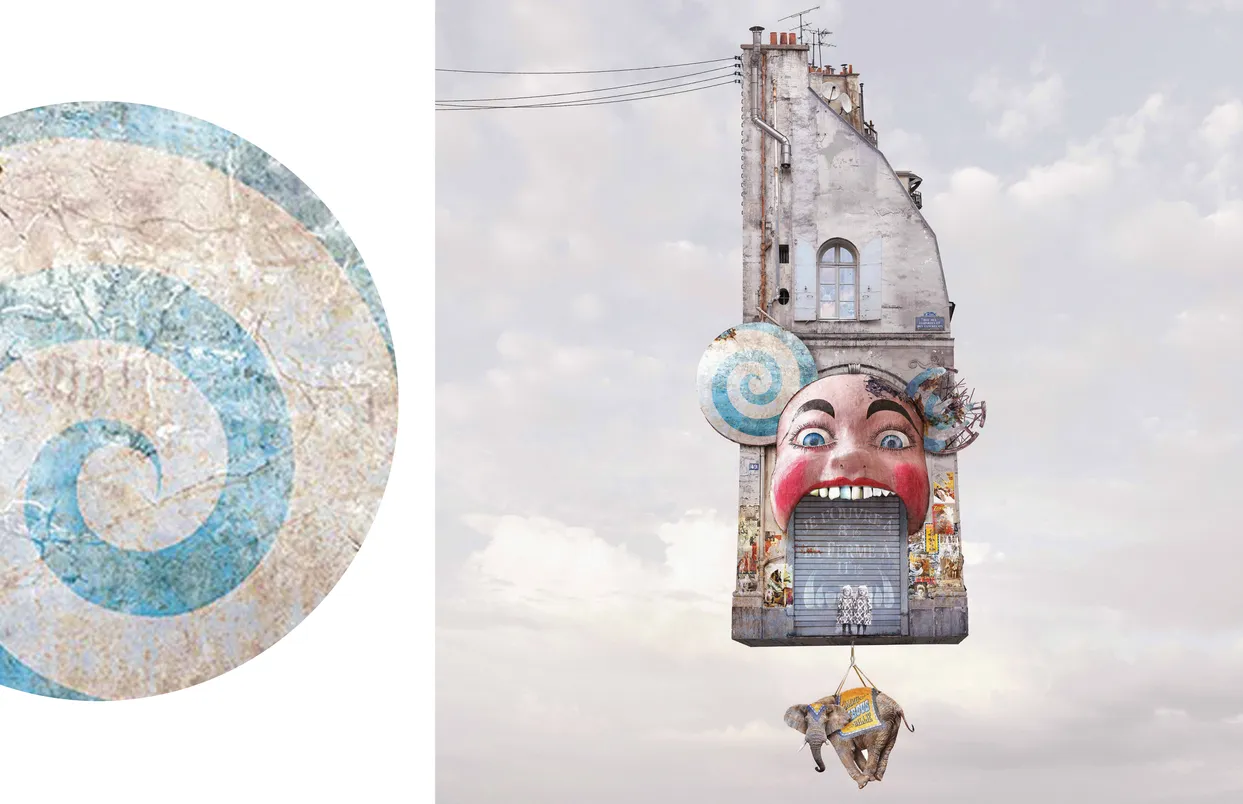
- Castles in the Sky: Fantasy Architecture in Contemporary Art exhibition catalog, pages 44-45
- Client: Lehman College Art Gallery
- Visit figure page
- Type: portfolio
- Portfolio Type: publication_design
- Portfolio Role: design_layout
Castles In: The Sky — Pages 46–47
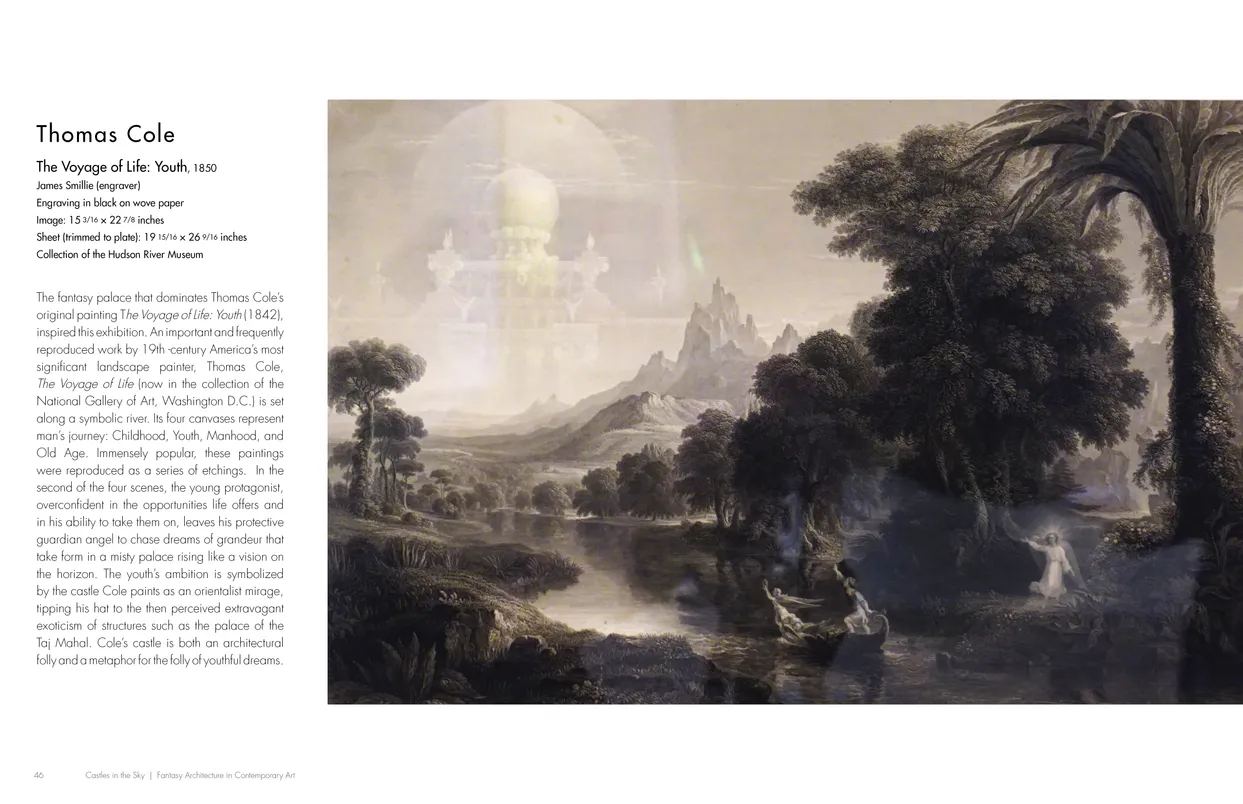
- Castles in the Sky: Fantasy Architecture in Contemporary Art exhibition catalog, pages 46-47
- Client: Lehman College Art Gallery
- Visit figure page
- Type: portfolio
- Portfolio Type: publication_design
- Portfolio Role: design_layout
Castles In: The Sky — Pages 48–49
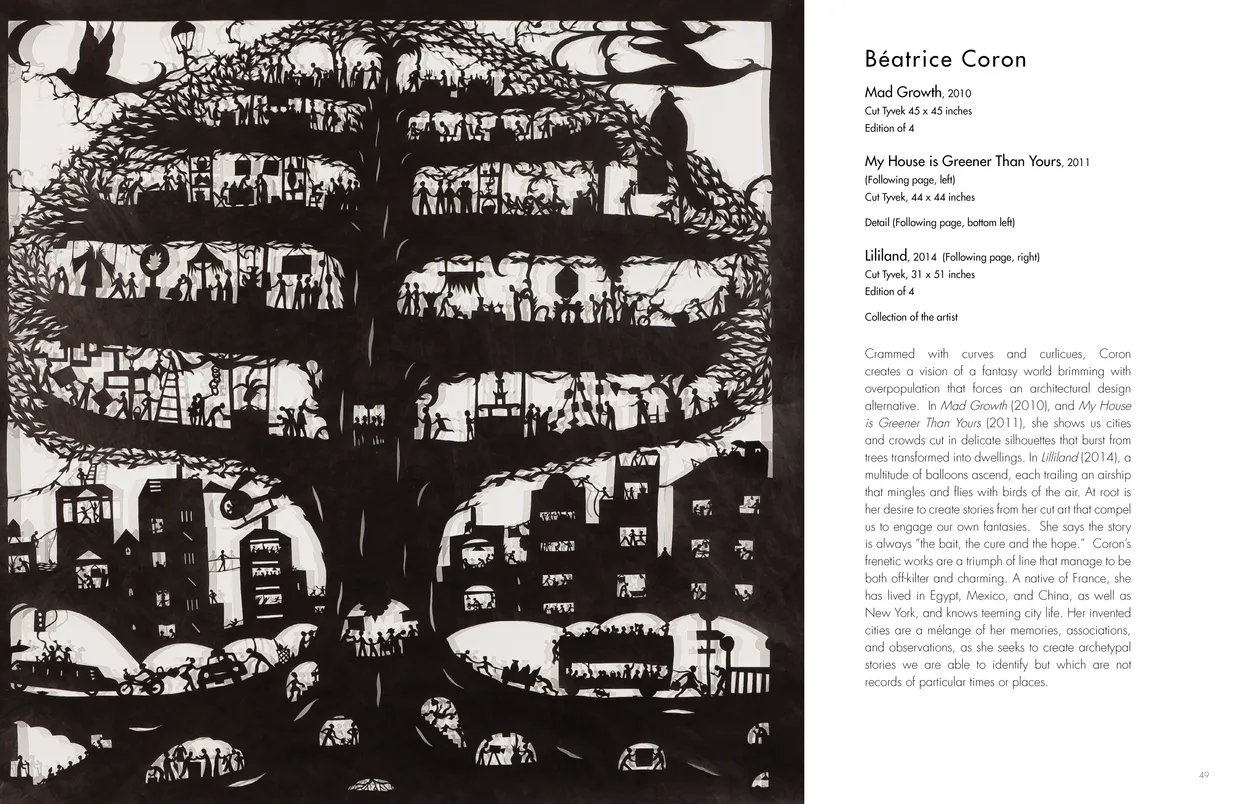
- Castles in the Sky: Fantasy Architecture in Contemporary Art exhibition catalog, pages 48-49
- Client: Lehman College Art Gallery
- Visit figure page
- Type: portfolio
- Portfolio Type: publication_design
- Portfolio Role: design_layout
Castles In: The Sky — Pages 50–51
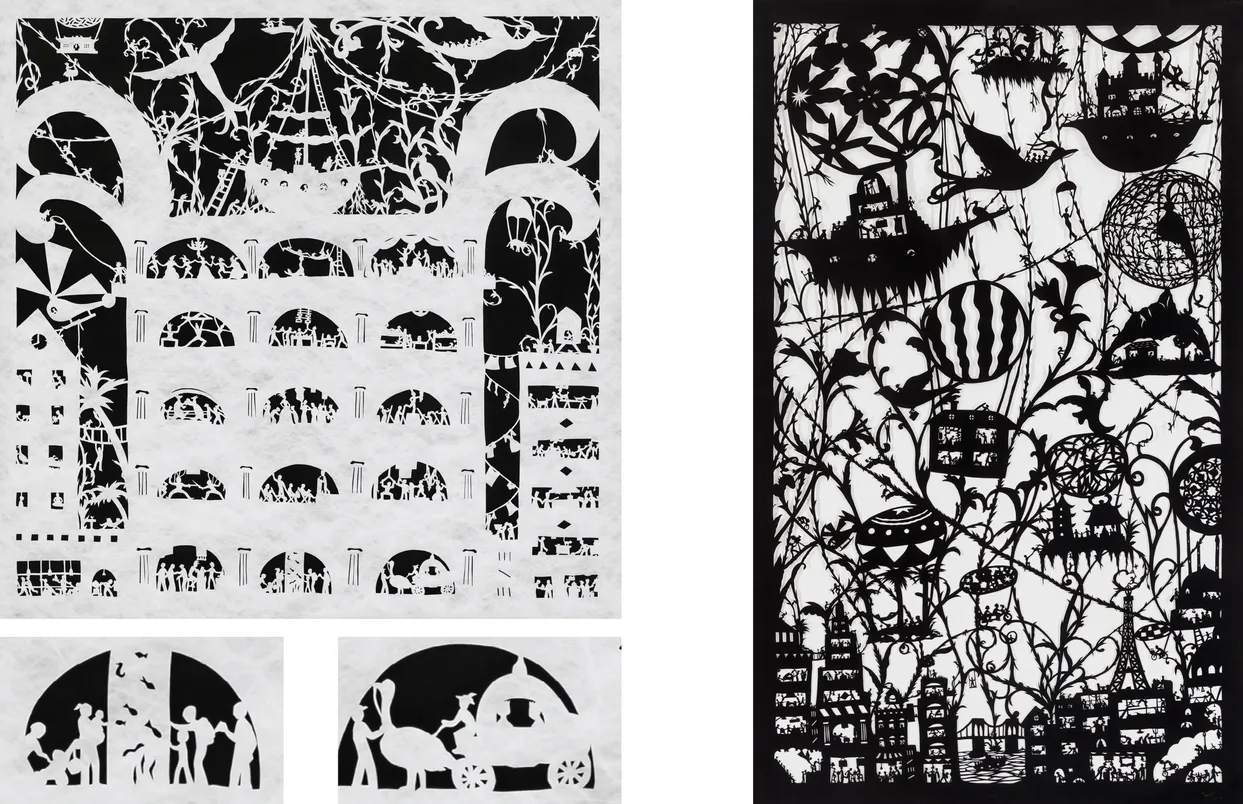
- Castles in the Sky: Fantasy Architecture in Contemporary Art exhibition catalog, pages 50-51
- Client: Lehman College Art Gallery
- Visit figure page
- Type: portfolio
- Portfolio Type: publication_design
- Portfolio Role: design_layout
Castles In: The Sky — Pages 52–53
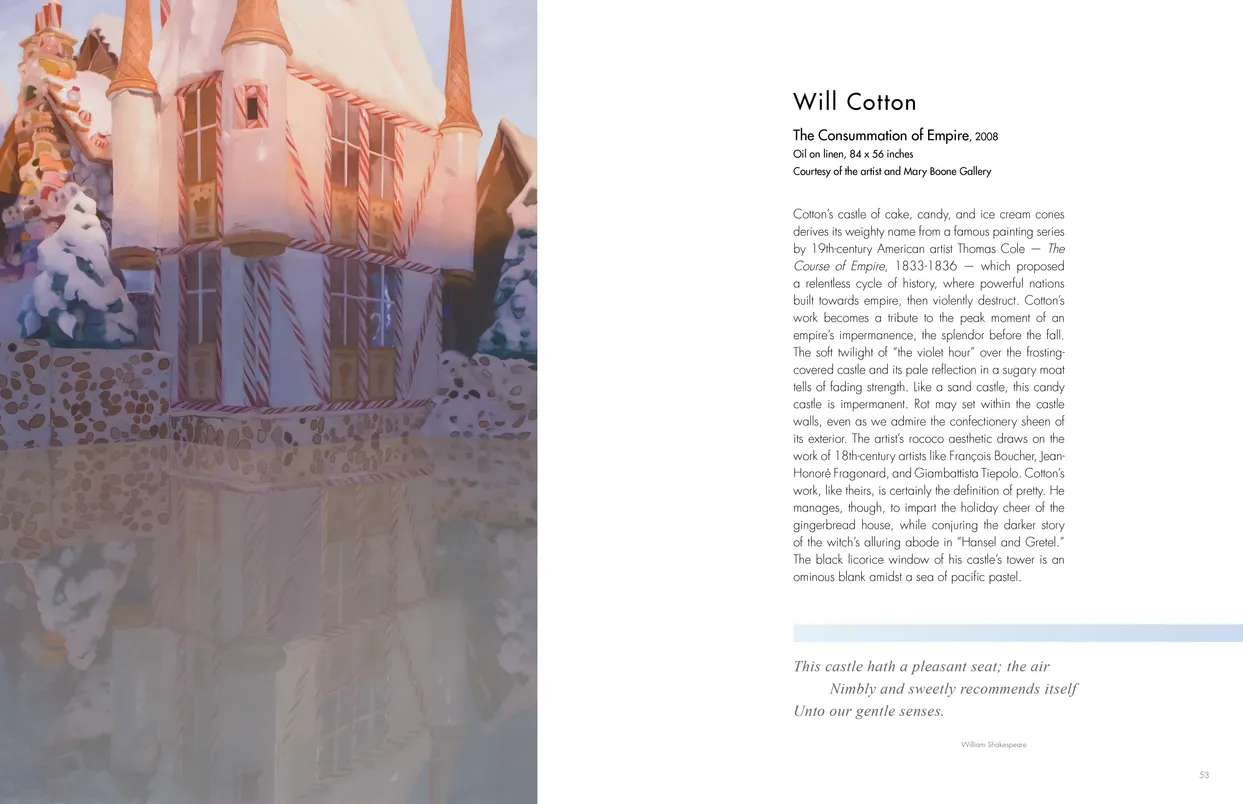
- Castles in the Sky: Fantasy Architecture in Contemporary Art exhibition catalog, pages 52-53
- Client: Lehman College Art Gallery
- Visit figure page
- Type: portfolio
- Portfolio Type: publication_design
- Portfolio Role: design_layout
Castles In: The Sky — Pages 54–55
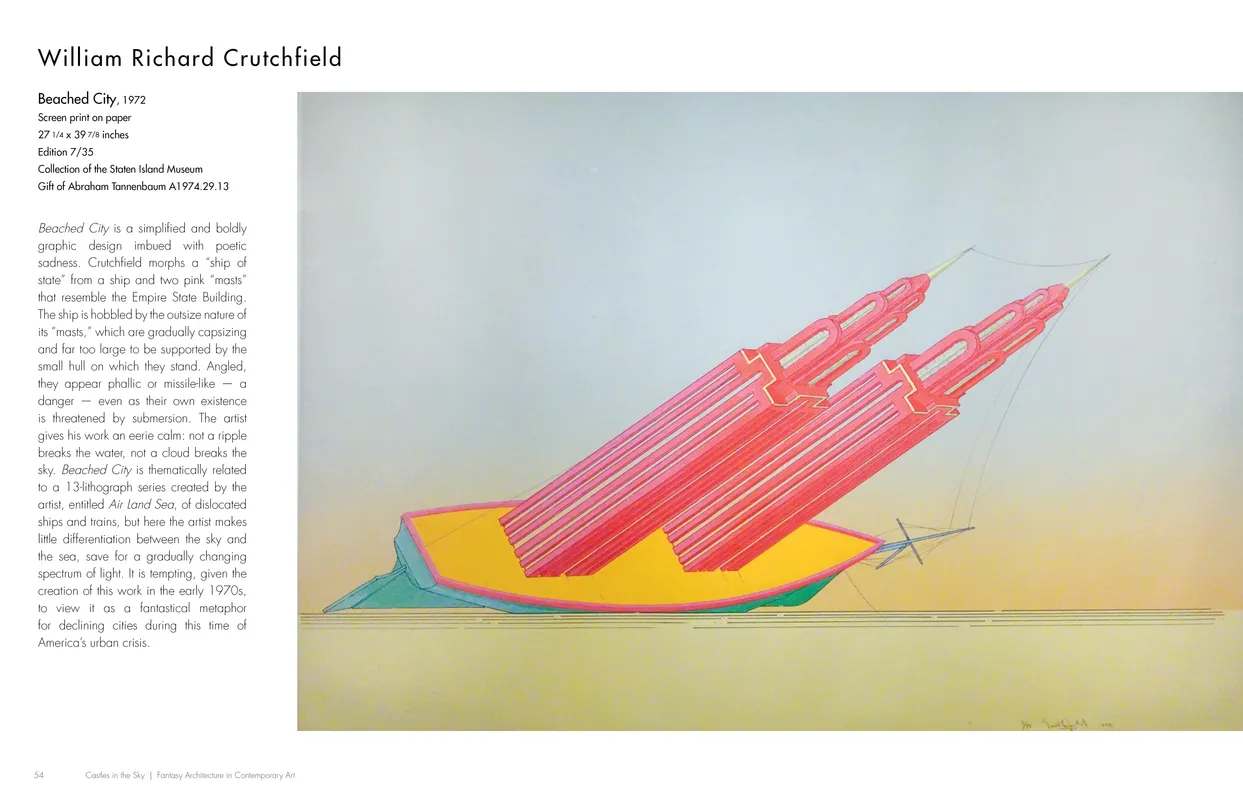
- Castles in the Sky: Fantasy Architecture in Contemporary Art exhibition catalog, pages 54-55
- Client: Lehman College Art Gallery
- Visit figure page
- Type: portfolio
- Portfolio Type: publication_design
- Portfolio Role: design_layout
Castles In: The Sky — Pages 56–57
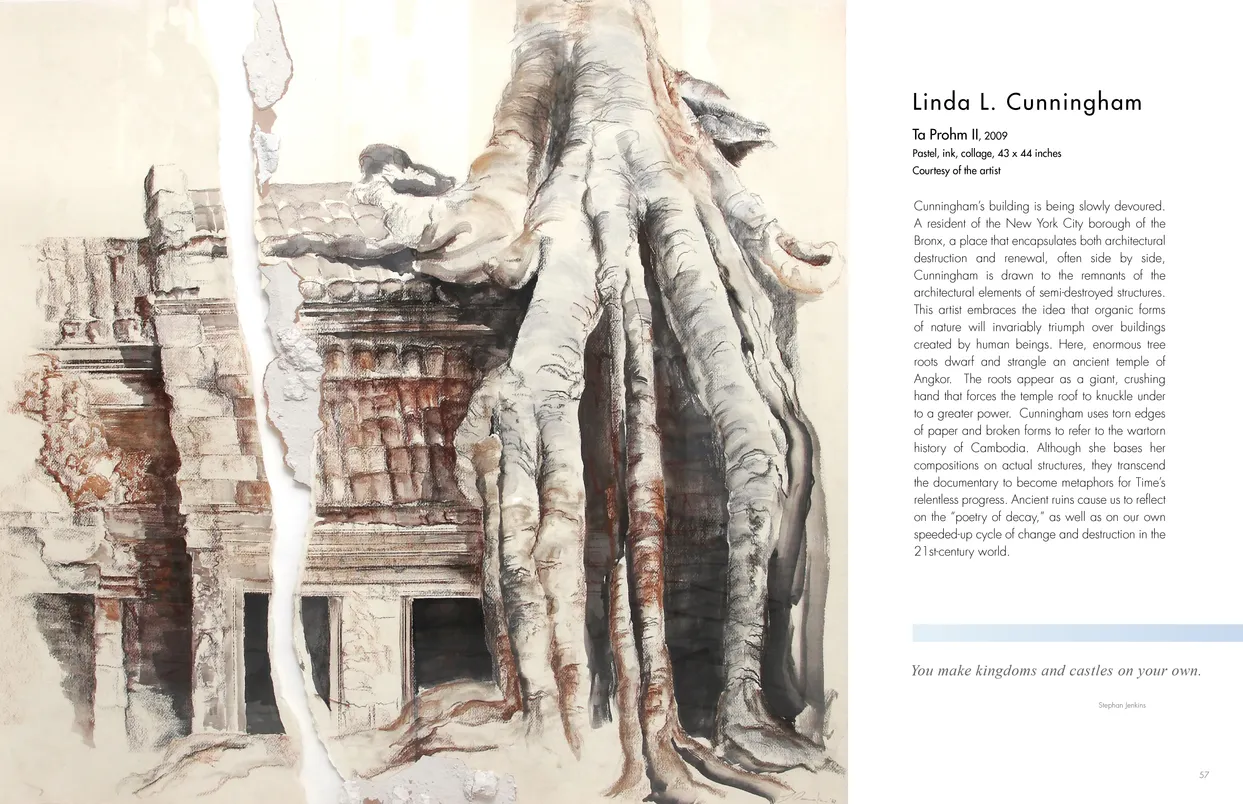
- Castles in the Sky: Fantasy Architecture in Contemporary Art exhibition catalog, pages 56-57
- Client: Lehman College Art Gallery
- Visit figure page
- Type: portfolio
- Portfolio Type: publication_design
- Portfolio Role: design_layout
Castles In: The Sky — Pages 58–59
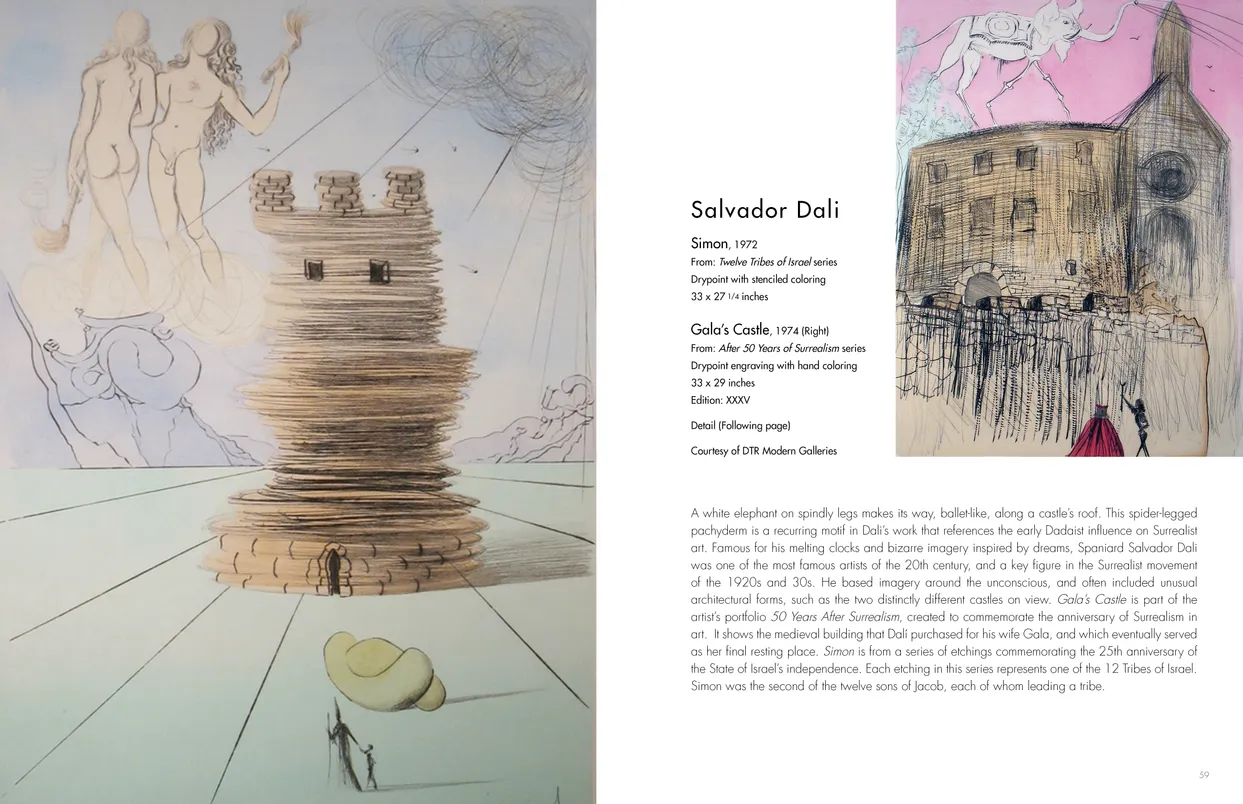
- Castles in the Sky: Fantasy Architecture in Contemporary Art exhibition catalog, pages 58-59
- Client: Lehman College Art Gallery
- Visit figure page
- Type: portfolio
- Portfolio Type: publication_design
- Portfolio Role: design_layout
Castles In: The Sky — Pages 6–7
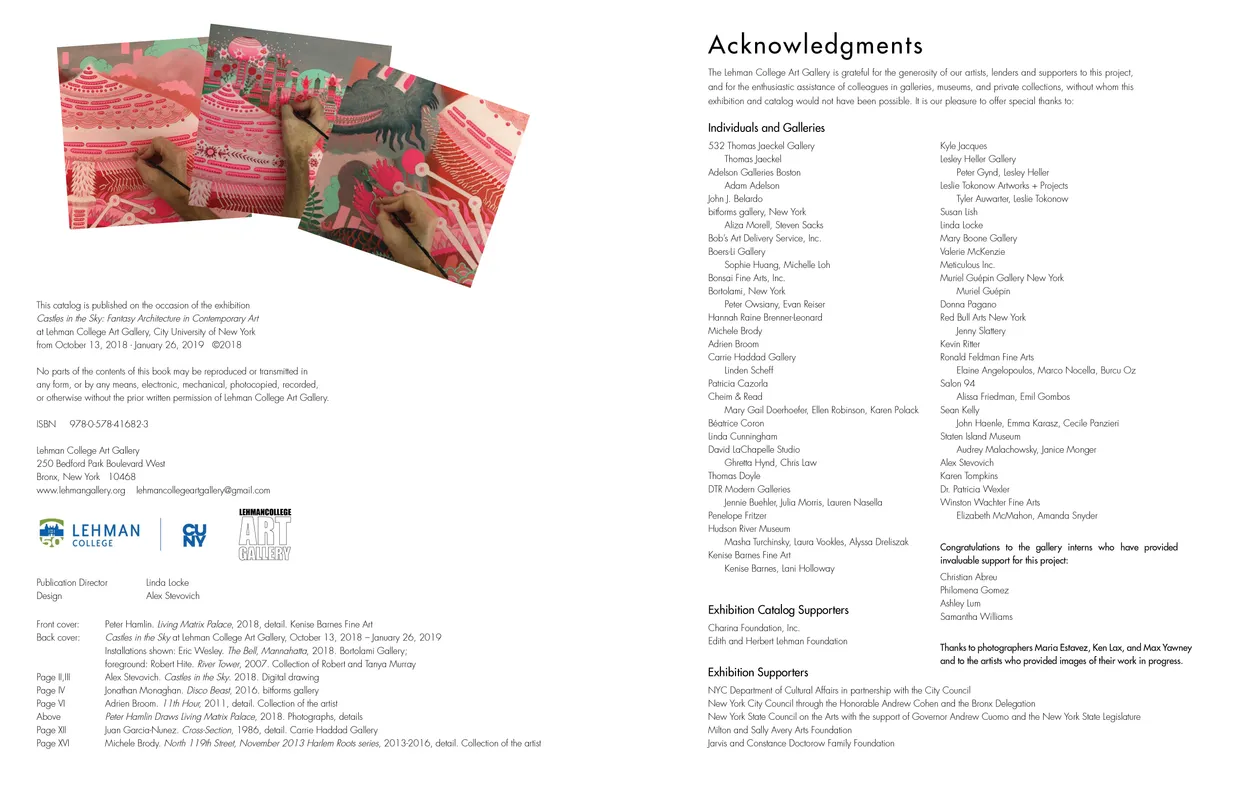
- Castles in the Sky: Fantasy Architecture in Contemporary Art exhibition catalog, pages 6-7
- Client: Lehman College Art Gallery
- Visit figure page
- Type: portfolio
- Portfolio Type: publication_design
- Portfolio Role: design_layout
Castles In: The Sky — Pages 60–61
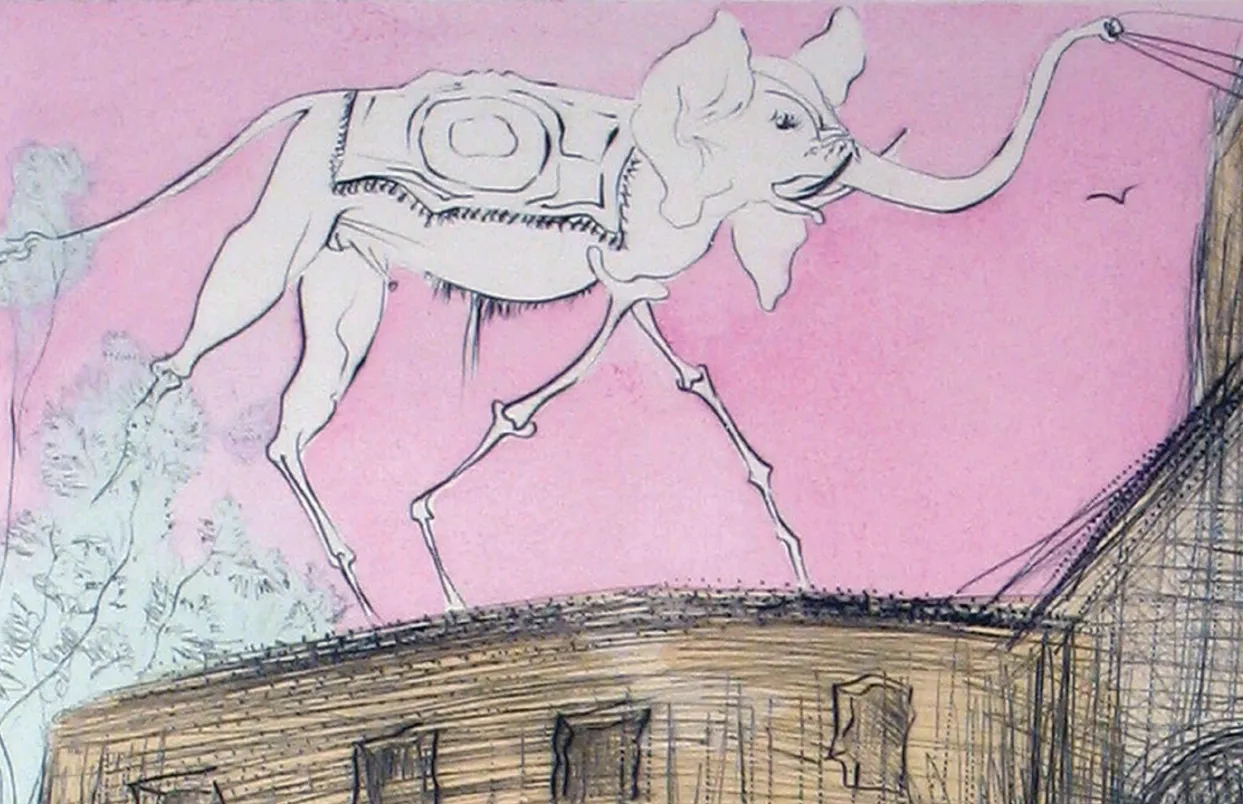
- Castles in the Sky: Fantasy Architecture in Contemporary Art exhibition catalog, pages 60-61
- Client: Lehman College Art Gallery
- Visit figure page
- Type: portfolio
- Portfolio Type: publication_design
- Portfolio Role: design_layout
Castles In: The Sky — Pages 62–63
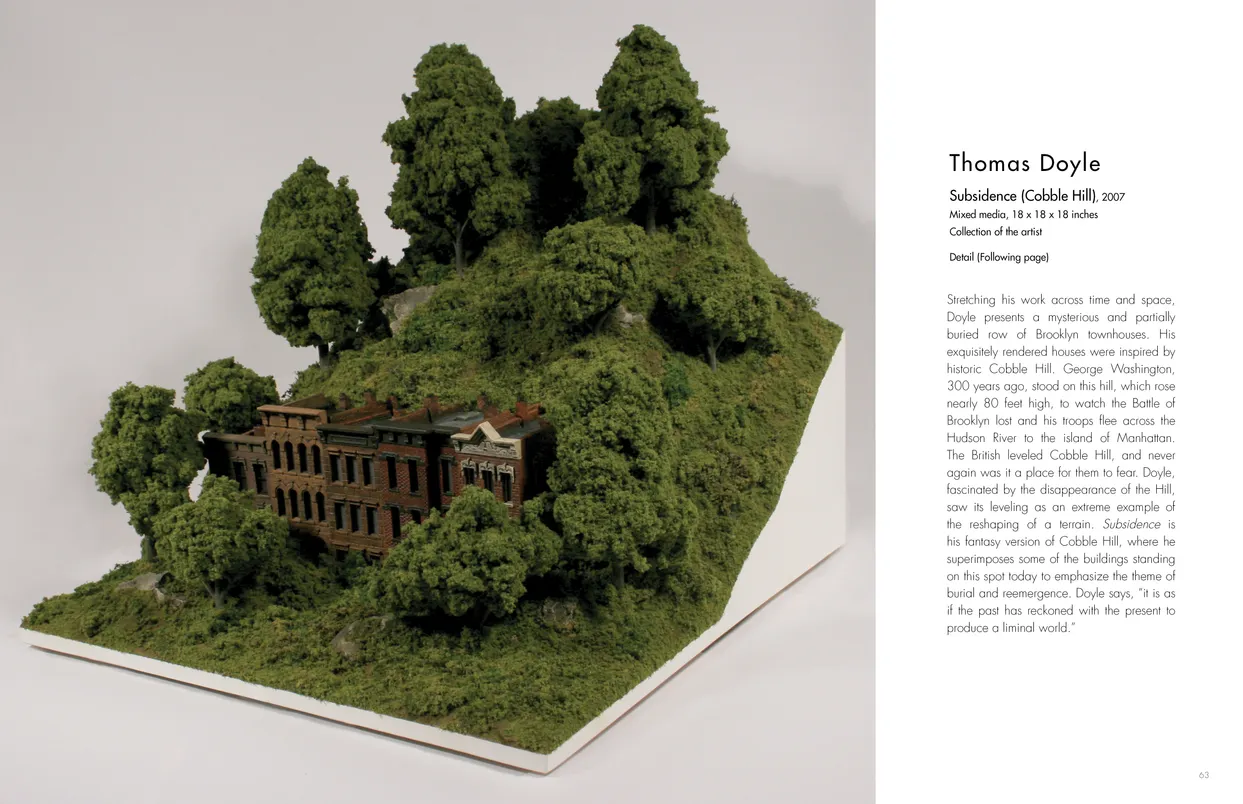
- Castles in the Sky: Fantasy Architecture in Contemporary Art exhibition catalog, pages 62-63
- Client: Lehman College Art Gallery
- Visit figure page
- Type: portfolio
- Portfolio Type: publication_design
- Portfolio Role: design_layout
Castles In: The Sky — Pages 64–65
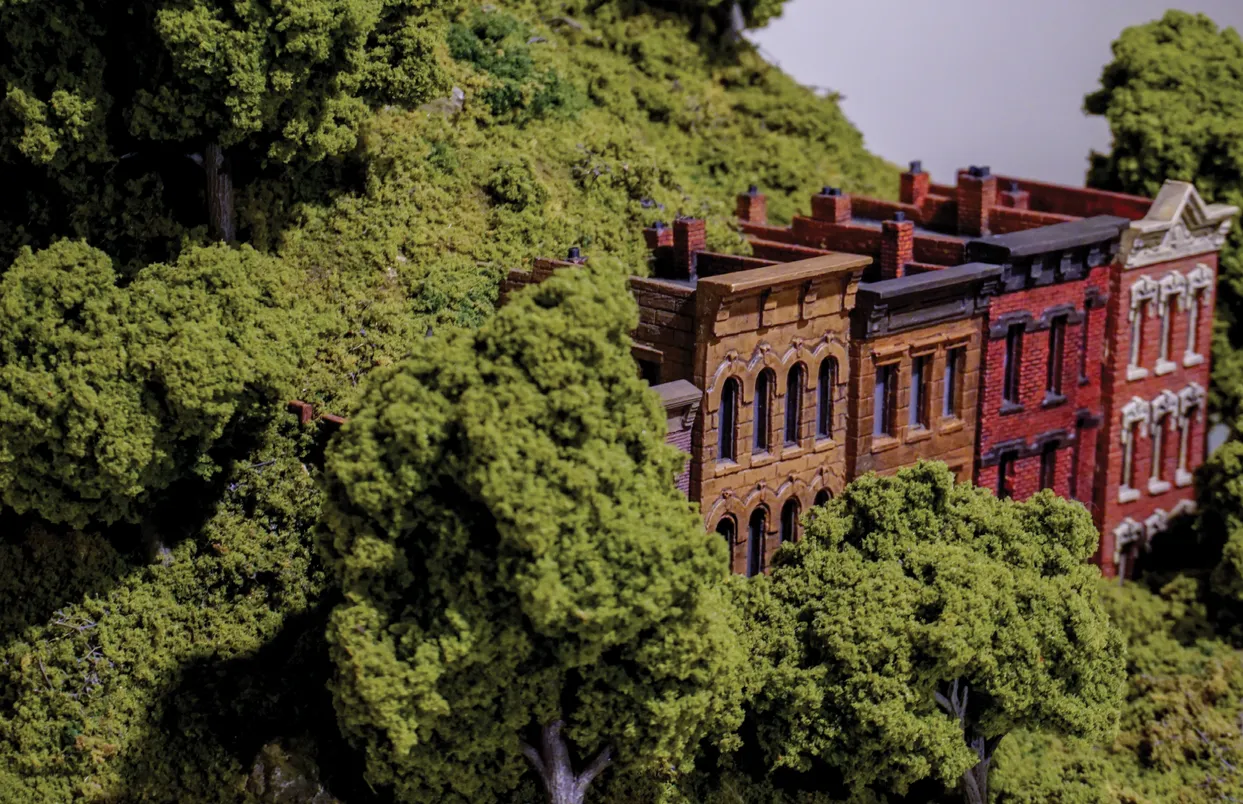
- Castles in the Sky: Fantasy Architecture in Contemporary Art exhibition catalog, pages 64-65
- Client: Lehman College Art Gallery
- Visit figure page
- Type: portfolio
- Portfolio Type: publication_design
- Portfolio Role: design_layout
Castles In: The Sky — Pages 66–67
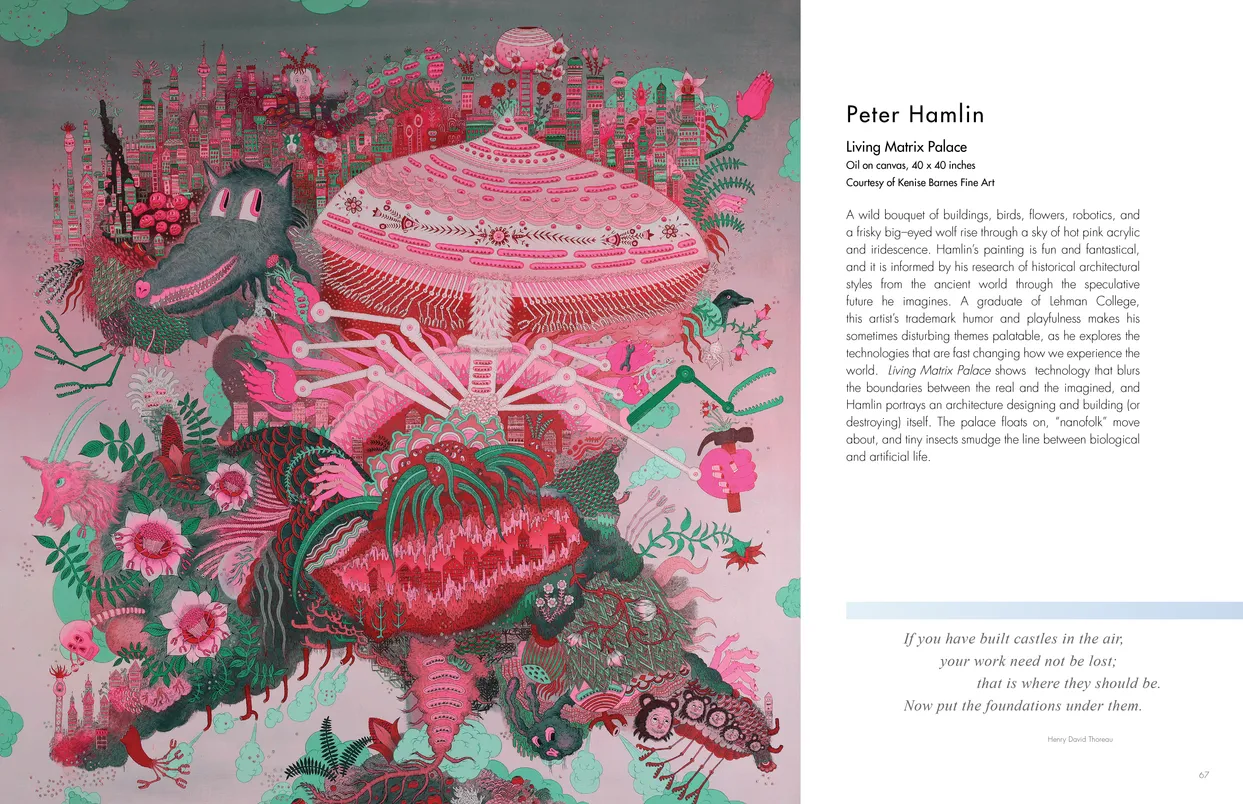
- Castles in the Sky: Fantasy Architecture in Contemporary Art exhibition catalog, pages 66-67
- Client: Lehman College Art Gallery
- Visit figure page
- Type: portfolio
- Portfolio Type: publication_design
- Portfolio Role: design_layout
Castles In: The Sky — Pages 68–69
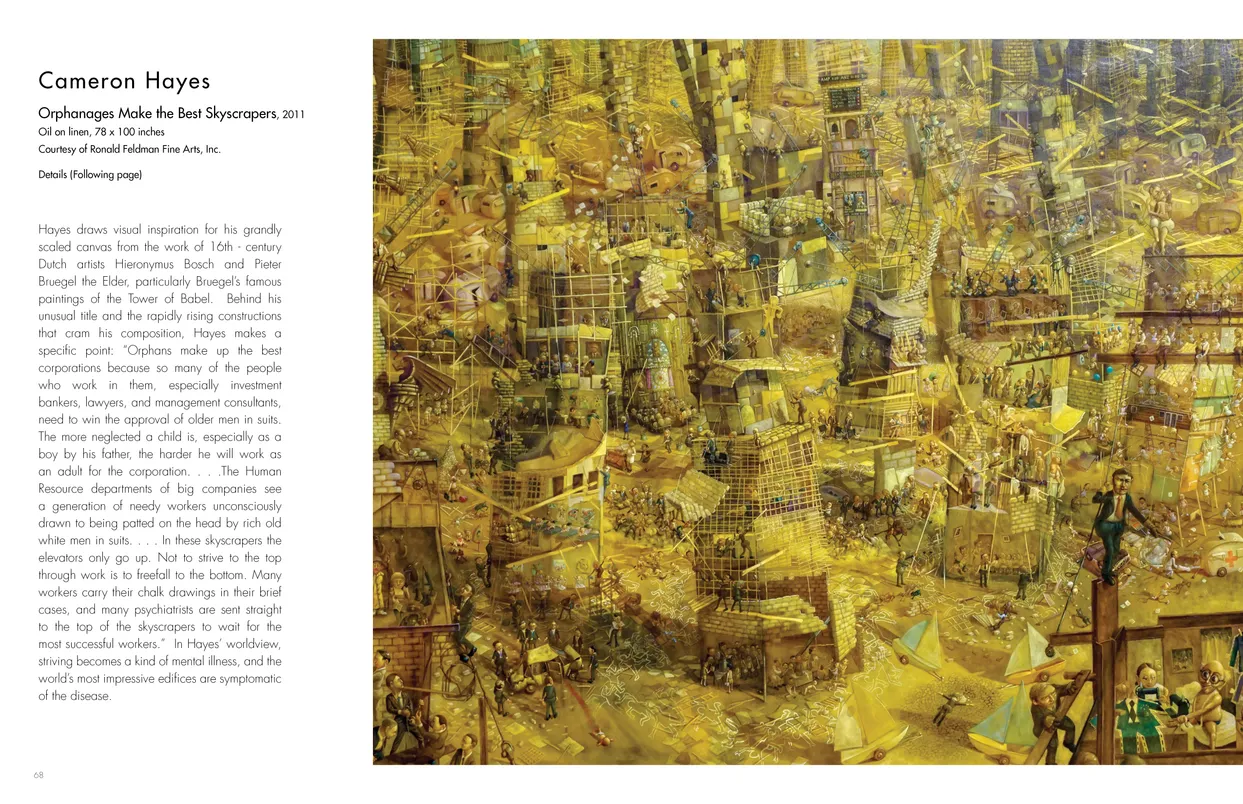
- Castles in the Sky: Fantasy Architecture in Contemporary Art exhibition catalog, pages 68-69
- Client: Lehman College Art Gallery
- Visit figure page
- Type: portfolio
- Portfolio Type: publication_design
- Portfolio Role: design_layout
Castles In: The Sky — Pages 70–71
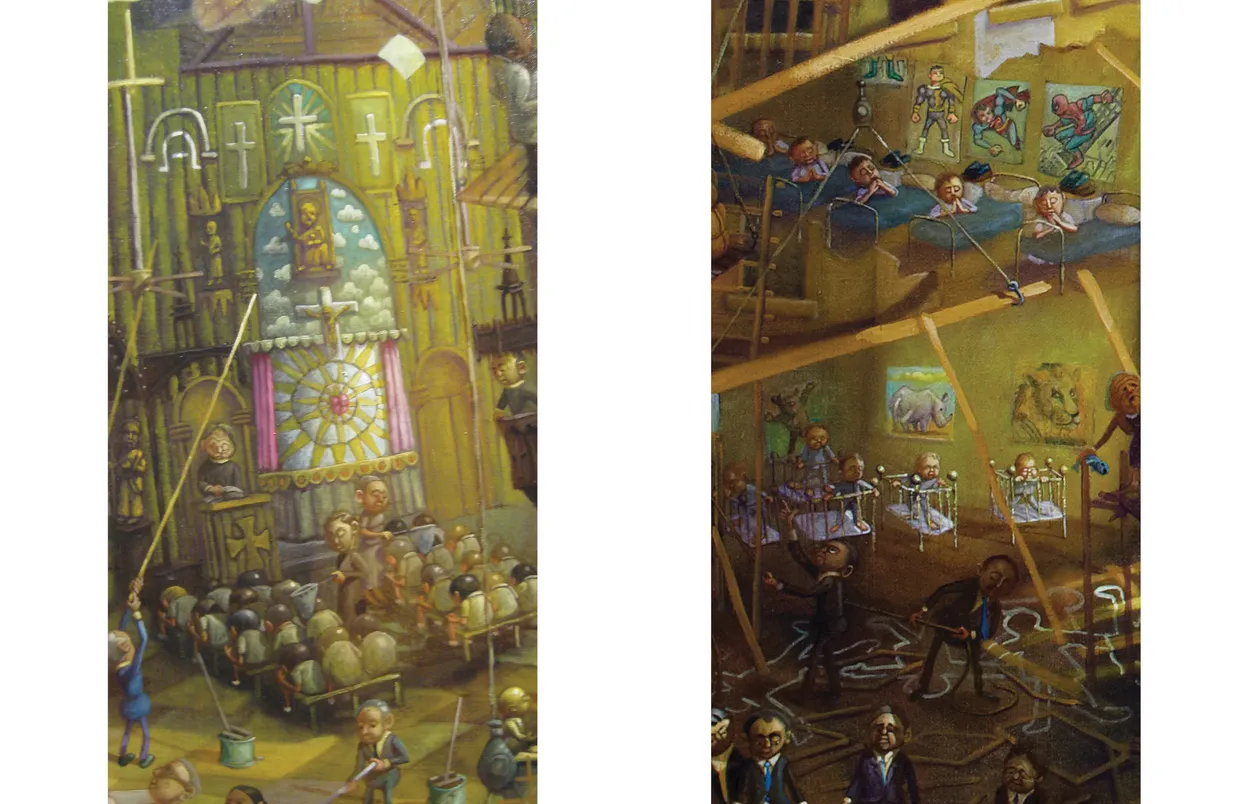
- Castles in the Sky: Fantasy Architecture in Contemporary Art exhibition catalog, pages 70-71
- Client: Lehman College Art Gallery
- Visit figure page
- Type: portfolio
- Portfolio Type: publication_design
- Portfolio Role: design_layout
Castles In: The Sky — Pages 72–73
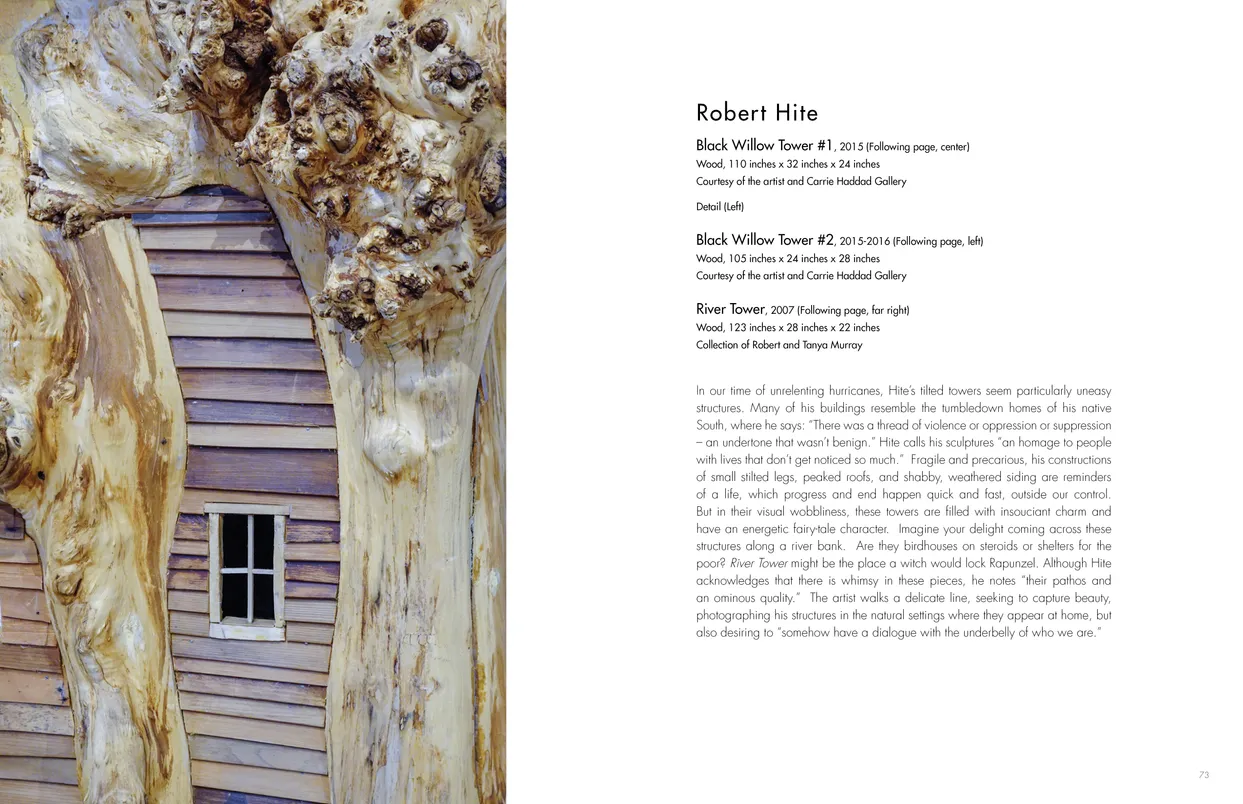
- Castles in the Sky: Fantasy Architecture in Contemporary Art exhibition catalog, pages 72-73
- Client: Lehman College Art Gallery
- Visit figure page
- Type: portfolio
- Portfolio Type: publication_design
- Portfolio Role: design_layout
Castles In: The Sky — Pages 74–75
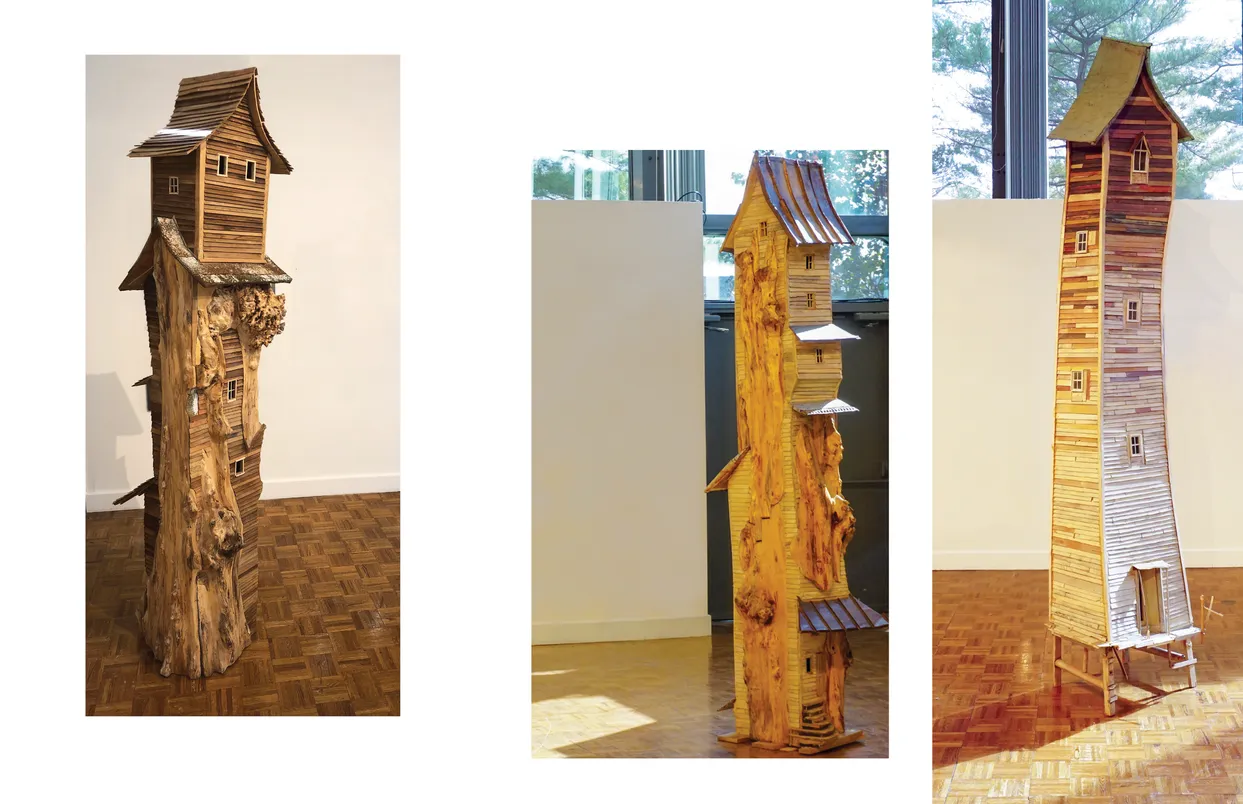
- Castles in the Sky: Fantasy Architecture in Contemporary Art exhibition catalog, pages 74-75
- Client: Lehman College Art Gallery
- Visit figure page
- Type: portfolio
- Portfolio Type: publication_design
- Portfolio Role: design_layout
Castles In: The Sky — Pages 76–77
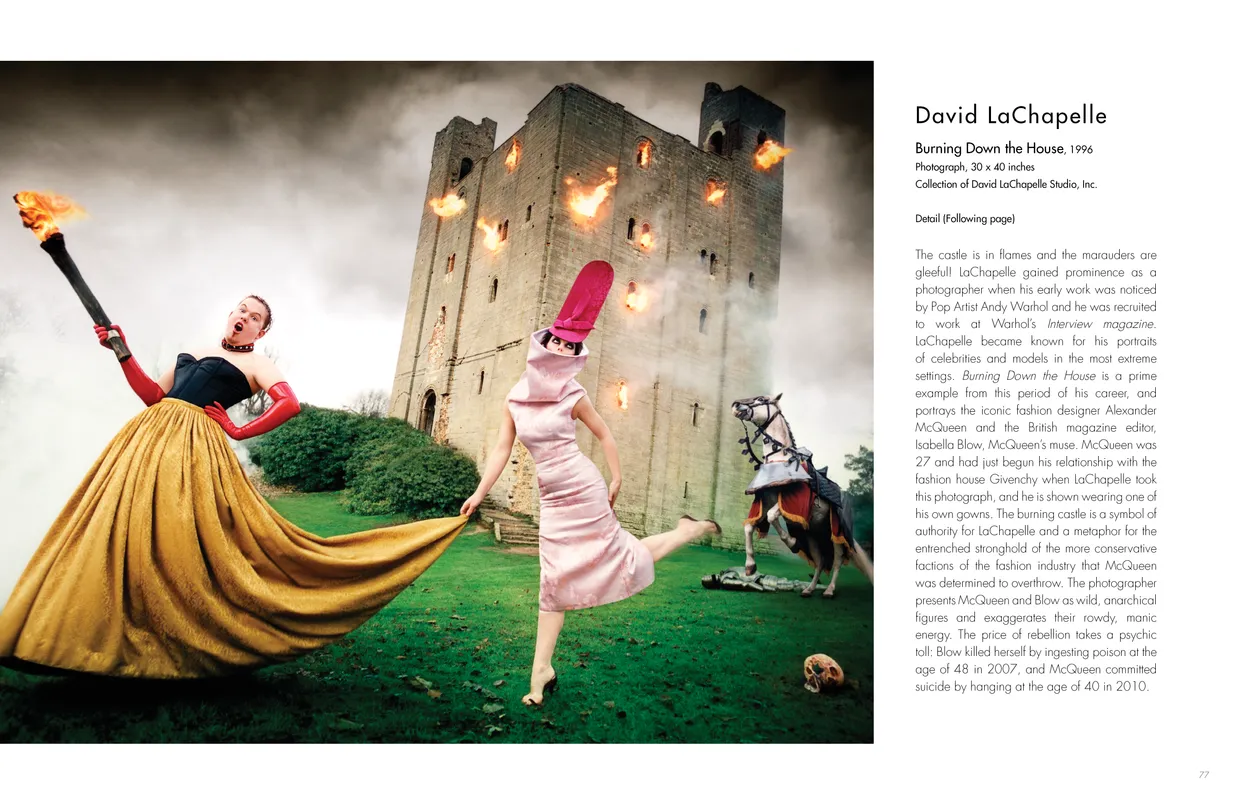
- Castles in the Sky: Fantasy Architecture in Contemporary Art exhibition catalog, pages 76-77
- Client: Lehman College Art Gallery
- Visit figure page
- Type: portfolio
- Portfolio Type: publication_design
- Portfolio Role: design_layout
Castles In: The Sky — Pages 78–79

- Castles in the Sky: Fantasy Architecture in Contemporary Art exhibition catalog, pages 78-79
- Client: Lehman College Art Gallery
- Visit figure page
- Type: portfolio
- Portfolio Type: publication_design
- Portfolio Role: design_layout
Castles In: The Sky — Pages 8–9
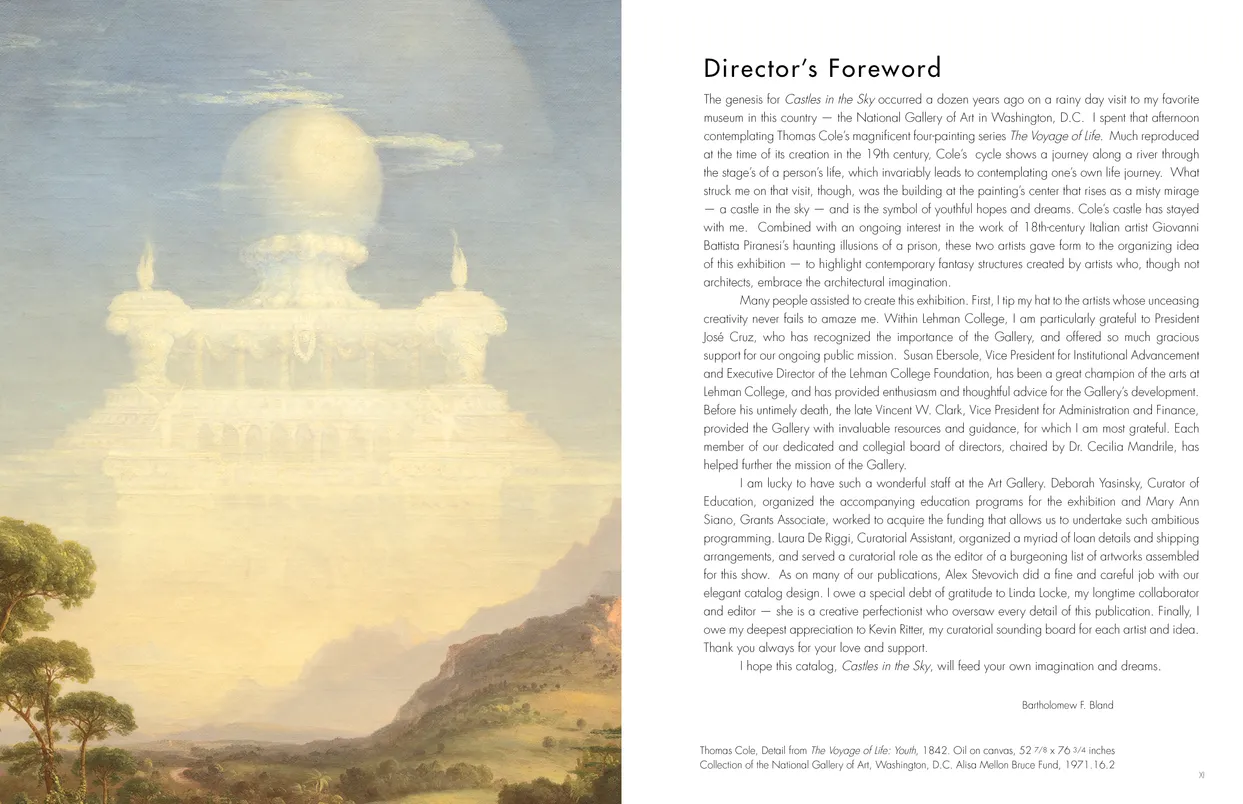
- Castles in the Sky: Fantasy Architecture in Contemporary Art exhibition catalog, pages 8-9
- Client: Lehman College Art Gallery
- Visit figure page
- Type: portfolio
- Portfolio Type: publication_design
- Portfolio Role: design_layout
Castles In: The Sky — Pages 80–81
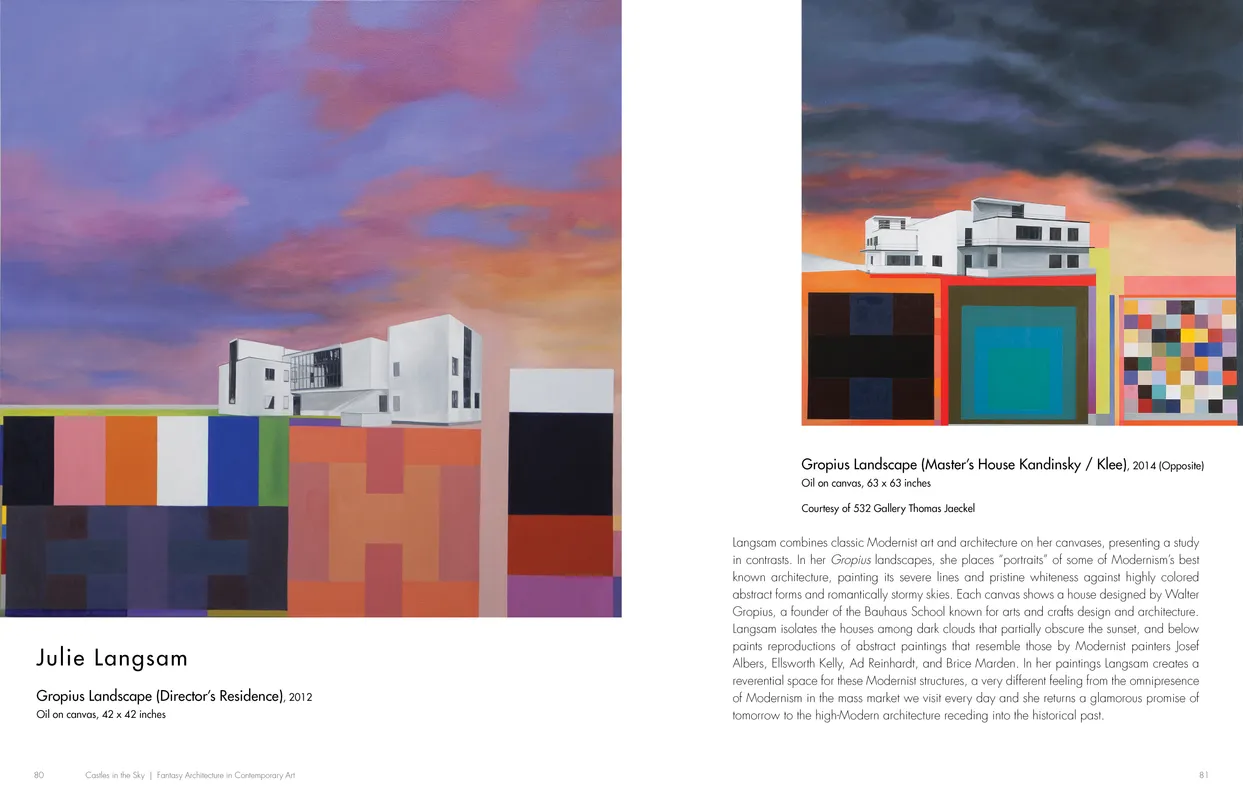
- Castles in the Sky: Fantasy Architecture in Contemporary Art exhibition catalog, pages 80-81
- Client: Lehman College Art Gallery
- Visit figure page
- Type: portfolio
- Portfolio Type: publication_design
- Portfolio Role: design_layout
Castles In: The Sky — Pages 82–83
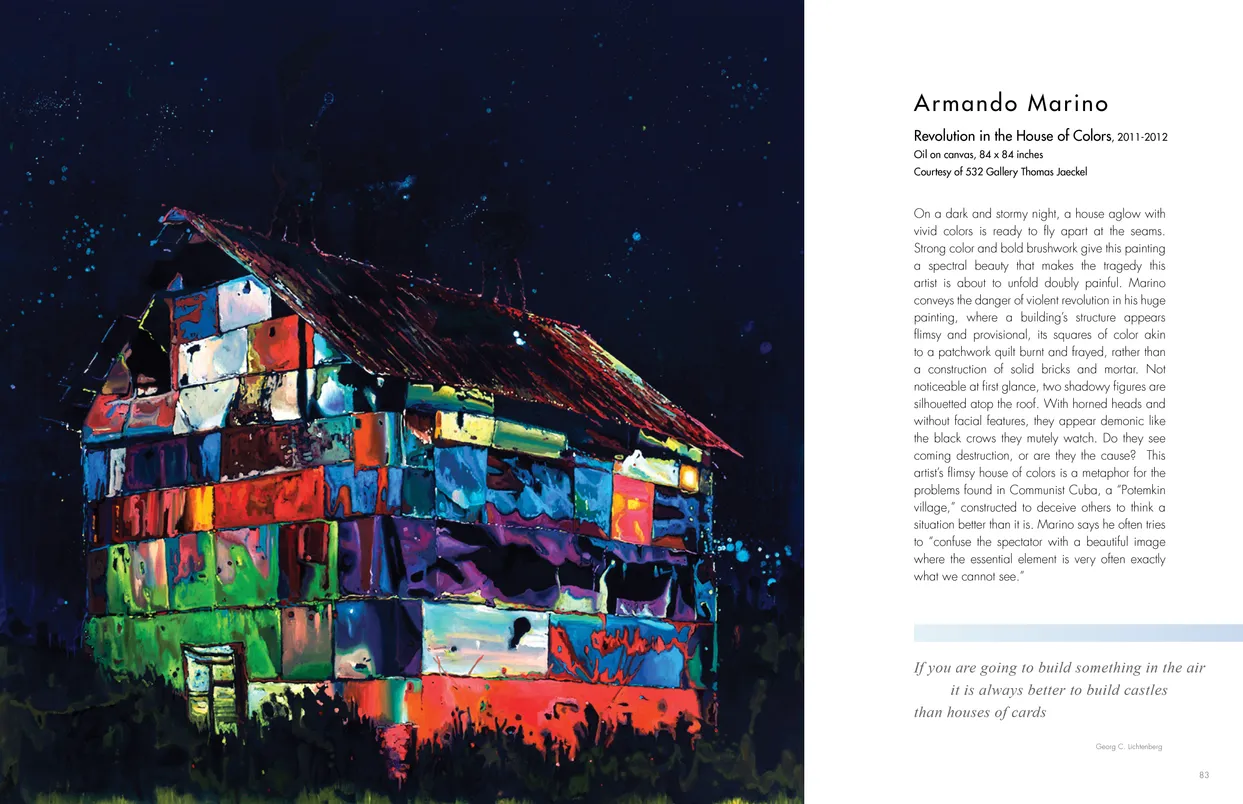
- Castles in the Sky: Fantasy Architecture in Contemporary Art exhibition catalog, pages 82-83
- Client: Lehman College Art Gallery
- Visit figure page
- Type: portfolio
- Portfolio Type: publication_design
- Portfolio Role: design_layout
Castles In: The Sky — Pages 84–85
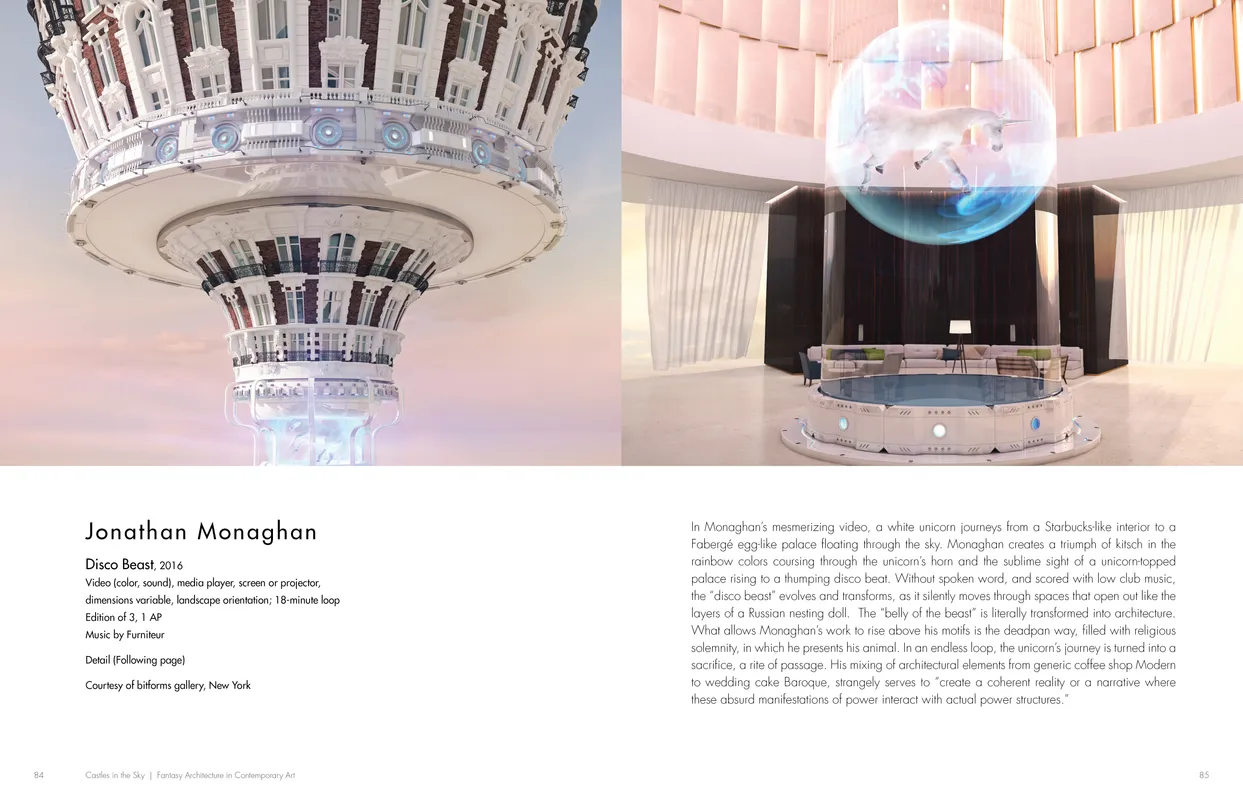
- Castles in the Sky: Fantasy Architecture in Contemporary Art exhibition catalog, pages 84-85
- Client: Lehman College Art Gallery
- Visit figure page
- Type: portfolio
- Portfolio Type: publication_design
- Portfolio Role: design_layout
Castles In: The Sky — Pages 88–89
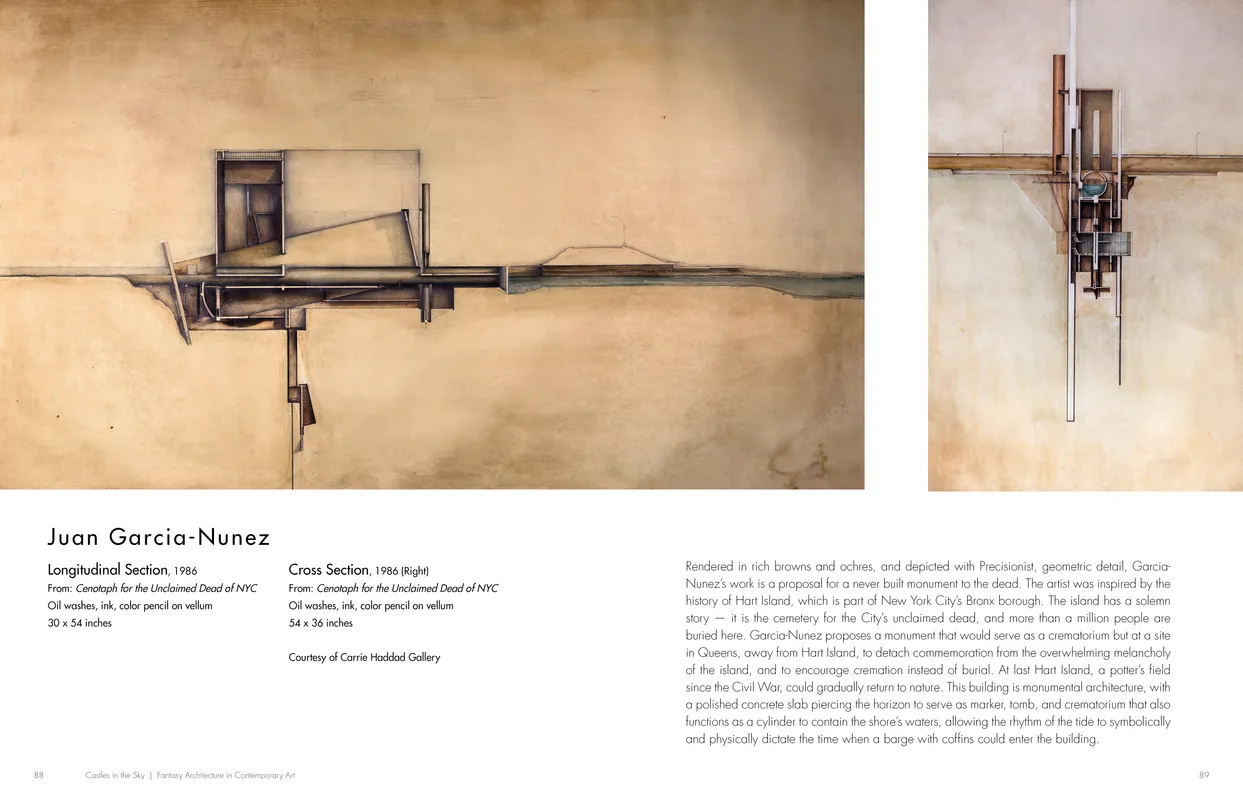
- Castles in the Sky: Fantasy Architecture in Contemporary Art exhibition catalog, pages 88-89
- Client: Lehman College Art Gallery
- Visit figure page
- Type: portfolio
- Portfolio Type: publication_design
- Portfolio Role: design_layout
Castles In: The Sky — Pages 90–91
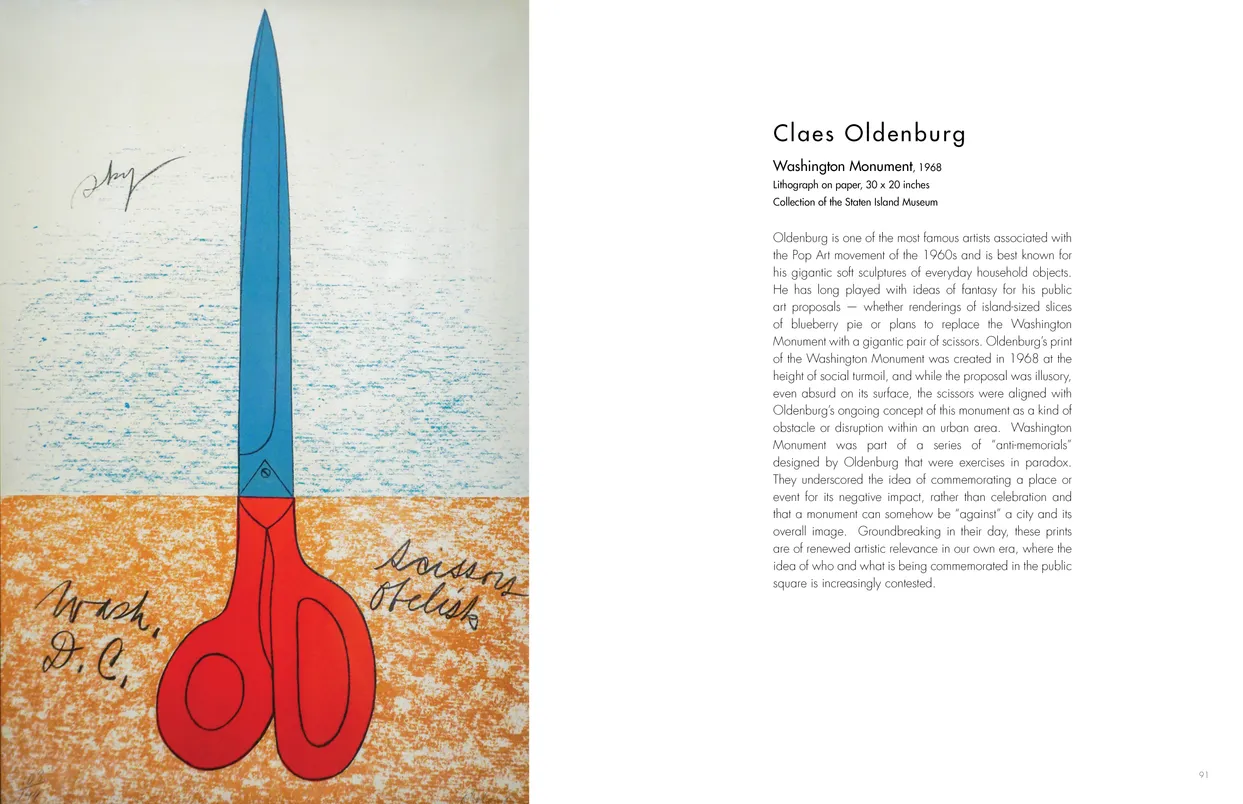
- Castles in the Sky: Fantasy Architecture in Contemporary Art exhibition catalog, pages 90-91
- Client: Lehman College Art Gallery
- Visit figure page
- Type: portfolio
- Portfolio Type: publication_design
- Portfolio Role: design_layout
Castles In: The Sky — Pages 92–93
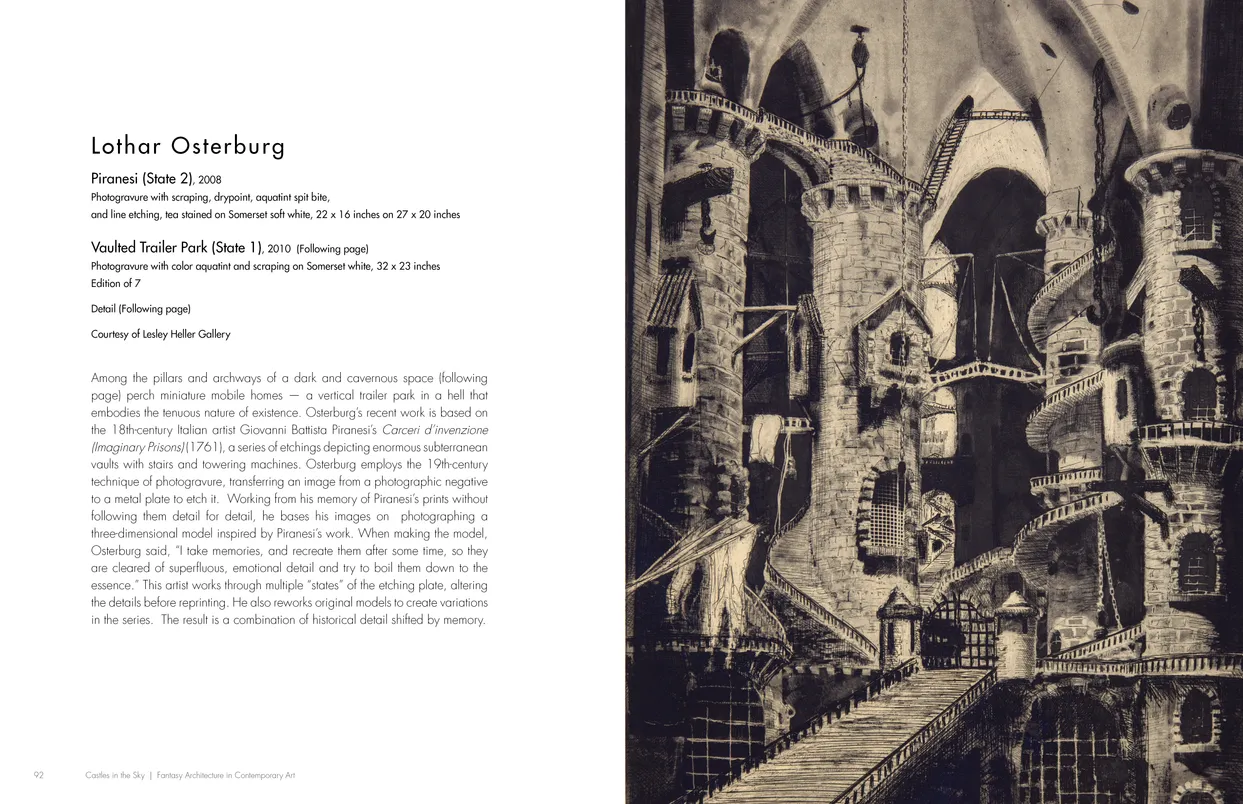
- Castles in the Sky: Fantasy Architecture in Contemporary Art exhibition catalog, pages 92-93
- Client: Lehman College Art Gallery
- Visit figure page
- Type: portfolio
- Portfolio Type: publication_design
- Portfolio Role: design_layout
Castles In: The Sky — Pages 94–95
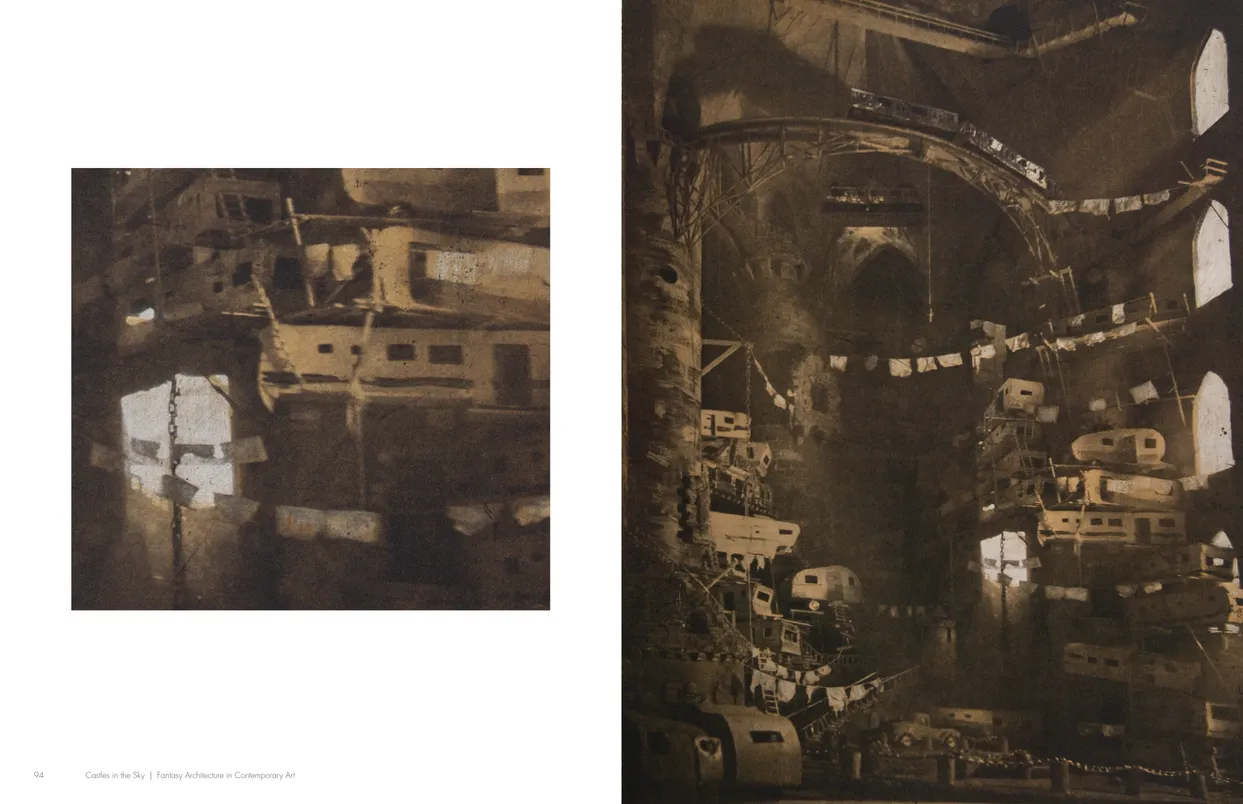
- Castles in the Sky: Fantasy Architecture in Contemporary Art exhibition catalog, pages 94-95
- Client: Lehman College Art Gallery
- Visit figure page
- Type: portfolio
- Portfolio Type: publication_design
- Portfolio Role: design_layout
Castles In: The Sky — Pages 96–97
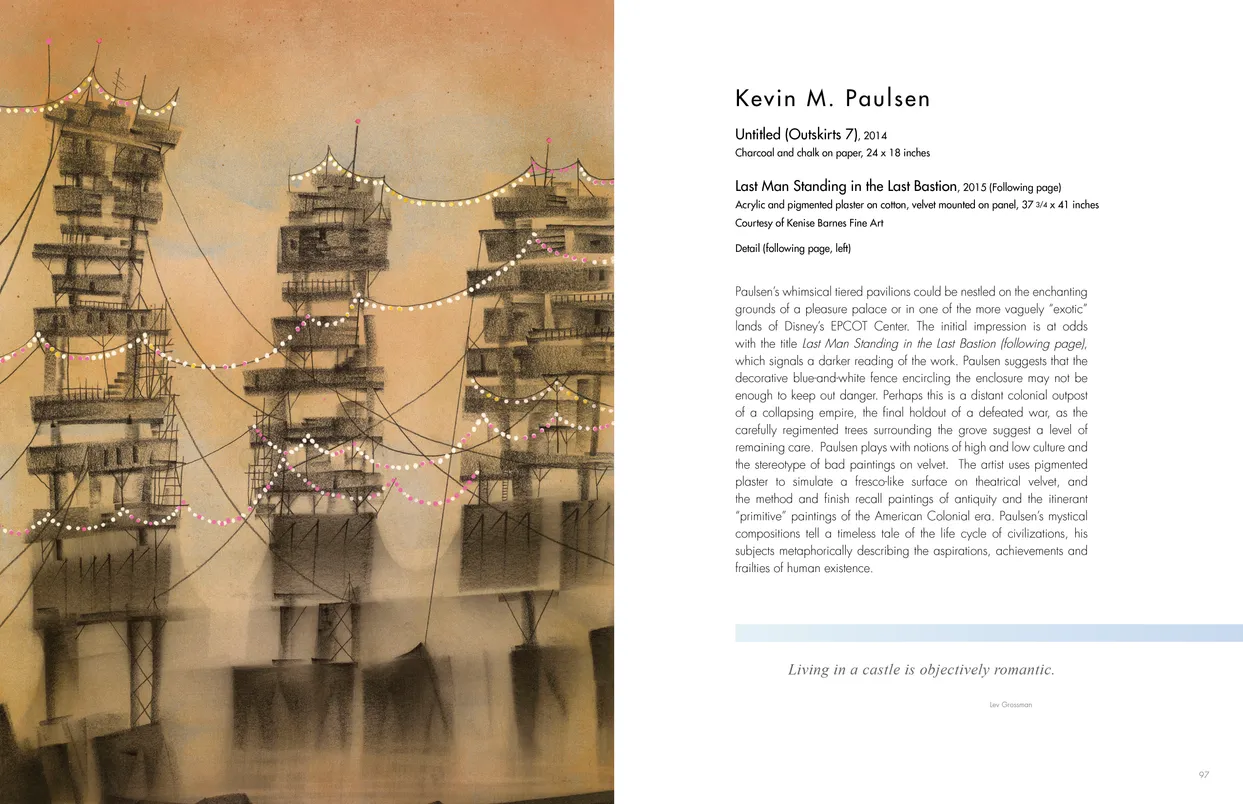
- Castles in the Sky: Fantasy Architecture in Contemporary Art exhibition catalog, pages 96-97
- Client: Lehman College Art Gallery
- Visit figure page
- Type: portfolio
- Portfolio Type: publication_design
- Portfolio Role: design_layout
Castles In: The Sky — Pages 98–99
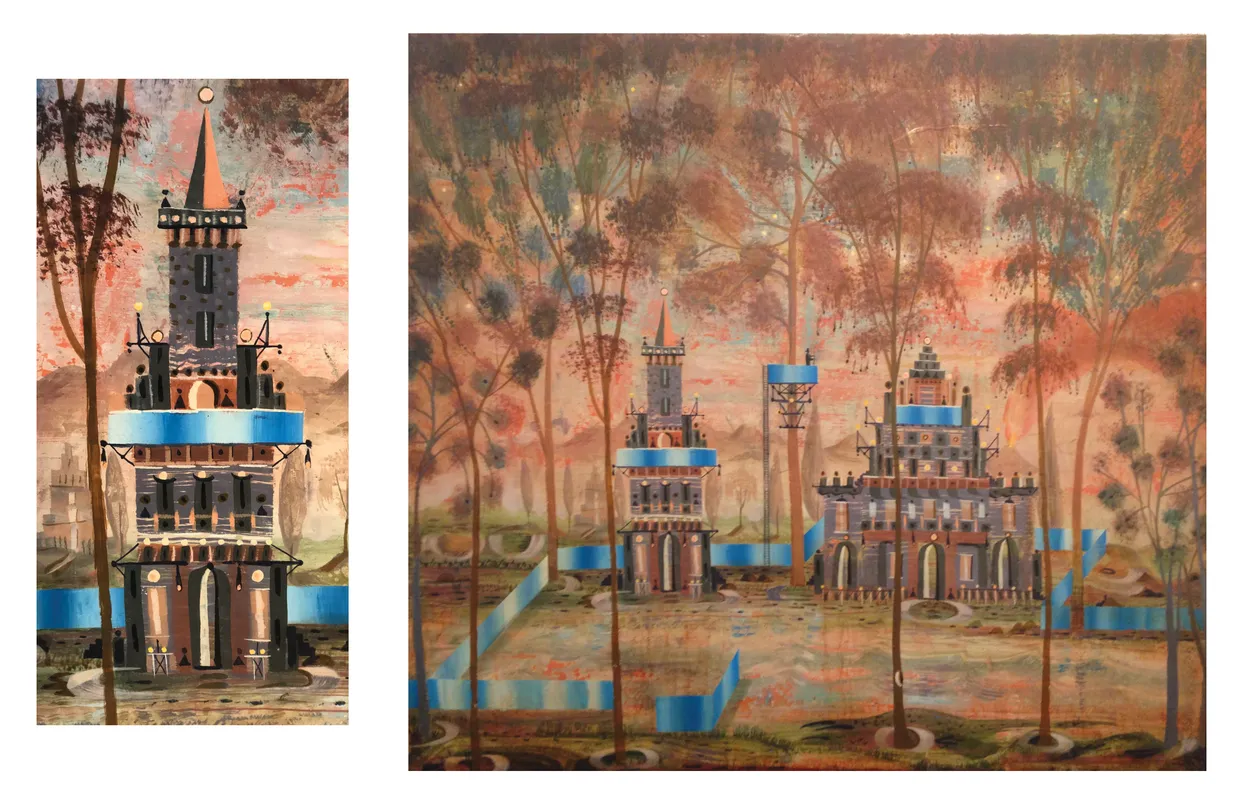
- Castles in the Sky: Fantasy Architecture in Contemporary Art exhibition catalog, pages 98-99
- Client: Lehman College Art Gallery
- Visit figure page
- Type: portfolio
- Portfolio Type: publication_design
- Portfolio Role: design_layout
Colors In The Sky Brand Brandmark

- Colors in the Sky brandmark
- Client: Colors in the Sky
- Visit figure page
- Type: portfolio
- Portfolio Type: advertising
- Portfolio Role: design_layout
Colors In The Sky Brand Brandmark Square

- Colors in the Sky square brandmark for dark contexts
- Client: Colors in the Sky
- Visit figure page
- Type: portfolio
- Portfolio Type: advertising
- Portfolio Role: design_layout
Colors In The Sky Brand Brandmark Square
- Colors in the Sky square brandmark for lights contexts
- Client: Colors in the Sky
- Visit figure page
- Type: portfolio
- Portfolio Type: advertising
- Portfolio Role: design_layout
Colors In The Sky Brand Brandmark Square Presentation

- Colors in the Sky brandmark in dark and light contexts
- Client: Colors in the Sky
- Visit figure page
- Type: portfolio
- Portfolio Type: advertising
- Portfolio Role: design_layout
Colors In The Sky Brand Iconmark

- Colors in the Sky iconmark
- Client: Colors in the Sky
- Visit figure page
- Type: portfolio
- Portfolio Type: advertising
- Portfolio Role: design_layout
Colors In The Sky Web Home Page
- Colors in the Sky Website — Home Page
- Client: Colors in the Sky
- Visit figure page
- Type: portfolio
- Portfolio Type: advertising
- Portfolio Role: design_layout
Conquer Xo Playing Card Graphic
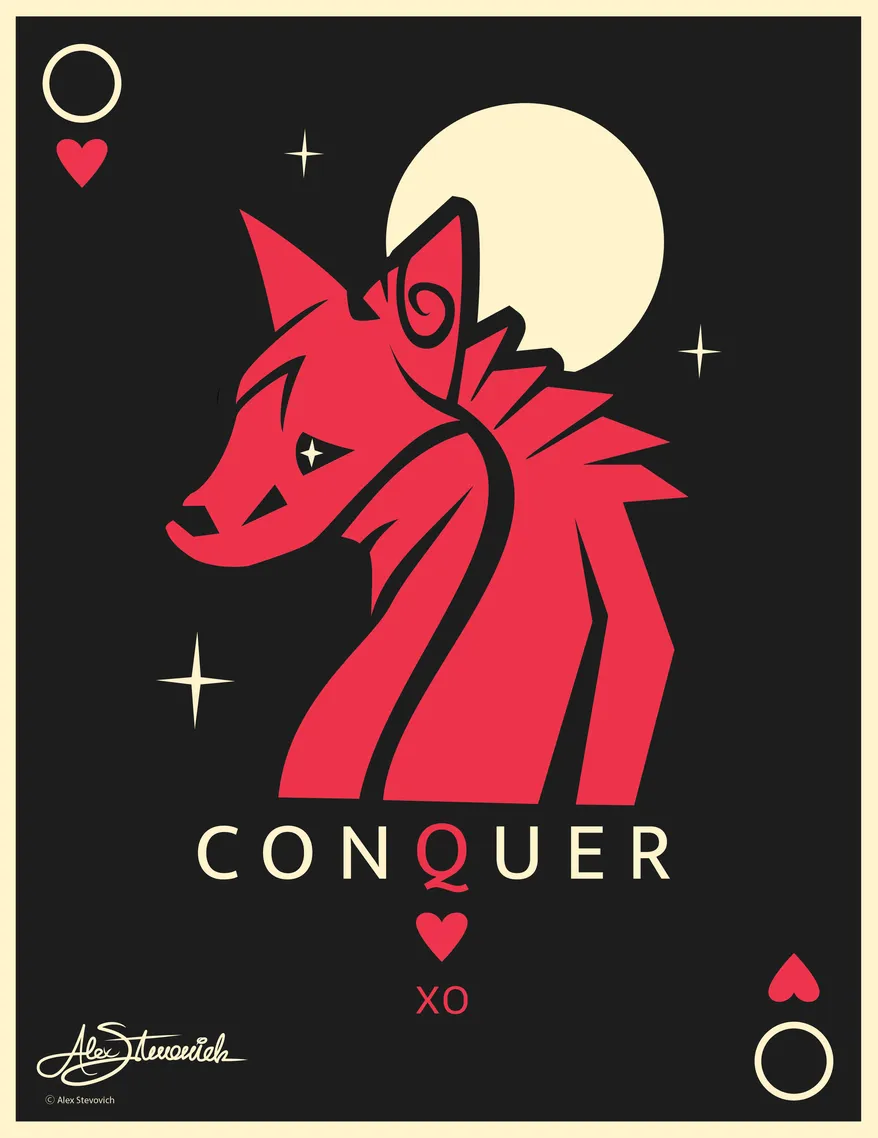
- Conquer XO playing card style graphic
- Artwork by Alex Stevovich
- © Alex Stevovich
- Visit figure page
- Type: portfolio
- Portfolio Type: advertising
- Portfolio Role: design_layout
- Portfolio Original Art: true
Dark And Stormy Night Exhibition Credits Panel

- Credits panel for the Dark and Stormy Night exhibition
- Client: Lehman College Art Gallery
- Visit figure page
- Type: portfolio
- Portfolio Type: advertising
- Portfolio Role: design_layout
Dark And Stormy Night Exhibition Intro Panel
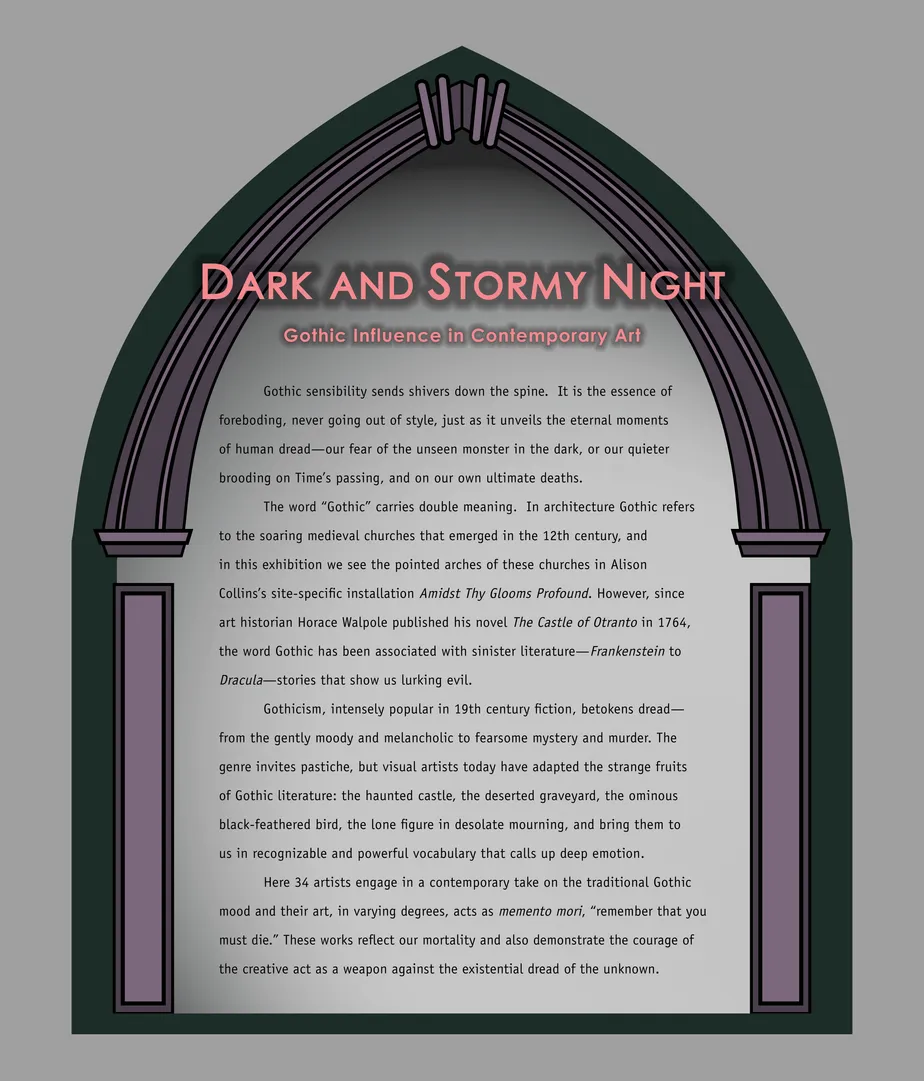
- Intro panel for the Dark and Stormy Night exhibition
- Client: Lehman College Art Gallery
- Visit figure page
- Type: portfolio
- Portfolio Type: advertising
- Portfolio Role: design_layout
Dark And Stormy Night Exhibition Poster

- Poster for the Dark and Stormy Night exhibition
- Client: Lehman College Art Gallery
- Visit figure page
- Type: portfolio
- Portfolio Type: advertising
- Portfolio Role: design_layout
Dark And: Stormy Night — Cover
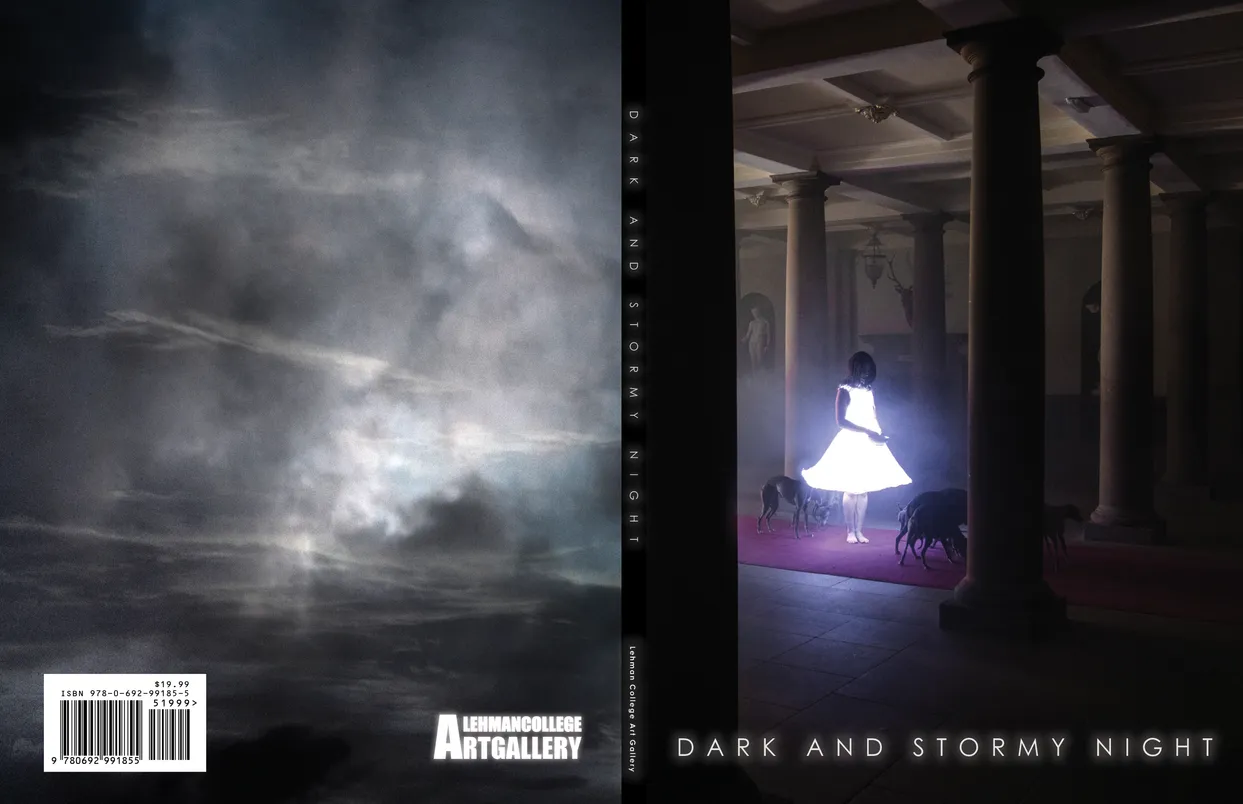
- Dark and Stormy Night: Gothic Influence in Contemporary Art exhibition catalog, cover
- Client: Lehman College Art Gallery
- Visit figure page
- Type: portfolio
- Portfolio Type: publication_design
- Portfolio Role: design_layout
Dark And: Stormy Night — Inside Front Cover

- Dark and Stormy Night: Gothic Influence in Contemporary Art exhibition catalog, inside front cover
- Client: Lehman College Art Gallery
- Visit figure page
- Type: portfolio
- Portfolio Type: publication_design
- Portfolio Role: design_layout
Dark And: Stormy Night — Pages 10–11
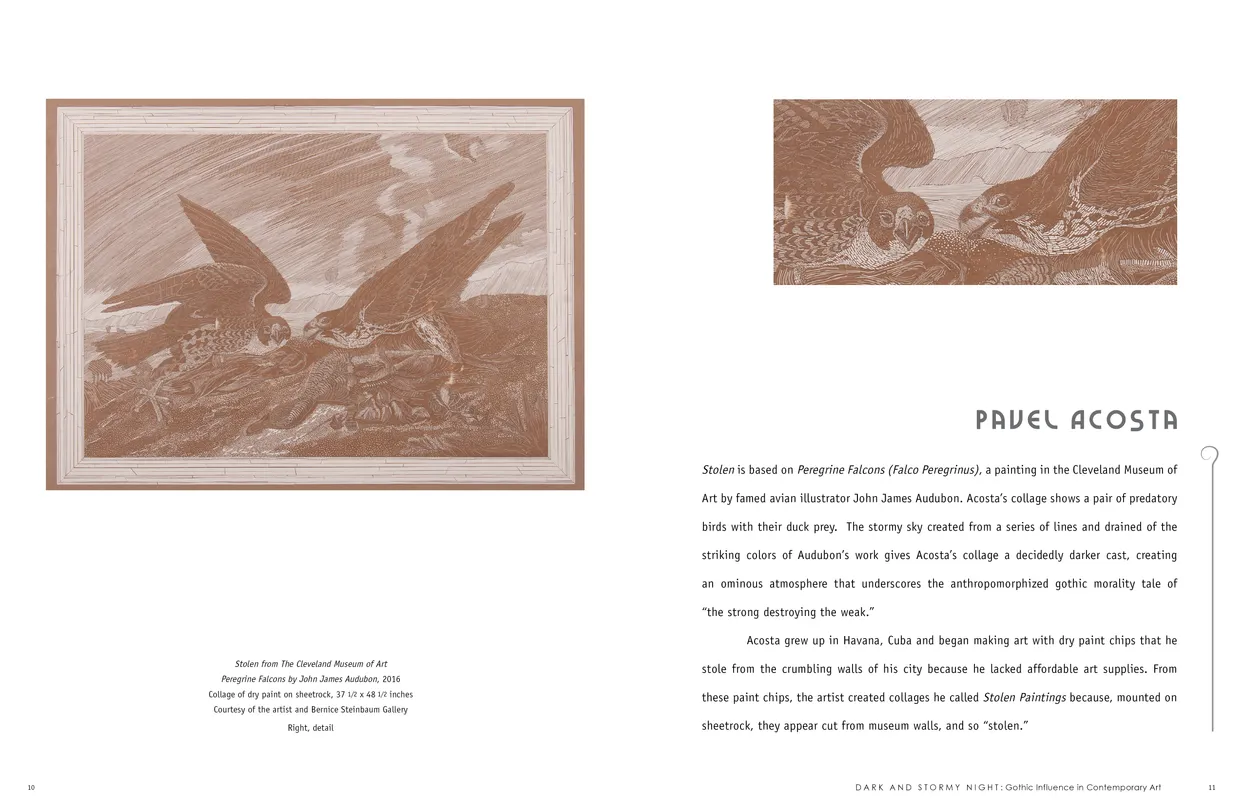
- Dark and Stormy Night: Gothic Influence in Contemporary Art exhibition catalog, pages 10-11
- Client: Lehman College Art Gallery
- Visit figure page
- Type: portfolio
- Portfolio Type: publication_design
- Portfolio Role: design_layout
Dark And: Stormy Night — Pages 100–101
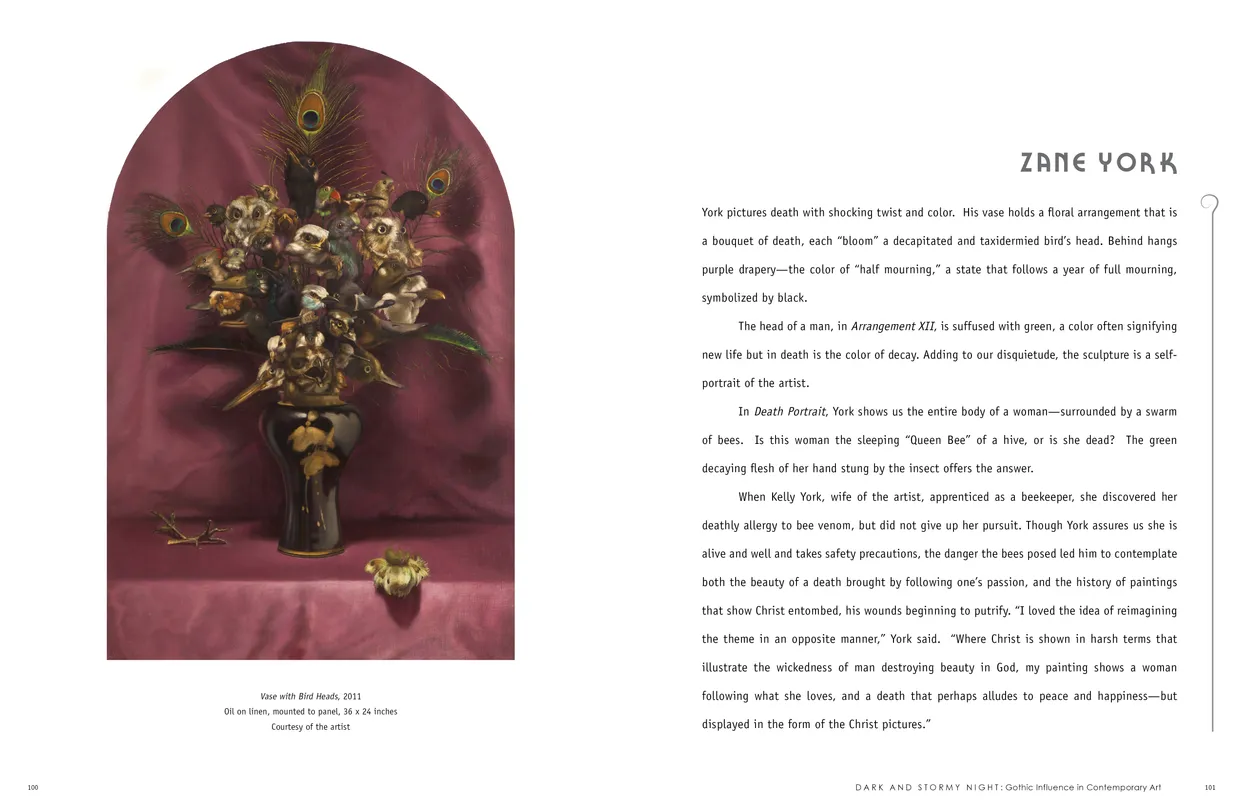
- Dark and Stormy Night: Gothic Influence in Contemporary Art exhibition catalog, pages 100-101
- Client: Lehman College Art Gallery
- Visit figure page
- Type: portfolio
- Portfolio Type: publication_design
- Portfolio Role: design_layout
Dark And: Stormy Night — Pages 102–103
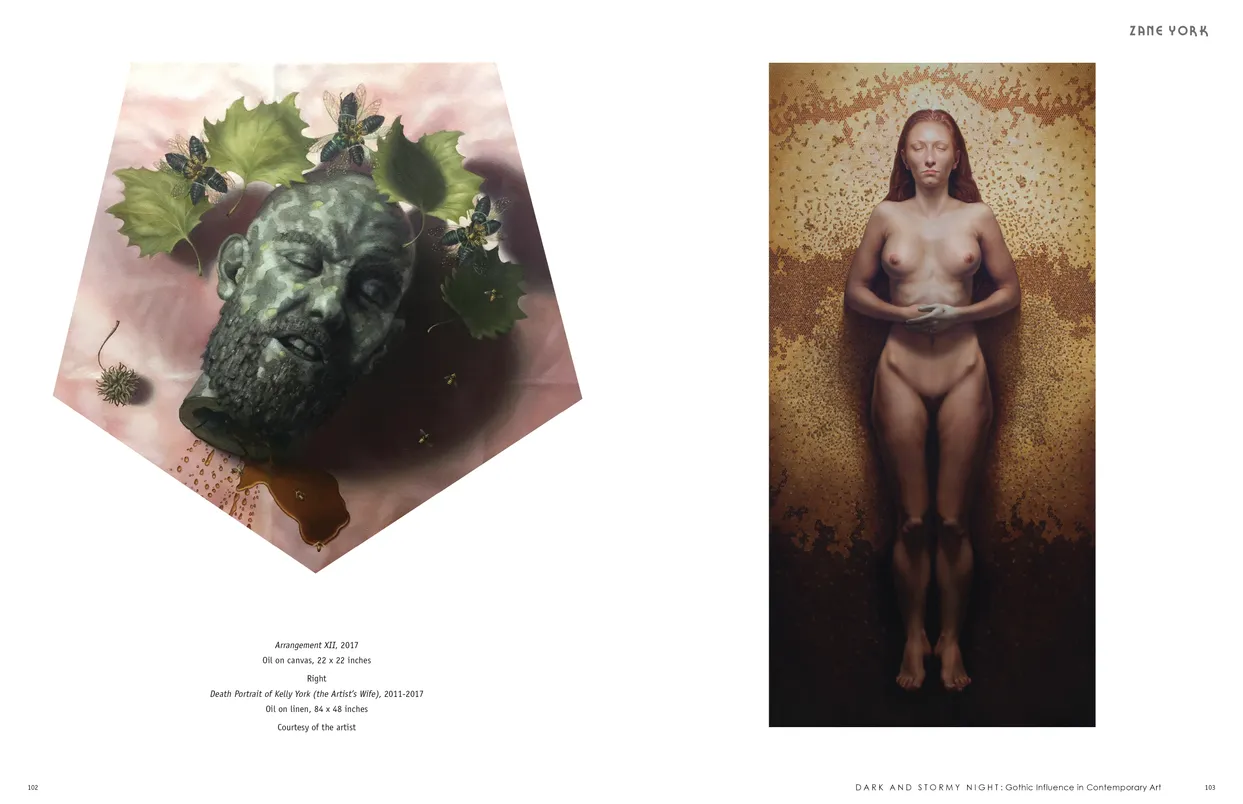
- Dark and Stormy Night: Gothic Influence in Contemporary Art exhibition catalog, pages 102-103
- Client: Lehman College Art Gallery
- Visit figure page
- Type: portfolio
- Portfolio Type: publication_design
- Portfolio Role: design_layout
Dark And: Stormy Night — Pages 104–105
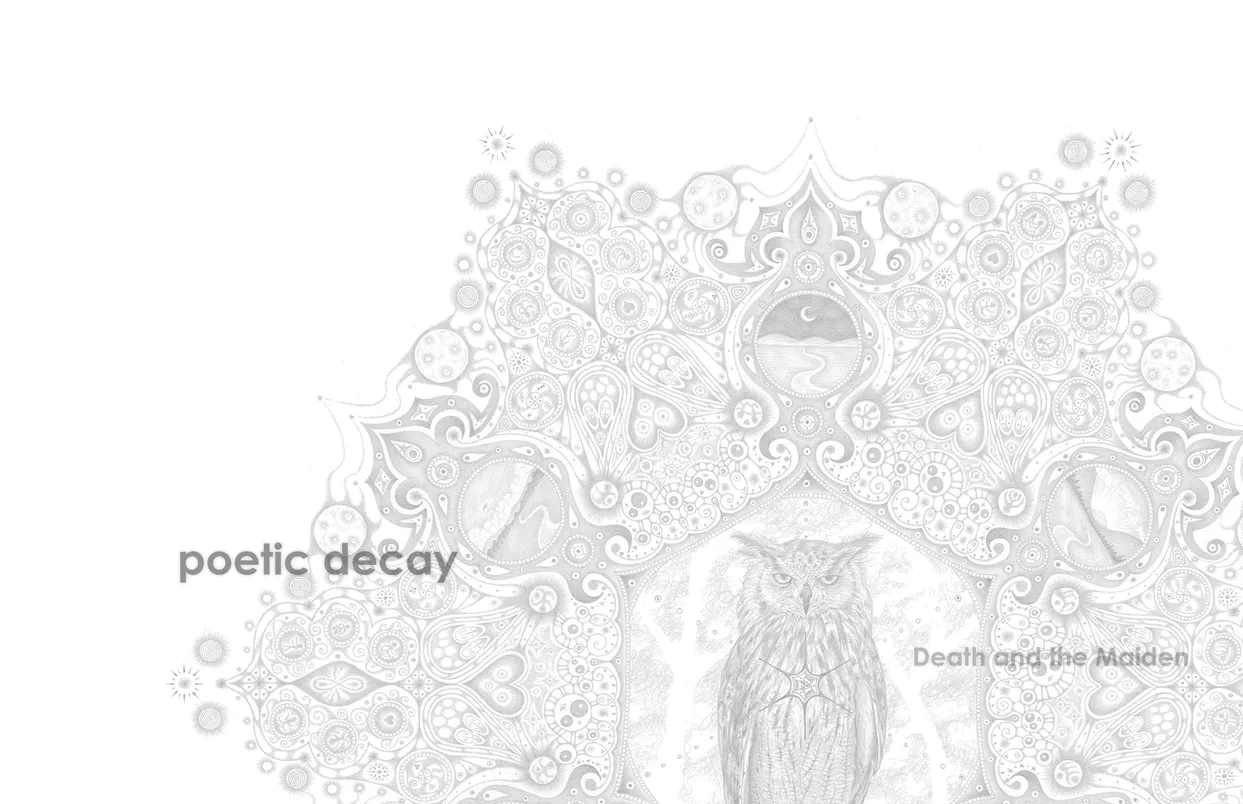
- Dark and Stormy Night: Gothic Influence in Contemporary Art exhibition catalog, pages 104-105
- Client: Lehman College Art Gallery
- Visit figure page
- Type: portfolio
- Portfolio Type: publication_design
- Portfolio Role: design_layout
Dark And: Stormy Night — Pages 12–13
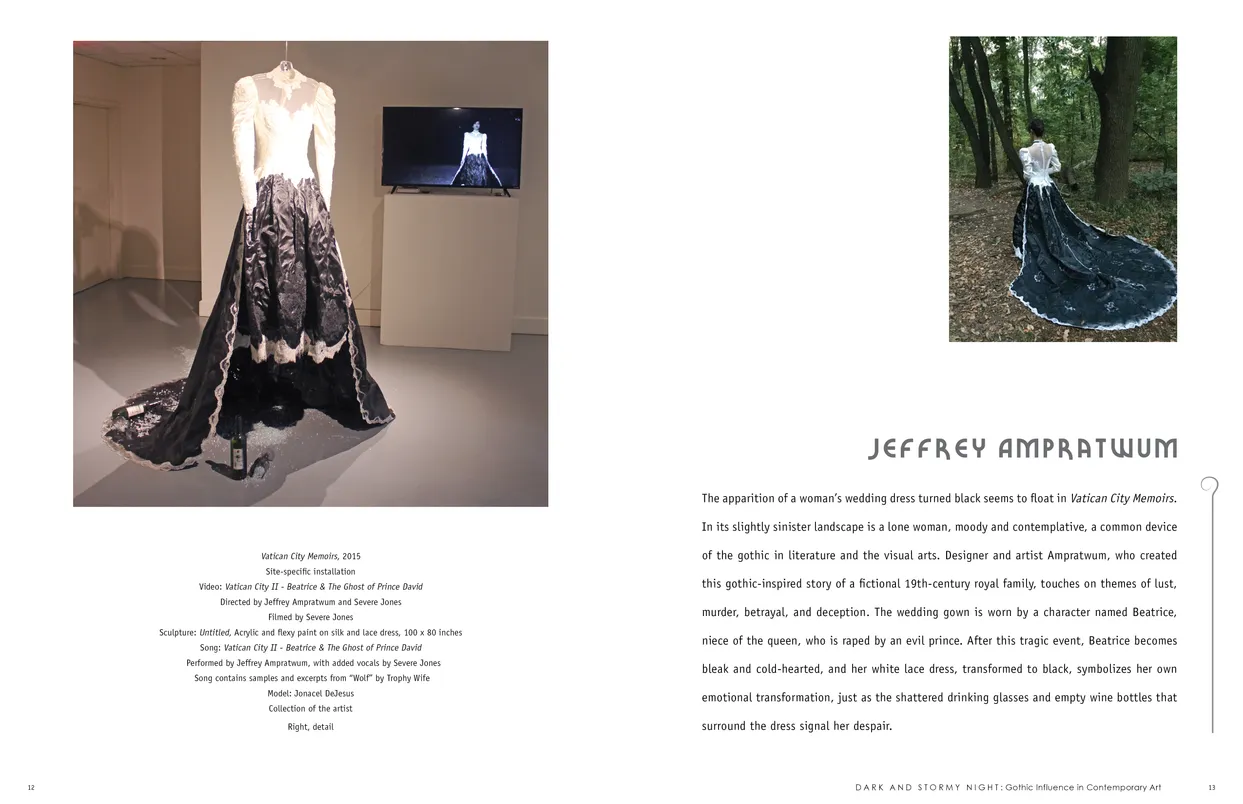
- Dark and Stormy Night: Gothic Influence in Contemporary Art exhibition catalog, pages 12-13
- Client: Lehman College Art Gallery
- Visit figure page
- Type: portfolio
- Portfolio Type: publication_design
- Portfolio Role: design_layout
Dark And: Stormy Night — Pages 14–15
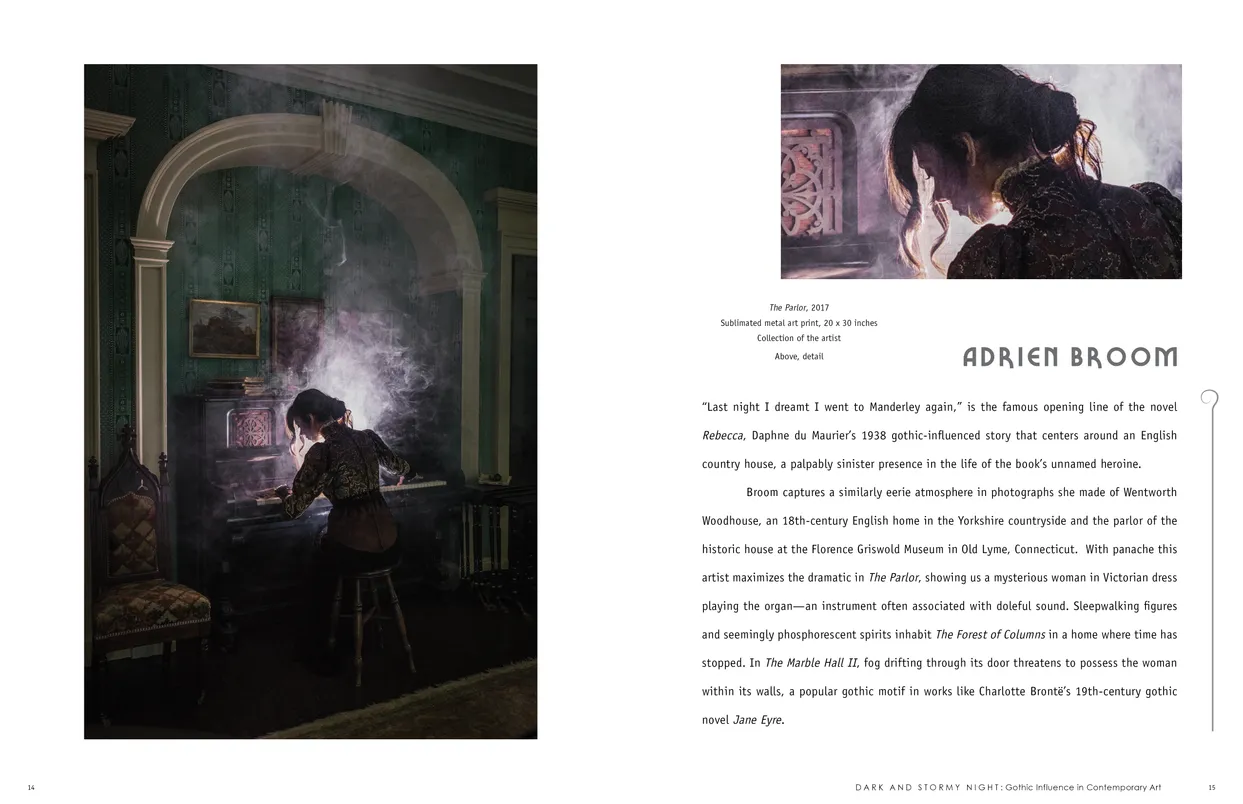
- Dark and Stormy Night: Gothic Influence in Contemporary Art exhibition catalog, pages 14-15
- Client: Lehman College Art Gallery
- Visit figure page
- Type: portfolio
- Portfolio Type: publication_design
- Portfolio Role: design_layout
Dark And: Stormy Night — Pages 16–17
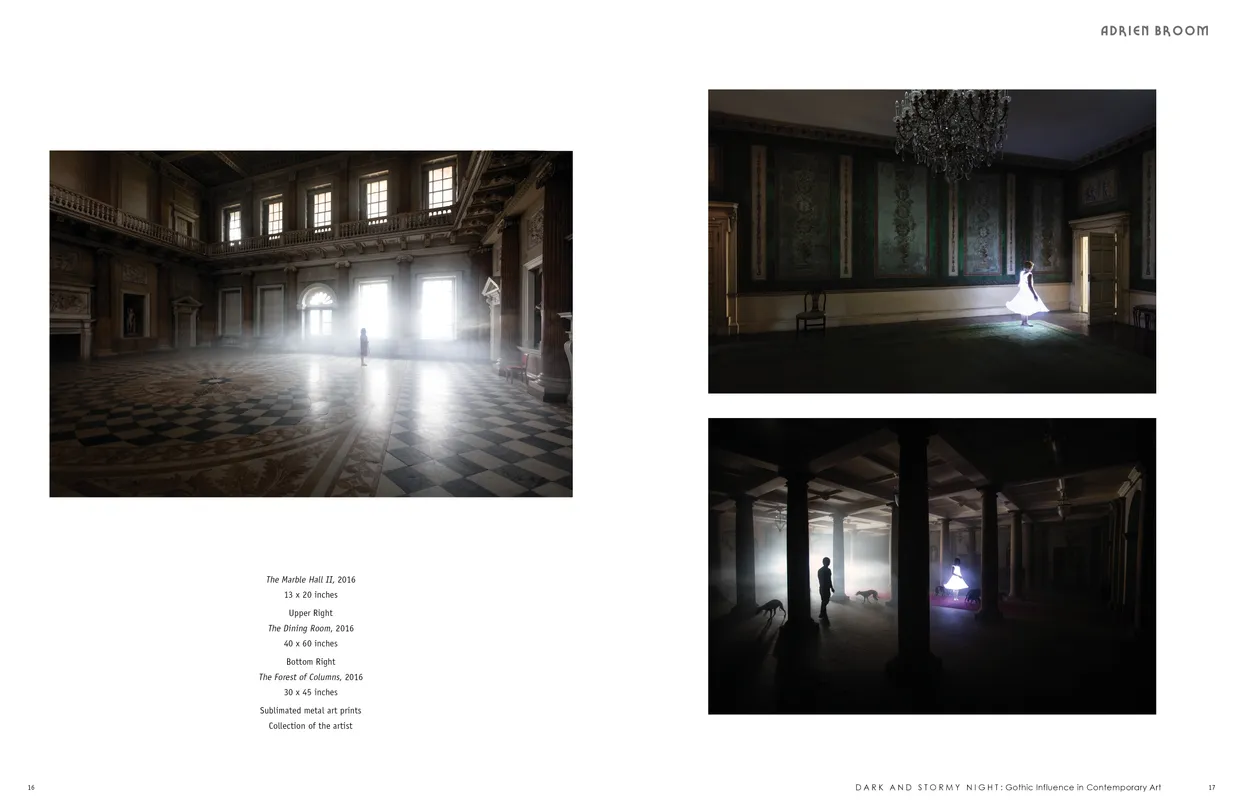
- Dark and Stormy Night: Gothic Influence in Contemporary Art exhibition catalog, pages 16-17
- Client: Lehman College Art Gallery
- Visit figure page
- Type: portfolio
- Portfolio Type: publication_design
- Portfolio Role: design_layout
Dark And: Stormy Night — Pages 18–19
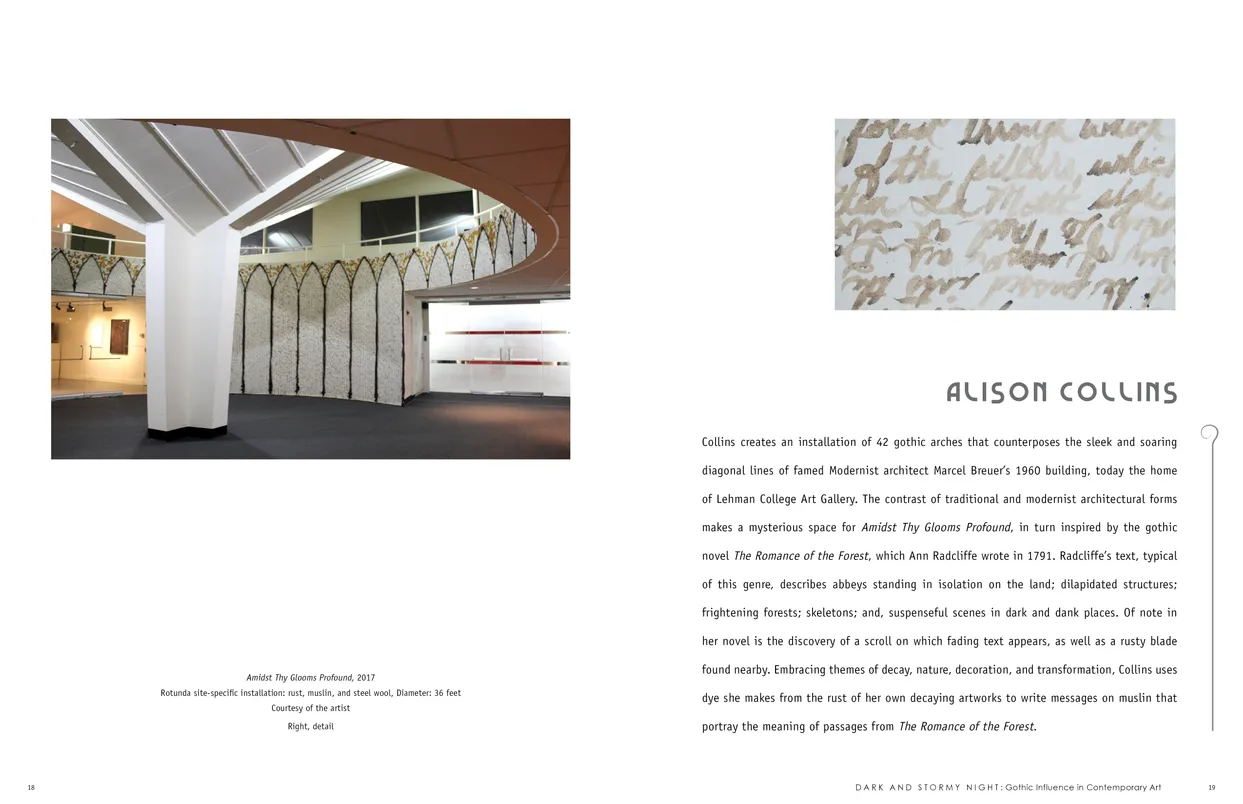
- Dark and Stormy Night: Gothic Influence in Contemporary Art exhibition catalog, pages 18-19
- Client: Lehman College Art Gallery
- Visit figure page
- Type: portfolio
- Portfolio Type: publication_design
- Portfolio Role: design_layout
Dark And: Stormy Night — Pages 2–3
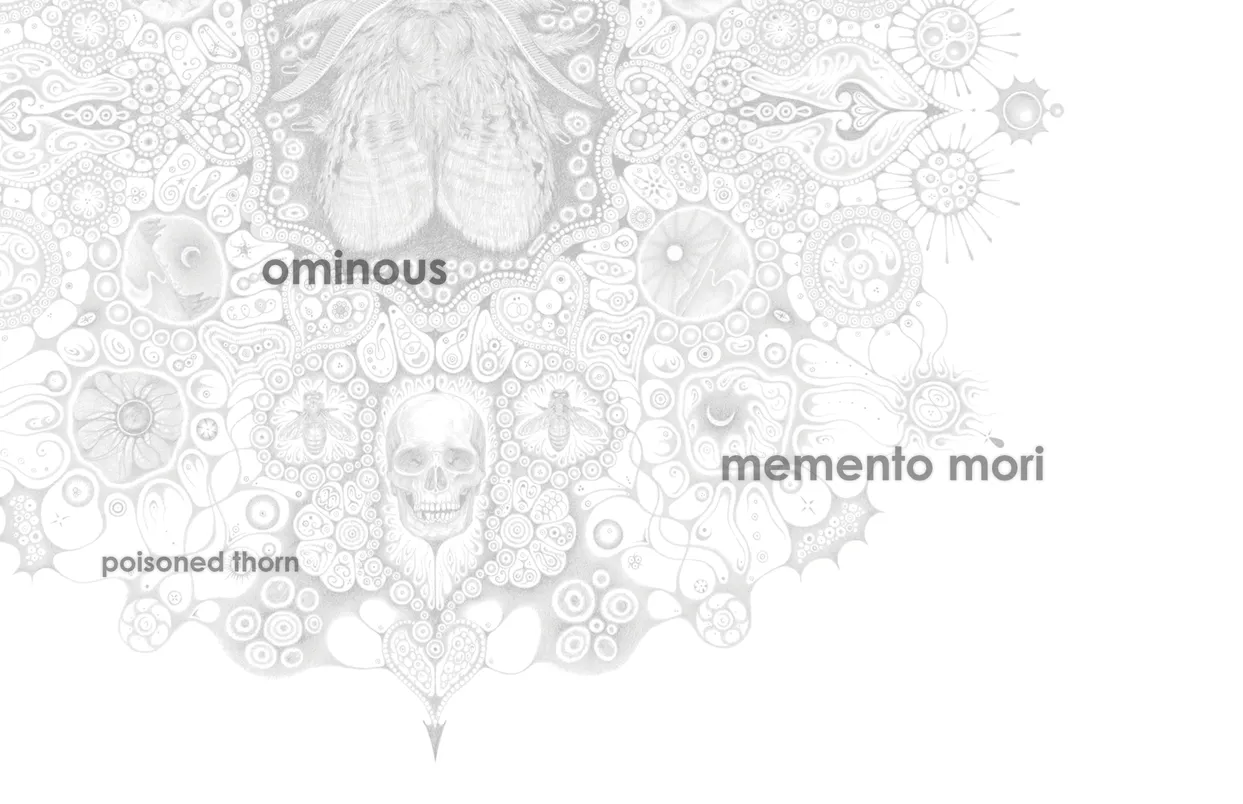
- Dark and Stormy Night: Gothic Influence in Contemporary Art exhibition catalog, pages 2-3
- Client: Lehman College Art Gallery
- Visit figure page
- Type: portfolio
- Portfolio Type: publication_design
- Portfolio Role: design_layout
Dark And: Stormy Night — Pages 20–21
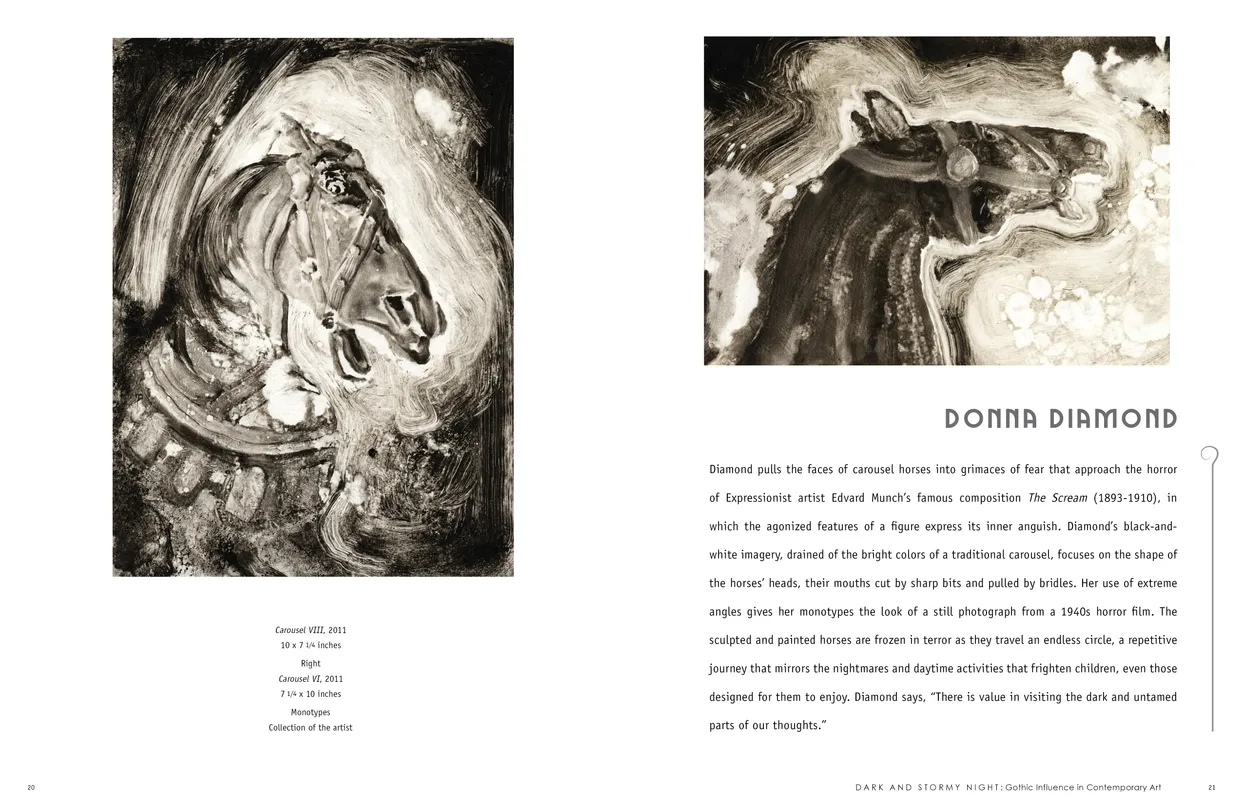
- Dark and Stormy Night: Gothic Influence in Contemporary Art exhibition catalog, pages 20-21
- Client: Lehman College Art Gallery
- Visit figure page
- Type: portfolio
- Portfolio Type: publication_design
- Portfolio Role: design_layout
Dark And: Stormy Night — Pages 22–23
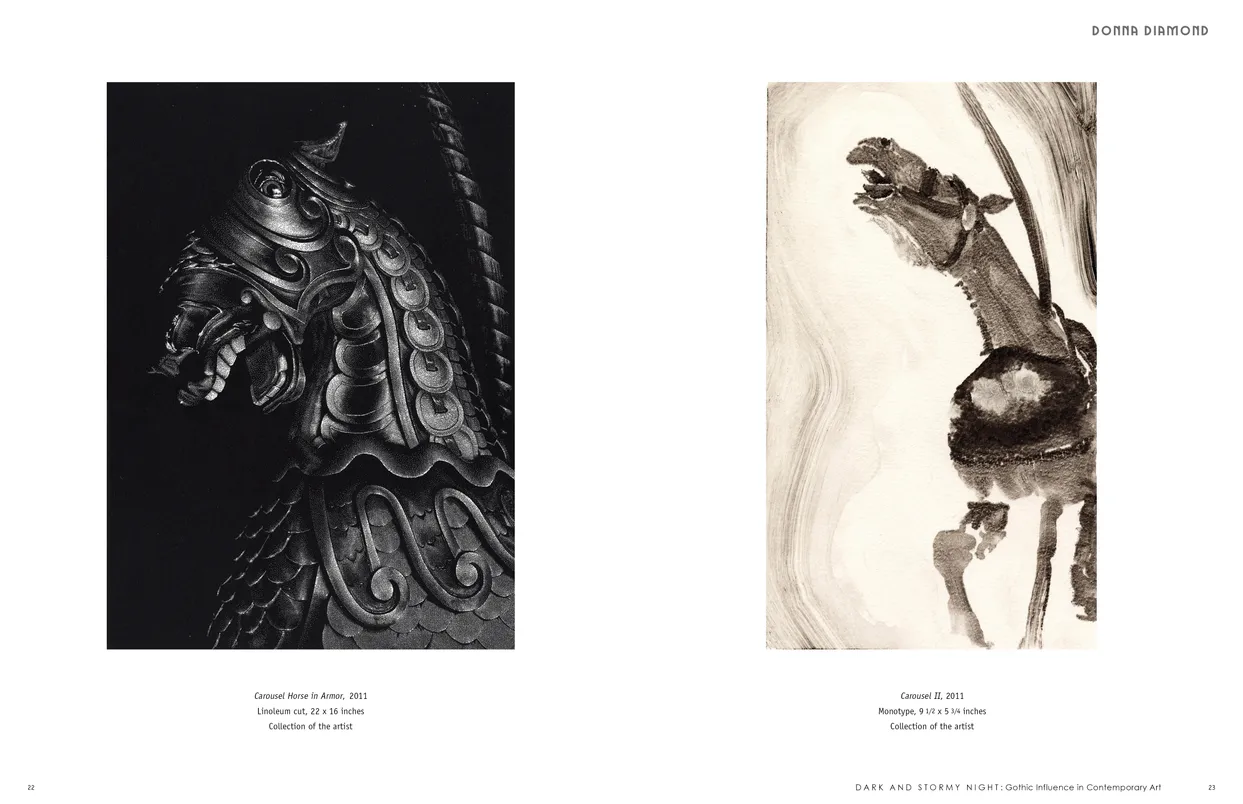
- Dark and Stormy Night: Gothic Influence in Contemporary Art exhibition catalog, pages 22-23
- Client: Lehman College Art Gallery
- Visit figure page
- Type: portfolio
- Portfolio Type: publication_design
- Portfolio Role: design_layout
Dark And: Stormy Night — Pages 24–25
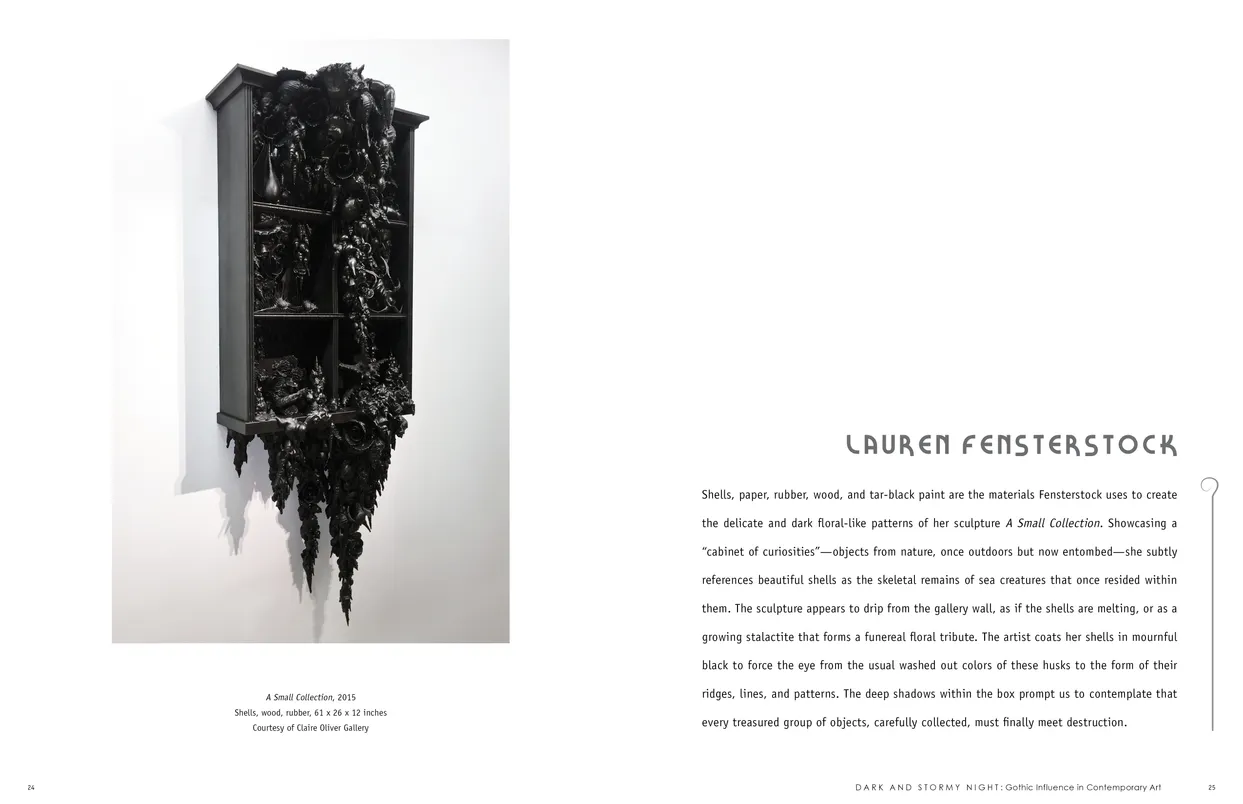
- Dark and Stormy Night: Gothic Influence in Contemporary Art exhibition catalog, pages 24-25
- Client: Lehman College Art Gallery
- Visit figure page
- Type: portfolio
- Portfolio Type: publication_design
- Portfolio Role: design_layout
Dark And: Stormy Night — Pages 26–27
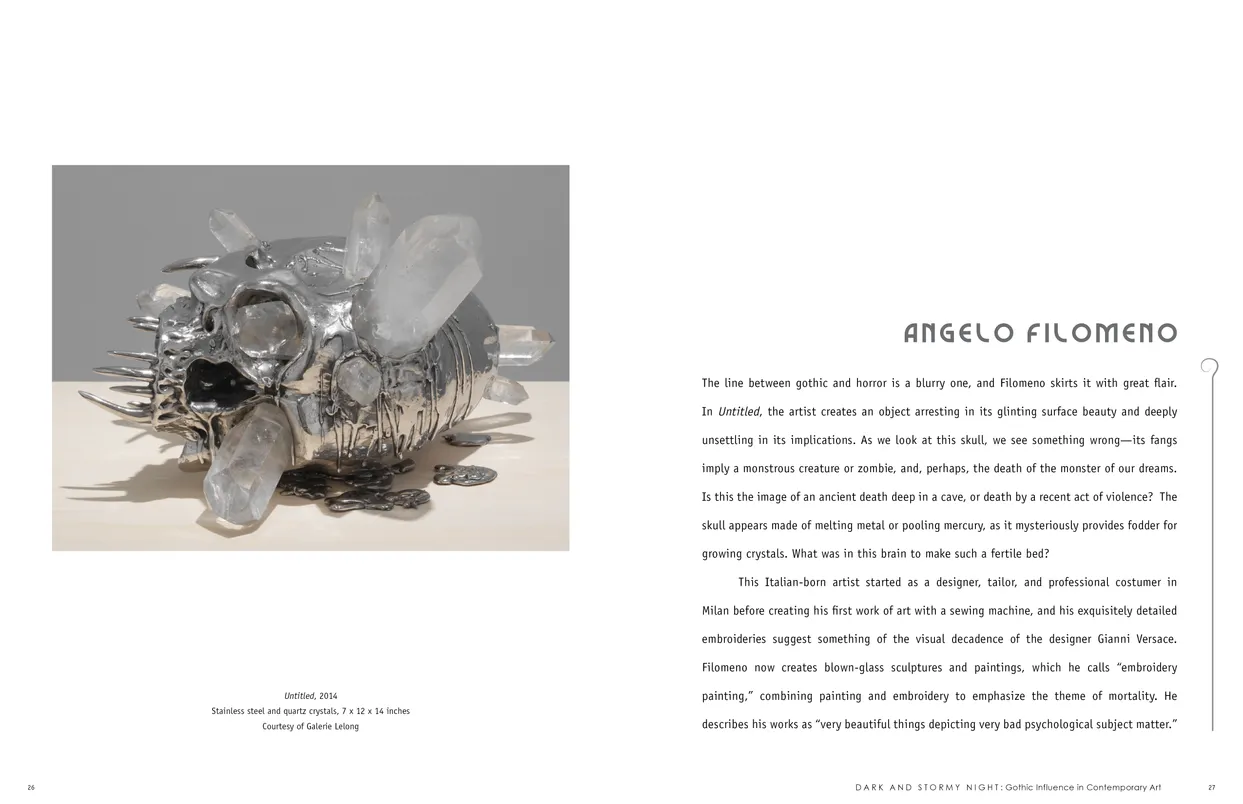
- Dark and Stormy Night: Gothic Influence in Contemporary Art exhibition catalog, pages 26-27
- Client: Lehman College Art Gallery
- Visit figure page
- Type: portfolio
- Portfolio Type: publication_design
- Portfolio Role: design_layout
Dark And: Stormy Night — Pages 28–29
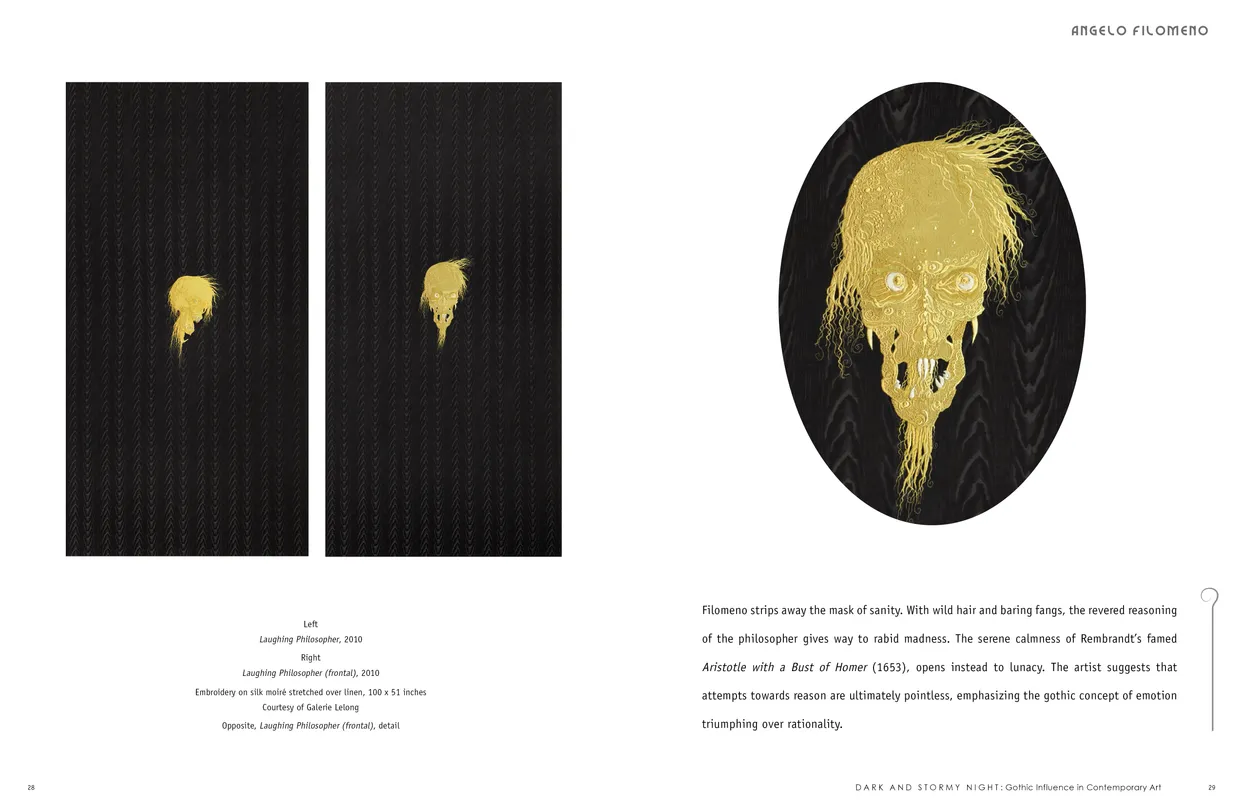
- Dark and Stormy Night: Gothic Influence in Contemporary Art exhibition catalog, pages 28-29
- Client: Lehman College Art Gallery
- Visit figure page
- Type: portfolio
- Portfolio Type: publication_design
- Portfolio Role: design_layout
Dark And: Stormy Night — Pages 30–31
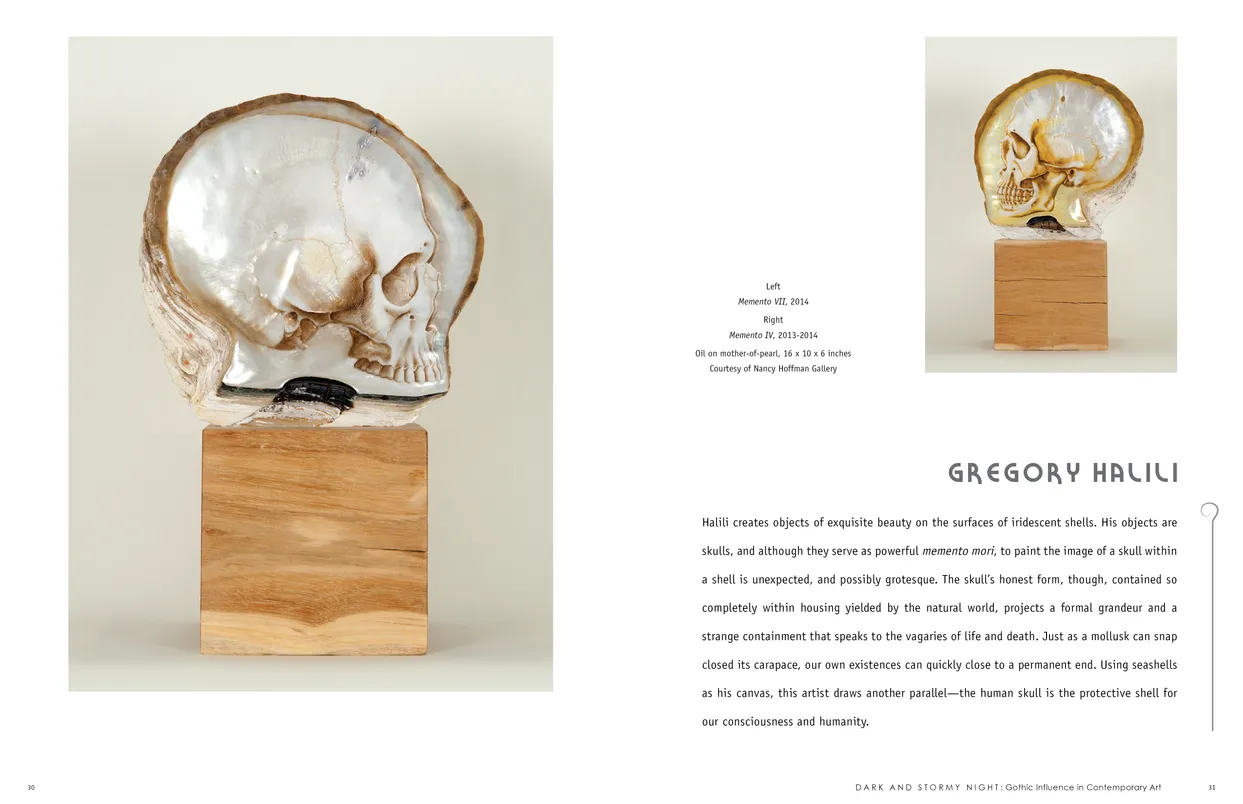
- Dark and Stormy Night: Gothic Influence in Contemporary Art exhibition catalog, pages 30-31
- Client: Lehman College Art Gallery
- Visit figure page
- Type: portfolio
- Portfolio Type: publication_design
- Portfolio Role: design_layout
Dark And: Stormy Night — Pages 32–33
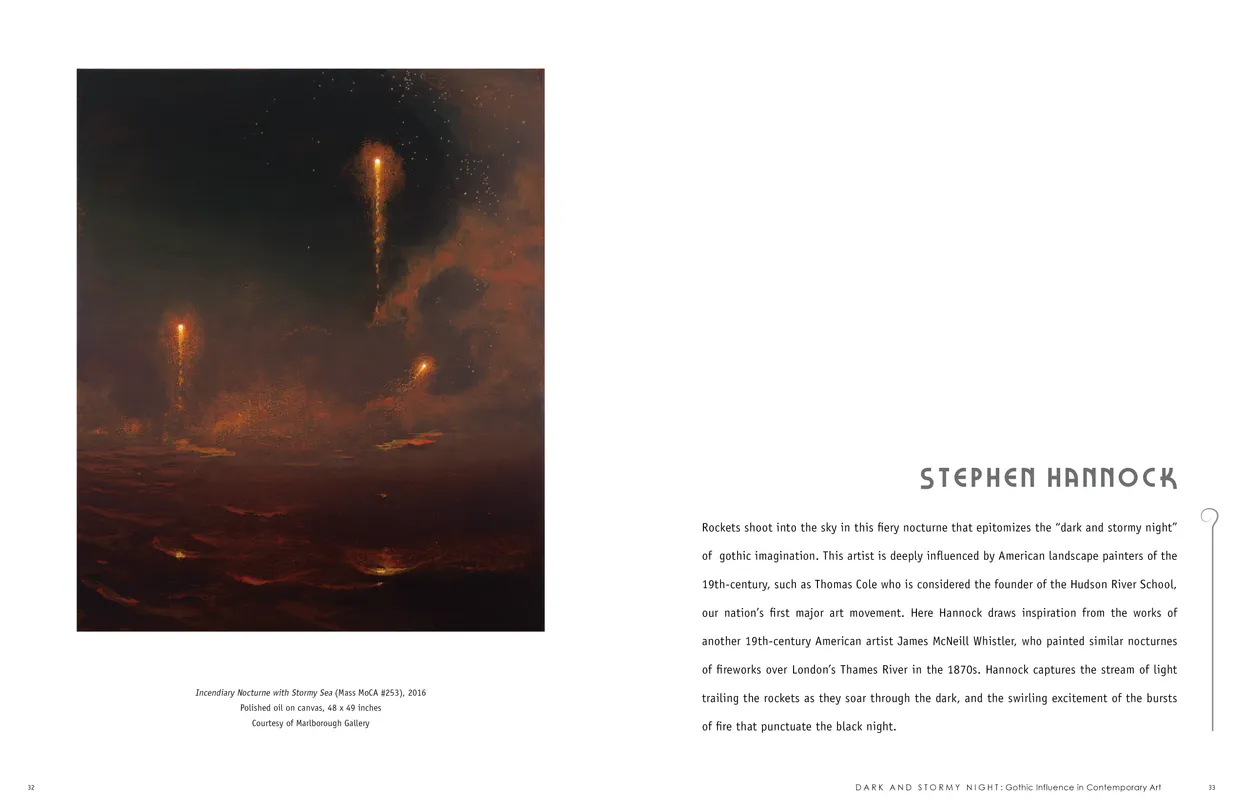
- Dark and Stormy Night: Gothic Influence in Contemporary Art exhibition catalog, pages 32-33
- Client: Lehman College Art Gallery
- Visit figure page
- Type: portfolio
- Portfolio Type: publication_design
- Portfolio Role: design_layout
Dark And: Stormy Night — Pages 34–35
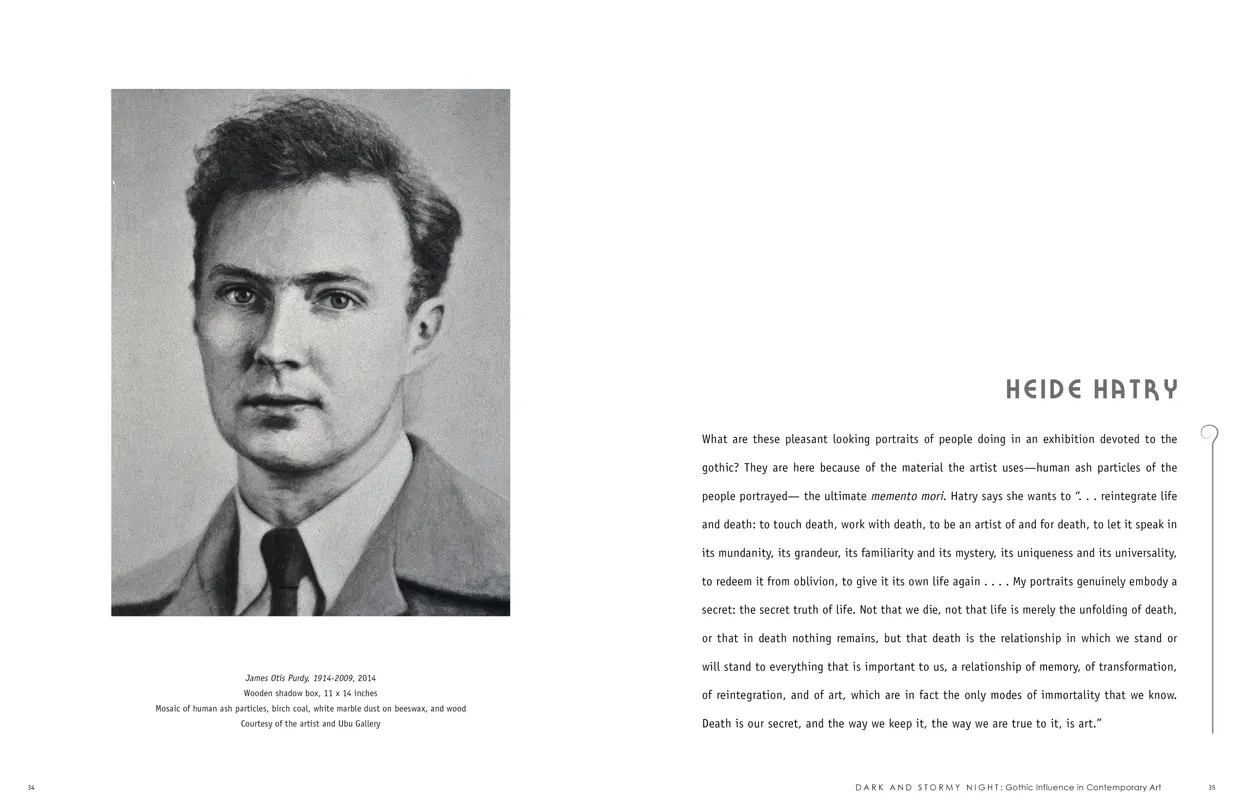
- Dark and Stormy Night: Gothic Influence in Contemporary Art exhibition catalog, pages 34-35
- Client: Lehman College Art Gallery
- Visit figure page
- Type: portfolio
- Portfolio Type: publication_design
- Portfolio Role: design_layout
Dark And: Stormy Night — Pages 36–37
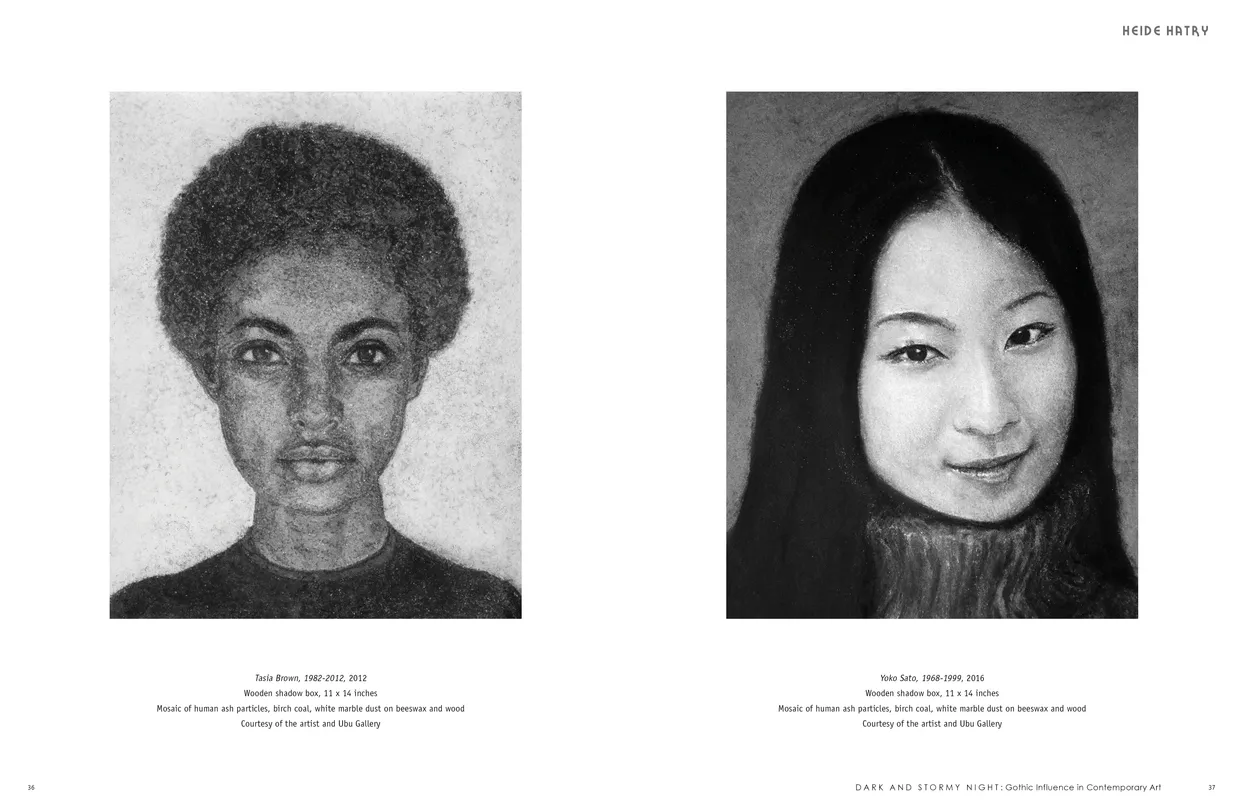
- Dark and Stormy Night: Gothic Influence in Contemporary Art exhibition catalog, pages 36-37
- Client: Lehman College Art Gallery
- Visit figure page
- Type: portfolio
- Portfolio Type: publication_design
- Portfolio Role: design_layout
Dark And: Stormy Night — Pages 38–39
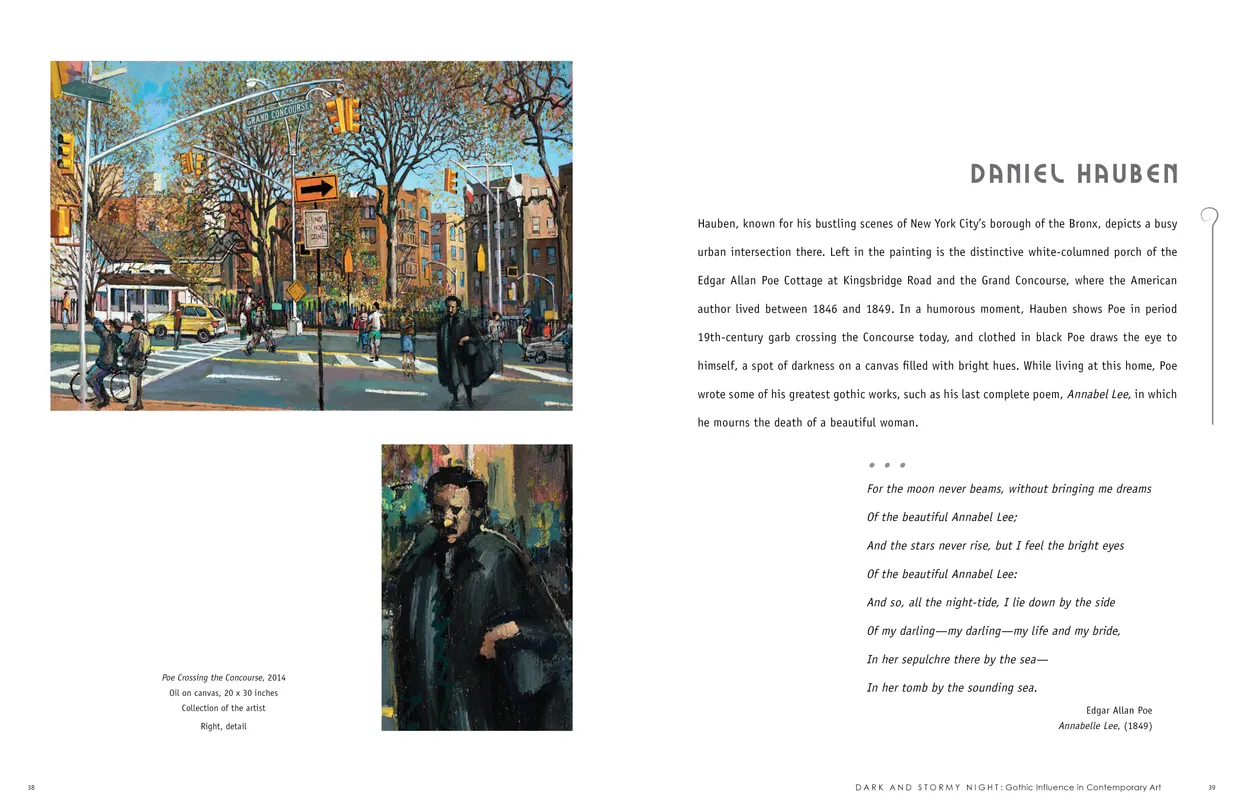
- Dark and Stormy Night: Gothic Influence in Contemporary Art exhibition catalog, pages 38-39
- Client: Lehman College Art Gallery
- Visit figure page
- Type: portfolio
- Portfolio Type: publication_design
- Portfolio Role: design_layout
Dark And: Stormy Night — Pages 4–5

- Dark and Stormy Night: Gothic Influence in Contemporary Art exhibition catalog, pages 4-5
- Client: Lehman College Art Gallery
- Visit figure page
- Type: portfolio
- Portfolio Type: publication_design
- Portfolio Role: design_layout
Dark And: Stormy Night — Pages 40–41
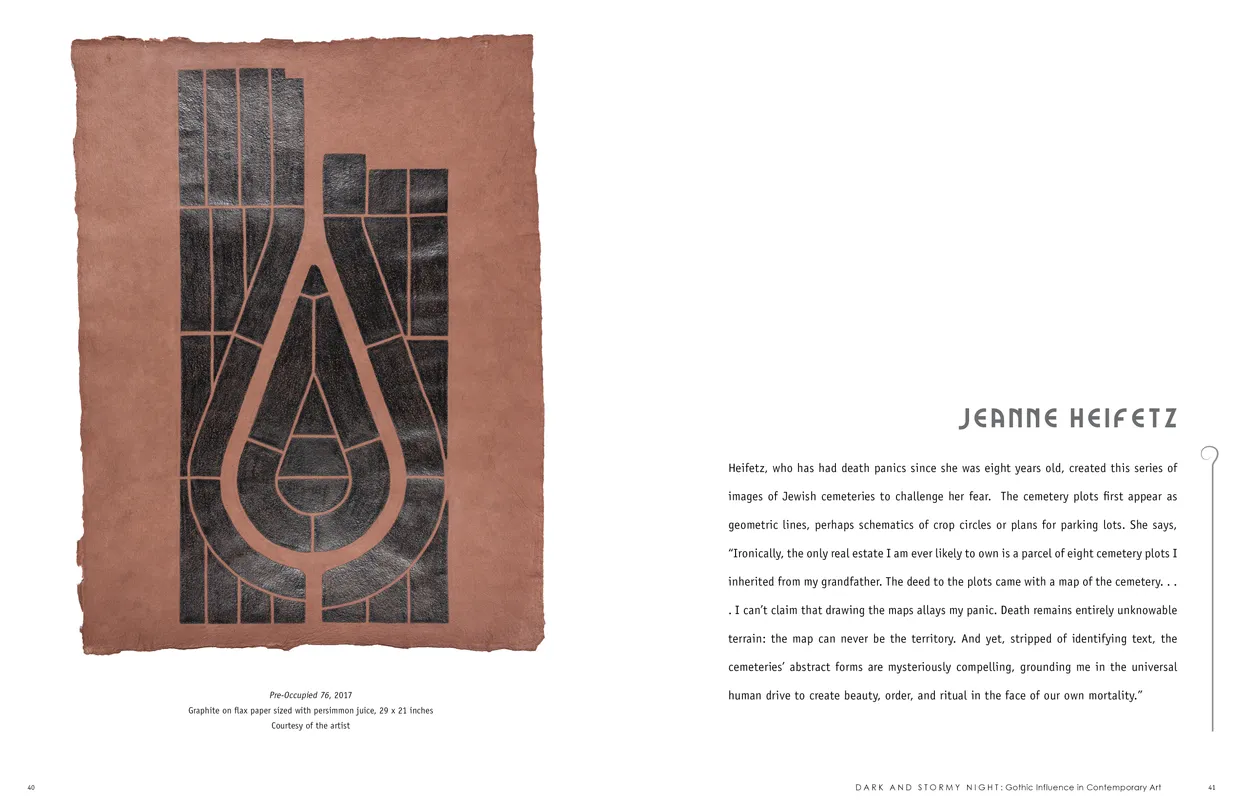
- Dark and Stormy Night: Gothic Influence in Contemporary Art exhibition catalog, pages 40-41
- Client: Lehman College Art Gallery
- Visit figure page
- Type: portfolio
- Portfolio Type: publication_design
- Portfolio Role: design_layout
Dark And: Stormy Night — Pages 42–43

- Dark and Stormy Night: Gothic Influence in Contemporary Art exhibition catalog, pages 42-43
- Client: Lehman College Art Gallery
- Visit figure page
- Type: portfolio
- Portfolio Type: publication_design
- Portfolio Role: design_layout
Dark And: Stormy Night — Pages 44–45

- Dark and Stormy Night: Gothic Influence in Contemporary Art exhibition catalog, pages 44-45
- Client: Lehman College Art Gallery
- Visit figure page
- Type: portfolio
- Portfolio Type: publication_design
- Portfolio Role: design_layout
Dark And: Stormy Night — Pages 46–47
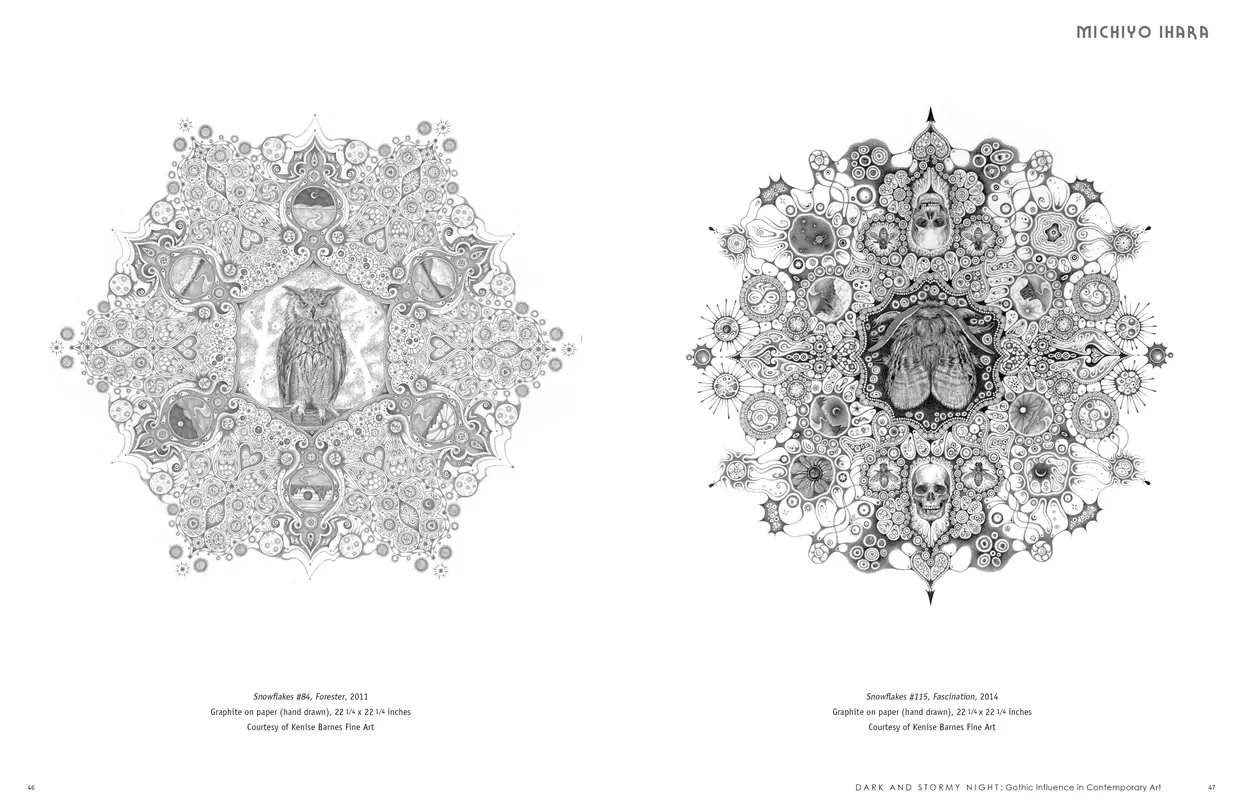
- Dark and Stormy Night: Gothic Influence in Contemporary Art exhibition catalog, pages 46-47
- Client: Lehman College Art Gallery
- Visit figure page
- Type: portfolio
- Portfolio Type: publication_design
- Portfolio Role: design_layout
Dark And: Stormy Night — Pages 48–49
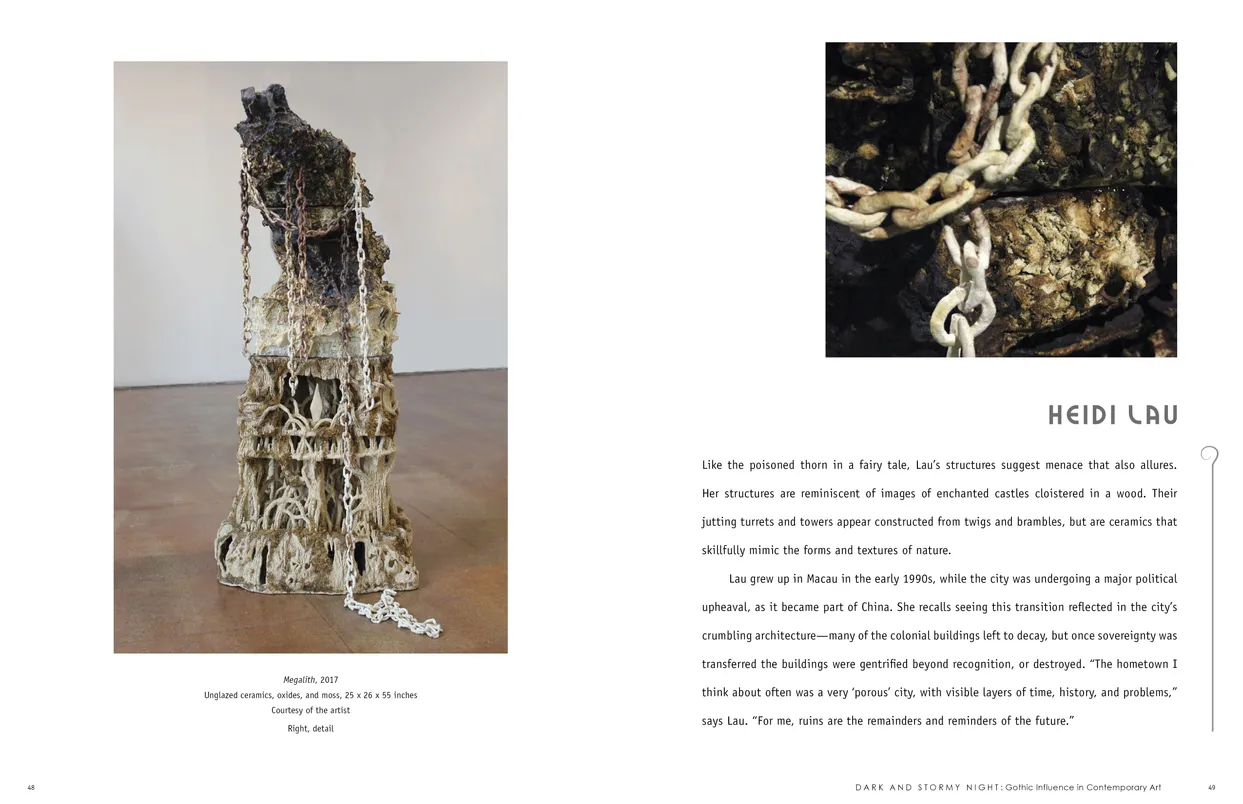
- Dark and Stormy Night: Gothic Influence in Contemporary Art exhibition catalog, pages 48-49
- Client: Lehman College Art Gallery
- Visit figure page
- Type: portfolio
- Portfolio Type: publication_design
- Portfolio Role: design_layout
Dark And: Stormy Night — Pages 50–51
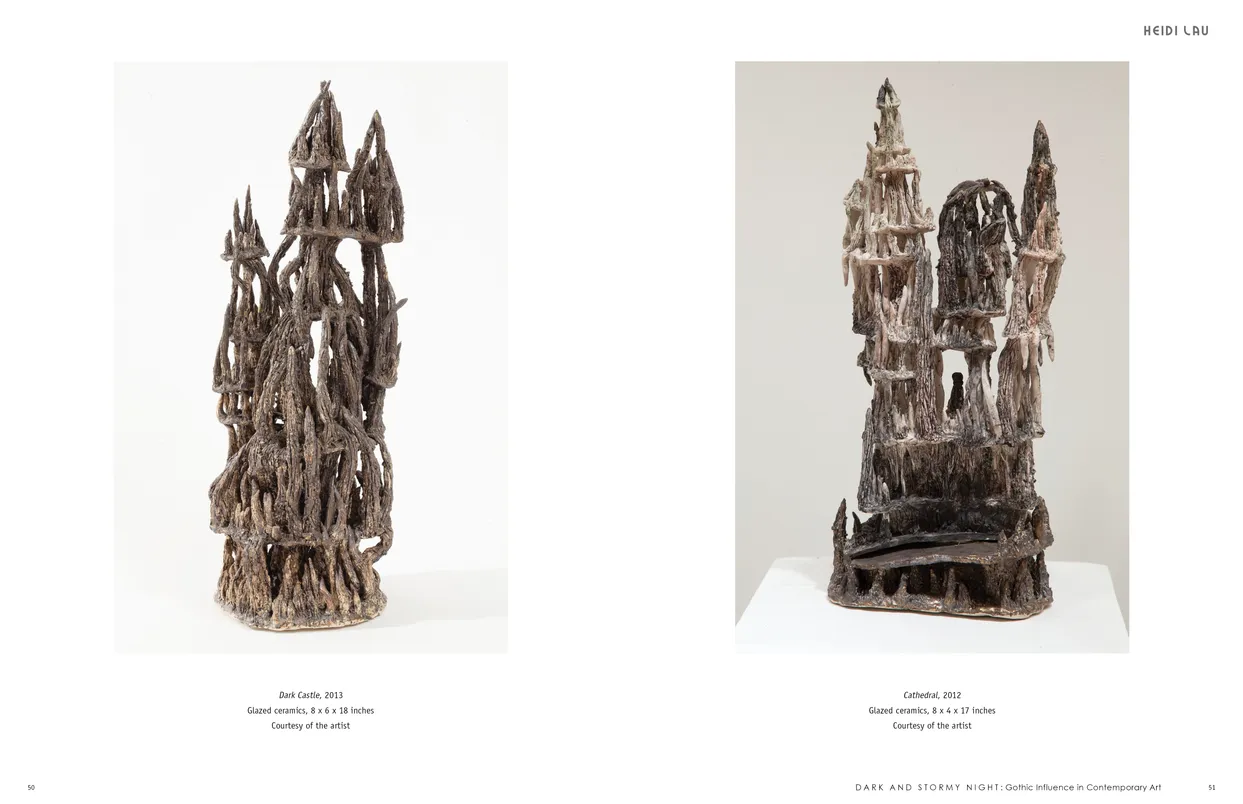
- Dark and Stormy Night: Gothic Influence in Contemporary Art exhibition catalog, pages 50-51
- Client: Lehman College Art Gallery
- Visit figure page
- Type: portfolio
- Portfolio Type: publication_design
- Portfolio Role: design_layout
Dark And: Stormy Night — Pages 52–53
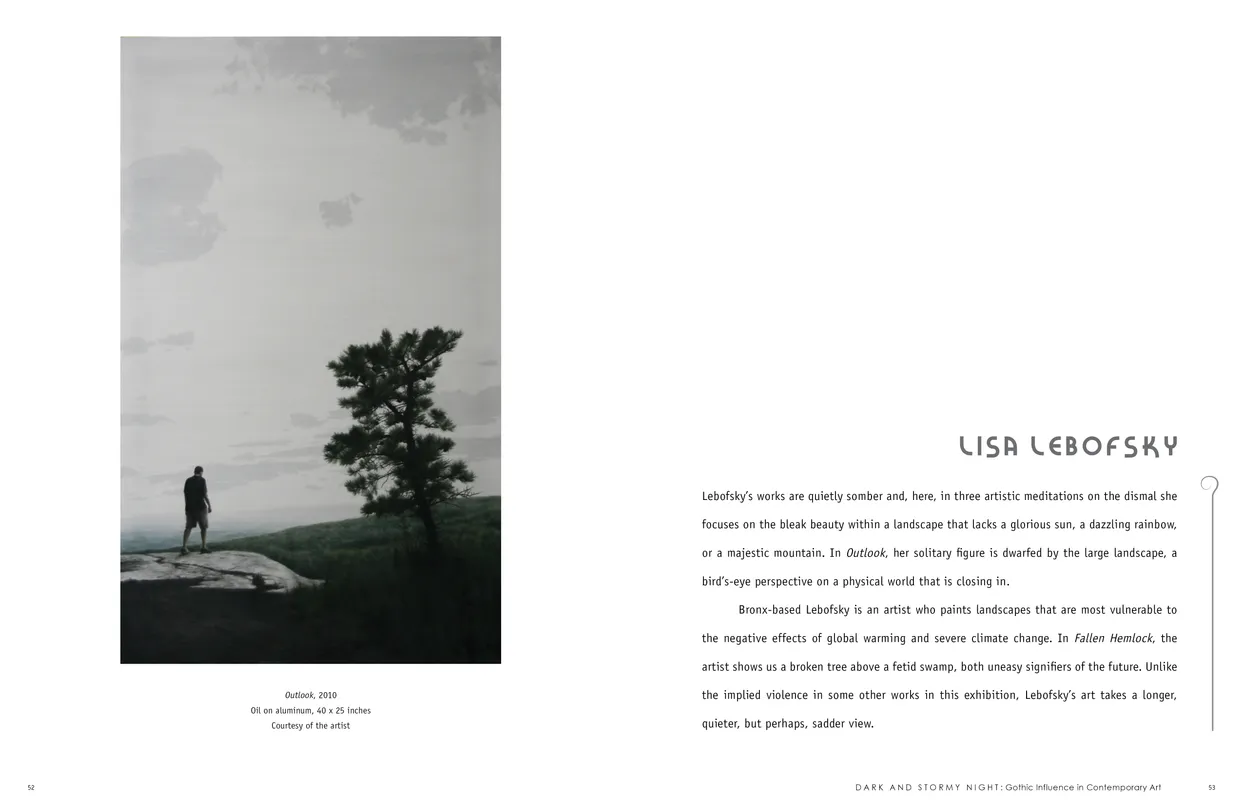
- Dark and Stormy Night: Gothic Influence in Contemporary Art exhibition catalog, pages 52-53
- Client: Lehman College Art Gallery
- Visit figure page
- Type: portfolio
- Portfolio Type: publication_design
- Portfolio Role: design_layout
Dark And: Stormy Night — Pages 54–55
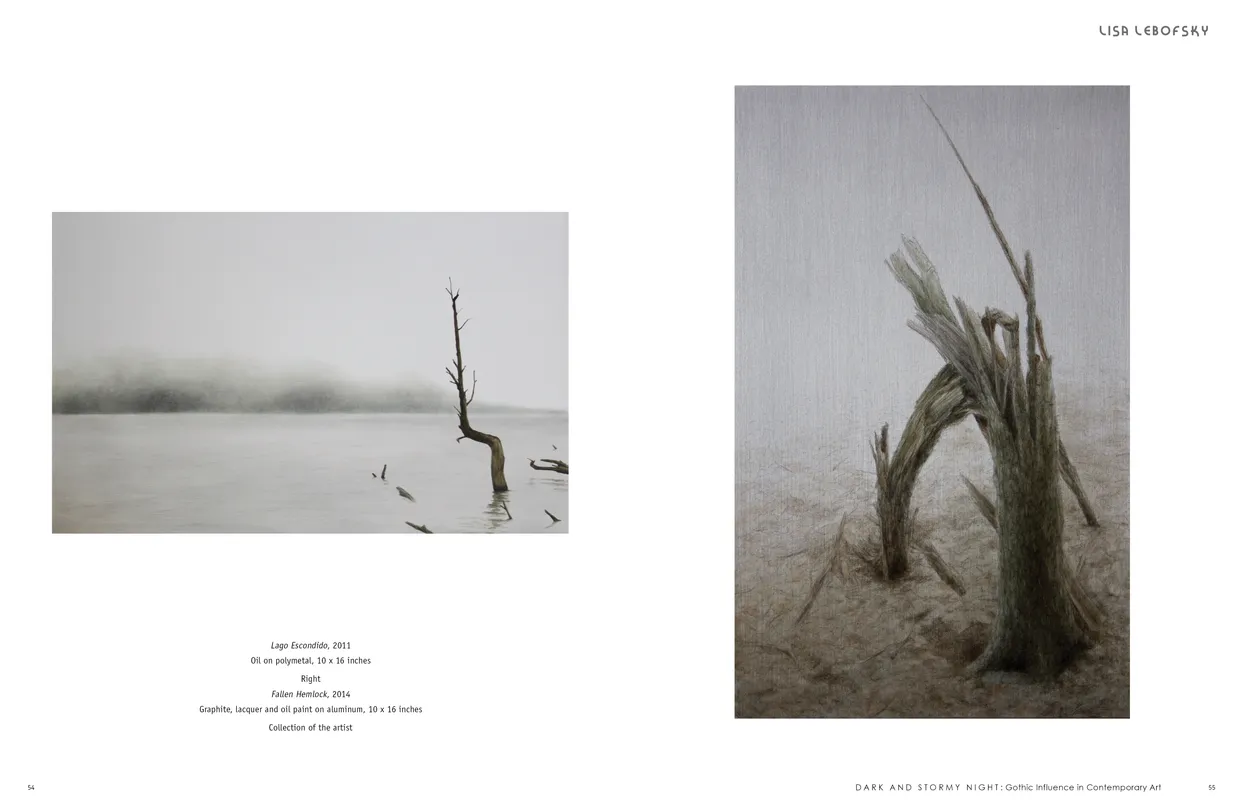
- Dark and Stormy Night: Gothic Influence in Contemporary Art exhibition catalog, pages 54-55
- Client: Lehman College Art Gallery
- Visit figure page
- Type: portfolio
- Portfolio Type: publication_design
- Portfolio Role: design_layout
Dark And: Stormy Night — Pages 56–57
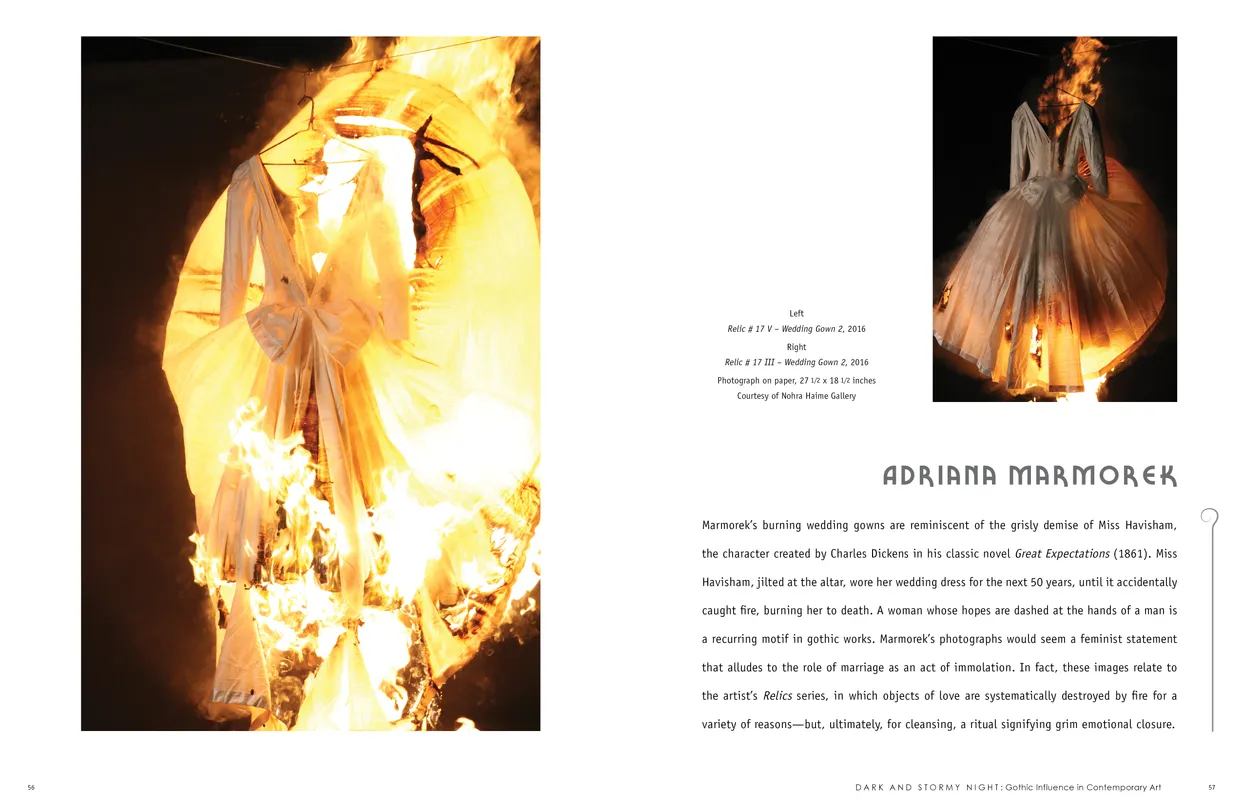
- Dark and Stormy Night: Gothic Influence in Contemporary Art exhibition catalog, pages 56-57
- Client: Lehman College Art Gallery
- Visit figure page
- Type: portfolio
- Portfolio Type: publication_design
- Portfolio Role: design_layout
Dark And: Stormy Night — Pages 58–59
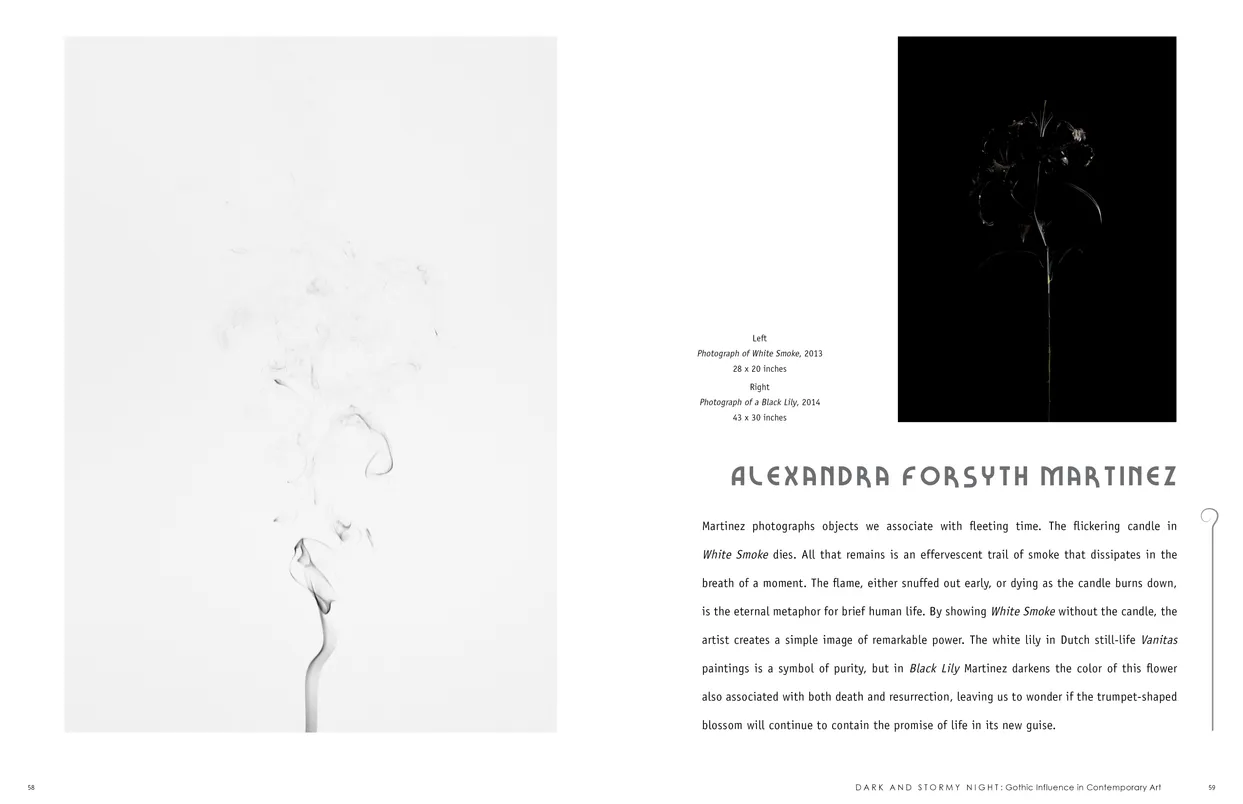
- Dark and Stormy Night: Gothic Influence in Contemporary Art exhibition catalog, pages 58-59
- Client: Lehman College Art Gallery
- Visit figure page
- Type: portfolio
- Portfolio Type: publication_design
- Portfolio Role: design_layout
Dark And: Stormy Night — Pages 6–7
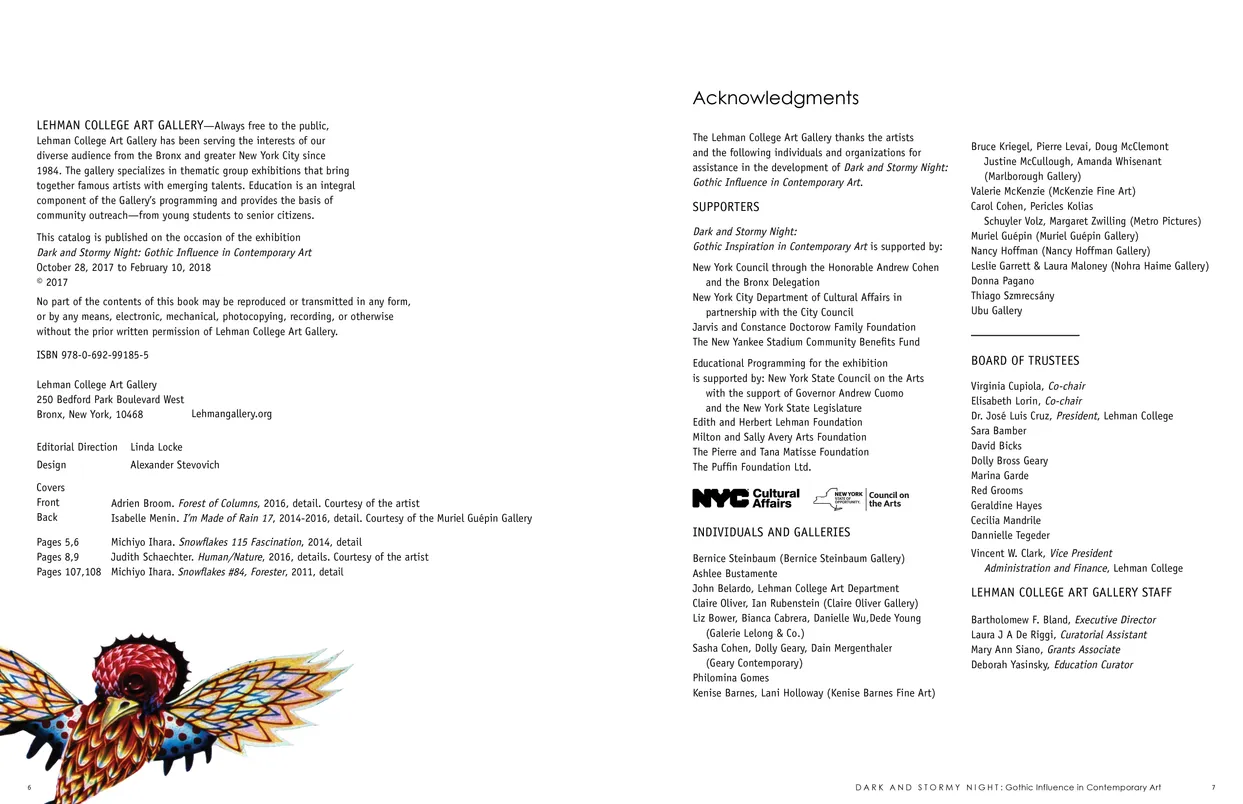
- Dark and Stormy Night: Gothic Influence in Contemporary Art exhibition catalog, pages 6-7
- Client: Lehman College Art Gallery
- Visit figure page
- Type: portfolio
- Portfolio Type: publication_design
- Portfolio Role: design_layout
Dark And: Stormy Night — Pages 60–61
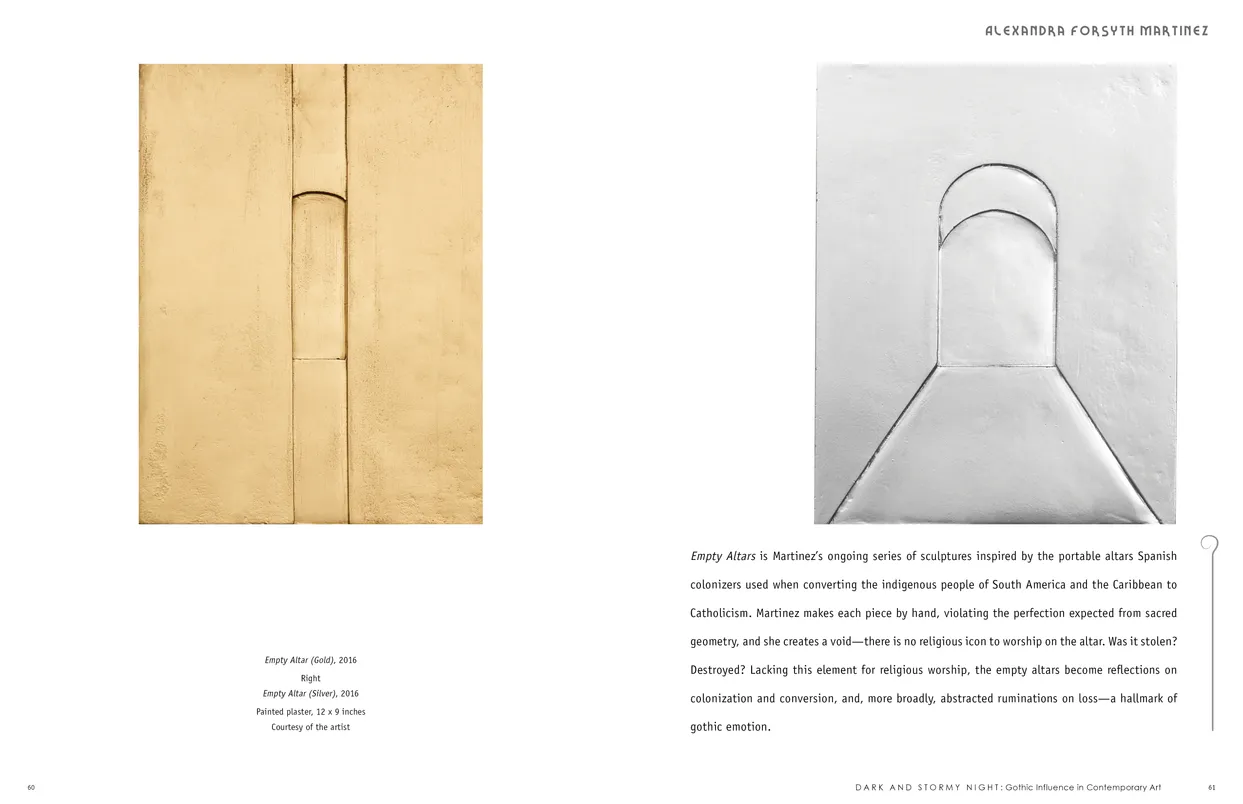
- Dark and Stormy Night: Gothic Influence in Contemporary Art exhibition catalog, pages 60-61
- Client: Lehman College Art Gallery
- Visit figure page
- Type: portfolio
- Portfolio Type: publication_design
- Portfolio Role: design_layout
Dark And: Stormy Night — Pages 62–63
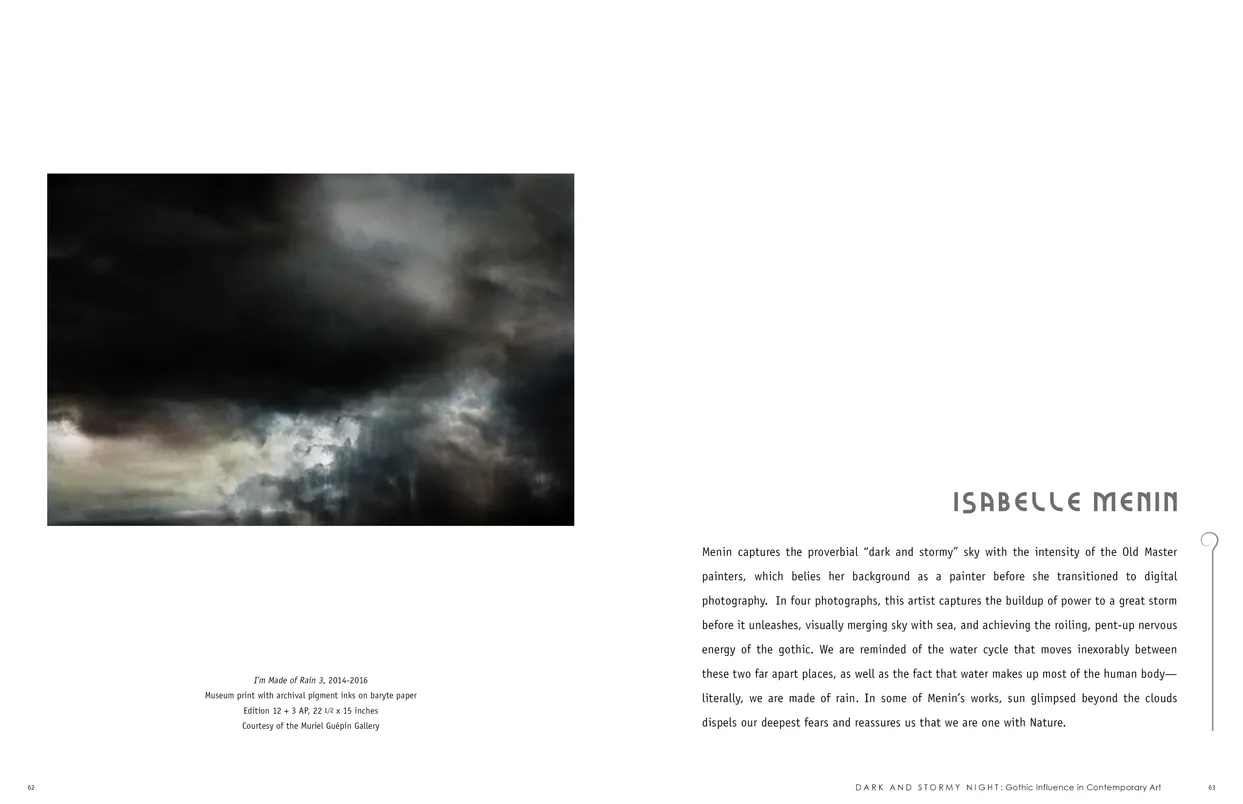
- Dark and Stormy Night: Gothic Influence in Contemporary Art exhibition catalog, pages 62-63
- Client: Lehman College Art Gallery
- Visit figure page
- Type: portfolio
- Portfolio Type: publication_design
- Portfolio Role: design_layout
Dark And: Stormy Night — Pages 64–65
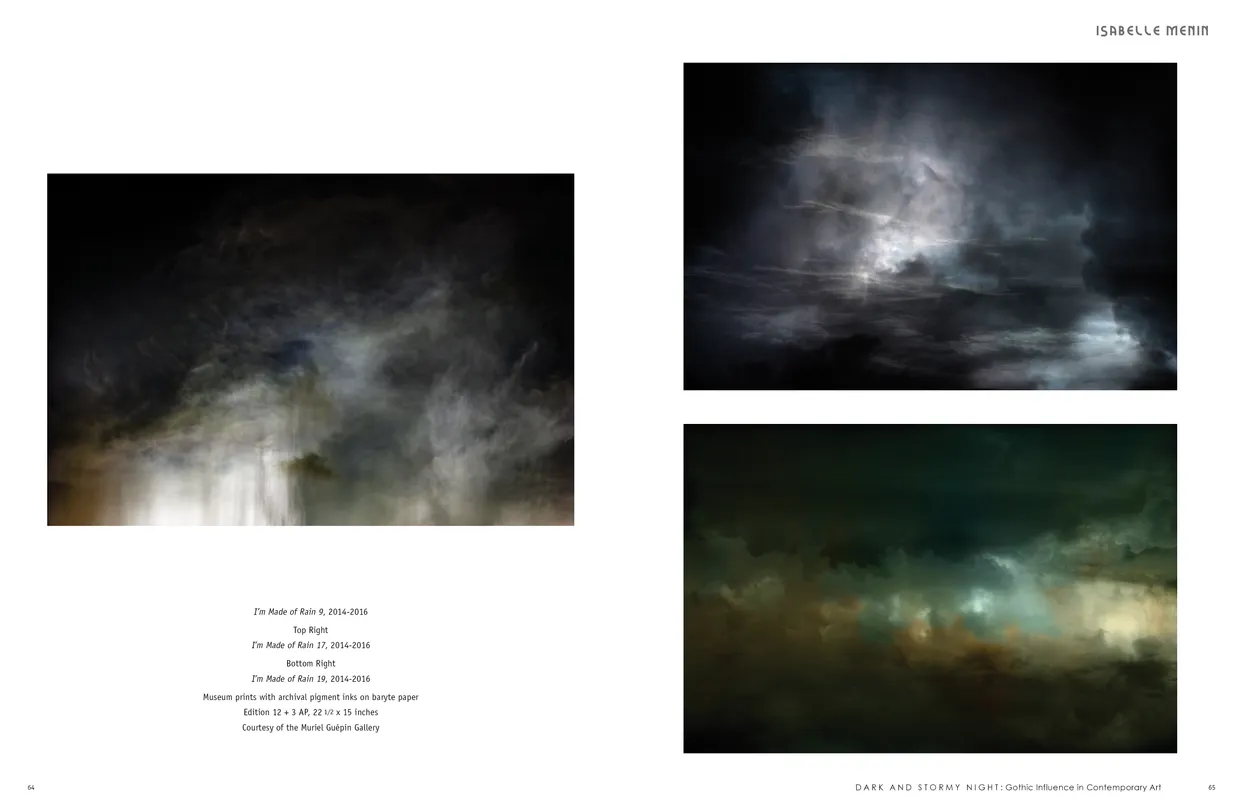
- Dark and Stormy Night: Gothic Influence in Contemporary Art exhibition catalog, pages 64-65
- Client: Lehman College Art Gallery
- Visit figure page
- Type: portfolio
- Portfolio Type: publication_design
- Portfolio Role: design_layout
Dark And: Stormy Night — Pages 66–67
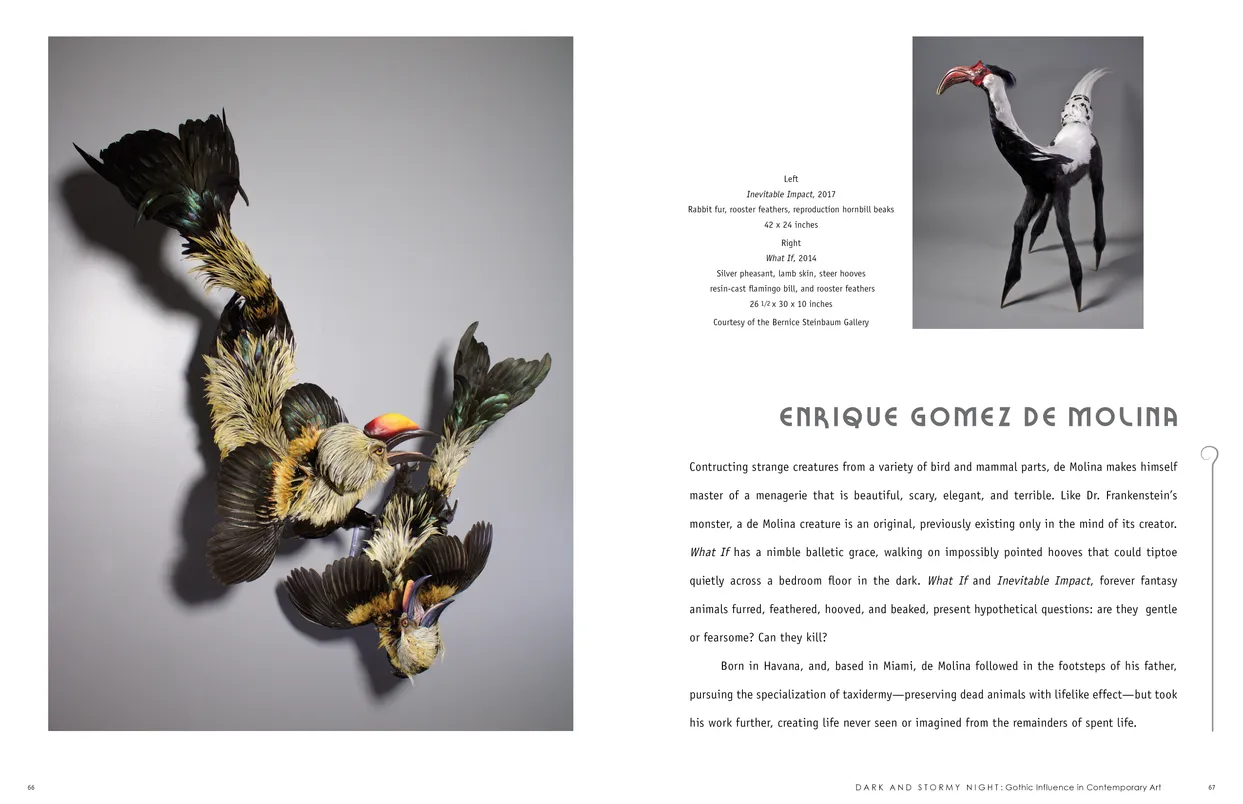
- Dark and Stormy Night: Gothic Influence in Contemporary Art exhibition catalog, pages 66-67
- Client: Lehman College Art Gallery
- Visit figure page
- Type: portfolio
- Portfolio Type: publication_design
- Portfolio Role: design_layout
Dark And: Stormy Night — Pages 68–69
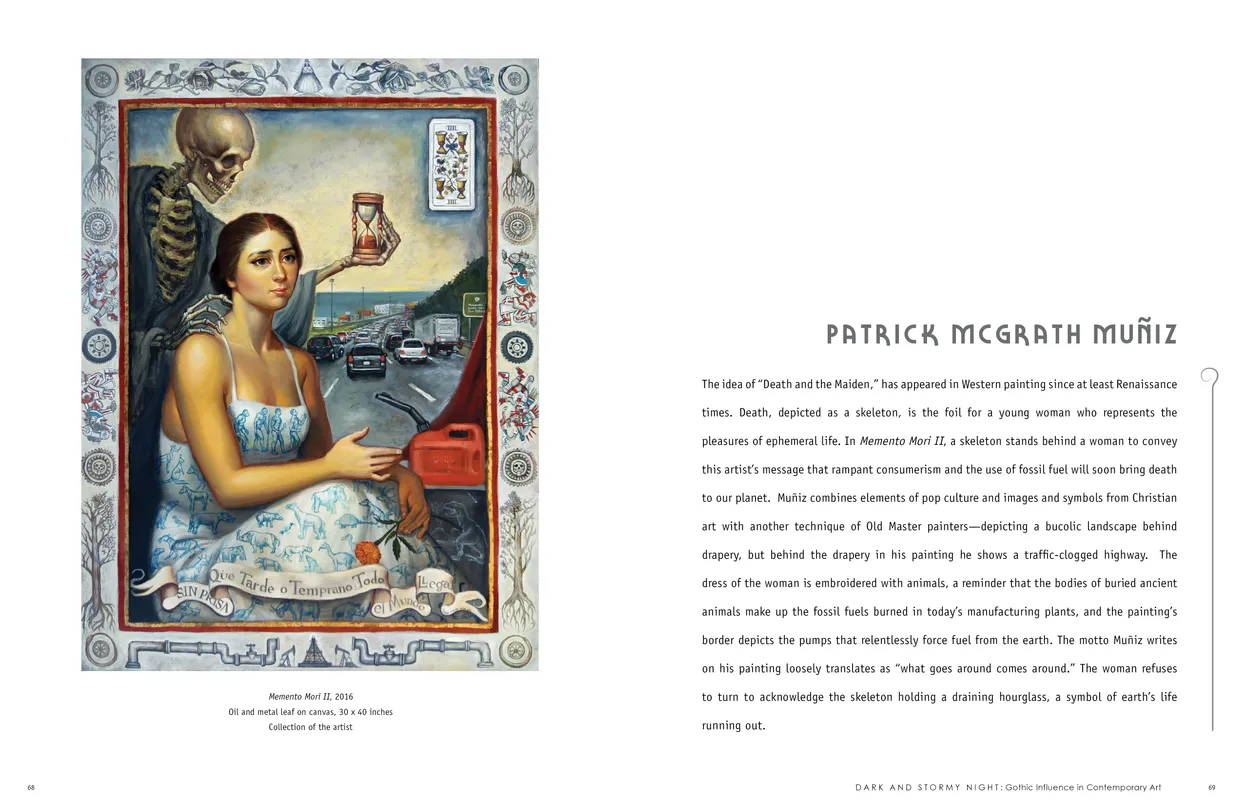
- Dark and Stormy Night: Gothic Influence in Contemporary Art exhibition catalog, pages 68-69
- Client: Lehman College Art Gallery
- Visit figure page
- Type: portfolio
- Portfolio Type: publication_design
- Portfolio Role: design_layout
Dark And: Stormy Night — Pages 70–71
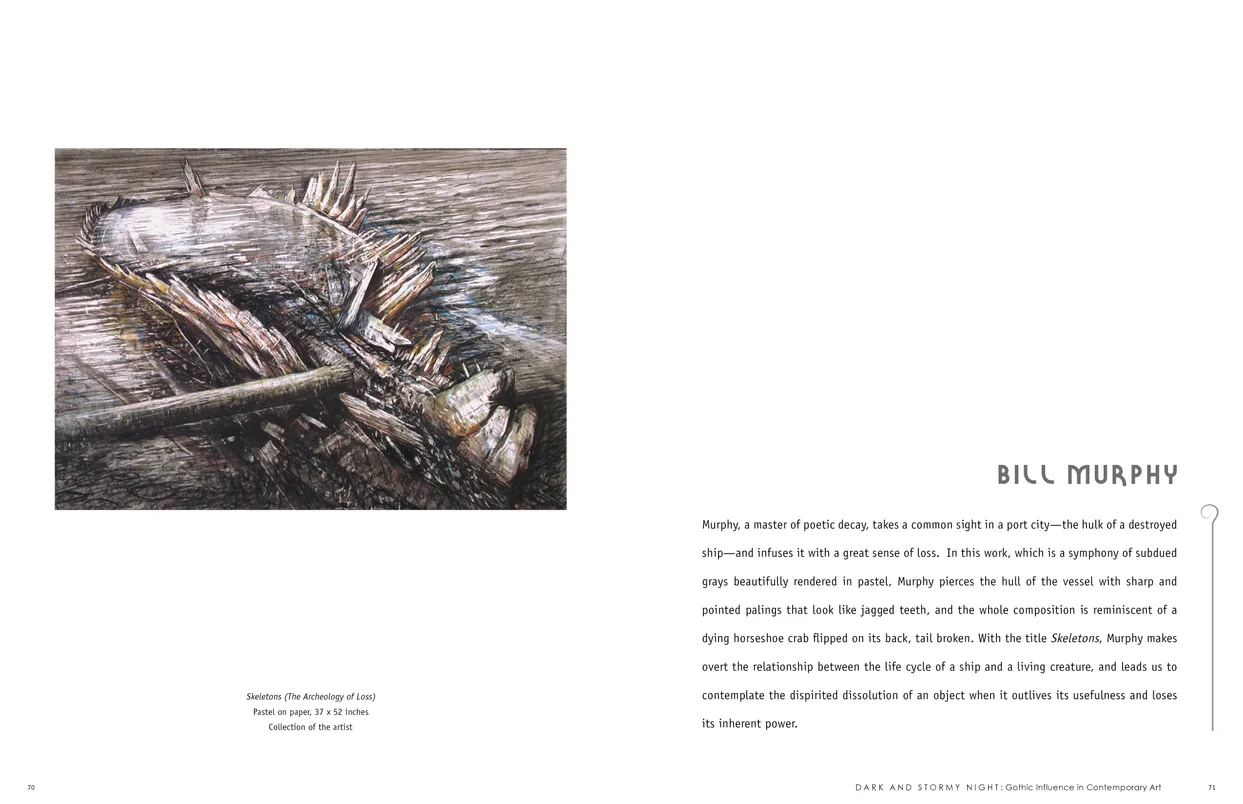
- Dark and Stormy Night: Gothic Influence in Contemporary Art exhibition catalog, pages 70-71
- Client: Lehman College Art Gallery
- Visit figure page
- Type: portfolio
- Portfolio Type: publication_design
- Portfolio Role: design_layout
Dark And: Stormy Night — Pages 72–73
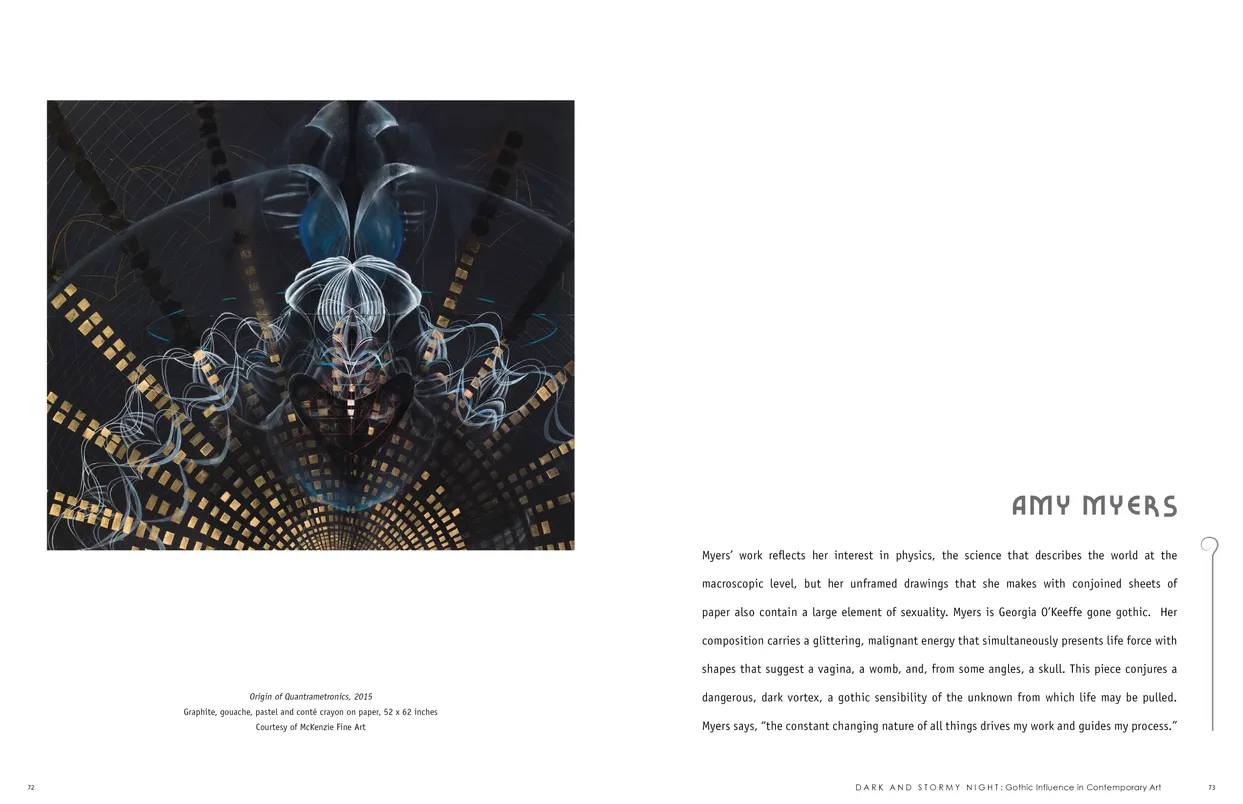
- Dark and Stormy Night: Gothic Influence in Contemporary Art exhibition catalog, pages 72-73
- Client: Lehman College Art Gallery
- Visit figure page
- Type: portfolio
- Portfolio Type: publication_design
- Portfolio Role: design_layout
Dark And: Stormy Night — Pages 74–75
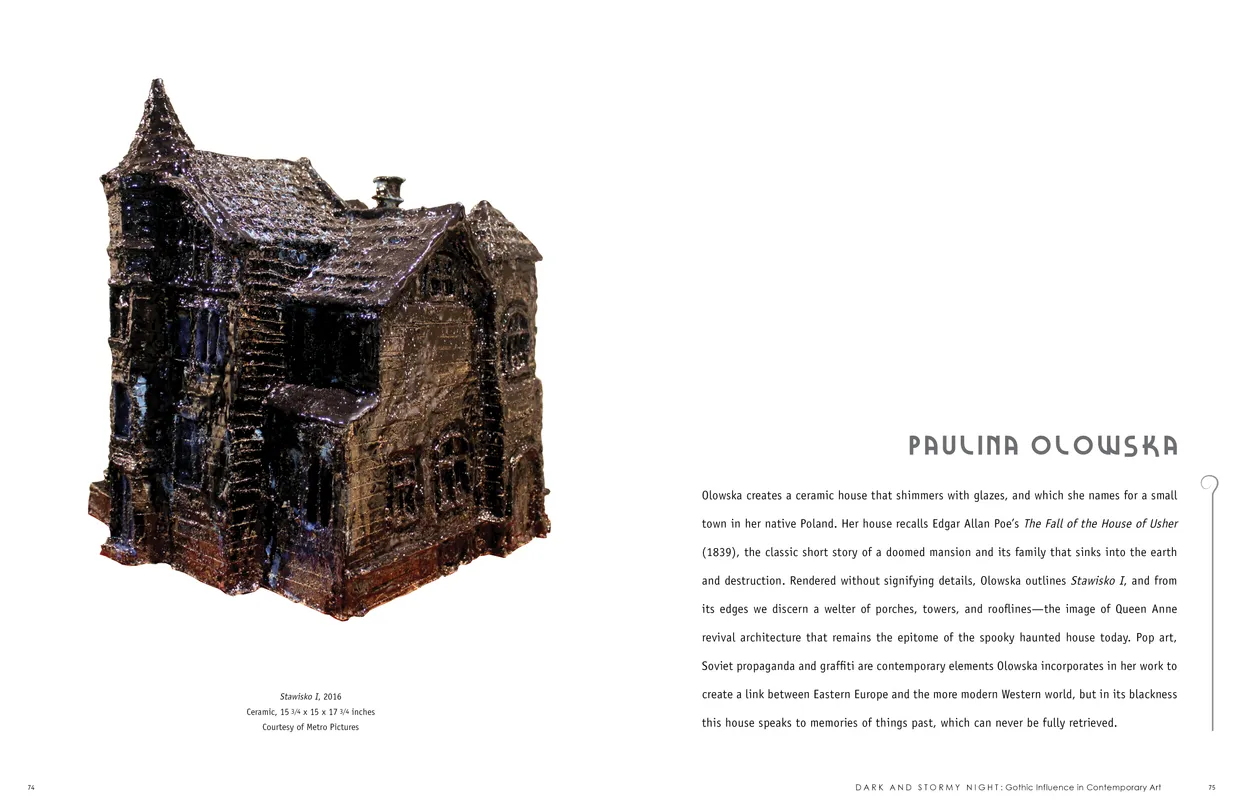
- Dark and Stormy Night: Gothic Influence in Contemporary Art exhibition catalog, pages 74-75
- Client: Lehman College Art Gallery
- Visit figure page
- Type: portfolio
- Portfolio Type: publication_design
- Portfolio Role: design_layout
Dark And: Stormy Night — Pages 76–77
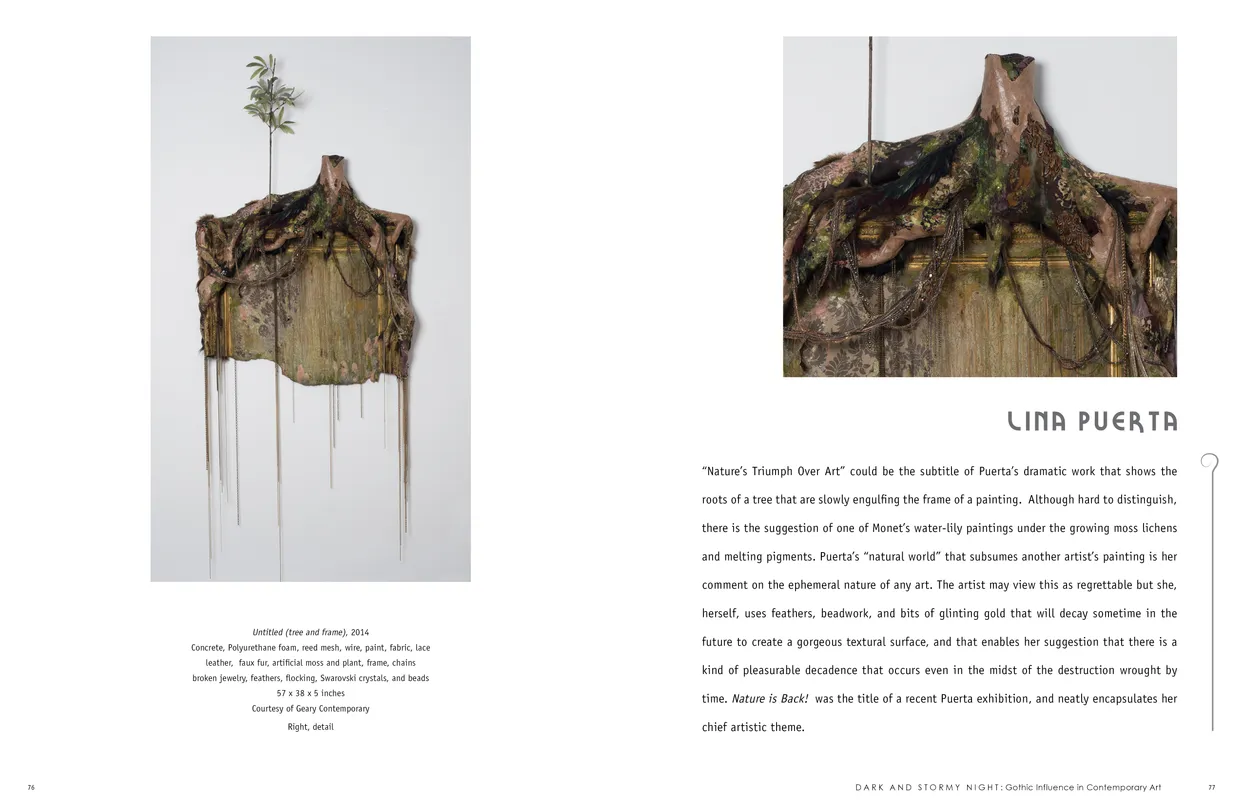
- Dark and Stormy Night: Gothic Influence in Contemporary Art exhibition catalog, pages 76-77
- Client: Lehman College Art Gallery
- Visit figure page
- Type: portfolio
- Portfolio Type: publication_design
- Portfolio Role: design_layout
Dark And: Stormy Night — Pages 78–79
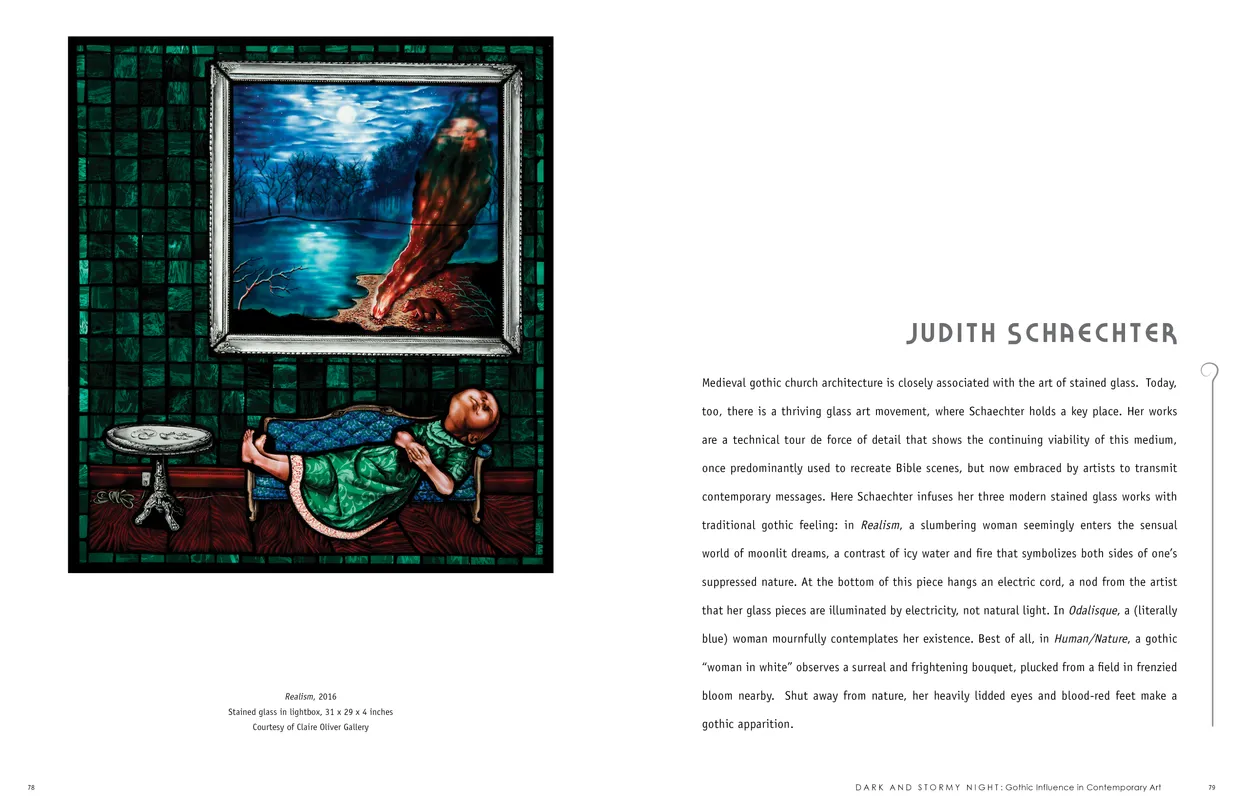
- Dark and Stormy Night: Gothic Influence in Contemporary Art exhibition catalog, pages 78-79
- Client: Lehman College Art Gallery
- Visit figure page
- Type: portfolio
- Portfolio Type: publication_design
- Portfolio Role: design_layout
Dark And: Stormy Night — Pages 8–9
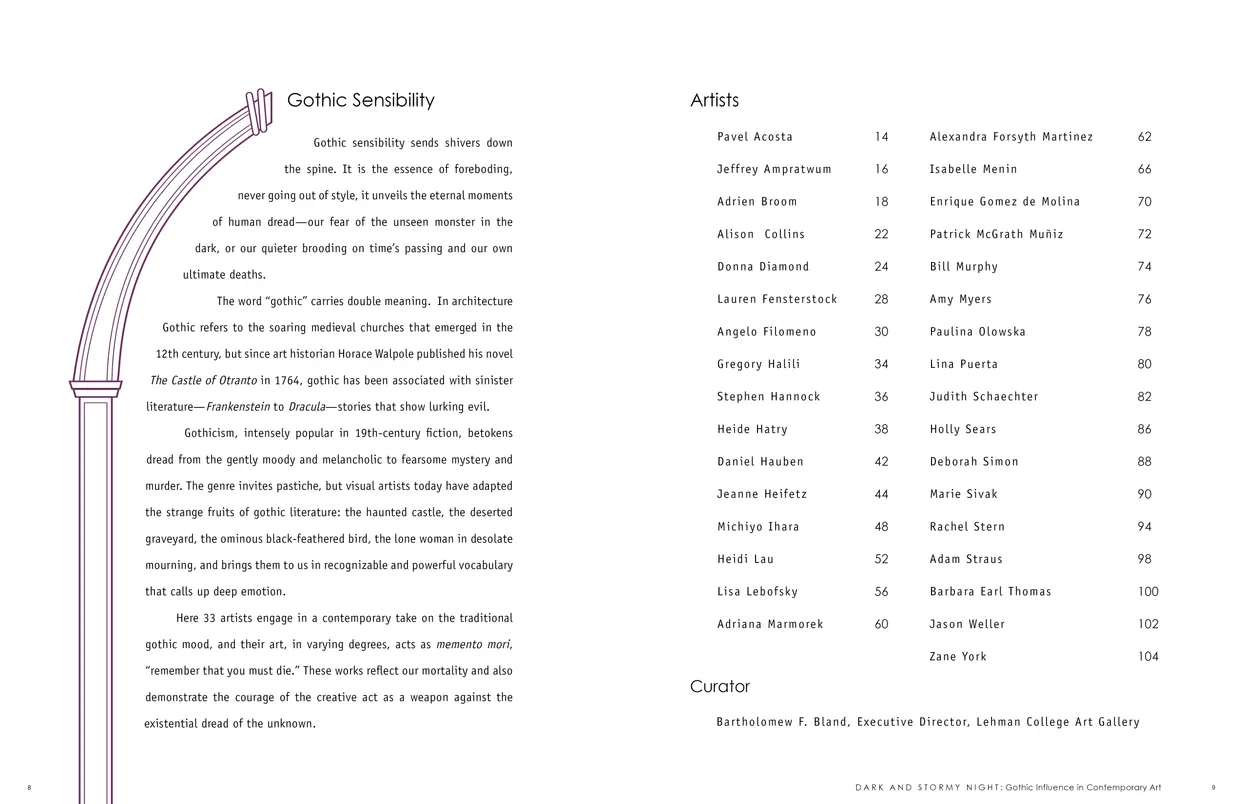
- Dark and Stormy Night: Gothic Influence in Contemporary Art exhibition catalog, pages 8-9
- Client: Lehman College Art Gallery
- Visit figure page
- Type: portfolio
- Portfolio Type: publication_design
- Portfolio Role: design_layout
Dark And: Stormy Night — Pages 80–81
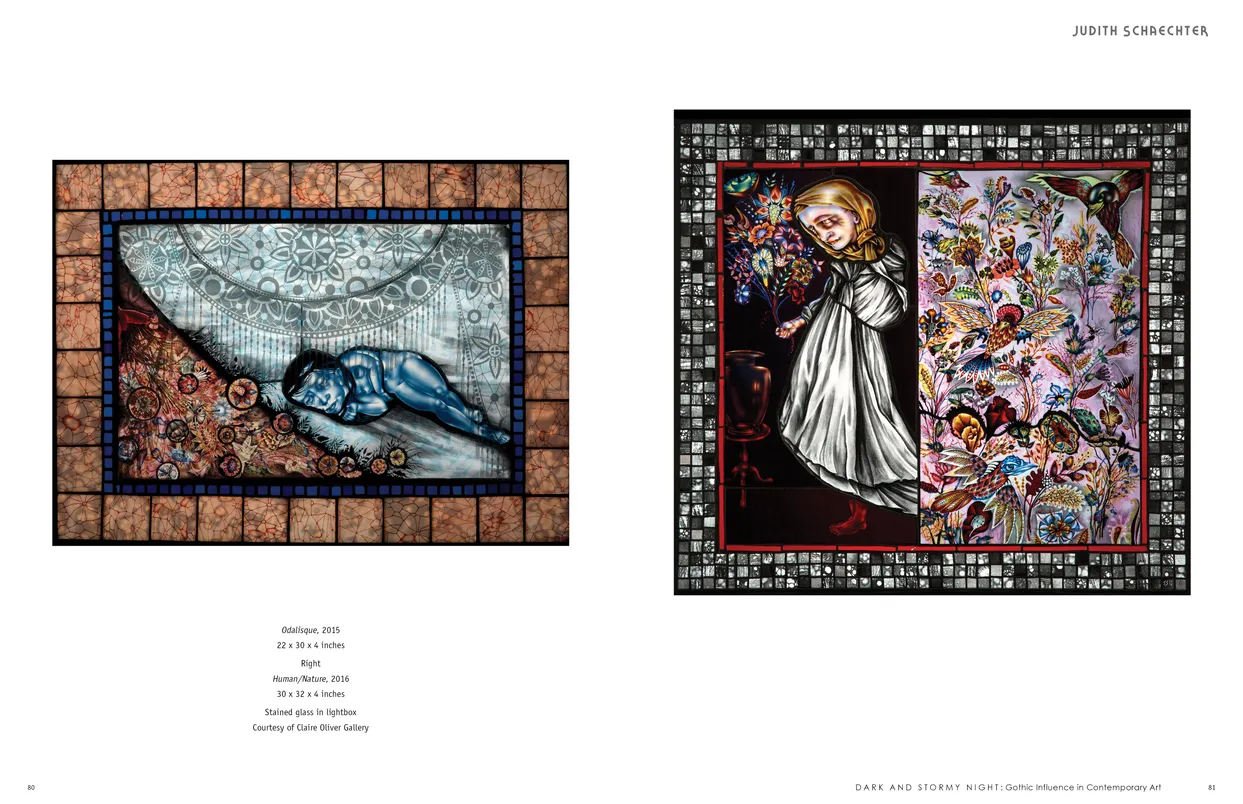
- Dark and Stormy Night: Gothic Influence in Contemporary Art exhibition catalog, pages 80-81
- Client: Lehman College Art Gallery
- Visit figure page
- Type: portfolio
- Portfolio Type: publication_design
- Portfolio Role: design_layout
Dark And: Stormy Night — Pages 82–83
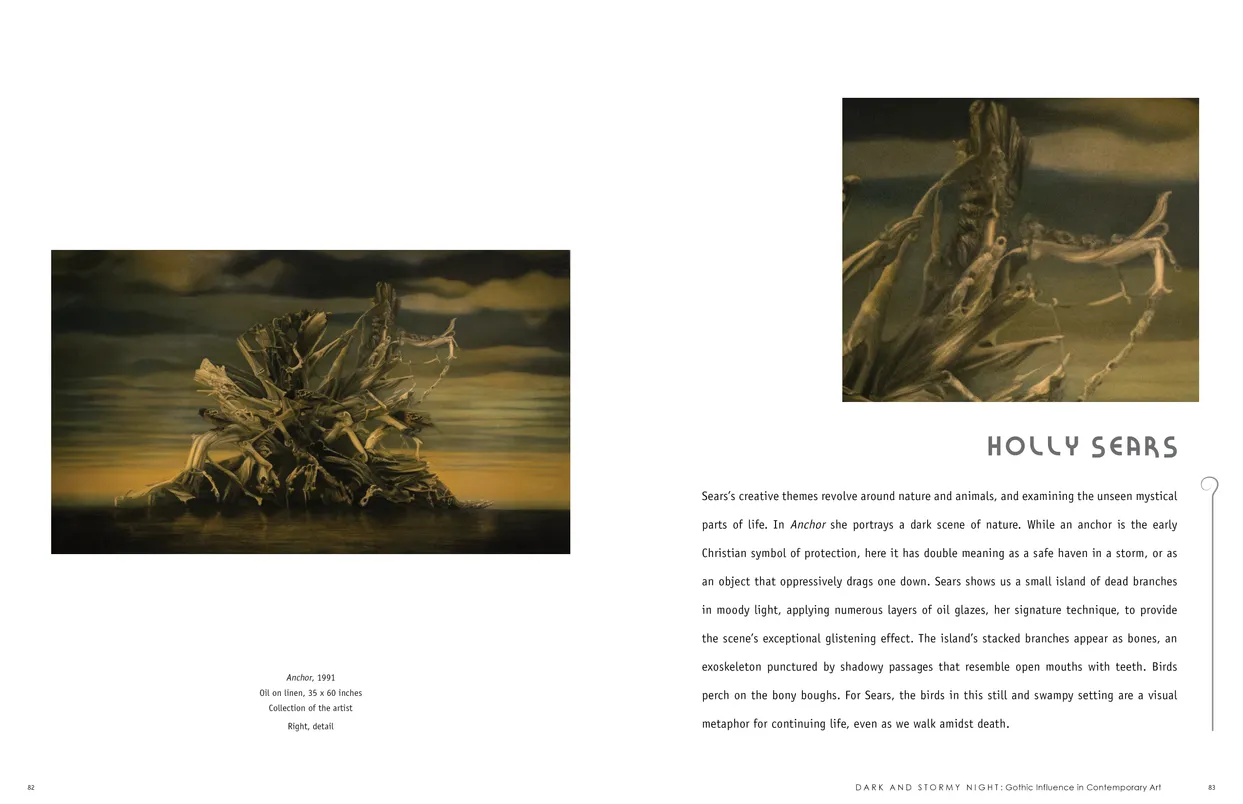
- Dark and Stormy Night: Gothic Influence in Contemporary Art exhibition catalog, pages 82-83
- Client: Lehman College Art Gallery
- Visit figure page
- Type: portfolio
- Portfolio Type: publication_design
- Portfolio Role: design_layout
Dark And: Stormy Night — Pages 84–85
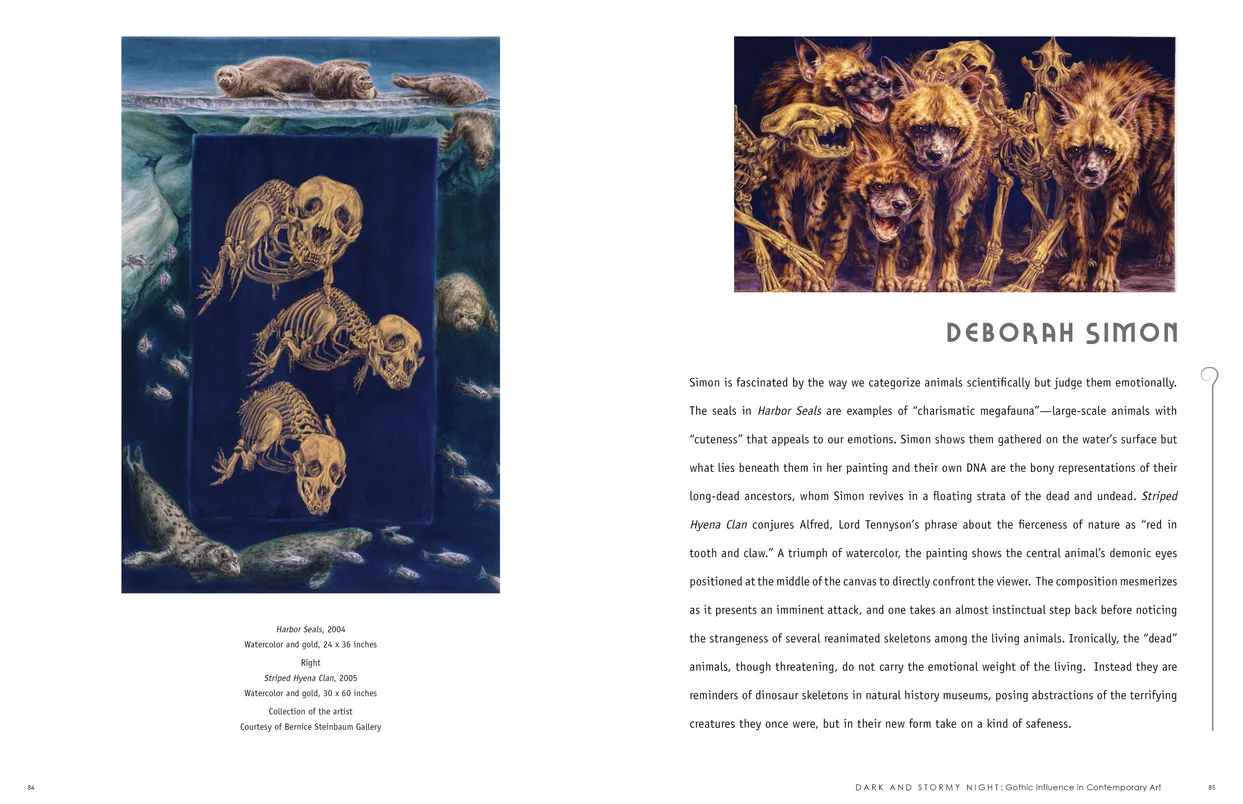
- Dark and Stormy Night: Gothic Influence in Contemporary Art exhibition catalog, pages 84-85
- Client: Lehman College Art Gallery
- Visit figure page
- Type: portfolio
- Portfolio Type: publication_design
- Portfolio Role: design_layout
Dark And: Stormy Night — Pages 86–87
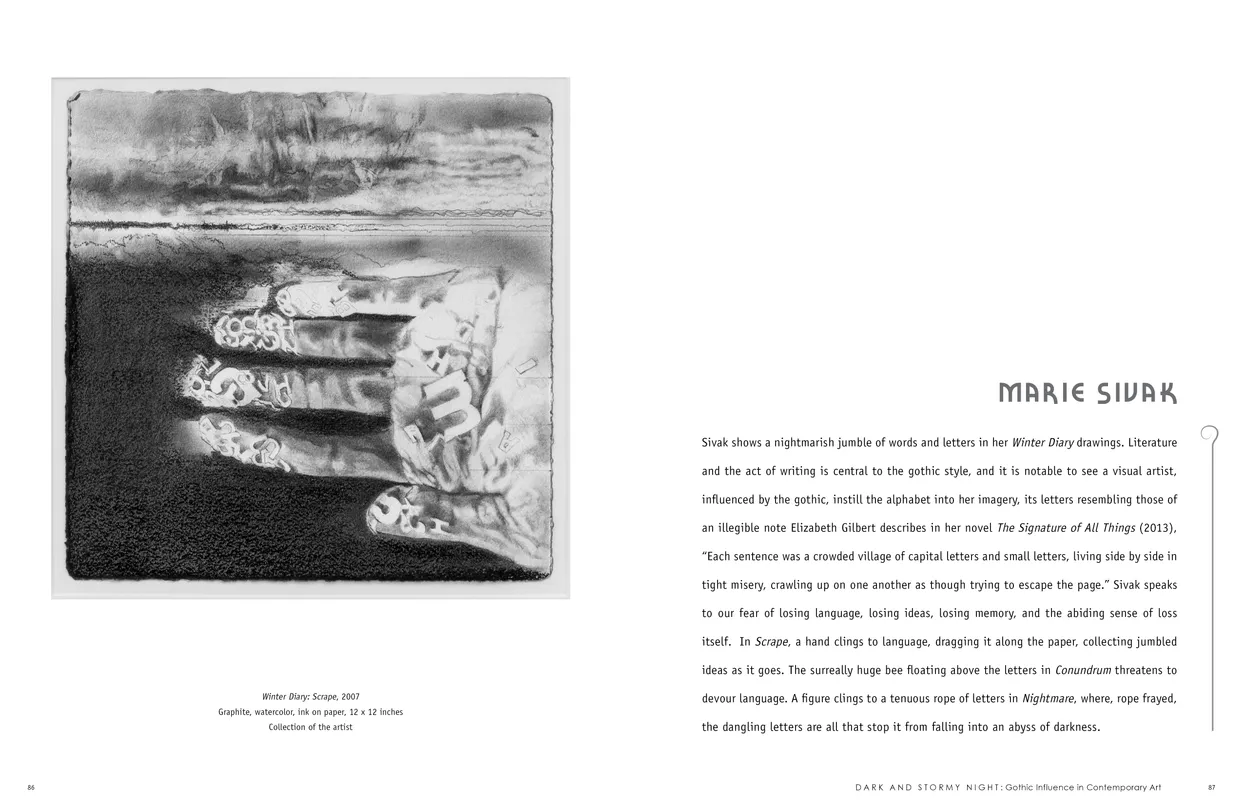
- Dark and Stormy Night: Gothic Influence in Contemporary Art exhibition catalog, pages 86-87
- Client: Lehman College Art Gallery
- Visit figure page
- Type: portfolio
- Portfolio Type: publication_design
- Portfolio Role: design_layout
Dark And: Stormy Night — Pages 88–89
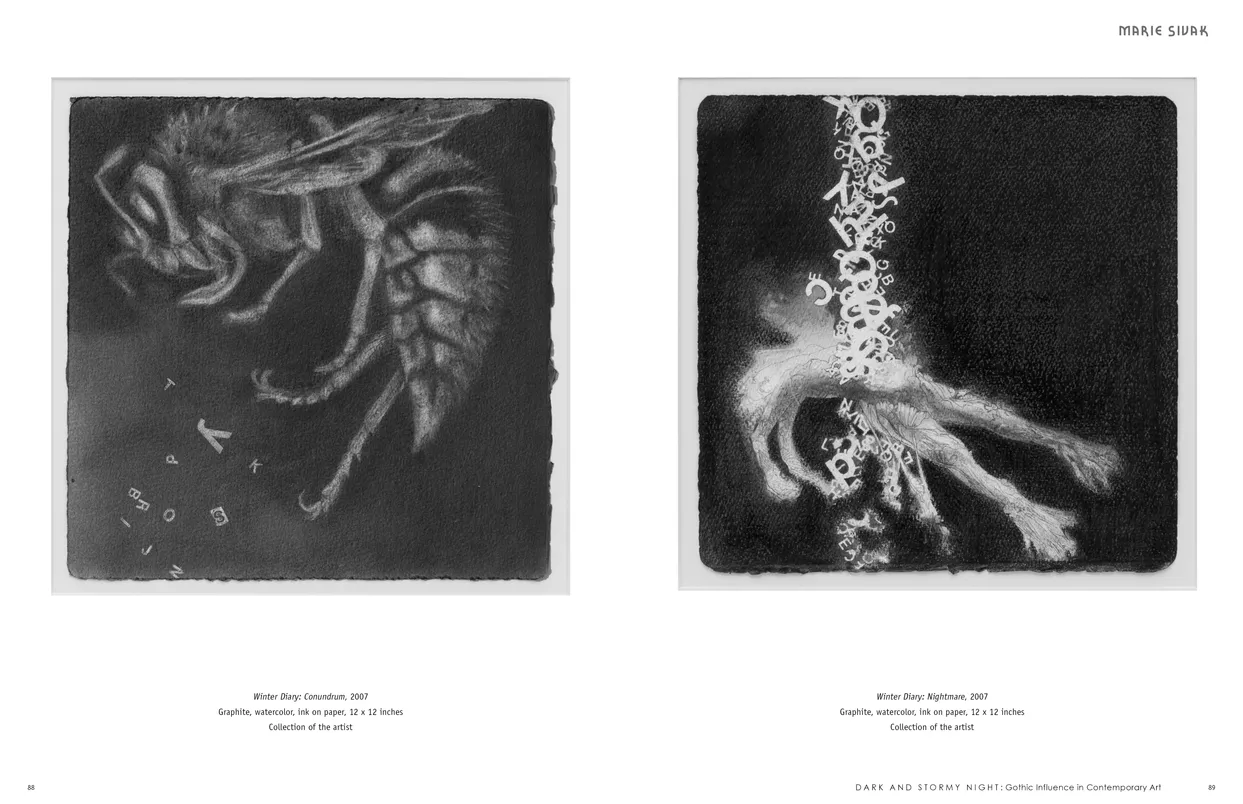
- Dark and Stormy Night: Gothic Influence in Contemporary Art exhibition catalog, pages 88-89
- Client: Lehman College Art Gallery
- Visit figure page
- Type: portfolio
- Portfolio Type: publication_design
- Portfolio Role: design_layout
Dark And: Stormy Night — Pages 90–91
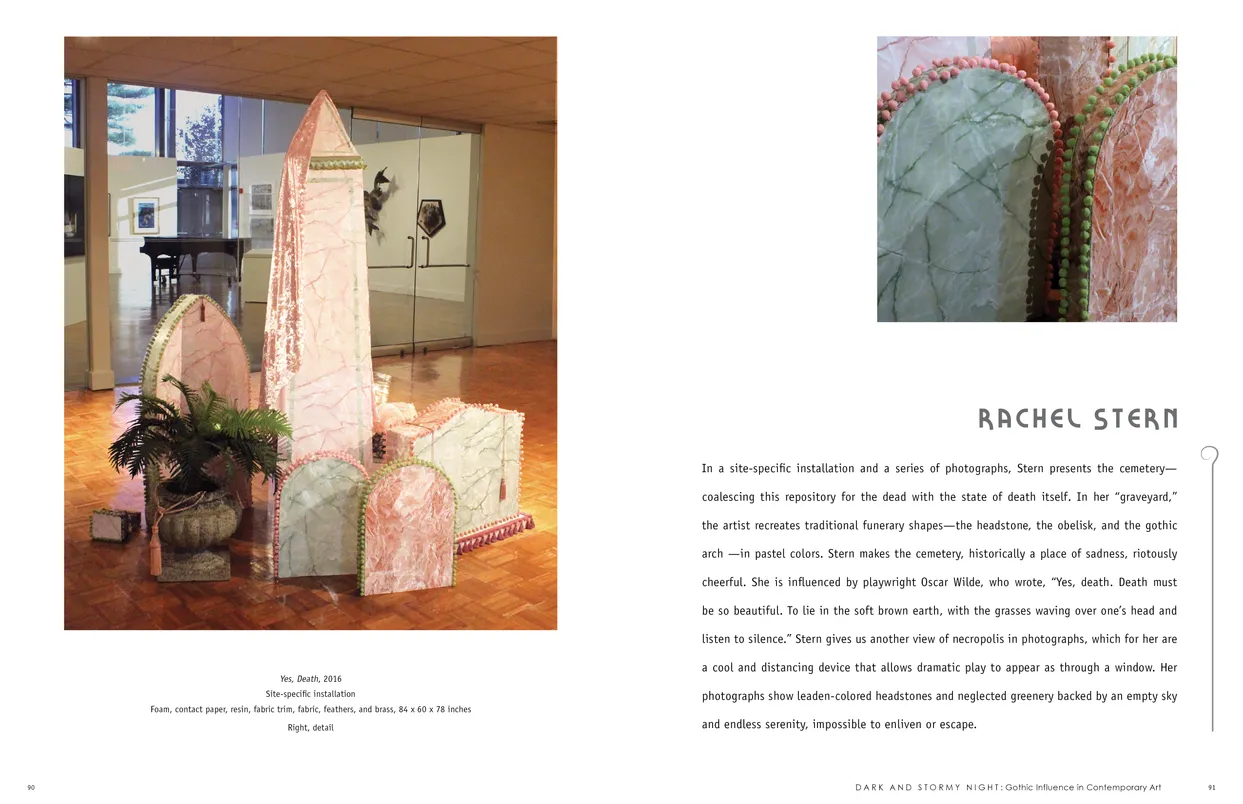
- Dark and Stormy Night: Gothic Influence in Contemporary Art exhibition catalog, pages 90-91
- Client: Lehman College Art Gallery
- Visit figure page
- Type: portfolio
- Portfolio Type: publication_design
- Portfolio Role: design_layout
Dark And: Stormy Night — Pages 92–93
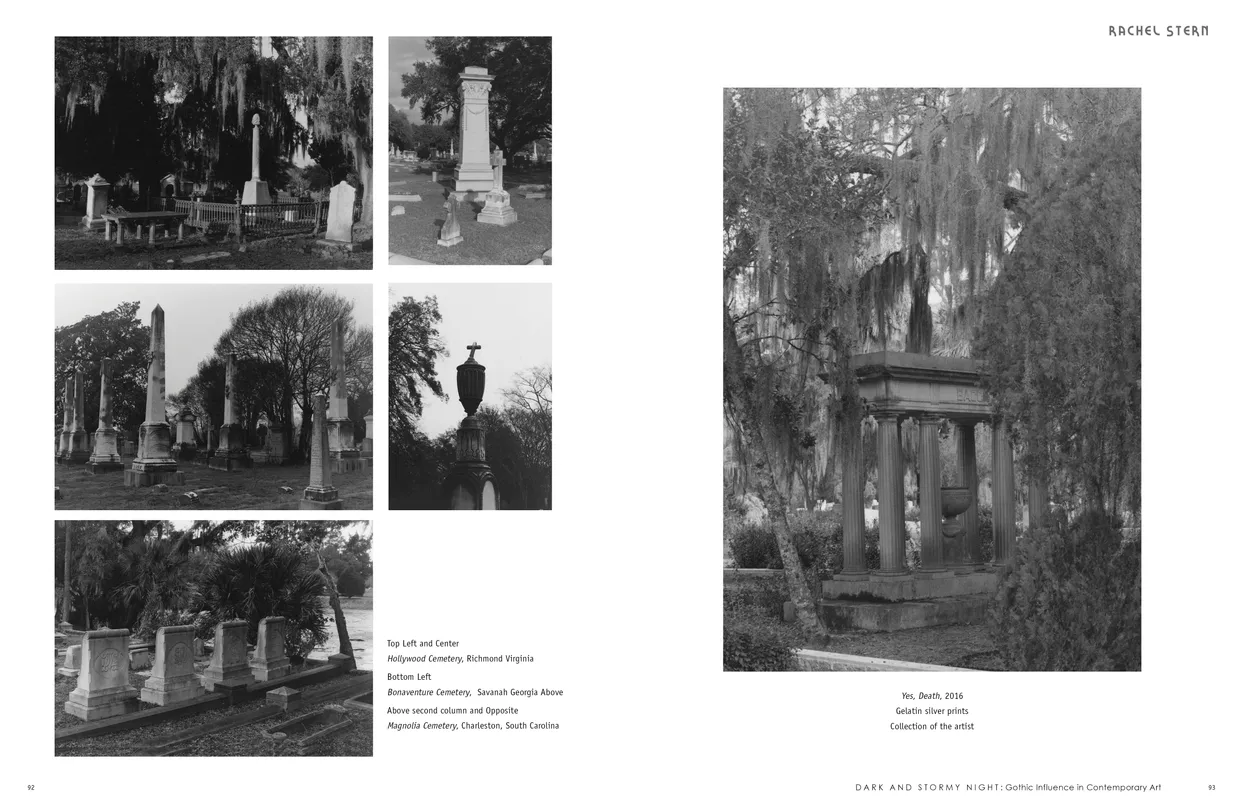
- Dark and Stormy Night: Gothic Influence in Contemporary Art exhibition catalog, pages 92-93
- Client: Lehman College Art Gallery
- Visit figure page
- Type: portfolio
- Portfolio Type: publication_design
- Portfolio Role: design_layout
Dark And: Stormy Night — Pages 94–95
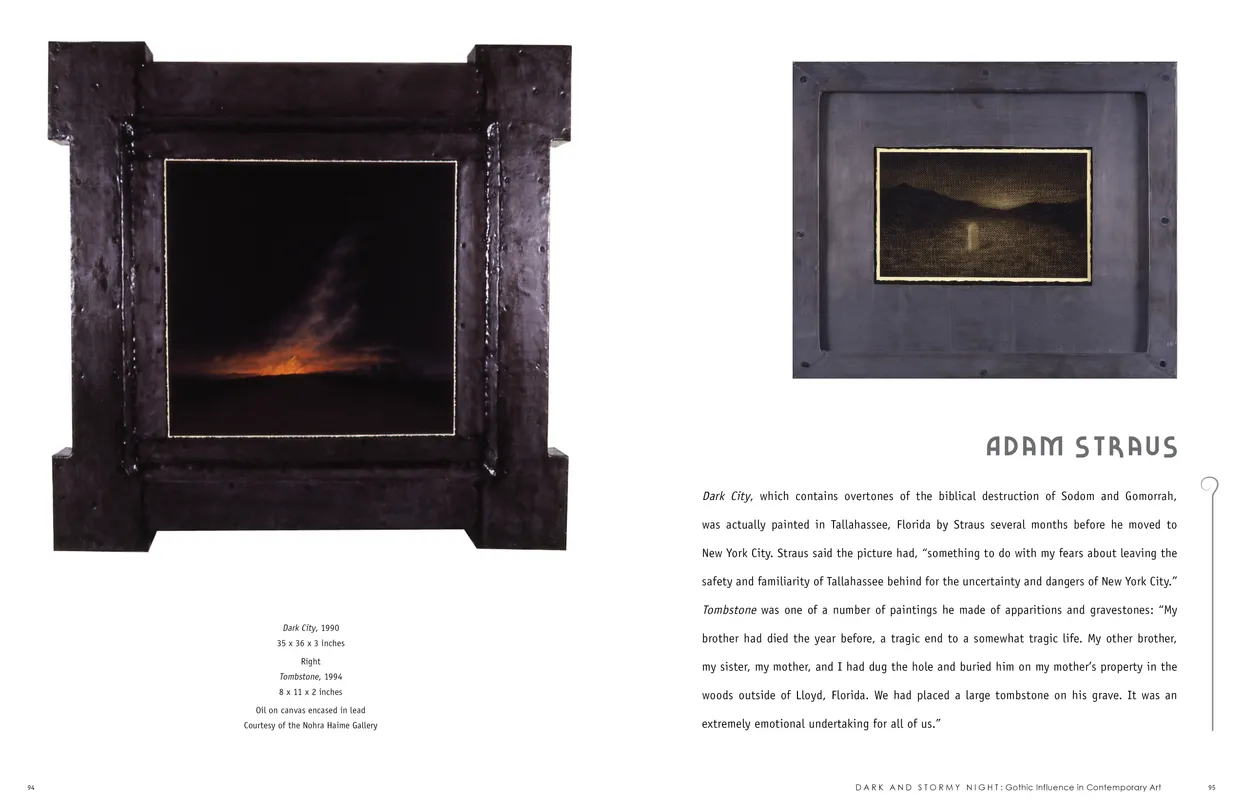
- Dark and Stormy Night: Gothic Influence in Contemporary Art exhibition catalog, pages 94-95
- Client: Lehman College Art Gallery
- Visit figure page
- Type: portfolio
- Portfolio Type: publication_design
- Portfolio Role: design_layout
Dark And: Stormy Night — Pages 96–97
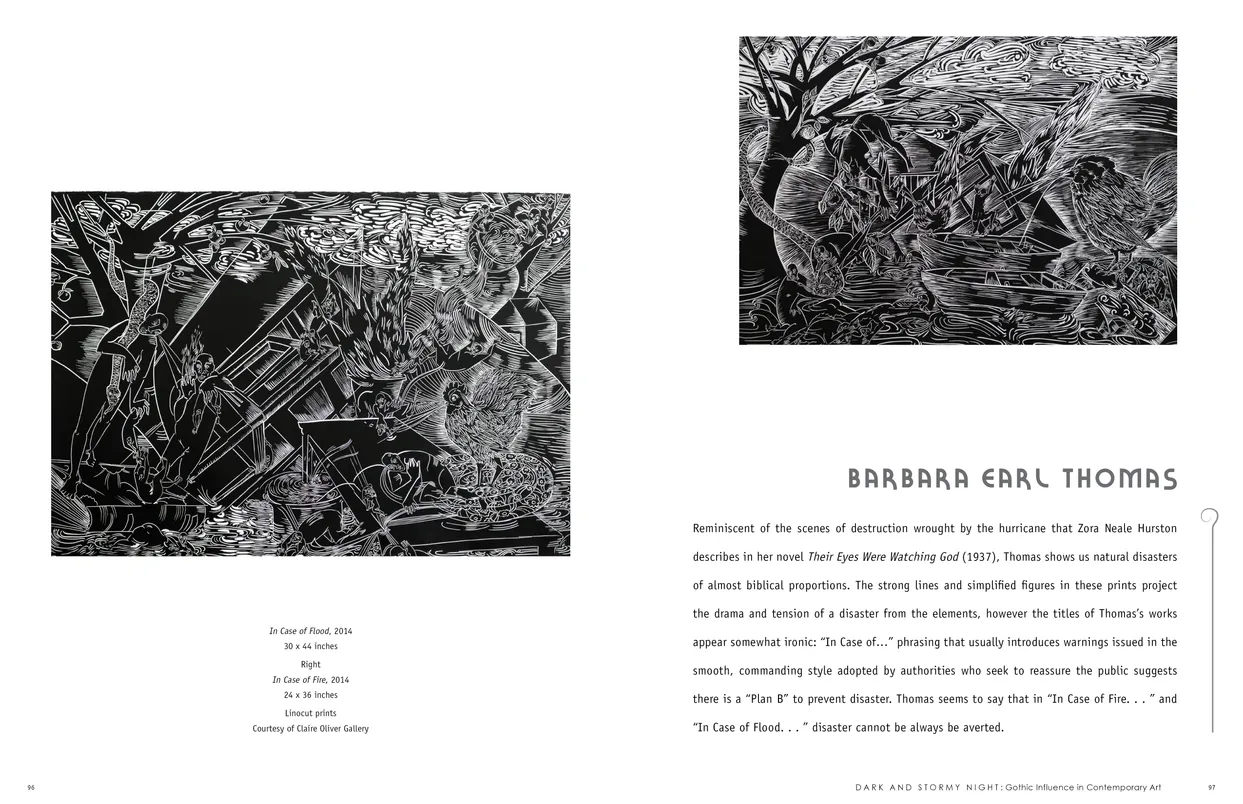
- Dark and Stormy Night: Gothic Influence in Contemporary Art exhibition catalog, pages 96-97
- Client: Lehman College Art Gallery
- Visit figure page
- Type: portfolio
- Portfolio Type: publication_design
- Portfolio Role: design_layout
Dark And: Stormy Night — Pages 98–99
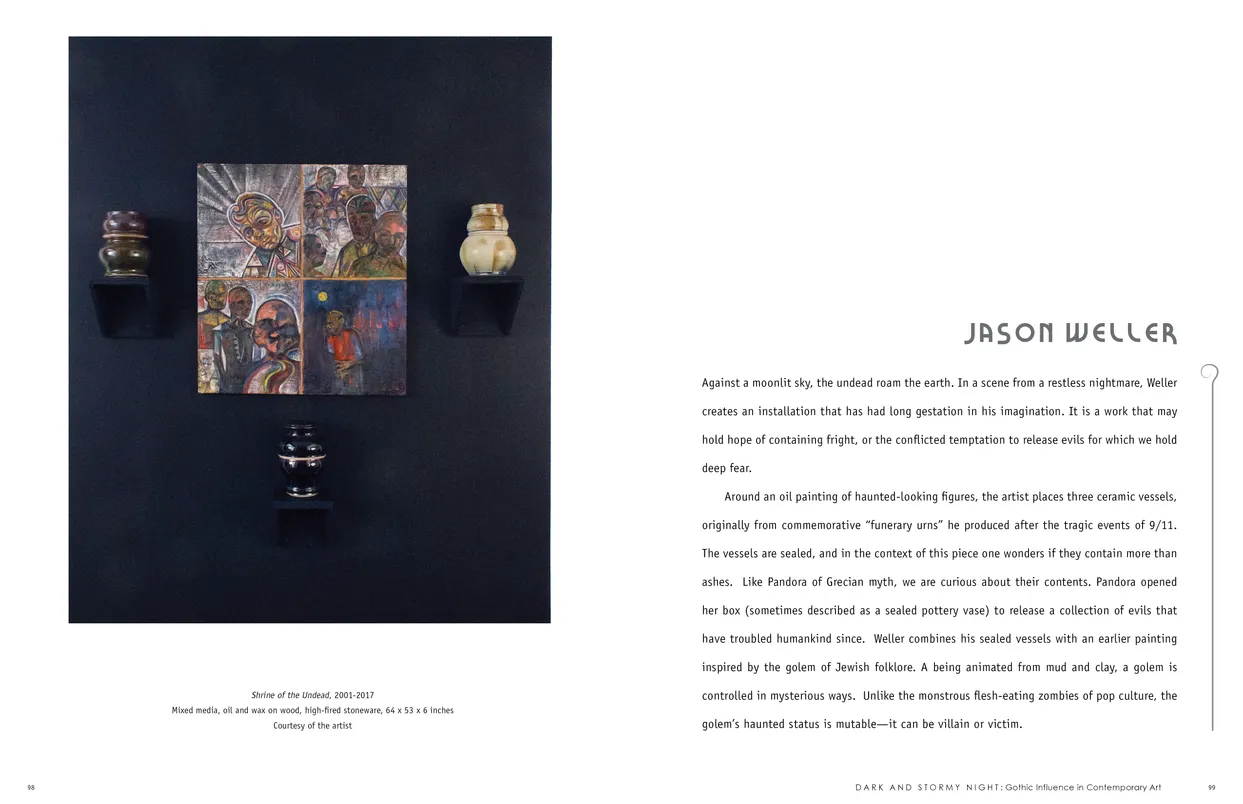
- Dark and Stormy Night: Gothic Influence in Contemporary Art exhibition catalog, pages 98-99
- Client: Lehman College Art Gallery
- Visit figure page
- Type: portfolio
- Portfolio Type: publication_design
- Portfolio Role: design_layout
Federico Uribe Animals And Friends Exhibition Invitation Presentation

- Invitation for the Federico Uribe: Animals and Friends in Pencils, Books, and Bullets exhibition
- Client: Adelson Galleries
- Visit figure page
- Type: portfolio
- Portfolio Type: advertising
- Portfolio Role: design_layout
Federico Uribe Animals And Friends Exhibition Nyt Ad 01

- Federico Uribe: Animals and Friends in Pencils, Books, and Bullets — New York Times print advertisement #1
- Client: Adelson Galleries
- Visit figure page
- Type: portfolio
- Portfolio Type: advertising
- Portfolio Role: design_layout
Federico Uribe Animals And Friends Exhibition Nyt Ad 02
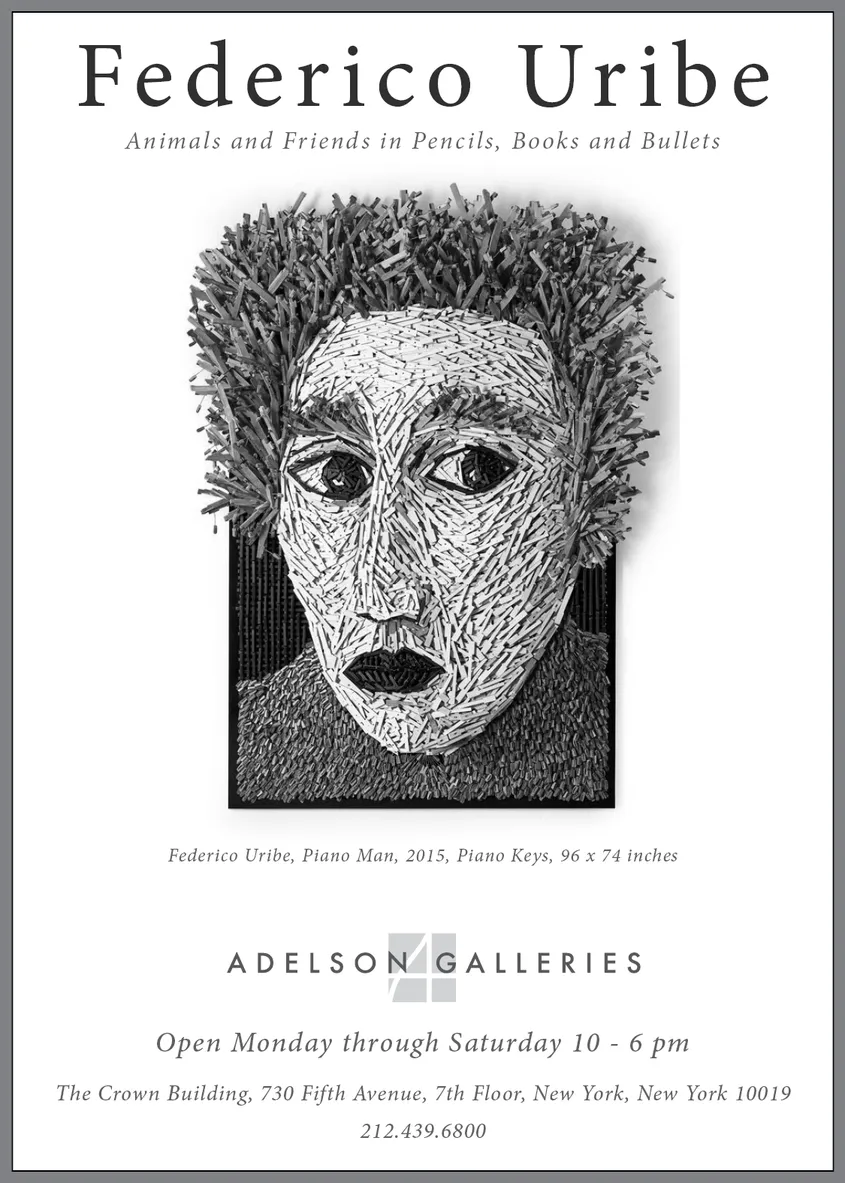
- Federico Uribe: Animals and Friends in Pencils, Books, and Bullets — New York Times print advertisement #2
- Client: Adelson Galleries
- Visit figure page
- Type: portfolio
- Portfolio Type: advertising
- Portfolio Role: design_layout
Federico Uribe Animals And Friends Exhibition Nyt Ad 03
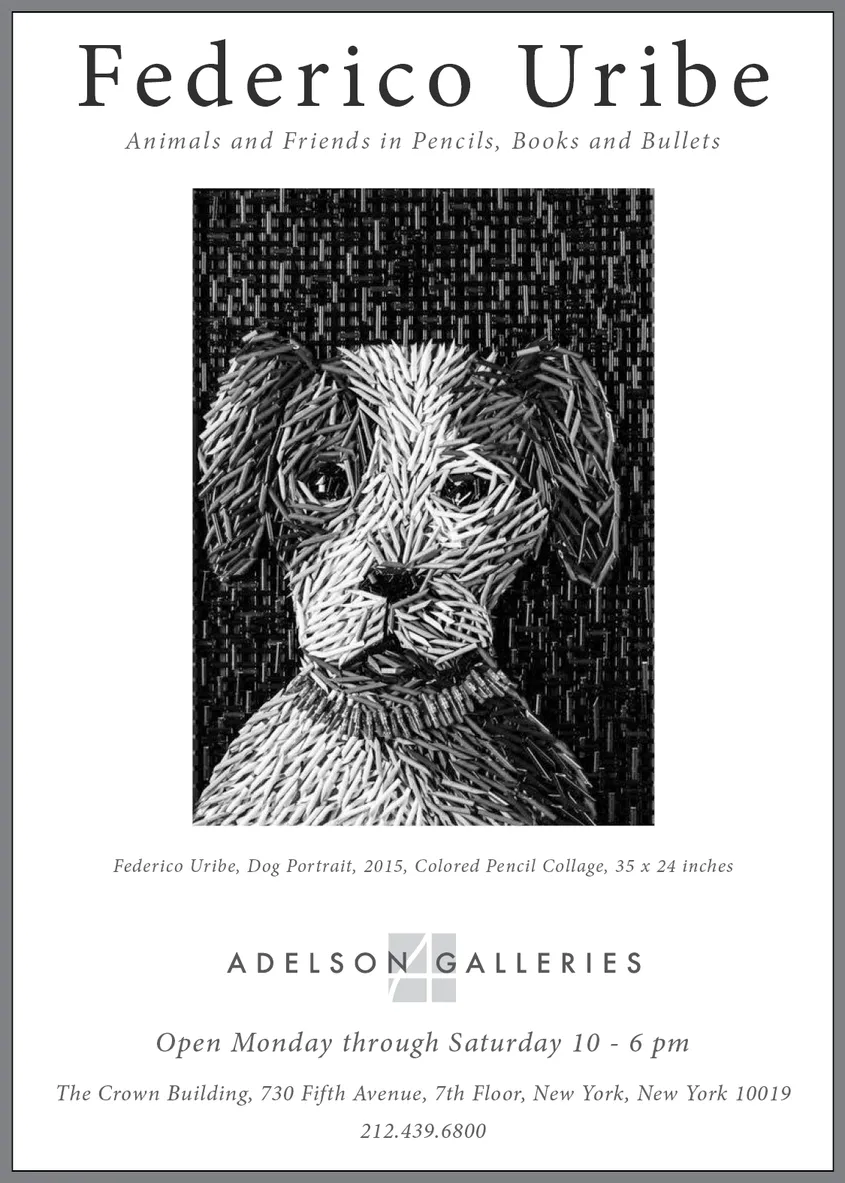
- Federico Uribe: Animals and Friends in Pencils, Books, and Bullets — New York Times print advertisement #3
- Client: Adelson Galleries
- Visit figure page
- Type: portfolio
- Portfolio Type: advertising
- Portfolio Role: design_layout
Federico Uribe Animals And Friends Exhibition Nyt Ad 04
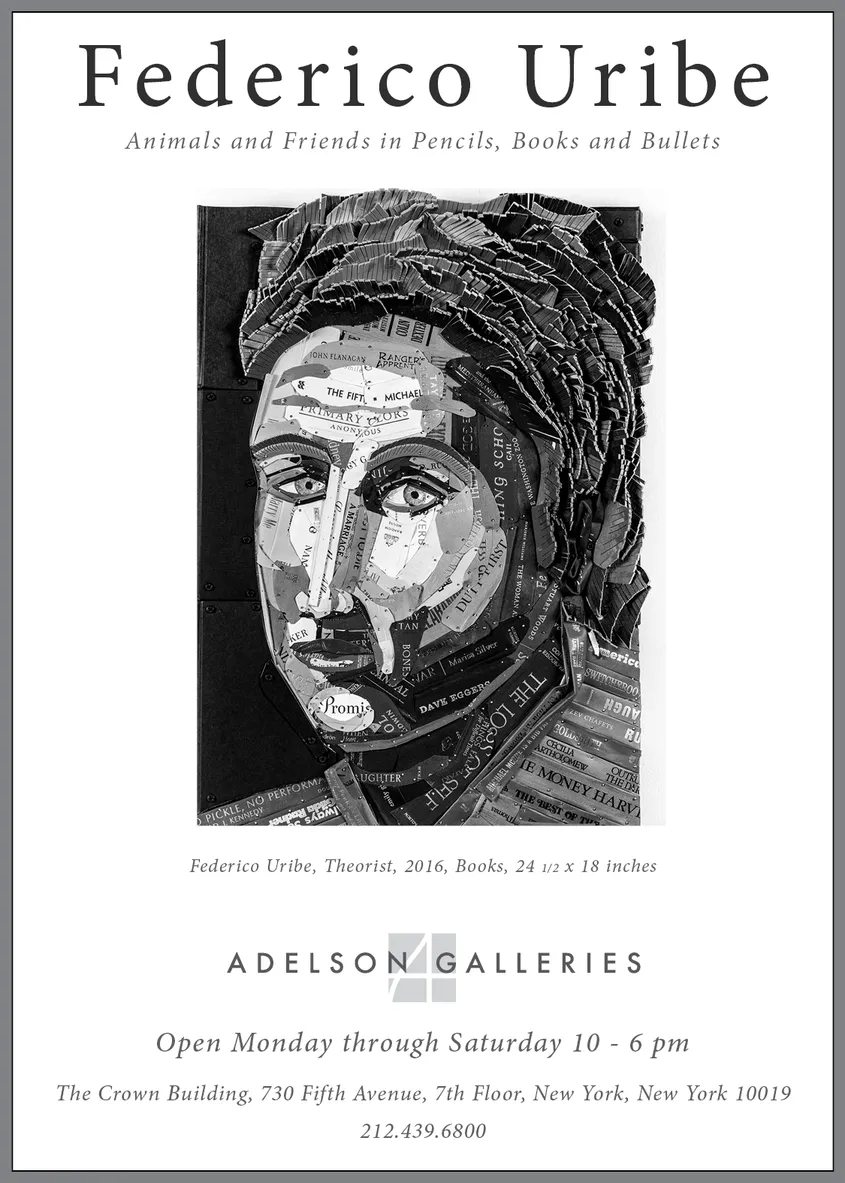
- Federico Uribe: Animals and Friends in Pencils, Books, and Bullets — New York Times print advertisement #4
- Client: Adelson Galleries
- Visit figure page
- Type: portfolio
- Portfolio Type: advertising
- Portfolio Role: design_layout
Federico Uribe Animals And Friends Exhibition Takeaway Presentation

- Takeaway card for the Federico Uribe: Animals and Friends in Pencils, Books, and Bullets exhibition and the Art New York fair
- Client: Adelson Galleries
- Visit figure page
- Type: portfolio
- Portfolio Type: advertising
- Portfolio Role: design_layout
Federico Uribe Animals And Friends Exhibition Wordmark

- Wordmark for Federico Uribe: Animals and Friends exhibition
- Client: Adelson Galleries
- Visit figure page
- Type: portfolio
- Portfolio Type: advertising
- Portfolio Role: design_layout
Federico Uribe Drawn In Pencils Artforum Ad

- Federico Uribe: Drawn in Pencils Artforum magazine advertisement
- Client: Adelson Galleries
- Visit figure page
- Type: portfolio
- Portfolio Type: advertising
- Portfolio Role: design_layout
Federico Uribe Drawn In Pencils Exhibition Invitation Presentation
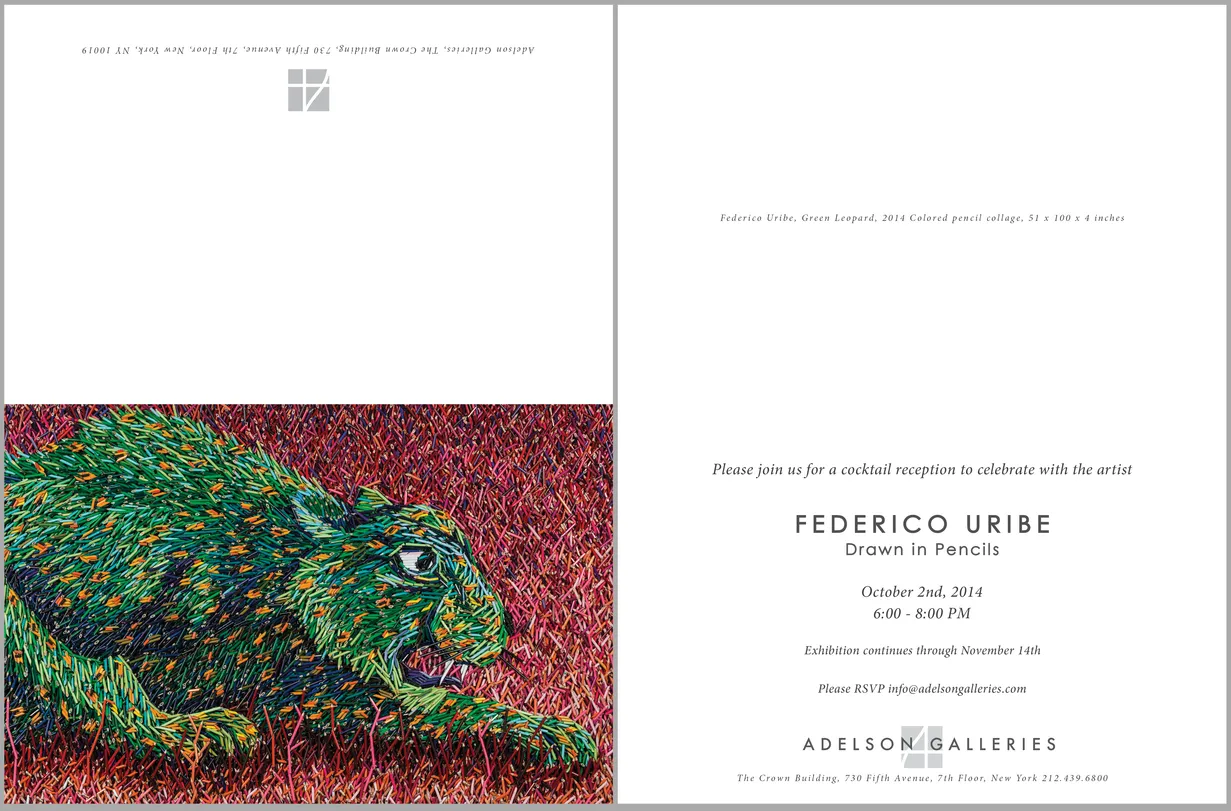
- Invitation for the Federico Uribe: Drawn in Pencils exhibition
- Client: Adelson Galleries
- Visit figure page
- Type: portfolio
- Portfolio Type: advertising
- Portfolio Role: design_layout
Federico Uribe Drawn In Pencils Exhibition Wordmark

- Wordmark for Federico Uribe: Drawn in Pencils exhibition
- Client: Adelson Galleries
- Visit figure page
- Type: portfolio
- Portfolio Type: advertising
- Portfolio Role: design_layout
Federico Uribe: Animals And Friends — Cover
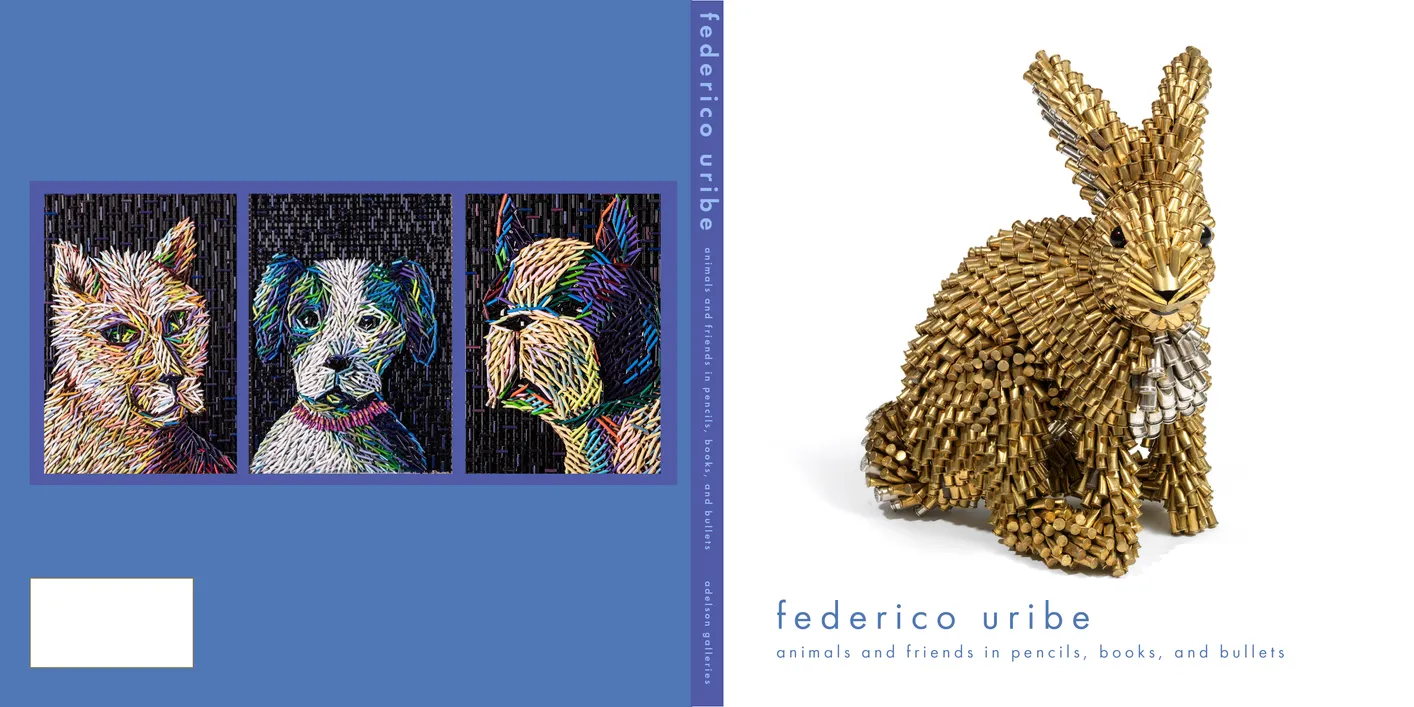
- Federico Uribe: Animals and Friends in Pencils, Books, and Bullets exhibition catalog, cover
- Client: Adelson Galleries
- Visit figure page
- Type: portfolio
- Portfolio Type: publication_design
- Portfolio Role: design_layout
Federico Uribe: Animals And Friends — Inside Front Cover

- Federico Uribe: Animals and Friends in Pencils, Books, and Bullets exhibition catalog, inside back cover
- Client: Adelson Galleries
- Visit figure page
- Type: portfolio
- Portfolio Type: publication_design
- Portfolio Role: design_layout
Federico Uribe: Animals And Friends — Inside Front Cover

- Federico Uribe: Animals and Friends in Pencils, Books, and Bullets exhibition catalog, inside front cover
- Client: Adelson Galleries
- Visit figure page
- Type: portfolio
- Portfolio Type: publication_design
- Portfolio Role: design_layout
Federico Uribe: Animals And Friends — Inside Front Cover
- Federico Uribe: Animals and Friends in Pencils, Books, and Bullets exhibition catalog, inside back cover
- Client: Adelson Galleries
- Visit figure page
- Type: portfolio
- Portfolio Type: publication_design
- Portfolio Role: design_layout
Federico Uribe: Animals And Friends — Pages 10–11
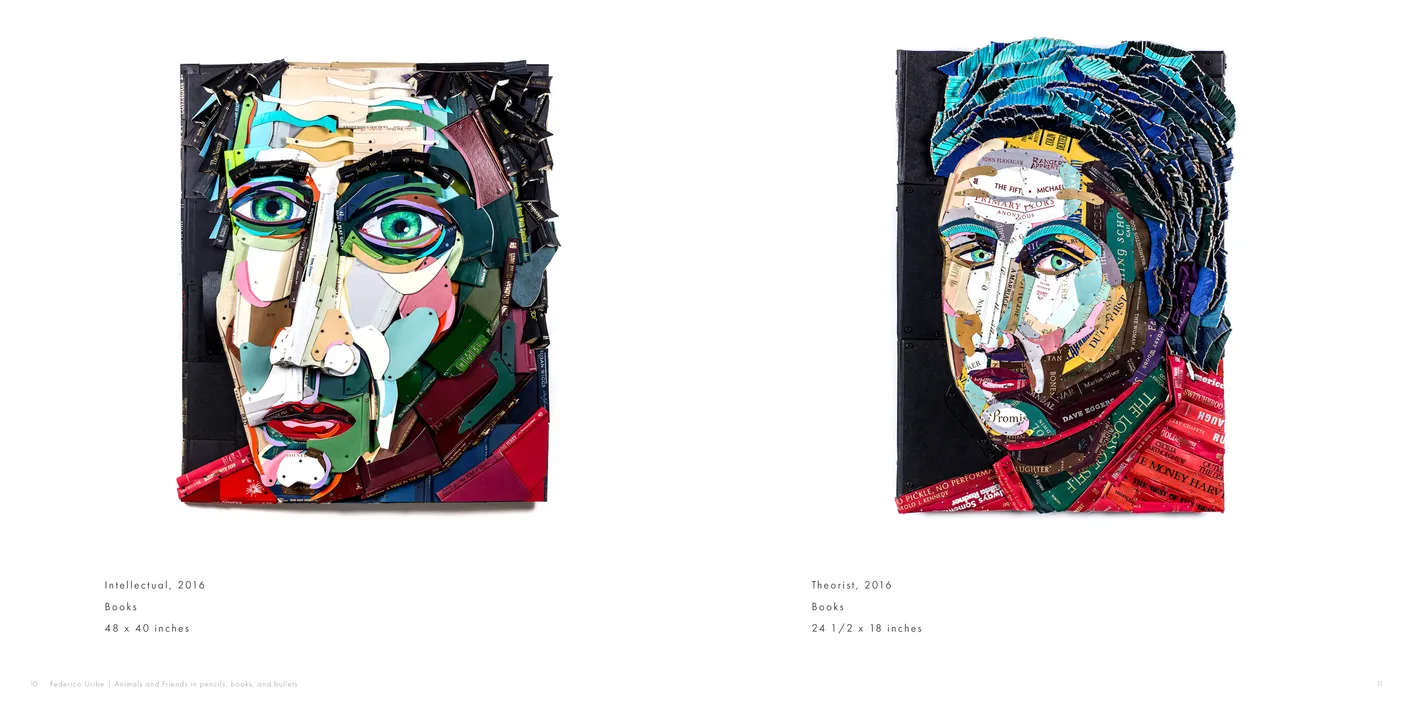
- Federico Uribe: Animals and Friends in Pencils, Books, and Bullets exhibition catalog, pages 10-11
- Client: Adelson Galleries
- Visit figure page
- Type: portfolio
- Portfolio Type: publication_design
- Portfolio Role: design_layout
Federico Uribe: Animals And Friends — Pages 12–13
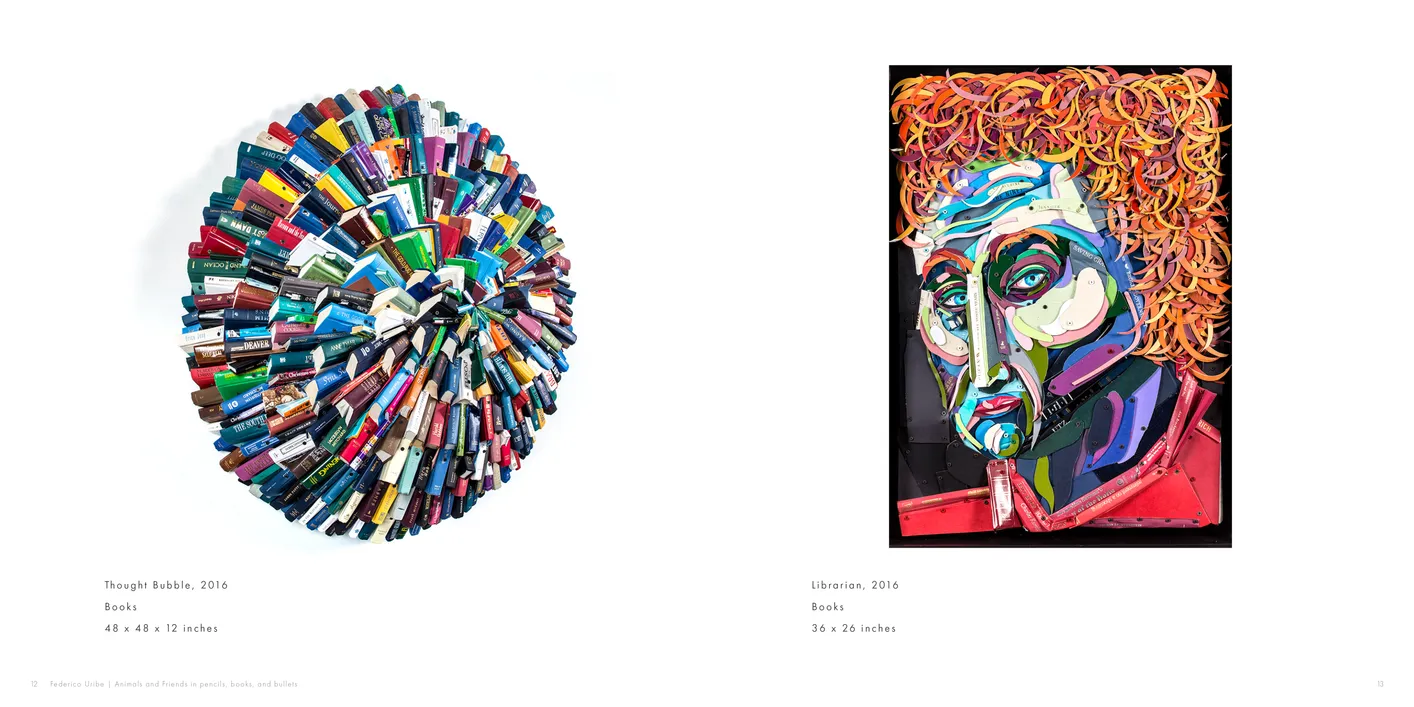
- Federico Uribe: Animals and Friends in Pencils, Books, and Bullets exhibition catalog, pages 12-13
- Client: Adelson Galleries
- Visit figure page
- Type: portfolio
- Portfolio Type: publication_design
- Portfolio Role: design_layout
Federico Uribe: Animals And Friends — Pages 14–15
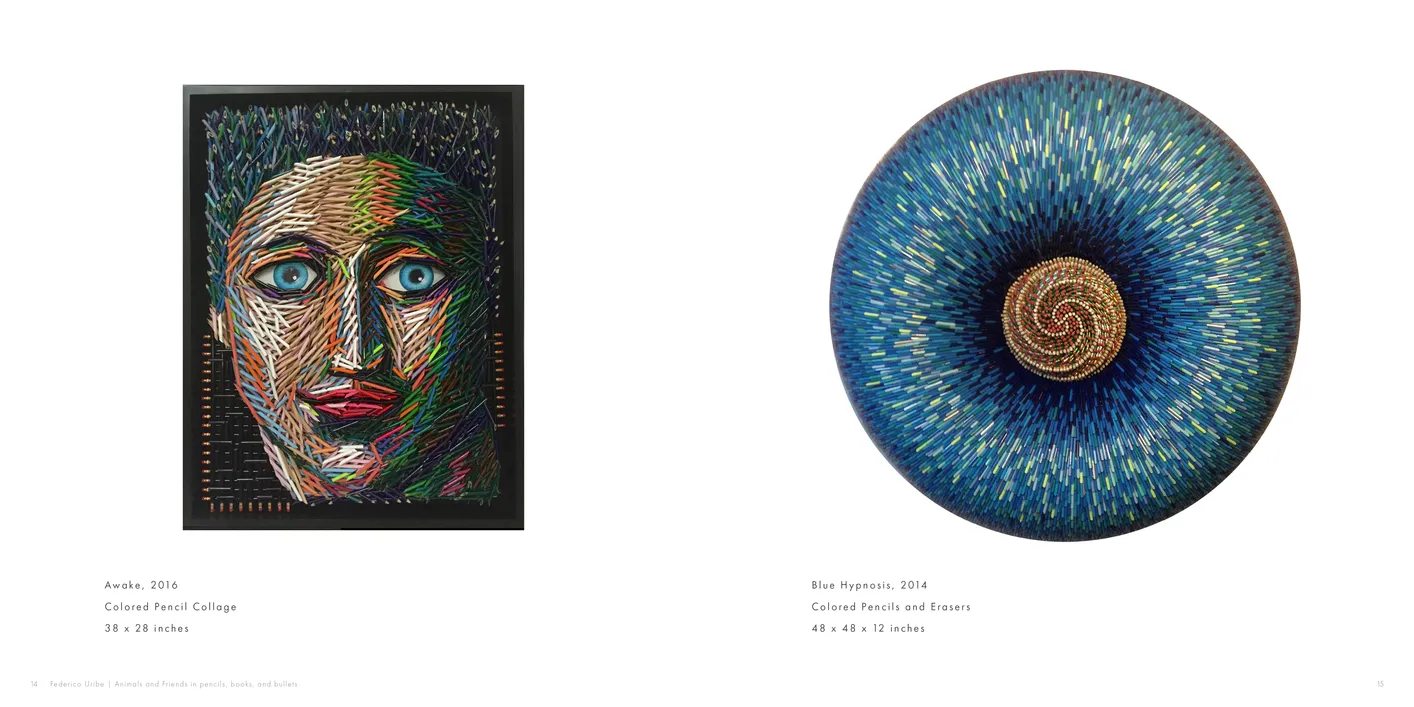
- Federico Uribe: Animals and Friends in Pencils, Books, and Bullets exhibition catalog, pages 14-15
- Client: Adelson Galleries
- Visit figure page
- Type: portfolio
- Portfolio Type: publication_design
- Portfolio Role: design_layout
Federico Uribe: Animals And Friends — Pages 16–17
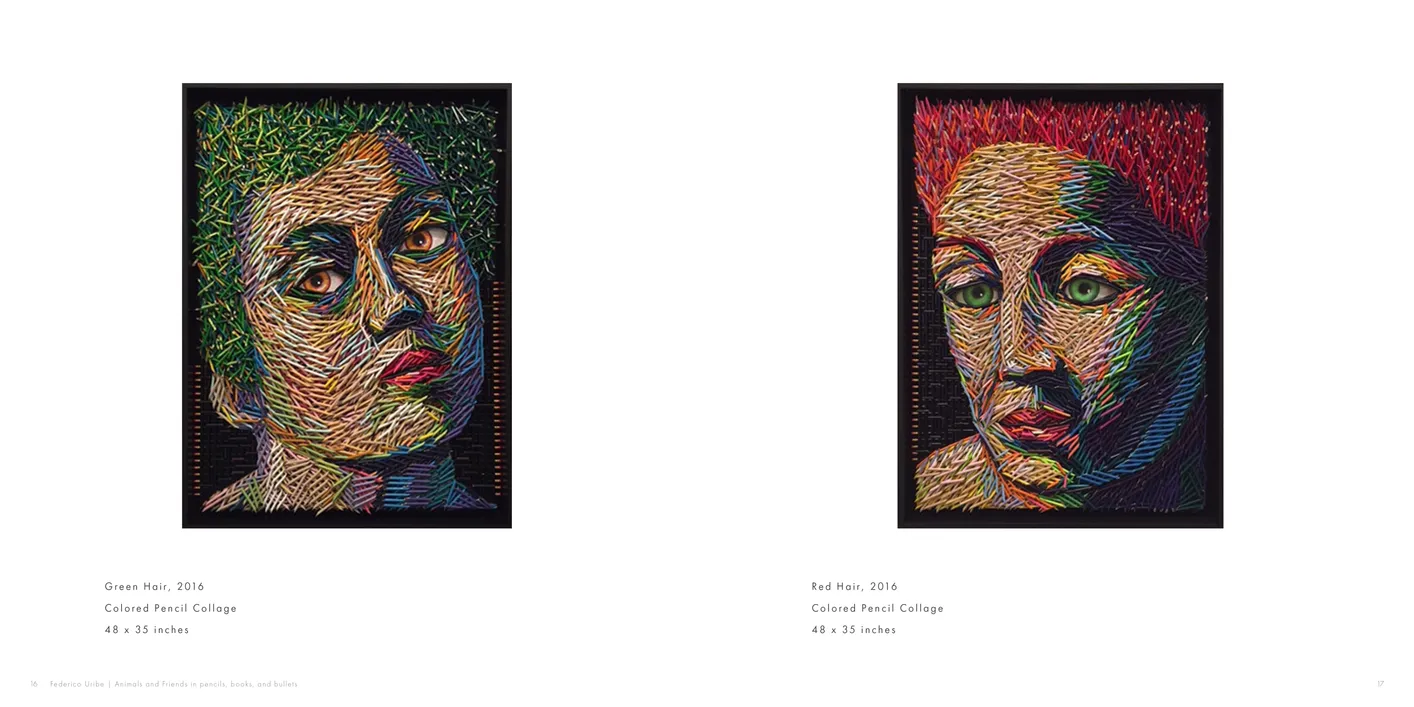
- Federico Uribe: Animals and Friends in Pencils, Books, and Bullets exhibition catalog, pages 16-17
- Client: Adelson Galleries
- Visit figure page
- Type: portfolio
- Portfolio Type: publication_design
- Portfolio Role: design_layout
Federico Uribe: Animals And Friends — Pages 18–19
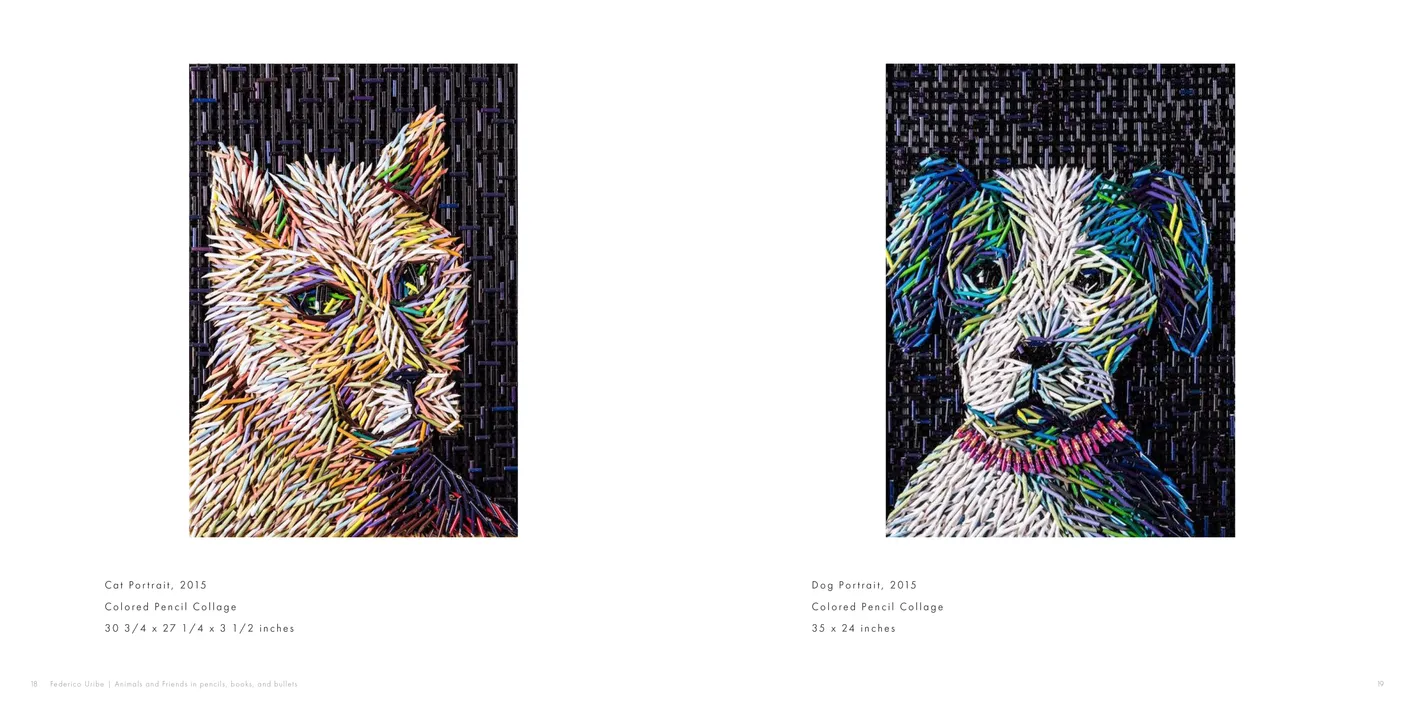
- Federico Uribe: Animals and Friends in Pencils, Books, and Bullets exhibition catalog, pages 18-19
- Client: Adelson Galleries
- Visit figure page
- Type: portfolio
- Portfolio Type: publication_design
- Portfolio Role: design_layout
Federico Uribe: Animals And Friends — Pages 2–3
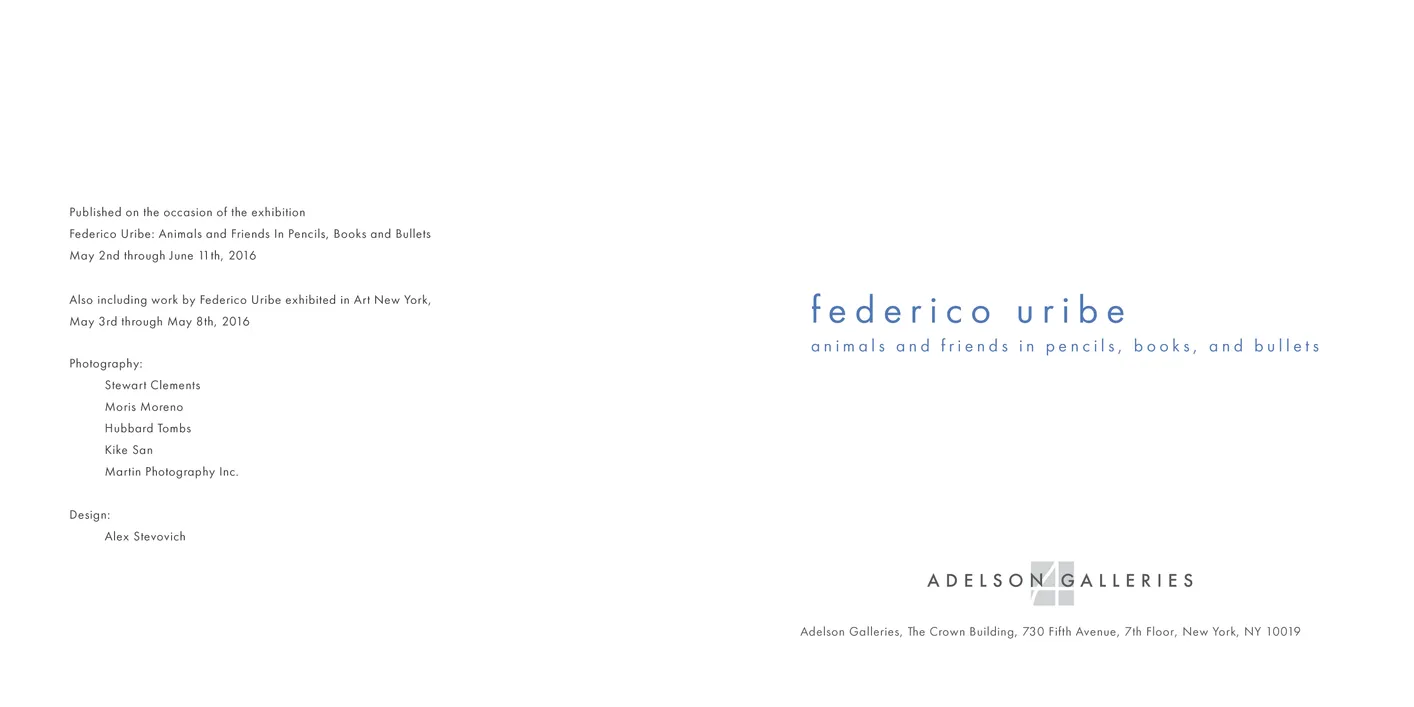
- Federico Uribe: Animals and Friends in Pencils, Books, and Bullets exhibition catalog, pages 2-3
- Client: Adelson Galleries
- Visit figure page
- Type: portfolio
- Portfolio Type: publication_design
- Portfolio Role: design_layout
Federico Uribe: Animals And Friends — Pages 20–21
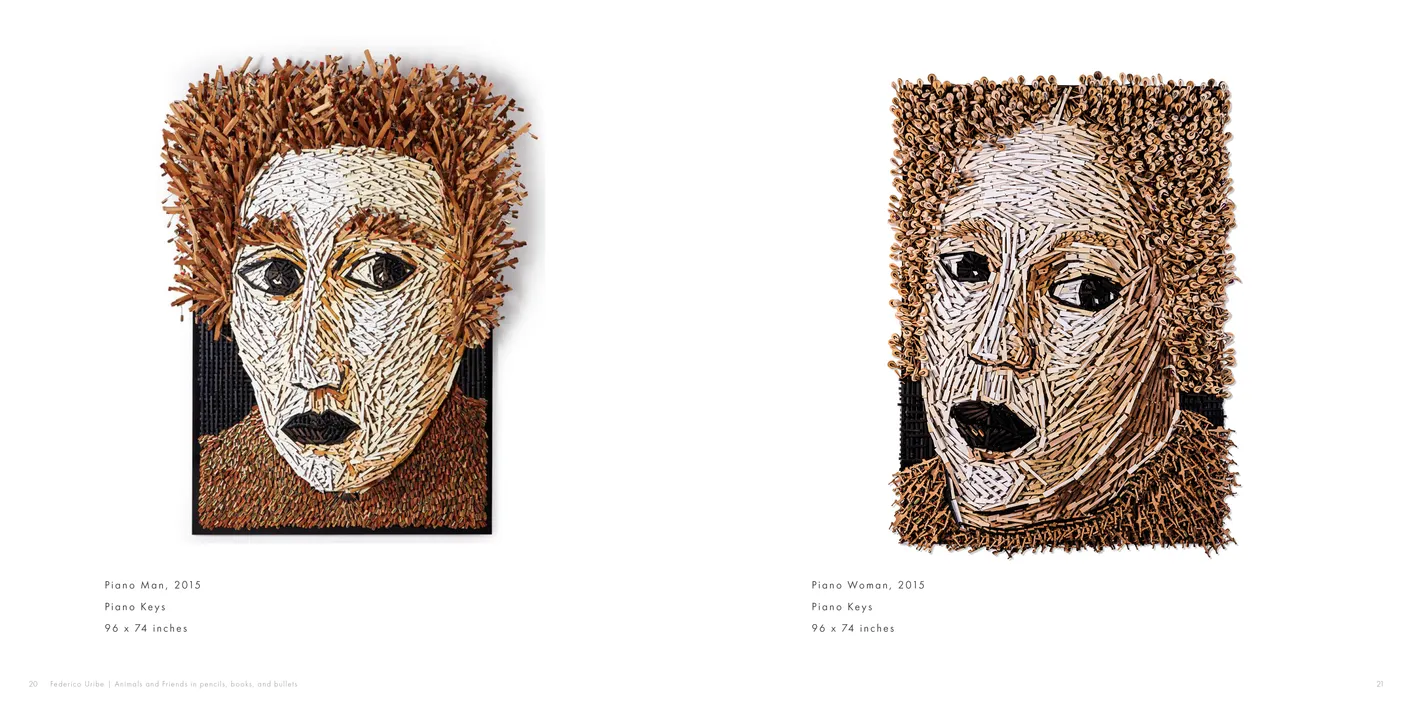
- Federico Uribe: Animals and Friends in Pencils, Books, and Bullets exhibition catalog, pages 20-21
- Client: Adelson Galleries
- Visit figure page
- Type: portfolio
- Portfolio Type: publication_design
- Portfolio Role: design_layout
Federico Uribe: Animals And Friends — Pages 22–23
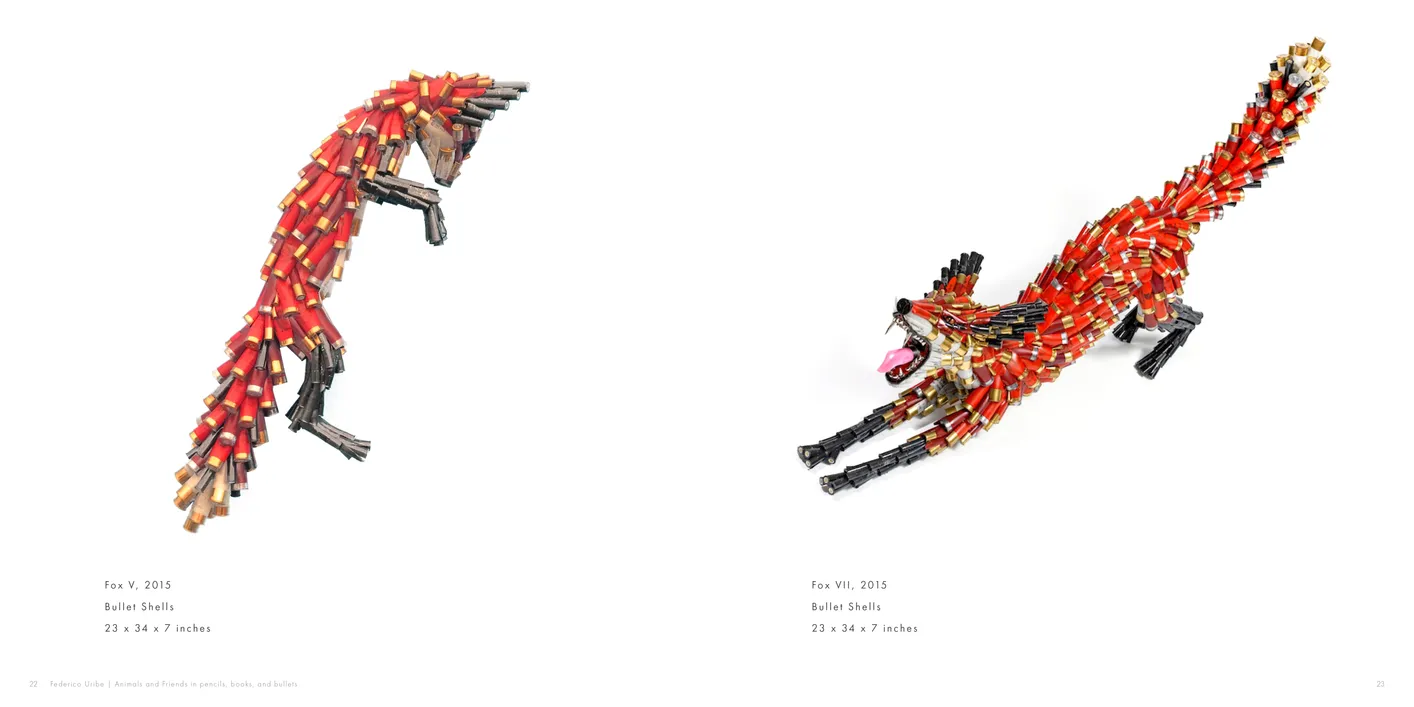
- Federico Uribe: Animals and Friends in Pencils, Books, and Bullets exhibition catalog, pages 22-23
- Client: Adelson Galleries
- Visit figure page
- Type: portfolio
- Portfolio Type: publication_design
- Portfolio Role: design_layout
Federico Uribe: Animals And Friends — Pages 24–25
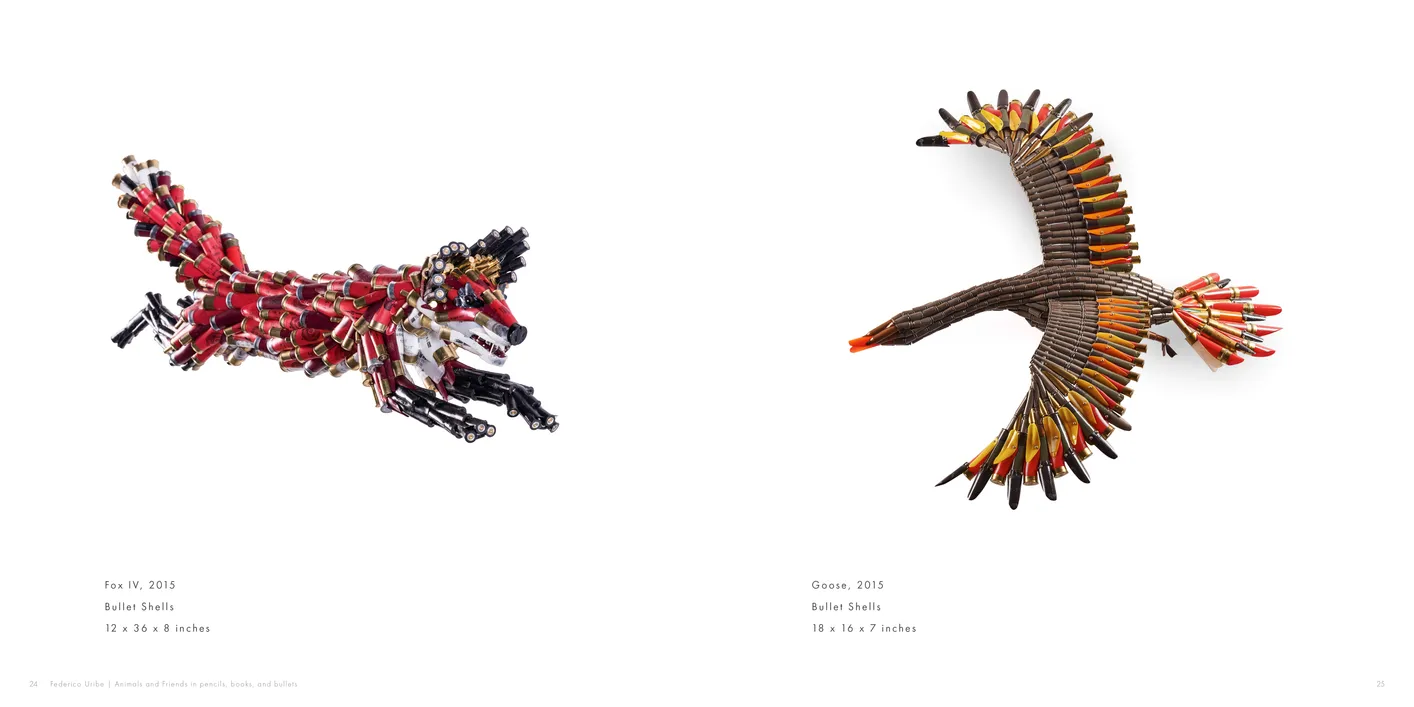
- Federico Uribe: Animals and Friends in Pencils, Books, and Bullets exhibition catalog, pages 24-25
- Client: Adelson Galleries
- Visit figure page
- Type: portfolio
- Portfolio Type: publication_design
- Portfolio Role: design_layout
Federico Uribe: Animals And Friends — Pages 26–27

- Federico Uribe: Animals and Friends in Pencils, Books, and Bullets exhibition catalog, pages 26-27
- Client: Adelson Galleries
- Visit figure page
- Type: portfolio
- Portfolio Type: publication_design
- Portfolio Role: design_layout
Federico Uribe: Animals And Friends — Pages 28–29
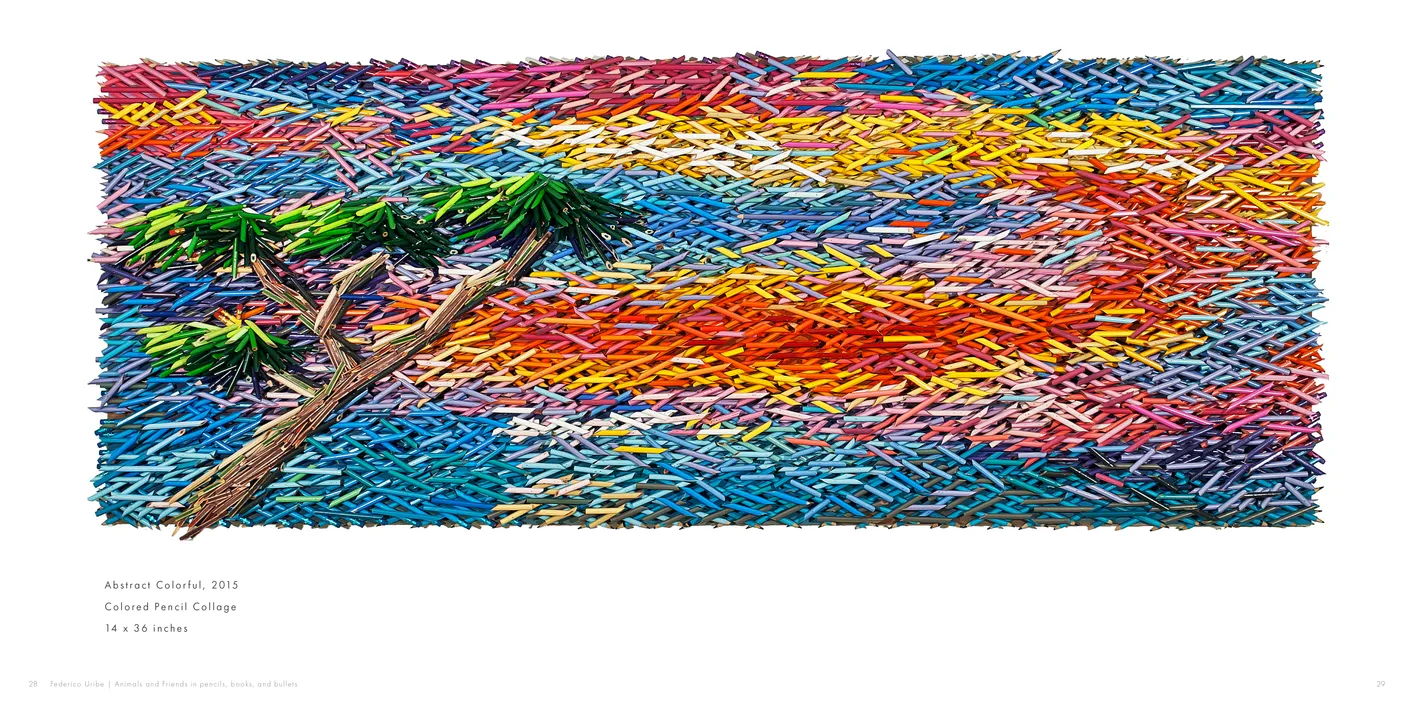
- Federico Uribe: Animals and Friends in Pencils, Books, and Bullets exhibition catalog, pages 28-29
- Client: Adelson Galleries
- Visit figure page
- Type: portfolio
- Portfolio Type: publication_design
- Portfolio Role: design_layout
Federico Uribe: Animals And Friends — Pages 30–31
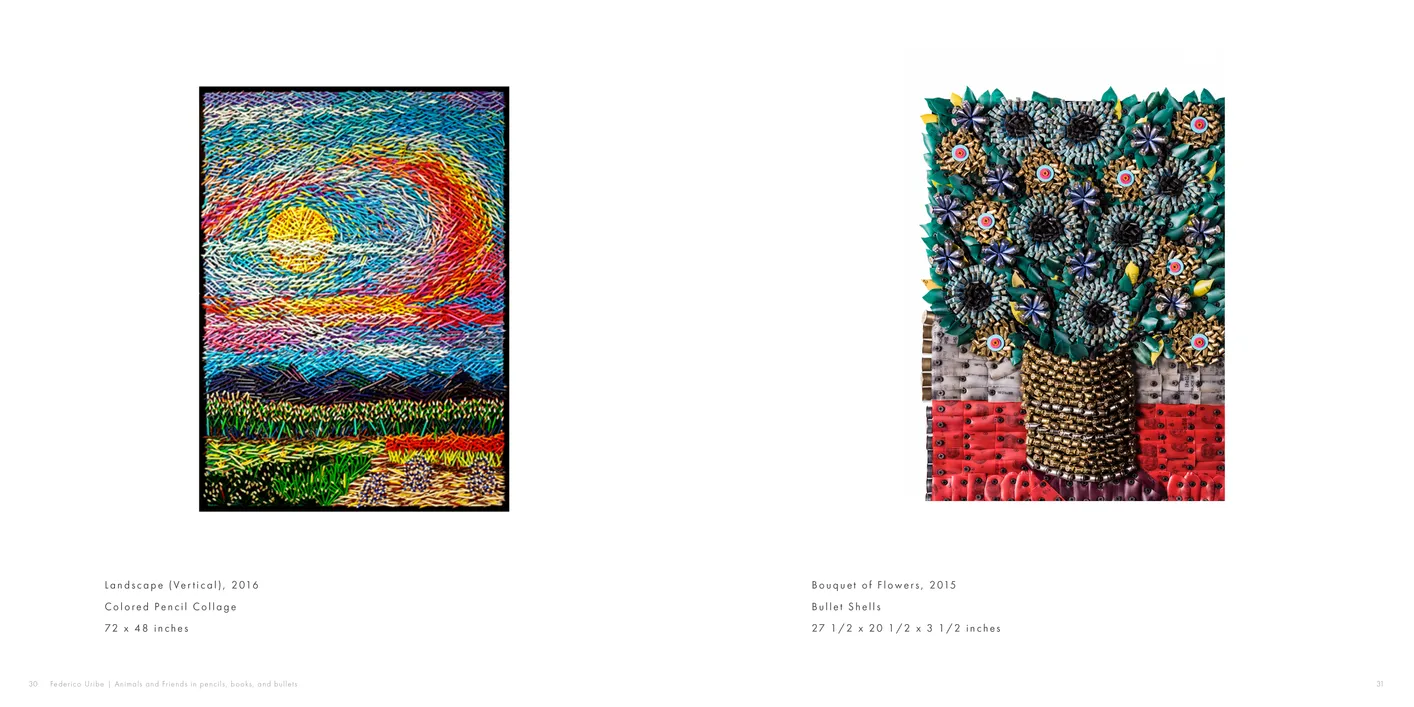
- Federico Uribe: Animals and Friends in Pencils, Books, and Bullets exhibition catalog, pages 30-31
- Client: Adelson Galleries
- Visit figure page
- Type: portfolio
- Portfolio Type: publication_design
- Portfolio Role: design_layout
Federico Uribe: Animals And Friends — Pages 32–33
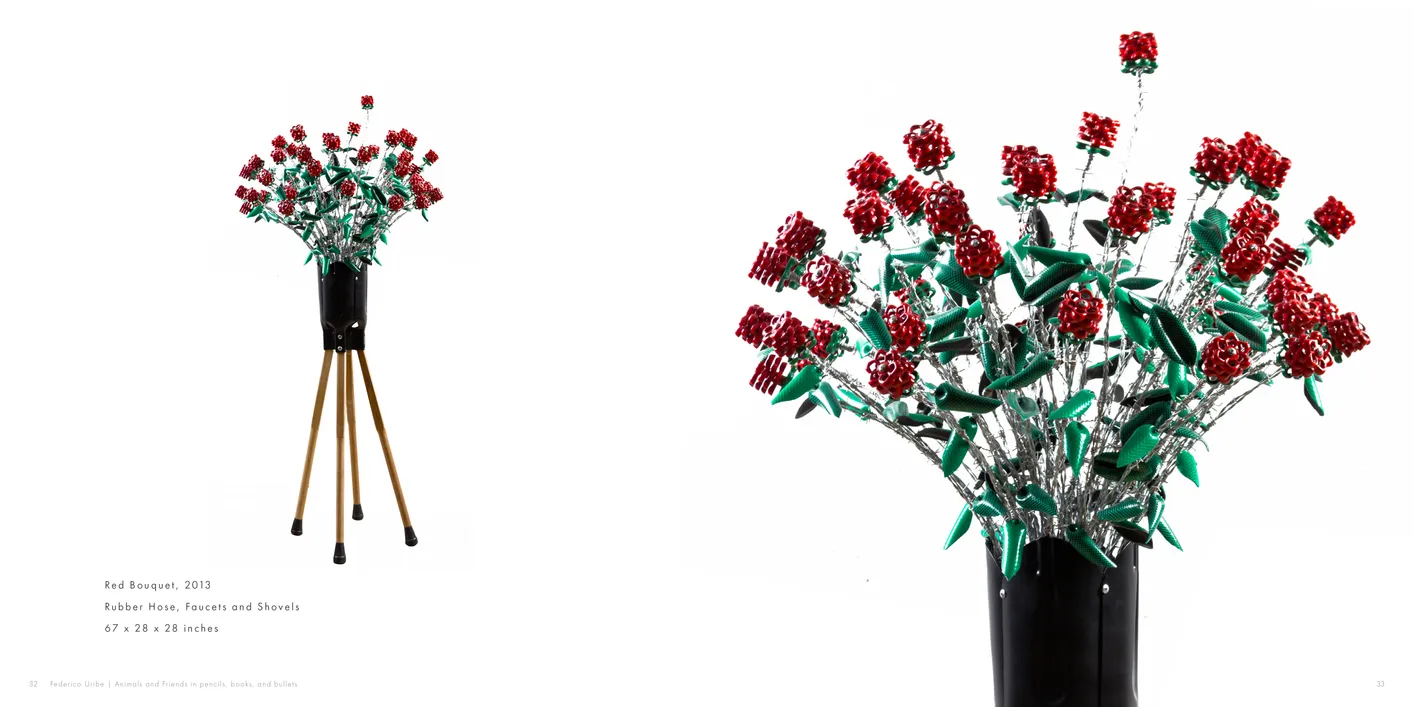
- Federico Uribe: Animals and Friends in Pencils, Books, and Bullets exhibition catalog, pages 32-33
- Client: Adelson Galleries
- Visit figure page
- Type: portfolio
- Portfolio Type: publication_design
- Portfolio Role: design_layout
Federico Uribe: Animals And Friends — Pages 34–35

- Federico Uribe: Animals and Friends in Pencils, Books, and Bullets exhibition catalog, pages 34-35
- Client: Adelson Galleries
- Visit figure page
- Type: portfolio
- Portfolio Type: publication_design
- Portfolio Role: design_layout
Federico Uribe: Animals And Friends — Pages 36–37
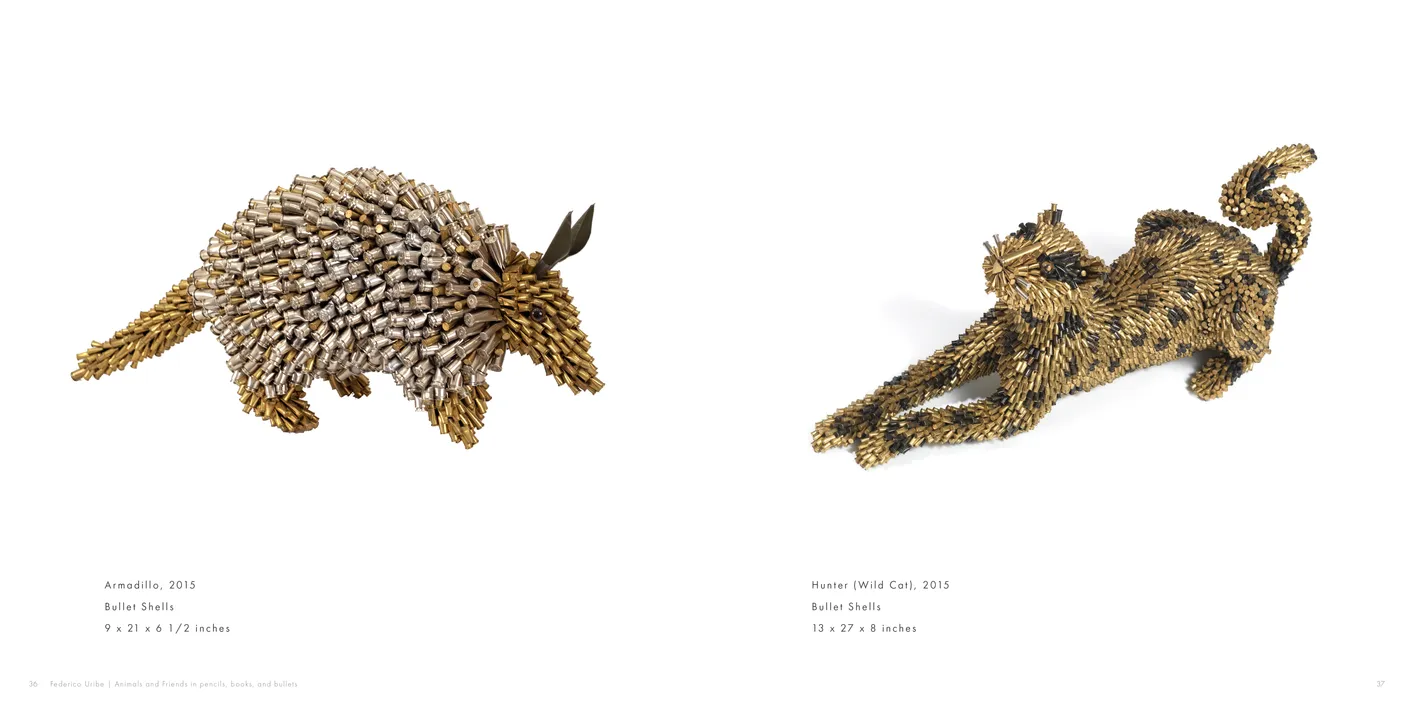
- Federico Uribe: Animals and Friends in Pencils, Books, and Bullets exhibition catalog, pages 36-37
- Client: Adelson Galleries
- Visit figure page
- Type: portfolio
- Portfolio Type: publication_design
- Portfolio Role: design_layout
Federico Uribe: Animals And Friends — Pages 38–39
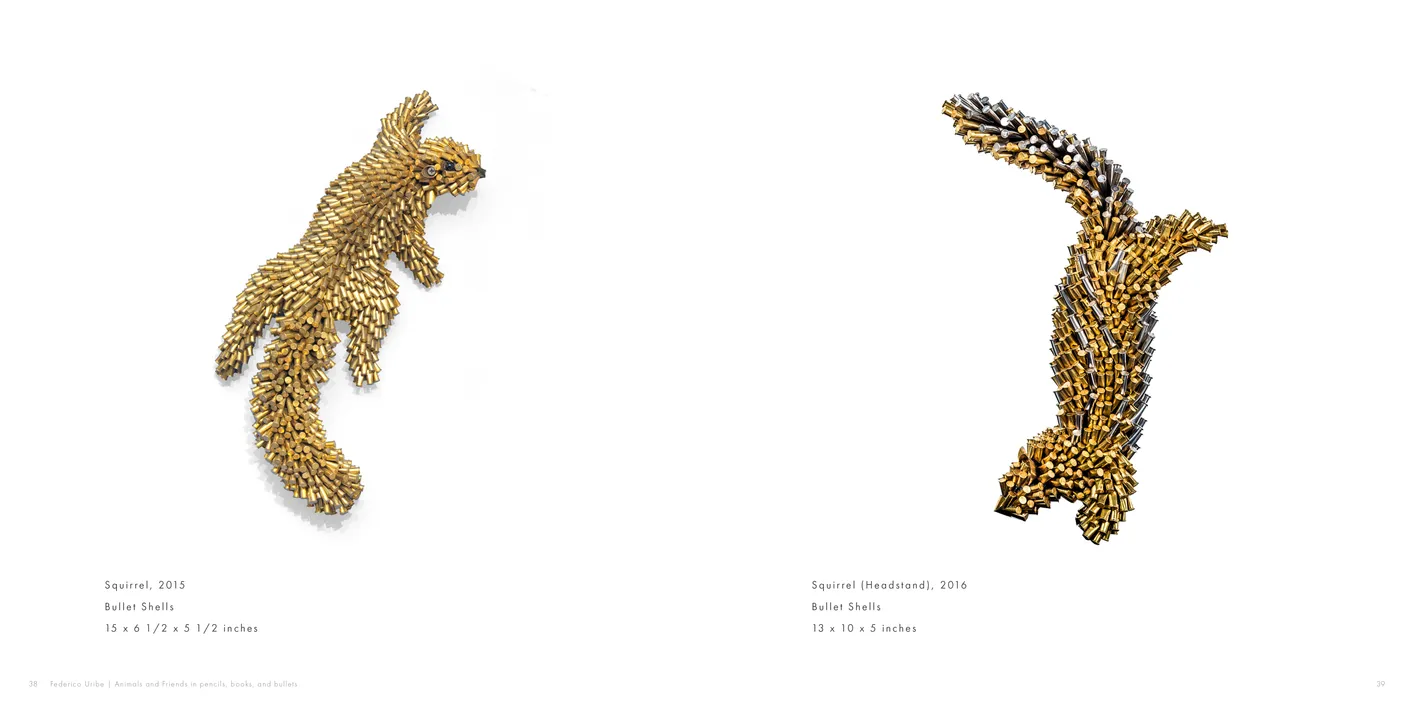
- Federico Uribe: Animals and Friends in Pencils, Books, and Bullets exhibition catalog, pages 38-39
- Client: Adelson Galleries
- Visit figure page
- Type: portfolio
- Portfolio Type: publication_design
- Portfolio Role: design_layout
Federico Uribe: Animals And Friends — Pages 4–5
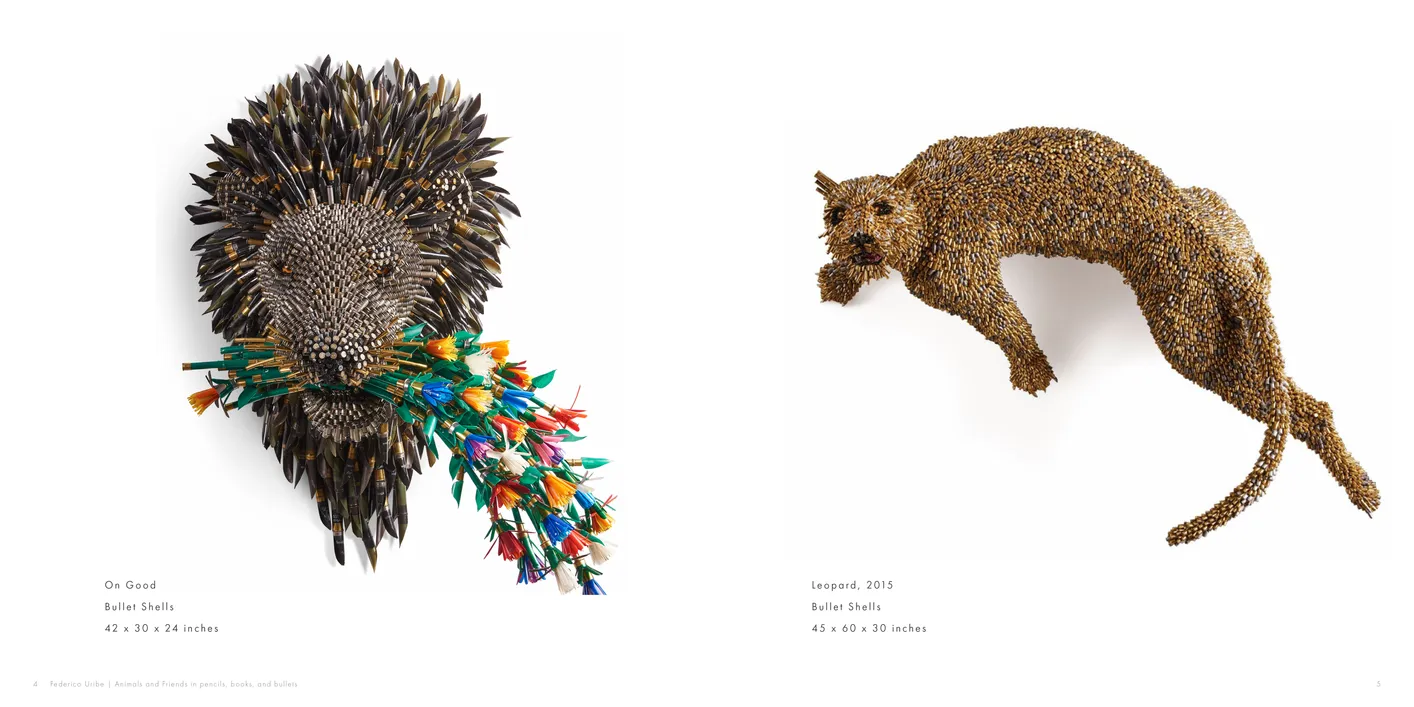
- Federico Uribe: Animals and Friends in Pencils, Books, and Bullets exhibition catalog, pages 4-5
- Client: Adelson Galleries
- Visit figure page
- Type: portfolio
- Portfolio Type: publication_design
- Portfolio Role: design_layout
Federico Uribe: Animals And Friends — Pages 40–41
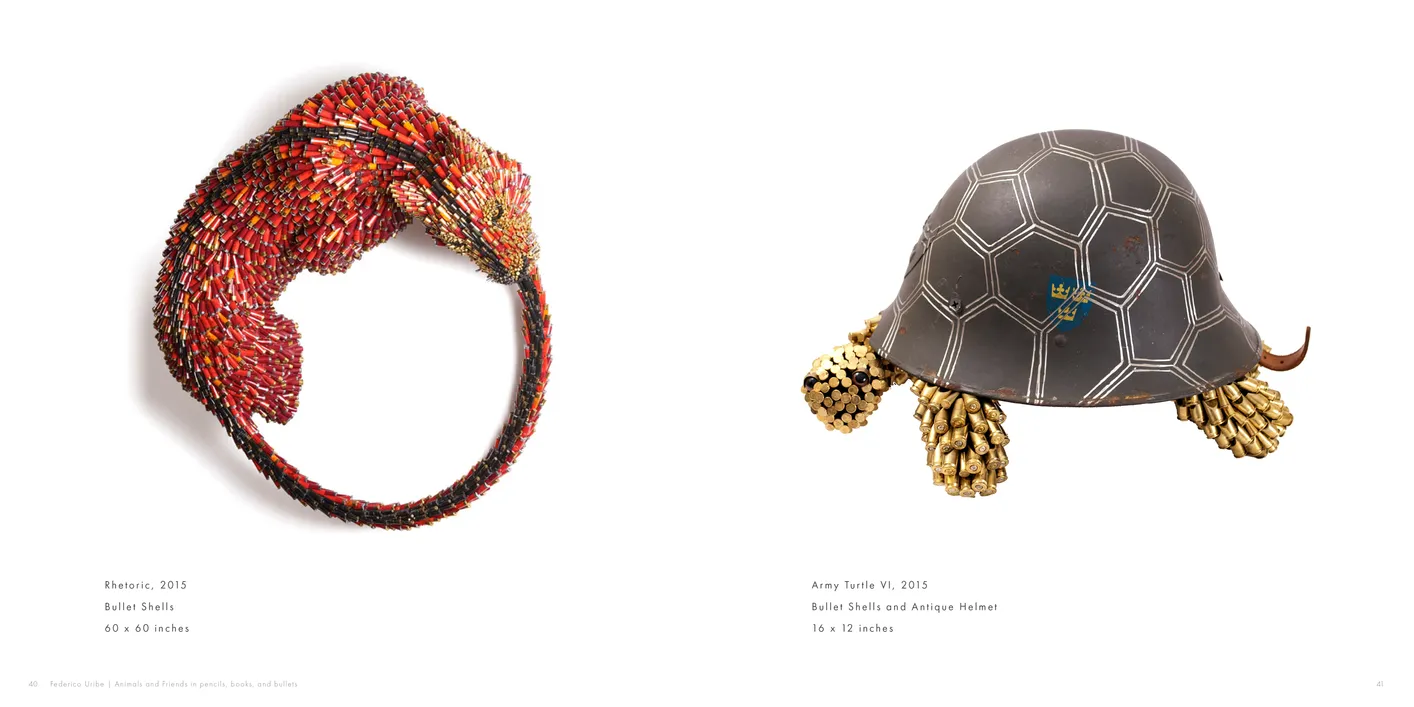
- Federico Uribe: Animals and Friends in Pencils, Books, and Bullets exhibition catalog, pages 40-41
- Client: Adelson Galleries
- Visit figure page
- Type: portfolio
- Portfolio Type: publication_design
- Portfolio Role: design_layout
Federico Uribe: Animals And Friends — Pages 42–43
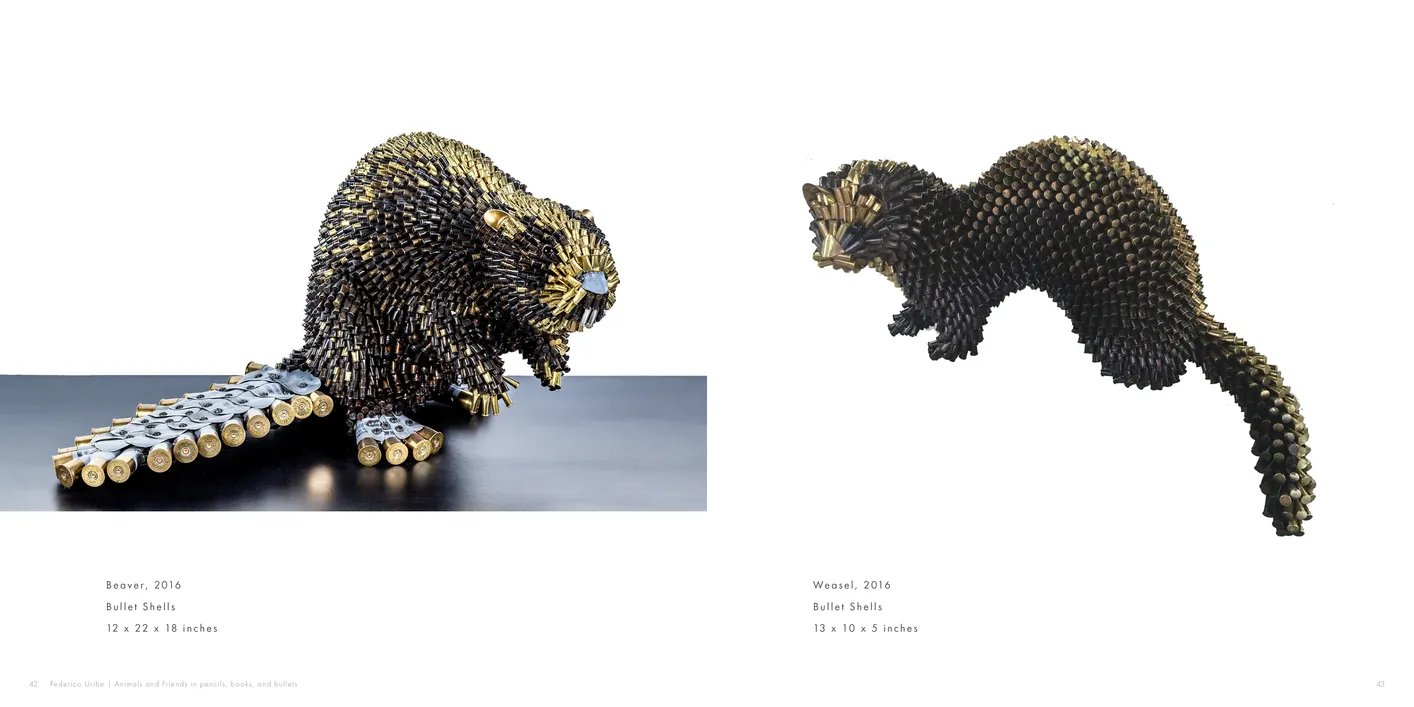
- Federico Uribe: Animals and Friends in Pencils, Books, and Bullets exhibition catalog, pages 42-43
- Client: Adelson Galleries
- Visit figure page
- Type: portfolio
- Portfolio Type: publication_design
- Portfolio Role: design_layout
Federico Uribe: Animals And Friends — Pages 44–45

- Federico Uribe: Animals and Friends in Pencils, Books, and Bullets exhibition catalog, pages 44-45
- Client: Adelson Galleries
- Visit figure page
- Type: portfolio
- Portfolio Type: publication_design
- Portfolio Role: design_layout
Federico Uribe: Animals And Friends — Pages 46–47
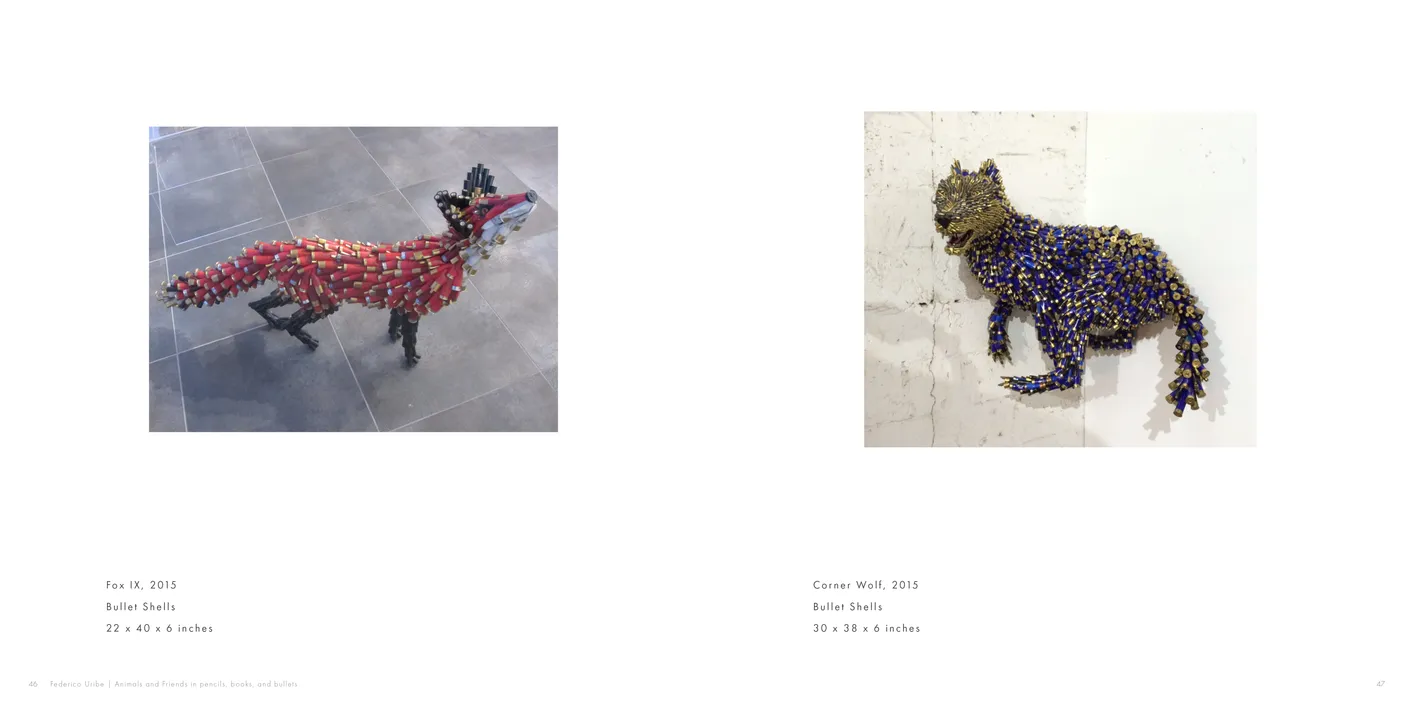
- Federico Uribe: Animals and Friends in Pencils, Books, and Bullets exhibition catalog, pages 46-47
- Client: Adelson Galleries
- Visit figure page
- Type: portfolio
- Portfolio Type: publication_design
- Portfolio Role: design_layout
Federico Uribe: Animals And Friends — Pages 48–49
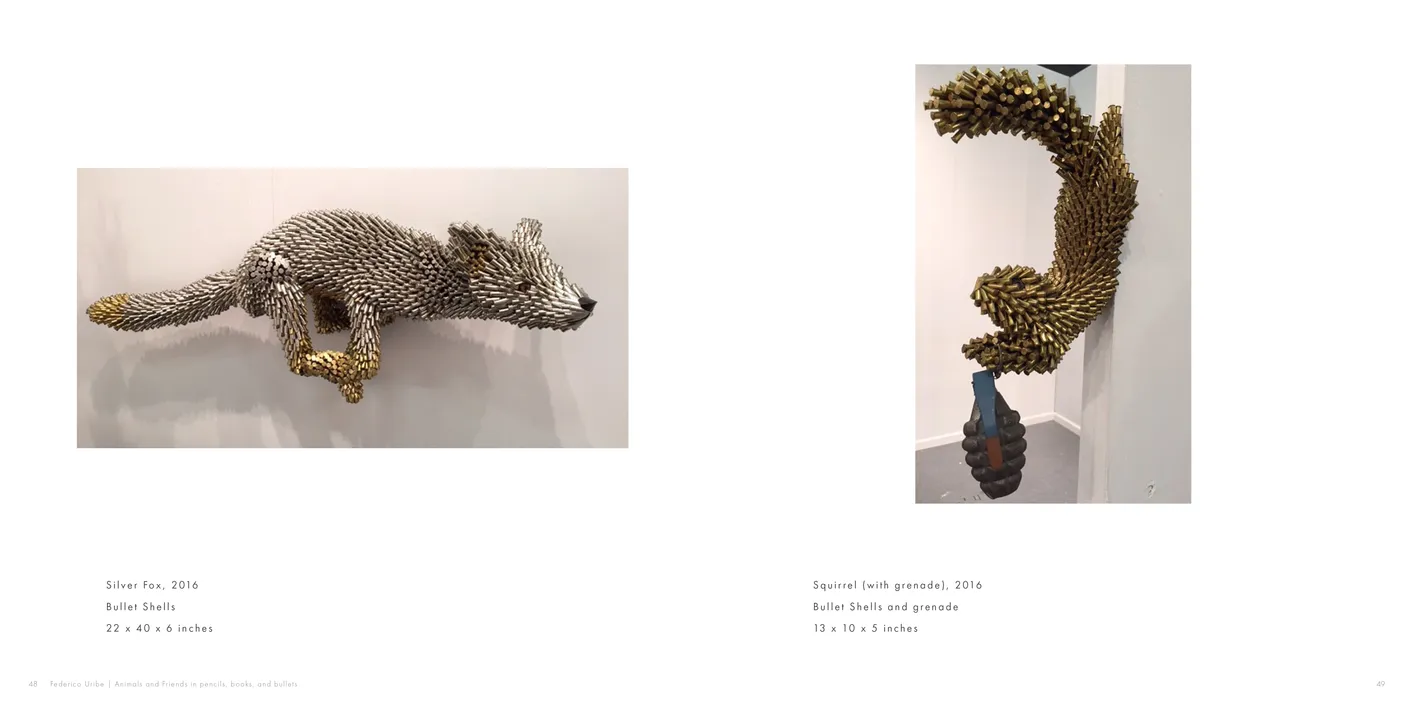
- Federico Uribe: Animals and Friends in Pencils, Books, and Bullets exhibition catalog, pages 48-49
- Client: Adelson Galleries
- Visit figure page
- Type: portfolio
- Portfolio Type: publication_design
- Portfolio Role: design_layout
Federico Uribe: Animals And Friends — Pages 6–7
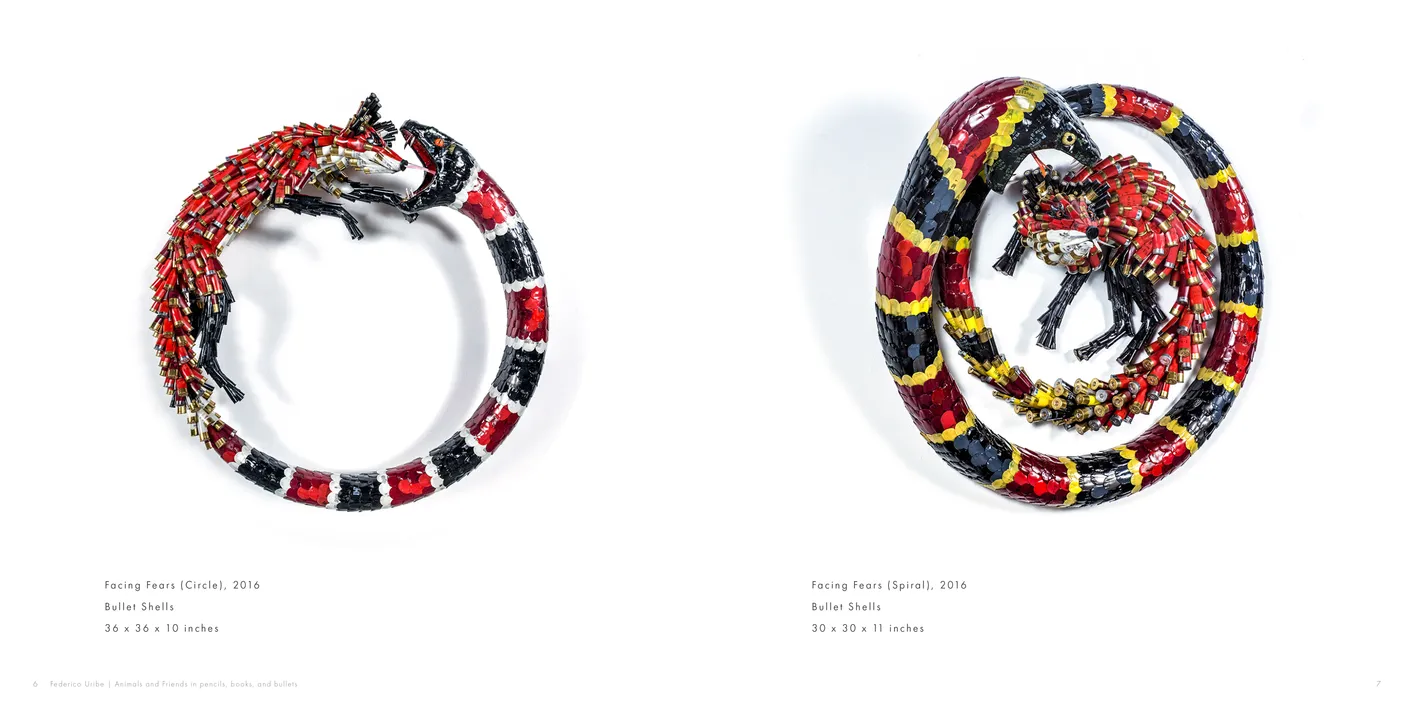
- Federico Uribe: Animals and Friends in Pencils, Books, and Bullets exhibition catalog, pages 6-7
- Client: Adelson Galleries
- Visit figure page
- Type: portfolio
- Portfolio Type: publication_design
- Portfolio Role: design_layout
Federico Uribe: Animals And Friends — Pages 8–9
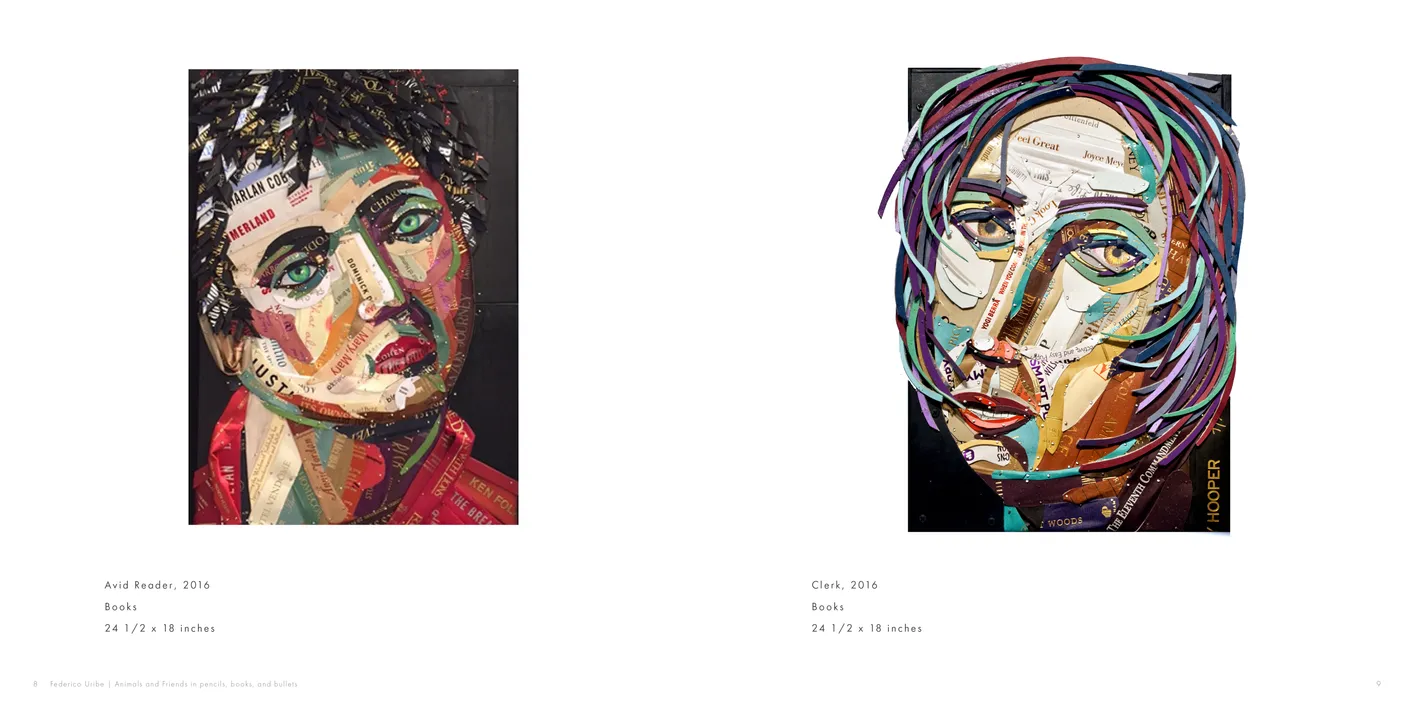
- Federico Uribe: Animals and Friends in Pencils, Books, and Bullets exhibition catalog, pages 8-9
- Client: Adelson Galleries
- Visit figure page
- Type: portfolio
- Portfolio Type: publication_design
- Portfolio Role: design_layout
Federico Uribe: Drawn In Pencils — Cover

- Federico Uribe Drawn in Pencils exhibition catalog, cover
- Client: Adelson Galleries
- Visit figure page
- Type: portfolio
- Portfolio Type: publication_design
- Portfolio Role: design_layout
Federico Uribe: Drawn In Pencils — Inside Front Cover
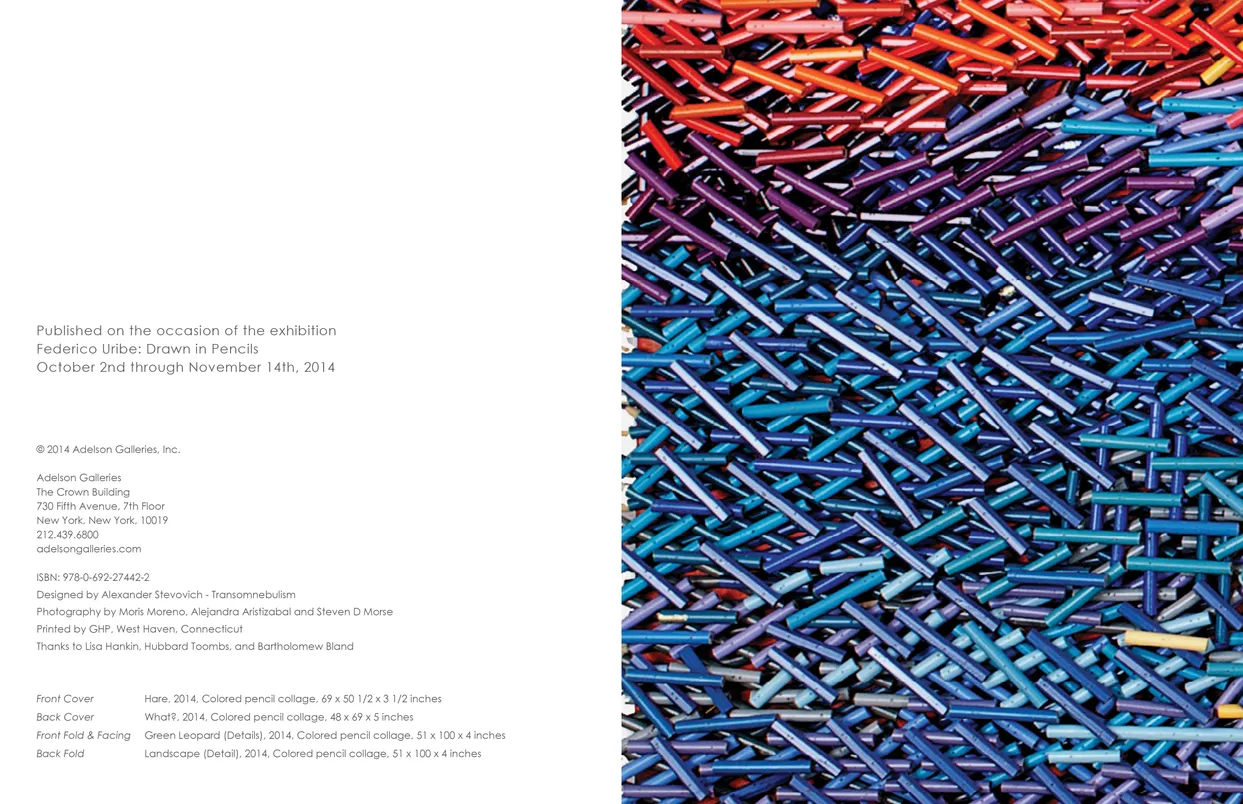
- Federico Uribe Drawn in Pencils exhibition catalog, inside back cover
- Client: Adelson Galleries
- Visit figure page
- Type: portfolio
- Portfolio Type: publication_design
- Portfolio Role: design_layout
Federico Uribe: Drawn In Pencils — Inside Front Cover

- Federico Uribe Drawn in Pencils exhibition catalog, inside front cover
- Client: Adelson Galleries
- Visit figure page
- Type: portfolio
- Portfolio Type: publication_design
- Portfolio Role: design_layout
Federico Uribe: Drawn In Pencils — Pages 10–11
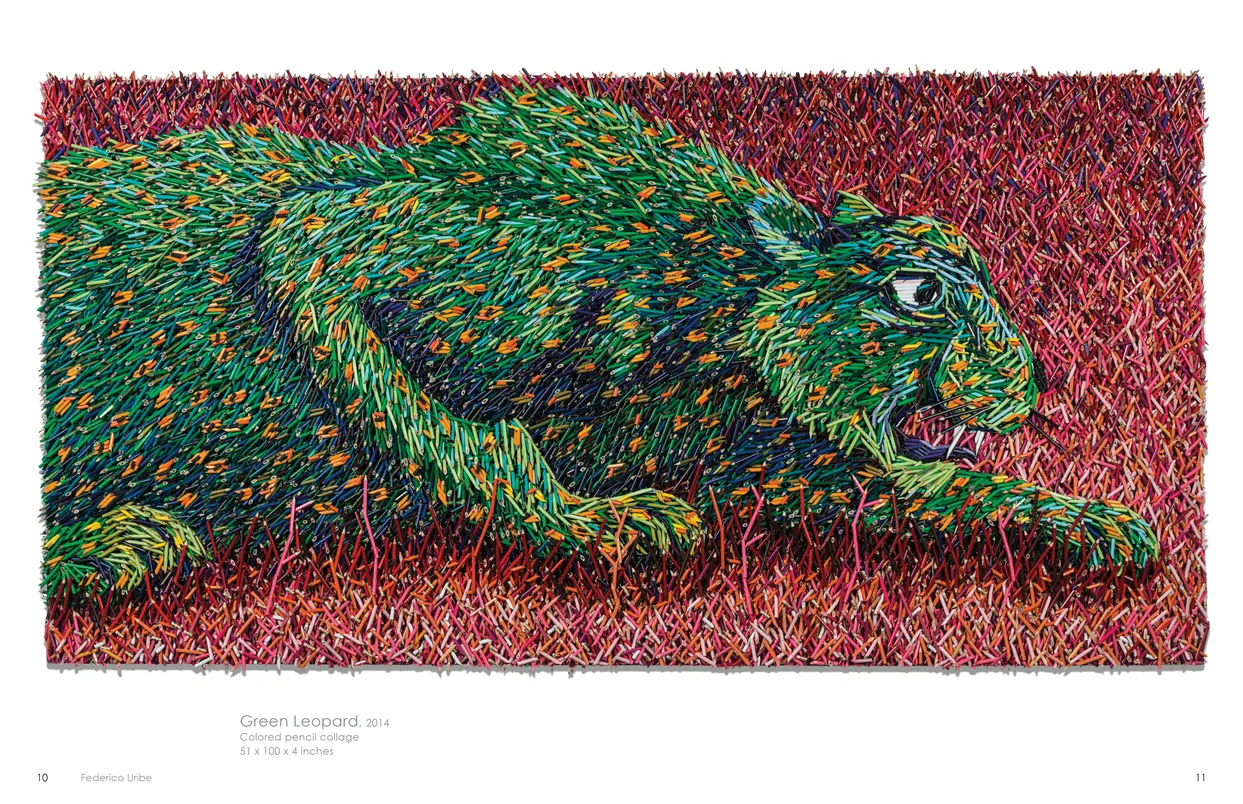
- Federico Uribe Drawn in Pencils exhibition catalog, pages 10-11
- Client: Adelson Galleries
- Visit figure page
- Type: portfolio
- Portfolio Type: publication_design
- Portfolio Role: design_layout
Federico Uribe: Drawn In Pencils — Pages 14–15

- Federico Uribe Drawn in Pencils exhibition catalog, pages 14-15
- Client: Adelson Galleries
- Visit figure page
- Type: portfolio
- Portfolio Type: publication_design
- Portfolio Role: design_layout
Federico Uribe: Drawn In Pencils — Pages 18–19

- Federico Uribe Drawn in Pencils exhibition catalog, pages 18-19
- Client: Adelson Galleries
- Visit figure page
- Type: portfolio
- Portfolio Type: publication_design
- Portfolio Role: design_layout
Federico Uribe: Drawn In Pencils — Pages 2–3

- Federico Uribe Drawn in Pencils exhibition catalog, pages 2-3
- Client: Adelson Galleries
- Visit figure page
- Type: portfolio
- Portfolio Type: publication_design
- Portfolio Role: design_layout
Federico Uribe: Drawn In Pencils — Pages 20–21
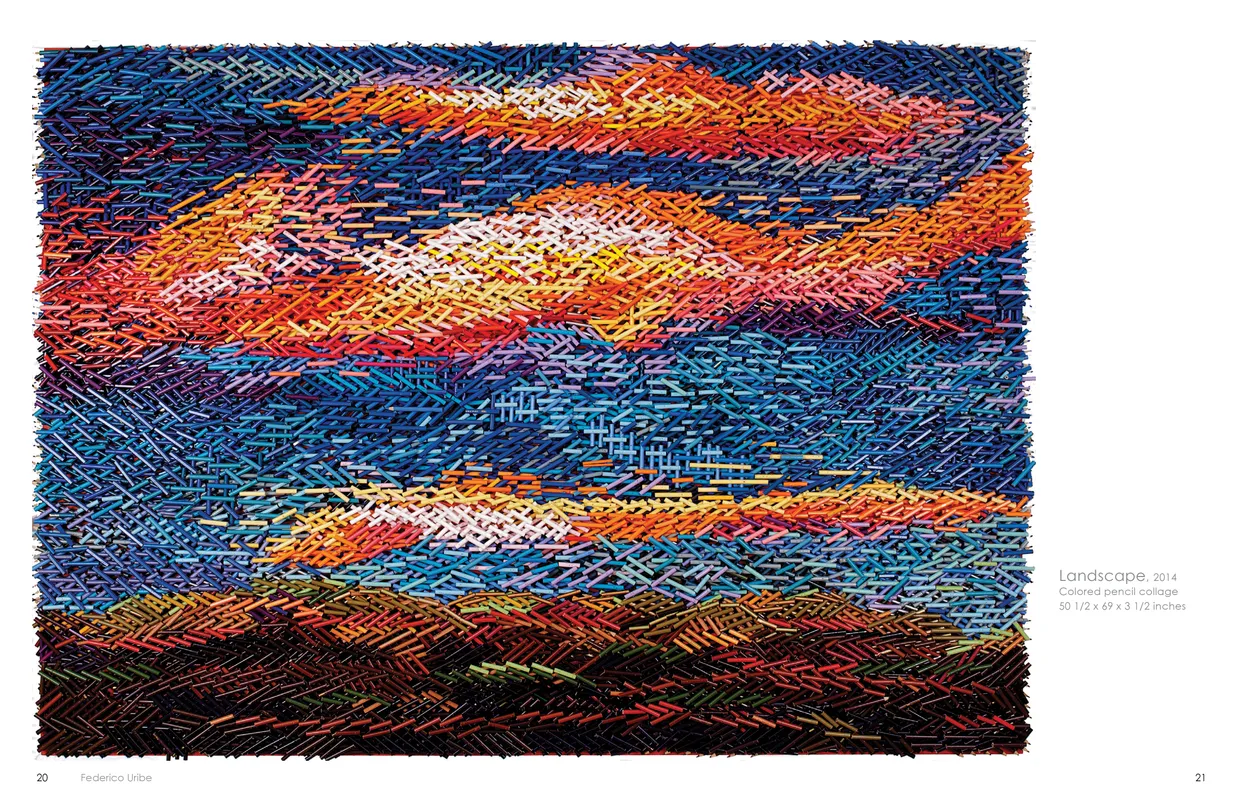
- Federico Uribe Drawn in Pencils exhibition catalog, pages 20-21
- Client: Adelson Galleries
- Visit figure page
- Type: portfolio
- Portfolio Type: publication_design
- Portfolio Role: design_layout
Federico Uribe: Drawn In Pencils — Pages 4–5

- Federico Uribe Drawn in Pencils exhibition catalog, pages 4-5
- Client: Adelson Galleries
- Visit figure page
- Type: portfolio
- Portfolio Type: publication_design
- Portfolio Role: design_layout
Federico Uribe: Drawn In Pencils — Pages 6–7

- Federico Uribe Drawn in Pencils exhibition catalog, pages 6-7
- Client: Adelson Galleries
- Visit figure page
- Type: portfolio
- Portfolio Type: publication_design
- Portfolio Role: design_layout
Federico Uribe: Watch The Parade — Cover

- Federico Uribe: Watch the Parade book, cover
- Client: Adelson Galleries
- Visit figure page
- Type: portfolio
- Portfolio Type: publication_design
- Portfolio Role: design_layout
Federico Uribe: Watch The Parade — Inside Front Cover

- Federico Uribe: Watch the Parade book, inside back cover
- Client: Adelson Galleries
- Visit figure page
- Type: portfolio
- Portfolio Type: publication_design
- Portfolio Role: design_layout
Federico Uribe: Watch The Parade — Inside Front Cover
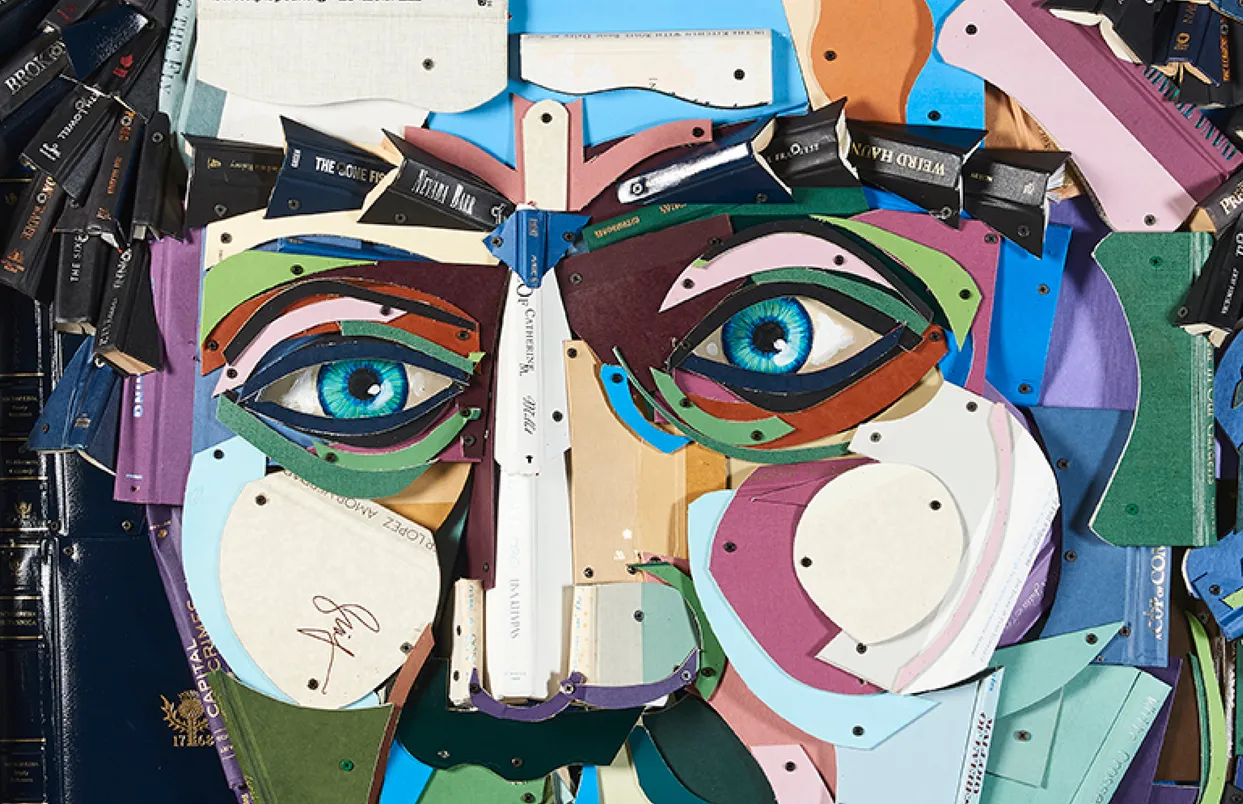
- Federico Uribe: Watch the Parade book, inside front cover
- Client: Adelson Galleries
- Visit figure page
- Type: portfolio
- Portfolio Type: publication_design
- Portfolio Role: design_layout
Federico Uribe: Watch The Parade — Pages 10–11

- Federico Uribe: Watch the Parade book, pages 10-11
- Client: Adelson Galleries
- Visit figure page
- Type: portfolio
- Portfolio Type: publication_design
- Portfolio Role: design_layout
Federico Uribe: Watch The Parade — Pages 100–101
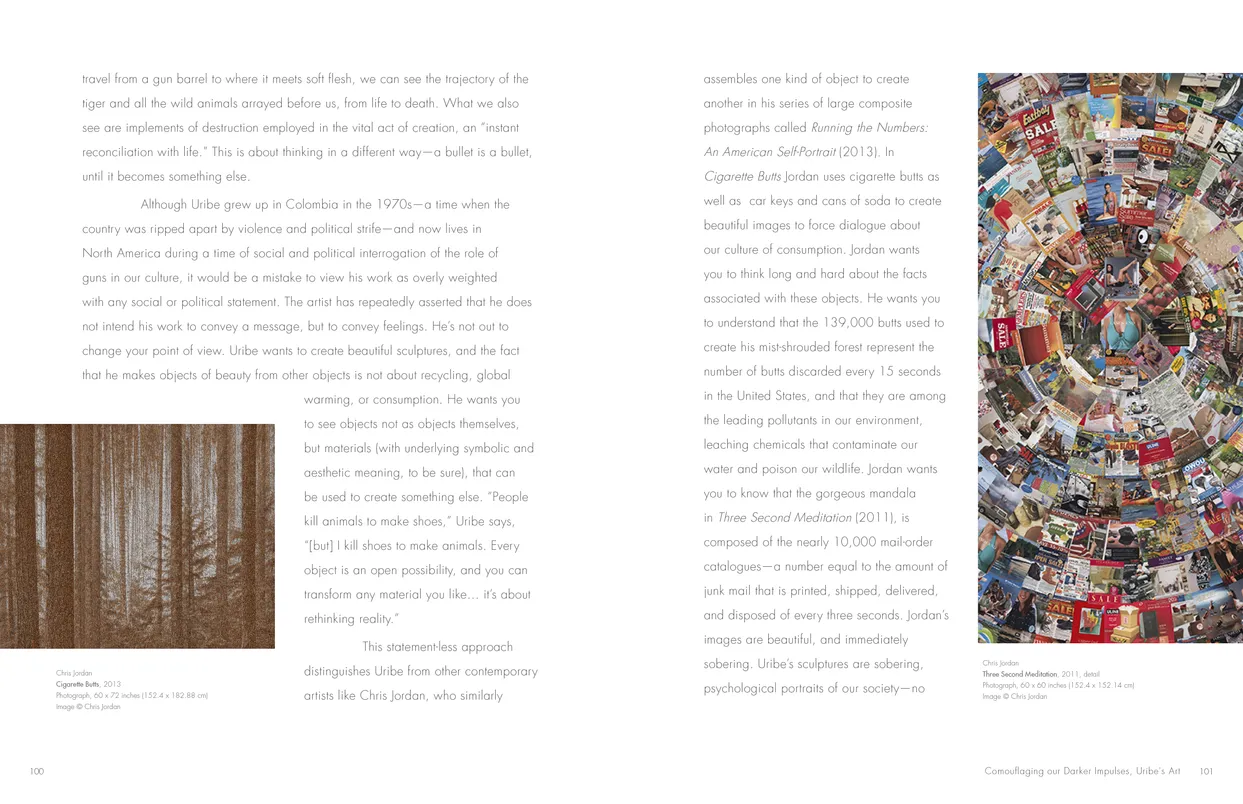
- Federico Uribe: Watch the Parade book, pages 100-101
- Client: Adelson Galleries
- Visit figure page
- Type: portfolio
- Portfolio Type: publication_design
- Portfolio Role: design_layout
Federico Uribe: Watch The Parade — Pages 102–103

- Federico Uribe: Watch the Parade book, pages 102-103
- Client: Adelson Galleries
- Visit figure page
- Type: portfolio
- Portfolio Type: publication_design
- Portfolio Role: design_layout
Federico Uribe: Watch The Parade — Pages 104–105

- Federico Uribe: Watch the Parade book, pages 104-105
- Client: Adelson Galleries
- Visit figure page
- Type: portfolio
- Portfolio Type: publication_design
- Portfolio Role: design_layout
Federico Uribe: Watch The Parade — Pages 106–107

- Federico Uribe: Watch the Parade book, pages 106-107
- Client: Adelson Galleries
- Visit figure page
- Type: portfolio
- Portfolio Type: publication_design
- Portfolio Role: design_layout
Federico Uribe: Watch The Parade — Pages 108–109

- Federico Uribe: Watch the Parade book, pages 108-109
- Client: Adelson Galleries
- Visit figure page
- Type: portfolio
- Portfolio Type: publication_design
- Portfolio Role: design_layout
Federico Uribe: Watch The Parade — Pages 110–111
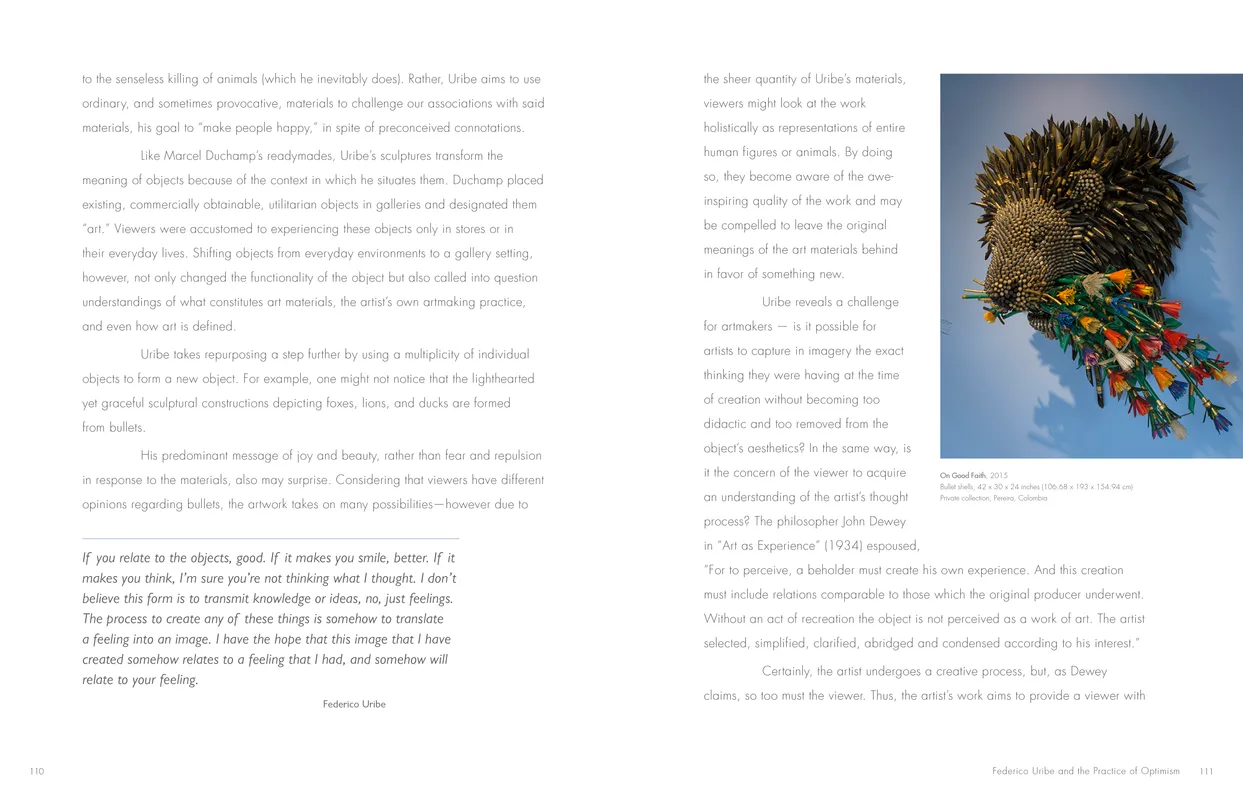
- Federico Uribe: Watch the Parade book, pages 110-111
- Client: Adelson Galleries
- Visit figure page
- Type: portfolio
- Portfolio Type: publication_design
- Portfolio Role: design_layout
Federico Uribe: Watch The Parade — Pages 112–113
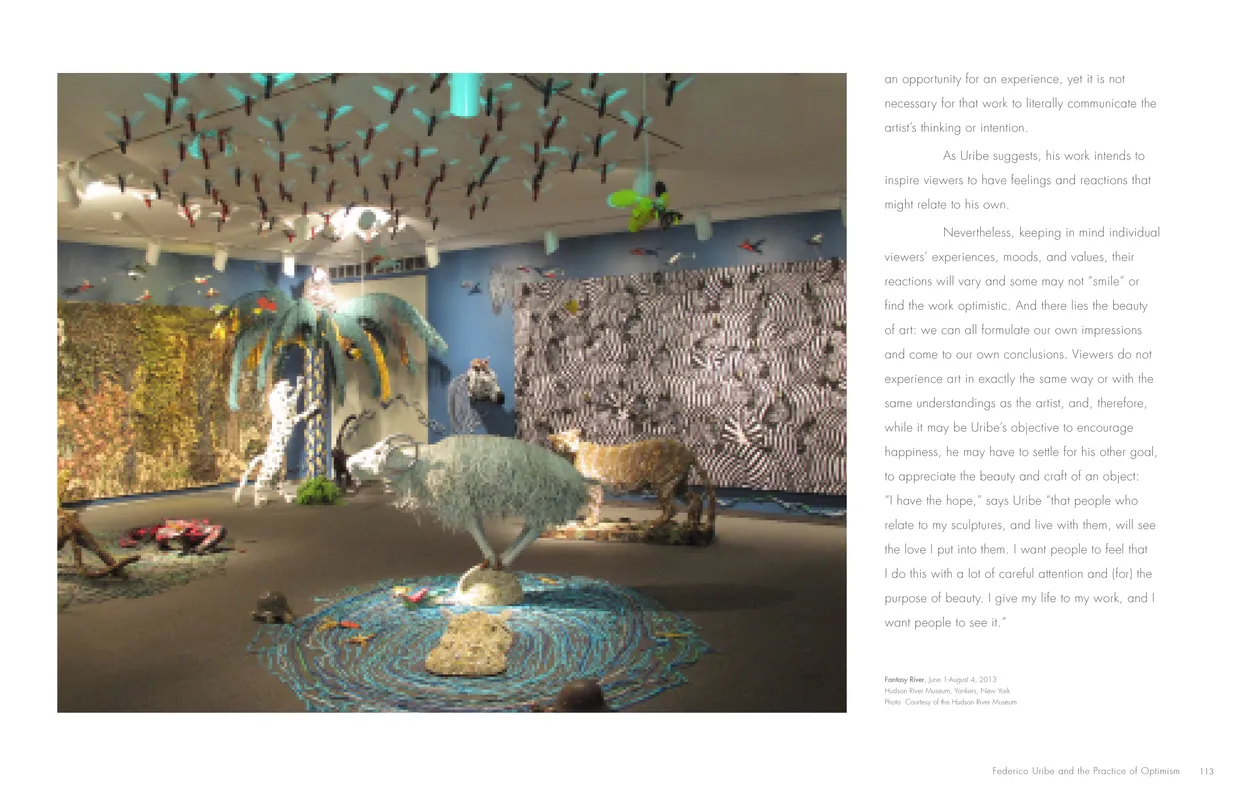
- Federico Uribe: Watch the Parade book, pages 112-113
- Client: Adelson Galleries
- Visit figure page
- Type: portfolio
- Portfolio Type: publication_design
- Portfolio Role: design_layout
Federico Uribe: Watch The Parade — Pages 114–115

- Federico Uribe: Watch the Parade book, pages 114-115
- Client: Adelson Galleries
- Visit figure page
- Type: portfolio
- Portfolio Type: publication_design
- Portfolio Role: design_layout
Federico Uribe: Watch The Parade — Pages 116–117

- Federico Uribe: Watch the Parade book, pages 116-117
- Client: Adelson Galleries
- Visit figure page
- Type: portfolio
- Portfolio Type: publication_design
- Portfolio Role: design_layout
Federico Uribe: Watch The Parade — Pages 118–119
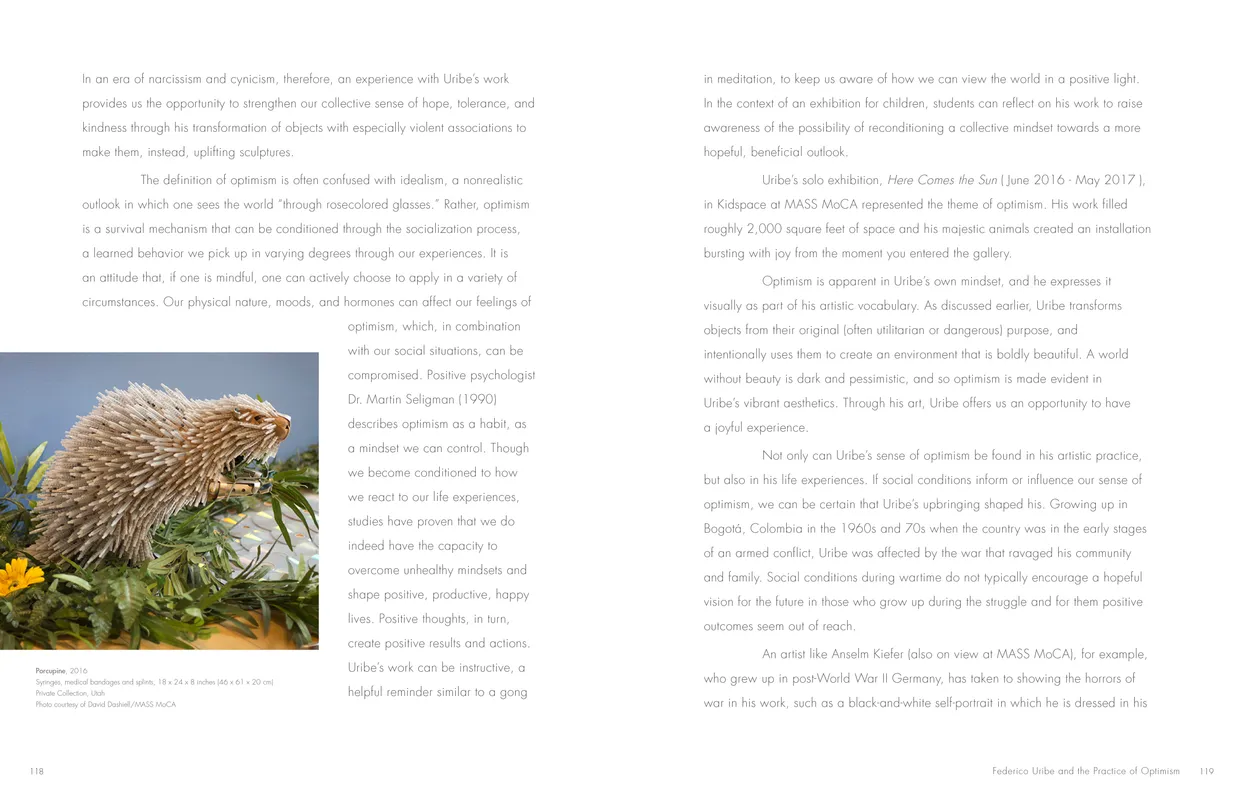
- Federico Uribe: Watch the Parade book, pages 118-119
- Client: Adelson Galleries
- Visit figure page
- Type: portfolio
- Portfolio Type: publication_design
- Portfolio Role: design_layout
Federico Uribe: Watch The Parade — Pages 12–13

- Federico Uribe: Watch the Parade book, pages 12-13
- Client: Adelson Galleries
- Visit figure page
- Type: portfolio
- Portfolio Type: publication_design
- Portfolio Role: design_layout
Federico Uribe: Watch The Parade — Pages 120–121

- Federico Uribe: Watch the Parade book, pages 120-121
- Client: Adelson Galleries
- Visit figure page
- Type: portfolio
- Portfolio Type: publication_design
- Portfolio Role: design_layout
Federico Uribe: Watch The Parade — Pages 122–123

- Federico Uribe: Watch the Parade book, pages 122-123
- Client: Adelson Galleries
- Visit figure page
- Type: portfolio
- Portfolio Type: publication_design
- Portfolio Role: design_layout
Federico Uribe: Watch The Parade — Pages 124–125

- Federico Uribe: Watch the Parade book, pages 124-125
- Client: Adelson Galleries
- Visit figure page
- Type: portfolio
- Portfolio Type: publication_design
- Portfolio Role: design_layout
Federico Uribe: Watch The Parade — Pages 126–127

- Federico Uribe: Watch the Parade book, pages 126-127
- Client: Adelson Galleries
- Visit figure page
- Type: portfolio
- Portfolio Type: publication_design
- Portfolio Role: design_layout
Federico Uribe: Watch The Parade — Pages 128–129

- Federico Uribe: Watch the Parade book, pages 128-129
- Client: Adelson Galleries
- Visit figure page
- Type: portfolio
- Portfolio Type: publication_design
- Portfolio Role: design_layout
Federico Uribe: Watch The Parade — Pages 130–131

- Federico Uribe: Watch the Parade book, pages 130-131
- Client: Adelson Galleries
- Visit figure page
- Type: portfolio
- Portfolio Type: publication_design
- Portfolio Role: design_layout
Federico Uribe: Watch The Parade — Pages 132–133

- Federico Uribe: Watch the Parade book, pages 132-133
- Client: Adelson Galleries
- Visit figure page
- Type: portfolio
- Portfolio Type: publication_design
- Portfolio Role: design_layout
Federico Uribe: Watch The Parade — Pages 134–135

- Federico Uribe: Watch the Parade book, pages 134-135
- Client: Adelson Galleries
- Visit figure page
- Type: portfolio
- Portfolio Type: publication_design
- Portfolio Role: design_layout
Federico Uribe: Watch The Parade — Pages 136–137

- Federico Uribe: Watch the Parade book, pages 136-137
- Client: Adelson Galleries
- Visit figure page
- Type: portfolio
- Portfolio Type: publication_design
- Portfolio Role: design_layout
Federico Uribe: Watch The Parade — Pages 138–139

- Federico Uribe: Watch the Parade book, pages 138-139
- Client: Adelson Galleries
- Visit figure page
- Type: portfolio
- Portfolio Type: publication_design
- Portfolio Role: design_layout
Federico Uribe: Watch The Parade — Pages 14–15

- Federico Uribe: Watch the Parade book, pages 14-15
- Client: Adelson Galleries
- Visit figure page
- Type: portfolio
- Portfolio Type: publication_design
- Portfolio Role: design_layout
Federico Uribe: Watch The Parade — Pages 140–141

- Federico Uribe: Watch the Parade book, pages 140-141
- Client: Adelson Galleries
- Visit figure page
- Type: portfolio
- Portfolio Type: publication_design
- Portfolio Role: design_layout
Federico Uribe: Watch The Parade — Pages 142–143

- Federico Uribe: Watch the Parade book, pages 142-143
- Client: Adelson Galleries
- Visit figure page
- Type: portfolio
- Portfolio Type: publication_design
- Portfolio Role: design_layout
Federico Uribe: Watch The Parade — Pages 144–145

- Federico Uribe: Watch the Parade book, pages 144-145
- Client: Adelson Galleries
- Visit figure page
- Type: portfolio
- Portfolio Type: publication_design
- Portfolio Role: design_layout
Federico Uribe: Watch The Parade — Pages 146–147

- Federico Uribe: Watch the Parade book, pages 146-147
- Client: Adelson Galleries
- Visit figure page
- Type: portfolio
- Portfolio Type: publication_design
- Portfolio Role: design_layout
Federico Uribe: Watch The Parade — Pages 148–149
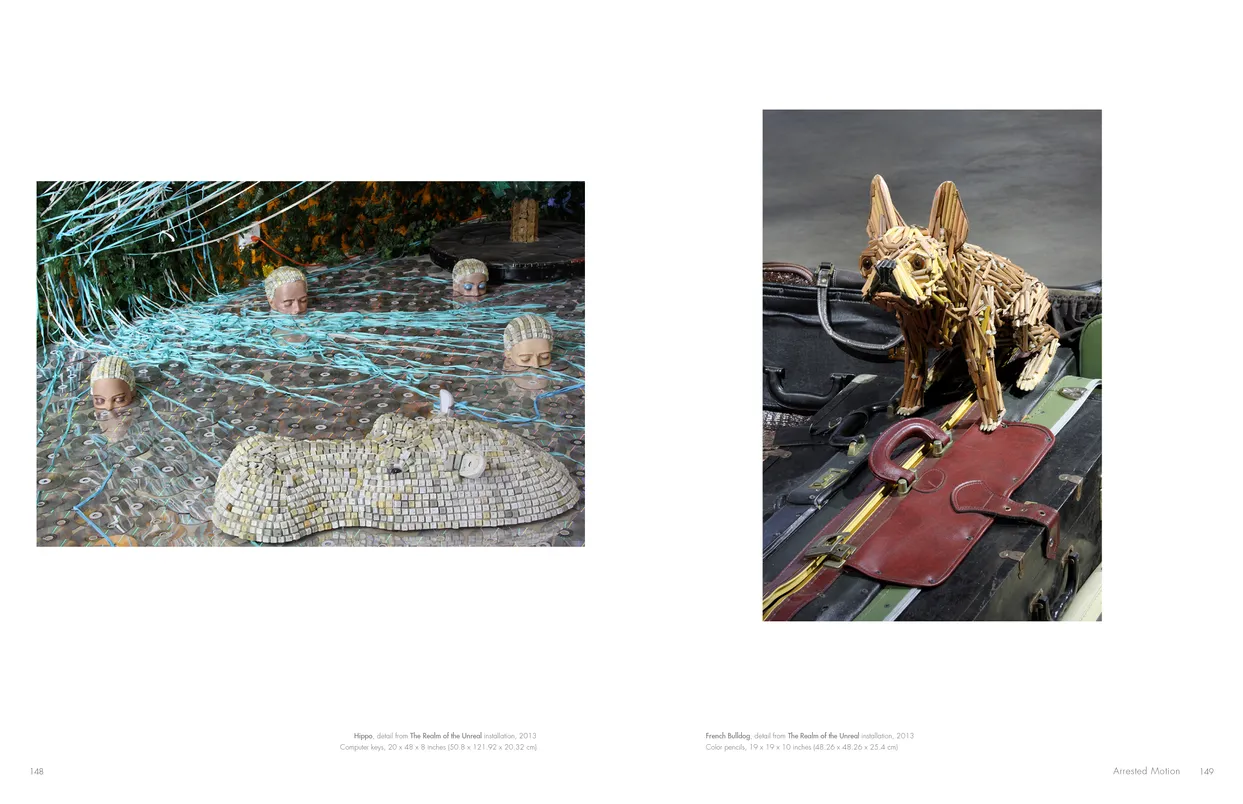
- Federico Uribe: Watch the Parade book, pages 148-149
- Client: Adelson Galleries
- Visit figure page
- Type: portfolio
- Portfolio Type: publication_design
- Portfolio Role: design_layout
Federico Uribe: Watch The Parade — Pages 150–151
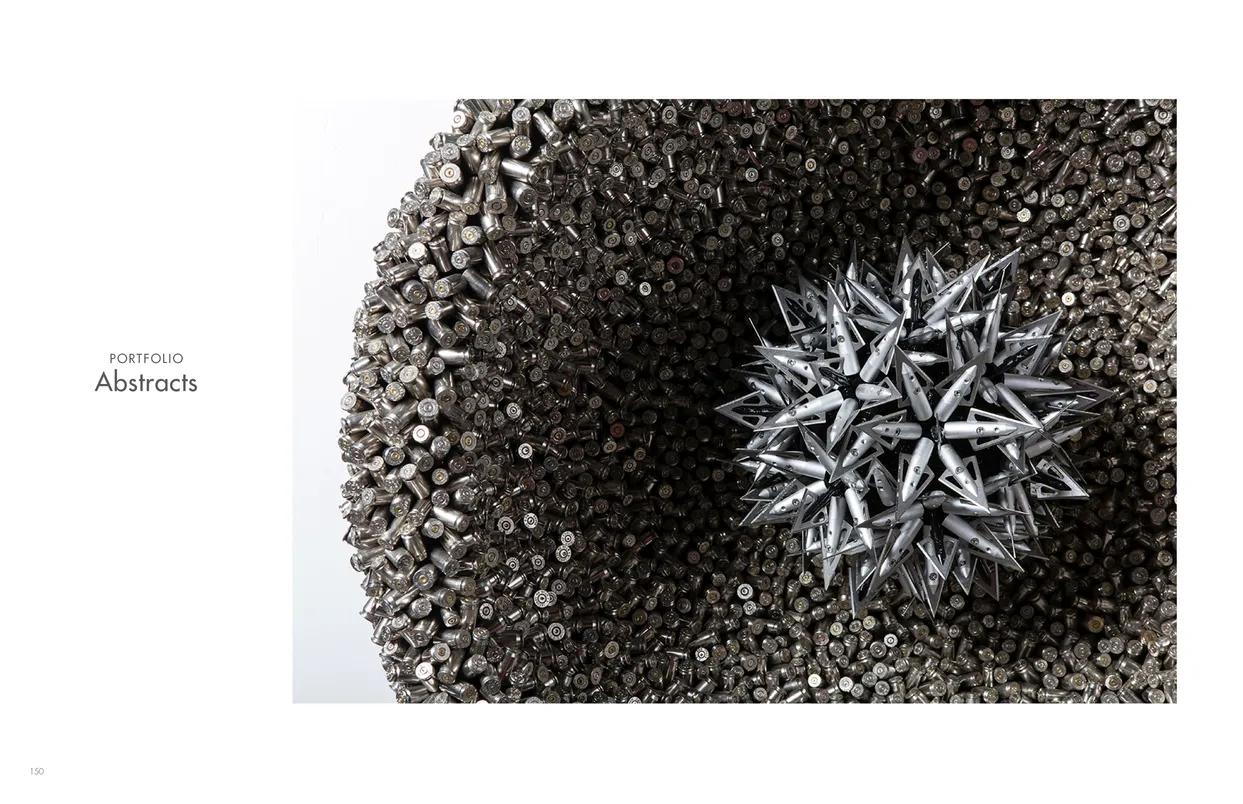
- Federico Uribe: Watch the Parade book, pages 150-151
- Client: Adelson Galleries
- Visit figure page
- Type: portfolio
- Portfolio Type: publication_design
- Portfolio Role: design_layout
Federico Uribe: Watch The Parade — Pages 152–153

- Federico Uribe: Watch the Parade book, pages 152-153
- Client: Adelson Galleries
- Visit figure page
- Type: portfolio
- Portfolio Type: publication_design
- Portfolio Role: design_layout
Federico Uribe: Watch The Parade — Pages 154–155
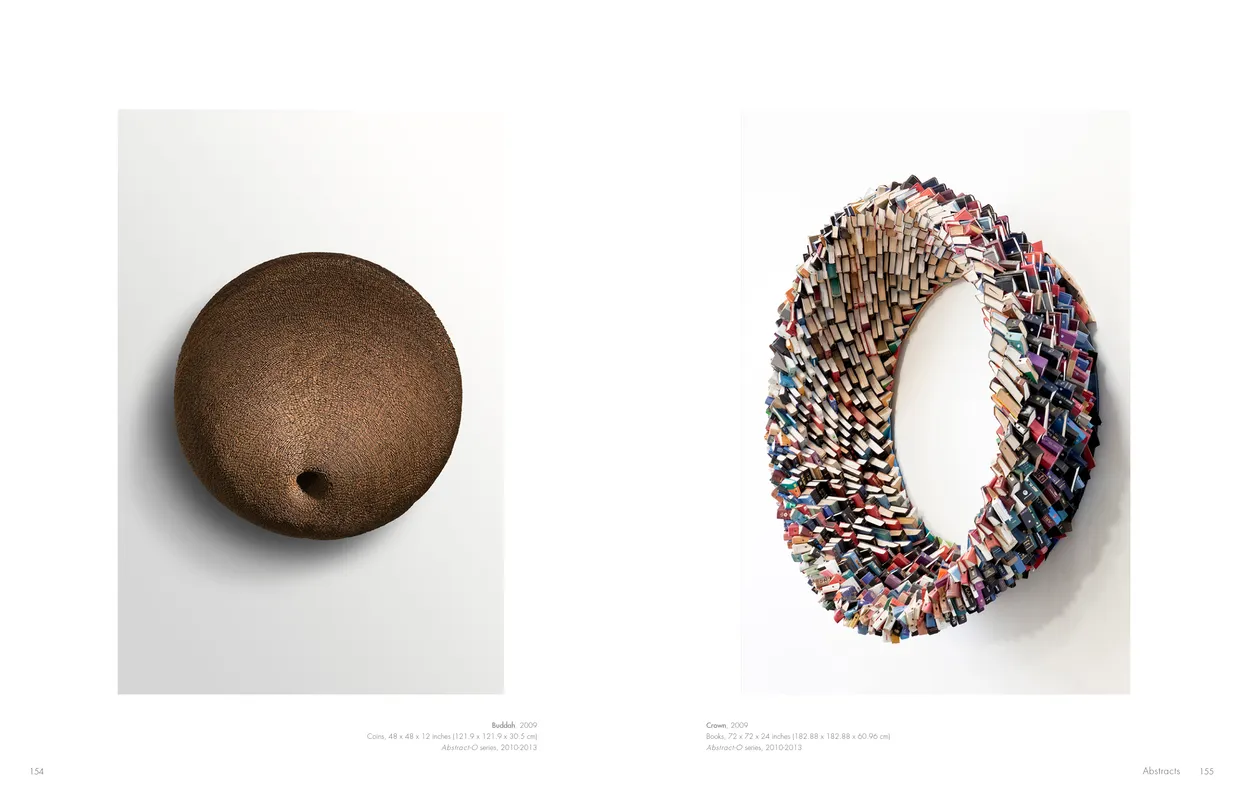
- Federico Uribe: Watch the Parade book, pages 154-155
- Client: Adelson Galleries
- Visit figure page
- Type: portfolio
- Portfolio Type: publication_design
- Portfolio Role: design_layout
Federico Uribe: Watch The Parade — Pages 156–157

- Federico Uribe: Watch the Parade book, pages 156-157
- Client: Adelson Galleries
- Visit figure page
- Type: portfolio
- Portfolio Type: publication_design
- Portfolio Role: design_layout
Federico Uribe: Watch The Parade — Pages 158–159

- Federico Uribe: Watch the Parade book, pages 158-159
- Client: Adelson Galleries
- Visit figure page
- Type: portfolio
- Portfolio Type: publication_design
- Portfolio Role: design_layout
Federico Uribe: Watch The Parade — Pages 16–17

- Federico Uribe: Watch the Parade book, pages 16-17
- Client: Adelson Galleries
- Visit figure page
- Type: portfolio
- Portfolio Type: publication_design
- Portfolio Role: design_layout
Federico Uribe: Watch The Parade — Pages 160–161

- Federico Uribe: Watch the Parade book, pages 160-161
- Client: Adelson Galleries
- Visit figure page
- Type: portfolio
- Portfolio Type: publication_design
- Portfolio Role: design_layout
Federico Uribe: Watch The Parade — Pages 162–163

- Federico Uribe: Watch the Parade book, pages 162-163
- Client: Adelson Galleries
- Visit figure page
- Type: portfolio
- Portfolio Type: publication_design
- Portfolio Role: design_layout
Federico Uribe: Watch The Parade — Pages 164–165

- Federico Uribe: Watch the Parade book, pages 164-165
- Client: Adelson Galleries
- Visit figure page
- Type: portfolio
- Portfolio Type: publication_design
- Portfolio Role: design_layout
Federico Uribe: Watch The Parade — Pages 168–169

- Federico Uribe: Watch the Parade book, pages 168-169
- Client: Adelson Galleries
- Visit figure page
- Type: portfolio
- Portfolio Type: publication_design
- Portfolio Role: design_layout
Federico Uribe: Watch The Parade — Pages 170–171

- Federico Uribe: Watch the Parade book, pages 170-171
- Client: Adelson Galleries
- Visit figure page
- Type: portfolio
- Portfolio Type: publication_design
- Portfolio Role: design_layout
Federico Uribe: Watch The Parade — Pages 172–173

- Federico Uribe: Watch the Parade book, pages 172-173
- Client: Adelson Galleries
- Visit figure page
- Type: portfolio
- Portfolio Type: publication_design
- Portfolio Role: design_layout
Federico Uribe: Watch The Parade — Pages 174–175

- Federico Uribe: Watch the Parade book, pages 174-175
- Client: Adelson Galleries
- Visit figure page
- Type: portfolio
- Portfolio Type: publication_design
- Portfolio Role: design_layout
Federico Uribe: Watch The Parade — Pages 176–177

- Federico Uribe: Watch the Parade book, pages 176-177
- Client: Adelson Galleries
- Visit figure page
- Type: portfolio
- Portfolio Type: publication_design
- Portfolio Role: design_layout
Federico Uribe: Watch The Parade — Pages 178–179

- Federico Uribe: Watch the Parade book, pages 178-179
- Client: Adelson Galleries
- Visit figure page
- Type: portfolio
- Portfolio Type: publication_design
- Portfolio Role: design_layout
Federico Uribe: Watch The Parade — Pages 18–19
- Federico Uribe: Watch the Parade book, pages 18-19
- Client: Adelson Galleries
- Visit figure page
- Type: portfolio
- Portfolio Type: publication_design
- Portfolio Role: design_layout
Federico Uribe: Watch The Parade — Pages 180–181

- Federico Uribe: Watch the Parade book, pages 180-181
- Client: Adelson Galleries
- Visit figure page
- Type: portfolio
- Portfolio Type: publication_design
- Portfolio Role: design_layout
Federico Uribe: Watch The Parade — Pages 182–183
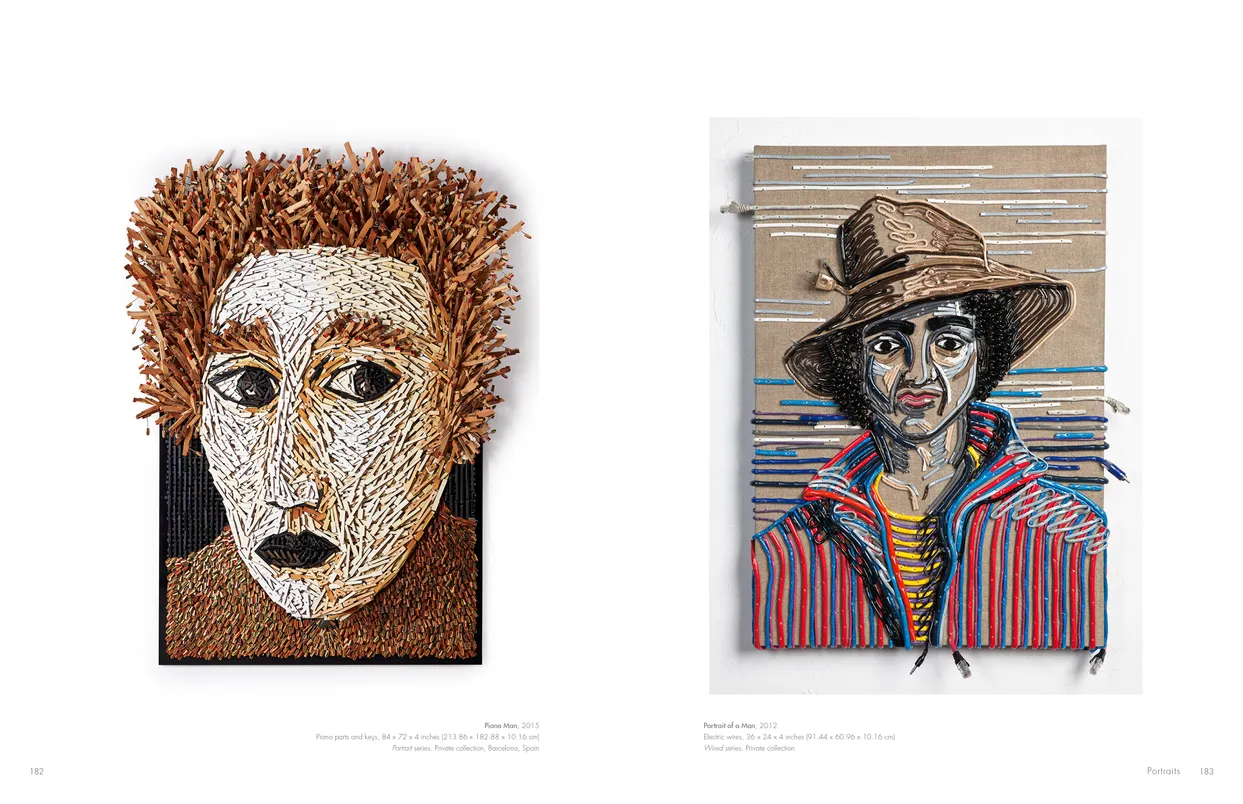
- Federico Uribe: Watch the Parade book, pages 182-183
- Client: Adelson Galleries
- Visit figure page
- Type: portfolio
- Portfolio Type: publication_design
- Portfolio Role: design_layout
Federico Uribe: Watch The Parade — Pages 184–185

- Federico Uribe: Watch the Parade book, pages 184-185
- Client: Adelson Galleries
- Visit figure page
- Type: portfolio
- Portfolio Type: publication_design
- Portfolio Role: design_layout
Federico Uribe: Watch The Parade — Pages 186–187
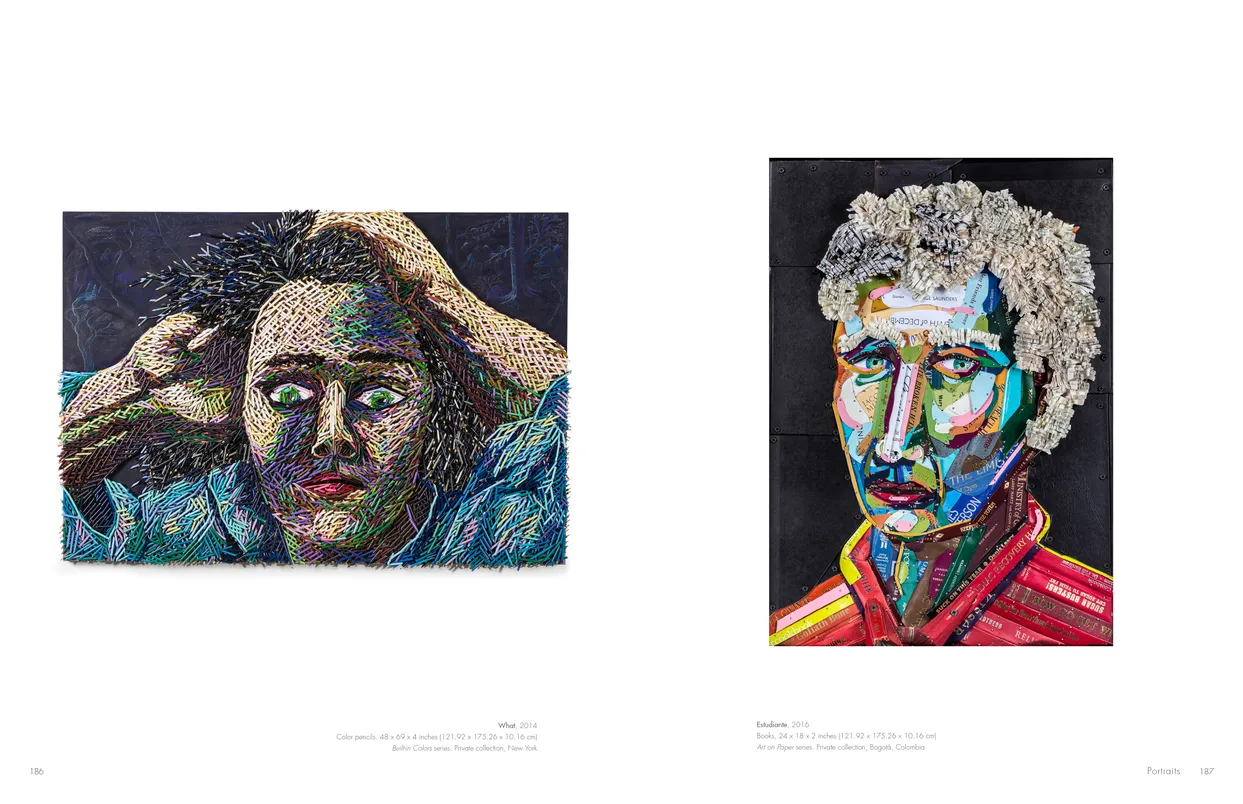
- Federico Uribe: Watch the Parade book, pages 186-187
- Client: Adelson Galleries
- Visit figure page
- Type: portfolio
- Portfolio Type: publication_design
- Portfolio Role: design_layout
Federico Uribe: Watch The Parade — Pages 188–189

- Federico Uribe: Watch the Parade book, pages 188-189
- Client: Adelson Galleries
- Visit figure page
- Type: portfolio
- Portfolio Type: publication_design
- Portfolio Role: design_layout
Federico Uribe: Watch The Parade — Pages 190–191
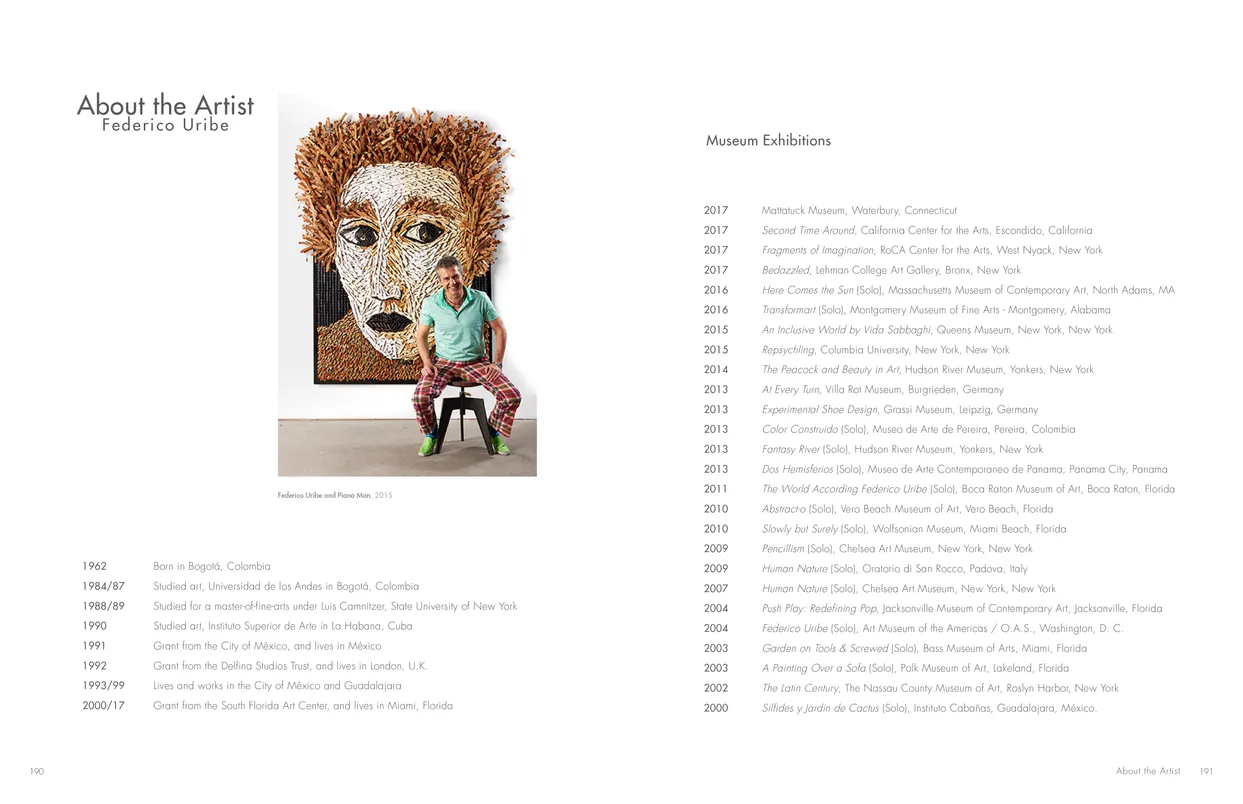
- Federico Uribe: Watch the Parade book, pages 190-191
- Client: Adelson Galleries
- Visit figure page
- Type: portfolio
- Portfolio Type: publication_design
- Portfolio Role: design_layout
Federico Uribe: Watch The Parade — Pages 192–193
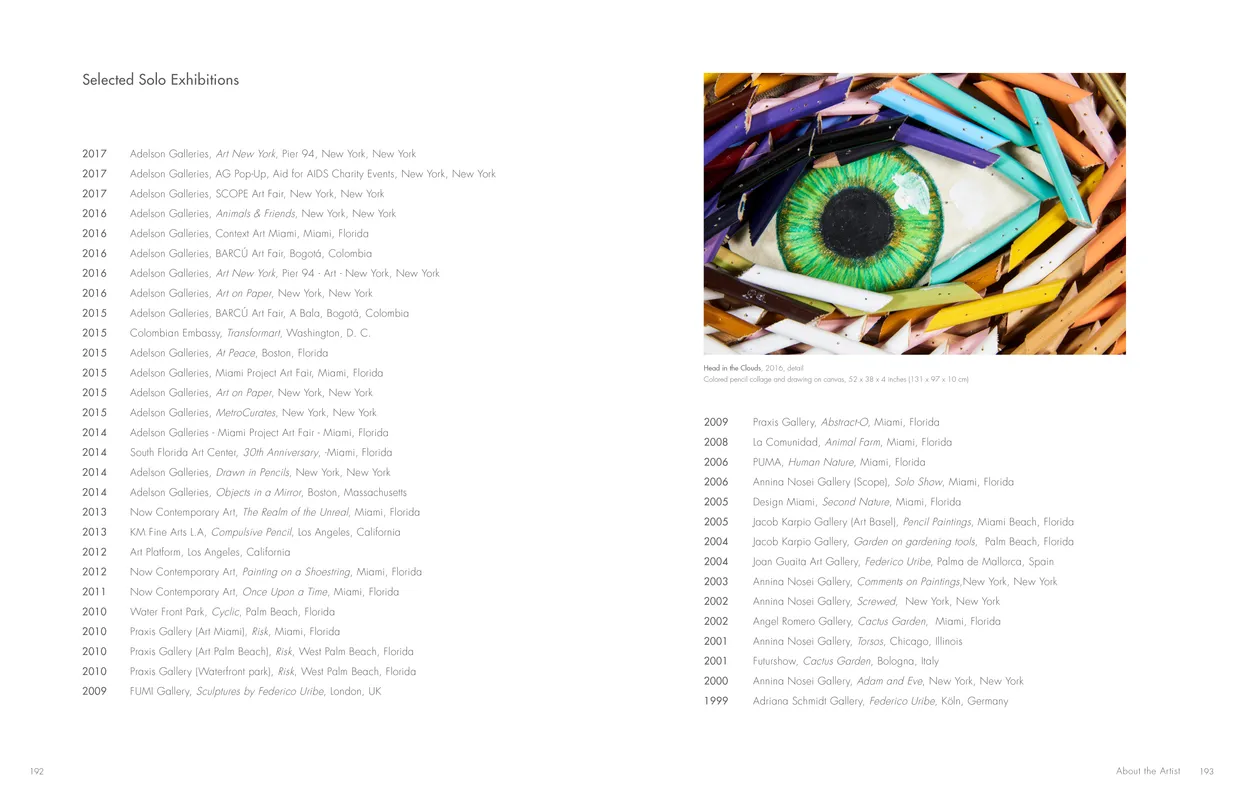
- Federico Uribe: Watch the Parade book, pages 192-193
- Client: Adelson Galleries
- Visit figure page
- Type: portfolio
- Portfolio Type: publication_design
- Portfolio Role: design_layout
Federico Uribe: Watch The Parade — Pages 194–195

- Federico Uribe: Watch the Parade book, pages 194-195
- Client: Adelson Galleries
- Visit figure page
- Type: portfolio
- Portfolio Type: publication_design
- Portfolio Role: design_layout
Federico Uribe: Watch The Parade — Pages 196–197

- Federico Uribe: Watch the Parade book, pages 196-197
- Client: Adelson Galleries
- Visit figure page
- Type: portfolio
- Portfolio Type: publication_design
- Portfolio Role: design_layout
Federico Uribe: Watch The Parade — Pages 198–199

- Federico Uribe: Watch the Parade book, pages 198-199
- Client: Adelson Galleries
- Visit figure page
- Type: portfolio
- Portfolio Type: publication_design
- Portfolio Role: design_layout
Federico Uribe: Watch The Parade — Pages 2–3

- Federico Uribe: Watch the Parade book, pages 2-3
- Client: Adelson Galleries
- Visit figure page
- Type: portfolio
- Portfolio Type: publication_design
- Portfolio Role: design_layout
Federico Uribe: Watch The Parade — Pages 20–21

- Federico Uribe: Watch the Parade book, pages 20-21
- Client: Adelson Galleries
- Visit figure page
- Type: portfolio
- Portfolio Type: publication_design
- Portfolio Role: design_layout
Federico Uribe: Watch The Parade — Pages 200–201
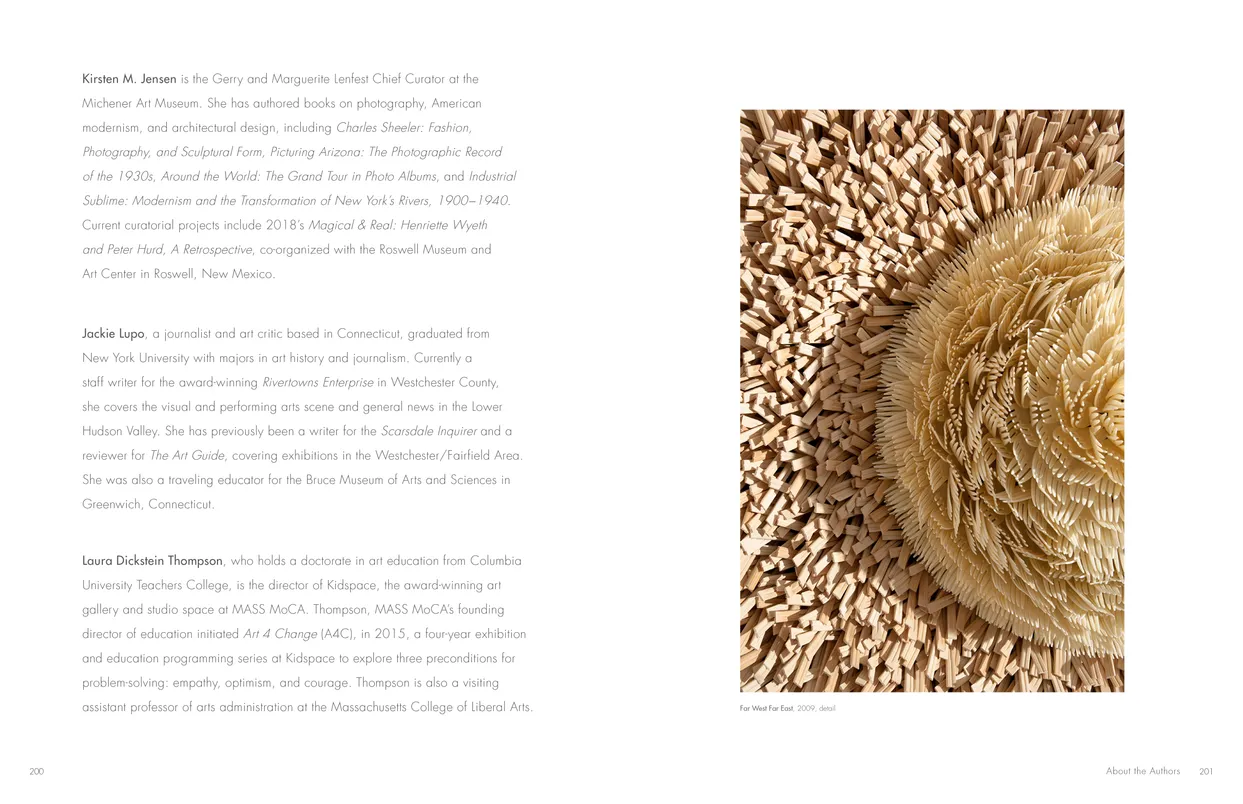
- Federico Uribe: Watch the Parade book, pages 200-201
- Client: Adelson Galleries
- Visit figure page
- Type: portfolio
- Portfolio Type: publication_design
- Portfolio Role: design_layout
Federico Uribe: Watch The Parade — Pages 22–23
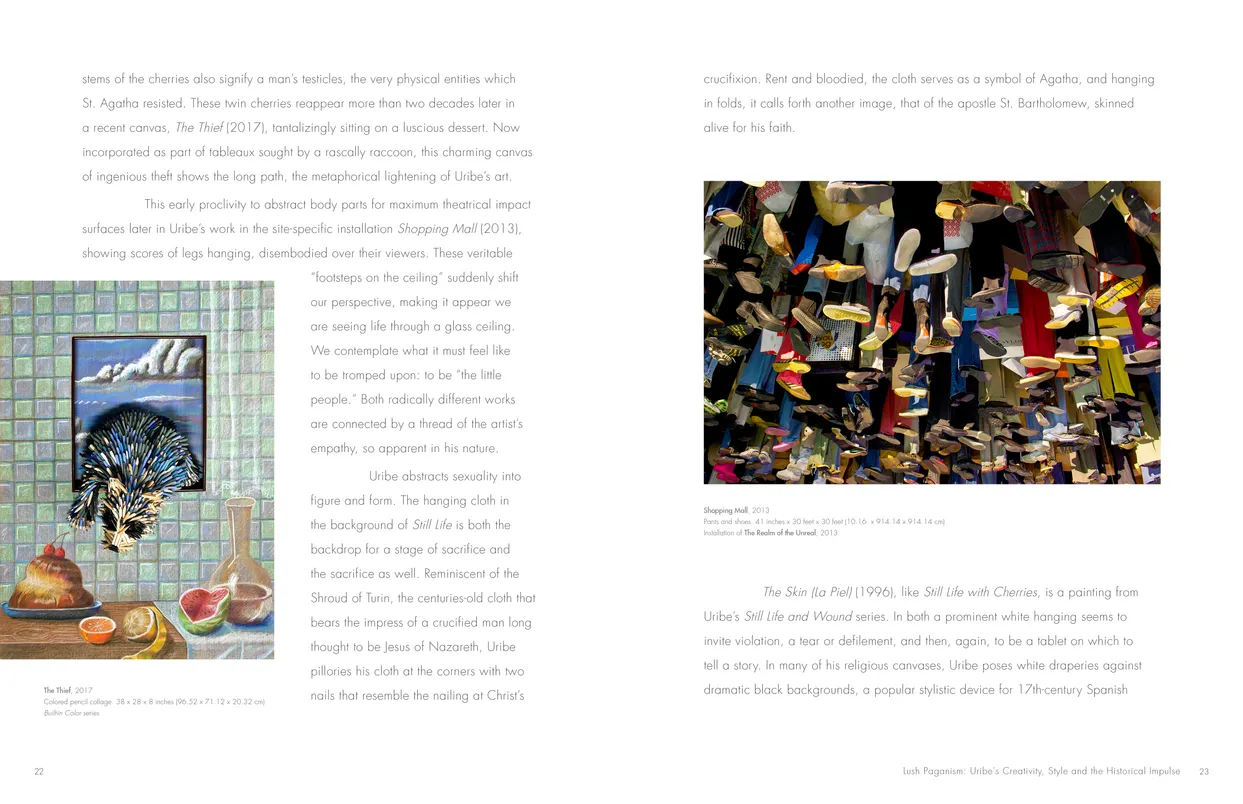
- Federico Uribe: Watch the Parade book, pages 22-23
- Client: Adelson Galleries
- Visit figure page
- Type: portfolio
- Portfolio Type: publication_design
- Portfolio Role: design_layout
Federico Uribe: Watch The Parade — Pages 24–25
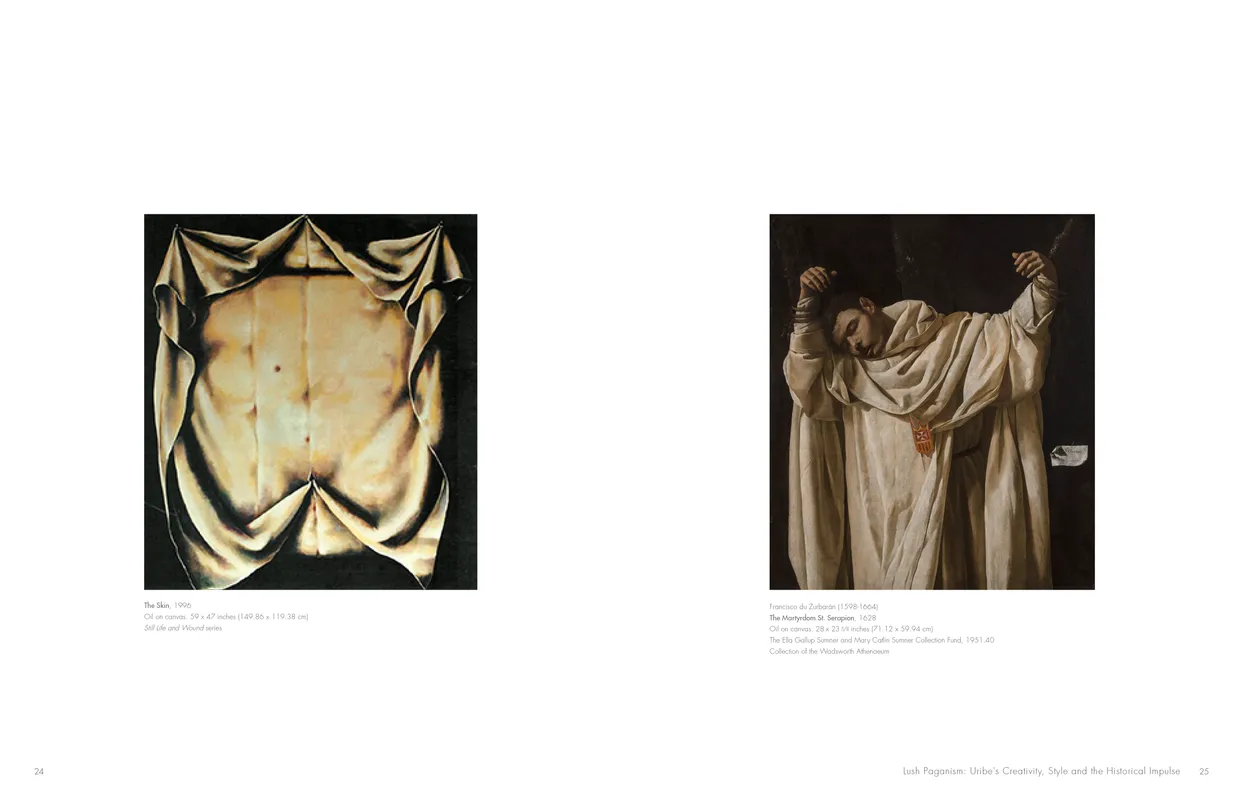
- Federico Uribe: Watch the Parade book, pages 24-25
- Client: Adelson Galleries
- Visit figure page
- Type: portfolio
- Portfolio Type: publication_design
- Portfolio Role: design_layout
Federico Uribe: Watch The Parade — Pages 26–27

- Federico Uribe: Watch the Parade book, pages 26-27
- Client: Adelson Galleries
- Visit figure page
- Type: portfolio
- Portfolio Type: publication_design
- Portfolio Role: design_layout
Federico Uribe: Watch The Parade — Pages 28–29

- Federico Uribe: Watch the Parade book, pages 28-29
- Client: Adelson Galleries
- Visit figure page
- Type: portfolio
- Portfolio Type: publication_design
- Portfolio Role: design_layout
Federico Uribe: Watch The Parade — Pages 30–31

- Federico Uribe: Watch the Parade book, pages 30-31
- Client: Adelson Galleries
- Visit figure page
- Type: portfolio
- Portfolio Type: publication_design
- Portfolio Role: design_layout
Federico Uribe: Watch The Parade — Pages 32–33
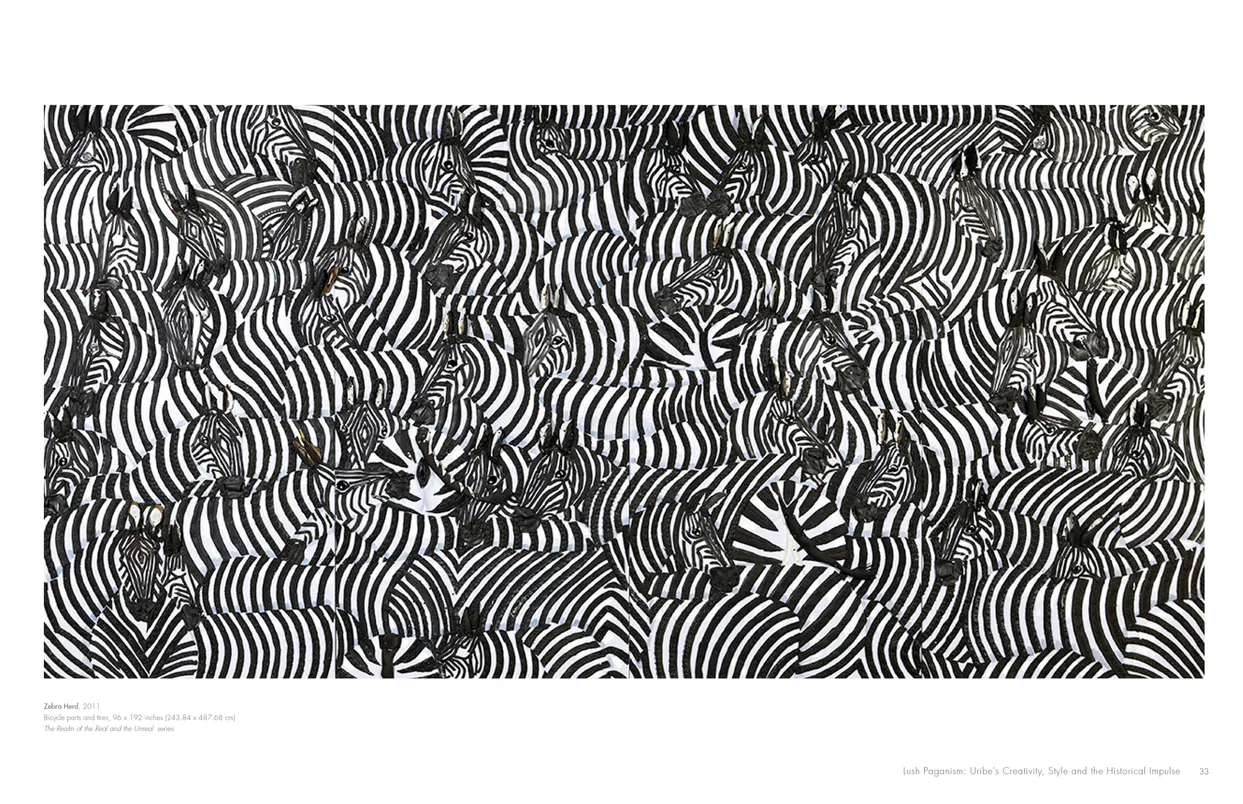
- Federico Uribe: Watch the Parade book, pages 32-33
- Client: Adelson Galleries
- Visit figure page
- Type: portfolio
- Portfolio Type: publication_design
- Portfolio Role: design_layout
Federico Uribe: Watch The Parade — Pages 34–35
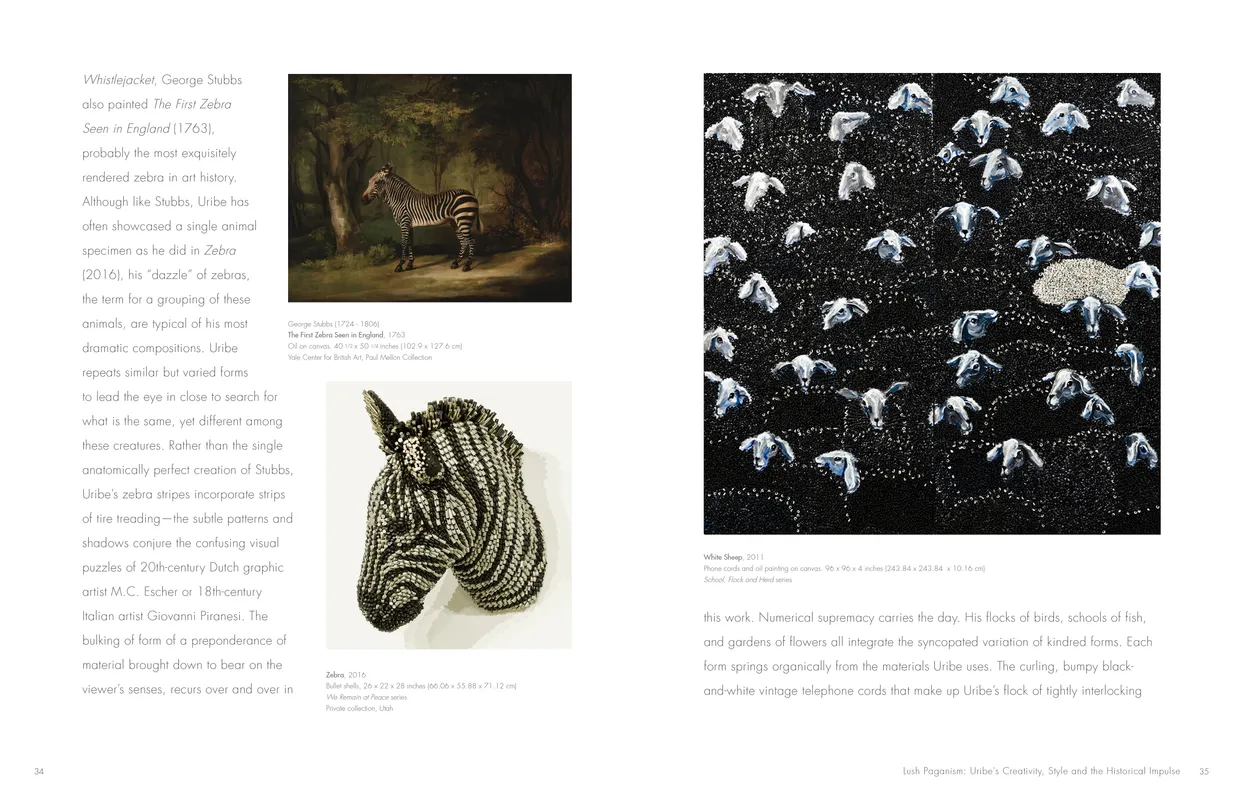
- Federico Uribe: Watch the Parade book, pages 34-35
- Client: Adelson Galleries
- Visit figure page
- Type: portfolio
- Portfolio Type: publication_design
- Portfolio Role: design_layout
Federico Uribe: Watch The Parade — Pages 36–37
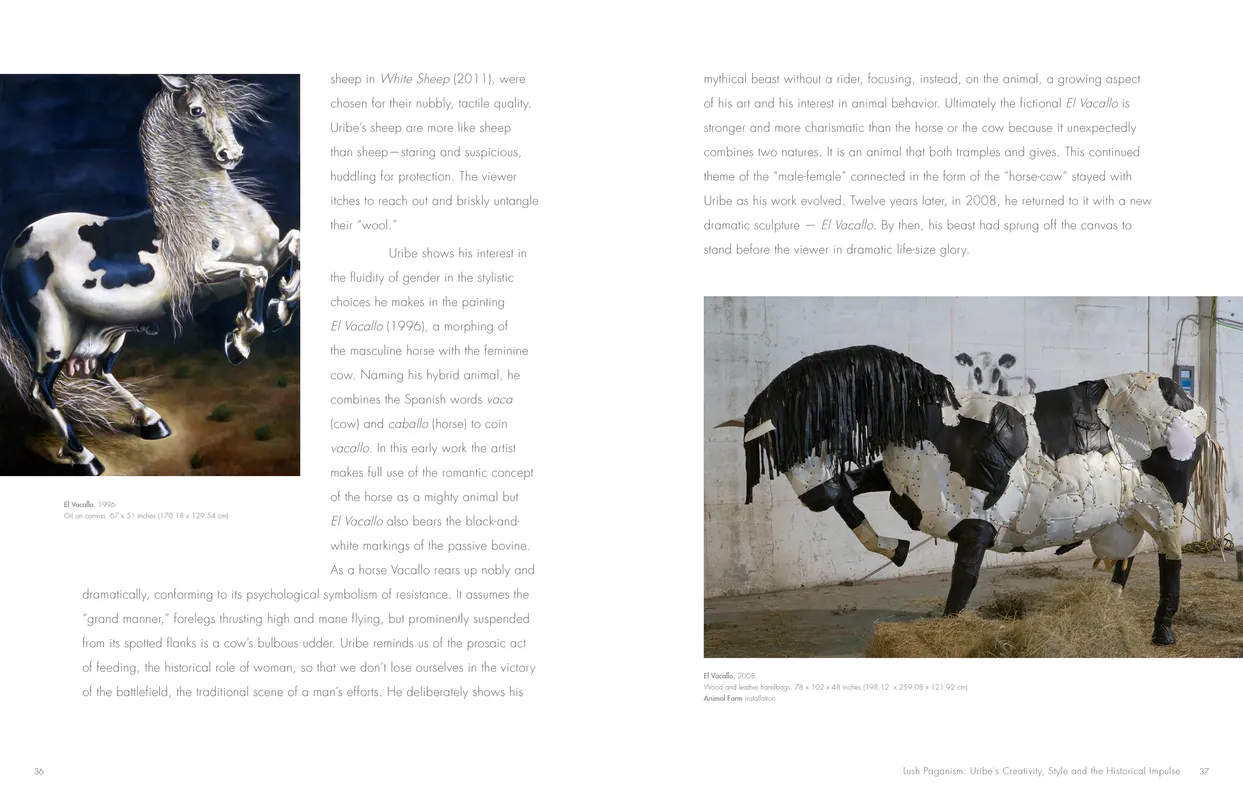
- Federico Uribe: Watch the Parade book, pages 36-37
- Client: Adelson Galleries
- Visit figure page
- Type: portfolio
- Portfolio Type: publication_design
- Portfolio Role: design_layout
Federico Uribe: Watch The Parade — Pages 38–39

- Federico Uribe: Watch the Parade book, pages 38-39
- Client: Adelson Galleries
- Visit figure page
- Type: portfolio
- Portfolio Type: publication_design
- Portfolio Role: design_layout
Federico Uribe: Watch The Parade — Pages 4–5

- Federico Uribe: Watch the Parade book, pages 4-5
- Client: Adelson Galleries
- Visit figure page
- Type: portfolio
- Portfolio Type: publication_design
- Portfolio Role: design_layout
Federico Uribe: Watch The Parade — Pages 40–41

- Federico Uribe: Watch the Parade book, pages 40-41
- Client: Adelson Galleries
- Visit figure page
- Type: portfolio
- Portfolio Type: publication_design
- Portfolio Role: design_layout
Federico Uribe: Watch The Parade — Pages 42–43
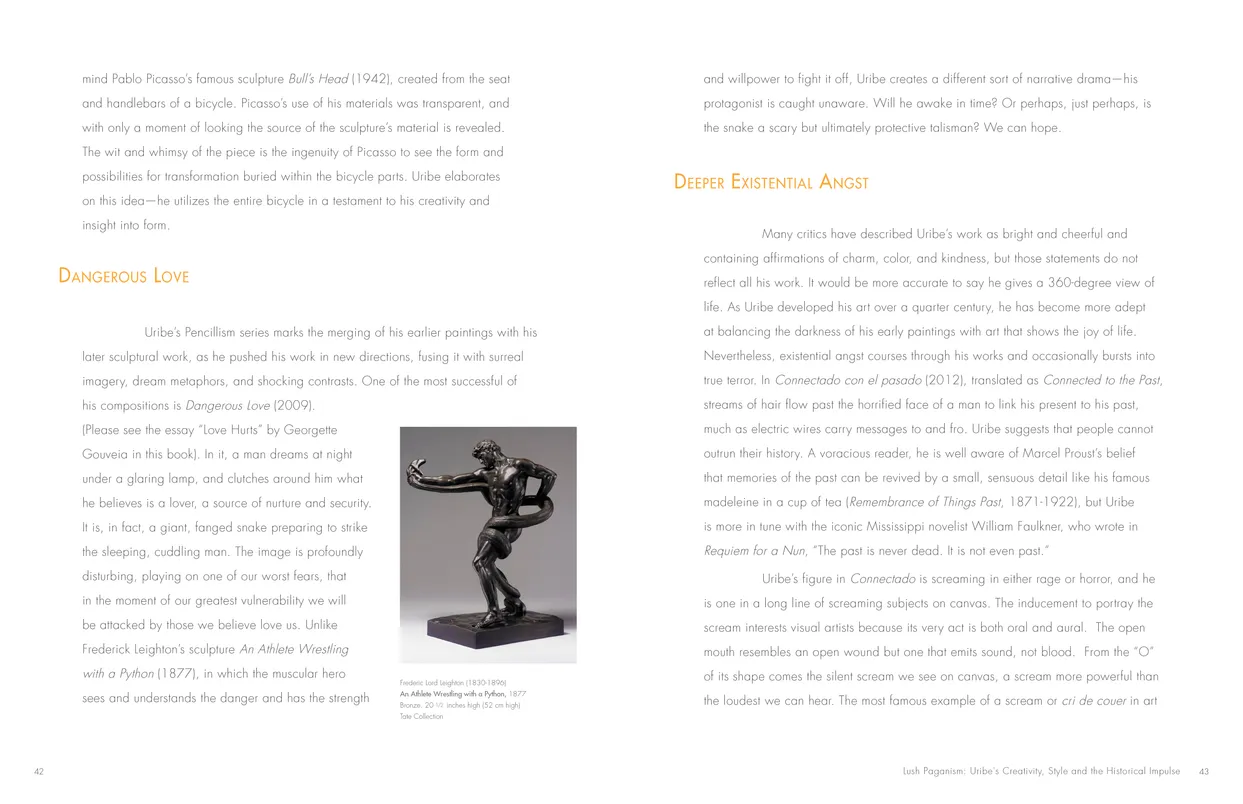
- Federico Uribe: Watch the Parade book, pages 42-43
- Client: Adelson Galleries
- Visit figure page
- Type: portfolio
- Portfolio Type: publication_design
- Portfolio Role: design_layout
Federico Uribe: Watch The Parade — Pages 44–45
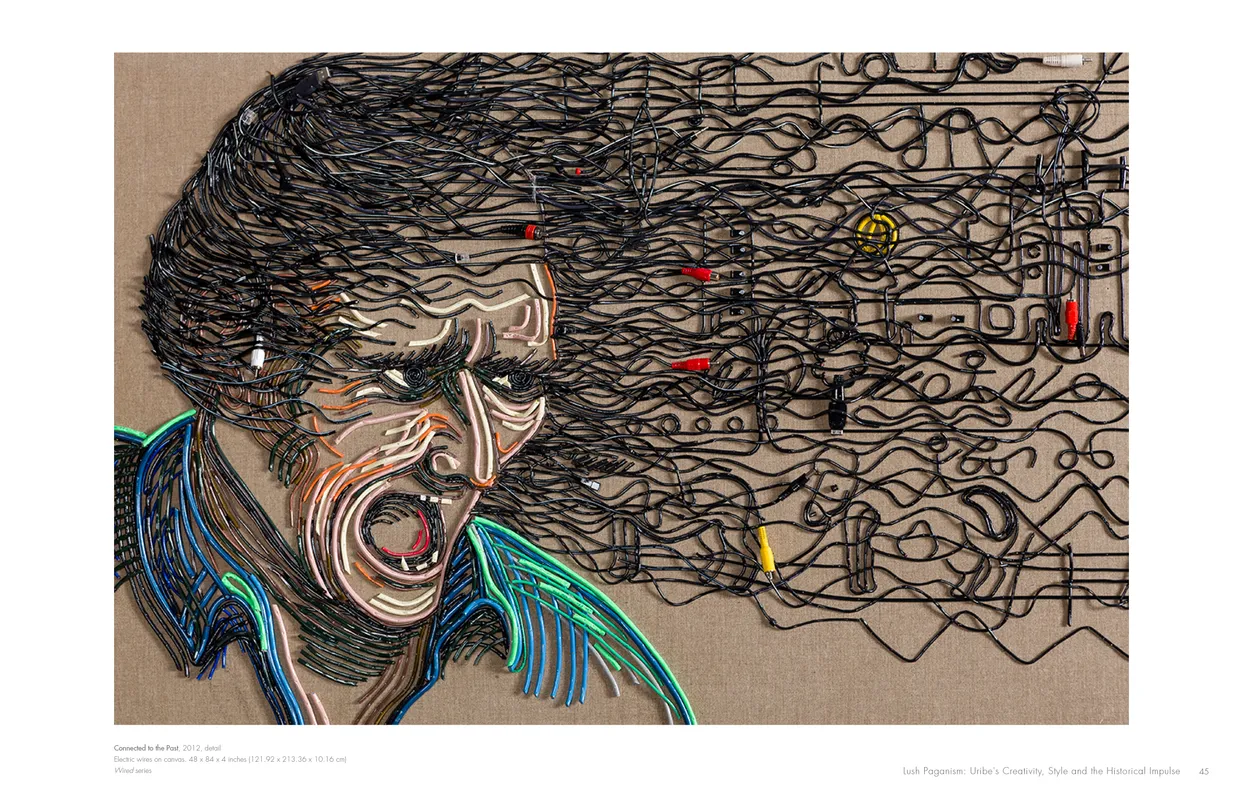
- Federico Uribe: Watch the Parade book, pages 44-45
- Client: Adelson Galleries
- Visit figure page
- Type: portfolio
- Portfolio Type: publication_design
- Portfolio Role: design_layout
Federico Uribe: Watch The Parade — Pages 46–47

- Federico Uribe: Watch the Parade book, pages 46-47
- Client: Adelson Galleries
- Visit figure page
- Type: portfolio
- Portfolio Type: publication_design
- Portfolio Role: design_layout
Federico Uribe: Watch The Parade — Pages 48–49
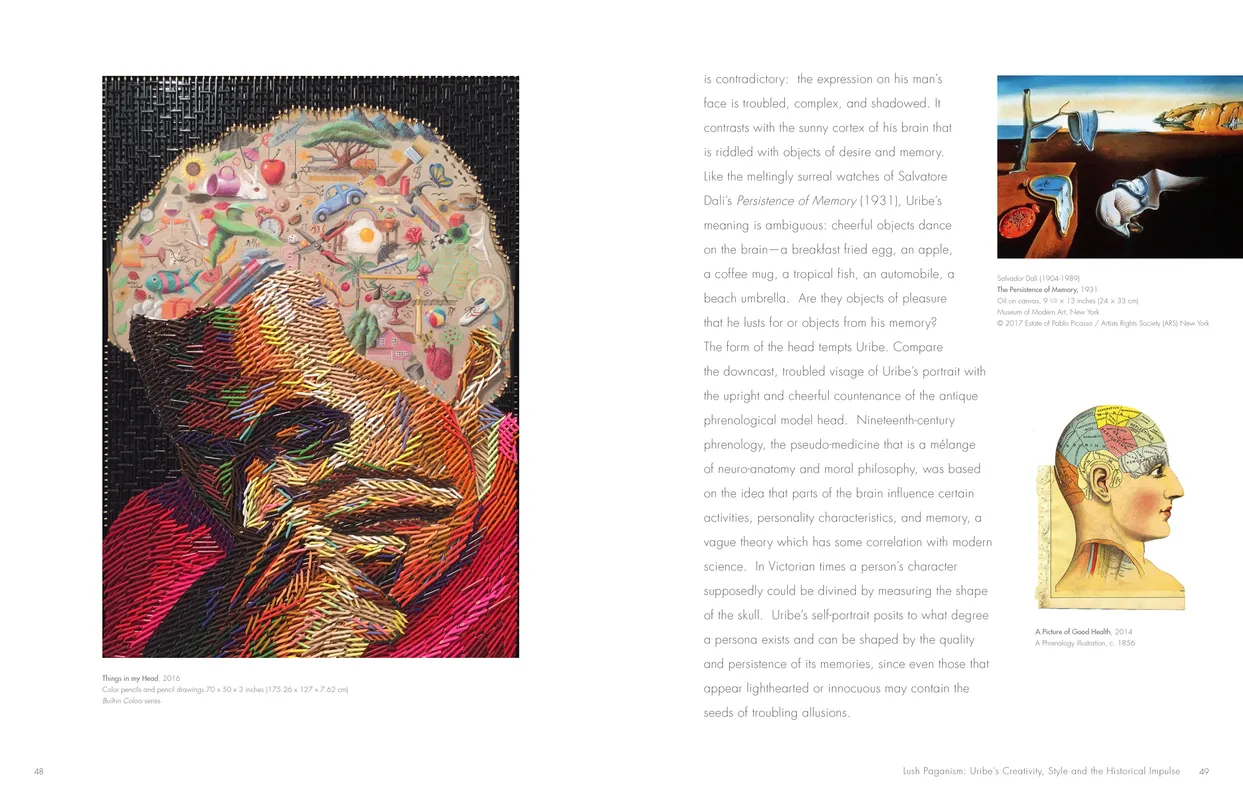
- Federico Uribe: Watch the Parade book, pages 48-49
- Client: Adelson Galleries
- Visit figure page
- Type: portfolio
- Portfolio Type: publication_design
- Portfolio Role: design_layout
Federico Uribe: Watch The Parade — Pages 50–51

- Federico Uribe: Watch the Parade book, pages 50-51
- Client: Adelson Galleries
- Visit figure page
- Type: portfolio
- Portfolio Type: publication_design
- Portfolio Role: design_layout
Federico Uribe: Watch The Parade — Pages 52–53

- Federico Uribe: Watch the Parade book, pages 52-53
- Client: Adelson Galleries
- Visit figure page
- Type: portfolio
- Portfolio Type: publication_design
- Portfolio Role: design_layout
Federico Uribe: Watch The Parade — Pages 54–55

- Federico Uribe: Watch the Parade book, pages 54-55
- Client: Adelson Galleries
- Visit figure page
- Type: portfolio
- Portfolio Type: publication_design
- Portfolio Role: design_layout
Federico Uribe: Watch The Parade — Pages 56–57

- Federico Uribe: Watch the Parade book, pages 56-57
- Client: Adelson Galleries
- Visit figure page
- Type: portfolio
- Portfolio Type: publication_design
- Portfolio Role: design_layout
Federico Uribe: Watch The Parade — Pages 58–59
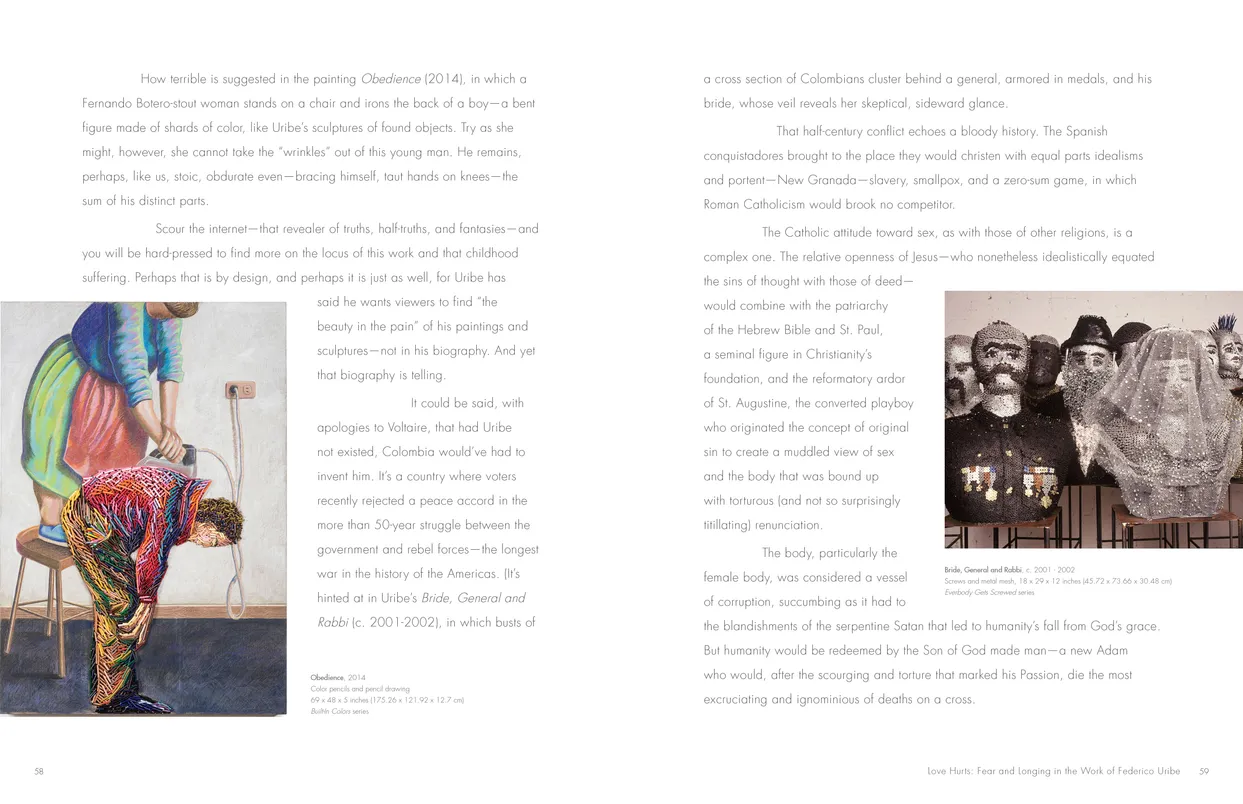
- Federico Uribe: Watch the Parade book, pages 58-59
- Client: Adelson Galleries
- Visit figure page
- Type: portfolio
- Portfolio Type: publication_design
- Portfolio Role: design_layout
Federico Uribe: Watch The Parade — Pages 6–7
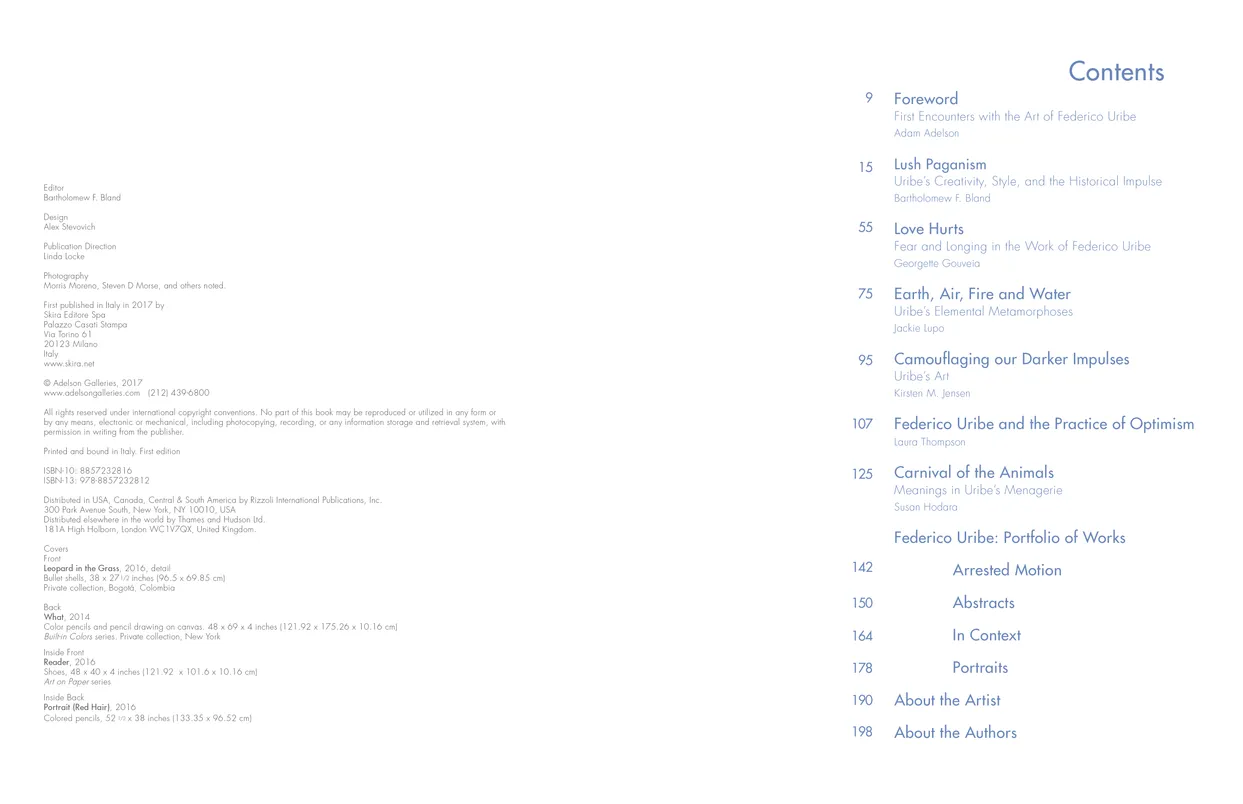
- Federico Uribe: Watch the Parade book, pages 6-7
- Client: Adelson Galleries
- Visit figure page
- Type: portfolio
- Portfolio Type: publication_design
- Portfolio Role: design_layout
Federico Uribe: Watch The Parade — Pages 60–61

- Federico Uribe: Watch the Parade book, pages 60-61
- Client: Adelson Galleries
- Visit figure page
- Type: portfolio
- Portfolio Type: publication_design
- Portfolio Role: design_layout
Federico Uribe: Watch The Parade — Pages 62–63
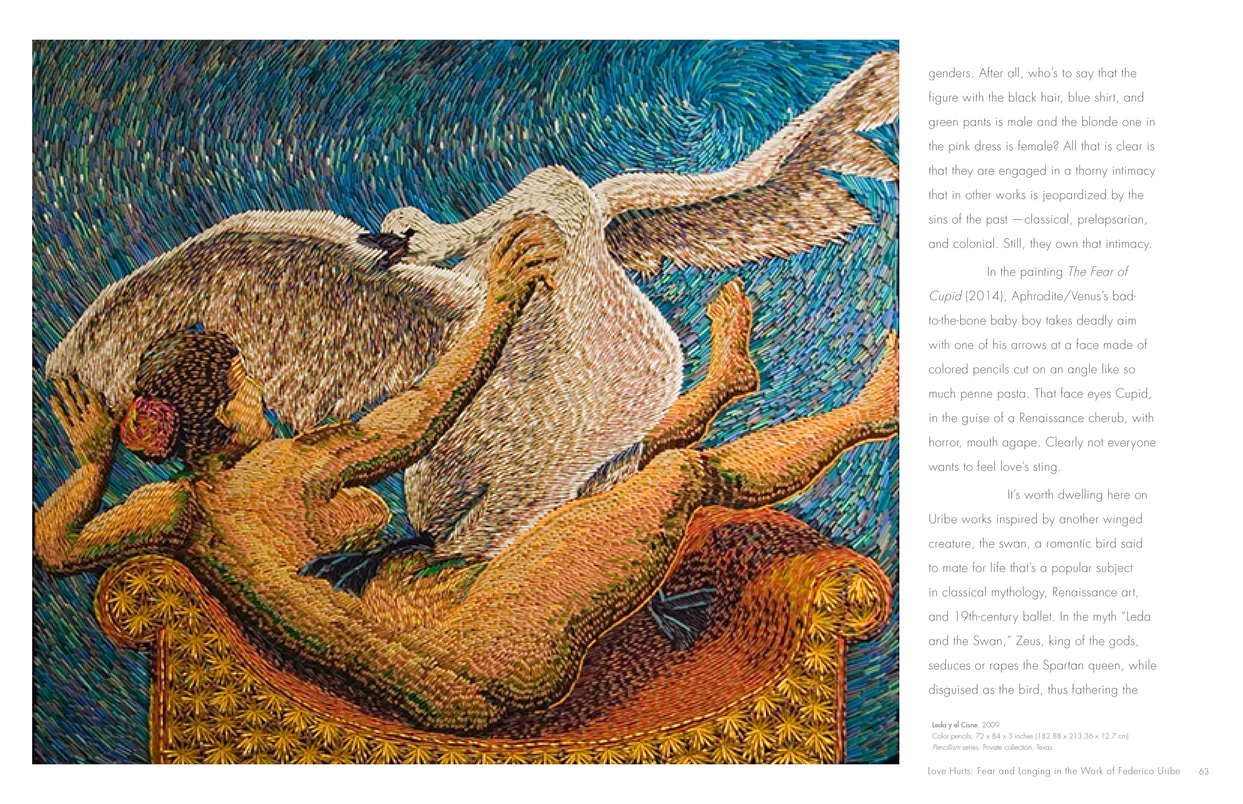
- Federico Uribe: Watch the Parade book, pages 62-63
- Client: Adelson Galleries
- Visit figure page
- Type: portfolio
- Portfolio Type: publication_design
- Portfolio Role: design_layout
Federico Uribe: Watch The Parade — Pages 64–65

- Federico Uribe: Watch the Parade book, pages 64-65
- Client: Adelson Galleries
- Visit figure page
- Type: portfolio
- Portfolio Type: publication_design
- Portfolio Role: design_layout
Federico Uribe: Watch The Parade — Pages 66–67

- Federico Uribe: Watch the Parade book, pages 66-67
- Client: Adelson Galleries
- Visit figure page
- Type: portfolio
- Portfolio Type: publication_design
- Portfolio Role: design_layout
Federico Uribe: Watch The Parade — Pages 68–69

- Federico Uribe: Watch the Parade book, pages 68-69
- Client: Adelson Galleries
- Visit figure page
- Type: portfolio
- Portfolio Type: publication_design
- Portfolio Role: design_layout
Federico Uribe: Watch The Parade — Pages 72–73
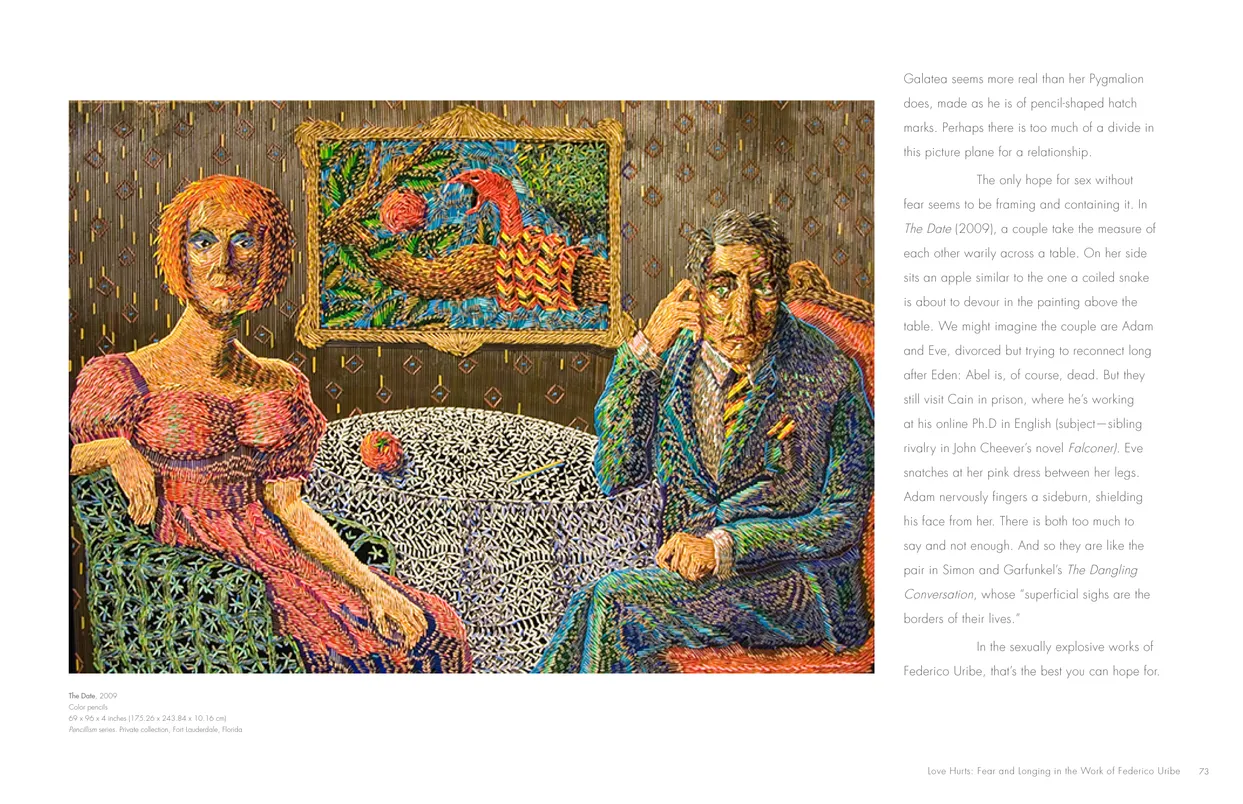
- Federico Uribe: Watch the Parade book, pages 72-73
- Client: Adelson Galleries
- Visit figure page
- Type: portfolio
- Portfolio Type: publication_design
- Portfolio Role: design_layout
Federico Uribe: Watch The Parade — Pages 74–75

- Federico Uribe: Watch the Parade book, pages 74-75
- Client: Adelson Galleries
- Visit figure page
- Type: portfolio
- Portfolio Type: publication_design
- Portfolio Role: design_layout
Federico Uribe: Watch The Parade — Pages 76–77

- Federico Uribe: Watch the Parade book, pages 76-77
- Client: Adelson Galleries
- Visit figure page
- Type: portfolio
- Portfolio Type: publication_design
- Portfolio Role: design_layout
Federico Uribe: Watch The Parade — Pages 78–79

- Federico Uribe: Watch the Parade book, pages 78-79
- Client: Adelson Galleries
- Visit figure page
- Type: portfolio
- Portfolio Type: publication_design
- Portfolio Role: design_layout
Federico Uribe: Watch The Parade — Pages 8–9
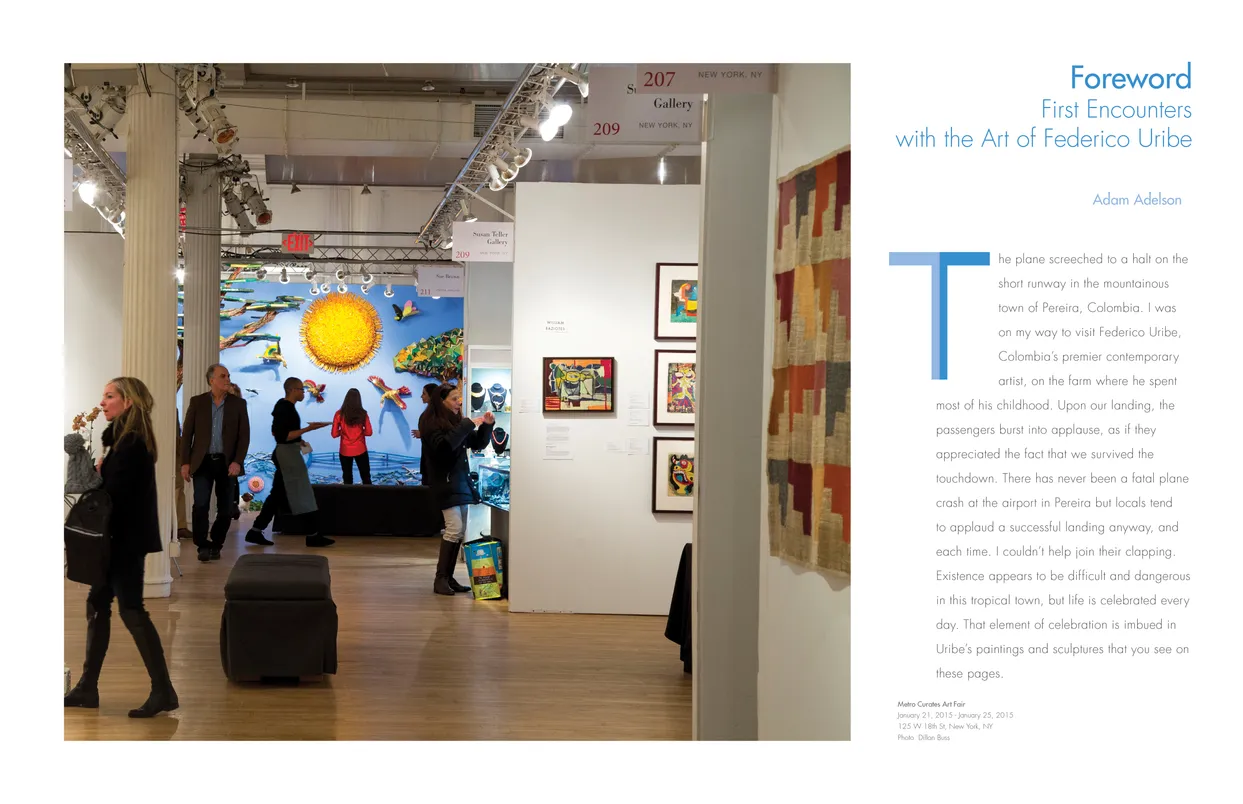
- Federico Uribe: Watch the Parade book, pages 8-9
- Client: Adelson Galleries
- Visit figure page
- Type: portfolio
- Portfolio Type: publication_design
- Portfolio Role: design_layout
Federico Uribe: Watch The Parade — Pages 80–81
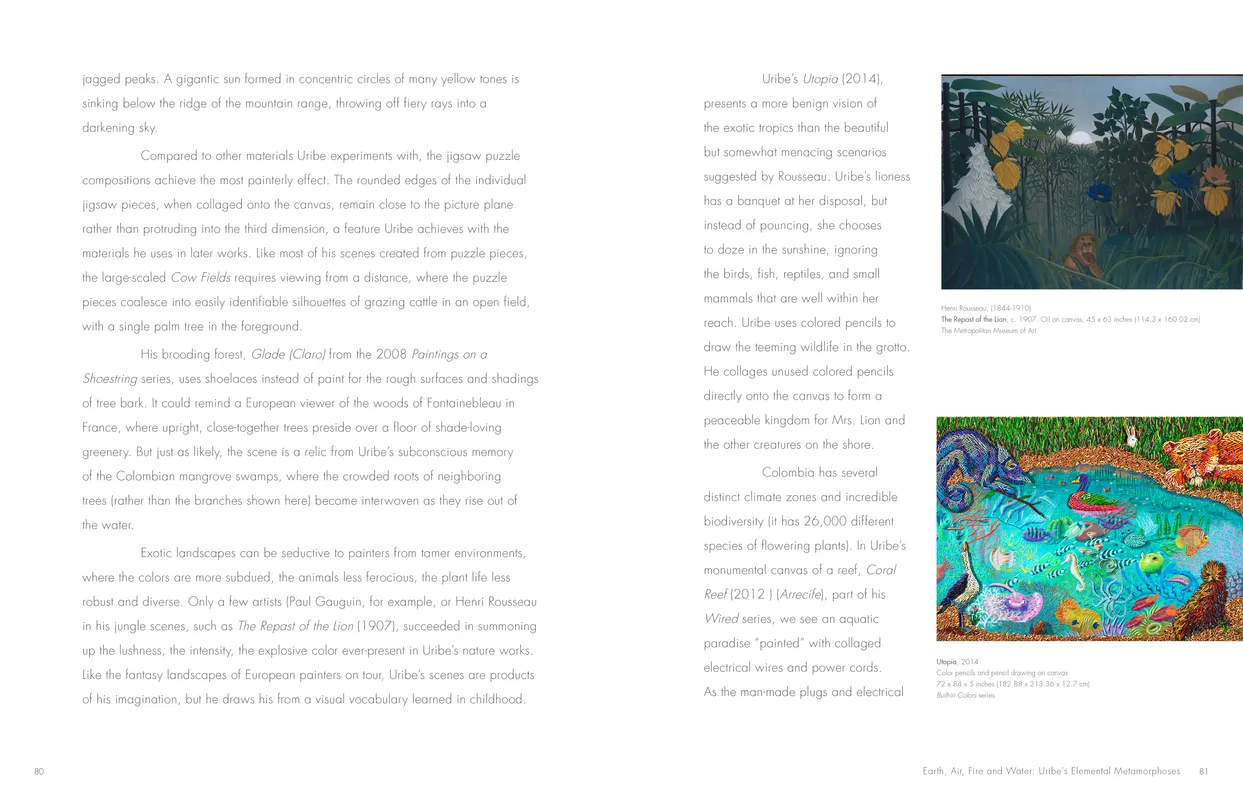
- Federico Uribe: Watch the Parade book, pages 80-81
- Client: Adelson Galleries
- Visit figure page
- Type: portfolio
- Portfolio Type: publication_design
- Portfolio Role: design_layout
Federico Uribe: Watch The Parade — Pages 82–83
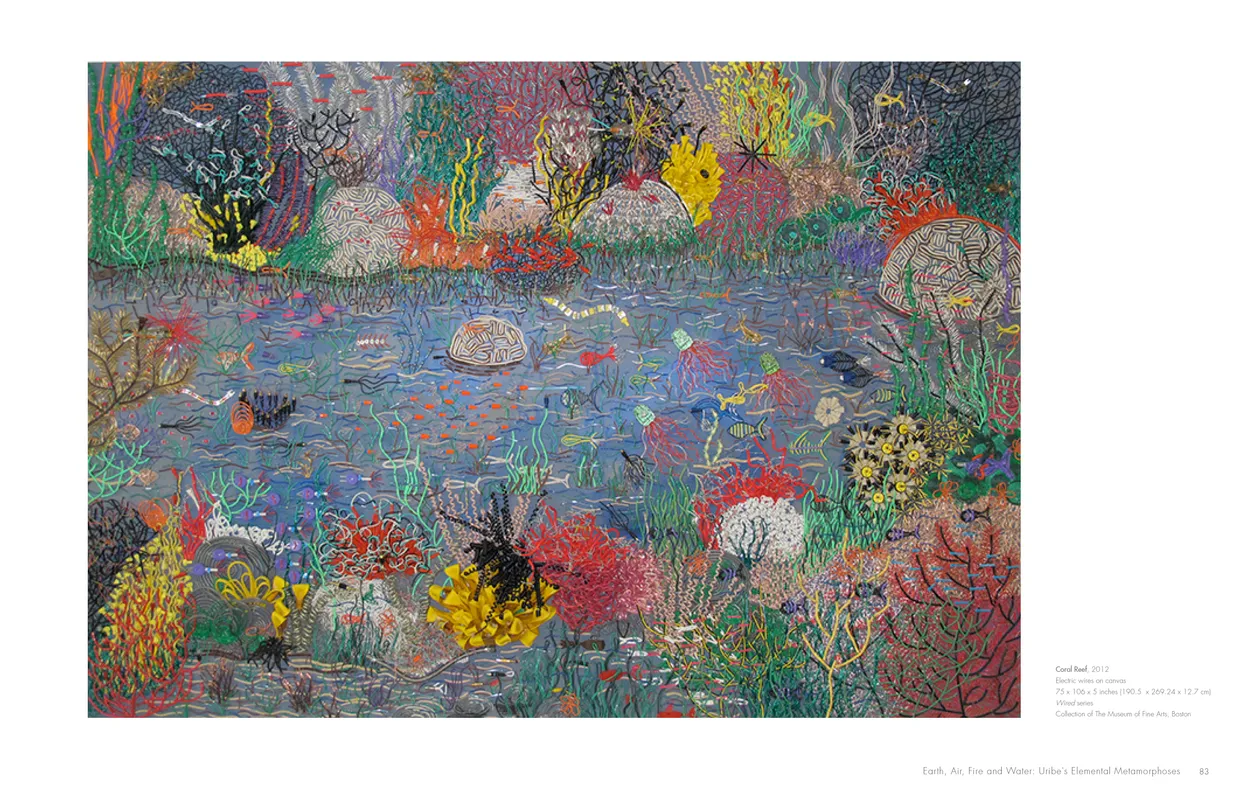
- Federico Uribe: Watch the Parade book, pages 82-83
- Client: Adelson Galleries
- Visit figure page
- Type: portfolio
- Portfolio Type: publication_design
- Portfolio Role: design_layout
Federico Uribe: Watch The Parade — Pages 84–85
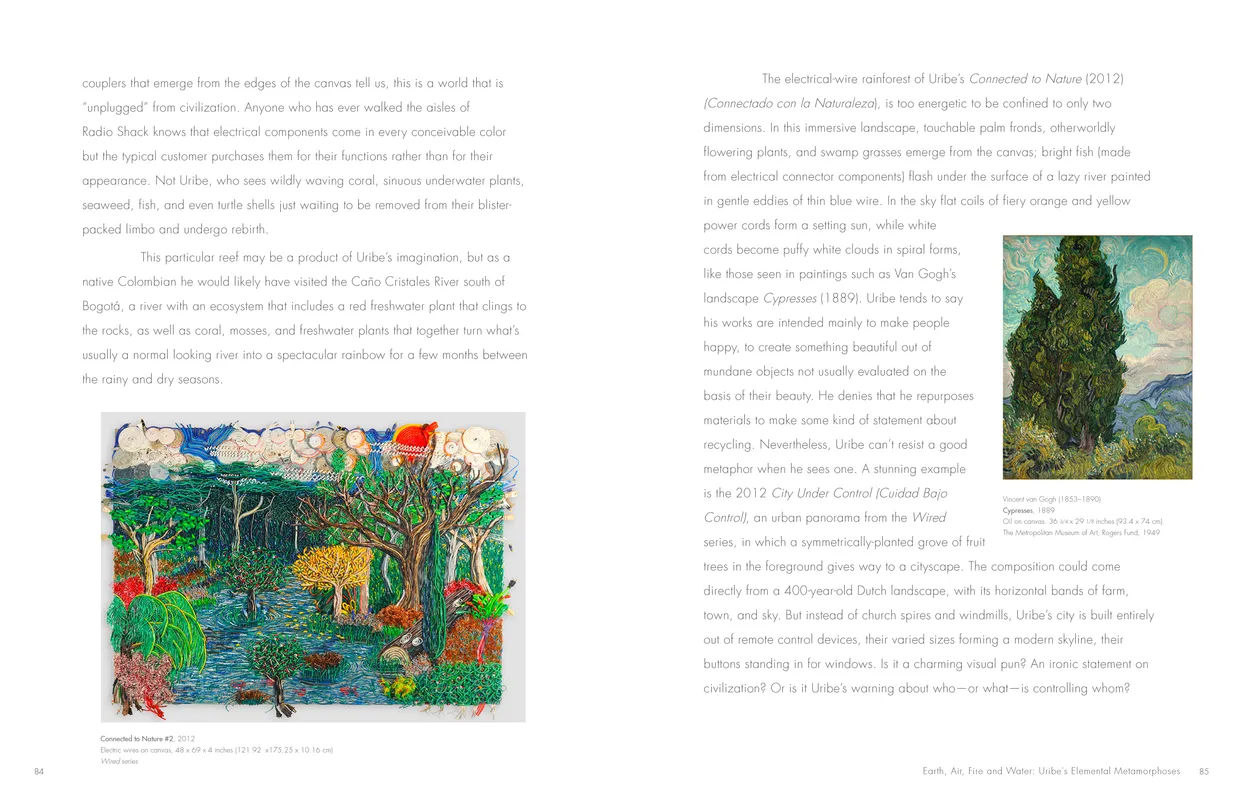
- Federico Uribe: Watch the Parade book, pages 84-85
- Client: Adelson Galleries
- Visit figure page
- Type: portfolio
- Portfolio Type: publication_design
- Portfolio Role: design_layout
Federico Uribe: Watch The Parade — Pages 86–87

- Federico Uribe: Watch the Parade book, pages 86-87
- Client: Adelson Galleries
- Visit figure page
- Type: portfolio
- Portfolio Type: publication_design
- Portfolio Role: design_layout
Federico Uribe: Watch The Parade — Pages 88–89
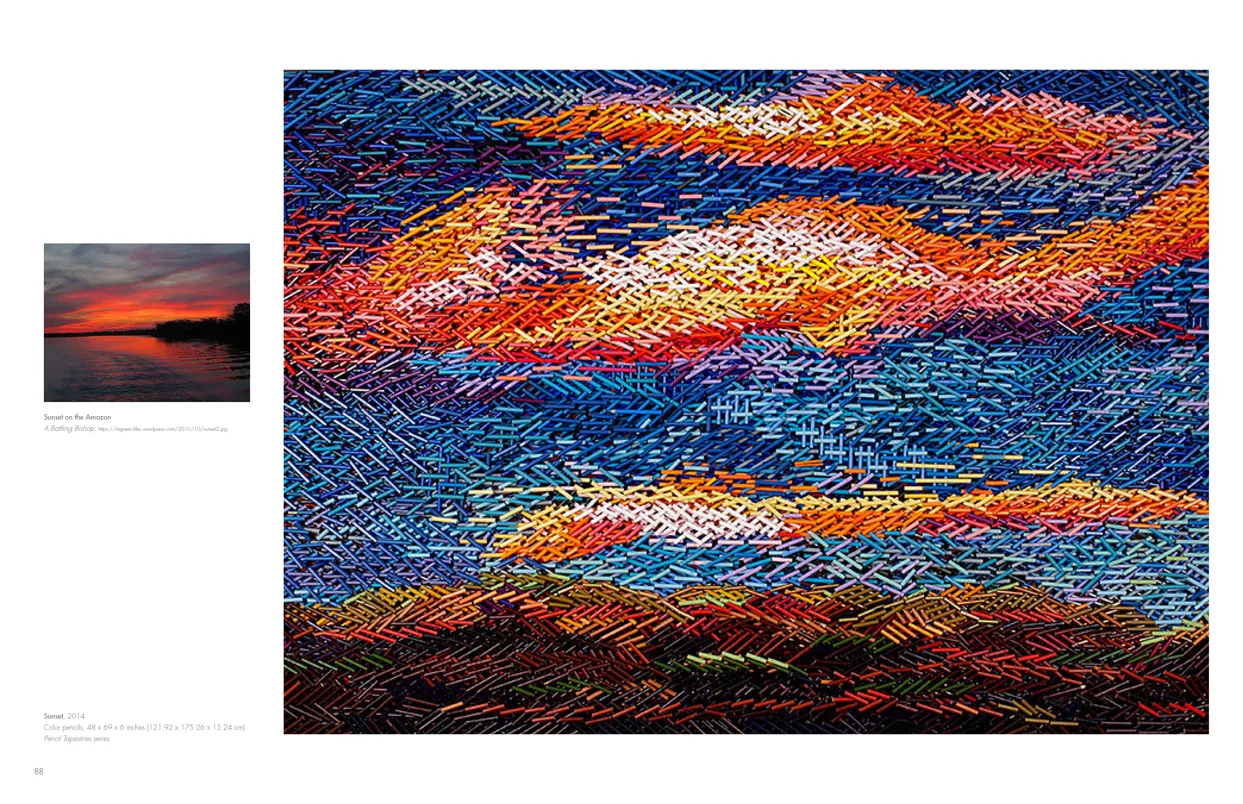
- Federico Uribe: Watch the Parade book, pages 88-89
- Client: Adelson Galleries
- Visit figure page
- Type: portfolio
- Portfolio Type: publication_design
- Portfolio Role: design_layout
Federico Uribe: Watch The Parade — Pages 90–91

- Federico Uribe: Watch the Parade book, pages 90-91
- Client: Adelson Galleries
- Visit figure page
- Type: portfolio
- Portfolio Type: publication_design
- Portfolio Role: design_layout
Federico Uribe: Watch The Parade — Pages 92–93
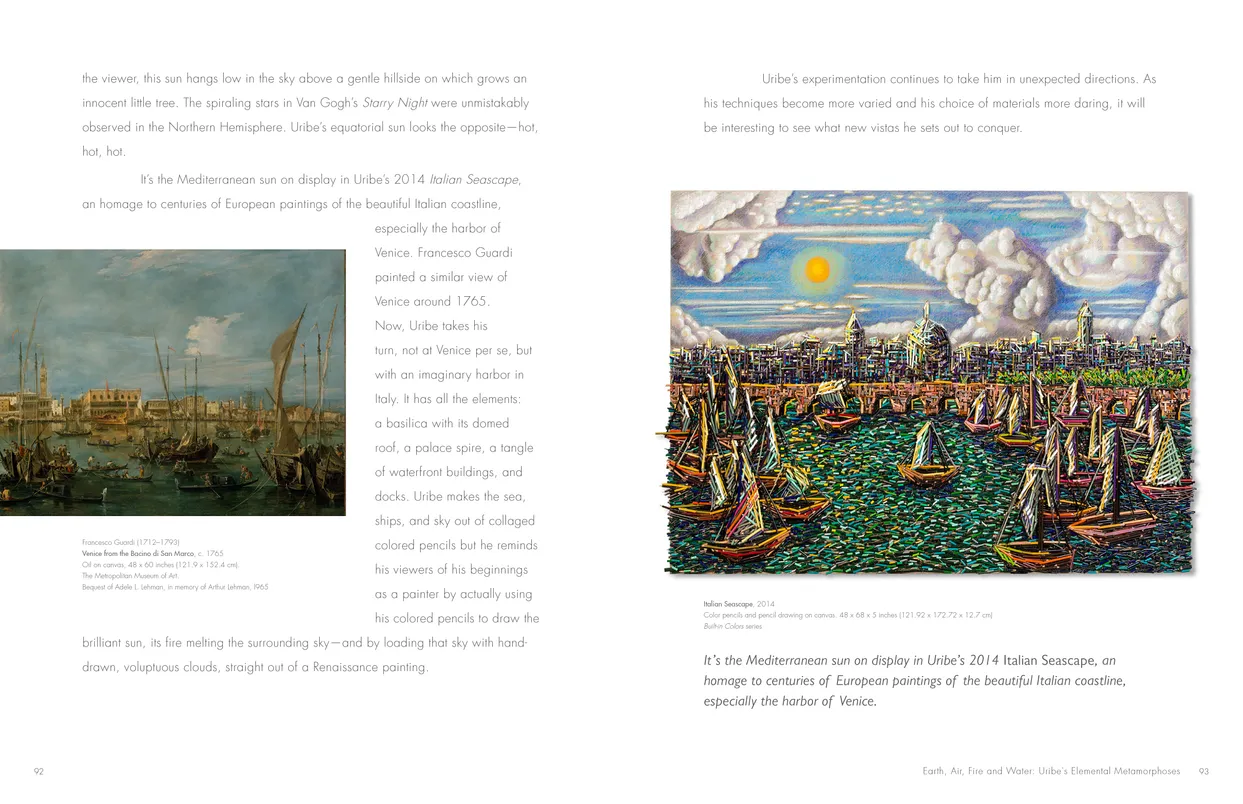
- Federico Uribe: Watch the Parade book, pages 92-93
- Client: Adelson Galleries
- Visit figure page
- Type: portfolio
- Portfolio Type: publication_design
- Portfolio Role: design_layout
Federico Uribe: Watch The Parade — Pages 94–95

- Federico Uribe: Watch the Parade book, pages 94-95
- Client: Adelson Galleries
- Visit figure page
- Type: portfolio
- Portfolio Type: publication_design
- Portfolio Role: design_layout
Federico Uribe: Watch The Parade — Pages 96–97

- Federico Uribe: Watch the Parade book, pages 96-97
- Client: Adelson Galleries
- Visit figure page
- Type: portfolio
- Portfolio Type: publication_design
- Portfolio Role: design_layout
Federico Uribe: Watch The Parade — Pages 98–99

- Federico Uribe: Watch the Parade book, pages 98-99
- Client: Adelson Galleries
- Visit figure page
- Type: portfolio
- Portfolio Type: publication_design
- Portfolio Role: design_layout
Fractal Bouquet Brand Brandmark

- Fractal Bouquet brandmark
- Client: Fractal Bouquet
- Visit figure page
- Type: portfolio
- Portfolio Type: advertising
- Portfolio Role: design_layout
Fractal Bouquet Web Home Page

- Fractal Bouquet Website — Home Page
- Client: Fractal Bouquet
- Visit figure page
- Type: portfolio
- Portfolio Type: advertising
- Portfolio Role: design_layout
Freedom Cube
- Freedom Cube graphic
- Artwork by Alex Stevovich
- © Alex Stevovich
- Visit figure page
- Type: portfolio
- Portfolio Type: advertising
- Portfolio Role: design_layout
- Portfolio Original Art: true
Frohawk Two: Feathers Kill Your Best Ideas — Cover
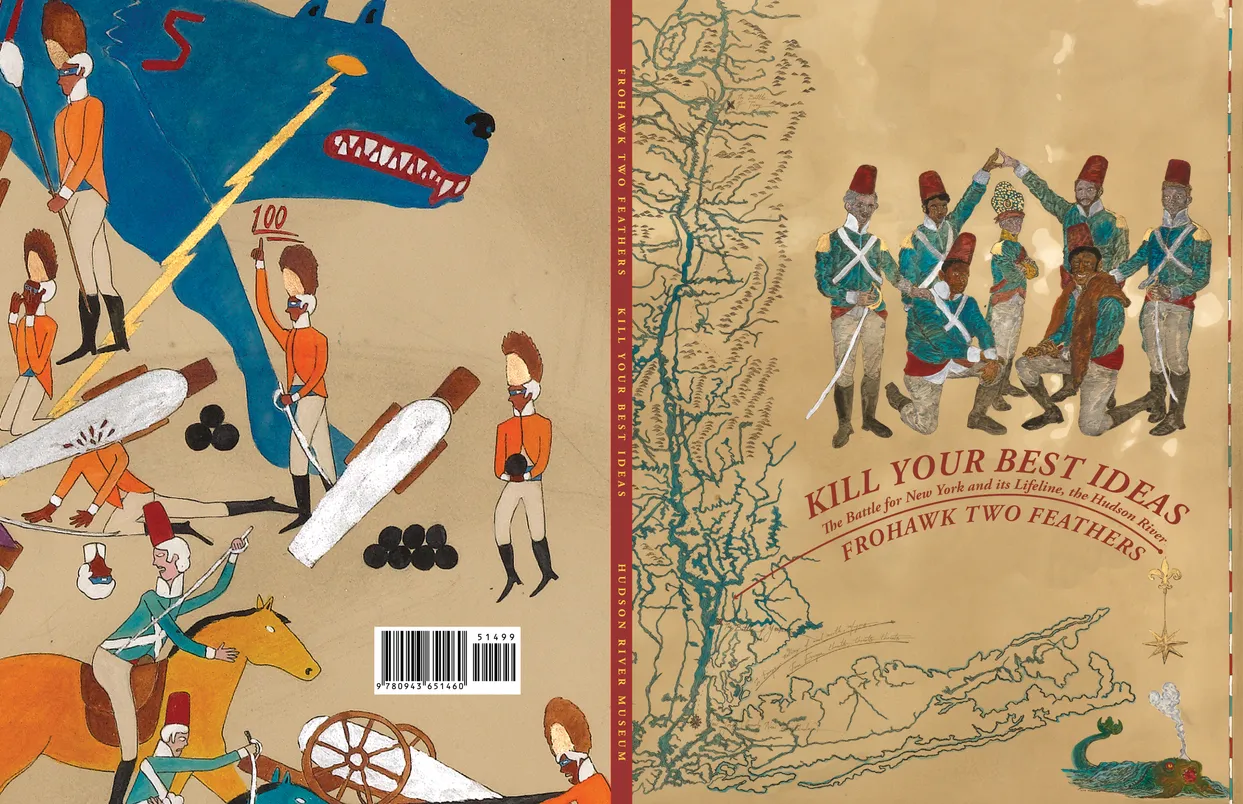
- Frohawk Two Feathers Kill Your Best Ideas exhibition catalog, cover
- Client: Hudon River Museum
- Visit figure page
- Type: portfolio
- Portfolio Type: publication_design
- Portfolio Role: design_layout
Frohawk Two: Feathers Kill Your Best Ideas — Inside Front Cover

- Frohawk Two Feathers Kill Your Best Ideas exhibition catalog, inside cover front
- Client: Hudon River Museum
- Visit figure page
- Type: portfolio
- Portfolio Type: publication_design
- Portfolio Role: design_layout
Frohawk Two: Feathers Kill Your Best Ideas — Pages 10–11
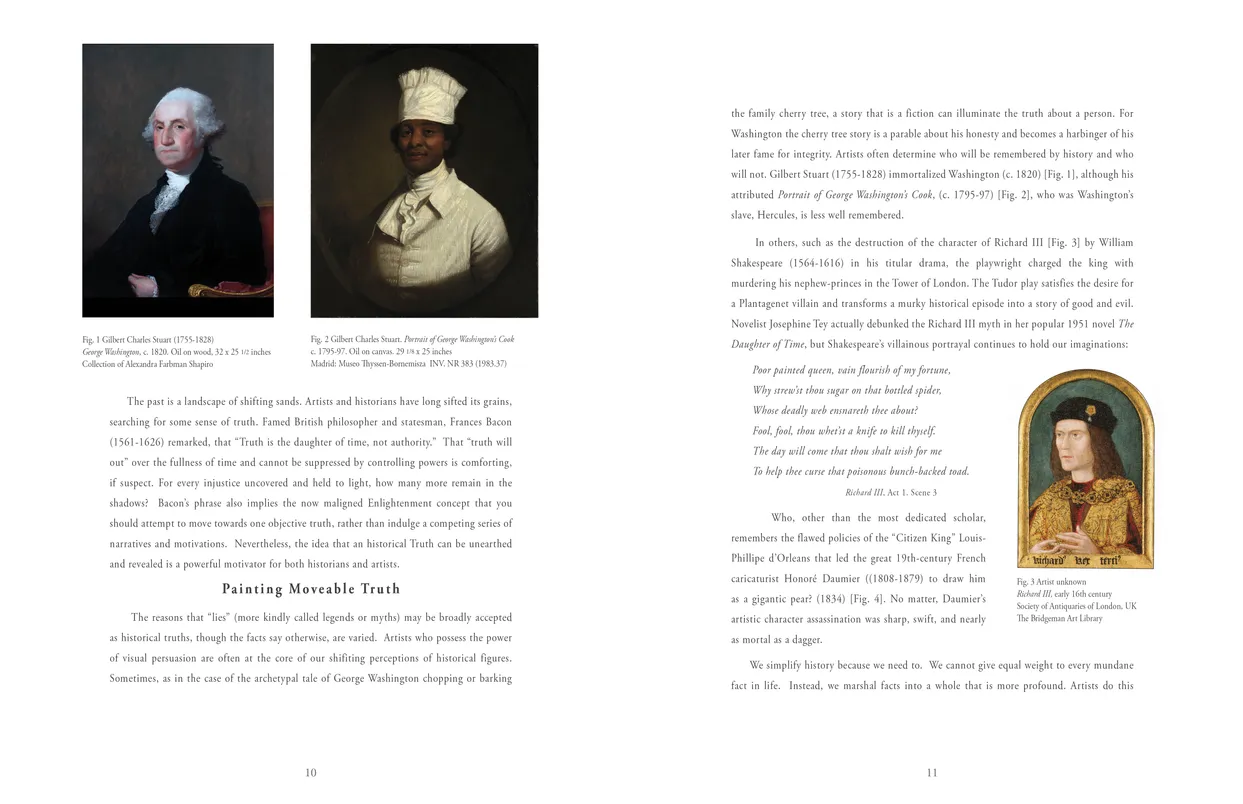
- Frohawk Two Feathers Kill Your Best Ideas exhibition catalog, pages 10-11
- Client: Hudon River Museum
- Visit figure page
- Type: portfolio
- Portfolio Type: publication_design
- Portfolio Role: design_layout
Frohawk Two: Feathers Kill Your Best Ideas — Pages 12–13
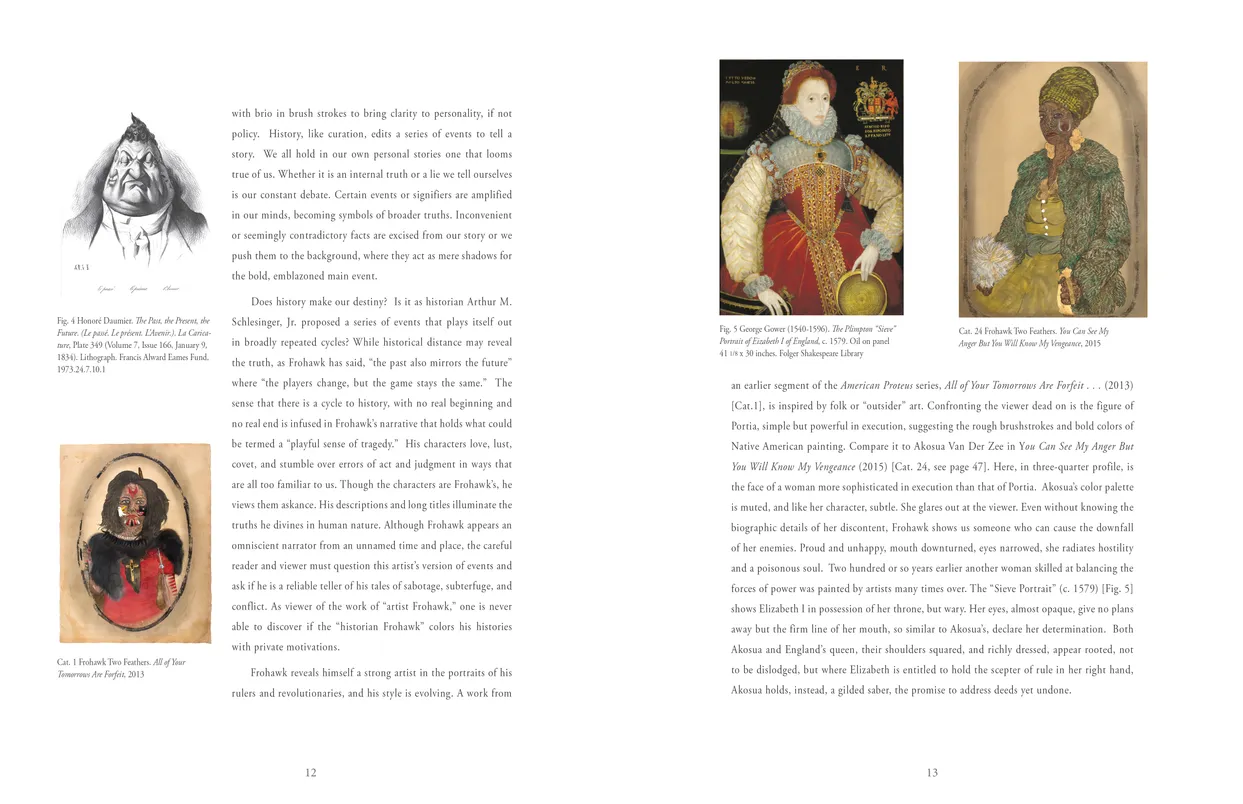
- Frohawk Two Feathers Kill Your Best Ideas exhibition catalog, pages 12-13
- Client: Hudon River Museum
- Visit figure page
- Type: portfolio
- Portfolio Type: publication_design
- Portfolio Role: design_layout
Frohawk Two: Feathers Kill Your Best Ideas — Pages 14–15
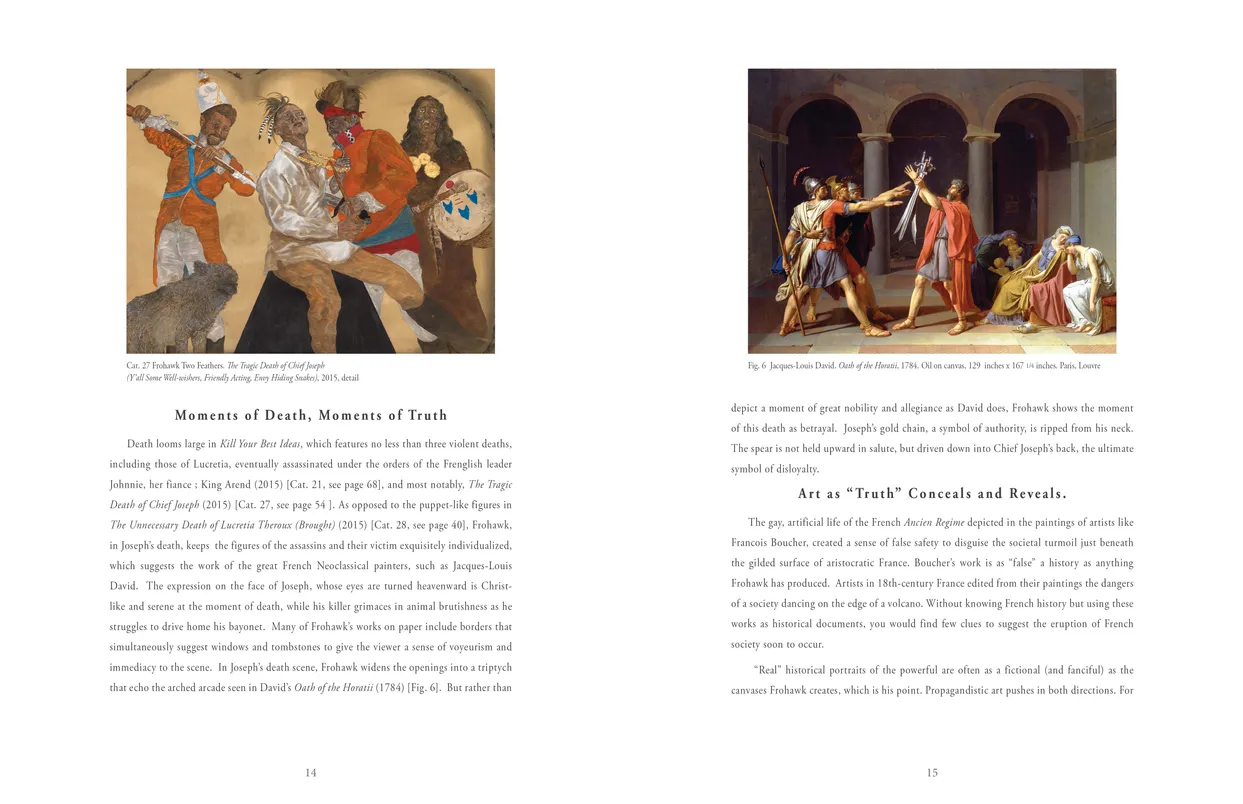
- Frohawk Two Feathers Kill Your Best Ideas exhibition catalog, pages 14-15
- Client: Hudon River Museum
- Visit figure page
- Type: portfolio
- Portfolio Type: publication_design
- Portfolio Role: design_layout
Frohawk Two: Feathers Kill Your Best Ideas — Pages 16–17
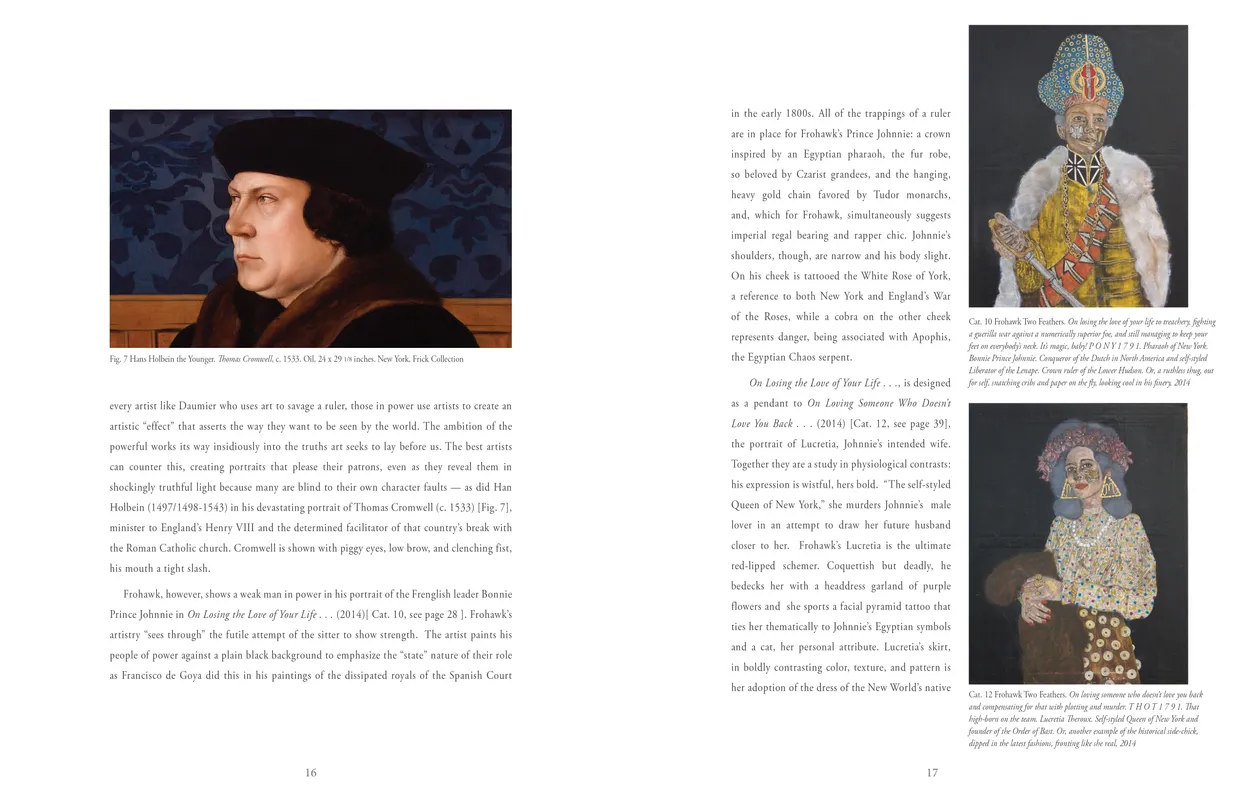
- Frohawk Two Feathers Kill Your Best Ideas exhibition catalog, pages 16-17
- Client: Hudon River Museum
- Visit figure page
- Type: portfolio
- Portfolio Type: publication_design
- Portfolio Role: design_layout
Frohawk Two: Feathers Kill Your Best Ideas — Pages 18–19
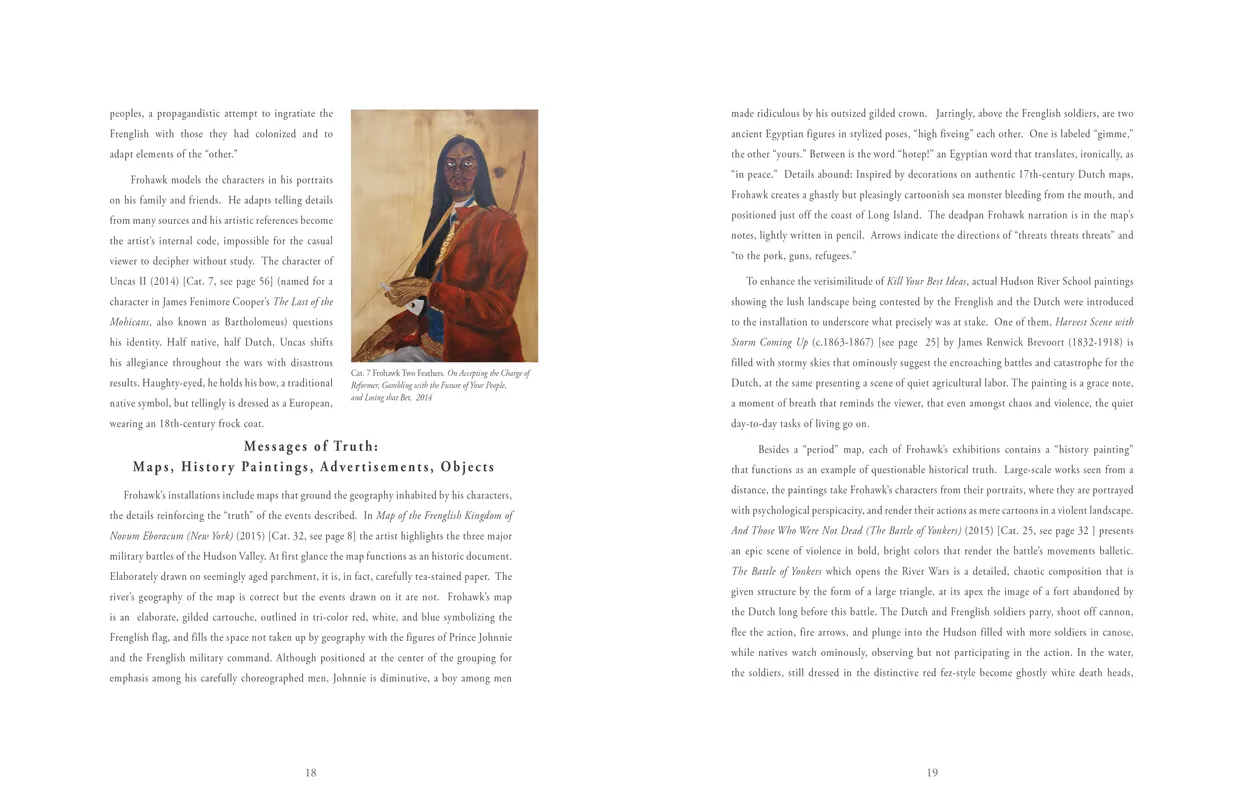
- Frohawk Two Feathers Kill Your Best Ideas exhibition catalog, pages 18-19
- Client: Hudon River Museum
- Visit figure page
- Type: portfolio
- Portfolio Type: publication_design
- Portfolio Role: design_layout
Frohawk Two: Feathers Kill Your Best Ideas — Pages 2–3

- Frohawk Two Feathers Kill Your Best Ideas exhibition catalog, pages 2-3
- Client: Hudon River Museum
- Visit figure page
- Type: portfolio
- Portfolio Type: publication_design
- Portfolio Role: design_layout
Frohawk Two: Feathers Kill Your Best Ideas — Pages 20–21
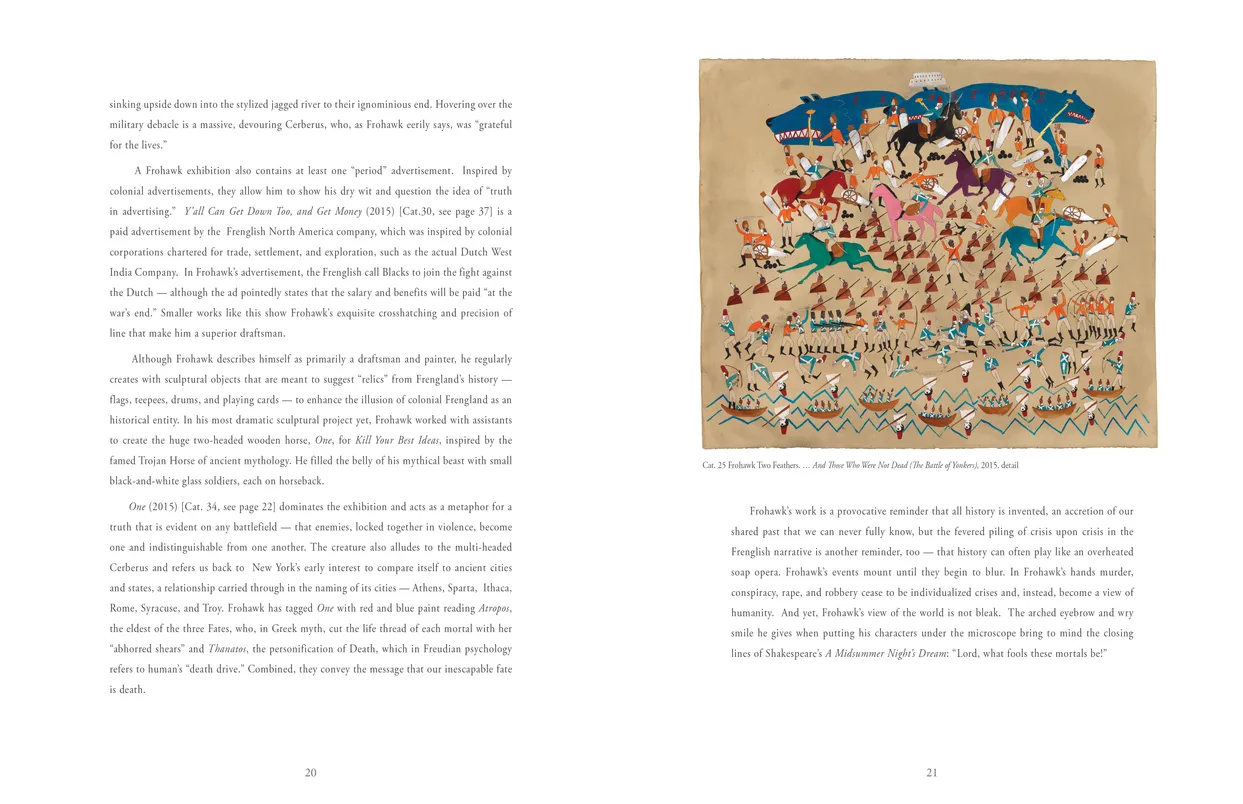
- Frohawk Two Feathers Kill Your Best Ideas exhibition catalog, pages 20-21
- Client: Hudon River Museum
- Visit figure page
- Type: portfolio
- Portfolio Type: publication_design
- Portfolio Role: design_layout
Frohawk Two: Feathers Kill Your Best Ideas — Pages 22–23
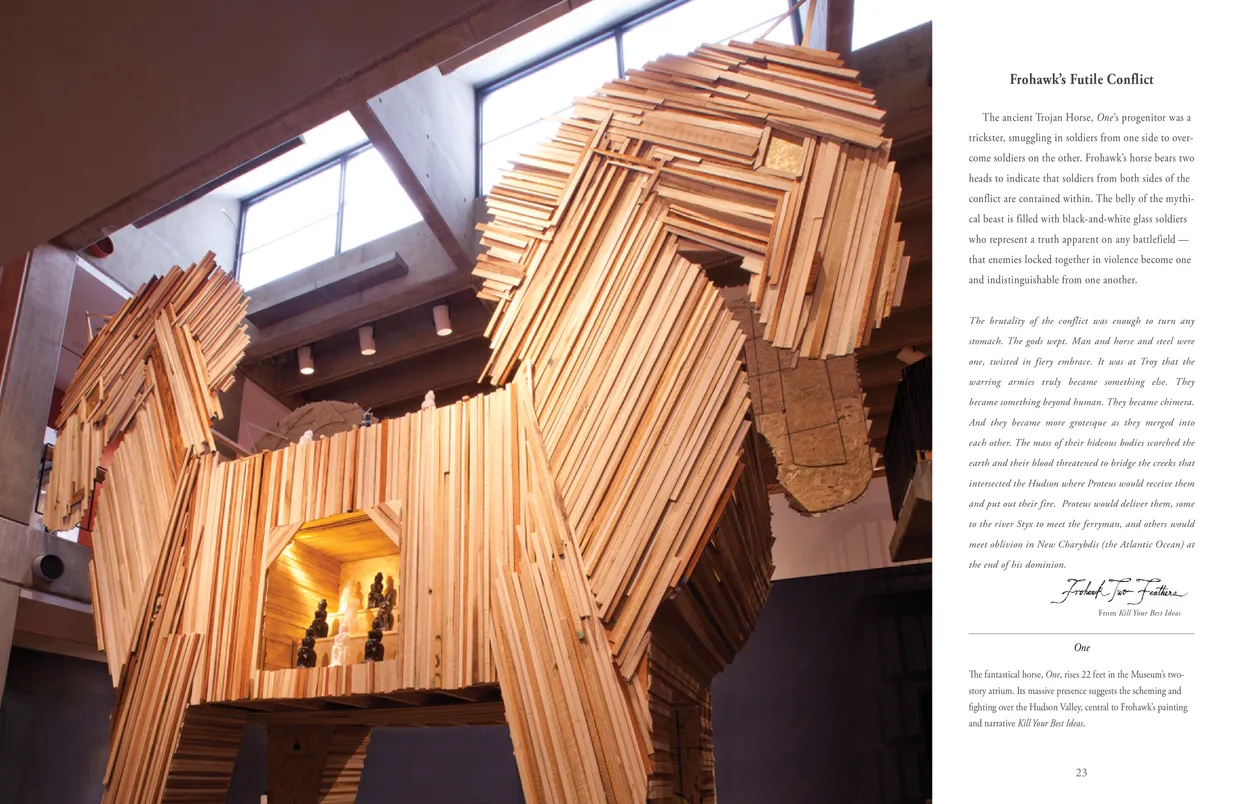
- Frohawk Two Feathers Kill Your Best Ideas exhibition catalog, pages 22-23
- Client: Hudon River Museum
- Visit figure page
- Type: portfolio
- Portfolio Type: publication_design
- Portfolio Role: design_layout
Frohawk Two: Feathers Kill Your Best Ideas — Pages 24–25
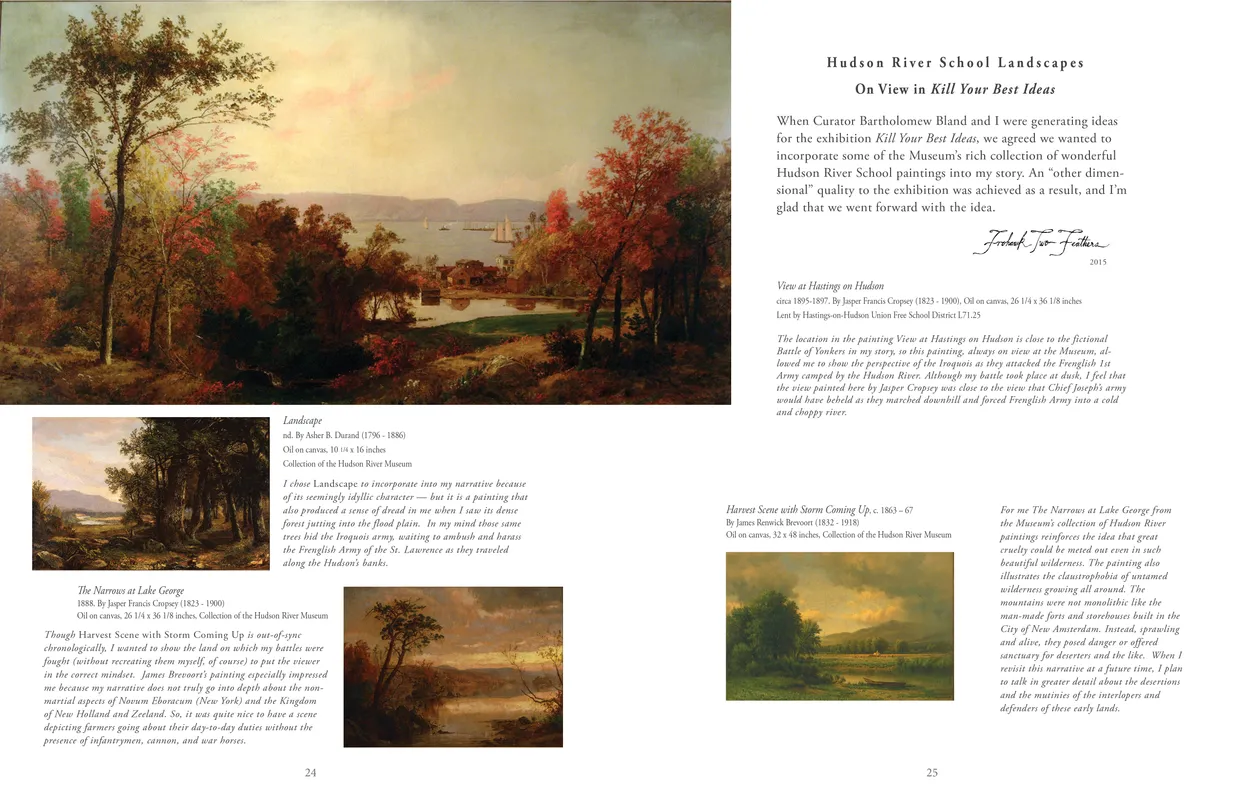
- Frohawk Two Feathers Kill Your Best Ideas exhibition catalog, pages 24-25
- Client: Hudon River Museum
- Visit figure page
- Type: portfolio
- Portfolio Type: publication_design
- Portfolio Role: design_layout
Frohawk Two: Feathers Kill Your Best Ideas — Pages 26–27
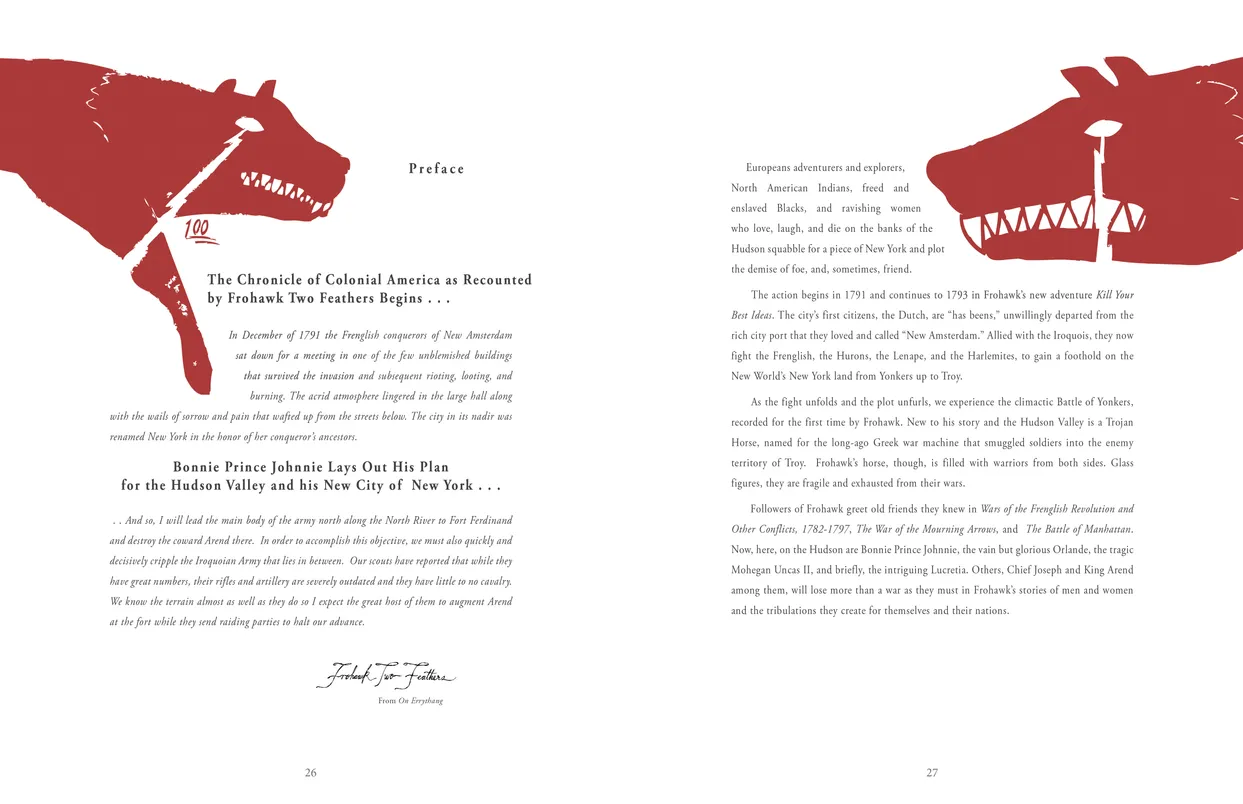
- Frohawk Two Feathers Kill Your Best Ideas exhibition catalog, pages 26-27
- Client: Hudon River Museum
- Visit figure page
- Type: portfolio
- Portfolio Type: publication_design
- Portfolio Role: design_layout
Frohawk Two: Feathers Kill Your Best Ideas — Pages 28–29
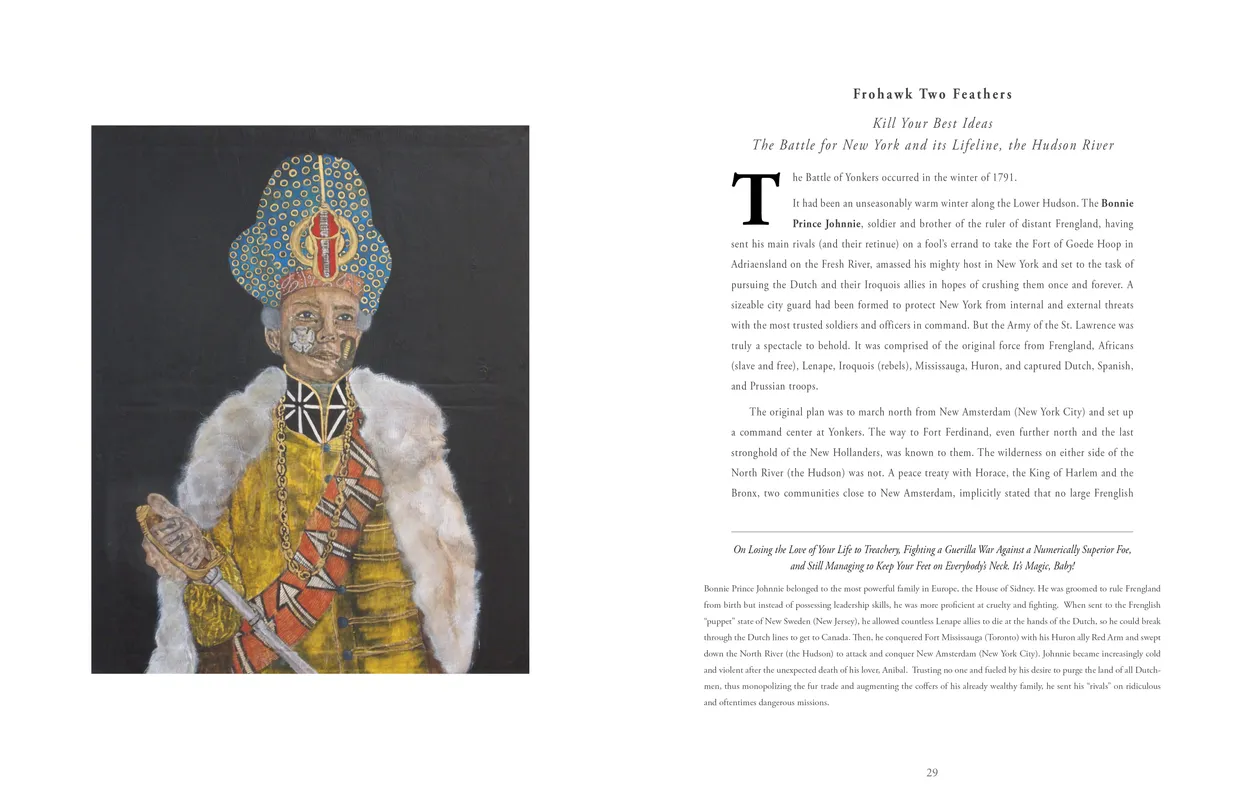
- Frohawk Two Feathers Kill Your Best Ideas exhibition catalog, pages 28-29
- Client: Hudon River Museum
- Visit figure page
- Type: portfolio
- Portfolio Type: publication_design
- Portfolio Role: design_layout
Frohawk Two: Feathers Kill Your Best Ideas — Pages 30–31
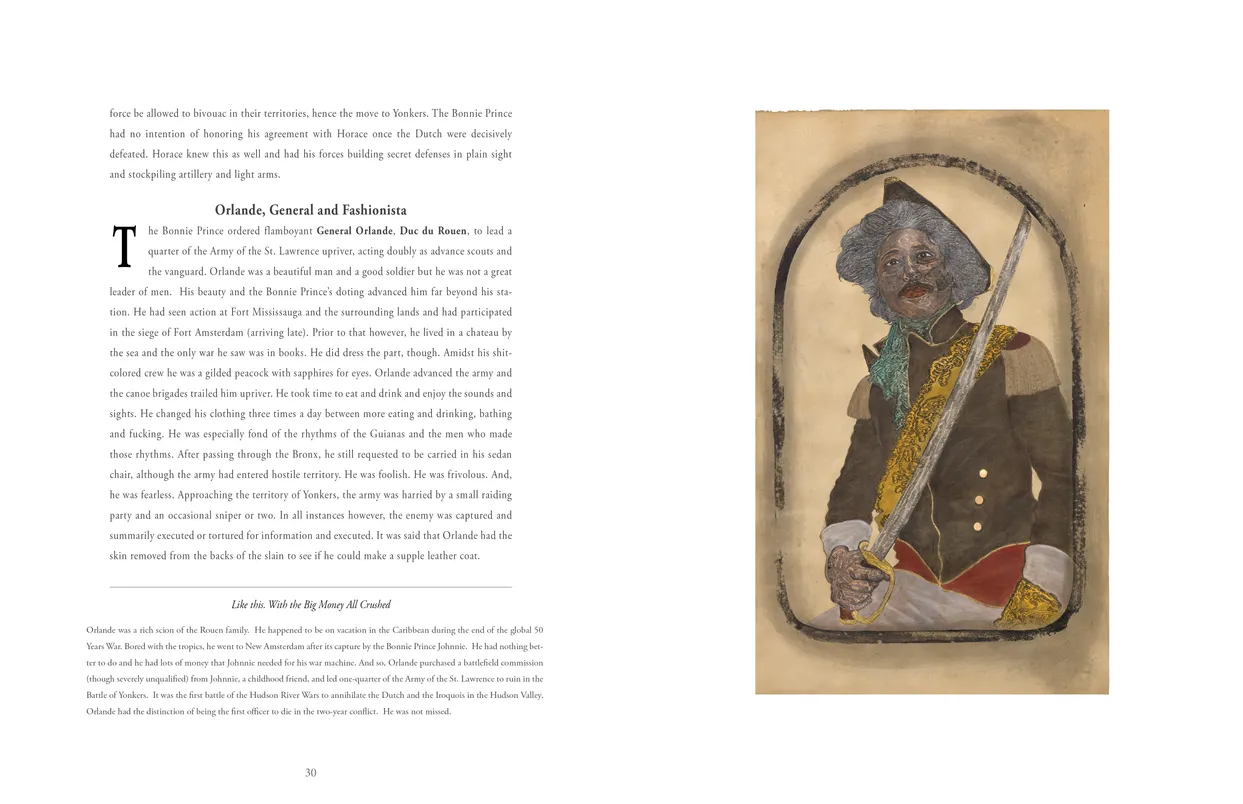
- Frohawk Two Feathers Kill Your Best Ideas exhibition catalog, pages 30-31
- Client: Hudon River Museum
- Visit figure page
- Type: portfolio
- Portfolio Type: publication_design
- Portfolio Role: design_layout
Frohawk Two: Feathers Kill Your Best Ideas — Pages 32–33
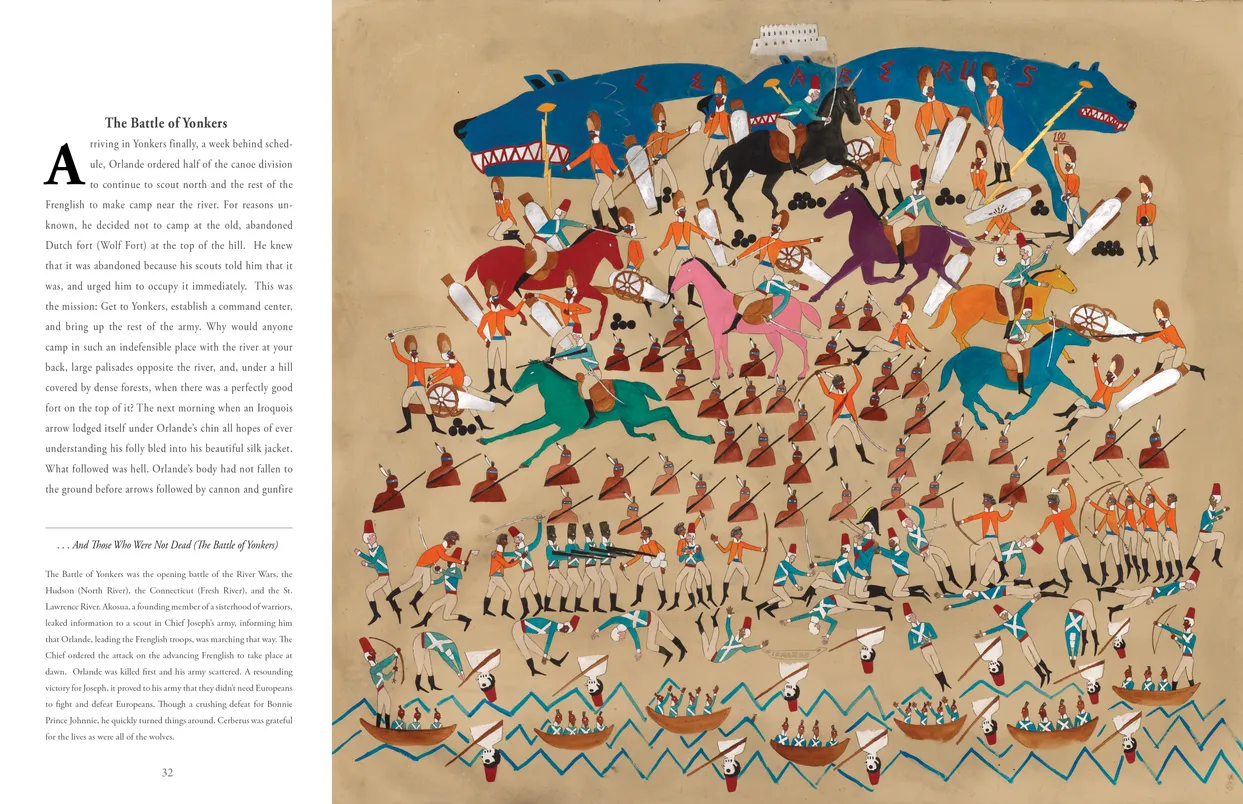
- Frohawk Two Feathers Kill Your Best Ideas exhibition catalog, pages 32-33
- Client: Hudon River Museum
- Visit figure page
- Type: portfolio
- Portfolio Type: publication_design
- Portfolio Role: design_layout
Frohawk Two: Feathers Kill Your Best Ideas — Pages 34–35

- Frohawk Two Feathers Kill Your Best Ideas exhibition catalog, pages 34-35
- Client: Hudon River Museum
- Visit figure page
- Type: portfolio
- Portfolio Type: publication_design
- Portfolio Role: design_layout
Frohawk Two: Feathers Kill Your Best Ideas — Pages 36–37
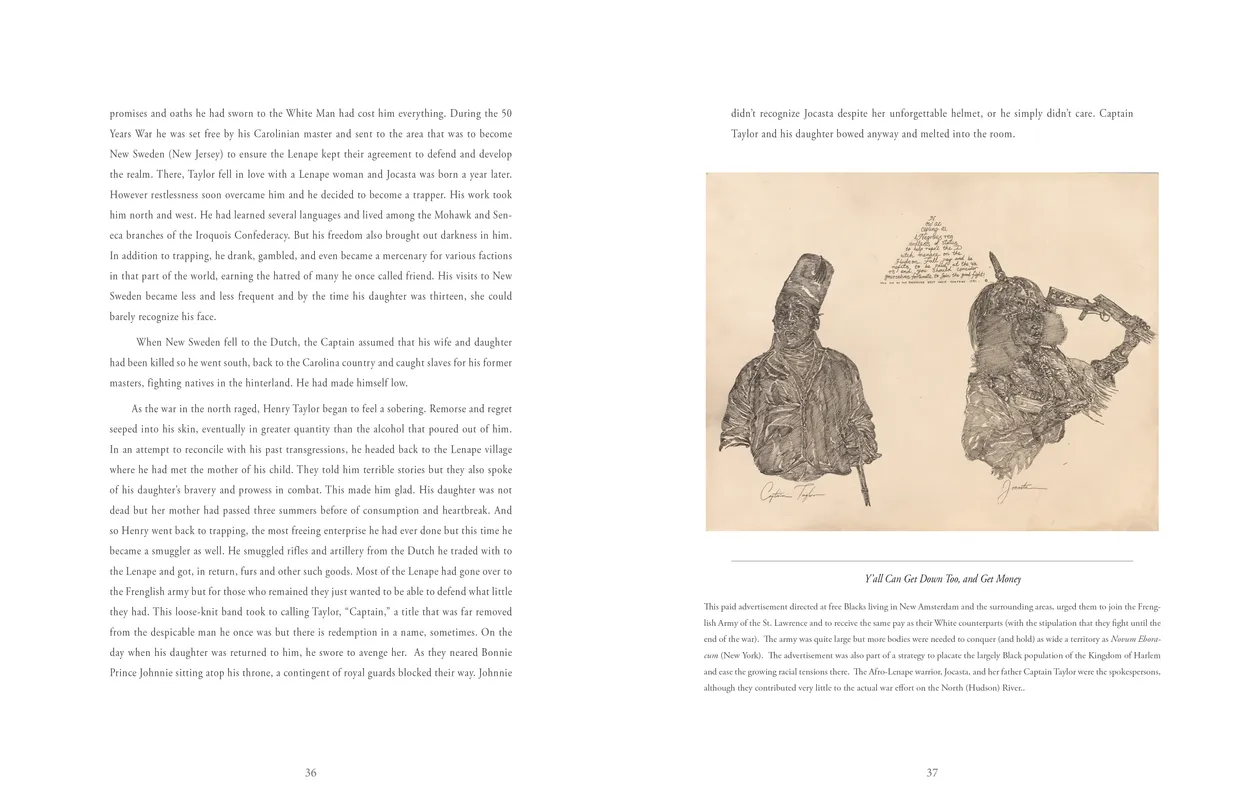
- Frohawk Two Feathers Kill Your Best Ideas exhibition catalog, pages 36-37
- Client: Hudon River Museum
- Visit figure page
- Type: portfolio
- Portfolio Type: publication_design
- Portfolio Role: design_layout
Frohawk Two: Feathers Kill Your Best Ideas — Pages 38–39
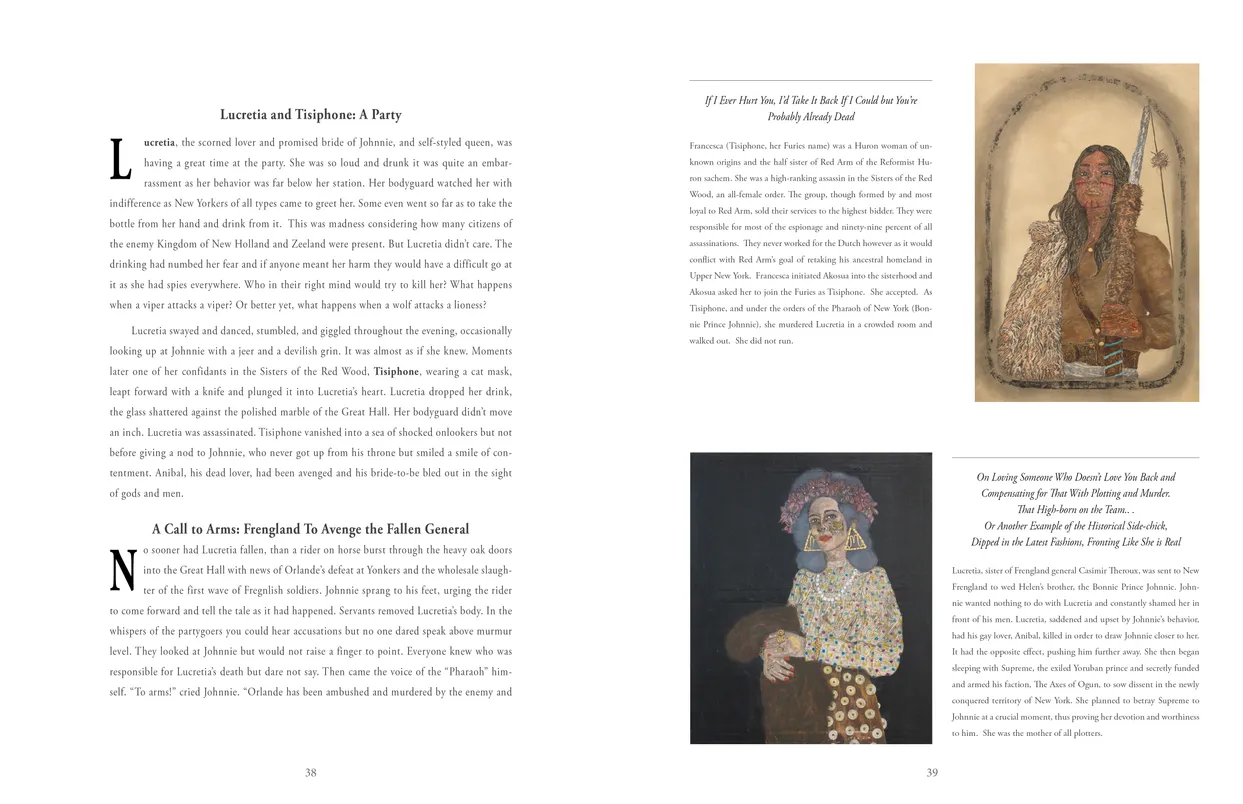
- Frohawk Two Feathers Kill Your Best Ideas exhibition catalog, pages 38-39
- Client: Hudon River Museum
- Visit figure page
- Type: portfolio
- Portfolio Type: publication_design
- Portfolio Role: design_layout
Frohawk Two: Feathers Kill Your Best Ideas — Pages 4–5

- Frohawk Two Feathers Kill Your Best Ideas exhibition catalog, pages 4-5
- Client: Hudon River Museum
- Visit figure page
- Type: portfolio
- Portfolio Type: publication_design
- Portfolio Role: design_layout
Frohawk Two: Feathers Kill Your Best Ideas — Pages 40–41
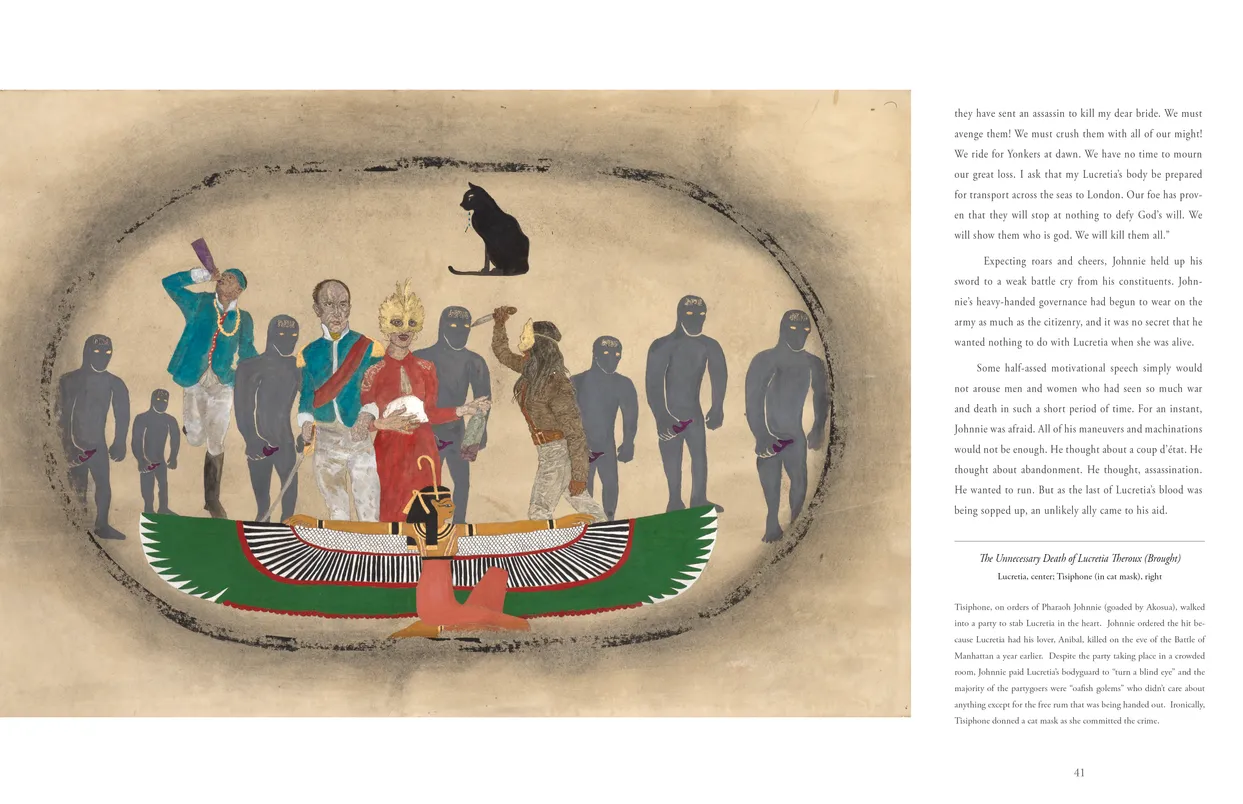
- Frohawk Two Feathers Kill Your Best Ideas exhibition catalog, pages 40-41
- Client: Hudon River Museum
- Visit figure page
- Type: portfolio
- Portfolio Type: publication_design
- Portfolio Role: design_layout
Frohawk Two: Feathers Kill Your Best Ideas — Pages 42–43
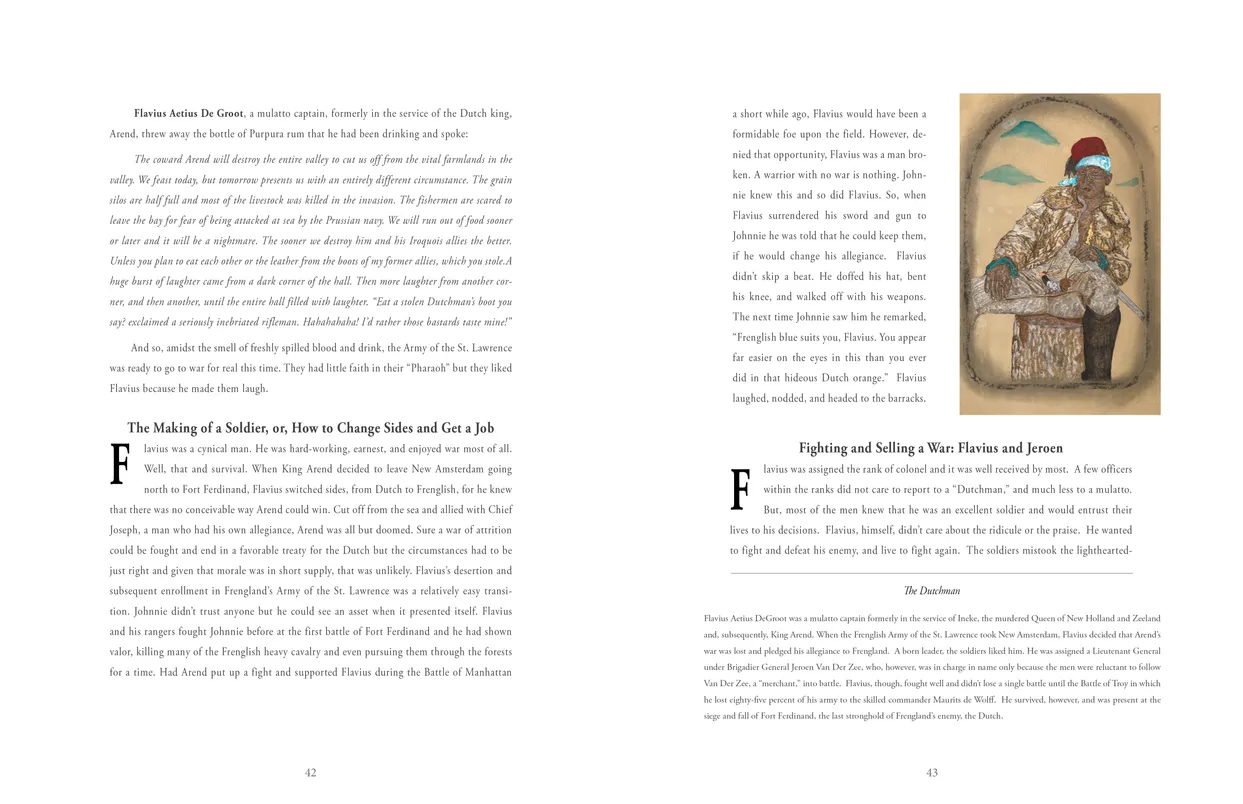
- Frohawk Two Feathers Kill Your Best Ideas exhibition catalog, pages 42-43
- Client: Hudon River Museum
- Visit figure page
- Type: portfolio
- Portfolio Type: publication_design
- Portfolio Role: design_layout
Frohawk Two: Feathers Kill Your Best Ideas — Pages 44–45
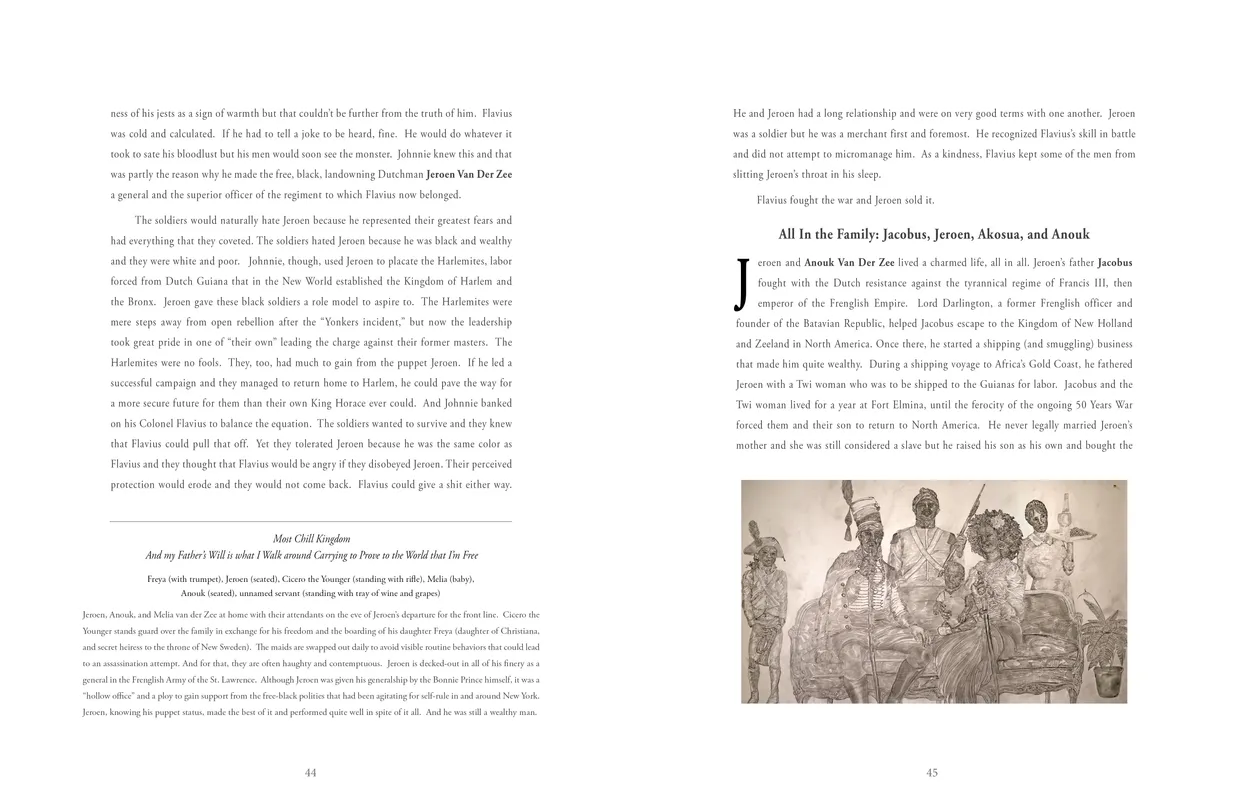
- Frohawk Two Feathers Kill Your Best Ideas exhibition catalog, pages 44-45
- Client: Hudon River Museum
- Visit figure page
- Type: portfolio
- Portfolio Type: publication_design
- Portfolio Role: design_layout
Frohawk Two: Feathers Kill Your Best Ideas — Pages 46–47
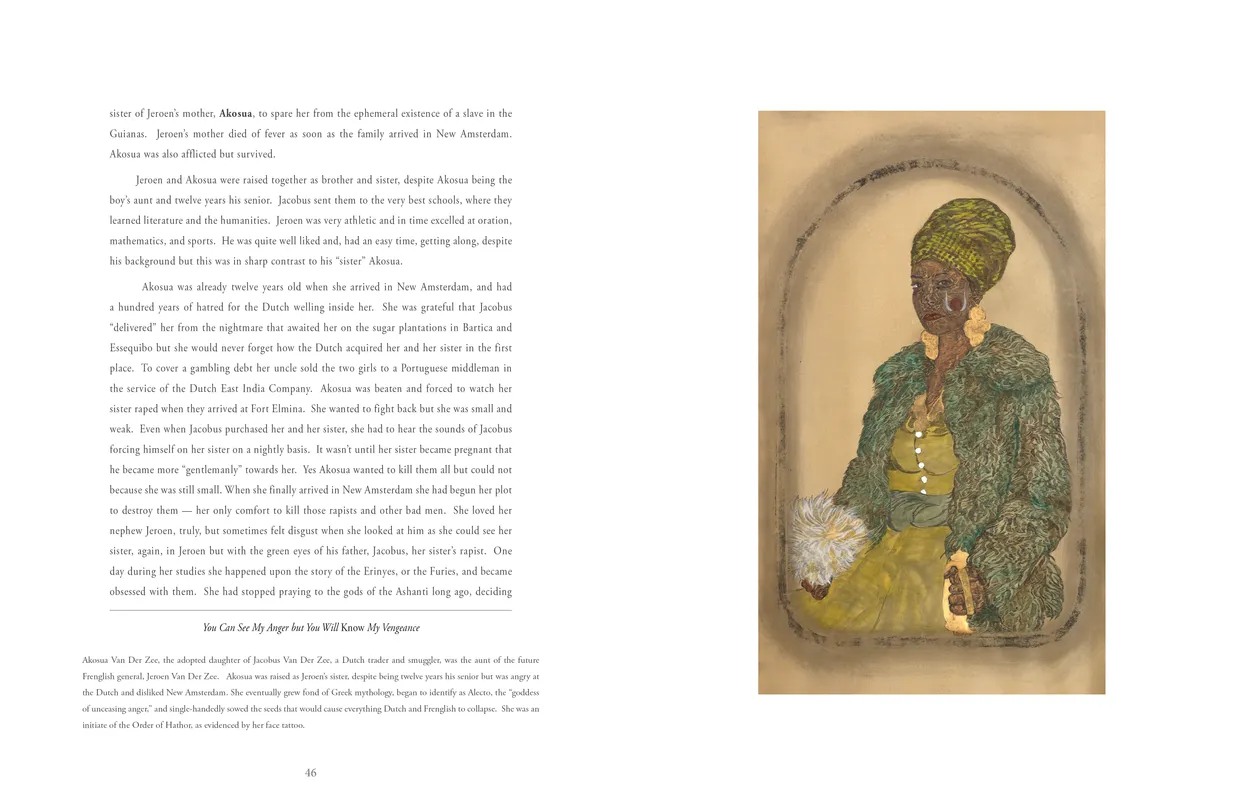
- Frohawk Two Feathers Kill Your Best Ideas exhibition catalog, pages 46-47
- Client: Hudon River Museum
- Visit figure page
- Type: portfolio
- Portfolio Type: publication_design
- Portfolio Role: design_layout
Frohawk Two: Feathers Kill Your Best Ideas — Pages 48–49
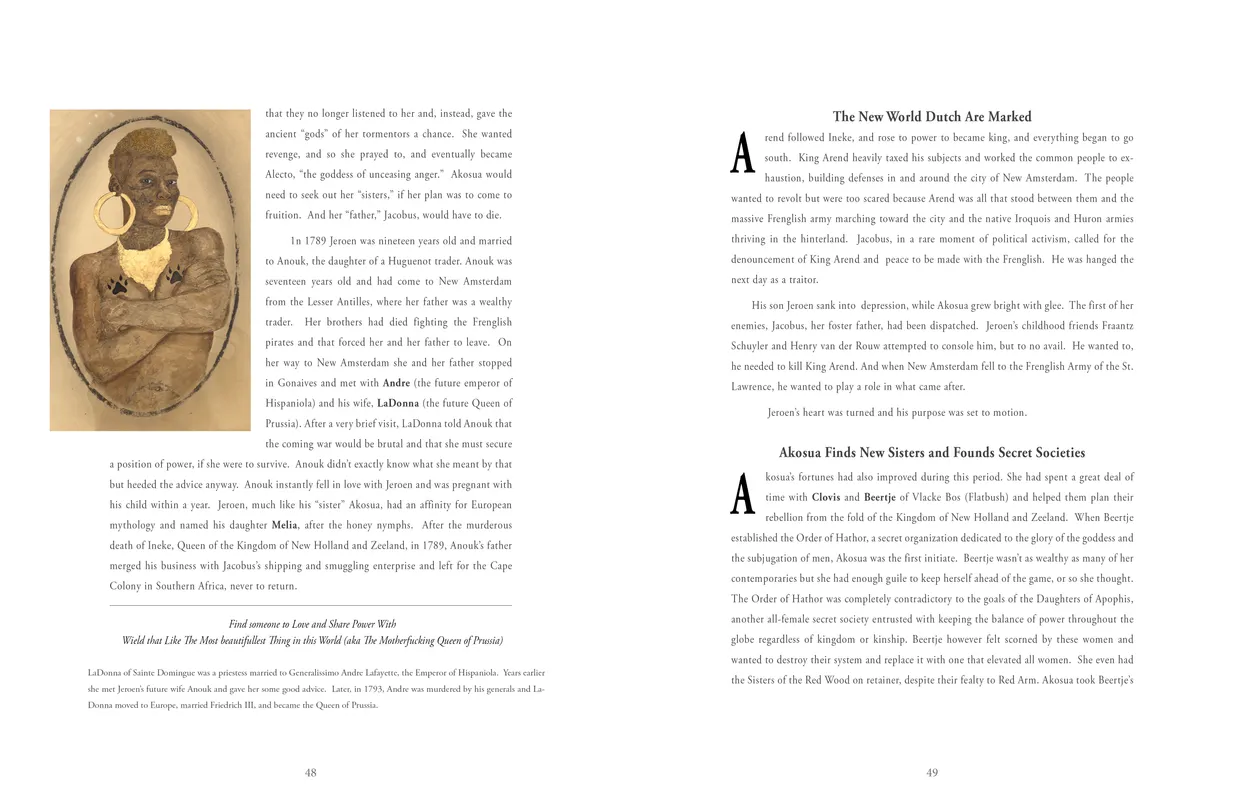
- Frohawk Two Feathers Kill Your Best Ideas exhibition catalog, pages 48-49
- Client: Hudon River Museum
- Visit figure page
- Type: portfolio
- Portfolio Type: publication_design
- Portfolio Role: design_layout
Frohawk Two: Feathers Kill Your Best Ideas — Pages 50–51
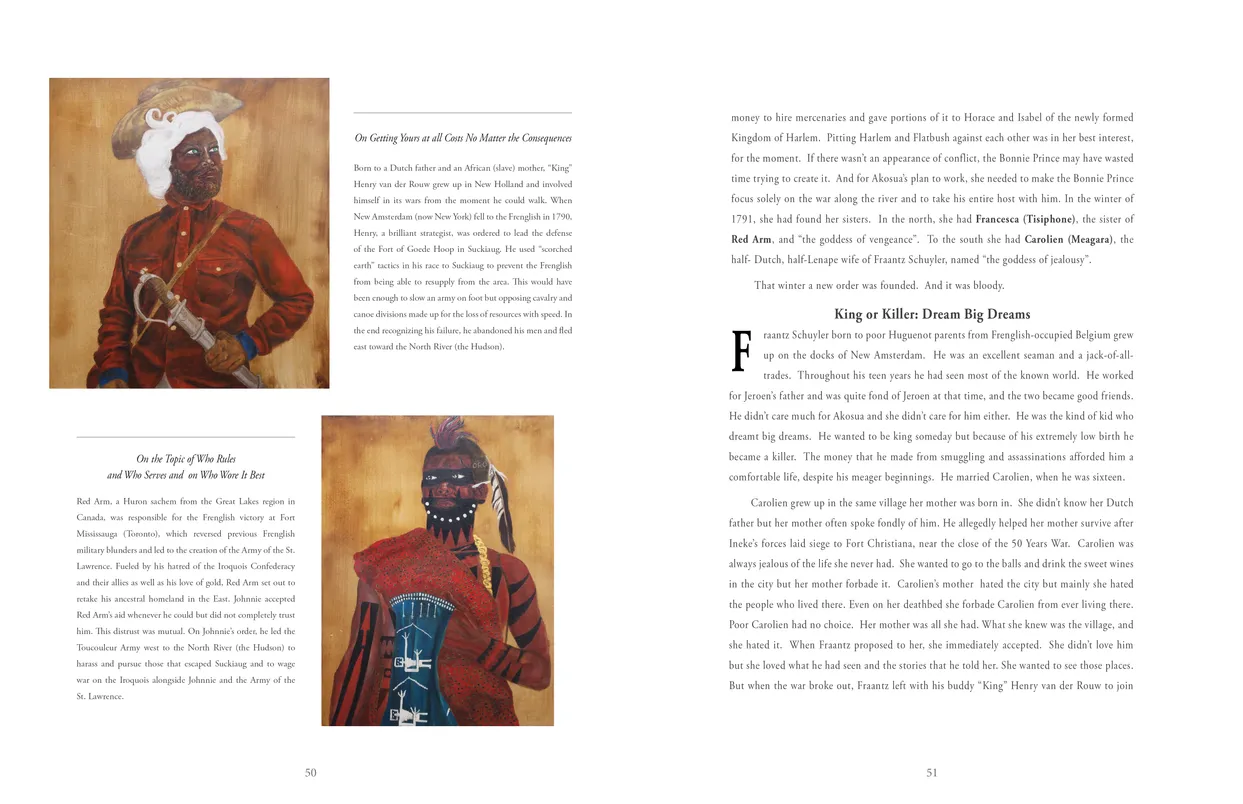
- Frohawk Two Feathers Kill Your Best Ideas exhibition catalog, pages 52-53
- Client: Hudon River Museum
- Visit figure page
- Type: portfolio
- Portfolio Type: publication_design
- Portfolio Role: design_layout
Frohawk Two: Feathers Kill Your Best Ideas — Pages 52–53
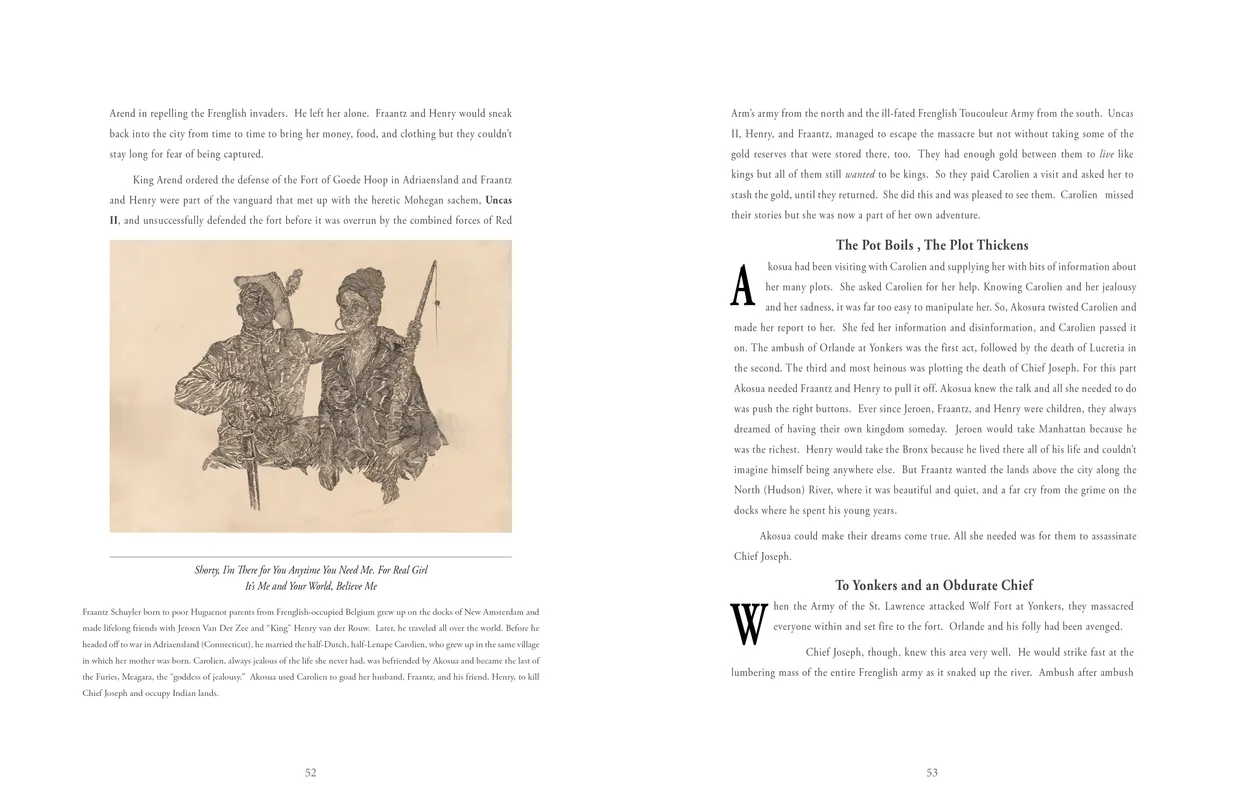
- Frohawk Two Feathers Kill Your Best Ideas exhibition catalog, pages 52-53
- Client: Hudon River Museum
- Visit figure page
- Type: portfolio
- Portfolio Type: publication_design
- Portfolio Role: design_layout
Frohawk Two: Feathers Kill Your Best Ideas — Pages 54–55

- Frohawk Two Feathers Kill Your Best Ideas exhibition catalog, pages 54-55
- Client: Hudon River Museum
- Visit figure page
- Type: portfolio
- Portfolio Type: publication_design
- Portfolio Role: design_layout
Frohawk Two: Feathers Kill Your Best Ideas — Pages 56–57
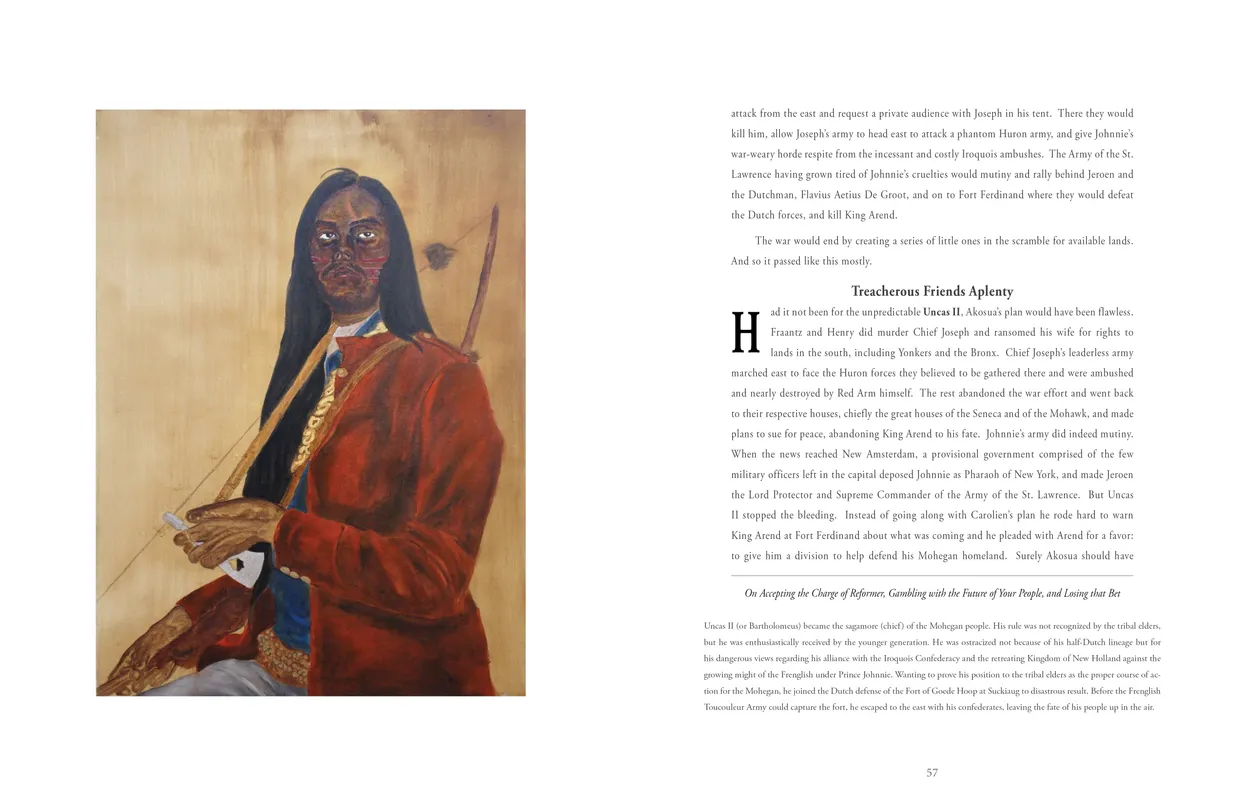
- Frohawk Two Feathers Kill Your Best Ideas exhibition catalog, pages 56-57
- Client: Hudon River Museum
- Visit figure page
- Type: portfolio
- Portfolio Type: publication_design
- Portfolio Role: design_layout
Frohawk Two: Feathers Kill Your Best Ideas — Pages 58–59
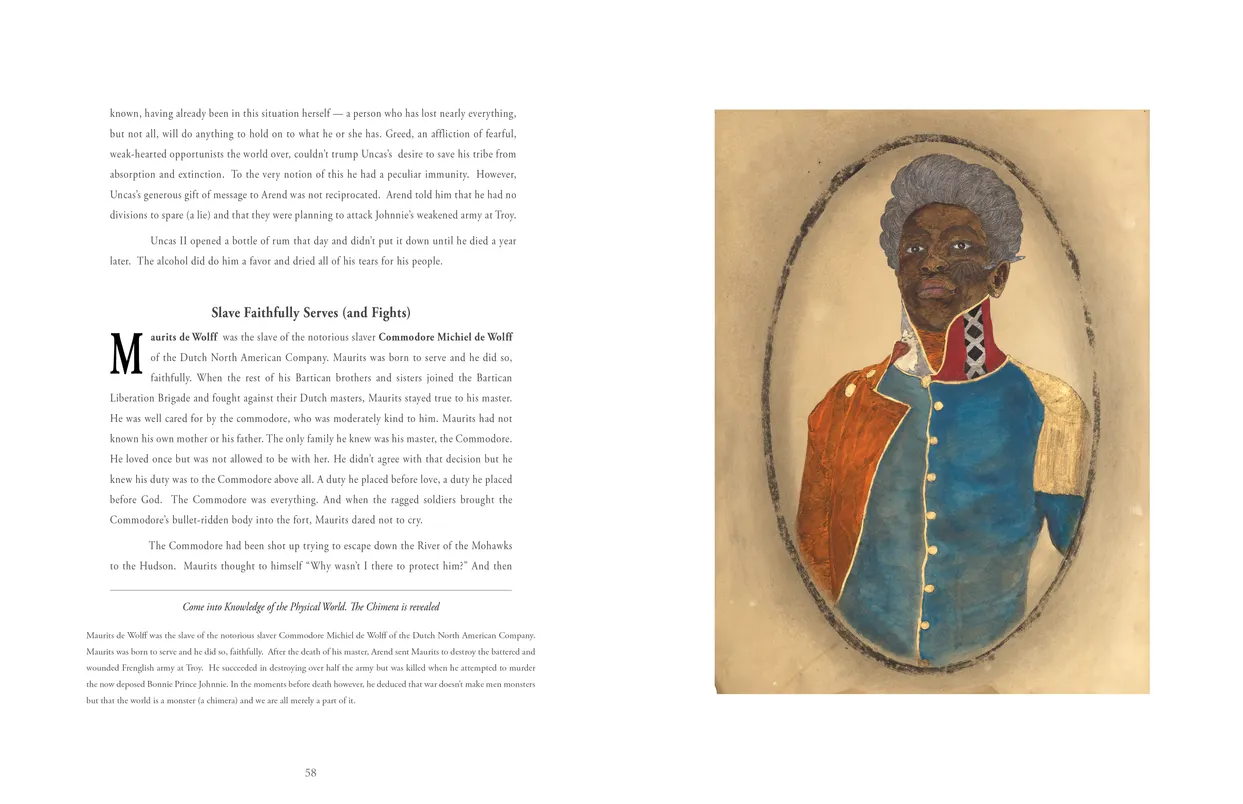
- Frohawk Two Feathers Kill Your Best Ideas exhibition catalog, pages 58-59
- Client: Hudon River Museum
- Visit figure page
- Type: portfolio
- Portfolio Type: publication_design
- Portfolio Role: design_layout
Frohawk Two: Feathers Kill Your Best Ideas — Pages 6–7
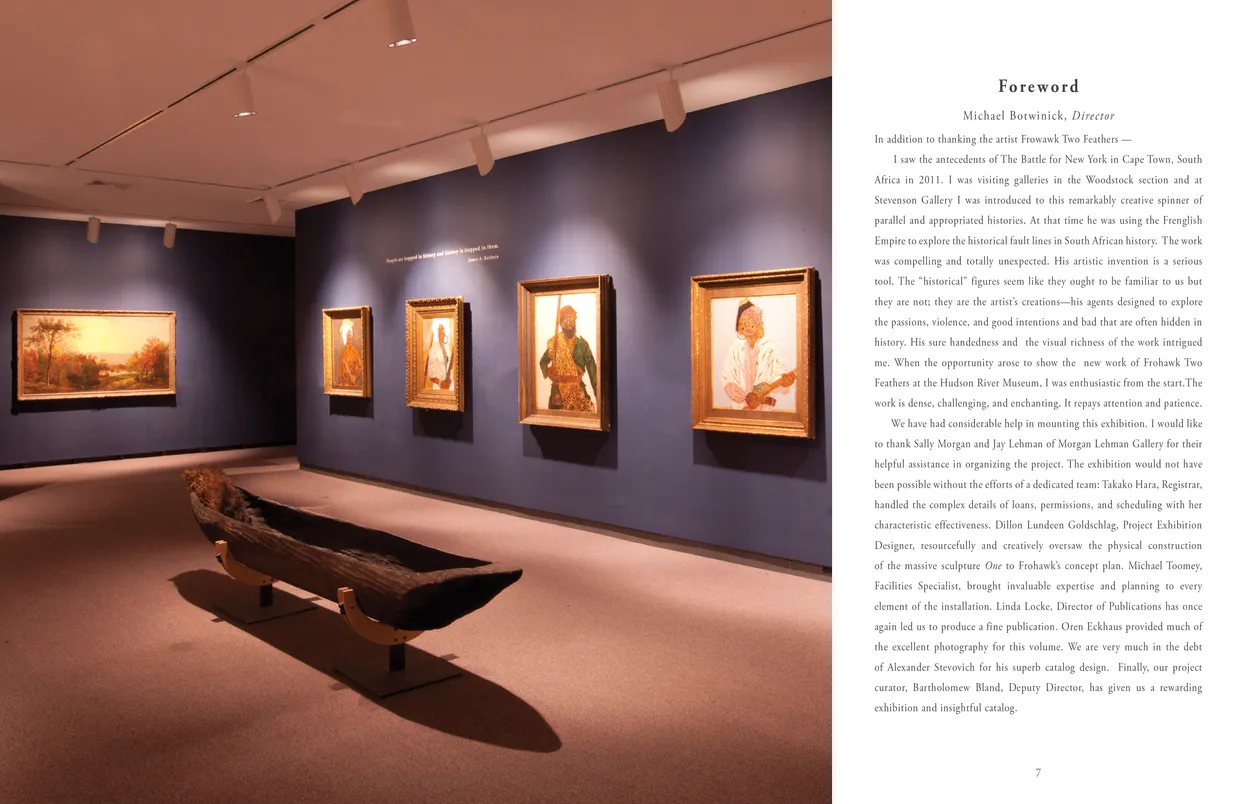
- Frohawk Two Feathers Kill Your Best Ideas exhibition catalog, pages 6-7
- Client: Hudon River Museum
- Visit figure page
- Type: portfolio
- Portfolio Type: publication_design
- Portfolio Role: design_layout
Frohawk Two: Feathers Kill Your Best Ideas — Pages 60–61

- Frohawk Two Feathers Kill Your Best Ideas exhibition catalog, pages 60-61
- Client: Hudon River Museum
- Visit figure page
- Type: portfolio
- Portfolio Type: publication_design
- Portfolio Role: design_layout
Frohawk Two: Feathers Kill Your Best Ideas — Pages 62–63
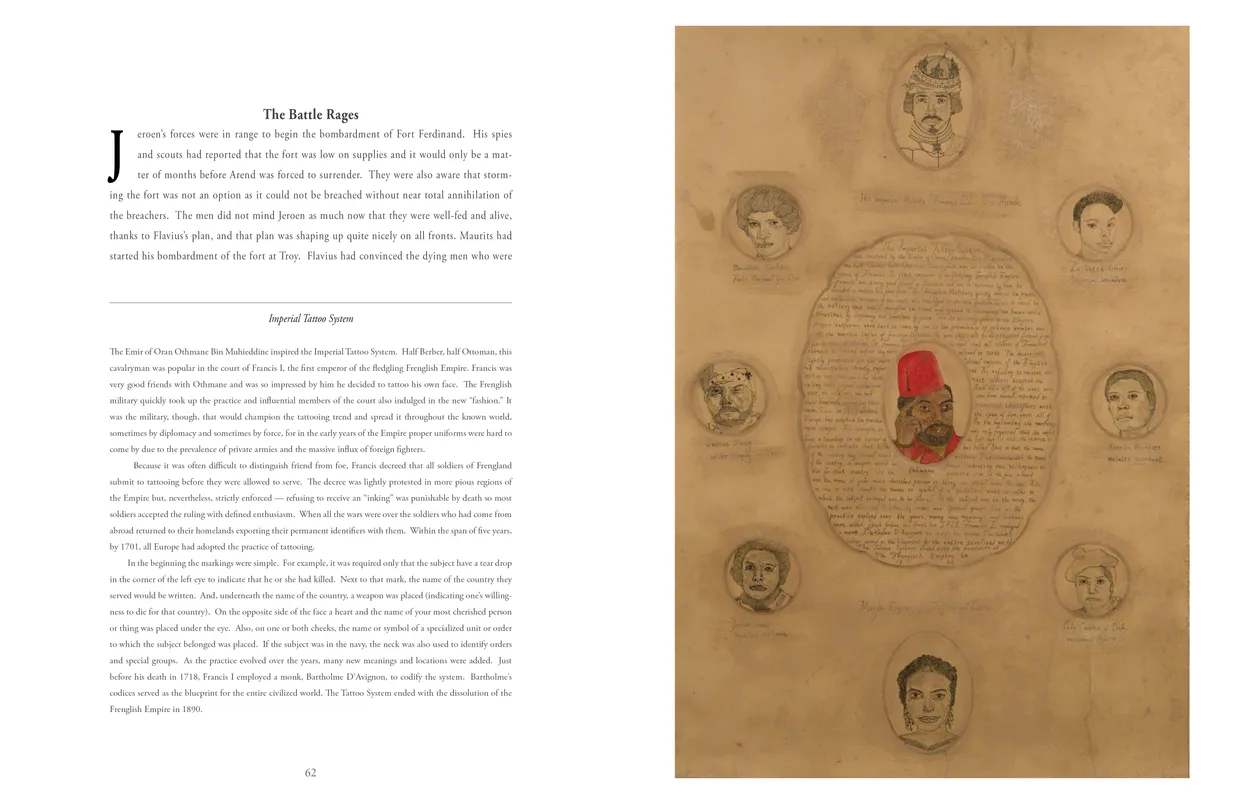
- Frohawk Two Feathers Kill Your Best Ideas exhibition catalog, pages 62-63
- Client: Hudon River Museum
- Visit figure page
- Type: portfolio
- Portfolio Type: publication_design
- Portfolio Role: design_layout
Frohawk Two: Feathers Kill Your Best Ideas — Pages 64–65
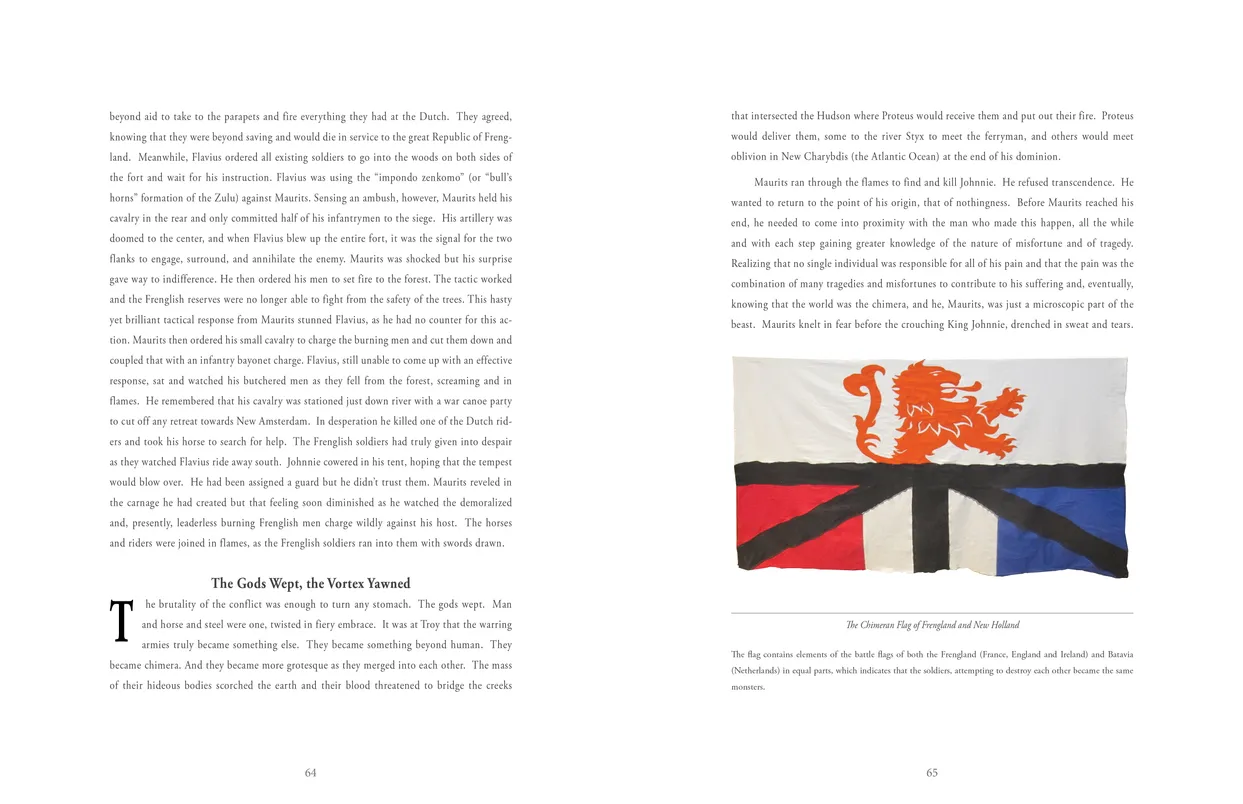
- Frohawk Two Feathers Kill Your Best Ideas exhibition catalog, pages 64-65
- Client: Hudon River Museum
- Visit figure page
- Type: portfolio
- Portfolio Type: publication_design
- Portfolio Role: design_layout
Frohawk Two: Feathers Kill Your Best Ideas — Pages 66–67
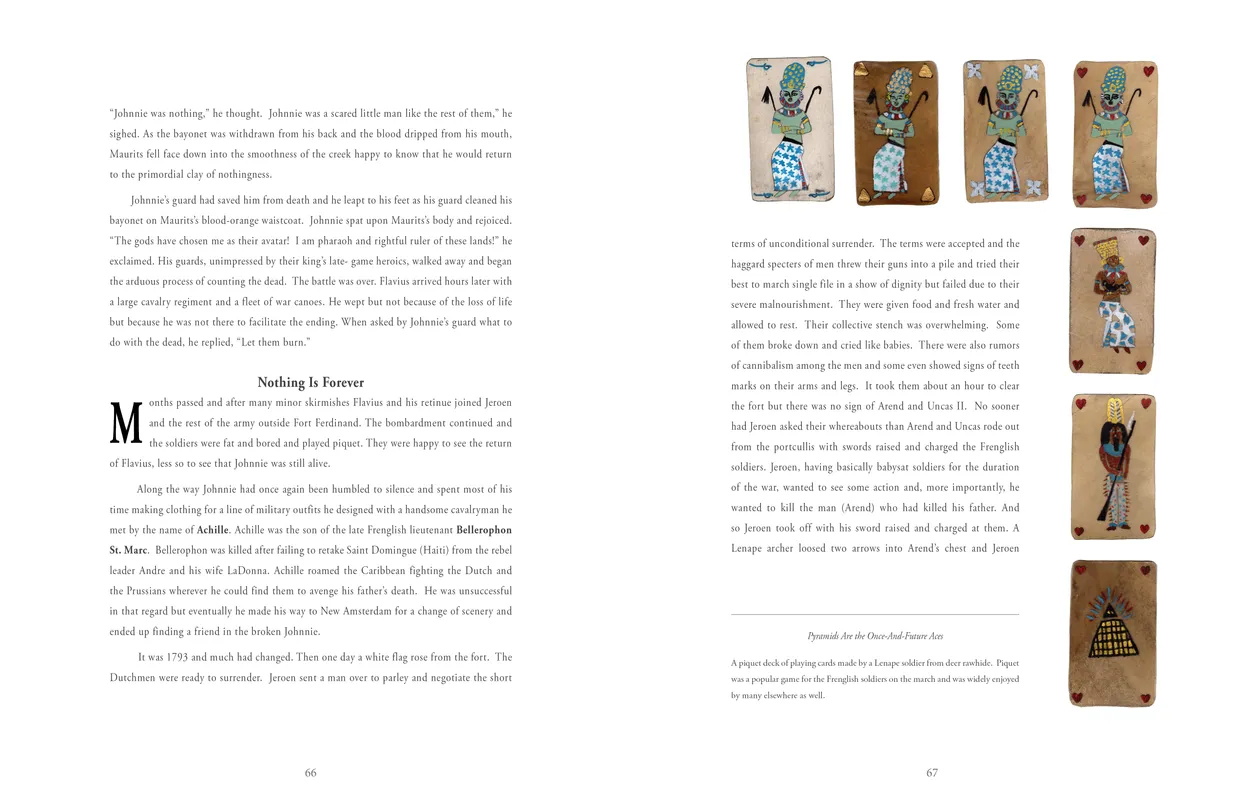
- Frohawk Two Feathers Kill Your Best Ideas exhibition catalog, pages 66-67
- Client: Hudon River Museum
- Visit figure page
- Type: portfolio
- Portfolio Type: publication_design
- Portfolio Role: design_layout
Frohawk Two: Feathers Kill Your Best Ideas — Pages 68–69
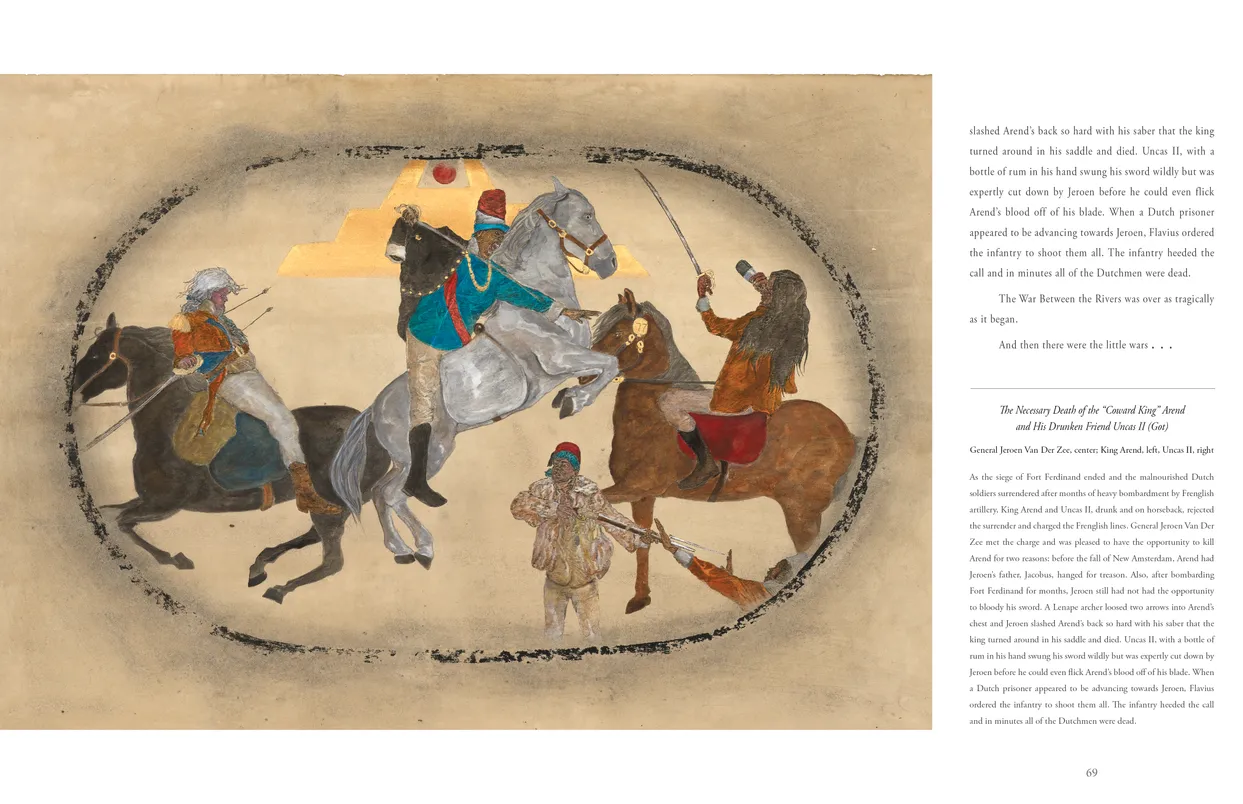
- Frohawk Two Feathers Kill Your Best Ideas exhibition catalog, pages 68-69
- Client: Hudon River Museum
- Visit figure page
- Type: portfolio
- Portfolio Type: publication_design
- Portfolio Role: design_layout
Frohawk Two: Feathers Kill Your Best Ideas — Pages 70–71
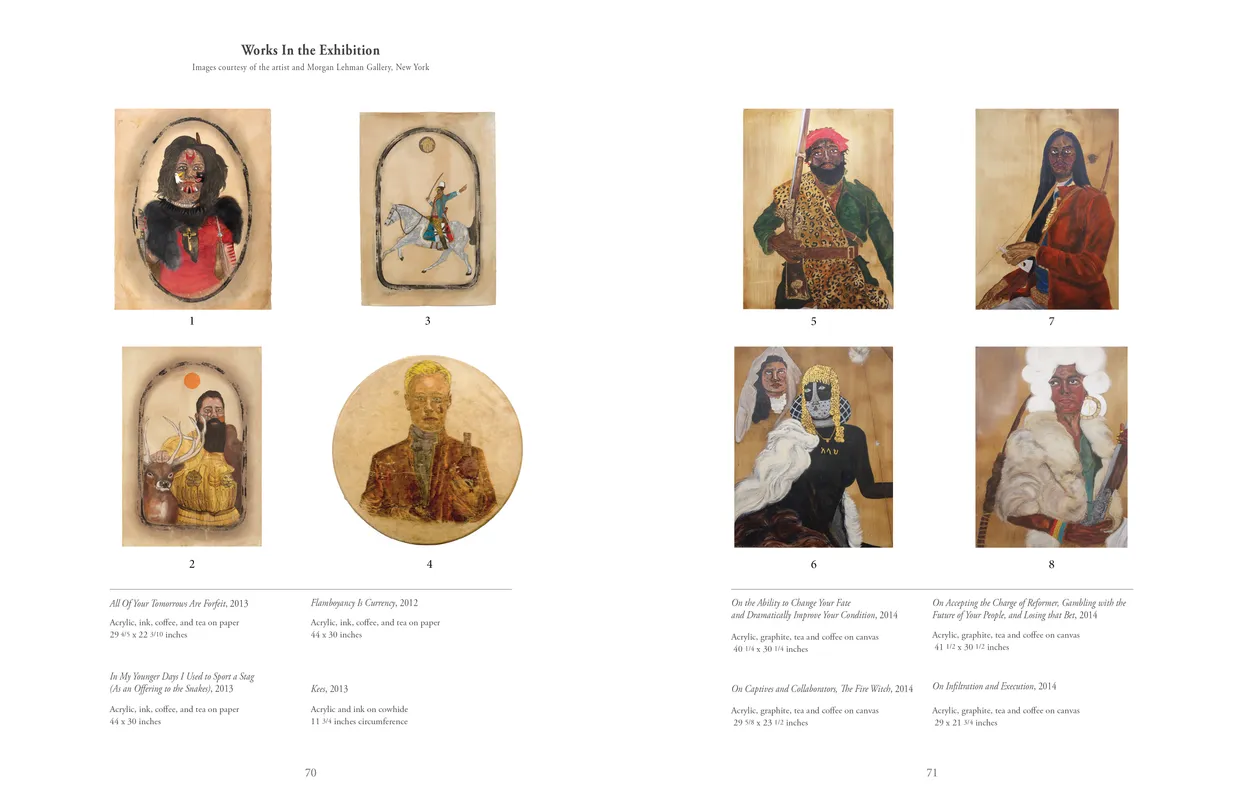
- Frohawk Two Feathers Kill Your Best Ideas exhibition catalog, pages 70-71
- Client: Hudon River Museum
- Visit figure page
- Type: portfolio
- Portfolio Type: publication_design
- Portfolio Role: design_layout
Frohawk Two: Feathers Kill Your Best Ideas — Pages 72–73

- Frohawk Two Feathers Kill Your Best Ideas exhibition catalog, pages 72-73
- Client: Hudon River Museum
- Visit figure page
- Type: portfolio
- Portfolio Type: publication_design
- Portfolio Role: design_layout
Frohawk Two: Feathers Kill Your Best Ideas — Pages 74–75
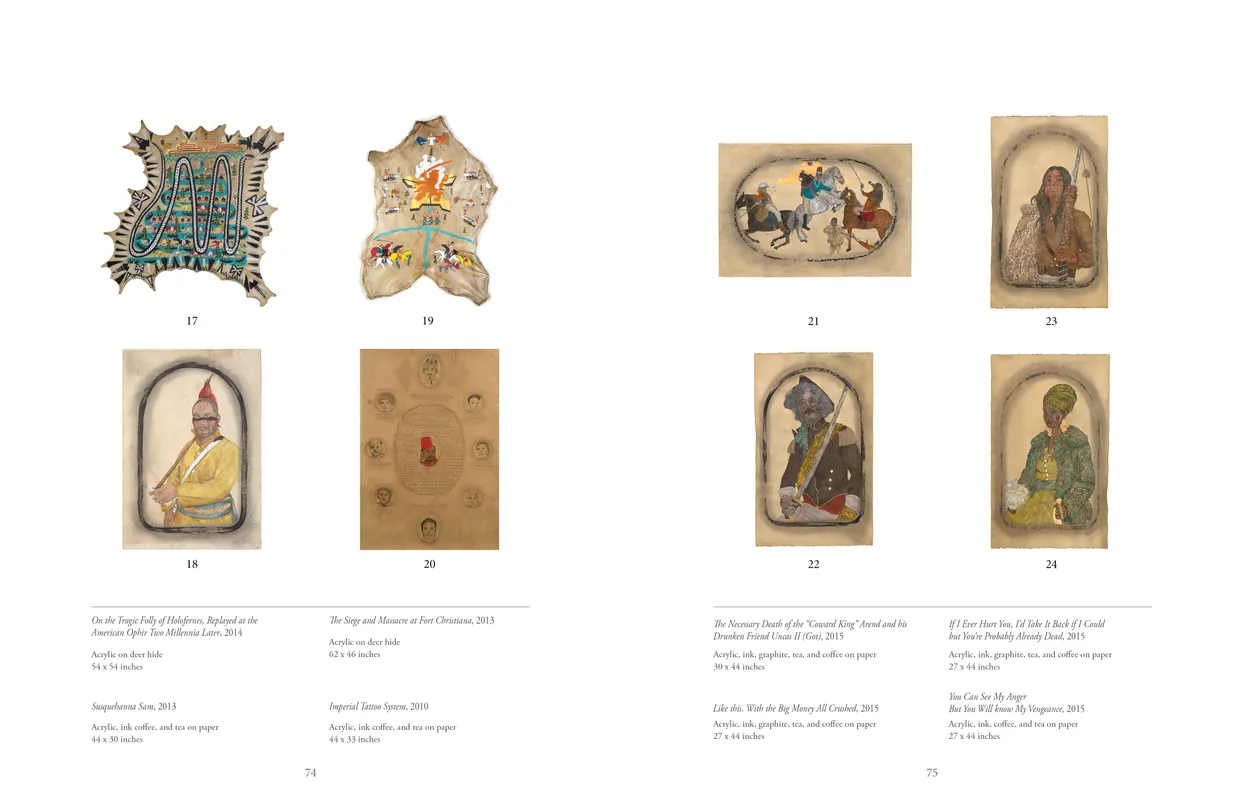
- Frohawk Two Feathers Kill Your Best Ideas exhibition catalog, pages 74-75
- Client: Hudon River Museum
- Visit figure page
- Type: portfolio
- Portfolio Type: publication_design
- Portfolio Role: design_layout
Frohawk Two: Feathers Kill Your Best Ideas — Pages 76–77
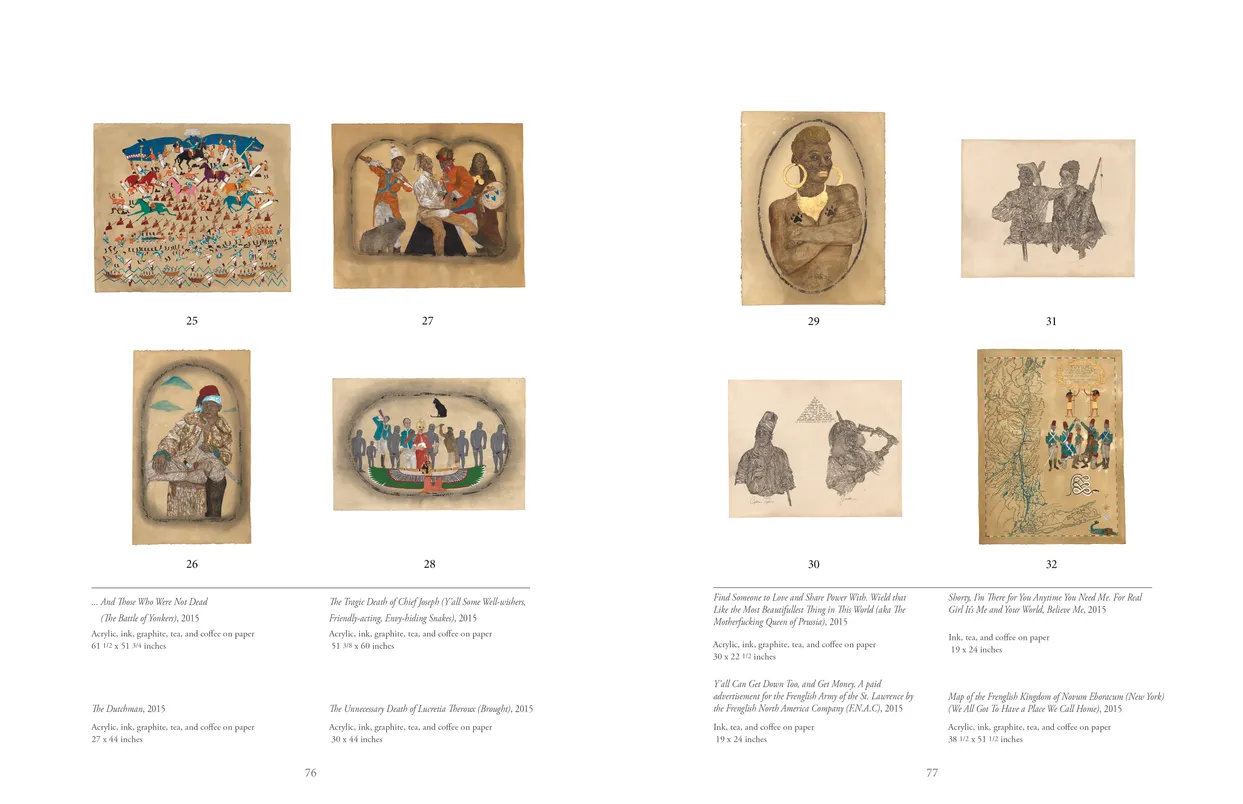
- Frohawk Two Feathers Kill Your Best Ideas exhibition catalog, pages 76-77
- Client: Hudon River Museum
- Visit figure page
- Type: portfolio
- Portfolio Type: publication_design
- Portfolio Role: design_layout
Frohawk Two: Feathers Kill Your Best Ideas — Pages 78–79
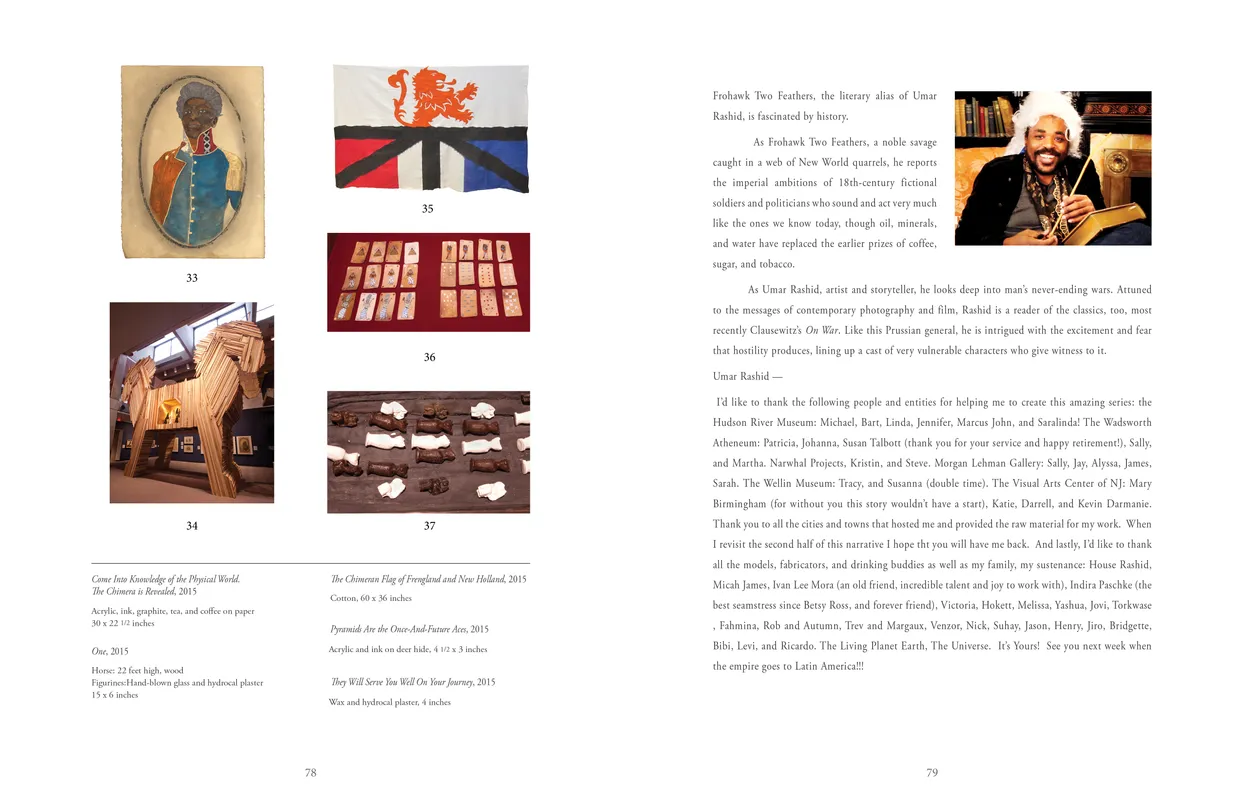
- Frohawk Two Feathers Kill Your Best Ideas exhibition catalog, pages 78-79
- Client: Hudon River Museum
- Visit figure page
- Type: portfolio
- Portfolio Type: publication_design
- Portfolio Role: design_layout
Frohawk Two: Feathers Kill Your Best Ideas — Pages 8–9
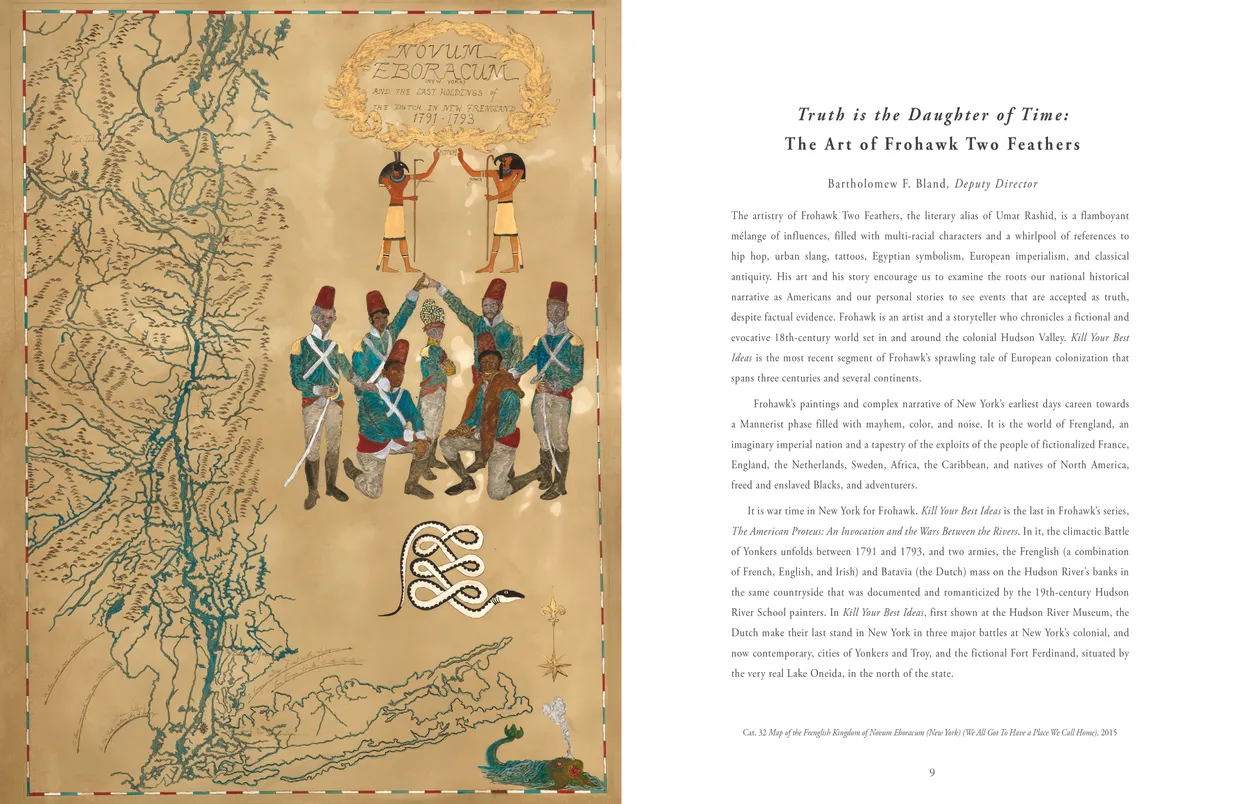
- Frohawk Two Feathers Kill Your Best Ideas exhibition catalog, pages 8-9
- Client: Hudon River Museum
- Visit figure page
- Type: portfolio
- Portfolio Type: publication_design
- Portfolio Role: design_layout
Ghost G Banner 01

- _ghost (G) banner #1
- Artwork by Alex Stevovich
- © Alex Stevovich
- Visit figure page
- Type: portfolio
- Portfolio Type: advertising
- Portfolio Role: design_layout
- Portfolio Original Art: true
Ghost G Banner 02

- _ghost (G) banner #2
- Artwork by Alex Stevovich
- © Alex Stevovich
- Visit figure page
- Type: portfolio
- Portfolio Type: advertising
- Portfolio Role: design_layout
- Portfolio Original Art: true
Ghost G Banner 03

- _ghost (G) banner #3
- Artwork by Alex Stevovich
- © Alex Stevovich
- Visit figure page
- Type: portfolio
- Portfolio Type: advertising
- Portfolio Role: design_layout
- Portfolio Original Art: true
Ghost G Poster

- _ghost (G) poster
- Artwork by Alex Stevovich
- © Alex Stevovich
- Visit figure page
- Type: portfolio
- Portfolio Type: advertising
- Portfolio Role: design_layout
- Portfolio Original Art: true
Grand Cosmic Enemy Emblem
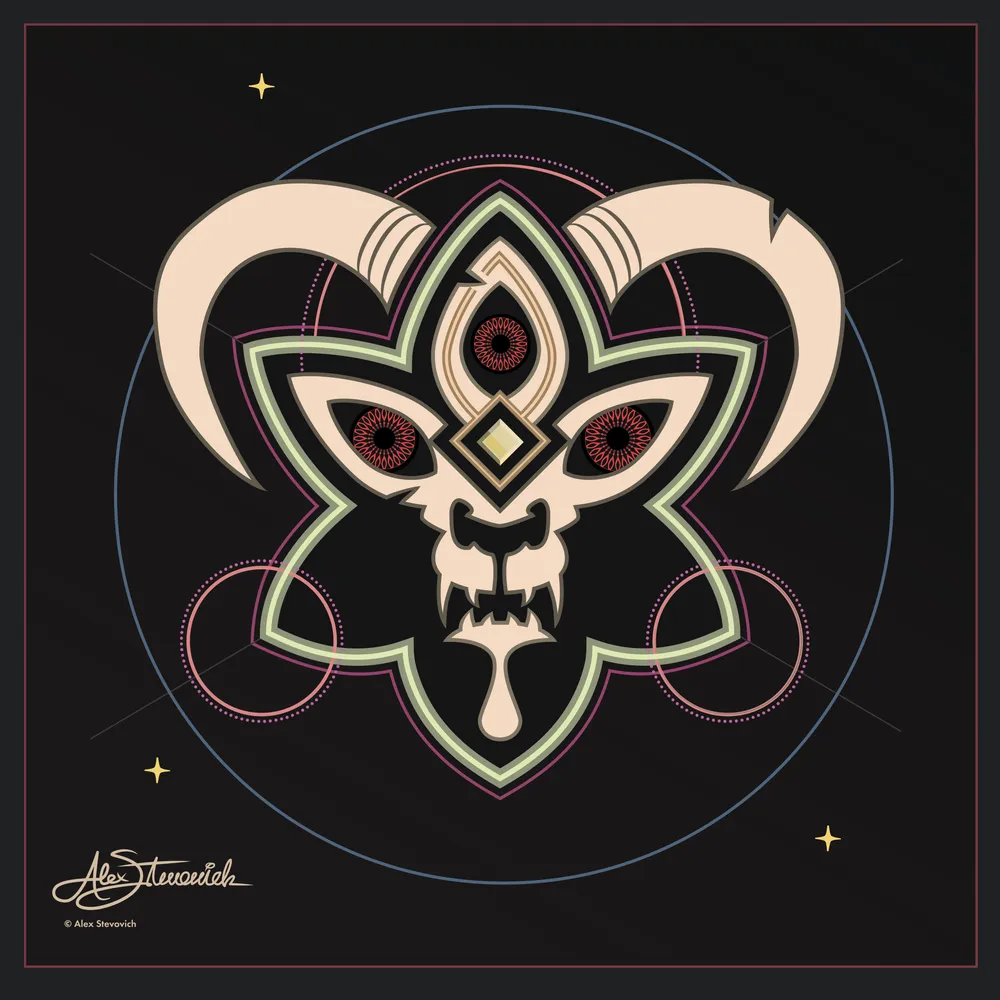
- Grand Cosmic Enemy Emblem, study for Kingdom of Flowers
- Artwork by Alex Stevovich
- © Alex Stevovich
- Visit figure page
- Type: portfolio
- Portfolio Type: advertising
- Portfolio Role: design_layout
- Portfolio Original Art: true
Honeycom8 Brand Brandmark

- Honeycom8 brandmark
- Client: Honeycom8
- Visit figure page
- Type: portfolio
- Portfolio Type: advertising
- Portfolio Role: design_layout
Hudson River Museum Ad 15 10 30

- Jordan Matter: Dancers Among Us — print advertisement
- Client: Hudson River Museum
- Visit figure page
- Type: portfolio
- Portfolio Type: advertising
- Portfolio Role: design_layout
Infinite Compassion: — Cover

- Infinite Compassion: Avalokiteshvara in Asian Art exhibition catalog, cover
- Client: Staten Island Museum
- Visit figure page
- Type: portfolio
- Portfolio Type: publication_design
- Portfolio Role: design_layout
Infinite Compassion: — Inside Front Cover

- Infinite Compassion: Avalokiteshvara in Asian Art exhibition catalog, inside back cover
- Client: Staten Island Museum
- Visit figure page
- Type: portfolio
- Portfolio Type: publication_design
- Portfolio Role: design_layout
Infinite Compassion: — Inside Front Cover

- Infinite Compassion: Avalokiteshvara in Asian Art exhibition catalog, inside front cover
- Client: Staten Island Museum
- Visit figure page
- Type: portfolio
- Portfolio Type: publication_design
- Portfolio Role: design_layout
Infinite Compassion: — Pages 10–11
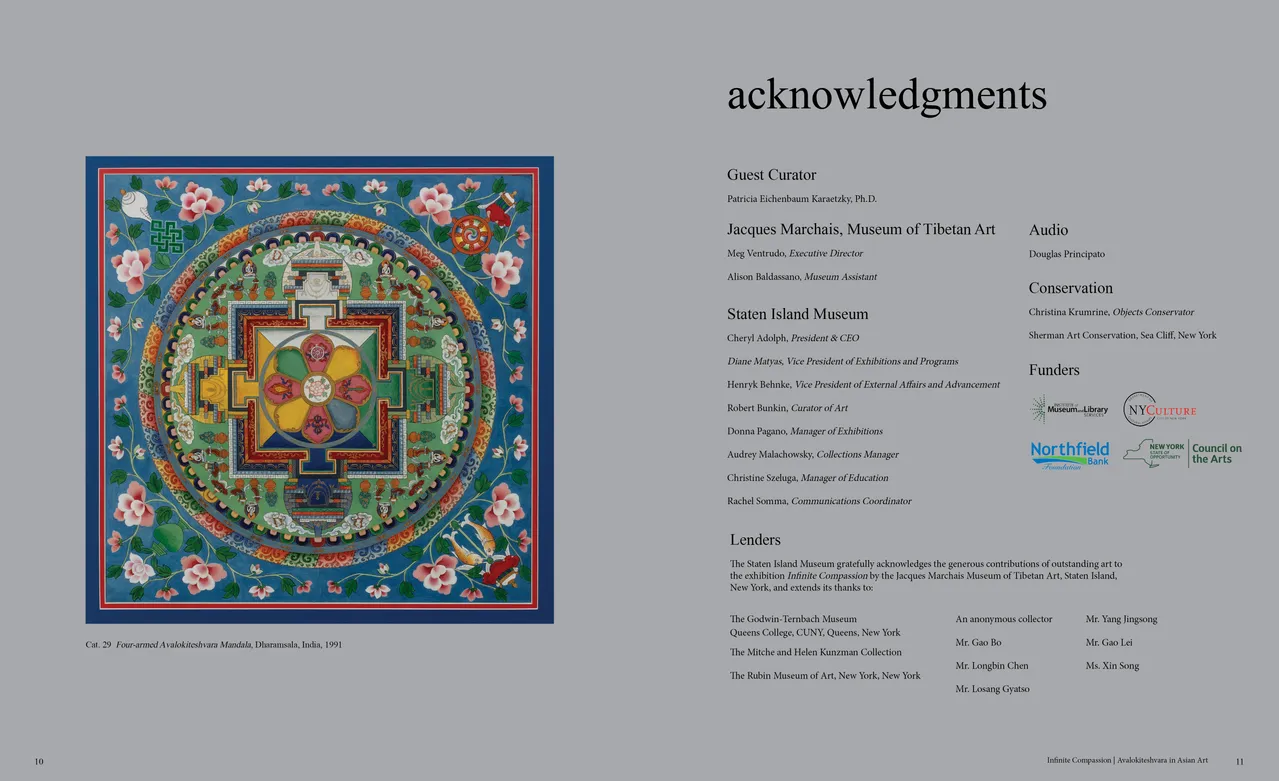
- Infinite Compassion: Avalokiteshvara in Asian Art exhibition catalog, pages 10-11
- Client: Staten Island Museum
- Visit figure page
- Type: portfolio
- Portfolio Type: publication_design
- Portfolio Role: design_layout
Infinite Compassion: — Pages 12–13
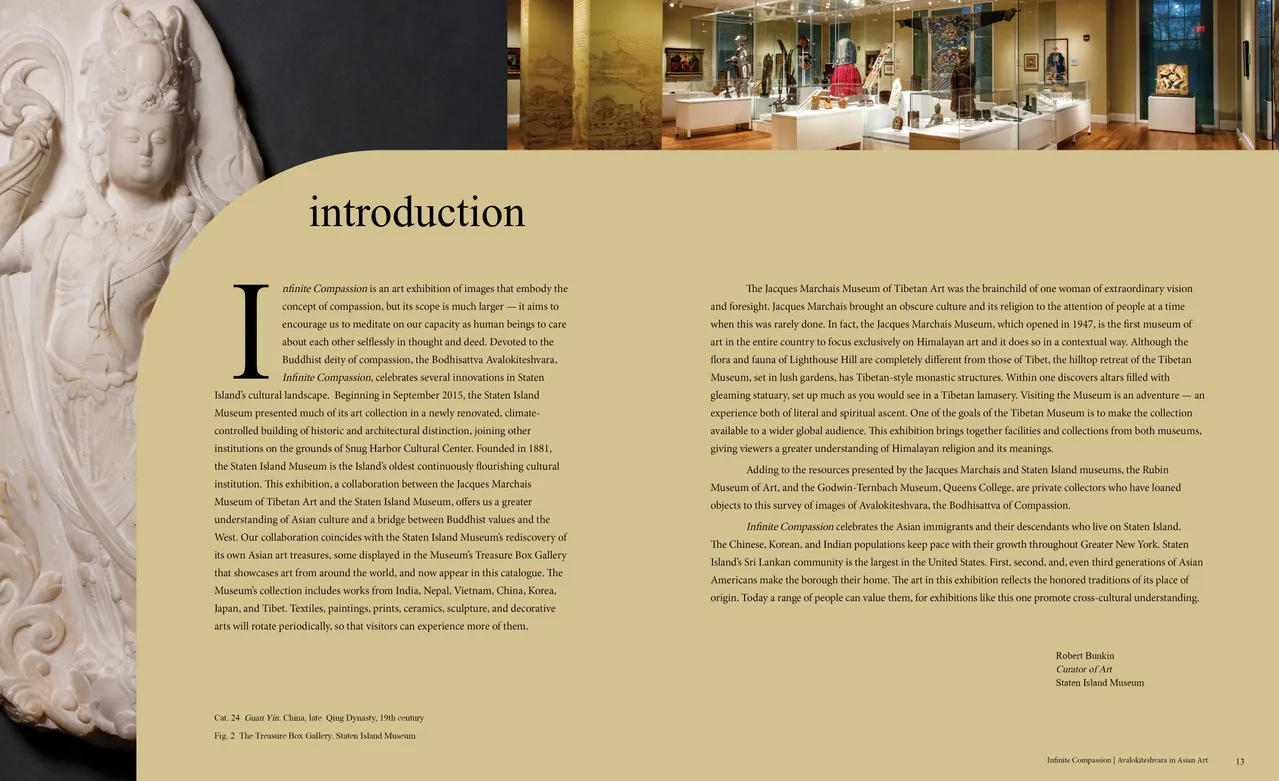
- Infinite Compassion: Avalokiteshvara in Asian Art exhibition catalog, pages 12-13
- Client: Staten Island Museum
- Visit figure page
- Type: portfolio
- Portfolio Type: publication_design
- Portfolio Role: design_layout
Infinite Compassion: — Pages 14–15
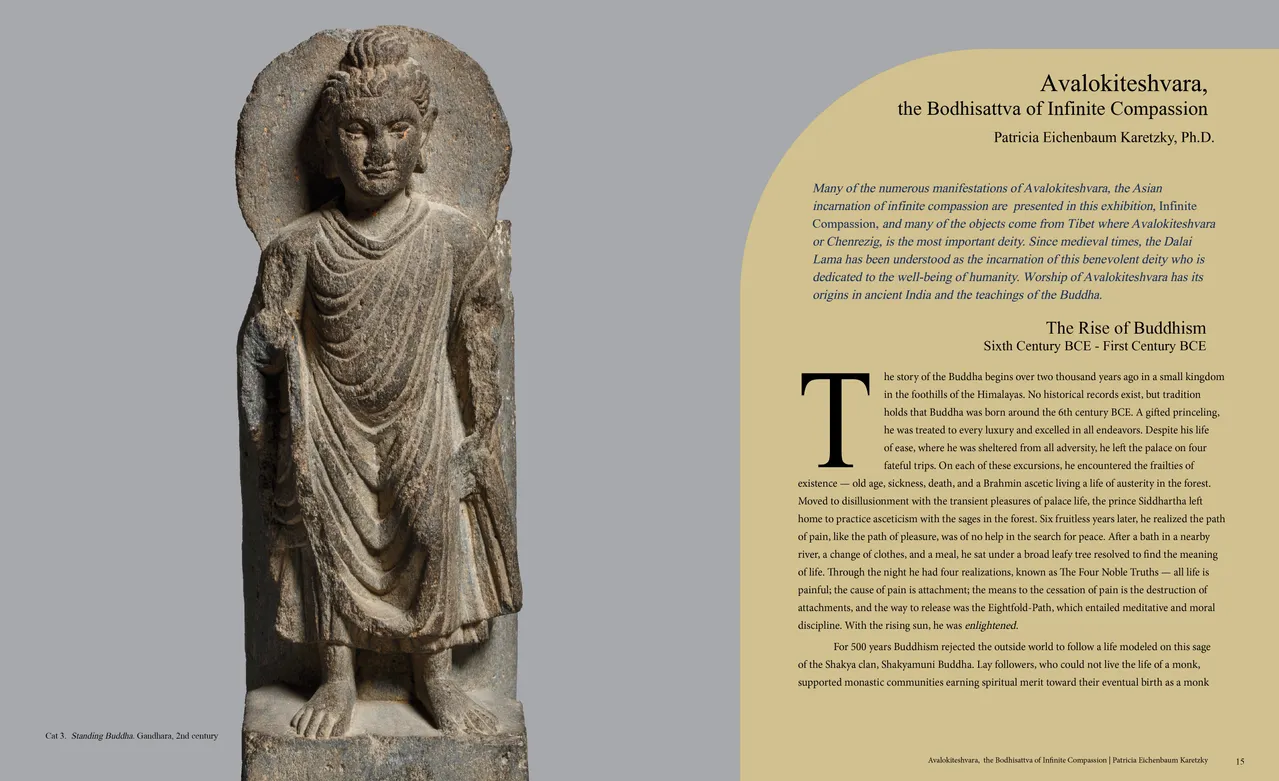
- Infinite Compassion: Avalokiteshvara in Asian Art exhibition catalog, pages 14-15
- Client: Staten Island Museum
- Visit figure page
- Type: portfolio
- Portfolio Type: publication_design
- Portfolio Role: design_layout
Infinite Compassion: — Pages 16–17

- Infinite Compassion: Avalokiteshvara in Asian Art exhibition catalog, pages 16-17
- Client: Staten Island Museum
- Visit figure page
- Type: portfolio
- Portfolio Type: publication_design
- Portfolio Role: design_layout
Infinite Compassion: — Pages 18–19

- Infinite Compassion: Avalokiteshvara in Asian Art exhibition catalog, pages 18-19
- Client: Staten Island Museum
- Visit figure page
- Type: portfolio
- Portfolio Type: publication_design
- Portfolio Role: design_layout
Infinite Compassion: — Pages 2–3

- Infinite Compassion: Avalokiteshvara in Asian Art exhibition catalog, pages 2-3
- Client: Staten Island Museum
- Visit figure page
- Type: portfolio
- Portfolio Type: publication_design
- Portfolio Role: design_layout
Infinite Compassion: — Pages 20–21
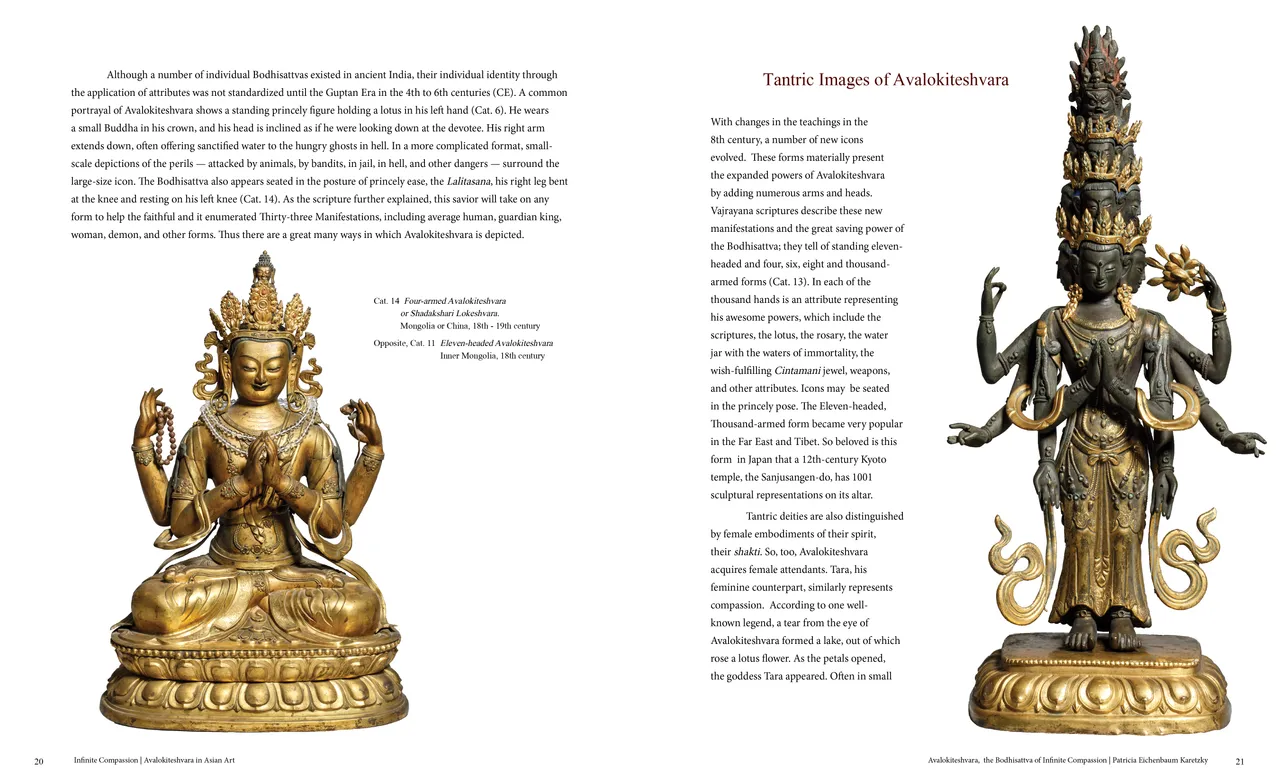
- Infinite Compassion: Avalokiteshvara in Asian Art exhibition catalog, pages 20-21
- Client: Staten Island Museum
- Visit figure page
- Type: portfolio
- Portfolio Type: publication_design
- Portfolio Role: design_layout
Infinite Compassion: — Pages 22–23
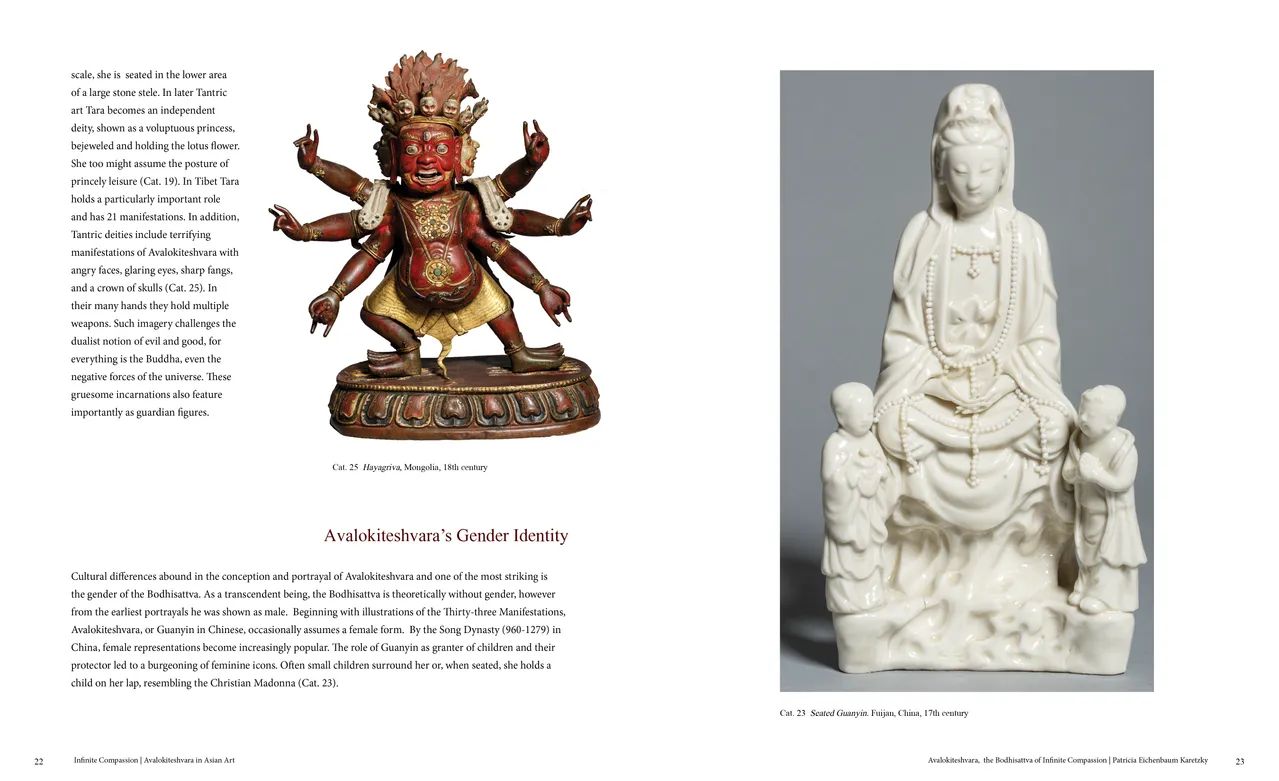
- Infinite Compassion: Avalokiteshvara in Asian Art exhibition catalog, pages 22-23
- Client: Staten Island Museum
- Visit figure page
- Type: portfolio
- Portfolio Type: publication_design
- Portfolio Role: design_layout
Infinite Compassion: — Pages 24–25
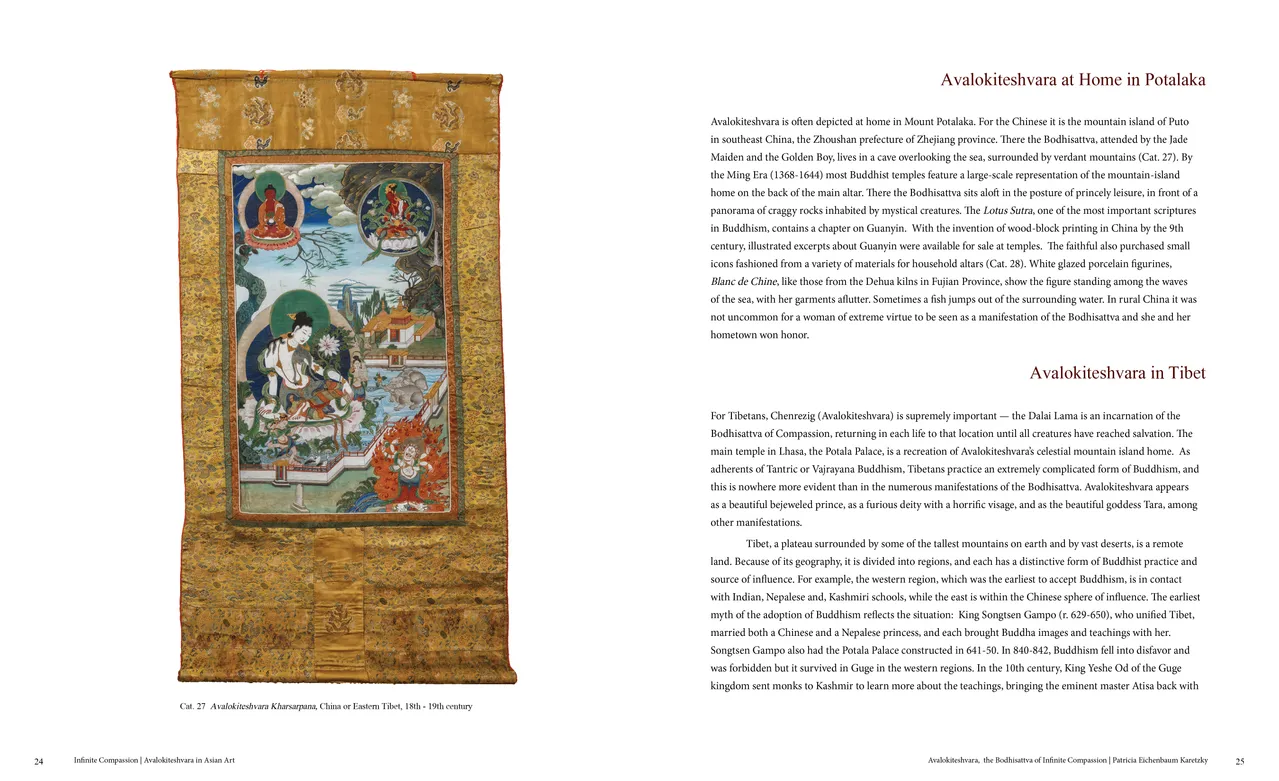
- Infinite Compassion: Avalokiteshvara in Asian Art exhibition catalog, pages 24-25
- Client: Staten Island Museum
- Visit figure page
- Type: portfolio
- Portfolio Type: publication_design
- Portfolio Role: design_layout
Infinite Compassion: — Pages 26–27

- Infinite Compassion: Avalokiteshvara in Asian Art exhibition catalog, pages 26-27
- Client: Staten Island Museum
- Visit figure page
- Type: portfolio
- Portfolio Type: publication_design
- Portfolio Role: design_layout
Infinite Compassion: — Pages 28–29
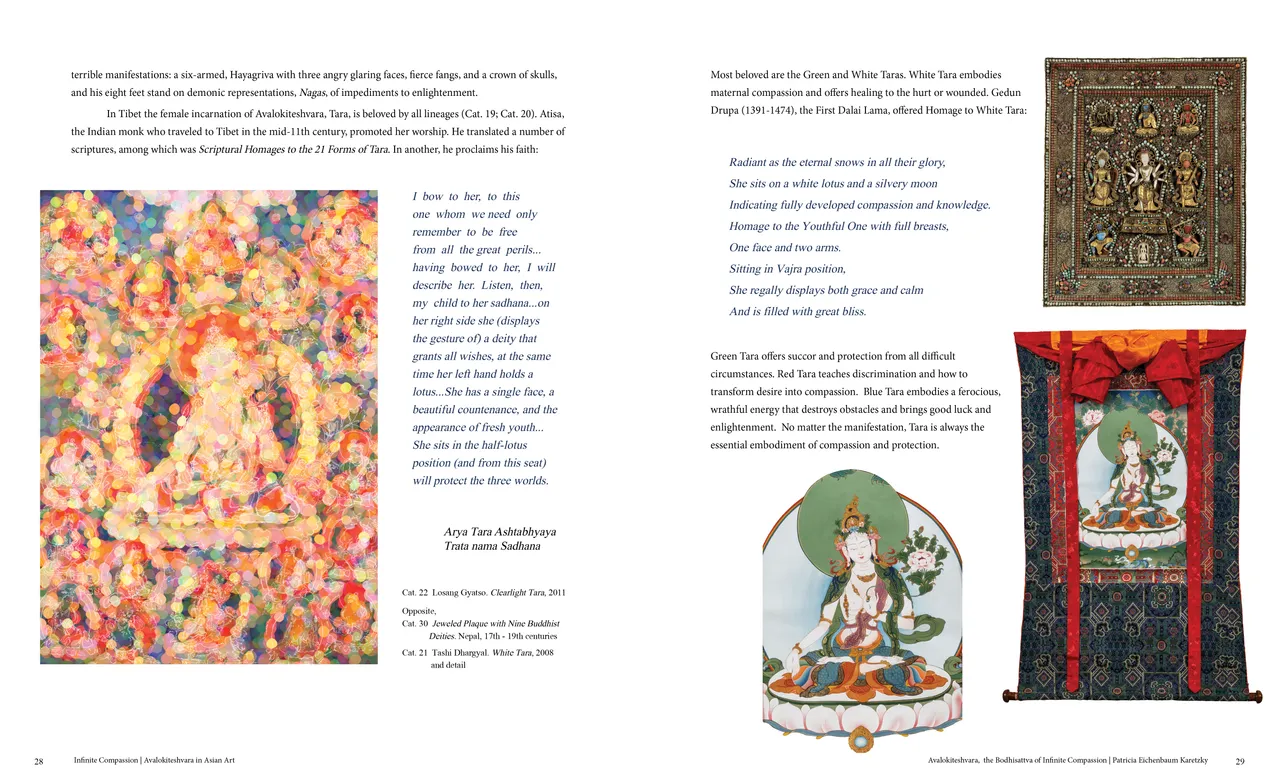
- Infinite Compassion: Avalokiteshvara in Asian Art exhibition catalog, pages 28-29
- Client: Staten Island Museum
- Visit figure page
- Type: portfolio
- Portfolio Type: publication_design
- Portfolio Role: design_layout
Infinite Compassion: — Pages 30–31
- Infinite Compassion: Avalokiteshvara in Asian Art exhibition catalog, pages 30-31
- Client: Staten Island Museum
- Visit figure page
- Type: portfolio
- Portfolio Type: publication_design
- Portfolio Role: design_layout
Infinite Compassion: — Pages 32–33

- Infinite Compassion: Avalokiteshvara in Asian Art exhibition catalog, pages 32-33
- Client: Staten Island Museum
- Visit figure page
- Type: portfolio
- Portfolio Type: publication_design
- Portfolio Role: design_layout
Infinite Compassion: — Pages 34–35
- Infinite Compassion: Avalokiteshvara in Asian Art exhibition catalog, pages 34-35
- Client: Staten Island Museum
- Visit figure page
- Type: portfolio
- Portfolio Type: publication_design
- Portfolio Role: design_layout
Infinite Compassion: — Pages 36–37
- Infinite Compassion: Avalokiteshvara in Asian Art exhibition catalog, pages 36-37
- Client: Staten Island Museum
- Visit figure page
- Type: portfolio
- Portfolio Type: publication_design
- Portfolio Role: design_layout
Infinite Compassion: — Pages 38–39
- Infinite Compassion: Avalokiteshvara in Asian Art exhibition catalog, pages 38-39
- Client: Staten Island Museum
- Visit figure page
- Type: portfolio
- Portfolio Type: publication_design
- Portfolio Role: design_layout
Infinite Compassion: — Pages 4–5
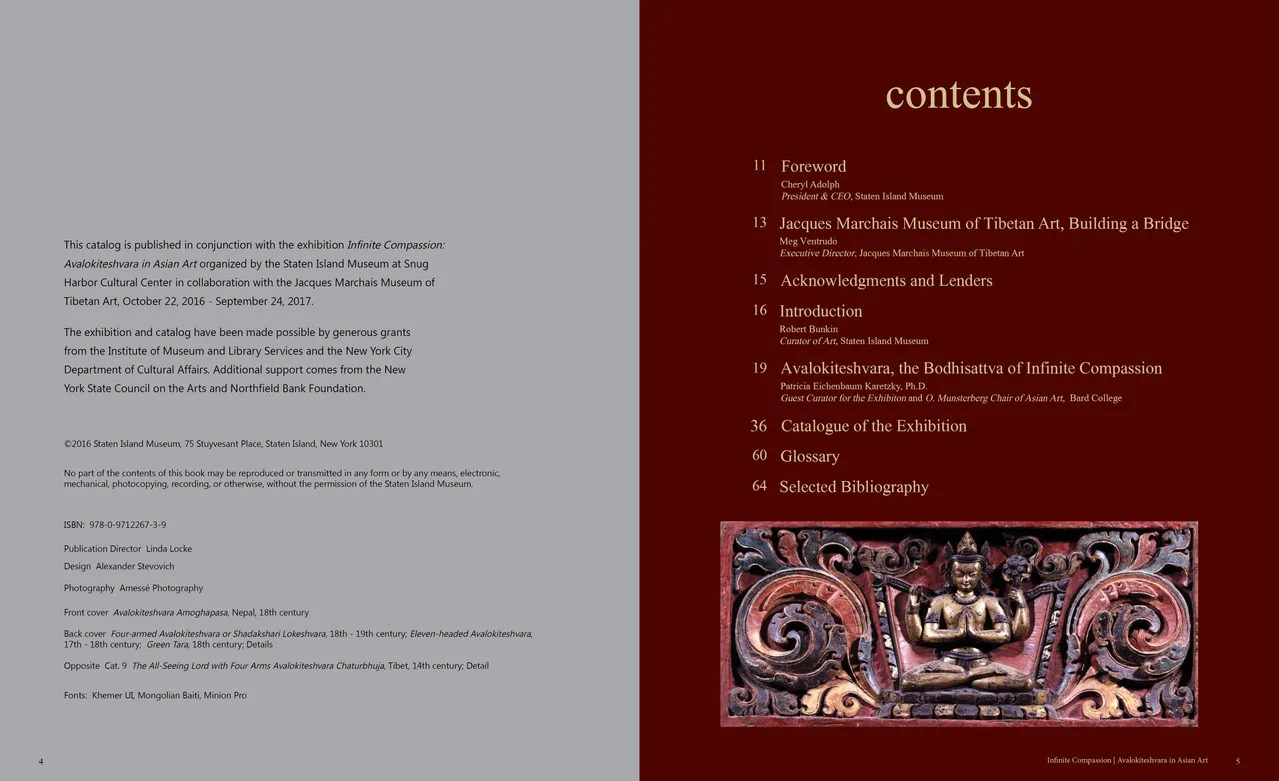
- Infinite Compassion: Avalokiteshvara in Asian Art exhibition catalog, pages 4-5
- Client: Staten Island Museum
- Visit figure page
- Type: portfolio
- Portfolio Type: publication_design
- Portfolio Role: design_layout
Infinite Compassion: — Pages 40–41
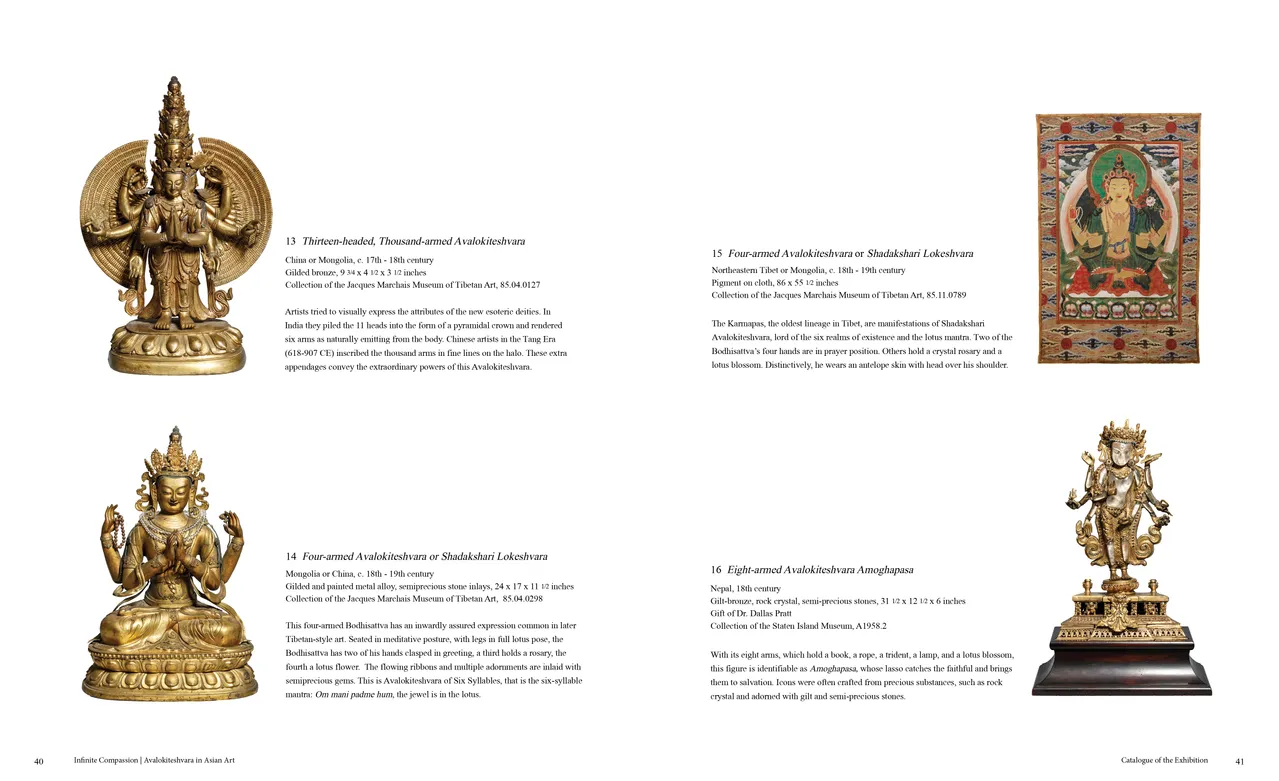
- Infinite Compassion: Avalokiteshvara in Asian Art exhibition catalog, pages 40-41
- Client: Staten Island Museum
- Visit figure page
- Type: portfolio
- Portfolio Type: publication_design
- Portfolio Role: design_layout
Infinite Compassion: — Pages 42–43
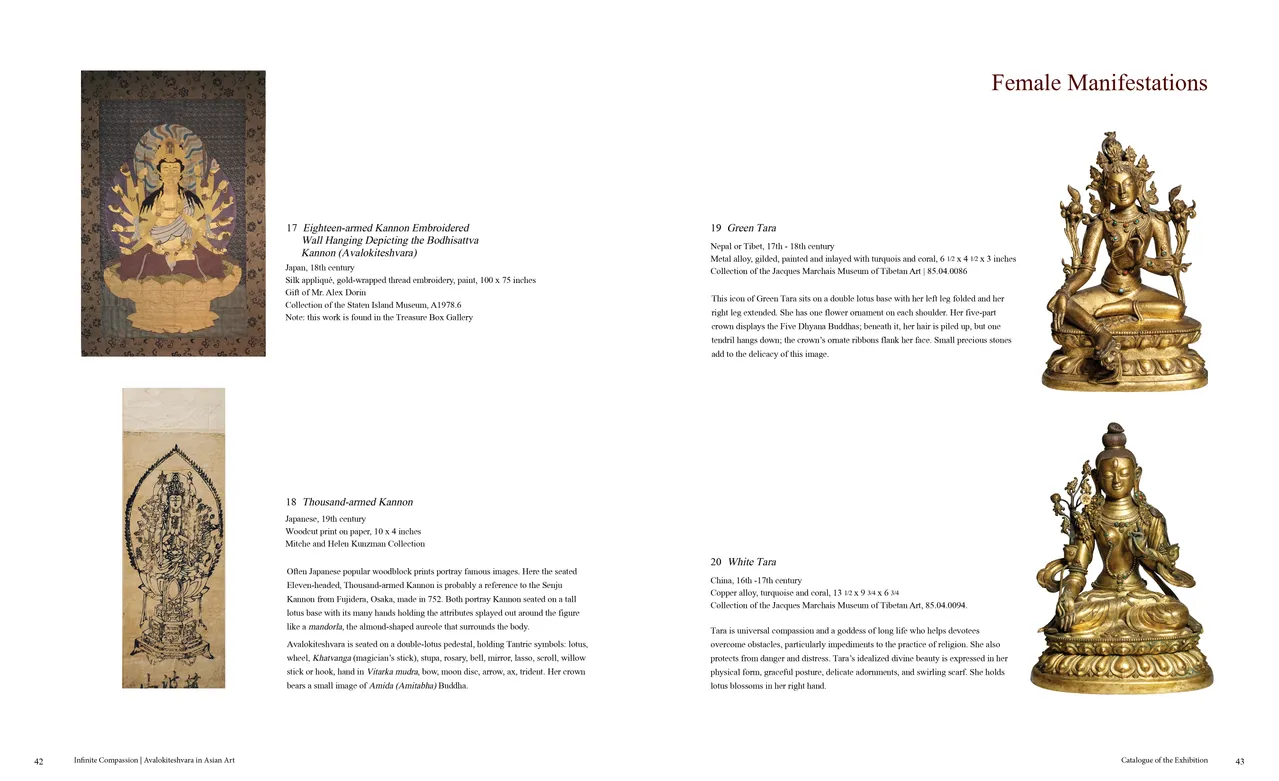
- Infinite Compassion: Avalokiteshvara in Asian Art exhibition catalog, pages 42-43
- Client: Staten Island Museum
- Visit figure page
- Type: portfolio
- Portfolio Type: publication_design
- Portfolio Role: design_layout
Infinite Compassion: — Pages 44–45
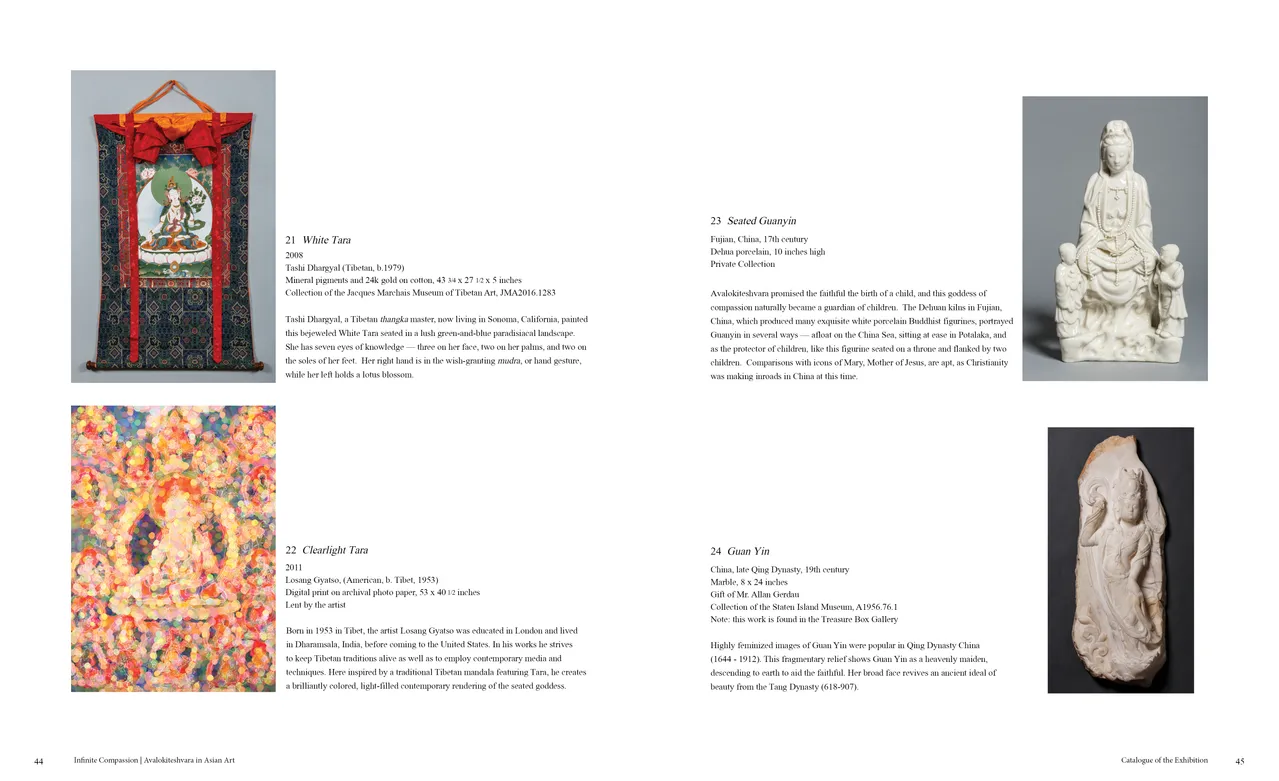
- Infinite Compassion: Avalokiteshvara in Asian Art exhibition catalog, pages 44-45
- Client: Staten Island Museum
- Visit figure page
- Type: portfolio
- Portfolio Type: publication_design
- Portfolio Role: design_layout
Infinite Compassion: — Pages 46–47
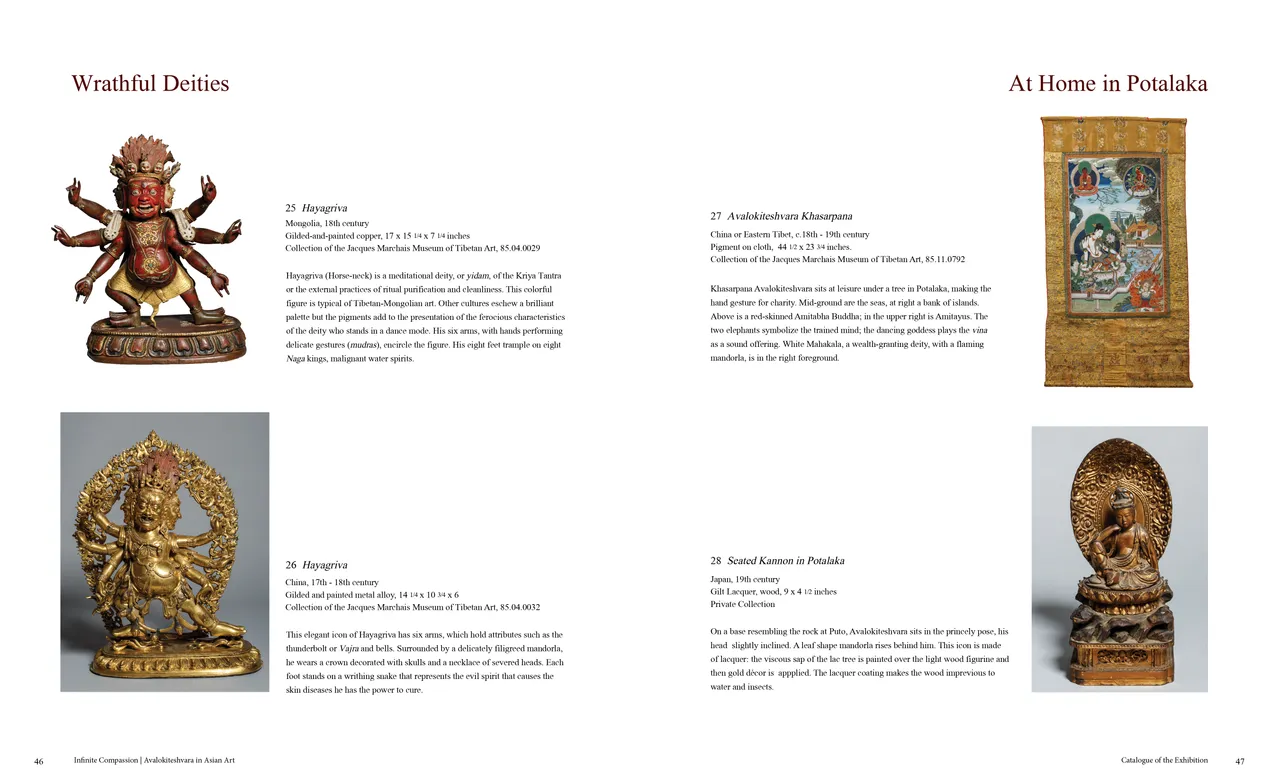
- Infinite Compassion: Avalokiteshvara in Asian Art exhibition catalog, pages 46-47
- Client: Staten Island Museum
- Visit figure page
- Type: portfolio
- Portfolio Type: publication_design
- Portfolio Role: design_layout
Infinite Compassion: — Pages 48–49
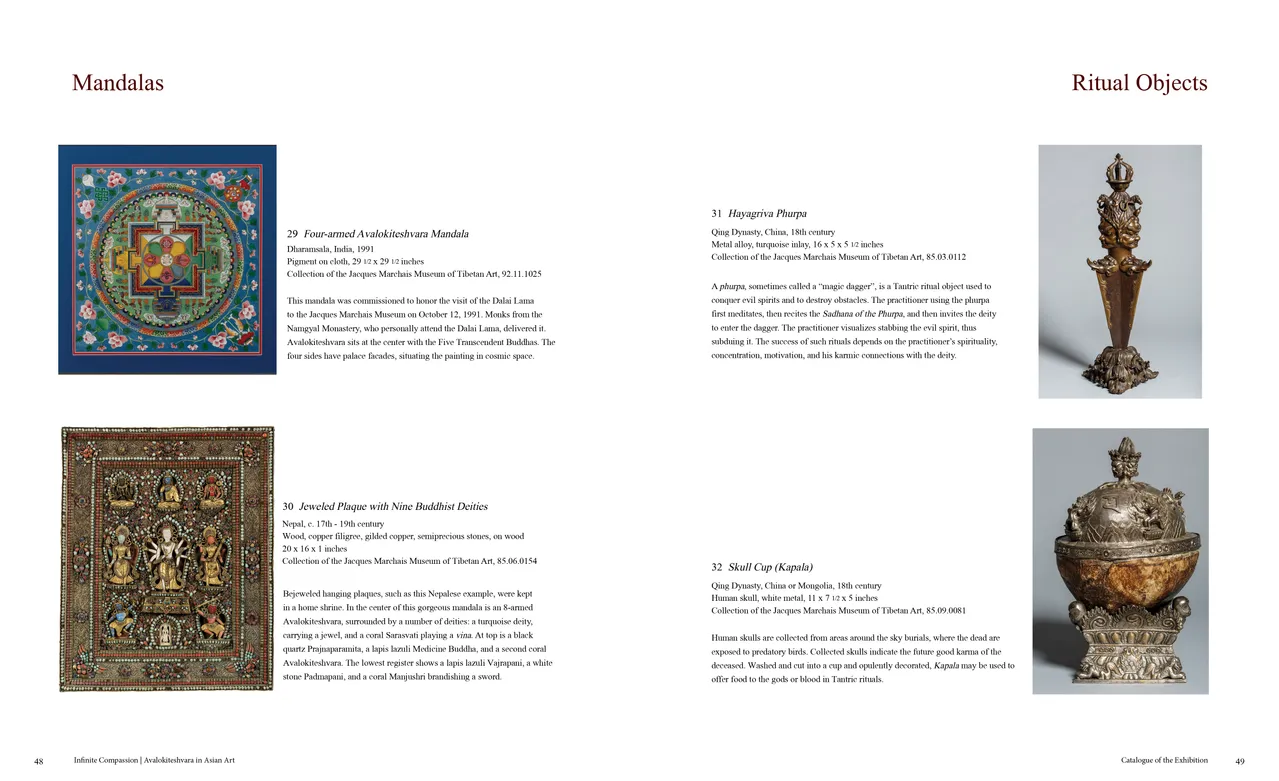
- Infinite Compassion: Avalokiteshvara in Asian Art exhibition catalog, pages 48-49
- Client: Staten Island Museum
- Visit figure page
- Type: portfolio
- Portfolio Type: publication_design
- Portfolio Role: design_layout
Infinite Compassion: — Pages 50–51
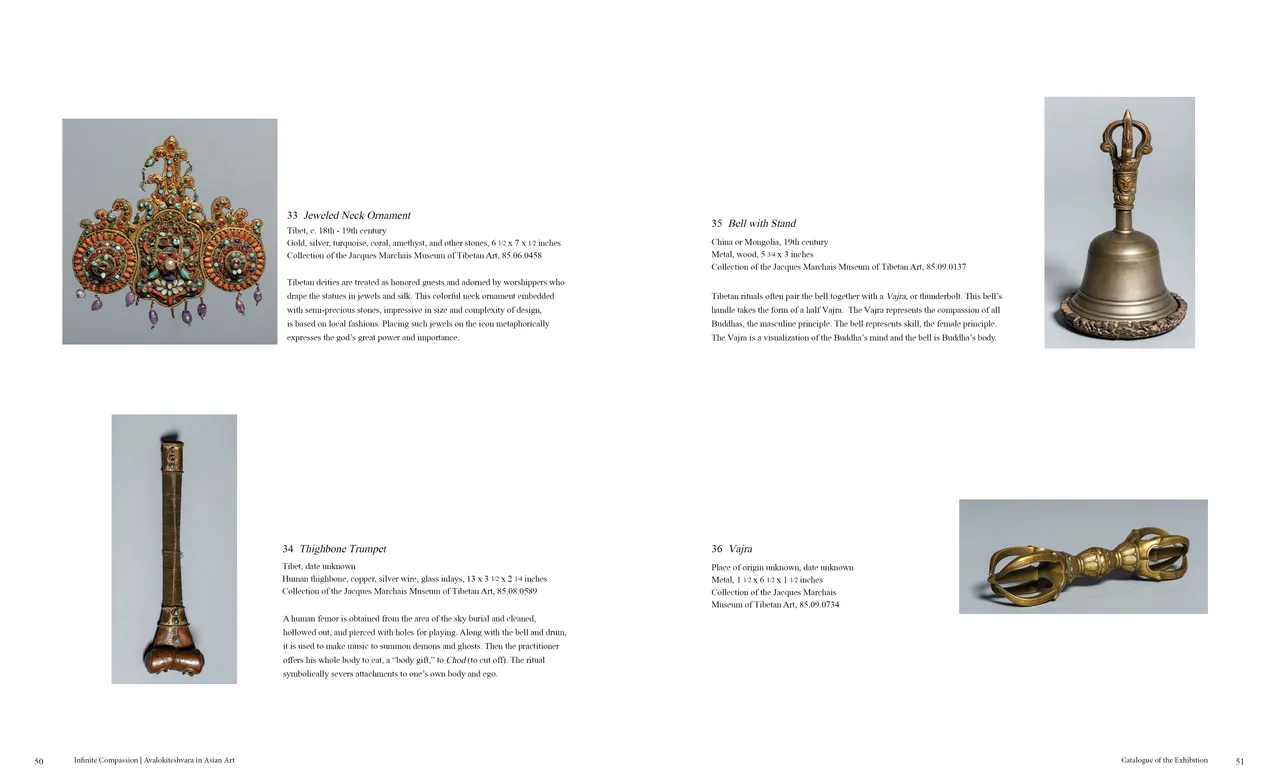
- Infinite Compassion: Avalokiteshvara in Asian Art exhibition catalog, pages 50-51
- Client: Staten Island Museum
- Visit figure page
- Type: portfolio
- Portfolio Type: publication_design
- Portfolio Role: design_layout
Infinite Compassion: — Pages 52–53
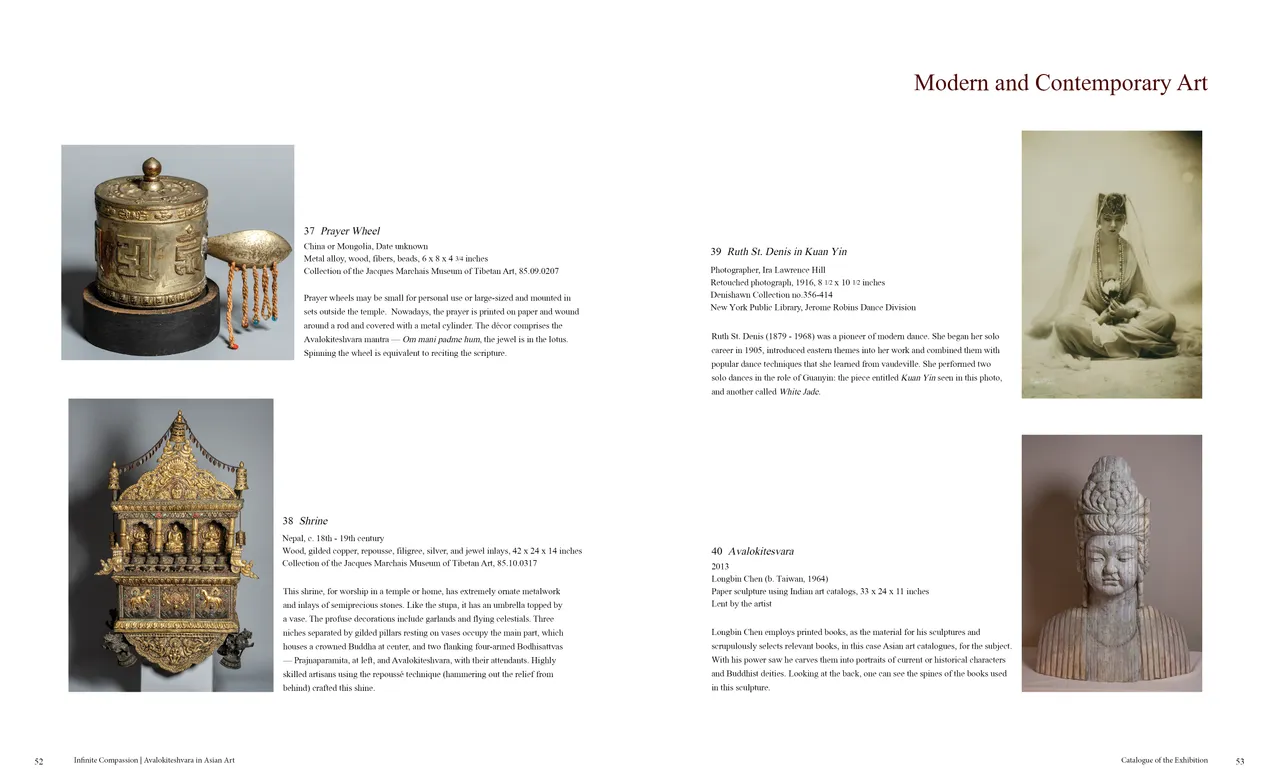
- Infinite Compassion: Avalokiteshvara in Asian Art exhibition catalog, pages 52-53
- Client: Staten Island Museum
- Visit figure page
- Type: portfolio
- Portfolio Type: publication_design
- Portfolio Role: design_layout
Infinite Compassion: — Pages 54–55
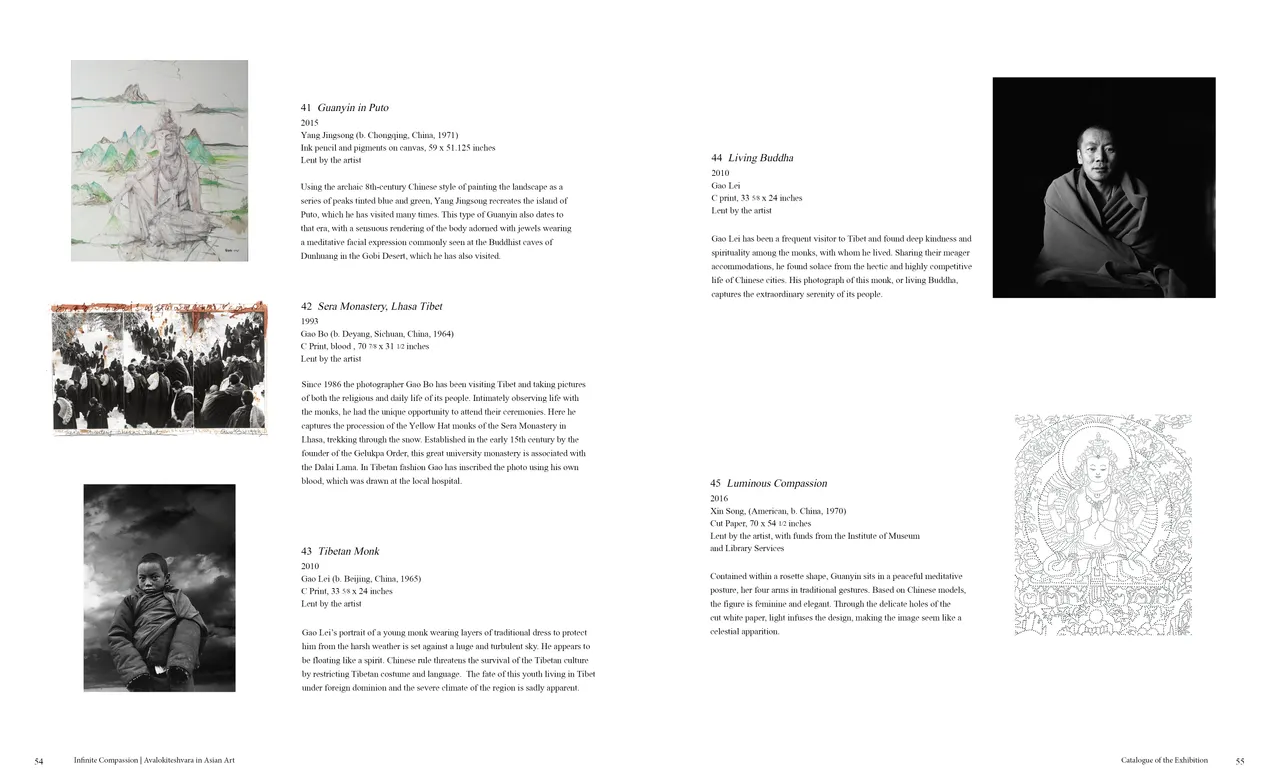
- Infinite Compassion: Avalokiteshvara in Asian Art exhibition catalog, pages 54-55
- Client: Staten Island Museum
- Visit figure page
- Type: portfolio
- Portfolio Type: publication_design
- Portfolio Role: design_layout
Infinite Compassion: — Pages 56–57
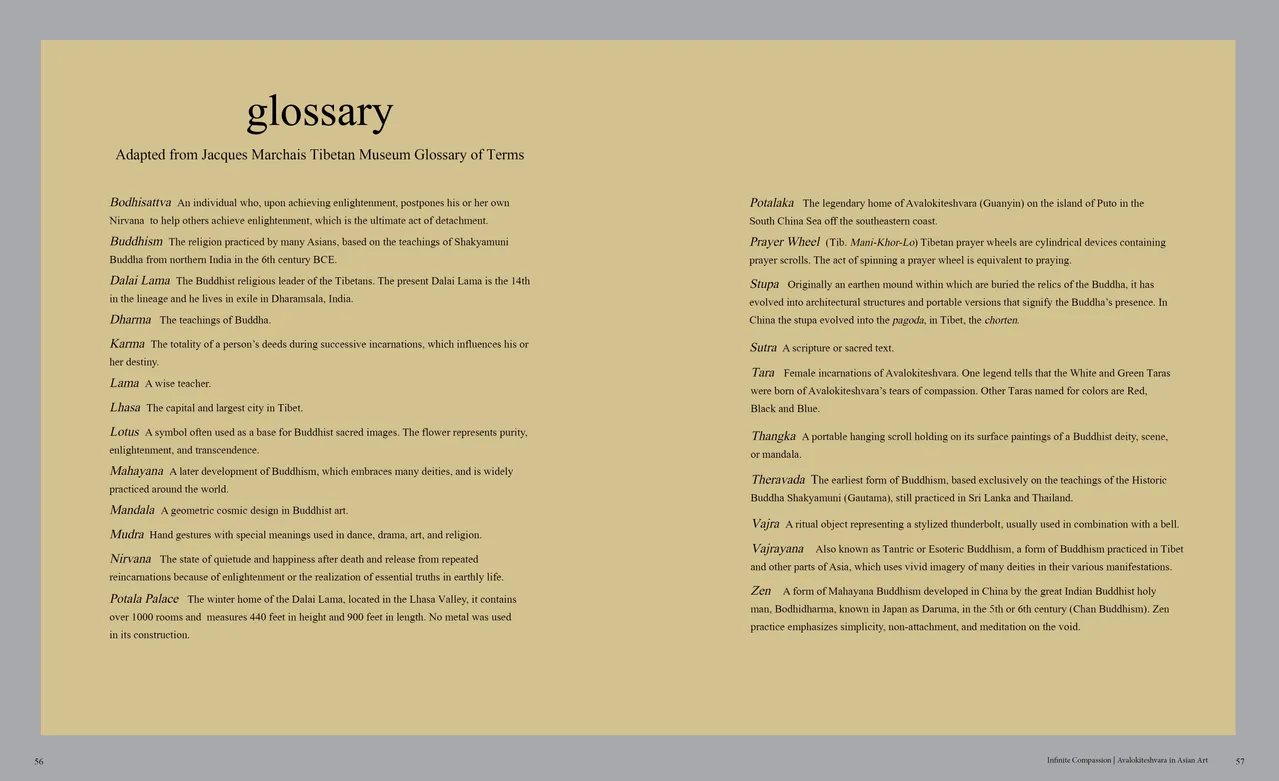
- Infinite Compassion: Avalokiteshvara in Asian Art exhibition catalog, pages 56-57
- Client: Staten Island Museum
- Visit figure page
- Type: portfolio
- Portfolio Type: publication_design
- Portfolio Role: design_layout
Infinite Compassion: — Pages 58–59
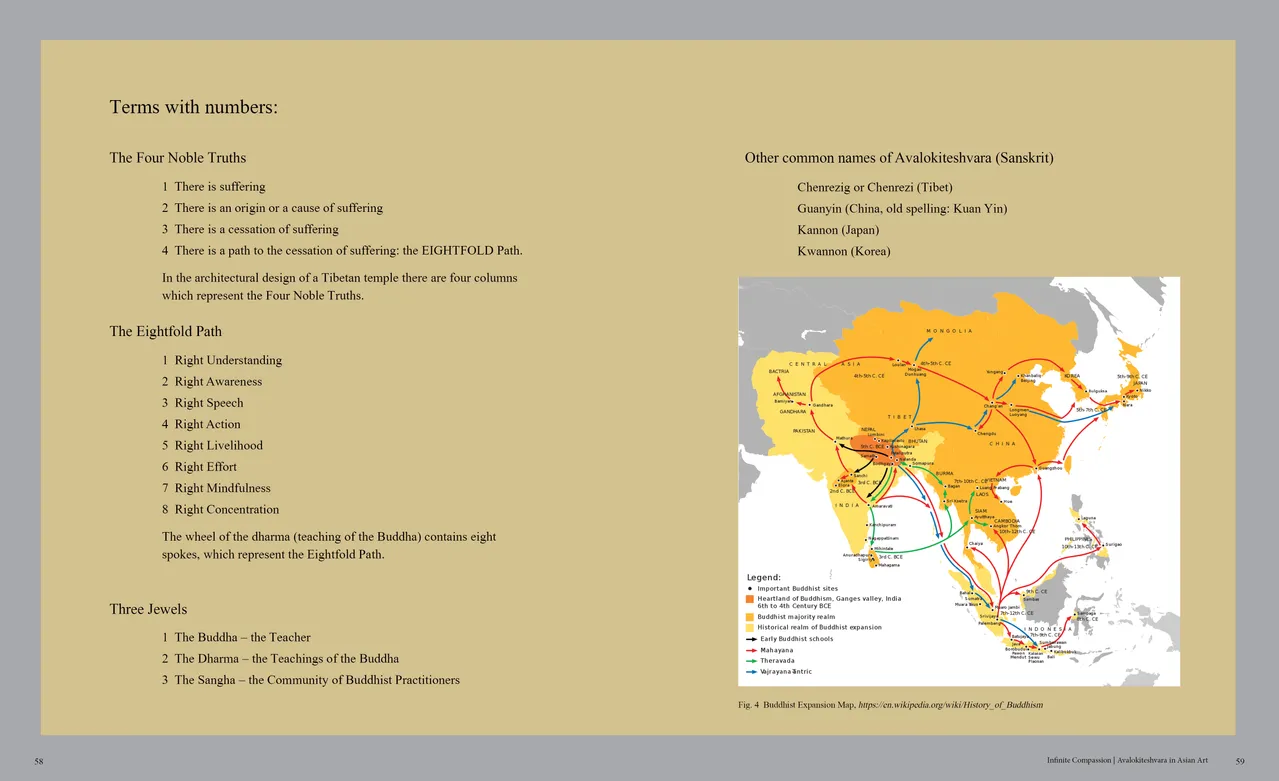
- Infinite Compassion: Avalokiteshvara in Asian Art exhibition catalog, pages 58-59
- Client: Staten Island Museum
- Visit figure page
- Type: portfolio
- Portfolio Type: publication_design
- Portfolio Role: design_layout
Infinite Compassion: — Pages 6–7

- Infinite Compassion: Avalokiteshvara in Asian Art exhibition catalog, pages 6-7
- Client: Staten Island Museum
- Visit figure page
- Type: portfolio
- Portfolio Type: publication_design
- Portfolio Role: design_layout
Infinite Compassion: — Pages 60–61

- Infinite Compassion: Avalokiteshvara in Asian Art exhibition catalog, pages 60-61
- Client: Staten Island Museum
- Visit figure page
- Type: portfolio
- Portfolio Type: publication_design
- Portfolio Role: design_layout
Infinite Compassion: — Pages 62–63
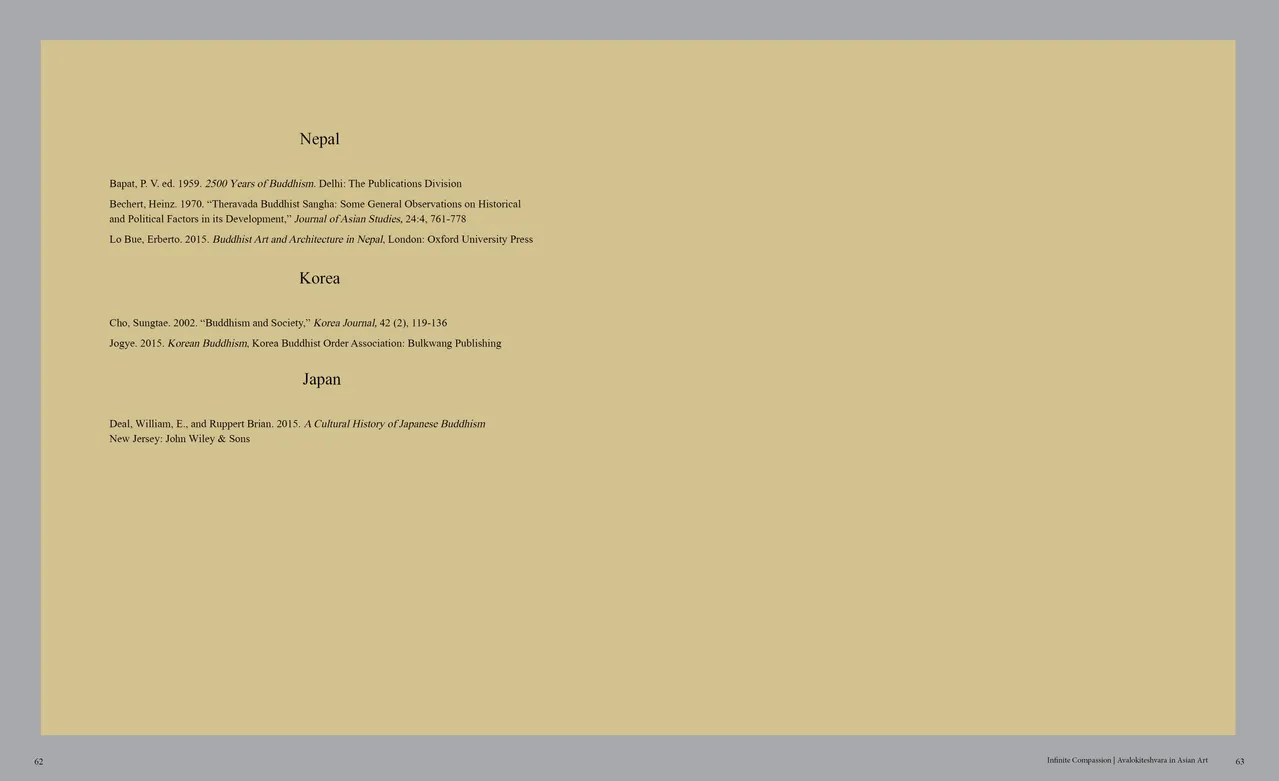
- Infinite Compassion: Avalokiteshvara in Asian Art exhibition catalog, pages 62-63
- Client: Staten Island Museum
- Visit figure page
- Type: portfolio
- Portfolio Type: publication_design
- Portfolio Role: design_layout
Infinite Compassion: — Pages 8–9
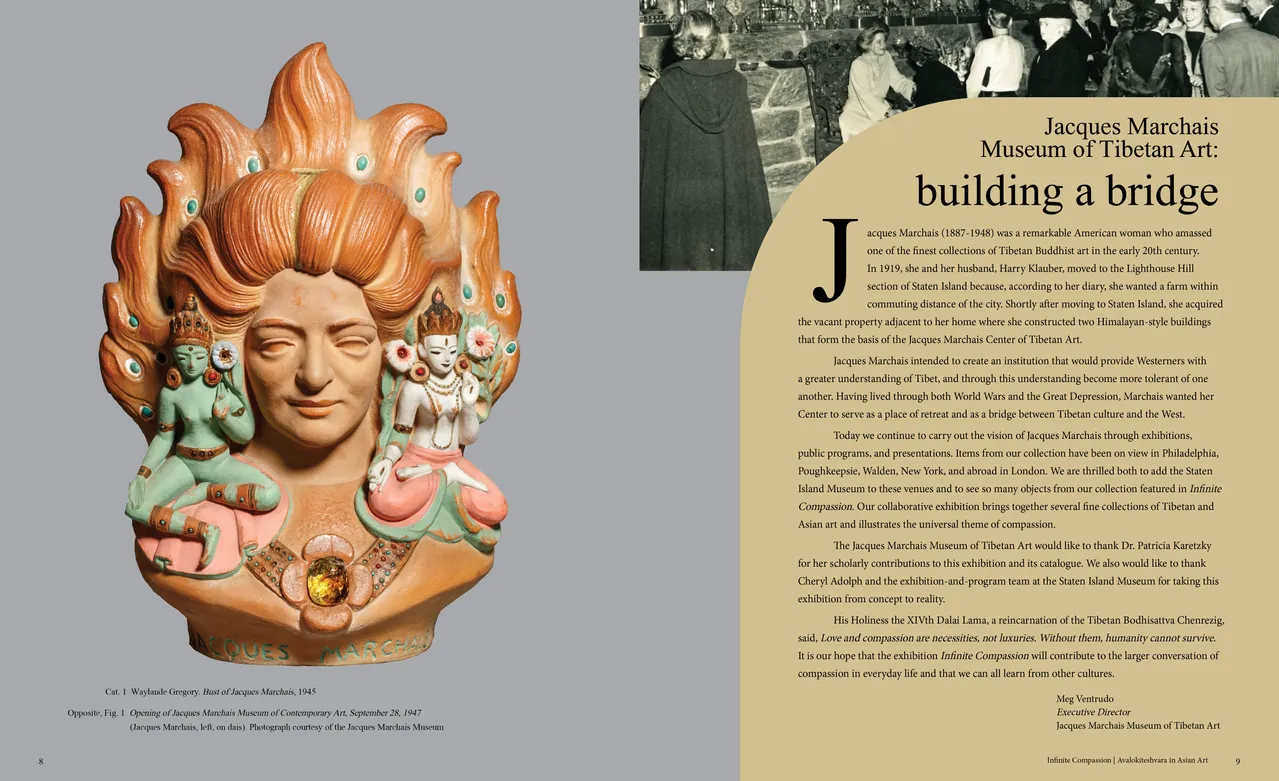
- Infinite Compassion: Avalokiteshvara in Asian Art exhibition catalog, pages 8-9
- Client: Staten Island Museum
- Visit figure page
- Type: portfolio
- Portfolio Type: publication_design
- Portfolio Role: design_layout
Jacob Collins 2015 Exhibition Brochure Presentation
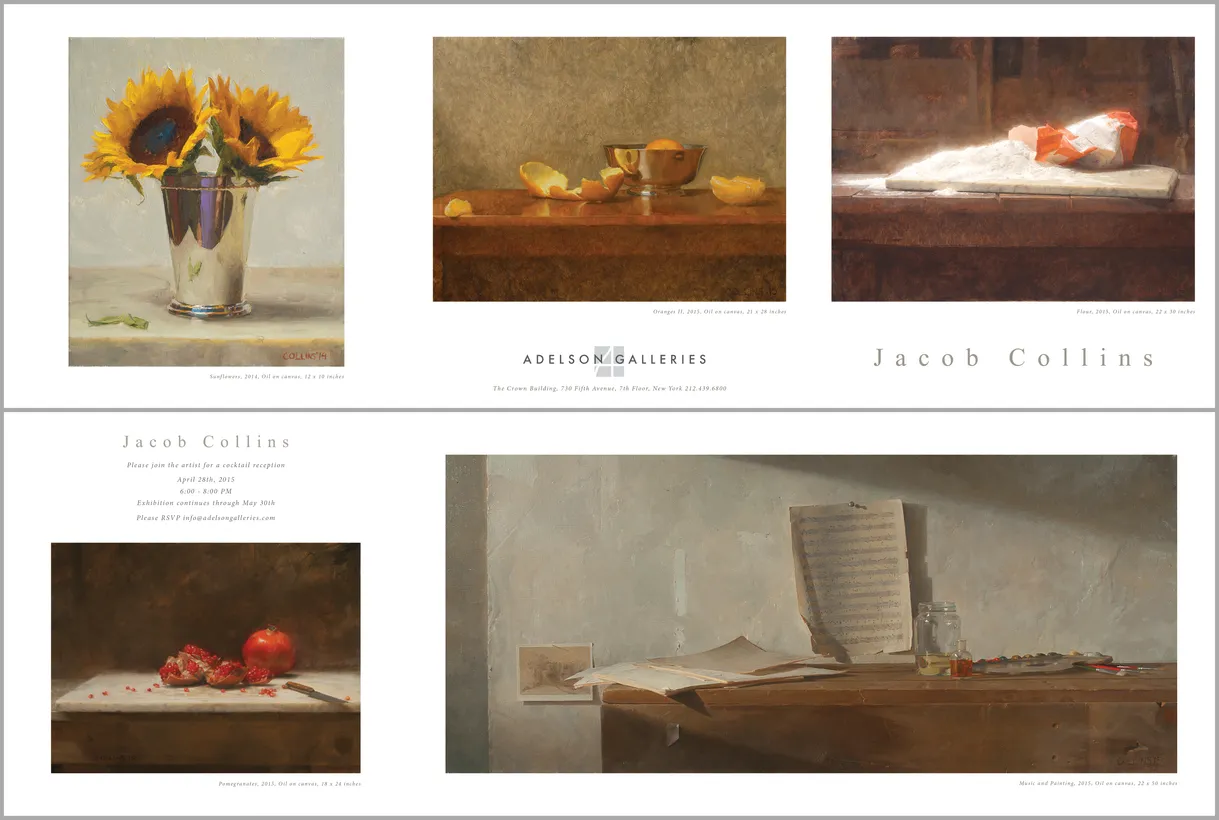
- Folding brochure for the Jacob Collins (2015) exhibition
- Client: Adelson Galleries
- Visit figure page
- Type: portfolio
- Portfolio Type: advertising
- Portfolio Role: design_layout
Jacob Collins 2015 Exhibition Wordmark

- Wordmark for Jacob Collins (2015) exhibition
- Client: Adelson Galleries
- Visit figure page
- Type: portfolio
- Portfolio Type: advertising
- Portfolio Role: design_layout
Jacob Collins Nyt Ad 2015 01
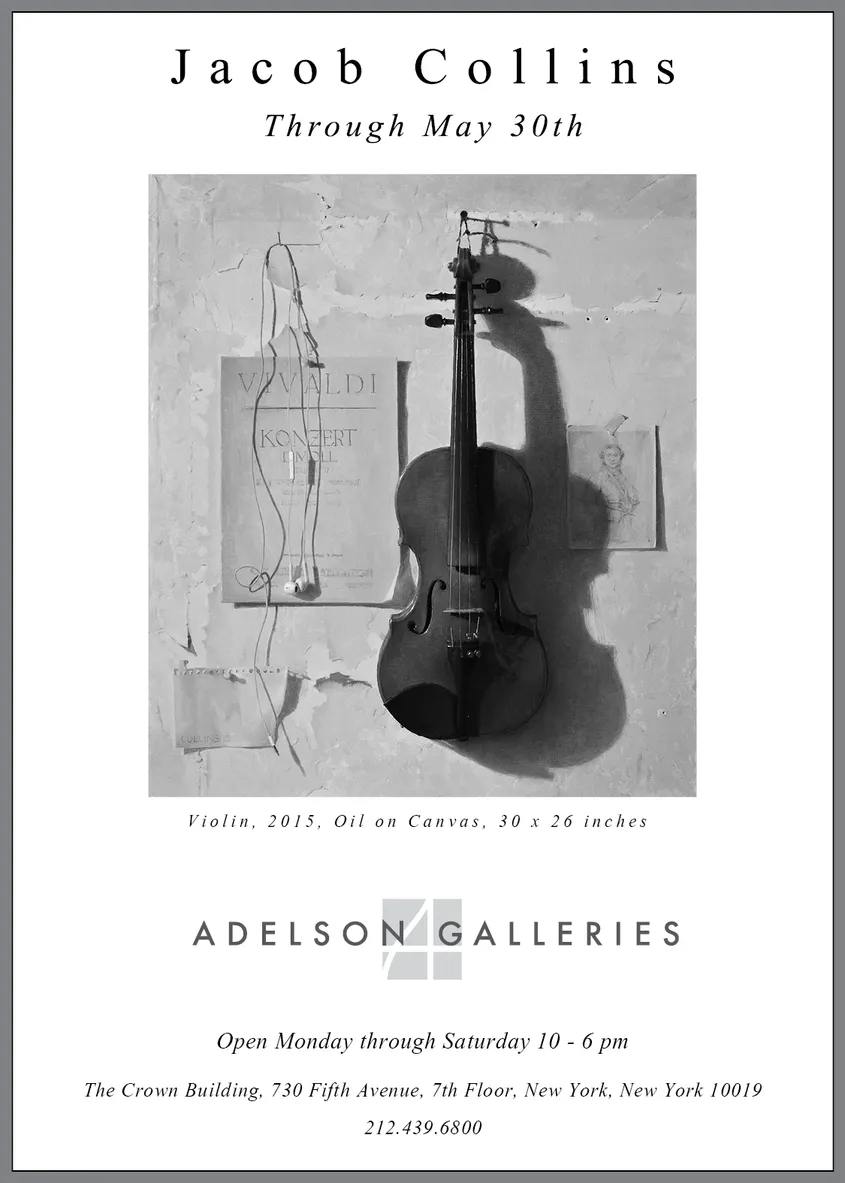
- Jacob Collins — New York Times print advertisement #1
- Client: Adelson Galleries
- Visit figure page
- Type: portfolio
- Portfolio Type: advertising
- Portfolio Role: design_layout
Jacob Collins Nyt Ad 2015 02
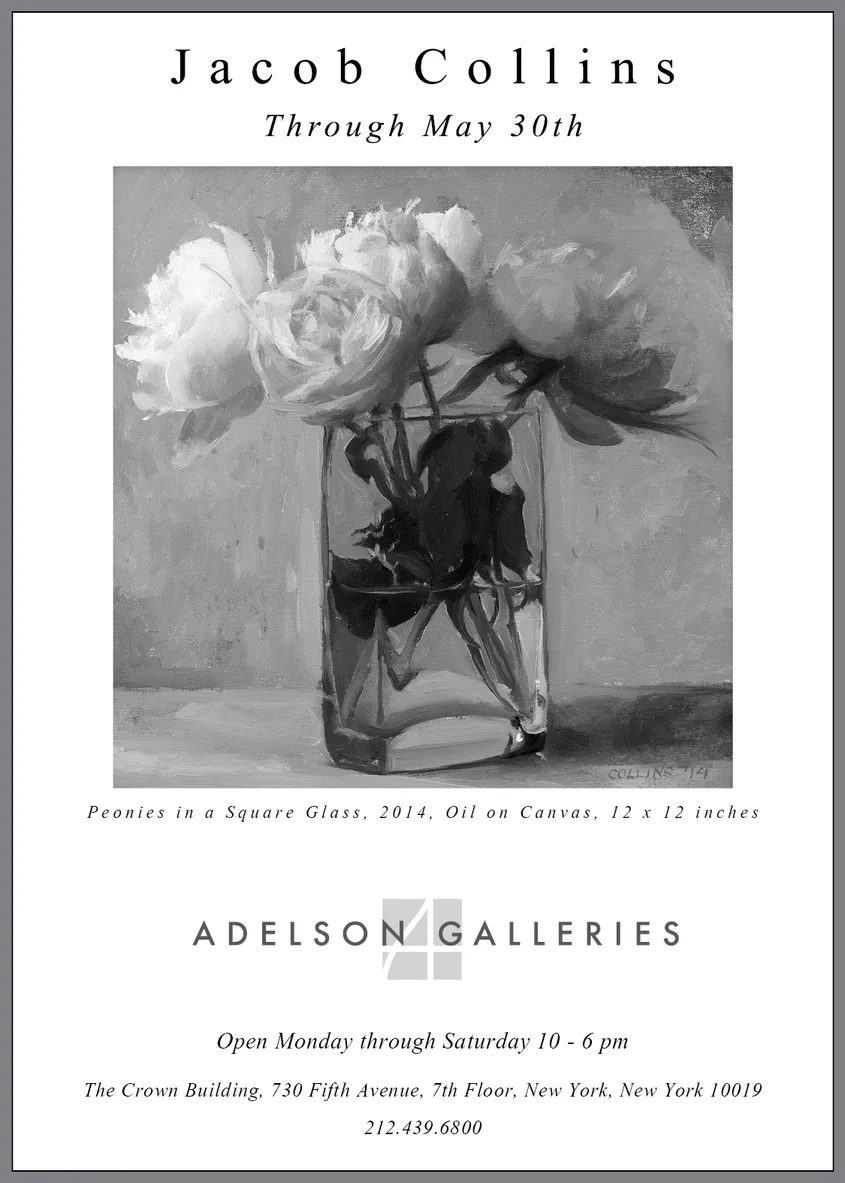
- Jacob Collins — New York Times print advertisement #2
- Client: Adelson Galleries
- Visit figure page
- Type: portfolio
- Portfolio Type: advertising
- Portfolio Role: design_layout
Jacob Collins Nyt Ad 2015 03
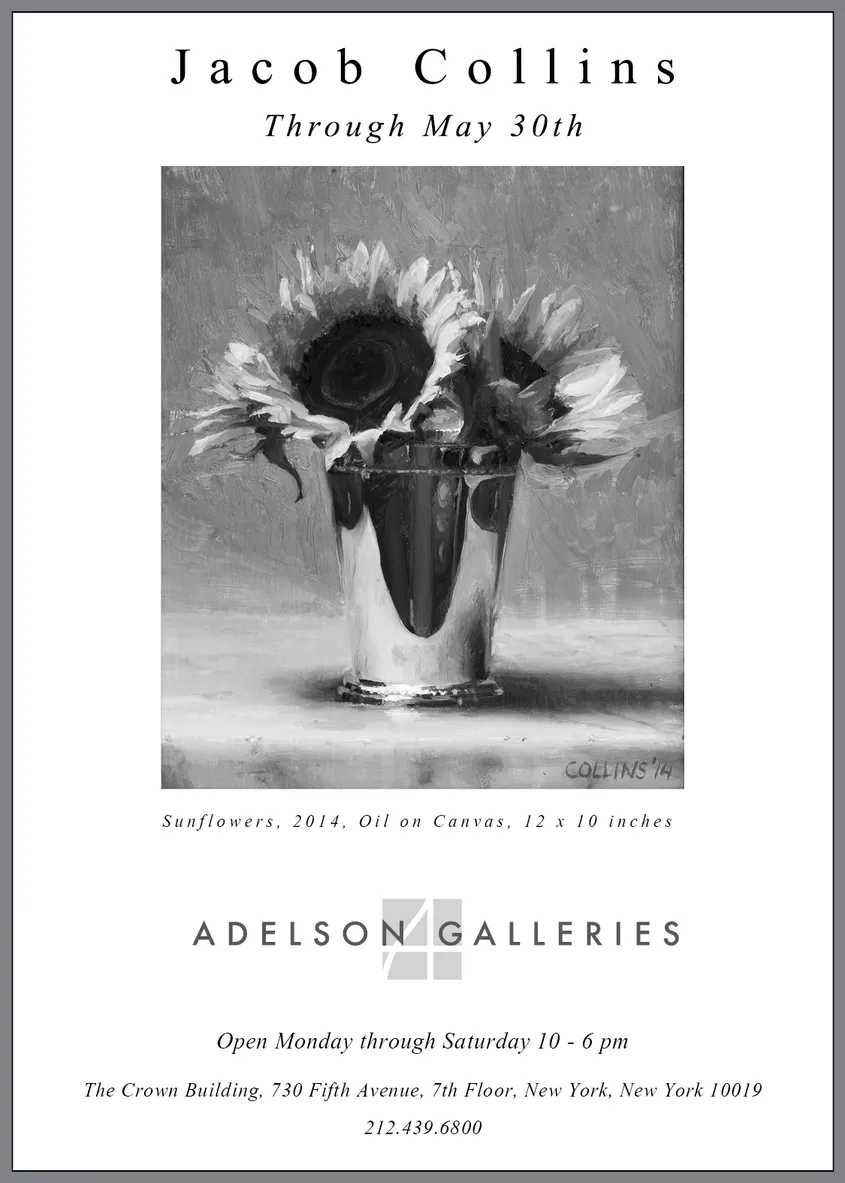
- Jacob Collins — New York Times print advertisement #3
- Client: Adelson Galleries
- Visit figure page
- Type: portfolio
- Portfolio Type: advertising
- Portfolio Role: design_layout
Jacob Collins Nyt Ad 2015 04
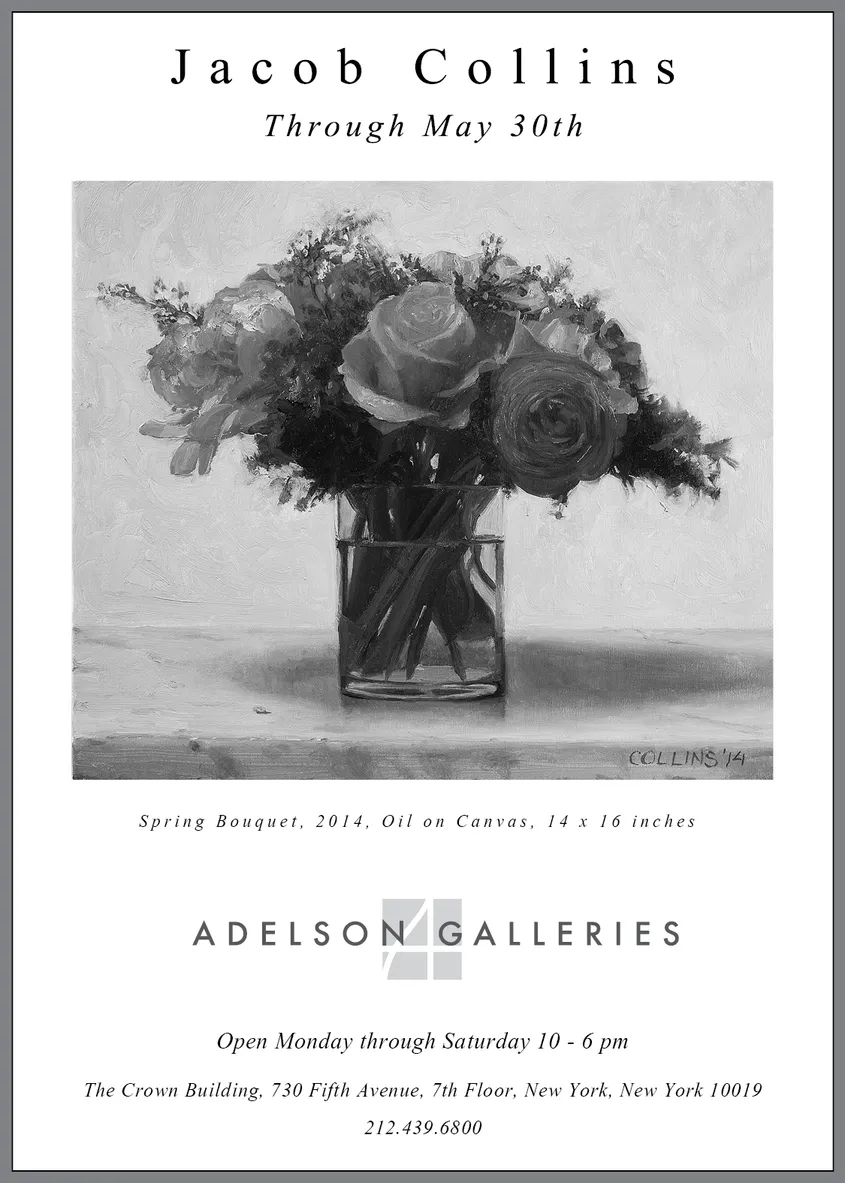
- Jacob Collins — New York Times print advertisement #4
- Client: Adelson Galleries
- Visit figure page
- Type: portfolio
- Portfolio Type: advertising
- Portfolio Role: design_layout
Jacob Collins: 2015 — Cover
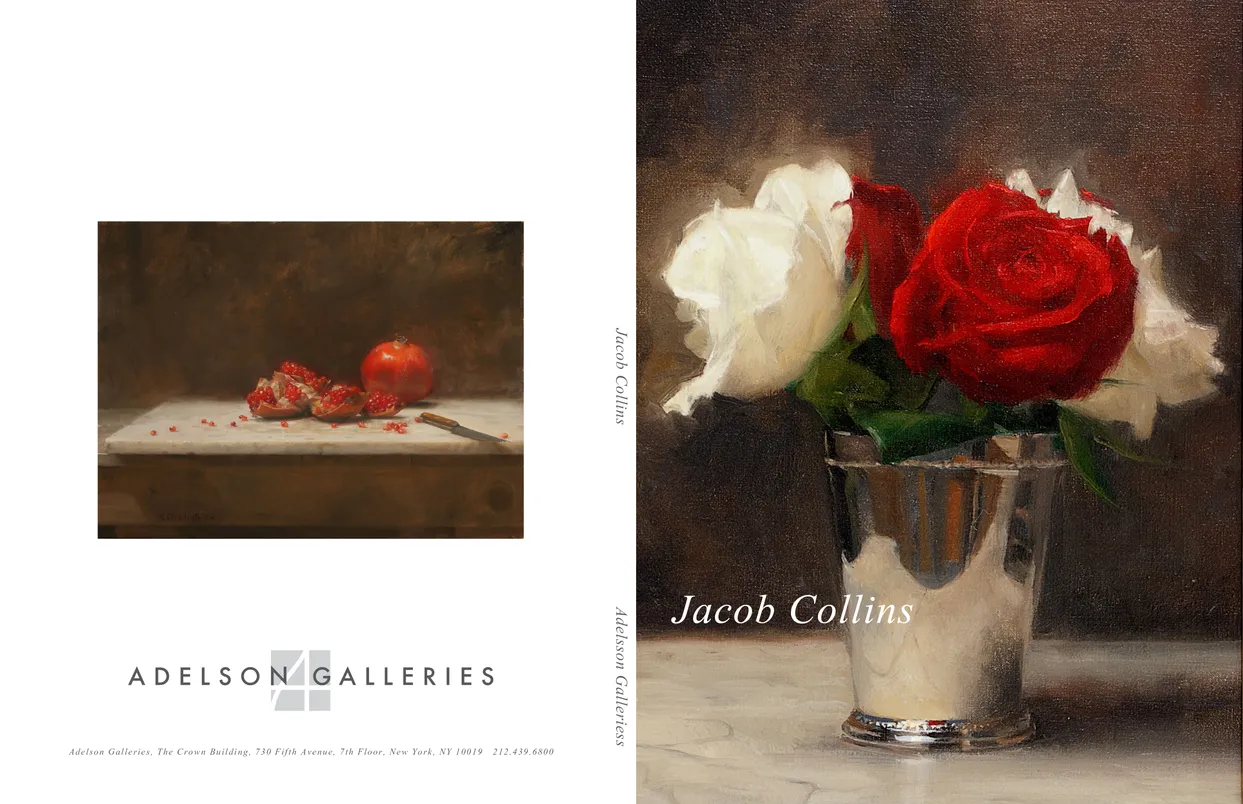
- Jacob Collins (2015) exhibition catalog, cover
- Client: Adelson Galleries
- Visit figure page
- Type: portfolio
- Portfolio Type: publication_design
- Portfolio Role: design_layout
Jacob Collins: 2015 — Inside Front Cover
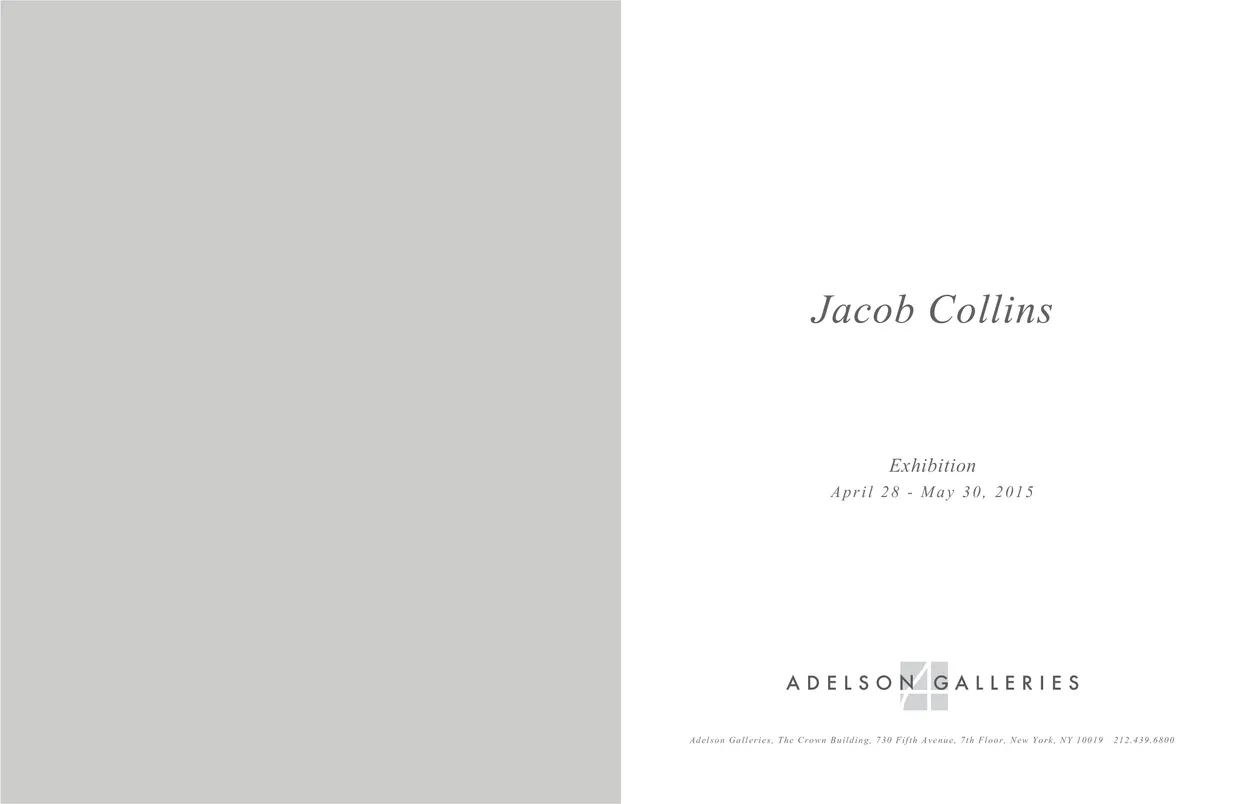
- Jacob Collins (2015) exhibition catalog, inside front cover
- Client: Adelson Galleries
- Visit figure page
- Type: portfolio
- Portfolio Type: publication_design
- Portfolio Role: design_layout
Jacob Collins: 2015 — Pages 10–11
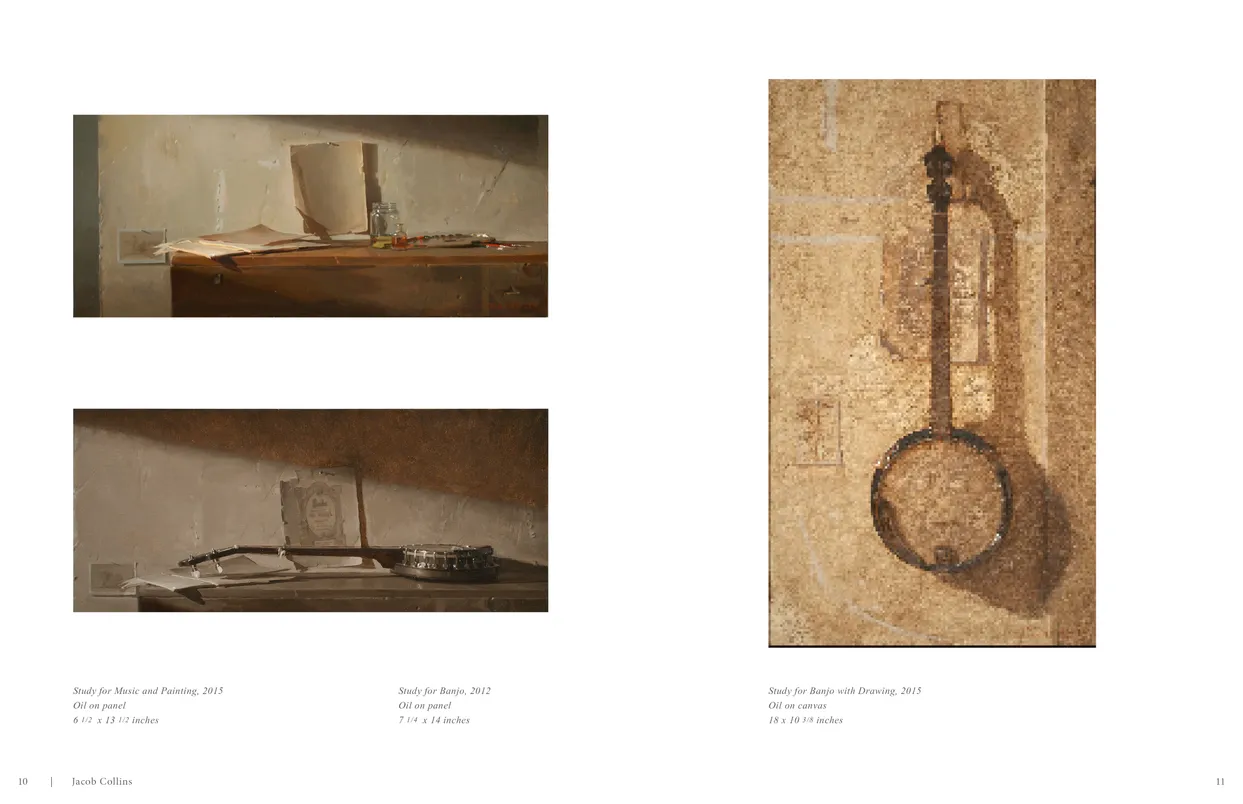
- Jacob Collins (2015) exhibition catalog, pages 10-11
- Client: Adelson Galleries
- Visit figure page
- Type: portfolio
- Portfolio Type: publication_design
- Portfolio Role: design_layout
Jacob Collins: 2015 — Pages 12–13
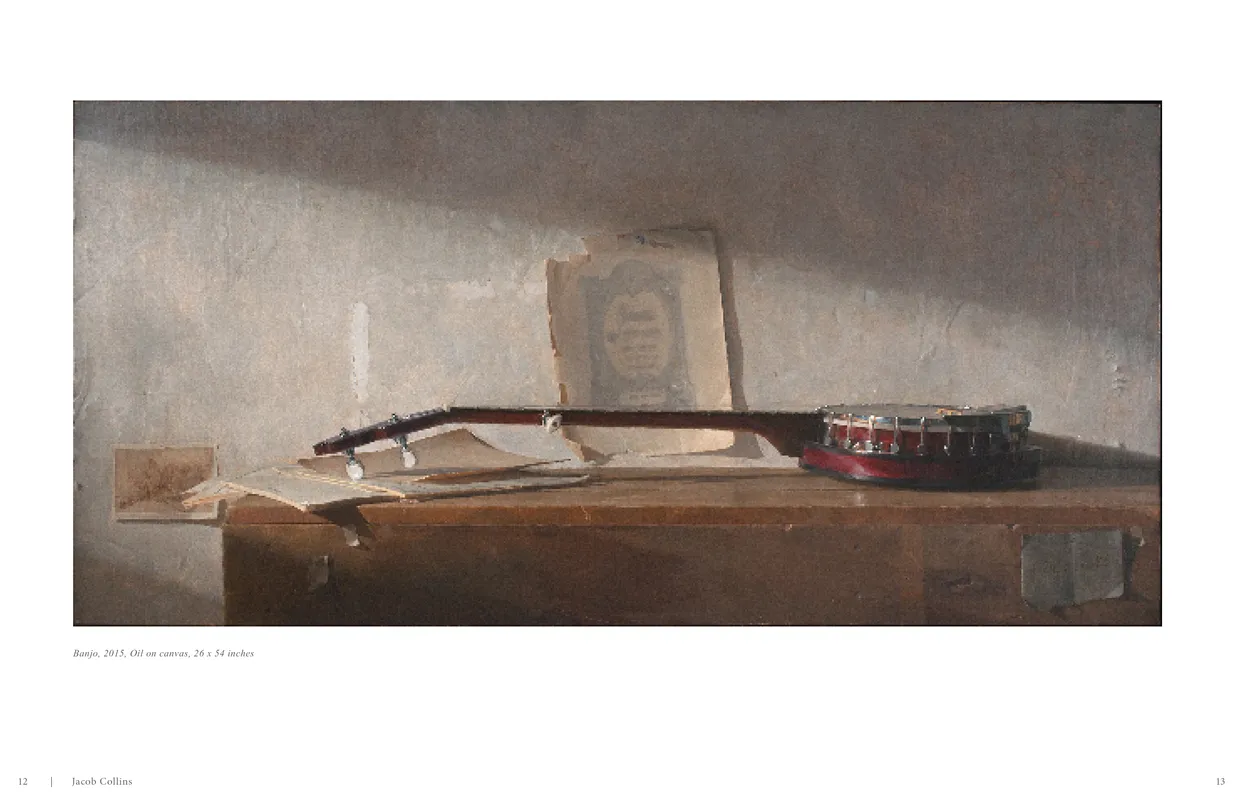
- Jacob Collins (2015) exhibition catalog, pages 12-13
- Client: Adelson Galleries
- Visit figure page
- Type: portfolio
- Portfolio Type: publication_design
- Portfolio Role: design_layout
Jacob Collins: 2015 — Pages 14–15
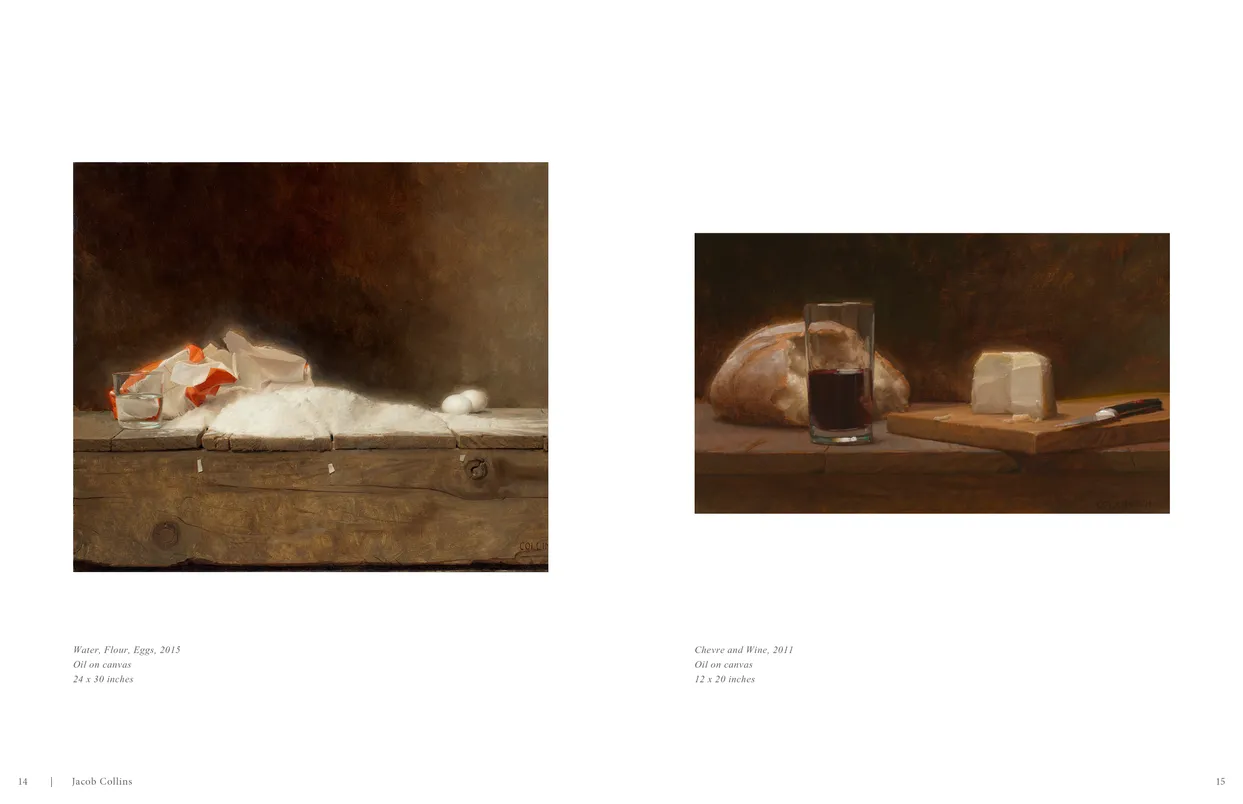
- Jacob Collins (2015) exhibition catalog, pages 14-15
- Client: Adelson Galleries
- Visit figure page
- Type: portfolio
- Portfolio Type: publication_design
- Portfolio Role: design_layout
Jacob Collins: 2015 — Pages 16–17
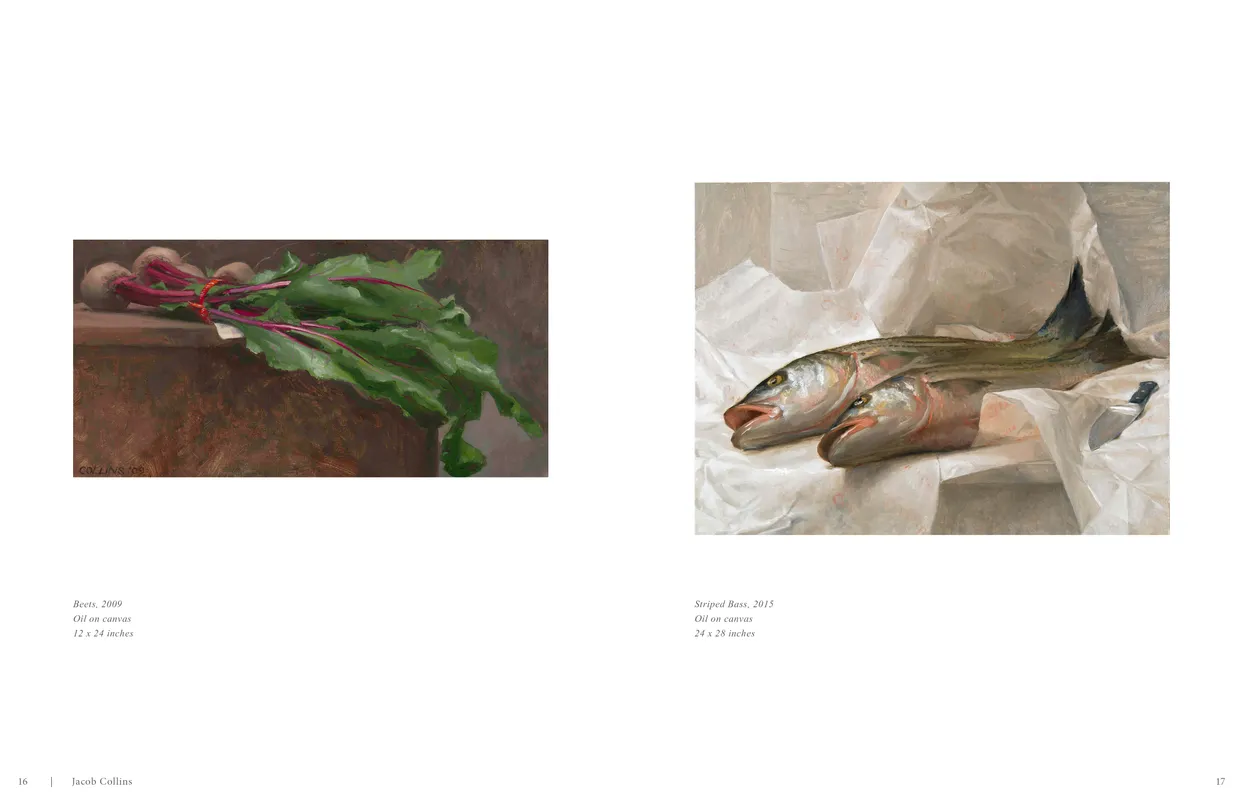
- Jacob Collins (2015) exhibition catalog, pages 16-17
- Client: Adelson Galleries
- Visit figure page
- Type: portfolio
- Portfolio Type: publication_design
- Portfolio Role: design_layout
Jacob Collins: 2015 — Pages 18–19
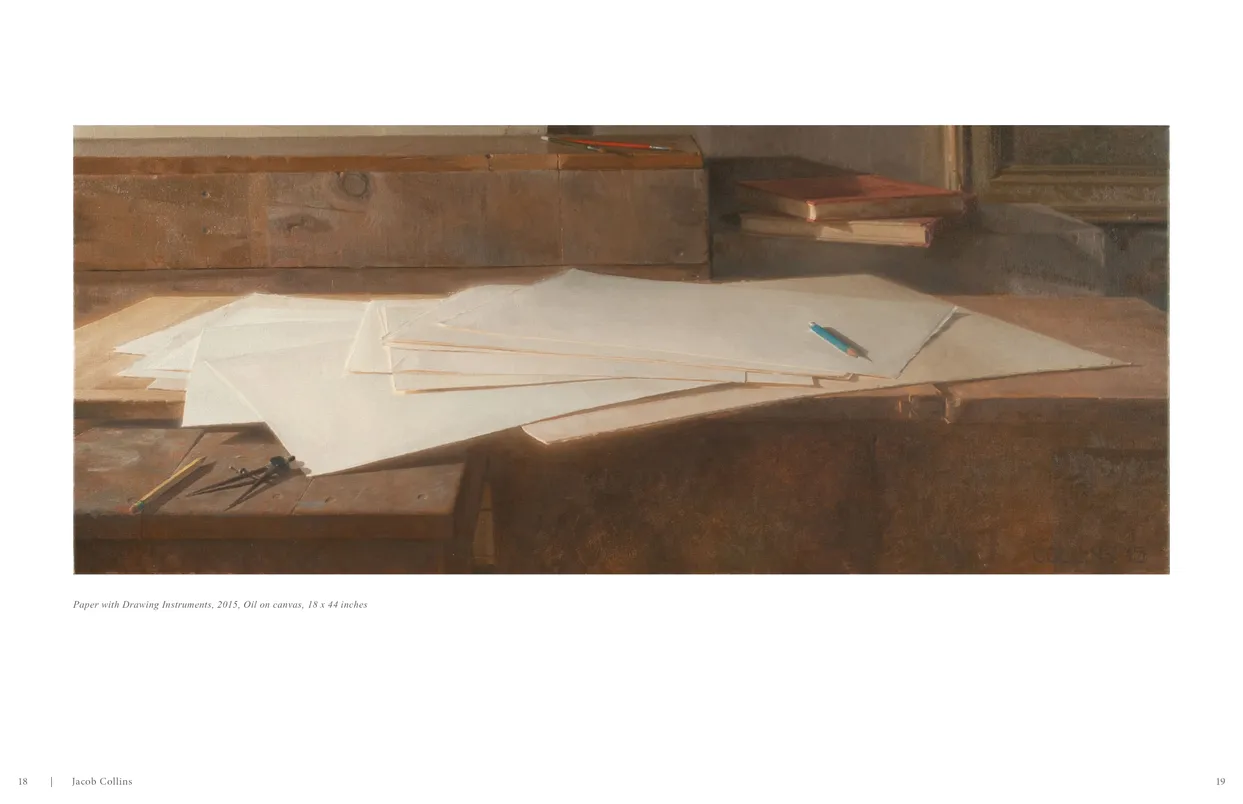
- Jacob Collins (2015) exhibition catalog, pages 18-19
- Client: Adelson Galleries
- Visit figure page
- Type: portfolio
- Portfolio Type: publication_design
- Portfolio Role: design_layout
Jacob Collins: 2015 — Pages 2–3
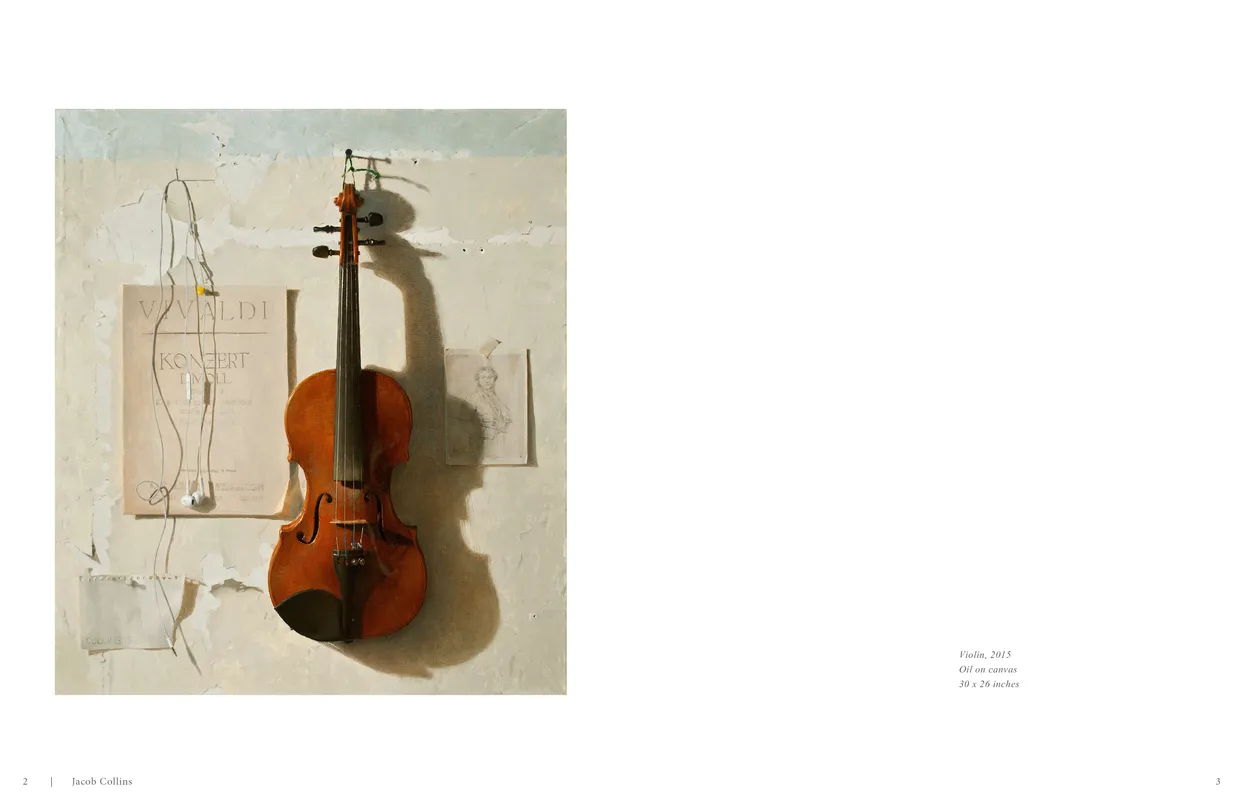
- Jacob Collins (2015) exhibition catalog, pages 2-3
- Client: Adelson Galleries
- Visit figure page
- Type: portfolio
- Portfolio Type: publication_design
- Portfolio Role: design_layout
Jacob Collins: 2015 — Pages 20–21
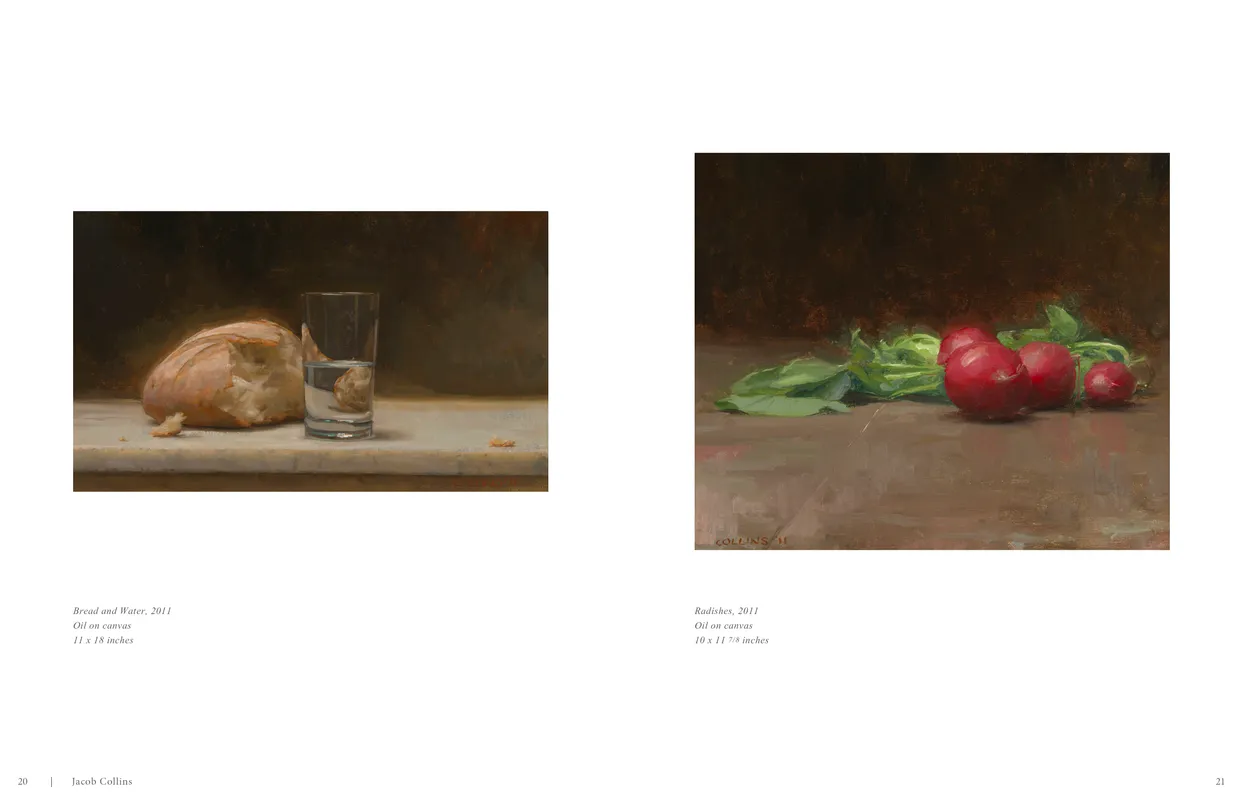
- Jacob Collins (2015) exhibition catalog, pages 20-21
- Client: Adelson Galleries
- Visit figure page
- Type: portfolio
- Portfolio Type: publication_design
- Portfolio Role: design_layout
Jacob Collins: 2015 — Pages 22–23

- Jacob Collins (2015) exhibition catalog, pages 22-23
- Client: Adelson Galleries
- Visit figure page
- Type: portfolio
- Portfolio Type: publication_design
- Portfolio Role: design_layout
Jacob Collins: 2015 — Pages 24–25

- Jacob Collins (2015) exhibition catalog, pages 24-25
- Client: Adelson Galleries
- Visit figure page
- Type: portfolio
- Portfolio Type: publication_design
- Portfolio Role: design_layout
Jacob Collins: 2015 — Pages 26–27
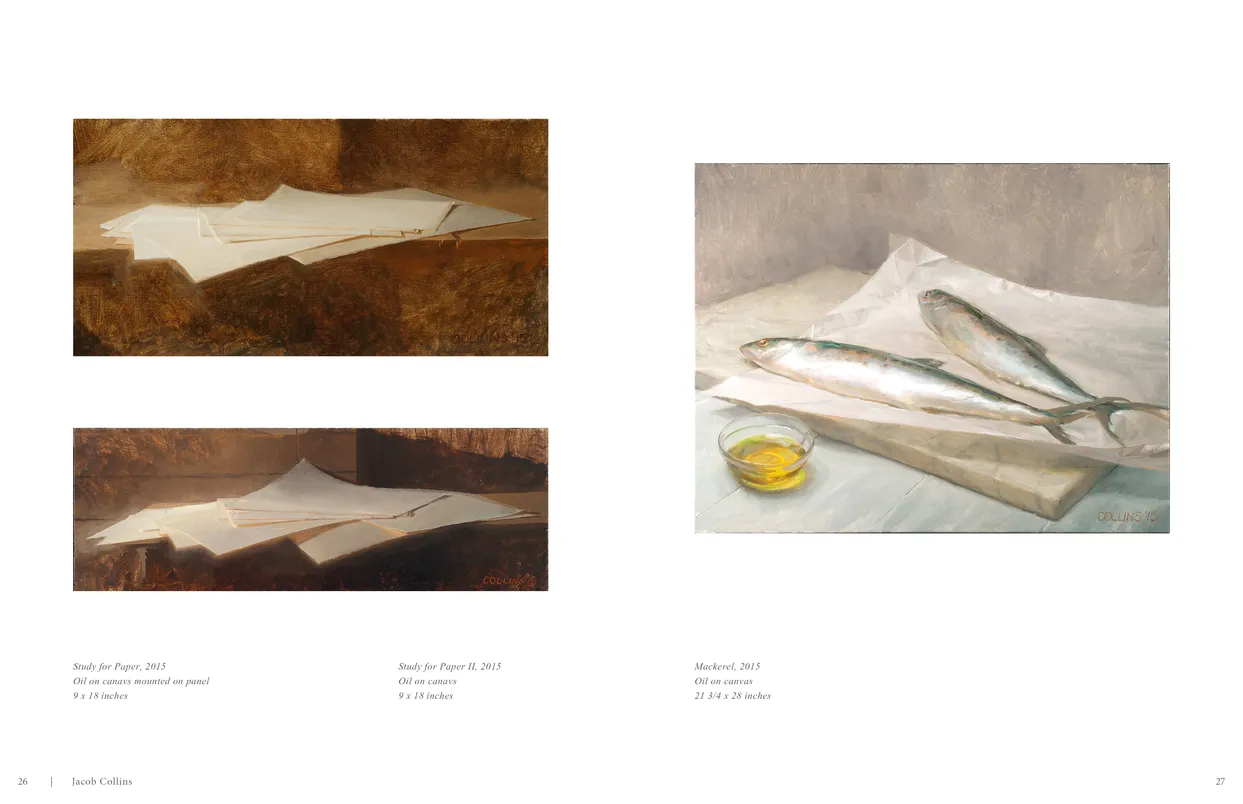
- Jacob Collins (2015) exhibition catalog, pages 26-27
- Client: Adelson Galleries
- Visit figure page
- Type: portfolio
- Portfolio Type: publication_design
- Portfolio Role: design_layout
Jacob Collins: 2015 — Pages 28–29
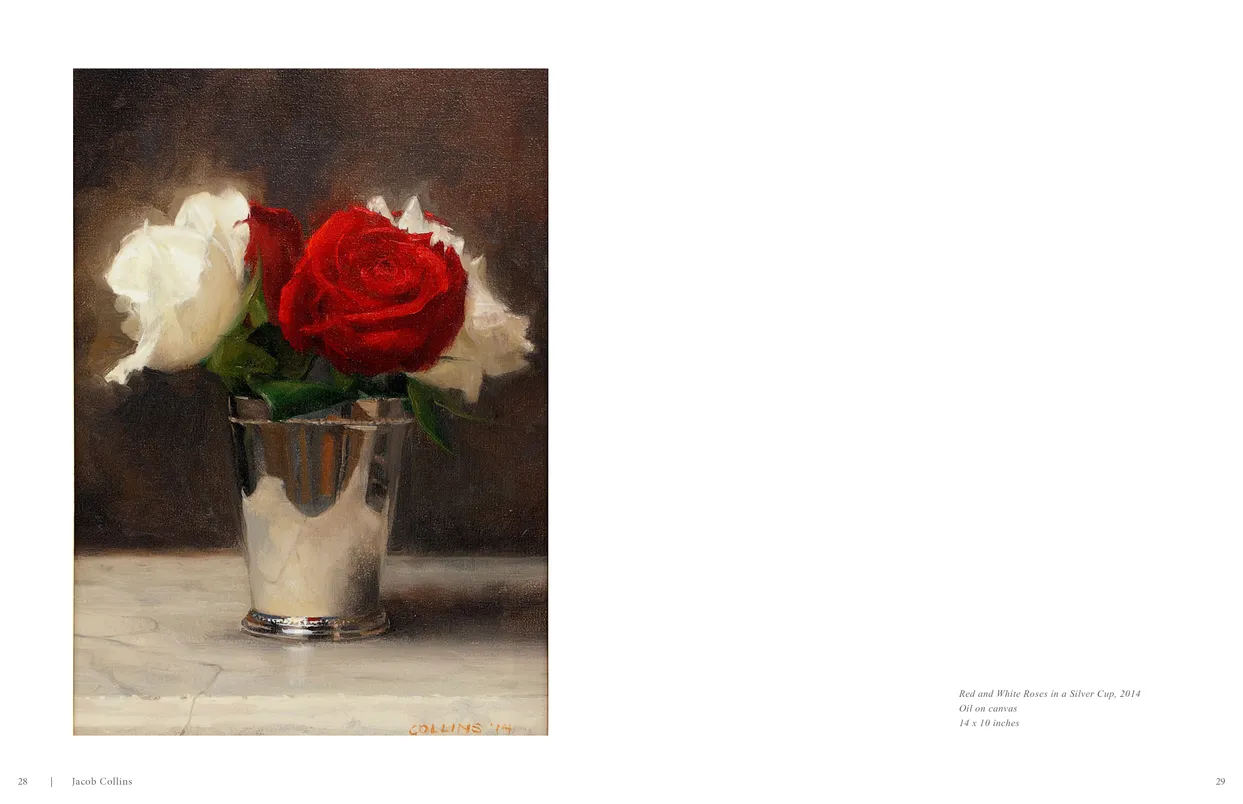
- Jacob Collins (2015) exhibition catalog, pages 28-29
- Client: Adelson Galleries
- Visit figure page
- Type: portfolio
- Portfolio Type: publication_design
- Portfolio Role: design_layout
Jacob Collins: 2015 — Pages 30–31
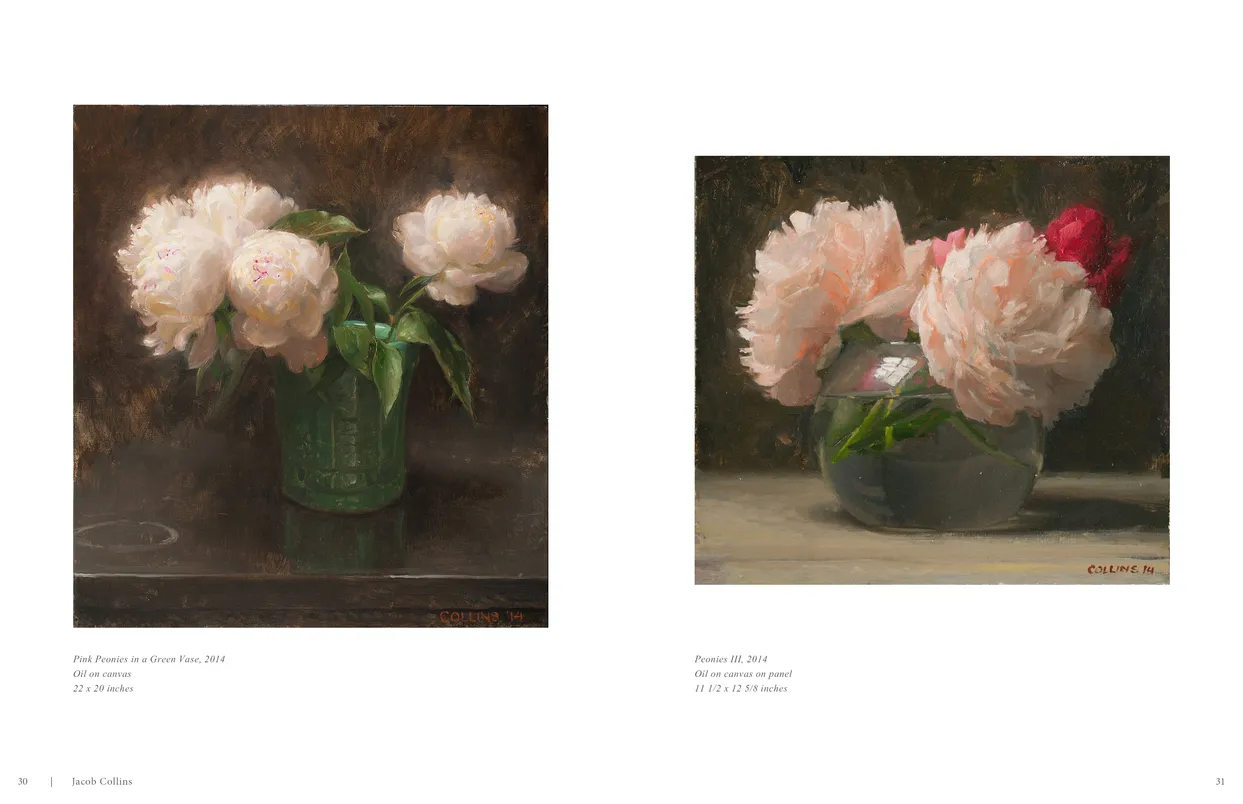
- Jacob Collins (2015) exhibition catalog, pages 30-31
- Client: Adelson Galleries
- Visit figure page
- Type: portfolio
- Portfolio Type: publication_design
- Portfolio Role: design_layout
Jacob Collins: 2015 — Pages 32–33
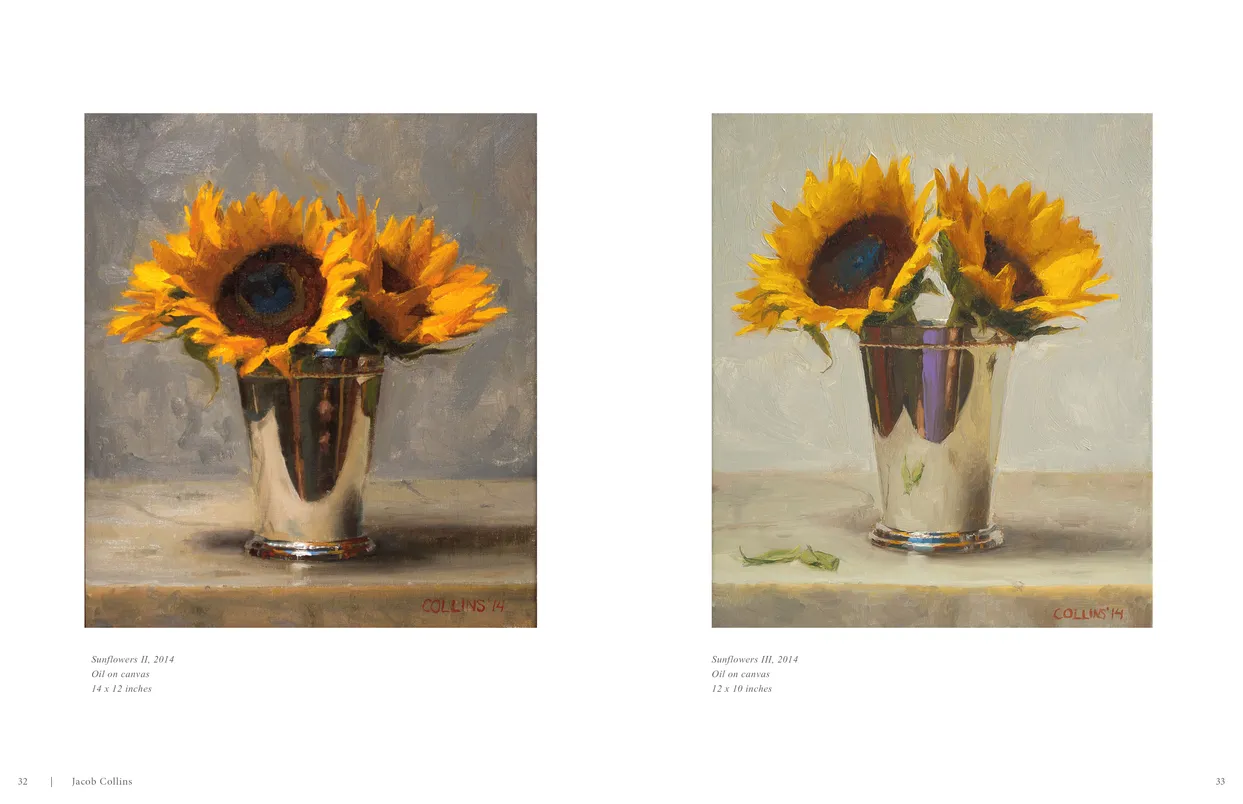
- Jacob Collins (2015) exhibition catalog, pages 32-33
- Client: Adelson Galleries
- Visit figure page
- Type: portfolio
- Portfolio Type: publication_design
- Portfolio Role: design_layout
Jacob Collins: 2015 — Pages 34–35
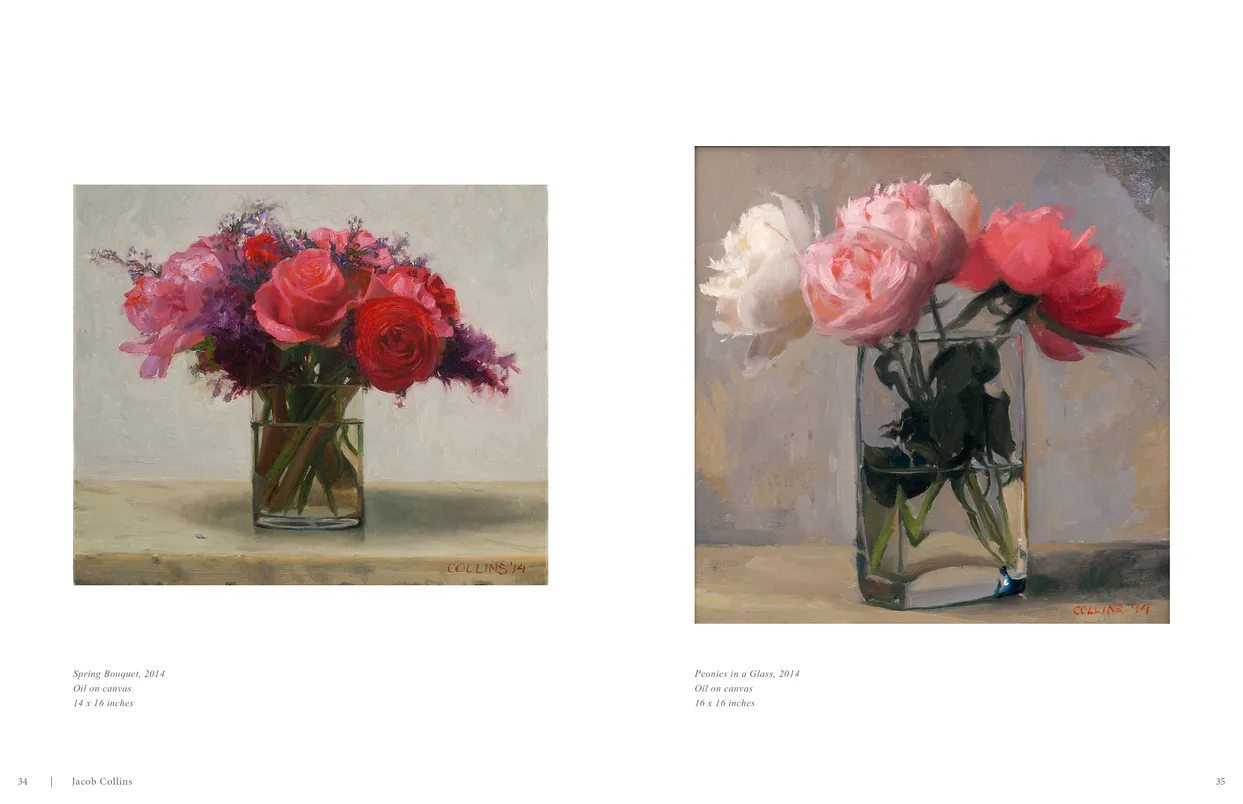
- Jacob Collins (2015) exhibition catalog, pages 34-35
- Client: Adelson Galleries
- Visit figure page
- Type: portfolio
- Portfolio Type: publication_design
- Portfolio Role: design_layout
Jacob Collins: 2015 — Pages 36–37
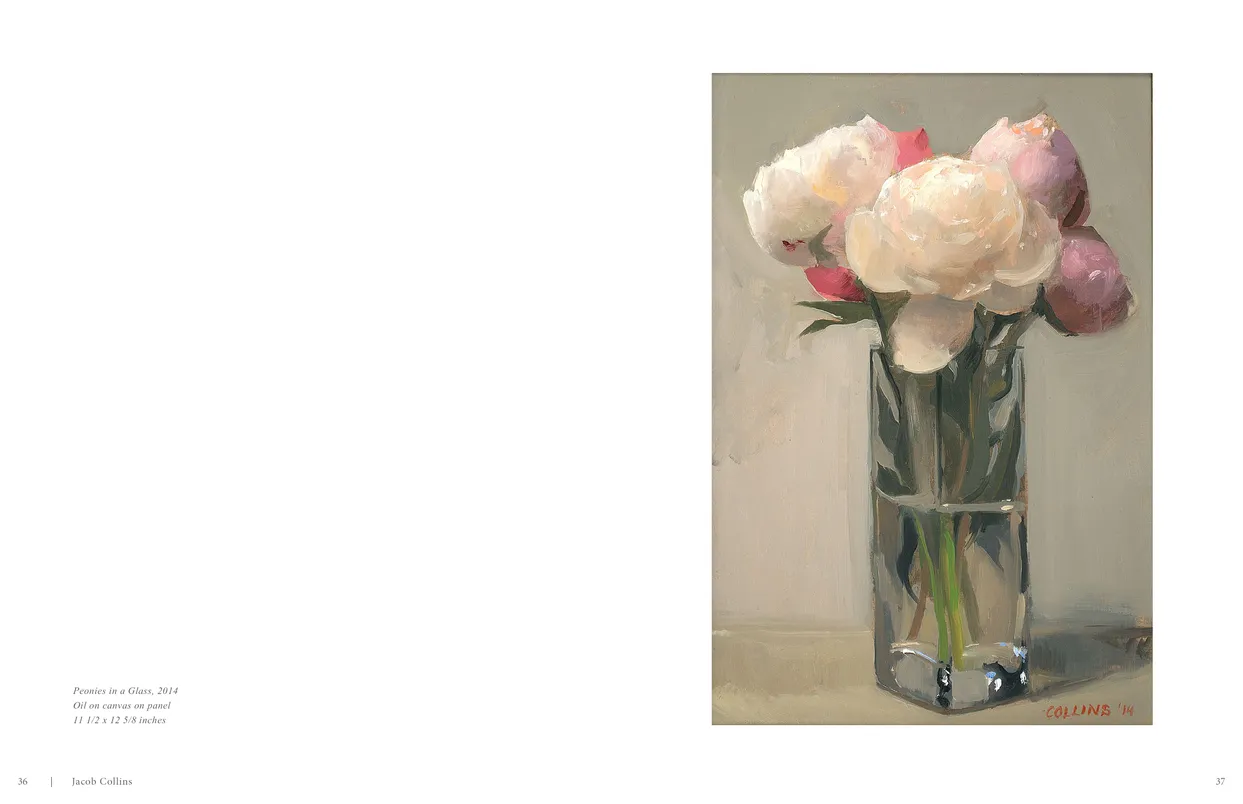
- Jacob Collins (2015) exhibition catalog, pages 36-37
- Client: Adelson Galleries
- Visit figure page
- Type: portfolio
- Portfolio Type: publication_design
- Portfolio Role: design_layout
Jacob Collins: 2015 — Pages 38–39
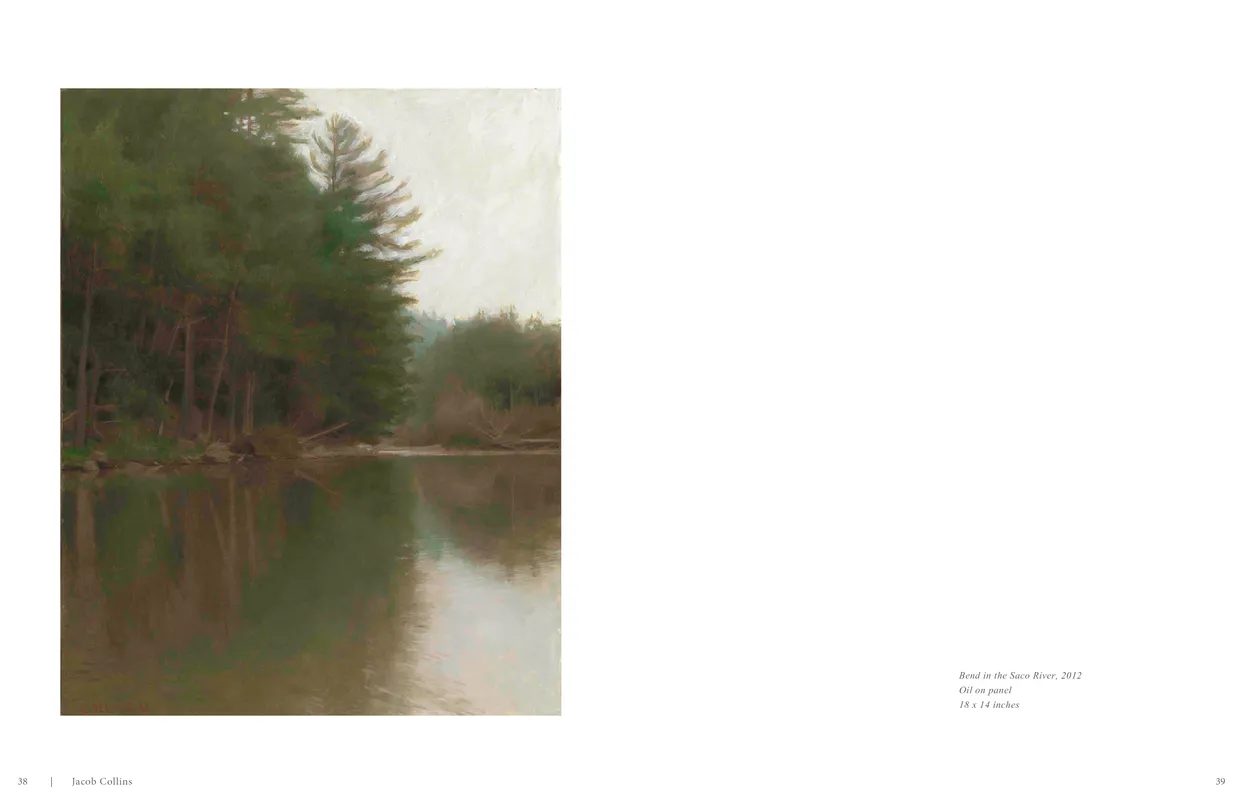
- Jacob Collins (2015) exhibition catalog, pages 38-39
- Client: Adelson Galleries
- Visit figure page
- Type: portfolio
- Portfolio Type: publication_design
- Portfolio Role: design_layout
Jacob Collins: 2015 — Pages 4–5
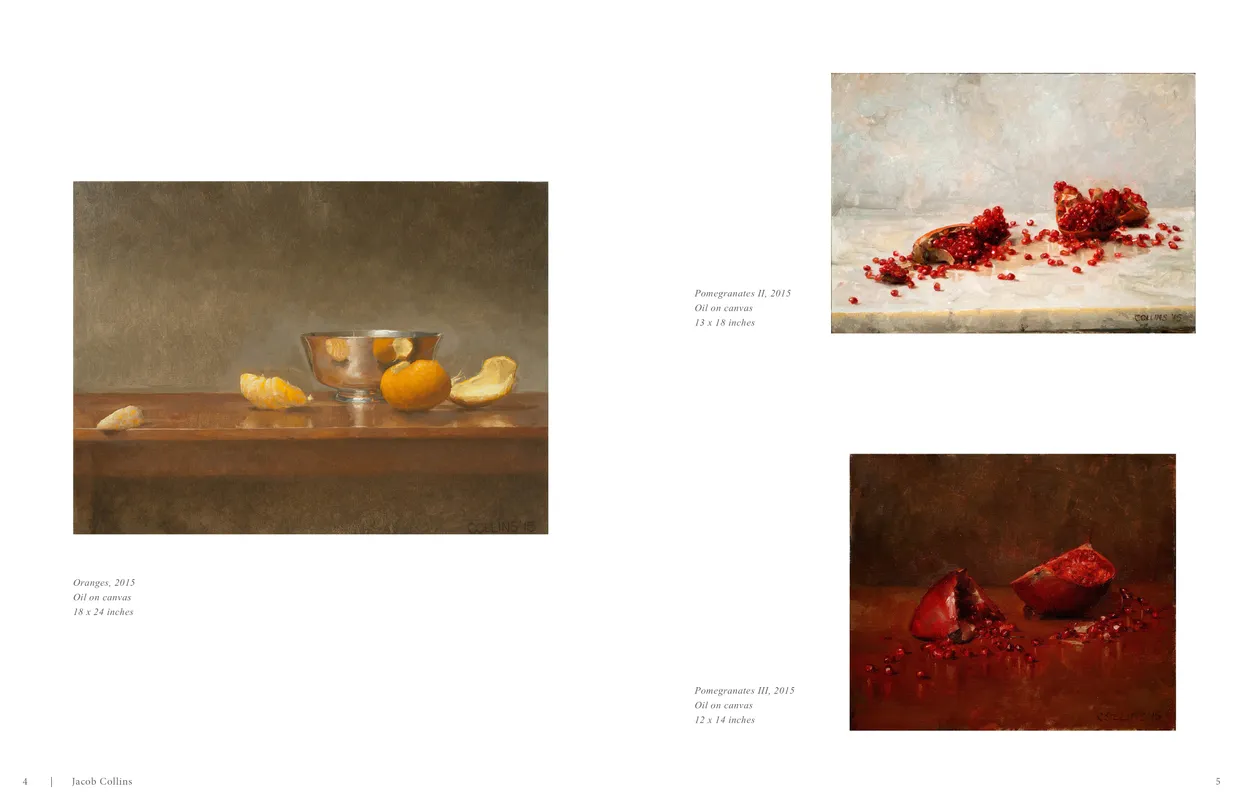
- Jacob Collins (2015) exhibition catalog, pages 4-5
- Client: Adelson Galleries
- Visit figure page
- Type: portfolio
- Portfolio Type: publication_design
- Portfolio Role: design_layout
Jacob Collins: 2015 — Pages 40–41
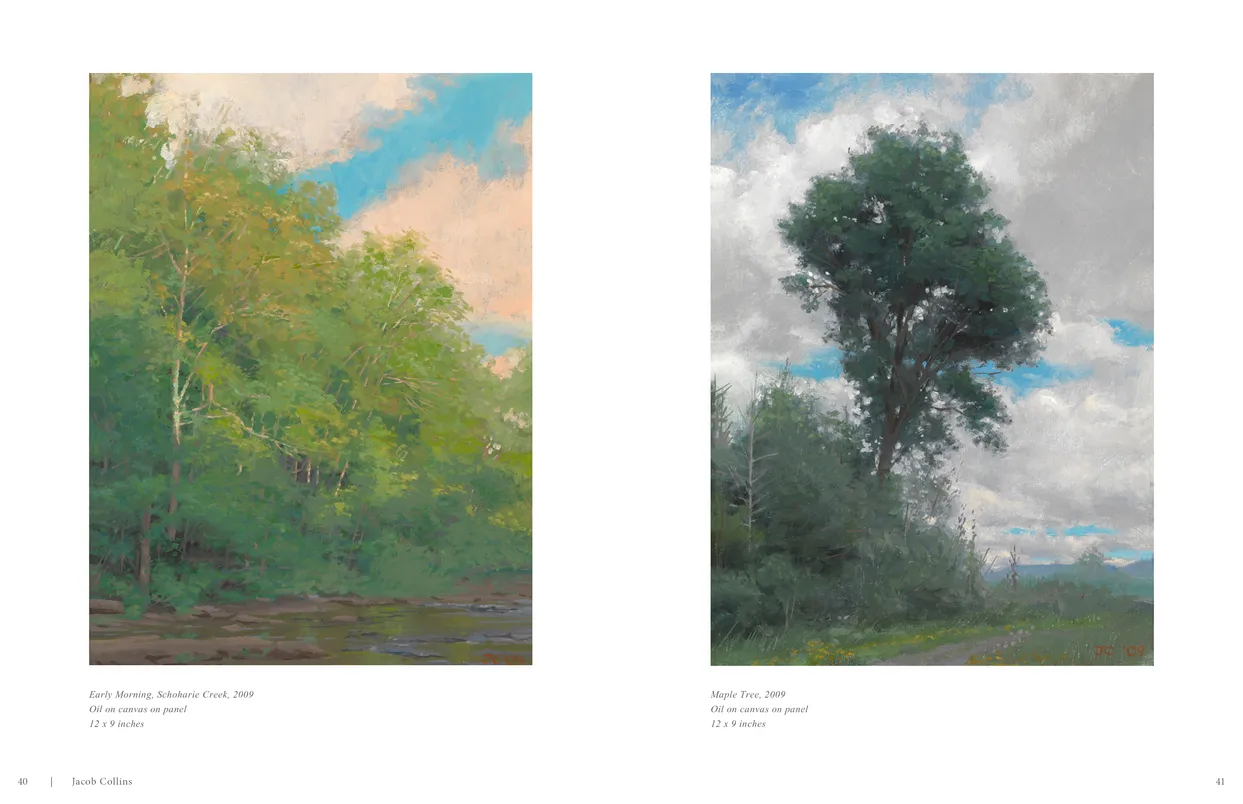
- Jacob Collins (2015) exhibition catalog, pages 40-41
- Client: Adelson Galleries
- Visit figure page
- Type: portfolio
- Portfolio Type: publication_design
- Portfolio Role: design_layout
Jacob Collins: 2015 — Pages 42–43
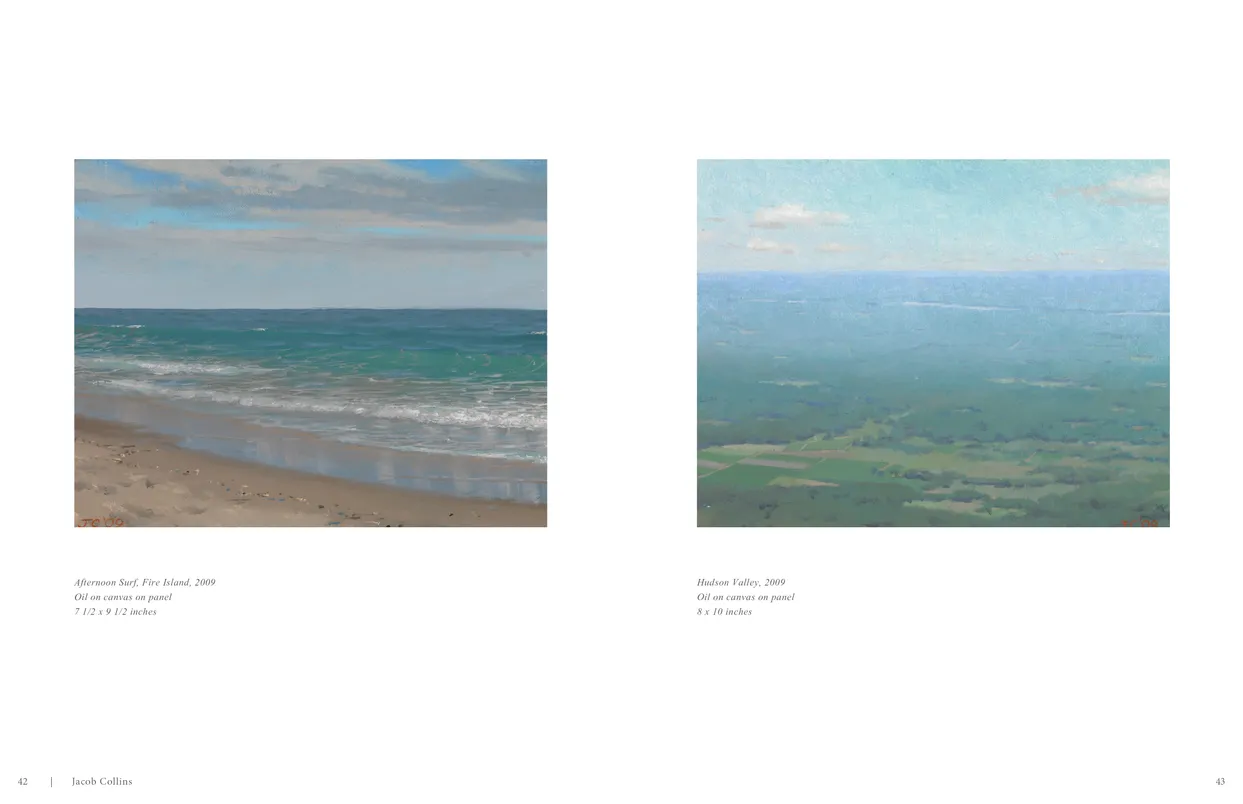
- Jacob Collins (2015) exhibition catalog, pages 42-43
- Client: Adelson Galleries
- Visit figure page
- Type: portfolio
- Portfolio Type: publication_design
- Portfolio Role: design_layout
Jacob Collins: 2015 — Pages 44–45
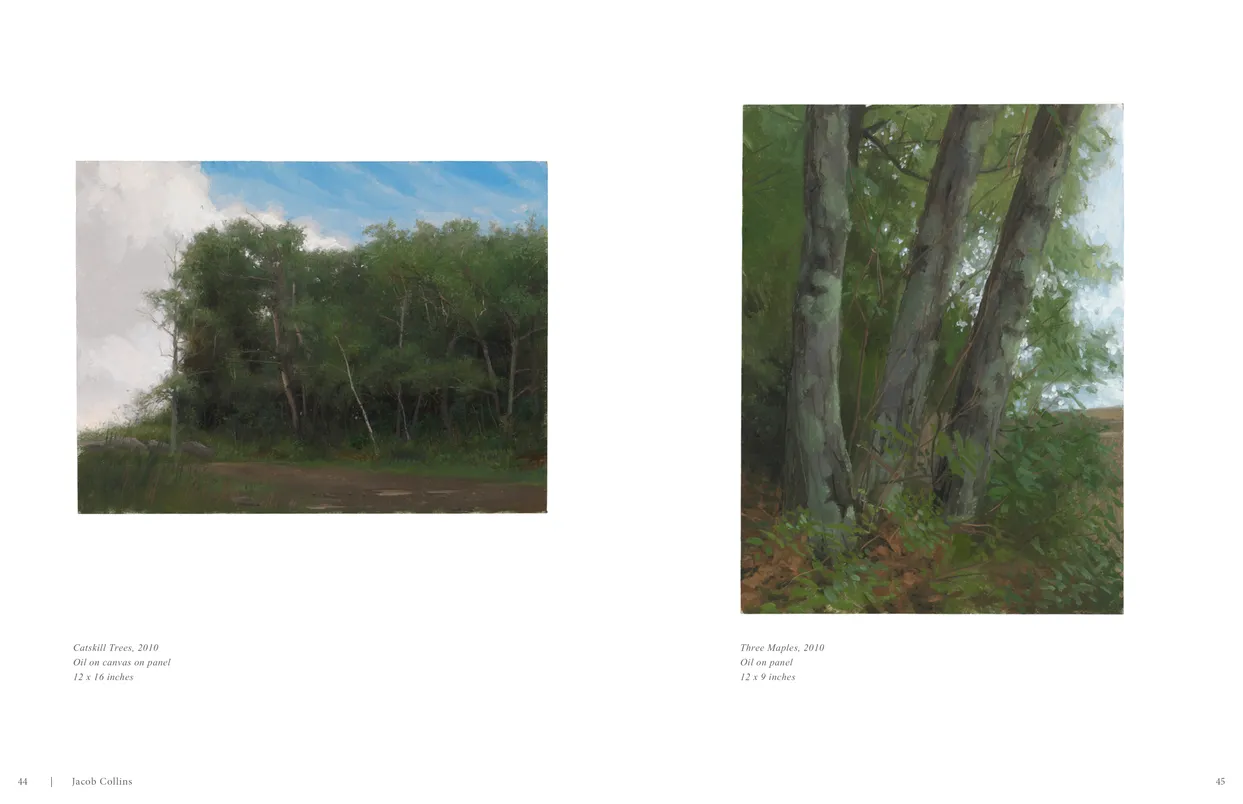
- Jacob Collins (2015) exhibition catalog, pages 44-45
- Client: Adelson Galleries
- Visit figure page
- Type: portfolio
- Portfolio Type: publication_design
- Portfolio Role: design_layout
Jacob Collins: 2015 — Pages 46–47

- Jacob Collins (2015) exhibition catalog, pages 46-47
- Client: Adelson Galleries
- Visit figure page
- Type: portfolio
- Portfolio Type: publication_design
- Portfolio Role: design_layout
Jacob Collins: 2015 — Pages 48–49
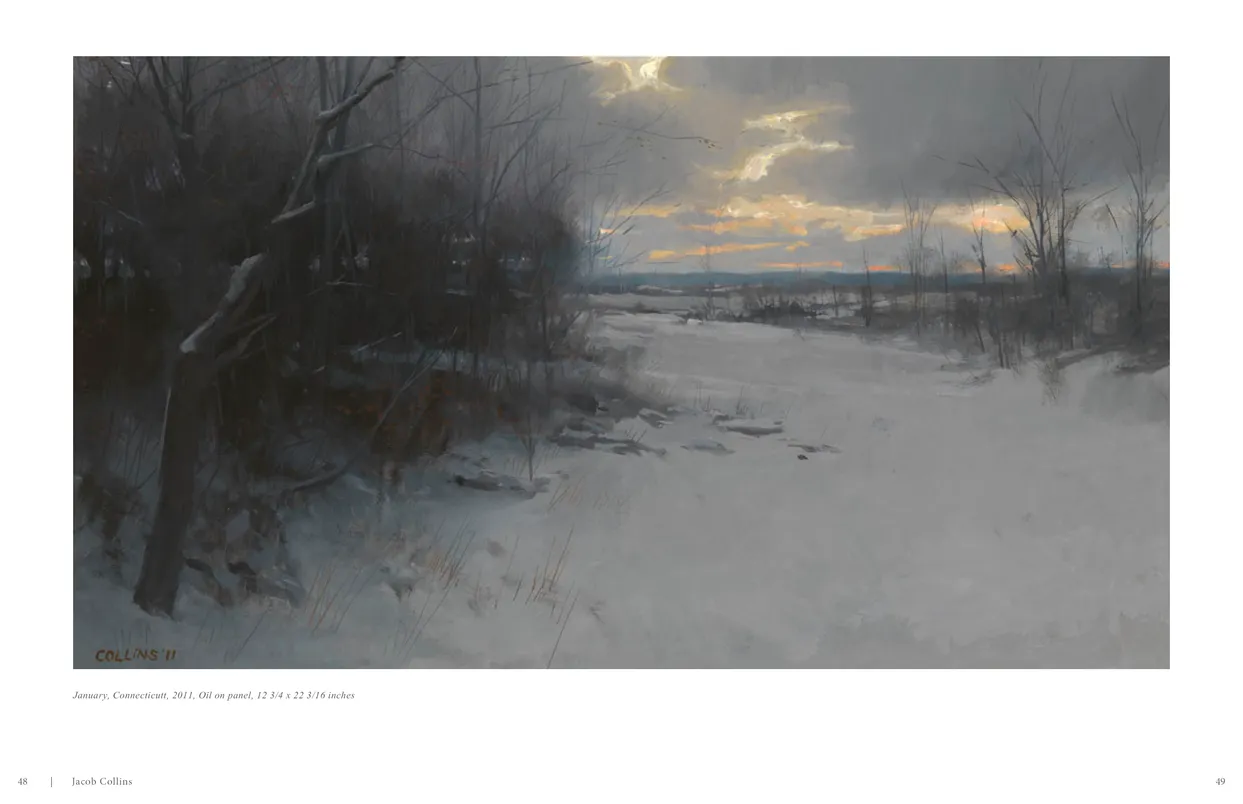
- Jacob Collins (2015) exhibition catalog, pages 48-49
- Client: Adelson Galleries
- Visit figure page
- Type: portfolio
- Portfolio Type: publication_design
- Portfolio Role: design_layout
Jacob Collins: 2015 — Pages 50–51
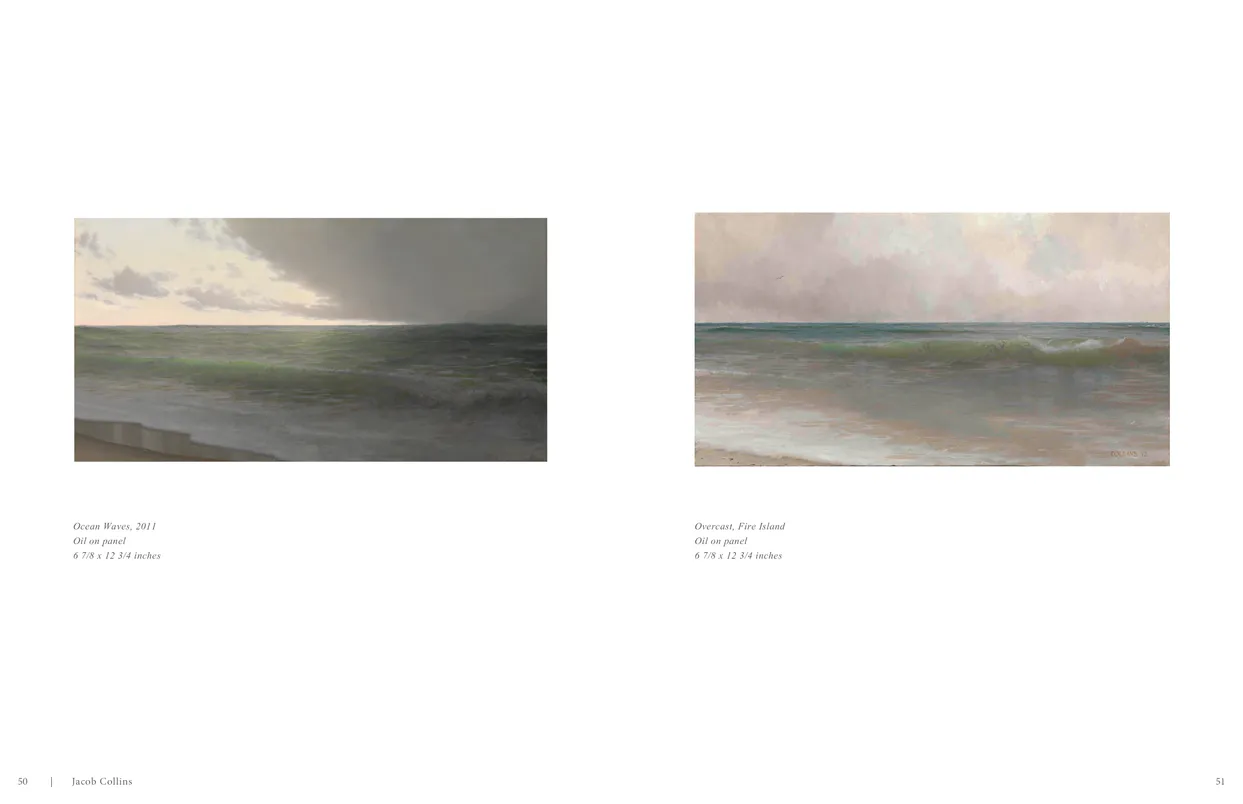
- Jacob Collins (2015) exhibition catalog, pages 50-51
- Client: Adelson Galleries
- Visit figure page
- Type: portfolio
- Portfolio Type: publication_design
- Portfolio Role: design_layout
Jacob Collins: 2015 — Pages 52–53
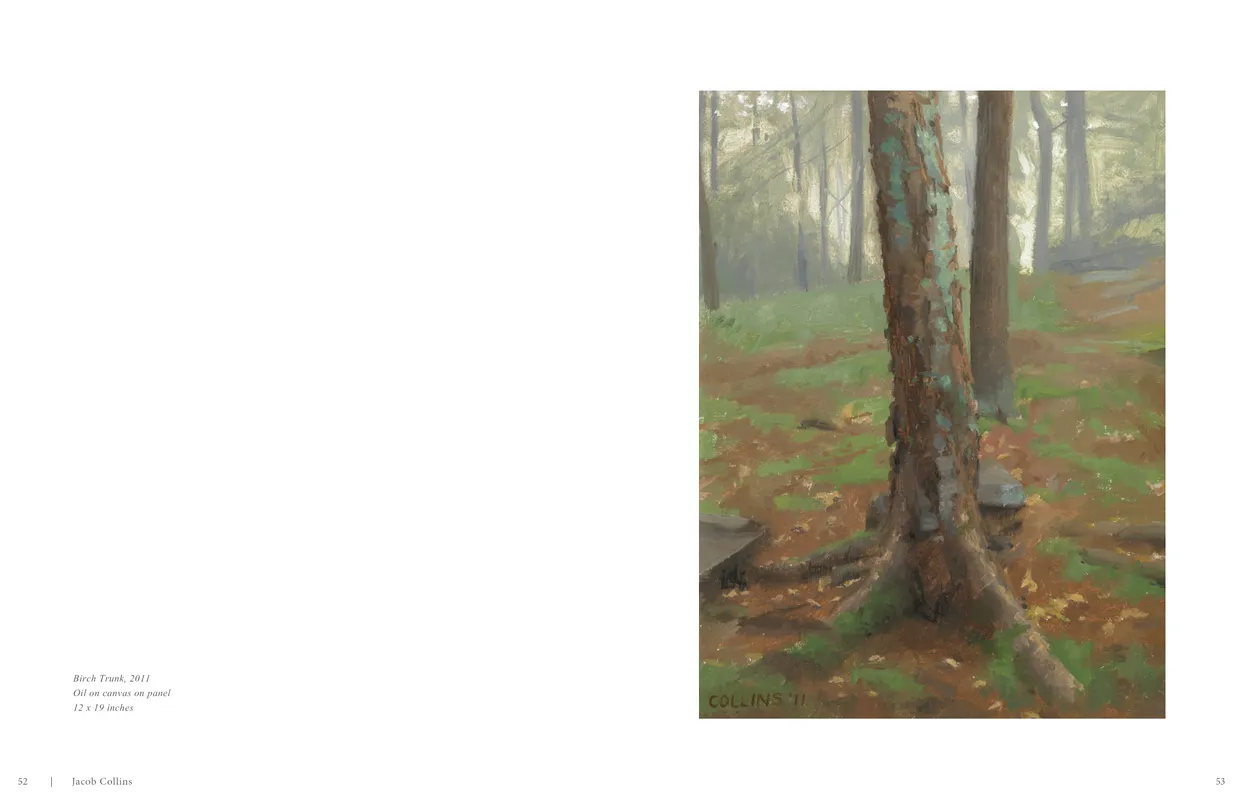
- Jacob Collins (2015) exhibition catalog, pages 52-53
- Client: Adelson Galleries
- Visit figure page
- Type: portfolio
- Portfolio Type: publication_design
- Portfolio Role: design_layout
Jacob Collins: 2015 — Pages 54–55
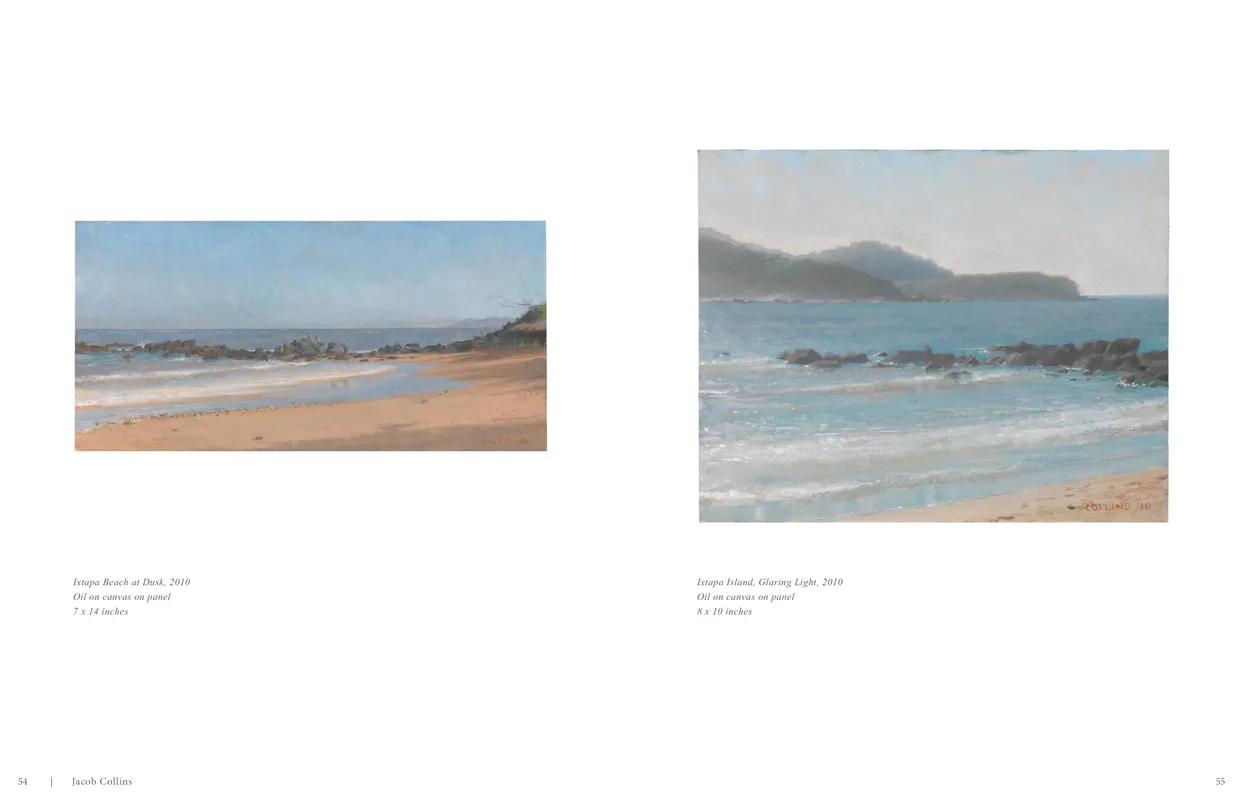
- Jacob Collins (2015) exhibition catalog, pages 54-55
- Client: Adelson Galleries
- Visit figure page
- Type: portfolio
- Portfolio Type: publication_design
- Portfolio Role: design_layout
Jacob Collins: 2015 — Pages 56–57
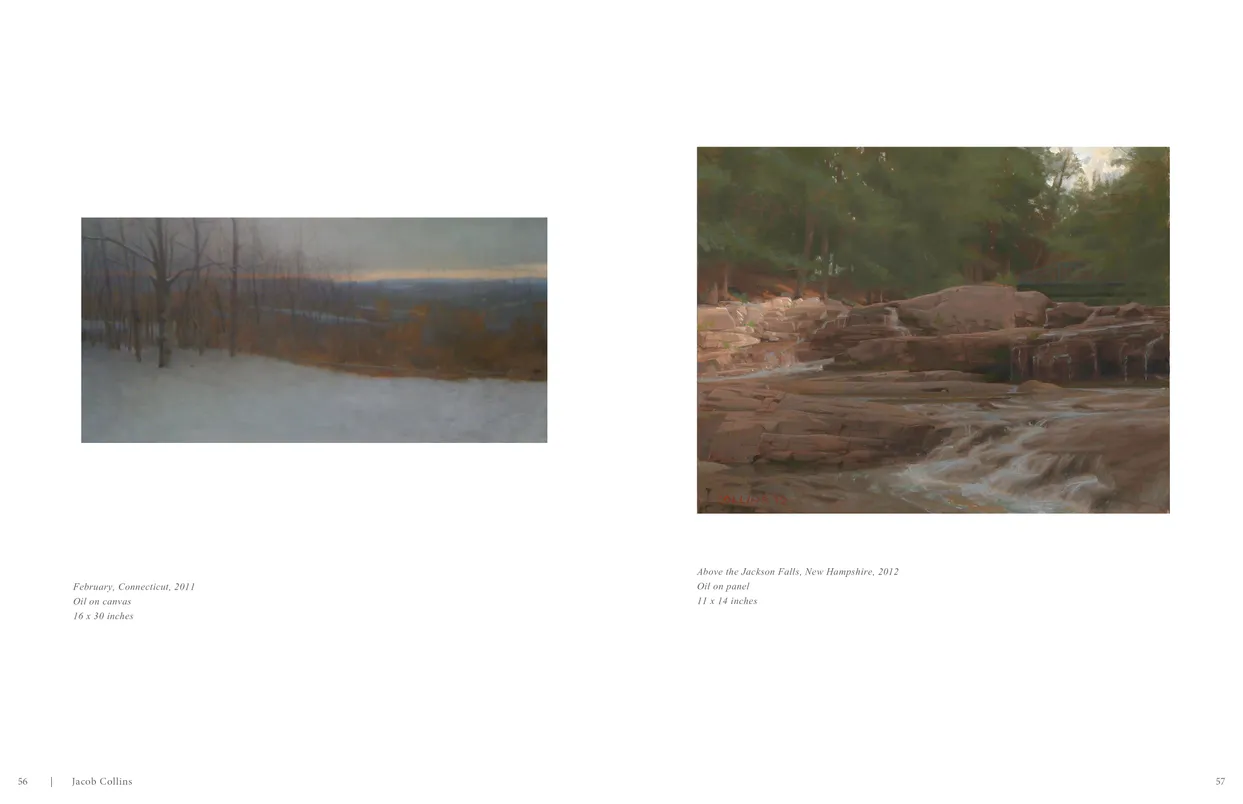
- Jacob Collins (2015) exhibition catalog, pages 56-57
- Client: Adelson Galleries
- Visit figure page
- Type: portfolio
- Portfolio Type: publication_design
- Portfolio Role: design_layout
Jacob Collins: 2015 — Pages 58–59
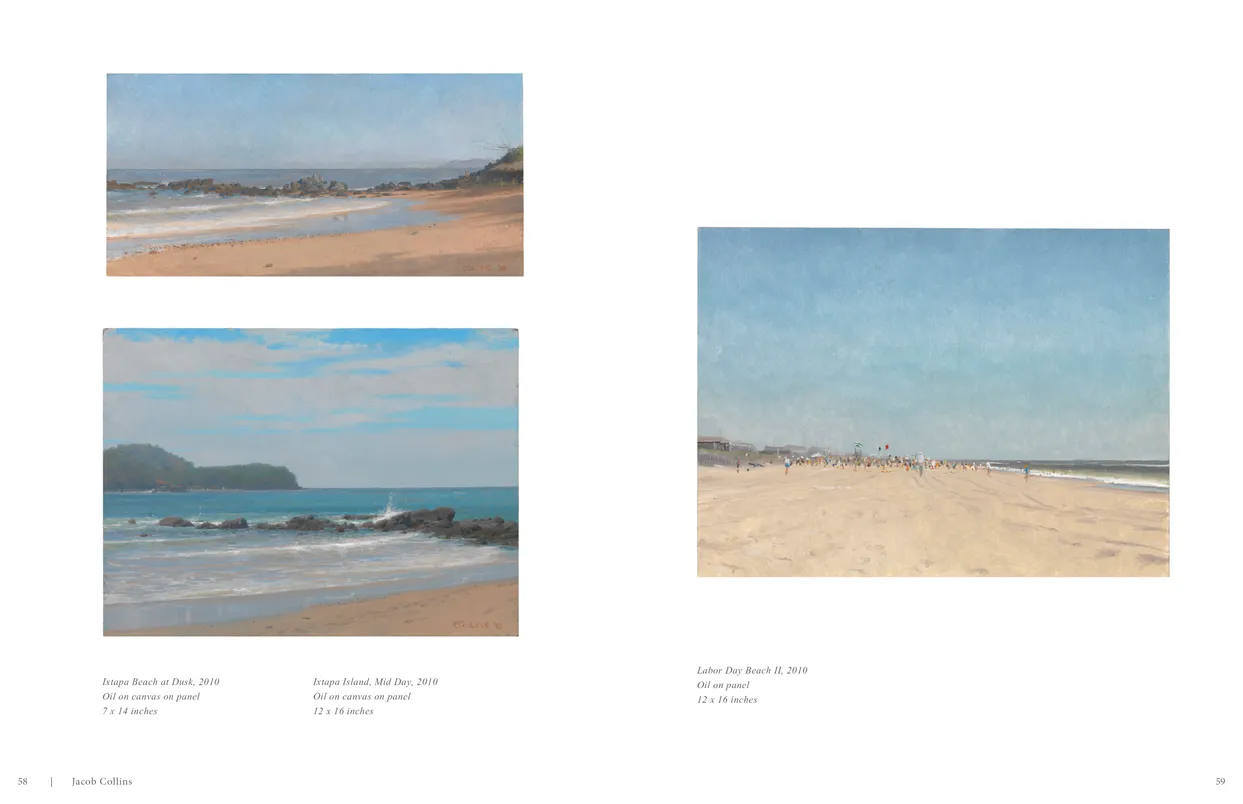
- Jacob Collins (2015) exhibition catalog, pages 58-59
- Client: Adelson Galleries
- Visit figure page
- Type: portfolio
- Portfolio Type: publication_design
- Portfolio Role: design_layout
Jacob Collins: 2015 — Pages 6–7
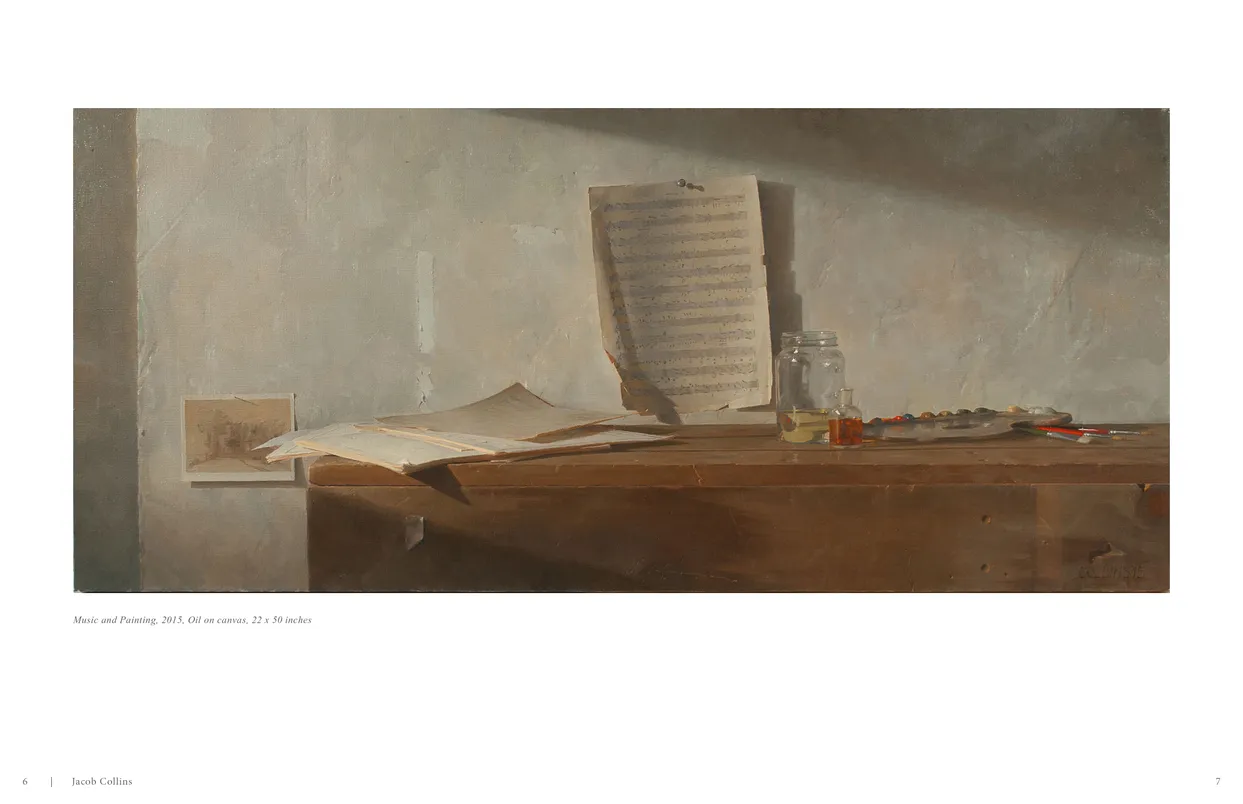
- Jacob Collins (2015) exhibition catalog, pages 6-7
- Client: Adelson Galleries
- Visit figure page
- Type: portfolio
- Portfolio Type: publication_design
- Portfolio Role: design_layout
Jacob Collins: 2015 — Pages 60–61
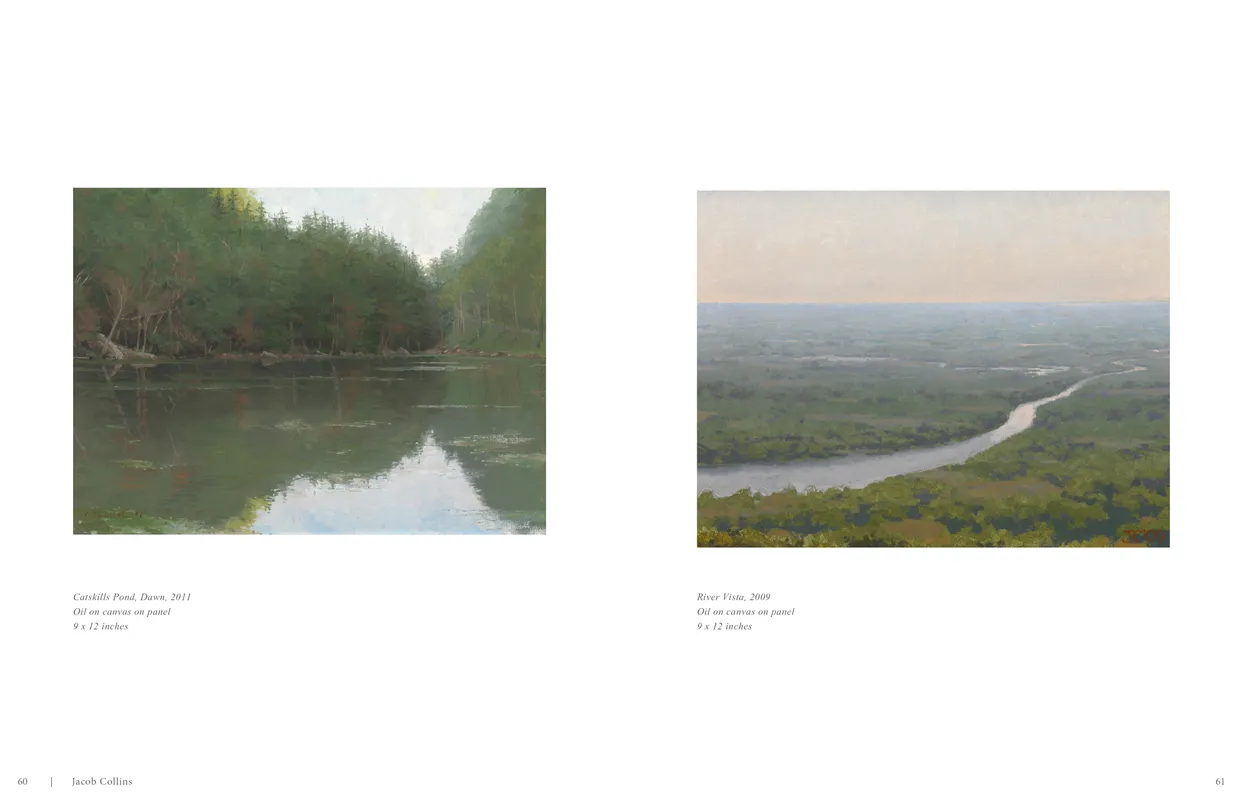
- Jacob Collins (2015) exhibition catalog, pages 60-61
- Client: Adelson Galleries
- Visit figure page
- Type: portfolio
- Portfolio Type: publication_design
- Portfolio Role: design_layout
Jacob Collins: 2015 — Pages 62–63
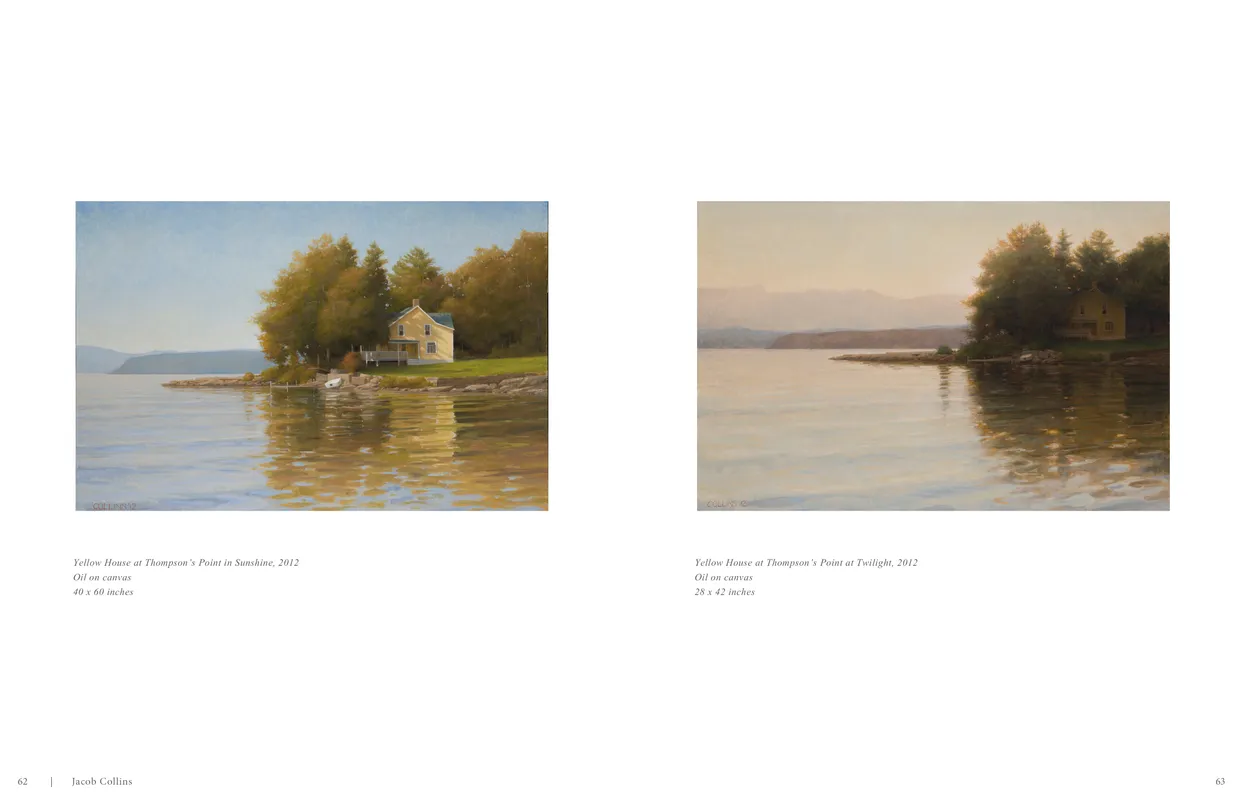
- Jacob Collins (2015) exhibition catalog, pages 62-63
- Client: Adelson Galleries
- Visit figure page
- Type: portfolio
- Portfolio Type: publication_design
- Portfolio Role: design_layout
Jacob Collins: 2015 — Pages 64–65
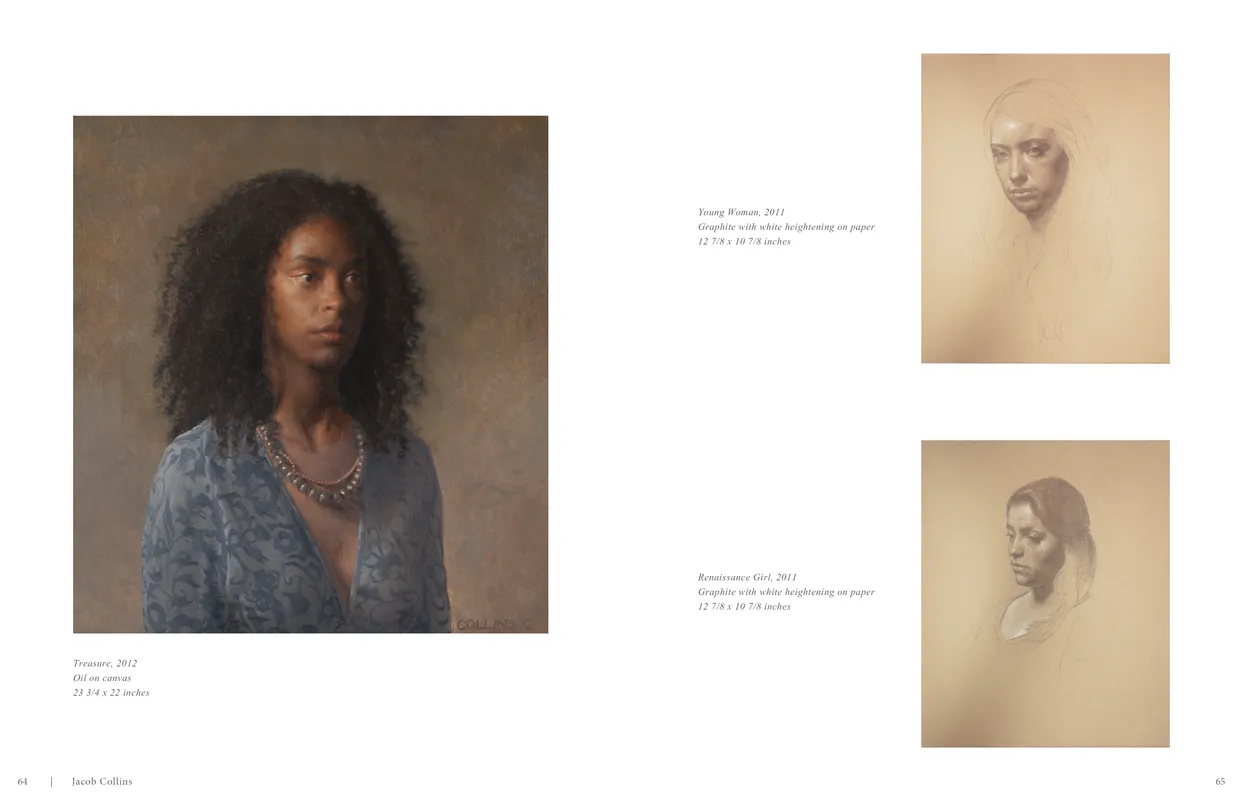
- Jacob Collins (2015) exhibition catalog, pages 64-65
- Client: Adelson Galleries
- Visit figure page
- Type: portfolio
- Portfolio Type: publication_design
- Portfolio Role: design_layout
Jacob Collins: 2015 — Pages 66–67
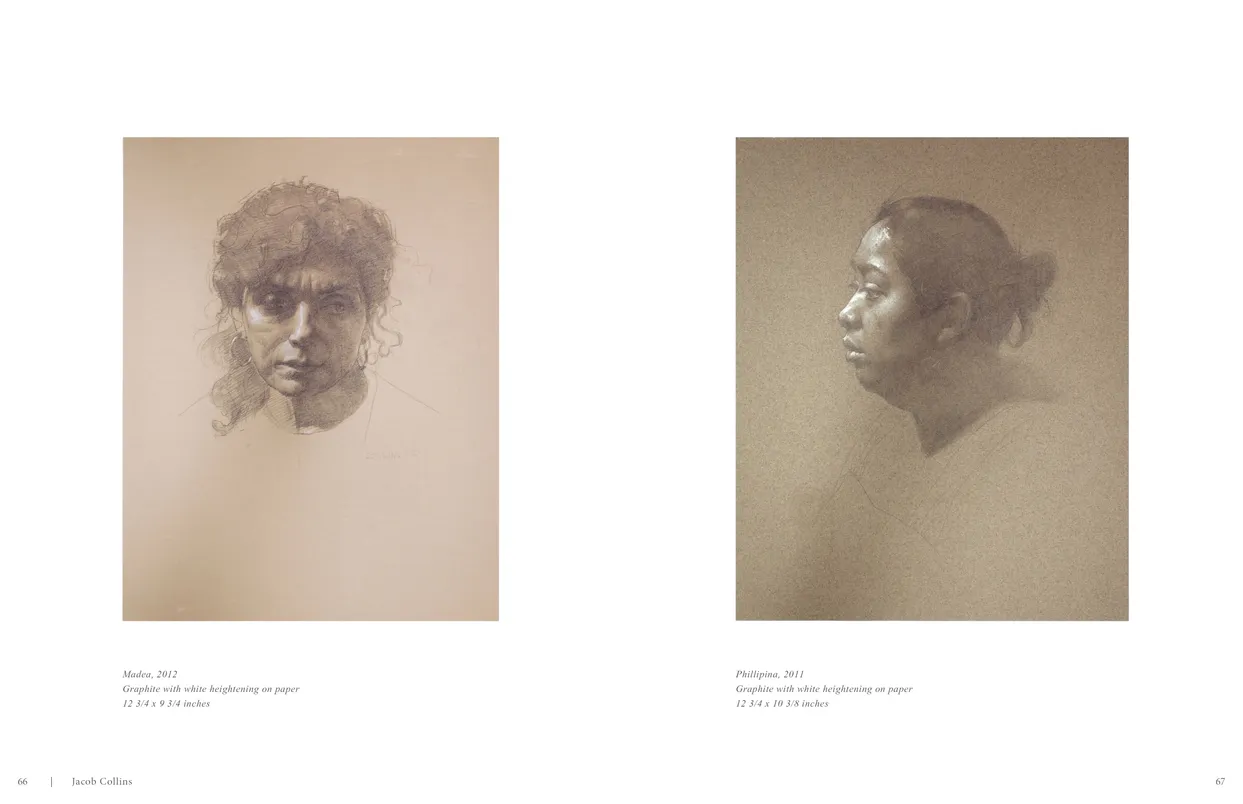
- Jacob Collins (2015) exhibition catalog, pages 66-67
- Client: Adelson Galleries
- Visit figure page
- Type: portfolio
- Portfolio Type: publication_design
- Portfolio Role: design_layout
Jacob Collins: 2015 — Pages 68–69
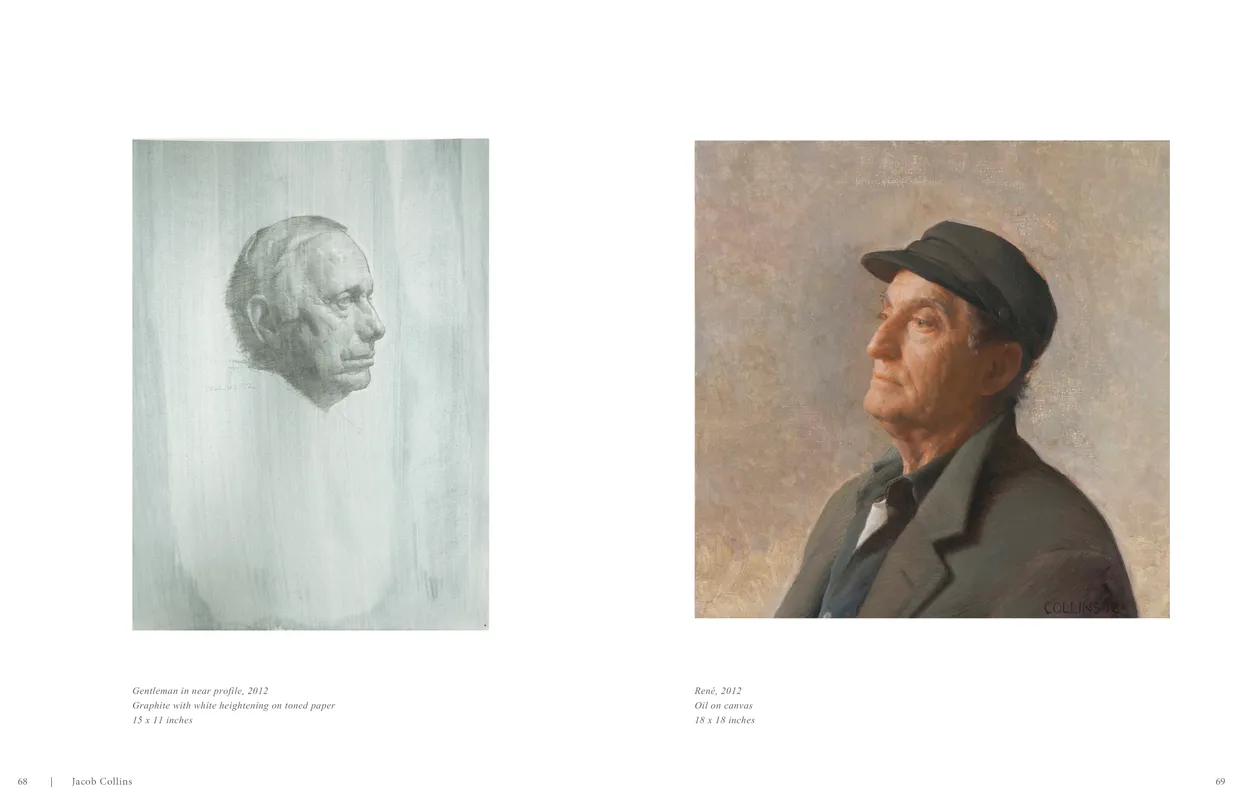
- Jacob Collins (2015) exhibition catalog, pages 68-69
- Client: Adelson Galleries
- Visit figure page
- Type: portfolio
- Portfolio Type: publication_design
- Portfolio Role: design_layout
Jacob Collins: 2015 — Pages 70–71
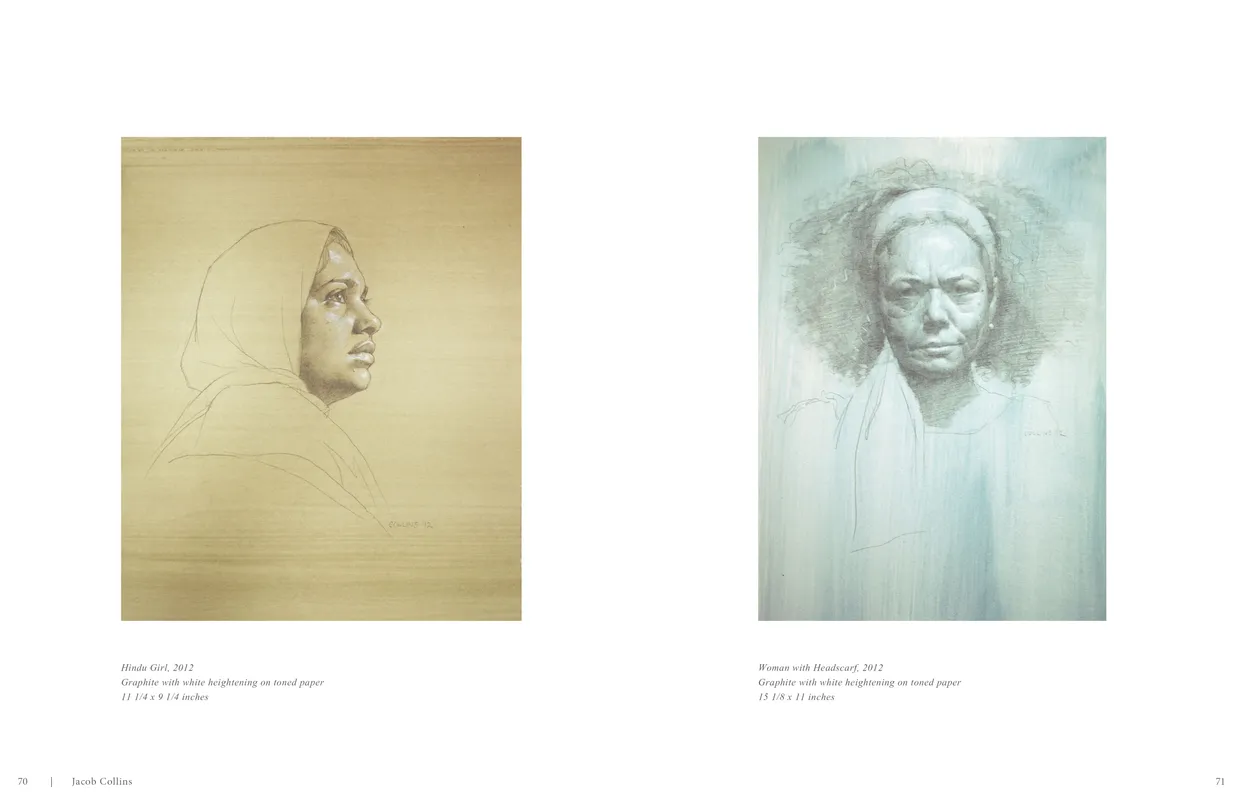
- Jacob Collins (2015) exhibition catalog, pages 70-71
- Client: Adelson Galleries
- Visit figure page
- Type: portfolio
- Portfolio Type: publication_design
- Portfolio Role: design_layout
Jacob Collins: 2015 — Pages 72–73
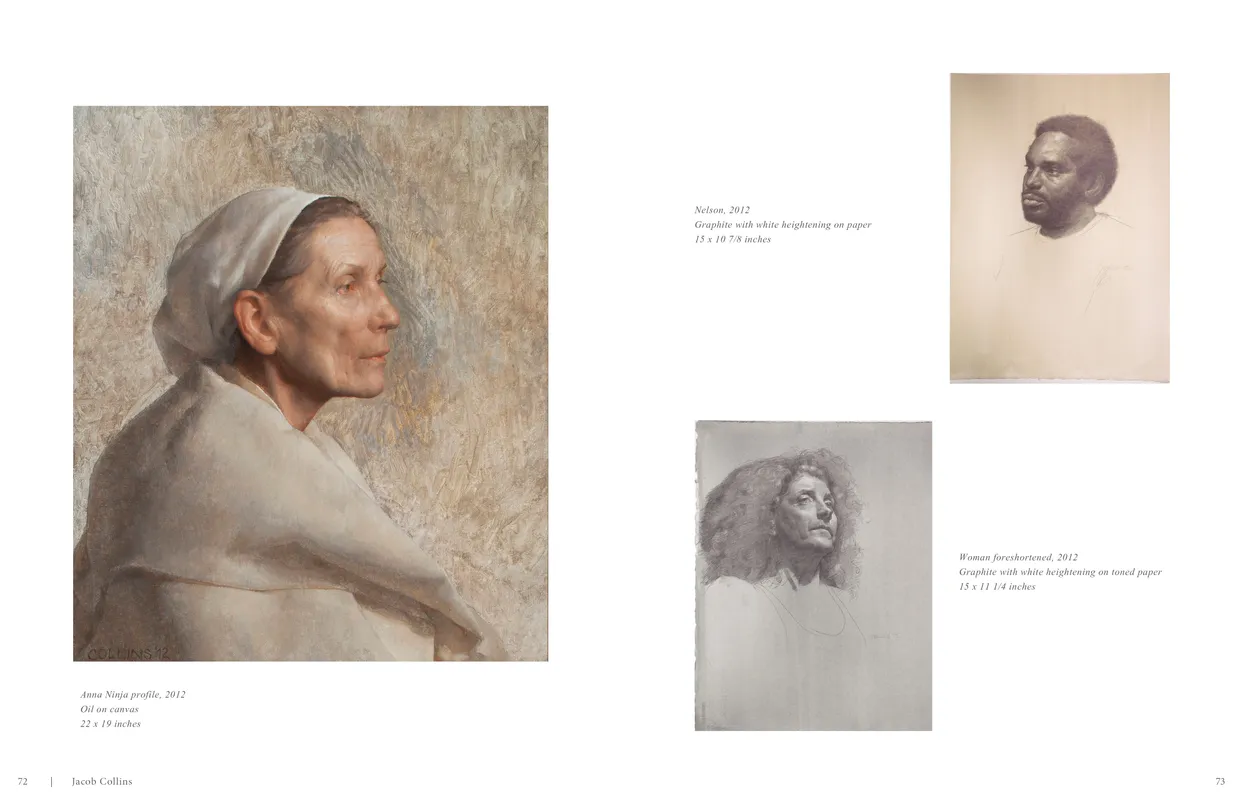
- Jacob Collins (2015) exhibition catalog, pages 72-73
- Client: Adelson Galleries
- Visit figure page
- Type: portfolio
- Portfolio Type: publication_design
- Portfolio Role: design_layout
Jacob Collins: 2015 — Pages 74–75
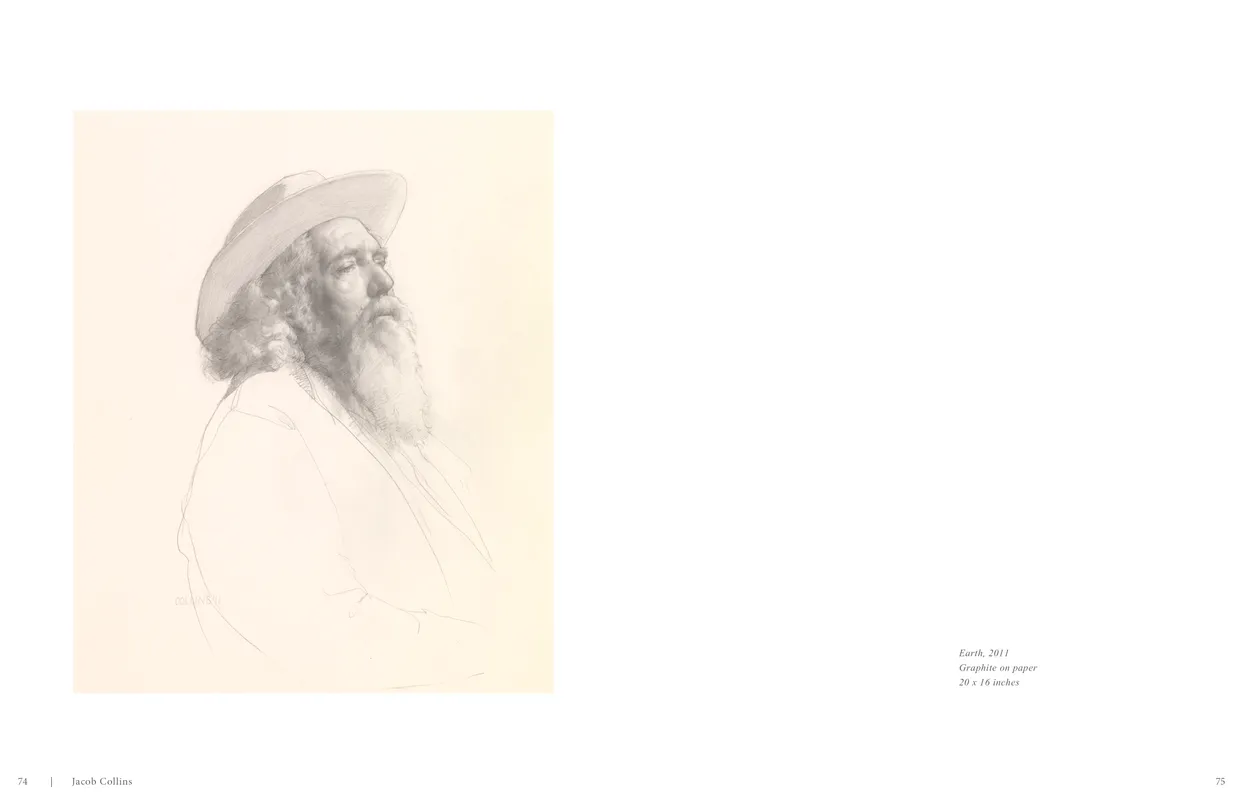
- Jacob Collins (2015) exhibition catalog, pages 74-75
- Client: Adelson Galleries
- Visit figure page
- Type: portfolio
- Portfolio Type: publication_design
- Portfolio Role: design_layout
Jacob Collins: 2015 — Pages 76–77
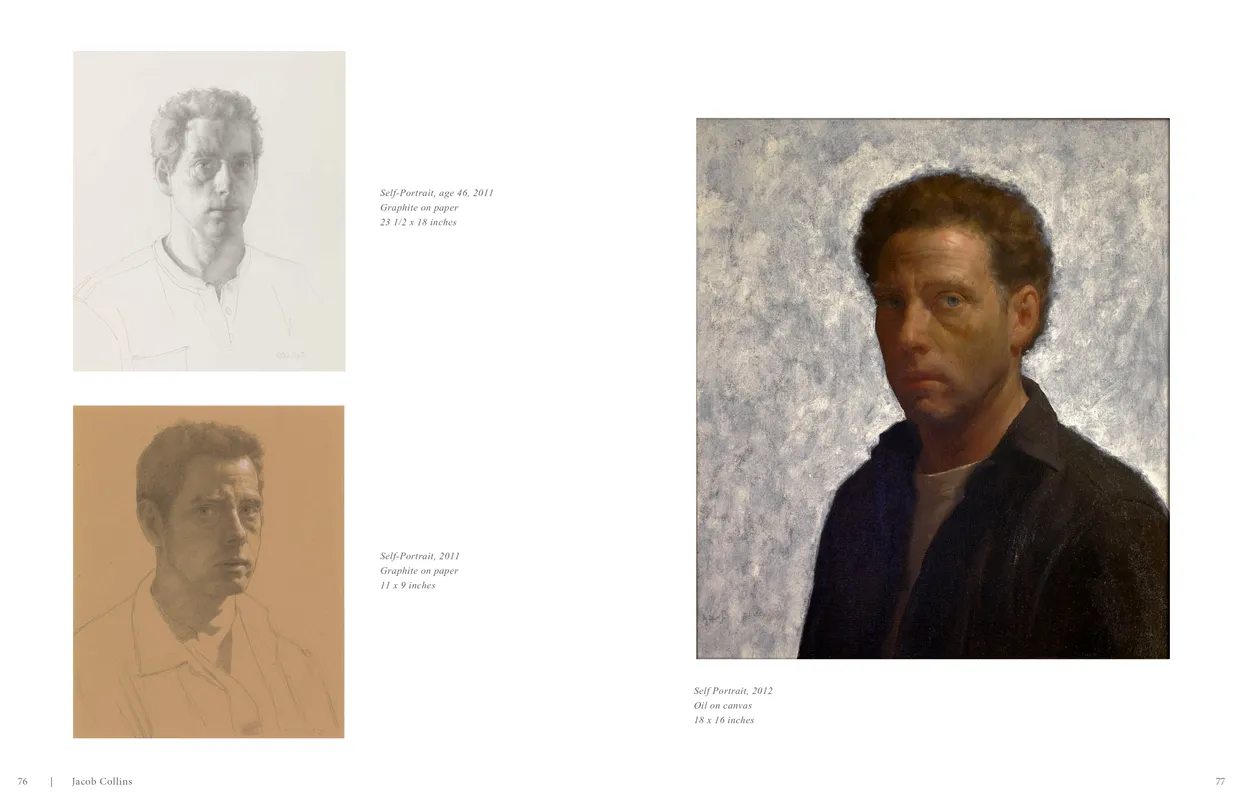
- Jacob Collins (2015) exhibition catalog, pages 76-77
- Client: Adelson Galleries
- Visit figure page
- Type: portfolio
- Portfolio Type: publication_design
- Portfolio Role: design_layout
Jacob Collins: 2015 — Pages 78–79
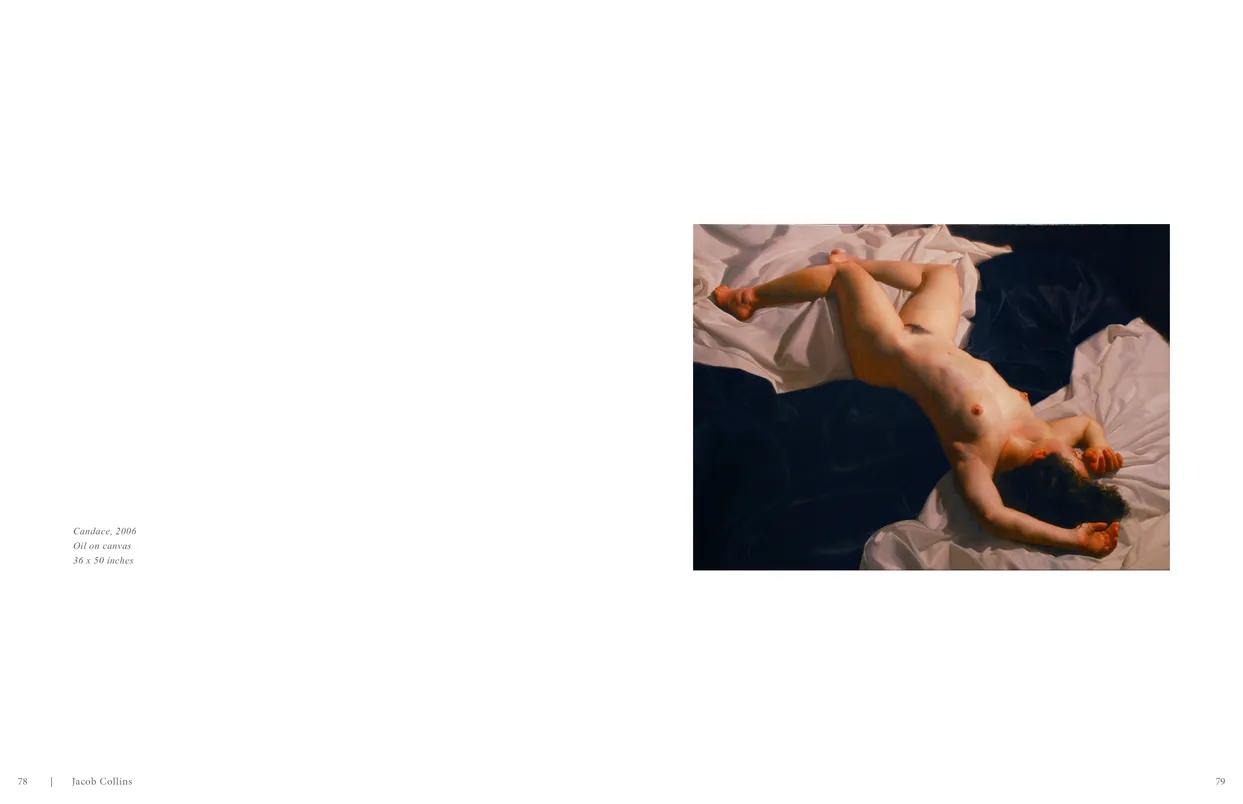
- Jacob Collins (2015) exhibition catalog, pages 78-79
- Client: Adelson Galleries
- Visit figure page
- Type: portfolio
- Portfolio Type: publication_design
- Portfolio Role: design_layout
Jacob Collins: 2015 — Pages 8–9
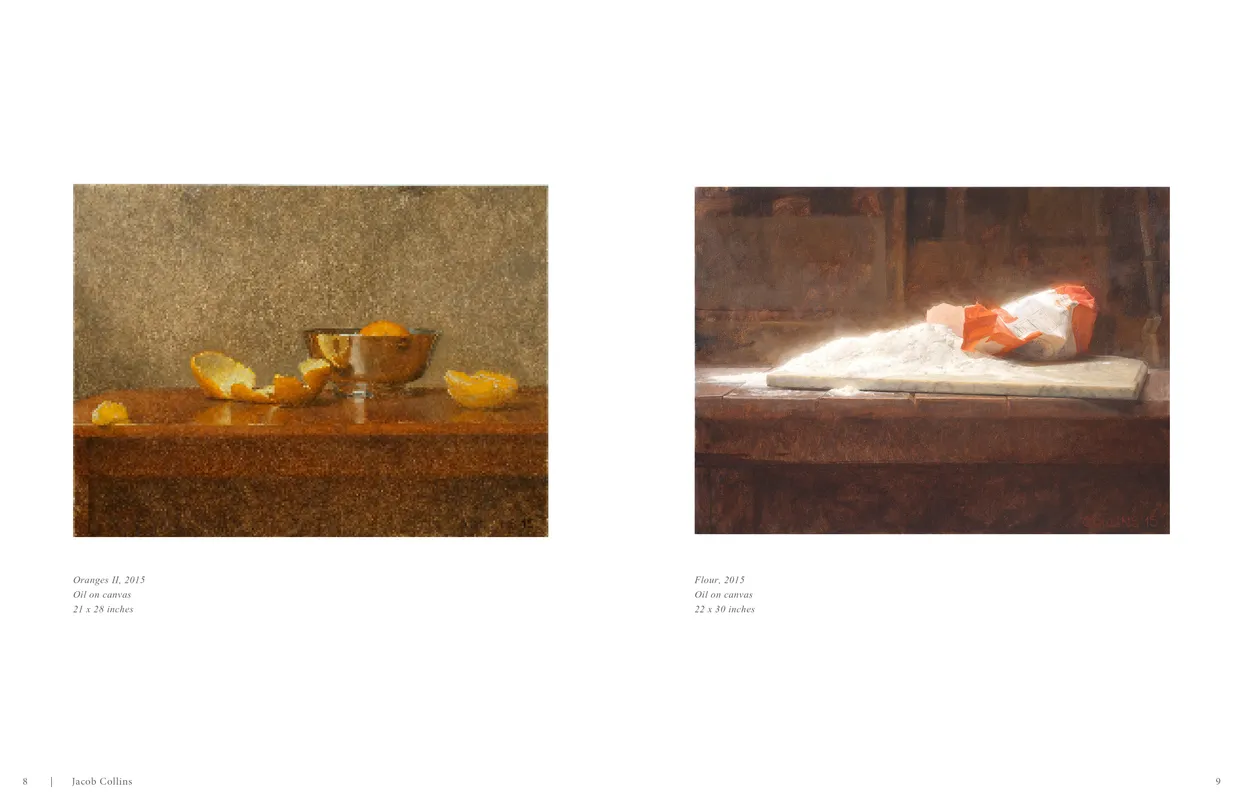
- Jacob Collins (2015) exhibition catalog, pages 8-9
- Client: Adelson Galleries
- Visit figure page
- Type: portfolio
- Portfolio Type: publication_design
- Portfolio Role: design_layout
Jacob Collins: 2015 — Pages 80–81

- Jacob Collins (2015) exhibition catalog, pages 80-81
- Client: Adelson Galleries
- Visit figure page
- Type: portfolio
- Portfolio Type: publication_design
- Portfolio Role: design_layout
Jacob Collins: 2015 — Pages 82–83
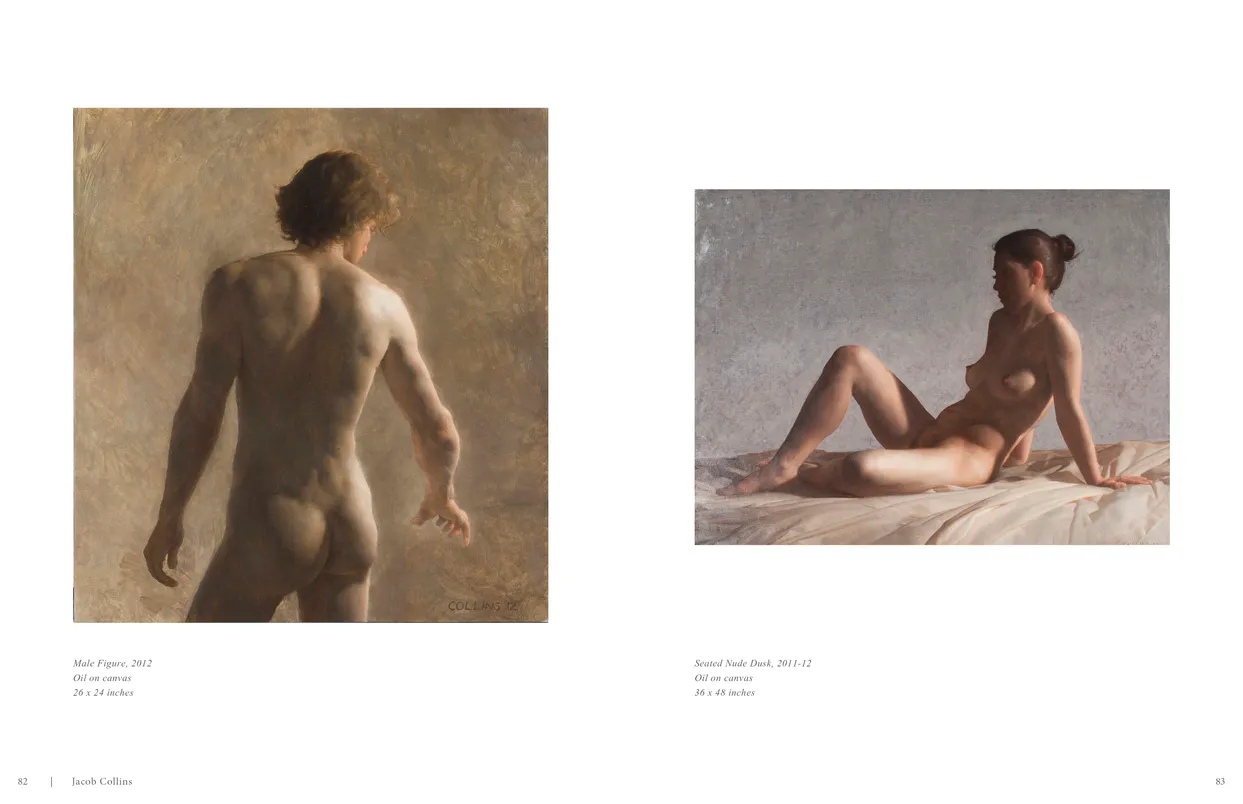
- Jacob Collins (2015) exhibition catalog, pages 82-83
- Client: Adelson Galleries
- Visit figure page
- Type: portfolio
- Portfolio Type: publication_design
- Portfolio Role: design_layout
Jacob Collins: 2015 — Pages 84–85
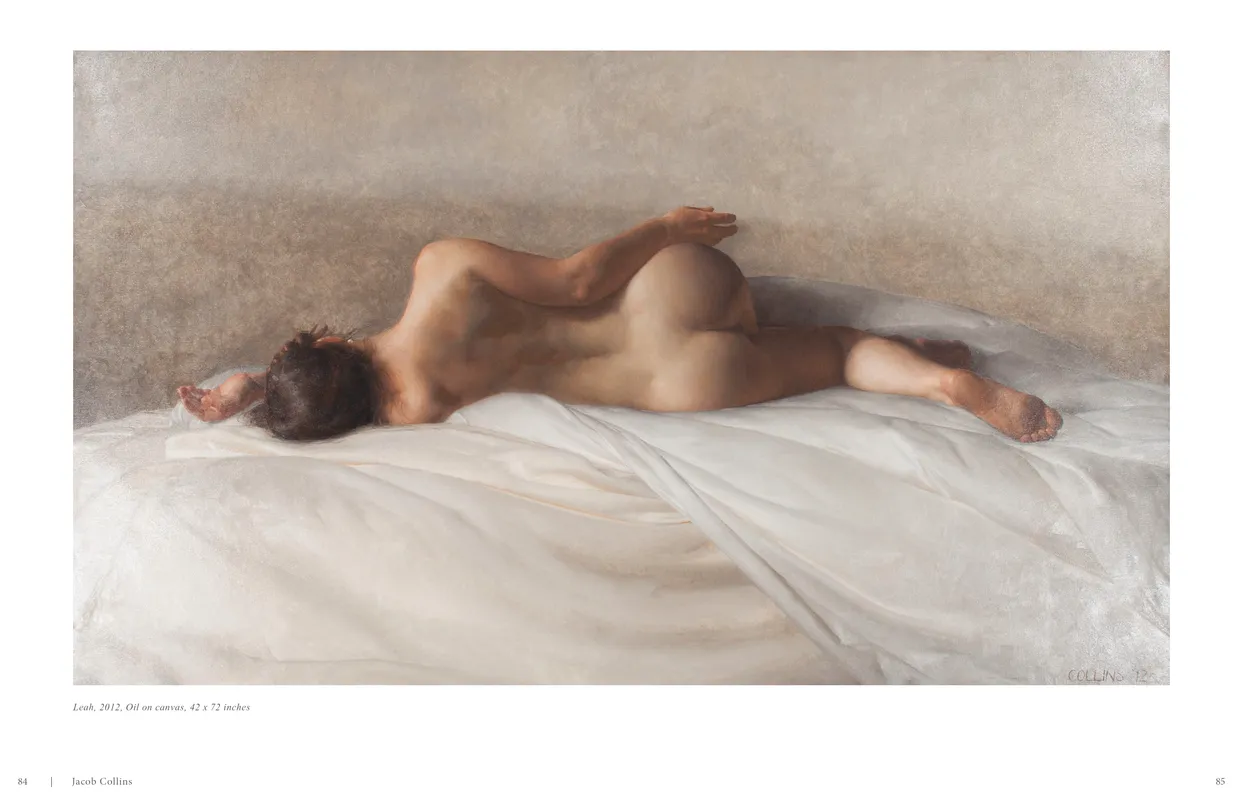
- Jacob Collins (2015) exhibition catalog, pages 84-85
- Client: Adelson Galleries
- Visit figure page
- Type: portfolio
- Portfolio Type: publication_design
- Portfolio Role: design_layout
Jacob Collins: 2015 — Pages 86–87
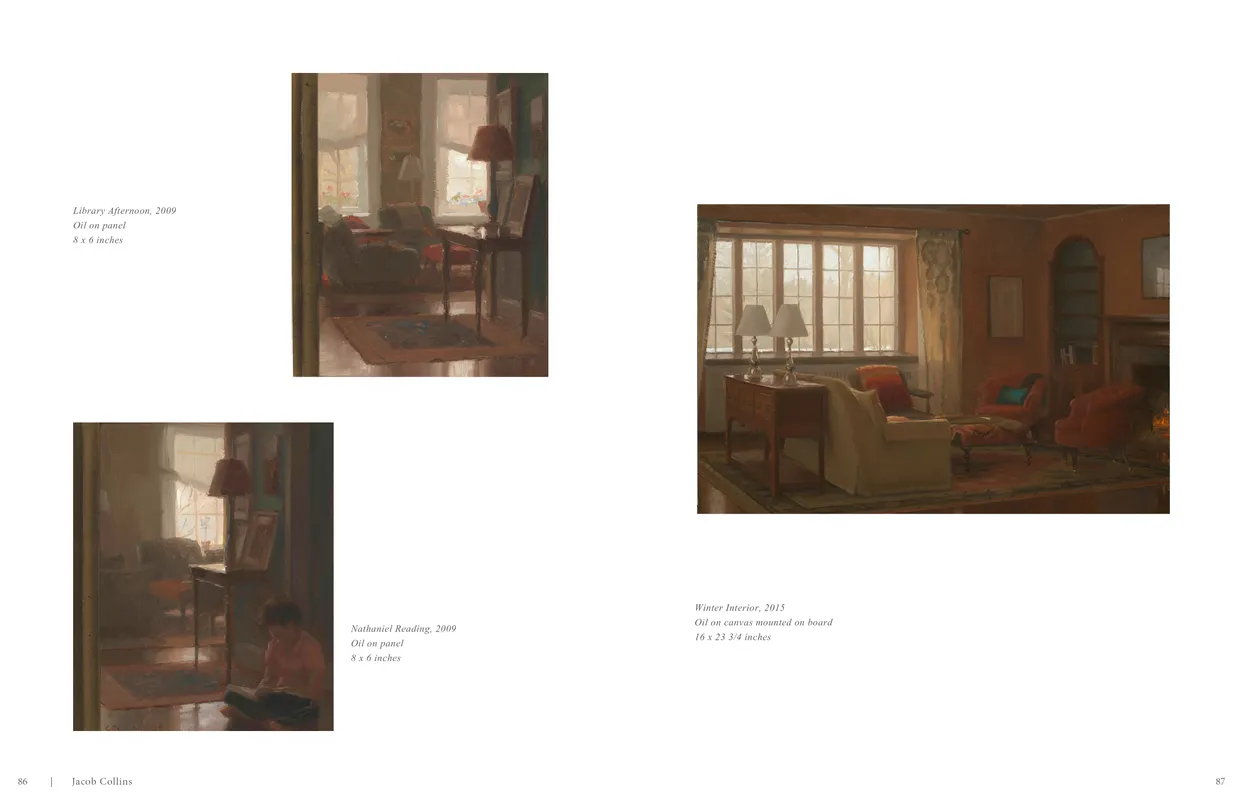
- Jacob Collins (2015) exhibition catalog, pages 86-87
- Client: Adelson Galleries
- Visit figure page
- Type: portfolio
- Portfolio Type: publication_design
- Portfolio Role: design_layout
Jacob Collins: 2015 — Pages 88–89
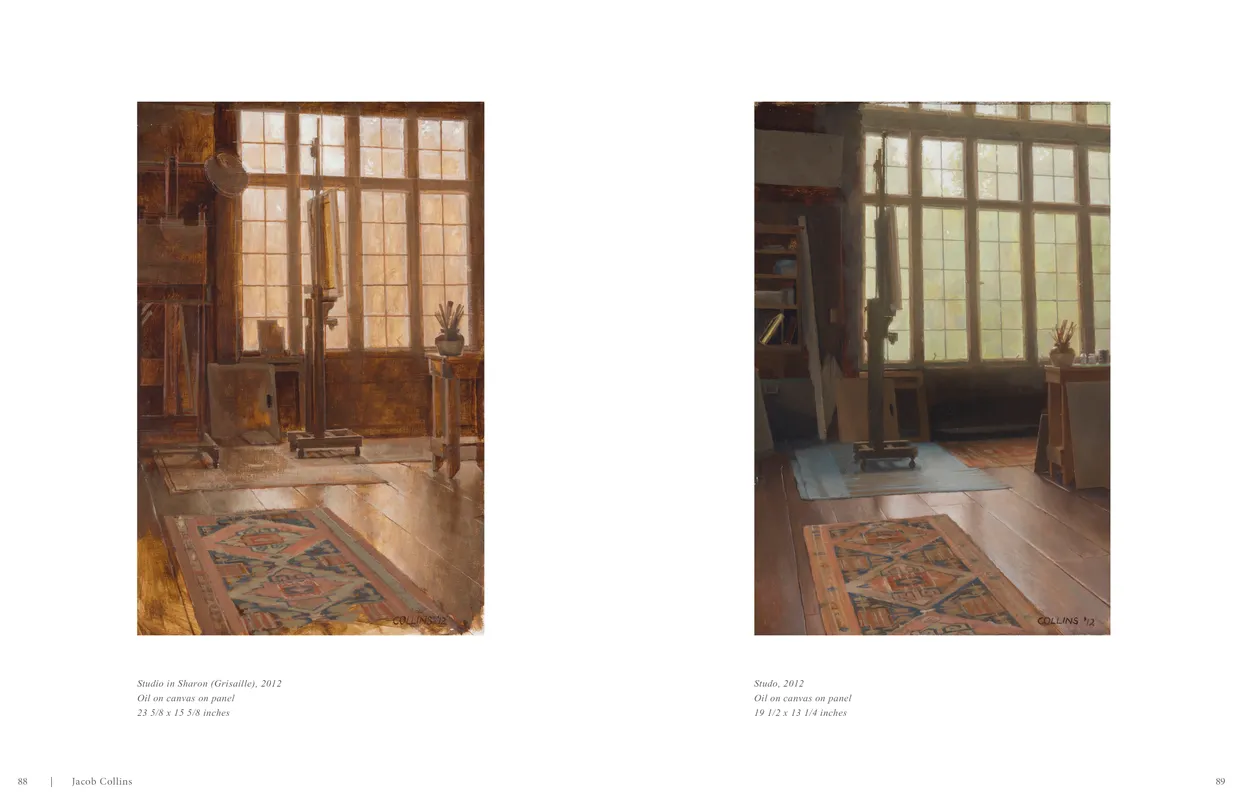
- Jacob Collins (2015) exhibition catalog, pages 88-89
- Client: Adelson Galleries
- Visit figure page
- Type: portfolio
- Portfolio Type: publication_design
- Portfolio Role: design_layout
Jacob Collins: 2015 — Pages 90–91
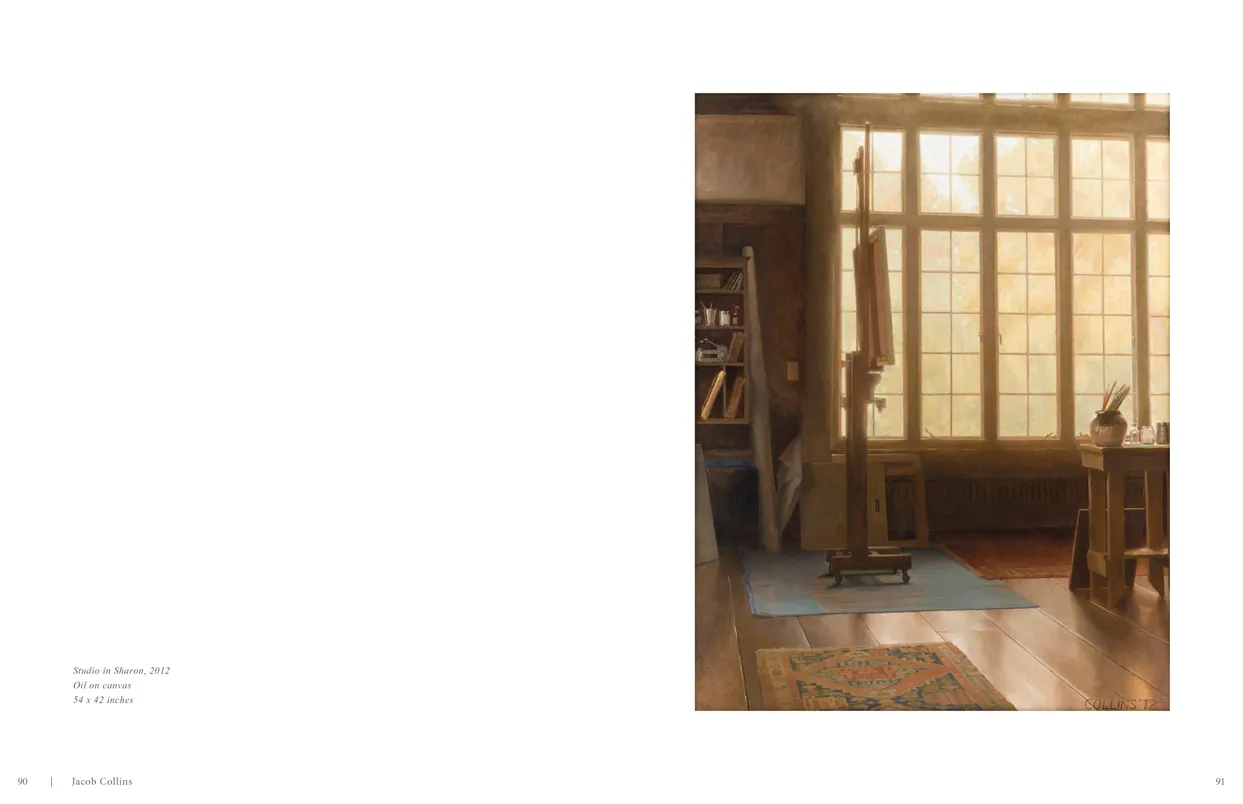
- Jacob Collins (2015) exhibition catalog, pages 90-91
- Client: Adelson Galleries
- Visit figure page
- Type: portfolio
- Portfolio Type: publication_design
- Portfolio Role: design_layout
Jacob Collins: 2015 — Pages 92–93
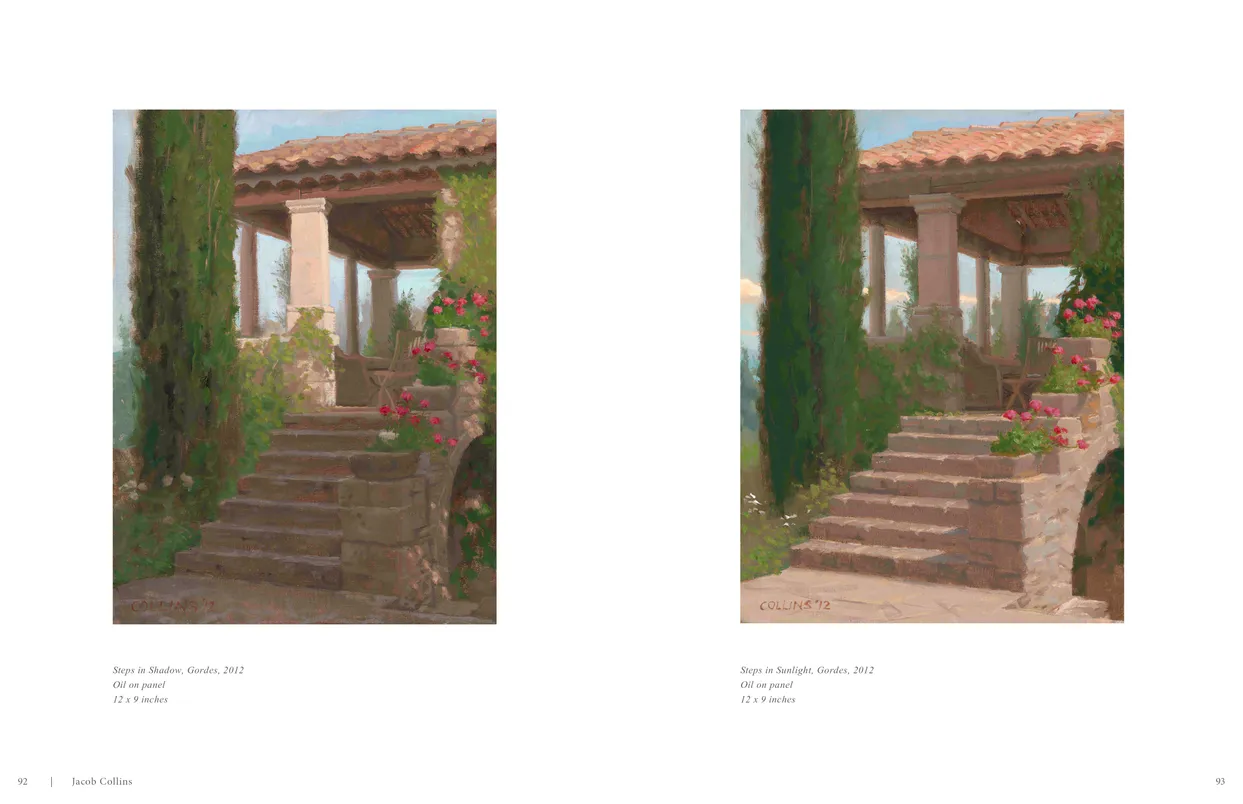
- Jacob Collins (2015) exhibition catalog, pages 92-93
- Client: Adelson Galleries
- Visit figure page
- Type: portfolio
- Portfolio Type: publication_design
- Portfolio Role: design_layout
Jamie Wyeth Art And Antiques Ad December 2014

- Jamie Wyeth — Art & Antiques full-page advertisement
- Client: Adelson Galleries
- Visit figure page
- Type: portfolio
- Portfolio Type: advertising
- Portfolio Role: design_layout
John Singer Sargent Winter Show Ad 2013
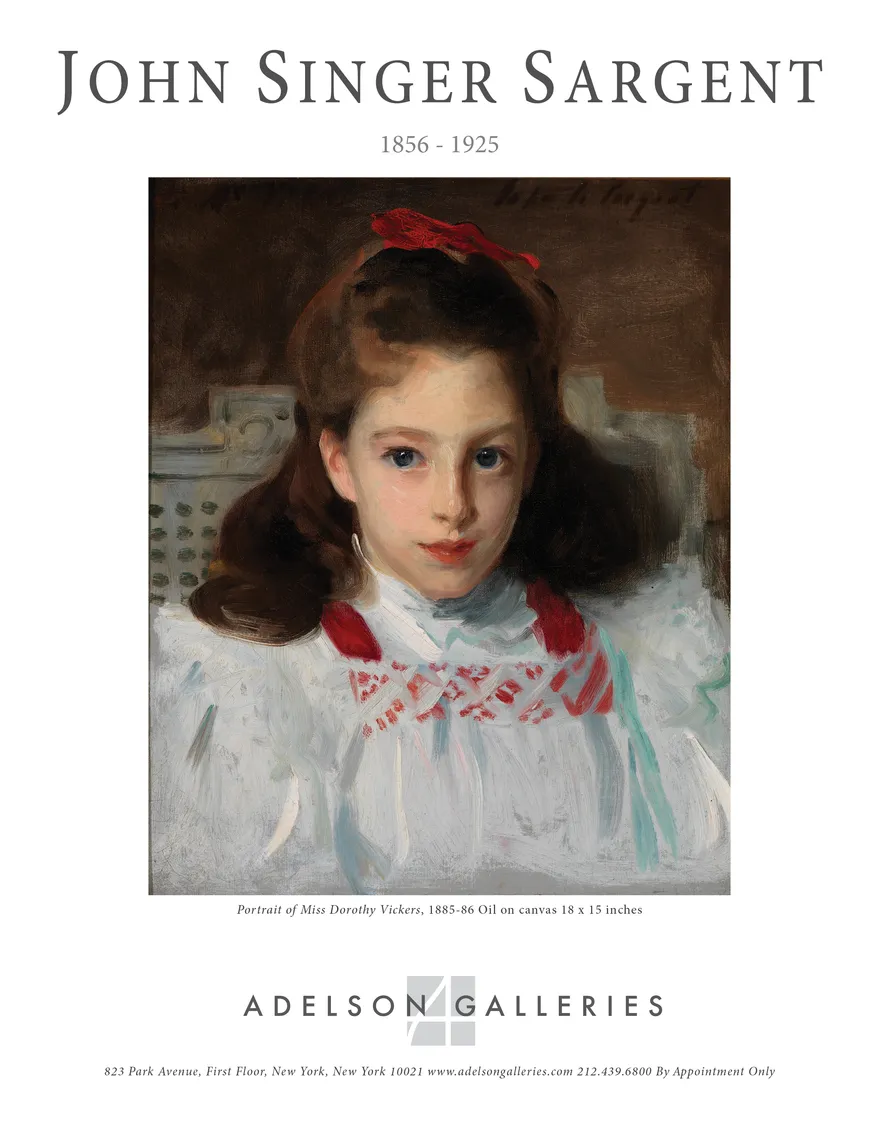
- John Singer Sargent — Winter Show full-page display advertisement
- Client: Adelson Galleries
- Visit figure page
- Type: portfolio
- Portfolio Type: advertising
- Portfolio Role: design_layout
Jon Imber: — Cover
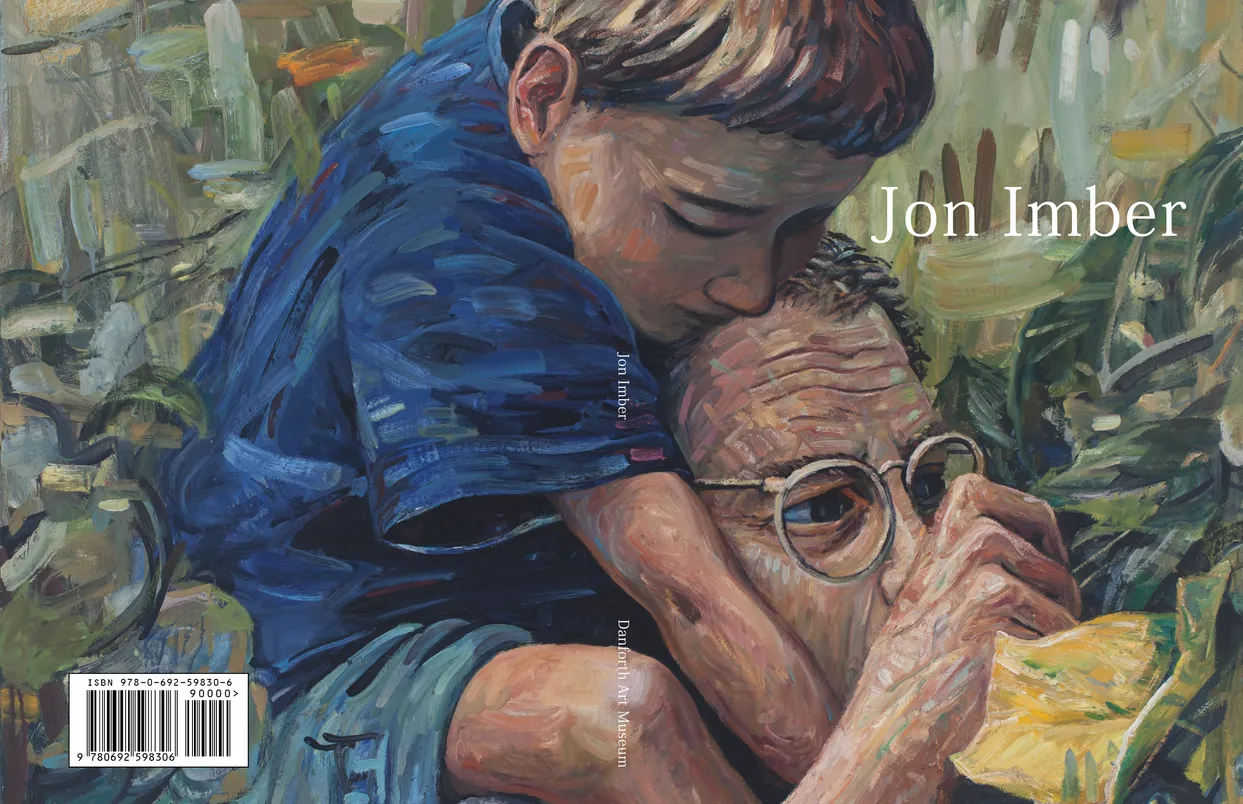
- Jon Imber exhibition catalog, cover
- Client: Danforth Art Museum
- Visit figure page
- Type: portfolio
- Portfolio Type: publication_design
- Portfolio Role: design_layout
Jon Imber: — Inside Front Cover
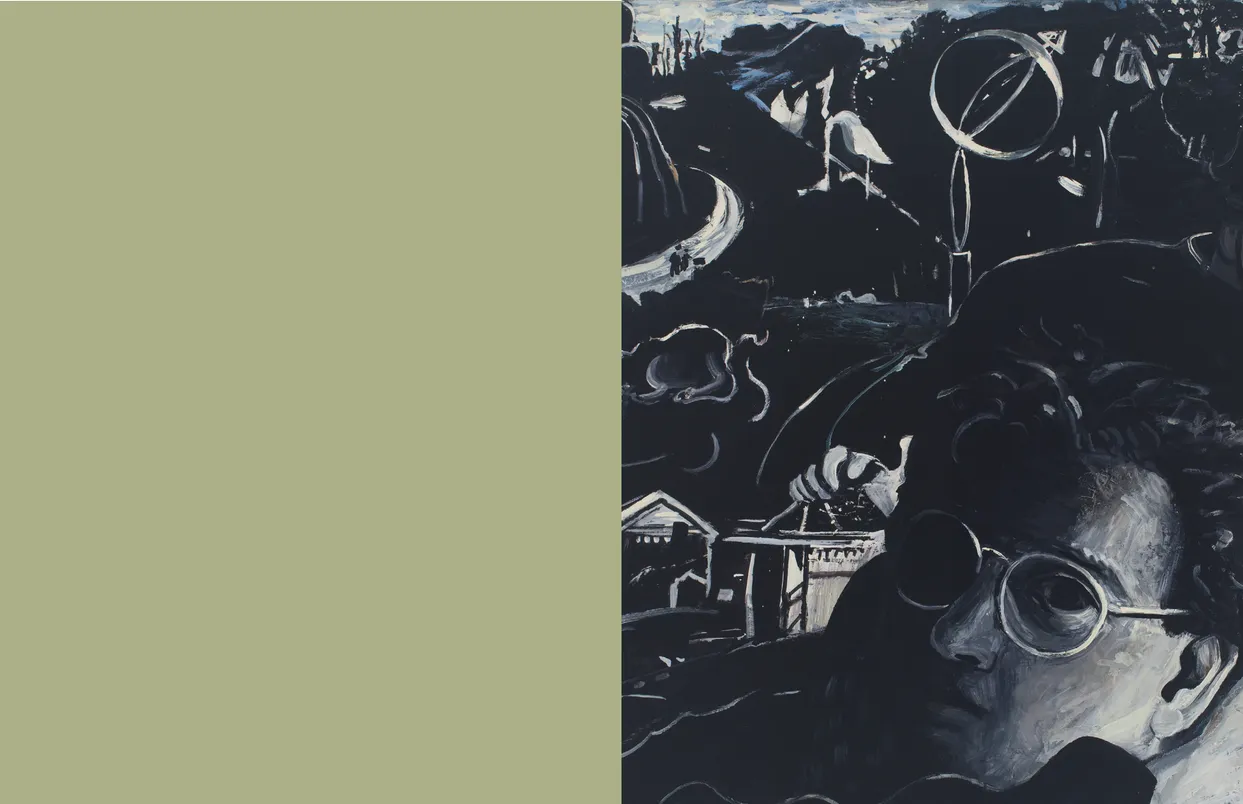
- Jon Imber exhibition catalog, inside cover back
- Client: Danforth Art Museum
- Visit figure page
- Type: portfolio
- Portfolio Type: publication_design
- Portfolio Role: design_layout
Jon Imber: — Inside Front Cover
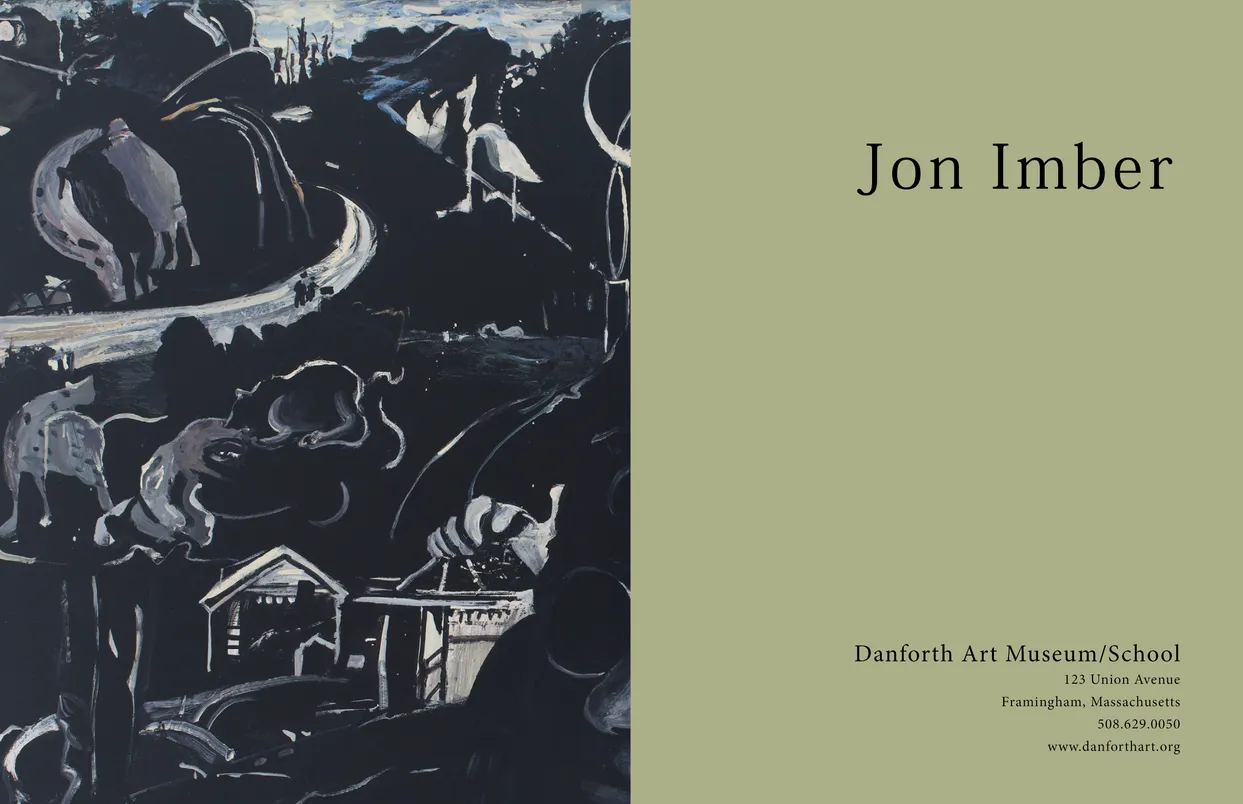
- Jon Imber exhibition catalog, inside cover front
- Client: Danforth Art Museum
- Visit figure page
- Type: portfolio
- Portfolio Type: publication_design
- Portfolio Role: design_layout
Jon Imber: — Pages 10–11
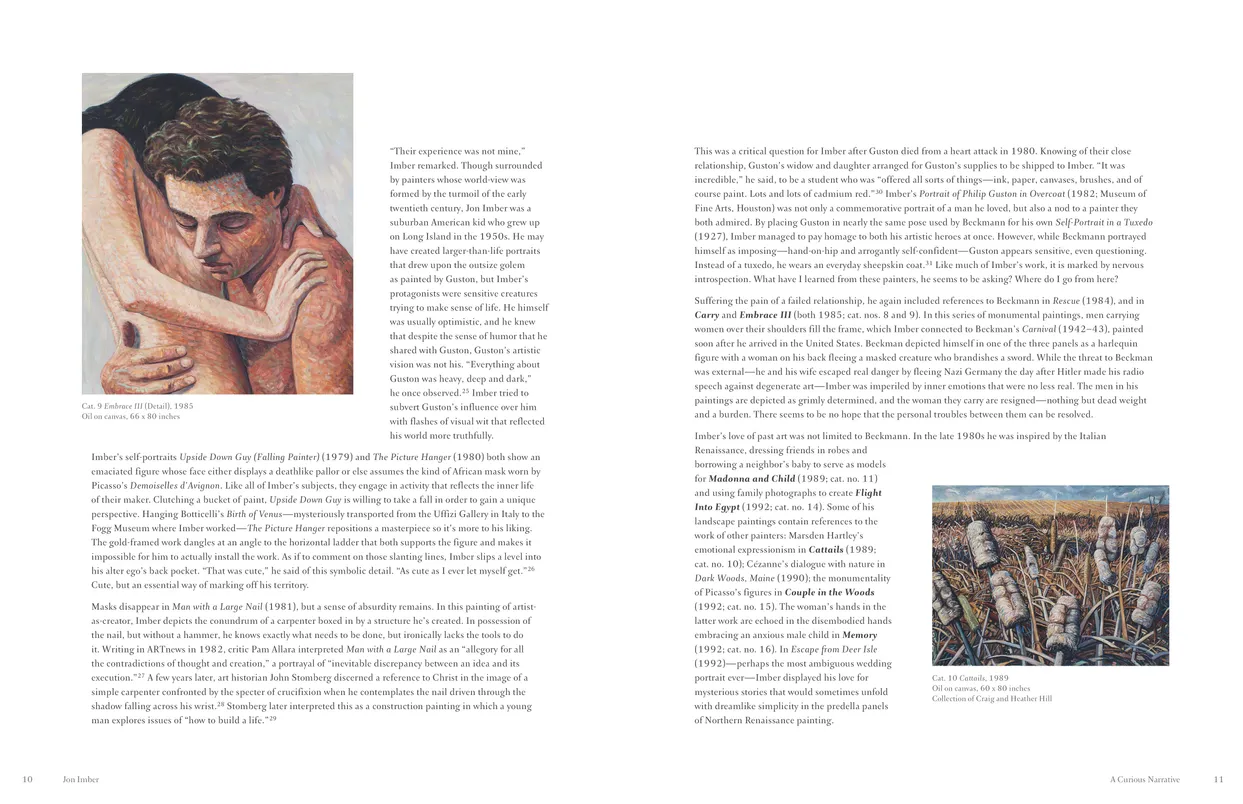
- Jon Imber exhibition catalog, pages 10-11
- Client: Danforth Art Museum
- Visit figure page
- Type: portfolio
- Portfolio Type: publication_design
- Portfolio Role: design_layout
Jon Imber: — Pages 12–13

- Jon Imber exhibition catalog, pages 12-13
- Client: Danforth Art Museum
- Visit figure page
- Type: portfolio
- Portfolio Type: publication_design
- Portfolio Role: design_layout
Jon Imber: — Pages 14–15
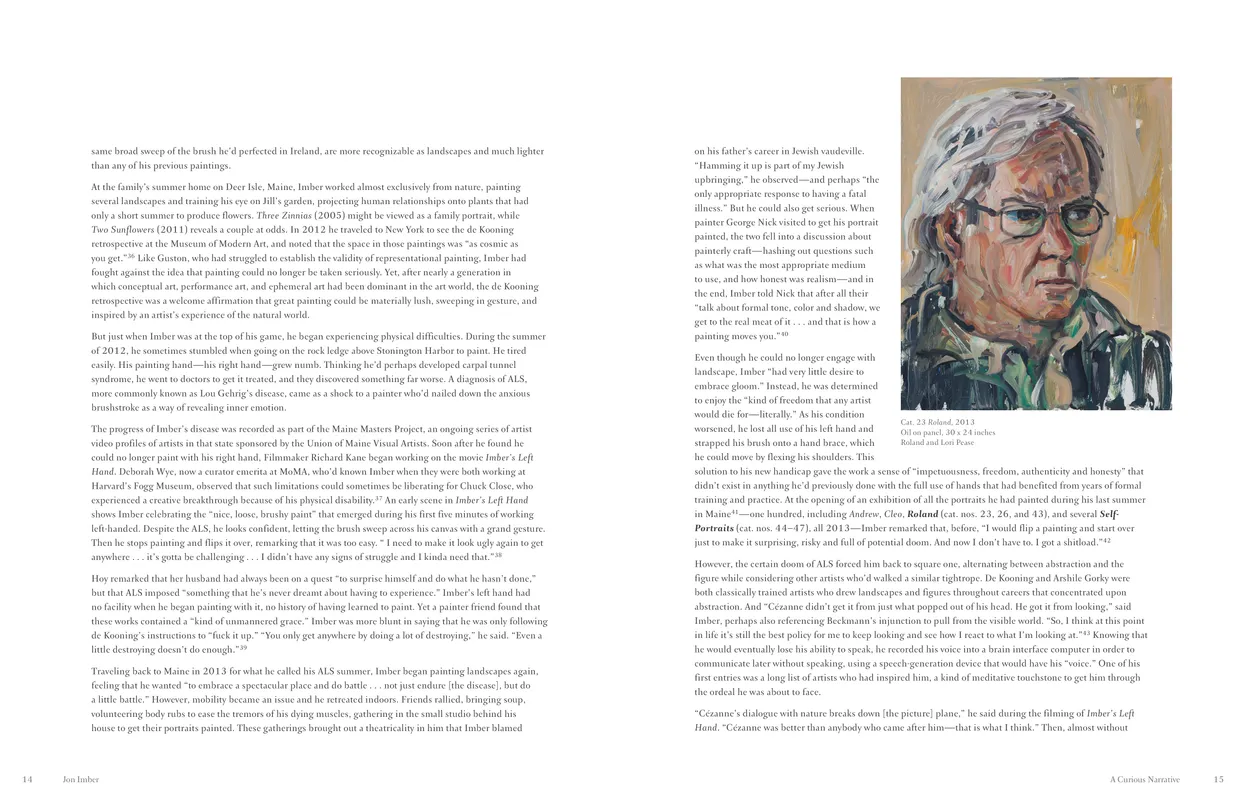
- Jon Imber exhibition catalog, pages 14-15
- Client: Danforth Art Museum
- Visit figure page
- Type: portfolio
- Portfolio Type: publication_design
- Portfolio Role: design_layout
Jon Imber: — Pages 16–17
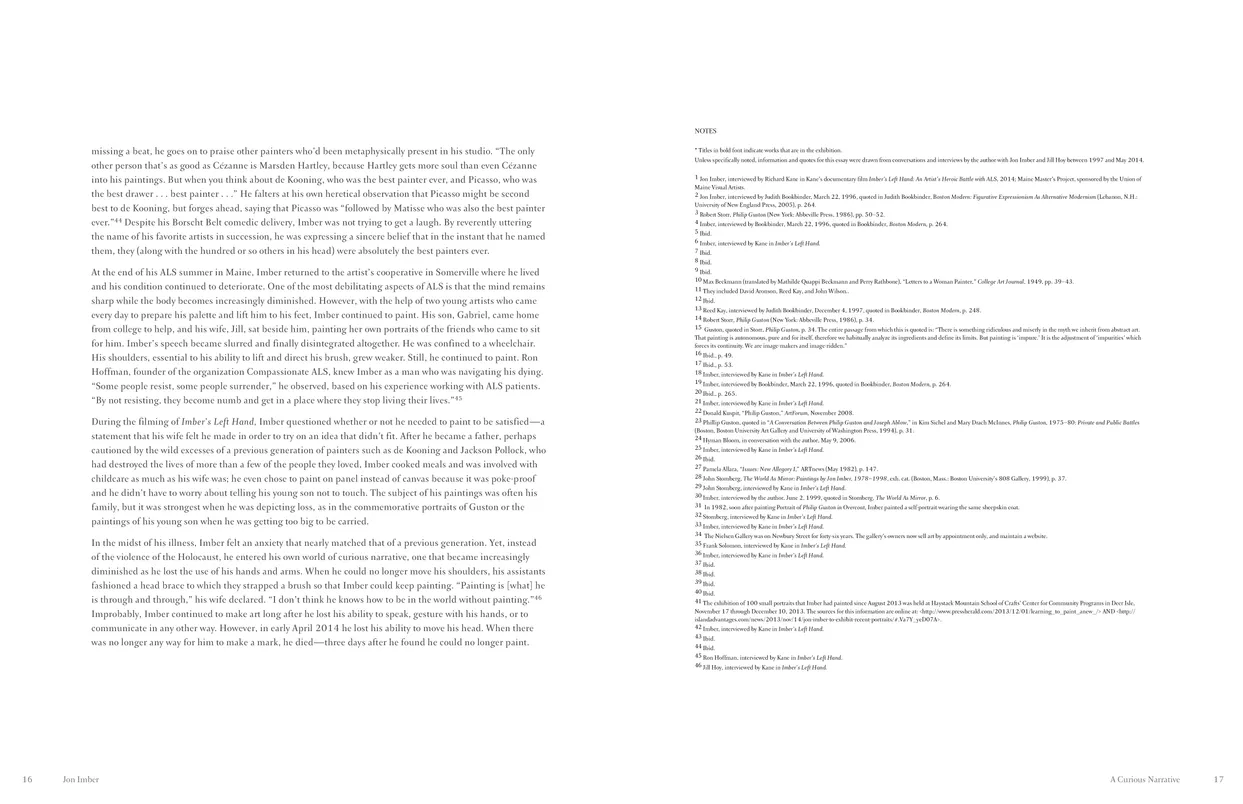
- Jon Imber exhibition catalog, pages 16-17
- Client: Danforth Art Museum
- Visit figure page
- Type: portfolio
- Portfolio Type: publication_design
- Portfolio Role: design_layout
Jon Imber: — Pages 18–19

- Jon Imber exhibition catalog, pages 18-19
- Client: Danforth Art Museum
- Visit figure page
- Type: portfolio
- Portfolio Type: publication_design
- Portfolio Role: design_layout
Jon Imber: — Pages 2–3
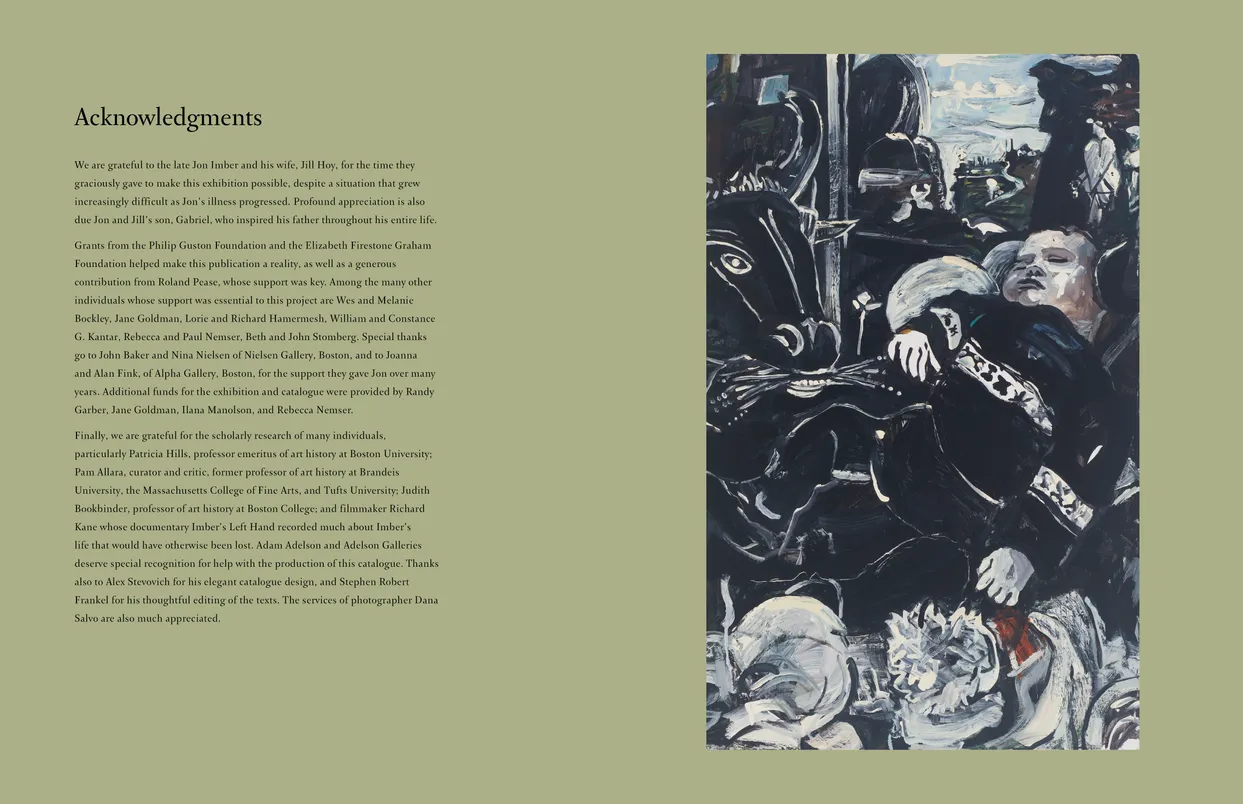
- Jon Imber exhibition catalog, pages 2-3
- Client: Danforth Art Museum
- Visit figure page
- Type: portfolio
- Portfolio Type: publication_design
- Portfolio Role: design_layout
Jon Imber: — Pages 22–23
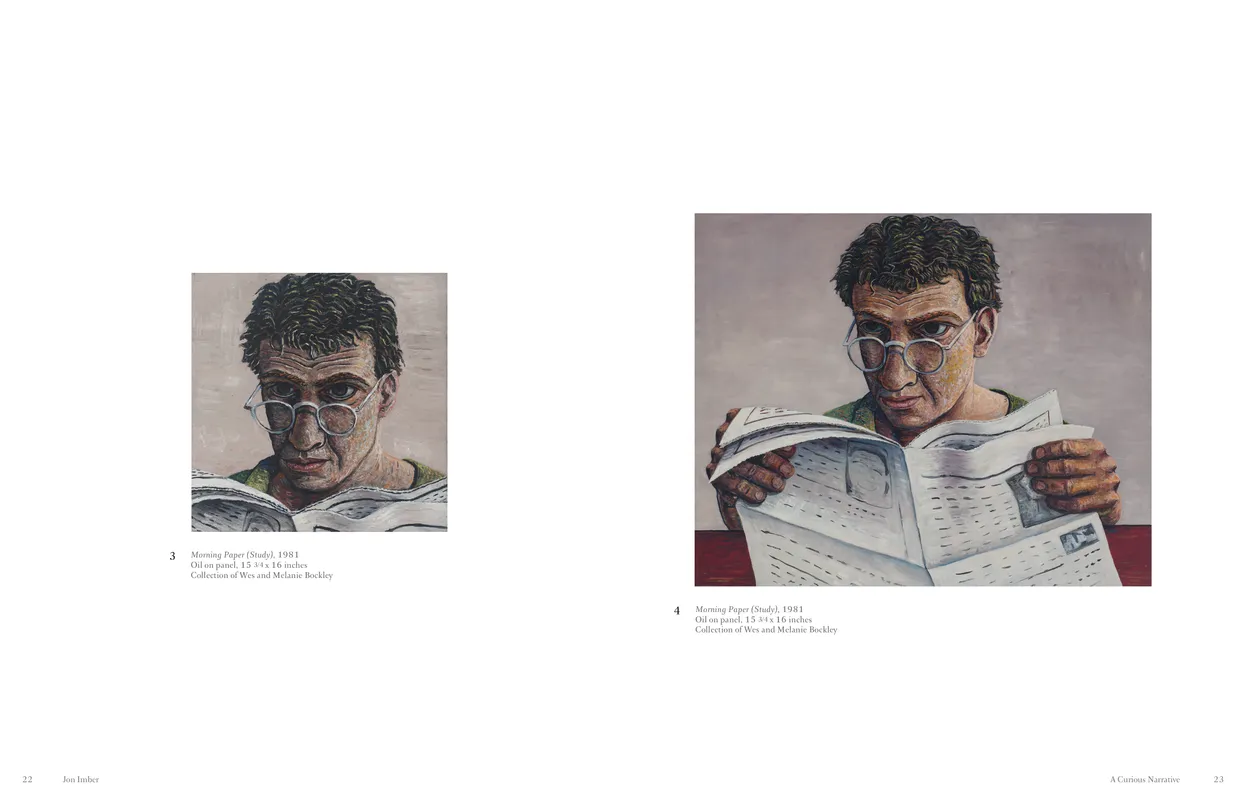
- Jon Imber exhibition catalog, pages 22-23
- Client: Danforth Art Museum
- Visit figure page
- Type: portfolio
- Portfolio Type: publication_design
- Portfolio Role: design_layout
Jon Imber: — Pages 24–25
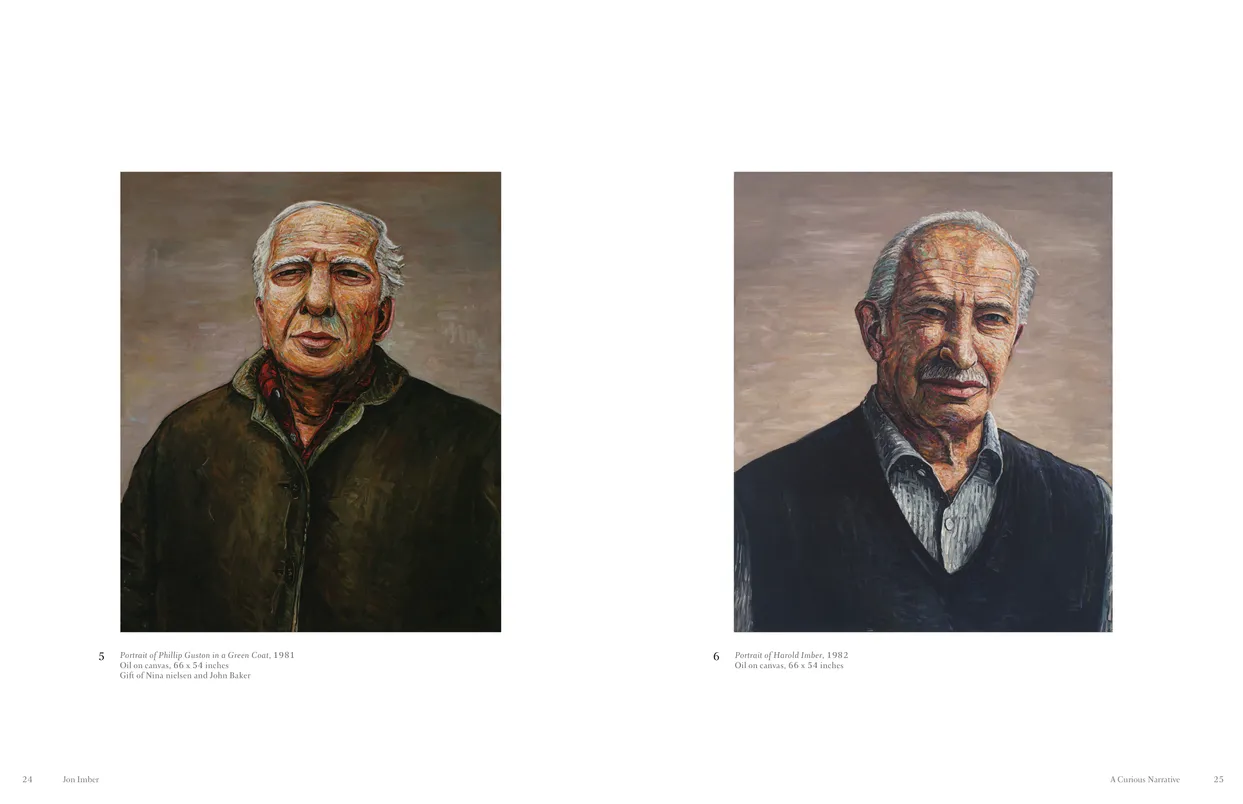
- Jon Imber exhibition catalog, pages 24-25
- Client: Danforth Art Museum
- Visit figure page
- Type: portfolio
- Portfolio Type: publication_design
- Portfolio Role: design_layout
Jon Imber: — Pages 26–27
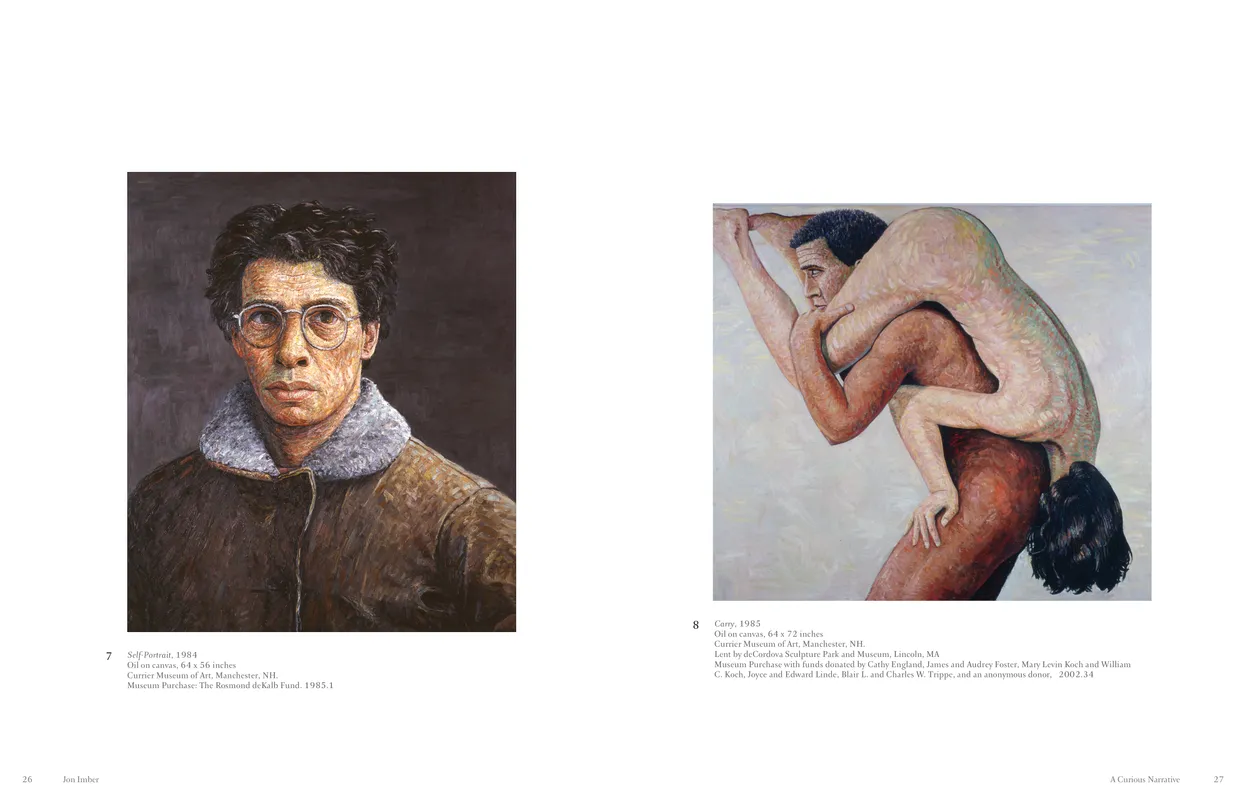
- Jon Imber exhibition catalog, pages 26-27
- Client: Danforth Art Museum
- Visit figure page
- Type: portfolio
- Portfolio Type: publication_design
- Portfolio Role: design_layout
Jon Imber: — Pages 28–29
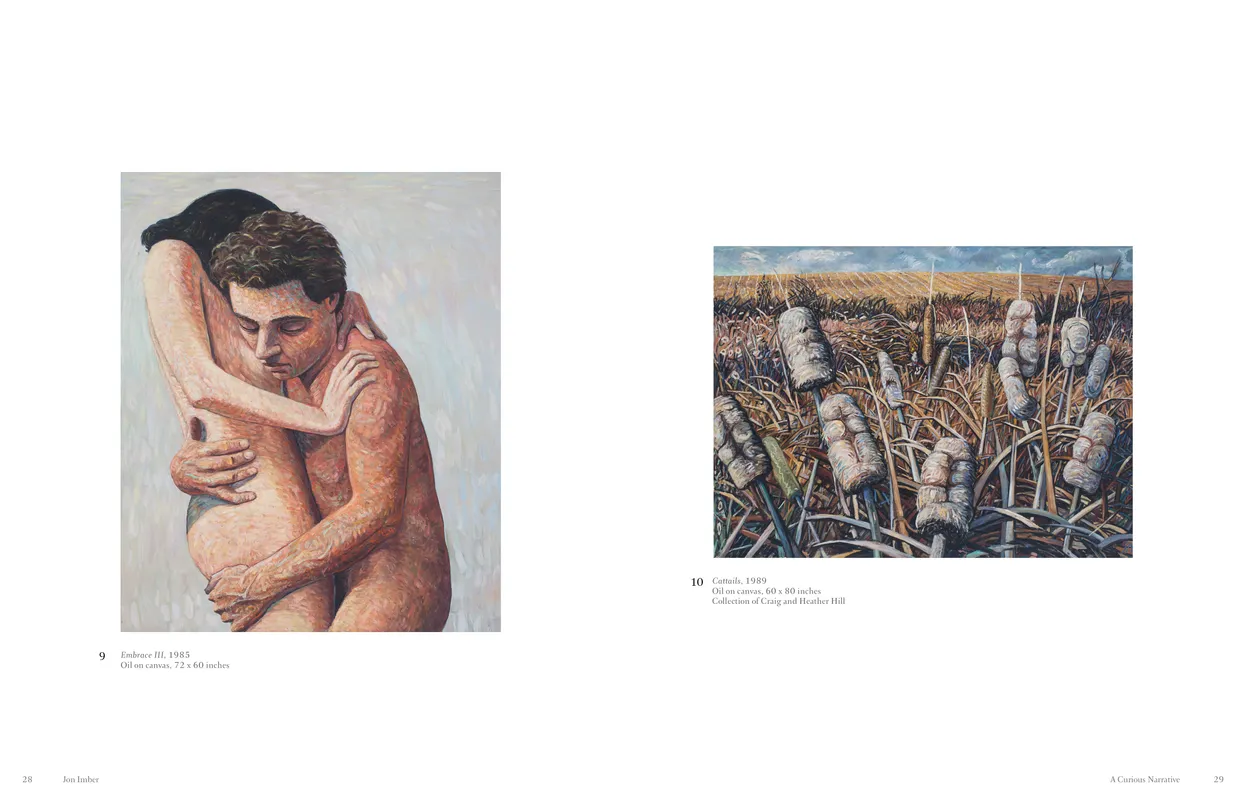
- Jon Imber exhibition catalog, pages 28-29
- Client: Danforth Art Museum
- Visit figure page
- Type: portfolio
- Portfolio Type: publication_design
- Portfolio Role: design_layout
Jon Imber: — Pages 30–31
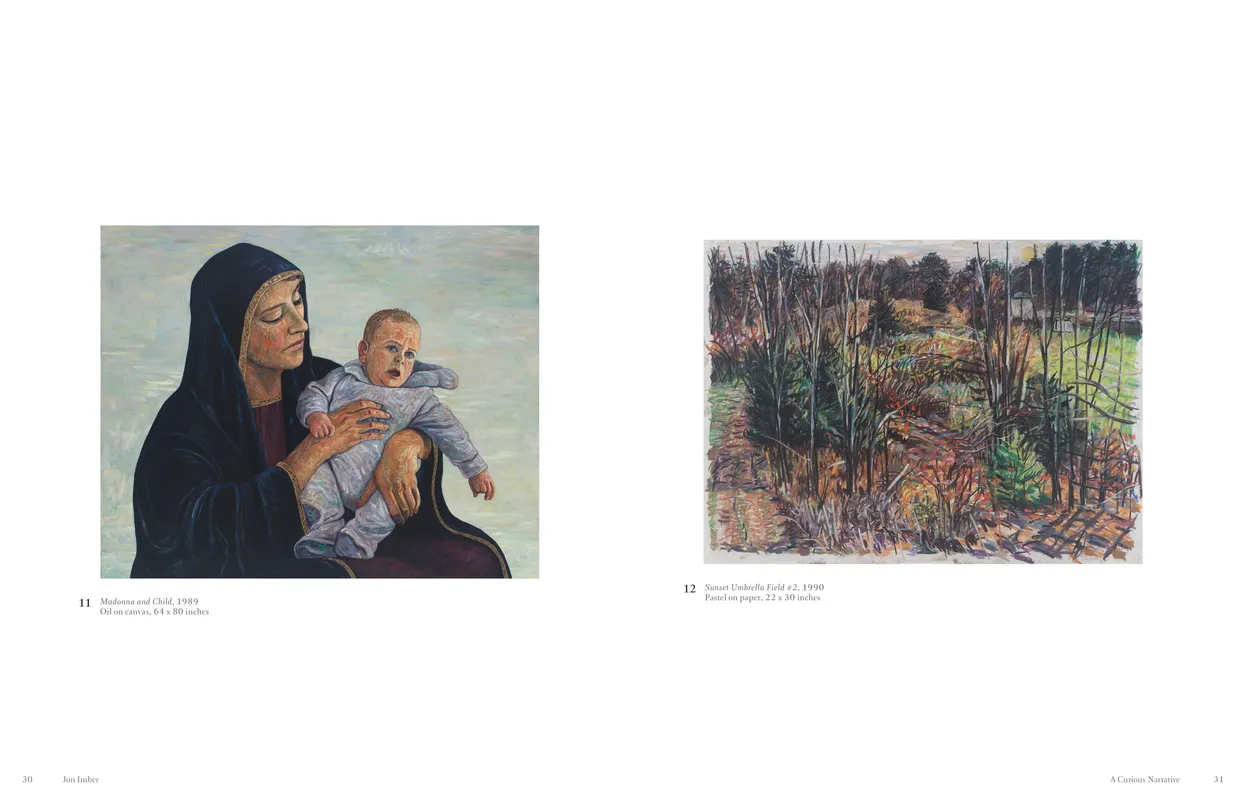
- Jon Imber exhibition catalog, pages 30-31
- Client: Danforth Art Museum
- Visit figure page
- Type: portfolio
- Portfolio Type: publication_design
- Portfolio Role: design_layout
Jon Imber: — Pages 32–33
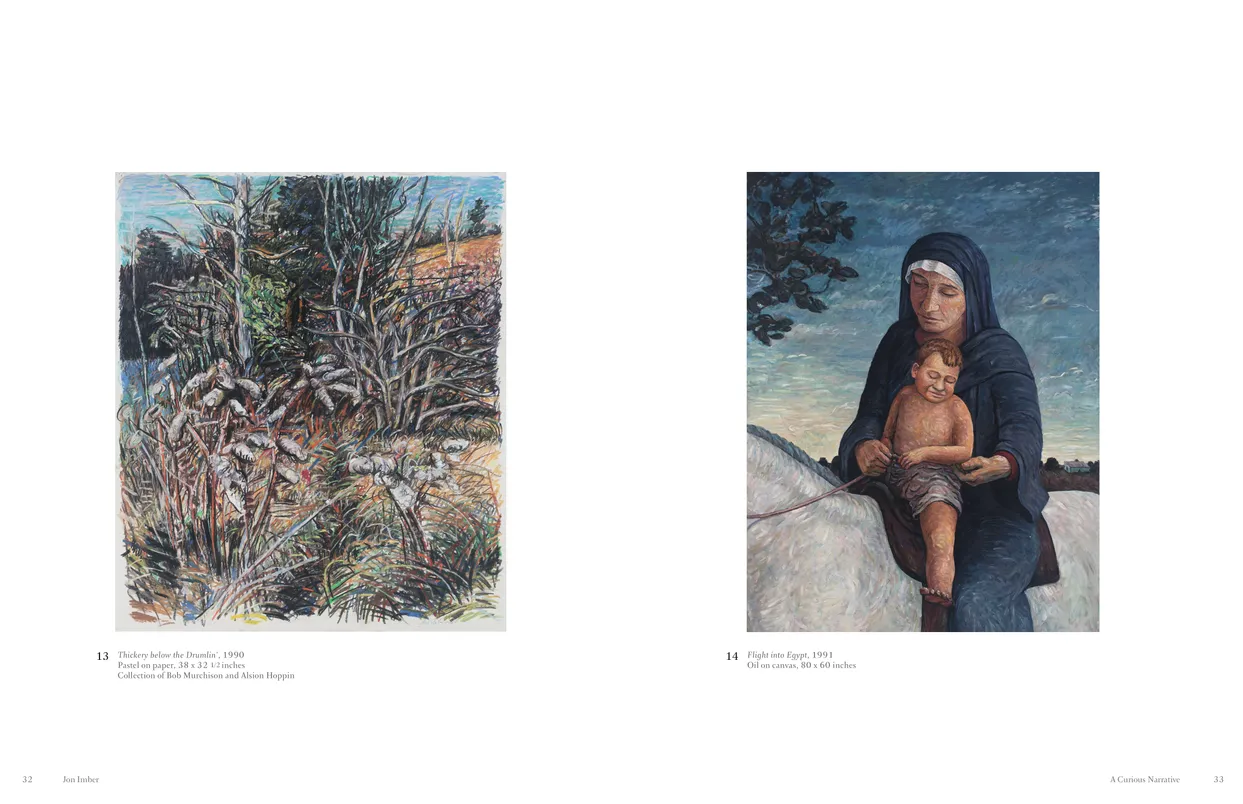
- Jon Imber exhibition catalog, pages 32-33
- Client: Danforth Art Museum
- Visit figure page
- Type: portfolio
- Portfolio Type: publication_design
- Portfolio Role: design_layout
Jon Imber: — Pages 36–37
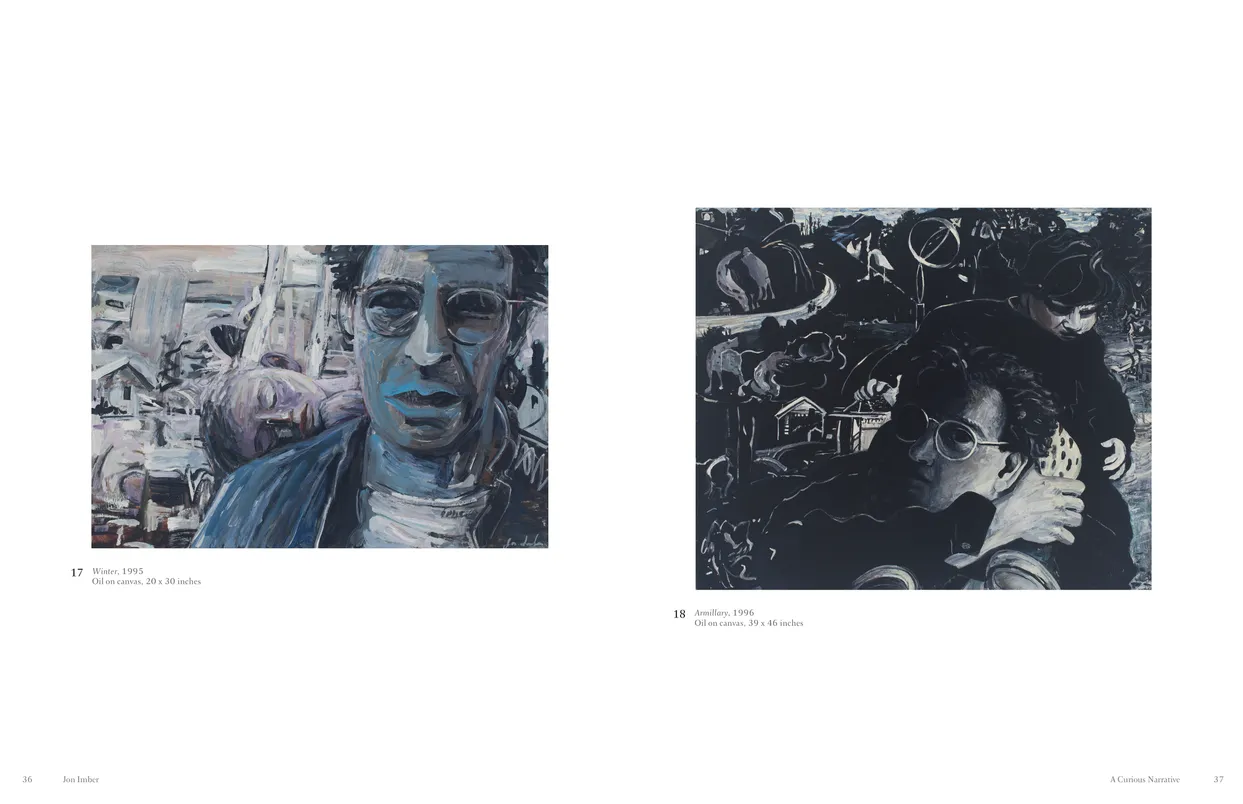
- Jon Imber exhibition catalog, pages 36-37
- Client: Danforth Art Museum
- Visit figure page
- Type: portfolio
- Portfolio Type: publication_design
- Portfolio Role: design_layout
Jon Imber: — Pages 38–39
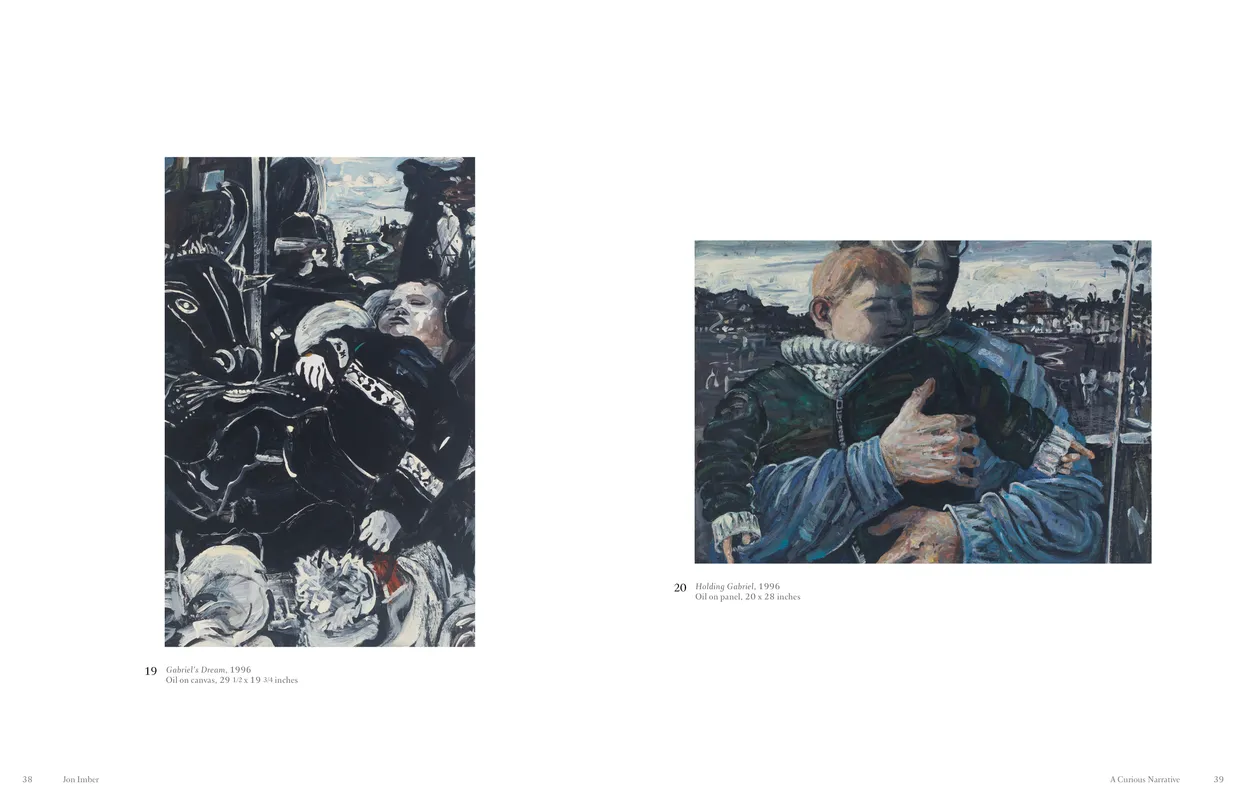
- Jon Imber exhibition catalog, pages 38-39
- Client: Danforth Art Museum
- Visit figure page
- Type: portfolio
- Portfolio Type: publication_design
- Portfolio Role: design_layout
Jon Imber: — Pages 4–5
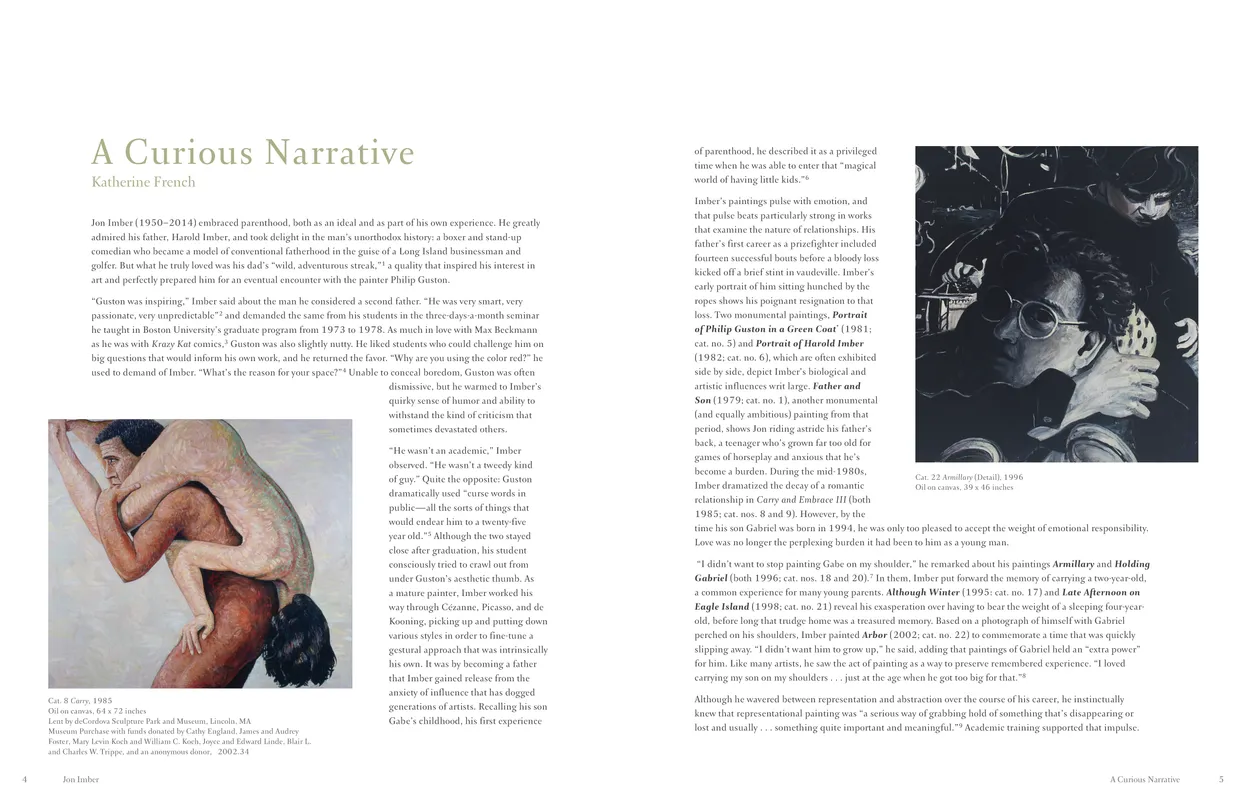
- Jon Imber exhibition catalog, pages 4-5
- Client: Danforth Art Museum
- Visit figure page
- Type: portfolio
- Portfolio Type: publication_design
- Portfolio Role: design_layout
Jon Imber: — Pages 40–41
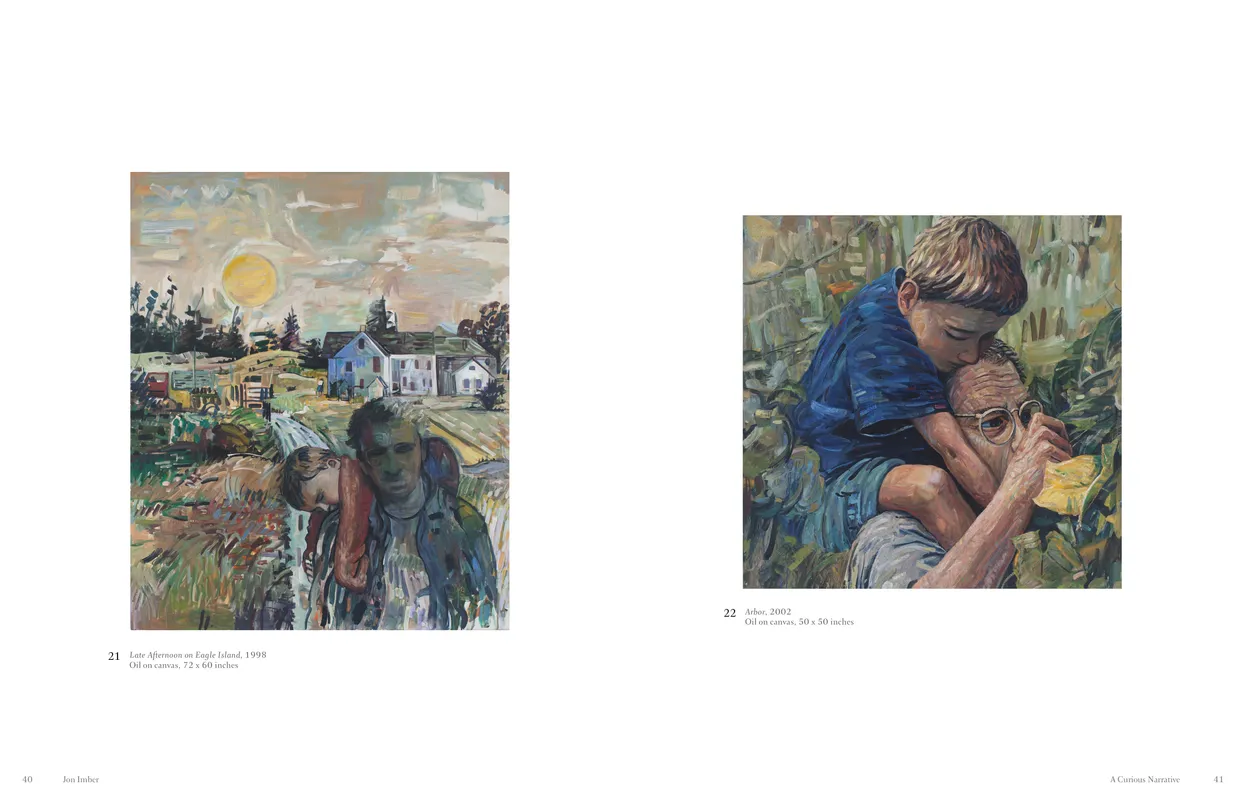
- Jon Imber exhibition catalog, pages 40-41
- Client: Danforth Art Museum
- Visit figure page
- Type: portfolio
- Portfolio Type: publication_design
- Portfolio Role: design_layout
Jon Imber: — Pages 42–43
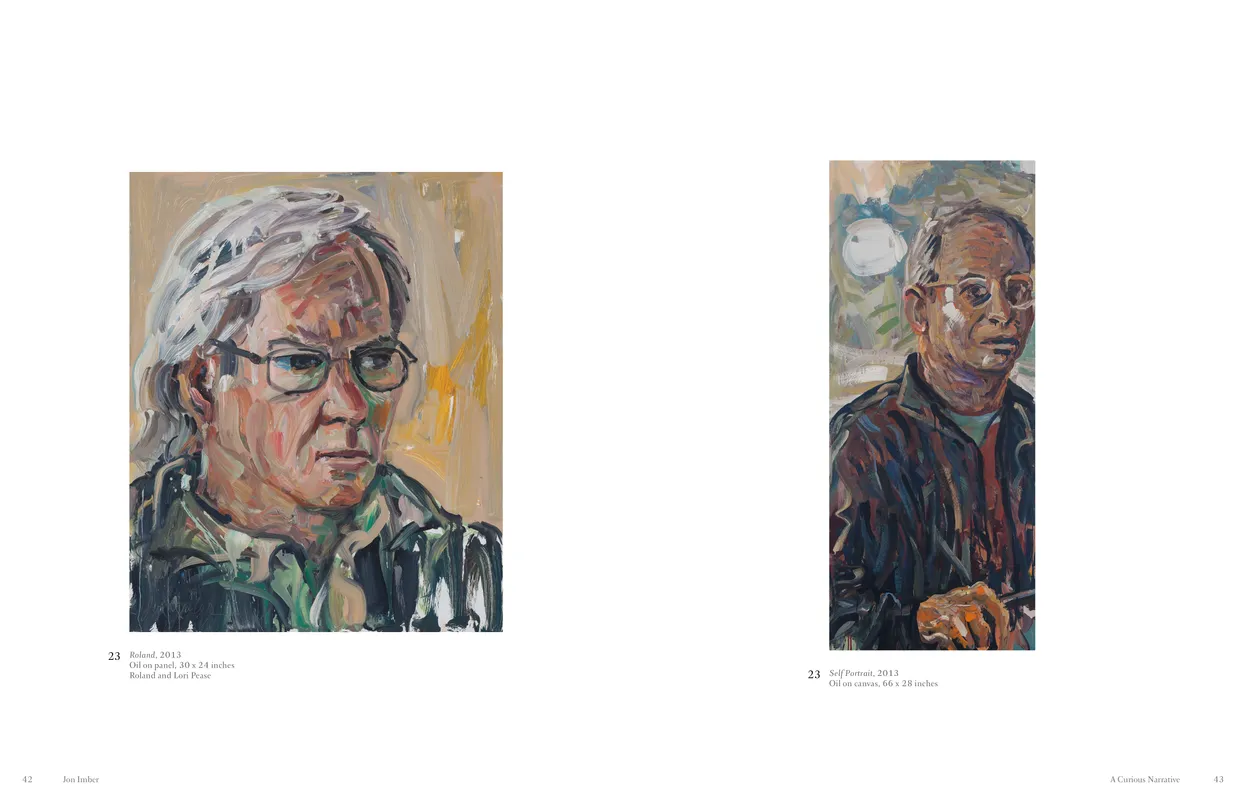
- Jon Imber exhibition catalog, pages 42-43
- Client: Danforth Art Museum
- Visit figure page
- Type: portfolio
- Portfolio Type: publication_design
- Portfolio Role: design_layout
Jon Imber: — Pages 6–7
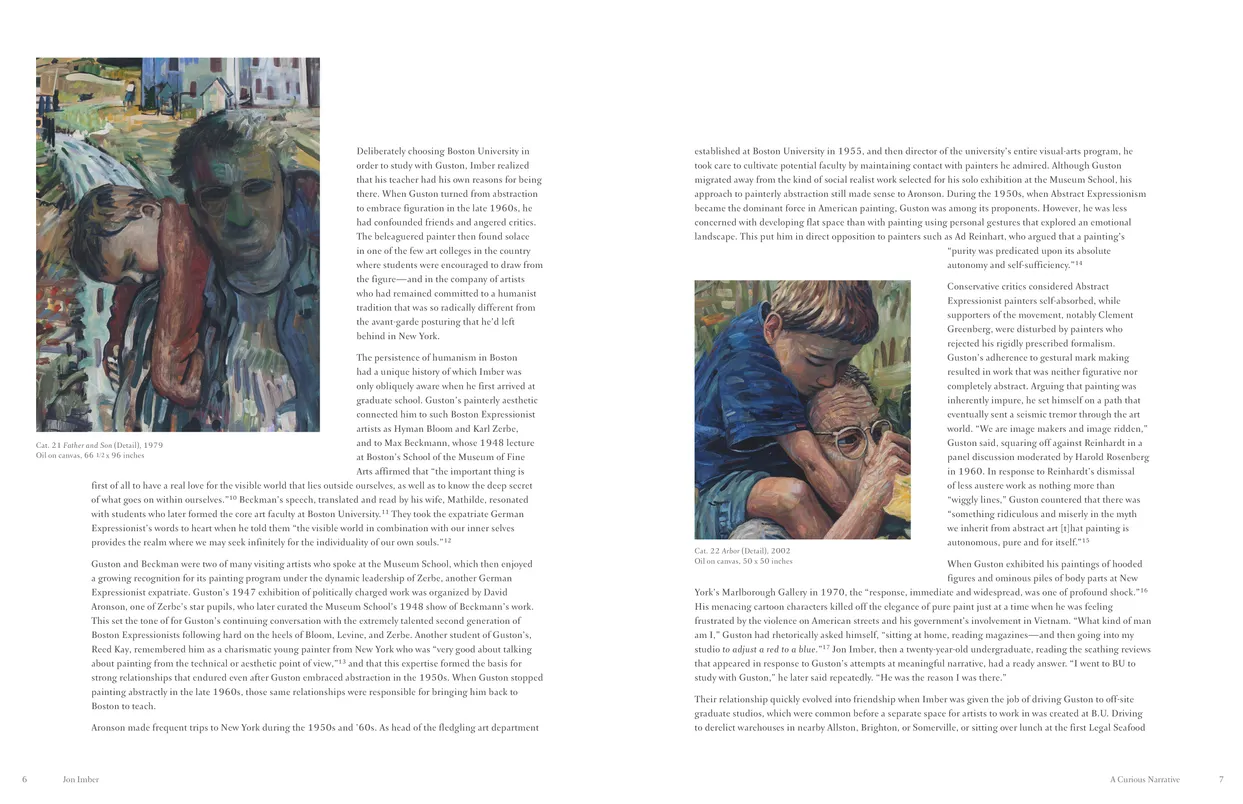
- Jon Imber exhibition catalog, pages 6-7
- Client: Danforth Art Museum
- Visit figure page
- Type: portfolio
- Portfolio Type: publication_design
- Portfolio Role: design_layout
Jon Imber: — Pages 8–9
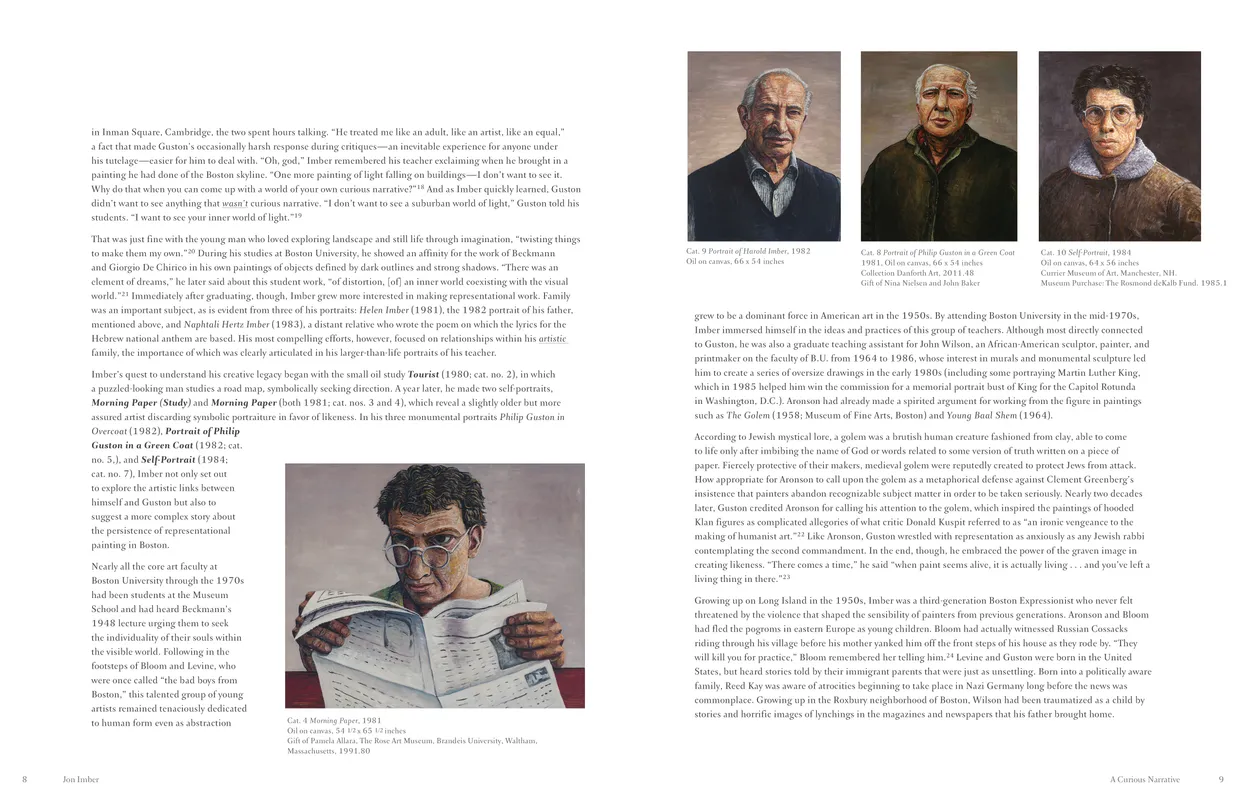
- Jon Imber exhibition catalog, pages 8-9
- Client: Danforth Art Museum
- Visit figure page
- Type: portfolio
- Portfolio Type: publication_design
- Portfolio Role: design_layout
Jonas Lie Oh Panama Exhibition Artist Panel
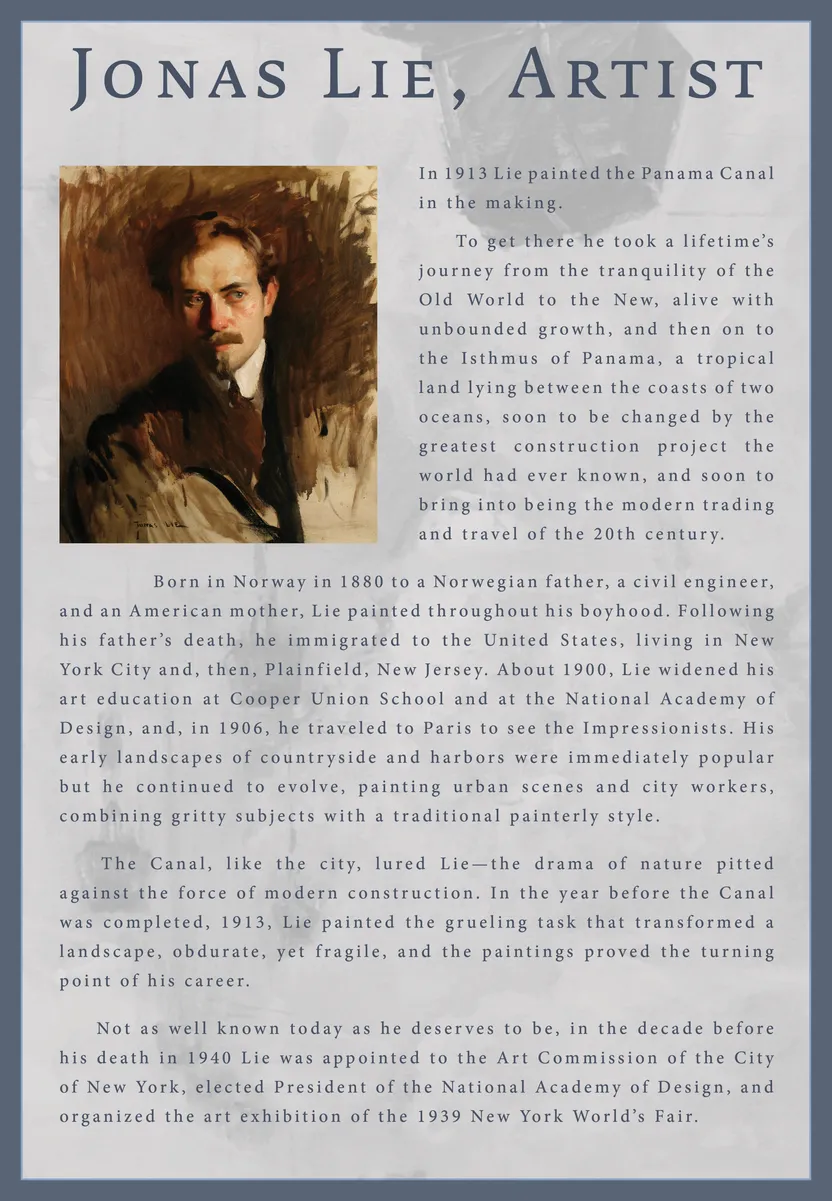
- Artist wall panel for the Oh Panama! Jonas Lie Paints the Panama Canal exhibition
- Client: Hudson River Museum
- Visit figure page
- Type: portfolio
- Portfolio Type: advertising
- Portfolio Role: design_layout
Jonas Lie Oh Panama Exhibition Canal Construction Panel
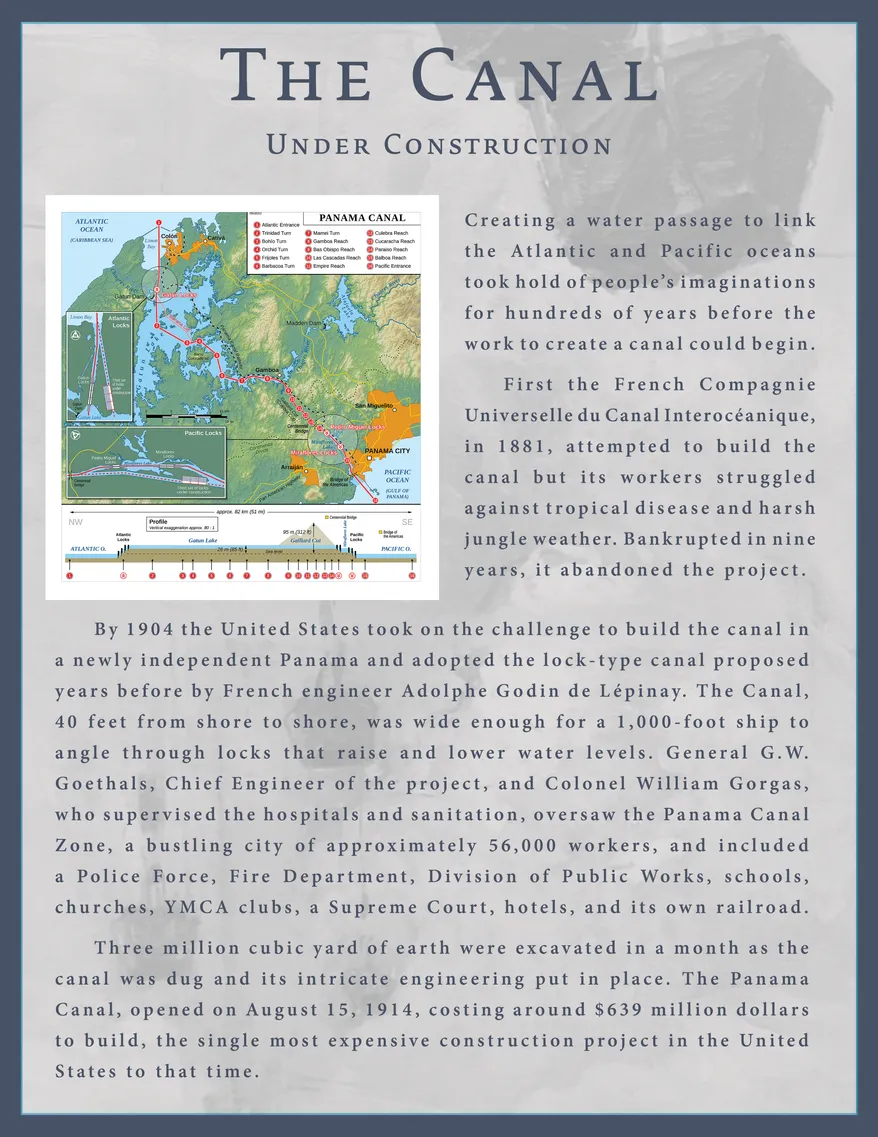
- Canal construction wall panel for the Oh Panama! Jonas Lie Paints the Panama Canal exhibition
- Client: Hudson River Museum
- Visit figure page
- Type: portfolio
- Portfolio Type: advertising
- Portfolio Role: design_layout
Jonas Lie Oh Panama Exhibition Caption 001
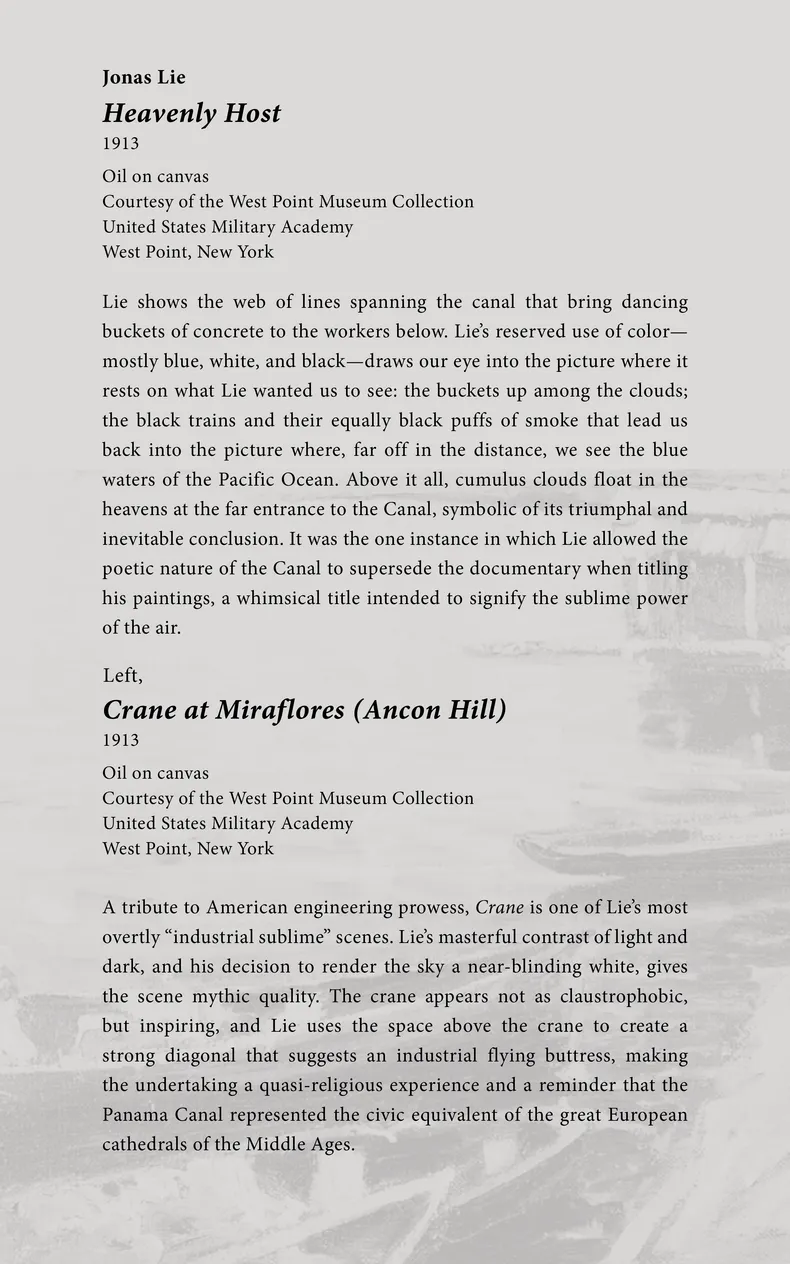
- Caption panel for the artworks Heavenely Host & Crane at Miraflores shown at the Oh Panama! Jonas Lie Paints the Panama Canal exhibition
- Client: Hudson River Museum
- Visit figure page
- Type: portfolio
- Portfolio Type: advertising
- Portfolio Role: design_layout
Jonas Lie Oh Panama Exhibition Caption 002
- Caption panel for the artwork Toil shown at the Oh Panama! Jonas Lie Paints the Panama Canal exhibition
- Client: Hudson River Museum
- Visit figure page
- Type: portfolio
- Portfolio Type: advertising
- Portfolio Role: design_layout
Jonas Lie Oh Panama Exhibition Caption 003
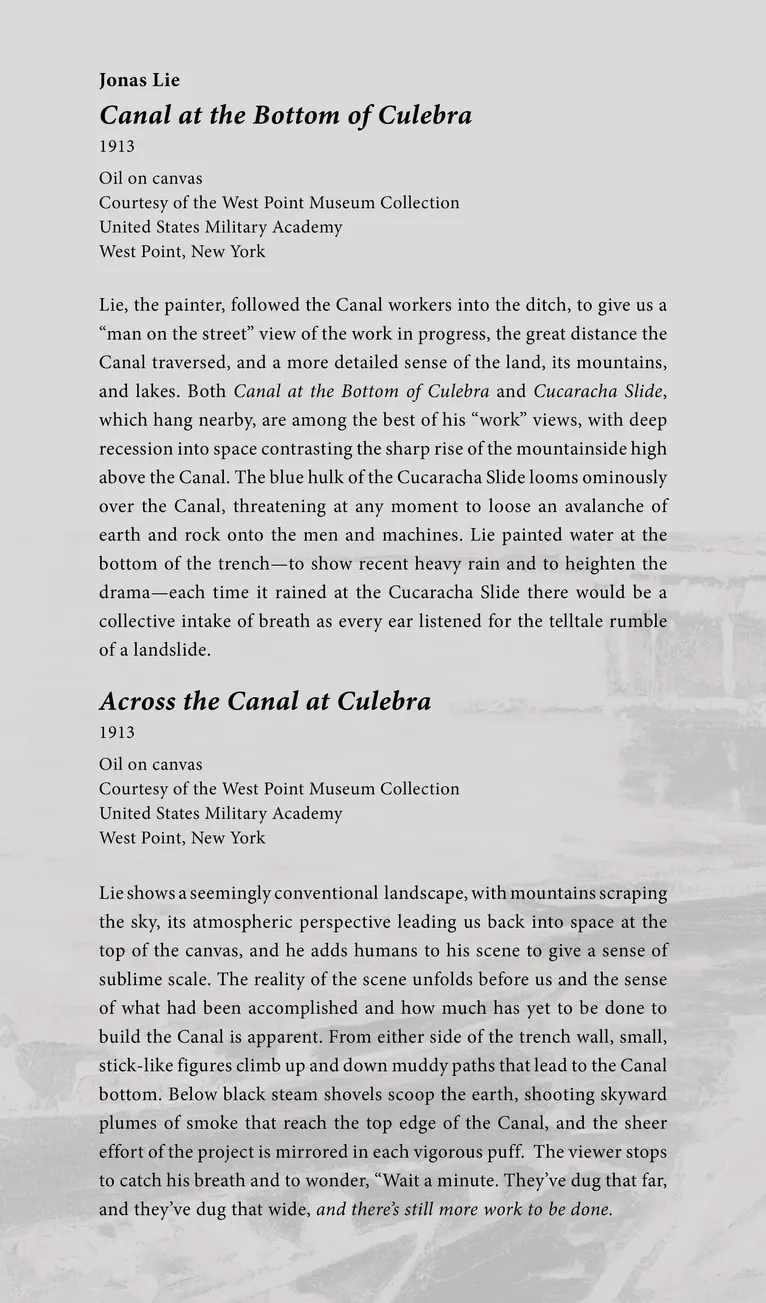
- Caption panel for the artworks Canal at the Bottom o Culebra & Across the Canal at Cluebra at the Oh Panama! Jonas Lie Paints the Panama Canal exhibition
- Client: Hudson River Museum
- Visit figure page
- Type: portfolio
- Portfolio Type: advertising
- Portfolio Role: design_layout
Jonas Lie Oh Panama Exhibition Caption 004
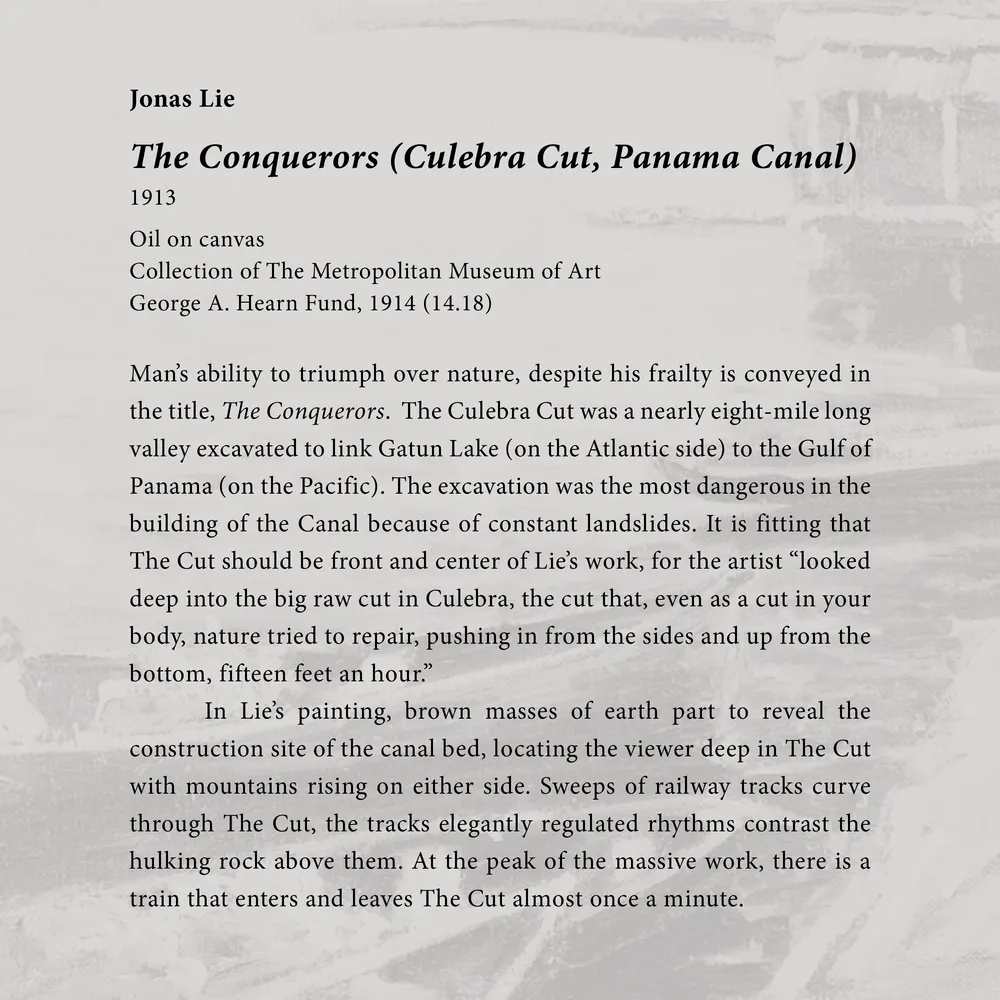
- Caption panel for the artwork The Conquerors (Culuebra Cut, Panama Canal) at the Oh Panama! Jonas Lie Paints the Panama Canal exhibition
- Client: Hudson River Museum
- Visit figure page
- Type: portfolio
- Portfolio Type: advertising
- Portfolio Role: design_layout
Jonas Lie Oh Panama Exhibition Caption 005
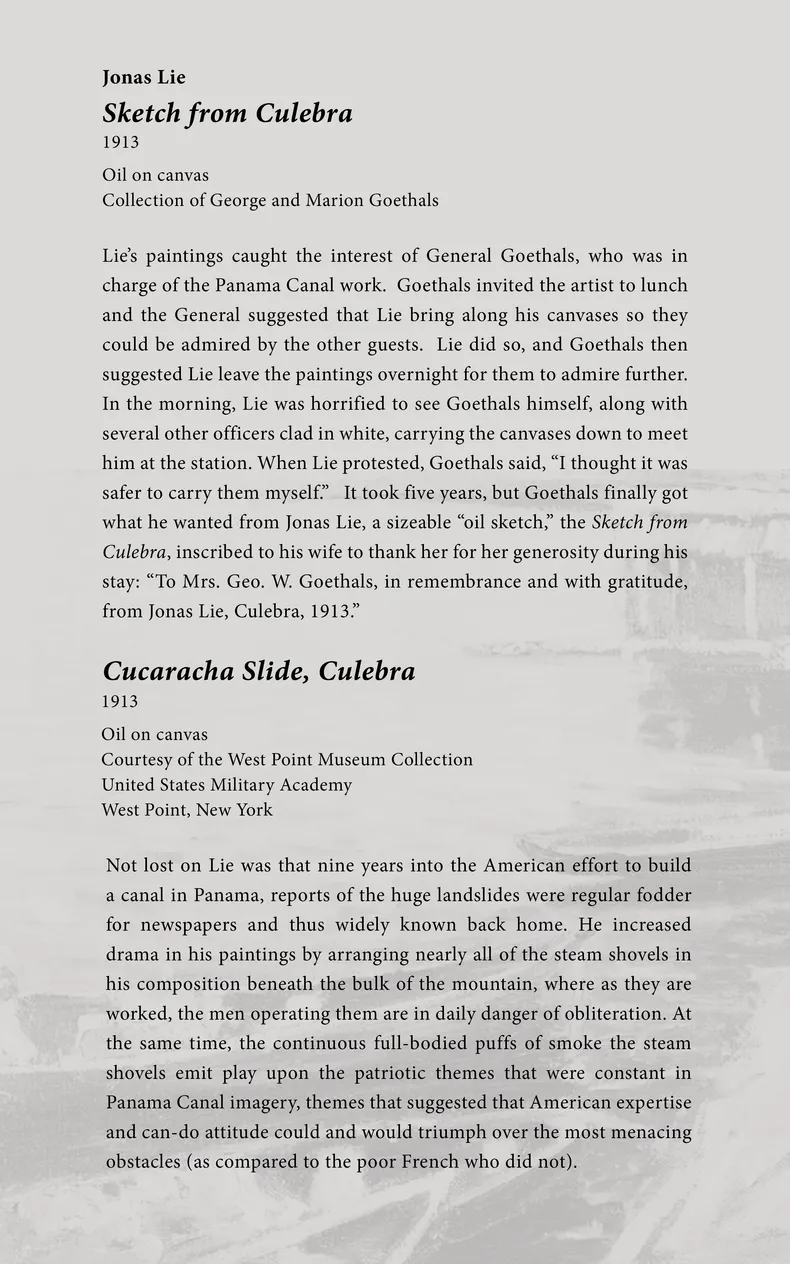
- Caption panel for the artworks Sketch from Culebra & Cucaracha Slide, Culebra at the Oh Panama! Jonas Lie Paints the Panama Canal exhibition
- Client: Hudson River Museum
- Visit figure page
- Type: portfolio
- Portfolio Type: advertising
- Portfolio Role: design_layout
Jonas Lie Oh Panama Exhibition Caption 006
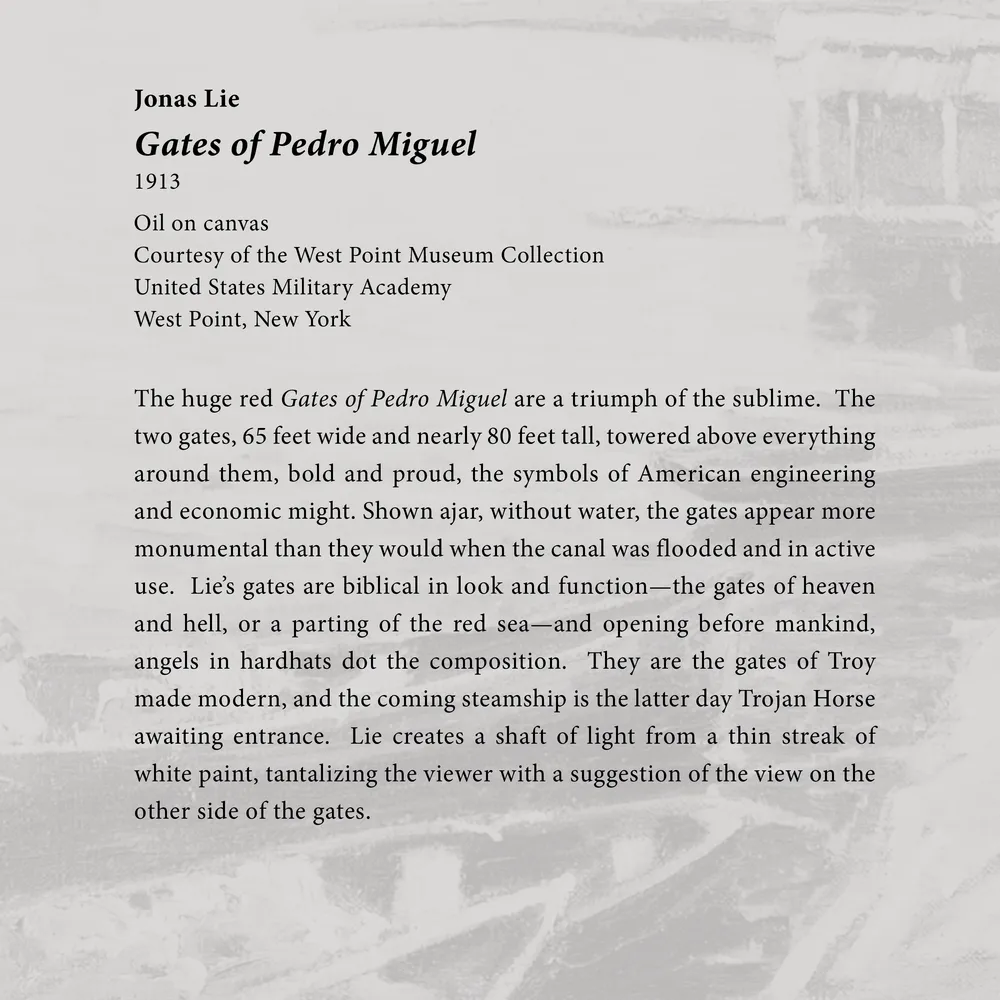
- Caption panel for the artwork Gates of Pedro Miguel at the Oh Panama! Jonas Lie Paints the Panama Canal exhibition
- Client: Hudson River Museum
- Visit figure page
- Type: portfolio
- Portfolio Type: advertising
- Portfolio Role: design_layout
Jonas Lie Oh Panama Exhibition Caption 007
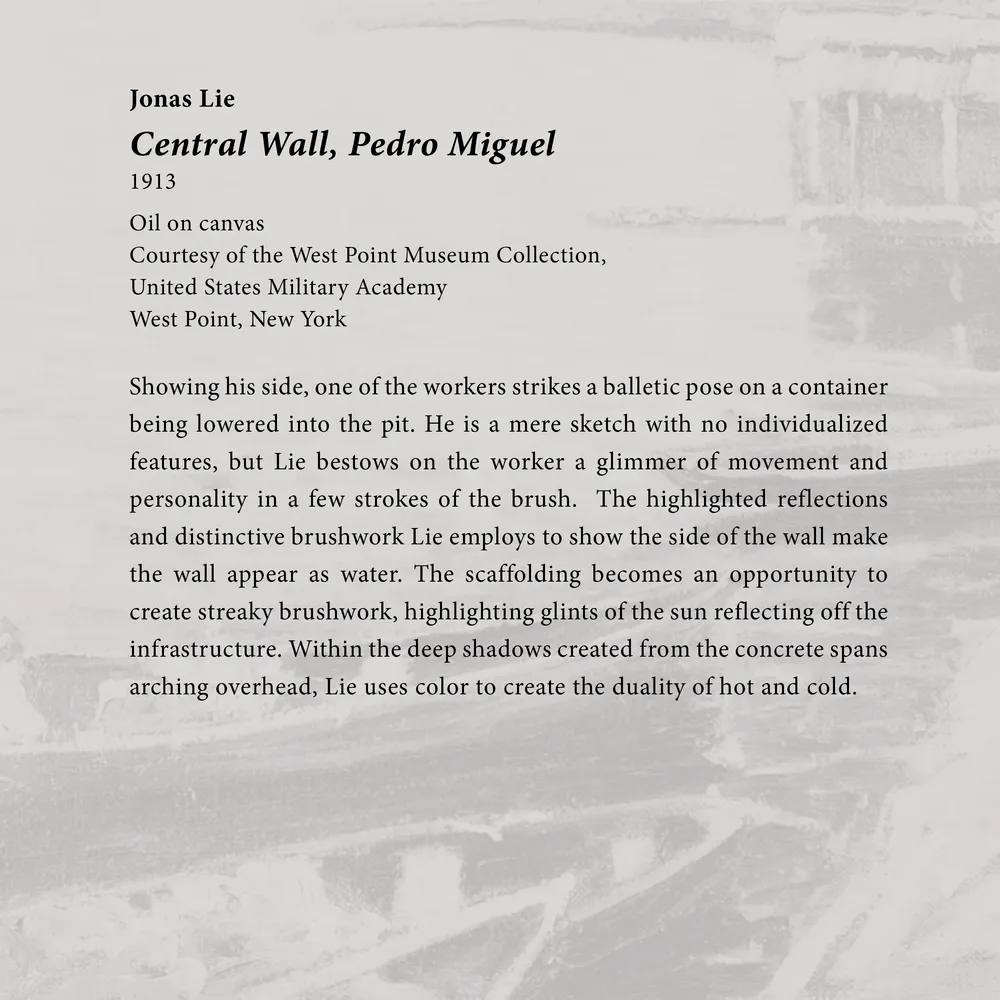
- Caption panel for the artwork Central Wall, Pedro Miguel at the Oh Panama! Jonas Lie Paints the Panama Canal exhibition
- Client: Hudson River Museum
- Visit figure page
- Type: portfolio
- Portfolio Type: advertising
- Portfolio Role: design_layout
Jonas Lie Oh Panama Exhibition Caption 008
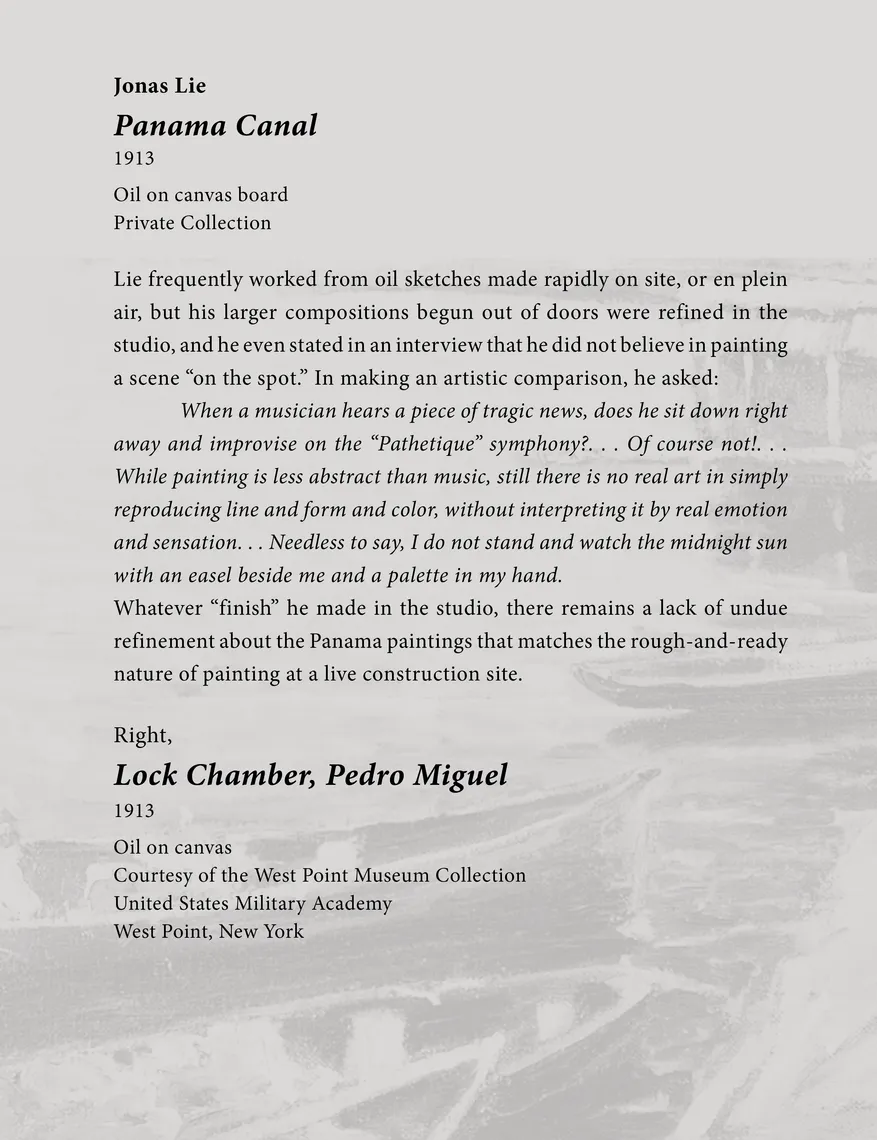
- Caption panel for the artworks Panama Canal & Lock Chamber, Pedro Miguel at the Oh Panama! Jonas Lie Paints the Panama Canal exhibition
- Client: Hudson River Museum
- Visit figure page
- Type: portfolio
- Portfolio Type: advertising
- Portfolio Role: design_layout
Jonas Lie Oh Panama Exhibition Caption 009
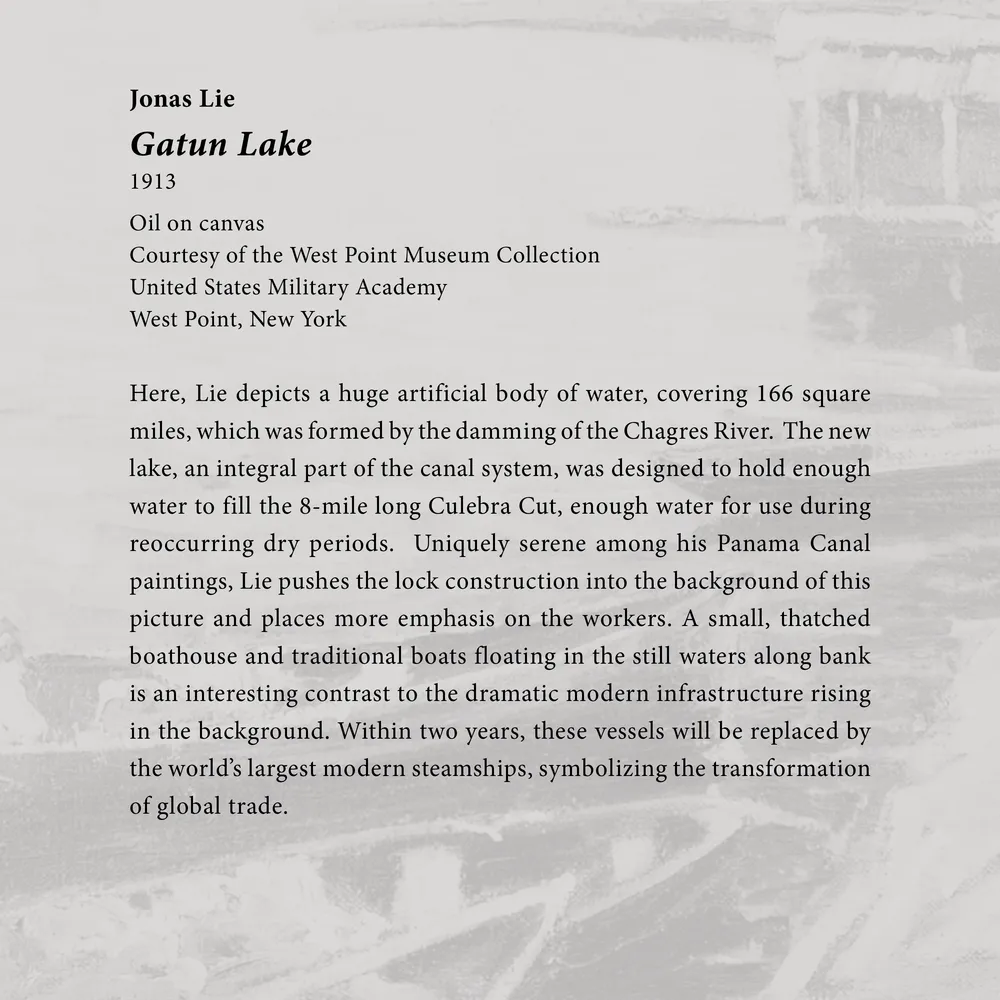
- Caption panel for the artwork Gatun Lake at the Oh Panama! Jonas Lie Paints the Panama Canal exhibition
- Client: Hudson River Museum
- Visit figure page
- Type: portfolio
- Portfolio Type: advertising
- Portfolio Role: design_layout
Jonas Lie Oh Panama Exhibition Caption 010
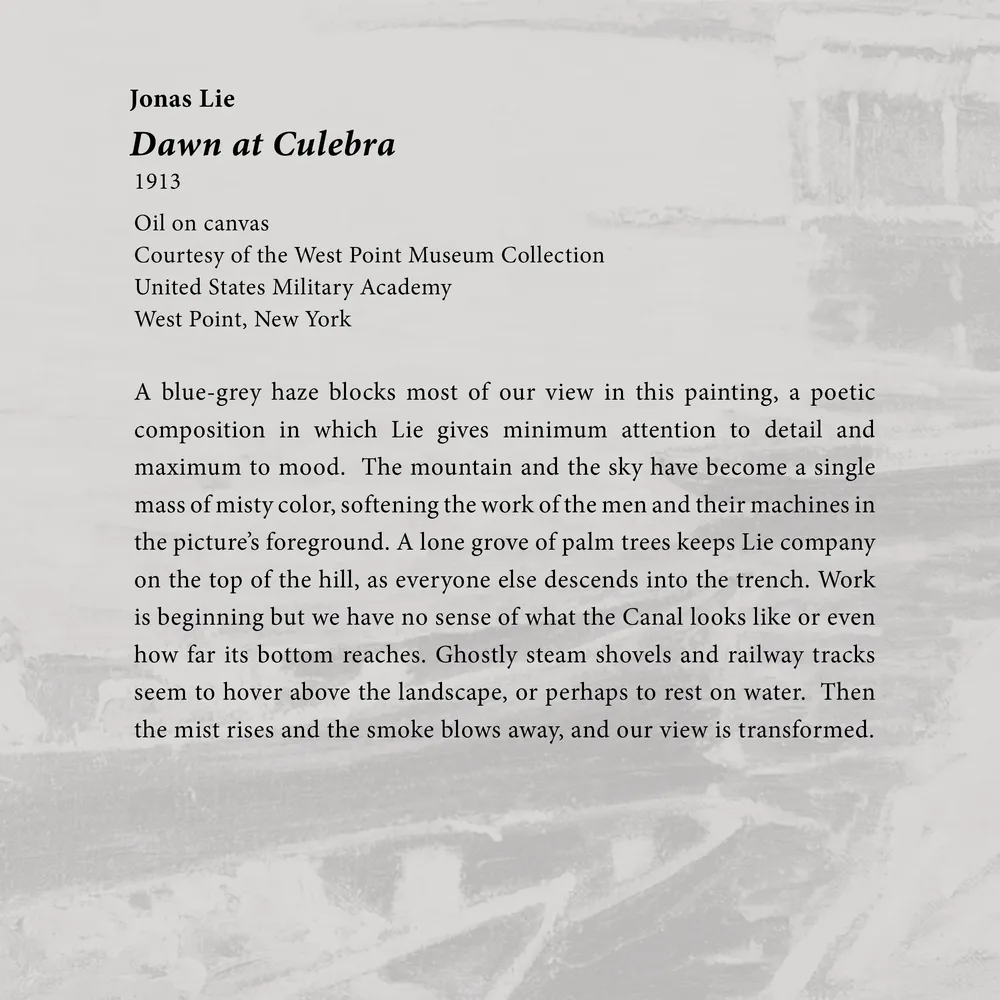
- Caption panel for the artwork Dawn at Culebra at the Oh Panama! Jonas Lie Paints the Panama Canal exhibition
- Client: Hudson River Museum
- Visit figure page
- Type: portfolio
- Portfolio Type: advertising
- Portfolio Role: design_layout
Jonas Lie Oh Panama Exhibition Caption 011
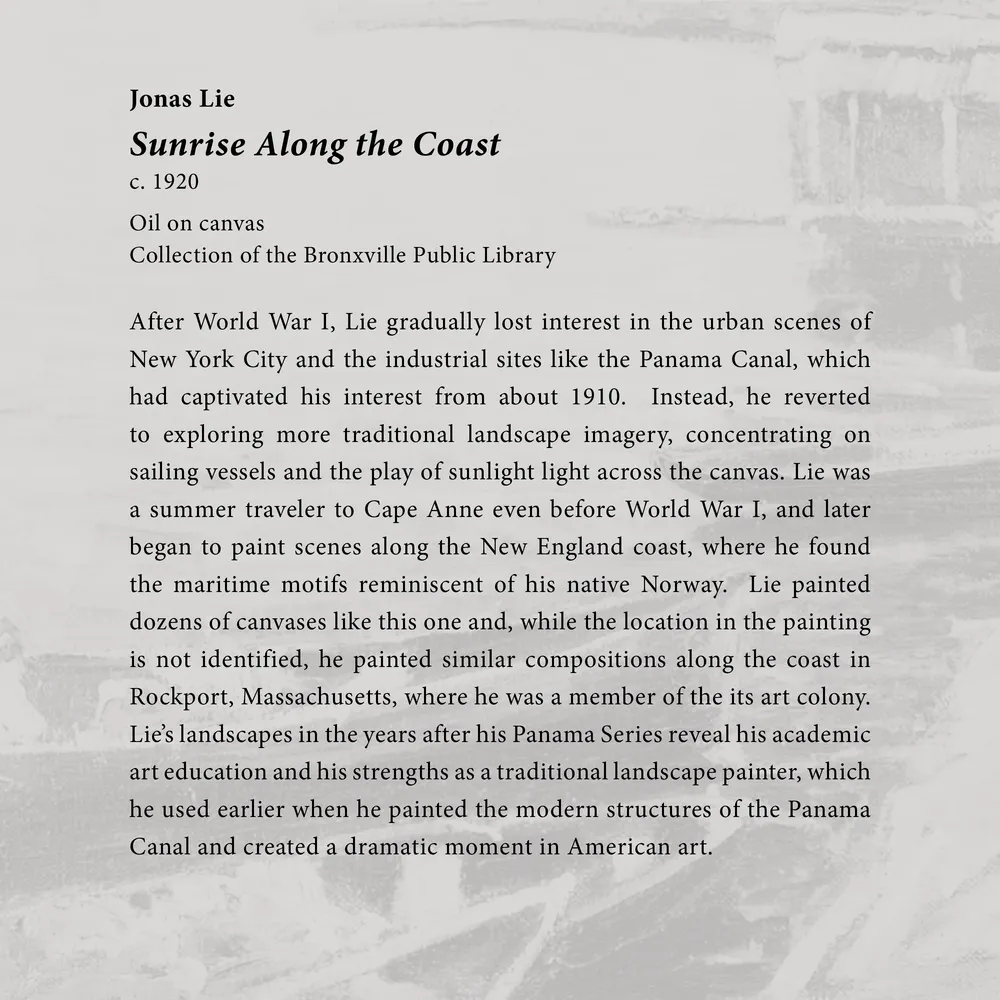
- Caption panel for the artwork Sunrise Along the Coast at the Oh Panama! Jonas Lie Paints the Panama Canal exhibition
- Client: Hudson River Museum
- Visit figure page
- Type: portfolio
- Portfolio Type: advertising
- Portfolio Role: design_layout
Jonas Lie Oh Panama Exhibition Caption 012

- Caption panel for the artworks Toil, Gates of Pedro Miguel, and Heavenly Host at the Oh Panama! Jonas Lie Paints the Panama Canal exhibition
- Client: Hudson River Museum
- Visit figure page
- Type: portfolio
- Portfolio Type: advertising
- Portfolio Role: design_layout
Jonas Lie Oh Panama Exhibition Caption 013
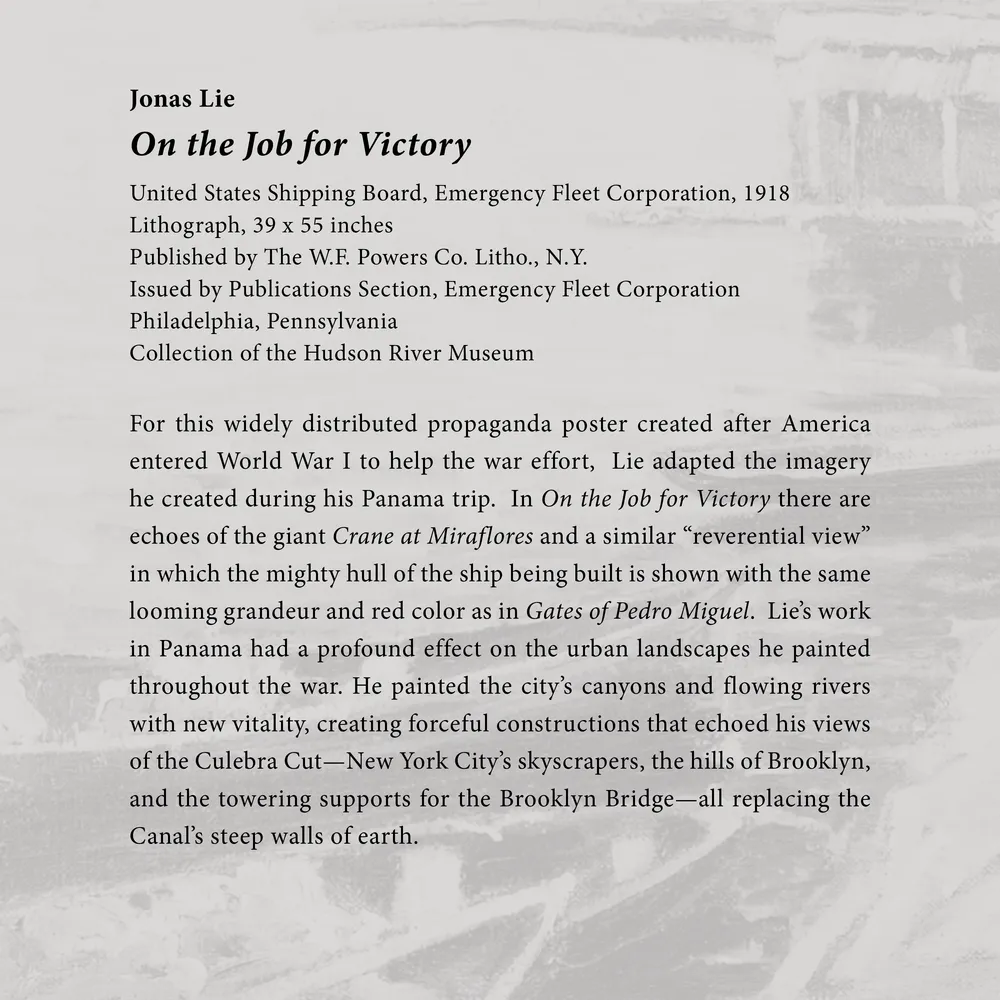
- Caption panel for the artwork On the Job for Victory at the Oh Panama! Jonas Lie Paints the Panama Canal exhibition
- Client: Hudson River Museum
- Visit figure page
- Type: portfolio
- Portfolio Type: advertising
- Portfolio Role: design_layout
Jonas Lie Oh Panama Exhibition Intro Panel
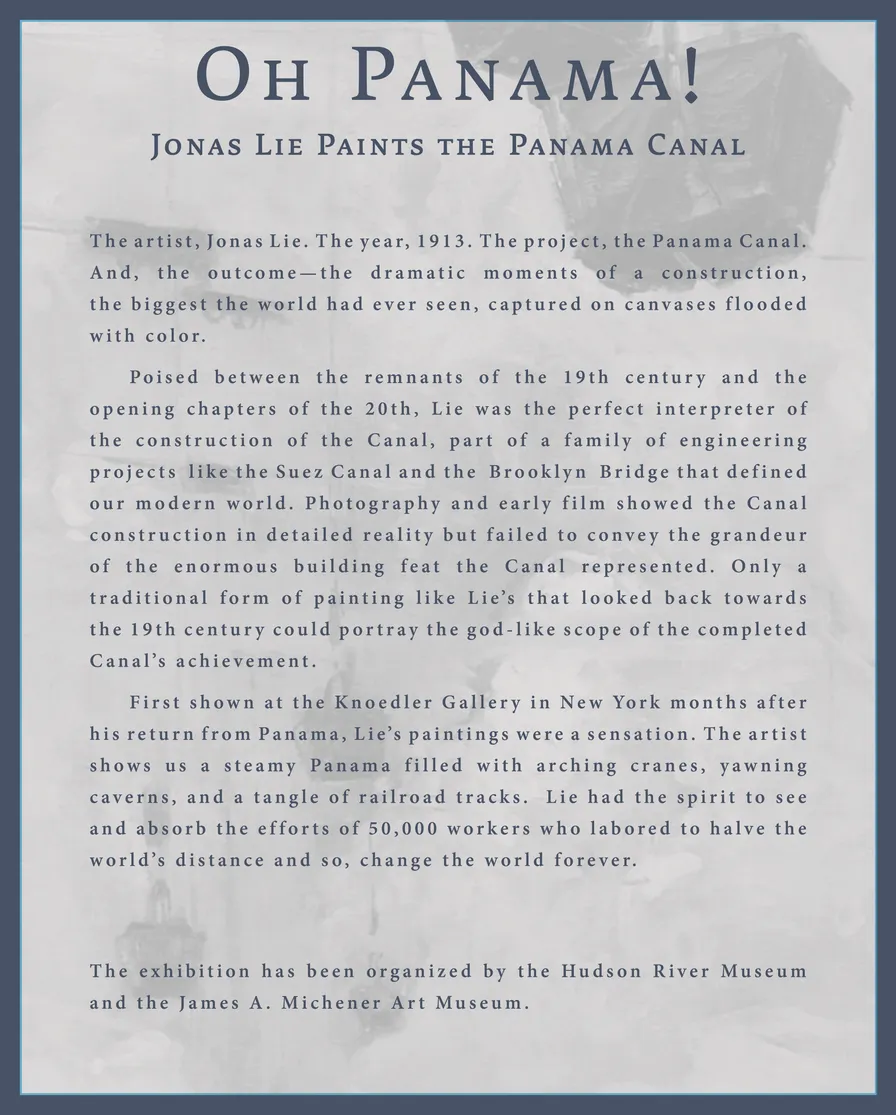
- Intro wall panel for the Oh Panama! Jonas Lie Paints the Panama Canal exhibition
- Client: Hudson River Museum
- Visit figure page
- Type: portfolio
- Portfolio Type: advertising
- Portfolio Role: design_layout
Jonas Lie: Oh Panama — Cover

- Oh Panama! Jonas Lie Paints the Panama Canal exhibition catalog, cover
- Client: Hudson River Museum & Michener Art Museum
- Visit figure page
- Type: portfolio
- Portfolio Type: publication_design
- Portfolio Role: design_layout
Jonas Lie: Oh Panama — Inside Front Cover
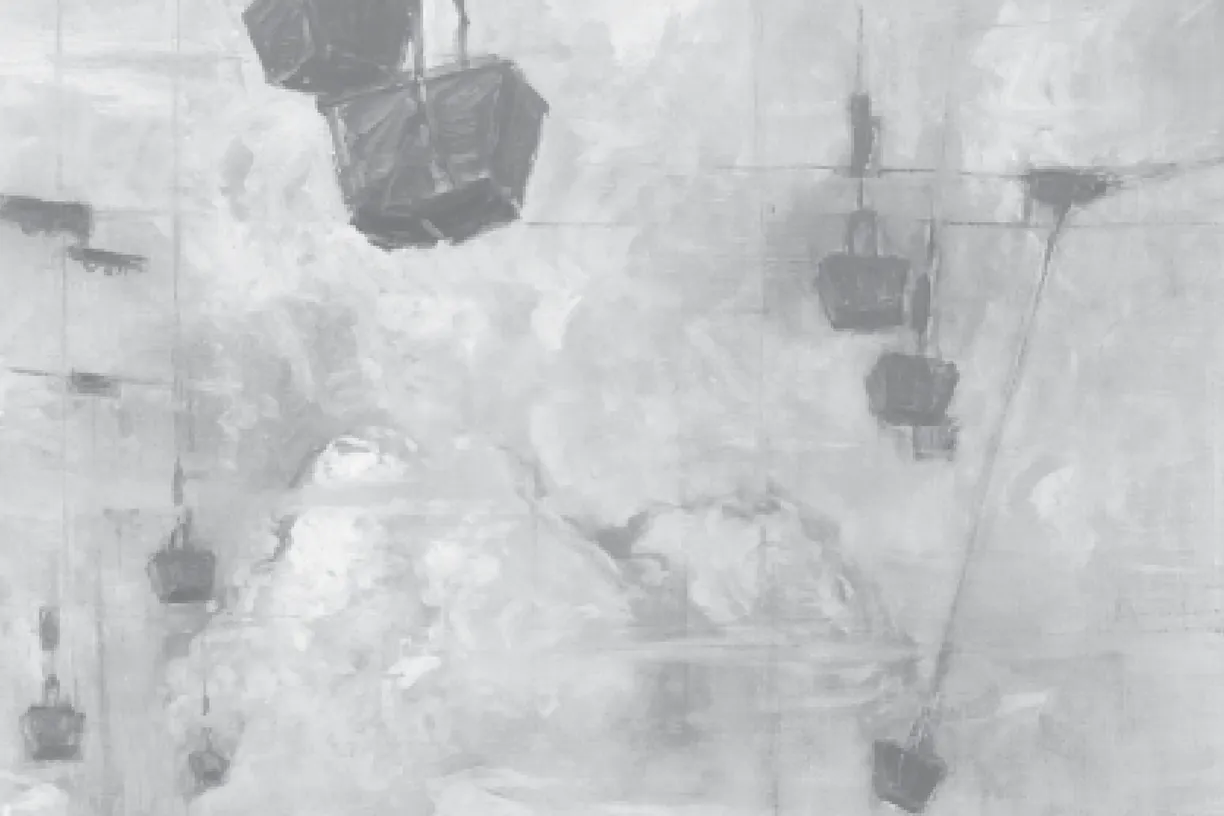
- Oh Panama! Jonas Lie Paints the Panama Canal exhibition catalog, inside cover front
- Client: Hudson River Museum & Michener Art Museum
- Visit figure page
- Type: portfolio
- Portfolio Type: publication_design
- Portfolio Role: design_layout
Jonas Lie: Oh Panama — Pages 10–11

- Oh Panama! Jonas Lie Paints the Panama Canal exhibition catalog, pages 10-11
- Client: Hudson River Museum & Michener Art Museum
- Visit figure page
- Type: portfolio
- Portfolio Type: publication_design
- Portfolio Role: design_layout
Jonas Lie: Oh Panama — Pages 12–13
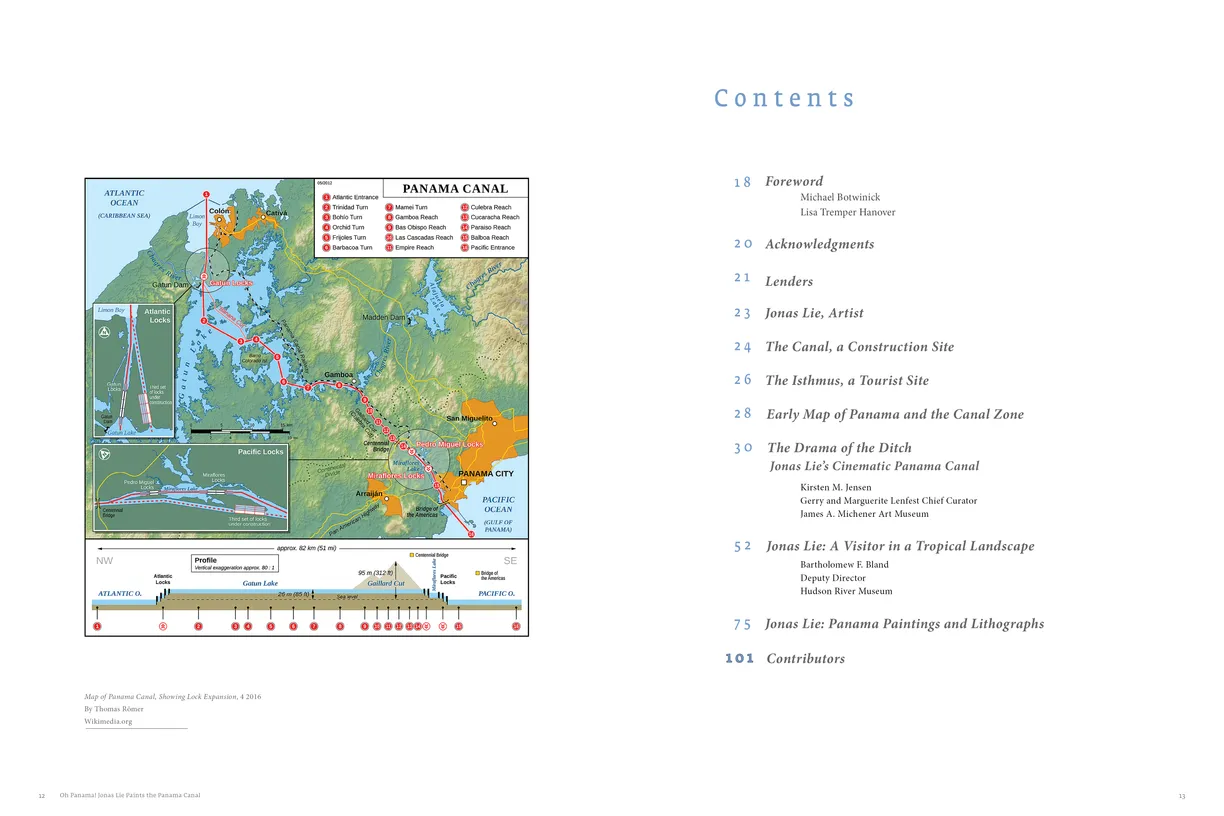
- Oh Panama! Jonas Lie Paints the Panama Canal exhibition catalog, pages 12-13
- Client: Hudson River Museum & Michener Art Museum
- Visit figure page
- Type: portfolio
- Portfolio Type: publication_design
- Portfolio Role: design_layout
Jonas Lie: Oh Panama — Pages 14–15
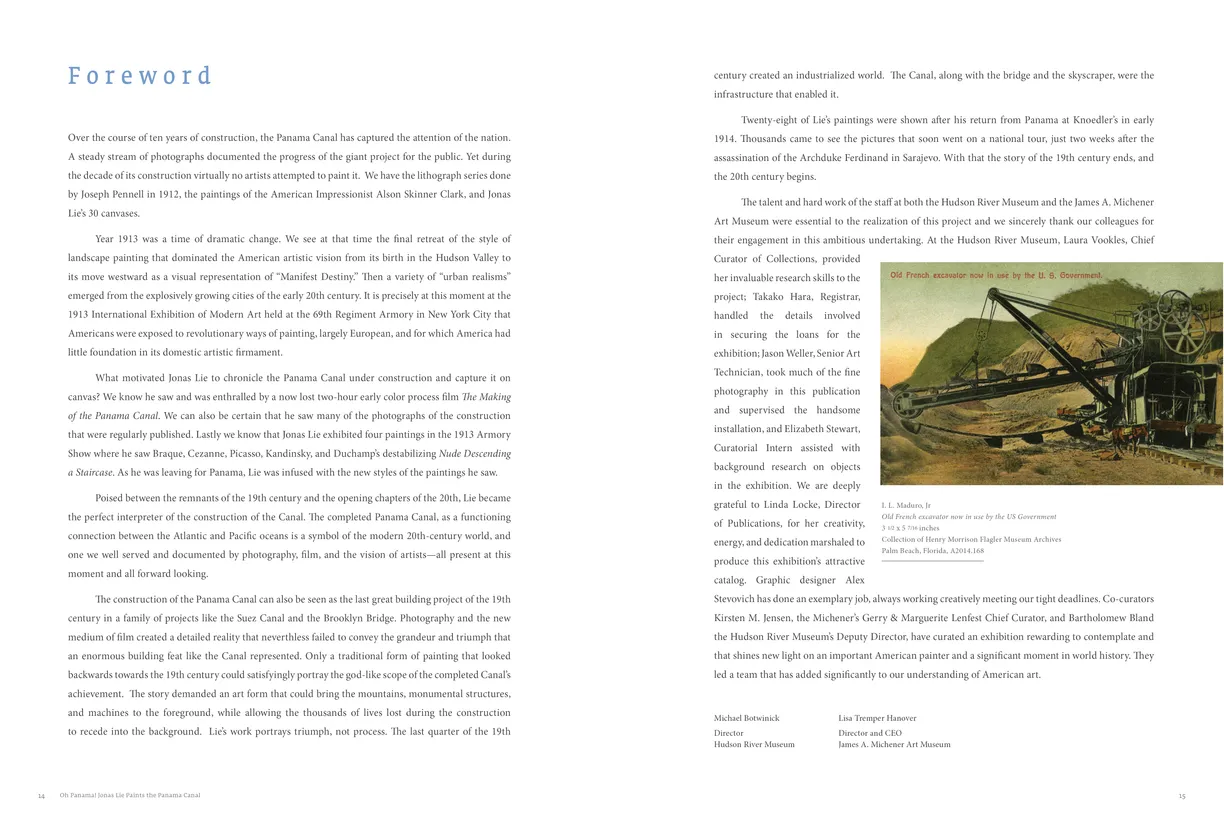
- Oh Panama! Jonas Lie Paints the Panama Canal exhibition catalog, pages 14-15
- Client: Hudson River Museum & Michener Art Museum
- Visit figure page
- Type: portfolio
- Portfolio Type: publication_design
- Portfolio Role: design_layout
Jonas Lie: Oh Panama — Pages 16–17
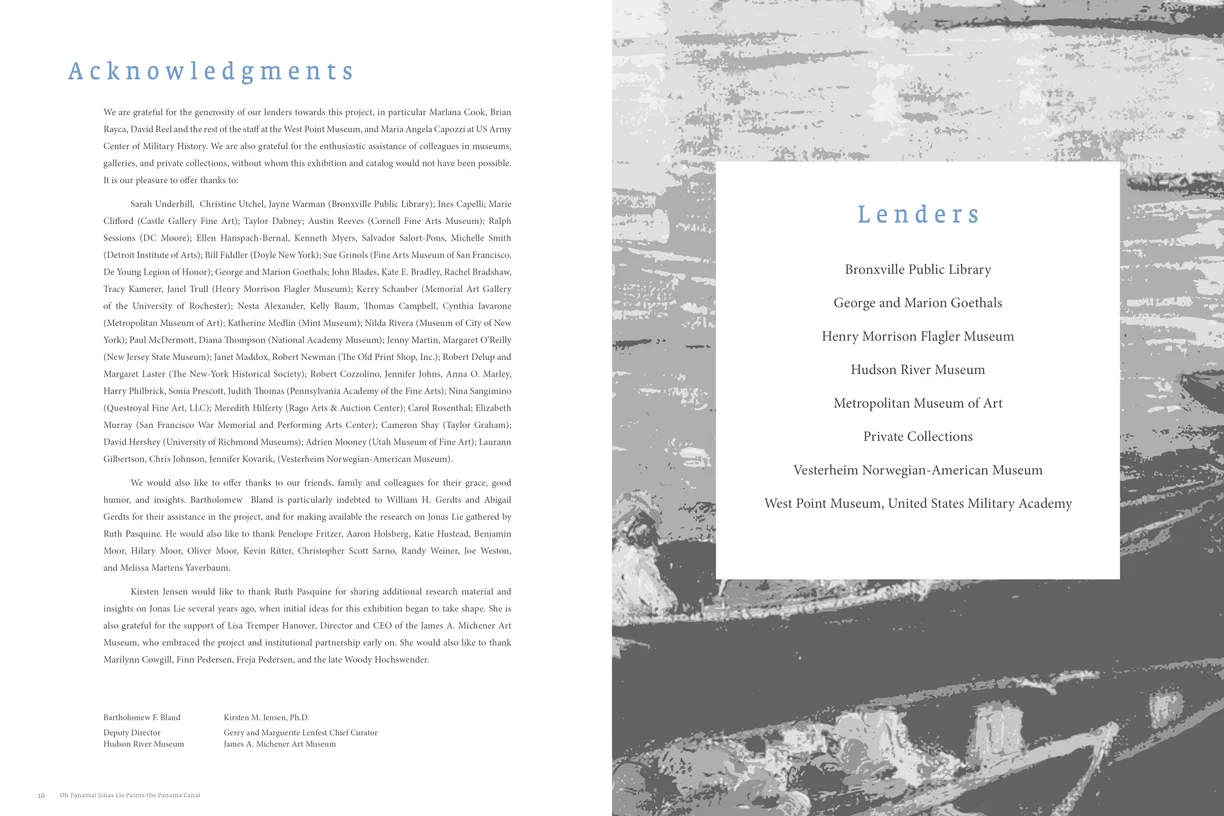
- Oh Panama! Jonas Lie Paints the Panama Canal exhibition catalog, pages 16-17
- Client: Hudson River Museum & Michener Art Museum
- Visit figure page
- Type: portfolio
- Portfolio Type: publication_design
- Portfolio Role: design_layout
Jonas Lie: Oh Panama — Pages 18–19
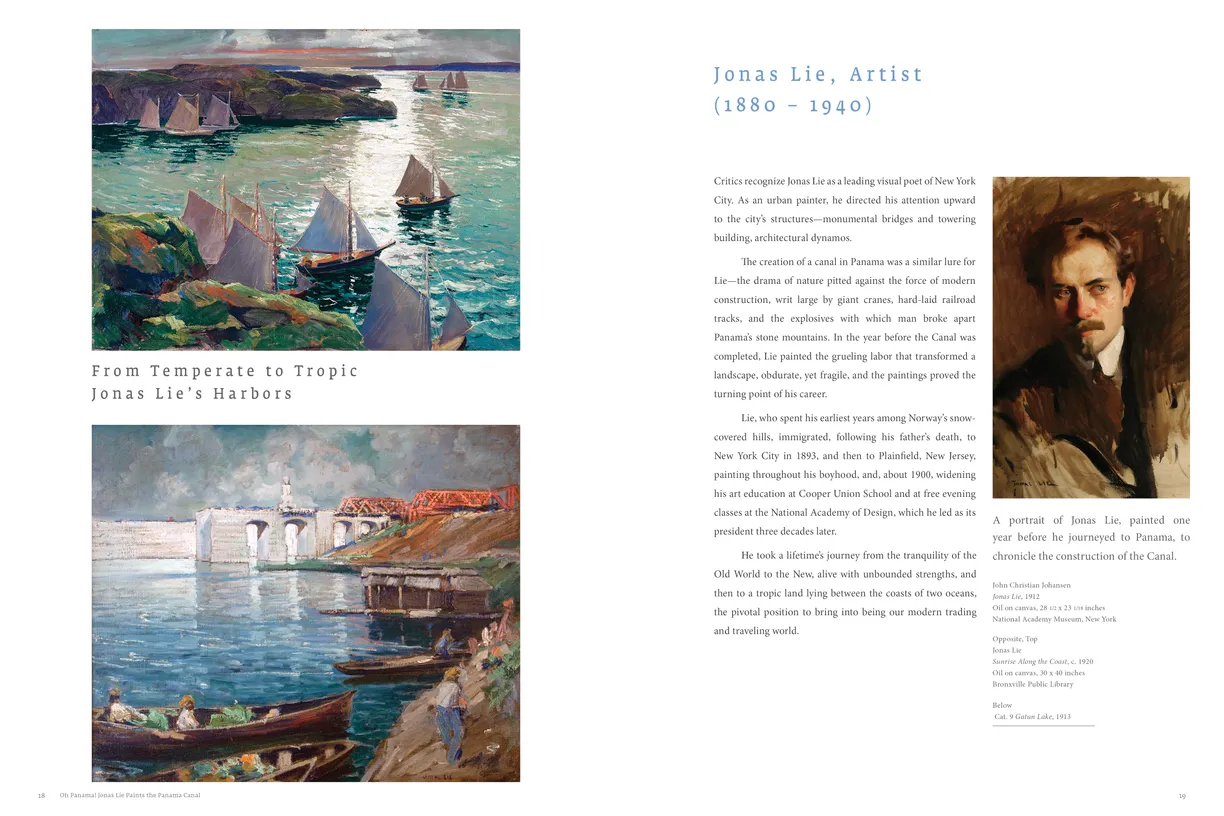
- Oh Panama! Jonas Lie Paints the Panama Canal exhibition catalog, pages 18-19
- Client: Hudson River Museum & Michener Art Museum
- Visit figure page
- Type: portfolio
- Portfolio Type: publication_design
- Portfolio Role: design_layout
Jonas Lie: Oh Panama — Pages 2–3
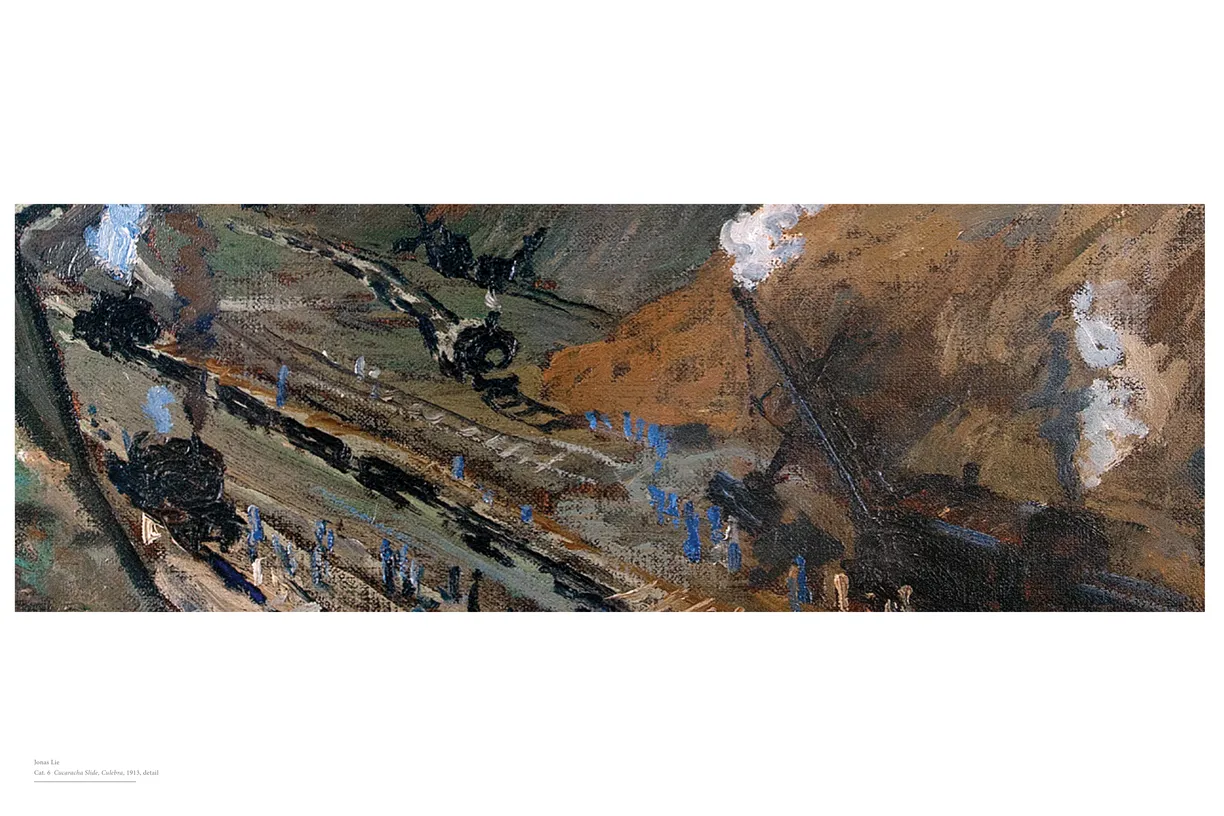
- Oh Panama! Jonas Lie Paints the Panama Canal exhibition catalog, pages 2-3
- Client: Hudson River Museum & Michener Art Museum
- Visit figure page
- Type: portfolio
- Portfolio Type: publication_design
- Portfolio Role: design_layout
Jonas Lie: Oh Panama — Pages 20–21
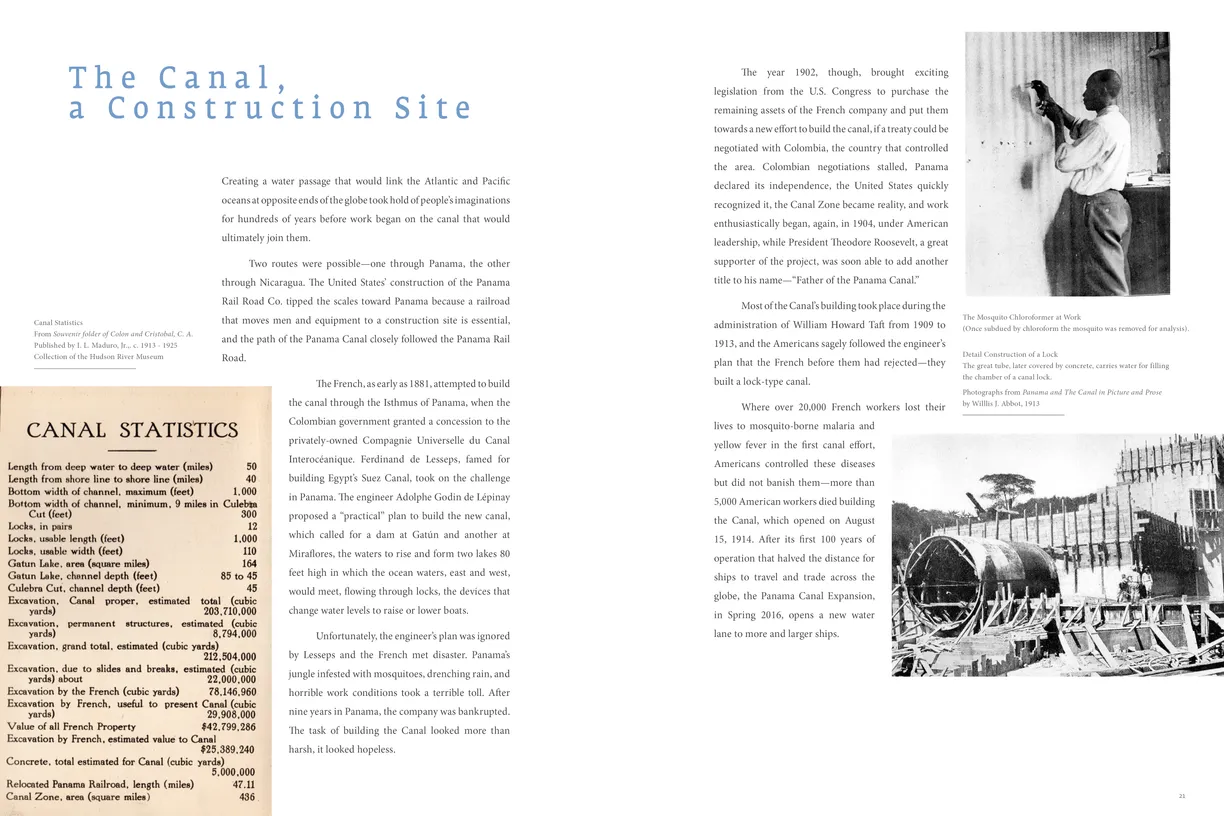
- Oh Panama! Jonas Lie Paints the Panama Canal exhibition catalog, pages 20-21
- Client: Hudson River Museum & Michener Art Museum
- Visit figure page
- Type: portfolio
- Portfolio Type: publication_design
- Portfolio Role: design_layout
Jonas Lie: Oh Panama — Pages 22–23
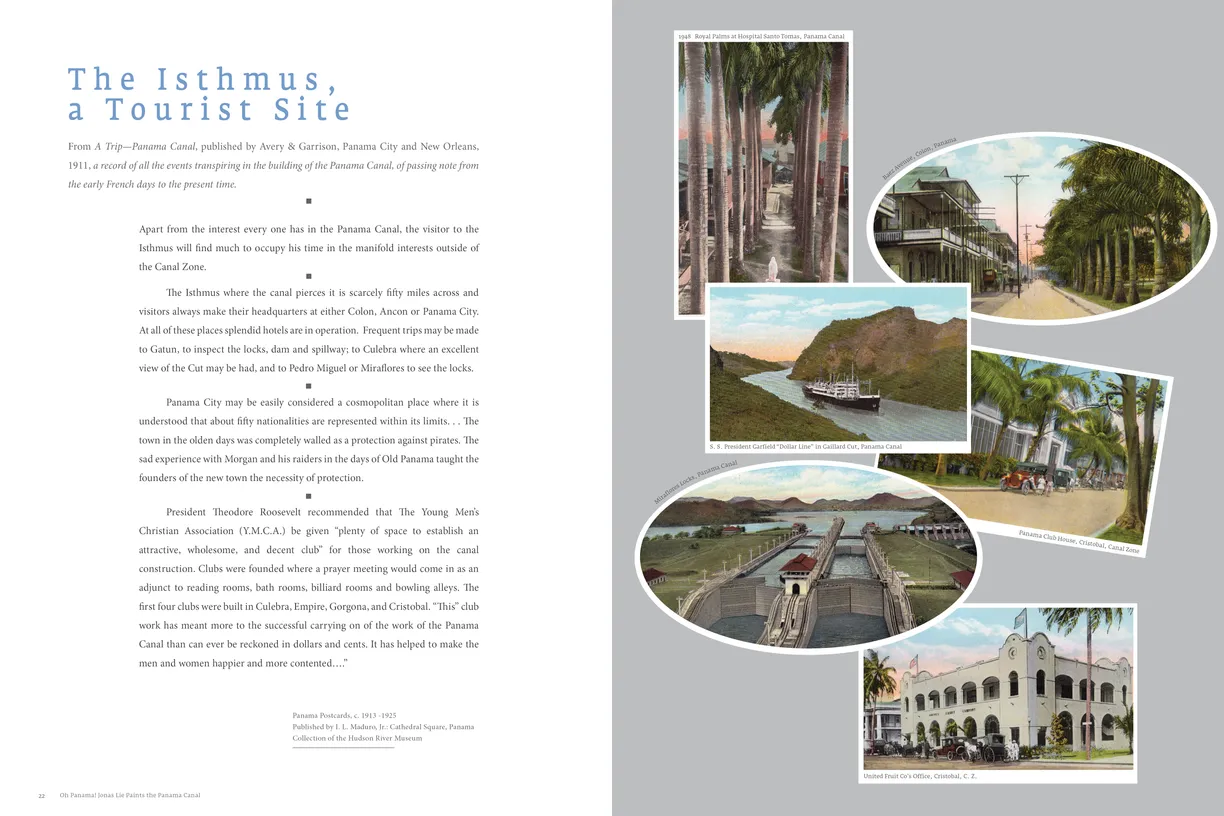
- Oh Panama! Jonas Lie Paints the Panama Canal exhibition catalog, pages 22-23
- Client: Hudson River Museum & Michener Art Museum
- Visit figure page
- Type: portfolio
- Portfolio Type: publication_design
- Portfolio Role: design_layout
Jonas Lie: Oh Panama — Pages 24–25

- Oh Panama! Jonas Lie Paints the Panama Canal exhibition catalog, pages 24-25
- Client: Hudson River Museum & Michener Art Museum
- Visit figure page
- Type: portfolio
- Portfolio Type: publication_design
- Portfolio Role: design_layout
Jonas Lie: Oh Panama — Pages 26–27
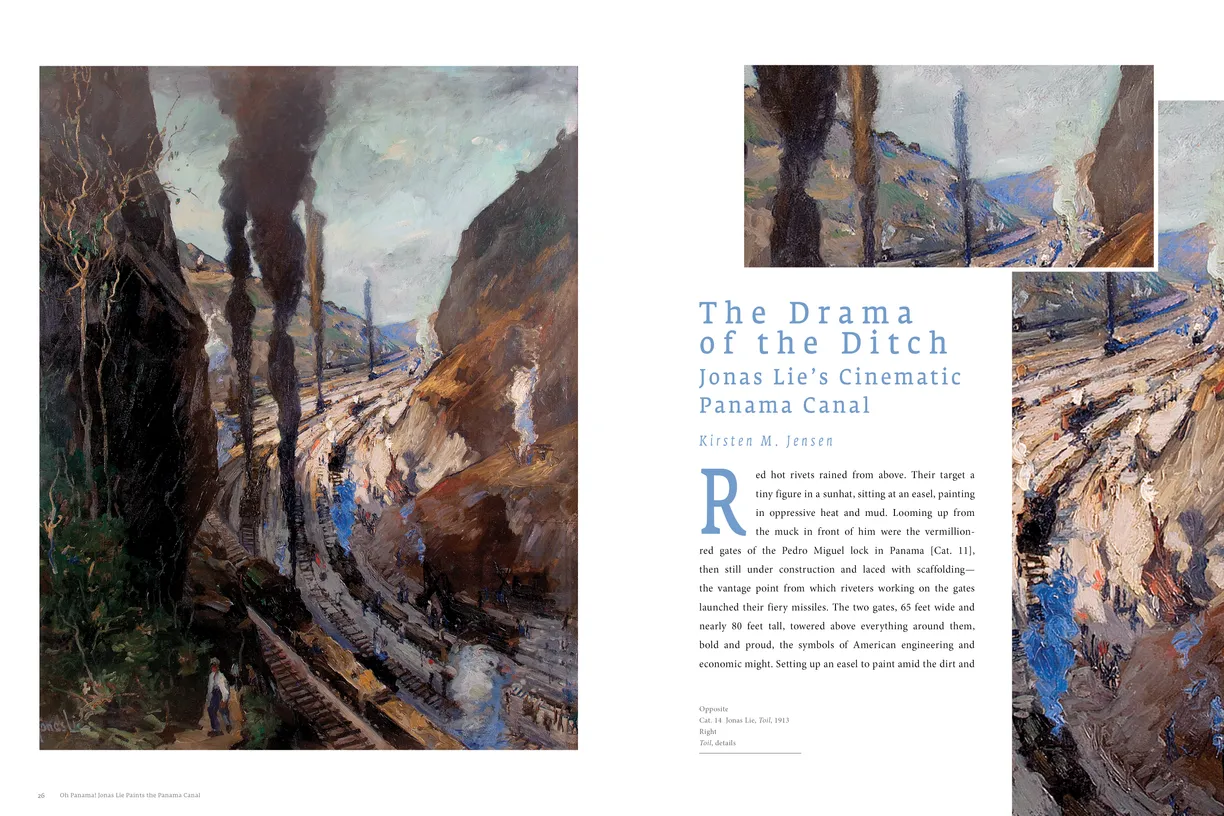
- Oh Panama! Jonas Lie Paints the Panama Canal exhibition catalog, pages 26-27
- Client: Hudson River Museum & Michener Art Museum
- Visit figure page
- Type: portfolio
- Portfolio Type: publication_design
- Portfolio Role: design_layout
Jonas Lie: Oh Panama — Pages 28–29
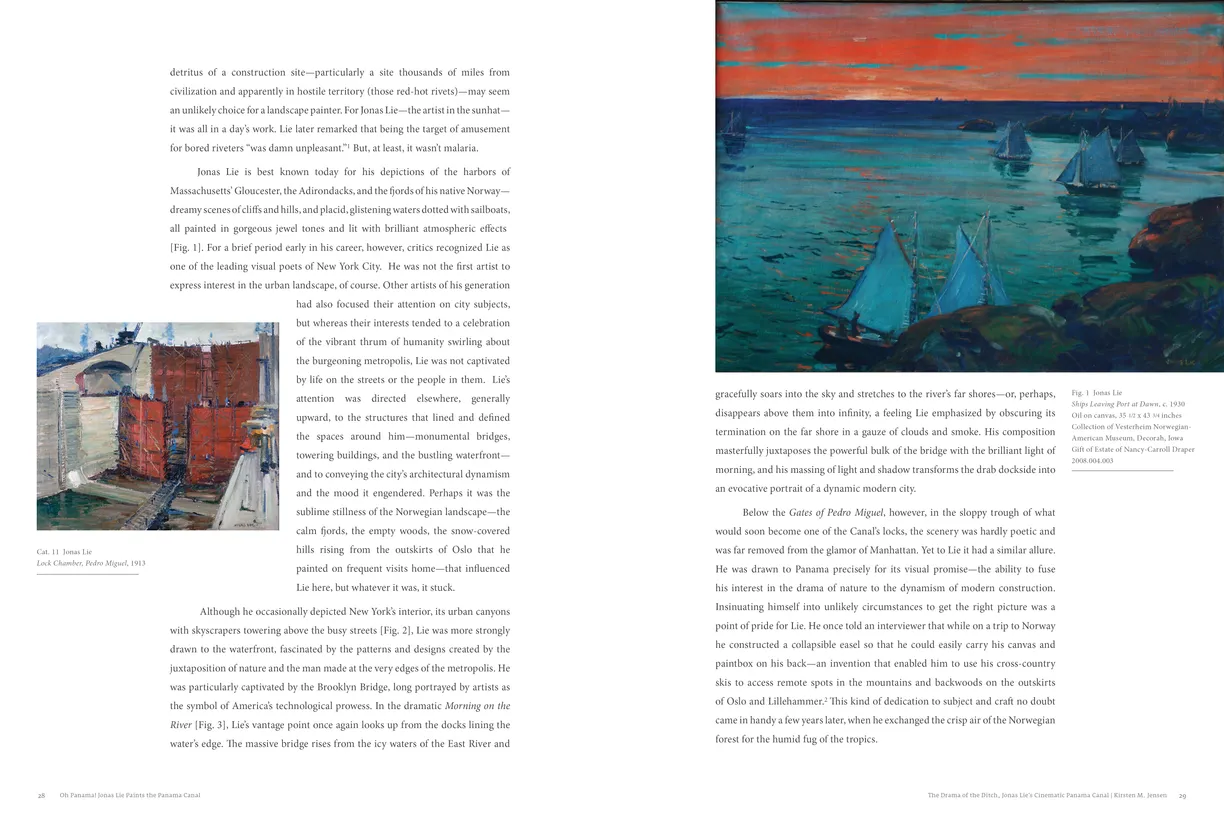
- Oh Panama! Jonas Lie Paints the Panama Canal exhibition catalog, pages 28-29
- Client: Hudson River Museum & Michener Art Museum
- Visit figure page
- Type: portfolio
- Portfolio Type: publication_design
- Portfolio Role: design_layout
Jonas Lie: Oh Panama — Pages 30–31
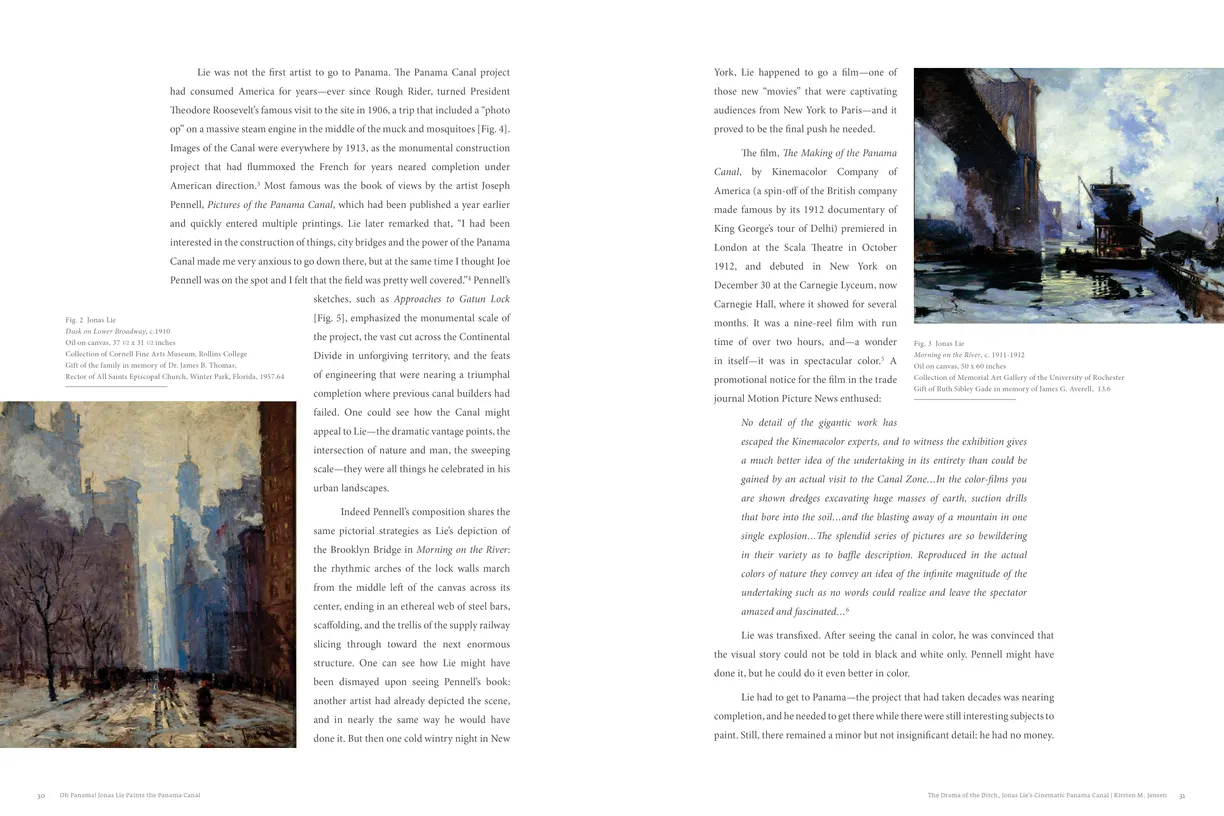
- Oh Panama! Jonas Lie Paints the Panama Canal exhibition catalog, pages 30-31
- Client: Hudson River Museum & Michener Art Museum
- Visit figure page
- Type: portfolio
- Portfolio Type: publication_design
- Portfolio Role: design_layout
Jonas Lie: Oh Panama — Pages 32–33
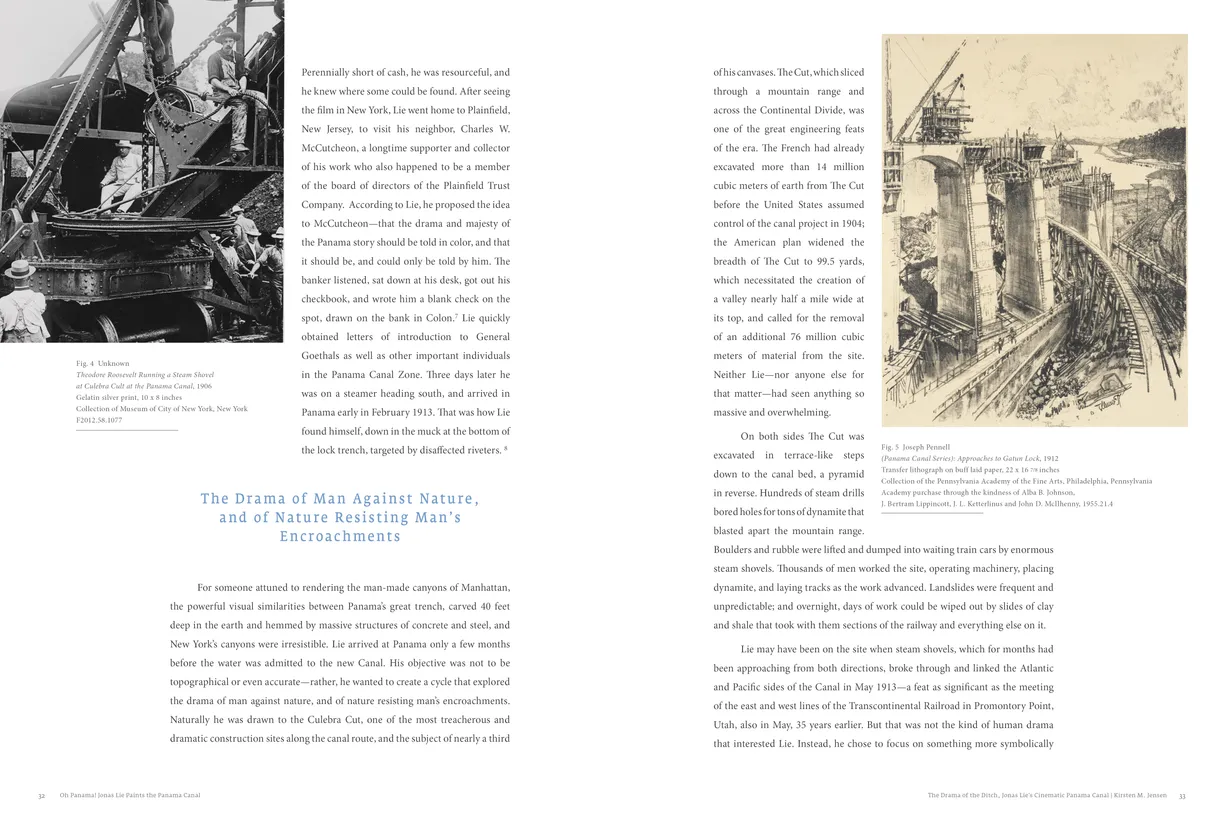
- Oh Panama! Jonas Lie Paints the Panama Canal exhibition catalog, pages 32-33
- Client: Hudson River Museum & Michener Art Museum
- Visit figure page
- Type: portfolio
- Portfolio Type: publication_design
- Portfolio Role: design_layout
Jonas Lie: Oh Panama — Pages 34–35
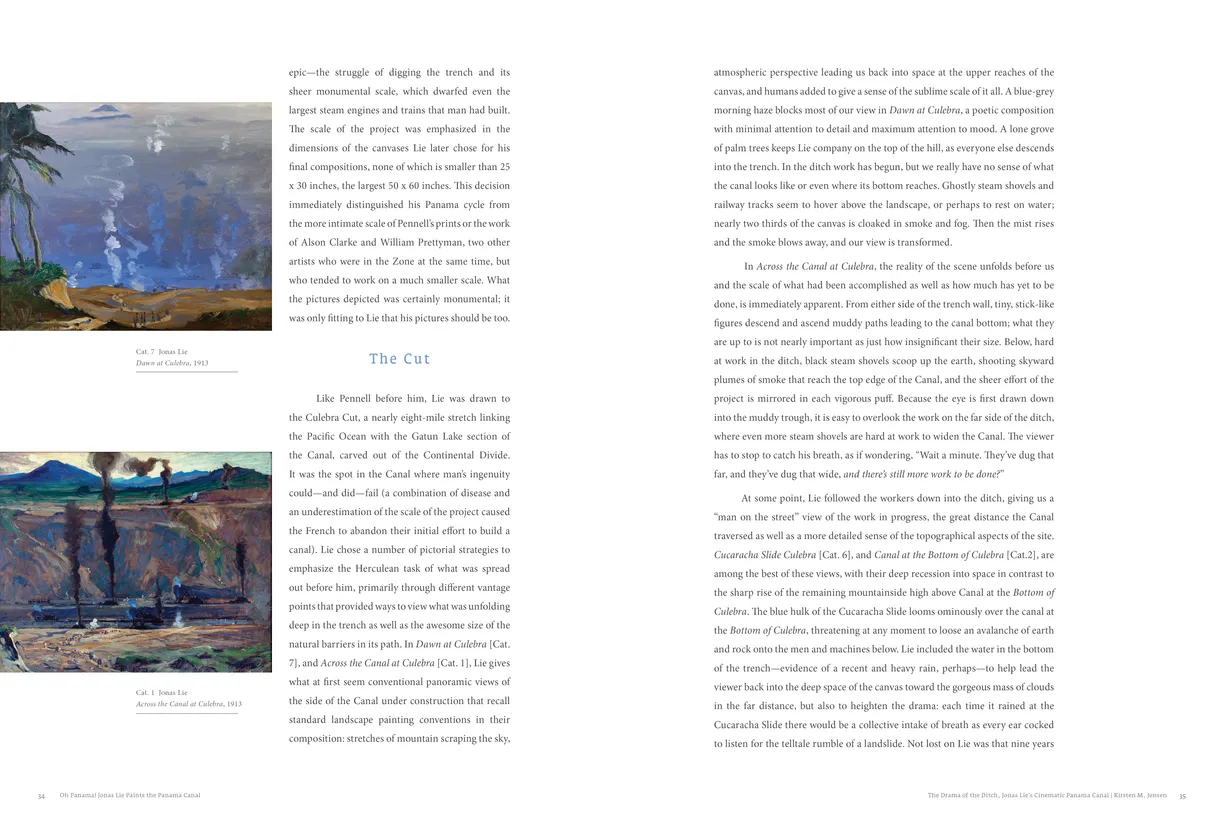
- Oh Panama! Jonas Lie Paints the Panama Canal exhibition catalog, pages 34-35
- Client: Hudson River Museum & Michener Art Museum
- Visit figure page
- Type: portfolio
- Portfolio Type: publication_design
- Portfolio Role: design_layout
Jonas Lie: Oh Panama — Pages 36–37
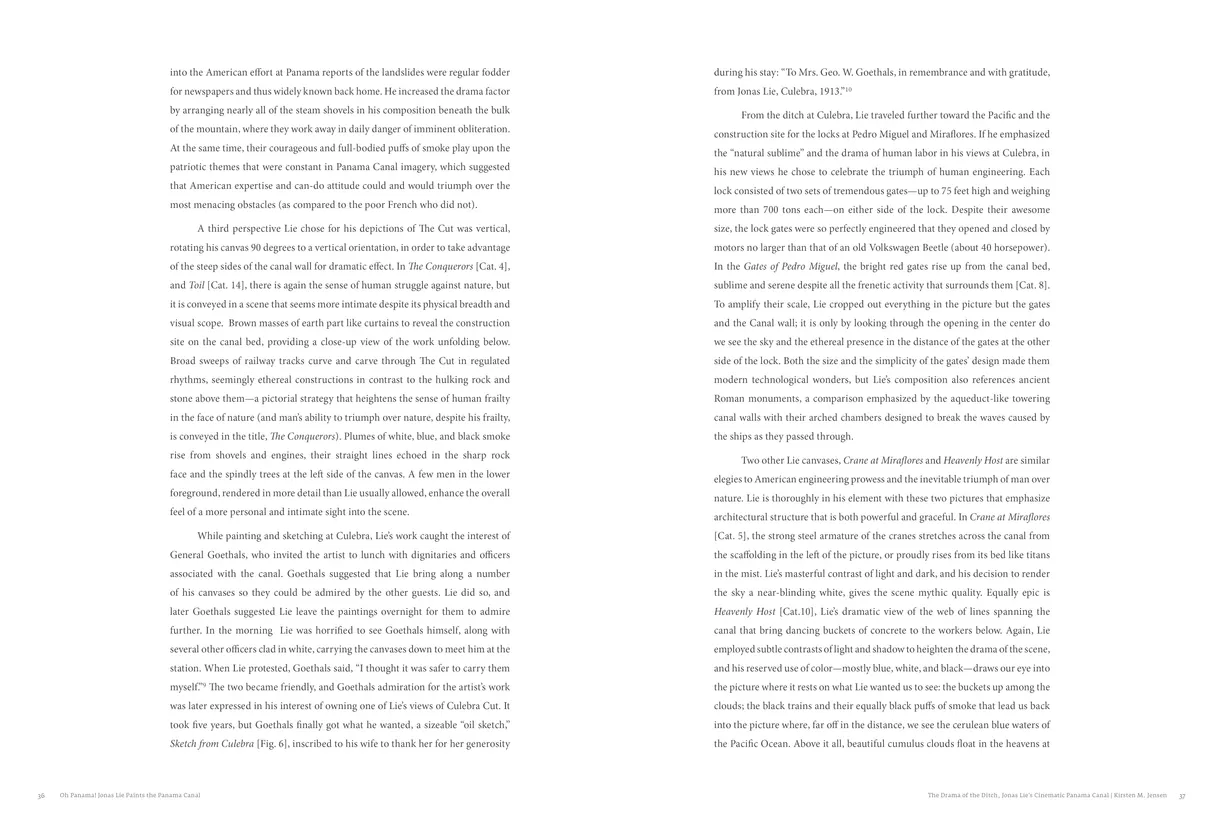
- Oh Panama! Jonas Lie Paints the Panama Canal exhibition catalog, pages 36-37
- Client: Hudson River Museum & Michener Art Museum
- Visit figure page
- Type: portfolio
- Portfolio Type: publication_design
- Portfolio Role: design_layout
Jonas Lie: Oh Panama — Pages 38–39
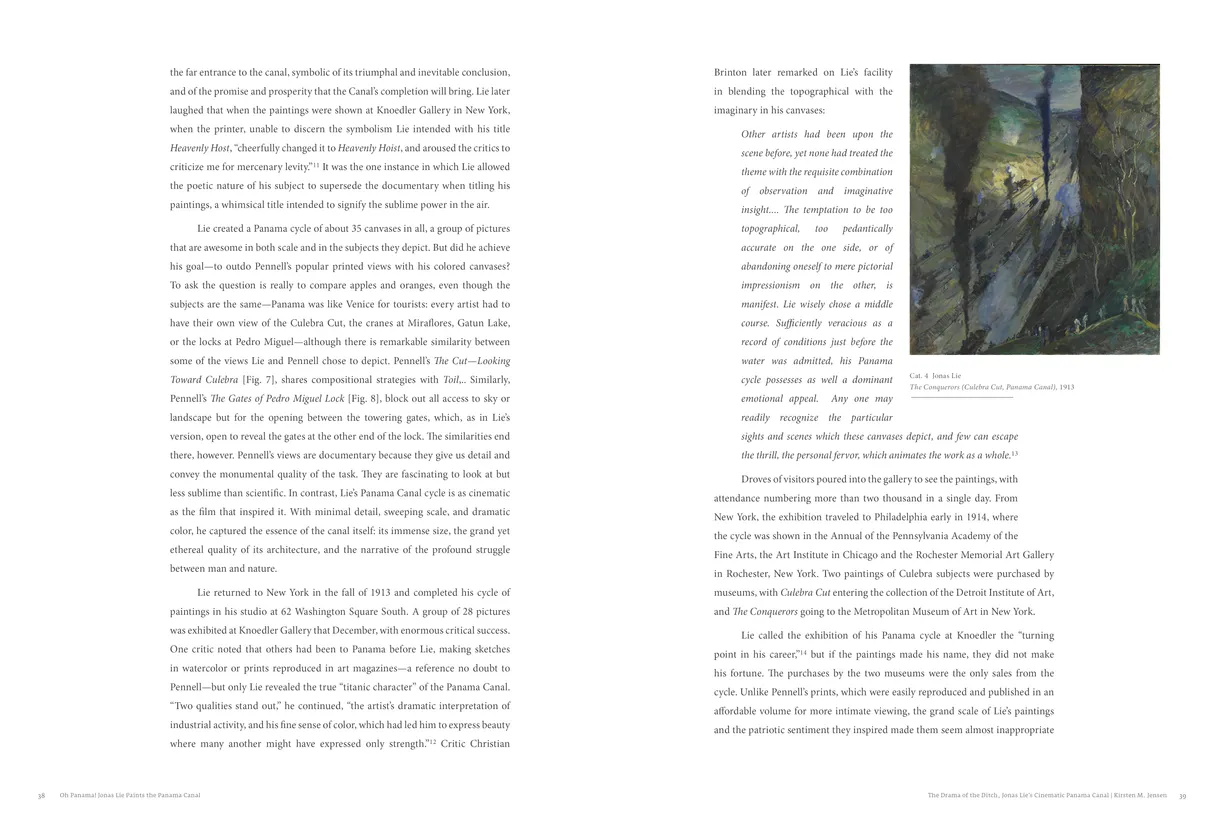
- Oh Panama! Jonas Lie Paints the Panama Canal exhibition catalog, pages 38-39
- Client: Hudson River Museum & Michener Art Museum
- Visit figure page
- Type: portfolio
- Portfolio Type: publication_design
- Portfolio Role: design_layout
Jonas Lie: Oh Panama — Pages 4–5
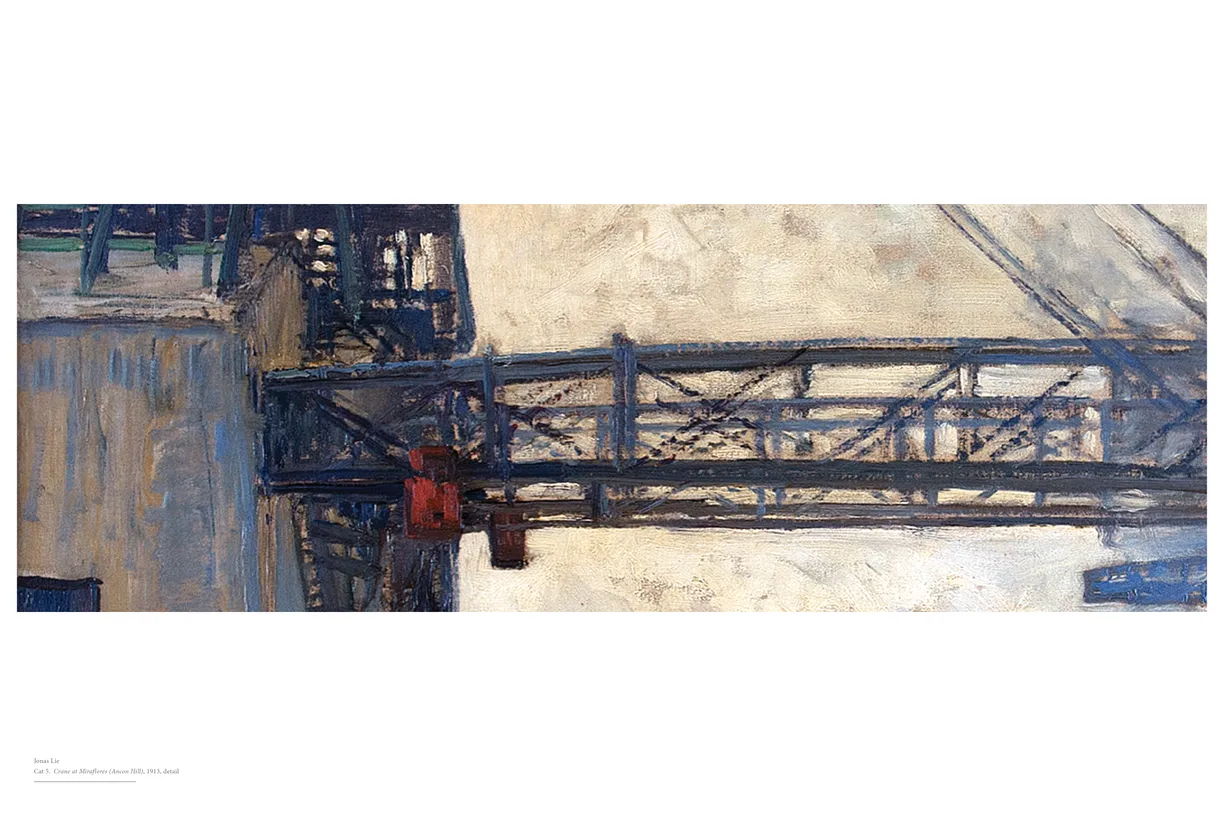
- Oh Panama! Jonas Lie Paints the Panama Canal exhibition catalog, pages 4-5
- Client: Hudson River Museum & Michener Art Museum
- Visit figure page
- Type: portfolio
- Portfolio Type: publication_design
- Portfolio Role: design_layout
Jonas Lie: Oh Panama — Pages 40–41
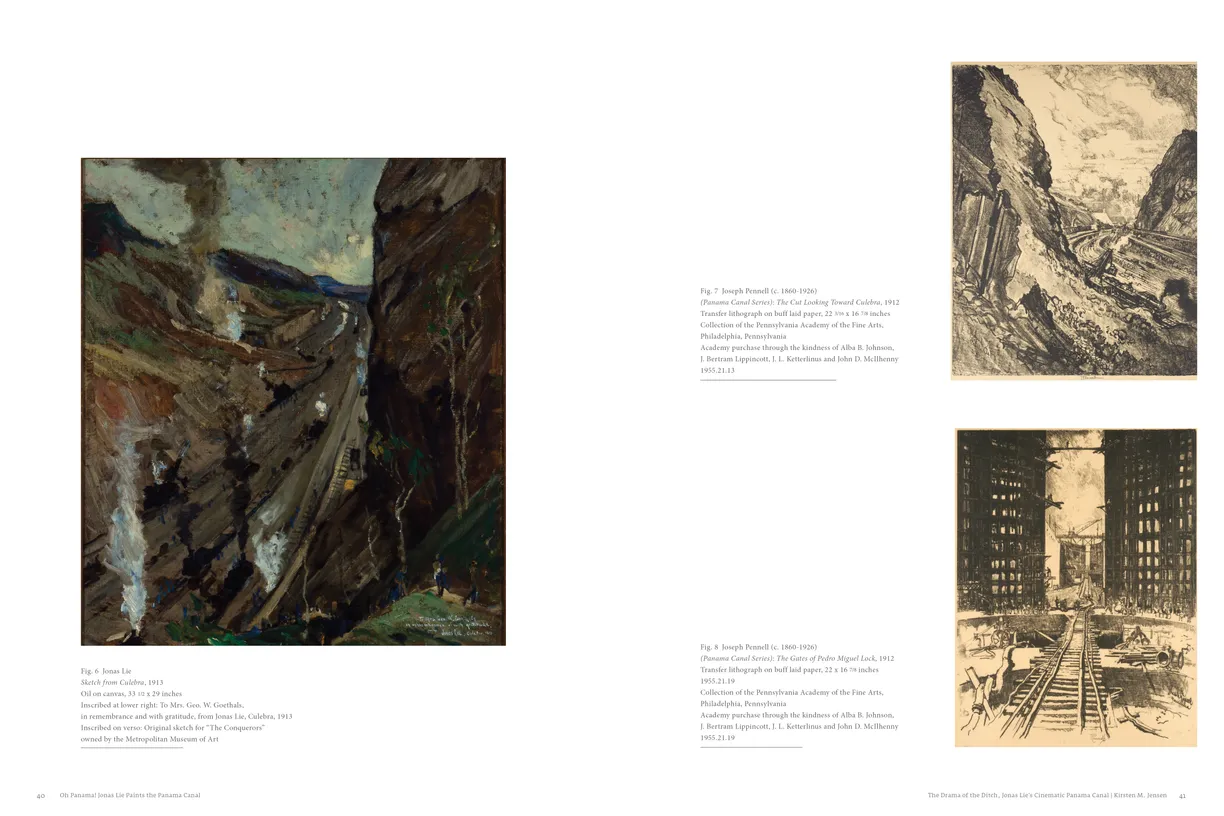
- Oh Panama! Jonas Lie Paints the Panama Canal exhibition catalog, pages 40-41
- Client: Hudson River Museum & Michener Art Museum
- Visit figure page
- Type: portfolio
- Portfolio Type: publication_design
- Portfolio Role: design_layout
Jonas Lie: Oh Panama — Pages 42–43
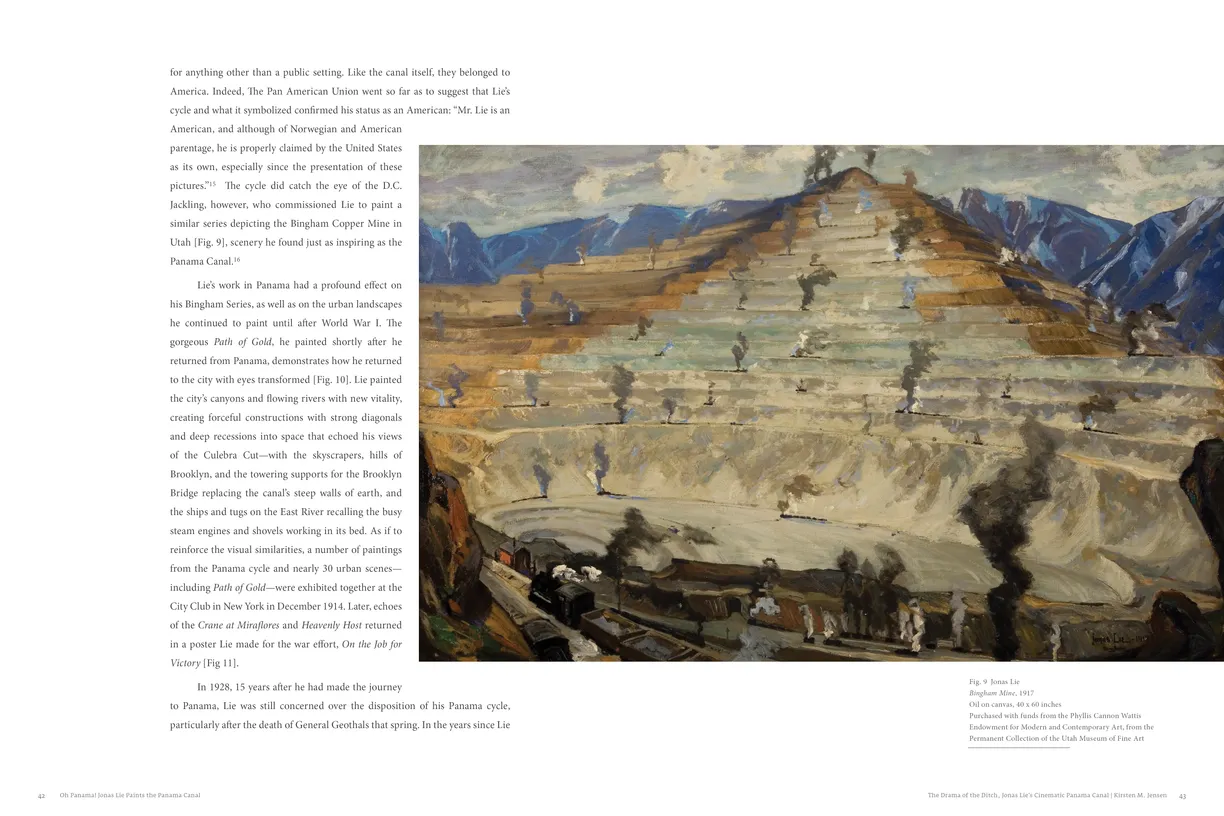
- Oh Panama! Jonas Lie Paints the Panama Canal exhibition catalog, pages 42-43
- Client: Hudson River Museum & Michener Art Museum
- Visit figure page
- Type: portfolio
- Portfolio Type: publication_design
- Portfolio Role: design_layout
Jonas Lie: Oh Panama — Pages 44–45
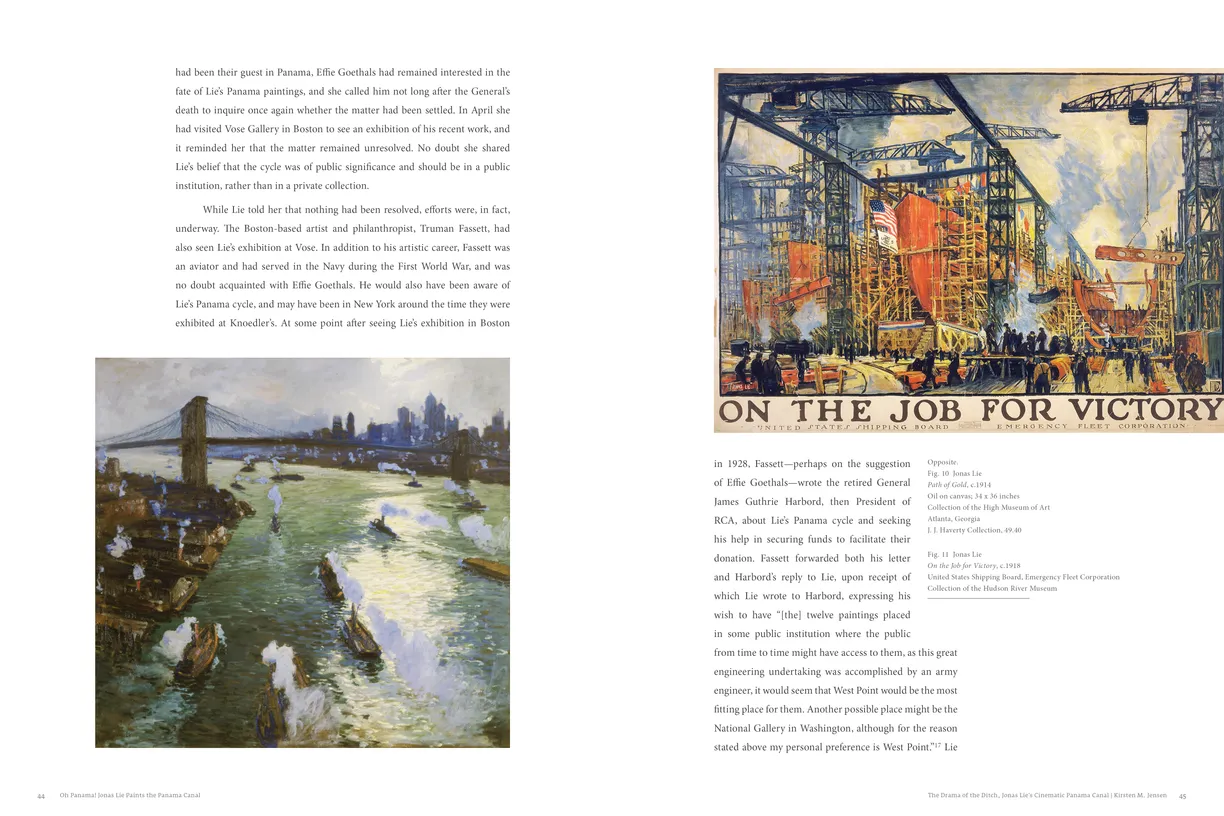
- Oh Panama! Jonas Lie Paints the Panama Canal exhibition catalog, pages 44-45
- Client: Hudson River Museum & Michener Art Museum
- Visit figure page
- Type: portfolio
- Portfolio Type: publication_design
- Portfolio Role: design_layout
Jonas Lie: Oh Panama — Pages 46–47
- Oh Panama! Jonas Lie Paints the Panama Canal exhibition catalog, pages 46-47
- Client: Hudson River Museum & Michener Art Museum
- Visit figure page
- Type: portfolio
- Portfolio Type: publication_design
- Portfolio Role: design_layout
Jonas Lie: Oh Panama — Pages 48–49
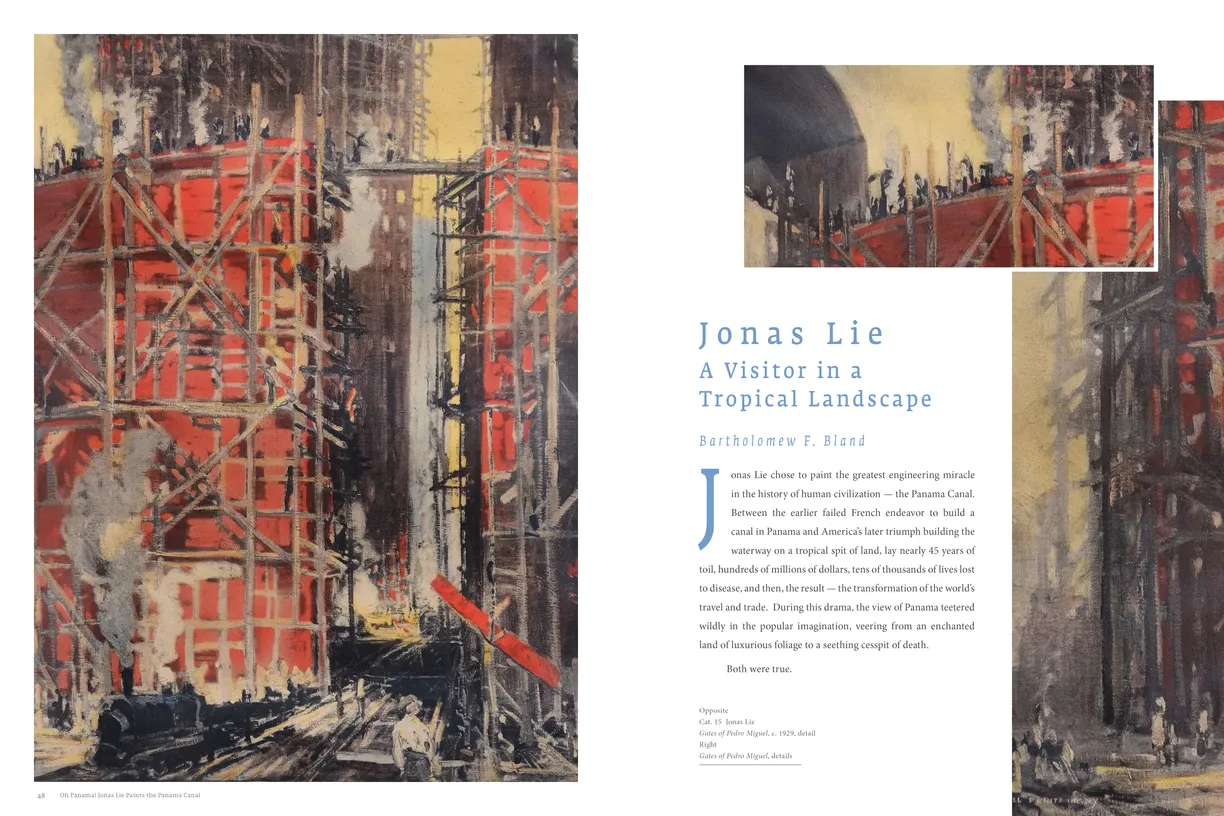
- Oh Panama! Jonas Lie Paints the Panama Canal exhibition catalog, pages 48-49
- Client: Hudson River Museum & Michener Art Museum
- Visit figure page
- Type: portfolio
- Portfolio Type: publication_design
- Portfolio Role: design_layout
Jonas Lie: Oh Panama — Pages 50–51
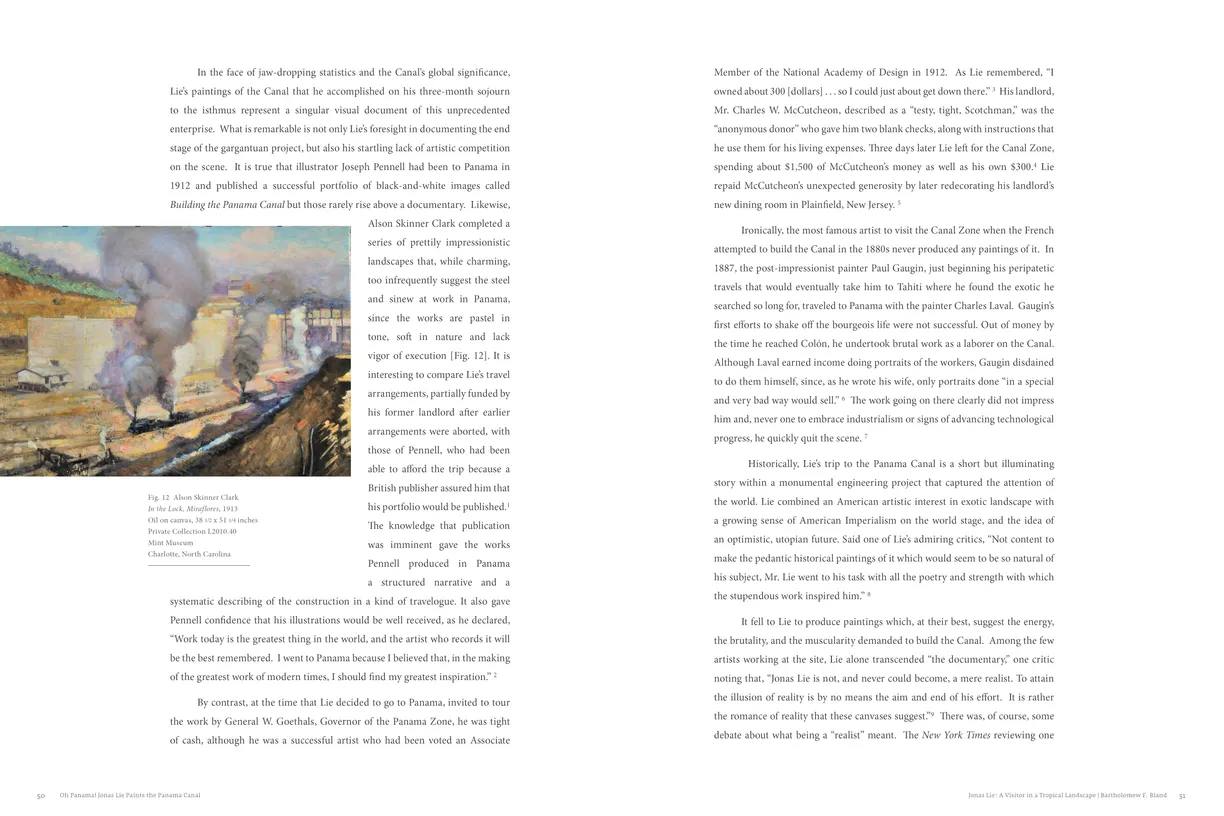
- Oh Panama! Jonas Lie Paints the Panama Canal exhibition catalog, pages 50-51
- Client: Hudson River Museum & Michener Art Museum
- Visit figure page
- Type: portfolio
- Portfolio Type: publication_design
- Portfolio Role: design_layout
Jonas Lie: Oh Panama — Pages 52–53
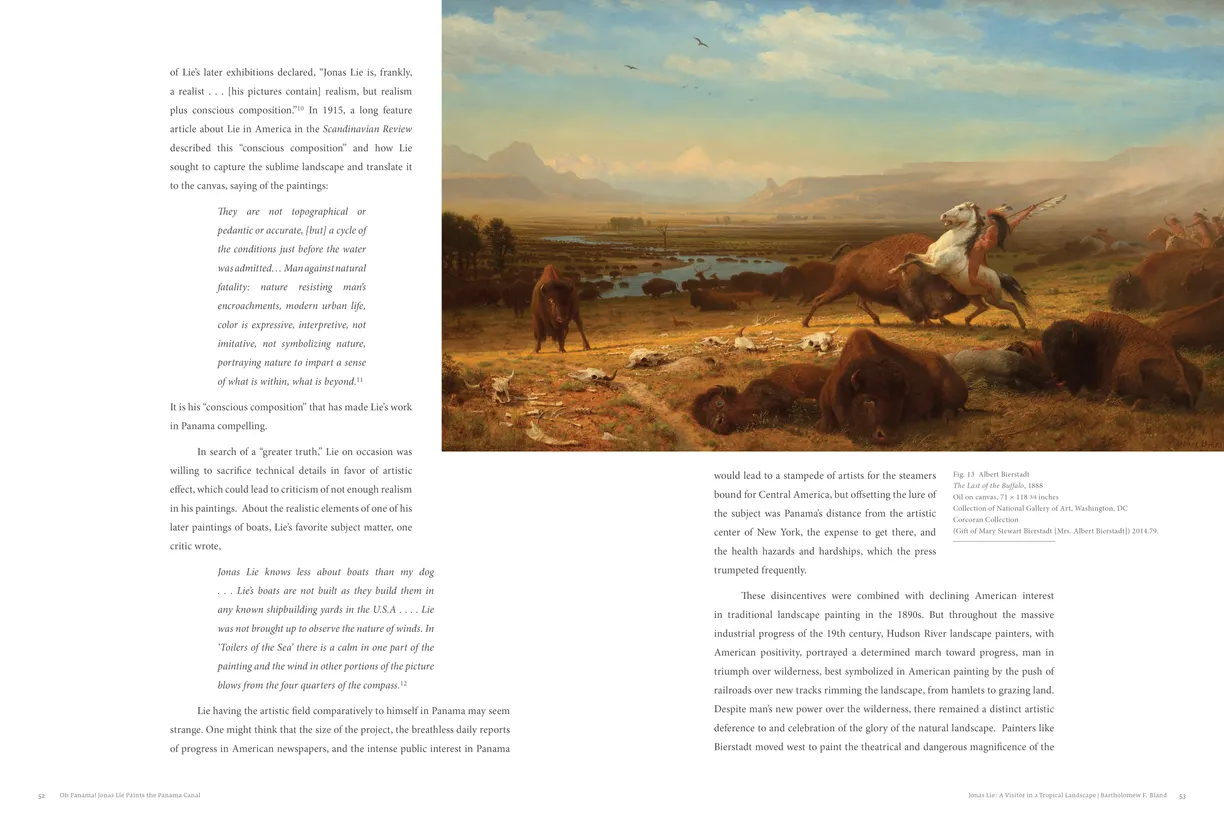
- Oh Panama! Jonas Lie Paints the Panama Canal exhibition catalog, pages 52-53
- Client: Hudson River Museum & Michener Art Museum
- Visit figure page
- Type: portfolio
- Portfolio Type: publication_design
- Portfolio Role: design_layout
Jonas Lie: Oh Panama — Pages 54–55
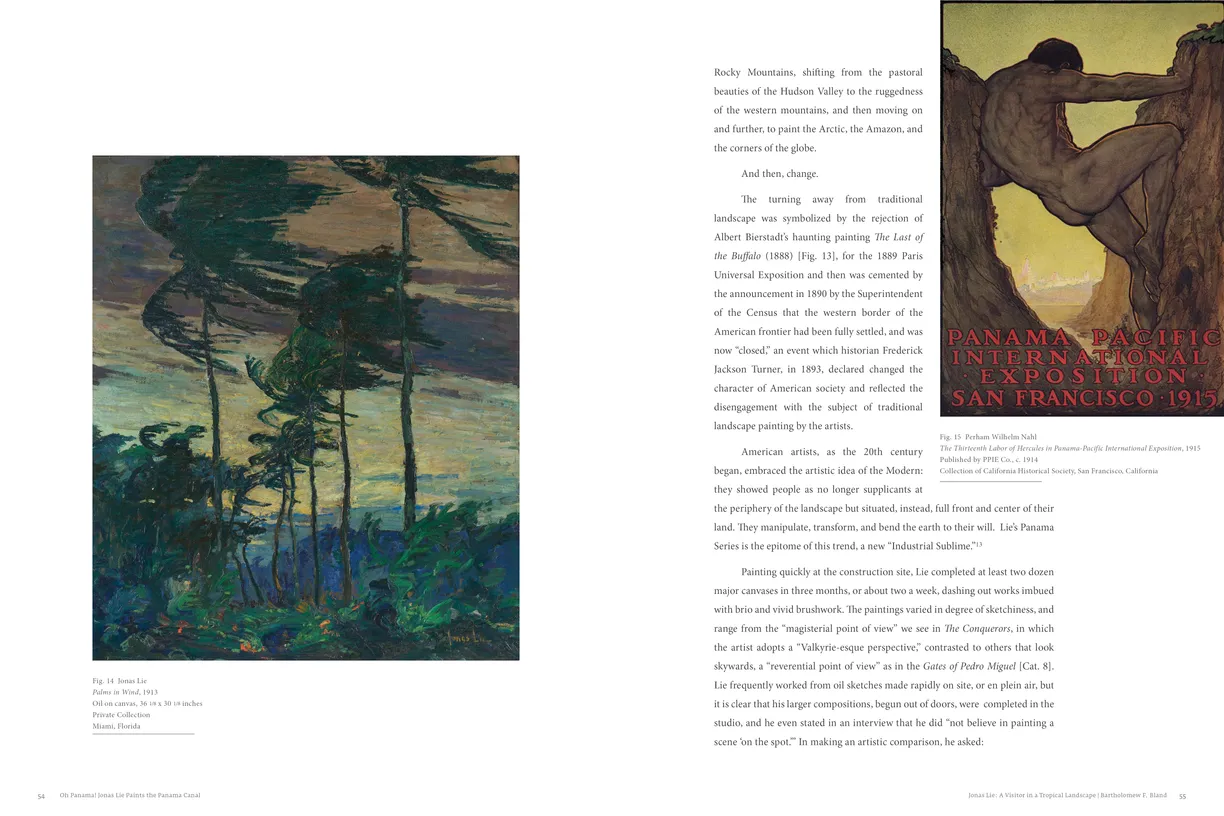
- Oh Panama! Jonas Lie Paints the Panama Canal exhibition catalog, pages 54-55
- Client: Hudson River Museum & Michener Art Museum
- Visit figure page
- Type: portfolio
- Portfolio Type: publication_design
- Portfolio Role: design_layout
Jonas Lie: Oh Panama — Pages 56–57
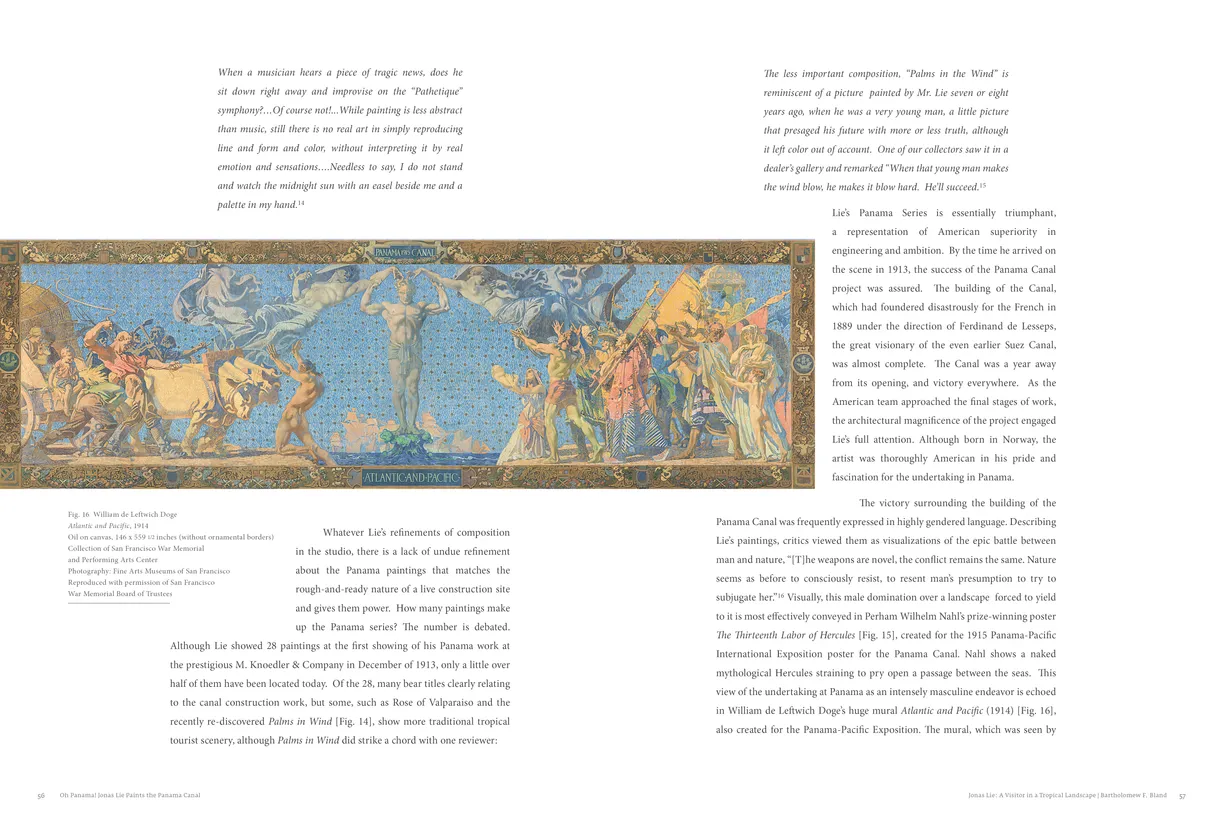
- Oh Panama! Jonas Lie Paints the Panama Canal exhibition catalog, pages 56-57
- Client: Hudson River Museum & Michener Art Museum
- Visit figure page
- Type: portfolio
- Portfolio Type: publication_design
- Portfolio Role: design_layout
Jonas Lie: Oh Panama — Pages 58–59
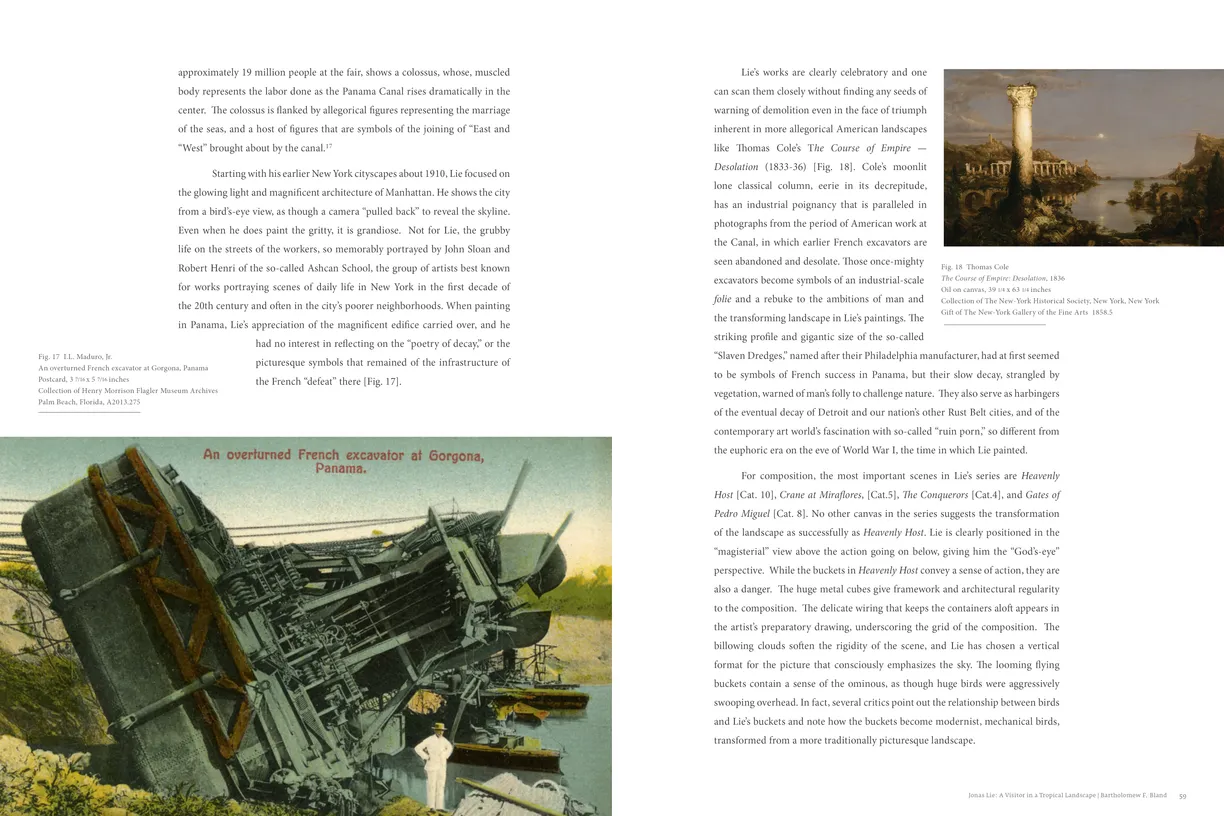
- Oh Panama! Jonas Lie Paints the Panama Canal exhibition catalog, pages 58-59
- Client: Hudson River Museum & Michener Art Museum
- Visit figure page
- Type: portfolio
- Portfolio Type: publication_design
- Portfolio Role: design_layout
Jonas Lie: Oh Panama — Pages 6–7
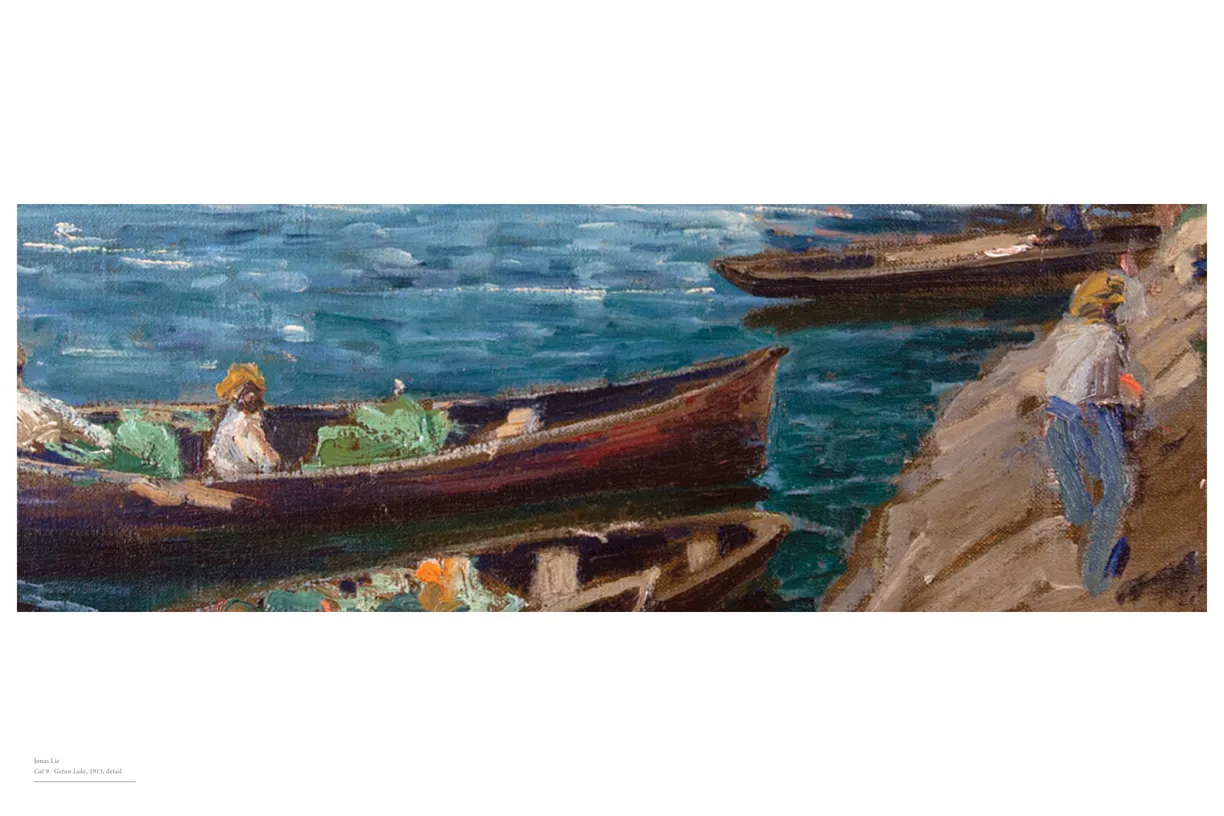
- Oh Panama! Jonas Lie Paints the Panama Canal exhibition catalog, pages 6-7
- Client: Hudson River Museum & Michener Art Museum
- Visit figure page
- Type: portfolio
- Portfolio Type: publication_design
- Portfolio Role: design_layout
Jonas Lie: Oh Panama — Pages 60–61

- Oh Panama! Jonas Lie Paints the Panama Canal exhibition catalog, pages 60-61
- Client: Hudson River Museum & Michener Art Museum
- Visit figure page
- Type: portfolio
- Portfolio Type: publication_design
- Portfolio Role: design_layout
Jonas Lie: Oh Panama — Pages 62–63
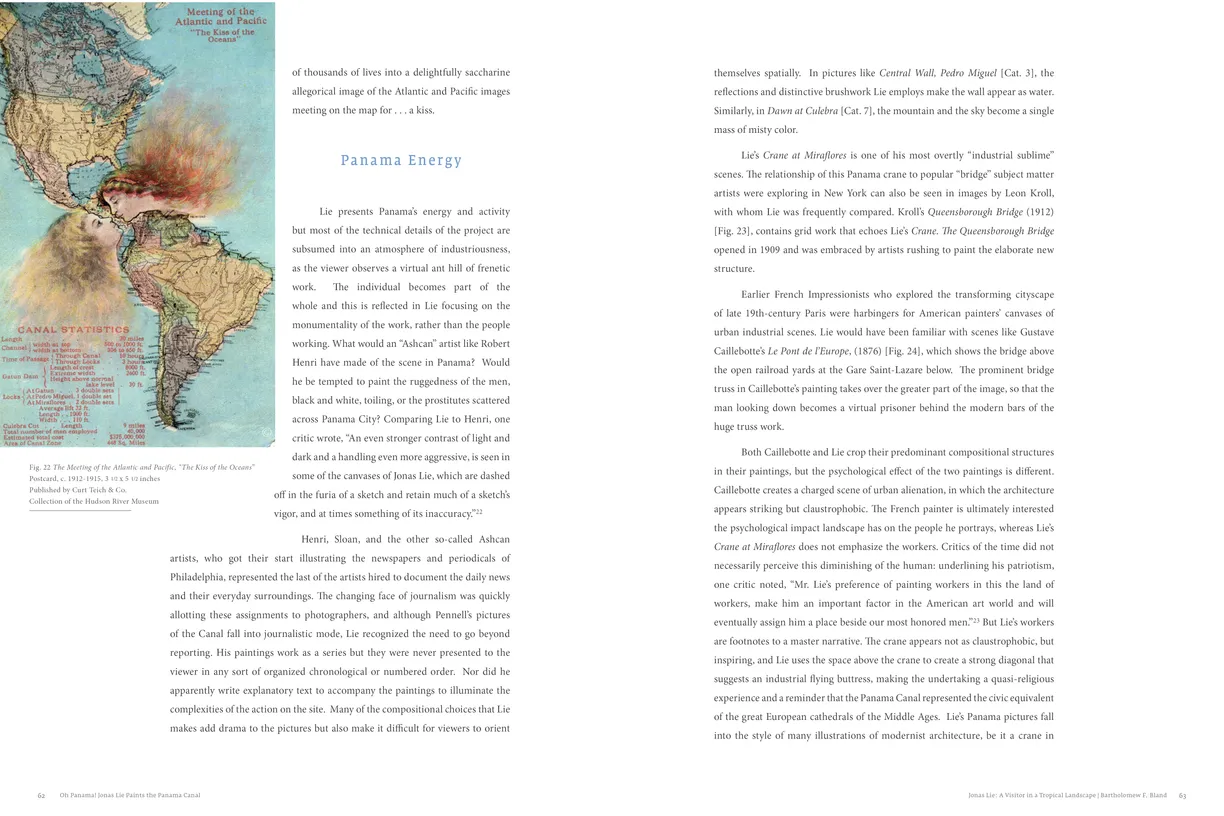
- Oh Panama! Jonas Lie Paints the Panama Canal exhibition catalog, pages 62-63
- Client: Hudson River Museum & Michener Art Museum
- Visit figure page
- Type: portfolio
- Portfolio Type: publication_design
- Portfolio Role: design_layout
Jonas Lie: Oh Panama — Pages 64–65
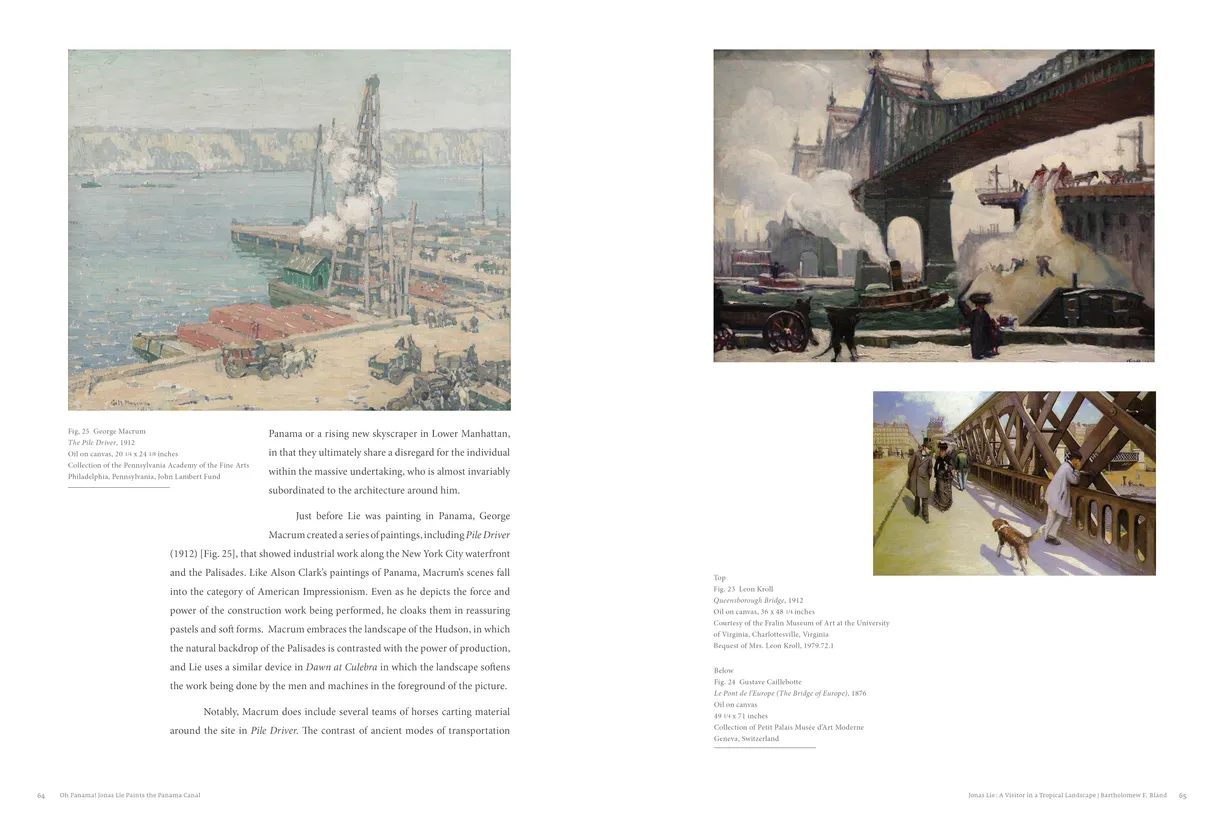
- Oh Panama! Jonas Lie Paints the Panama Canal exhibition catalog, pages 64-65
- Client: Hudson River Museum & Michener Art Museum
- Visit figure page
- Type: portfolio
- Portfolio Type: publication_design
- Portfolio Role: design_layout
Jonas Lie: Oh Panama — Pages 66–67
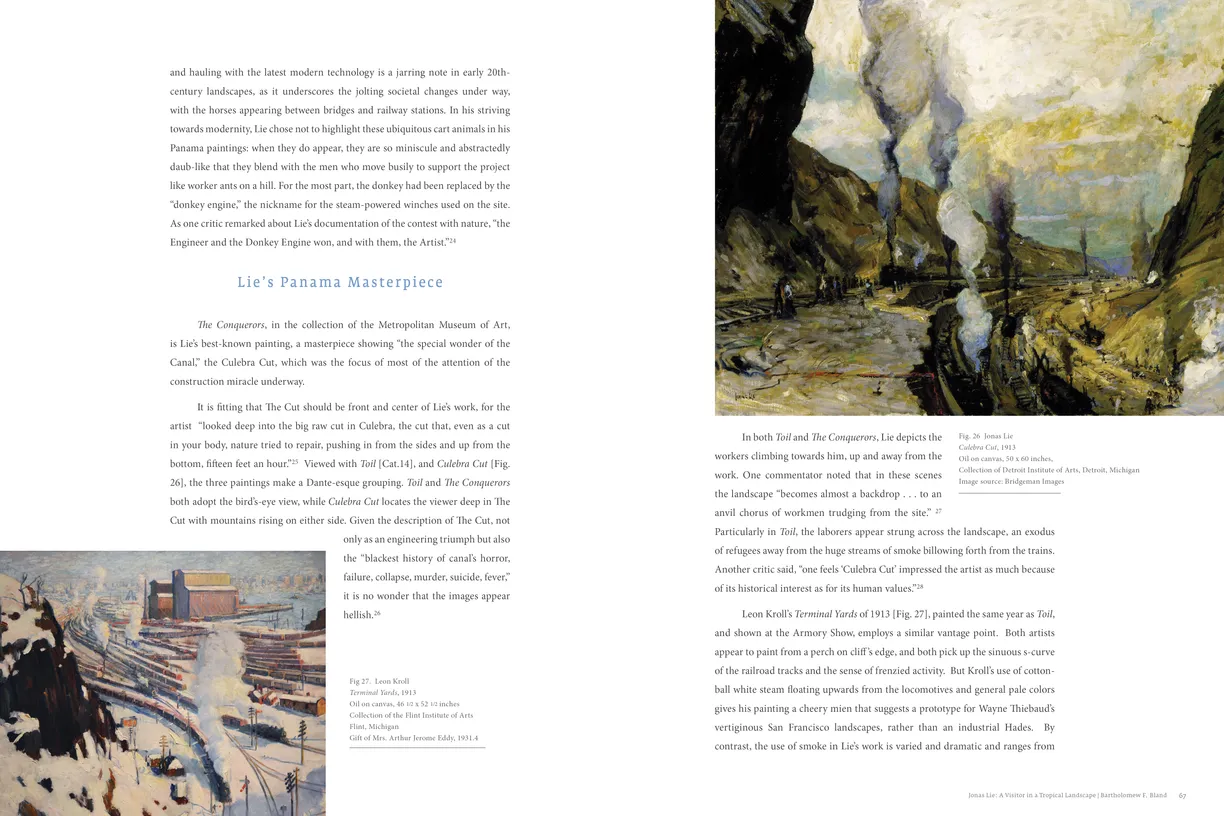
- Oh Panama! Jonas Lie Paints the Panama Canal exhibition catalog, pages 66-67
- Client: Hudson River Museum & Michener Art Museum
- Visit figure page
- Type: portfolio
- Portfolio Type: publication_design
- Portfolio Role: design_layout
Jonas Lie: Oh Panama — Pages 68–69
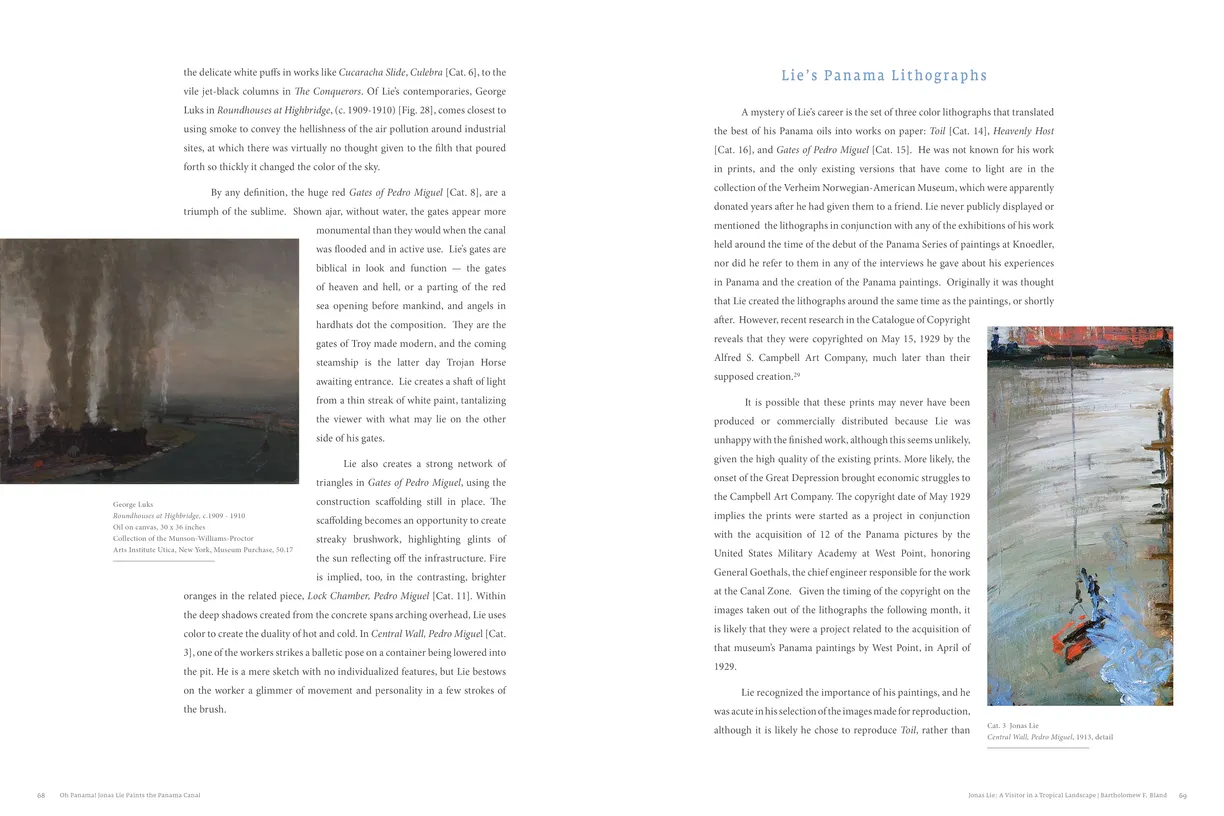
- Oh Panama! Jonas Lie Paints the Panama Canal exhibition catalog, pages 68-69
- Client: Hudson River Museum & Michener Art Museum
- Visit figure page
- Type: portfolio
- Portfolio Type: publication_design
- Portfolio Role: design_layout
Jonas Lie: Oh Panama — Pages 70–71
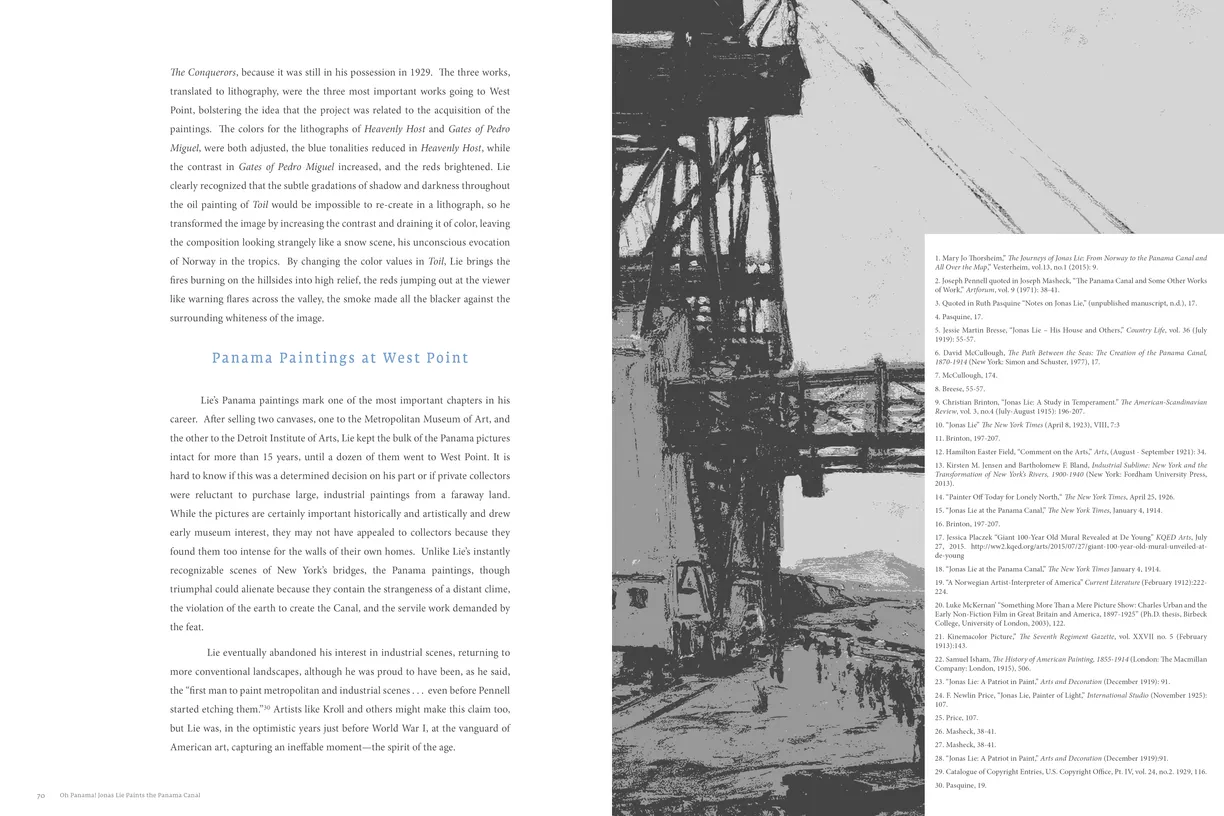
- Oh Panama! Jonas Lie Paints the Panama Canal exhibition catalog, pages 70-71
- Client: Hudson River Museum & Michener Art Museum
- Visit figure page
- Type: portfolio
- Portfolio Type: publication_design
- Portfolio Role: design_layout
Jonas Lie: Oh Panama — Pages 72–73

- Oh Panama! Jonas Lie Paints the Panama Canal exhibition catalog, pages 72-73
- Client: Hudson River Museum & Michener Art Museum
- Visit figure page
- Type: portfolio
- Portfolio Type: publication_design
- Portfolio Role: design_layout
Jonas Lie: Oh Panama — Pages 74–75
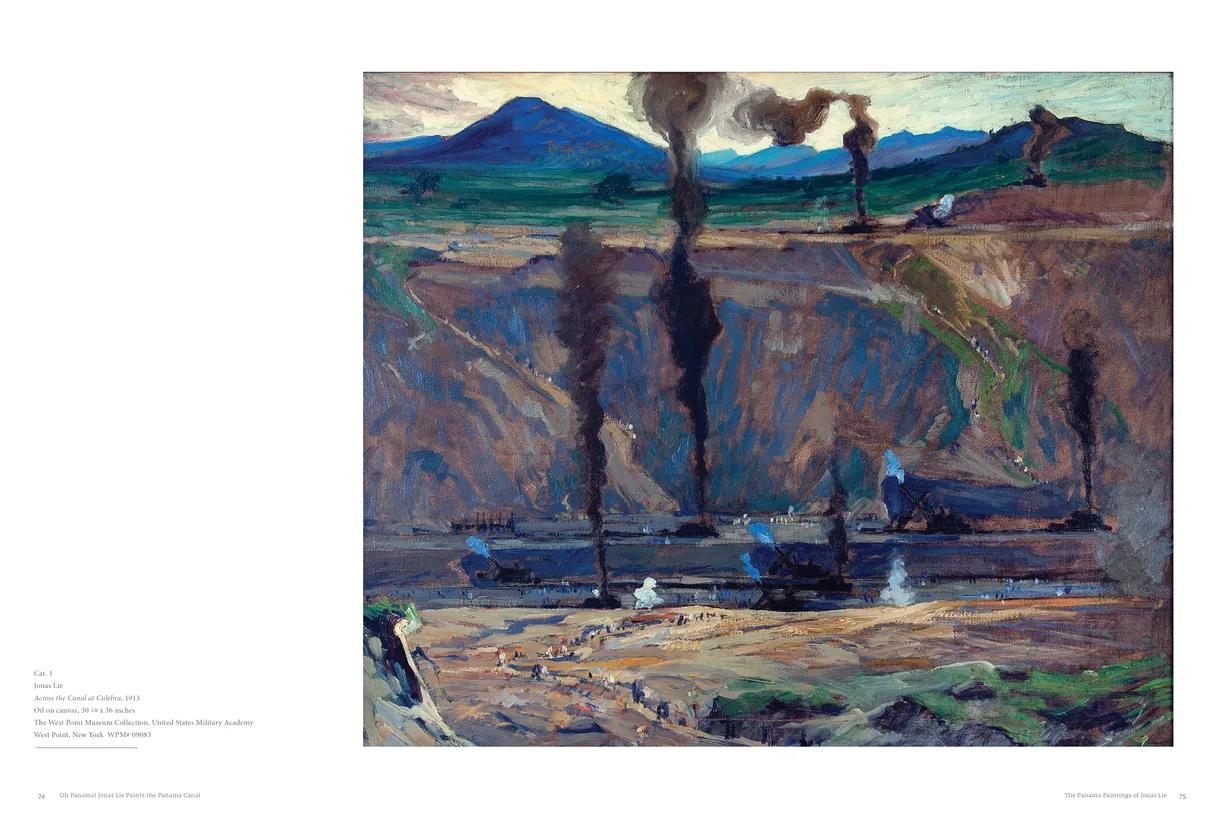
- Oh Panama! Jonas Lie Paints the Panama Canal exhibition catalog, pages 74-75
- Client: Hudson River Museum & Michener Art Museum
- Visit figure page
- Type: portfolio
- Portfolio Type: publication_design
- Portfolio Role: design_layout
Jonas Lie: Oh Panama — Pages 76–77
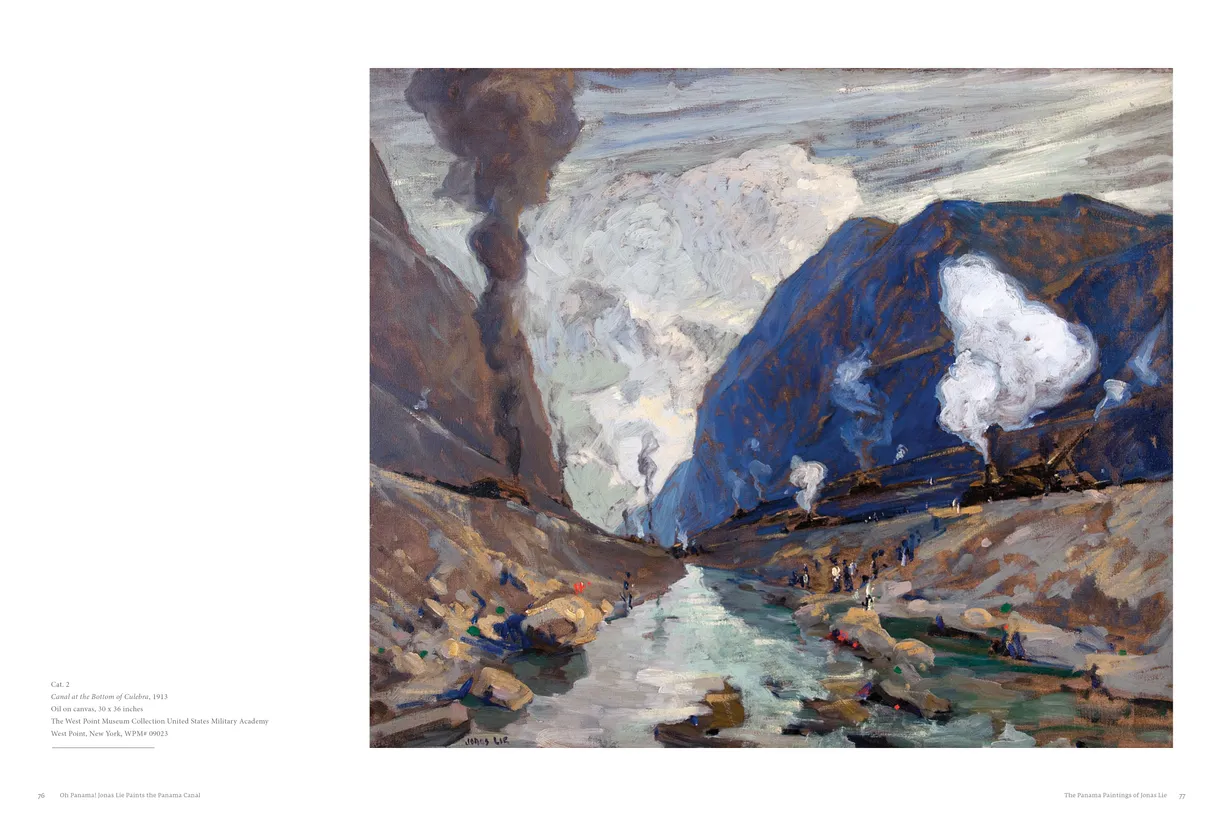
- Oh Panama! Jonas Lie Paints the Panama Canal exhibition catalog, pages 76-77
- Client: Hudson River Museum & Michener Art Museum
- Visit figure page
- Type: portfolio
- Portfolio Type: publication_design
- Portfolio Role: design_layout
Jonas Lie: Oh Panama — Pages 78–79
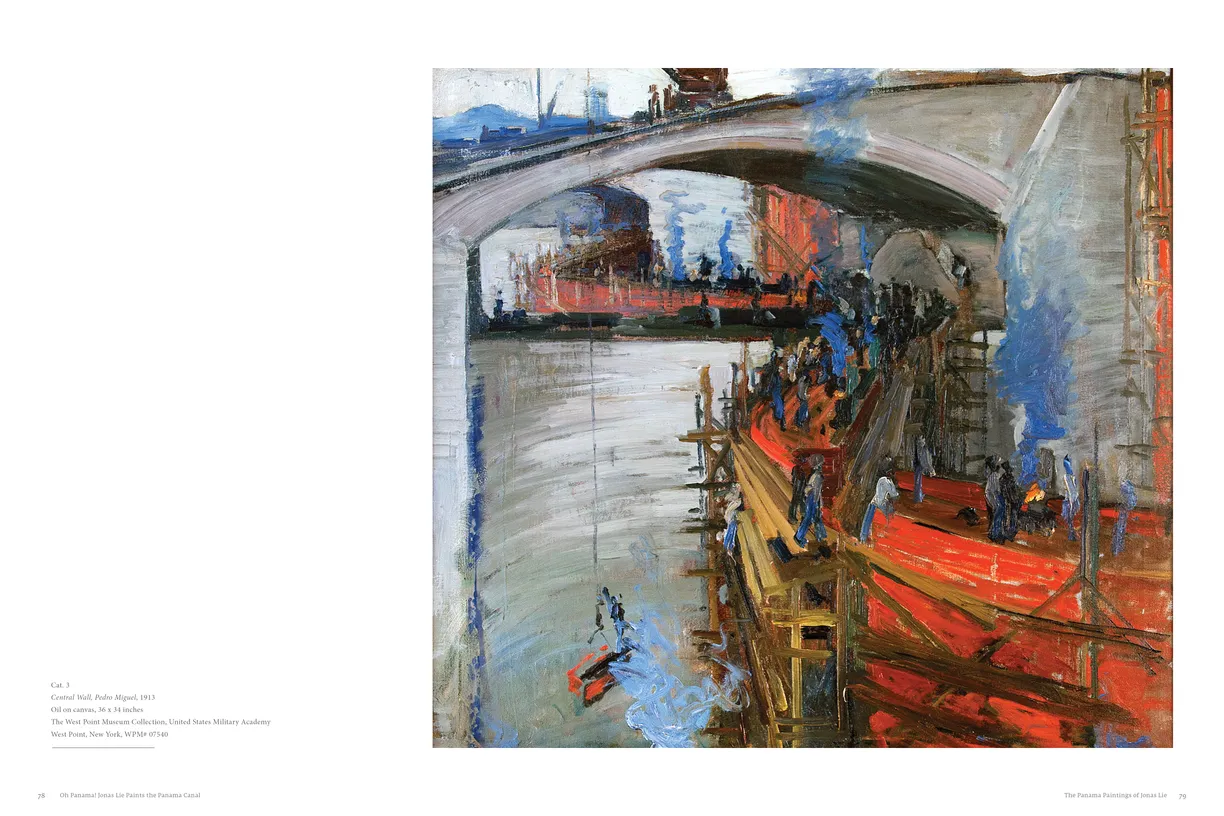
- Oh Panama! Jonas Lie Paints the Panama Canal exhibition catalog, pages 78-79
- Client: Hudson River Museum & Michener Art Museum
- Visit figure page
- Type: portfolio
- Portfolio Type: publication_design
- Portfolio Role: design_layout
Jonas Lie: Oh Panama — Pages 8–9
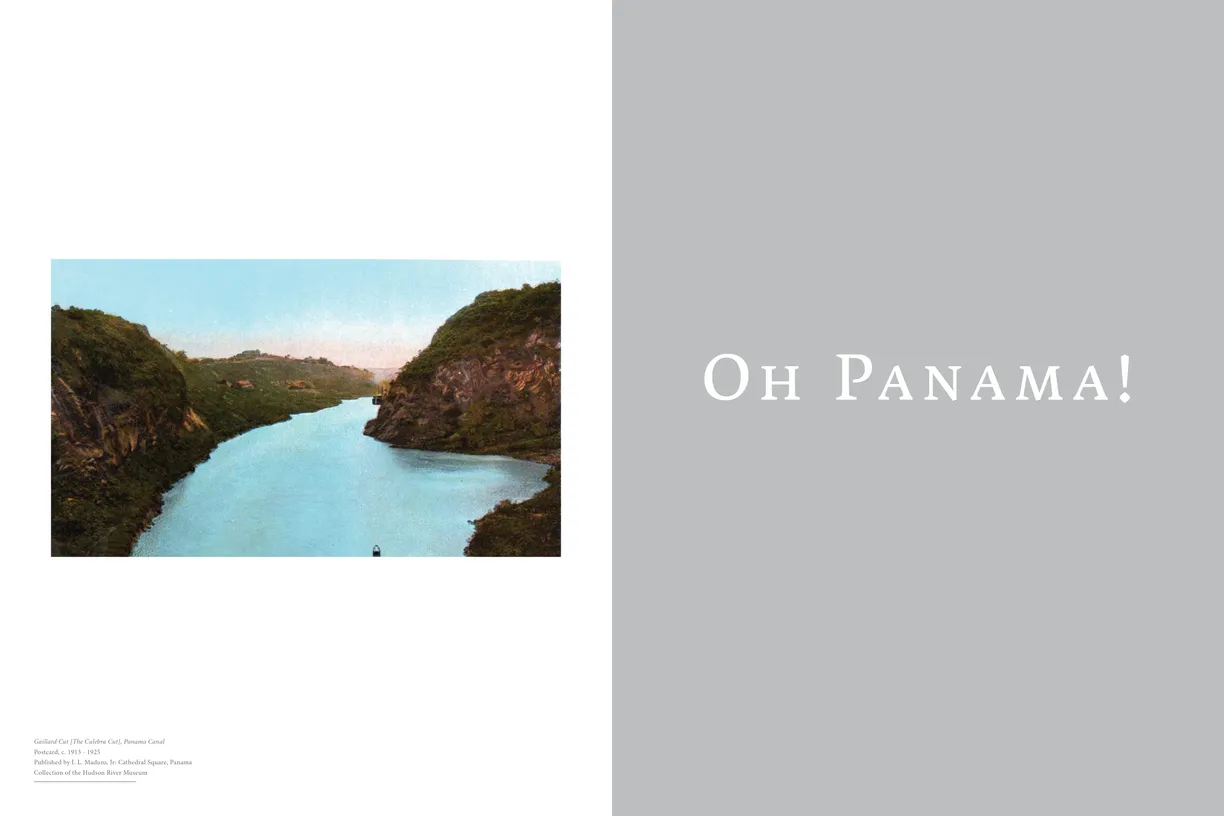
- Oh Panama! Jonas Lie Paints the Panama Canal exhibition catalog, pages 8-9
- Client: Hudson River Museum & Michener Art Museum
- Visit figure page
- Type: portfolio
- Portfolio Type: publication_design
- Portfolio Role: design_layout
Jonas Lie: Oh Panama — Pages 80–81
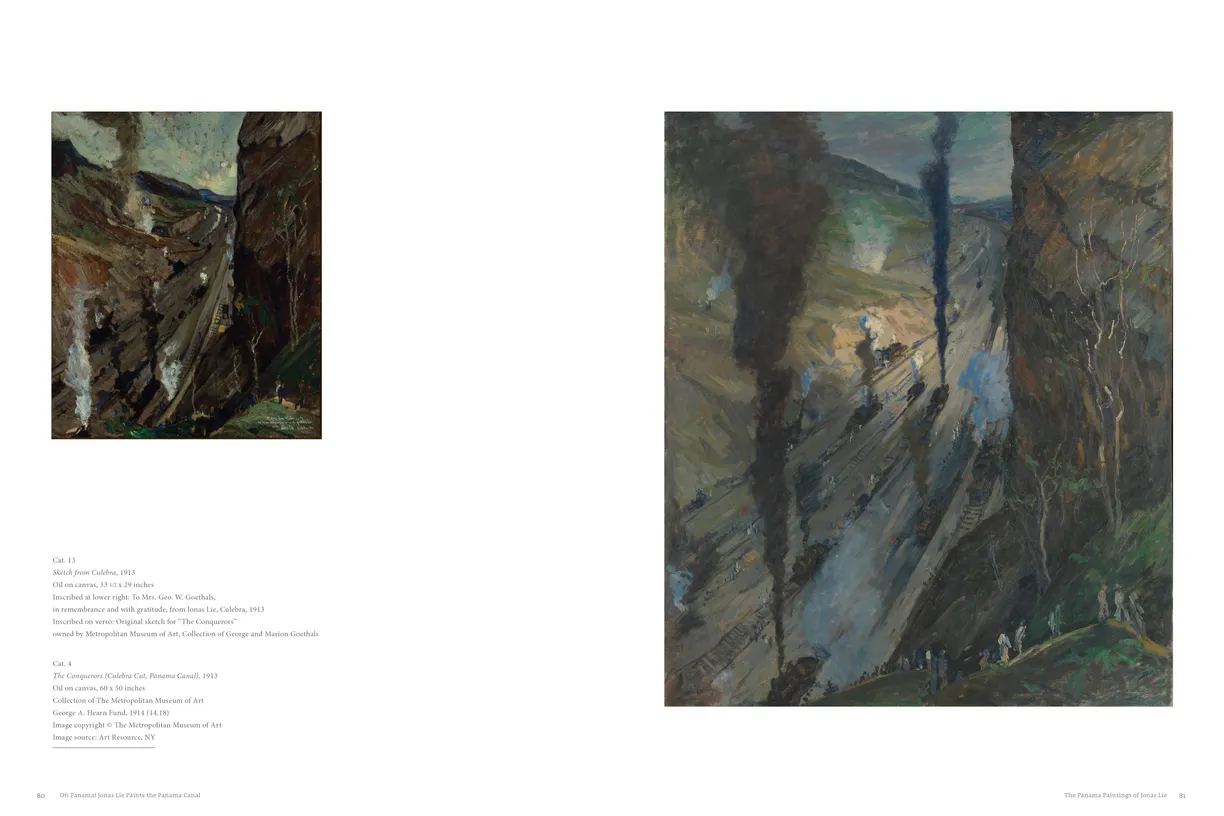
- Oh Panama! Jonas Lie Paints the Panama Canal exhibition catalog, pages 80-81
- Client: Hudson River Museum & Michener Art Museum
- Visit figure page
- Type: portfolio
- Portfolio Type: publication_design
- Portfolio Role: design_layout
Jonas Lie: Oh Panama — Pages 82–83
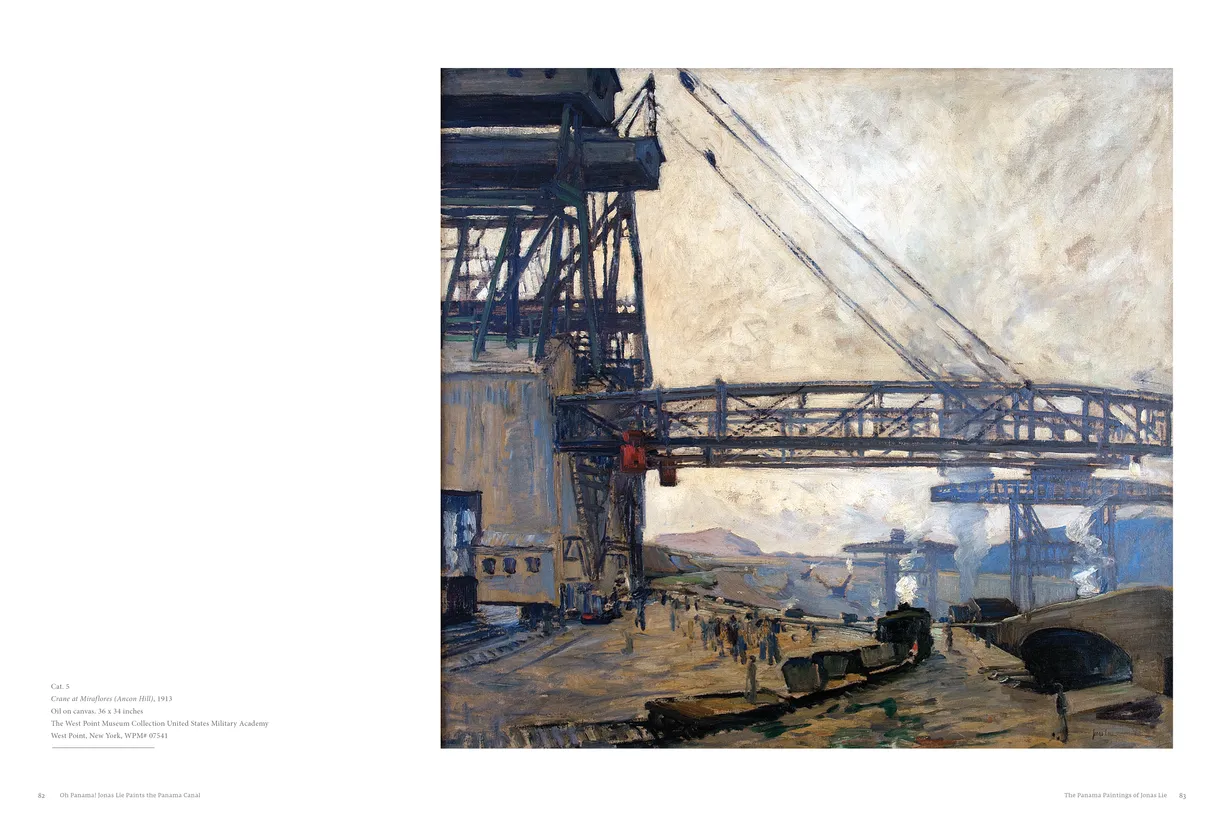
- Oh Panama! Jonas Lie Paints the Panama Canal exhibition catalog, pages 82-83
- Client: Hudson River Museum & Michener Art Museum
- Visit figure page
- Type: portfolio
- Portfolio Type: publication_design
- Portfolio Role: design_layout
Jonas Lie: Oh Panama — Pages 84–85

- Oh Panama! Jonas Lie Paints the Panama Canal exhibition catalog, pages 84-85
- Client: Hudson River Museum & Michener Art Museum
- Visit figure page
- Type: portfolio
- Portfolio Type: publication_design
- Portfolio Role: design_layout
Jonas Lie: Oh Panama — Pages 86–87
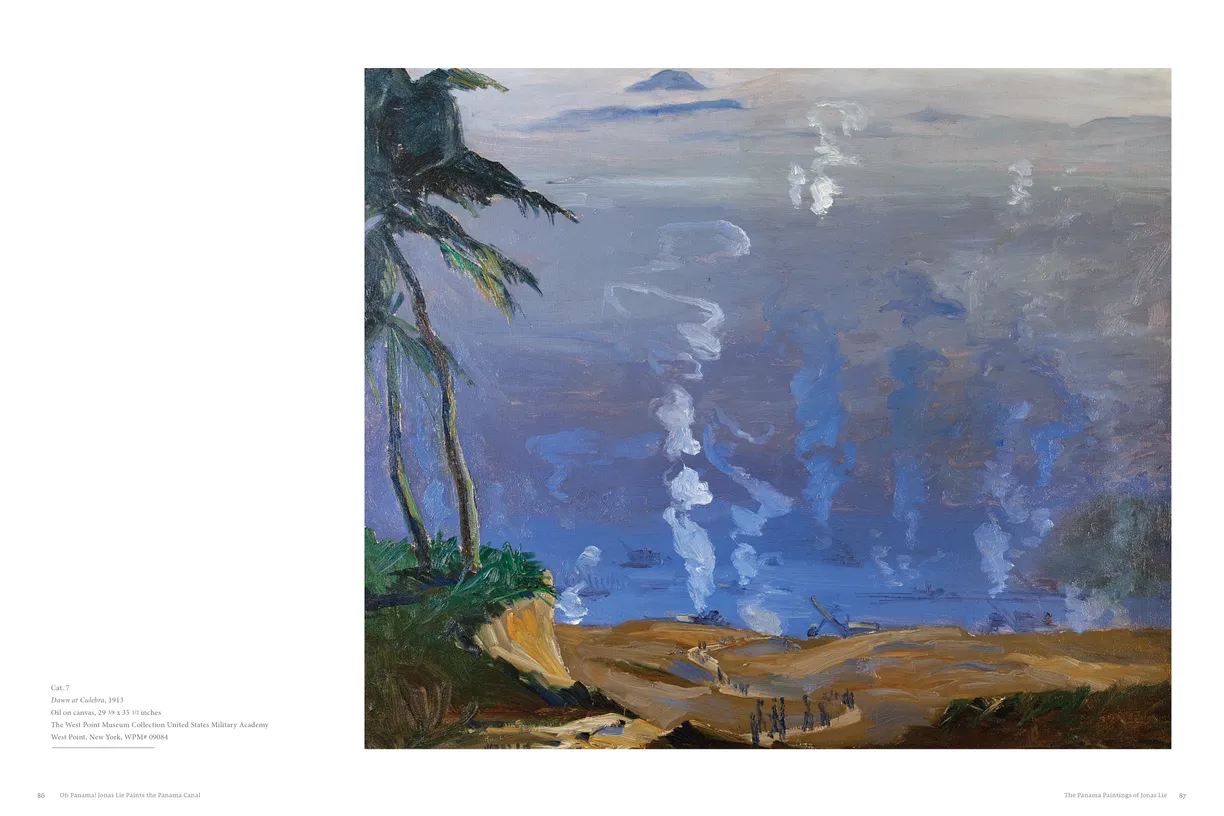
- Oh Panama! Jonas Lie Paints the Panama Canal exhibition catalog, pages 86-87
- Client: Hudson River Museum & Michener Art Museum
- Visit figure page
- Type: portfolio
- Portfolio Type: publication_design
- Portfolio Role: design_layout
Jonas Lie: Oh Panama — Pages 88–89
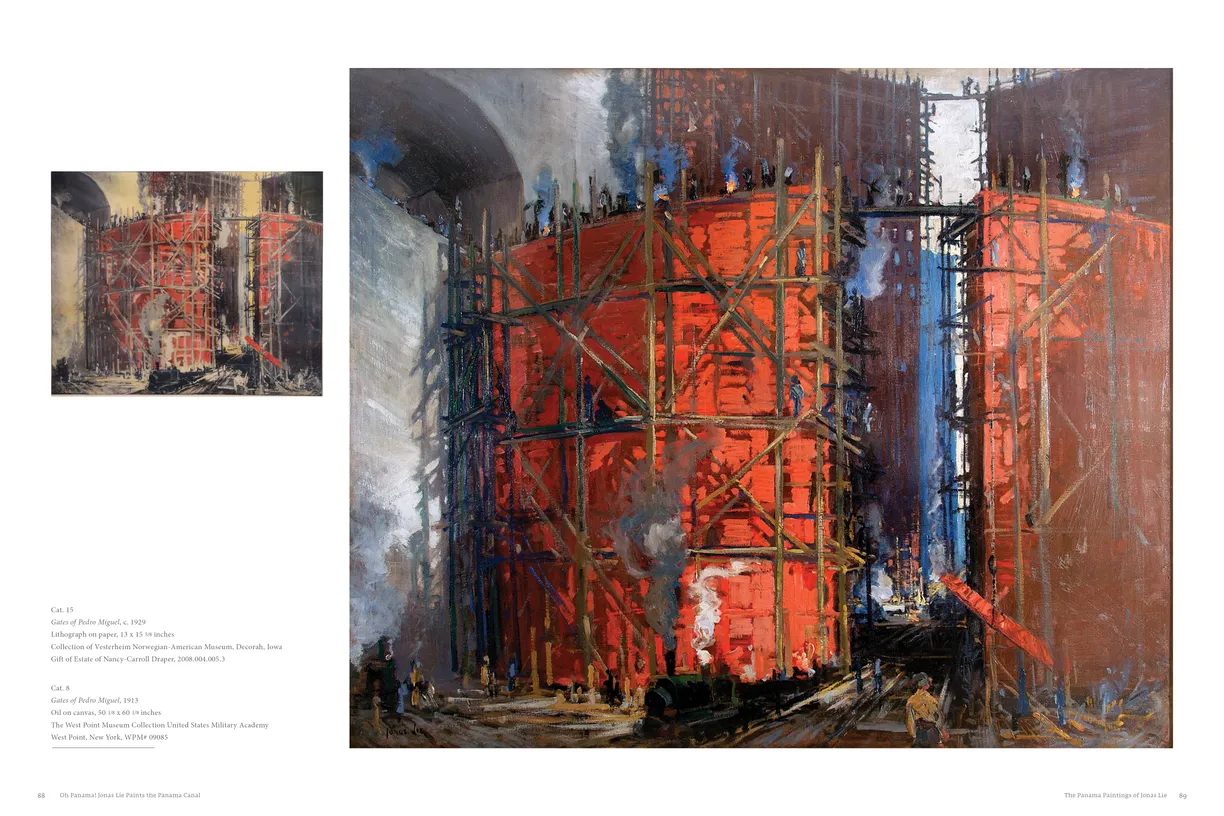
- Oh Panama! Jonas Lie Paints the Panama Canal exhibition catalog, pages 88-89
- Client: Hudson River Museum & Michener Art Museum
- Visit figure page
- Type: portfolio
- Portfolio Type: publication_design
- Portfolio Role: design_layout
Jonas Lie: Oh Panama — Pages 90–91
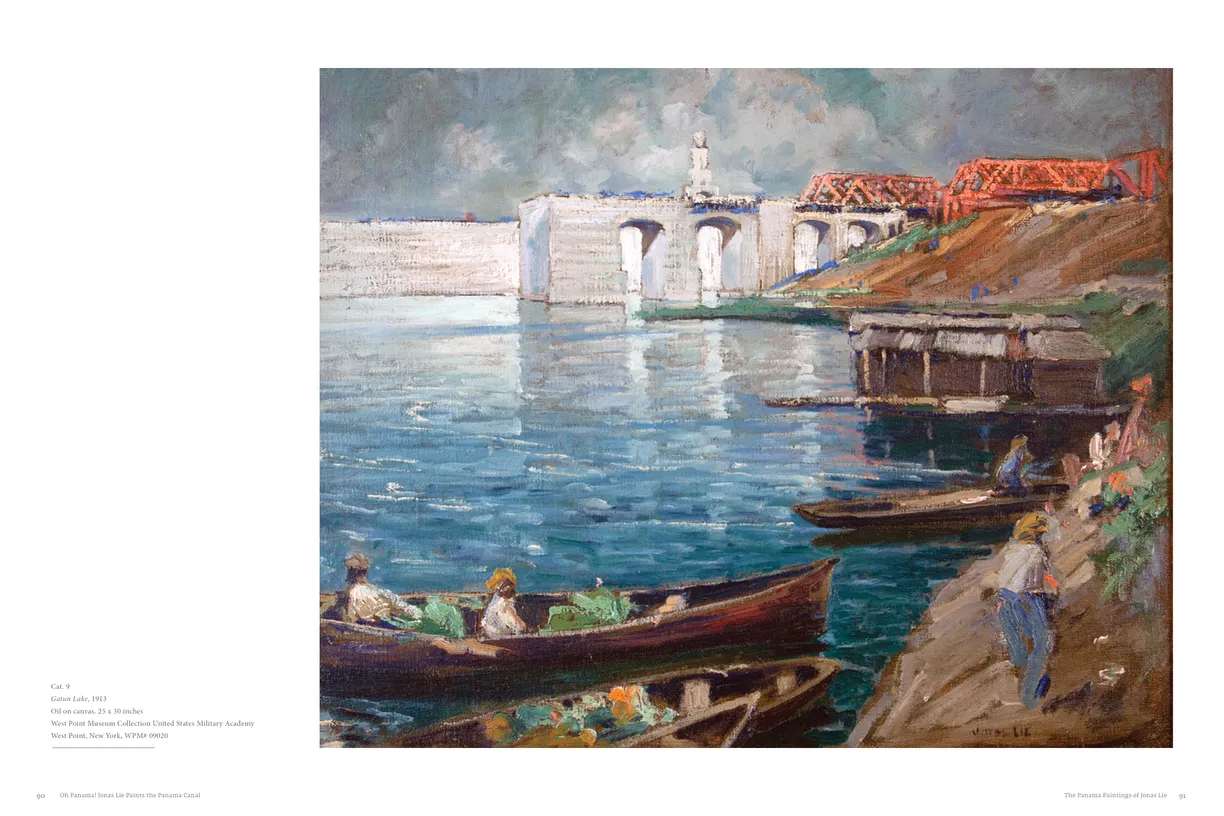
- Oh Panama! Jonas Lie Paints the Panama Canal exhibition catalog, pages 90-91
- Client: Hudson River Museum & Michener Art Museum
- Visit figure page
- Type: portfolio
- Portfolio Type: publication_design
- Portfolio Role: design_layout
Jonas Lie: Oh Panama — Pages 92–93
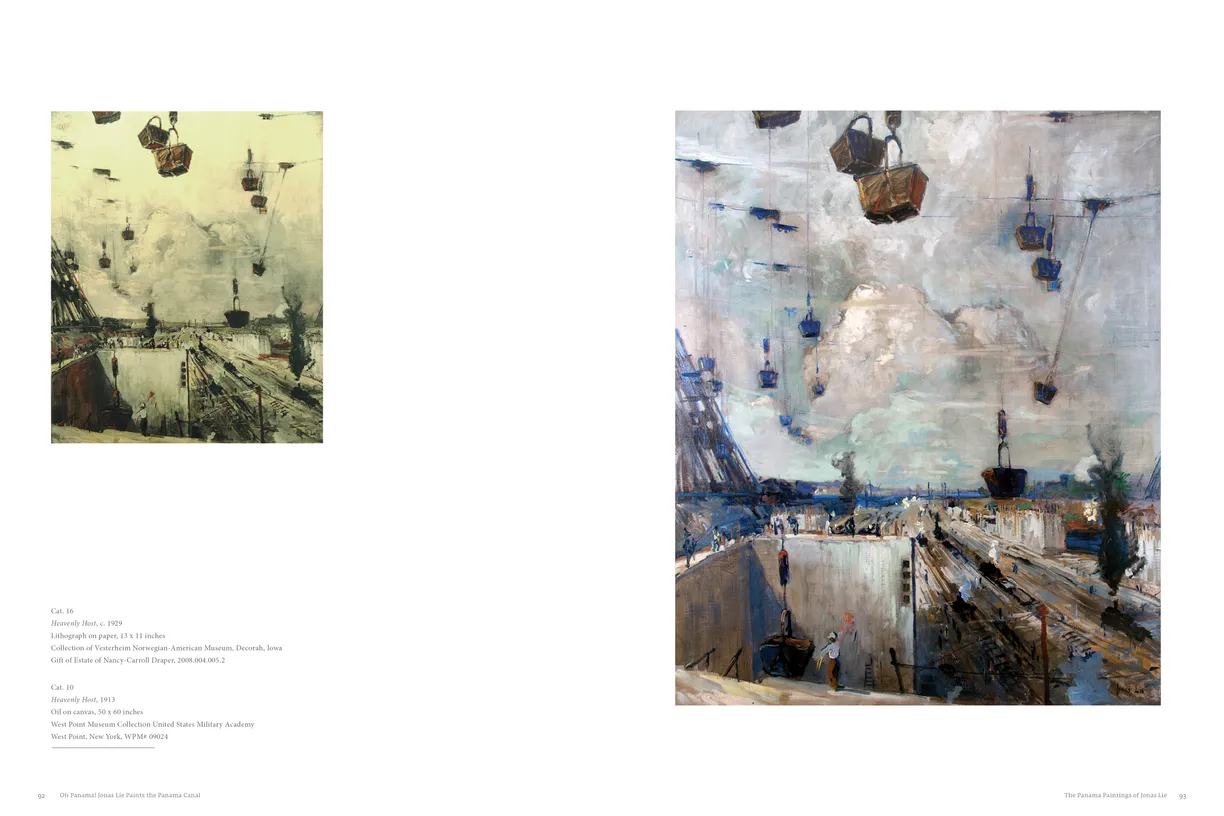
- Oh Panama! Jonas Lie Paints the Panama Canal exhibition catalog, pages 92-93
- Client: Hudson River Museum & Michener Art Museum
- Visit figure page
- Type: portfolio
- Portfolio Type: publication_design
- Portfolio Role: design_layout
Jonas Lie: Oh Panama — Pages 94–95
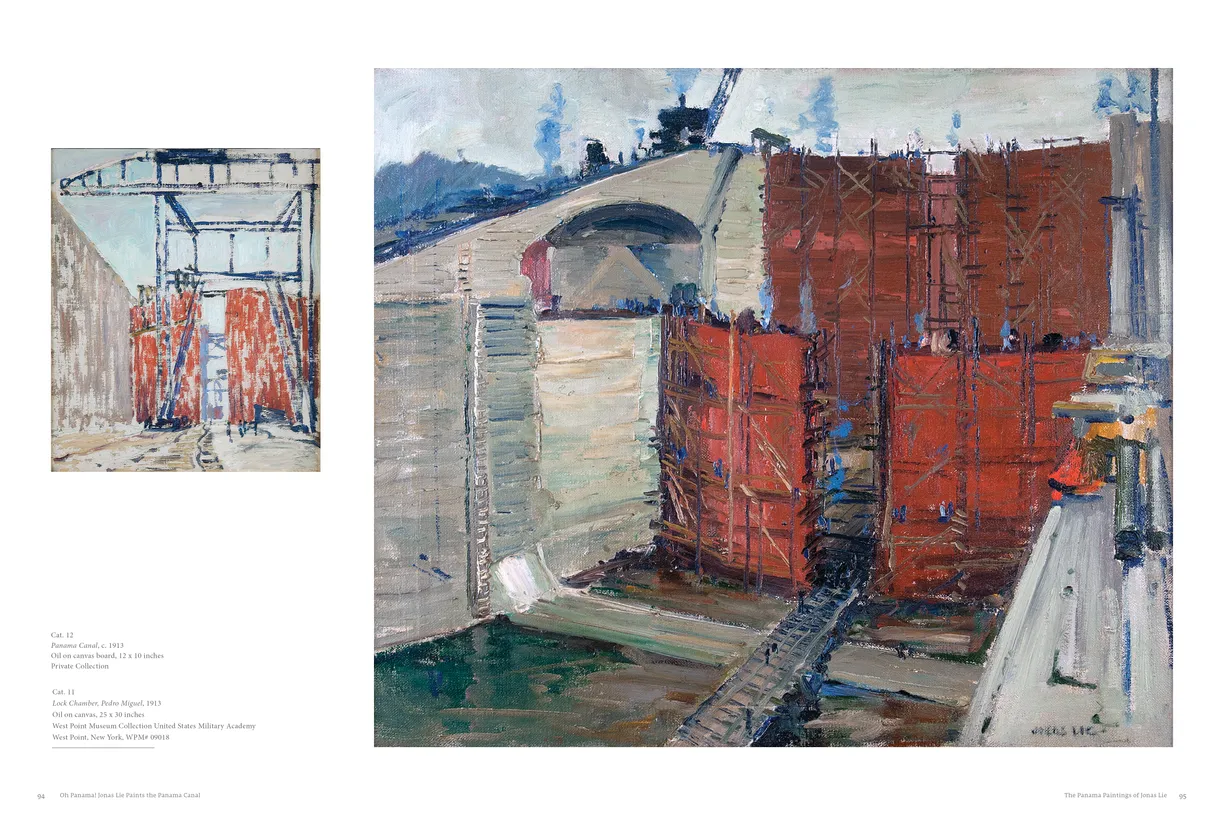
- Oh Panama! Jonas Lie Paints the Panama Canal exhibition catalog, pages 94-95
- Client: Hudson River Museum & Michener Art Museum
- Visit figure page
- Type: portfolio
- Portfolio Type: publication_design
- Portfolio Role: design_layout
Jonas Lie: Oh Panama — Pages 96–97
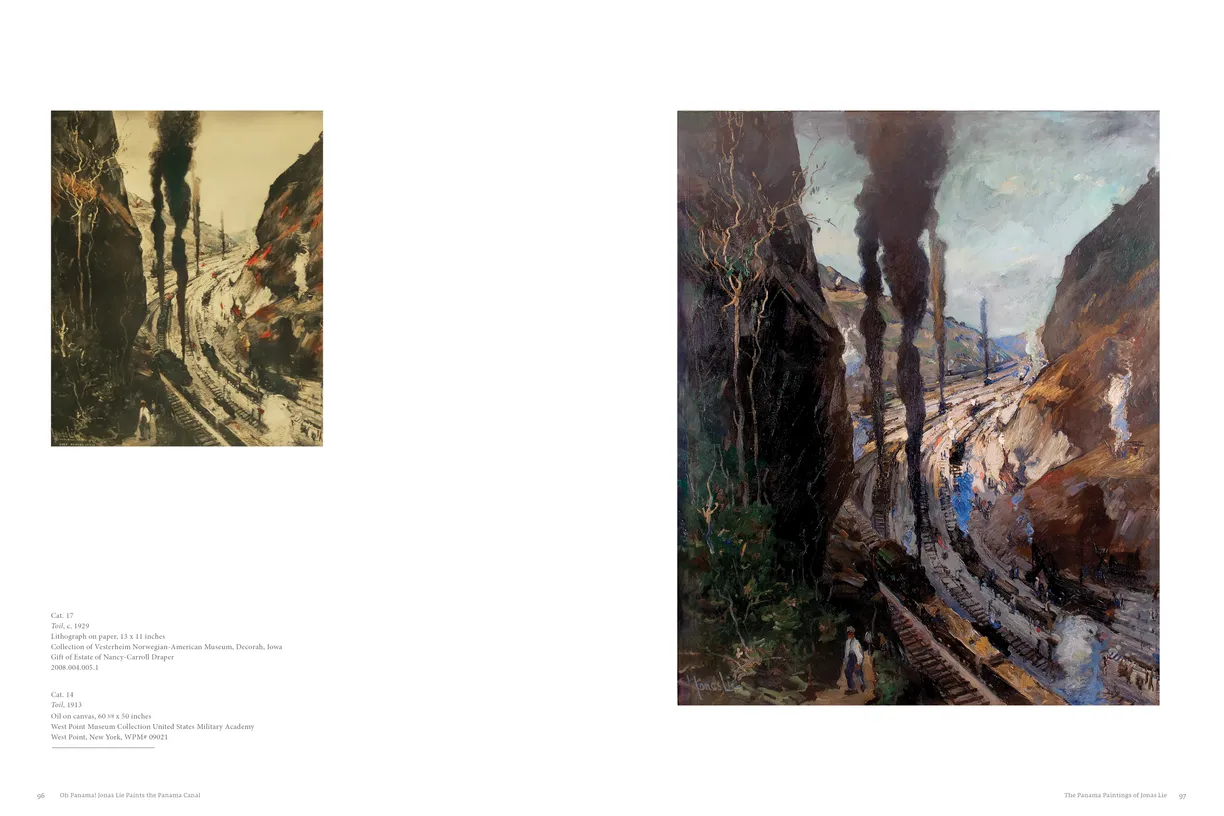
- Oh Panama! Jonas Lie Paints the Panama Canal exhibition catalog, pages 96-97
- Client: Hudson River Museum & Michener Art Museum
- Visit figure page
- Type: portfolio
- Portfolio Type: publication_design
- Portfolio Role: design_layout
Jonas Lie: Oh Panama — Pages 98–99
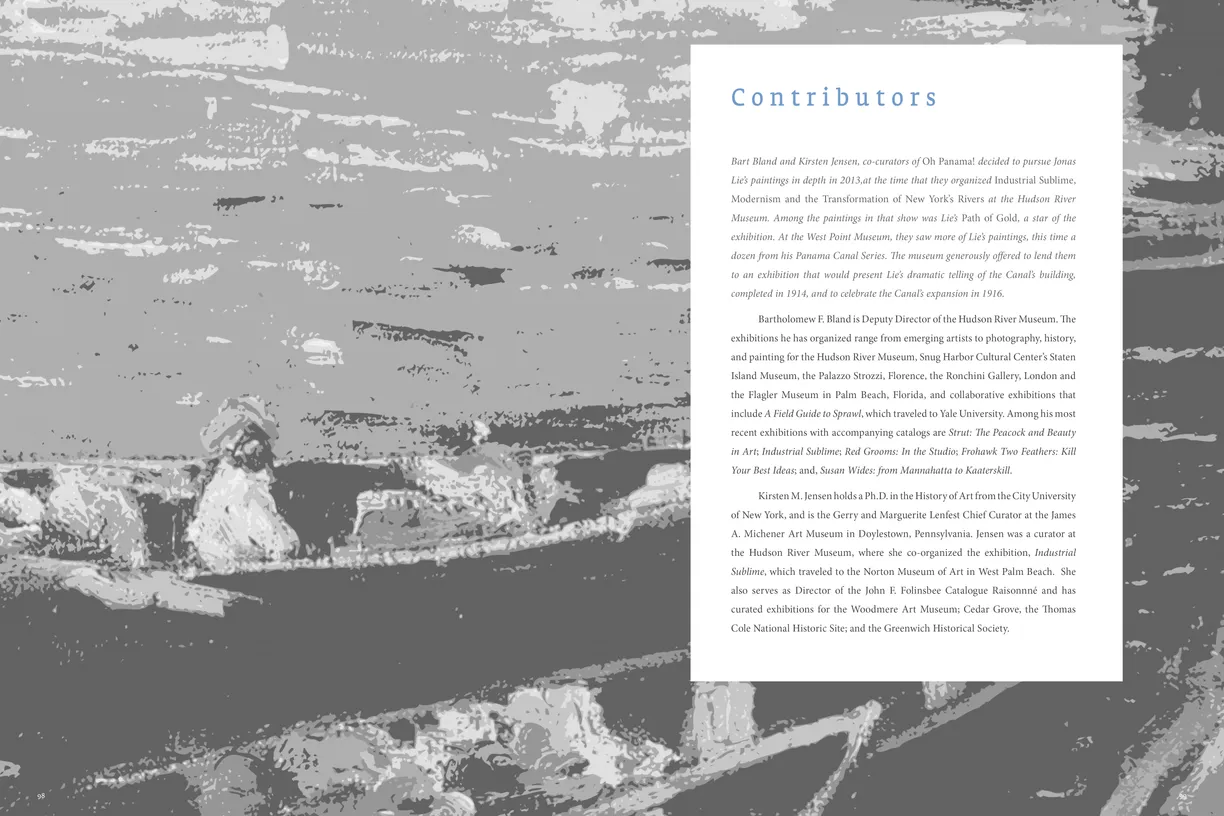
- Oh Panama! Jonas Lie Paints the Panama Canal exhibition catalog, pages 98-99
- Client: Hudson River Museum & Michener Art Museum
- Visit figure page
- Type: portfolio
- Portfolio Type: publication_design
- Portfolio Role: design_layout
Jordan Matter Dancers Among Us Exhibition Artist Panel
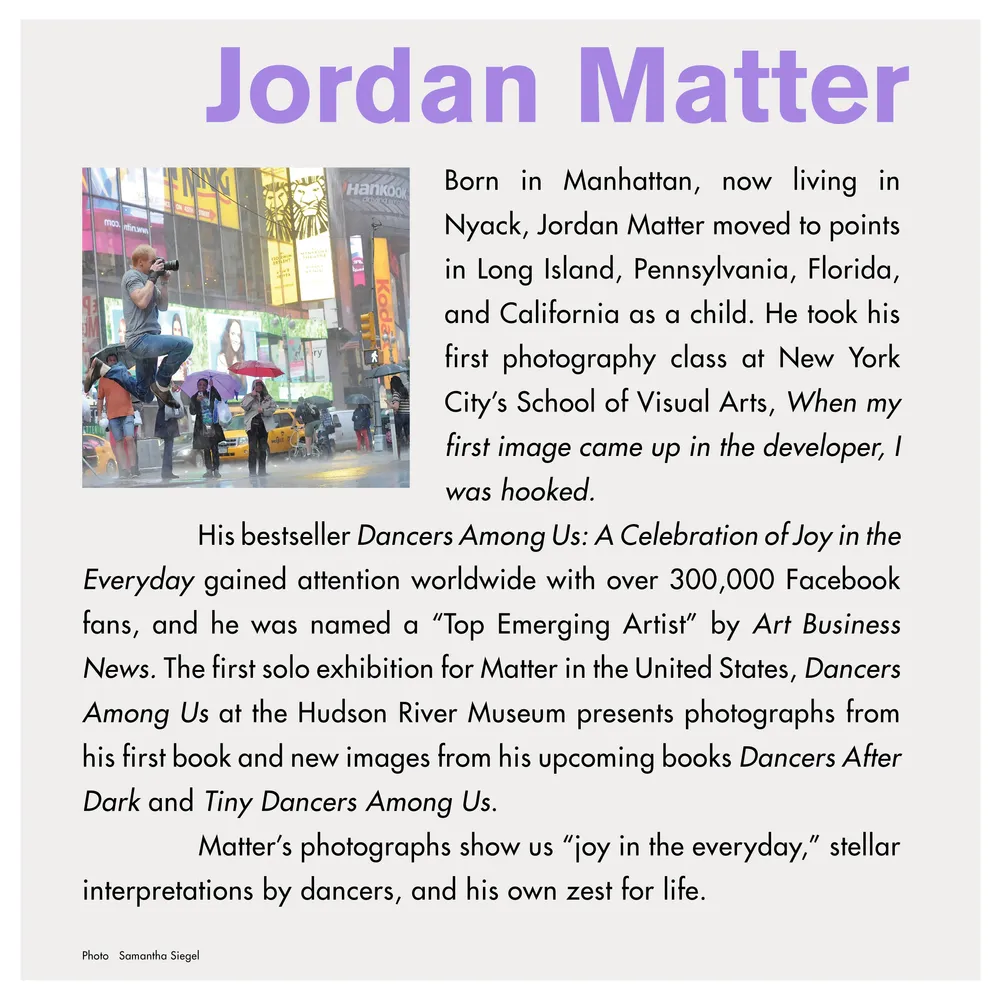
- Jordan Matter: Dancers Among Us exhibition artist panel
- Client: Hudson River Museum
- Visit figure page
- Type: portfolio
- Portfolio Type: advertising
- Portfolio Role: design_layout
Jordan Matter Dancers Among Us Exhibition Invitation Presentation
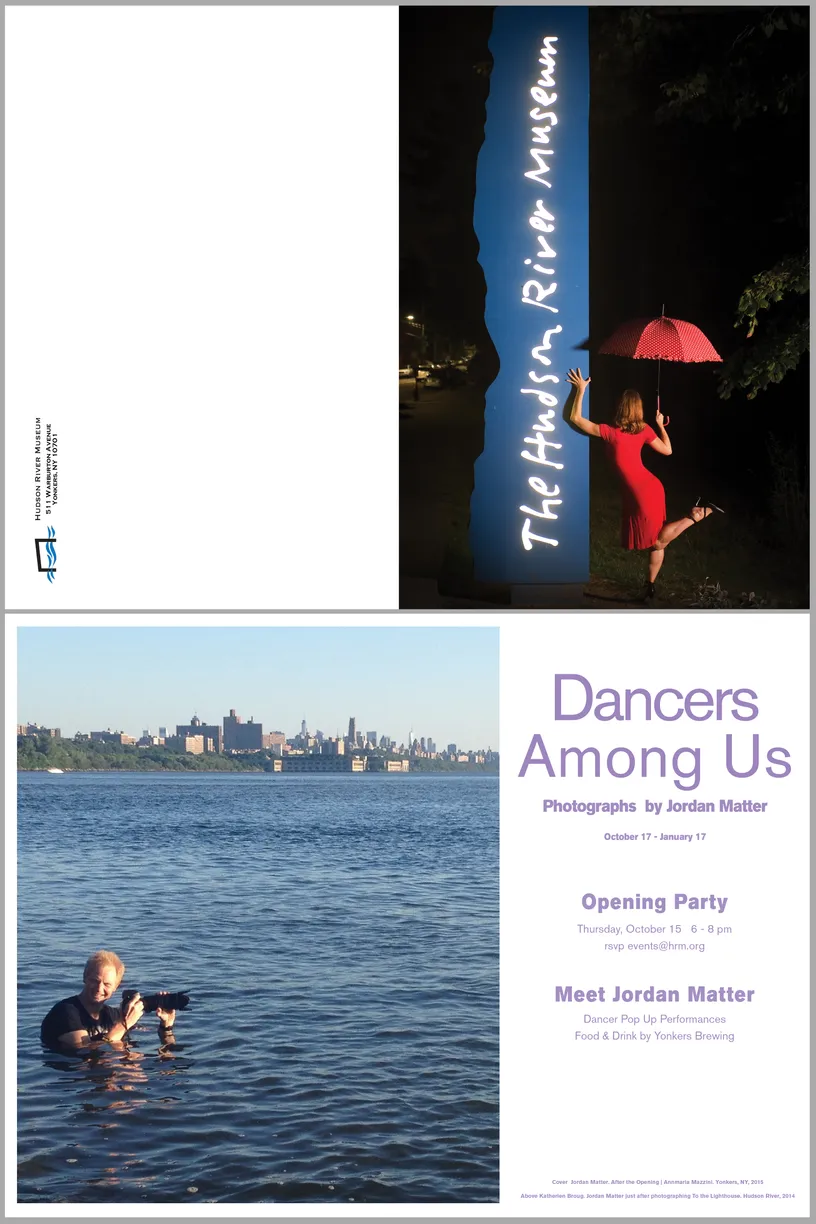
- Jordan Matter: Dancers Among Us exhibition invation
- Client: Hudson River Museum
- Visit figure page
- Type: portfolio
- Portfolio Type: advertising
- Portfolio Role: design_layout
Jordan Matter Dancers Among Us Exhibition Label Panel 001
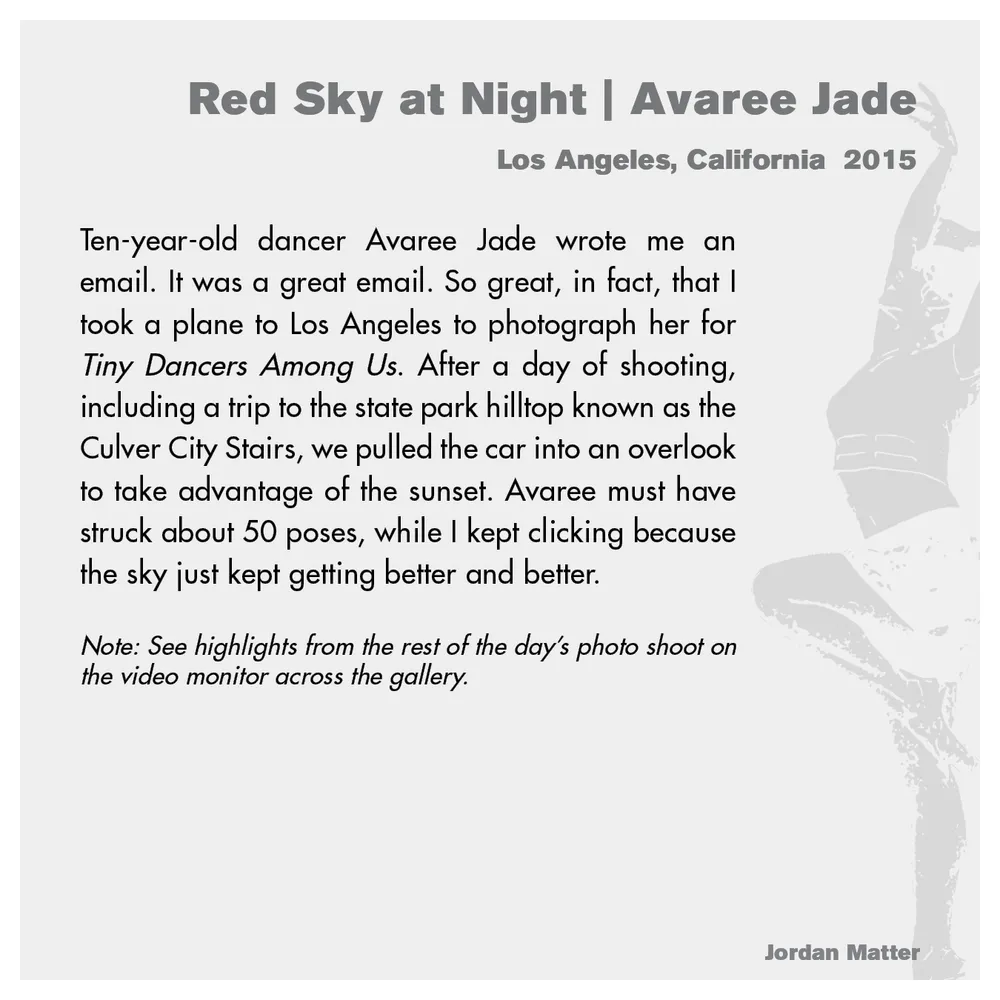
- Jordan Matter: Dancers Among Us exhibition wall label 1/43
- Client: Hudson River Museum
- Visit figure page
- Type: portfolio
- Portfolio Type: advertising
- Portfolio Role: design_layout
Jordan Matter Dancers Among Us Exhibition Label Panel 002
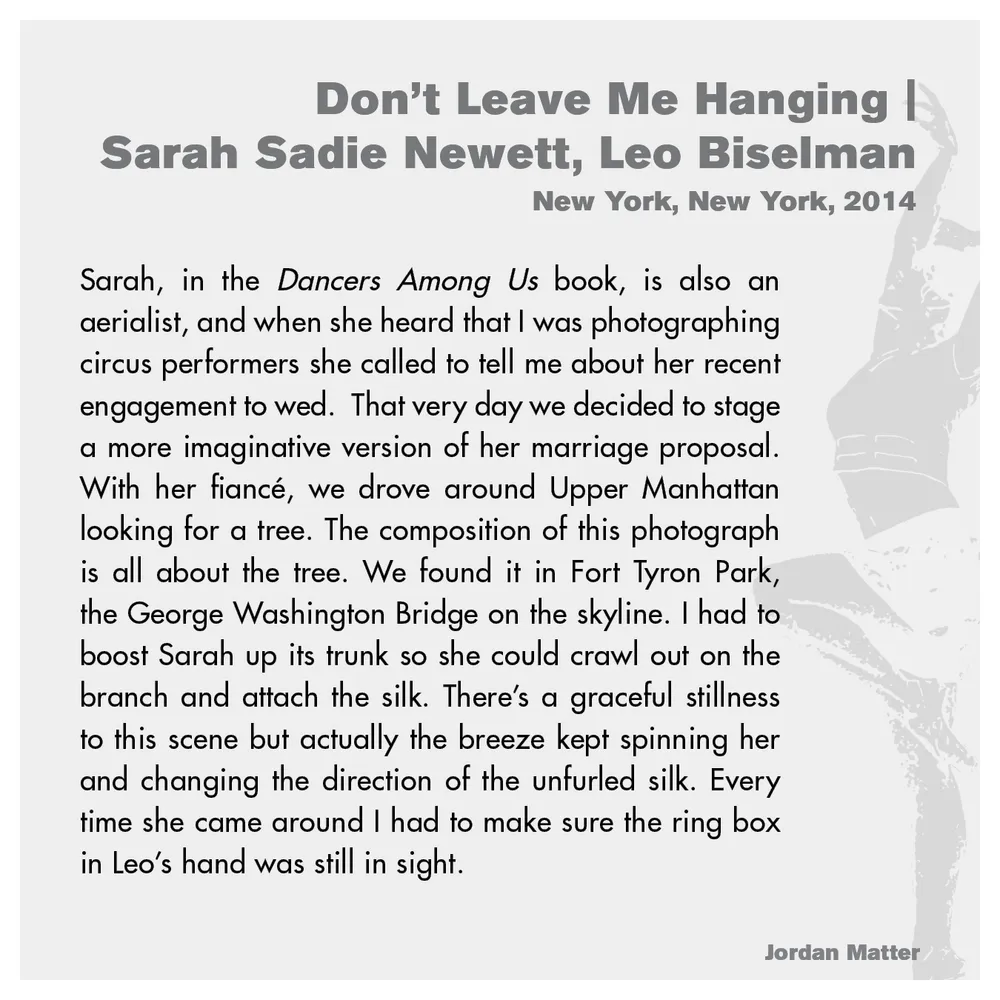
- Jordan Matter: Dancers Among Us exhibition wall label 2/43
- Client: Hudson River Museum
- Visit figure page
- Type: portfolio
- Portfolio Type: advertising
- Portfolio Role: design_layout
Jordan Matter Dancers Among Us Exhibition Label Panel 003

- Jordan Matter: Dancers Among Us exhibition wall label 3/43
- Client: Hudson River Museum
- Visit figure page
- Type: portfolio
- Portfolio Type: advertising
- Portfolio Role: design_layout
Jordan Matter Dancers Among Us Exhibition Label Panel 004
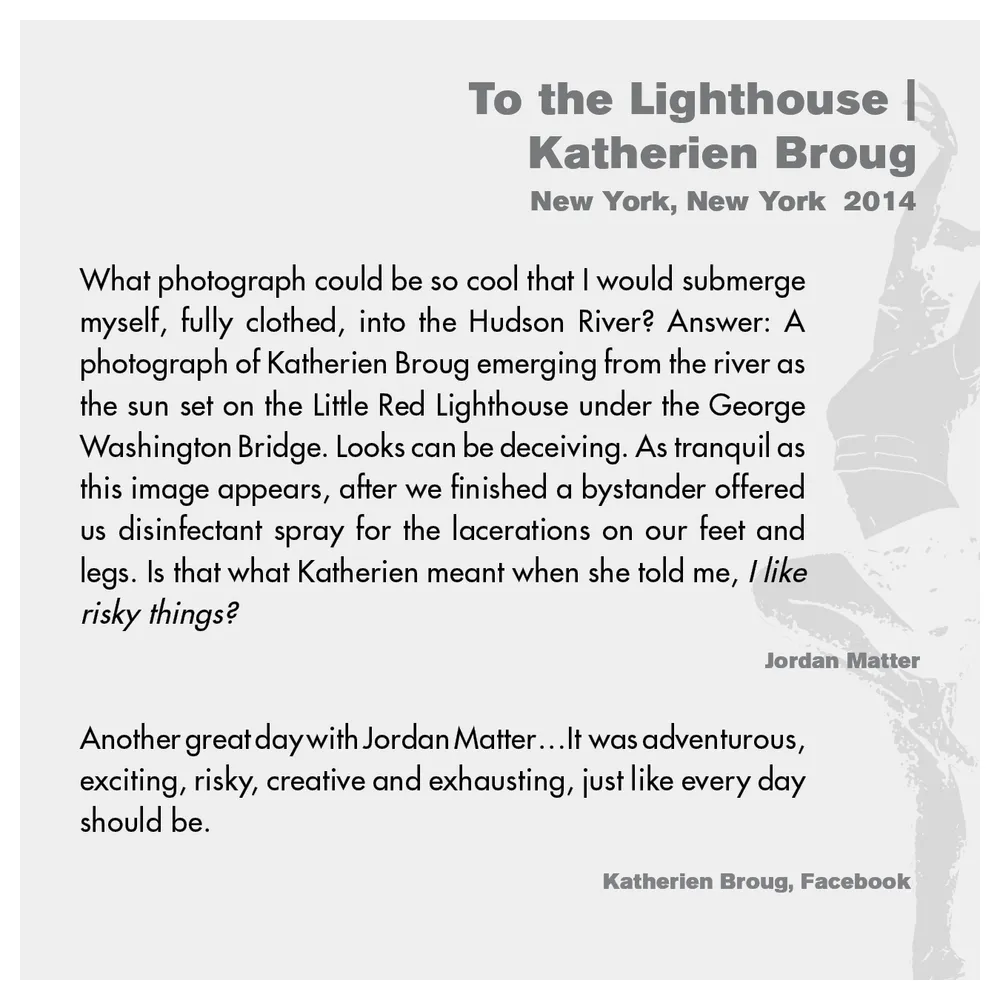
- Jordan Matter: Dancers Among Us exhibition wall label 4/43
- Client: Hudson River Museum
- Visit figure page
- Type: portfolio
- Portfolio Type: advertising
- Portfolio Role: design_layout
Jordan Matter Dancers Among Us Exhibition Label Panel 005
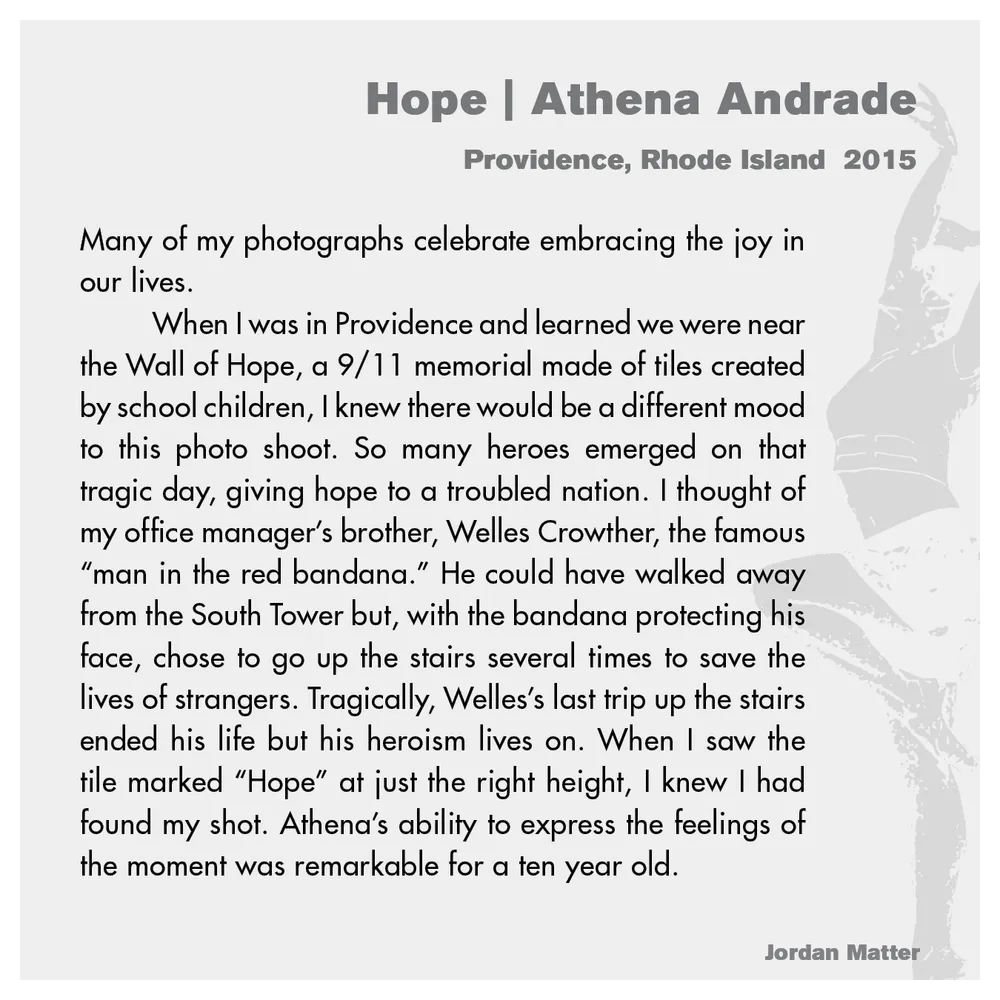
- Jordan Matter: Dancers Among Us exhibition wall label 5/43
- Client: Hudson River Museum
- Visit figure page
- Type: portfolio
- Portfolio Type: advertising
- Portfolio Role: design_layout
Jordan Matter Dancers Among Us Exhibition Label Panel 006
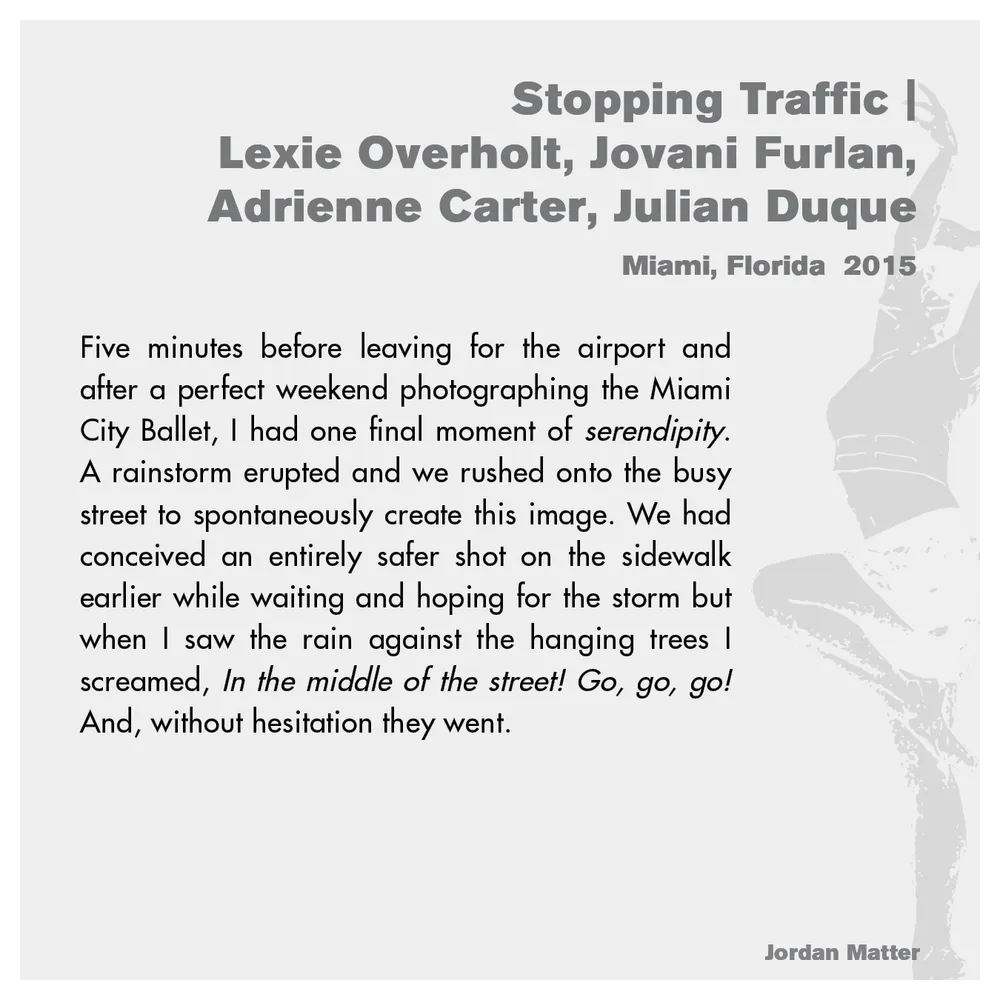
- Jordan Matter: Dancers Among Us exhibition wall label 6/43
- Client: Hudson River Museum
- Visit figure page
- Type: portfolio
- Portfolio Type: advertising
- Portfolio Role: design_layout
Jordan Matter Dancers Among Us Exhibition Label Panel 007
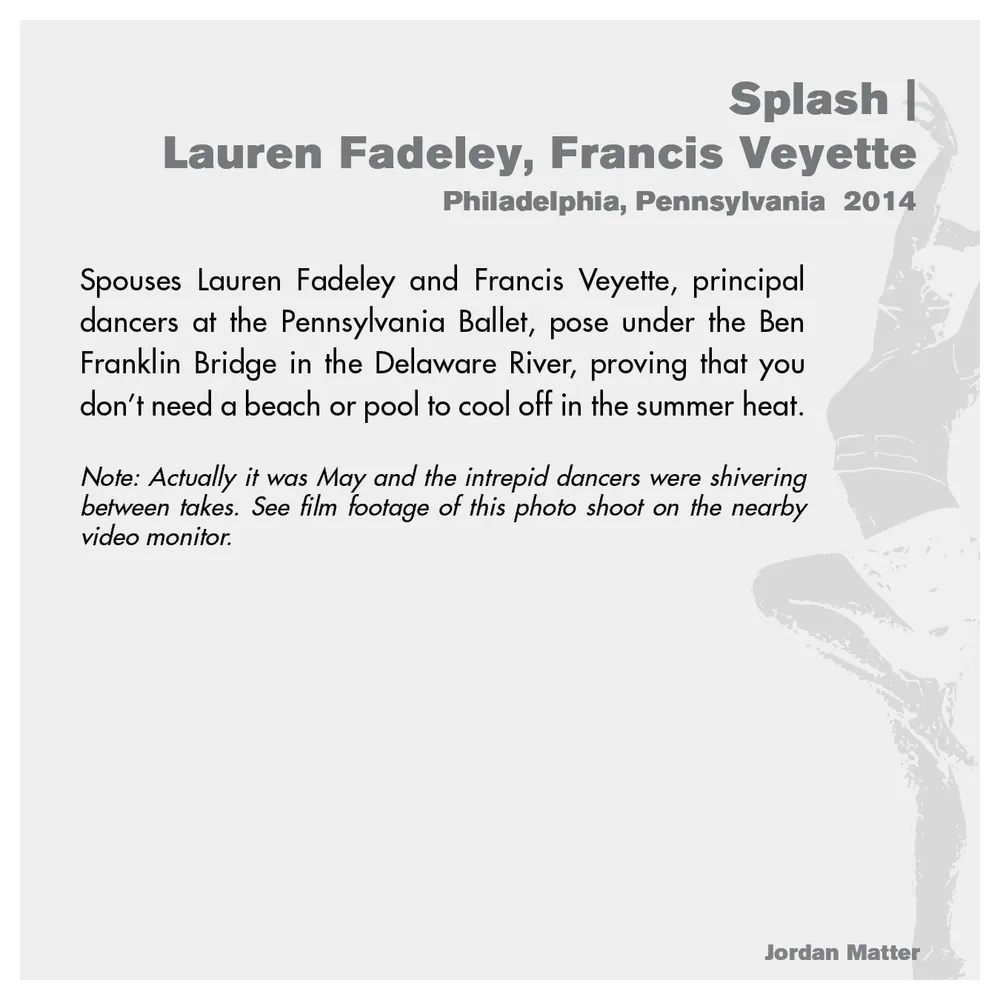
- Jordan Matter: Dancers Among Us exhibition wall label 7/43
- Client: Hudson River Museum
- Visit figure page
- Type: portfolio
- Portfolio Type: advertising
- Portfolio Role: design_layout
Jordan Matter Dancers Among Us Exhibition Label Panel 008
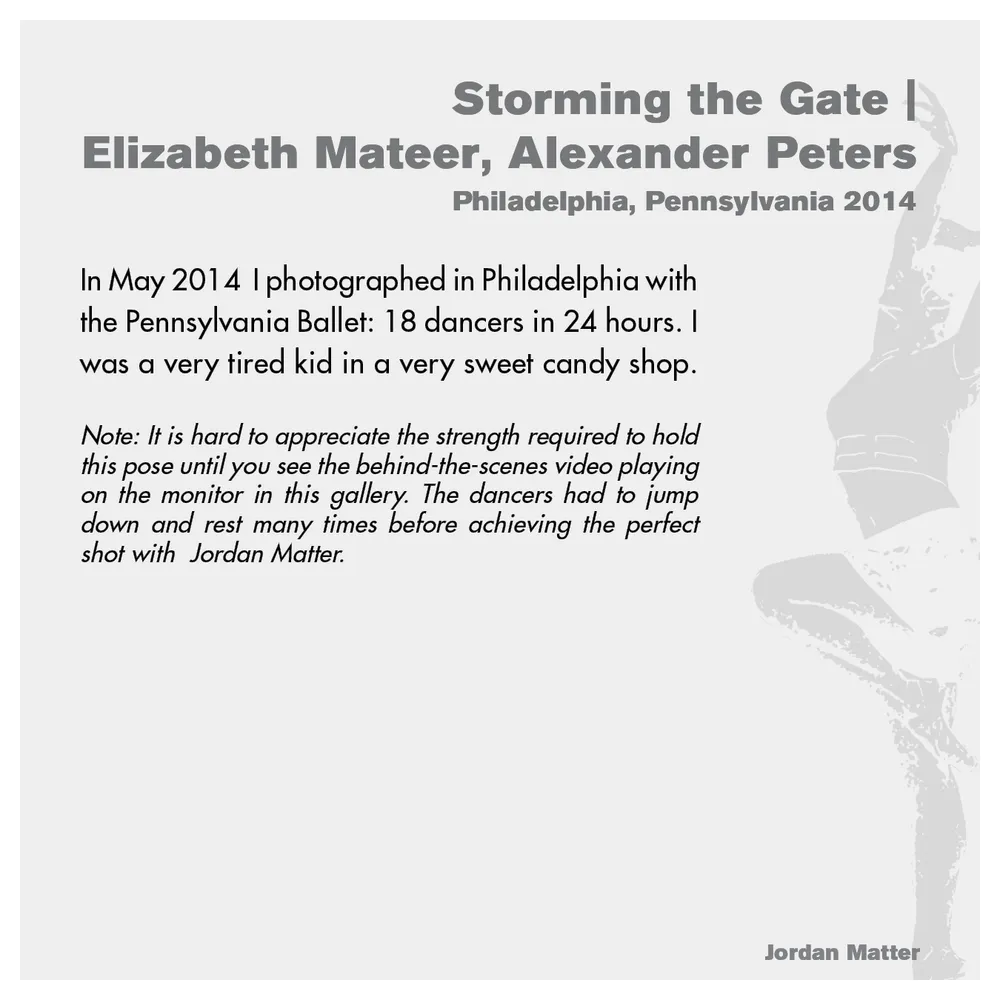
- Jordan Matter: Dancers Among Us exhibition wall label 8/43
- Client: Hudson River Museum
- Visit figure page
- Type: portfolio
- Portfolio Type: advertising
- Portfolio Role: design_layout
Jordan Matter Dancers Among Us Exhibition Label Panel 009
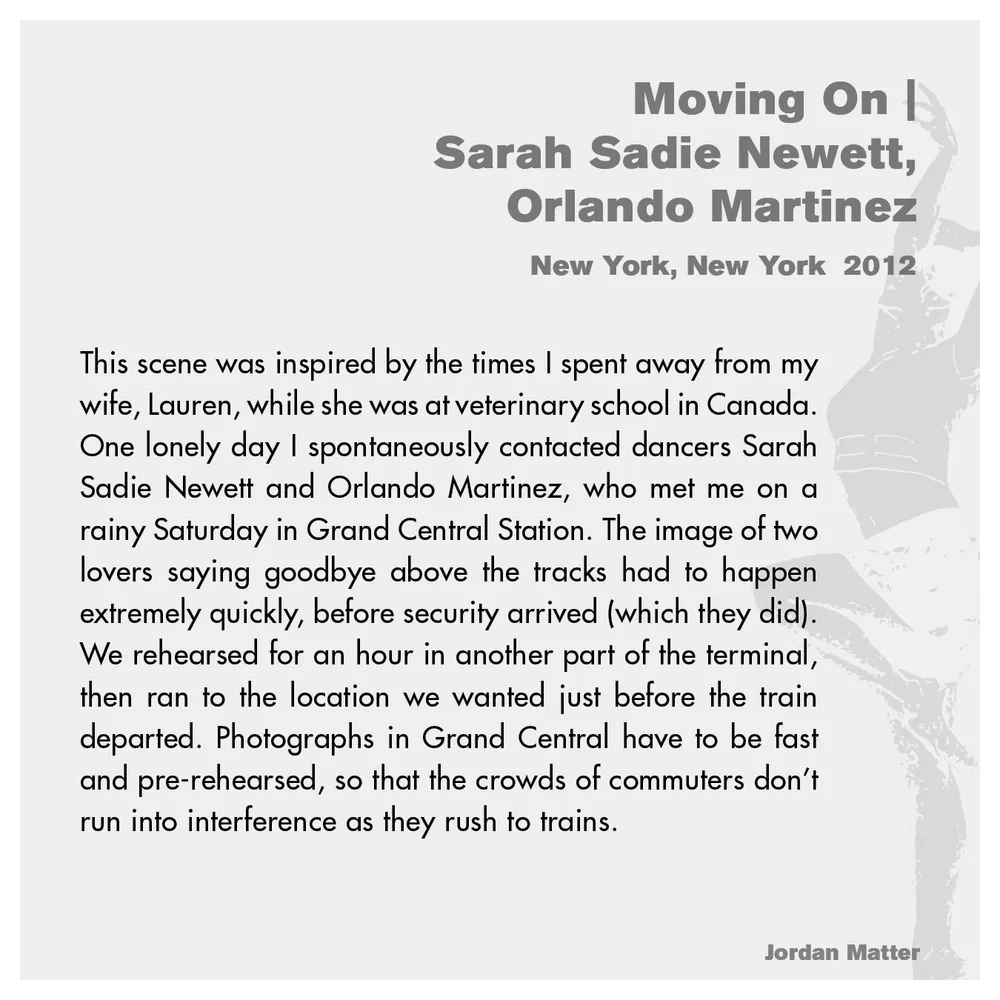
- Jordan Matter: Dancers Among Us exhibition wall label 9/43
- Client: Hudson River Museum
- Visit figure page
- Type: portfolio
- Portfolio Type: advertising
- Portfolio Role: design_layout
Jordan Matter Dancers Among Us Exhibition Label Panel 010

- Jordan Matter: Dancers Among Us exhibition wall label 10/43
- Client: Hudson River Museum
- Visit figure page
- Type: portfolio
- Portfolio Type: advertising
- Portfolio Role: design_layout
Jordan Matter Dancers Among Us Exhibition Label Panel 011

- Jordan Matter: Dancers Among Us exhibition wall label 11/43
- Client: Hudson River Museum
- Visit figure page
- Type: portfolio
- Portfolio Type: advertising
- Portfolio Role: design_layout
Jordan Matter Dancers Among Us Exhibition Label Panel 012
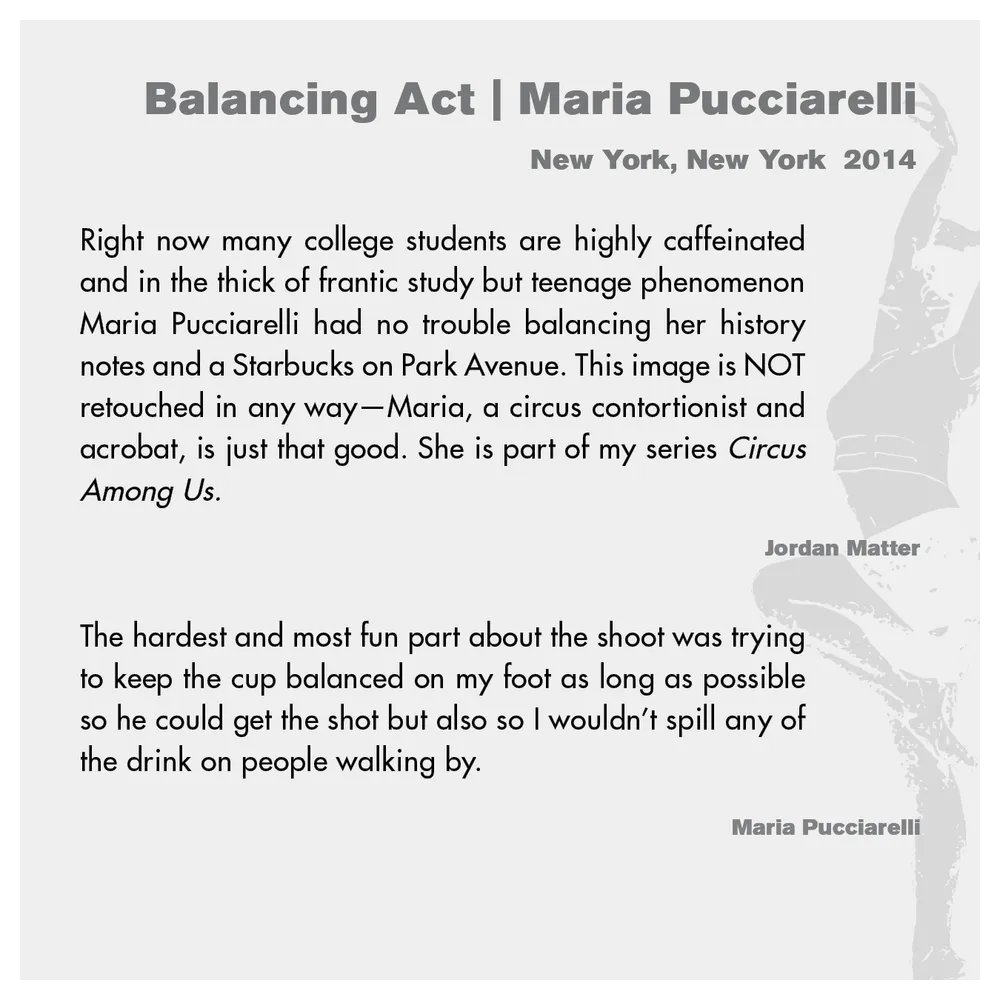
- Jordan Matter: Dancers Among Us exhibition wall label 12/43
- Client: Hudson River Museum
- Visit figure page
- Type: portfolio
- Portfolio Type: advertising
- Portfolio Role: design_layout
Jordan Matter Dancers Among Us Exhibition Label Panel 013
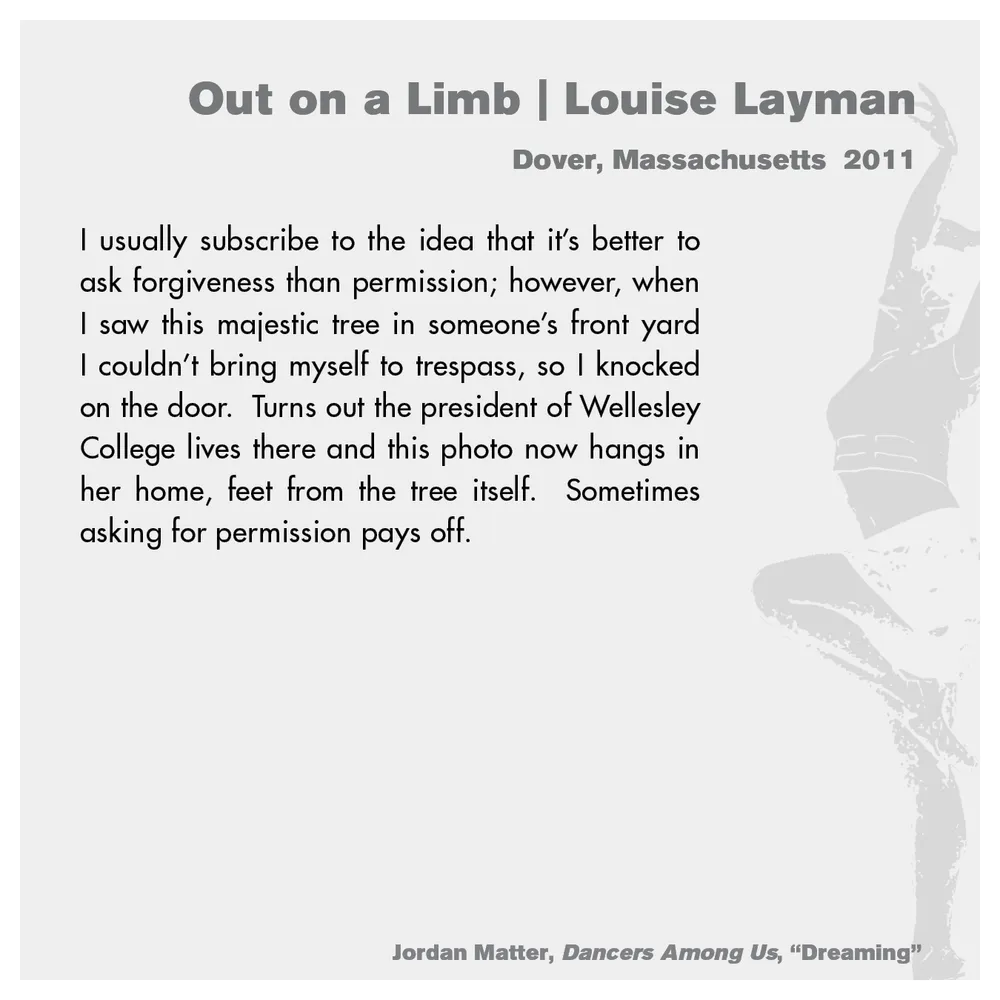
- Jordan Matter: Dancers Among Us exhibition wall label 13/43
- Client: Hudson River Museum
- Visit figure page
- Type: portfolio
- Portfolio Type: advertising
- Portfolio Role: design_layout
Jordan Matter Dancers Among Us Exhibition Label Panel 014
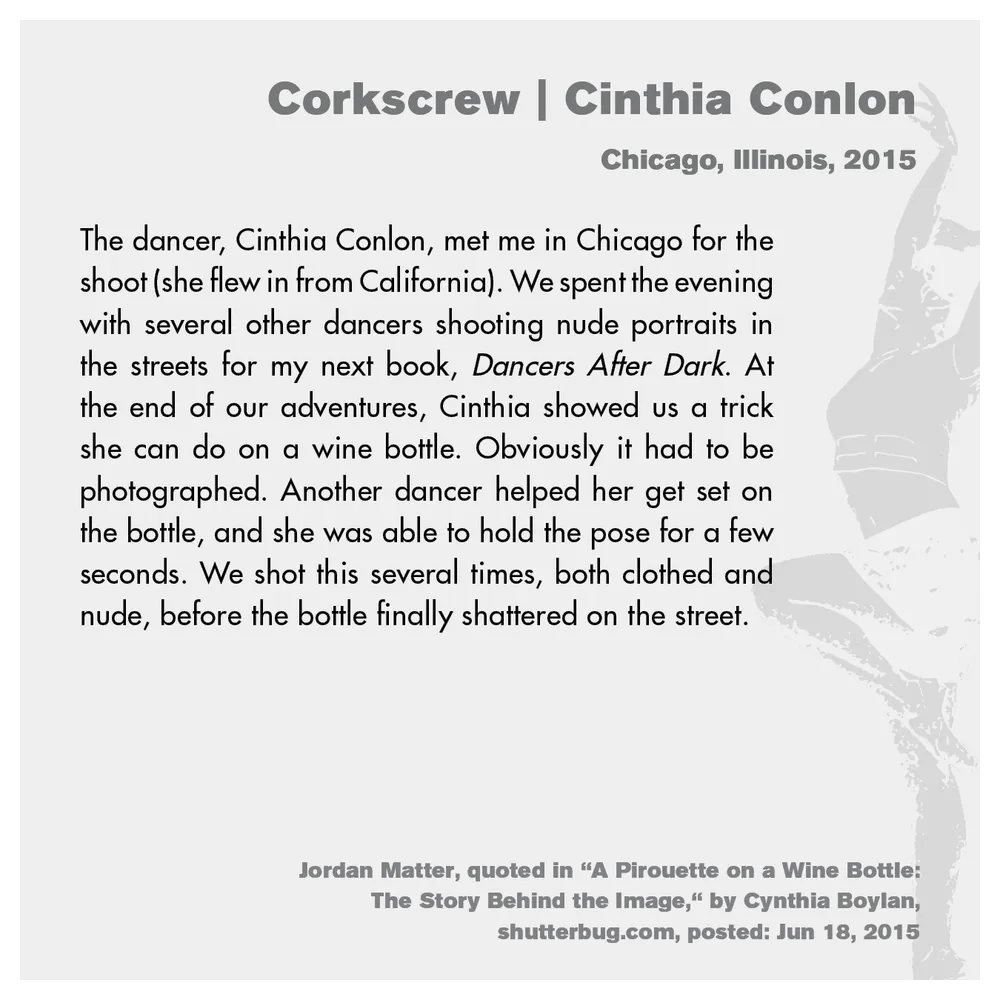
- Jordan Matter: Dancers Among Us exhibition wall label 14/43
- Client: Hudson River Museum
- Visit figure page
- Type: portfolio
- Portfolio Type: advertising
- Portfolio Role: design_layout
Jordan Matter Dancers Among Us Exhibition Label Panel 015
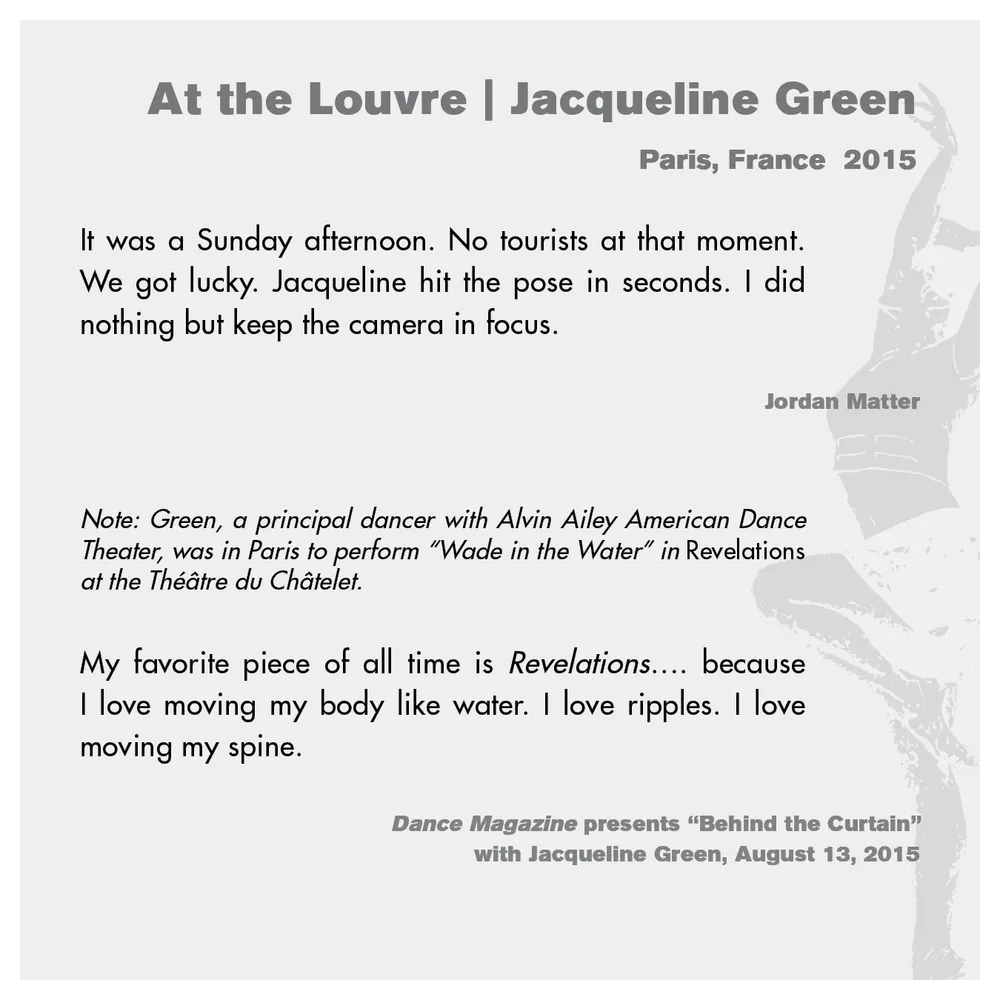
- Jordan Matter: Dancers Among Us exhibition wall label 15/43
- Client: Hudson River Museum
- Visit figure page
- Type: portfolio
- Portfolio Type: advertising
- Portfolio Role: design_layout
Jordan Matter Dancers Among Us Exhibition Label Panel 016

- Jordan Matter: Dancers Among Us exhibition wall label 16/43
- Client: Hudson River Museum
- Visit figure page
- Type: portfolio
- Portfolio Type: advertising
- Portfolio Role: design_layout
Jordan Matter Dancers Among Us Exhibition Label Panel 017
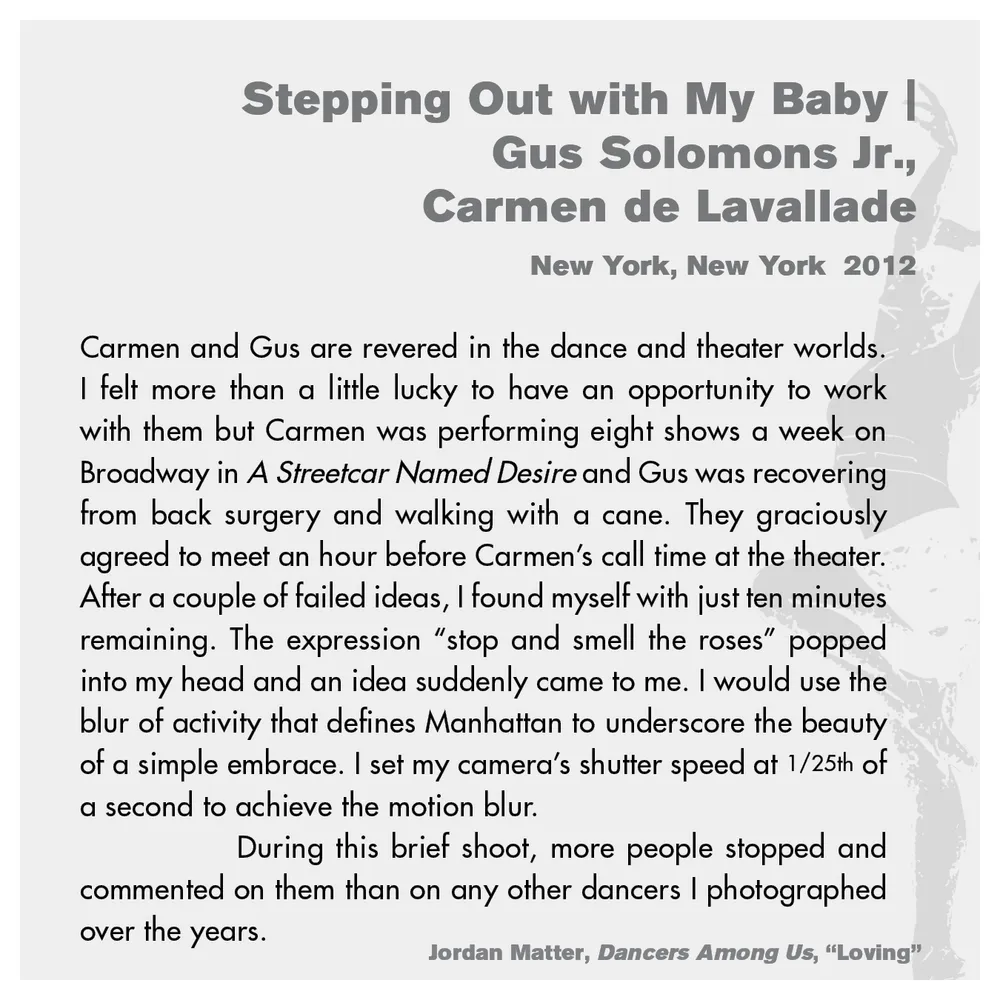
- Jordan Matter: Dancers Among Us exhibition wall label 17/43
- Client: Hudson River Museum
- Visit figure page
- Type: portfolio
- Portfolio Type: advertising
- Portfolio Role: design_layout
Jordan Matter Dancers Among Us Exhibition Label Panel 018
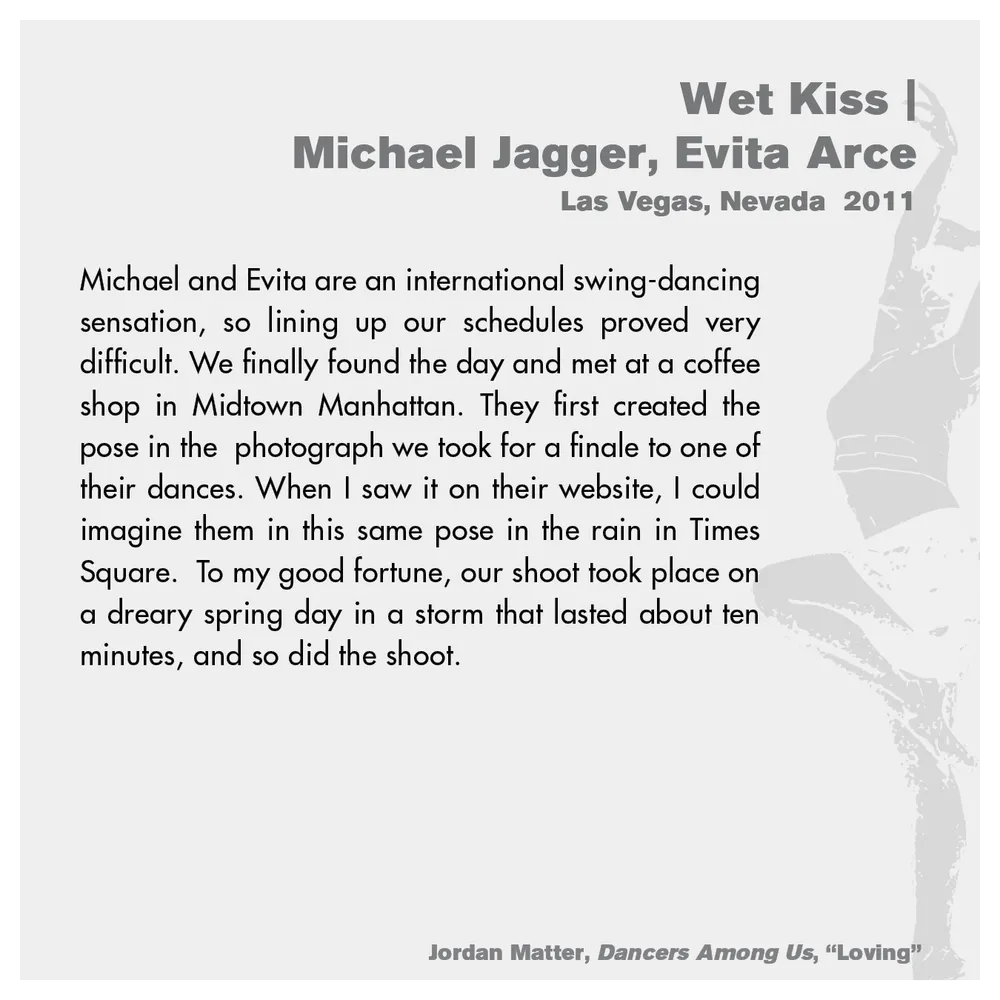
- Jordan Matter: Dancers Among Us exhibition wall label 18/43
- Client: Hudson River Museum
- Visit figure page
- Type: portfolio
- Portfolio Type: advertising
- Portfolio Role: design_layout
Jordan Matter Dancers Among Us Exhibition Label Panel 019
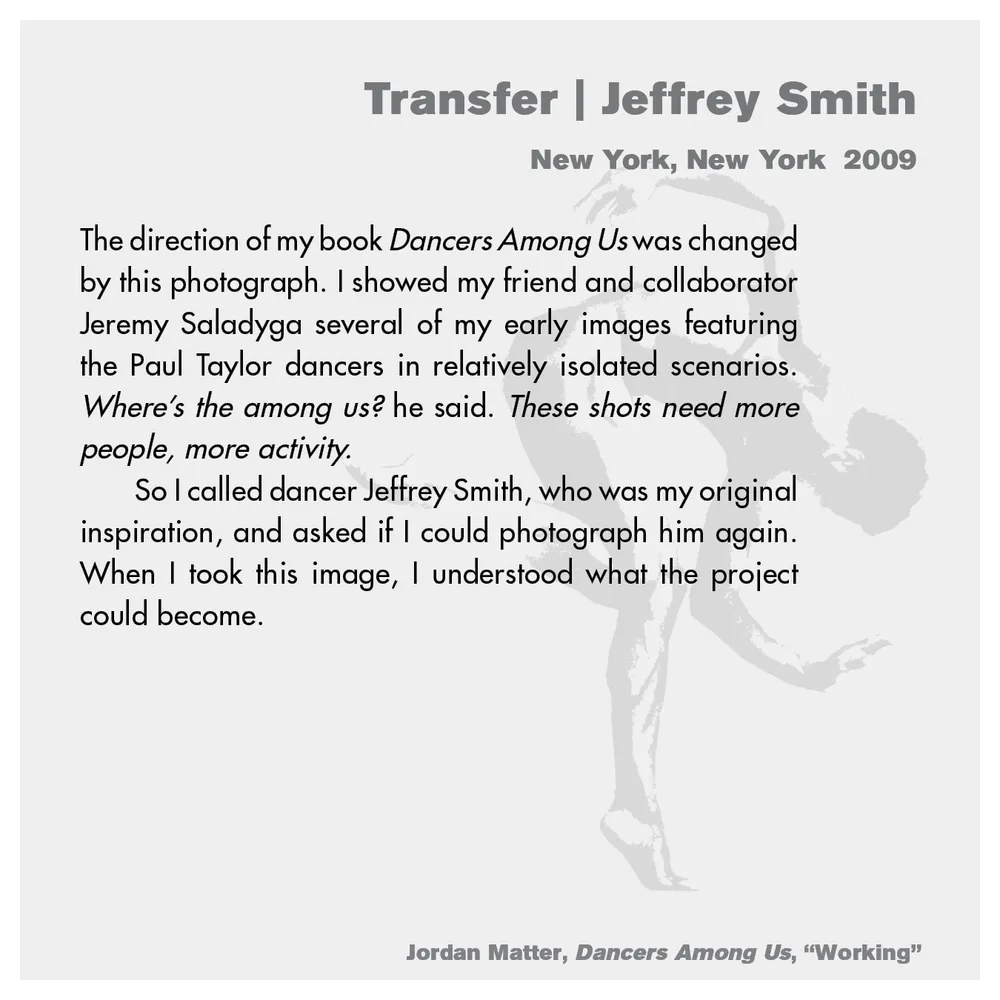
- Jordan Matter: Dancers Among Us exhibition wall label 19/43
- Client: Hudson River Museum
- Visit figure page
- Type: portfolio
- Portfolio Type: advertising
- Portfolio Role: design_layout
Jordan Matter Dancers Among Us Exhibition Label Panel 020

- Jordan Matter: Dancers Among Us exhibition wall label 20/43
- Client: Hudson River Museum
- Visit figure page
- Type: portfolio
- Portfolio Type: advertising
- Portfolio Role: design_layout
Jordan Matter Dancers Among Us Exhibition Label Panel 021
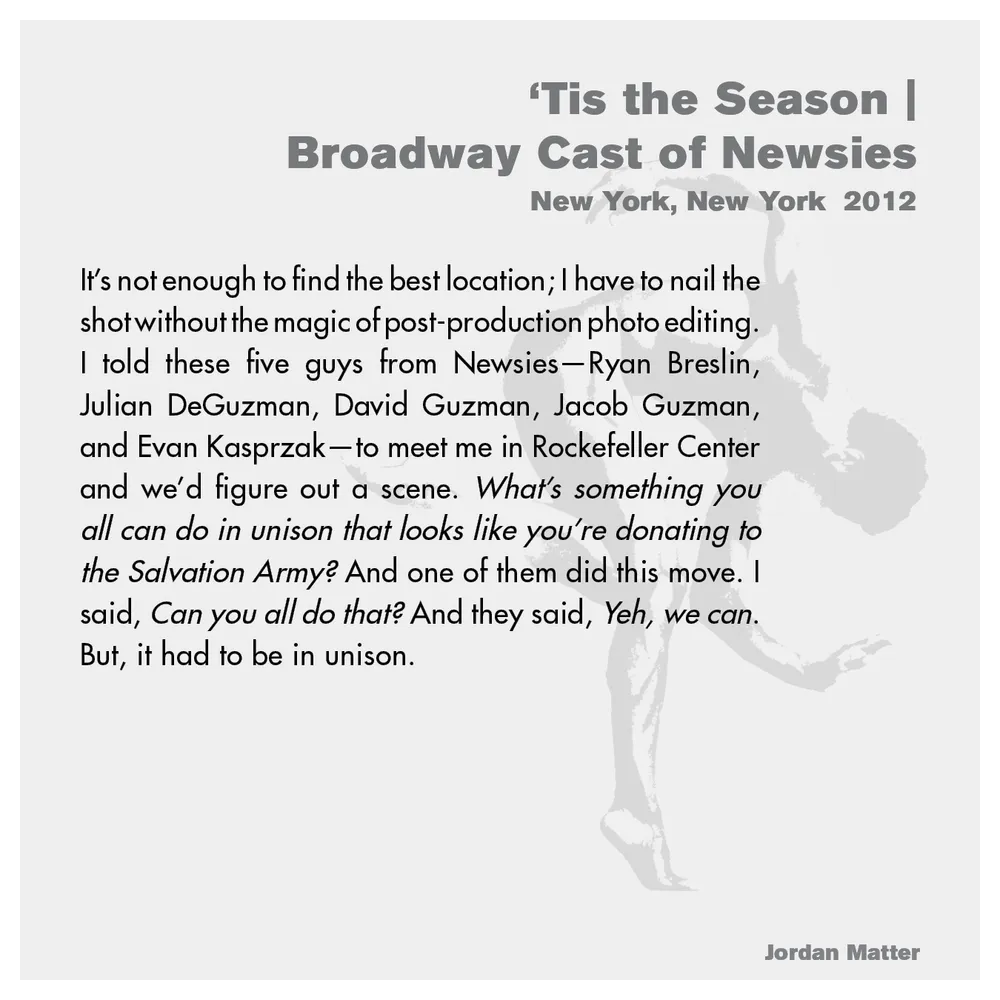
- Jordan Matter: Dancers Among Us exhibition wall label 21/43
- Client: Hudson River Museum
- Visit figure page
- Type: portfolio
- Portfolio Type: advertising
- Portfolio Role: design_layout
Jordan Matter Dancers Among Us Exhibition Label Panel 022
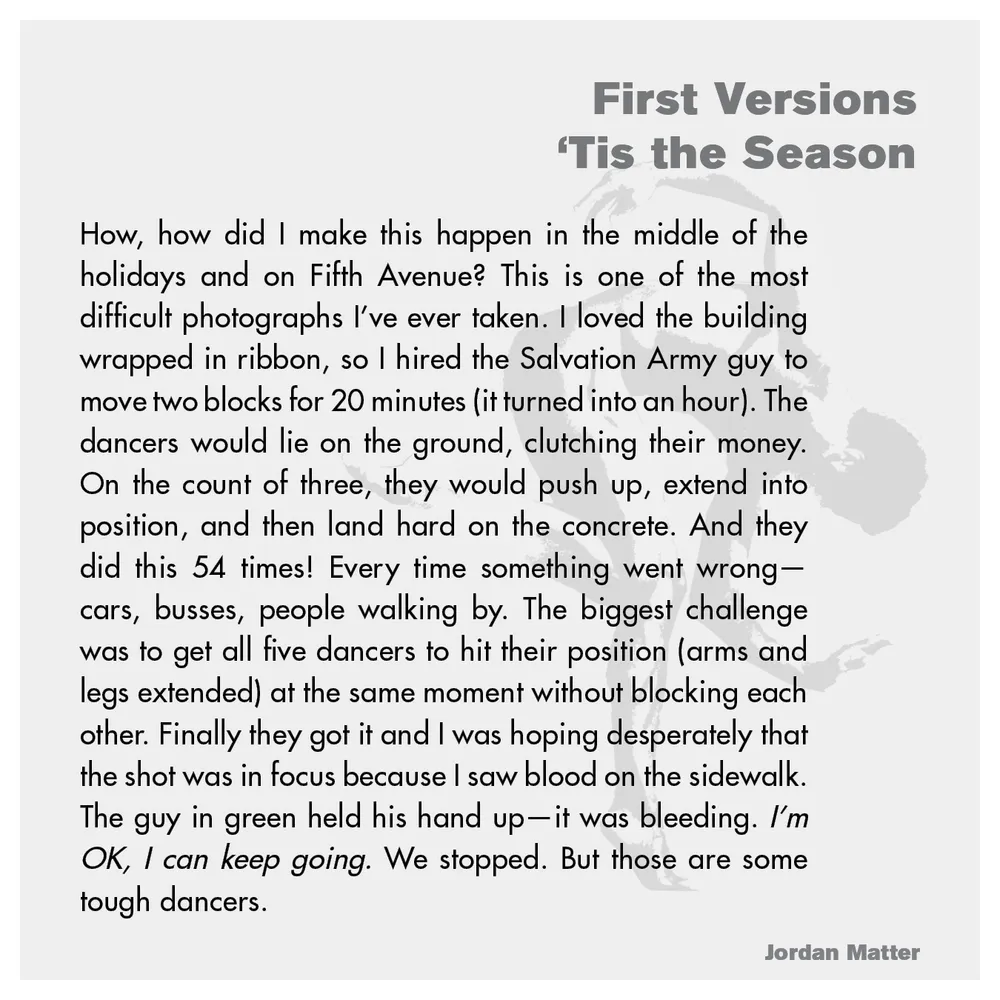
- Jordan Matter: Dancers Among Us exhibition wall label 22/43
- Client: Hudson River Museum
- Visit figure page
- Type: portfolio
- Portfolio Type: advertising
- Portfolio Role: design_layout
Jordan Matter Dancers Among Us Exhibition Label Panel 023
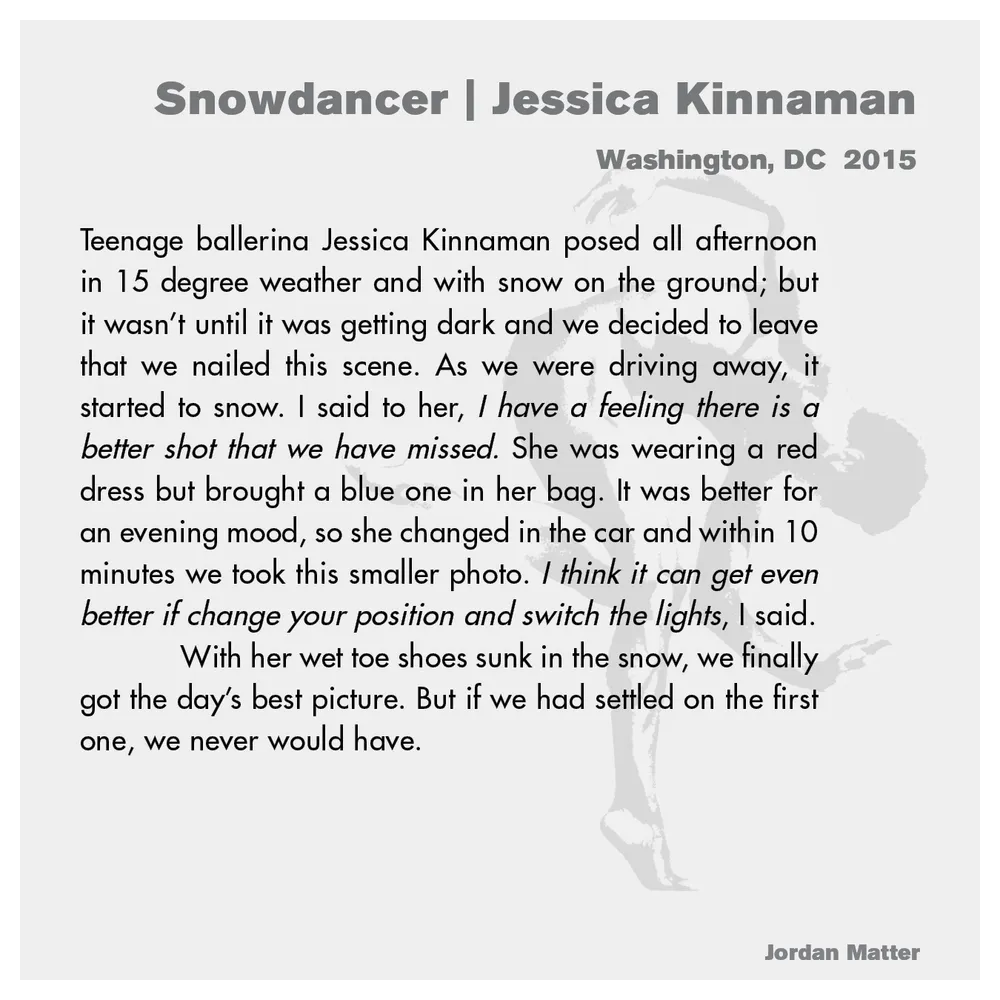
- Jordan Matter: Dancers Among Us exhibition wall label 23/43
- Client: Hudson River Museum
- Visit figure page
- Type: portfolio
- Portfolio Type: advertising
- Portfolio Role: design_layout
Jordan Matter Dancers Among Us Exhibition Label Panel 024
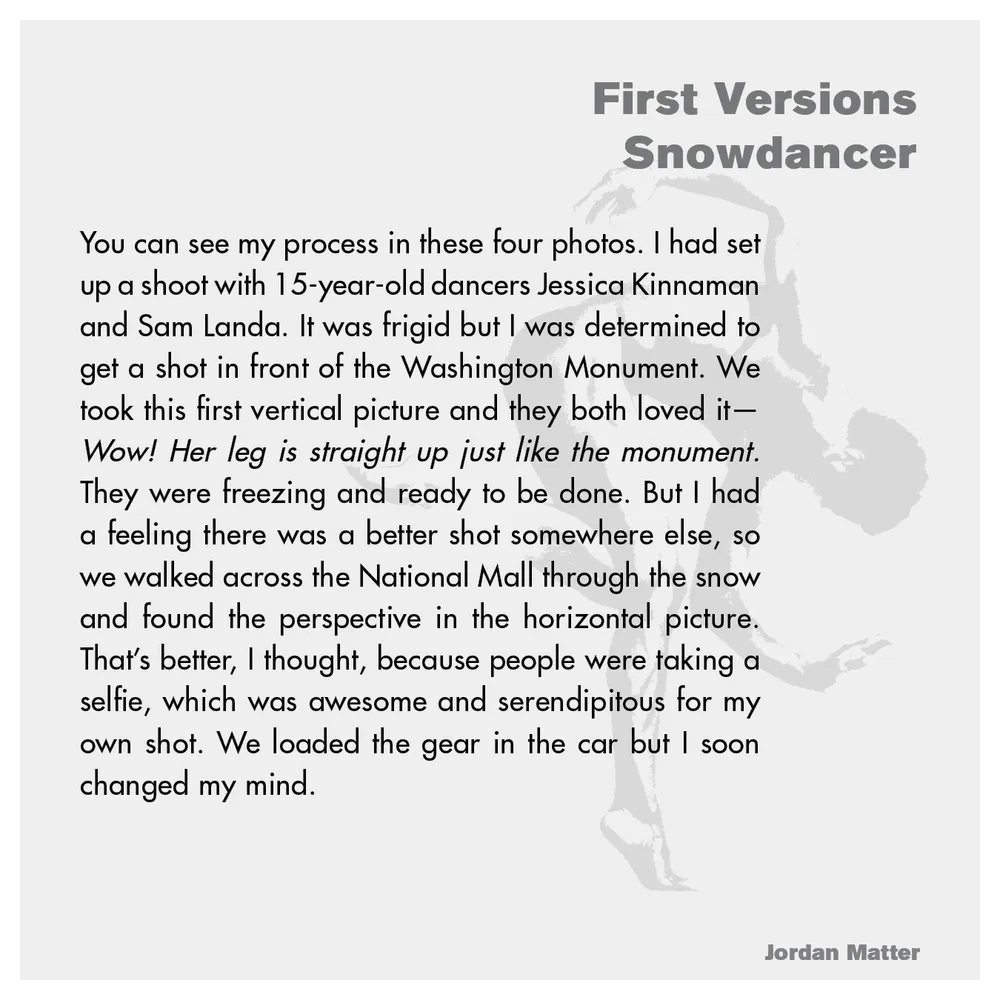
- Jordan Matter: Dancers Among Us exhibition wall label 24/43
- Client: Hudson River Museum
- Visit figure page
- Type: portfolio
- Portfolio Type: advertising
- Portfolio Role: design_layout
Jordan Matter Dancers Among Us Exhibition Label Panel 025
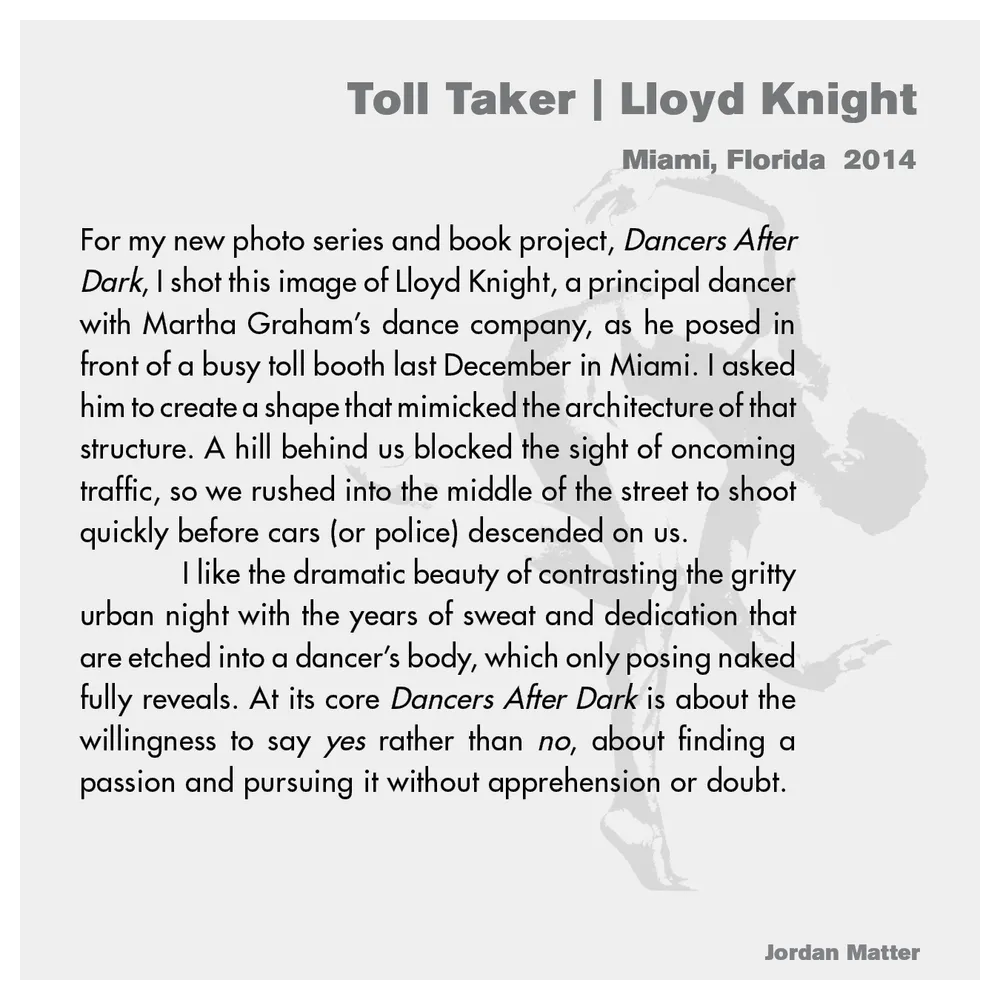
- Jordan Matter: Dancers Among Us exhibition wall label 25/43
- Client: Hudson River Museum
- Visit figure page
- Type: portfolio
- Portfolio Type: advertising
- Portfolio Role: design_layout
Jordan Matter Dancers Among Us Exhibition Label Panel 026
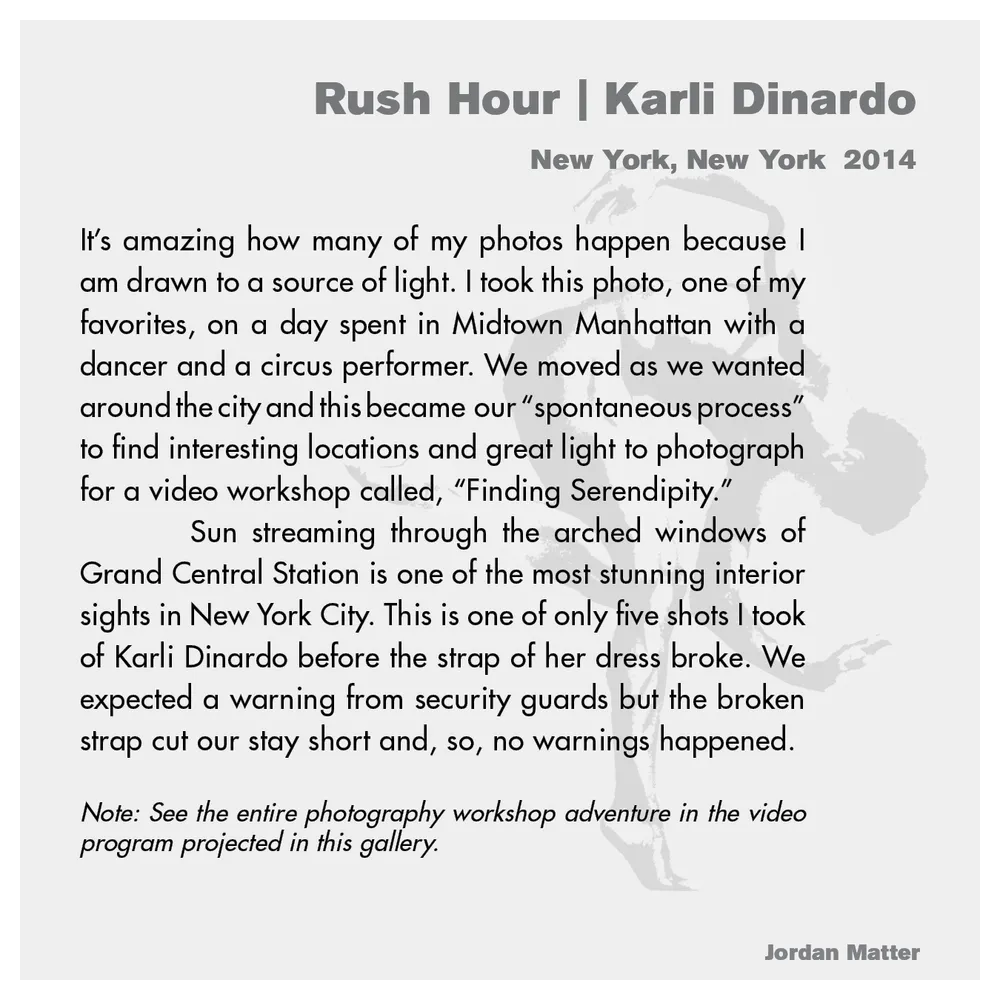
- Jordan Matter: Dancers Among Us exhibition wall label 26/43
- Client: Hudson River Museum
- Visit figure page
- Type: portfolio
- Portfolio Type: advertising
- Portfolio Role: design_layout
Jordan Matter Dancers Among Us Exhibition Label Panel 027

- Jordan Matter: Dancers Among Us exhibition wall label 27/43
- Client: Hudson River Museum
- Visit figure page
- Type: portfolio
- Portfolio Type: advertising
- Portfolio Role: design_layout
Jordan Matter Dancers Among Us Exhibition Label Panel 028
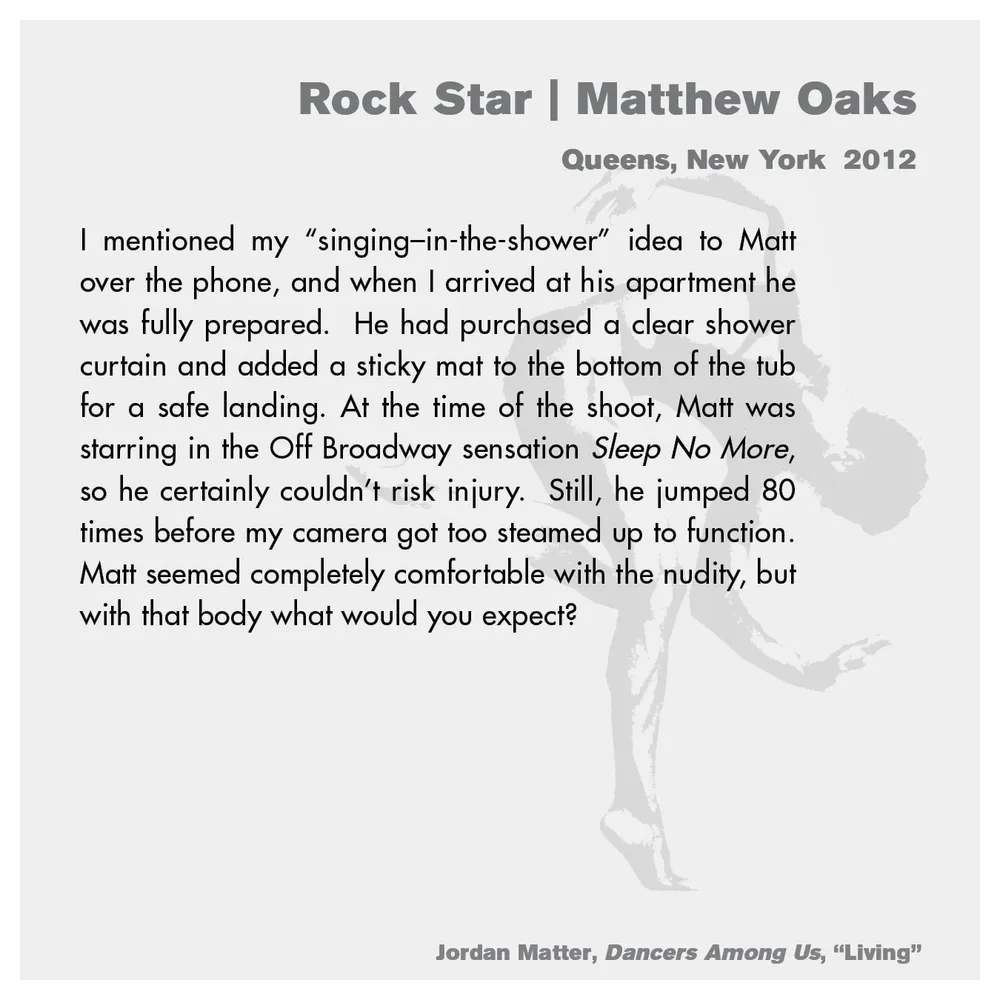
- Jordan Matter: Dancers Among Us exhibition wall label 28/43
- Client: Hudson River Museum
- Visit figure page
- Type: portfolio
- Portfolio Type: advertising
- Portfolio Role: design_layout
Jordan Matter Dancers Among Us Exhibition Label Panel 029
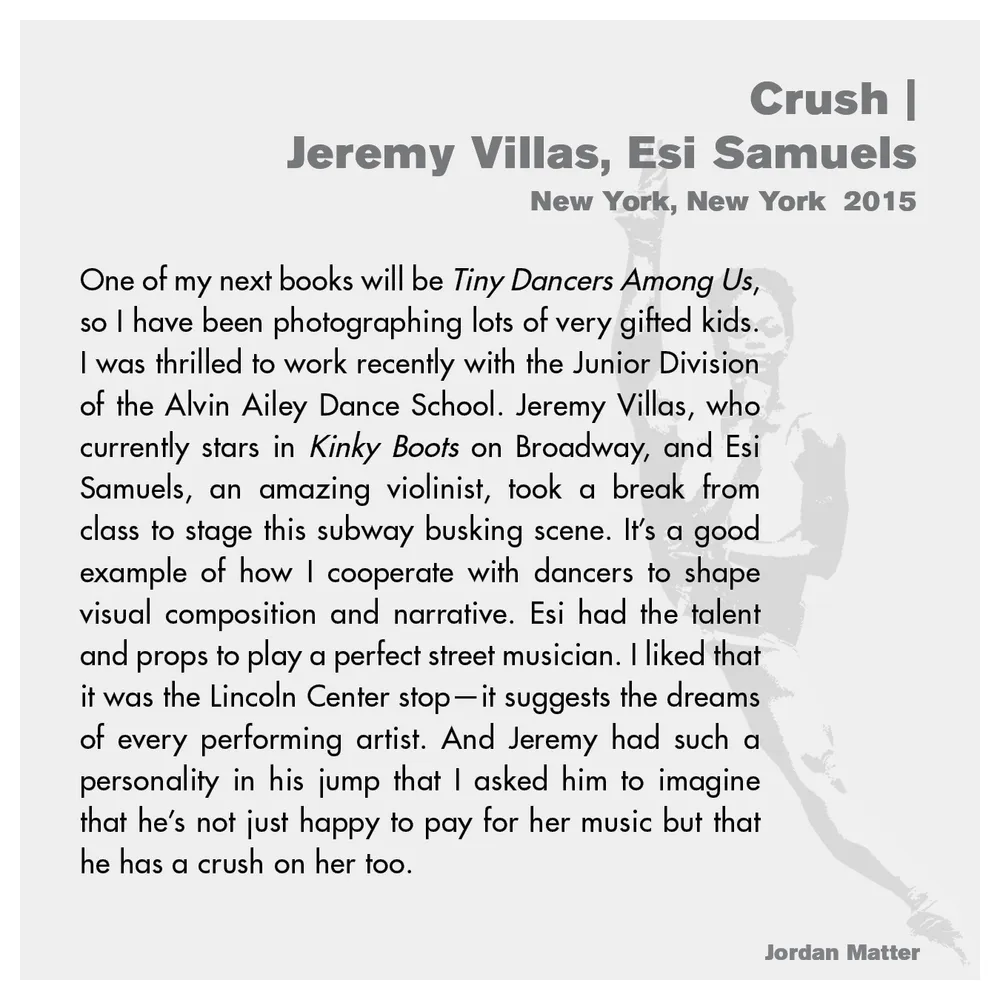
- Jordan Matter: Dancers Among Us exhibition wall label 29/43
- Client: Hudson River Museum
- Visit figure page
- Type: portfolio
- Portfolio Type: advertising
- Portfolio Role: design_layout
Jordan Matter Dancers Among Us Exhibition Label Panel 030
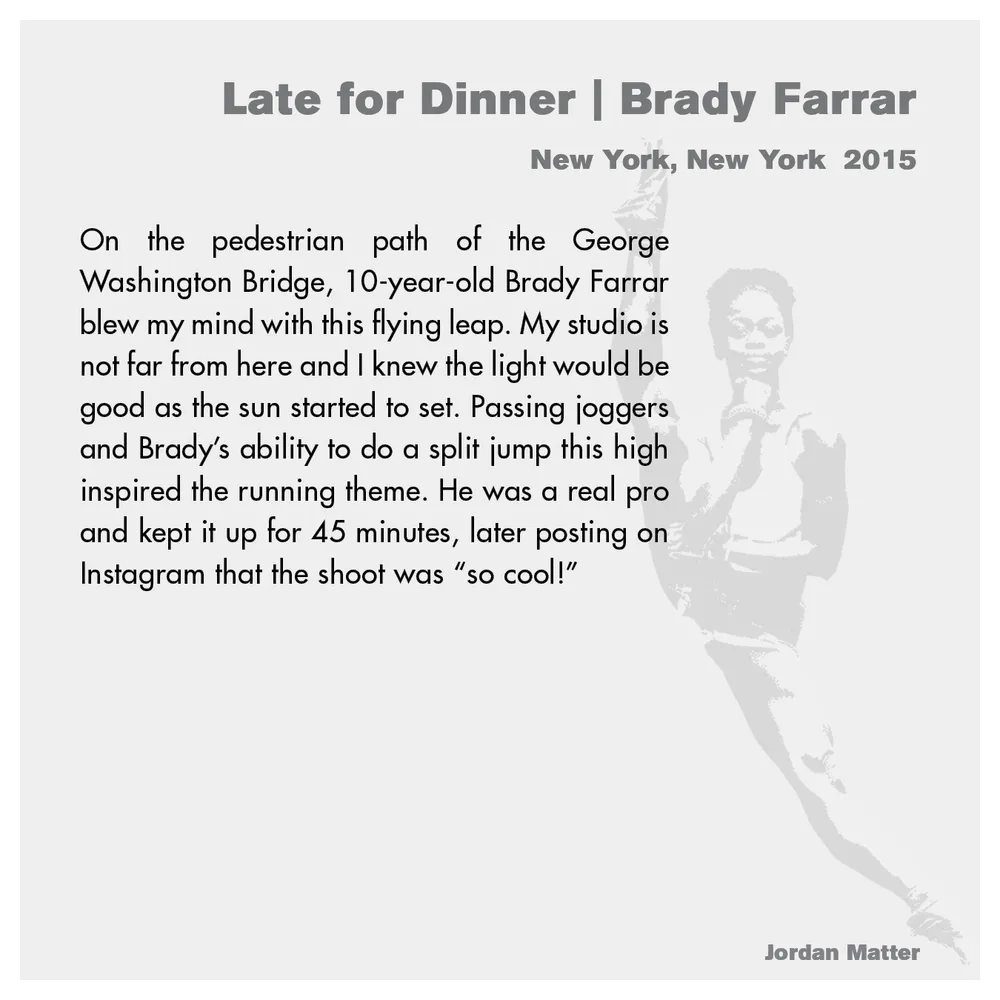
- Jordan Matter: Dancers Among Us exhibition wall label 30/43
- Client: Hudson River Museum
- Visit figure page
- Type: portfolio
- Portfolio Type: advertising
- Portfolio Role: design_layout
Jordan Matter Dancers Among Us Exhibition Label Panel 031

- Jordan Matter: Dancers Among Us exhibition wall label 31/43
- Client: Hudson River Museum
- Visit figure page
- Type: portfolio
- Portfolio Type: advertising
- Portfolio Role: design_layout
Jordan Matter Dancers Among Us Exhibition Label Panel 032

- Jordan Matter: Dancers Among Us exhibition wall label 32/43
- Client: Hudson River Museum
- Visit figure page
- Type: portfolio
- Portfolio Type: advertising
- Portfolio Role: design_layout
Jordan Matter Dancers Among Us Exhibition Label Panel 033
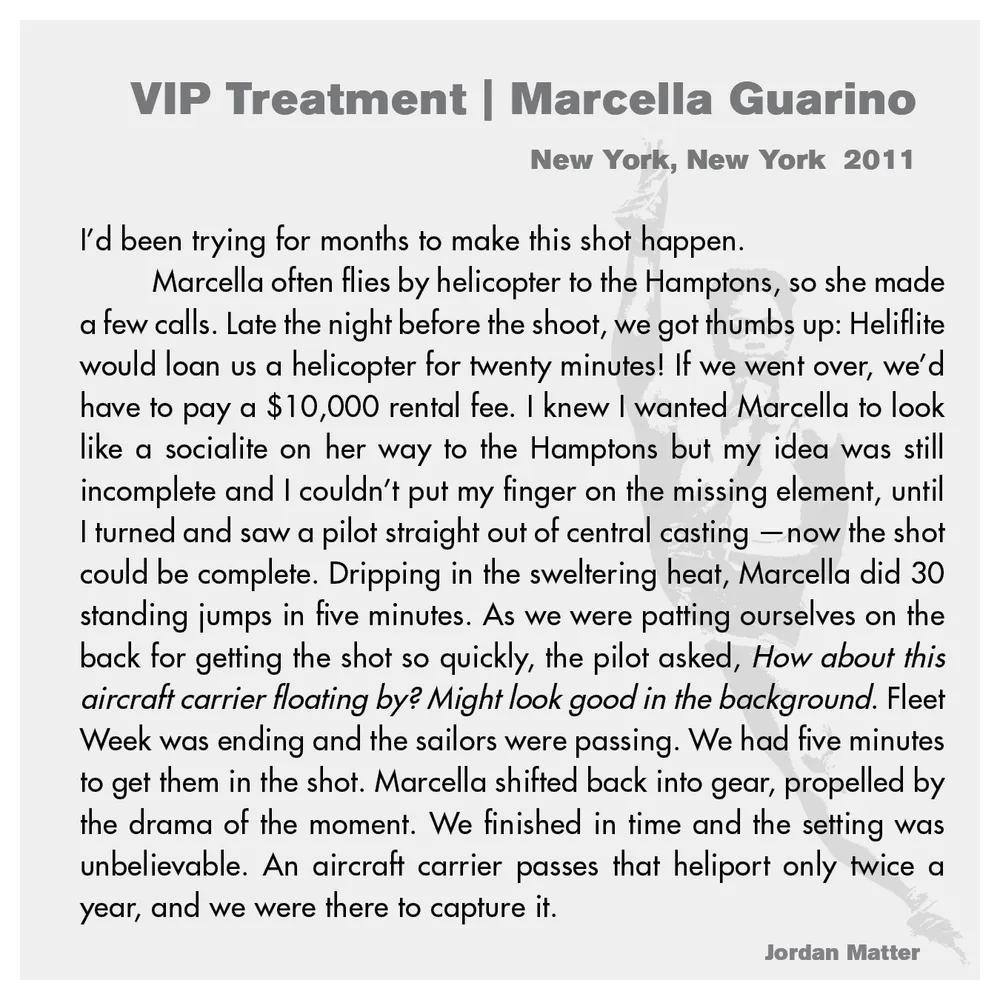
- Jordan Matter: Dancers Among Us exhibition wall label 33/43
- Client: Hudson River Museum
- Visit figure page
- Type: portfolio
- Portfolio Type: advertising
- Portfolio Role: design_layout
Jordan Matter Dancers Among Us Exhibition Label Panel 034
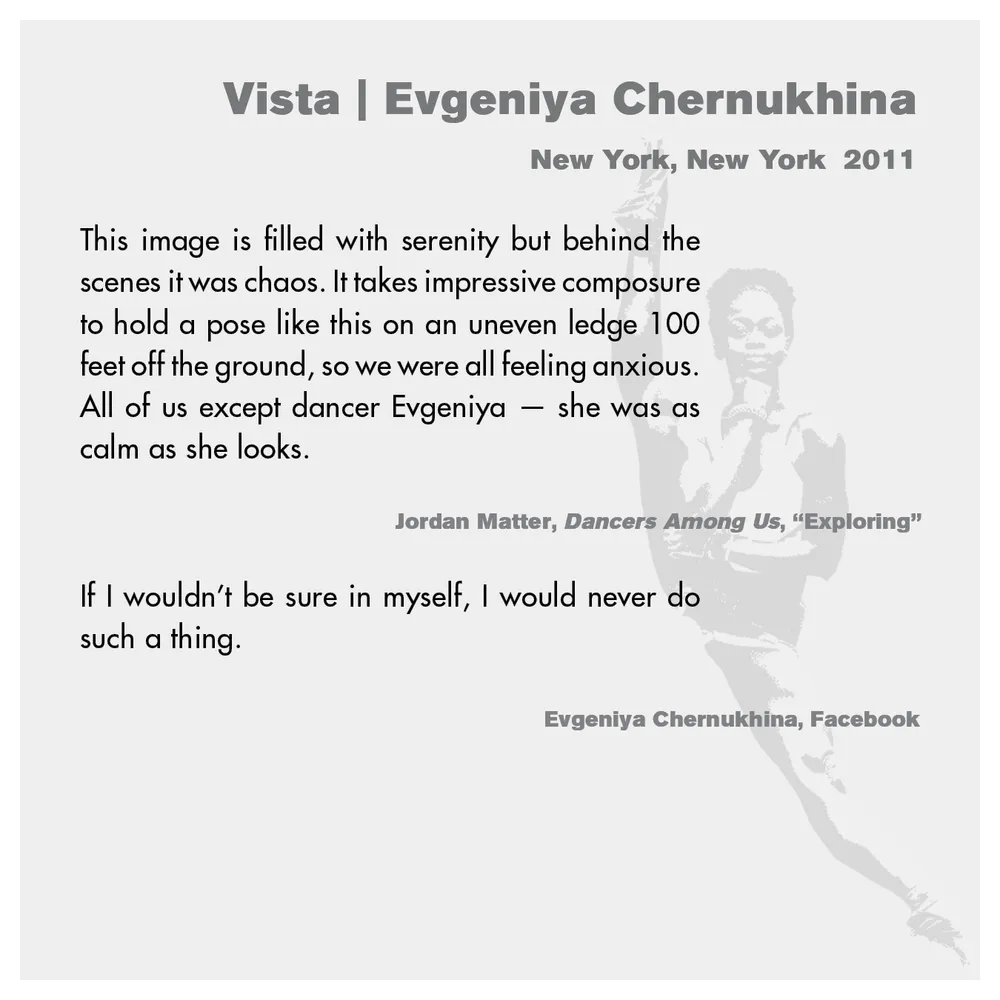
- Jordan Matter: Dancers Among Us exhibition wall label 34/43
- Client: Hudson River Museum
- Visit figure page
- Type: portfolio
- Portfolio Type: advertising
- Portfolio Role: design_layout
Jordan Matter Dancers Among Us Exhibition Label Panel 035

- Jordan Matter: Dancers Among Us exhibition wall label 35/43
- Client: Hudson River Museum
- Visit figure page
- Type: portfolio
- Portfolio Type: advertising
- Portfolio Role: design_layout
Jordan Matter Dancers Among Us Exhibition Label Panel 036
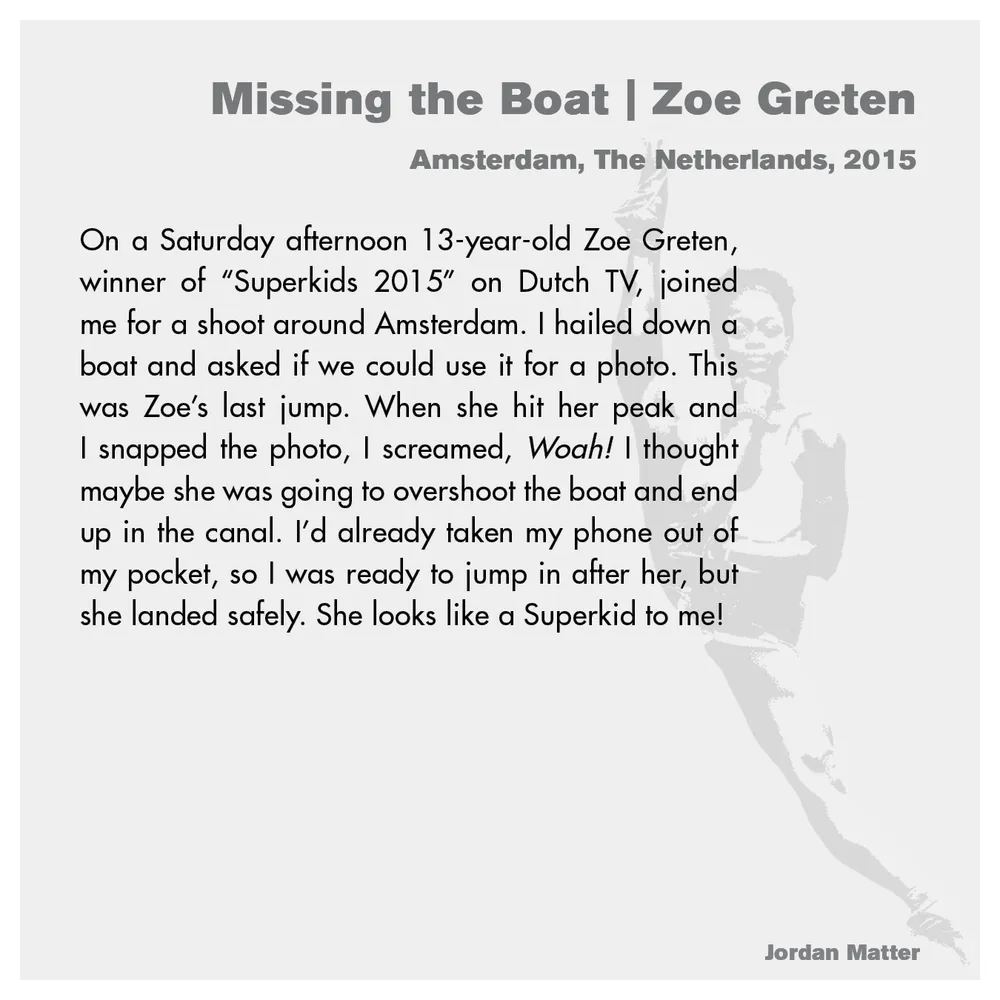
- Jordan Matter: Dancers Among Us exhibition wall label 36/43
- Client: Hudson River Museum
- Visit figure page
- Type: portfolio
- Portfolio Type: advertising
- Portfolio Role: design_layout
Jordan Matter Dancers Among Us Exhibition Label Panel 037
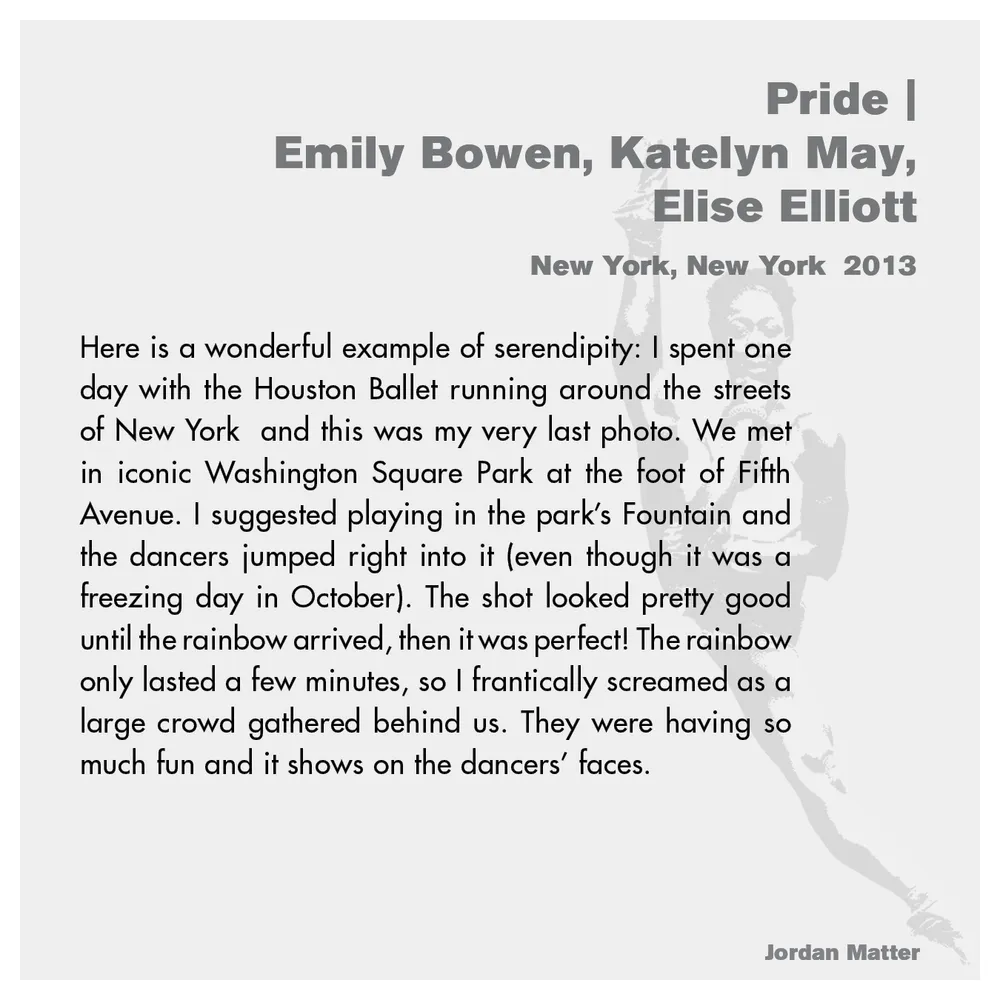
- Jordan Matter: Dancers Among Us exhibition wall label 37/43
- Client: Hudson River Museum
- Visit figure page
- Type: portfolio
- Portfolio Type: advertising
- Portfolio Role: design_layout
Jordan Matter Dancers Among Us Exhibition Label Panel 038
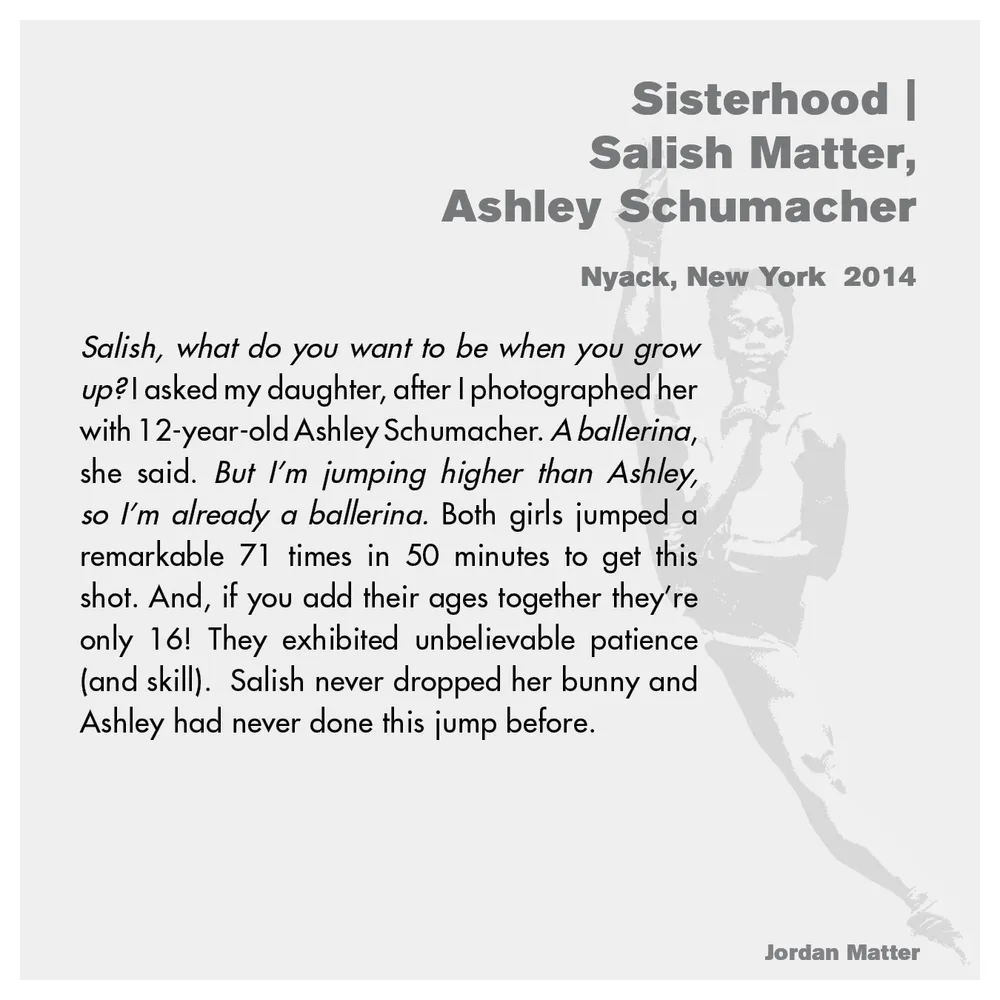
- Jordan Matter: Dancers Among Us exhibition wall label 38/43
- Client: Hudson River Museum
- Visit figure page
- Type: portfolio
- Portfolio Type: advertising
- Portfolio Role: design_layout
Jordan Matter Dancers Among Us Exhibition Label Panel 039
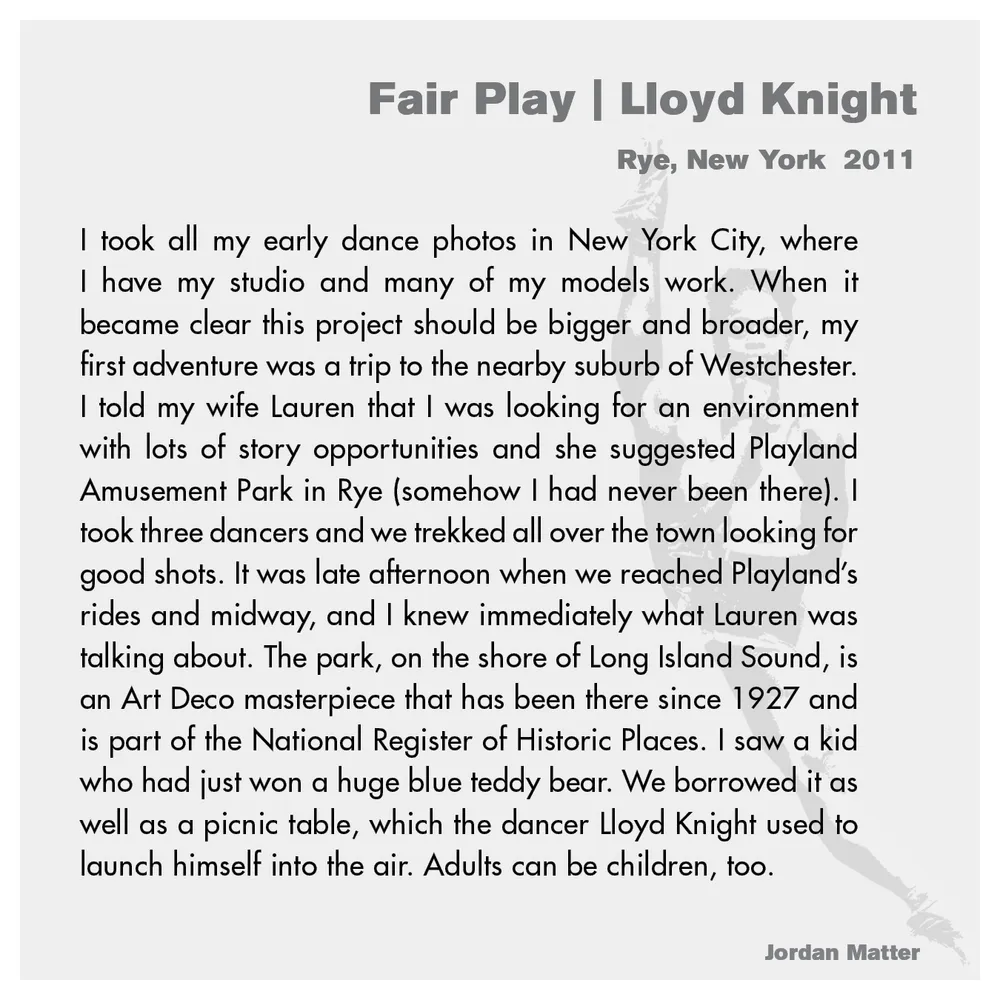
- Jordan Matter: Dancers Among Us exhibition wall label 39/43
- Client: Hudson River Museum
- Visit figure page
- Type: portfolio
- Portfolio Type: advertising
- Portfolio Role: design_layout
Jordan Matter Dancers Among Us Exhibition Label Panel 040

- Jordan Matter: Dancers Among Us exhibition wall label 40/43
- Client: Hudson River Museum
- Visit figure page
- Type: portfolio
- Portfolio Type: advertising
- Portfolio Role: design_layout
Jordan Matter Dancers Among Us Exhibition Label Panel 041
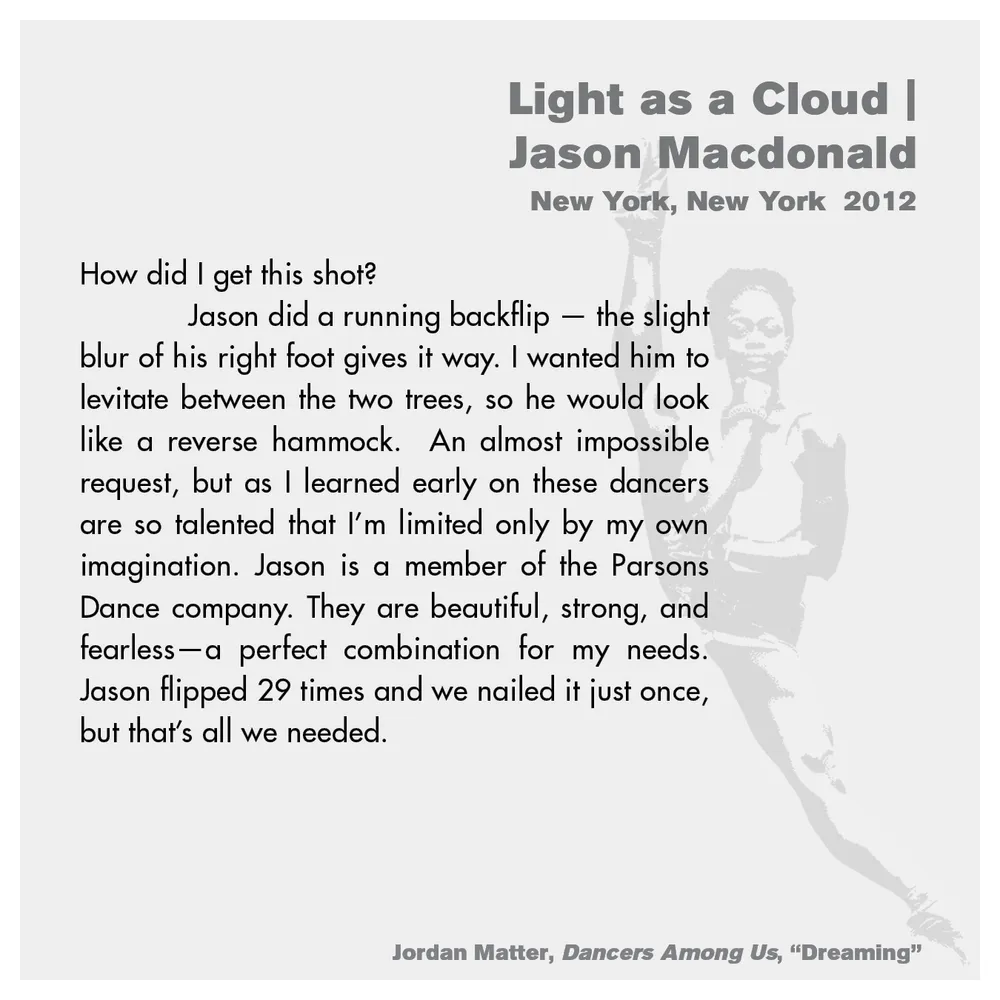
- Jordan Matter: Dancers Among Us exhibition wall label 41/43
- Client: Hudson River Museum
- Visit figure page
- Type: portfolio
- Portfolio Type: advertising
- Portfolio Role: design_layout
Jordan Matter Dancers Among Us Exhibition Label Panel 042
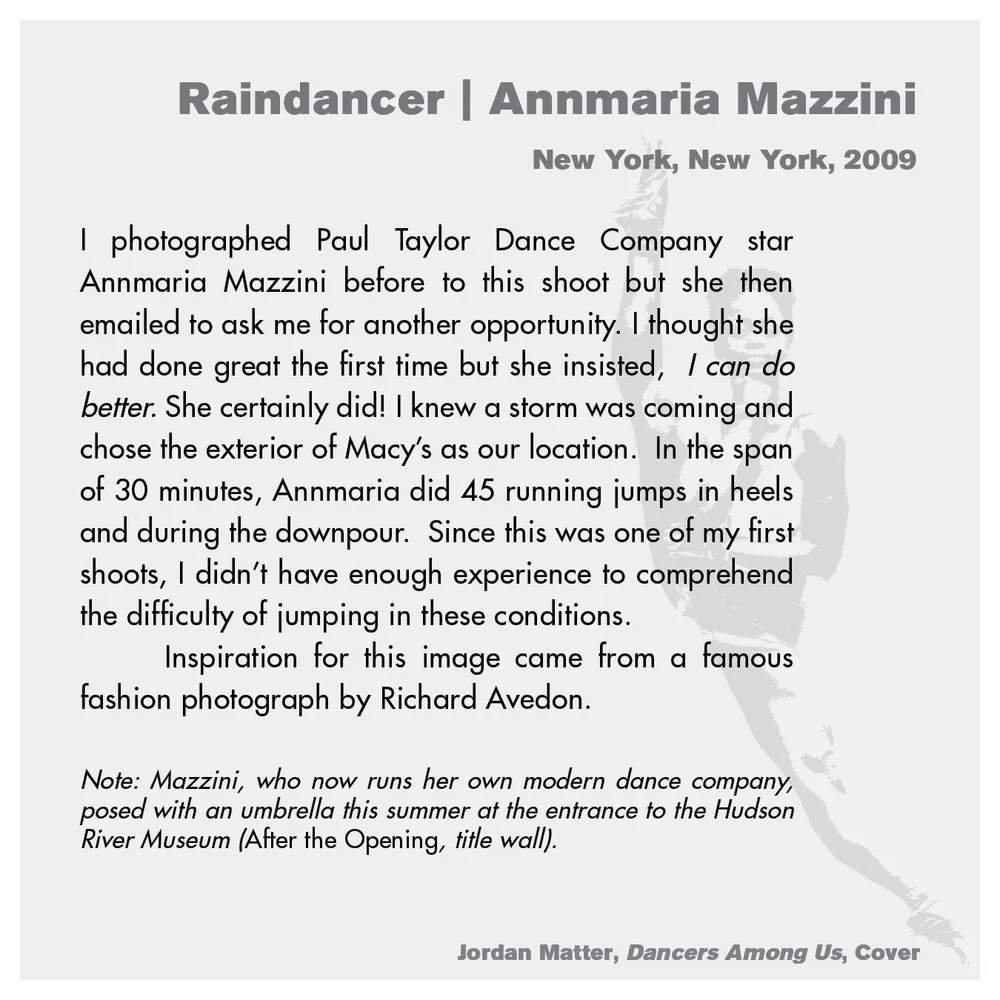
- Jordan Matter: Dancers Among Us exhibition wall label 42/43
- Client: Hudson River Museum
- Visit figure page
- Type: portfolio
- Portfolio Type: advertising
- Portfolio Role: design_layout
Jordan Matter Dancers Among Us Exhibition Label Panel 043
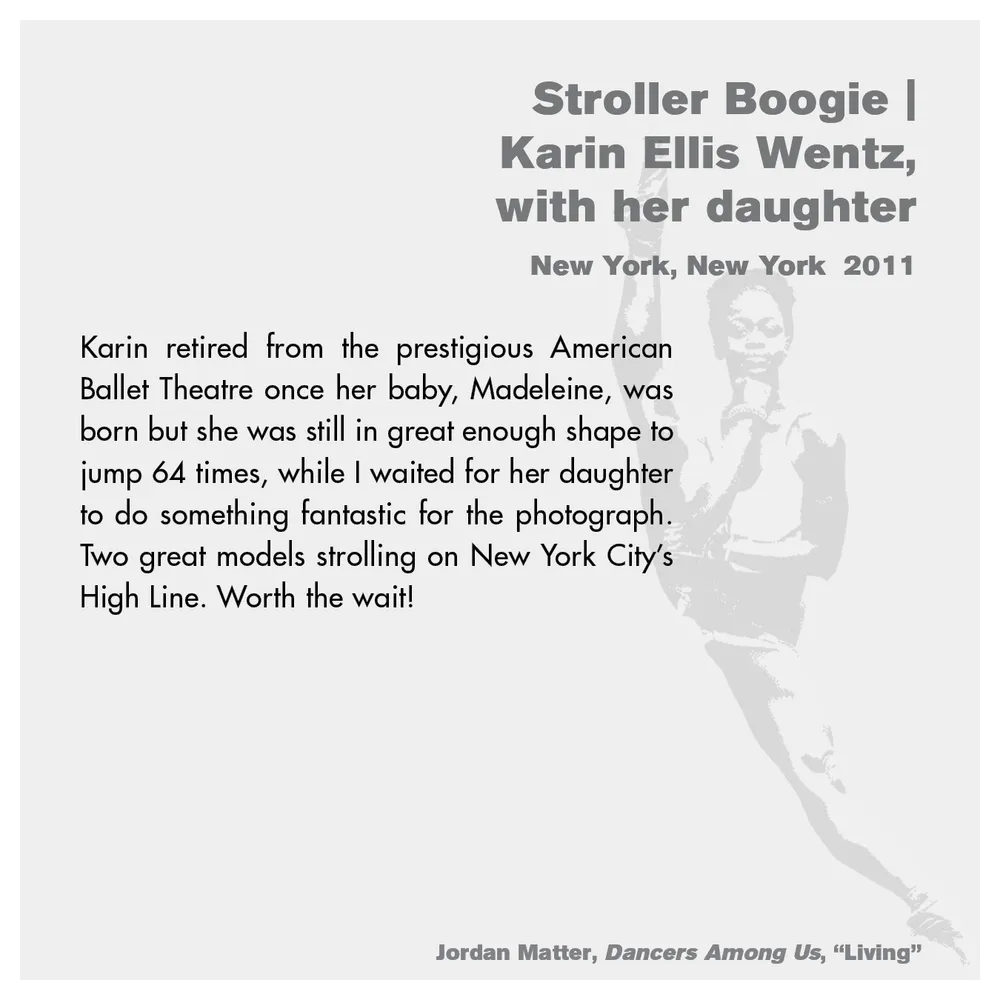
- Jordan Matter: Dancers Among Us exhibition wall label 43/43
- Client: Hudson River Museum
- Visit figure page
- Type: portfolio
- Portfolio Type: advertising
- Portfolio Role: design_layout
Jordan Matter Dancers Among Us Exhibition Mta Mailer Presentation
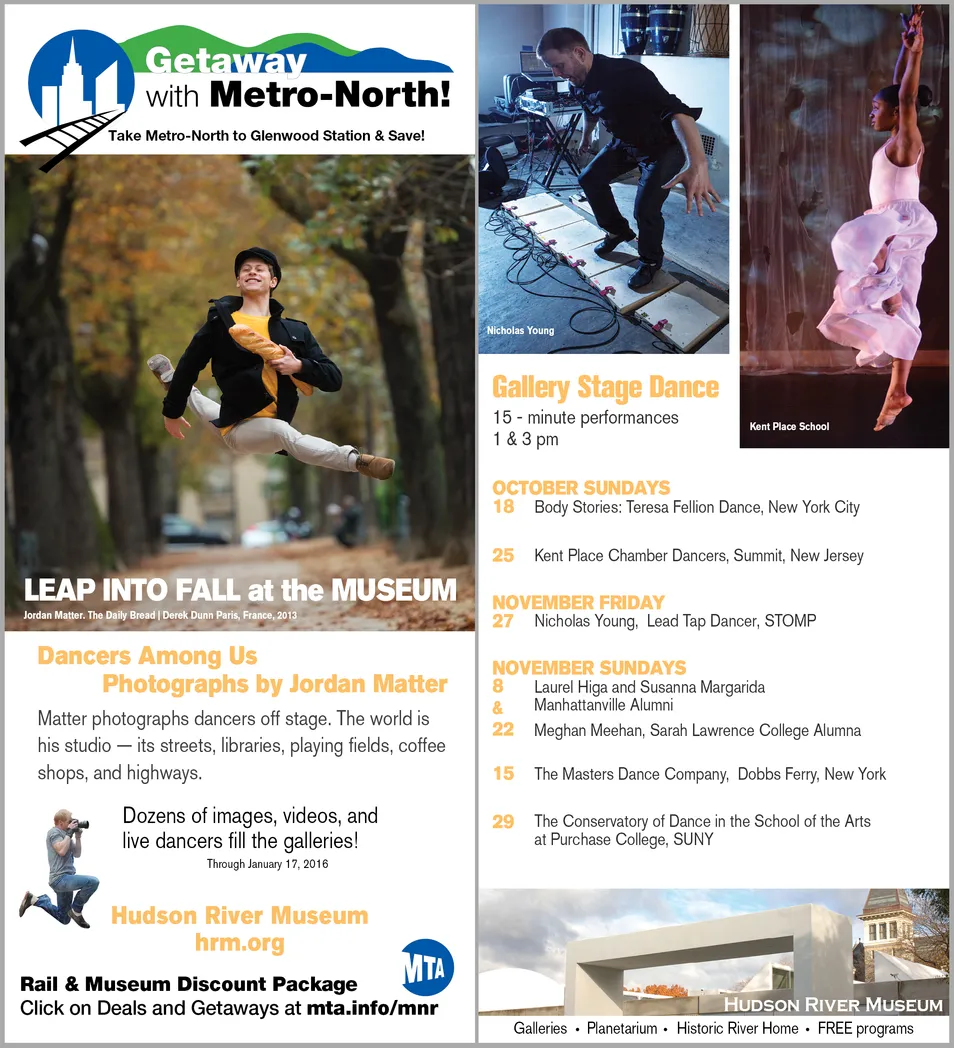
- Jordan Matter: Dancers Among Us MTA mailer
- Client: Hudson River Museum
- Visit figure page
- Type: portfolio
- Portfolio Type: advertising
- Portfolio Role: design_layout
Jordan Matter Dancers Among Us Exhibition Quote Panels Presentation

- Jordan Matter: Dancers Among Us exhibition quote wall panels
- Client: Hudson River Museum
- Visit figure page
- Type: portfolio
- Portfolio Type: advertising
- Portfolio Role: design_layout
Jordan Matter Dancers Among Us Exhibition Title Panel

- Jordan Matter: Dancers Among Us exhibition title wall panel
- Client: Hudson River Museum
- Visit figure page
- Type: portfolio
- Portfolio Type: advertising
- Portfolio Role: design_layout
Jordan Matter Dancers Among Us Mta Poster

- Jordan Matter: Dancers Among Us MTA promotional poster
- Client: Hudson River Museum
- Visit figure page
- Type: portfolio
- Portfolio Type: advertising
- Portfolio Role: design_layout
Kawaii Bird 006

- Kawaii Bird #6 Illustration
- Artwork by Alex Stevovich
- © Alex Stevovich
- Visit figure page
- Type: portfolio
- Portfolio Type: advertising
- Portfolio Role: design_layout
- Portfolio Original Art: true
Kawaii Blobby Slime Blue

- Blue Kawaii Blobby Slime illustration
- Artwork by Alex Stevovich
- © Alex Stevovich
- Visit figure page
- Type: portfolio
- Portfolio Type: advertising
- Portfolio Role: design_layout
- Portfolio Original Art: true
Kawaii Blobby Slime Red

- Red Kawaii Blobby Slime illustration
- Artwork by Alex Stevovich
- © Alex Stevovich
- Visit figure page
- Type: portfolio
- Portfolio Type: advertising
- Portfolio Role: design_layout
- Portfolio Original Art: true
Kawaii Blobby Slime Trio

- Kawaii Blobby Slime Trio illustration
- Artwork by Alex Stevovich
- © Alex Stevovich
- Visit figure page
- Type: portfolio
- Portfolio Type: advertising
- Portfolio Role: design_layout
- Portfolio Original Art: true
Kawaii Blobby Slime Yellow

- Yellow Kawaii Blobby Slime illustration
- Artwork by Alex Stevovich
- © Alex Stevovich
- Visit figure page
- Type: portfolio
- Portfolio Type: advertising
- Portfolio Role: design_layout
- Portfolio Original Art: true
Kawaii Cat Blob 014

- Kawaii Cat Blob #14
- Artwork by Alex Stevovich
- © Alex Stevovich
- Visit figure page
- Type: portfolio
- Portfolio Type: advertising
- Portfolio Role: design_layout
- Portfolio Original Art: true
Kawaii Clock 002

- Kawaii Clock #2 Illustration
- Artwork by Alex Stevovich
- © Alex Stevovich
- Visit figure page
- Type: portfolio
- Portfolio Type: advertising
- Portfolio Role: design_layout
- Portfolio Original Art: true
Kawaii Giraffe 003

- Kawaii Giraffe #3 Illustration
- Artwork by Alex Stevovich
- © Alex Stevovich
- Visit figure page
- Type: portfolio
- Portfolio Type: advertising
- Portfolio Role: design_layout
- Portfolio Original Art: true
Kawaii Giraffe 003 Detail 02

- Kawaii Giraffe #3 Illustration, detail
- Artwork by Alex Stevovich
- © Alex Stevovich
- Visit figure page
- Type: portfolio
- Portfolio Type: advertising
- Portfolio Role: design_layout
- Portfolio Original Art: true
Kf Ui Inventory Icon Gold Bar
- Gold Bar Icon for the Kingdom of Flowers UI
- Artwork by Alex Stevovich
- © Alex Stevovich
- Visit figure page
- Type: portfolio
- Portfolio Type: advertising
- Portfolio Role: design_layout
- Portfolio Original Art: true
Kf Ui Inventory Icon Maple Bow
- Maple Bow Icon for the Kingdom of Flowers UI
- Artwork by Alex Stevovich
- © Alex Stevovich
- Visit figure page
- Type: portfolio
- Portfolio Type: advertising
- Portfolio Role: design_layout
- Portfolio Original Art: true
Kf Ui Inventory Icon Rydanian Cotton Tunic
- Rydanian Cotton Tunic Inventory Icon for the Kingdom of Flowers UI
- Artwork by Alex Stevovich
- © Alex Stevovich
- Visit figure page
- Type: portfolio
- Portfolio Type: advertising
- Portfolio Role: design_layout
- Portfolio Original Art: true
Legacy Of: The Land — Cover
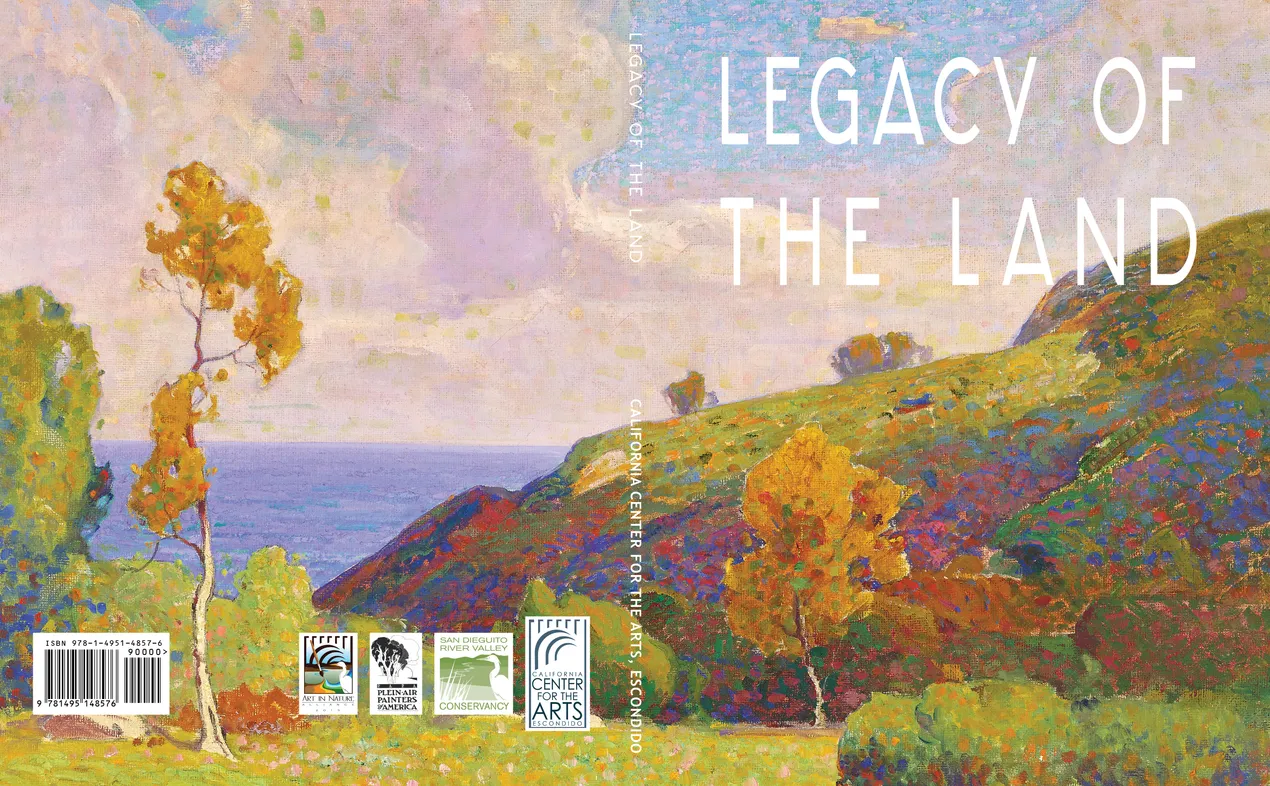
- Legacy of the Land exhibition catalog, cover
- Client: California Center for the Arts Escondido
- Visit figure page
- Type: portfolio
- Portfolio Type: publication_design
- Portfolio Role: design_layout
Legacy Of: The Land — Inside Front Cover

- Legacy of the Land exhibition catalog, inside back cover
- Client: California Center for the Arts Escondido
- Visit figure page
- Type: portfolio
- Portfolio Type: publication_design
- Portfolio Role: design_layout
Legacy Of: The Land — Inside Front Cover
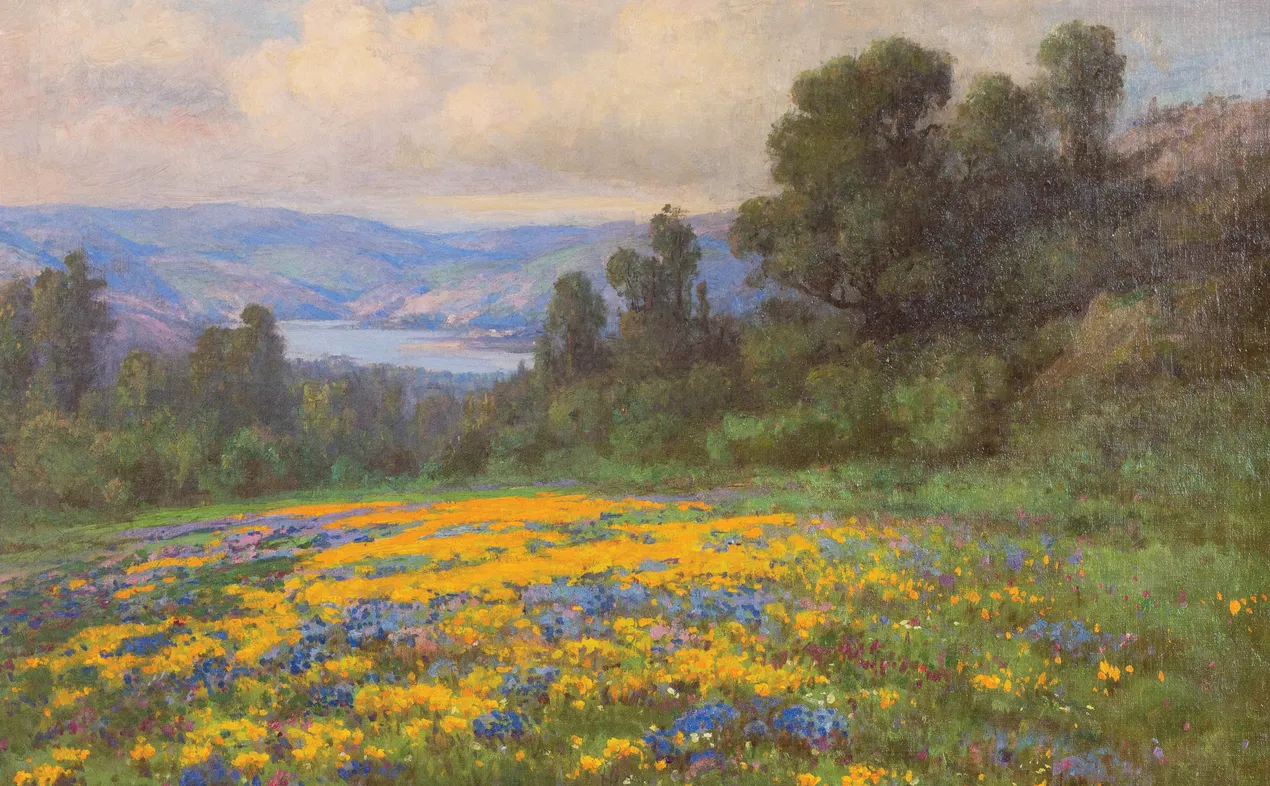
- Legacy of the Land exhibition catalog, inside front cover
- Client: California Center for the Arts Escondido
- Visit figure page
- Type: portfolio
- Portfolio Type: publication_design
- Portfolio Role: design_layout
Legacy Of: The Land — Pages 10–11

- Legacy of the Land exhibition catalog, pages 10-11
- Client: California Center for the Arts Escondido
- Visit figure page
- Type: portfolio
- Portfolio Type: publication_design
- Portfolio Role: design_layout
Legacy Of: The Land — Pages 100–101
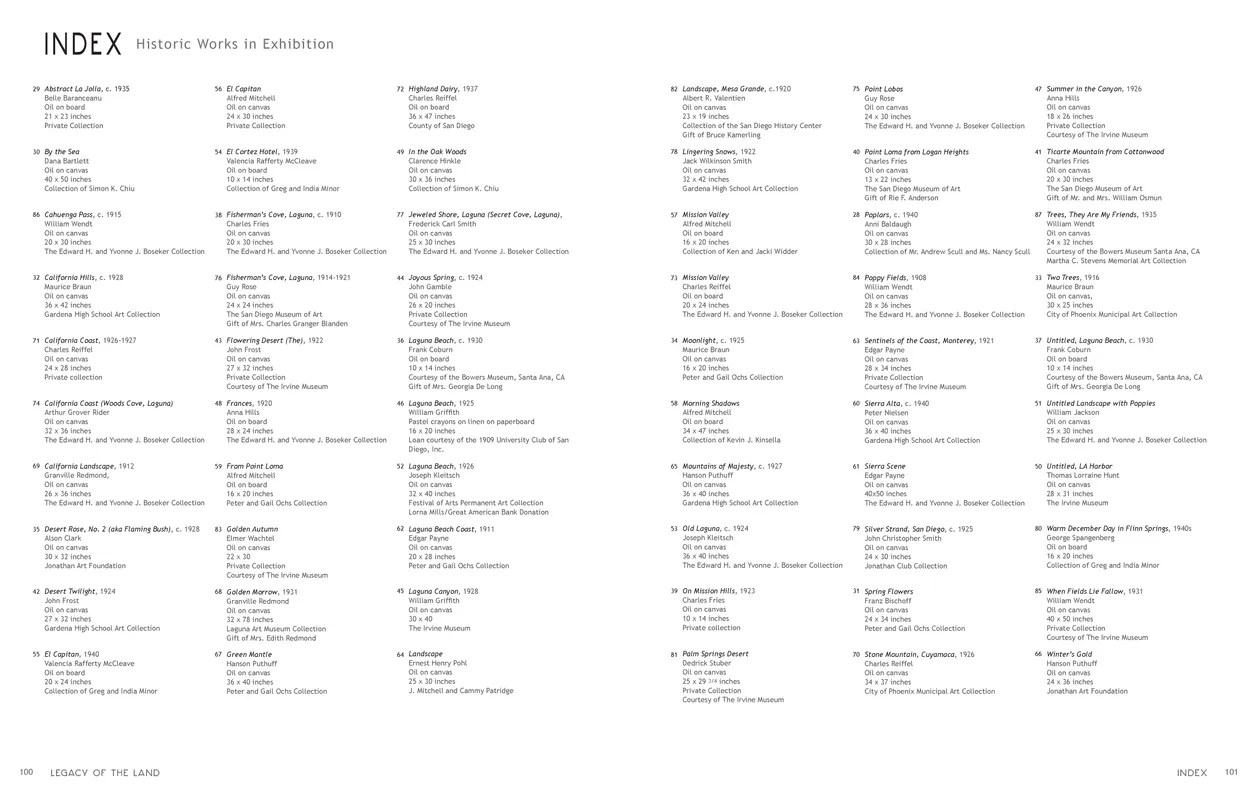
- Legacy of the Land exhibition catalog, pages 100-101
- Client: California Center for the Arts Escondido
- Visit figure page
- Type: portfolio
- Portfolio Type: publication_design
- Portfolio Role: design_layout
Legacy Of: The Land — Pages 102–103

- Legacy of the Land exhibition catalog, pages 102-103
- Client: California Center for the Arts Escondido
- Visit figure page
- Type: portfolio
- Portfolio Type: publication_design
- Portfolio Role: design_layout
Legacy Of: The Land — Pages 12–13

- Legacy of the Land exhibition catalog, pages 12-13
- Client: California Center for the Arts Escondido
- Visit figure page
- Type: portfolio
- Portfolio Type: publication_design
- Portfolio Role: design_layout
Legacy Of: The Land — Pages 14–15

- Legacy of the Land exhibition catalog, pages 14-15
- Client: California Center for the Arts Escondido
- Visit figure page
- Type: portfolio
- Portfolio Type: publication_design
- Portfolio Role: design_layout
Legacy Of: The Land — Pages 16–17

- Legacy of the Land exhibition catalog, pages 16-17
- Client: California Center for the Arts Escondido
- Visit figure page
- Type: portfolio
- Portfolio Type: publication_design
- Portfolio Role: design_layout
Legacy Of: The Land — Pages 18–19

- Legacy of the Land exhibition catalog, pages 18-19
- Client: California Center for the Arts Escondido
- Visit figure page
- Type: portfolio
- Portfolio Type: publication_design
- Portfolio Role: design_layout
Legacy Of: The Land — Pages 2–3

- Legacy of the Land exhibition catalog, pages 2-3
- Client: California Center for the Arts Escondido
- Visit figure page
- Type: portfolio
- Portfolio Type: publication_design
- Portfolio Role: design_layout
Legacy Of: The Land — Pages 20–21

- Legacy of the Land exhibition catalog, pages 20-21
- Client: California Center for the Arts Escondido
- Visit figure page
- Type: portfolio
- Portfolio Type: publication_design
- Portfolio Role: design_layout
Legacy Of: The Land — Pages 22–23
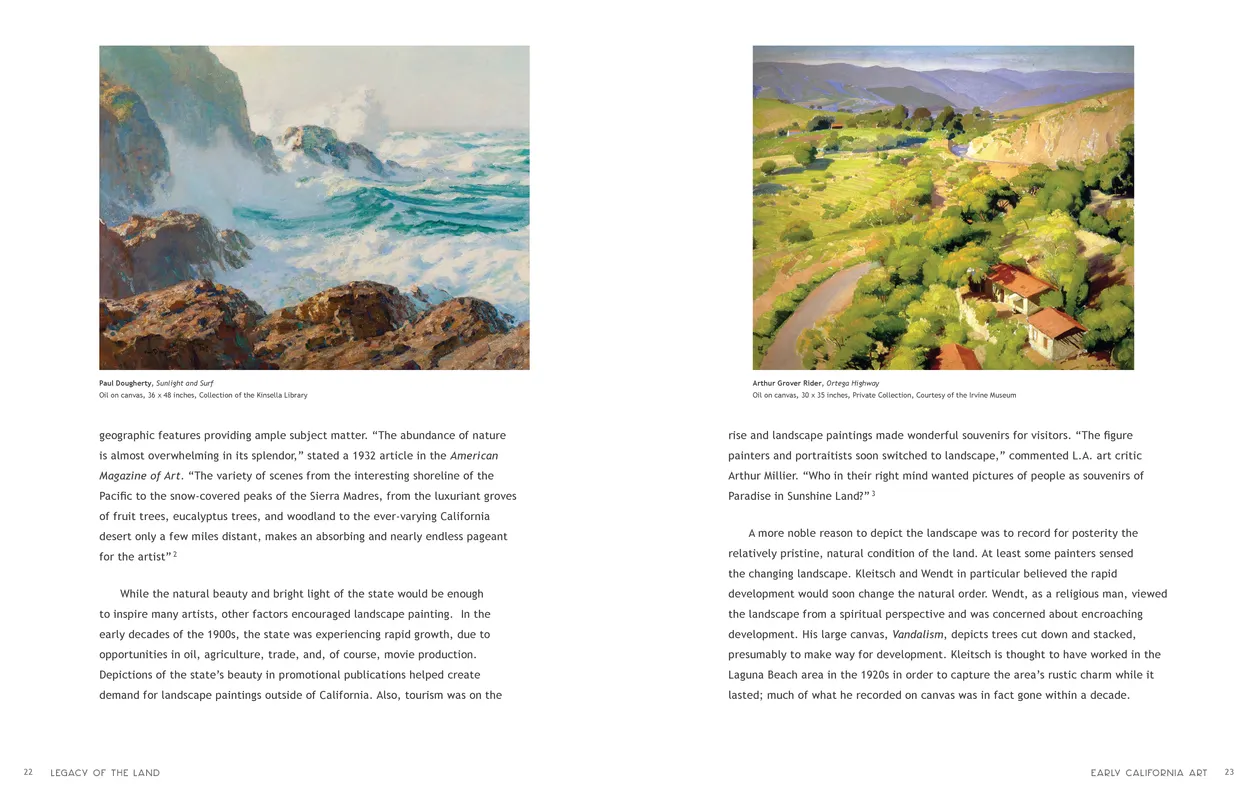
- Legacy of the Land exhibition catalog, pages 22-23
- Client: California Center for the Arts Escondido
- Visit figure page
- Type: portfolio
- Portfolio Type: publication_design
- Portfolio Role: design_layout
Legacy Of: The Land — Pages 24–25

- Legacy of the Land exhibition catalog, pages 24-25
- Client: California Center for the Arts Escondido
- Visit figure page
- Type: portfolio
- Portfolio Type: publication_design
- Portfolio Role: design_layout
Legacy Of: The Land — Pages 26–27

- Legacy of the Land exhibition catalog, pages 26-27
- Client: California Center for the Arts Escondido
- Visit figure page
- Type: portfolio
- Portfolio Type: publication_design
- Portfolio Role: design_layout
Legacy Of: The Land — Pages 28–29

- Legacy of the Land exhibition catalog, pages 28-29
- Client: California Center for the Arts Escondido
- Visit figure page
- Type: portfolio
- Portfolio Type: publication_design
- Portfolio Role: design_layout
Legacy Of: The Land — Pages 30–31

- Legacy of the Land exhibition catalog, pages 30-31
- Client: California Center for the Arts Escondido
- Visit figure page
- Type: portfolio
- Portfolio Type: publication_design
- Portfolio Role: design_layout
Legacy Of: The Land — Pages 32–33
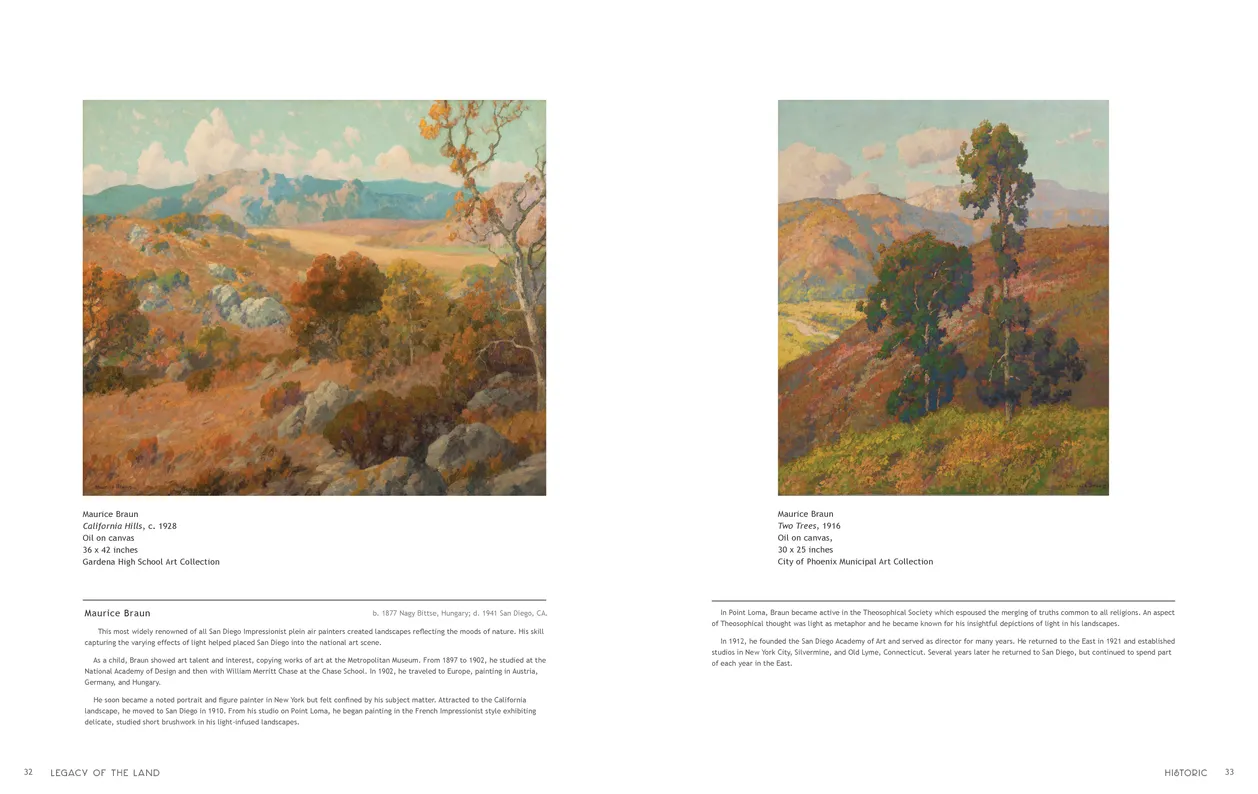
- Legacy of the Land exhibition catalog, pages 32-33
- Client: California Center for the Arts Escondido
- Visit figure page
- Type: portfolio
- Portfolio Type: publication_design
- Portfolio Role: design_layout
Legacy Of: The Land — Pages 34–35
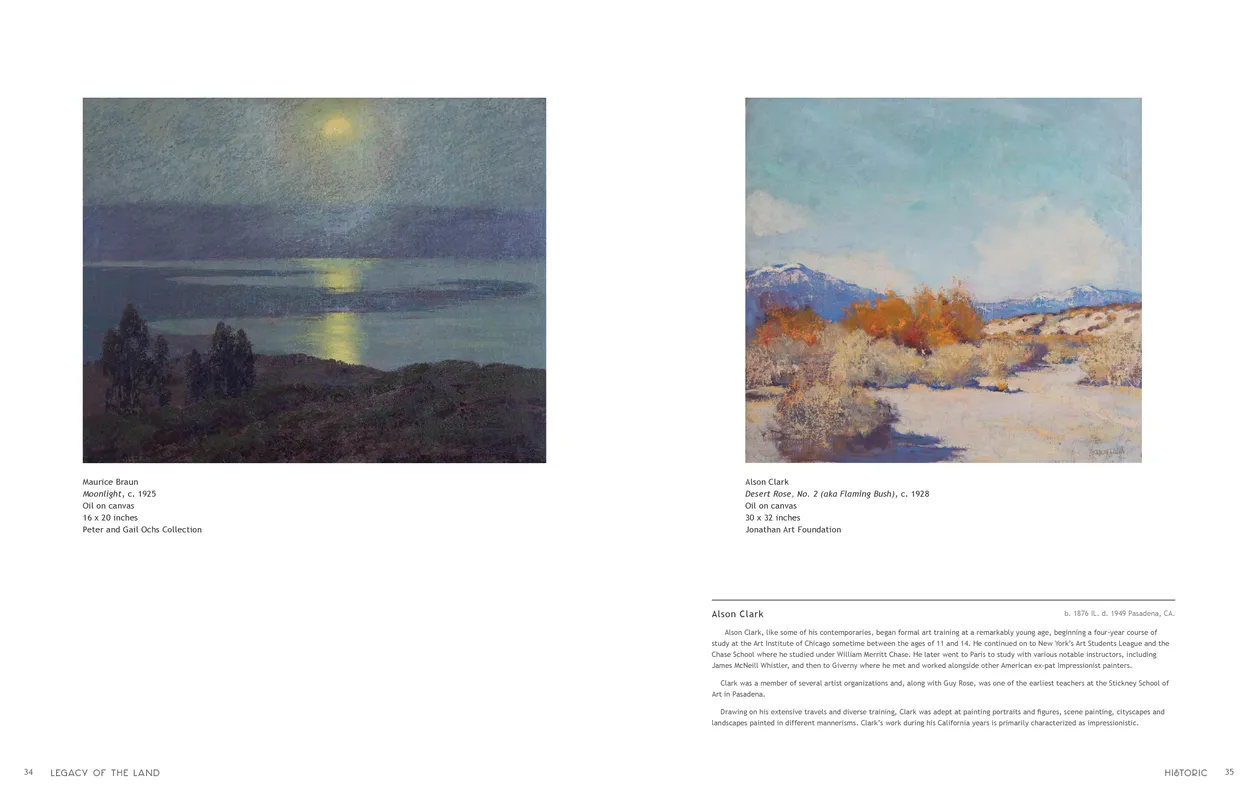
- Legacy of the Land exhibition catalog, pages 34-35
- Client: California Center for the Arts Escondido
- Visit figure page
- Type: portfolio
- Portfolio Type: publication_design
- Portfolio Role: design_layout
Legacy Of: The Land — Pages 36–37

- Legacy of the Land exhibition catalog, pages 36-37
- Client: California Center for the Arts Escondido
- Visit figure page
- Type: portfolio
- Portfolio Type: publication_design
- Portfolio Role: design_layout
Legacy Of: The Land — Pages 38–39

- Legacy of the Land exhibition catalog, pages 38-39
- Client: California Center for the Arts Escondido
- Visit figure page
- Type: portfolio
- Portfolio Type: publication_design
- Portfolio Role: design_layout
Legacy Of: The Land — Pages 4–5

- Legacy of the Land exhibition catalog, pages 4-5
- Client: California Center for the Arts Escondido
- Visit figure page
- Type: portfolio
- Portfolio Type: publication_design
- Portfolio Role: design_layout
Legacy Of: The Land — Pages 40–41

- Legacy of the Land exhibition catalog, pages 40-41
- Client: California Center for the Arts Escondido
- Visit figure page
- Type: portfolio
- Portfolio Type: publication_design
- Portfolio Role: design_layout
Legacy Of: The Land — Pages 42–43
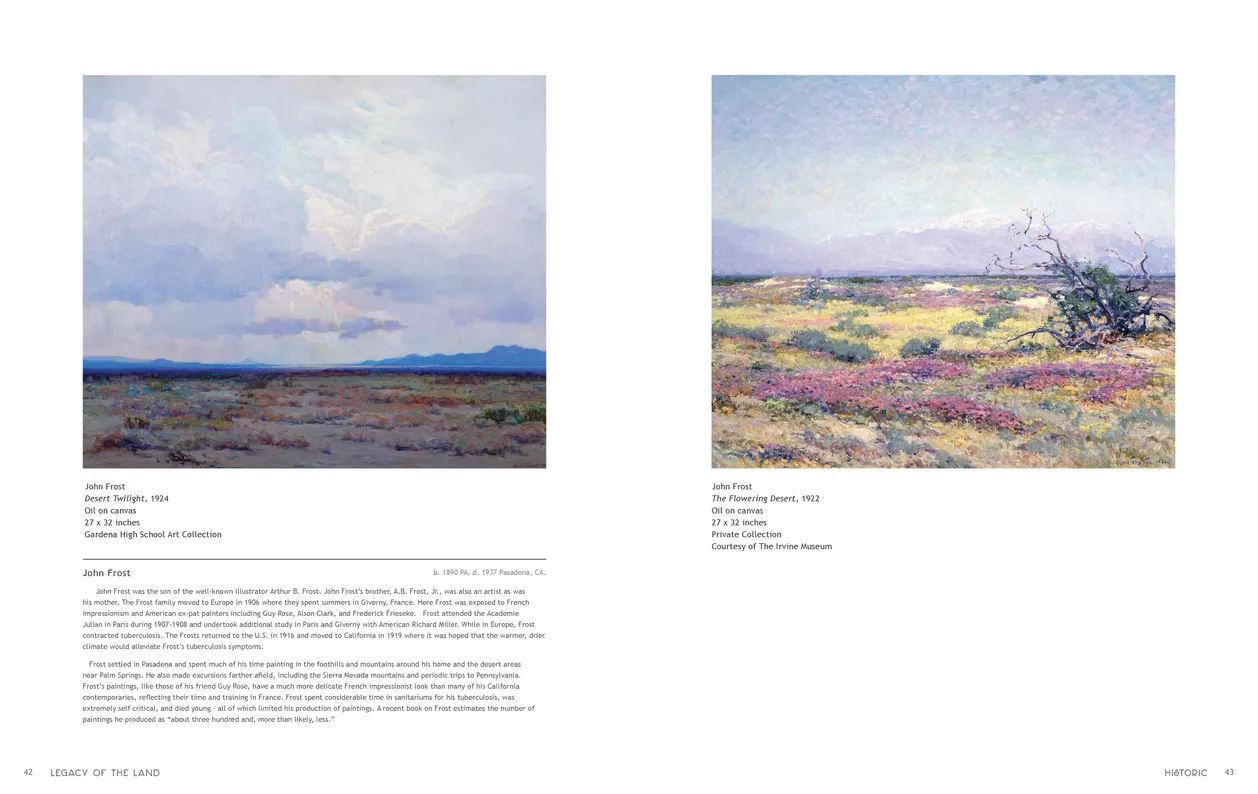
- Legacy of the Land exhibition catalog, pages 42-43
- Client: California Center for the Arts Escondido
- Visit figure page
- Type: portfolio
- Portfolio Type: publication_design
- Portfolio Role: design_layout
Legacy Of: The Land — Pages 44–45
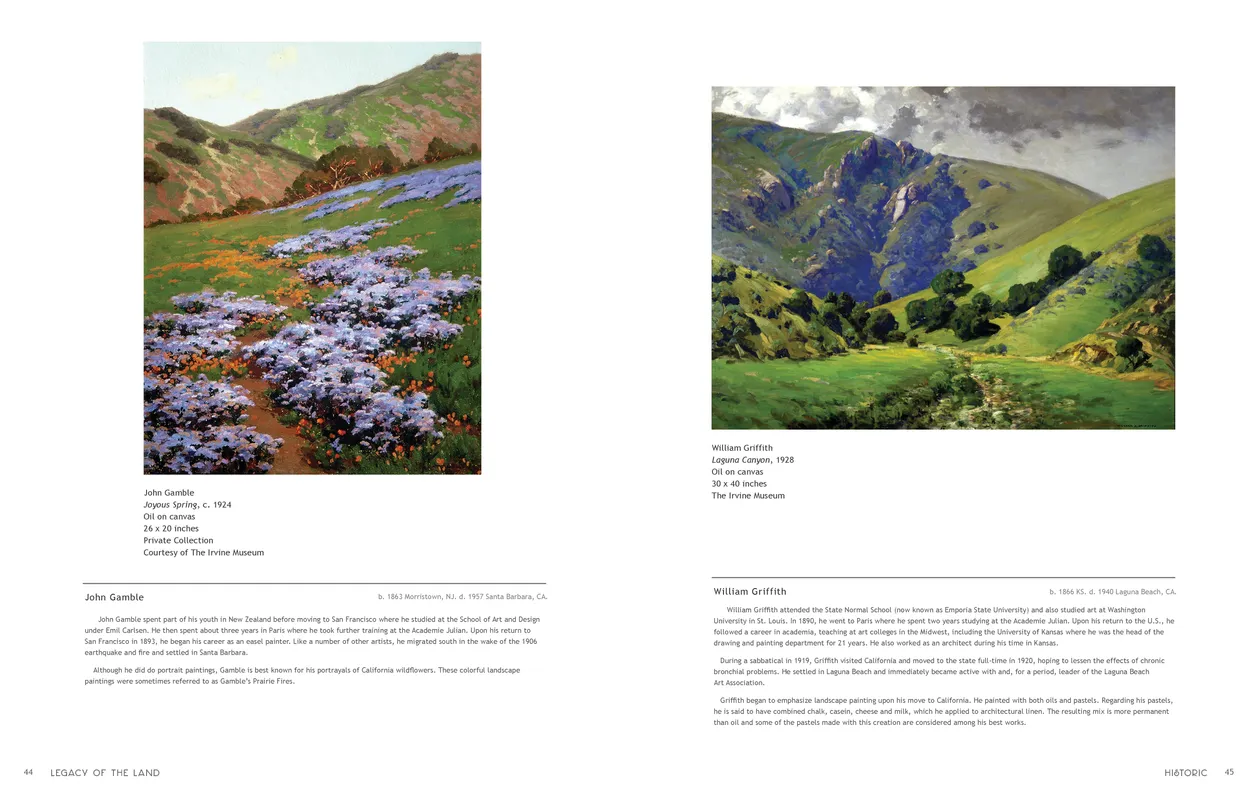
- Legacy of the Land exhibition catalog, pages 44-45
- Client: California Center for the Arts Escondido
- Visit figure page
- Type: portfolio
- Portfolio Type: publication_design
- Portfolio Role: design_layout
Legacy Of: The Land — Pages 46–47

- Legacy of the Land exhibition catalog, pages 46-47
- Client: California Center for the Arts Escondido
- Visit figure page
- Type: portfolio
- Portfolio Type: publication_design
- Portfolio Role: design_layout
Legacy Of: The Land — Pages 48–49

- Legacy of the Land exhibition catalog, pages 48-49
- Client: California Center for the Arts Escondido
- Visit figure page
- Type: portfolio
- Portfolio Type: publication_design
- Portfolio Role: design_layout
Legacy Of: The Land — Pages 50–51

- Legacy of the Land exhibition catalog, pages 50-51
- Client: California Center for the Arts Escondido
- Visit figure page
- Type: portfolio
- Portfolio Type: publication_design
- Portfolio Role: design_layout
Legacy Of: The Land — Pages 52–53

- Legacy of the Land exhibition catalog, pages 52-53
- Client: California Center for the Arts Escondido
- Visit figure page
- Type: portfolio
- Portfolio Type: publication_design
- Portfolio Role: design_layout
Legacy Of: The Land — Pages 54–55

- Legacy of the Land exhibition catalog, pages 54-55
- Client: California Center for the Arts Escondido
- Visit figure page
- Type: portfolio
- Portfolio Type: publication_design
- Portfolio Role: design_layout
Legacy Of: The Land — Pages 56–57

- Legacy of the Land exhibition catalog, pages 56-57
- Client: California Center for the Arts Escondido
- Visit figure page
- Type: portfolio
- Portfolio Type: publication_design
- Portfolio Role: design_layout
Legacy Of: The Land — Pages 58–59
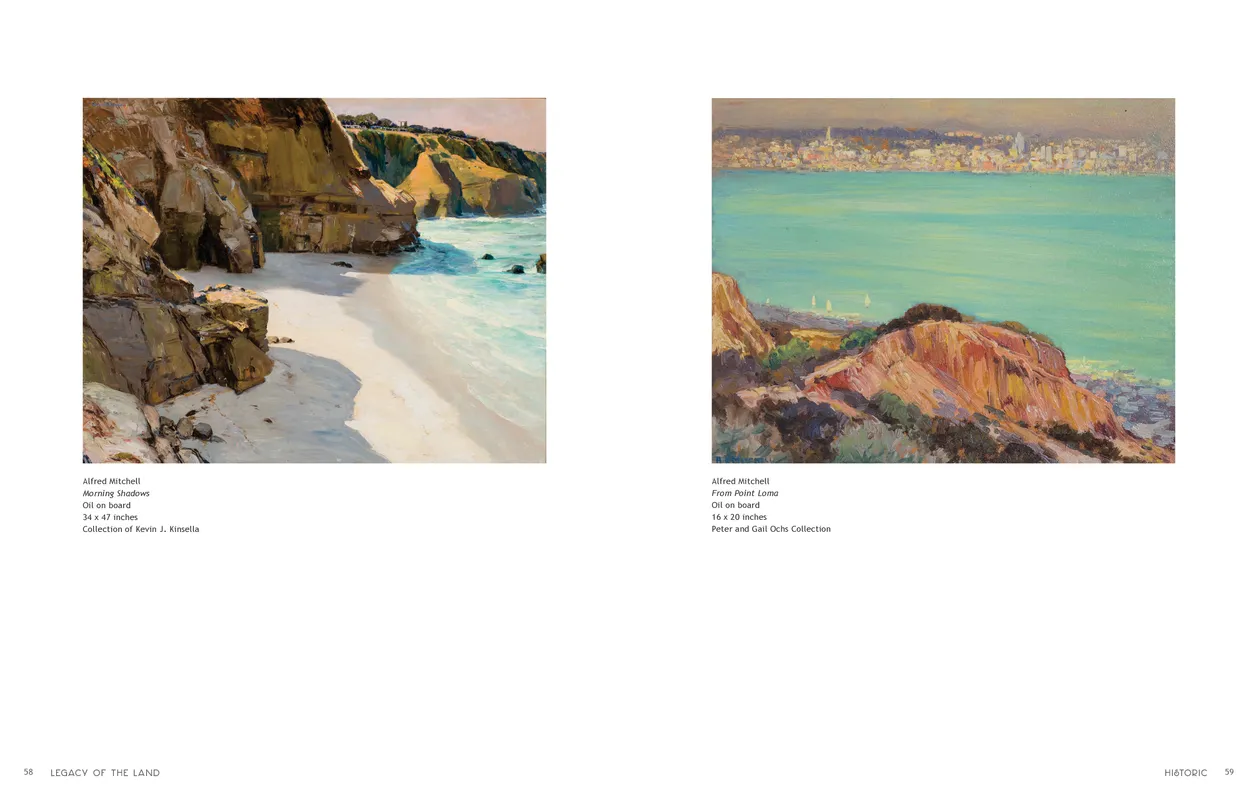
- Legacy of the Land exhibition catalog, pages 58-59
- Client: California Center for the Arts Escondido
- Visit figure page
- Type: portfolio
- Portfolio Type: publication_design
- Portfolio Role: design_layout
Legacy Of: The Land — Pages 6–7

- Legacy of the Land exhibition catalog, pages 6-7
- Client: California Center for the Arts Escondido
- Visit figure page
- Type: portfolio
- Portfolio Type: publication_design
- Portfolio Role: design_layout
Legacy Of: The Land — Pages 60–61

- Legacy of the Land exhibition catalog, pages 60-61
- Client: California Center for the Arts Escondido
- Visit figure page
- Type: portfolio
- Portfolio Type: publication_design
- Portfolio Role: design_layout
Legacy Of: The Land — Pages 62–63

- Legacy of the Land exhibition catalog, pages 62-63
- Client: California Center for the Arts Escondido
- Visit figure page
- Type: portfolio
- Portfolio Type: publication_design
- Portfolio Role: design_layout
Legacy Of: The Land — Pages 64–65

- Legacy of the Land exhibition catalog, pages 64-65
- Client: California Center for the Arts Escondido
- Visit figure page
- Type: portfolio
- Portfolio Type: publication_design
- Portfolio Role: design_layout
Legacy Of: The Land — Pages 66–67

- Legacy of the Land exhibition catalog, pages 66-67
- Client: California Center for the Arts Escondido
- Visit figure page
- Type: portfolio
- Portfolio Type: publication_design
- Portfolio Role: design_layout
Legacy Of: The Land — Pages 68–69

- Legacy of the Land exhibition catalog, pages 68-69
- Client: California Center for the Arts Escondido
- Visit figure page
- Type: portfolio
- Portfolio Type: publication_design
- Portfolio Role: design_layout
Legacy Of: The Land — Pages 70–71

- Legacy of the Land exhibition catalog, pages 70-71
- Client: California Center for the Arts Escondido
- Visit figure page
- Type: portfolio
- Portfolio Type: publication_design
- Portfolio Role: design_layout
Legacy Of: The Land — Pages 72–73

- Legacy of the Land exhibition catalog, pages 72-73
- Client: California Center for the Arts Escondido
- Visit figure page
- Type: portfolio
- Portfolio Type: publication_design
- Portfolio Role: design_layout
Legacy Of: The Land — Pages 74–75

- Legacy of the Land exhibition catalog, pages 74-75
- Client: California Center for the Arts Escondido
- Visit figure page
- Type: portfolio
- Portfolio Type: publication_design
- Portfolio Role: design_layout
Legacy Of: The Land — Pages 76–77

- Legacy of the Land exhibition catalog, pages 76-77
- Client: California Center for the Arts Escondido
- Visit figure page
- Type: portfolio
- Portfolio Type: publication_design
- Portfolio Role: design_layout
Legacy Of: The Land — Pages 78–79

- Legacy of the Land exhibition catalog, pages 78-79
- Client: California Center for the Arts Escondido
- Visit figure page
- Type: portfolio
- Portfolio Type: publication_design
- Portfolio Role: design_layout
Legacy Of: The Land — Pages 8–9

- Legacy of the Land exhibition catalog, pages 8-9
- Client: California Center for the Arts Escondido
- Visit figure page
- Type: portfolio
- Portfolio Type: publication_design
- Portfolio Role: design_layout
Legacy Of: The Land — Pages 80–81

- Legacy of the Land exhibition catalog, pages 80-81
- Client: California Center for the Arts Escondido
- Visit figure page
- Type: portfolio
- Portfolio Type: publication_design
- Portfolio Role: design_layout
Legacy Of: The Land — Pages 82–83
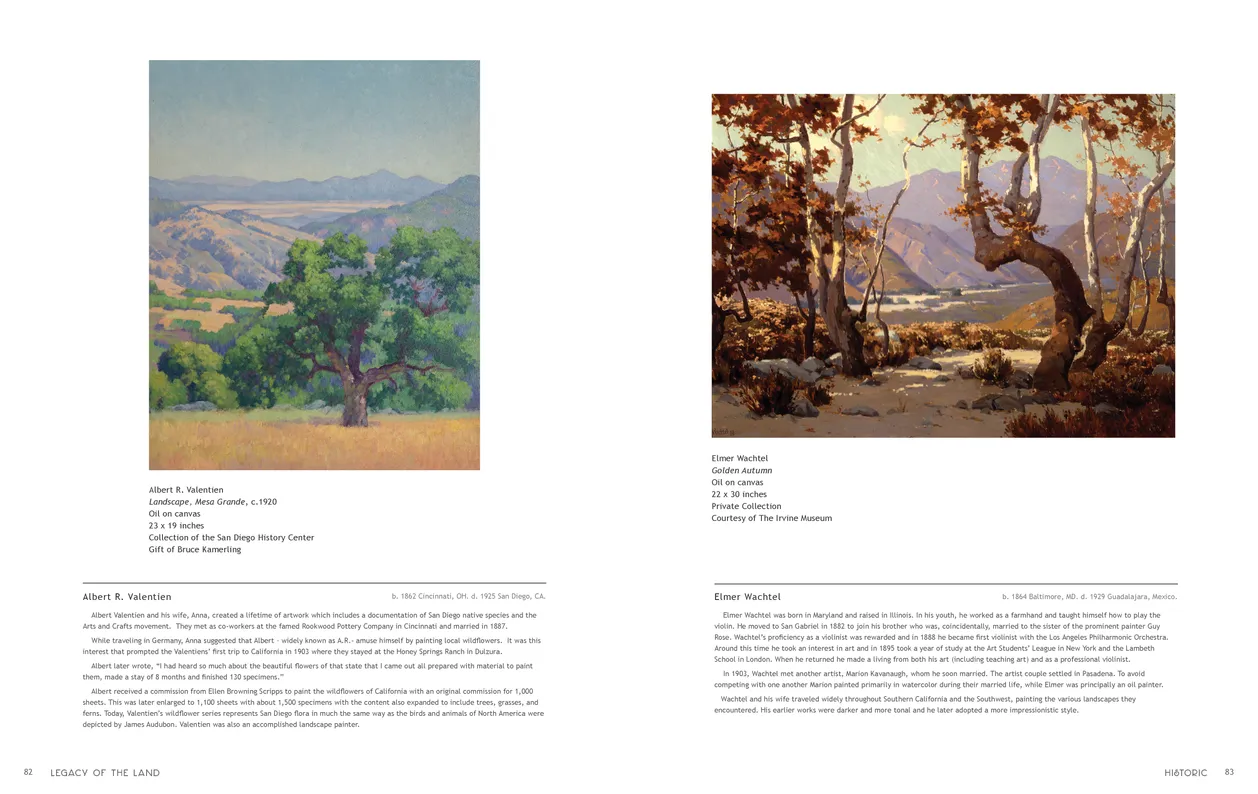
- Legacy of the Land exhibition catalog, pages 82-83
- Client: California Center for the Arts Escondido
- Visit figure page
- Type: portfolio
- Portfolio Type: publication_design
- Portfolio Role: design_layout
Legacy Of: The Land — Pages 84–85

- Legacy of the Land exhibition catalog, pages 84-85
- Client: California Center for the Arts Escondido
- Visit figure page
- Type: portfolio
- Portfolio Type: publication_design
- Portfolio Role: design_layout
Legacy Of: The Land — Pages 86–87

- Legacy of the Land exhibition catalog, pages 86-87
- Client: California Center for the Arts Escondido
- Visit figure page
- Type: portfolio
- Portfolio Type: publication_design
- Portfolio Role: design_layout
Legacy Of: The Land — Pages 88–89

- Legacy of the Land exhibition catalog, pages 88-89
- Client: California Center for the Arts Escondido
- Visit figure page
- Type: portfolio
- Portfolio Type: publication_design
- Portfolio Role: design_layout
Legacy Of: The Land — Pages 90–91

- Legacy of the Land exhibition catalog, pages 90-91
- Client: California Center for the Arts Escondido
- Visit figure page
- Type: portfolio
- Portfolio Type: publication_design
- Portfolio Role: design_layout
Legacy Of: The Land — Pages 92–93

- Legacy of the Land exhibition catalog, pages 92-93
- Client: California Center for the Arts Escondido
- Visit figure page
- Type: portfolio
- Portfolio Type: publication_design
- Portfolio Role: design_layout
Legacy Of: The Land — Pages 94–95

- Legacy of the Land exhibition catalog, pages 94-95
- Client: California Center for the Arts Escondido
- Visit figure page
- Type: portfolio
- Portfolio Type: publication_design
- Portfolio Role: design_layout
Legacy Of: The Land — Pages 96–97

- Legacy of the Land exhibition catalog, pages 96-97
- Client: California Center for the Arts Escondido
- Visit figure page
- Type: portfolio
- Portfolio Type: publication_design
- Portfolio Role: design_layout
Legacy Of: The Land — Pages 98–99

- Legacy of the Land exhibition catalog, pages 98-99
- Client: California Center for the Arts Escondido
- Visit figure page
- Type: portfolio
- Portfolio Type: publication_design
- Portfolio Role: design_layout
Lipstick Instructions Step 2
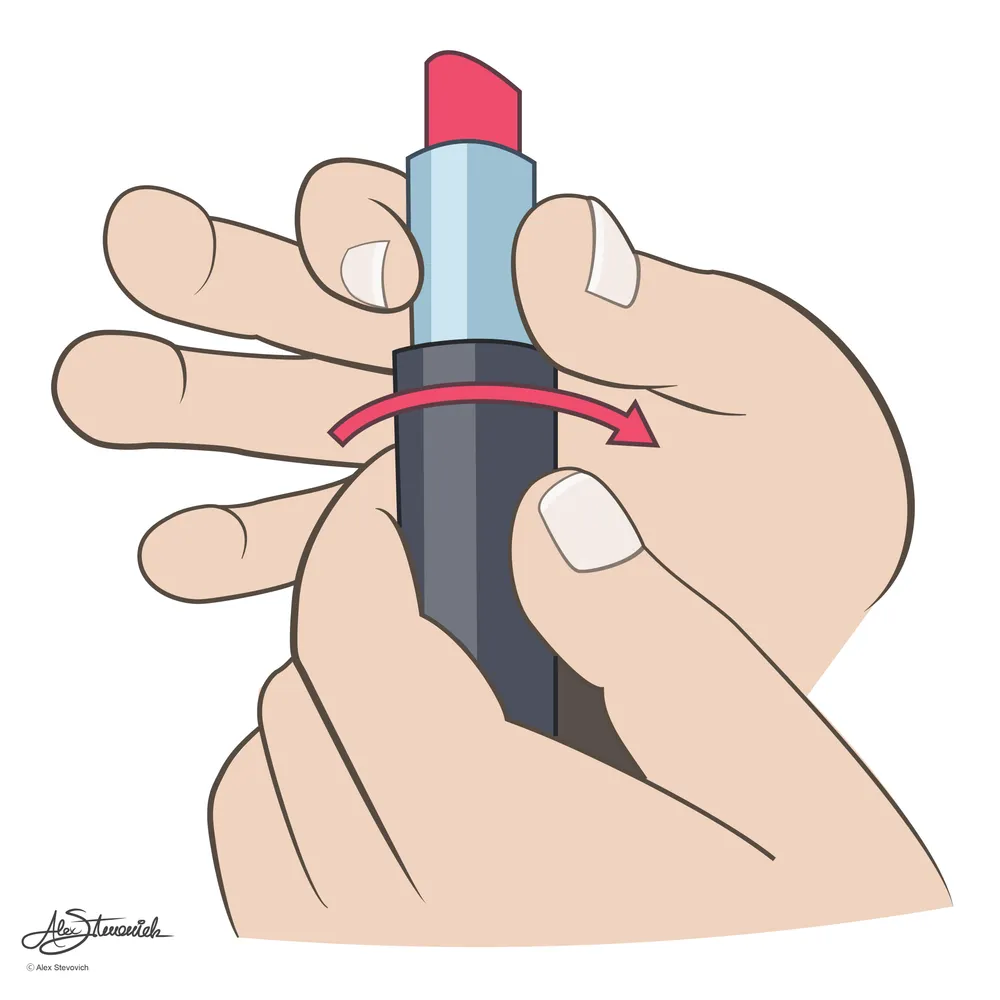
- Lipstick Instructions Step 2
- Client: Universal Symbols
- Artwork by Alex Stevovich
- © Alex Stevovich
- Visit figure page
- Type: portfolio
- Portfolio Type: advertising
- Portfolio Role: design_layout
- Portfolio Original Art: true
Mandy Greer The Ecstatic Moment Exhibition Presentation
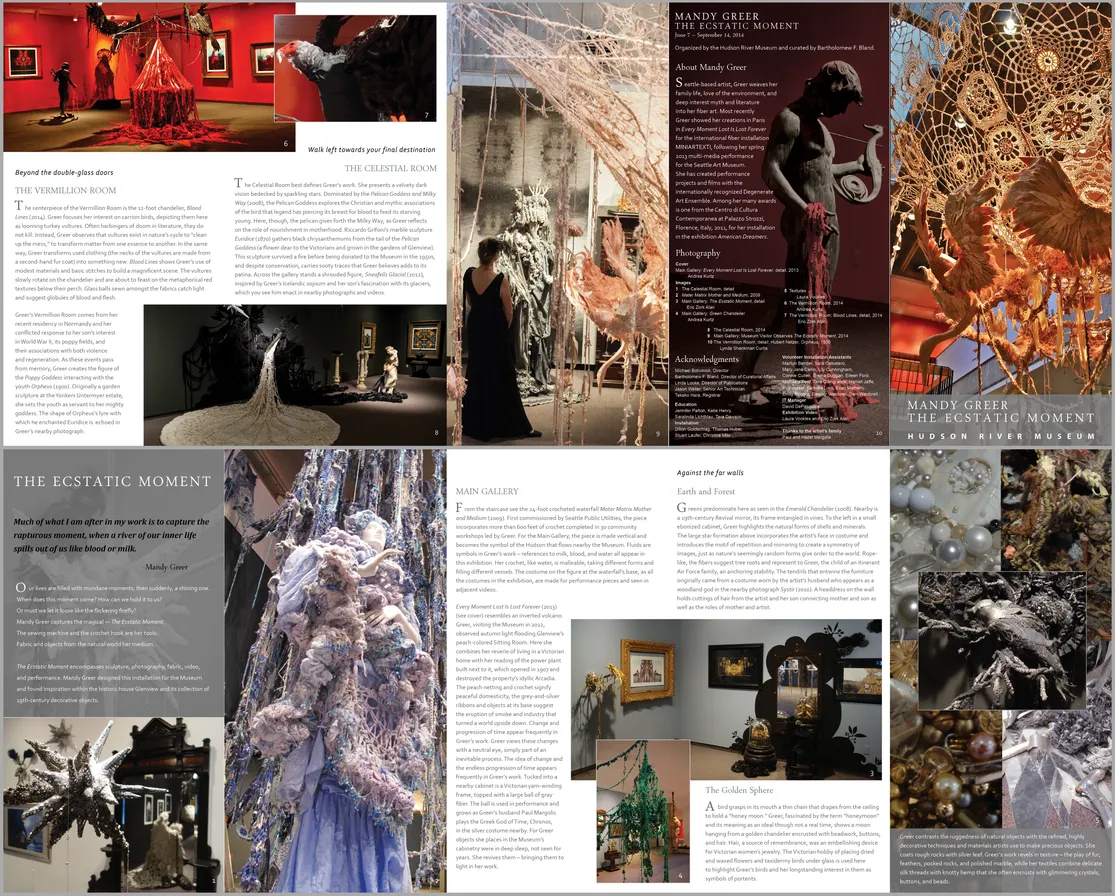
- Folding brochure for the Mandy Greer: The Ecastatic Moment exhibition
- Client: Hudson River Museum
- Visit figure page
- Type: portfolio
- Portfolio Type: advertising
- Portfolio Role: design_layout
Mary Cassatt Works On Paper Exhibition Wordmark
- Wordmark for Mary Cassatt: Works on Paper exhibition
- Client: Adelson Galleries
- Visit figure page
- Type: portfolio
- Portfolio Type: advertising
- Portfolio Role: design_layout
Midnight Citylights Brandmark

- Midnight Citylights bandmark
- Client: Midnight Citylights
- Visit figure page
- Type: portfolio
- Portfolio Type: advertising
- Portfolio Role: design_layout
Midnight Citylights Graphicmark

- Midnight Citylights graphicmark
- Client: Midnight Citylights
- Visit figure page
- Type: portfolio
- Portfolio Type: advertising
- Portfolio Role: design_layout
Midnight Citylights Iconmark

- Midnight Citylights iconmark
- Client: Midnight Citylights
- Visit figure page
- Type: portfolio
- Portfolio Type: advertising
- Portfolio Role: design_layout
Midnight Citylights Iconmark Alt

- Midnight Citylights iconmark (Alternative)
- Client: Midnight Citylights
- Visit figure page
- Type: portfolio
- Portfolio Type: advertising
- Portfolio Role: design_layout
Midnight Citylights Web Home Page

- Midnight Citylights Website — Home Page
- Client: Midnight Citylights
- Visit figure page
- Type: portfolio
- Portfolio Type: advertising
- Portfolio Role: design_layout
Midnight Citylights Web Software Page
- Midnight Citylights Website — Software Page
- Client: Midnight Citylights
- Visit figure page
- Type: portfolio
- Portfolio Type: advertising
- Portfolio Role: design_layout
Modern Rydanian Script

- Modern Rydanian Script
- Client: Kingdom of Flowers
- Visit figure page
- Type: portfolio
- Portfolio Type: advertising
- Portfolio Role: design_layout
Nielsen Gallery Web Artist Artwork Item Page
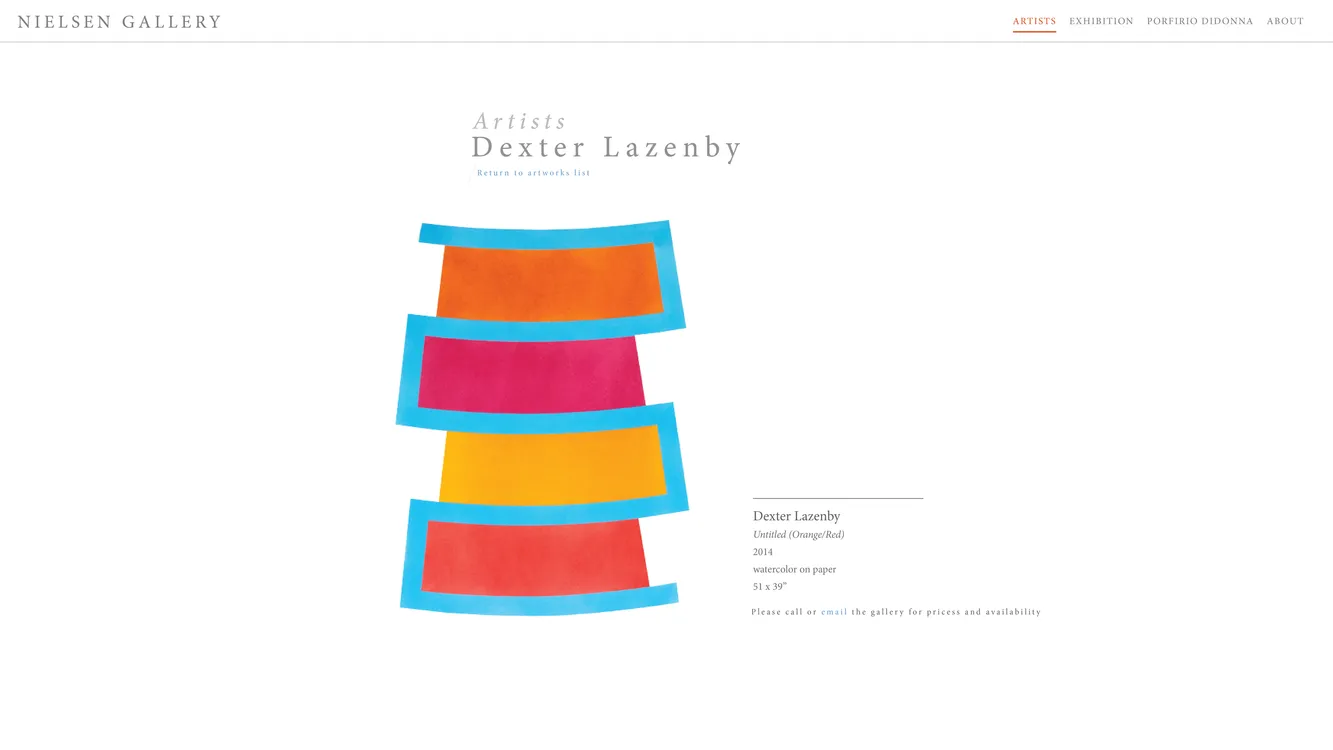
- Nielsen Gallery Website — Artist Artwork Item Page
- Client: Nielsen Gallery
- Visit figure page
- Type: portfolio
- Portfolio Type: advertising
- Portfolio Role: design_layout
One Winged Eye Emblem

- One Winged Eye emblem
- Artwork by Alex Stevovich
- © Alex Stevovich
- Visit figure page
- Type: portfolio
- Portfolio Type: advertising
- Portfolio Role: design_layout
- Portfolio Original Art: true
Oracle
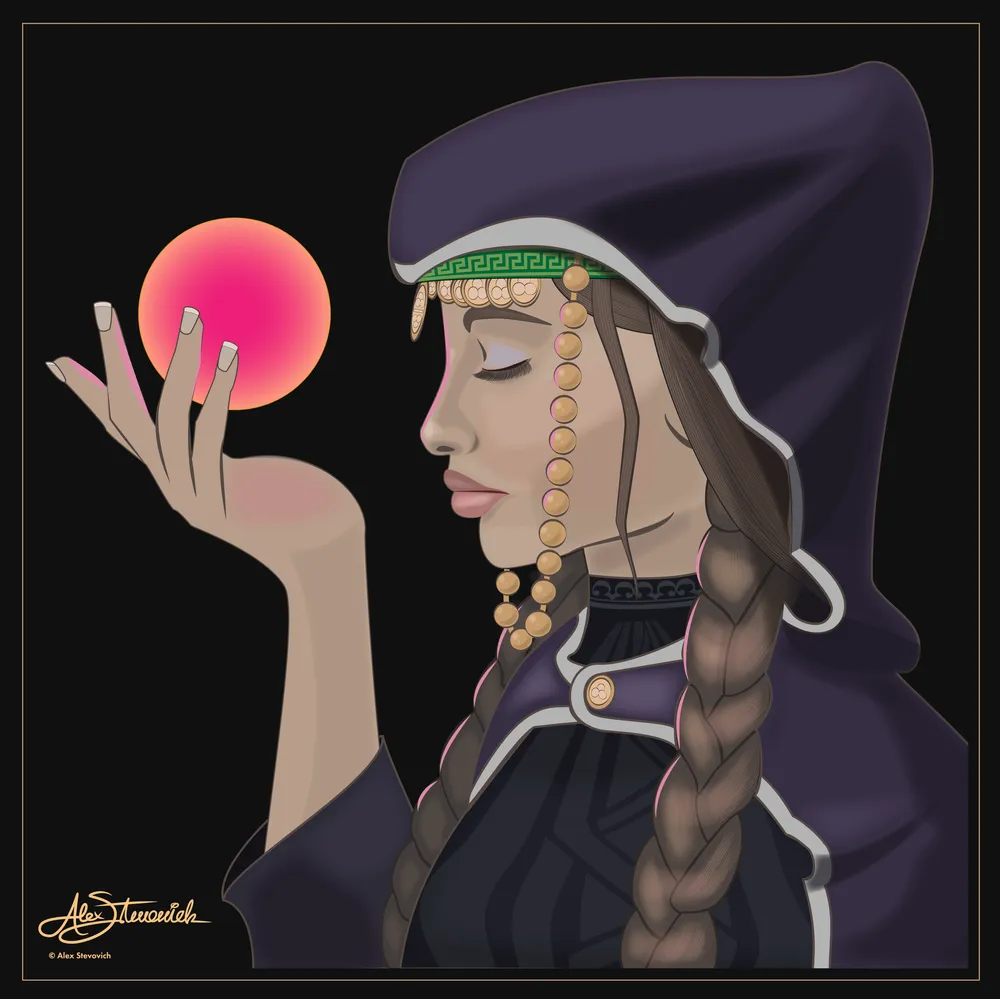
- Oracle
- Artwork by Alex Stevovich
- © Alex Stevovich
- Visit figure page
- Type: portfolio
- Portfolio Type: advertising
- Portfolio Role: design_layout
- Portfolio Original Art: true
Oracle Vector Split
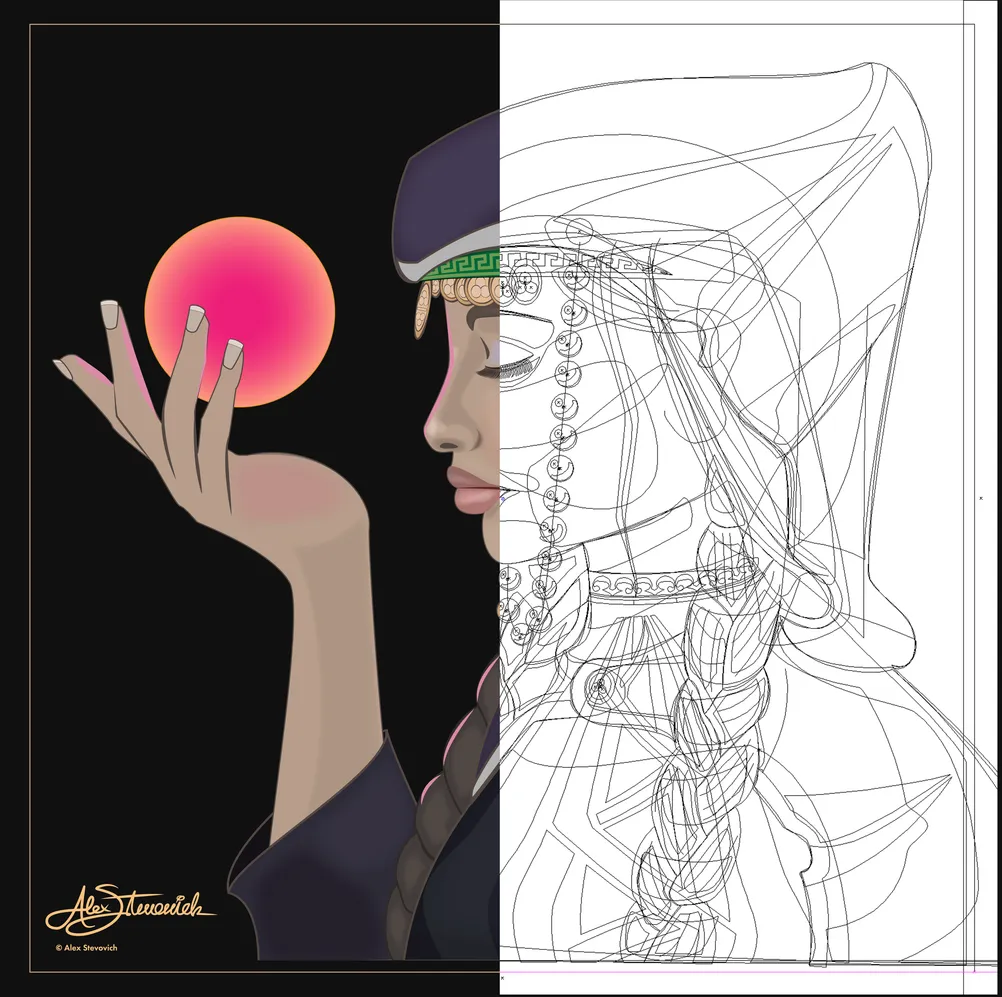
- Oracle — Vector Artwork Split Display
- Artwork by Alex Stevovich
- © Alex Stevovich
- Visit figure page
- Type: portfolio
- Portfolio Type: advertising
- Portfolio Role: design_layout
- Portfolio Original Art: true
Paddock Particulars Brand Brandmark

- Paddock Particulars brandmark
- Client: Paddock Particulars
- Visit figure page
- Type: portfolio
- Portfolio Type: advertising
- Portfolio Role: design_layout
Paddock Particulars Brand Iconmark

- Paddock Particulars brand iconmark
- Client: Paddock Particulars
- Visit figure page
- Type: portfolio
- Portfolio Type: advertising
- Portfolio Role: design_layout
Peter Reginato Fiction Art And Antiques Ad December 2015
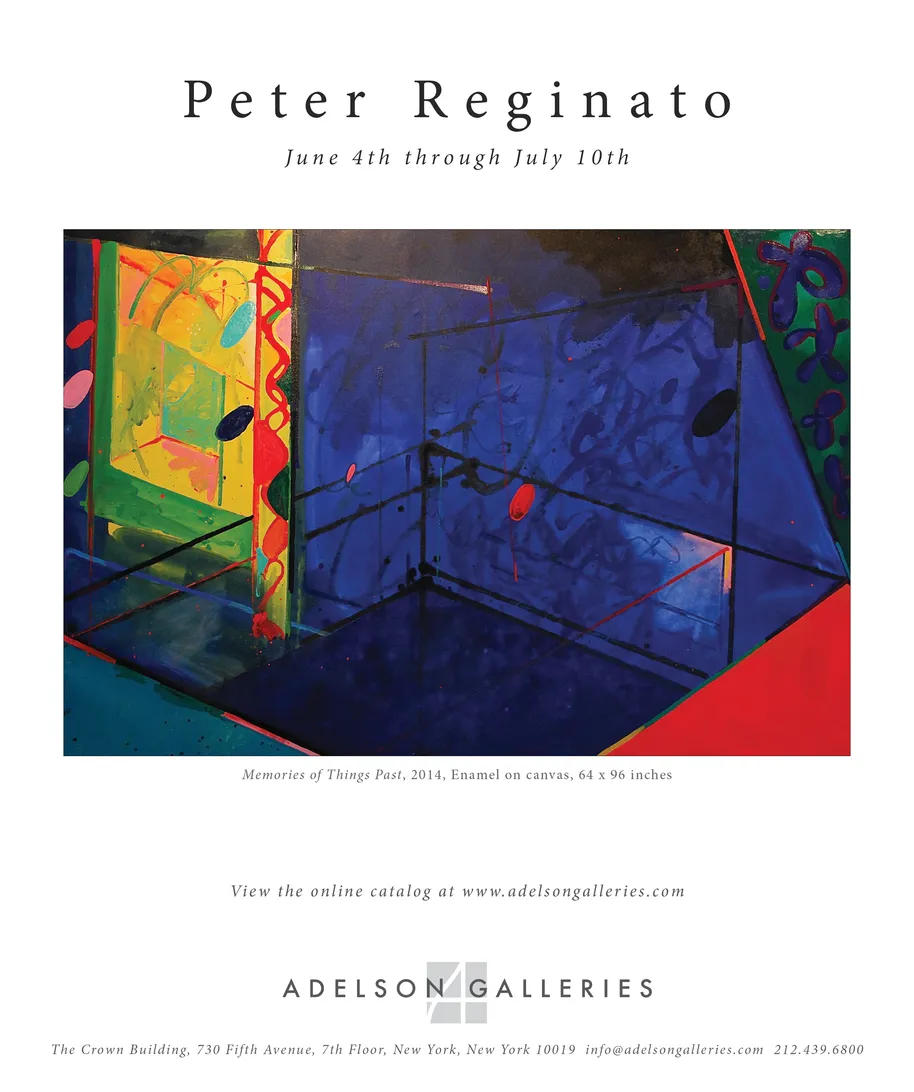
- Peter Reginato: Fiction — exhiibition advertisement in Art & Antiques magazine
- Client: Adelson Galleries
- Visit figure page
- Type: portfolio
- Portfolio Type: advertising
- Portfolio Role: design_layout
Peter Reginato Fiction Exhibition Wordmark
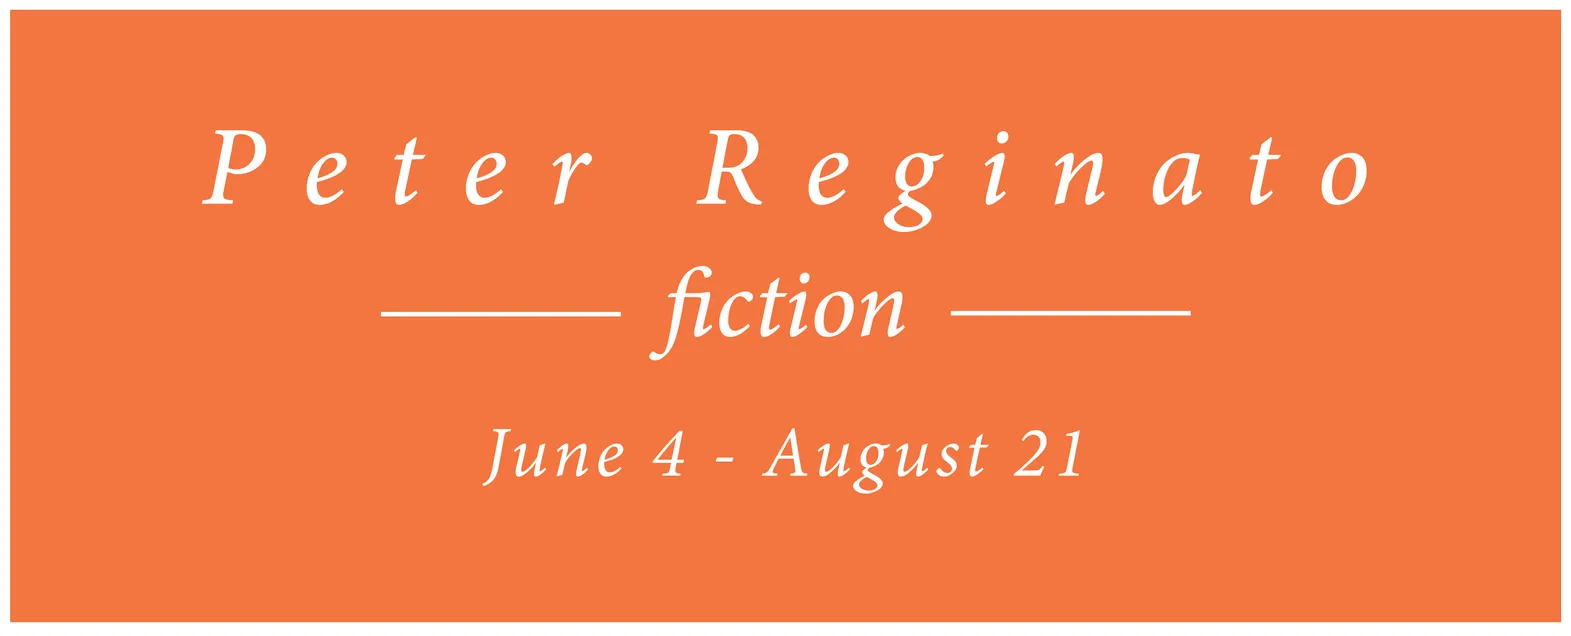
- Wordmark for Peter Reginato: Fiction exhibition
- Client: Adelson Galleries
- Visit figure page
- Type: portfolio
- Portfolio Type: advertising
- Portfolio Role: design_layout
Peter Reginato: Fiction — Cover
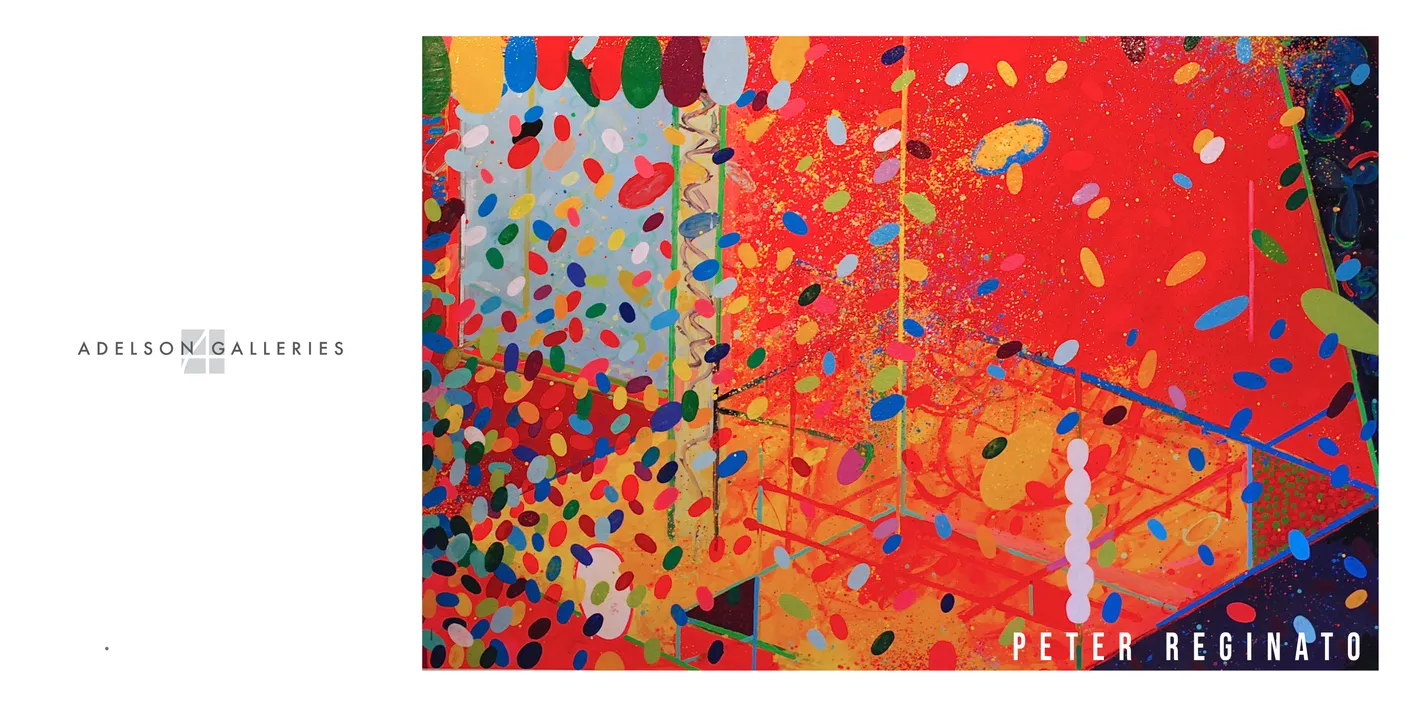
- Peter Reginato: Fiction exhibition catalog, cover
- Client: Adelson Galleries
- Visit figure page
- Type: portfolio
- Portfolio Type: publication_design
- Portfolio Role: design_layout
Peter Reginato: Fiction — Inside Front Cover
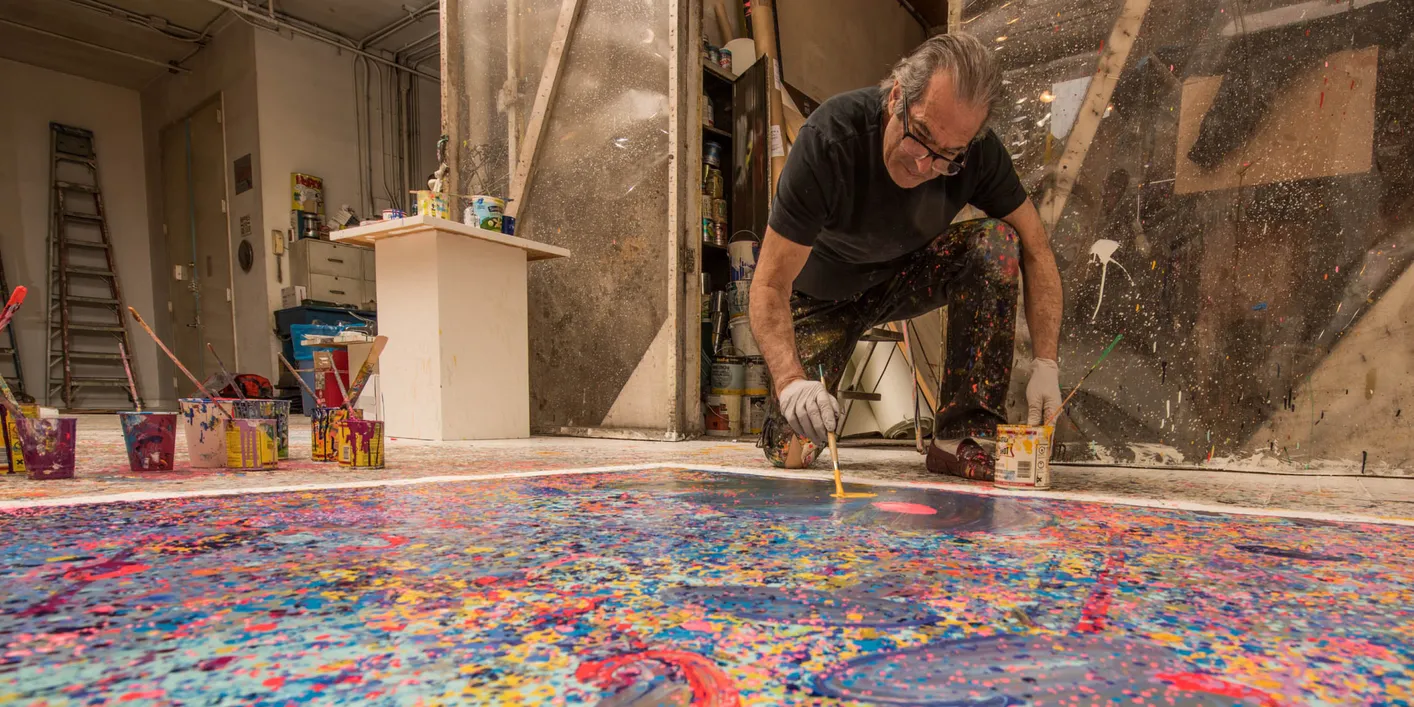
- Peter Reginato: Fiction exhibition catalog, inside front cover
- Client: Adelson Galleries
- Visit figure page
- Type: portfolio
- Portfolio Type: publication_design
- Portfolio Role: design_layout
Peter Reginato: Fiction — Pages 10–11
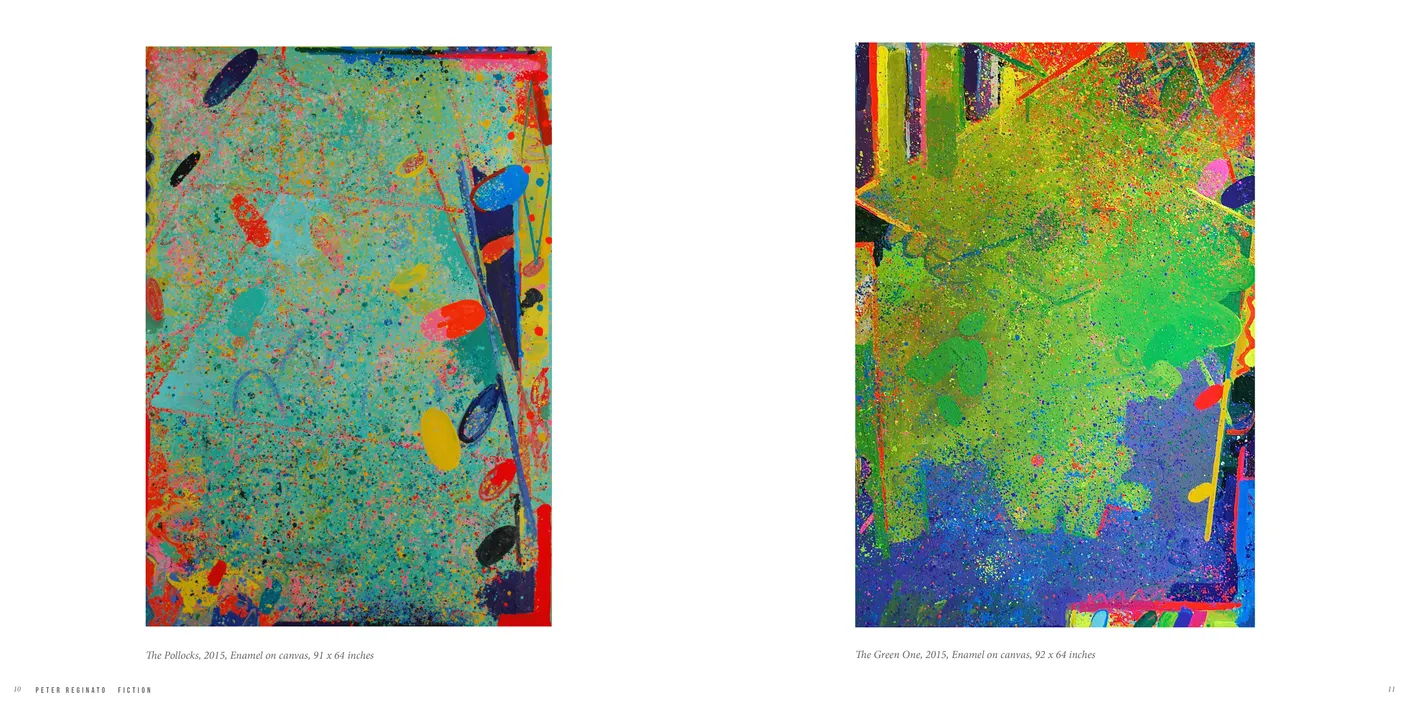
- Peter Reginato: Fiction exhibition catalog, pages 10-11
- Client: Adelson Galleries
- Visit figure page
- Type: portfolio
- Portfolio Type: publication_design
- Portfolio Role: design_layout
Peter Reginato: Fiction — Pages 12–13
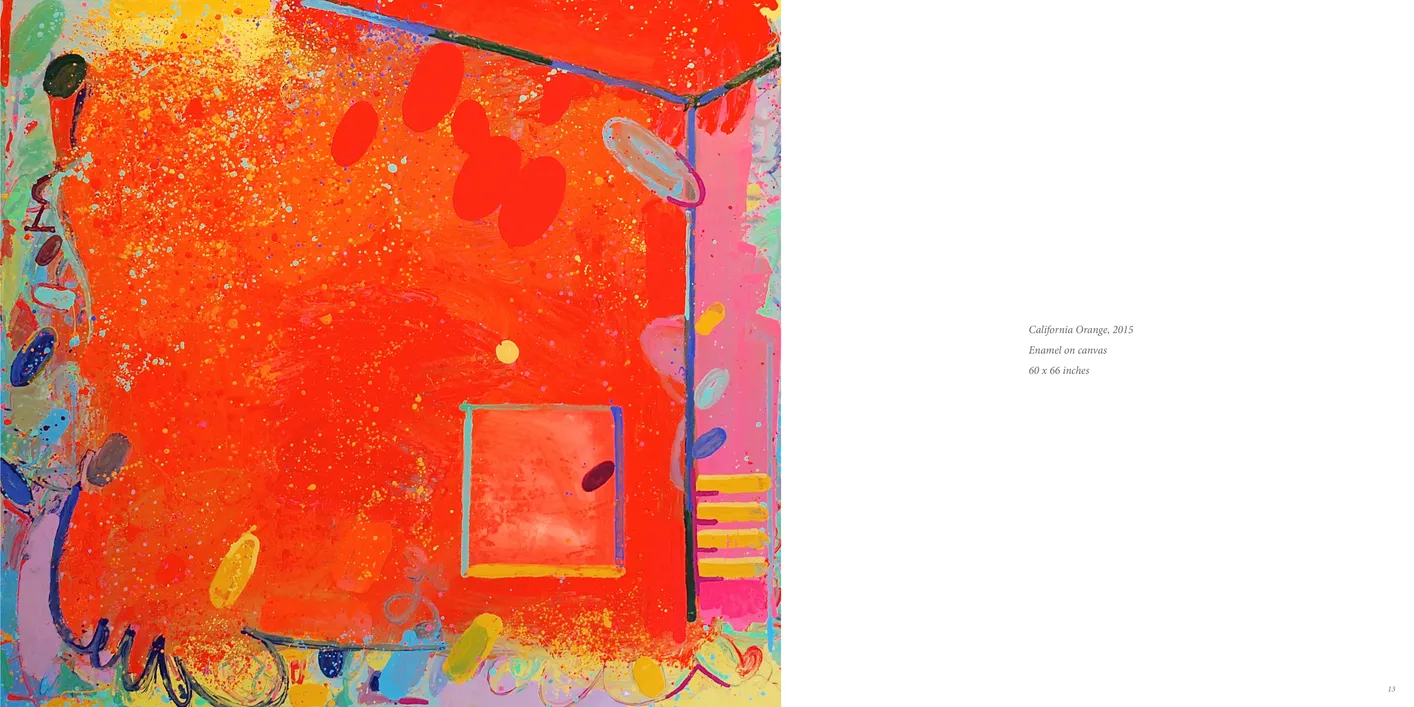
- Peter Reginato: Fiction exhibition catalog, pages 12-13
- Client: Adelson Galleries
- Visit figure page
- Type: portfolio
- Portfolio Type: publication_design
- Portfolio Role: design_layout
Peter Reginato: Fiction — Pages 14–15
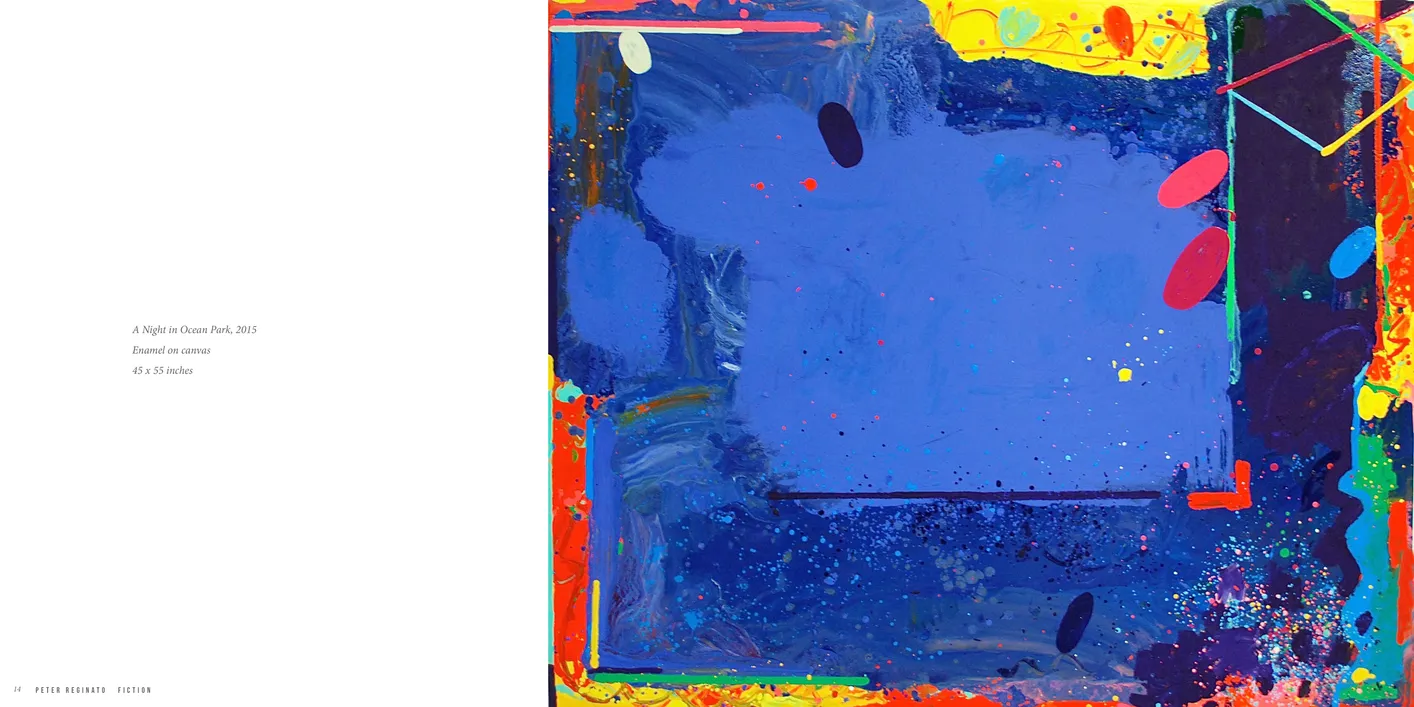
- Peter Reginato: Fiction exhibition catalog, pages 14-15
- Client: Adelson Galleries
- Visit figure page
- Type: portfolio
- Portfolio Type: publication_design
- Portfolio Role: design_layout
Peter Reginato: Fiction — Pages 16–17
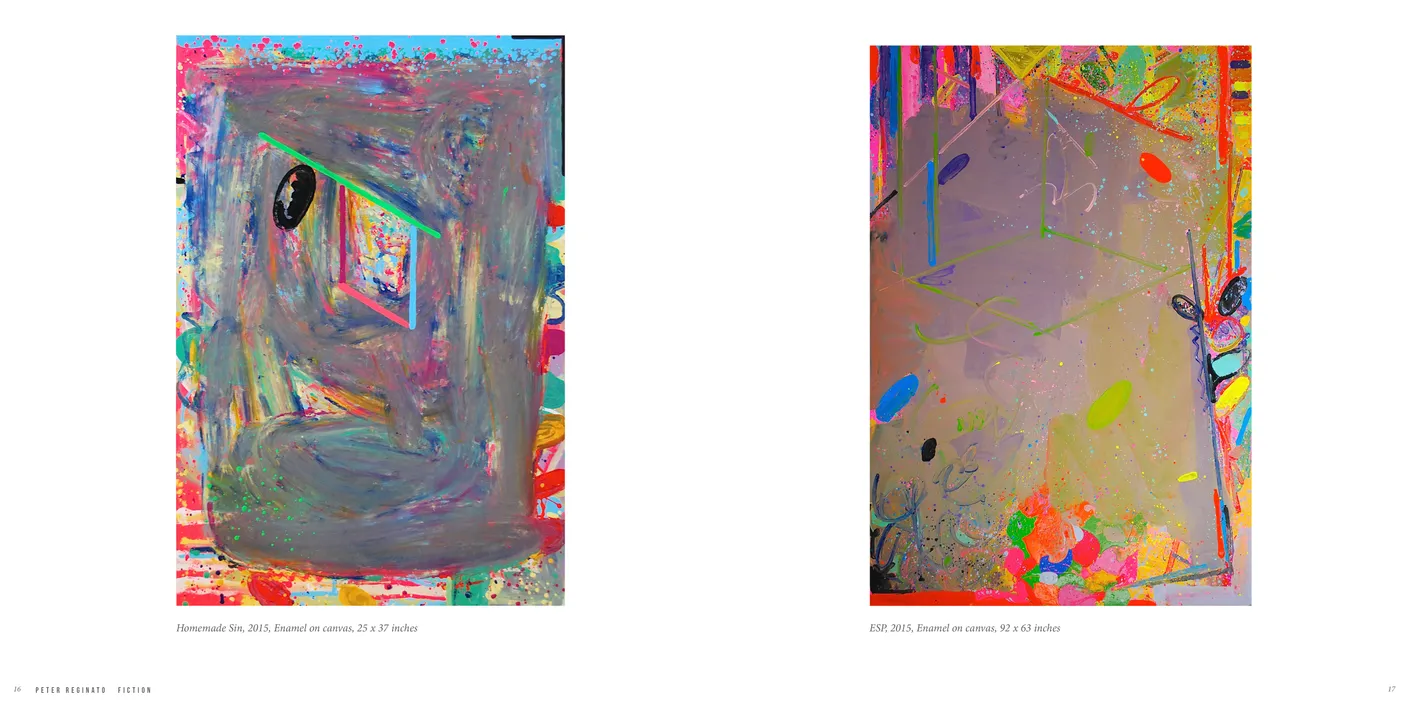
- Peter Reginato: Fiction exhibition catalog, pages 16-17
- Client: Adelson Galleries
- Visit figure page
- Type: portfolio
- Portfolio Type: publication_design
- Portfolio Role: design_layout
Peter Reginato: Fiction — Pages 18–19
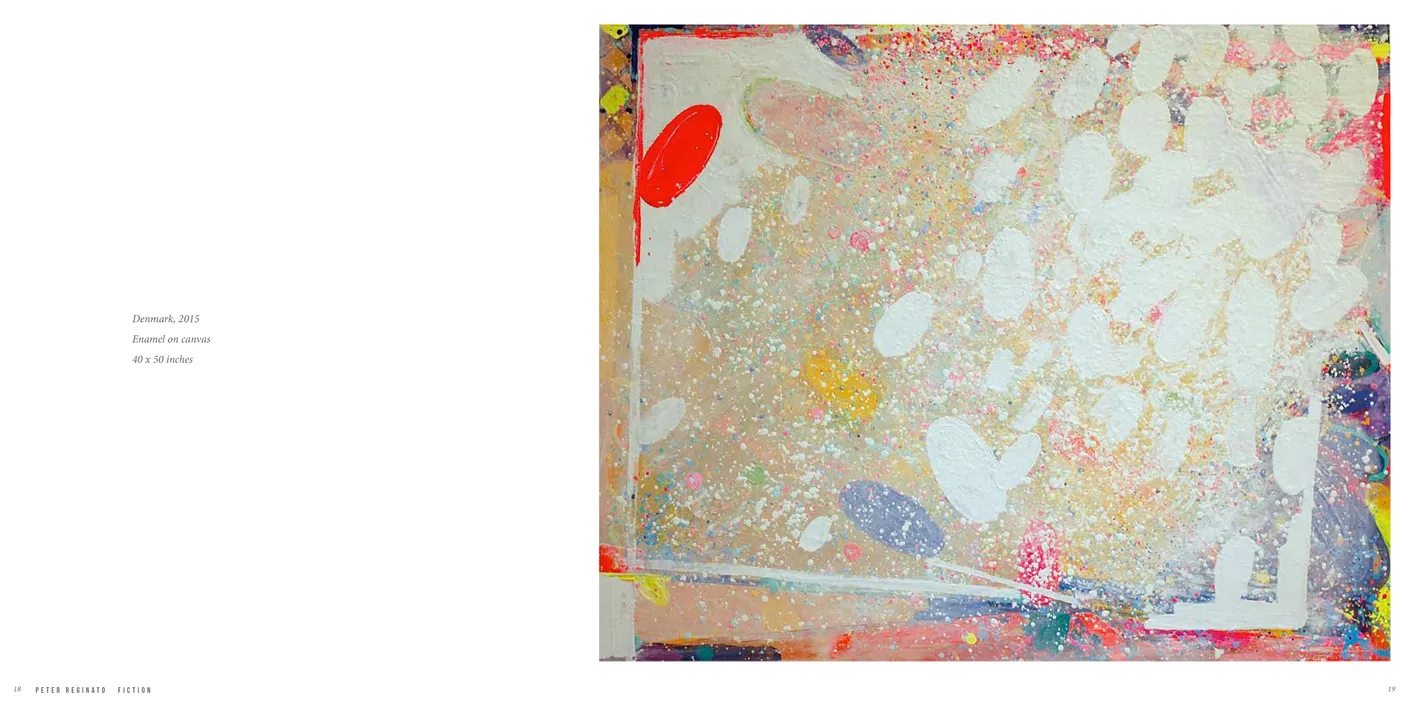
- Peter Reginato: Fiction exhibition catalog, pages 18-19
- Client: Adelson Galleries
- Visit figure page
- Type: portfolio
- Portfolio Type: publication_design
- Portfolio Role: design_layout
Peter Reginato: Fiction — Pages 2–3

- Peter Reginato: Fiction exhibition catalog, pages 2-3
- Client: Adelson Galleries
- Visit figure page
- Type: portfolio
- Portfolio Type: publication_design
- Portfolio Role: design_layout
Peter Reginato: Fiction — Pages 20–21
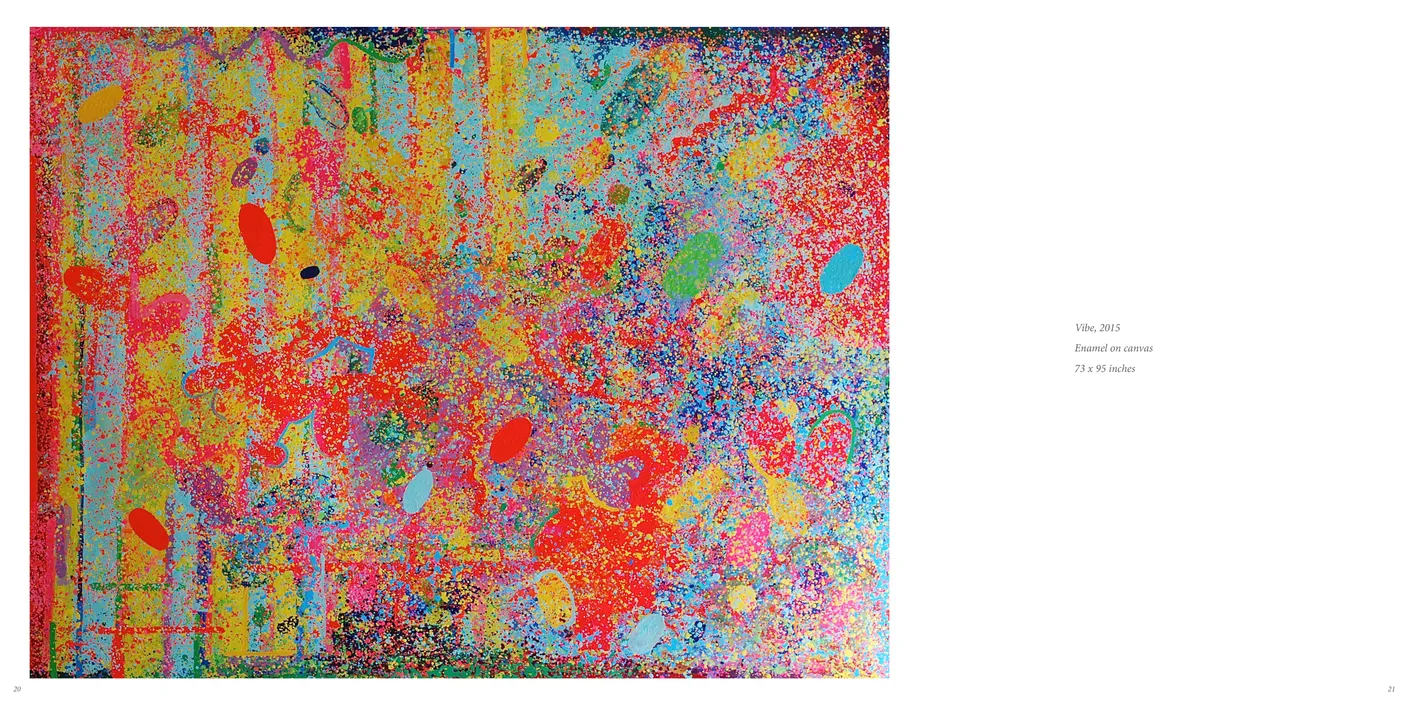
- Peter Reginato: Fiction exhibition catalog, pages 20-21
- Client: Adelson Galleries
- Visit figure page
- Type: portfolio
- Portfolio Type: publication_design
- Portfolio Role: design_layout
Peter Reginato: Fiction — Pages 22–23
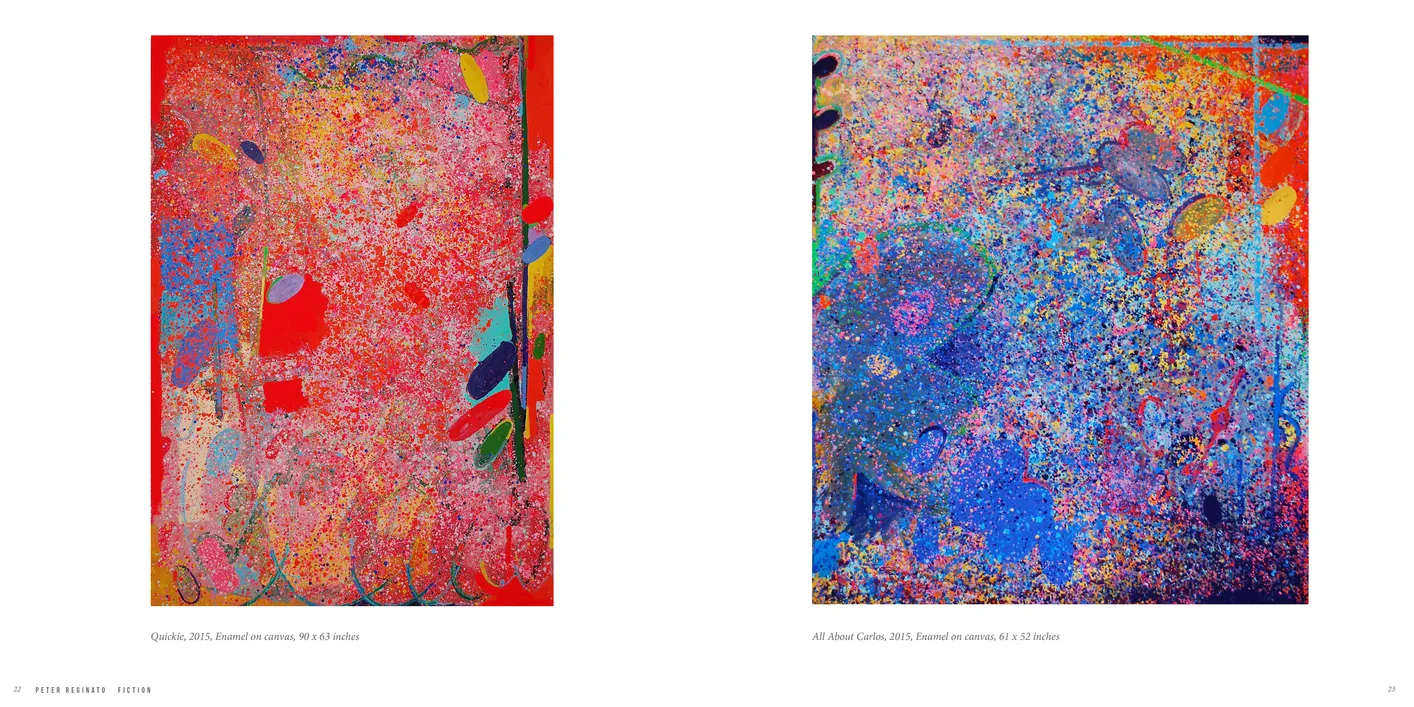
- Peter Reginato: Fiction exhibition catalog, pages 22-23
- Client: Adelson Galleries
- Visit figure page
- Type: portfolio
- Portfolio Type: publication_design
- Portfolio Role: design_layout
Peter Reginato: Fiction — Pages 24–25
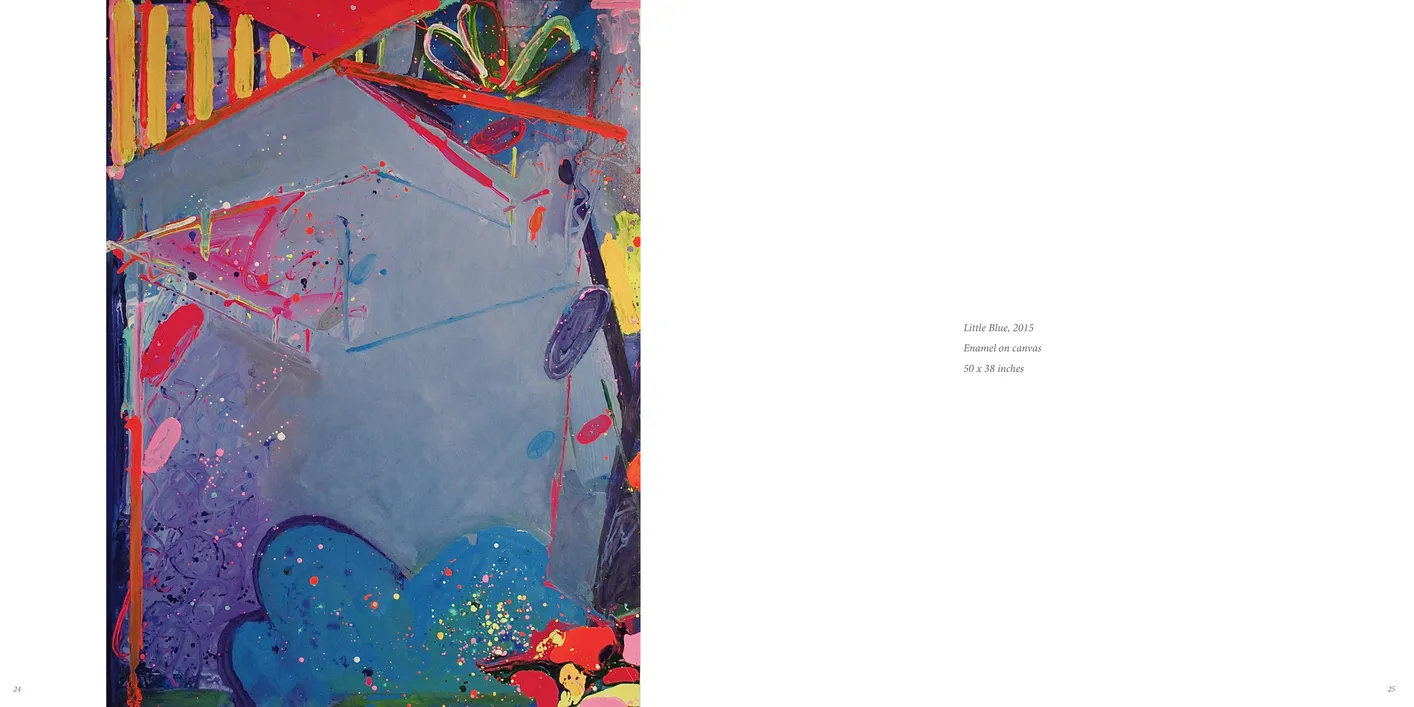
- Peter Reginato: Fiction exhibition catalog, pages 24-25
- Client: Adelson Galleries
- Visit figure page
- Type: portfolio
- Portfolio Type: publication_design
- Portfolio Role: design_layout
Peter Reginato: Fiction — Pages 26–27
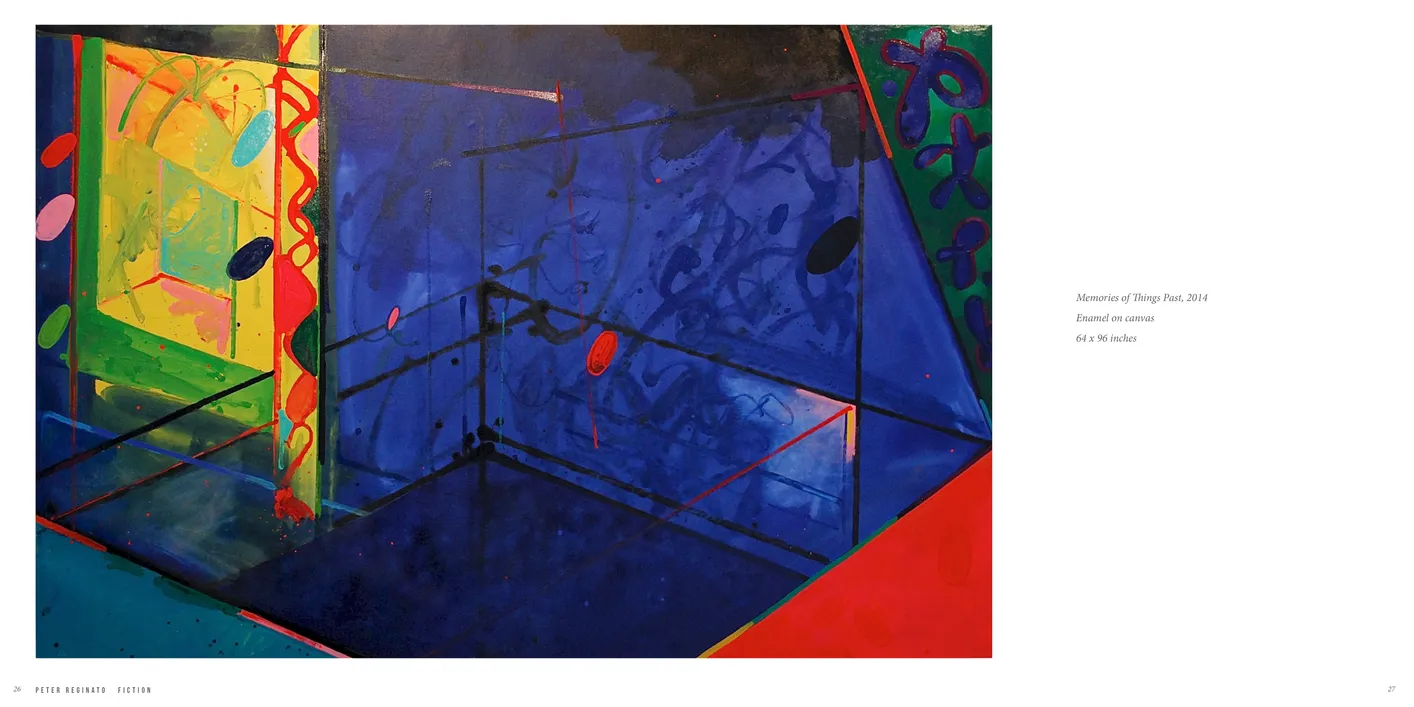
- Peter Reginato: Fiction exhibition catalog, pages 26-27
- Client: Adelson Galleries
- Visit figure page
- Type: portfolio
- Portfolio Type: publication_design
- Portfolio Role: design_layout
Peter Reginato: Fiction — Pages 28–29
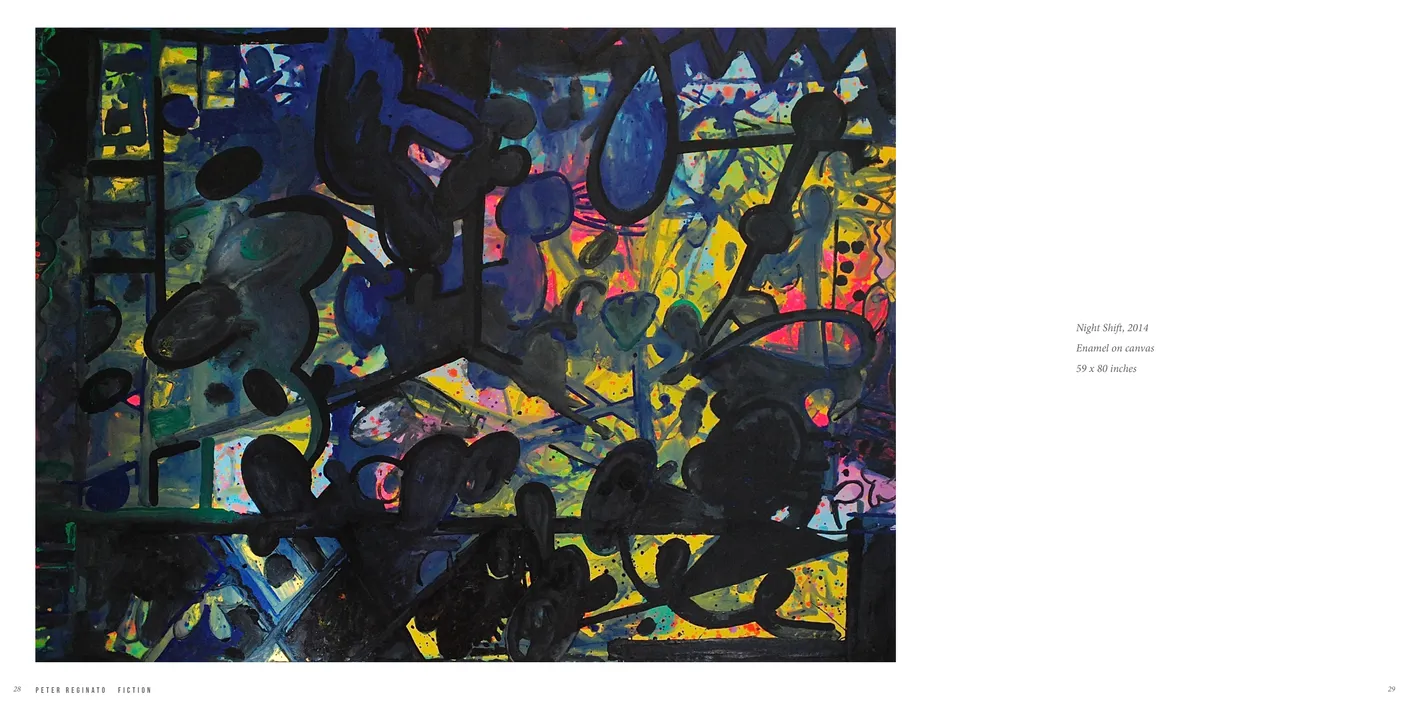
- Peter Reginato: Fiction exhibition catalog, pages 28-29
- Client: Adelson Galleries
- Visit figure page
- Type: portfolio
- Portfolio Type: publication_design
- Portfolio Role: design_layout
Peter Reginato: Fiction — Pages 30–31
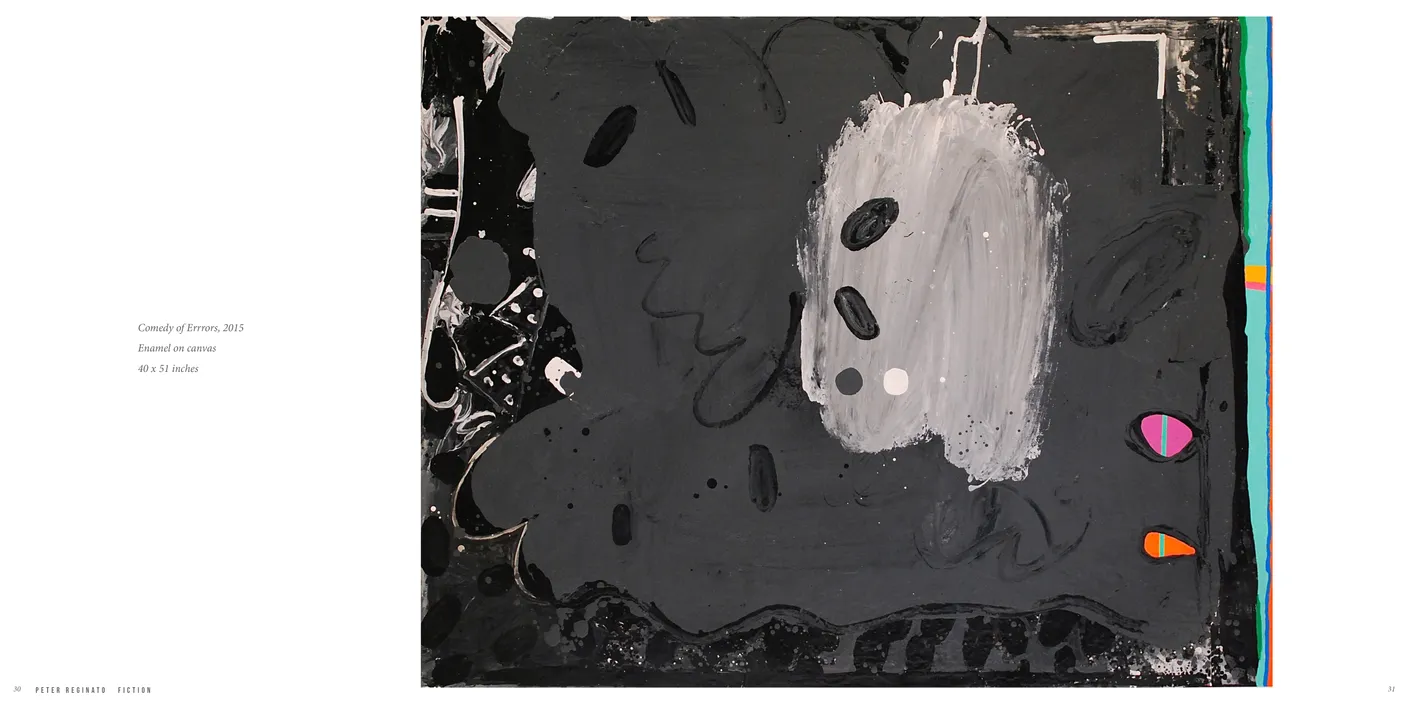
- Peter Reginato: Fiction exhibition catalog, pages 30-31
- Client: Adelson Galleries
- Visit figure page
- Type: portfolio
- Portfolio Type: publication_design
- Portfolio Role: design_layout
Peter Reginato: Fiction — Pages 32–33
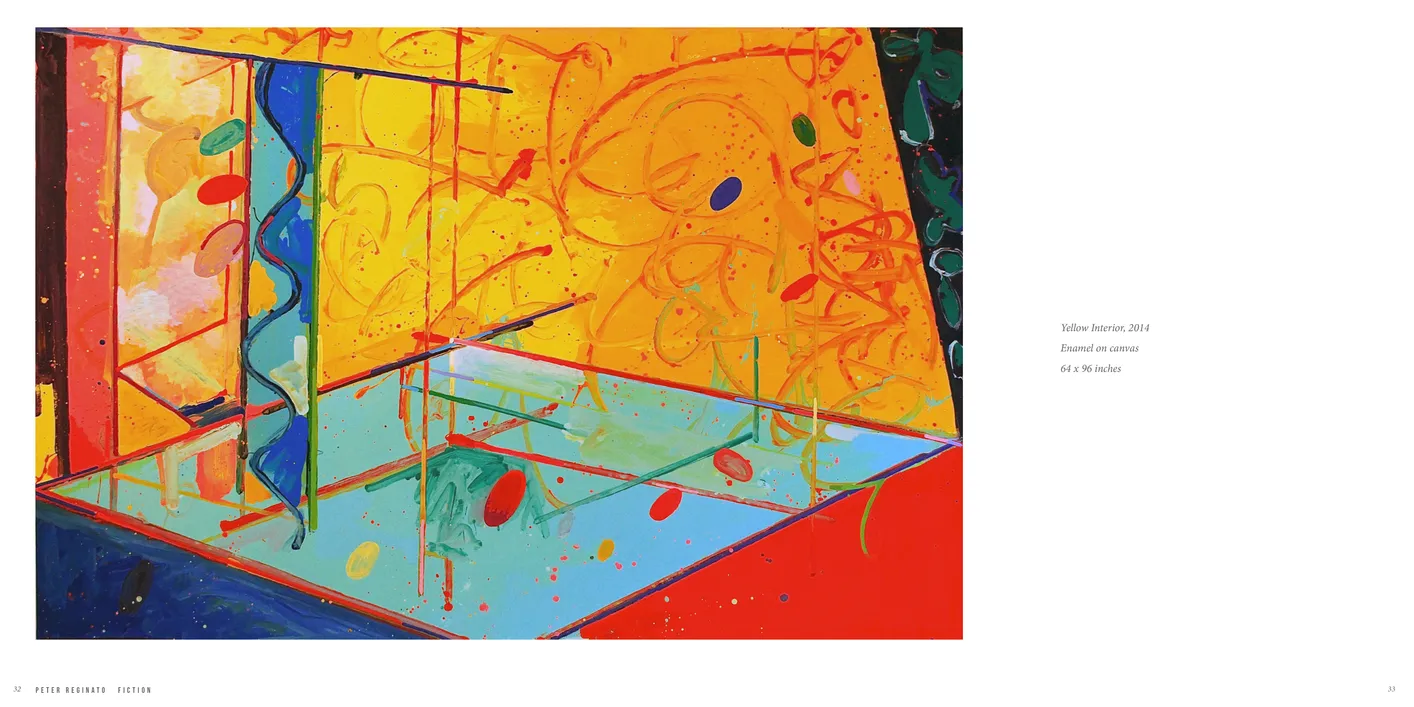
- Peter Reginato: Fiction exhibition catalog, pages 32-33
- Client: Adelson Galleries
- Visit figure page
- Type: portfolio
- Portfolio Type: publication_design
- Portfolio Role: design_layout
Peter Reginato: Fiction — Pages 34–35
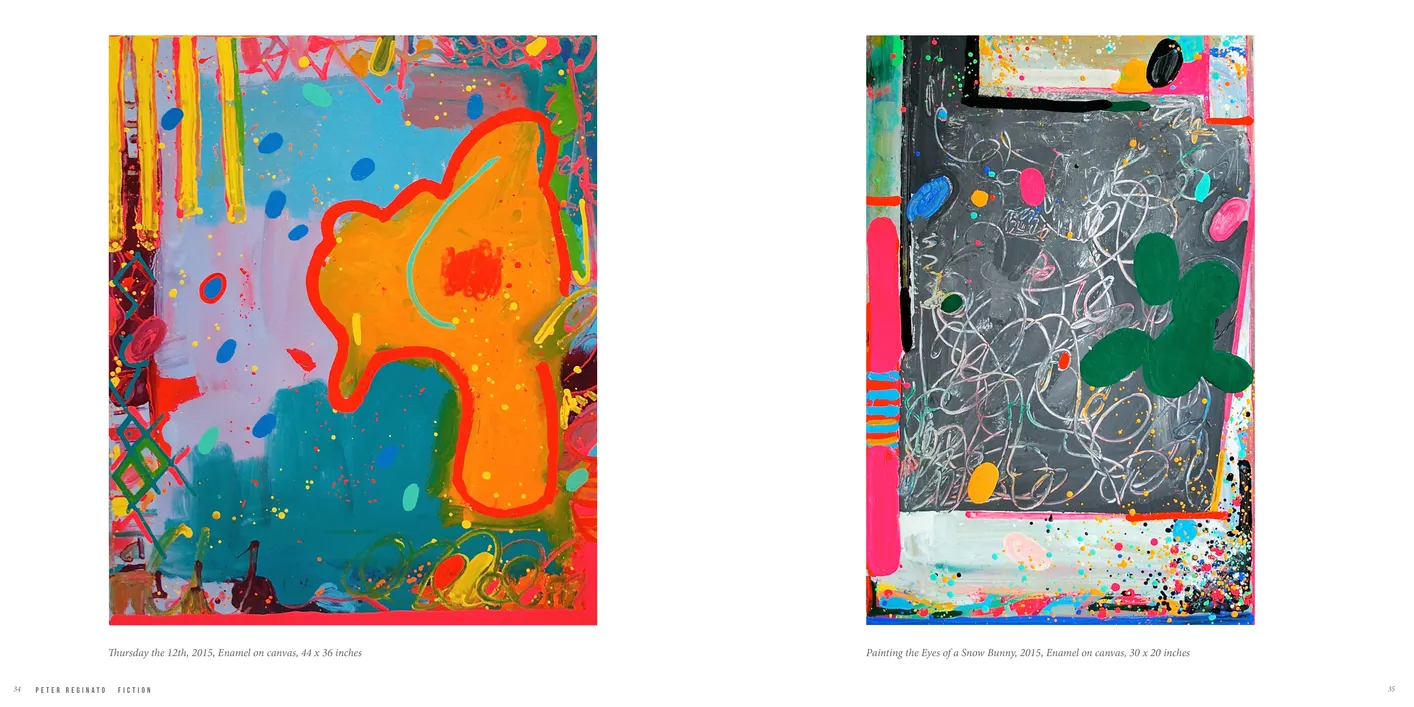
- Peter Reginato: Fiction exhibition catalog, pages 34-35
- Client: Adelson Galleries
- Visit figure page
- Type: portfolio
- Portfolio Type: publication_design
- Portfolio Role: design_layout
Peter Reginato: Fiction — Pages 36–37
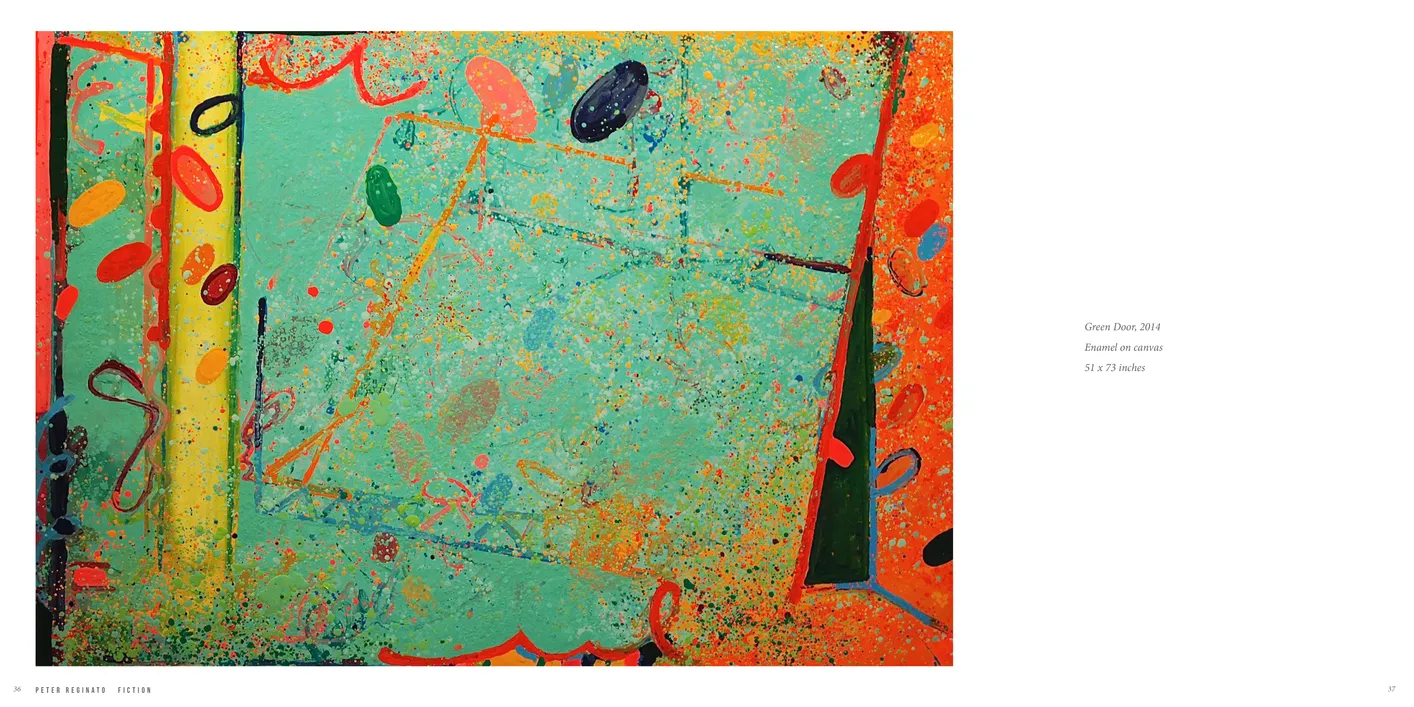
- Peter Reginato: Fiction exhibition catalog, pages 36-37
- Client: Adelson Galleries
- Visit figure page
- Type: portfolio
- Portfolio Type: publication_design
- Portfolio Role: design_layout
Peter Reginato: Fiction — Pages 38–39
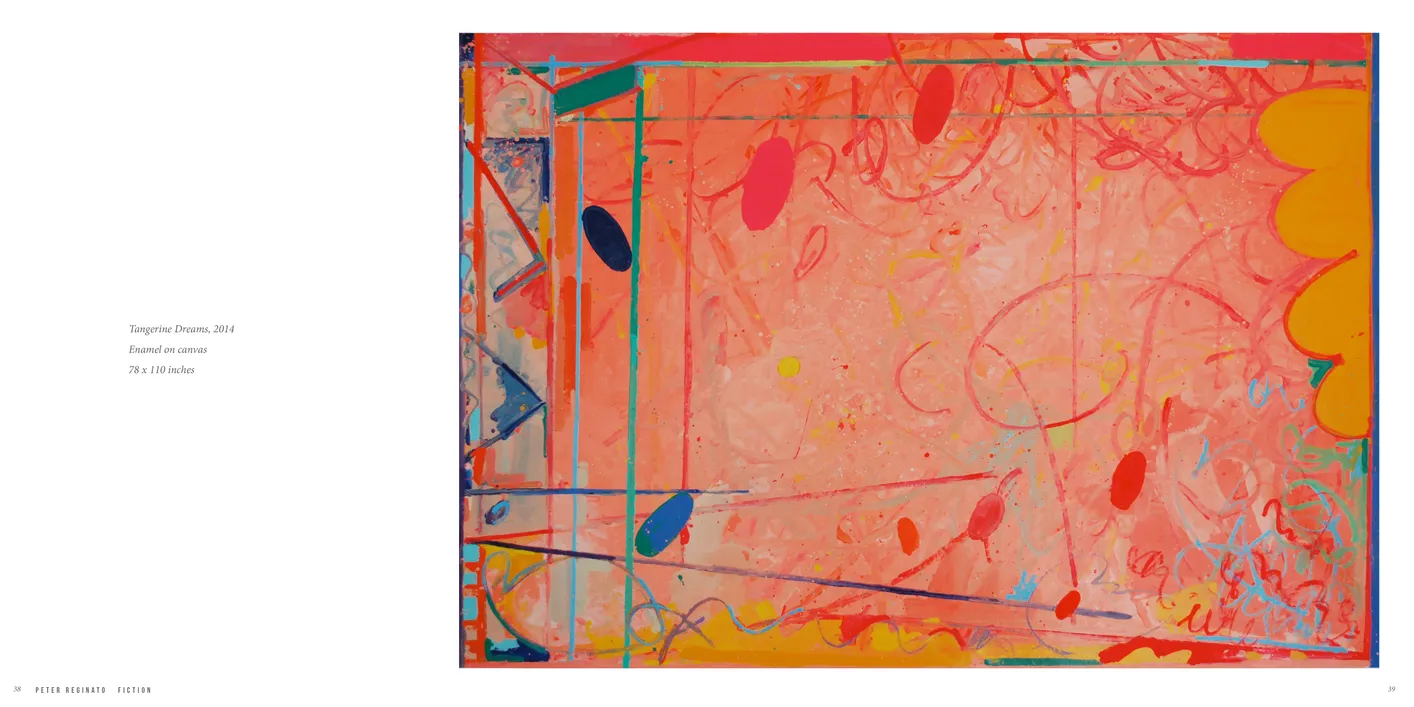
- Peter Reginato: Fiction exhibition catalog, pages 38-39
- Client: Adelson Galleries
- Visit figure page
- Type: portfolio
- Portfolio Type: publication_design
- Portfolio Role: design_layout
Peter Reginato: Fiction — Pages 4–5
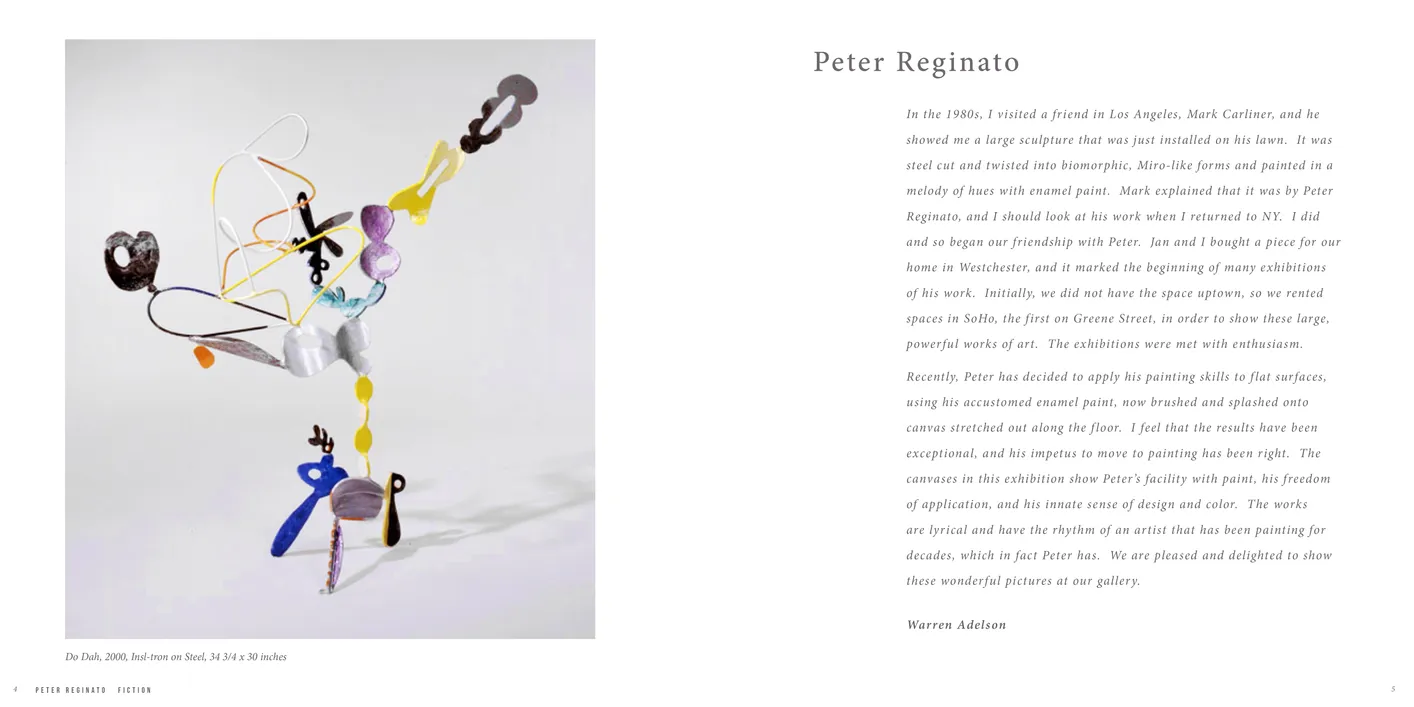
- Peter Reginato: Fiction exhibition catalog, pages 4-5
- Client: Adelson Galleries
- Visit figure page
- Type: portfolio
- Portfolio Type: publication_design
- Portfolio Role: design_layout
Peter Reginato: Fiction — Pages 40–41
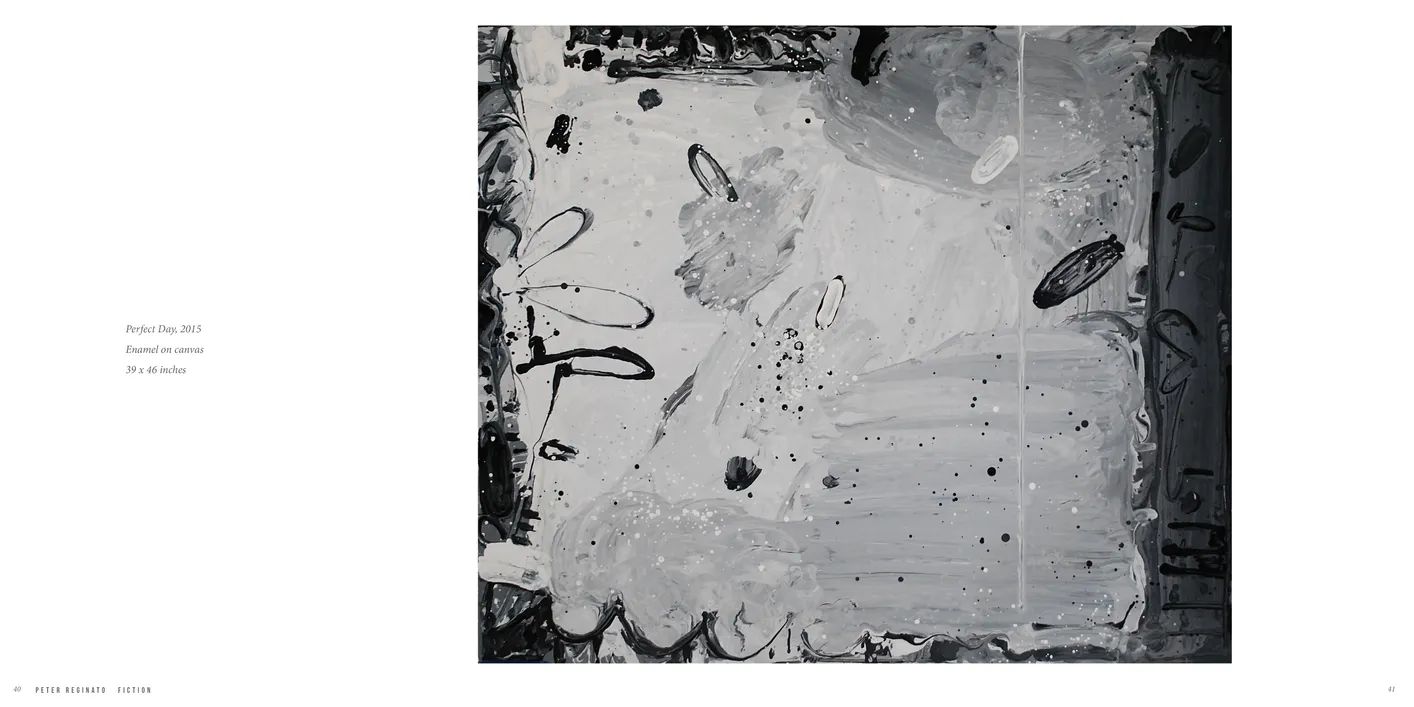
- Peter Reginato: Fiction exhibition catalog, pages 40-41
- Client: Adelson Galleries
- Visit figure page
- Type: portfolio
- Portfolio Type: publication_design
- Portfolio Role: design_layout
Peter Reginato: Fiction — Pages 46–47
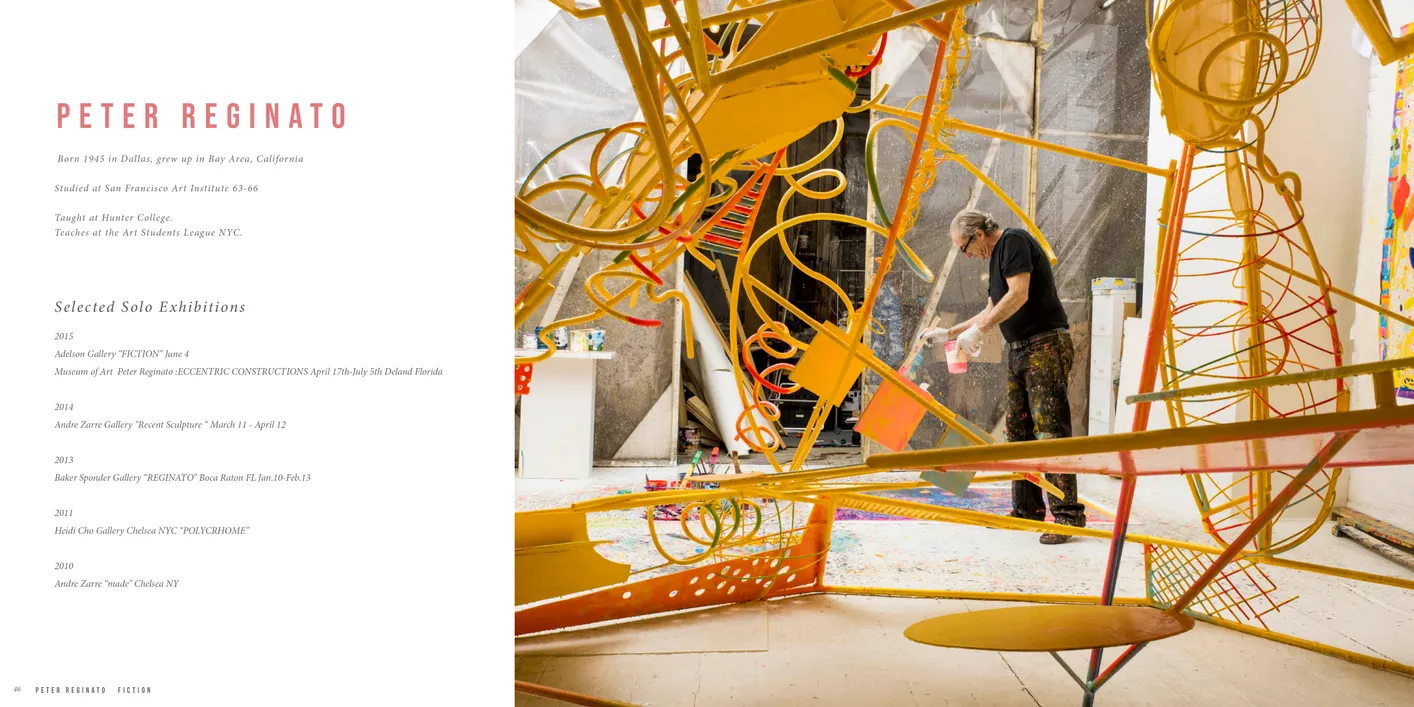
- Peter Reginato: Fiction exhibition catalog, pages 46-47
- Client: Adelson Galleries
- Visit figure page
- Type: portfolio
- Portfolio Type: publication_design
- Portfolio Role: design_layout
Peter Reginato: Fiction — Pages 58–59

- Peter Reginato: Fiction exhibition catalog, pages 58-59
- Client: Adelson Galleries
- Visit figure page
- Type: portfolio
- Portfolio Type: publication_design
- Portfolio Role: design_layout
Peter Reginato: Fiction — Pages 6–7
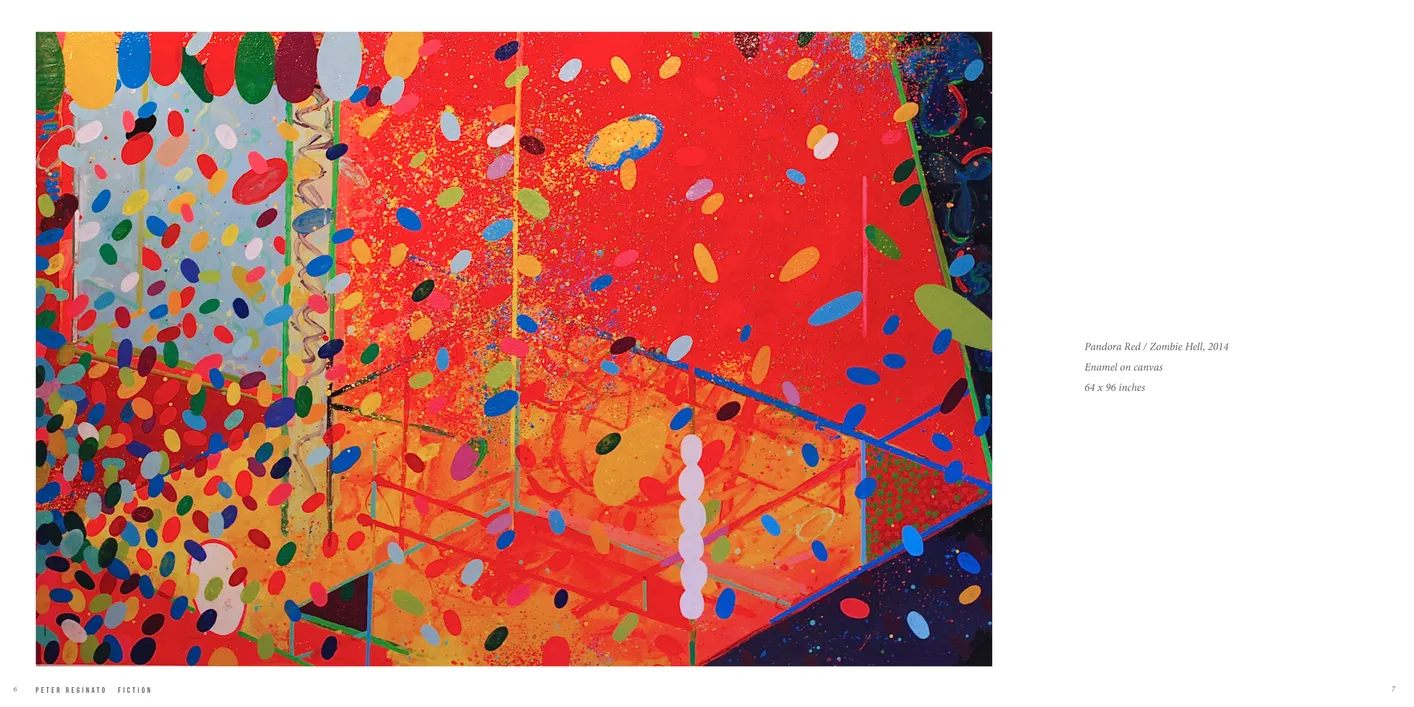
- Peter Reginato: Fiction exhibition catalog, pages 6-7
- Client: Adelson Galleries
- Visit figure page
- Type: portfolio
- Portfolio Type: publication_design
- Portfolio Role: design_layout
Peter Reginato: Fiction — Pages 8–9
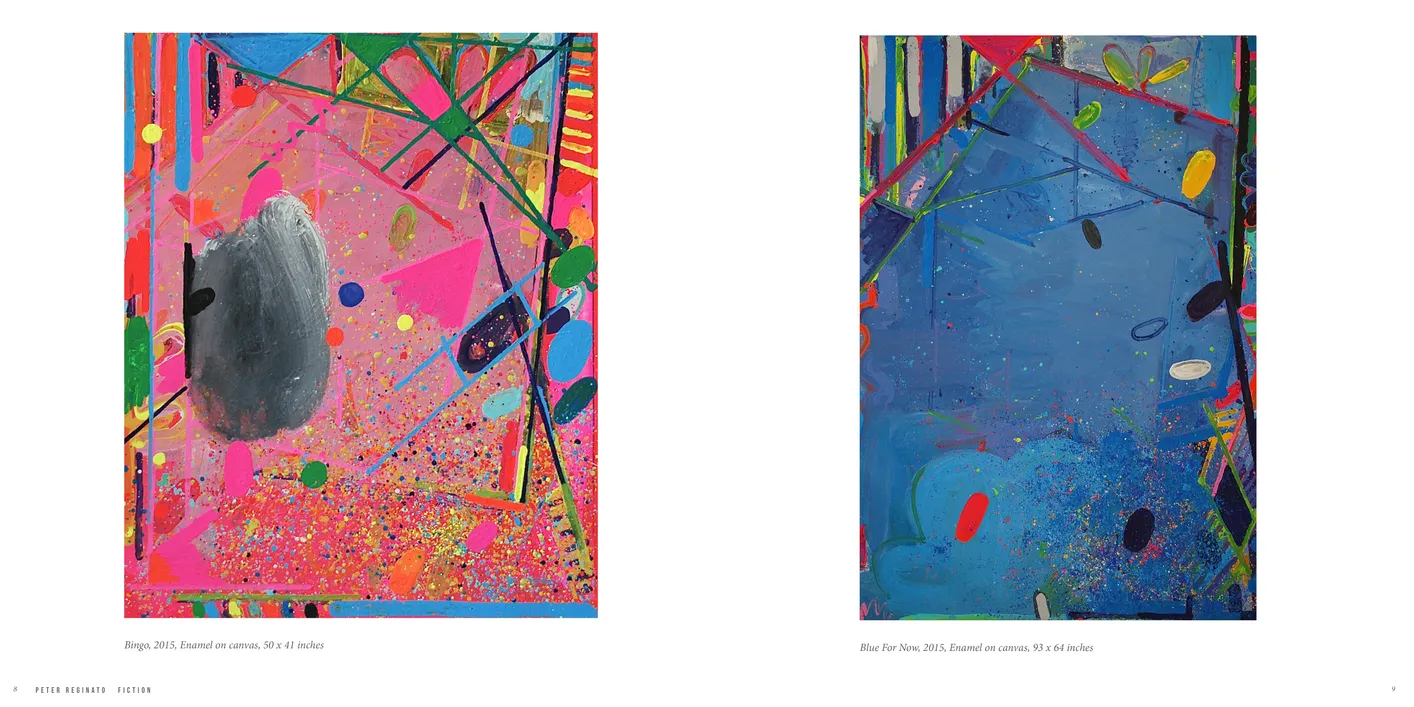
- Peter Reginato: Fiction exhibition catalog, pages 8-9
- Client: Adelson Galleries
- Visit figure page
- Type: portfolio
- Portfolio Type: publication_design
- Portfolio Role: design_layout
Picasso Vollard Exhibition Wordmark
- Wordmark for Picasso / Vollard: Prints from the Stock of the Artist's Publisher exhibition
- Client: Marc Rosen Fine Art
- Visit figure page
- Type: portfolio
- Portfolio Type: advertising
- Portfolio Role: design_layout
Picasso Vollard Ifpda Ad
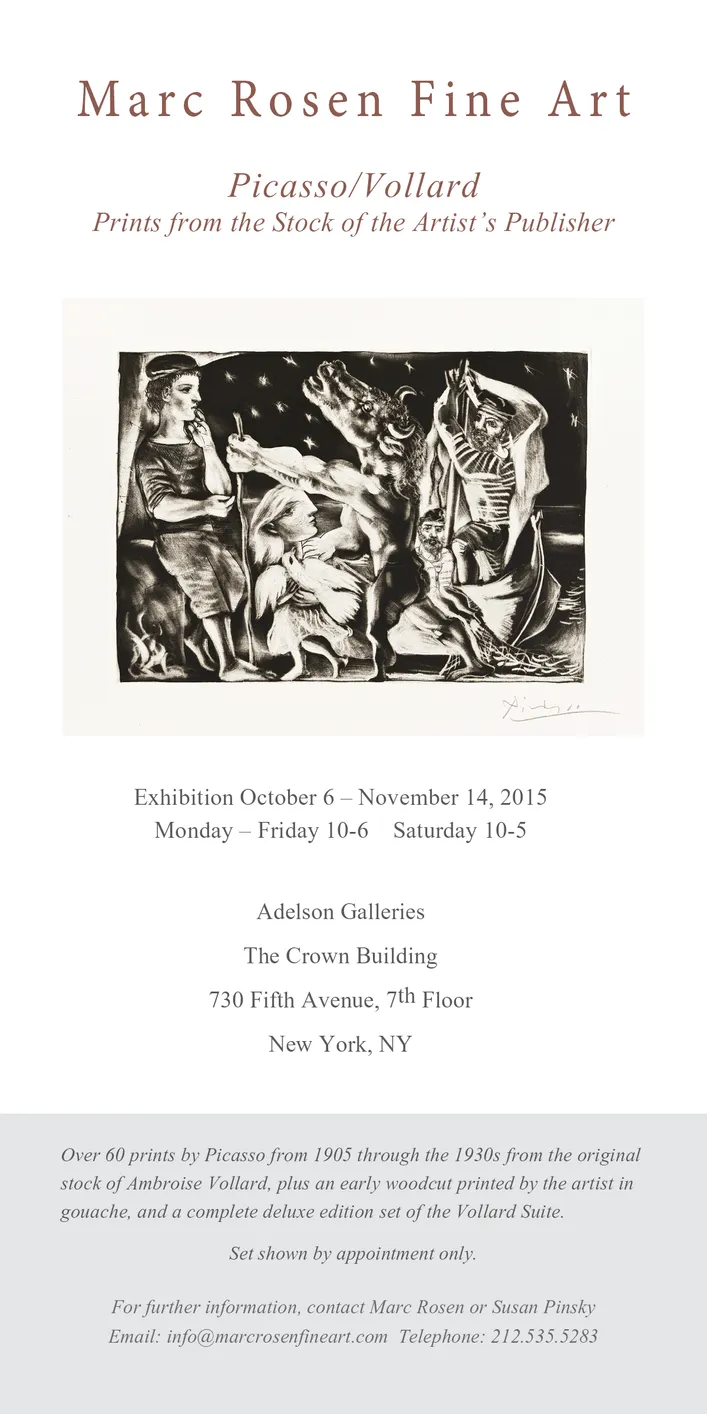
- Picasso/Vollard exhibition advertisment in the International Fine Print Dealers Association publication
- Client: Marc Rosen Fine Art
- Visit figure page
- Type: portfolio
- Portfolio Type: advertising
- Portfolio Role: design_layout
Picasso Vollard Nyt Ad 01
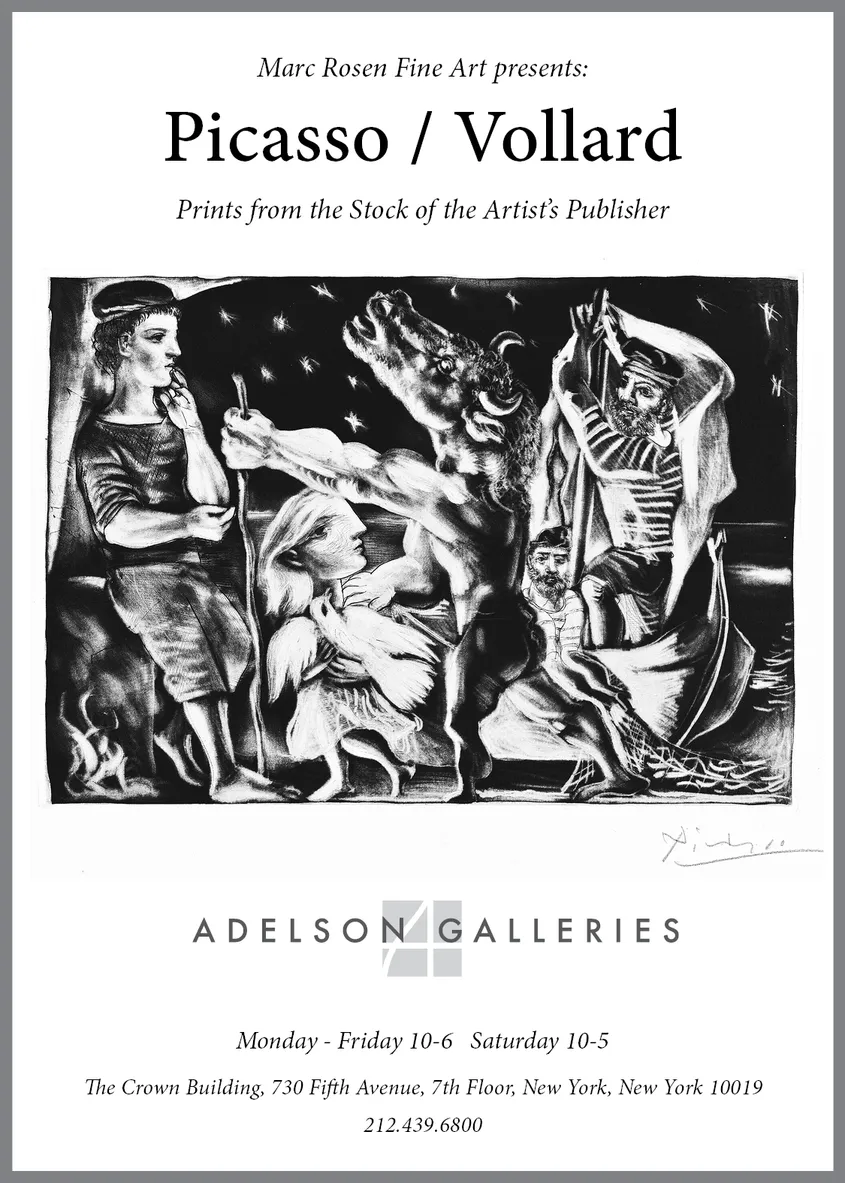
- Picasso/Vollard — New York Times print advertisement #1
- Client: Marc Rosen Fine Art
- Visit figure page
- Type: portfolio
- Portfolio Type: advertising
- Portfolio Role: design_layout
Picasso Vollard Nyt Ad 02
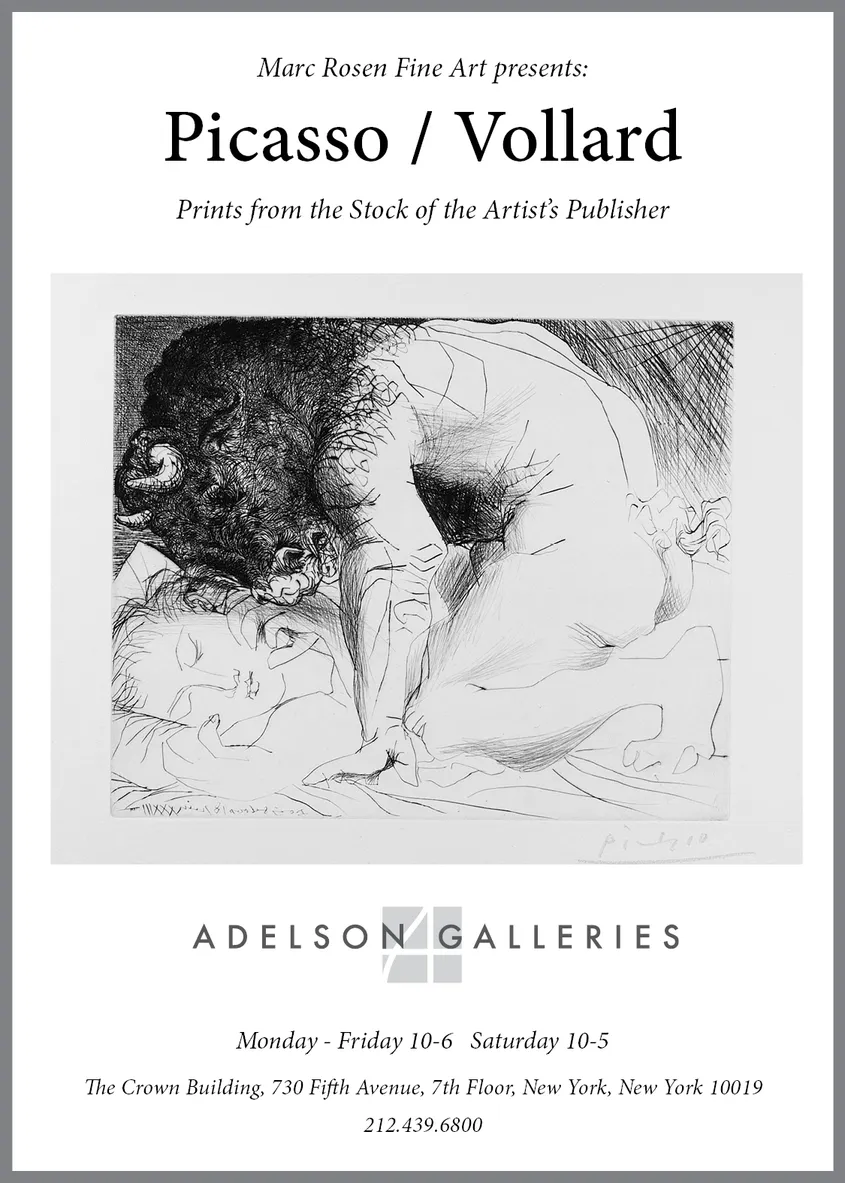
- Picasso/Vollard — New York Times print advertisement #2
- Client: Marc Rosen Fine Art
- Visit figure page
- Type: portfolio
- Portfolio Type: advertising
- Portfolio Role: design_layout
Picasso Vollard Nyt Ad 03
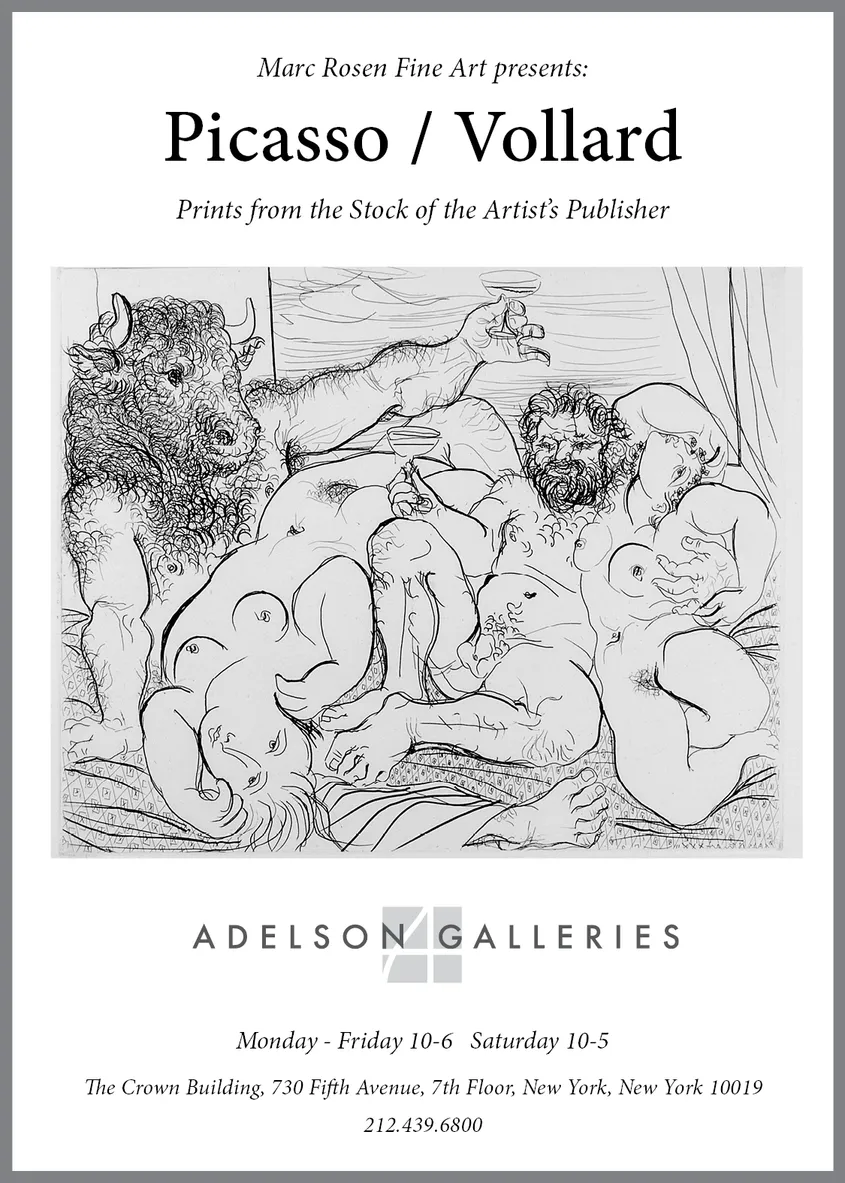
- Picasso/Vollard — New York Times print advertisement #3
- Client: Marc Rosen Fine Art
- Visit figure page
- Type: portfolio
- Portfolio Type: advertising
- Portfolio Role: design_layout
Picasso Vollard Nyt Ad 04
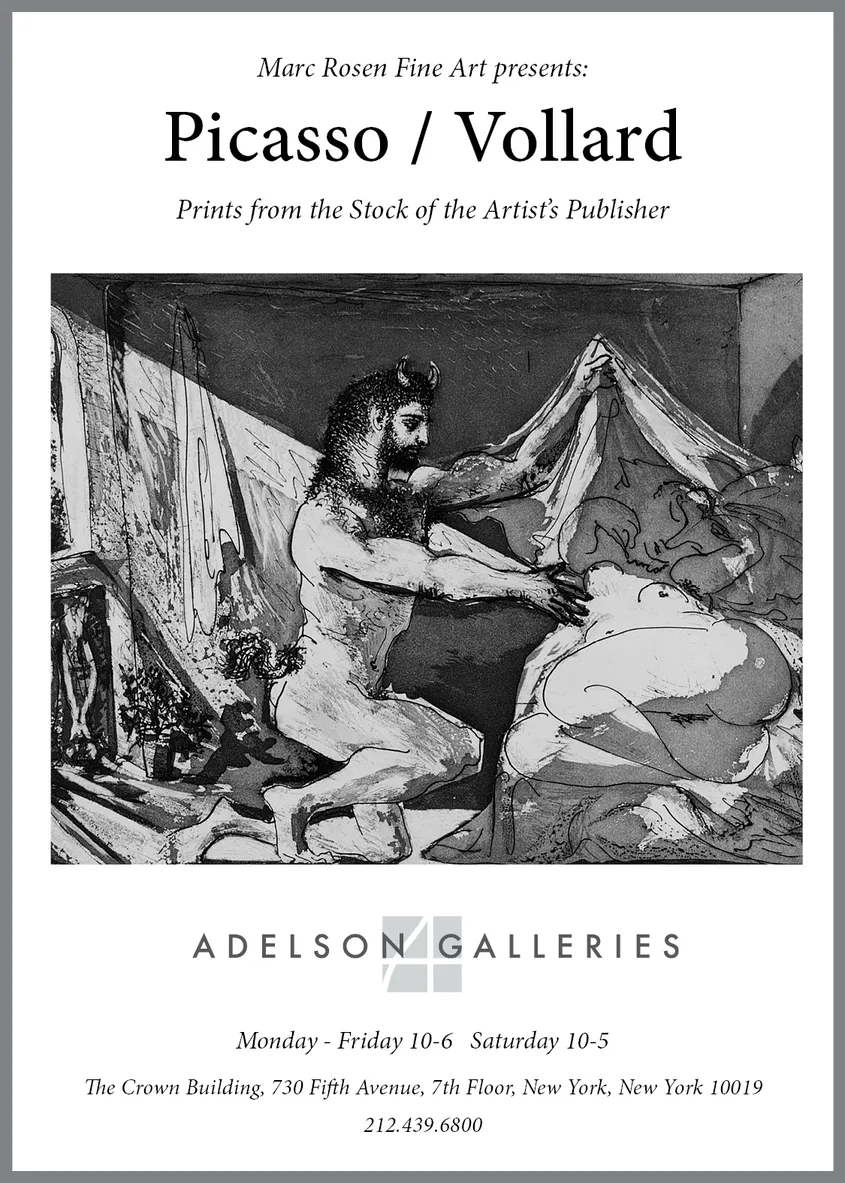
- Picasso/Vollard — New York Times print advertisement #4
- Client: Marc Rosen Fine Art
- Visit figure page
- Type: portfolio
- Portfolio Type: advertising
- Portfolio Role: design_layout
Picasso Vollard: — Cover
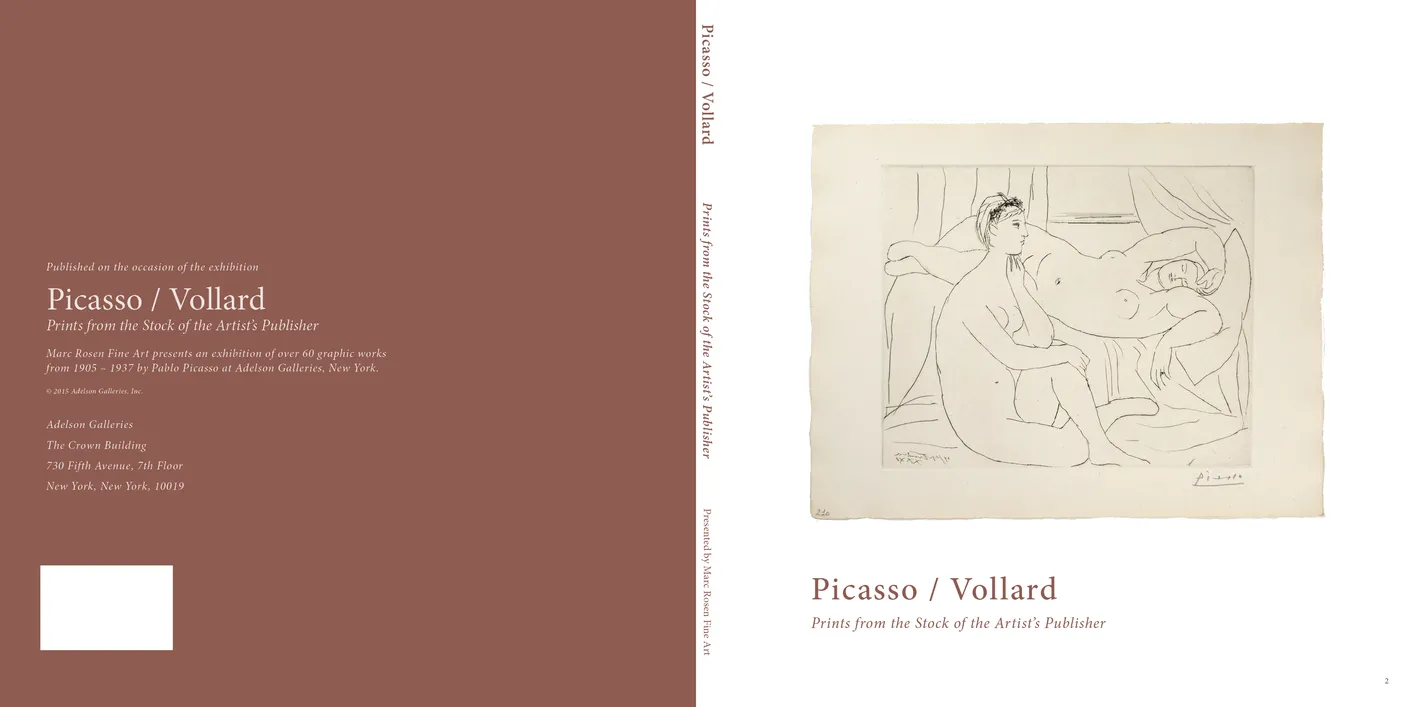
- Picasso / Vollard: Prints from the Stock of the Artist’s Publisher exhibition catalog, cover
- Client: Marc Rosen Fine Art
- Visit figure page
- Type: portfolio
- Portfolio Type: publication_design
- Portfolio Role: design_layout
Picasso Vollard: — Inside Front Cover

- Picasso / Vollard: Prints from the Stock of the Artist’s Publisher exhibition catalog, inside front cover
- Client: Marc Rosen Fine Art
- Visit figure page
- Type: portfolio
- Portfolio Type: publication_design
- Portfolio Role: design_layout
Picasso Vollard: — Pages 10–11
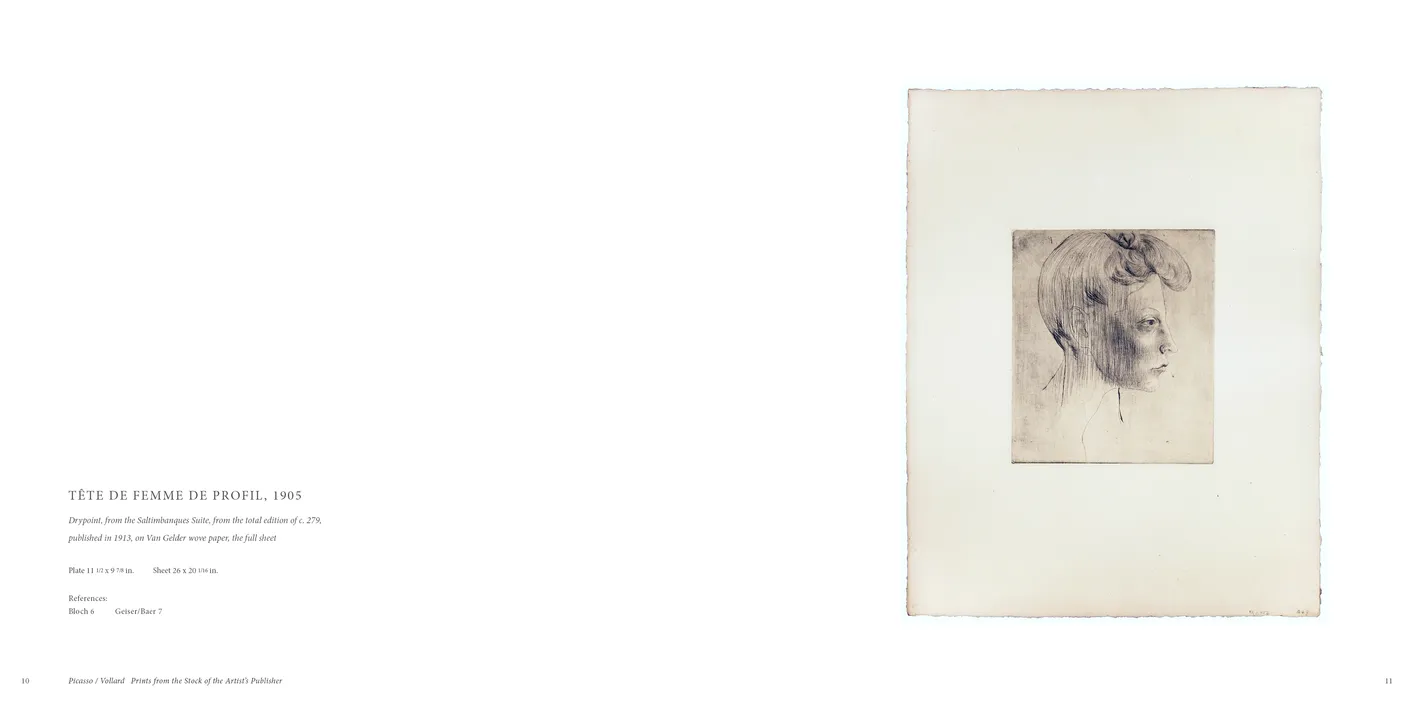
- Picasso / Vollard: Prints from the Stock of the Artist’s Publisher exhibition catalog, pages 10-11
- Client: Marc Rosen Fine Art
- Visit figure page
- Type: portfolio
- Portfolio Type: publication_design
- Portfolio Role: design_layout
Picasso Vollard: — Pages 100–101
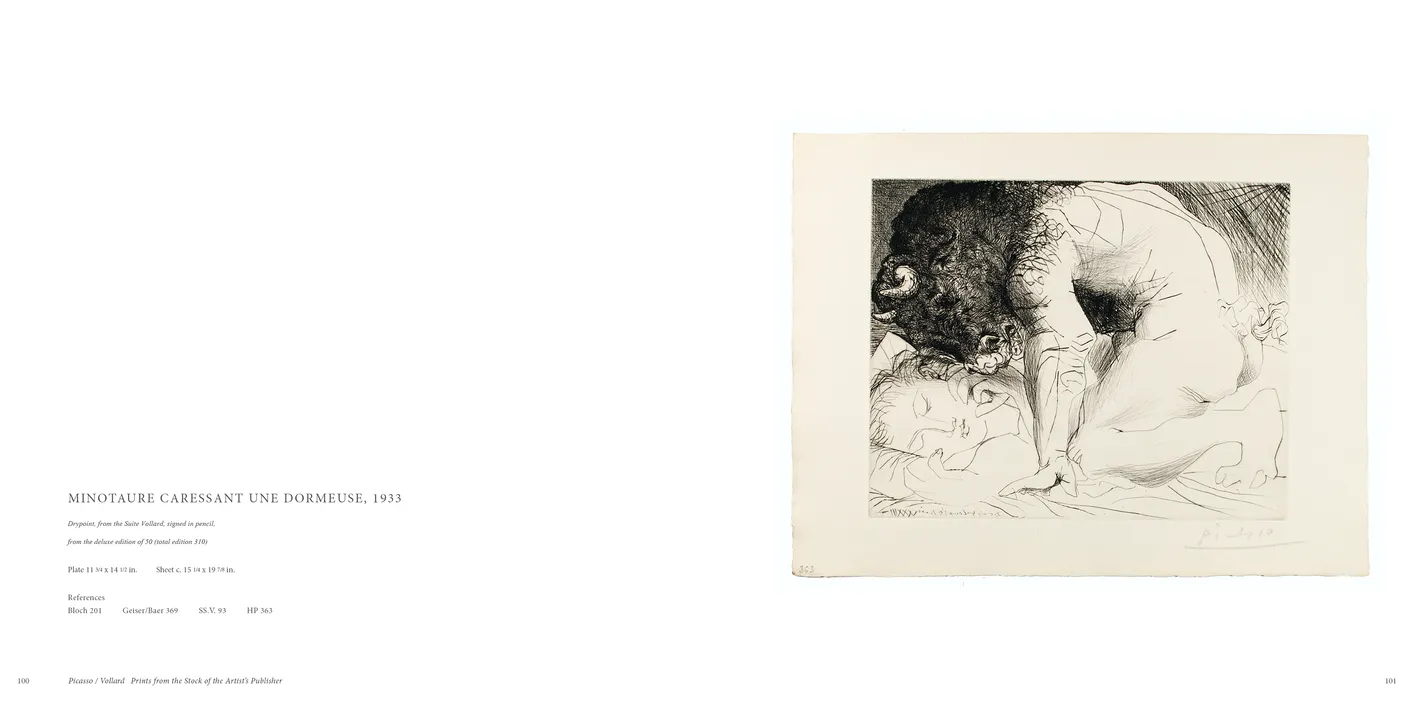
- Picasso / Vollard: Prints from the Stock of the Artist’s Publisher exhibition catalog, pages 100-101
- Client: Marc Rosen Fine Art
- Visit figure page
- Type: portfolio
- Portfolio Type: publication_design
- Portfolio Role: design_layout
Picasso Vollard: — Pages 102–103
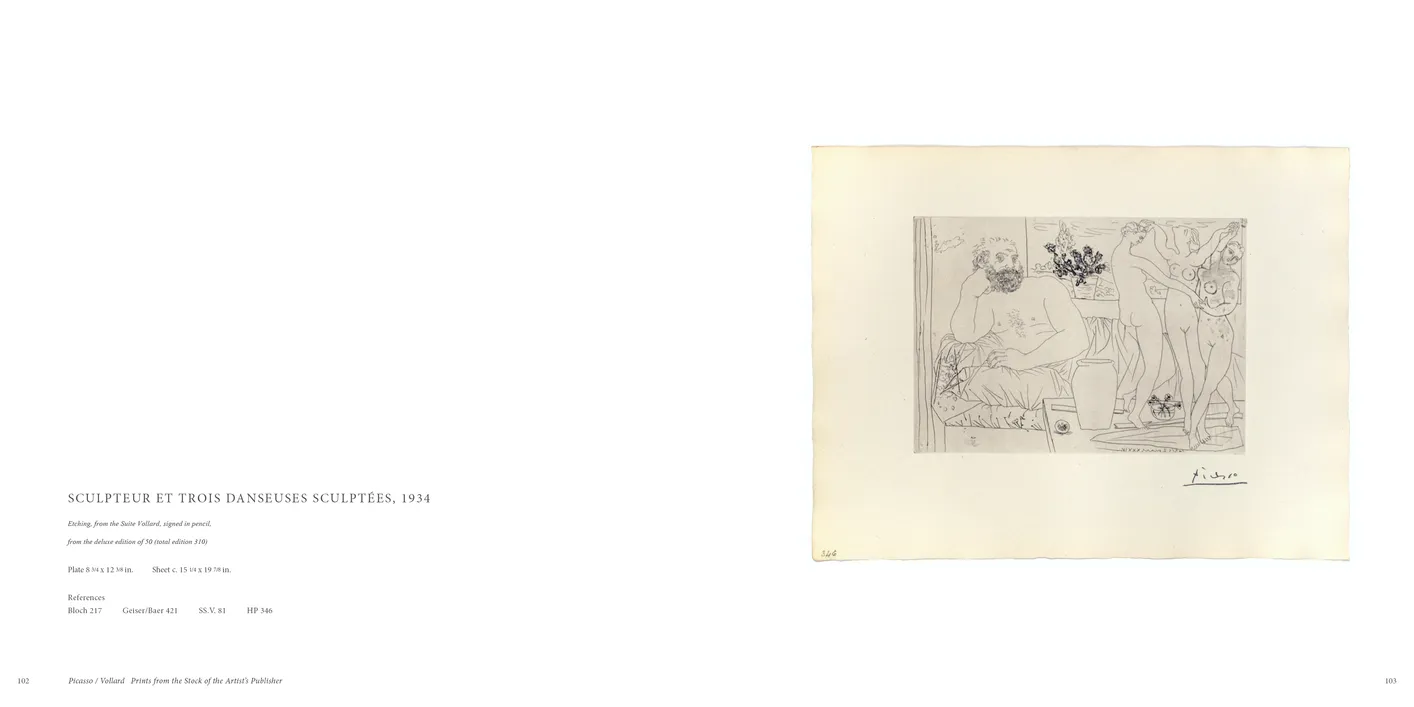
- Picasso / Vollard: Prints from the Stock of the Artist’s Publisher exhibition catalog, pages 102-103
- Client: Marc Rosen Fine Art
- Visit figure page
- Type: portfolio
- Portfolio Type: publication_design
- Portfolio Role: design_layout
Picasso Vollard: — Pages 104–105
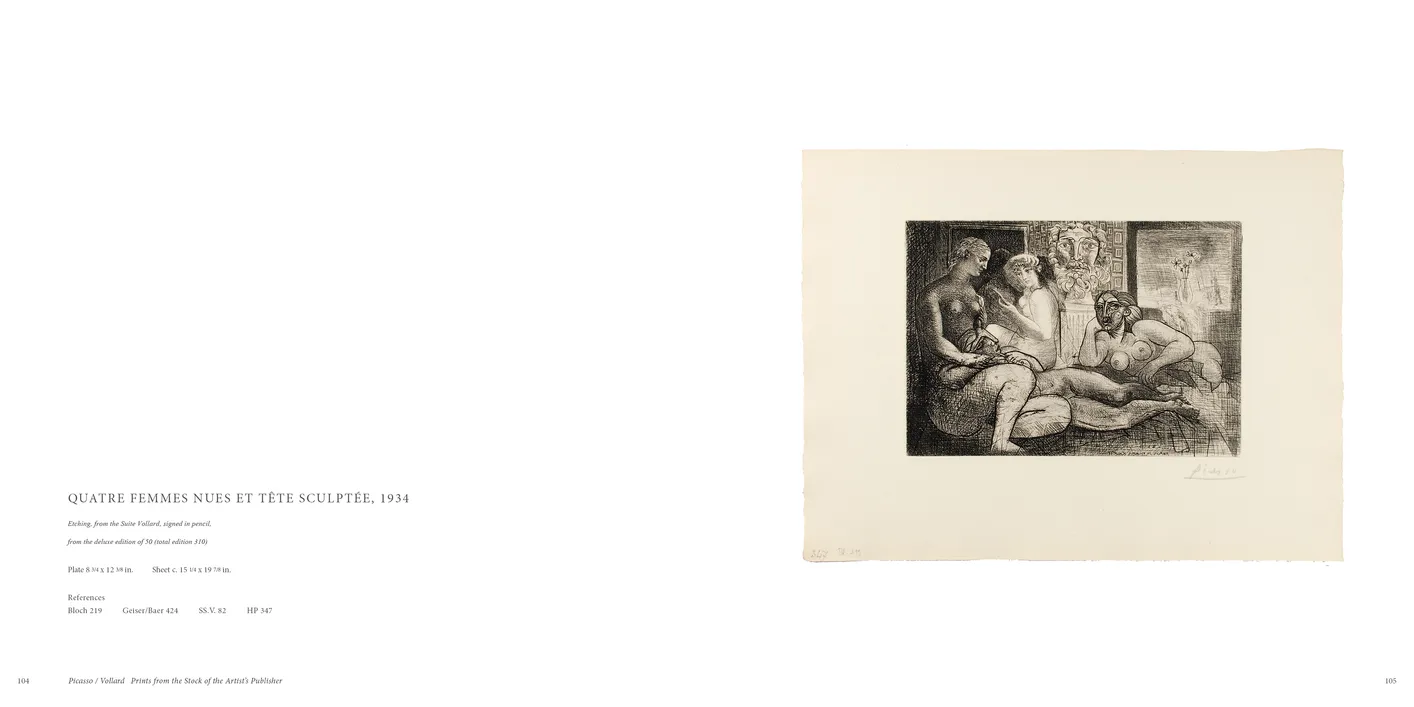
- Picasso / Vollard: Prints from the Stock of the Artist’s Publisher exhibition catalog, pages 104-105
- Client: Marc Rosen Fine Art
- Visit figure page
- Type: portfolio
- Portfolio Type: publication_design
- Portfolio Role: design_layout
Picasso Vollard: — Pages 106–107
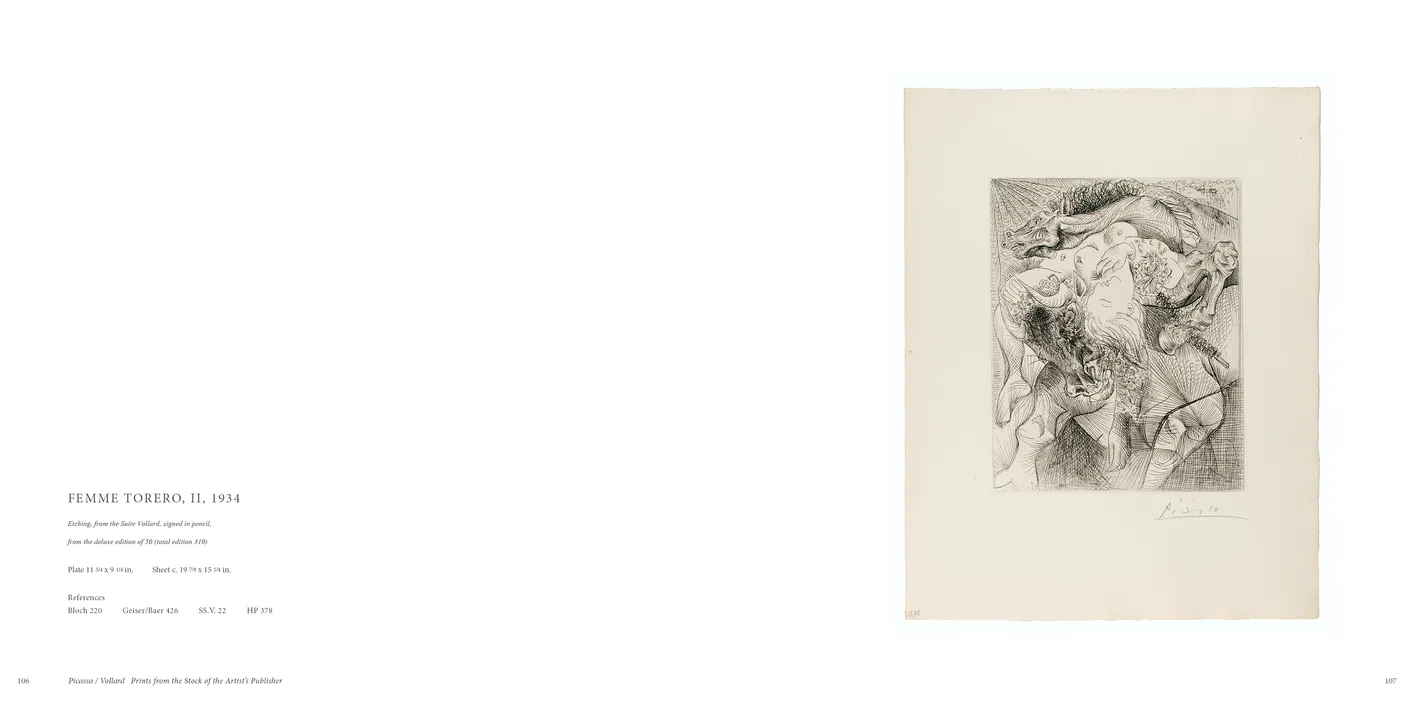
- Picasso / Vollard: Prints from the Stock of the Artist’s Publisher exhibition catalog, pages 106-107
- Client: Marc Rosen Fine Art
- Visit figure page
- Type: portfolio
- Portfolio Type: publication_design
- Portfolio Role: design_layout
Picasso Vollard: — Pages 108–109
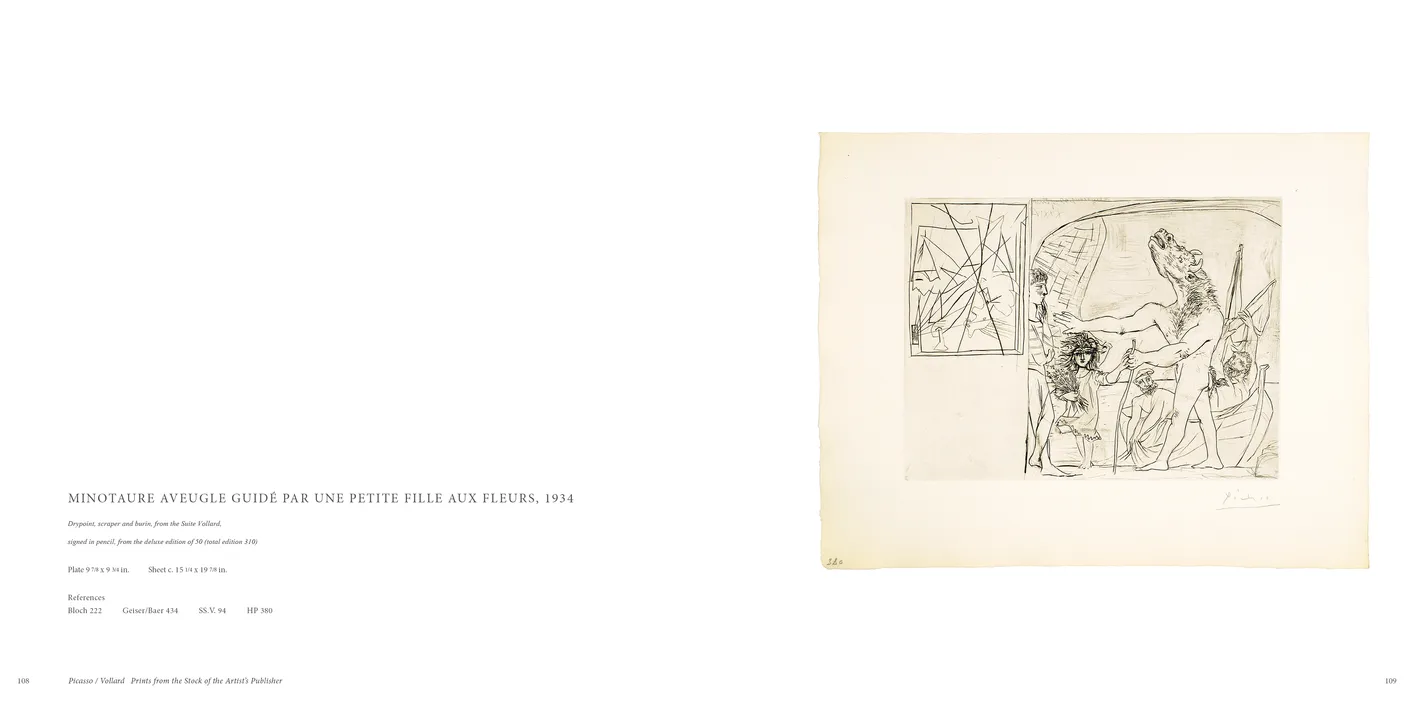
- Picasso / Vollard: Prints from the Stock of the Artist’s Publisher exhibition catalog, pages 108-109
- Client: Marc Rosen Fine Art
- Visit figure page
- Type: portfolio
- Portfolio Type: publication_design
- Portfolio Role: design_layout
Picasso Vollard: — Pages 110–111

- Picasso / Vollard: Prints from the Stock of the Artist’s Publisher exhibition catalog, pages 110-111
- Client: Marc Rosen Fine Art
- Visit figure page
- Type: portfolio
- Portfolio Type: publication_design
- Portfolio Role: design_layout
Picasso Vollard: — Pages 112–113
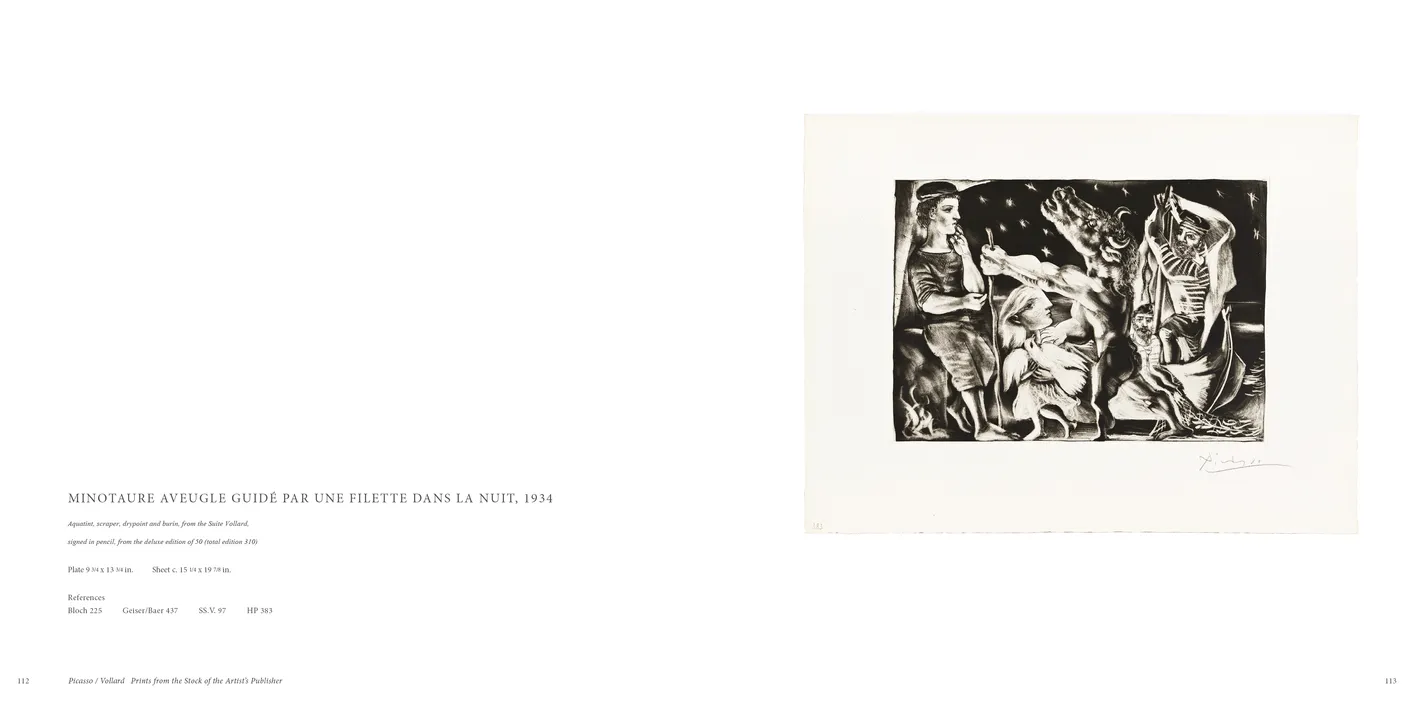
- Picasso / Vollard: Prints from the Stock of the Artist’s Publisher exhibition catalog, pages 112-113
- Client: Marc Rosen Fine Art
- Visit figure page
- Type: portfolio
- Portfolio Type: publication_design
- Portfolio Role: design_layout
Picasso Vollard: — Pages 114–115
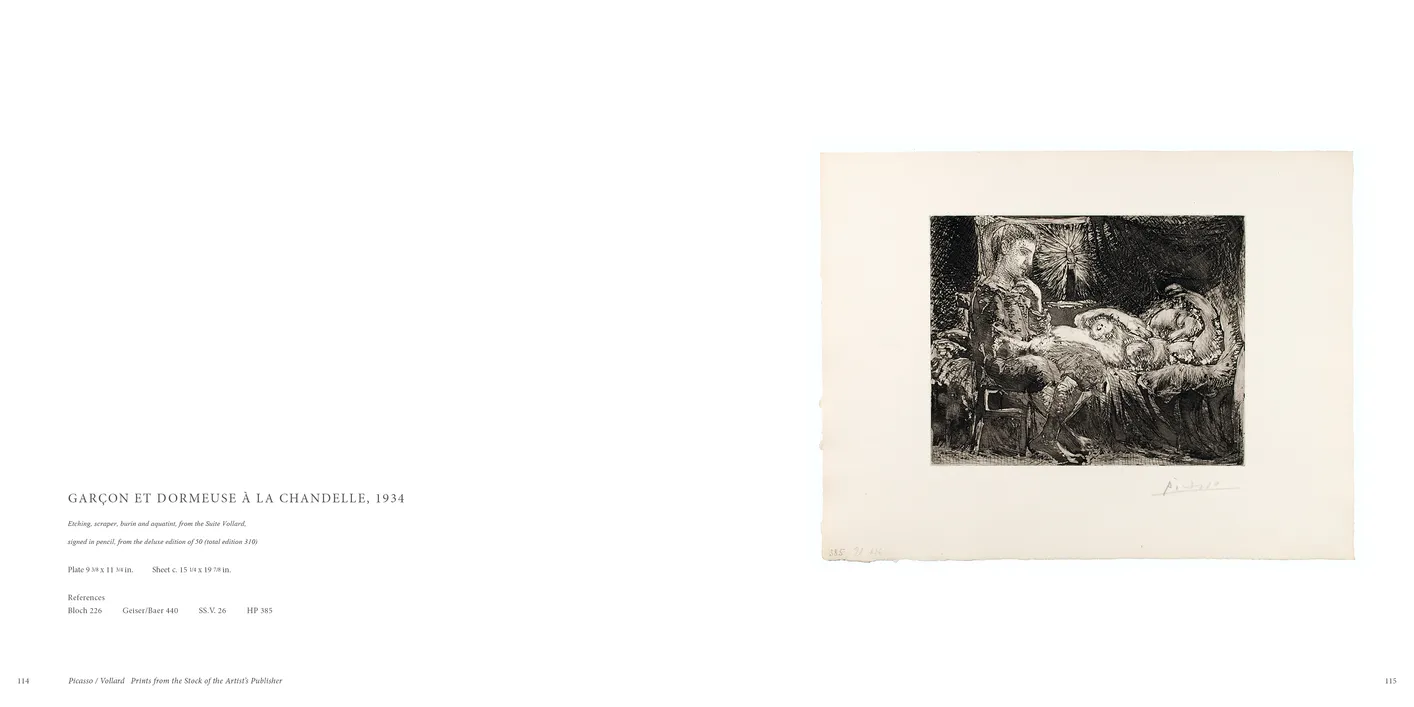
- Picasso / Vollard: Prints from the Stock of the Artist’s Publisher exhibition catalog, pages 114-115
- Client: Marc Rosen Fine Art
- Visit figure page
- Type: portfolio
- Portfolio Type: publication_design
- Portfolio Role: design_layout
Picasso Vollard: — Pages 116–117
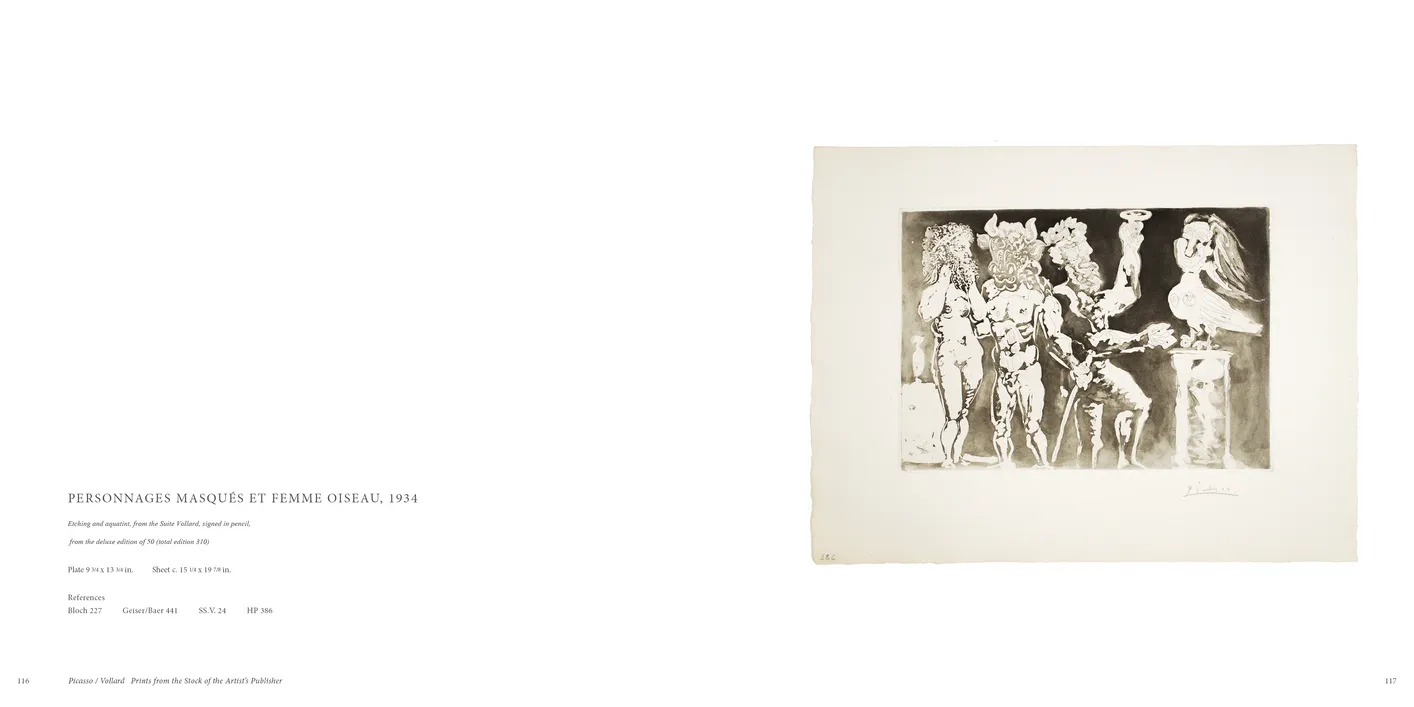
- Picasso / Vollard: Prints from the Stock of the Artist’s Publisher exhibition catalog, pages 116-117
- Client: Marc Rosen Fine Art
- Visit figure page
- Type: portfolio
- Portfolio Type: publication_design
- Portfolio Role: design_layout
Picasso Vollard: — Pages 118–119
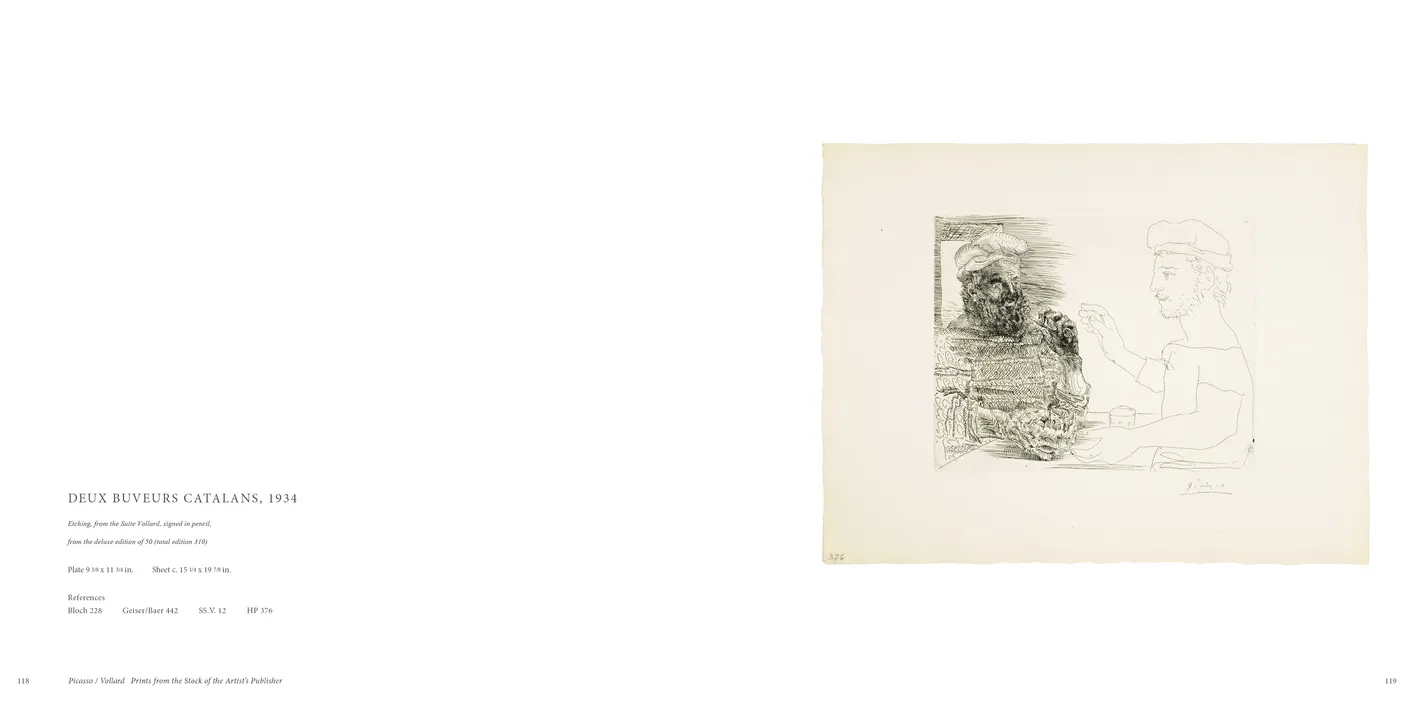
- Picasso / Vollard: Prints from the Stock of the Artist’s Publisher exhibition catalog, pages 118-119
- Client: Marc Rosen Fine Art
- Visit figure page
- Type: portfolio
- Portfolio Type: publication_design
- Portfolio Role: design_layout
Picasso Vollard: — Pages 12–13
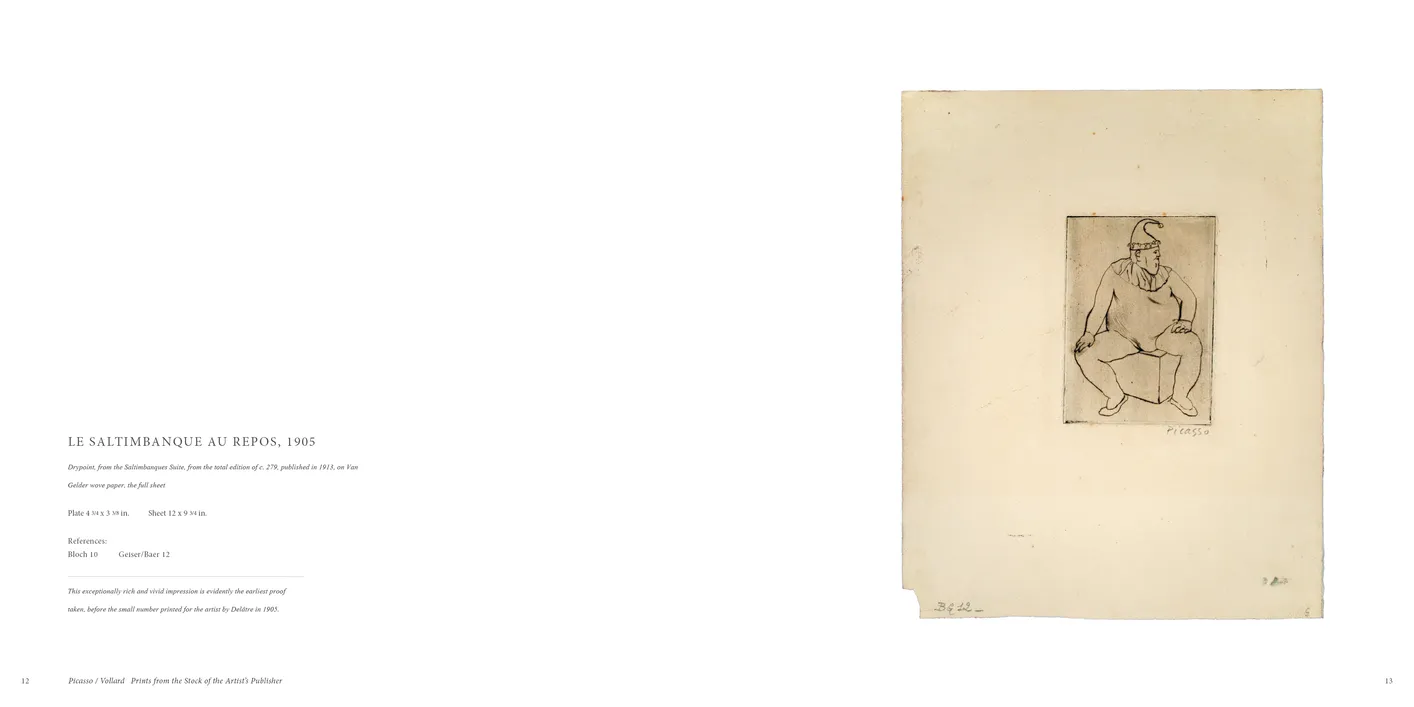
- Picasso / Vollard: Prints from the Stock of the Artist’s Publisher exhibition catalog, pages 12-13
- Client: Marc Rosen Fine Art
- Visit figure page
- Type: portfolio
- Portfolio Type: publication_design
- Portfolio Role: design_layout
Picasso Vollard: — Pages 120–121
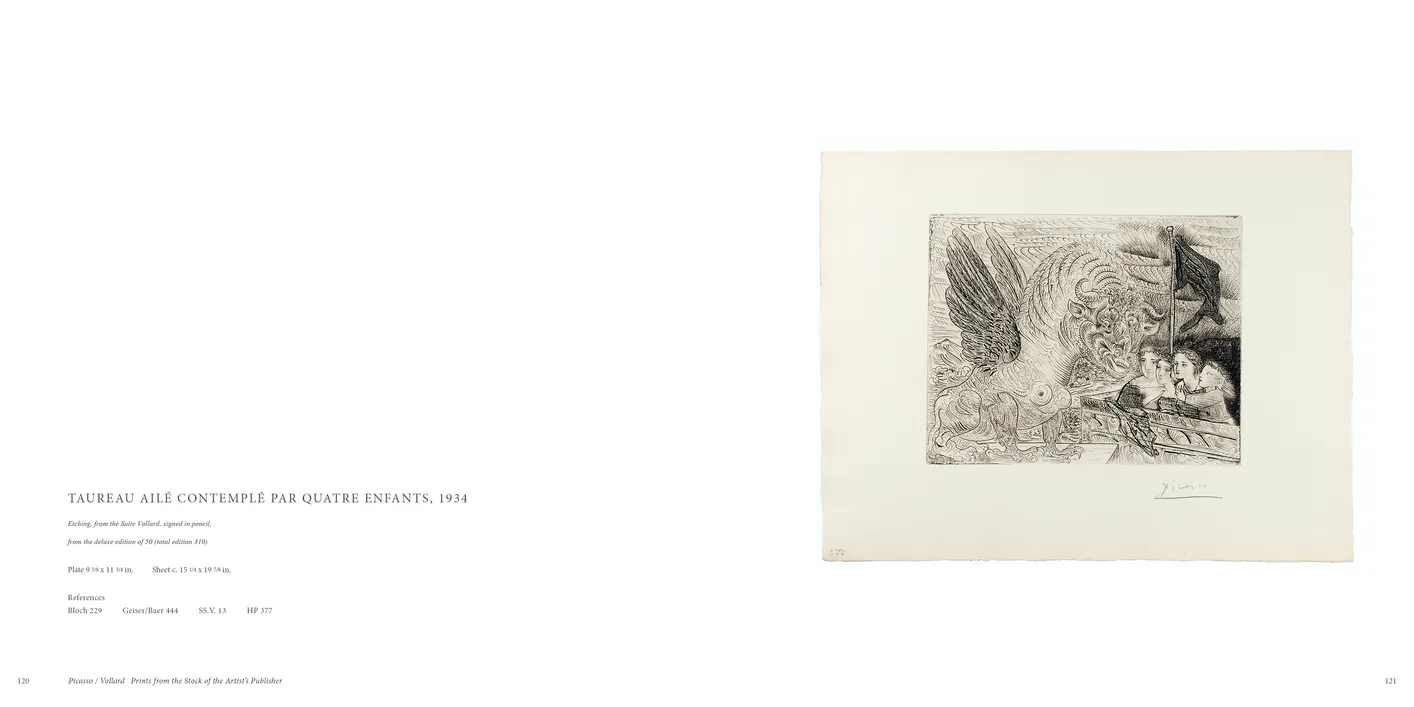
- Picasso / Vollard: Prints from the Stock of the Artist’s Publisher exhibition catalog, pages 120-121
- Client: Marc Rosen Fine Art
- Visit figure page
- Type: portfolio
- Portfolio Type: publication_design
- Portfolio Role: design_layout
Picasso Vollard: — Pages 122–123

- Picasso / Vollard: Prints from the Stock of the Artist’s Publisher exhibition catalog, pages 122-123
- Client: Marc Rosen Fine Art
- Visit figure page
- Type: portfolio
- Portfolio Type: publication_design
- Portfolio Role: design_layout
Picasso Vollard: — Pages 124–125
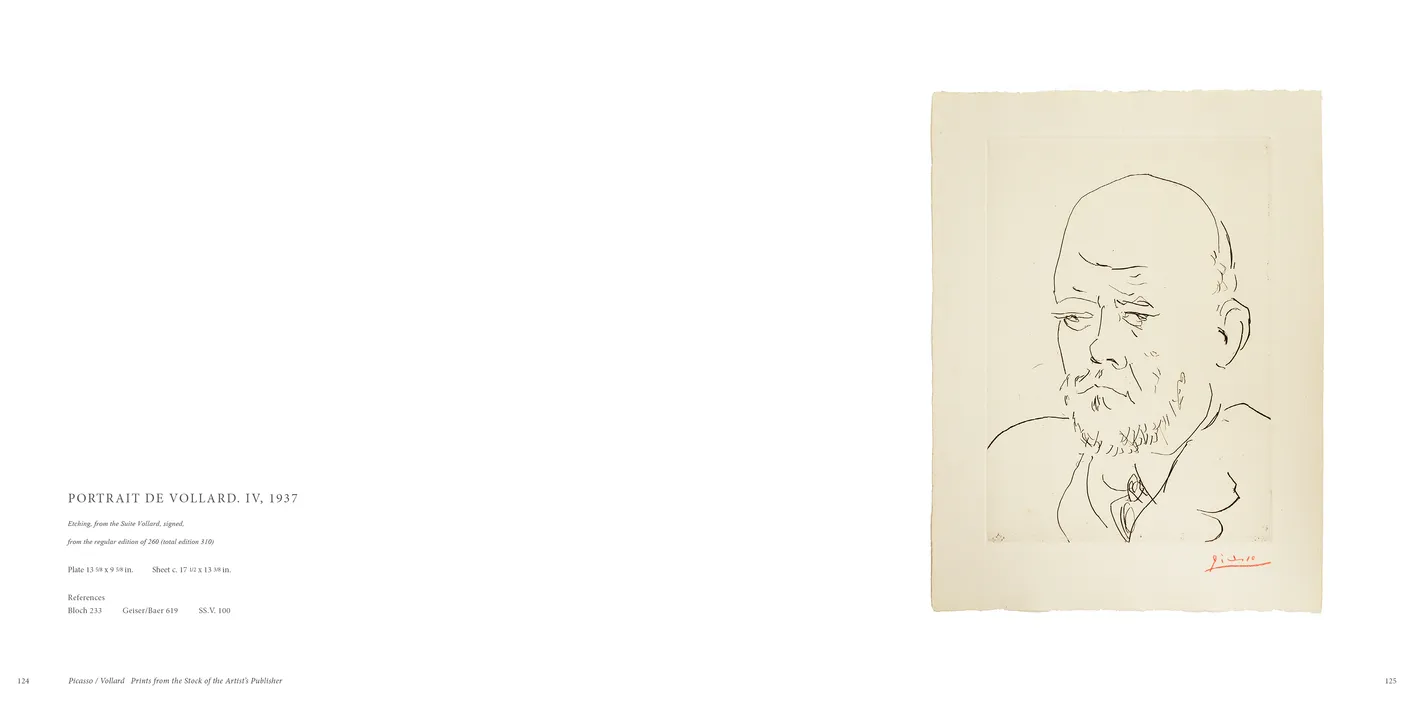
- Picasso / Vollard: Prints from the Stock of the Artist’s Publisher exhibition catalog, pages 124-125
- Client: Marc Rosen Fine Art
- Visit figure page
- Type: portfolio
- Portfolio Type: publication_design
- Portfolio Role: design_layout
Picasso Vollard: — Pages 126–127
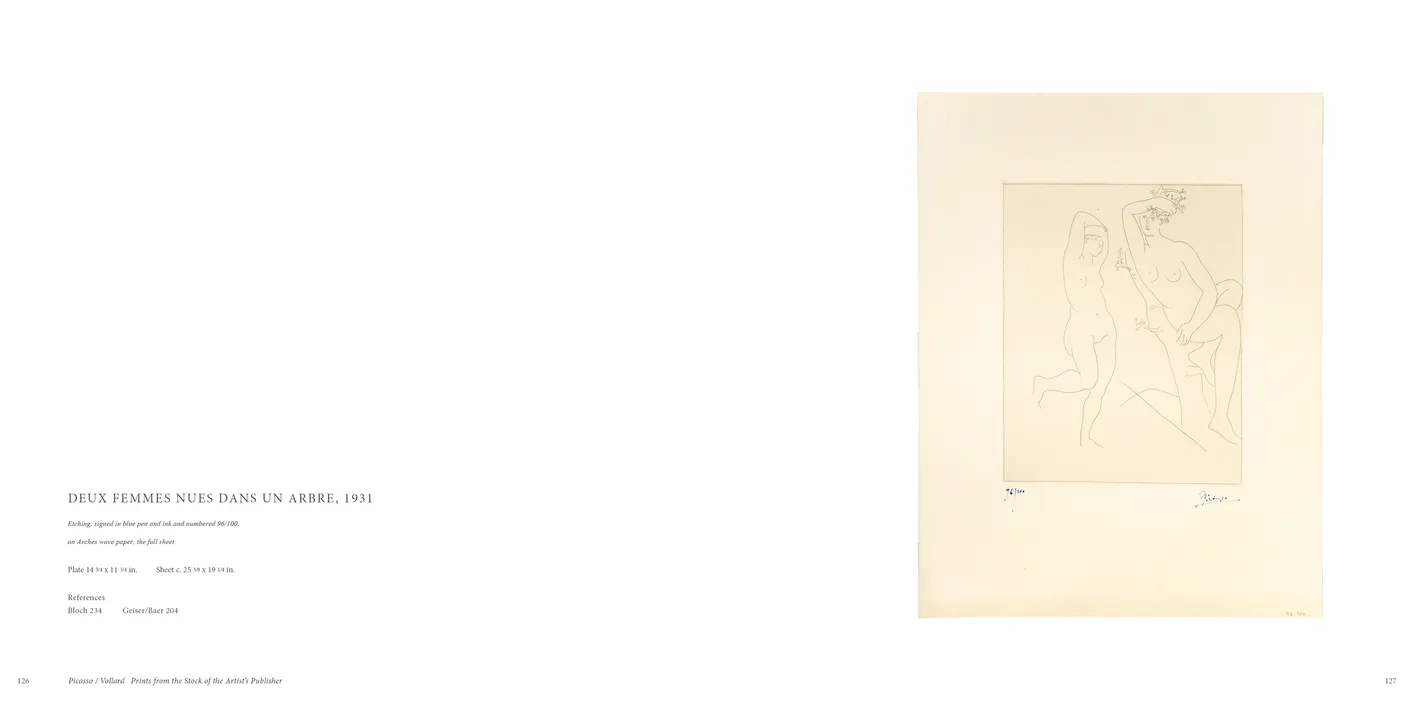
- Picasso / Vollard: Prints from the Stock of the Artist’s Publisher exhibition catalog, pages 126-127
- Client: Marc Rosen Fine Art
- Visit figure page
- Type: portfolio
- Portfolio Type: publication_design
- Portfolio Role: design_layout
Picasso Vollard: — Pages 128–129
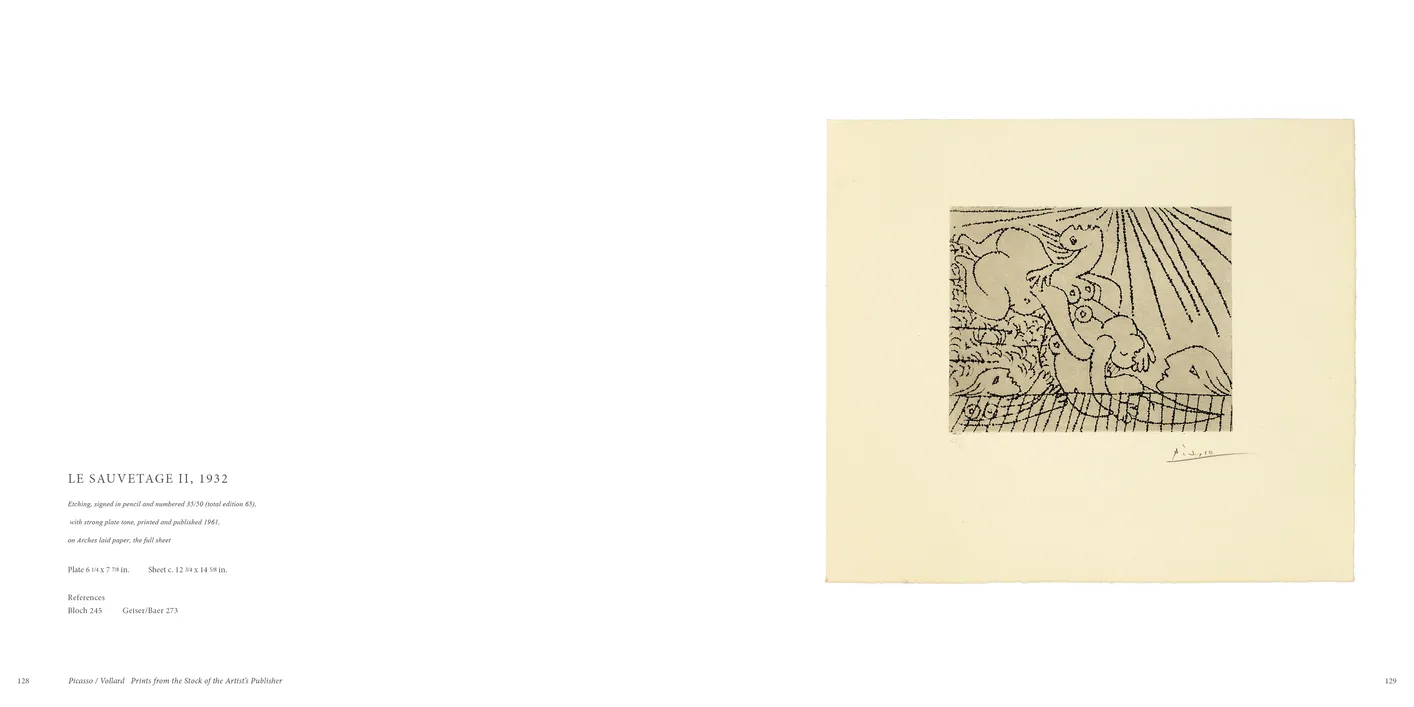
- Picasso / Vollard: Prints from the Stock of the Artist’s Publisher exhibition catalog, pages 128-129
- Client: Marc Rosen Fine Art
- Visit figure page
- Type: portfolio
- Portfolio Type: publication_design
- Portfolio Role: design_layout
Picasso Vollard: — Pages 130–131
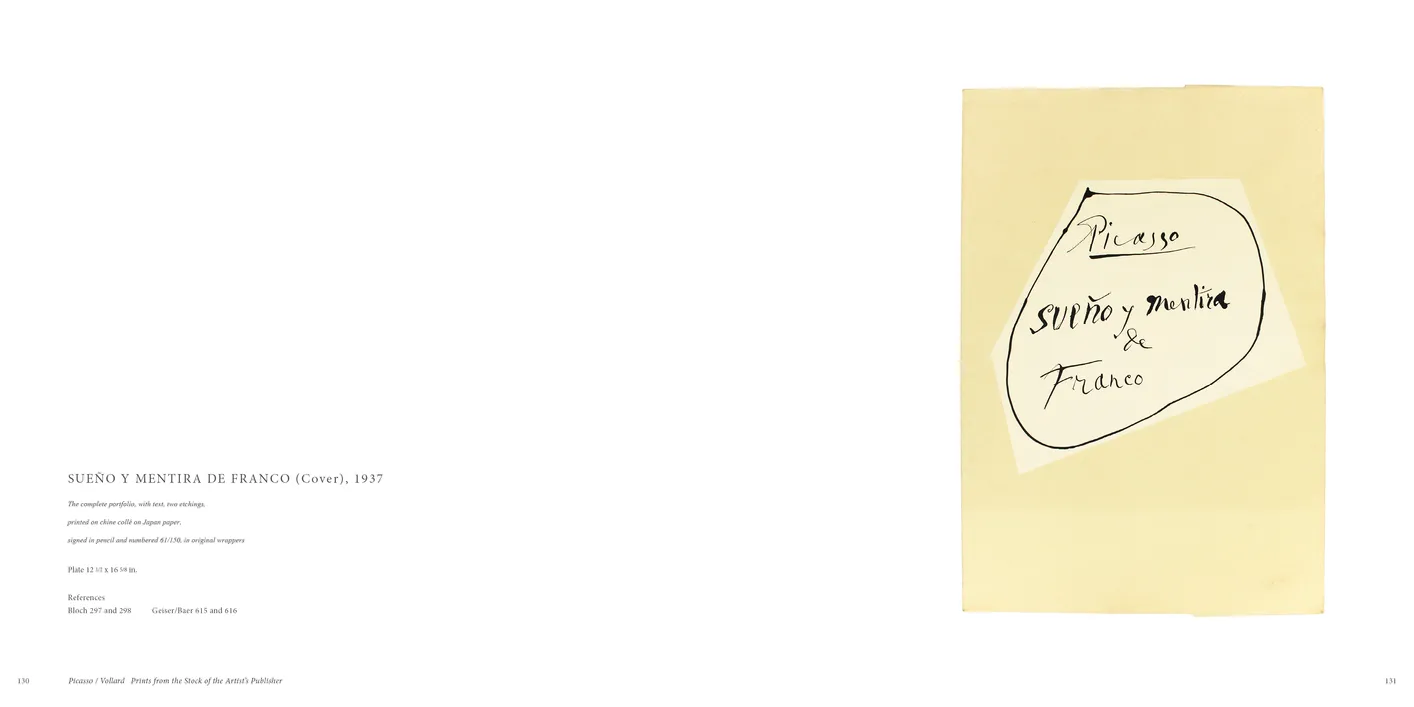
- Picasso / Vollard: Prints from the Stock of the Artist’s Publisher exhibition catalog, pages 130-131
- Client: Marc Rosen Fine Art
- Visit figure page
- Type: portfolio
- Portfolio Type: publication_design
- Portfolio Role: design_layout
Picasso Vollard: — Pages 132–133
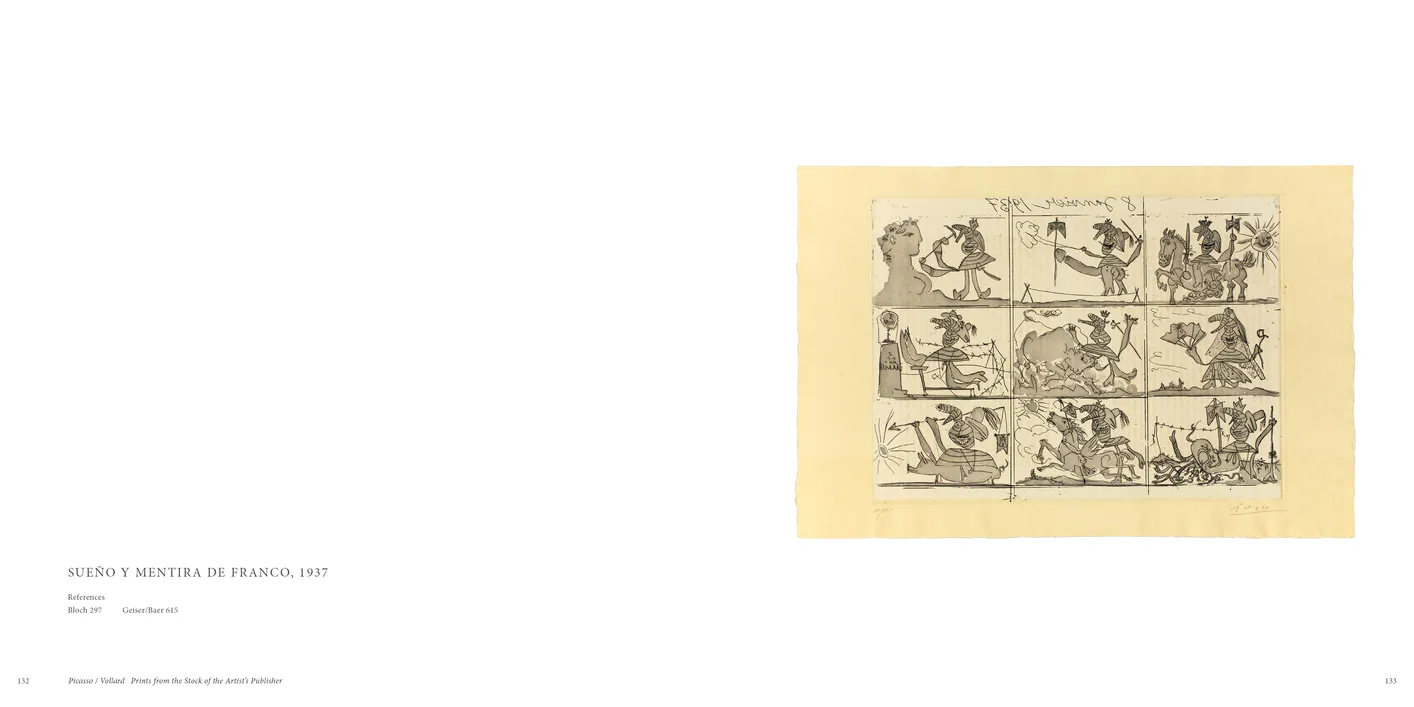
- Picasso / Vollard: Prints from the Stock of the Artist’s Publisher exhibition catalog, pages 132-133
- Client: Marc Rosen Fine Art
- Visit figure page
- Type: portfolio
- Portfolio Type: publication_design
- Portfolio Role: design_layout
Picasso Vollard: — Pages 134–135
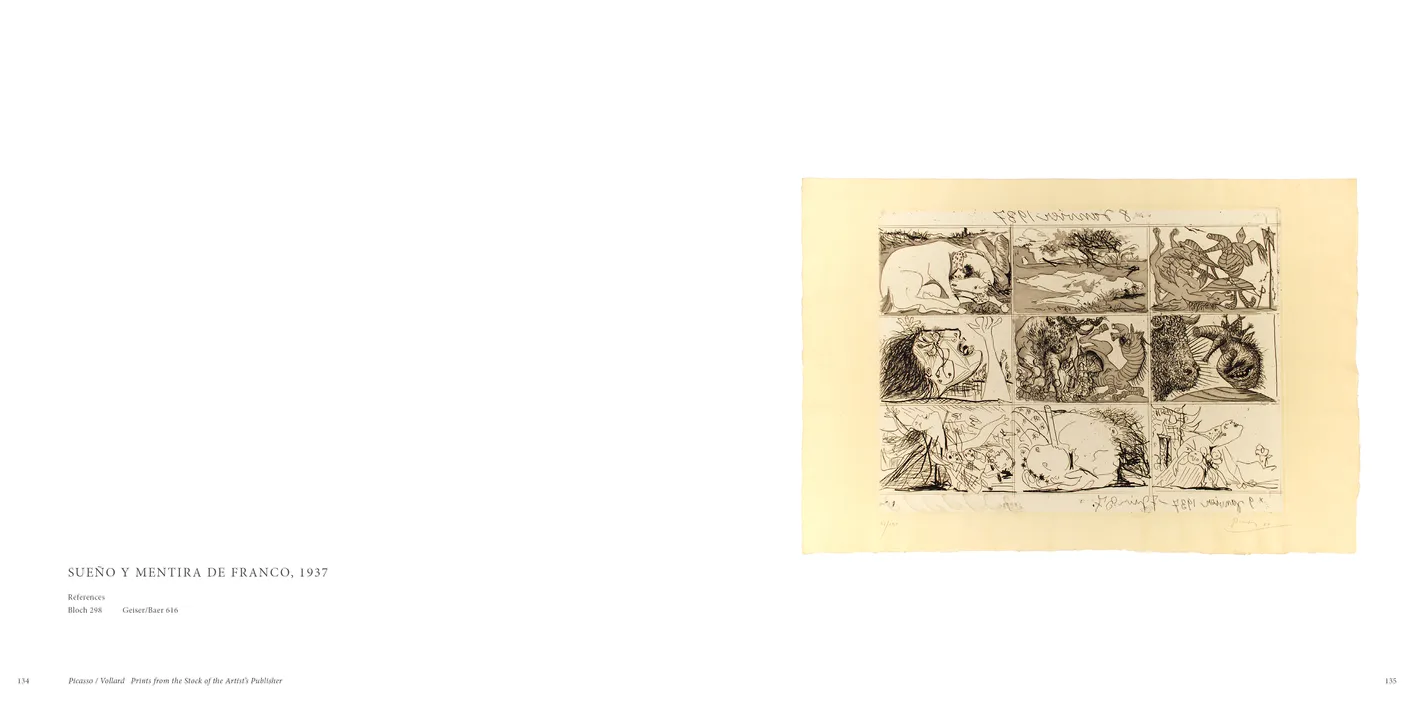
- Picasso / Vollard: Prints from the Stock of the Artist’s Publisher exhibition catalog, pages 134-135
- Client: Marc Rosen Fine Art
- Visit figure page
- Type: portfolio
- Portfolio Type: publication_design
- Portfolio Role: design_layout
Picasso Vollard: — Pages 136–137

- Picasso / Vollard: Prints from the Stock of the Artist’s Publisher exhibition catalog, pages 136-137
- Client: Marc Rosen Fine Art
- Visit figure page
- Type: portfolio
- Portfolio Type: publication_design
- Portfolio Role: design_layout
Picasso Vollard: — Pages 14–15
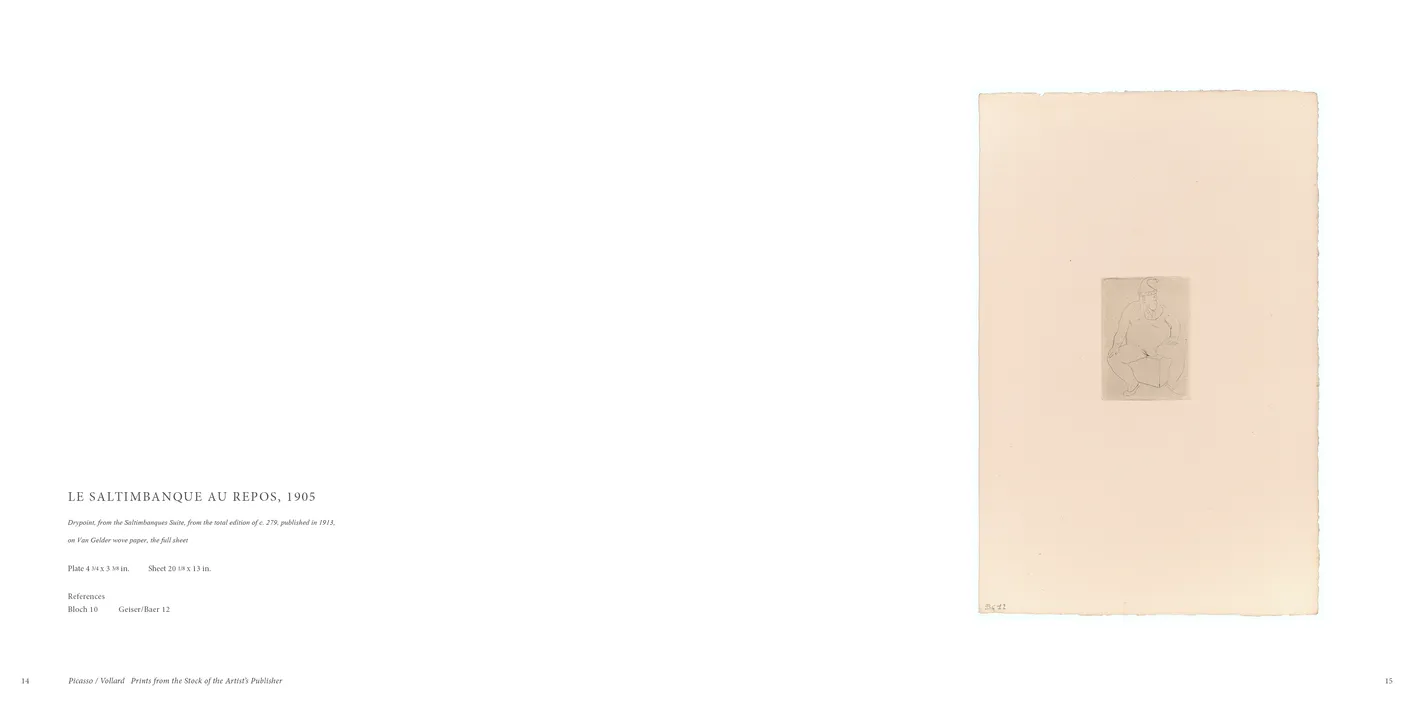
- Picasso / Vollard: Prints from the Stock of the Artist’s Publisher exhibition catalog, pages 14-15
- Client: Marc Rosen Fine Art
- Visit figure page
- Type: portfolio
- Portfolio Type: publication_design
- Portfolio Role: design_layout
Picasso Vollard: — Pages 16–17
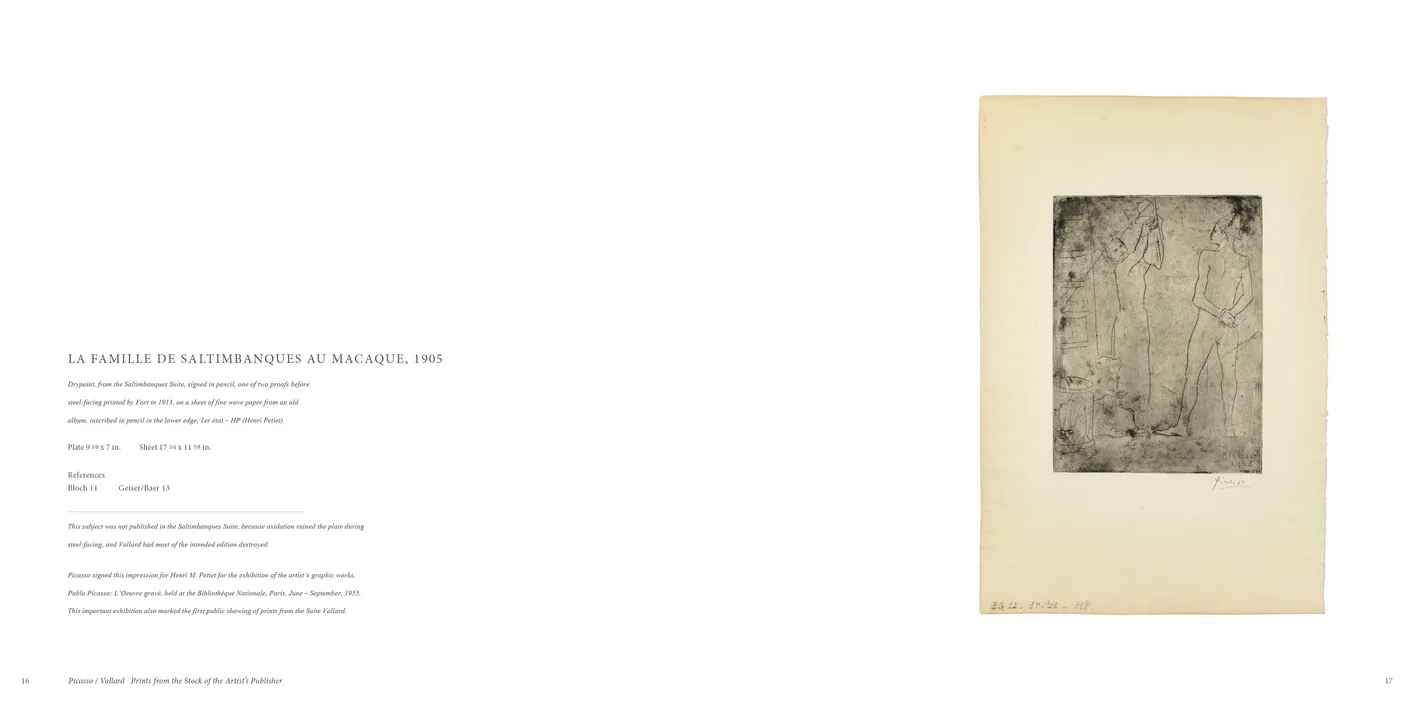
- Picasso / Vollard: Prints from the Stock of the Artist’s Publisher exhibition catalog, pages 16-17
- Client: Marc Rosen Fine Art
- Visit figure page
- Type: portfolio
- Portfolio Type: publication_design
- Portfolio Role: design_layout
Picasso Vollard: — Pages 18–19
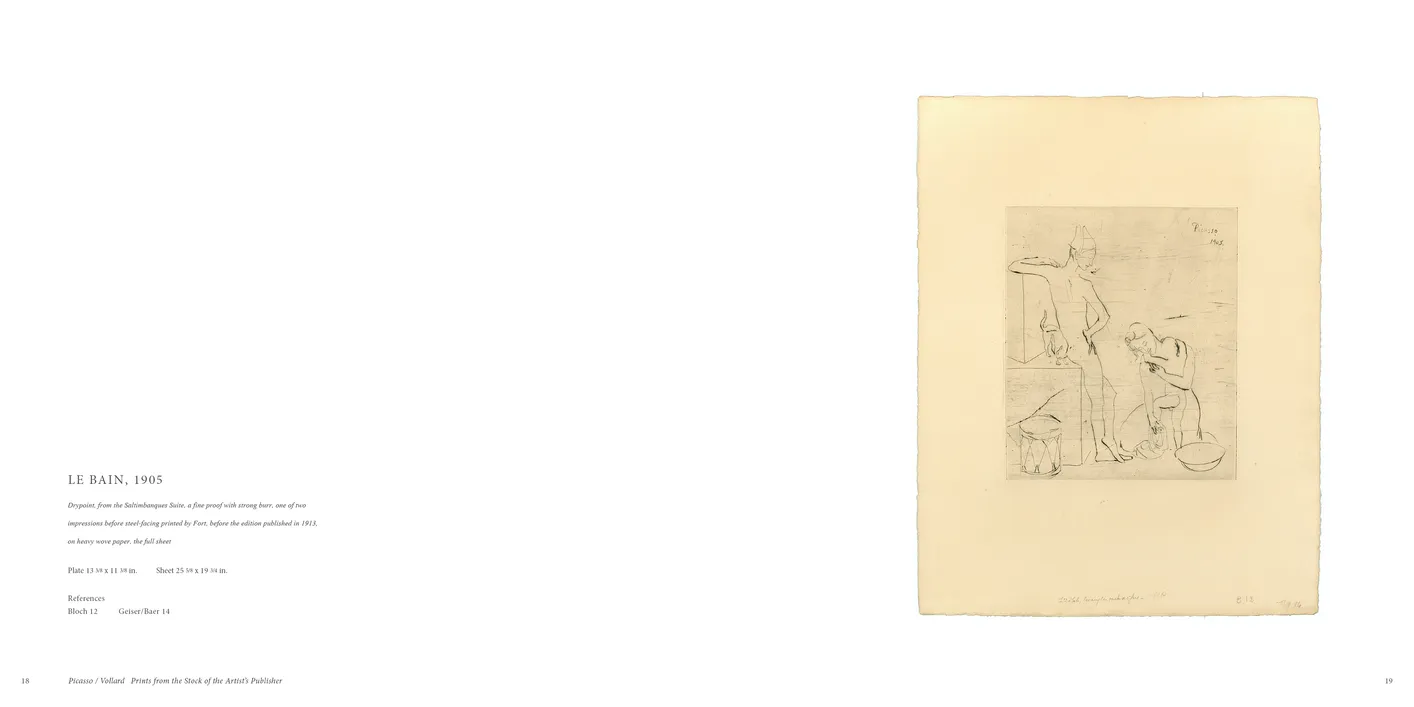
- Picasso / Vollard: Prints from the Stock of the Artist’s Publisher exhibition catalog, pages 18-19
- Client: Marc Rosen Fine Art
- Visit figure page
- Type: portfolio
- Portfolio Type: publication_design
- Portfolio Role: design_layout
Picasso Vollard: — Pages 2–3
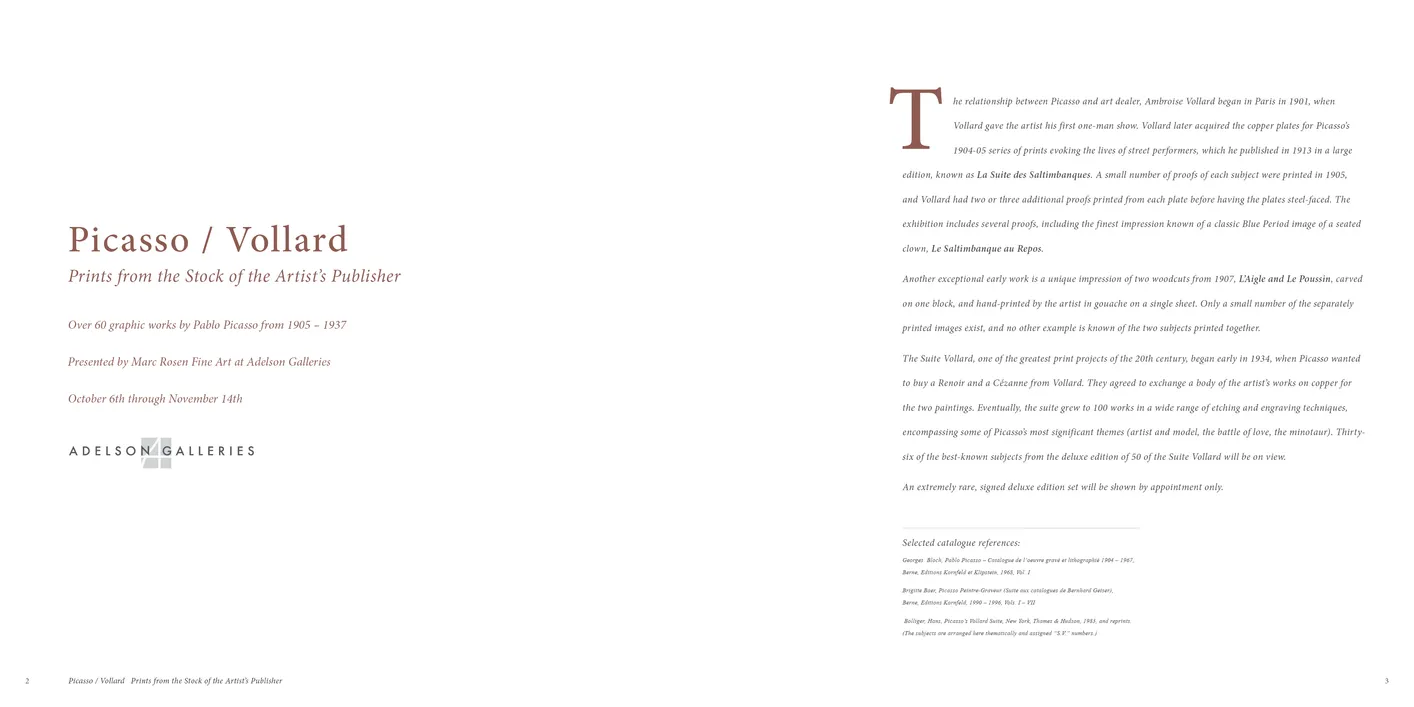
- Picasso / Vollard: Prints from the Stock of the Artist’s Publisher exhibition catalog, pages 2-3
- Client: Marc Rosen Fine Art
- Visit figure page
- Type: portfolio
- Portfolio Type: publication_design
- Portfolio Role: design_layout
Picasso Vollard: — Pages 20–21
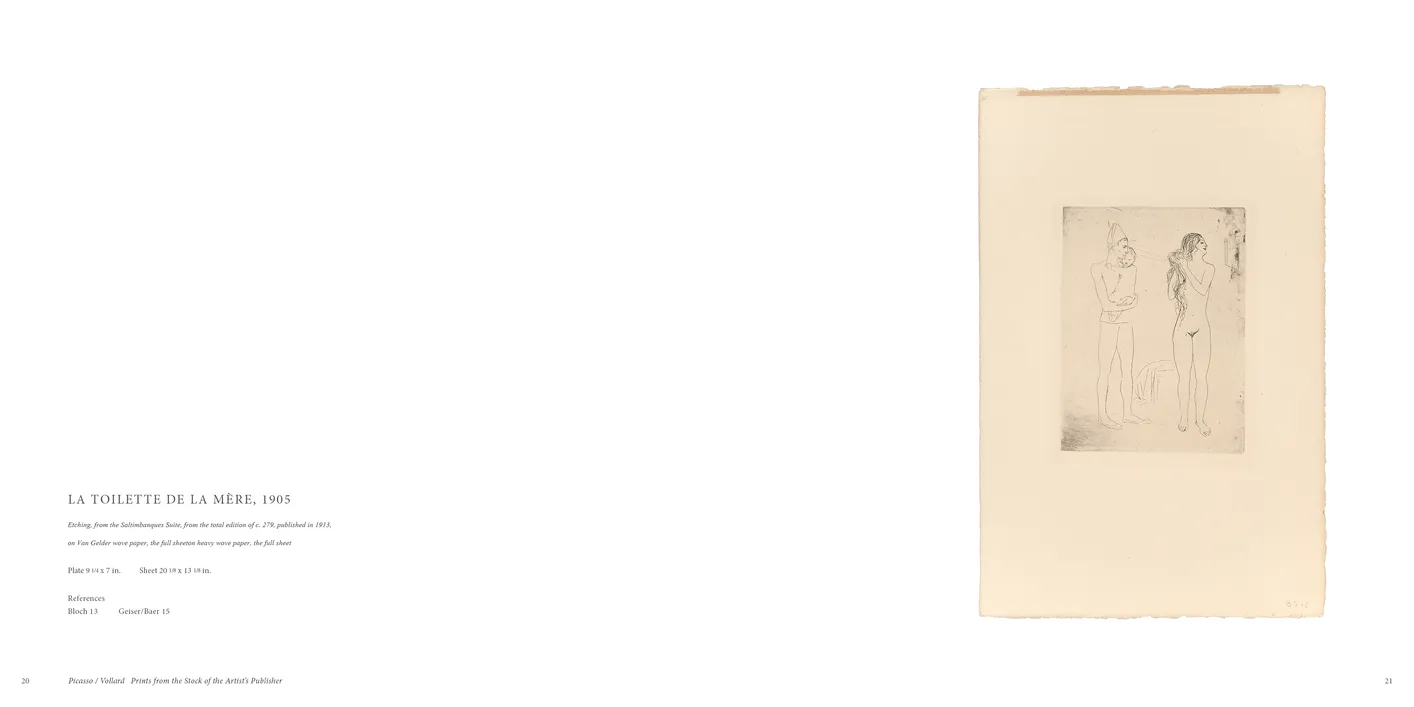
- Picasso / Vollard: Prints from the Stock of the Artist’s Publisher exhibition catalog, pages 20-21
- Client: Marc Rosen Fine Art
- Visit figure page
- Type: portfolio
- Portfolio Type: publication_design
- Portfolio Role: design_layout
Picasso Vollard: — Pages 22–23
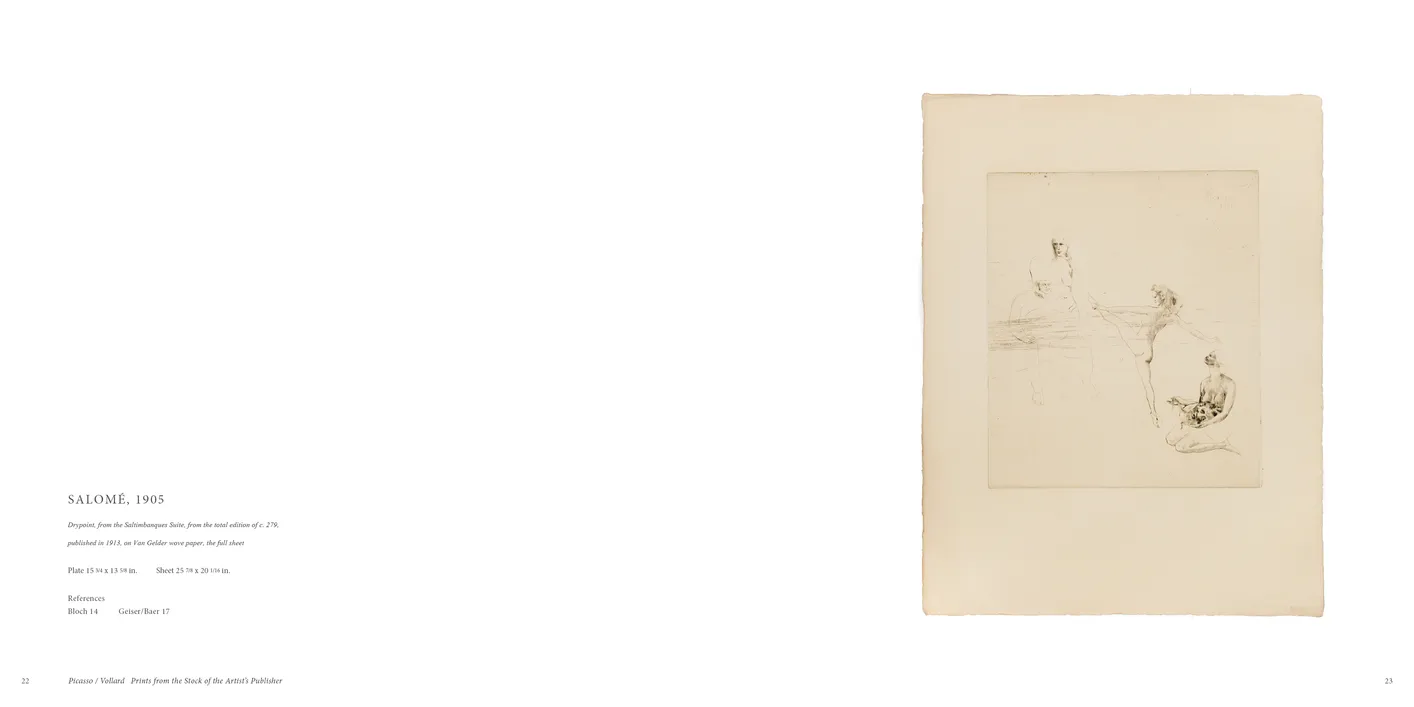
- Picasso / Vollard: Prints from the Stock of the Artist’s Publisher exhibition catalog, pages 22-23
- Client: Marc Rosen Fine Art
- Visit figure page
- Type: portfolio
- Portfolio Type: publication_design
- Portfolio Role: design_layout
Picasso Vollard: — Pages 24–25
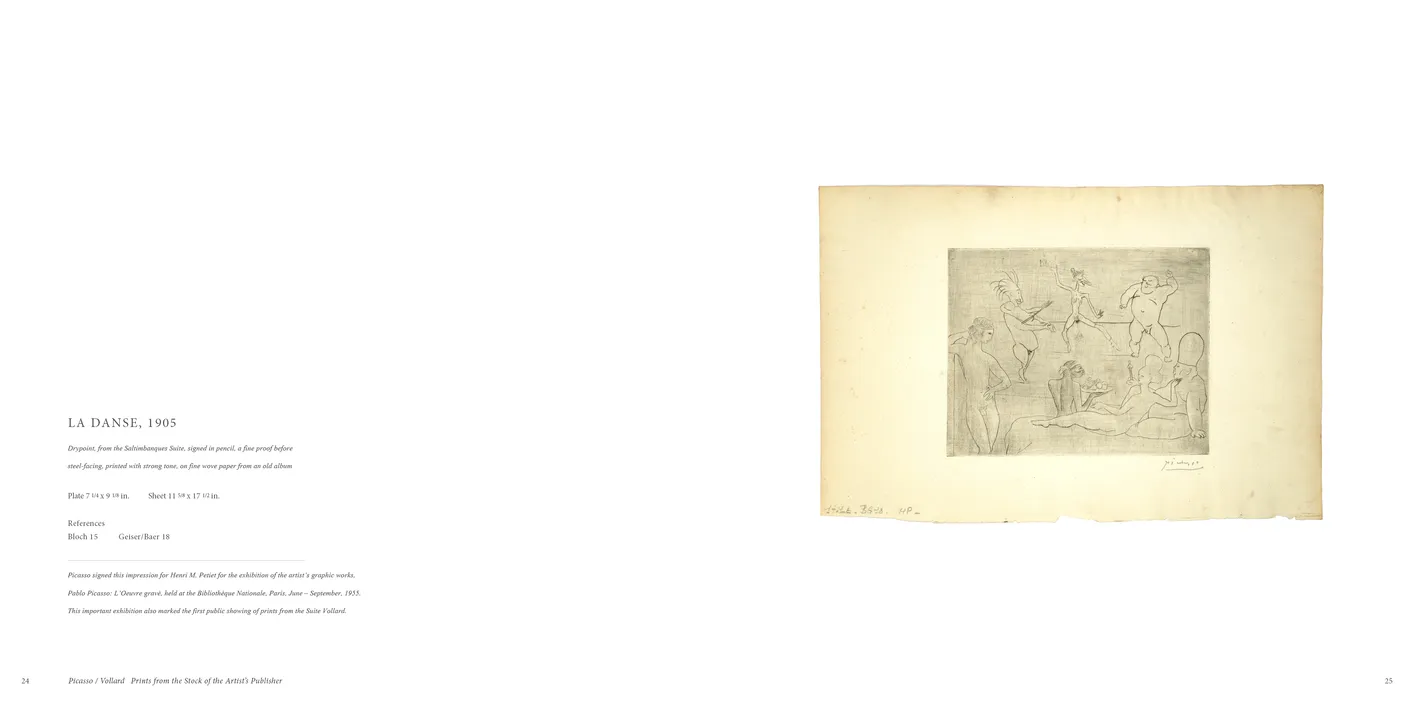
- Picasso / Vollard: Prints from the Stock of the Artist’s Publisher exhibition catalog, pages 24-25
- Client: Marc Rosen Fine Art
- Visit figure page
- Type: portfolio
- Portfolio Type: publication_design
- Portfolio Role: design_layout
Picasso Vollard: — Pages 26–27
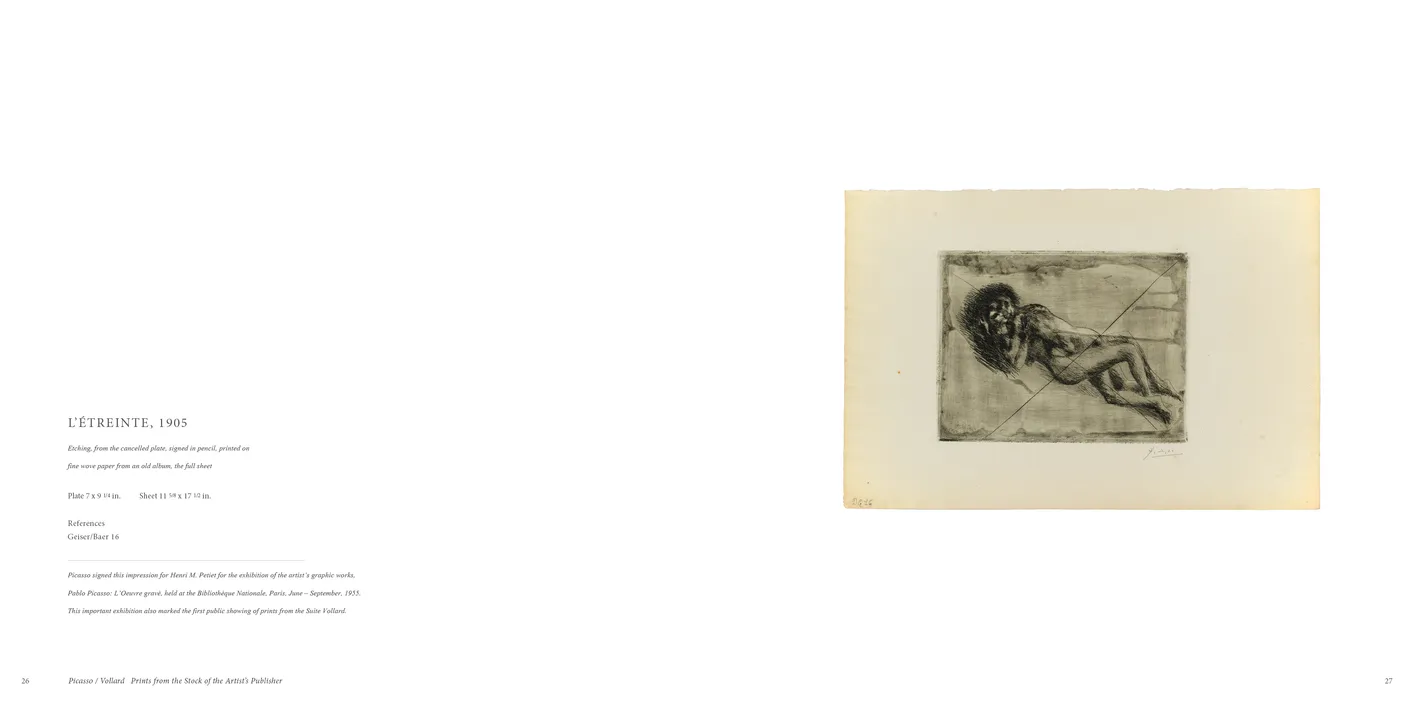
- Picasso / Vollard: Prints from the Stock of the Artist’s Publisher exhibition catalog, pages 26-27
- Client: Marc Rosen Fine Art
- Visit figure page
- Type: portfolio
- Portfolio Type: publication_design
- Portfolio Role: design_layout
Picasso Vollard: — Pages 28–29
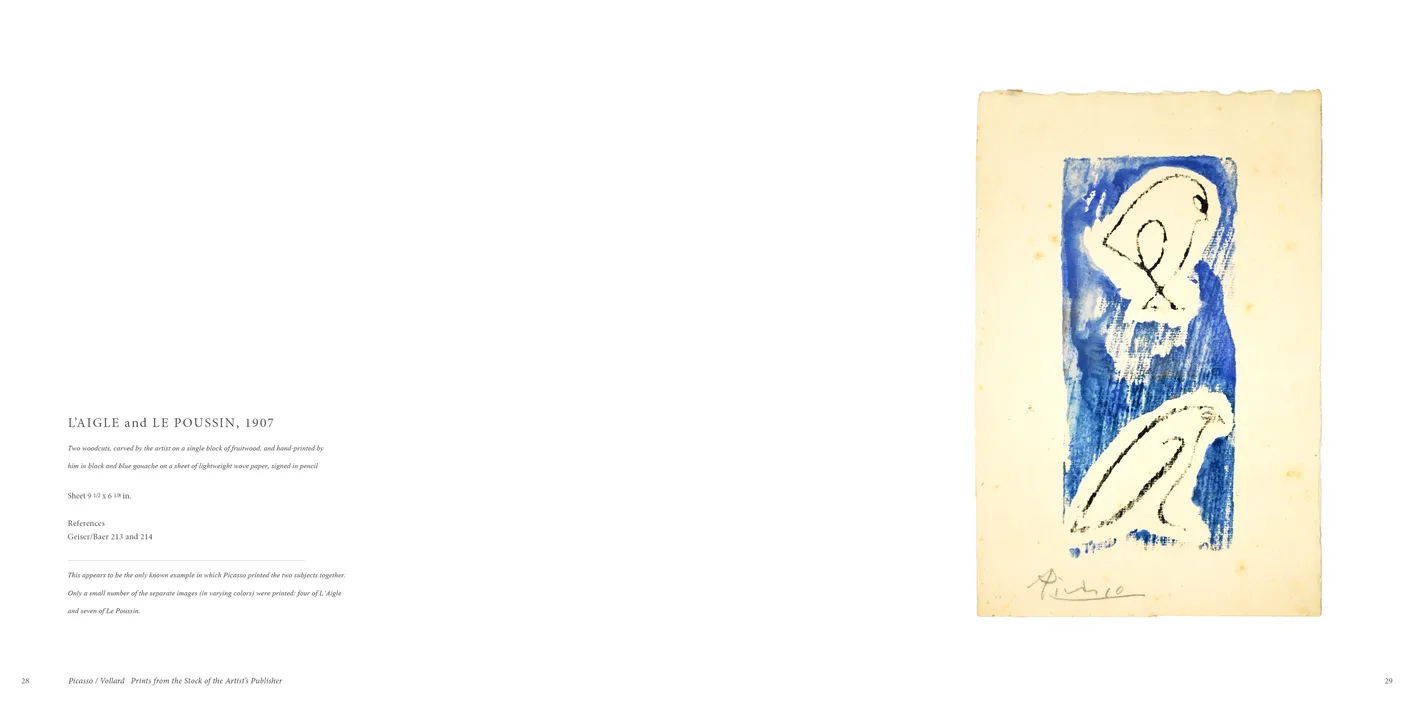
- Picasso / Vollard: Prints from the Stock of the Artist’s Publisher exhibition catalog, pages 28-29
- Client: Marc Rosen Fine Art
- Visit figure page
- Type: portfolio
- Portfolio Type: publication_design
- Portfolio Role: design_layout
Picasso Vollard: — Pages 30–31
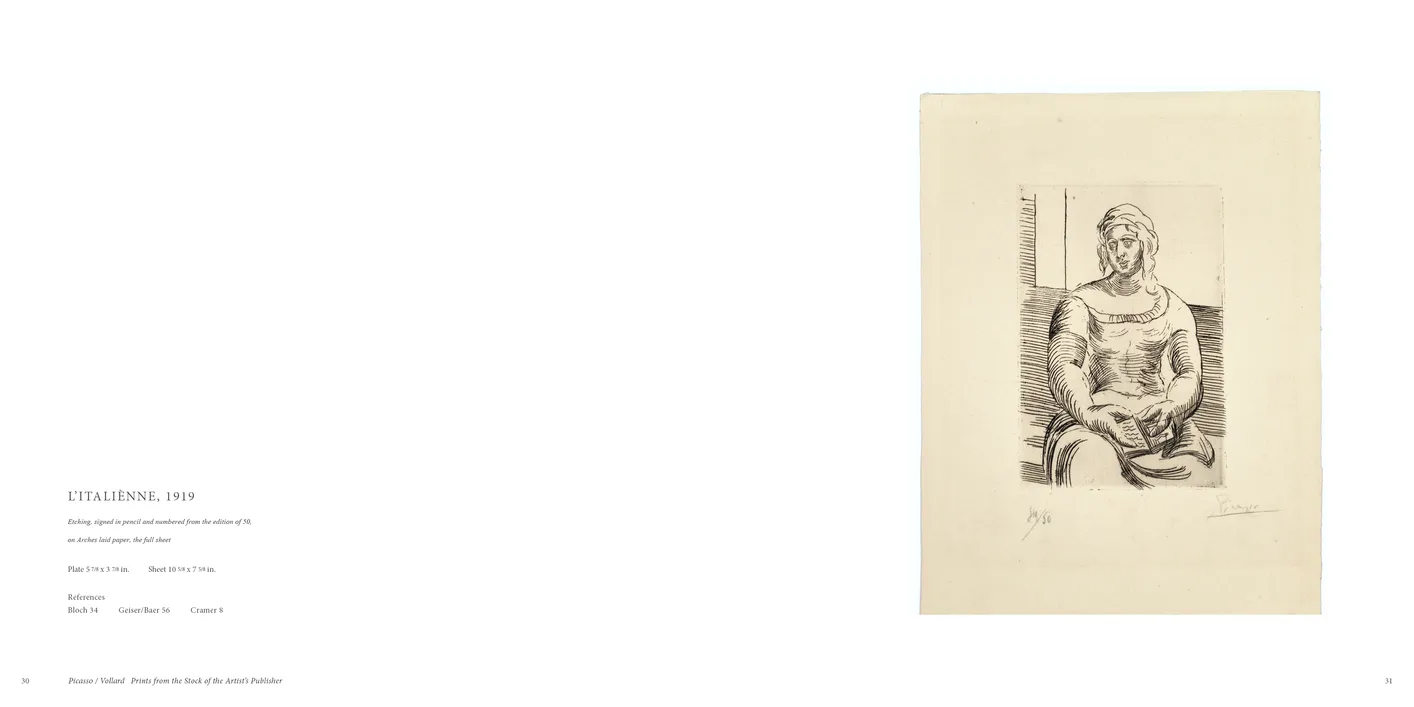
- Picasso / Vollard: Prints from the Stock of the Artist’s Publisher exhibition catalog, pages 30-31
- Client: Marc Rosen Fine Art
- Visit figure page
- Type: portfolio
- Portfolio Type: publication_design
- Portfolio Role: design_layout
Picasso Vollard: — Pages 32–33
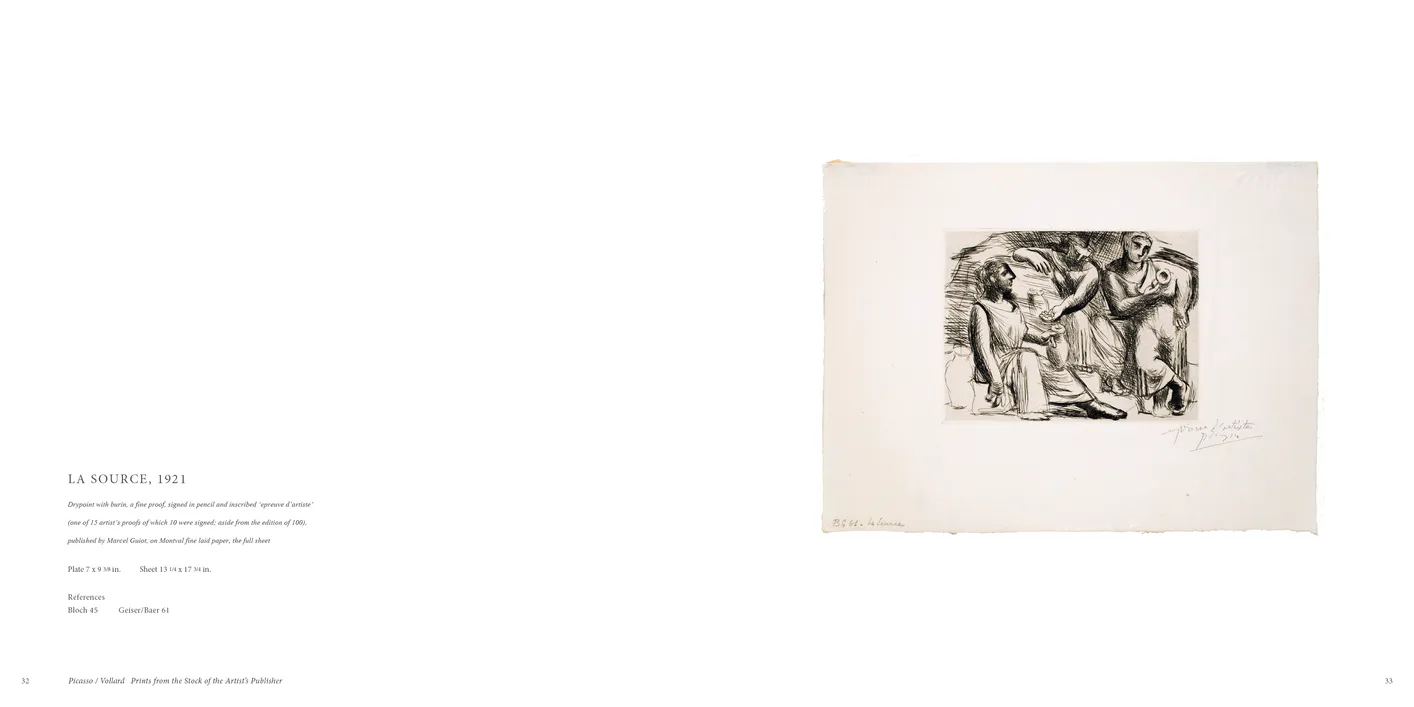
- Picasso / Vollard: Prints from the Stock of the Artist’s Publisher exhibition catalog, pages 32-33
- Client: Marc Rosen Fine Art
- Visit figure page
- Type: portfolio
- Portfolio Type: publication_design
- Portfolio Role: design_layout
Picasso Vollard: — Pages 34–35
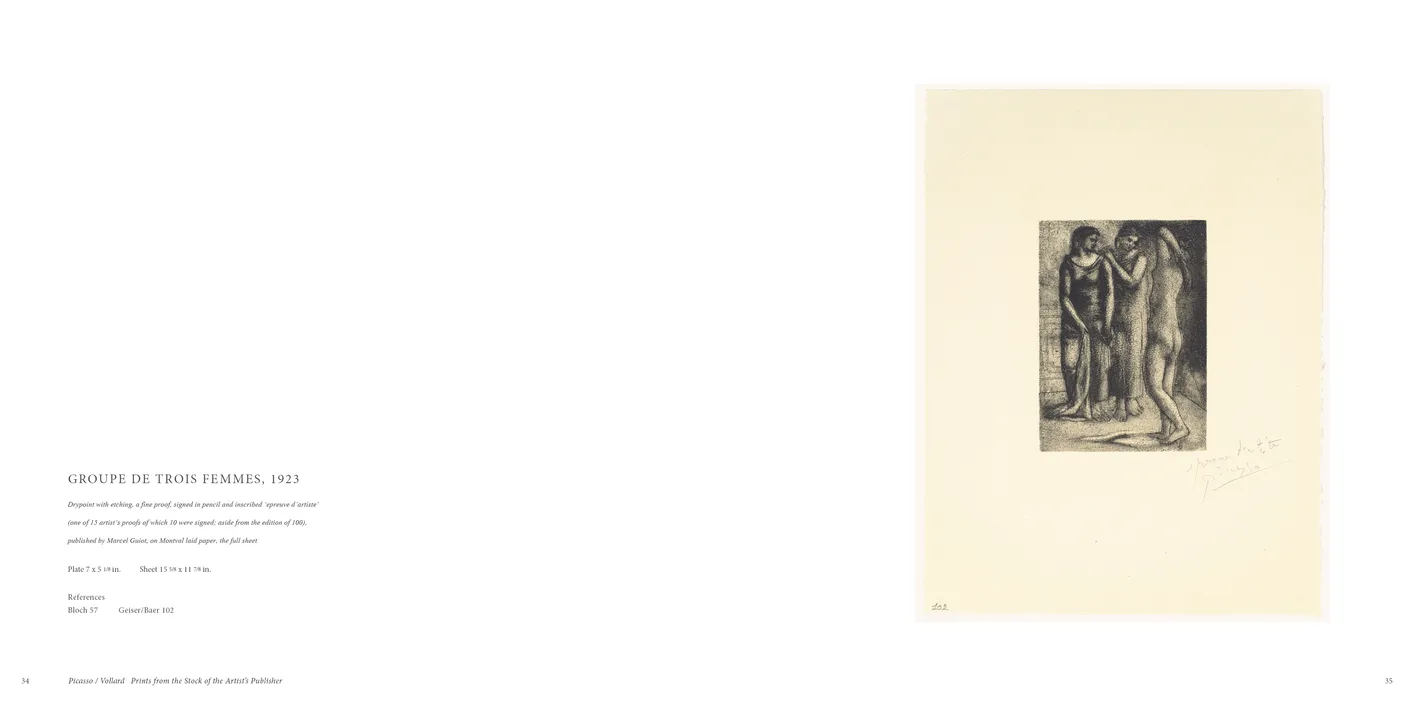
- Picasso / Vollard: Prints from the Stock of the Artist’s Publisher exhibition catalog, pages 34-35
- Client: Marc Rosen Fine Art
- Visit figure page
- Type: portfolio
- Portfolio Type: publication_design
- Portfolio Role: design_layout
Picasso Vollard: — Pages 36–37
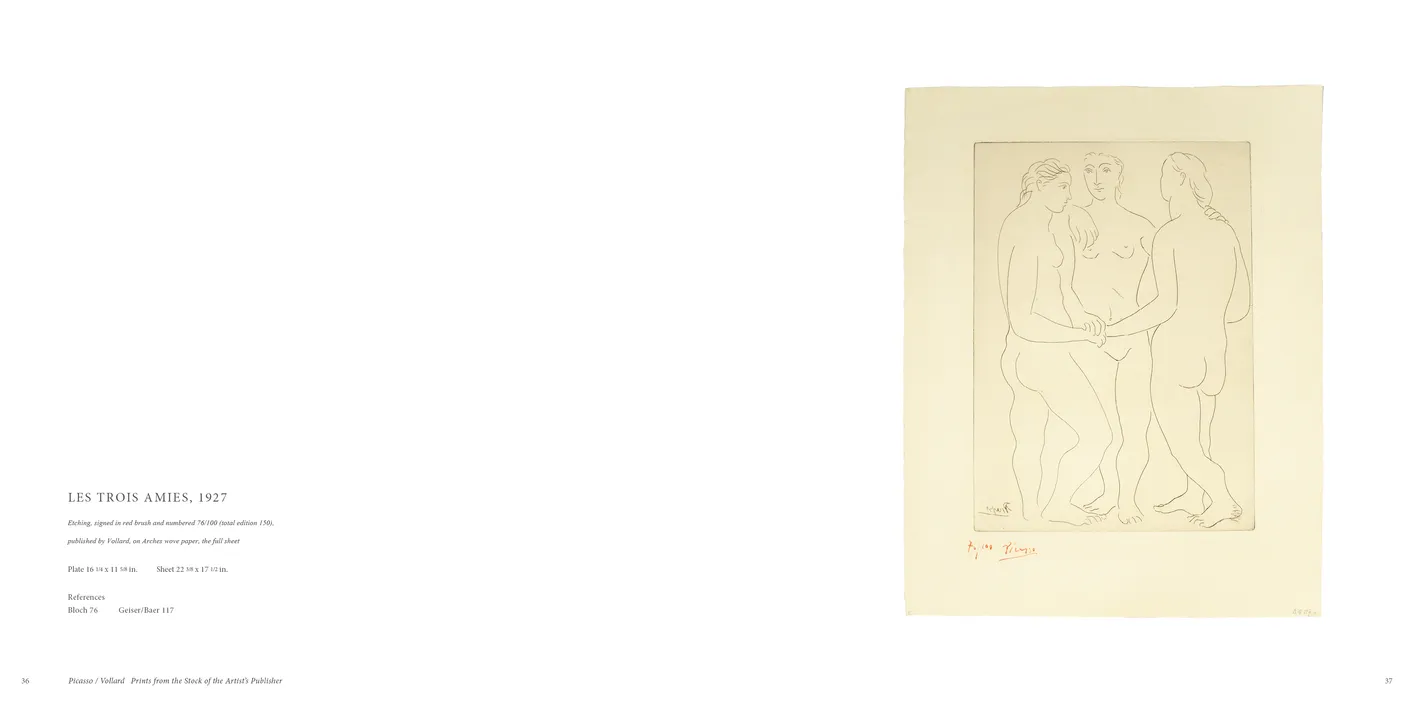
- Picasso / Vollard: Prints from the Stock of the Artist’s Publisher exhibition catalog, pages 36-37
- Client: Marc Rosen Fine Art
- Visit figure page
- Type: portfolio
- Portfolio Type: publication_design
- Portfolio Role: design_layout
Picasso Vollard: — Pages 38–39

- Picasso / Vollard: Prints from the Stock of the Artist’s Publisher exhibition catalog, pages 38-39
- Client: Marc Rosen Fine Art
- Visit figure page
- Type: portfolio
- Portfolio Type: publication_design
- Portfolio Role: design_layout
Picasso Vollard: — Pages 4–5
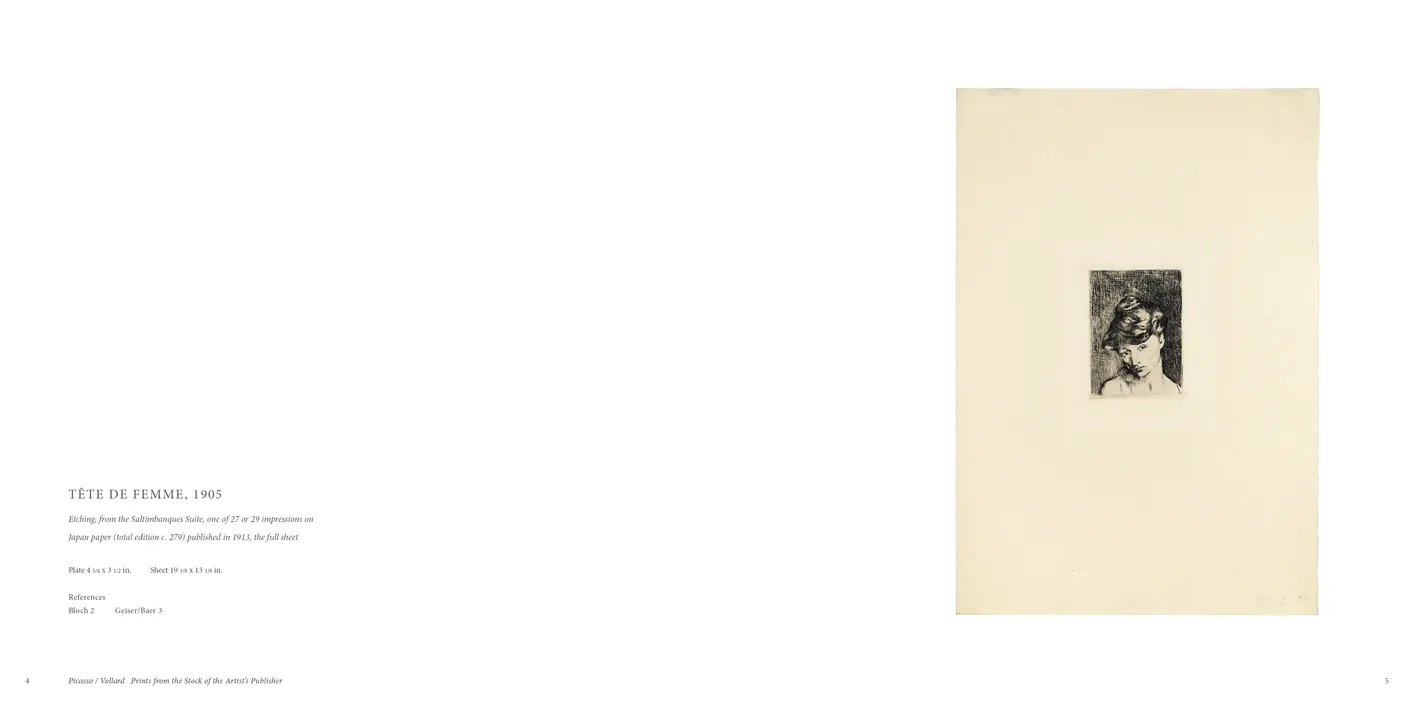
- Picasso / Vollard: Prints from the Stock of the Artist’s Publisher exhibition catalog, pages 4-5
- Client: Marc Rosen Fine Art
- Visit figure page
- Type: portfolio
- Portfolio Type: publication_design
- Portfolio Role: design_layout
Picasso Vollard: — Pages 40–41
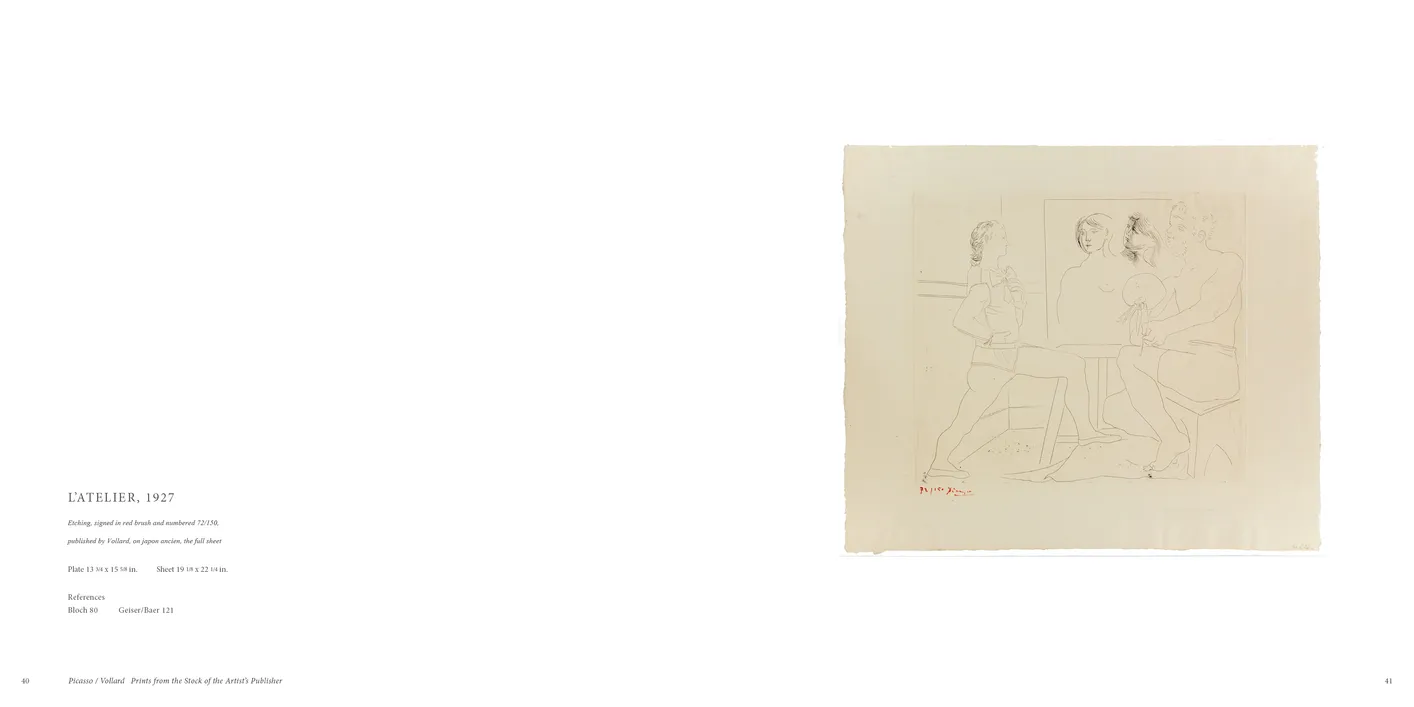
- Picasso / Vollard: Prints from the Stock of the Artist’s Publisher exhibition catalog, pages 40-41
- Client: Marc Rosen Fine Art
- Visit figure page
- Type: portfolio
- Portfolio Type: publication_design
- Portfolio Role: design_layout
Picasso Vollard: — Pages 42–43
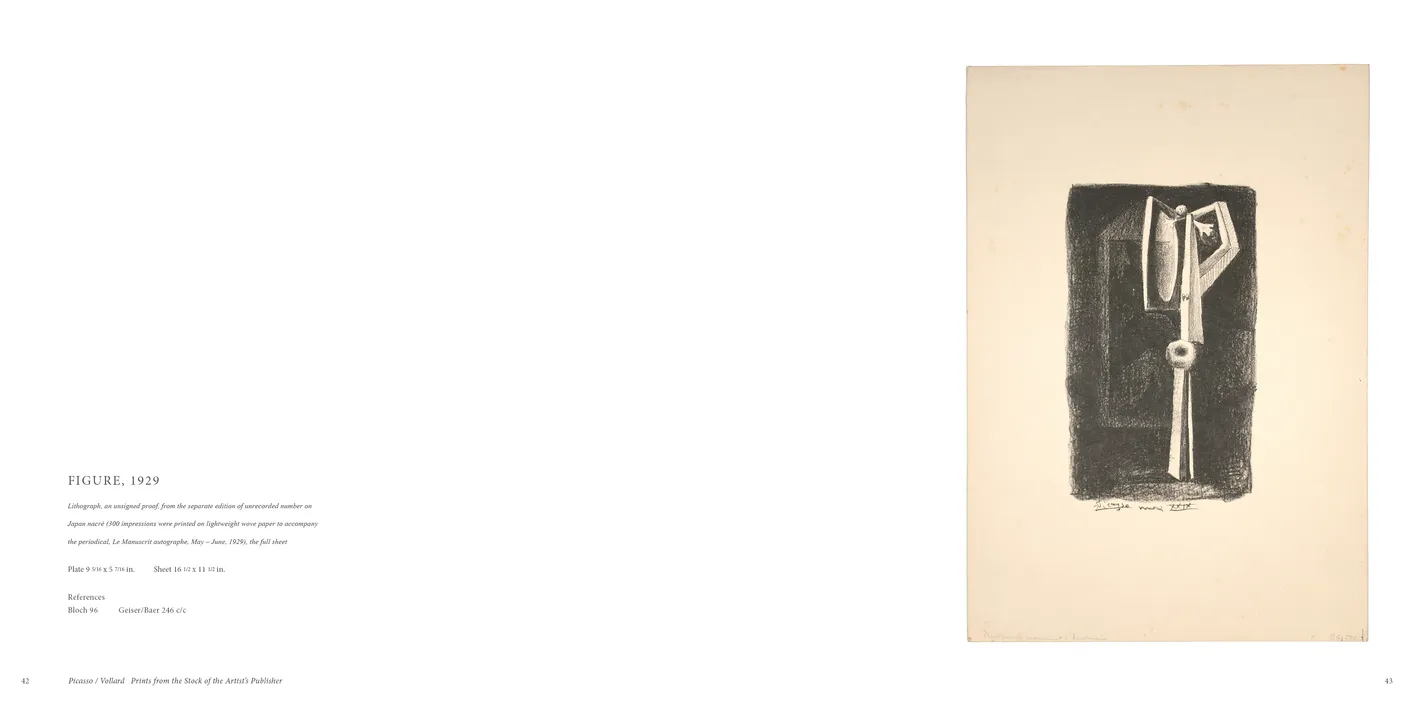
- Picasso / Vollard: Prints from the Stock of the Artist’s Publisher exhibition catalog, pages 42-43
- Client: Marc Rosen Fine Art
- Visit figure page
- Type: portfolio
- Portfolio Type: publication_design
- Portfolio Role: design_layout
Picasso Vollard: — Pages 44–45
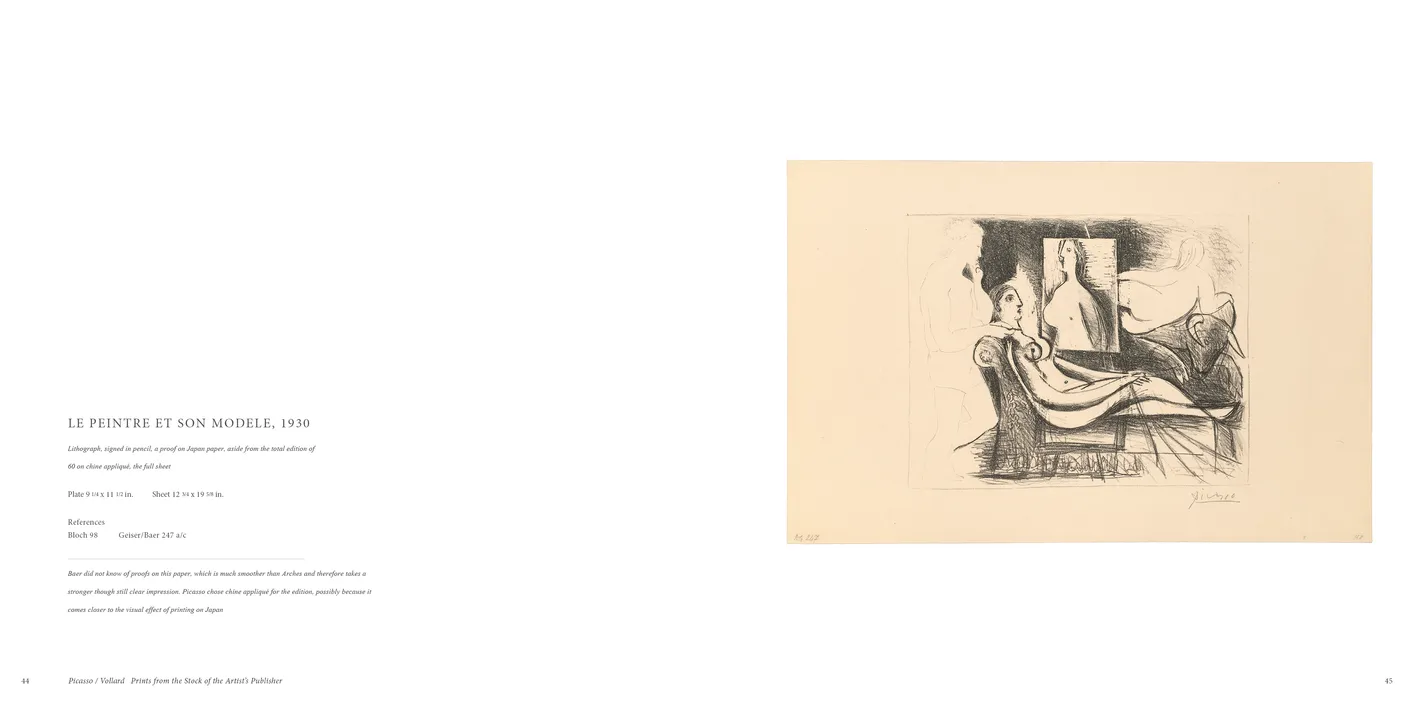
- Picasso / Vollard: Prints from the Stock of the Artist’s Publisher exhibition catalog, pages 44-45
- Client: Marc Rosen Fine Art
- Visit figure page
- Type: portfolio
- Portfolio Type: publication_design
- Portfolio Role: design_layout
Picasso Vollard: — Pages 46–47
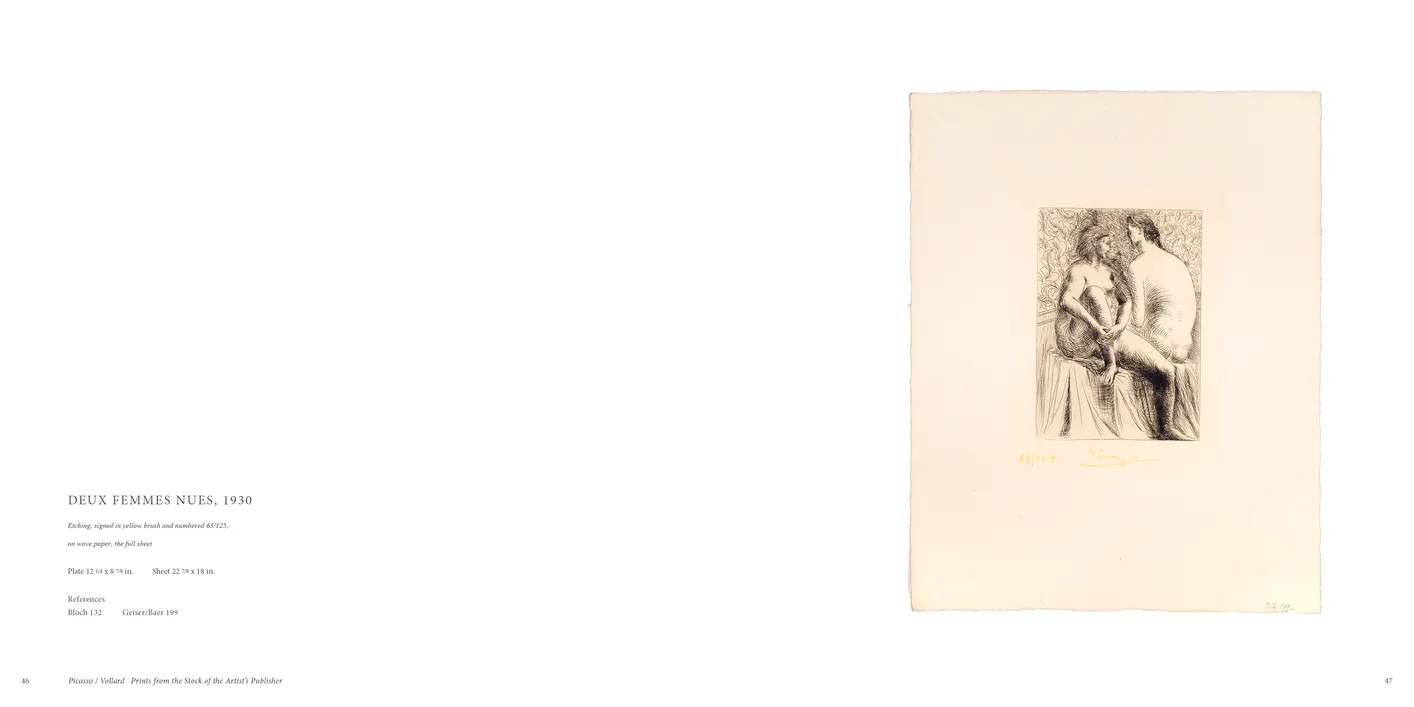
- Picasso / Vollard: Prints from the Stock of the Artist’s Publisher exhibition catalog, pages 46-47
- Client: Marc Rosen Fine Art
- Visit figure page
- Type: portfolio
- Portfolio Type: publication_design
- Portfolio Role: design_layout
Picasso Vollard: — Pages 48–49
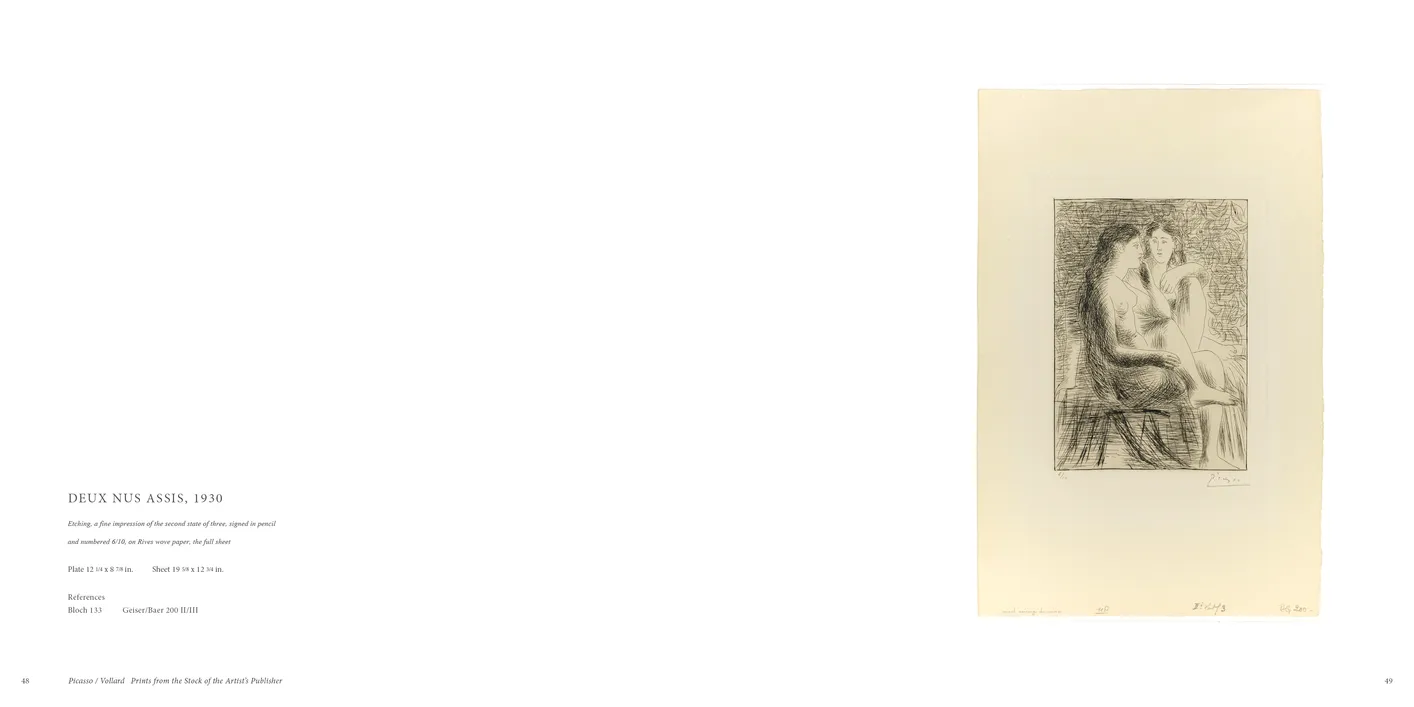
- Picasso / Vollard: Prints from the Stock of the Artist’s Publisher exhibition catalog, pages 48-49
- Client: Marc Rosen Fine Art
- Visit figure page
- Type: portfolio
- Portfolio Type: publication_design
- Portfolio Role: design_layout
Picasso Vollard: — Pages 50–51
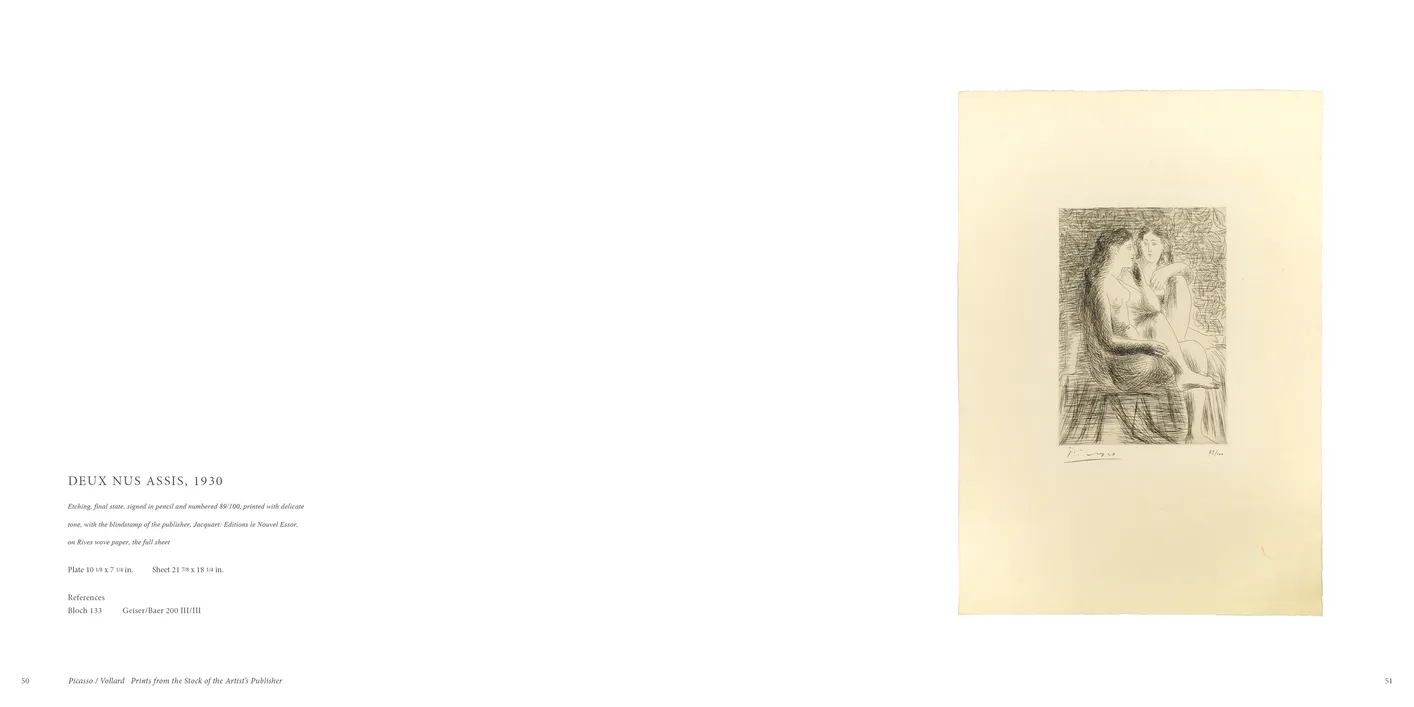
- Picasso / Vollard: Prints from the Stock of the Artist’s Publisher exhibition catalog, pages 50-51
- Client: Marc Rosen Fine Art
- Visit figure page
- Type: portfolio
- Portfolio Type: publication_design
- Portfolio Role: design_layout
Picasso Vollard: — Pages 52–53
- Picasso / Vollard: Prints from the Stock of the Artist’s Publisher exhibition catalog, pages 52-53
- Client: Marc Rosen Fine Art
- Visit figure page
- Type: portfolio
- Portfolio Type: publication_design
- Portfolio Role: design_layout
Picasso Vollard: — Pages 54–55
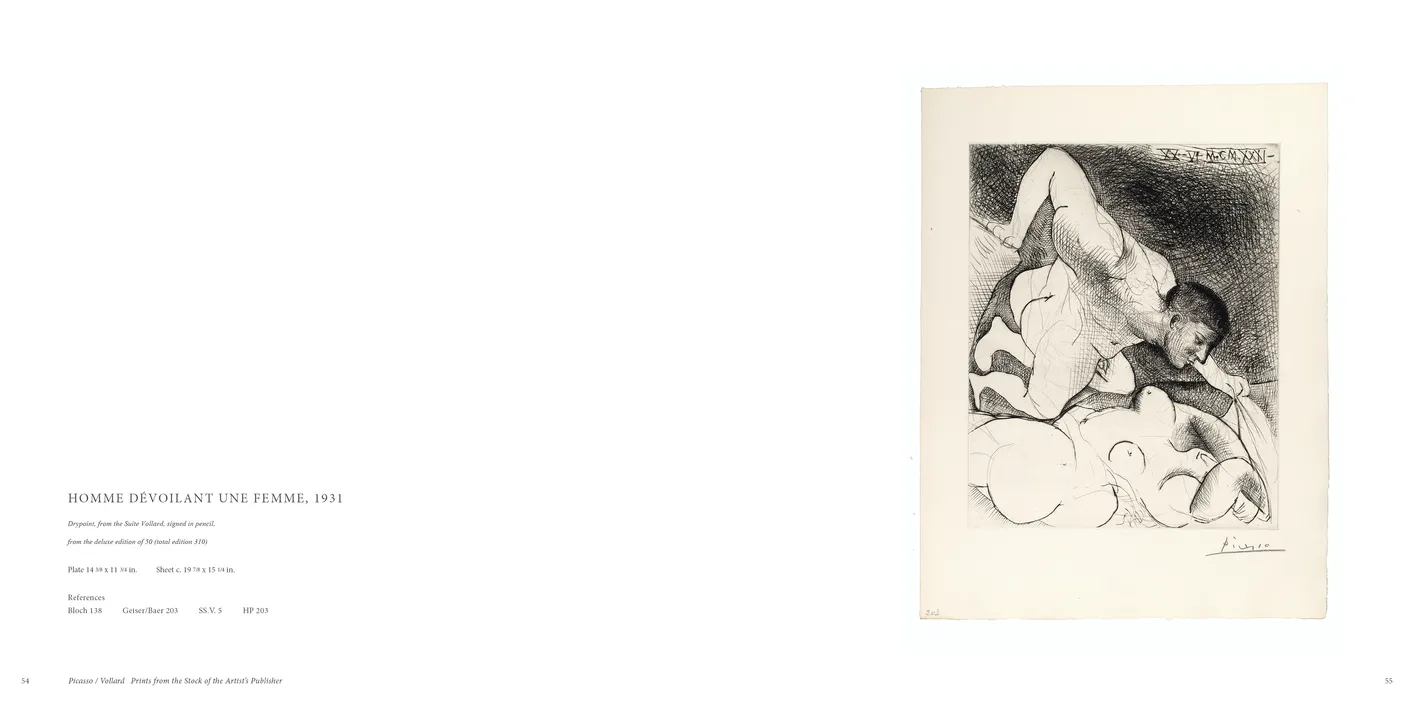
- Picasso / Vollard: Prints from the Stock of the Artist’s Publisher exhibition catalog, pages 54-55
- Client: Marc Rosen Fine Art
- Visit figure page
- Type: portfolio
- Portfolio Type: publication_design
- Portfolio Role: design_layout
Picasso Vollard: — Pages 56–57
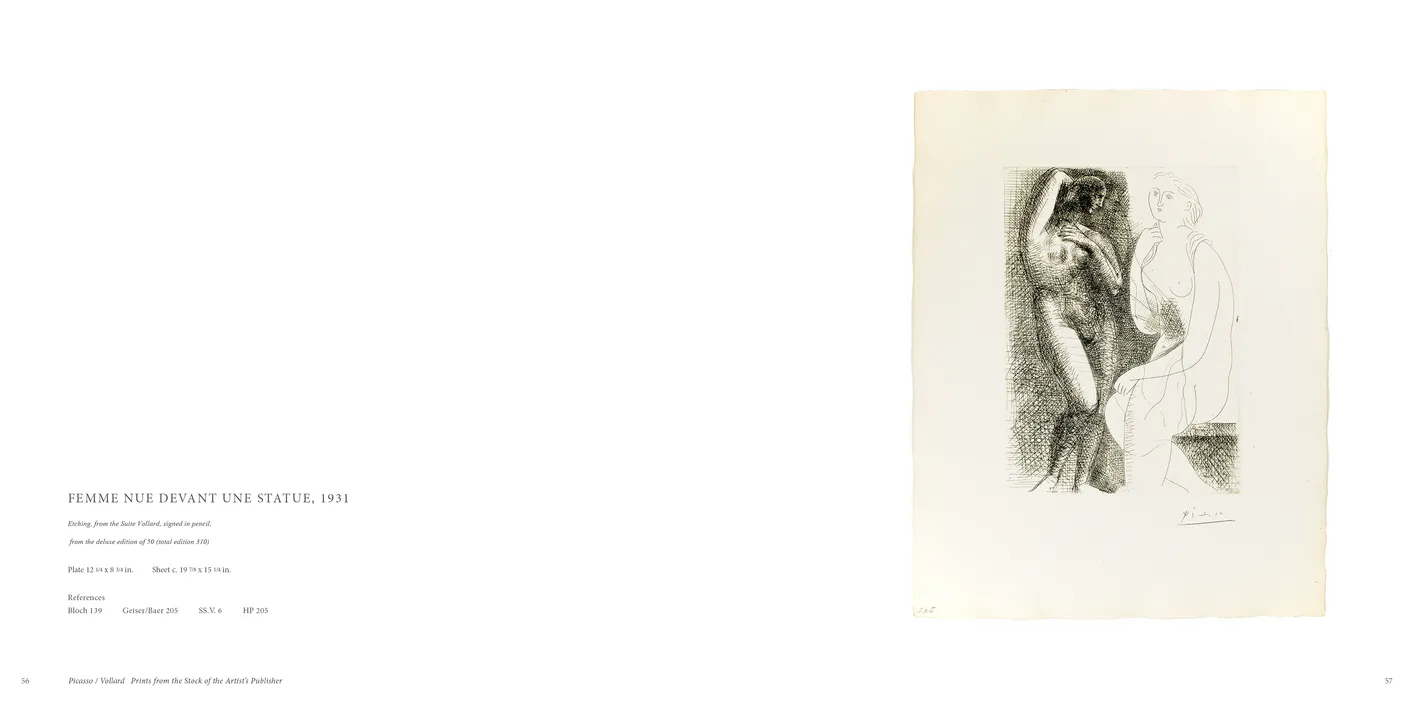
- Picasso / Vollard: Prints from the Stock of the Artist’s Publisher exhibition catalog, pages 56-57
- Client: Marc Rosen Fine Art
- Visit figure page
- Type: portfolio
- Portfolio Type: publication_design
- Portfolio Role: design_layout
Picasso Vollard: — Pages 58–59
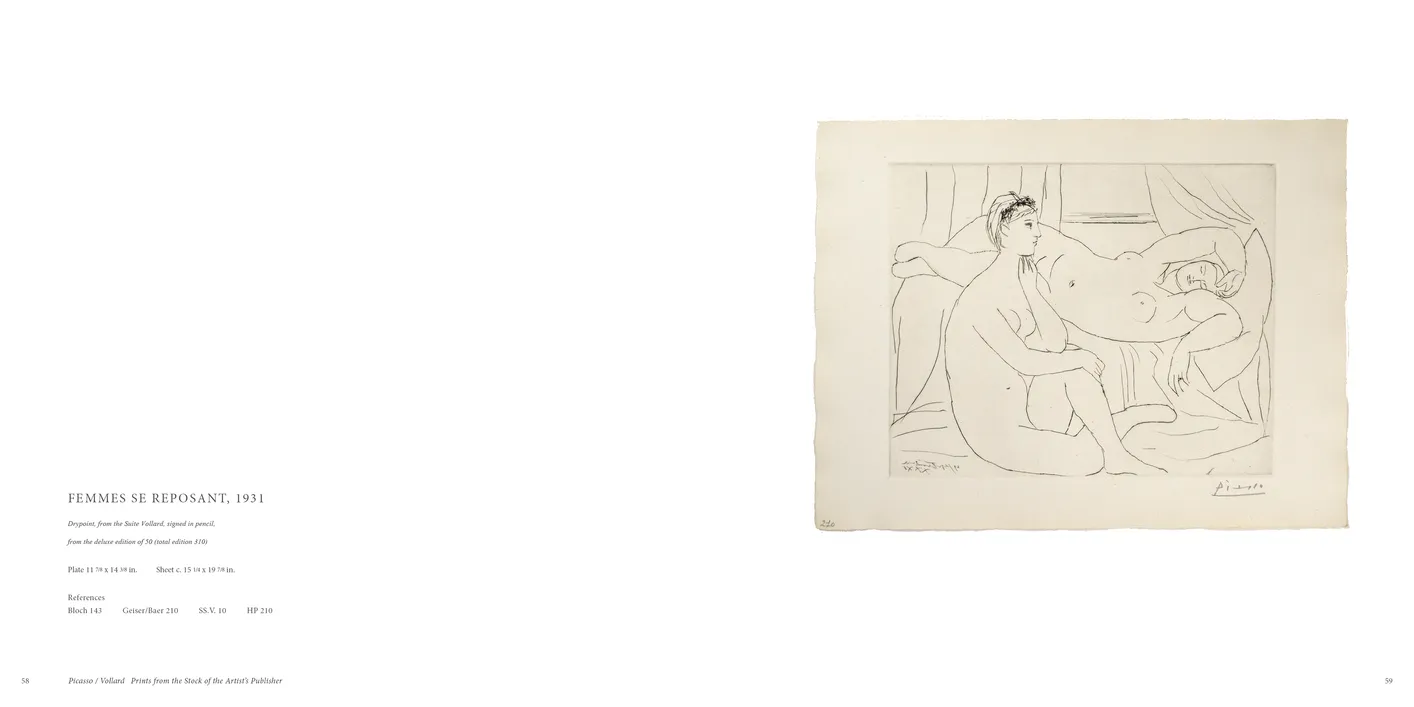
- Picasso / Vollard: Prints from the Stock of the Artist’s Publisher exhibition catalog, pages 58-59
- Client: Marc Rosen Fine Art
- Visit figure page
- Type: portfolio
- Portfolio Type: publication_design
- Portfolio Role: design_layout
Picasso Vollard: — Pages 6–7
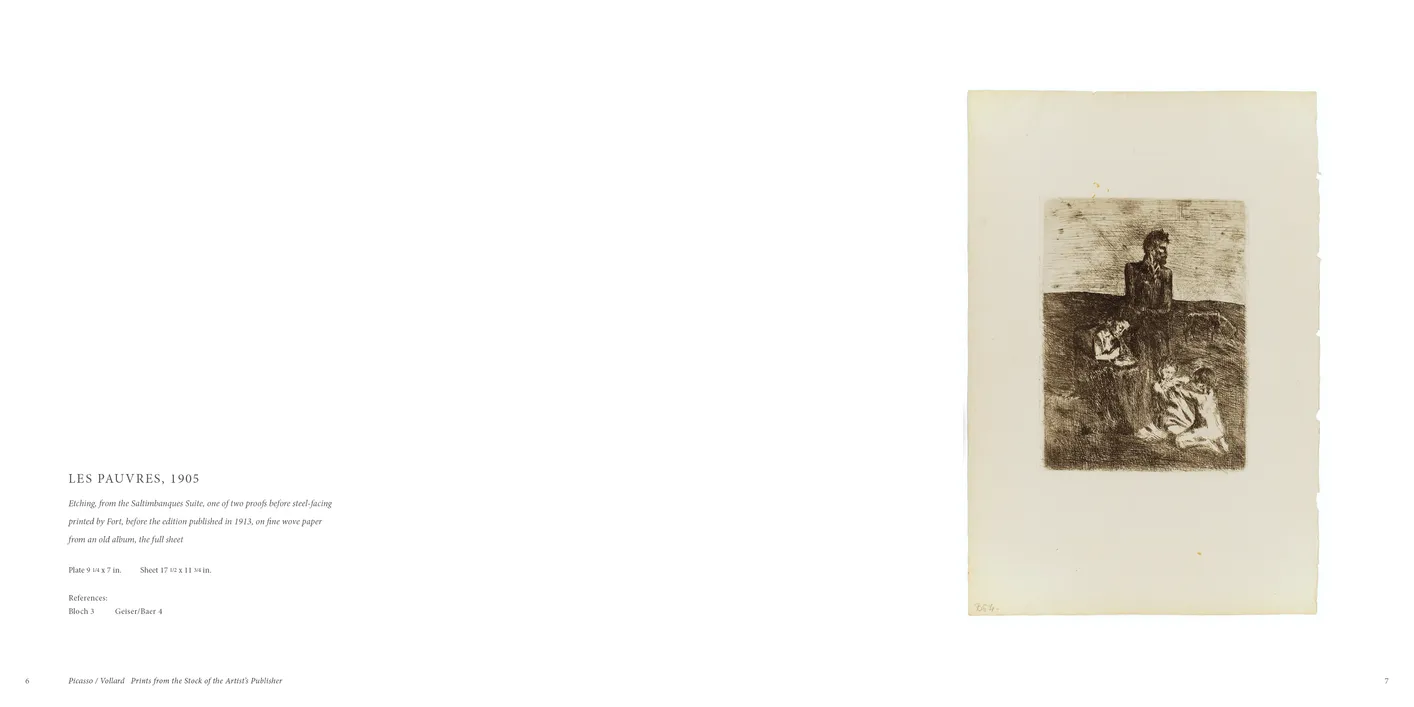
- Picasso / Vollard: Prints from the Stock of the Artist’s Publisher exhibition catalog, pages 6-7
- Client: Marc Rosen Fine Art
- Visit figure page
- Type: portfolio
- Portfolio Type: publication_design
- Portfolio Role: design_layout
Picasso Vollard: — Pages 60–61
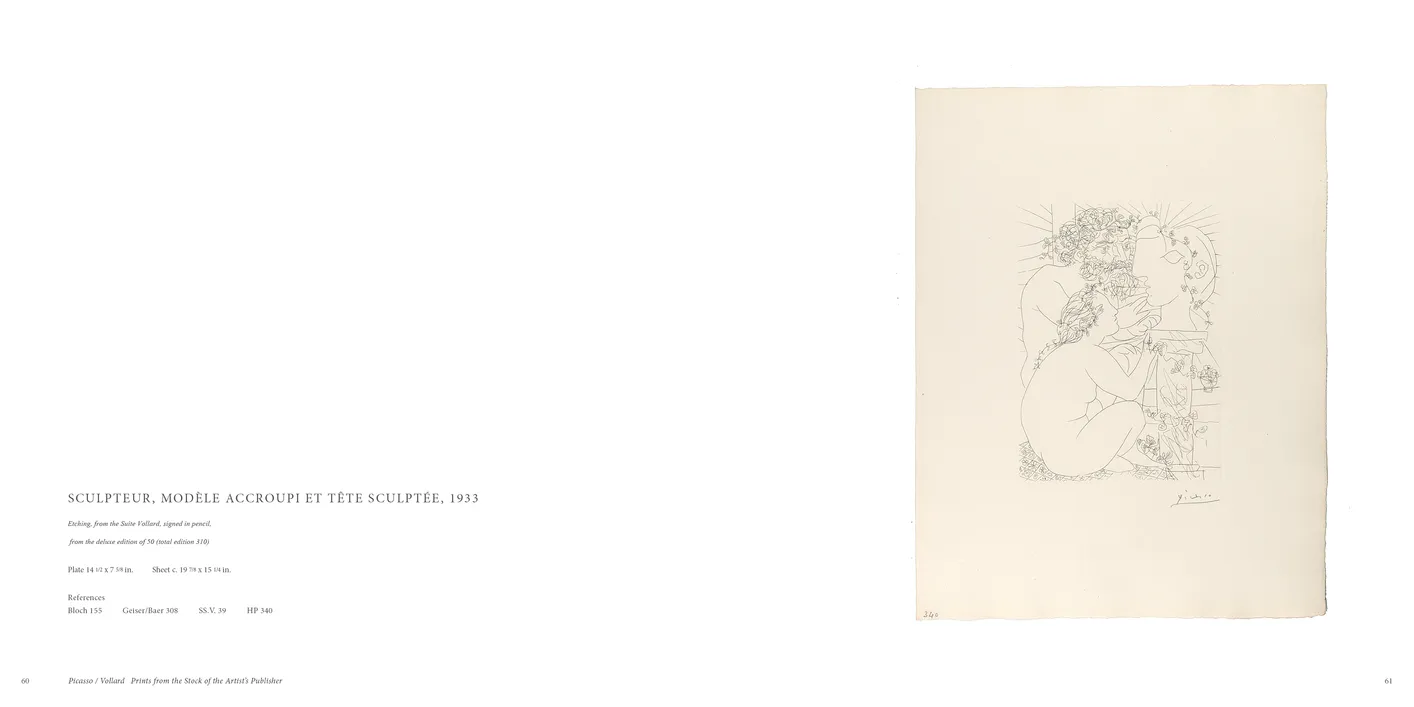
- Picasso / Vollard: Prints from the Stock of the Artist’s Publisher exhibition catalog, pages 60-61
- Client: Marc Rosen Fine Art
- Visit figure page
- Type: portfolio
- Portfolio Type: publication_design
- Portfolio Role: design_layout
Picasso Vollard: — Pages 62–63
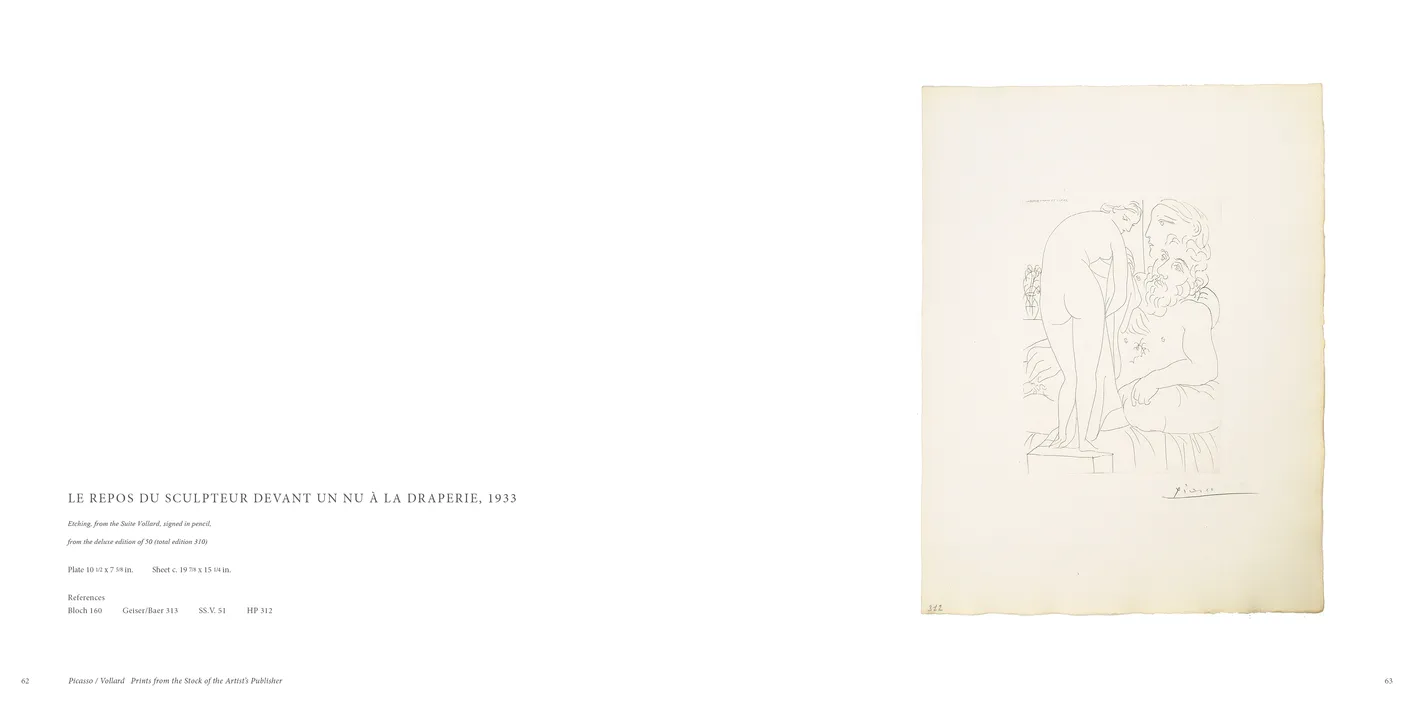
- Picasso / Vollard: Prints from the Stock of the Artist’s Publisher exhibition catalog, pages 62-63
- Client: Marc Rosen Fine Art
- Visit figure page
- Type: portfolio
- Portfolio Type: publication_design
- Portfolio Role: design_layout
Picasso Vollard: — Pages 64–65
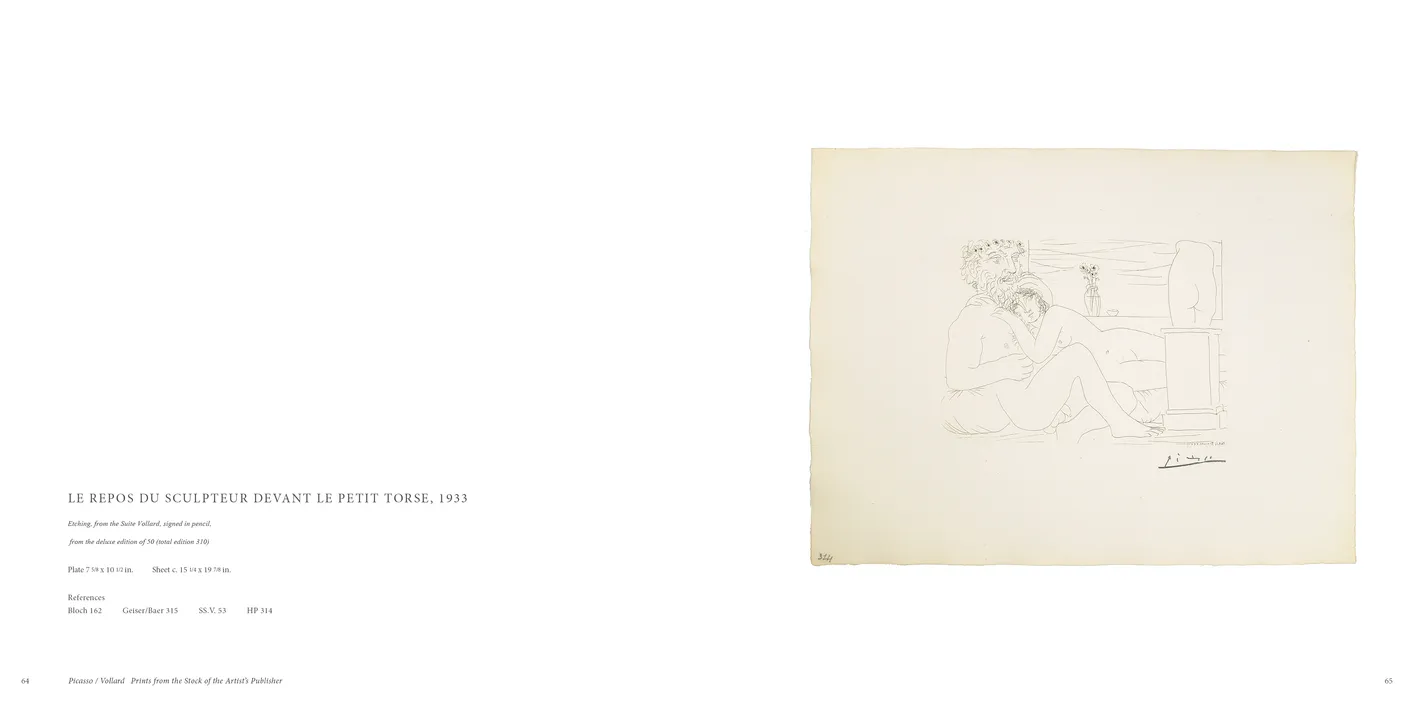
- Picasso / Vollard: Prints from the Stock of the Artist’s Publisher exhibition catalog, pages 64-65
- Client: Marc Rosen Fine Art
- Visit figure page
- Type: portfolio
- Portfolio Type: publication_design
- Portfolio Role: design_layout
Picasso Vollard: — Pages 66–67
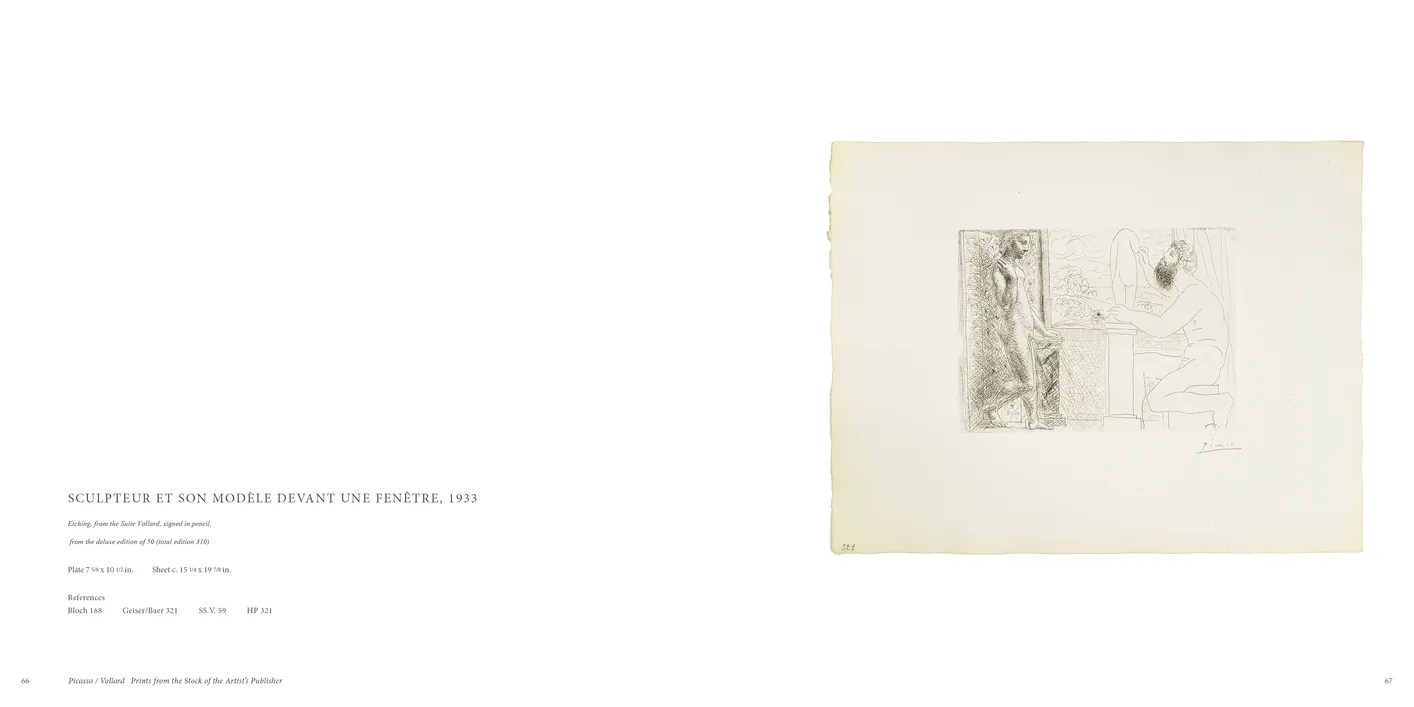
- Picasso / Vollard: Prints from the Stock of the Artist’s Publisher exhibition catalog, pages 66-67
- Client: Marc Rosen Fine Art
- Visit figure page
- Type: portfolio
- Portfolio Type: publication_design
- Portfolio Role: design_layout
Picasso Vollard: — Pages 68–69
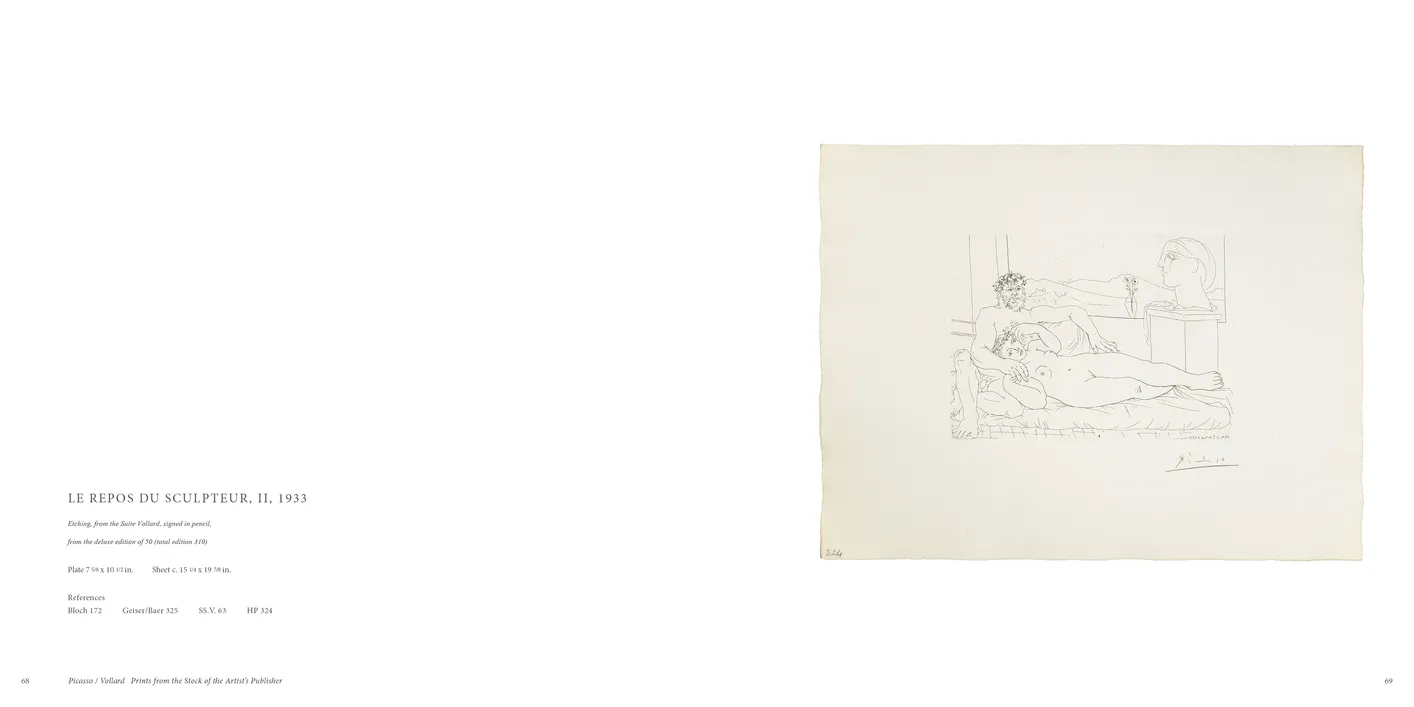
- Picasso / Vollard: Prints from the Stock of the Artist’s Publisher exhibition catalog, pages 68-69
- Client: Marc Rosen Fine Art
- Visit figure page
- Type: portfolio
- Portfolio Type: publication_design
- Portfolio Role: design_layout
Picasso Vollard: — Pages 70–71
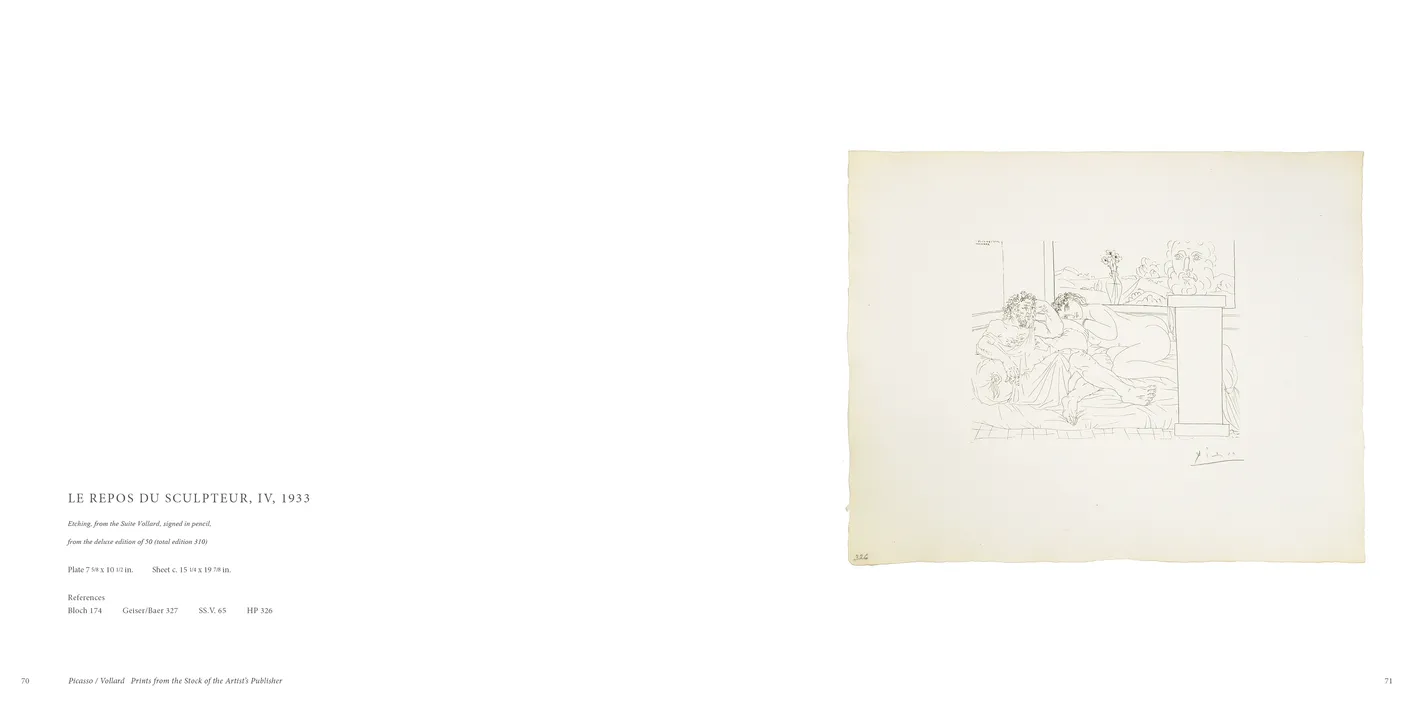
- Picasso / Vollard: Prints from the Stock of the Artist’s Publisher exhibition catalog, pages 70-71
- Client: Marc Rosen Fine Art
- Visit figure page
- Type: portfolio
- Portfolio Type: publication_design
- Portfolio Role: design_layout
Picasso Vollard: — Pages 72–73
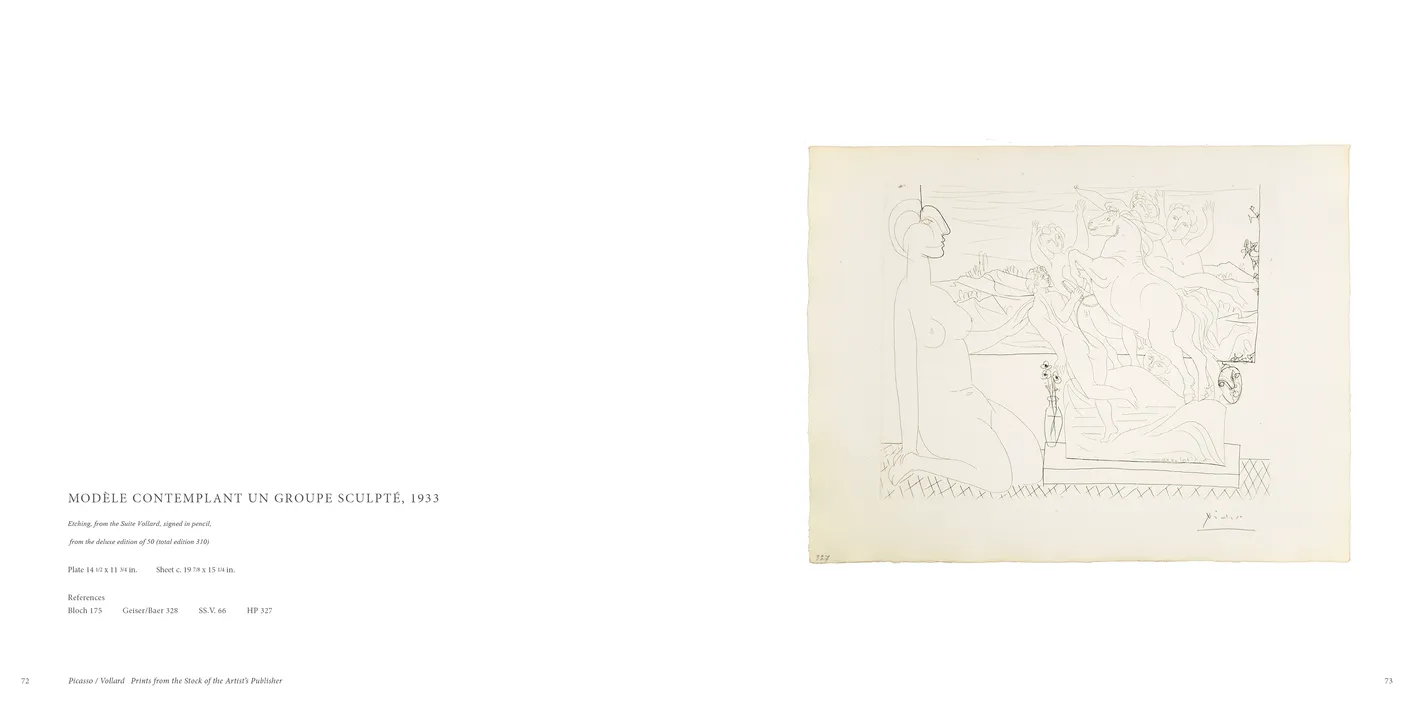
- Picasso / Vollard: Prints from the Stock of the Artist’s Publisher exhibition catalog, pages 72-73
- Client: Marc Rosen Fine Art
- Visit figure page
- Type: portfolio
- Portfolio Type: publication_design
- Portfolio Role: design_layout
Picasso Vollard: — Pages 74–75
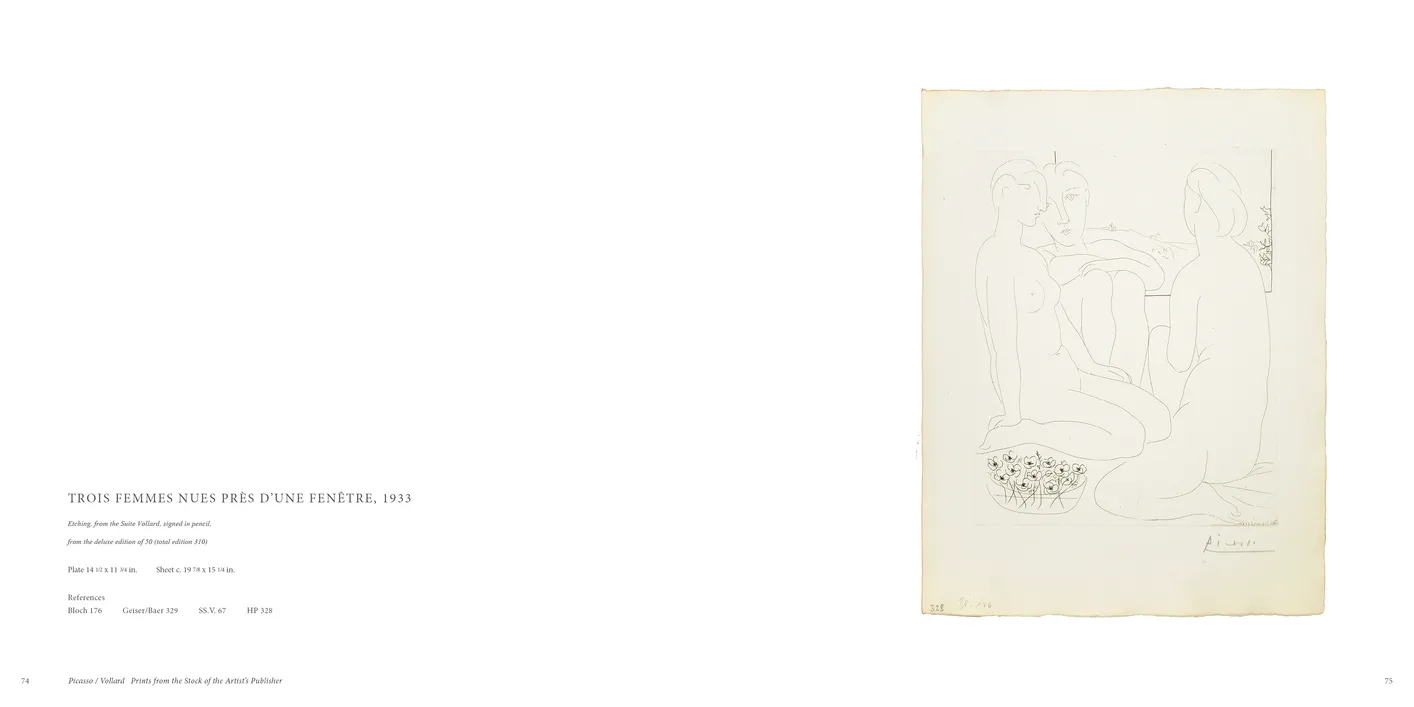
- Picasso / Vollard: Prints from the Stock of the Artist’s Publisher exhibition catalog, pages 74-75
- Client: Marc Rosen Fine Art
- Visit figure page
- Type: portfolio
- Portfolio Type: publication_design
- Portfolio Role: design_layout
Picasso Vollard: — Pages 76–77
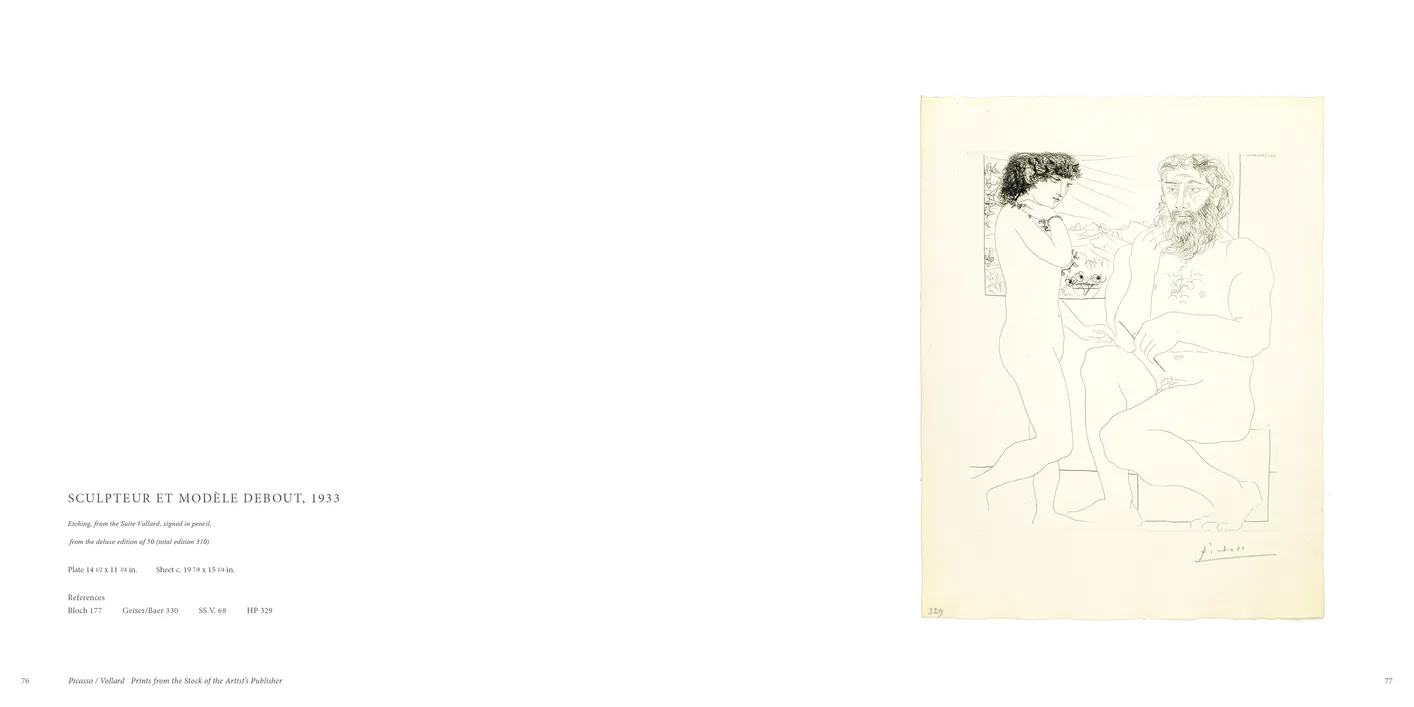
- Picasso / Vollard: Prints from the Stock of the Artist’s Publisher exhibition catalog, pages 76-77
- Client: Marc Rosen Fine Art
- Visit figure page
- Type: portfolio
- Portfolio Type: publication_design
- Portfolio Role: design_layout
Picasso Vollard: — Pages 78–79
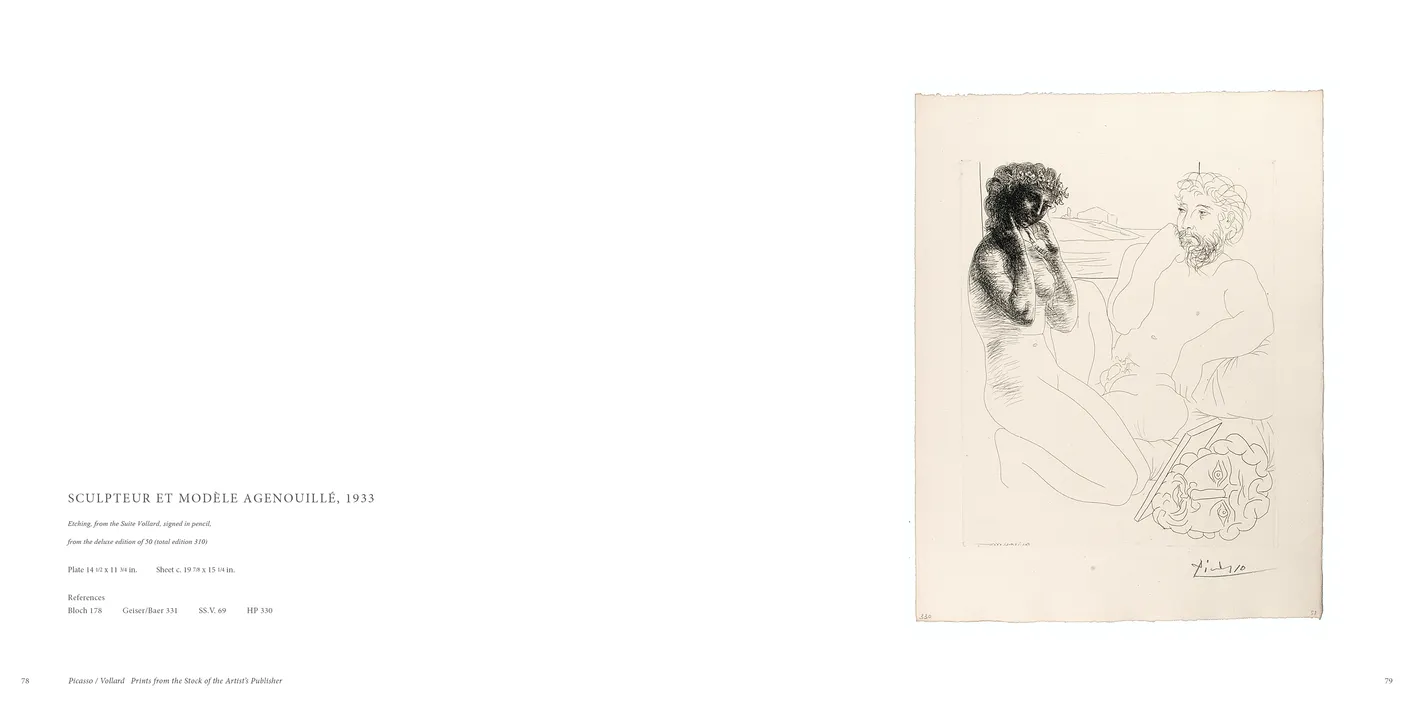
- Picasso / Vollard: Prints from the Stock of the Artist’s Publisher exhibition catalog, pages 78-79
- Client: Marc Rosen Fine Art
- Visit figure page
- Type: portfolio
- Portfolio Type: publication_design
- Portfolio Role: design_layout
Picasso Vollard: — Pages 8–9
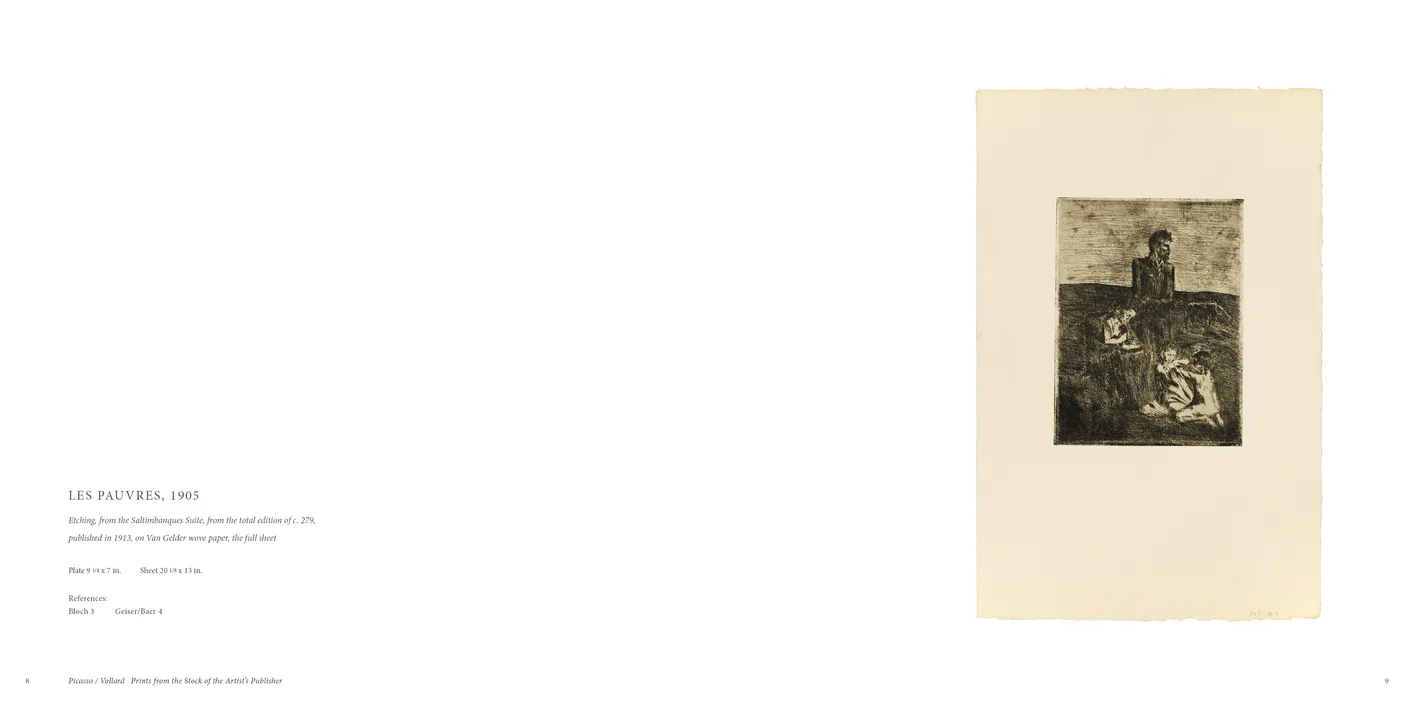
- Picasso / Vollard: Prints from the Stock of the Artist’s Publisher exhibition catalog, pages 8-9
- Client: Marc Rosen Fine Art
- Visit figure page
- Type: portfolio
- Portfolio Type: publication_design
- Portfolio Role: design_layout
Picasso Vollard: — Pages 80–81
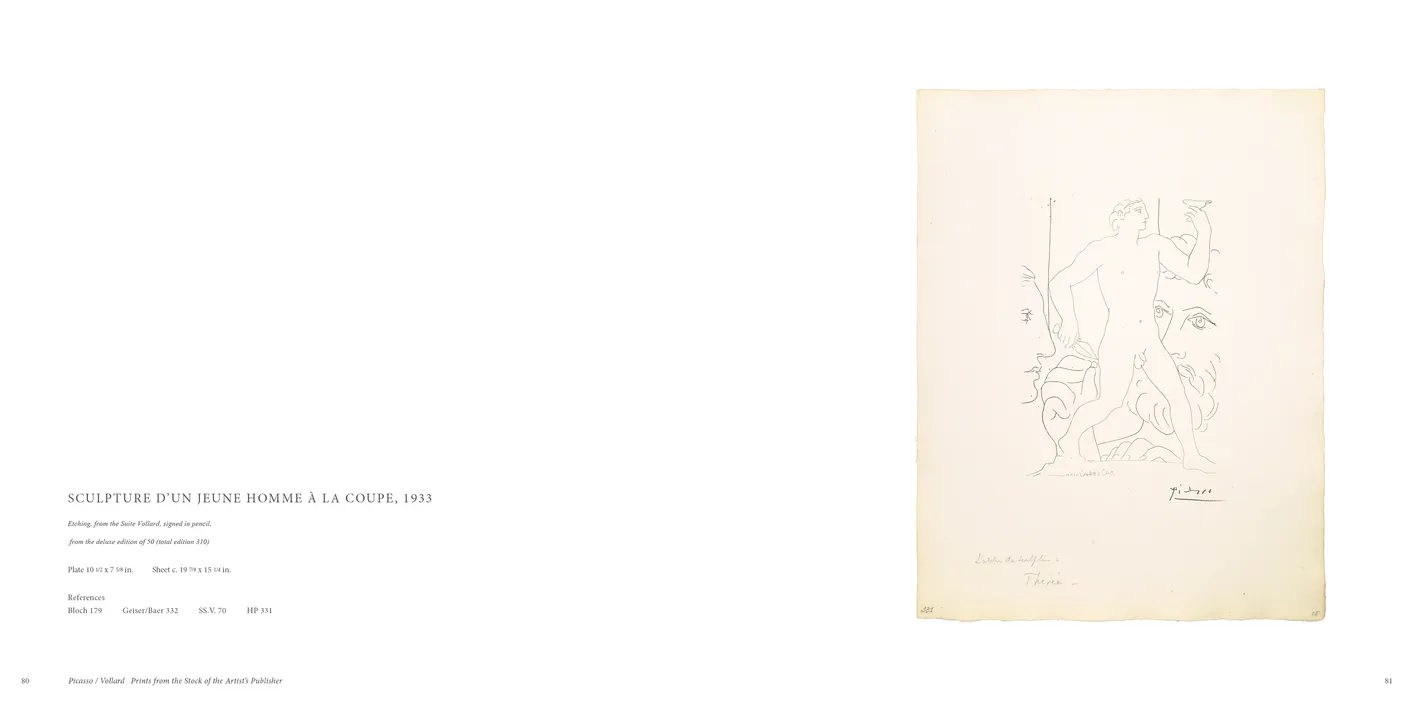
- Picasso / Vollard: Prints from the Stock of the Artist’s Publisher exhibition catalog, pages 80-81
- Client: Marc Rosen Fine Art
- Visit figure page
- Type: portfolio
- Portfolio Type: publication_design
- Portfolio Role: design_layout
Picasso Vollard: — Pages 82–83
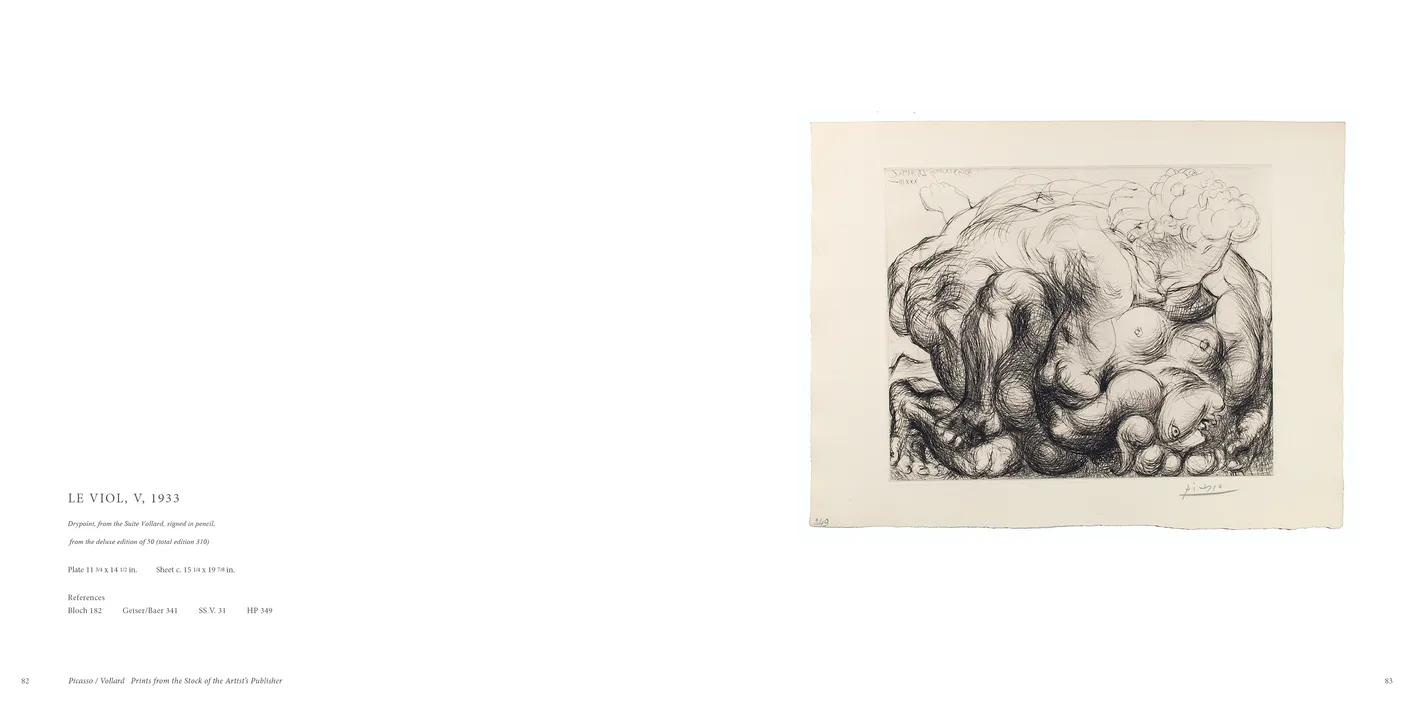
- Picasso / Vollard: Prints from the Stock of the Artist’s Publisher exhibition catalog, pages 82-83
- Client: Marc Rosen Fine Art
- Visit figure page
- Type: portfolio
- Portfolio Type: publication_design
- Portfolio Role: design_layout
Picasso Vollard: — Pages 84–85
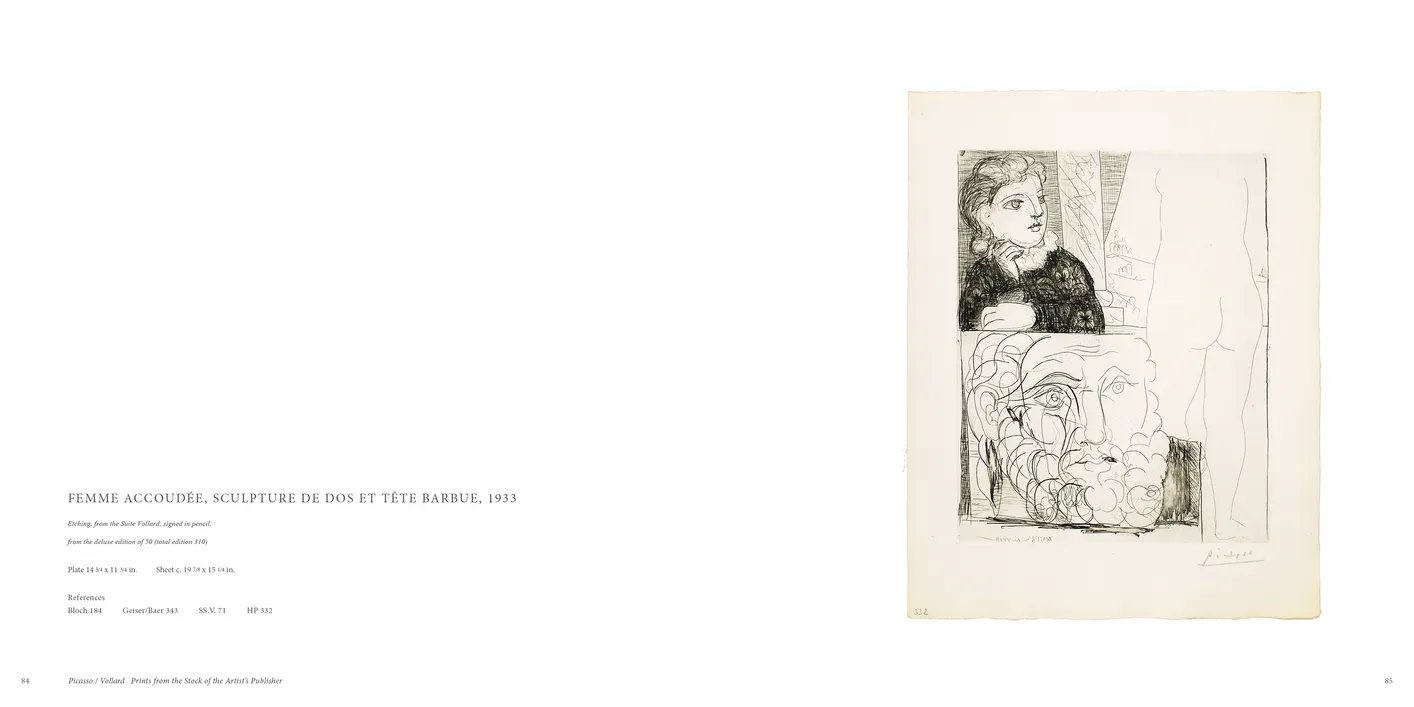
- Picasso / Vollard: Prints from the Stock of the Artist’s Publisher exhibition catalog, pages 84-85
- Client: Marc Rosen Fine Art
- Visit figure page
- Type: portfolio
- Portfolio Type: publication_design
- Portfolio Role: design_layout
Picasso Vollard: — Pages 86–87
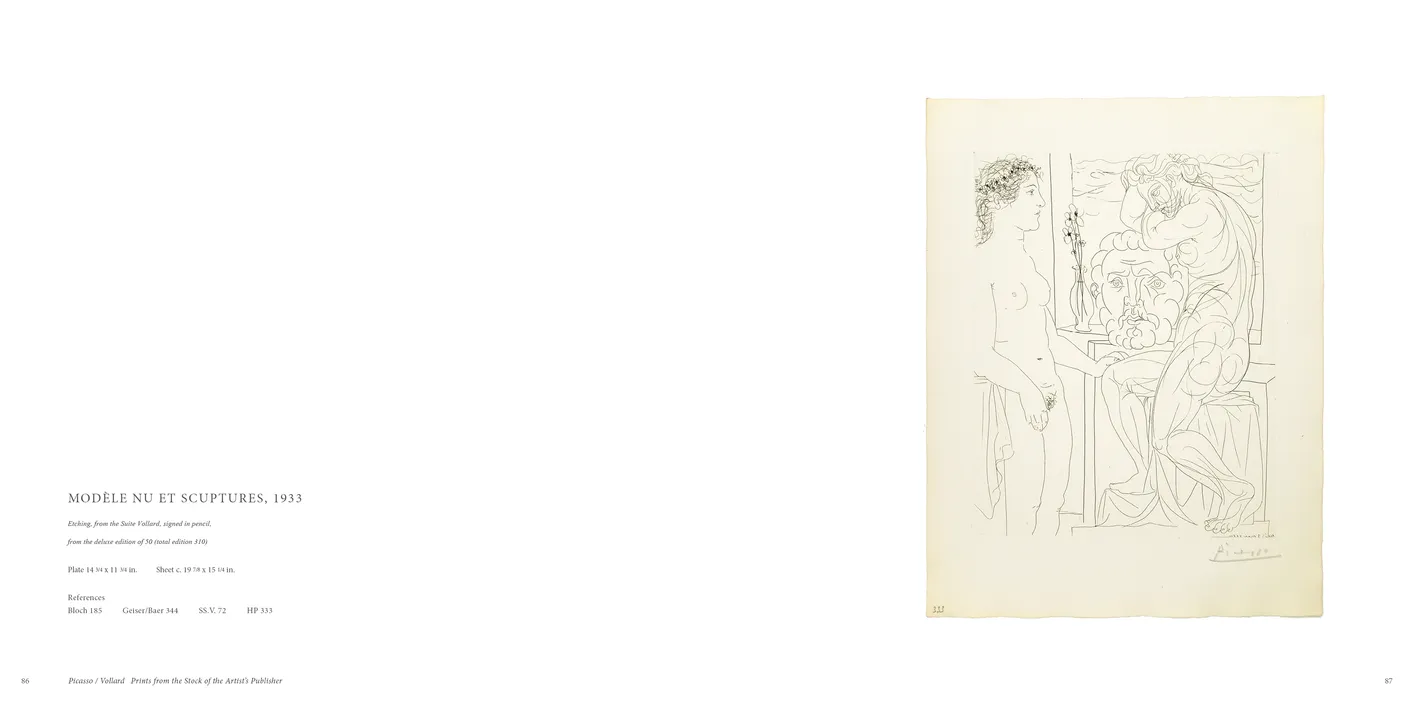
- Picasso / Vollard: Prints from the Stock of the Artist’s Publisher exhibition catalog, pages 86-87
- Client: Marc Rosen Fine Art
- Visit figure page
- Type: portfolio
- Portfolio Type: publication_design
- Portfolio Role: design_layout
Picasso Vollard: — Pages 88–89
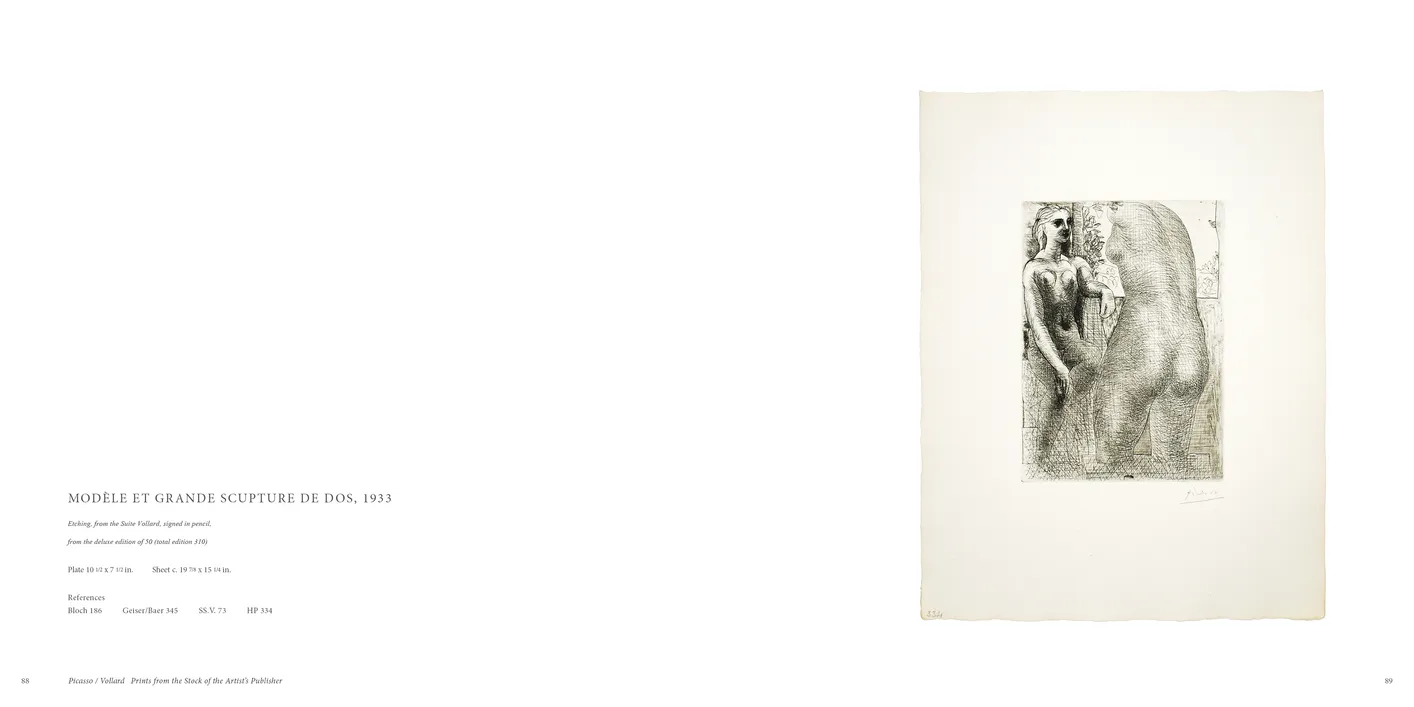
- Picasso / Vollard: Prints from the Stock of the Artist’s Publisher exhibition catalog, pages 88-89
- Client: Marc Rosen Fine Art
- Visit figure page
- Type: portfolio
- Portfolio Type: publication_design
- Portfolio Role: design_layout
Picasso Vollard: — Pages 90–91
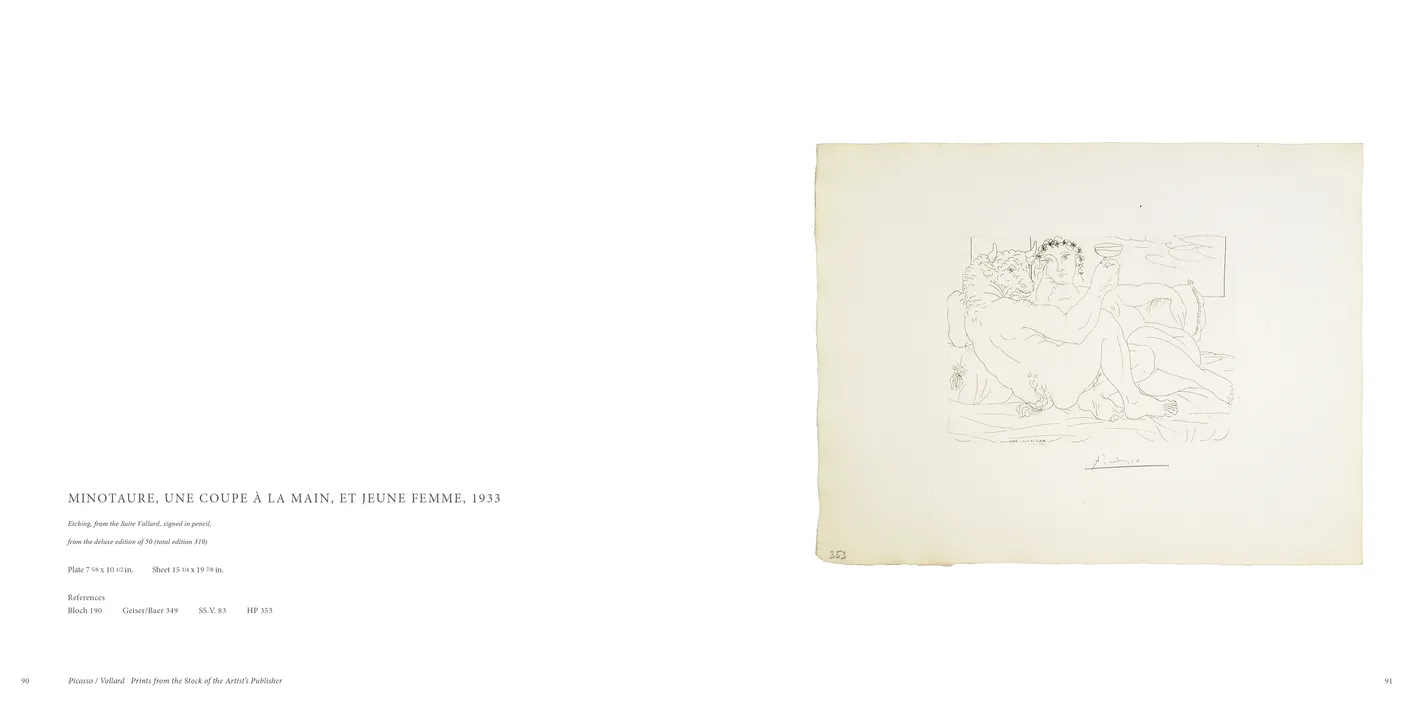
- Picasso / Vollard: Prints from the Stock of the Artist’s Publisher exhibition catalog, pages 90-91
- Client: Marc Rosen Fine Art
- Visit figure page
- Type: portfolio
- Portfolio Type: publication_design
- Portfolio Role: design_layout
Picasso Vollard: — Pages 92–93
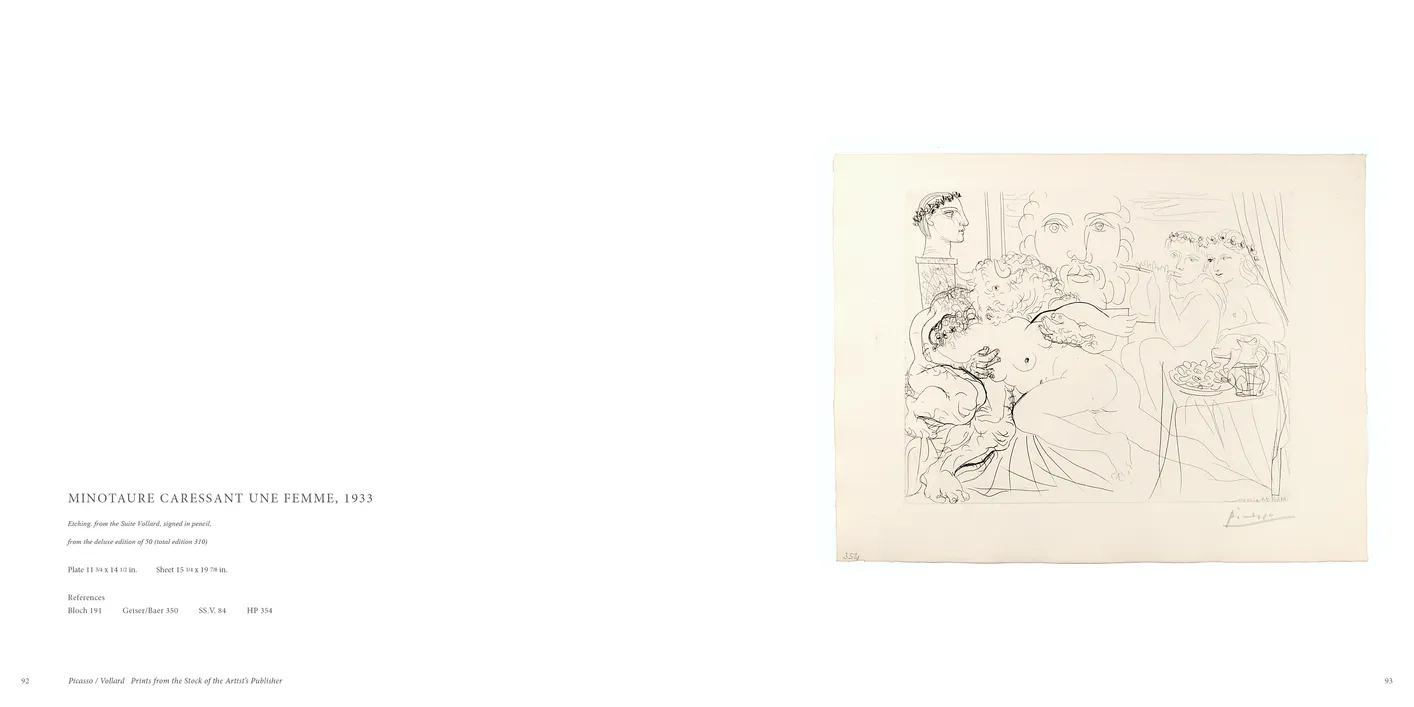
- Picasso / Vollard: Prints from the Stock of the Artist’s Publisher exhibition catalog, pages 92-93
- Client: Marc Rosen Fine Art
- Visit figure page
- Type: portfolio
- Portfolio Type: publication_design
- Portfolio Role: design_layout
Picasso Vollard: — Pages 94–95

- Picasso / Vollard: Prints from the Stock of the Artist’s Publisher exhibition catalog, pages 94-95
- Client: Marc Rosen Fine Art
- Visit figure page
- Type: portfolio
- Portfolio Type: publication_design
- Portfolio Role: design_layout
Picasso Vollard: — Pages 96–97
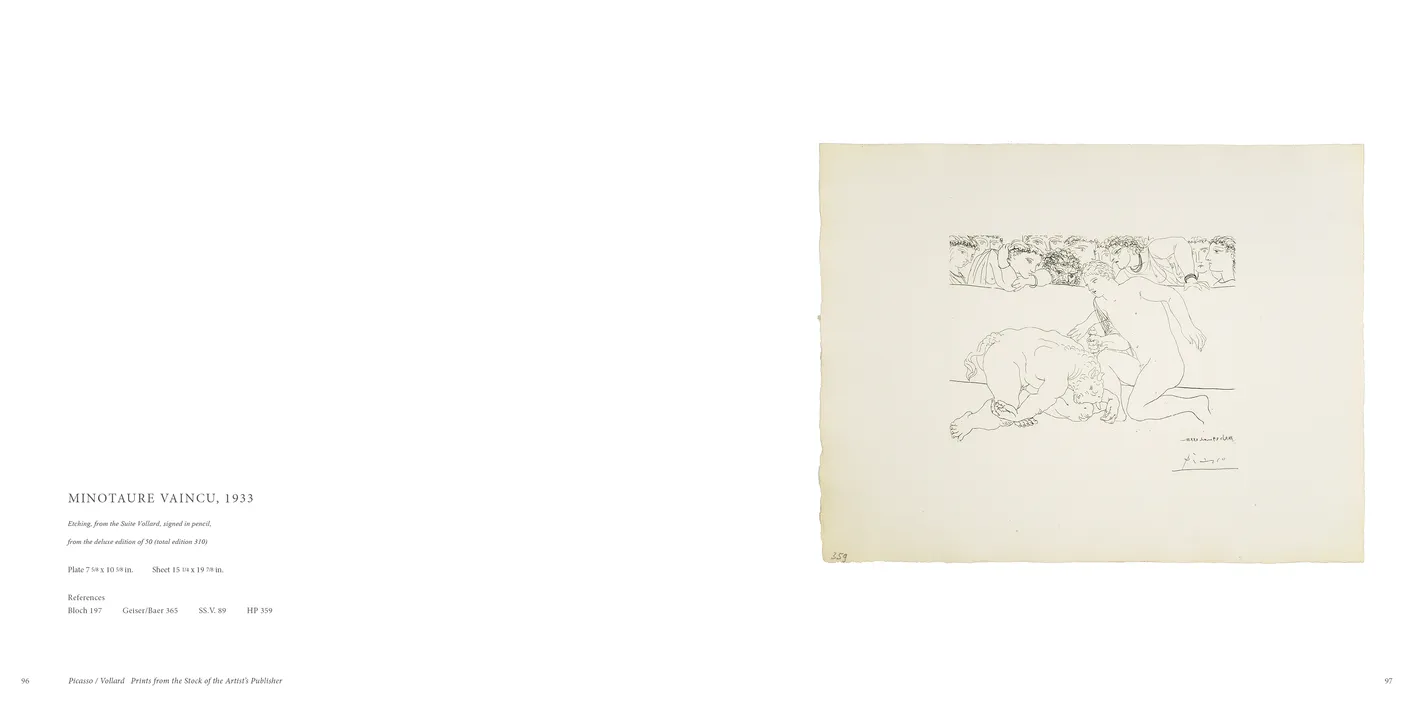
- Picasso / Vollard: Prints from the Stock of the Artist’s Publisher exhibition catalog, pages 96-97
- Client: Marc Rosen Fine Art
- Visit figure page
- Type: portfolio
- Portfolio Type: publication_design
- Portfolio Role: design_layout
Picasso Vollard: — Pages 98–99
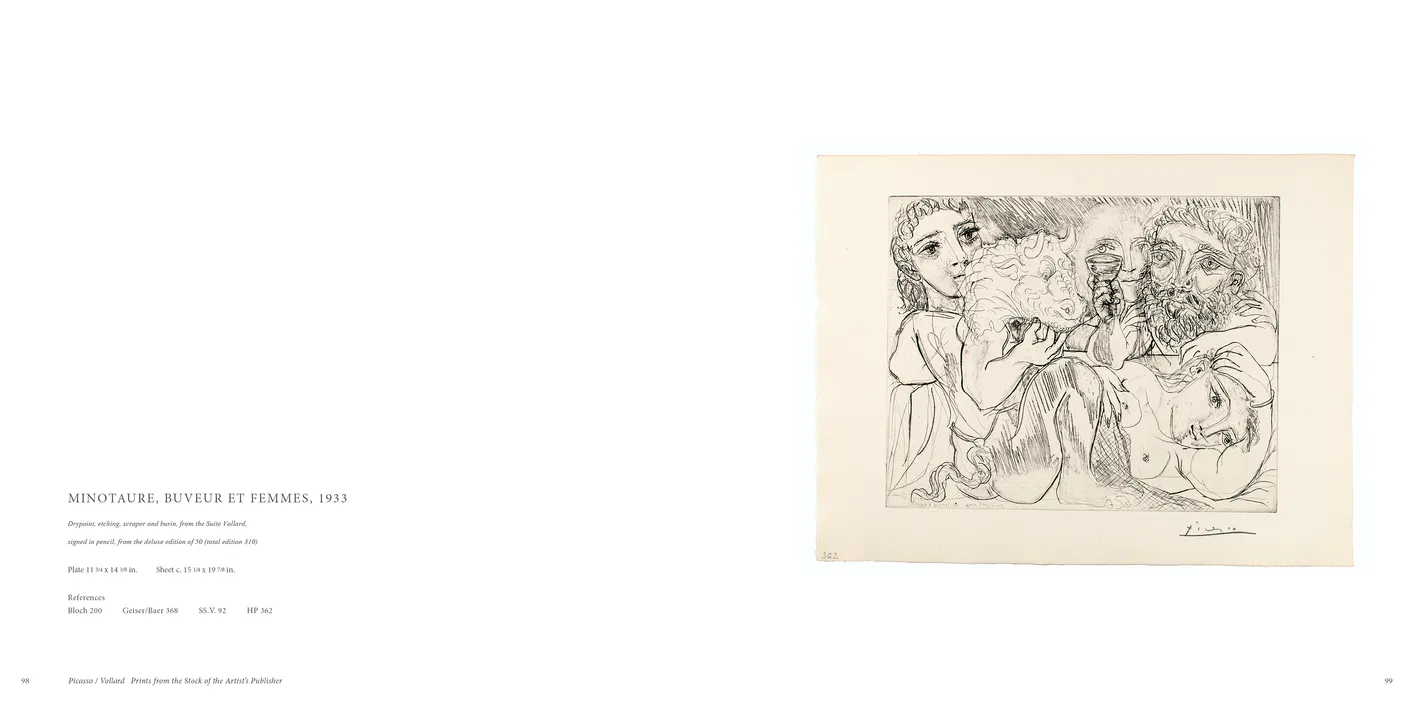
- Picasso / Vollard: Prints from the Stock of the Artist’s Publisher exhibition catalog, pages 98-99
- Client: Marc Rosen Fine Art
- Visit figure page
- Type: portfolio
- Portfolio Type: publication_design
- Portfolio Role: design_layout
Pintando Exhibition Artist Panel

- Artist panel for the Pintando: Colors of Education exhibition
- Client: Lehman College Art Gallery
- Visit figure page
- Type: portfolio
- Portfolio Type: advertising
- Portfolio Role: design_layout
Pintando Exhibition Banner
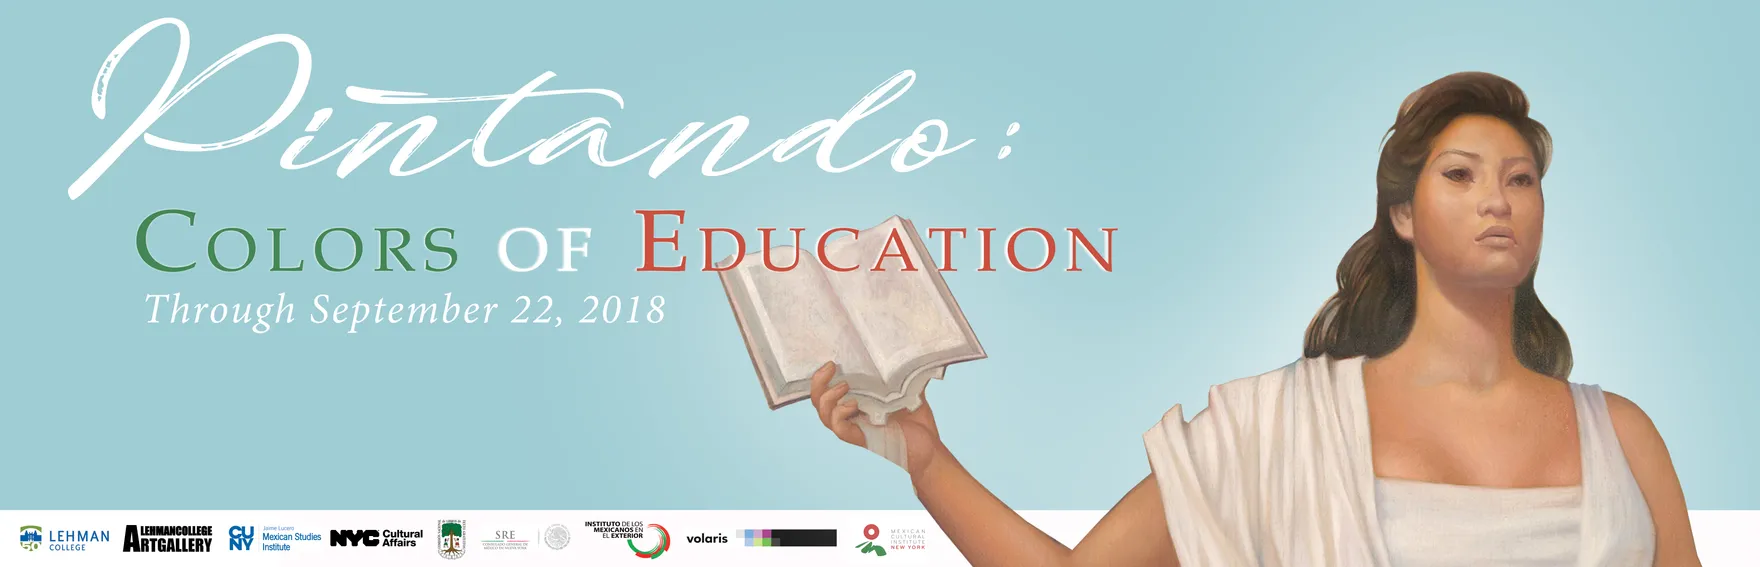
- Banner for the Pintando: Colors of Education exhibition
- Client: Lehman College Art Gallery
- Visit figure page
- Type: portfolio
- Portfolio Type: advertising
- Portfolio Role: design_layout
Pintando Exhibition Group Panel 01
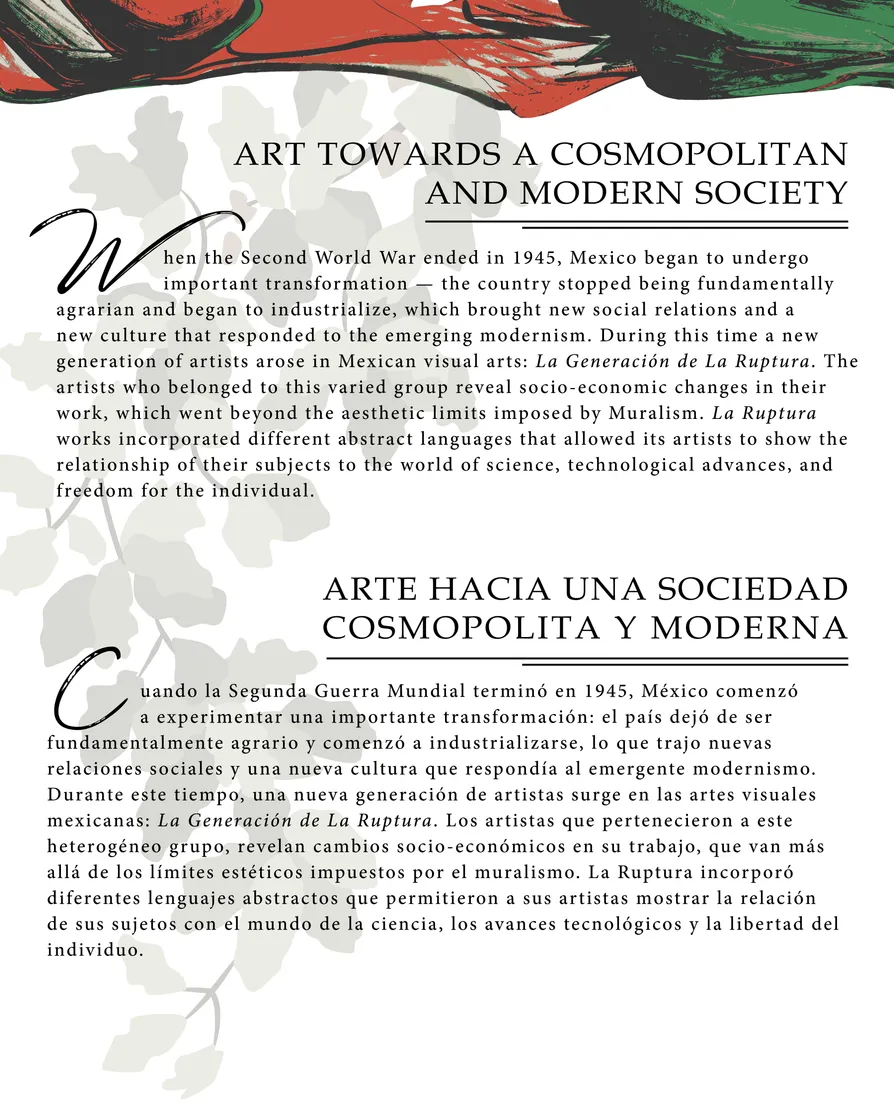
- Group panel #1 for the Pintando: Colors of Education exhibition
- Client: Lehman College Art Gallery
- Visit figure page
- Type: portfolio
- Portfolio Type: advertising
- Portfolio Role: design_layout
Pintando Exhibition Group Panel 02

- Group panel #2 for the Pintando: Colors of Education exhibition
- Client: Lehman College Art Gallery
- Visit figure page
- Type: portfolio
- Portfolio Type: advertising
- Portfolio Role: design_layout
Pintando Exhibition Group Panel 03

- Group panel #3 for the Pintando: Colors of Education exhibition
- Client: Lehman College Art Gallery
- Visit figure page
- Type: portfolio
- Portfolio Type: advertising
- Portfolio Role: design_layout
Pintando Exhibition Group Panel 04
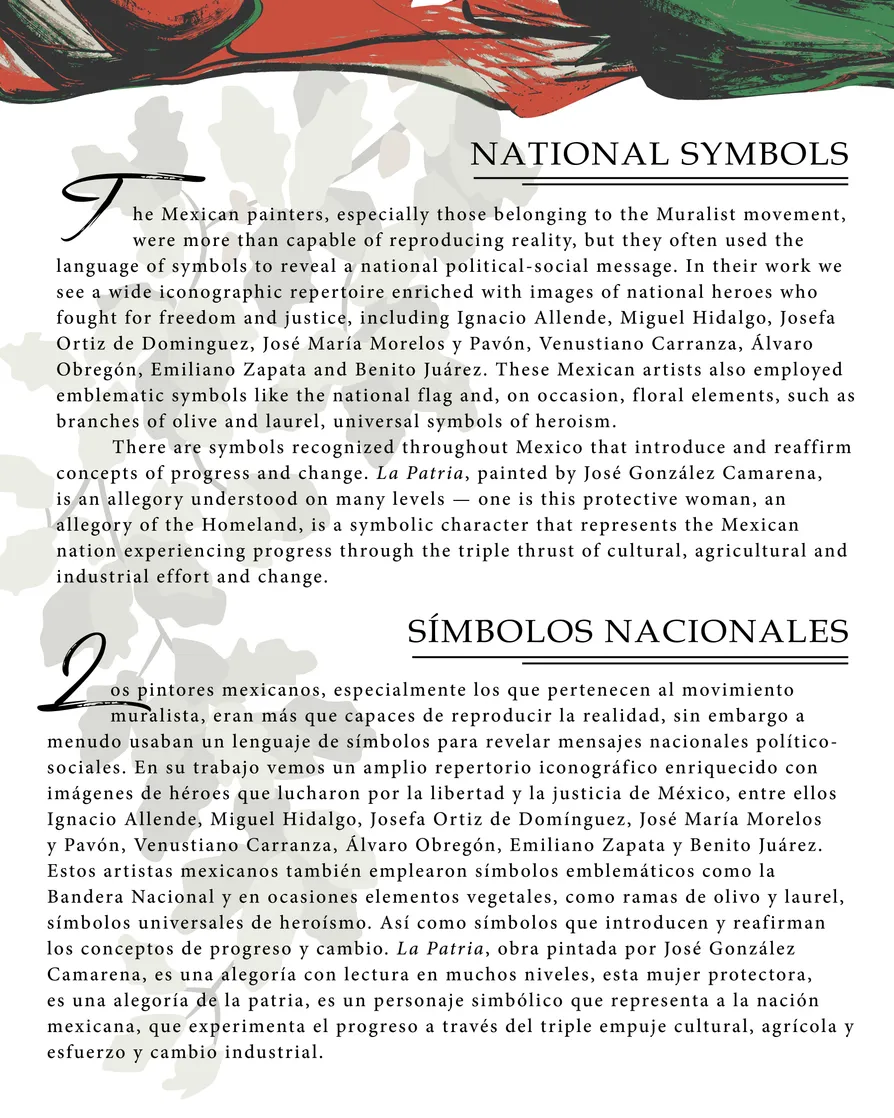
- Group panel #4 for the Pintando: Colors of Education exhibition
- Client: Lehman College Art Gallery
- Visit figure page
- Type: portfolio
- Portfolio Type: advertising
- Portfolio Role: design_layout
Pintando Exhibition Intro Panel
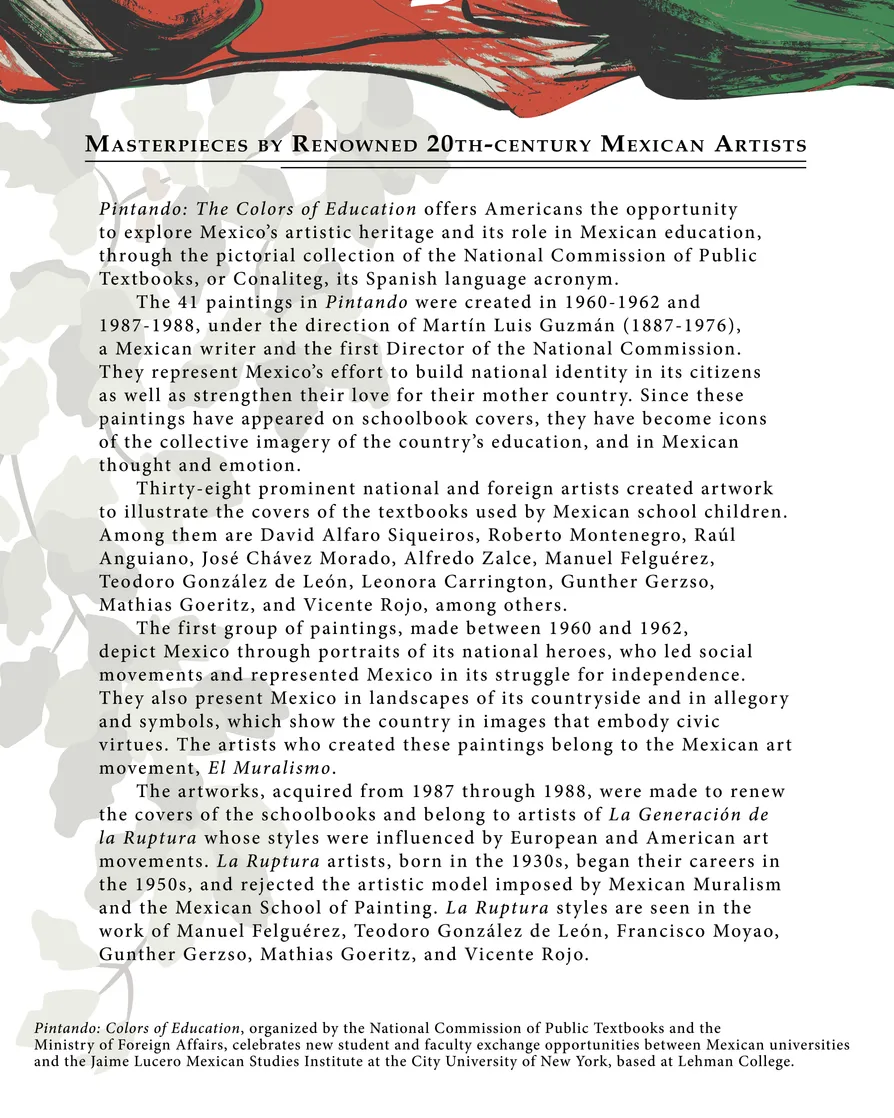
- Introduction panel (English) for the Pintando: Colors of Education exhibition
- Client: Lehman College Art Gallery
- Visit figure page
- Type: portfolio
- Portfolio Type: advertising
- Portfolio Role: design_layout
Pintando Exhibition Intro Panel Spanish

- Introduction panel (Spanish) for the Pintando: Colors of Education exhibition
- Client: Lehman College Art Gallery
- Visit figure page
- Type: portfolio
- Portfolio Type: advertising
- Portfolio Role: design_layout
Pintando Exhibition Invitation Presentation
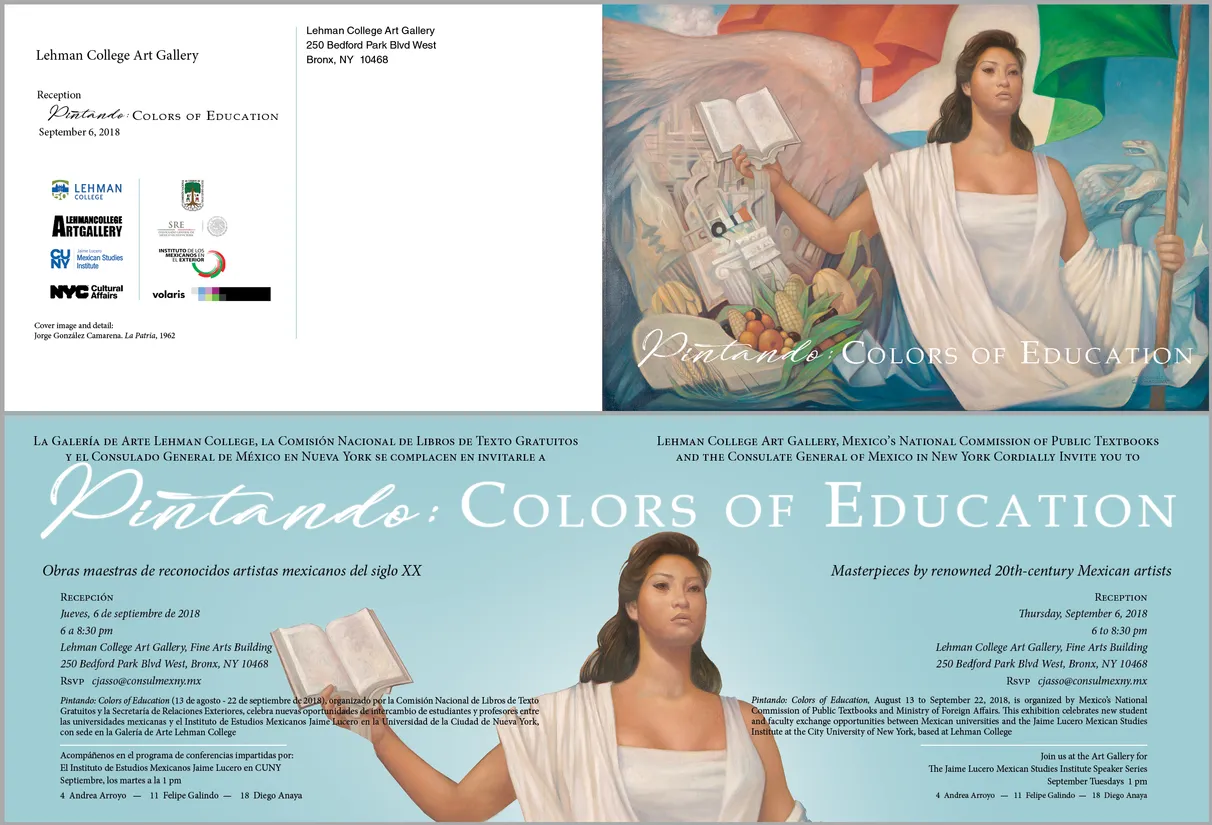
- Folding invitation for the Pintando: Colors of Education exhibition
- Client: Lehman College Art Gallery
- Visit figure page
- Type: portfolio
- Portfolio Type: advertising
- Portfolio Role: design_layout
Pintando Exhibition Poster

- Poster for the Pintando: Colors of Education exhibition
- Client: Lehman College Art Gallery
- Visit figure page
- Type: portfolio
- Portfolio Type: advertising
- Portfolio Role: design_layout
Pintando Exhibition Wordmark

- Wordmark for the Pintando: Colors of Education exhibition
- Client: Lehman College Art Gallery
- Visit figure page
- Type: portfolio
- Portfolio Type: advertising
- Portfolio Role: design_layout
Porfirio Didonna Web Chapter Iv Page
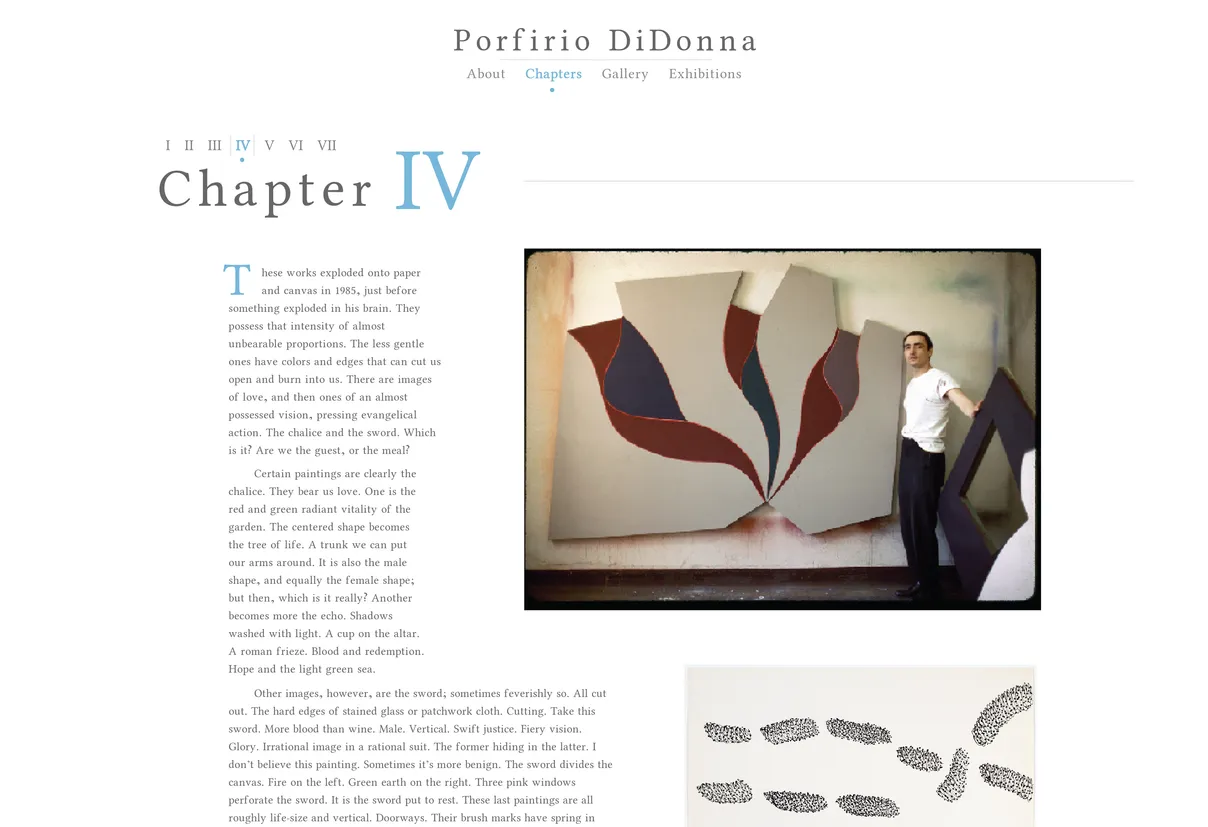
- Porfirio DiDonna Website — Chapter IV Page
- Client: Nielsen Gallery
- Visit figure page
- Type: portfolio
- Portfolio Type: advertising
- Portfolio Role: design_layout
Princess S
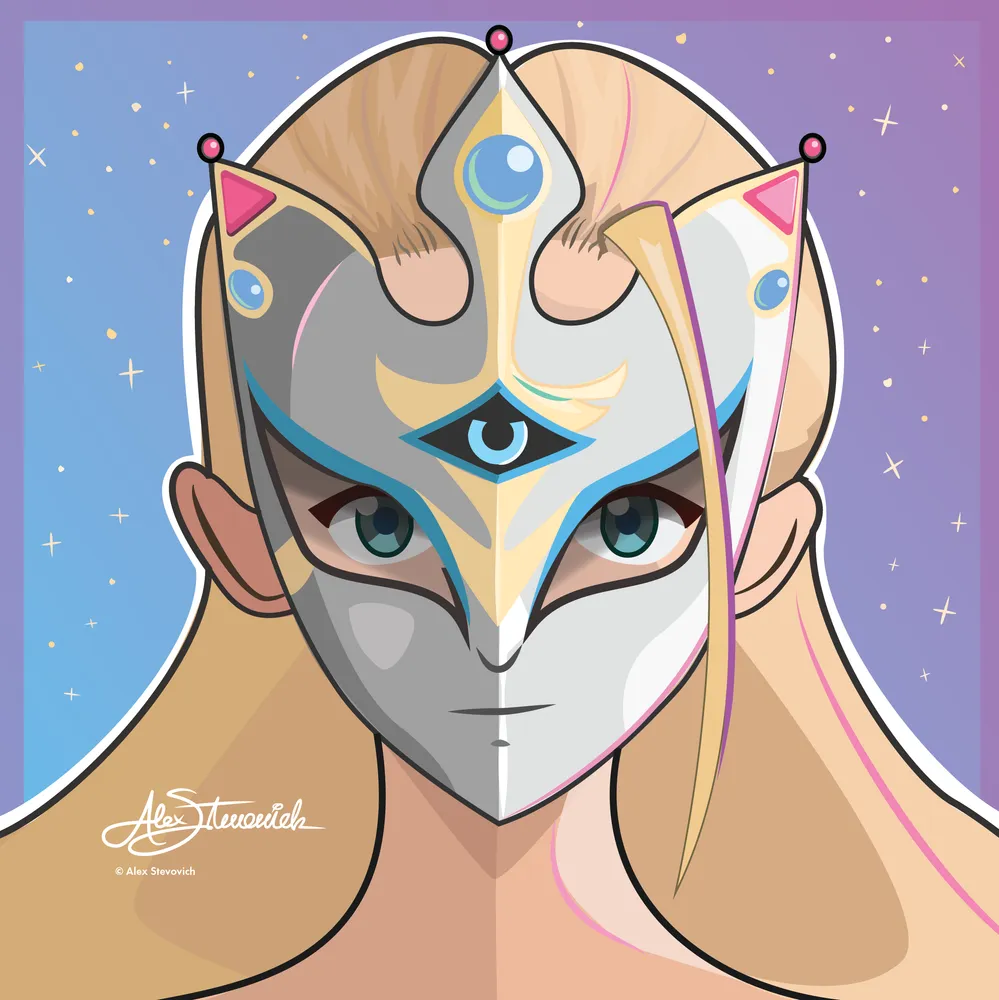
- Princess S Illustration
- Artwork by Alex Stevovich
- © Alex Stevovich
- Visit figure page
- Type: portfolio
- Portfolio Type: advertising
- Portfolio Role: design_layout
- Portfolio Original Art: true
Princess S Vector Split
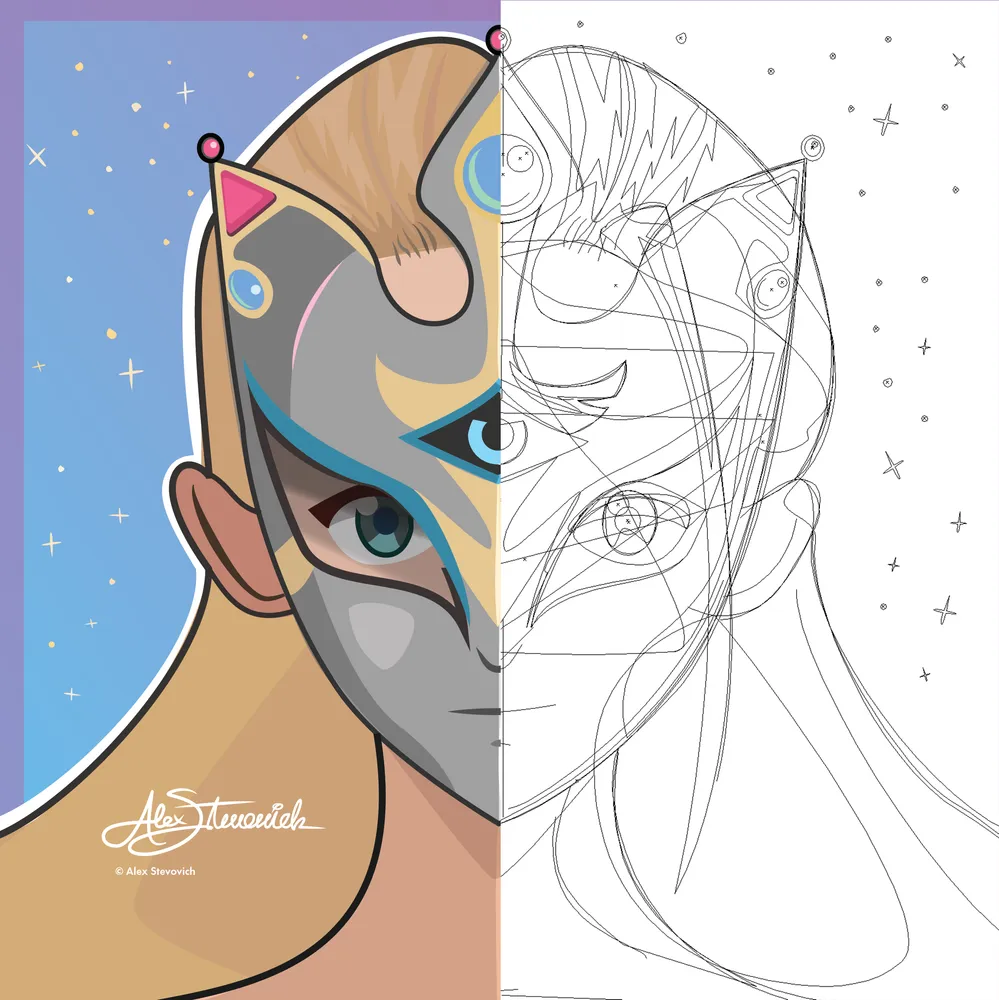
- Seo Masked Princess Illustration — Vector Artwork Split Display
- Artwork by Alex Stevovich
- © Alex Stevovich
- Visit figure page
- Type: portfolio
- Portfolio Type: advertising
- Portfolio Role: design_layout
- Portfolio Original Art: true
Promoting The President Exhibition Intro Panel
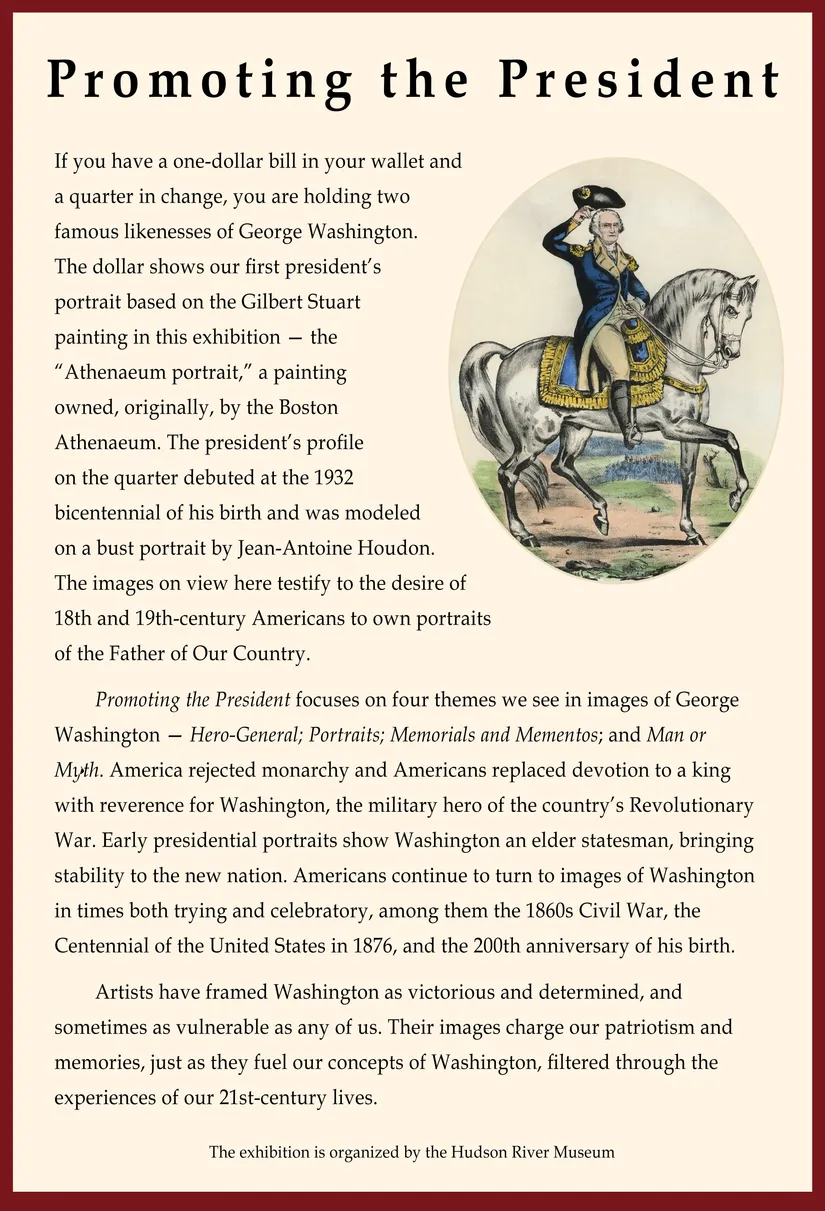
- Introduction wall panel for the Promoting the President exhibition
- Client: Hudson River Museum
- Visit figure page
- Type: portfolio
- Portfolio Type: advertising
- Portfolio Role: design_layout
Promoting The President Mta Poster

- Promoting the President MTA promotional poster
- Client: Hudson River Museum
- Visit figure page
- Type: portfolio
- Portfolio Type: advertising
- Portfolio Role: design_layout
Roserundin Brand Brandmark

- Roserundin brandmark
- Client: Roserundin
- Visit figure page
- Type: portfolio
- Portfolio Type: advertising
- Portfolio Role: design_layout
Roserundin Web Home Page
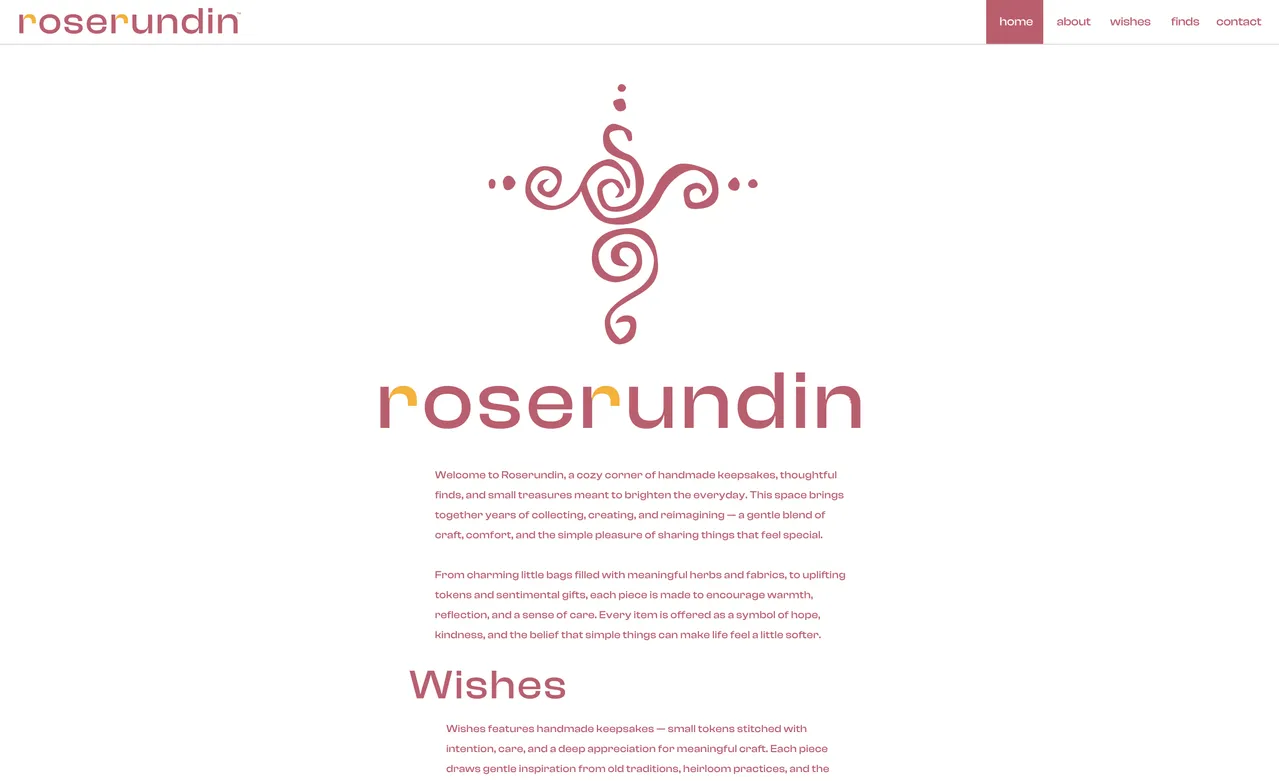
- Roserundin Website — Home Page
- Client: Roserundin
- Visit figure page
- Type: portfolio
- Portfolio Type: advertising
- Portfolio Role: design_layout
Shrouded Logic Emblem

- Shrouded Logic emblem
- Client: Kingdom of Flowers
- Visit figure page
- Type: portfolio
- Portfolio Type: advertising
- Portfolio Role: design_layout
Simches And Company Brand Identity

- Simches and Company brand identiy
- Client: Simches and Company
- Visit figure page
- Type: portfolio
- Portfolio Type: advertising
- Portfolio Role: design_layout
Simches And Company Brand Monogram

- Simches and Company brand monogram
- Client: Simches and Company
- Visit figure page
- Type: portfolio
- Portfolio Type: advertising
- Portfolio Role: design_layout
Simches And Company Web Home Page

- Simches and Company — Home Page
- Client: Simches and Company
- Visit figure page
- Type: portfolio
- Portfolio Type: advertising
- Portfolio Role: design_layout
South Florida Property Group Brand Identity

- South Florida Property Group brand identity
- Client: South Florida Property Group
- Visit figure page
- Type: portfolio
- Portfolio Type: advertising
- Portfolio Role: design_layout
Stag Beetle Sigil
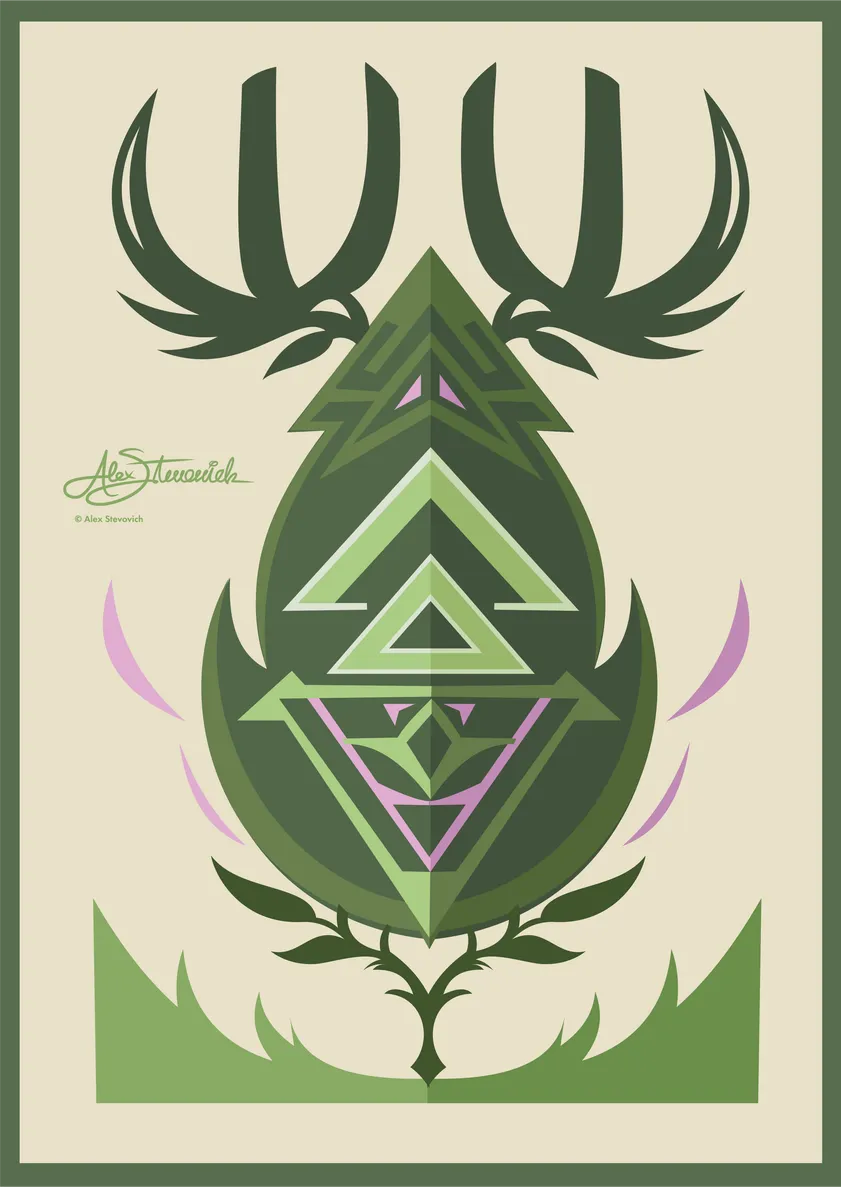
- Stag Beetle sigil
- Artwork by Alex Stevovich
- © Alex Stevovich
- Visit figure page
- Type: portfolio
- Portfolio Type: advertising
- Portfolio Role: design_layout
- Portfolio Original Art: true
Staten Island: Seen — Cover
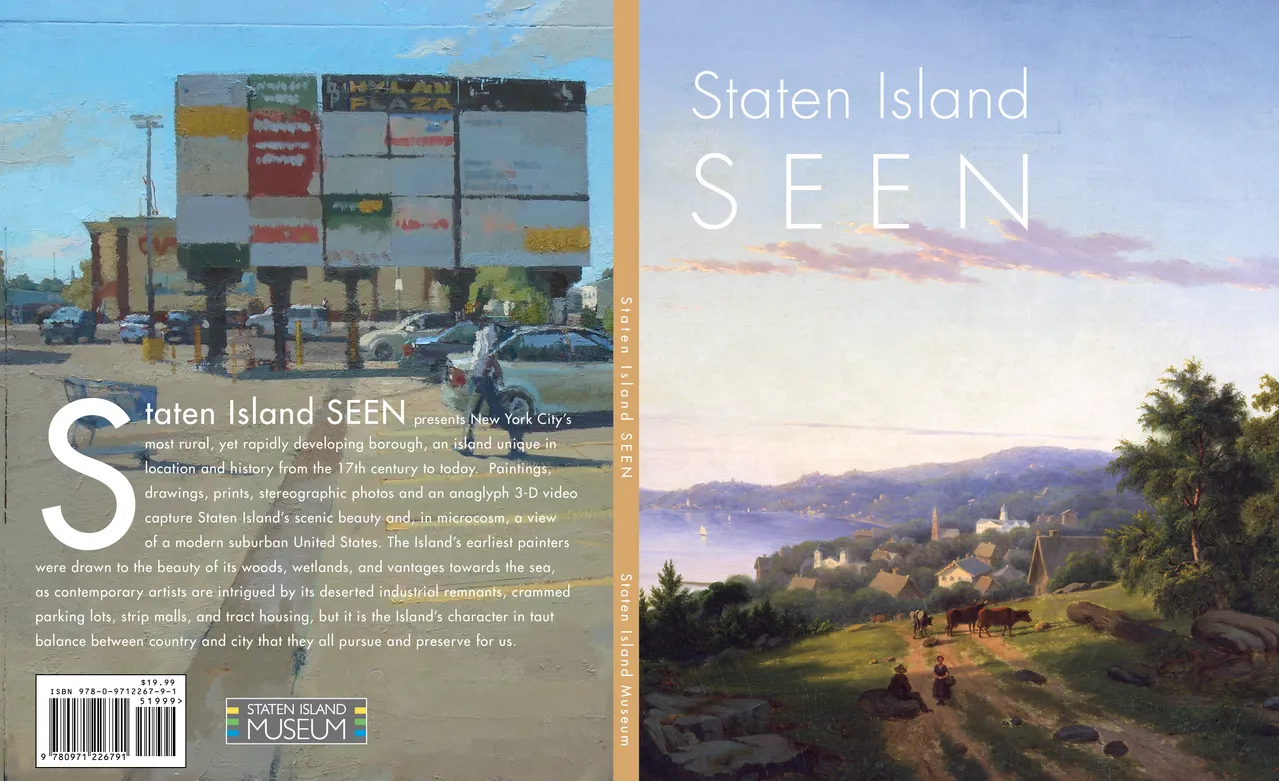
- Staten Island SEEN exhibition catalog, cover
- Client: Staten Island Museum
- Visit figure page
- Type: portfolio
- Portfolio Type: publication_design
- Portfolio Role: design_layout
Staten Island: Seen — Inside Front Cover

- Staten Island SEEN exhibition catalog, inside front cover
- Client: Staten Island Museum
- Visit figure page
- Type: portfolio
- Portfolio Type: publication_design
- Portfolio Role: design_layout
Staten Island: Seen — Pages 10–11
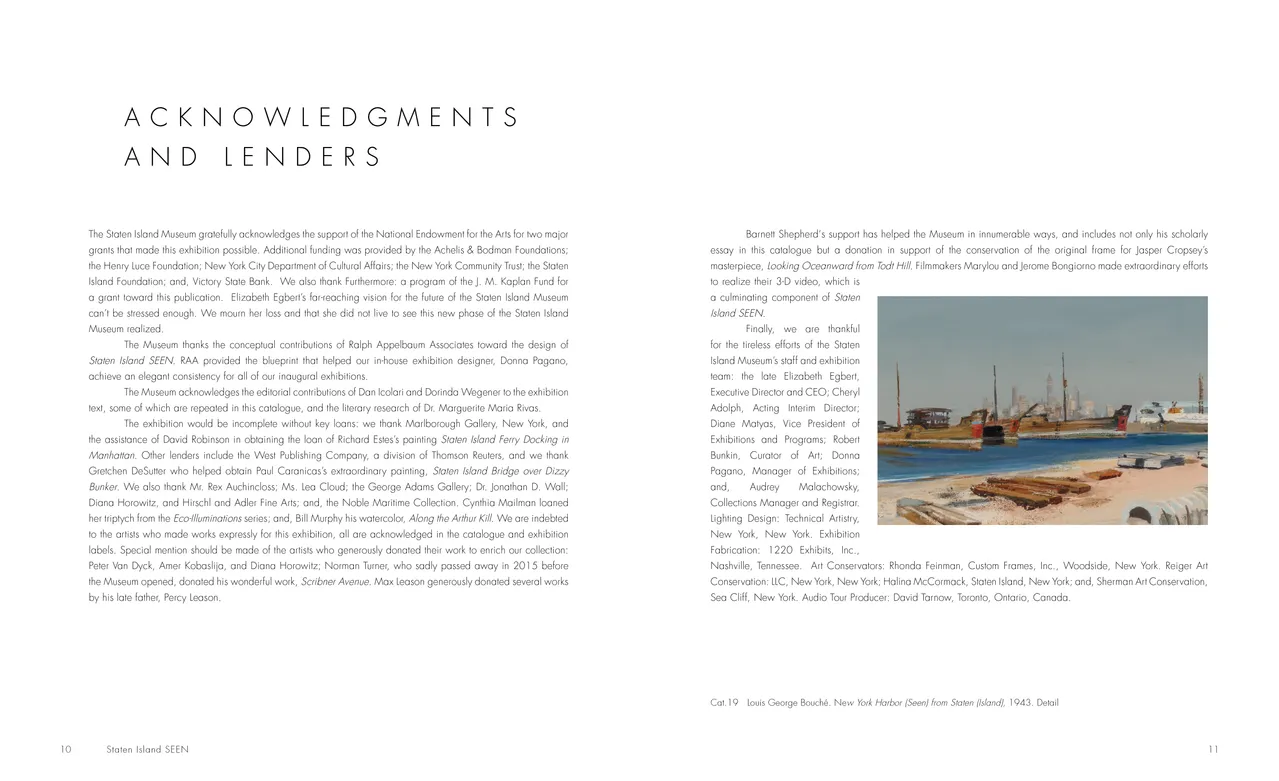
- Staten Island SEEN exhibition catalog, pages 10-11
- Client: Staten Island Museum
- Visit figure page
- Type: portfolio
- Portfolio Type: publication_design
- Portfolio Role: design_layout
Staten Island: Seen — Pages 100–101
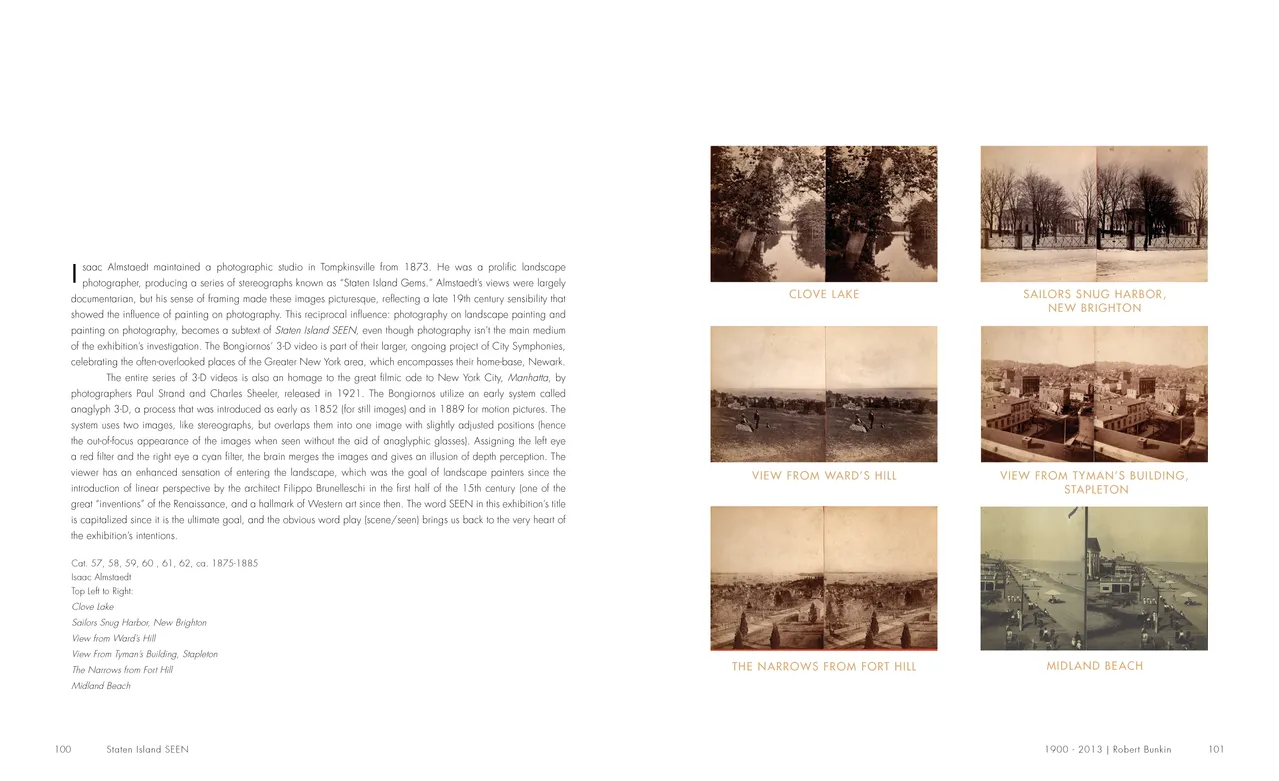
- Staten Island SEEN exhibition catalog, pages 100-101
- Client: Staten Island Museum
- Visit figure page
- Type: portfolio
- Portfolio Type: publication_design
- Portfolio Role: design_layout
Staten Island: Seen — Pages 102–103
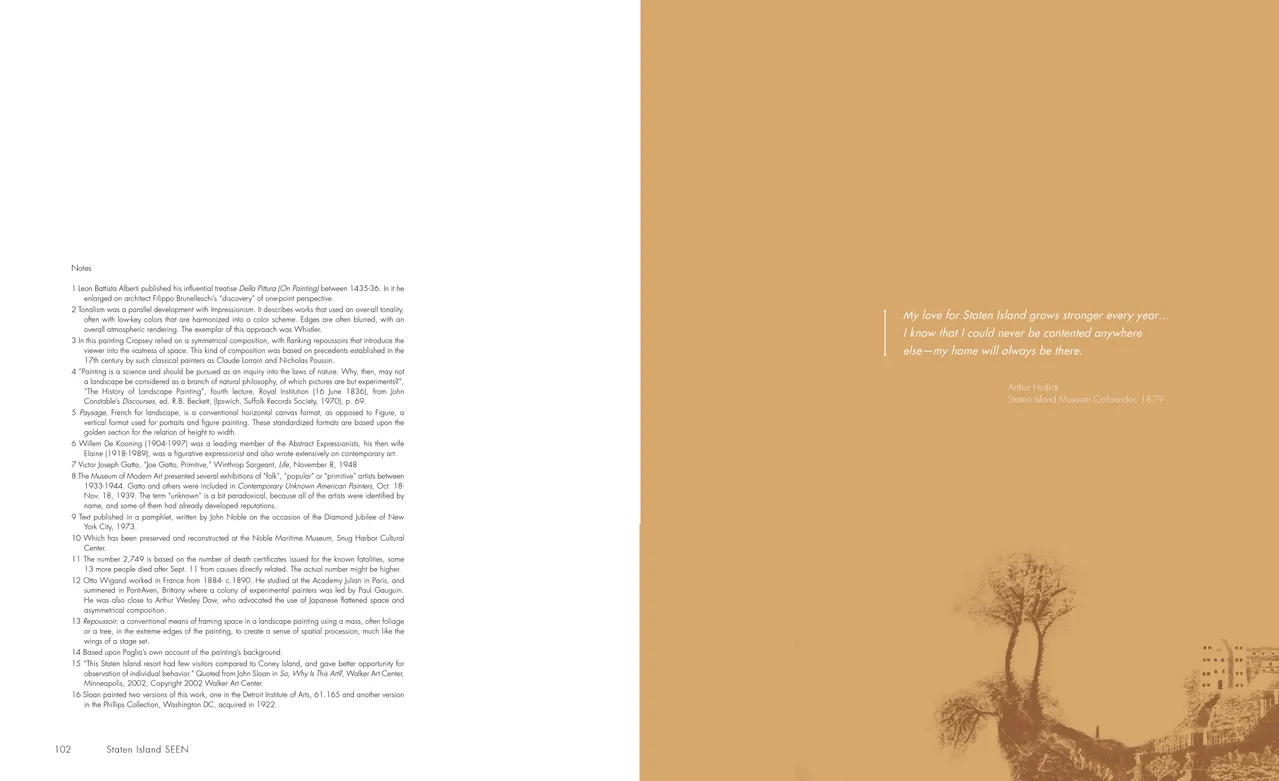
- Staten Island SEEN exhibition catalog, pages 102-103
- Client: Staten Island Museum
- Visit figure page
- Type: portfolio
- Portfolio Type: publication_design
- Portfolio Role: design_layout
Staten Island: Seen — Pages 104–105
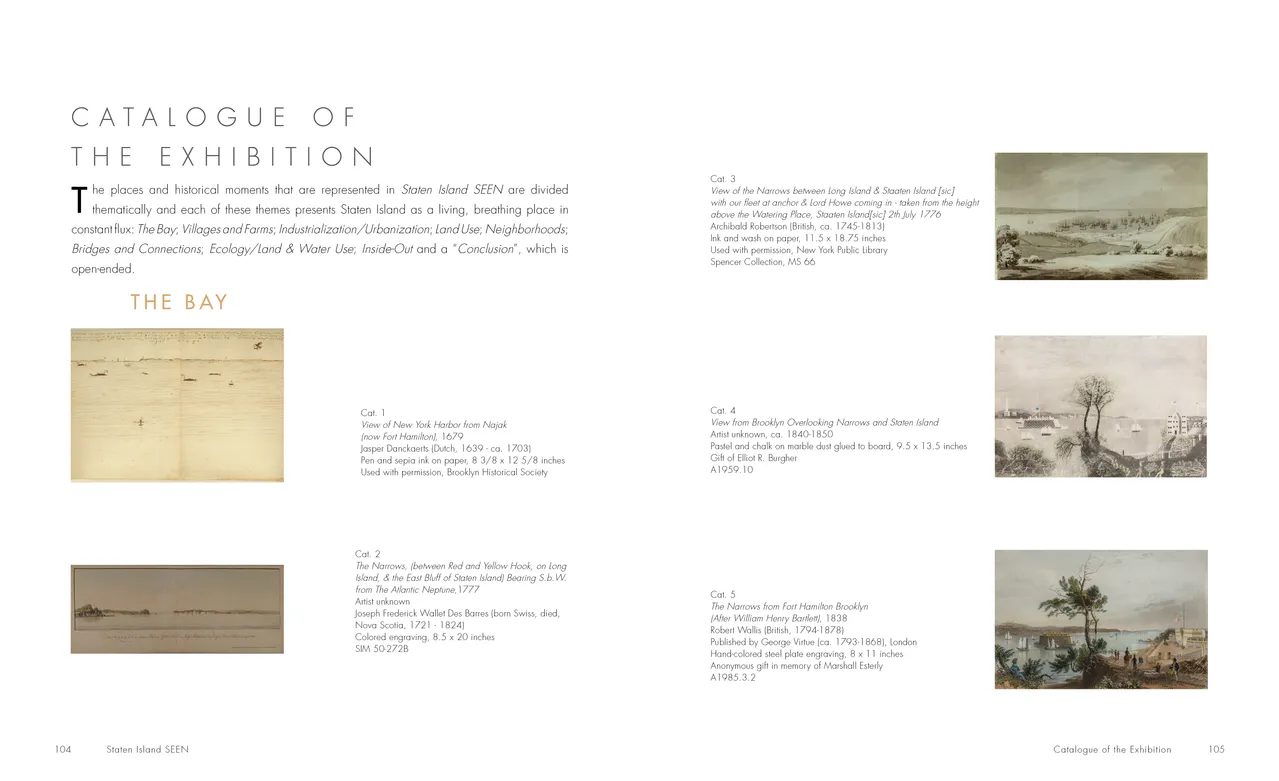
- Staten Island SEEN exhibition catalog, pages 104-105
- Client: Staten Island Museum
- Visit figure page
- Type: portfolio
- Portfolio Type: publication_design
- Portfolio Role: design_layout
Staten Island: Seen — Pages 106–107
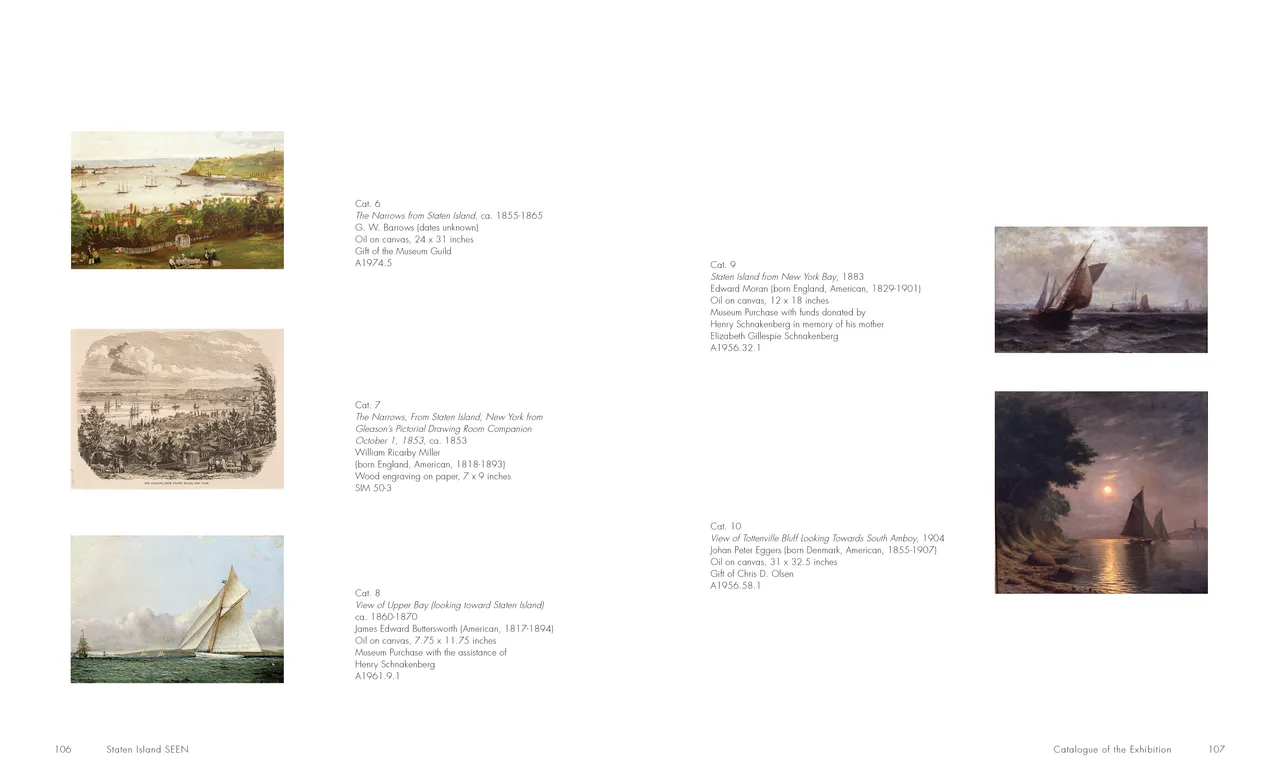
- Staten Island SEEN exhibition catalog, pages 106-107
- Client: Staten Island Museum
- Visit figure page
- Type: portfolio
- Portfolio Type: publication_design
- Portfolio Role: design_layout
Staten Island: Seen — Pages 108–109
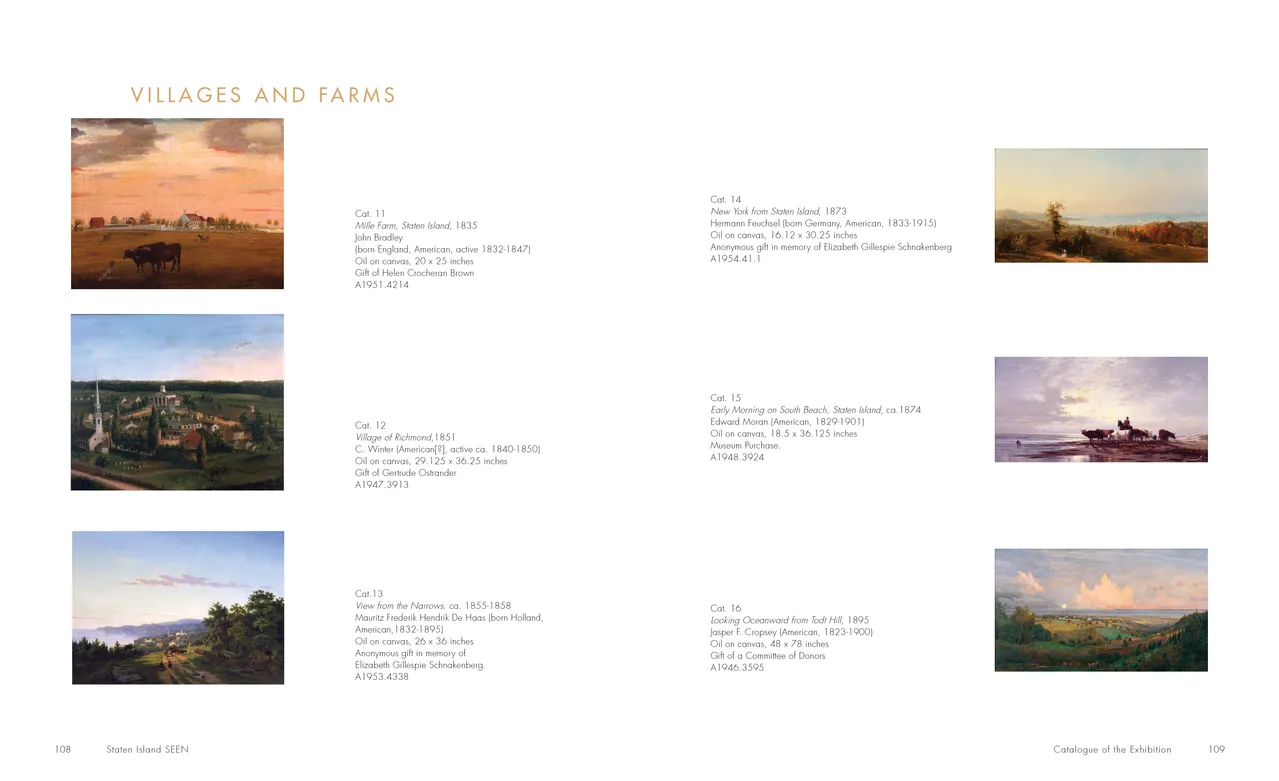
- Staten Island SEEN exhibition catalog, pages 108-109
- Client: Staten Island Museum
- Visit figure page
- Type: portfolio
- Portfolio Type: publication_design
- Portfolio Role: design_layout
Staten Island: Seen — Pages 110–111
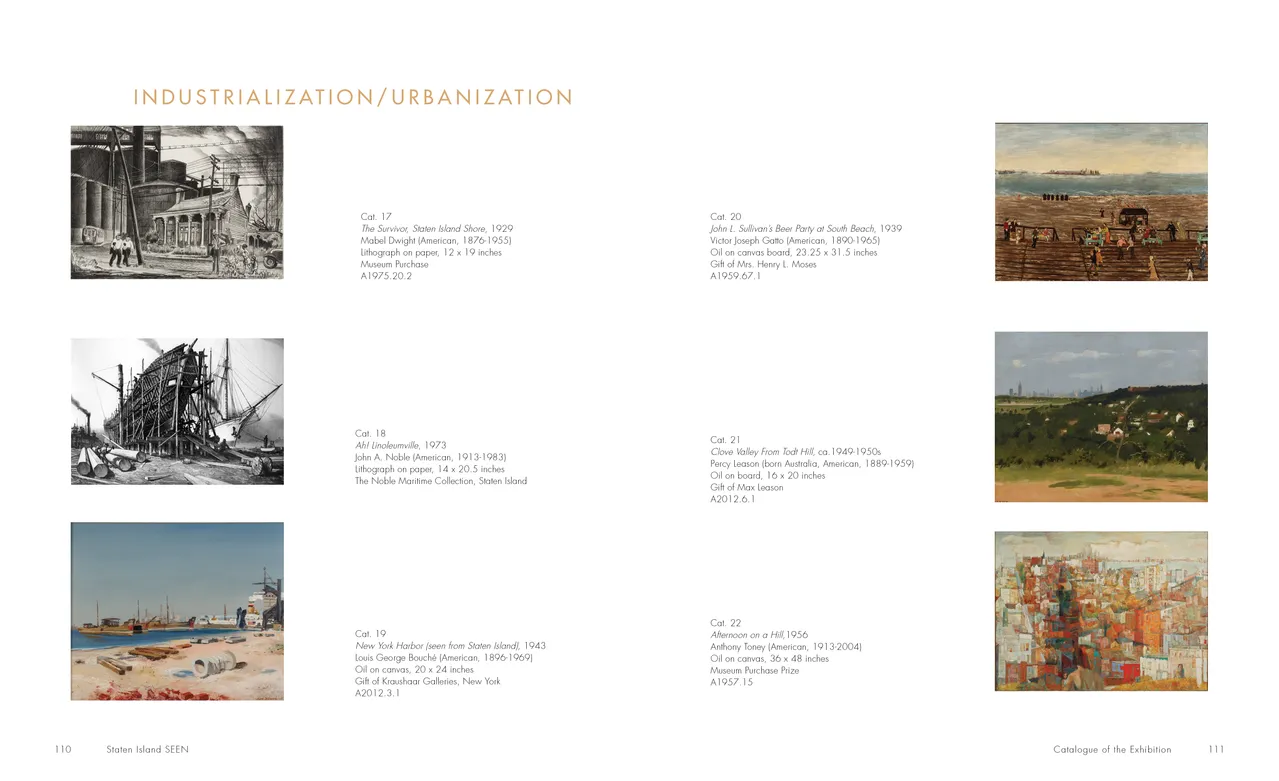
- Staten Island SEEN exhibition catalog, pages 110-111
- Client: Staten Island Museum
- Visit figure page
- Type: portfolio
- Portfolio Type: publication_design
- Portfolio Role: design_layout
Staten Island: Seen — Pages 112–113
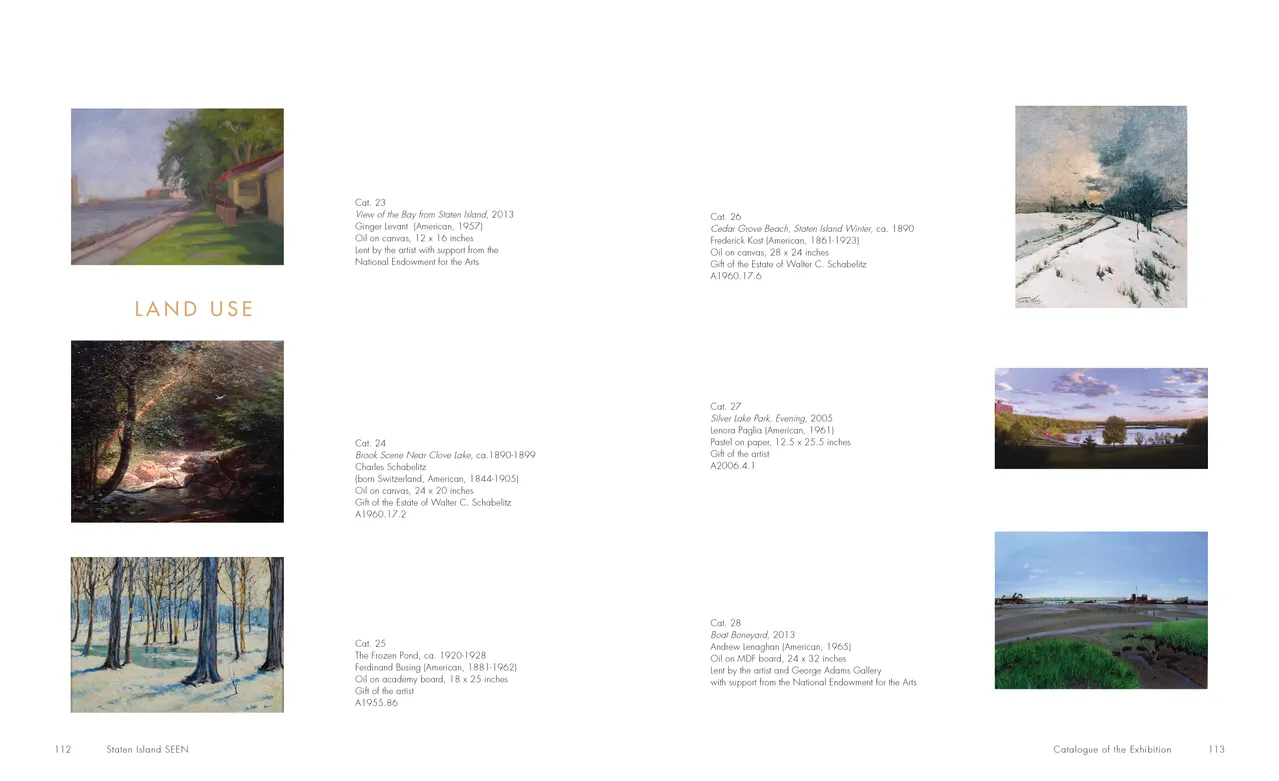
- Staten Island SEEN exhibition catalog, pages 112-113
- Client: Staten Island Museum
- Visit figure page
- Type: portfolio
- Portfolio Type: publication_design
- Portfolio Role: design_layout
Staten Island: Seen — Pages 114–115
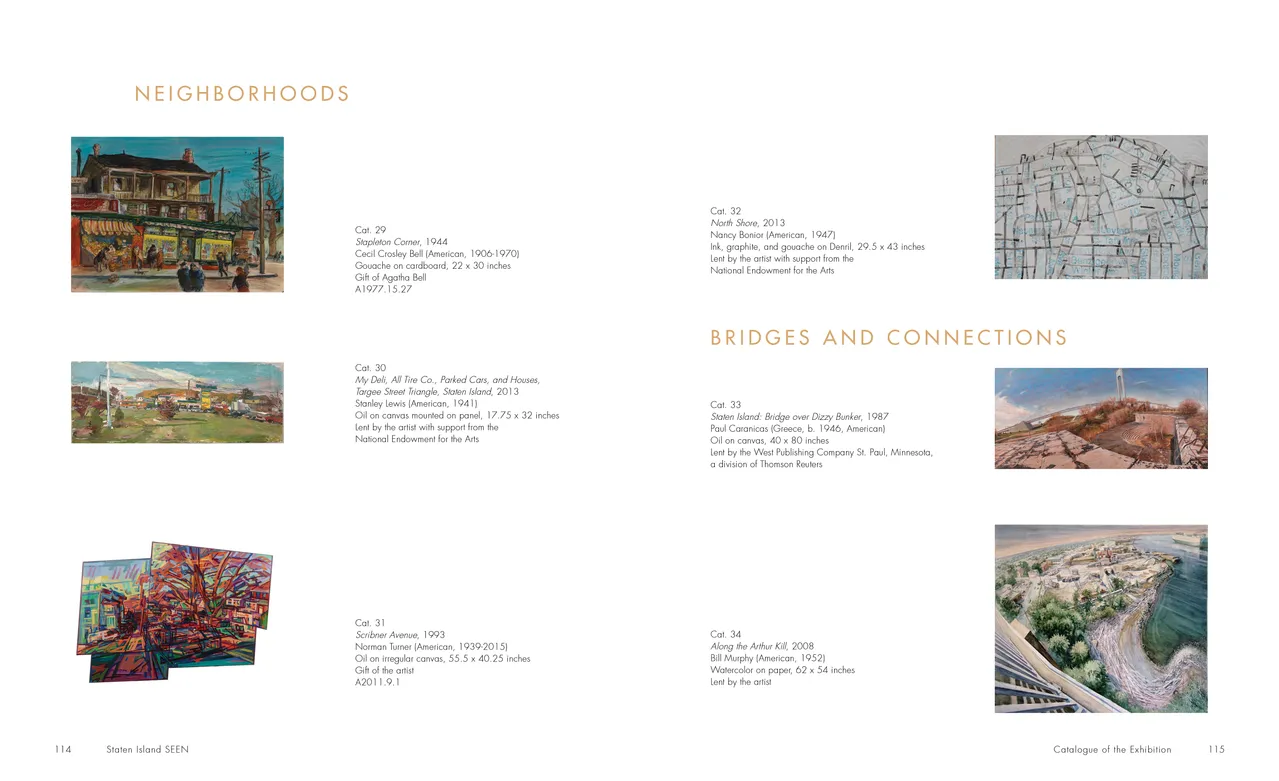
- Staten Island SEEN exhibition catalog, pages 114-115
- Client: Staten Island Museum
- Visit figure page
- Type: portfolio
- Portfolio Type: publication_design
- Portfolio Role: design_layout
Staten Island: Seen — Pages 116–117
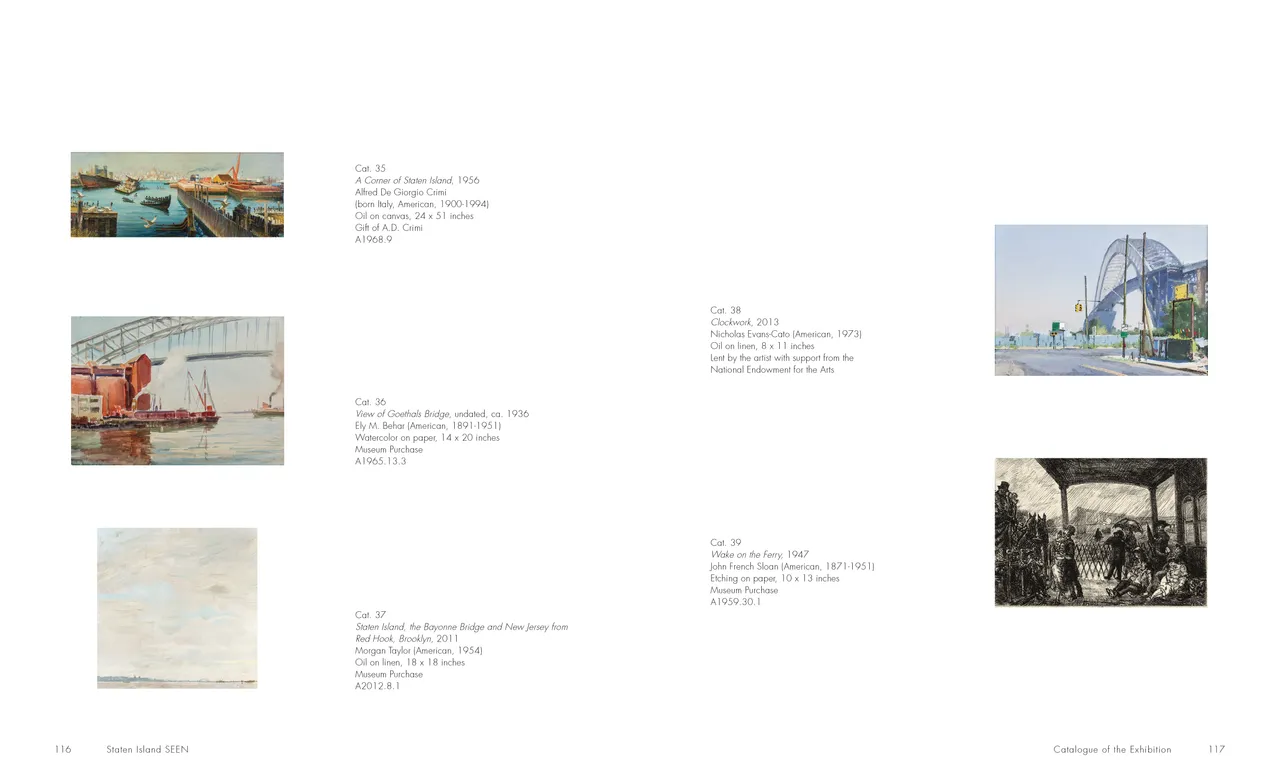
- Staten Island SEEN exhibition catalog, pages 116-117
- Client: Staten Island Museum
- Visit figure page
- Type: portfolio
- Portfolio Type: publication_design
- Portfolio Role: design_layout
Staten Island: Seen — Pages 118–119
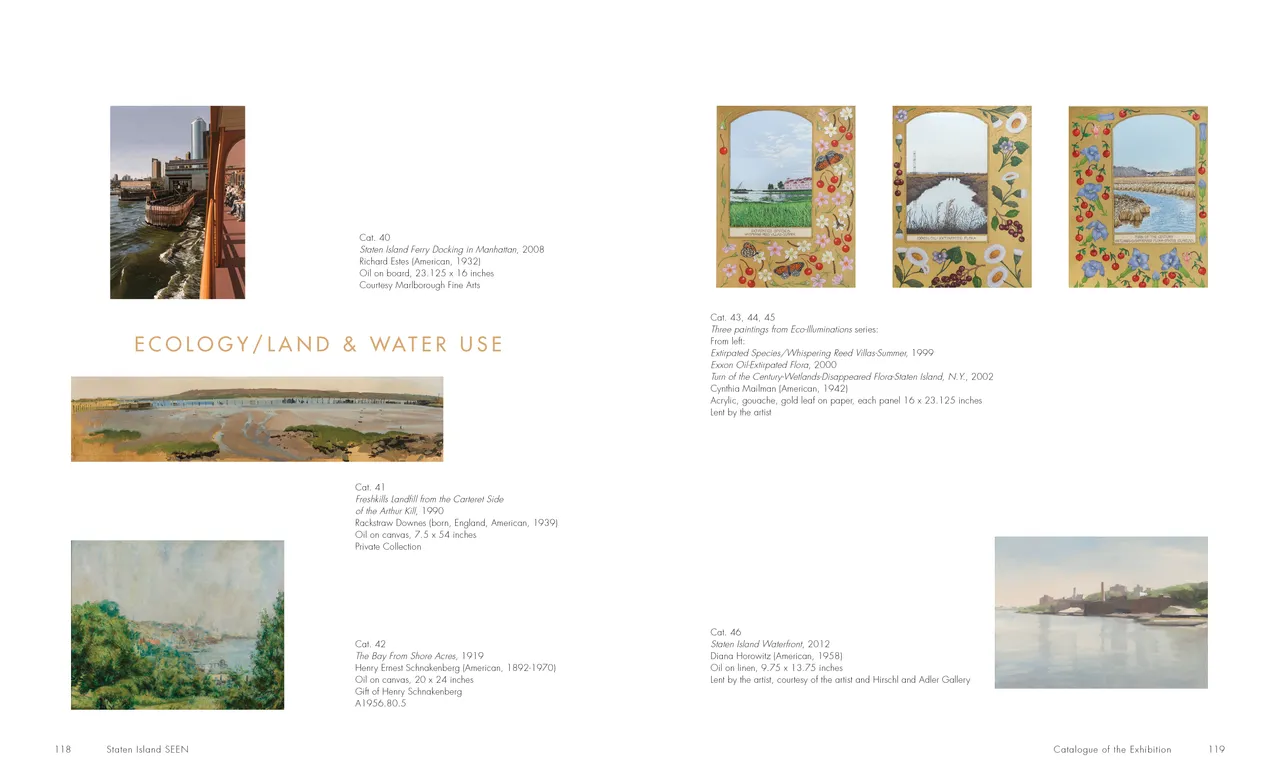
- Staten Island SEEN exhibition catalog, pages 118-119
- Client: Staten Island Museum
- Visit figure page
- Type: portfolio
- Portfolio Type: publication_design
- Portfolio Role: design_layout
Staten Island: Seen — Pages 12–13
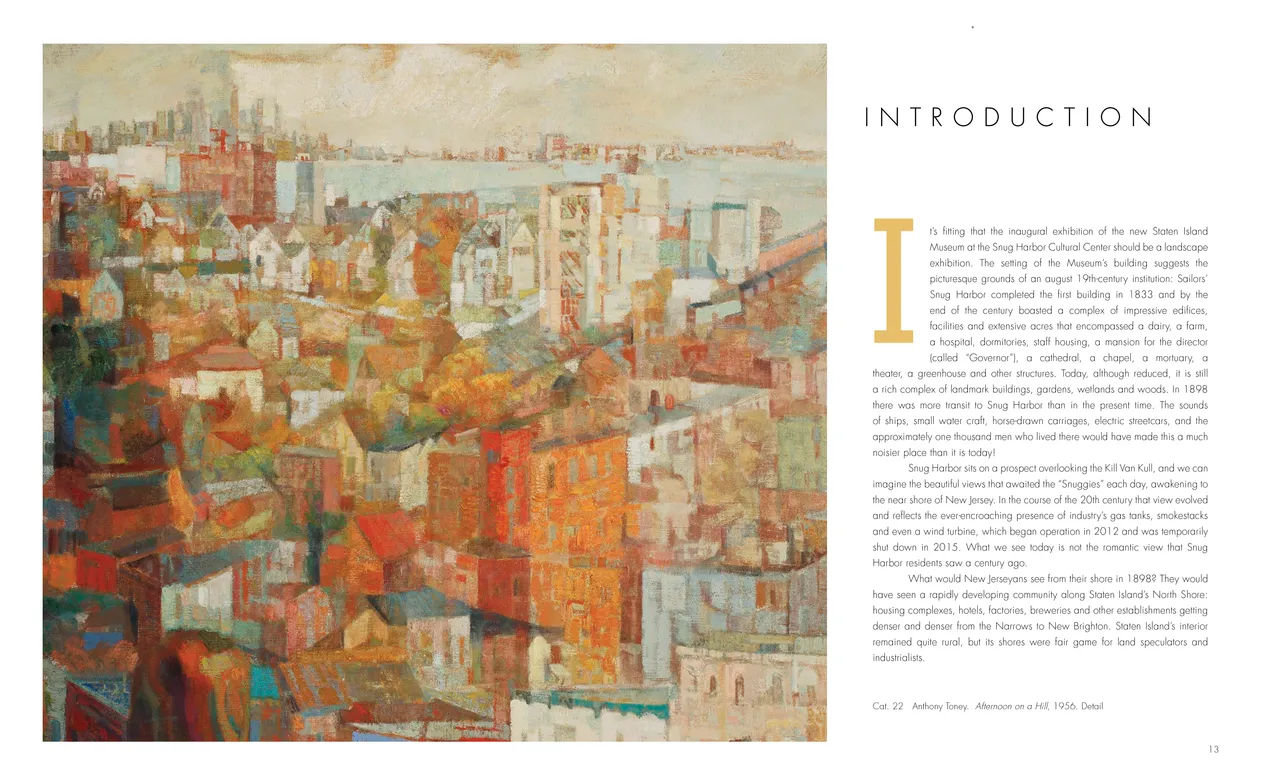
- Staten Island SEEN exhibition catalog, pages 12-13
- Client: Staten Island Museum
- Visit figure page
- Type: portfolio
- Portfolio Type: publication_design
- Portfolio Role: design_layout
Staten Island: Seen — Pages 120–121
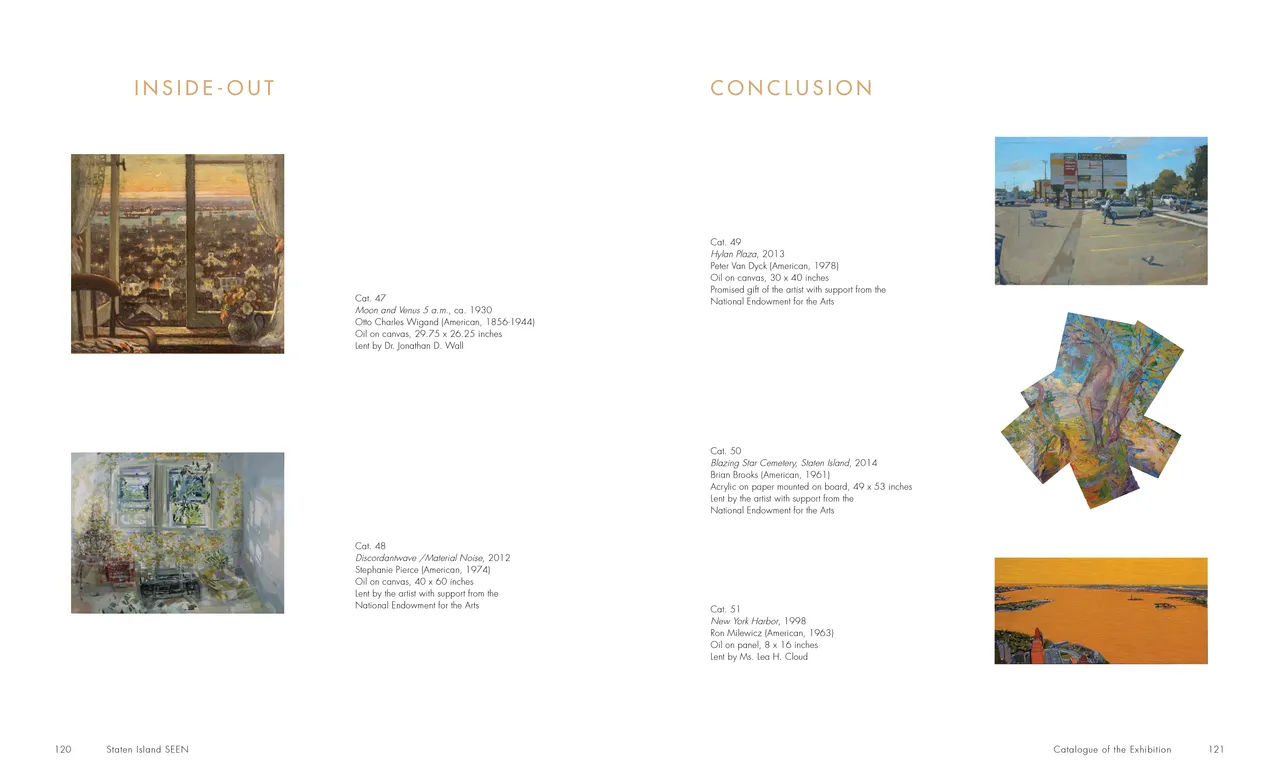
- Staten Island SEEN exhibition catalog, pages 120-121
- Client: Staten Island Museum
- Visit figure page
- Type: portfolio
- Portfolio Type: publication_design
- Portfolio Role: design_layout
Staten Island: Seen — Pages 122–123
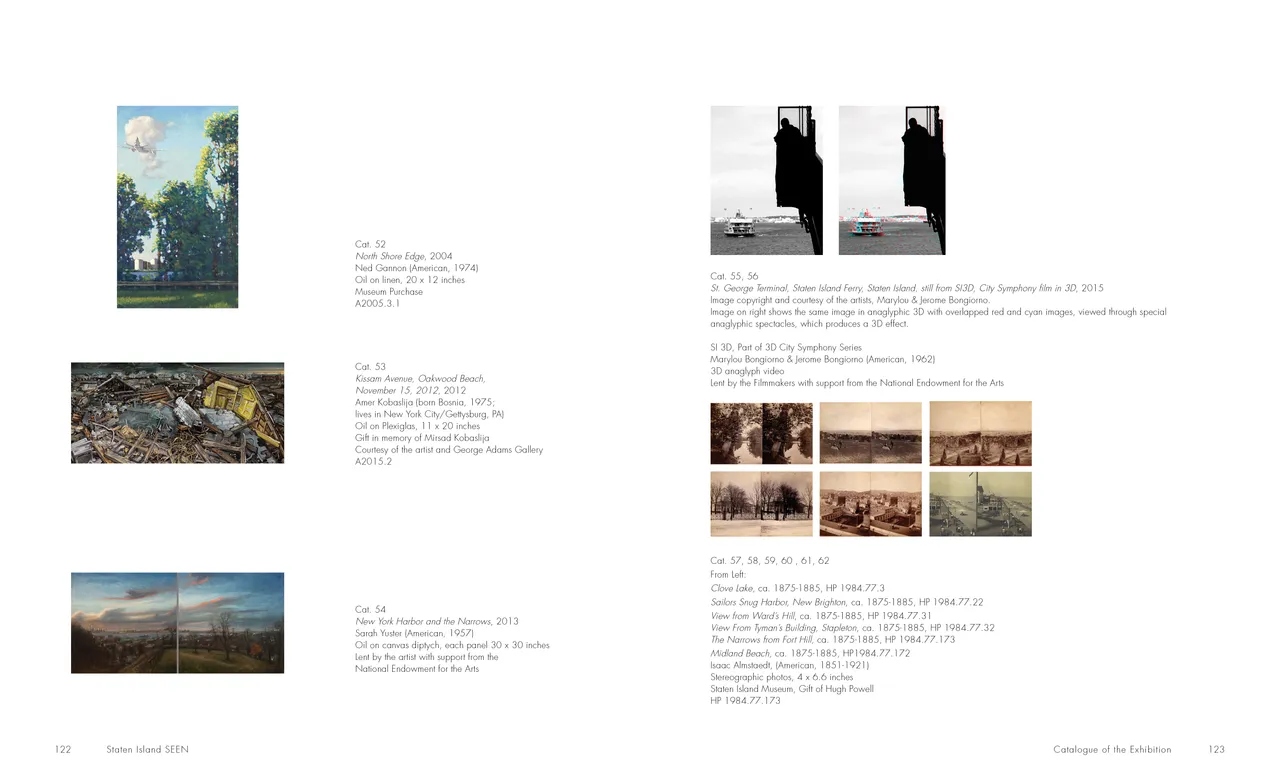
- Staten Island SEEN exhibition catalog, pages 120-121
- Client: Staten Island Museum
- Visit figure page
- Type: portfolio
- Portfolio Type: publication_design
- Portfolio Role: design_layout
Staten Island: Seen — Pages 124–125
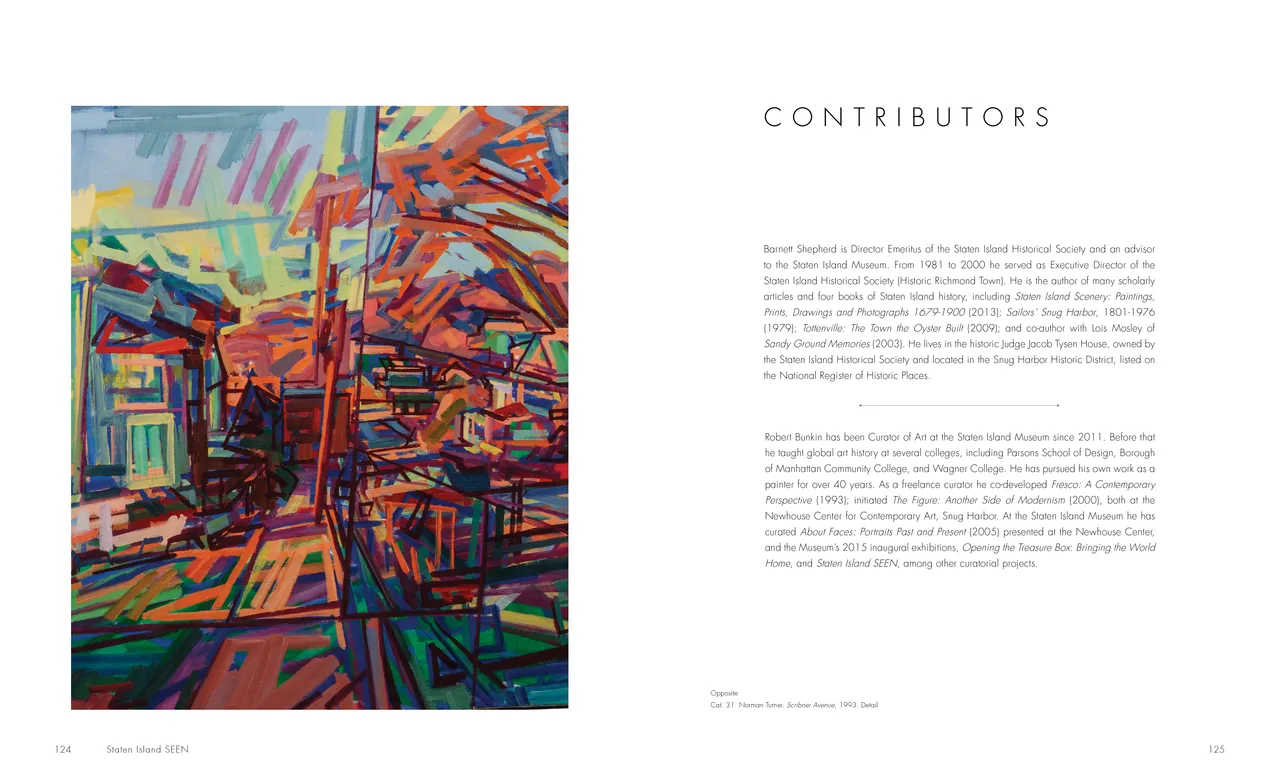
- Staten Island SEEN exhibition catalog, pages 120-121
- Client: Staten Island Museum
- Visit figure page
- Type: portfolio
- Portfolio Type: publication_design
- Portfolio Role: design_layout
Staten Island: Seen — Pages 124–125
- Staten Island SEEN exhibition catalog, pages 120-121
- Client: Staten Island Museum
- Visit figure page
- Type: portfolio
- Portfolio Type: publication_design
- Portfolio Role: design_layout
Staten Island: Seen — Pages 14–15
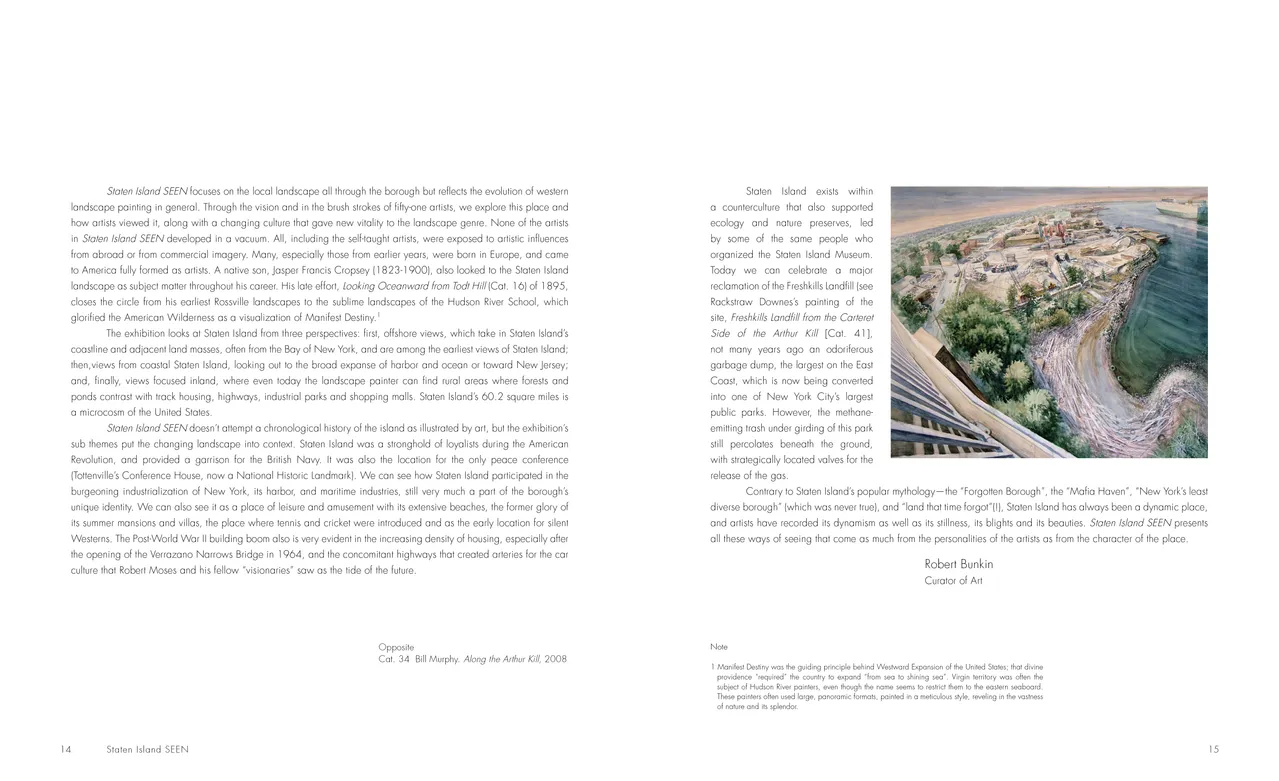
- Staten Island SEEN exhibition catalog, pages 14-15
- Client: Staten Island Museum
- Visit figure page
- Type: portfolio
- Portfolio Type: publication_design
- Portfolio Role: design_layout
Staten Island: Seen — Pages 16–17
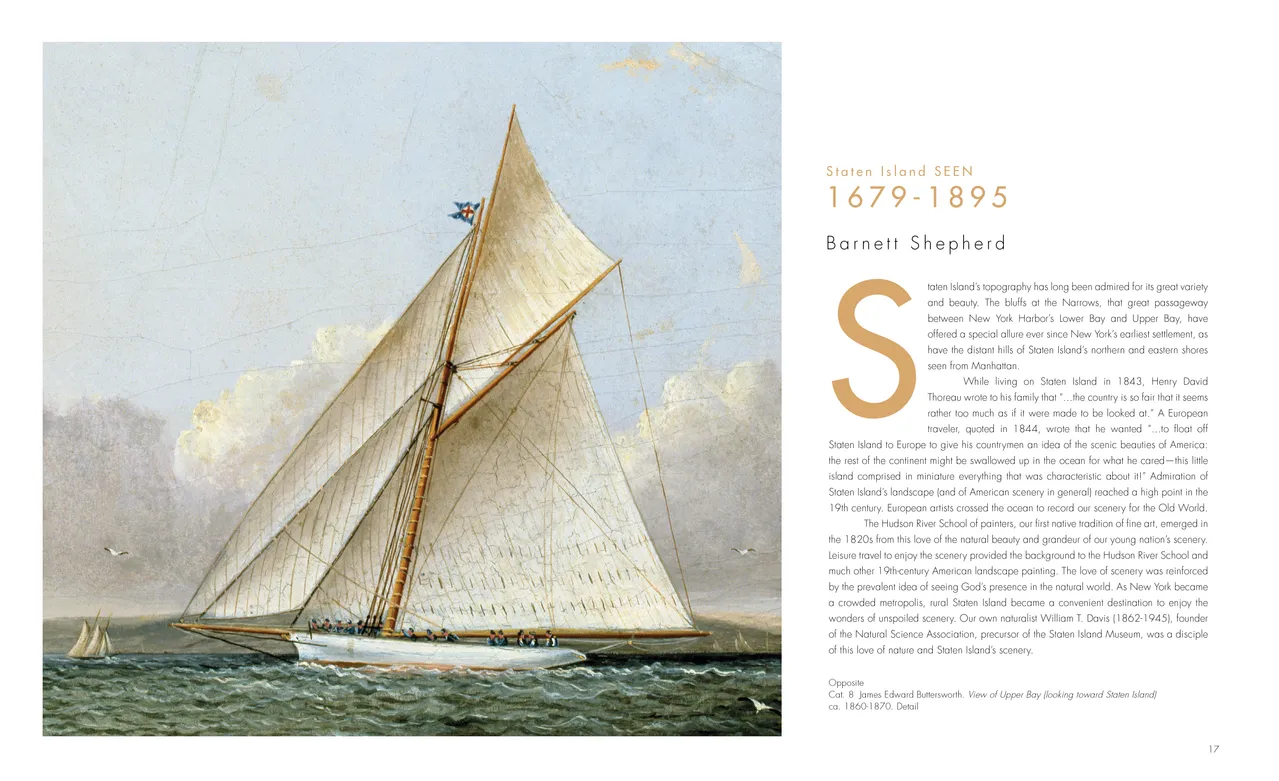
- Staten Island SEEN exhibition catalog, pages 16-17
- Client: Staten Island Museum
- Visit figure page
- Type: portfolio
- Portfolio Type: publication_design
- Portfolio Role: design_layout
Staten Island: Seen — Pages 18–19
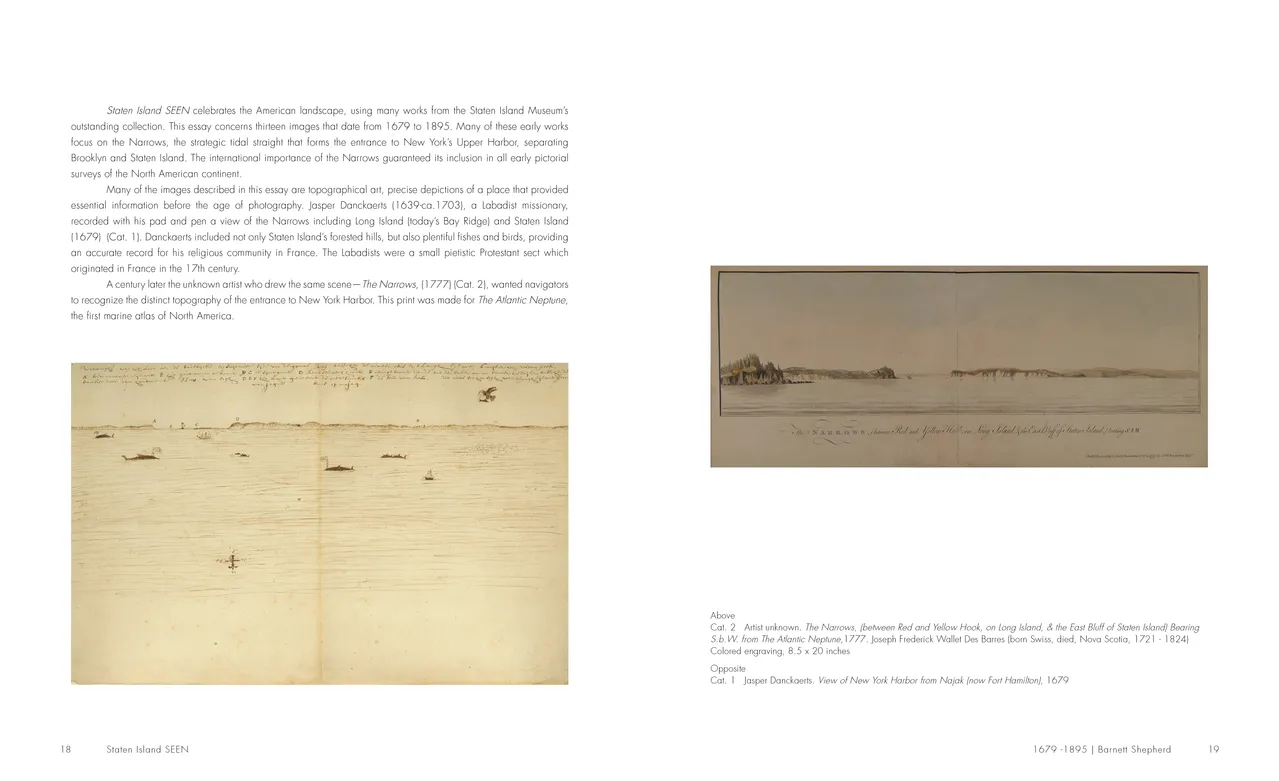
- Staten Island SEEN exhibition catalog, pages 18-19
- Client: Staten Island Museum
- Visit figure page
- Type: portfolio
- Portfolio Type: publication_design
- Portfolio Role: design_layout
Staten Island: Seen — Pages 2–3
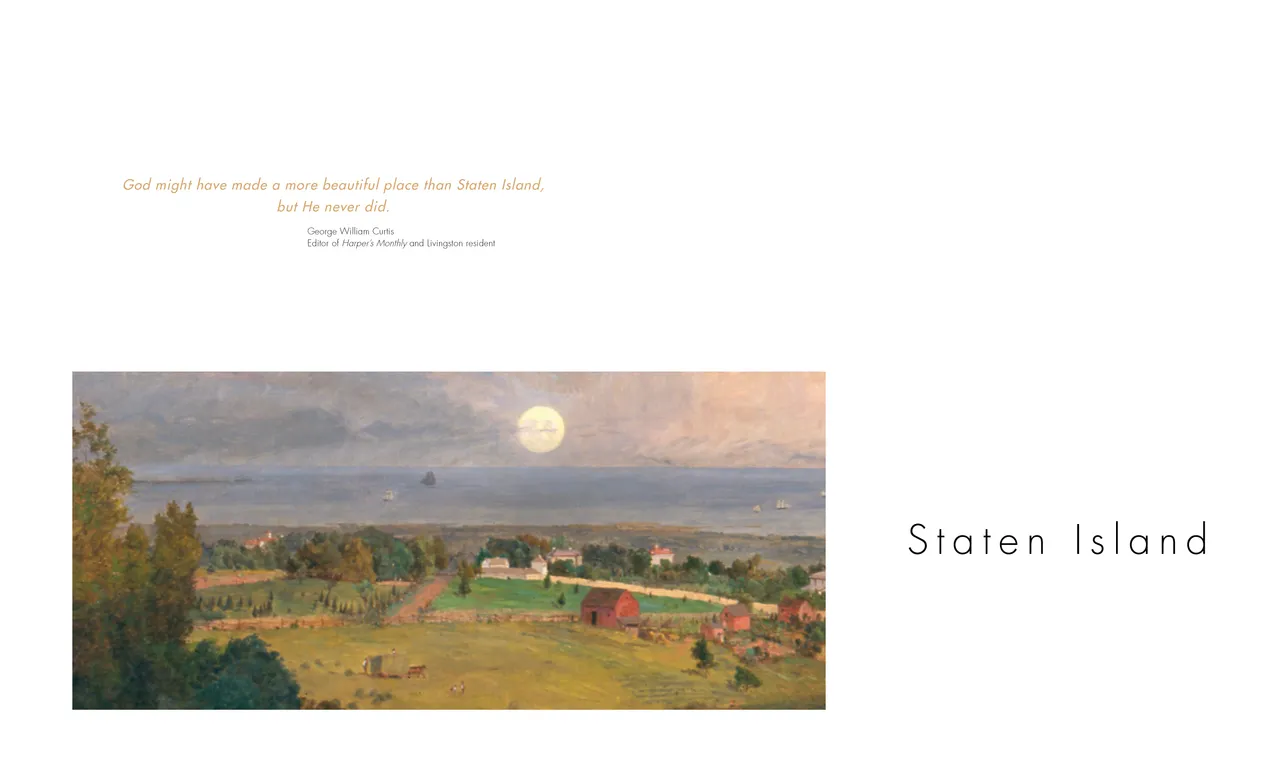
- Staten Island SEEN exhibition catalog, pages 2-3
- Client: Staten Island Museum
- Visit figure page
- Type: portfolio
- Portfolio Type: publication_design
- Portfolio Role: design_layout
Staten Island: Seen — Pages 20–21
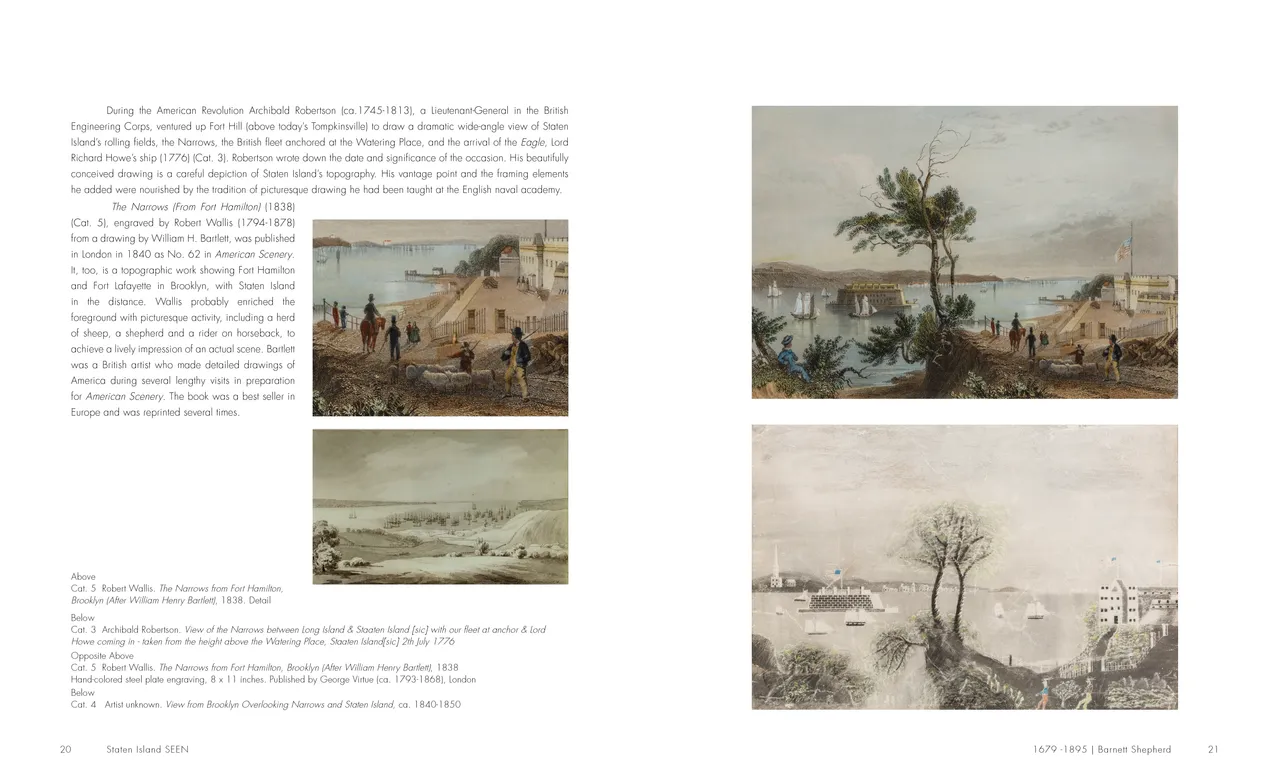
- Staten Island SEEN exhibition catalog, pages 20-21
- Client: Staten Island Museum
- Visit figure page
- Type: portfolio
- Portfolio Type: publication_design
- Portfolio Role: design_layout
Staten Island: Seen — Pages 22–23
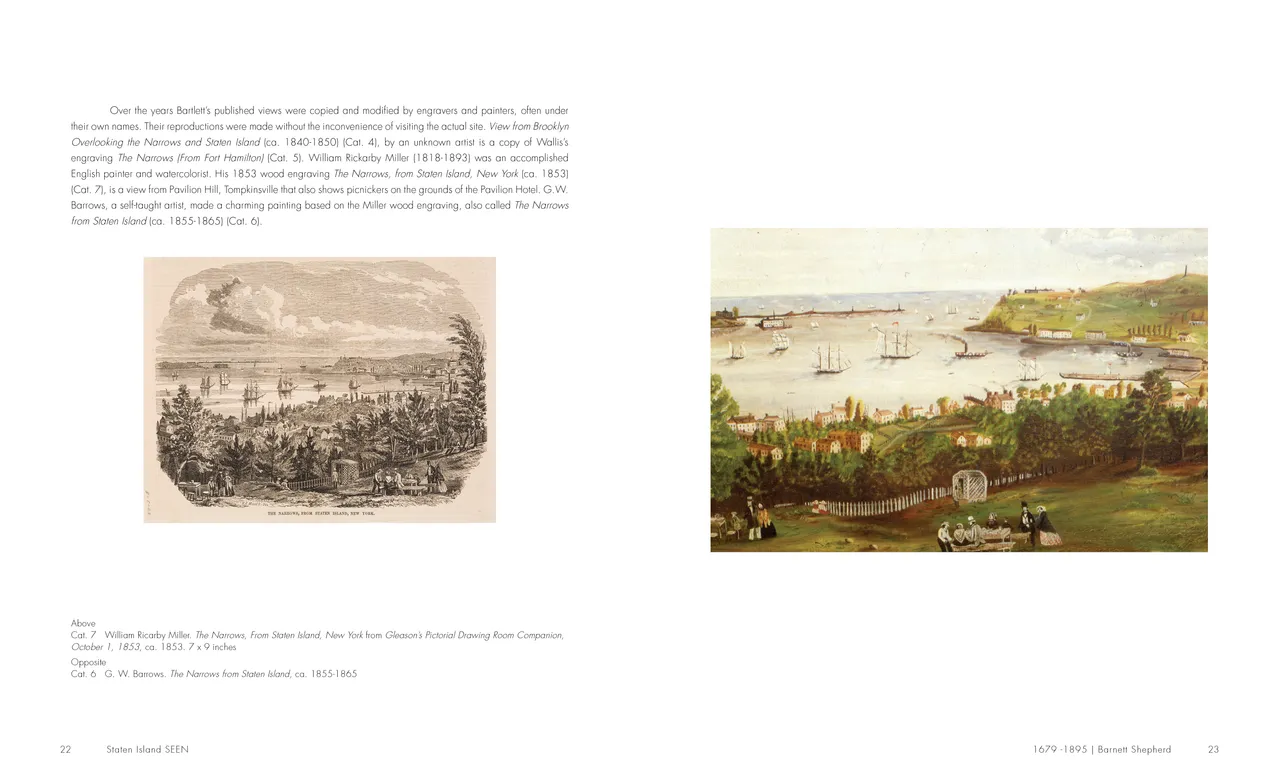
- Staten Island SEEN exhibition catalog, pages 22-23
- Client: Staten Island Museum
- Visit figure page
- Type: portfolio
- Portfolio Type: publication_design
- Portfolio Role: design_layout
Staten Island: Seen — Pages 24–25
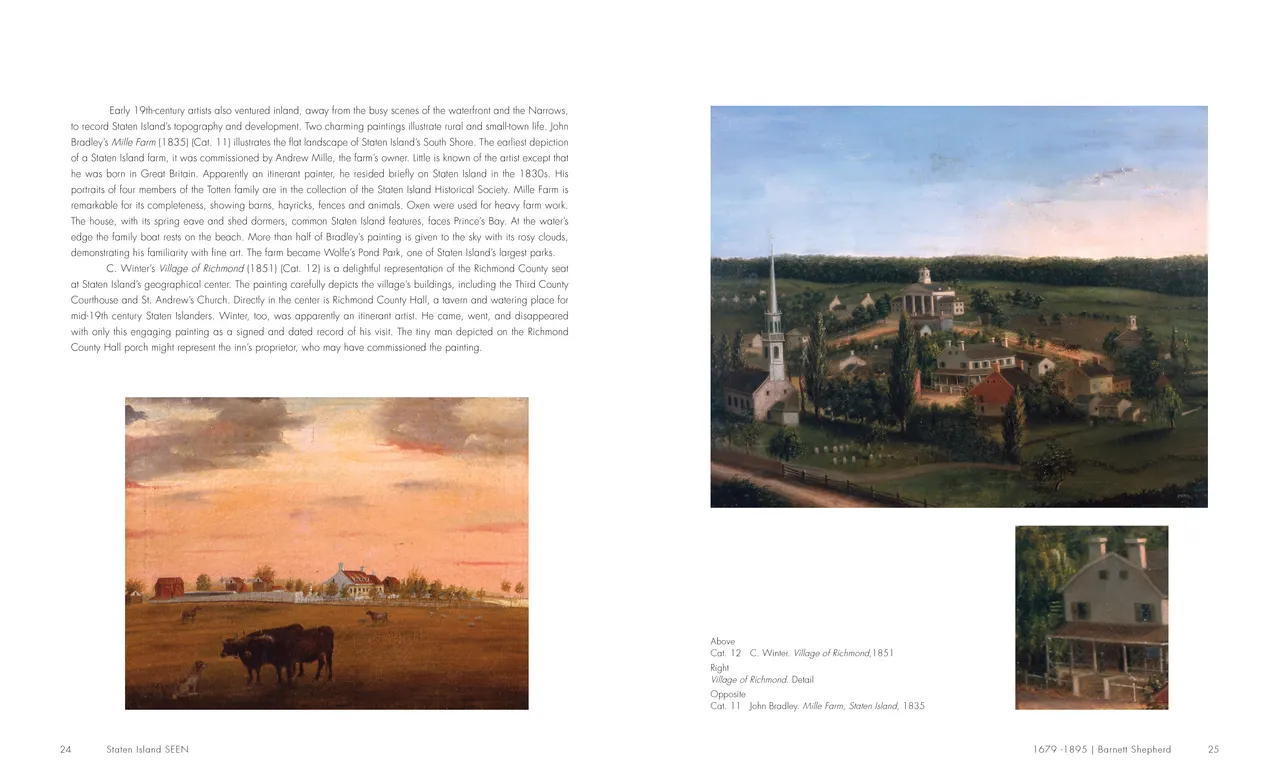
- Staten Island SEEN exhibition catalog, pages 24-25
- Client: Staten Island Museum
- Visit figure page
- Type: portfolio
- Portfolio Type: publication_design
- Portfolio Role: design_layout
Staten Island: Seen — Pages 26–27
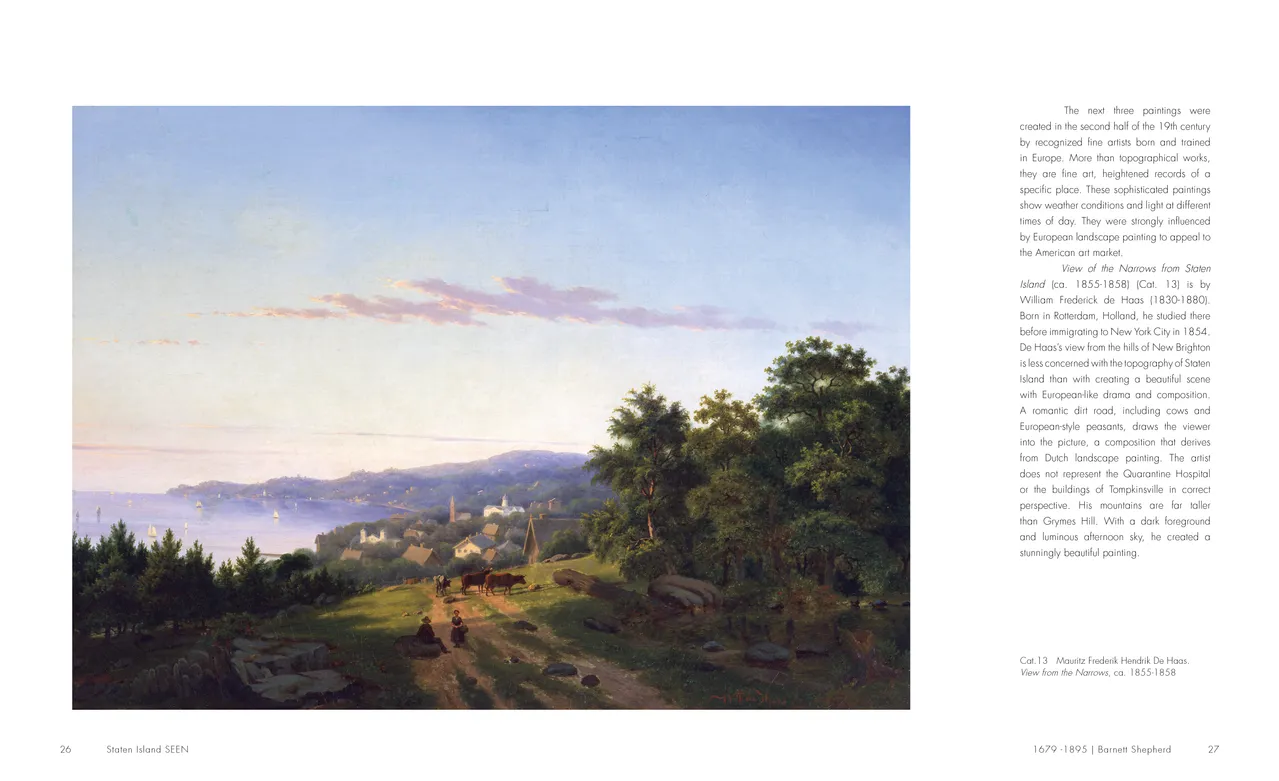
- Staten Island SEEN exhibition catalog, pages 26-27
- Client: Staten Island Museum
- Visit figure page
- Type: portfolio
- Portfolio Type: publication_design
- Portfolio Role: design_layout
Staten Island: Seen — Pages 28–29
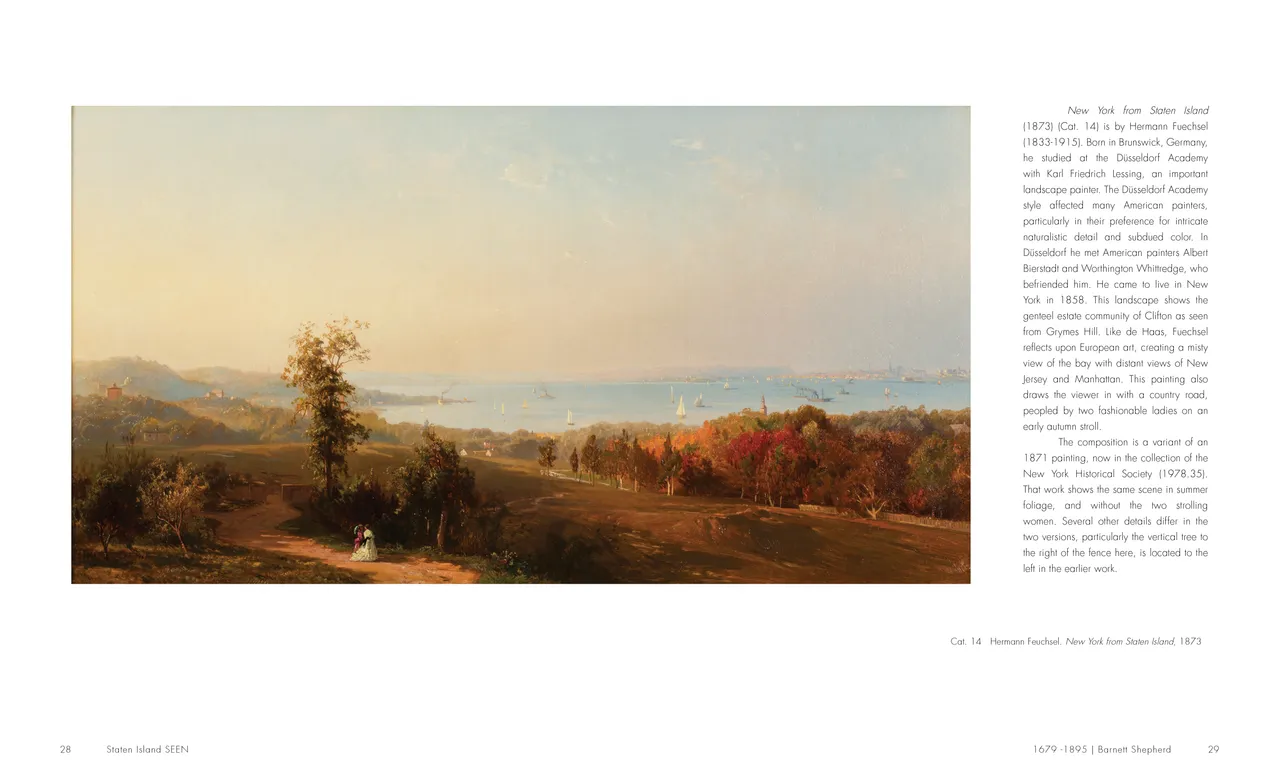
- Staten Island SEEN exhibition catalog, pages 28-29
- Client: Staten Island Museum
- Visit figure page
- Type: portfolio
- Portfolio Type: publication_design
- Portfolio Role: design_layout
Staten Island: Seen — Pages 30–31
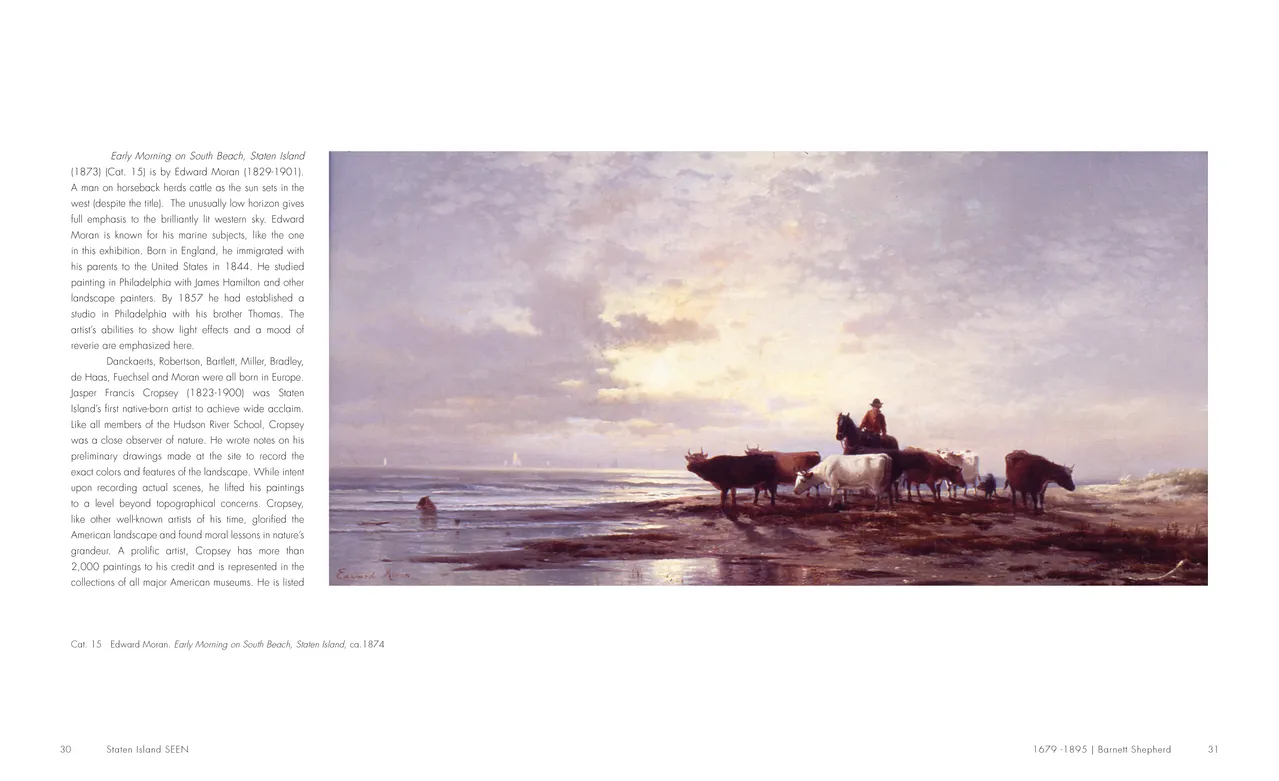
- Staten Island SEEN exhibition catalog, pages 30-31
- Client: Staten Island Museum
- Visit figure page
- Type: portfolio
- Portfolio Type: publication_design
- Portfolio Role: design_layout
Staten Island: Seen — Pages 32–33
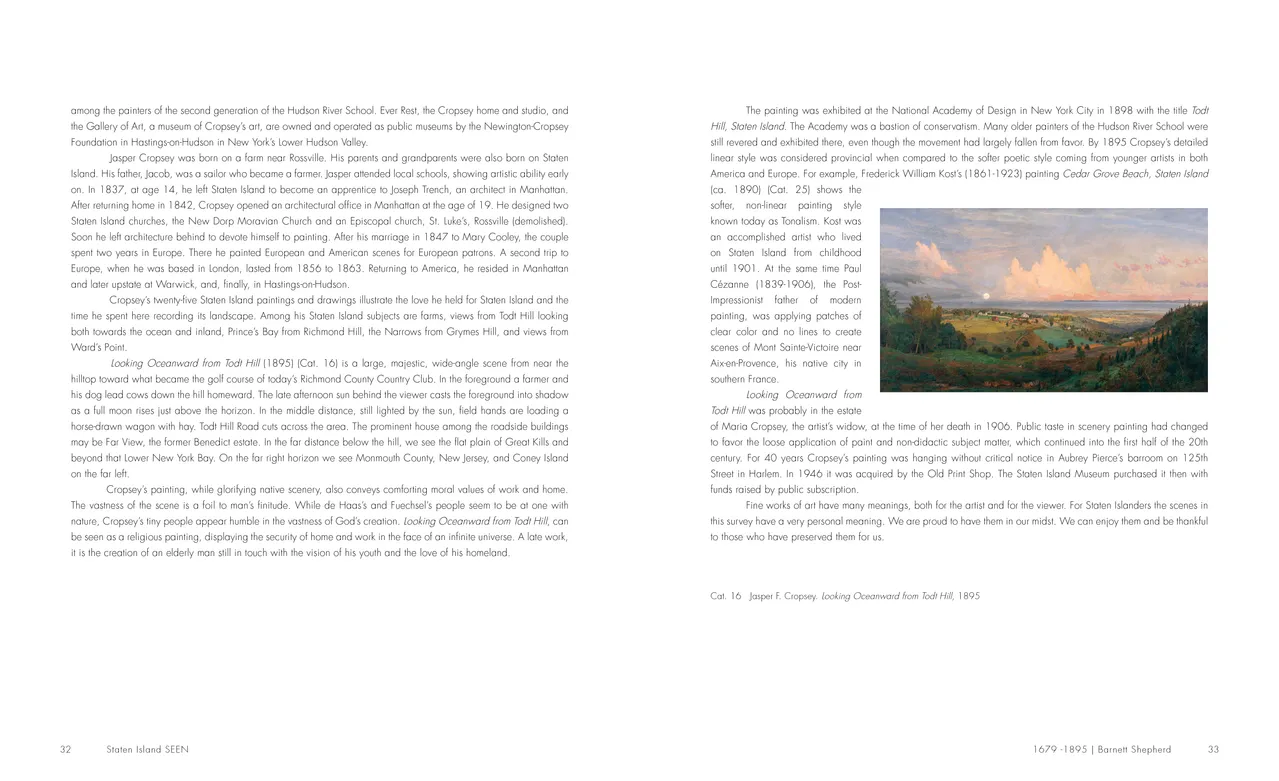
- Staten Island SEEN exhibition catalog, pages 32-33
- Client: Staten Island Museum
- Visit figure page
- Type: portfolio
- Portfolio Type: publication_design
- Portfolio Role: design_layout
Staten Island: Seen — Pages 34–35
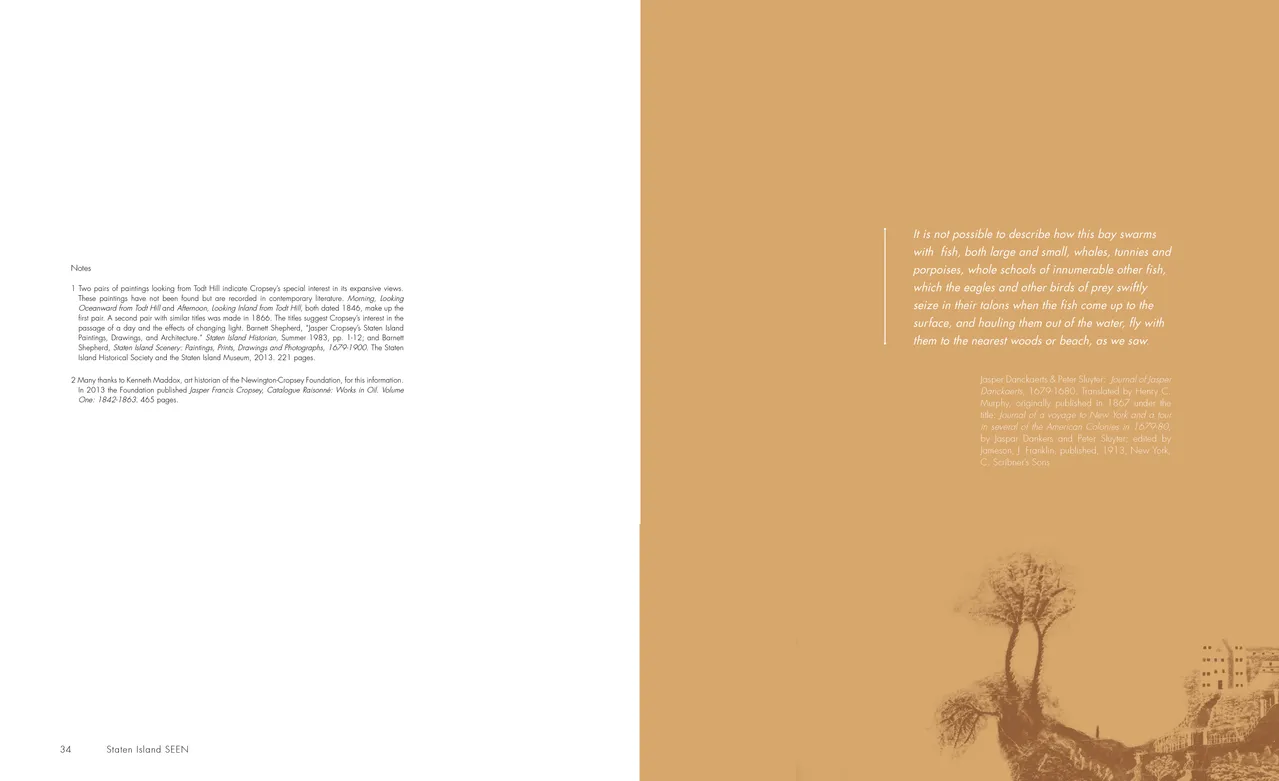
- Staten Island SEEN exhibition catalog, pages 34-35
- Client: Staten Island Museum
- Visit figure page
- Type: portfolio
- Portfolio Type: publication_design
- Portfolio Role: design_layout
Staten Island: Seen — Pages 36–37
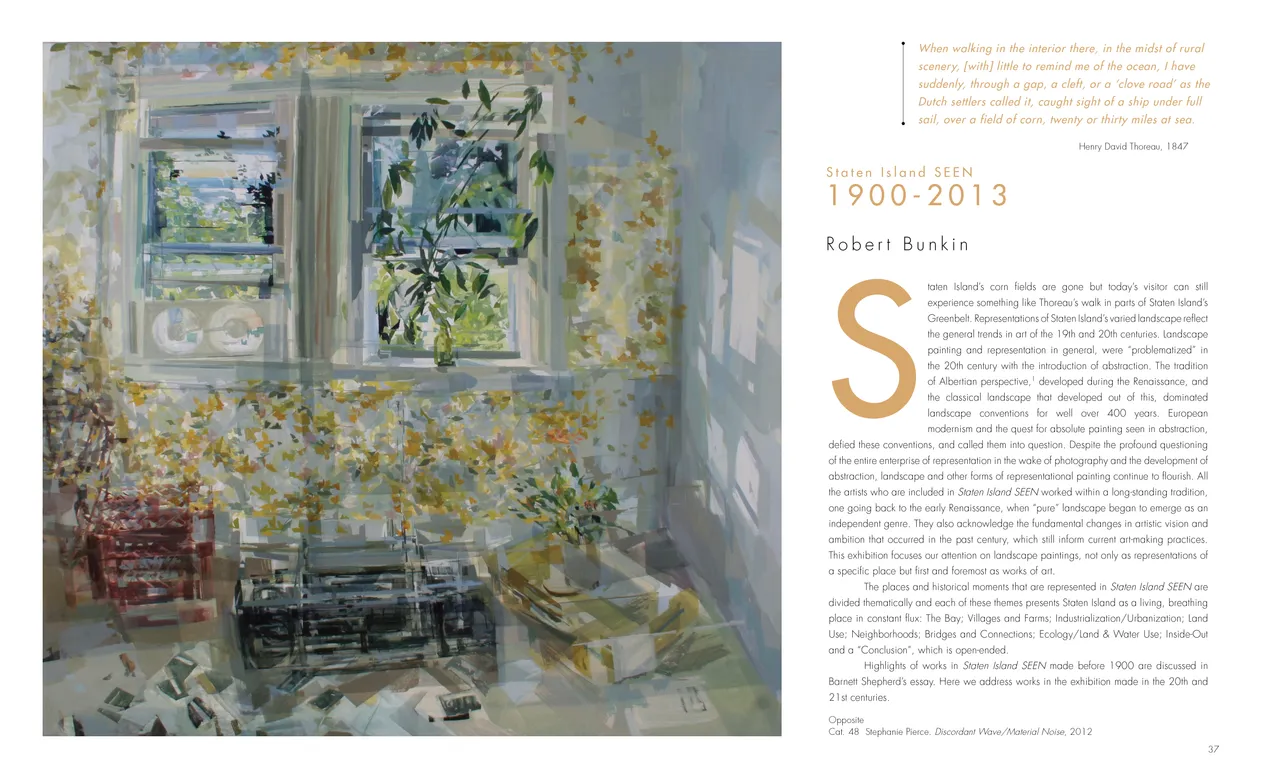
- Staten Island SEEN exhibition catalog, pages 36-37
- Client: Staten Island Museum
- Visit figure page
- Type: portfolio
- Portfolio Type: publication_design
- Portfolio Role: design_layout
Staten Island: Seen — Pages 38–39
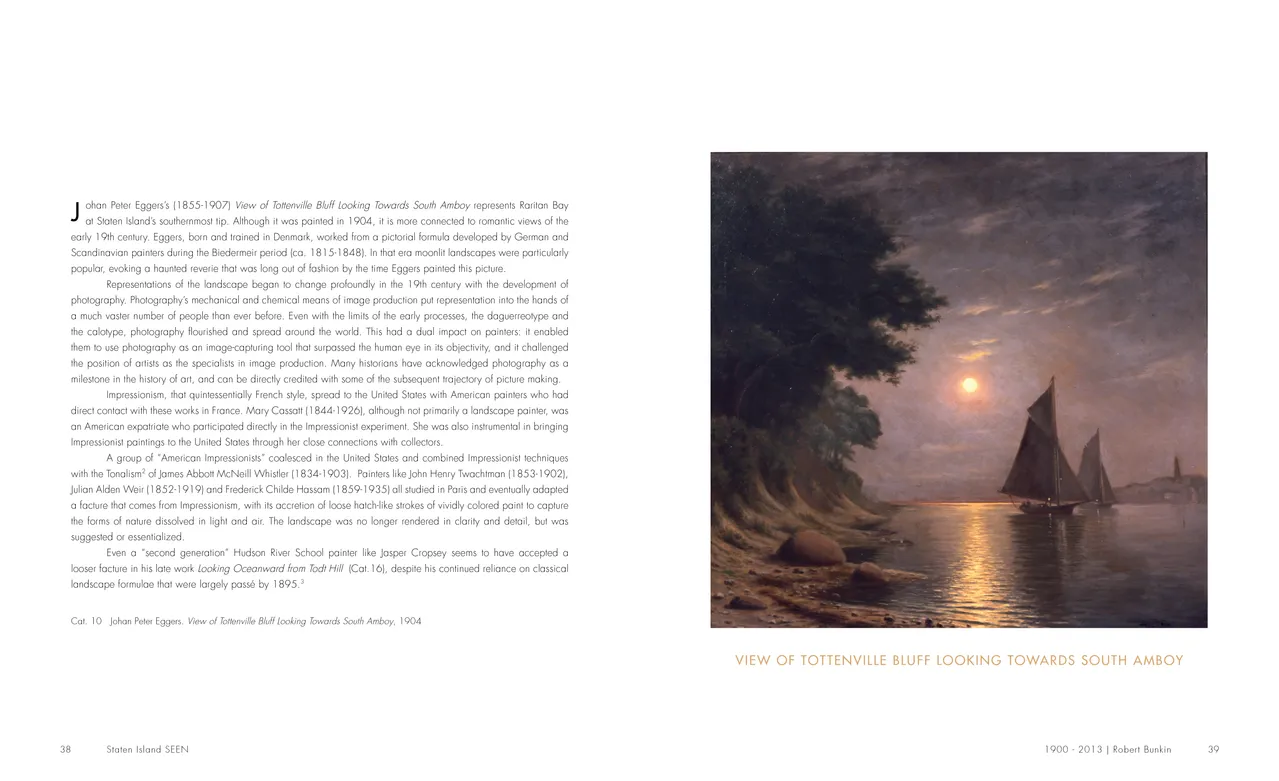
- Staten Island SEEN exhibition catalog, pages 38-39
- Client: Staten Island Museum
- Visit figure page
- Type: portfolio
- Portfolio Type: publication_design
- Portfolio Role: design_layout
Staten Island: Seen — Pages 4–5
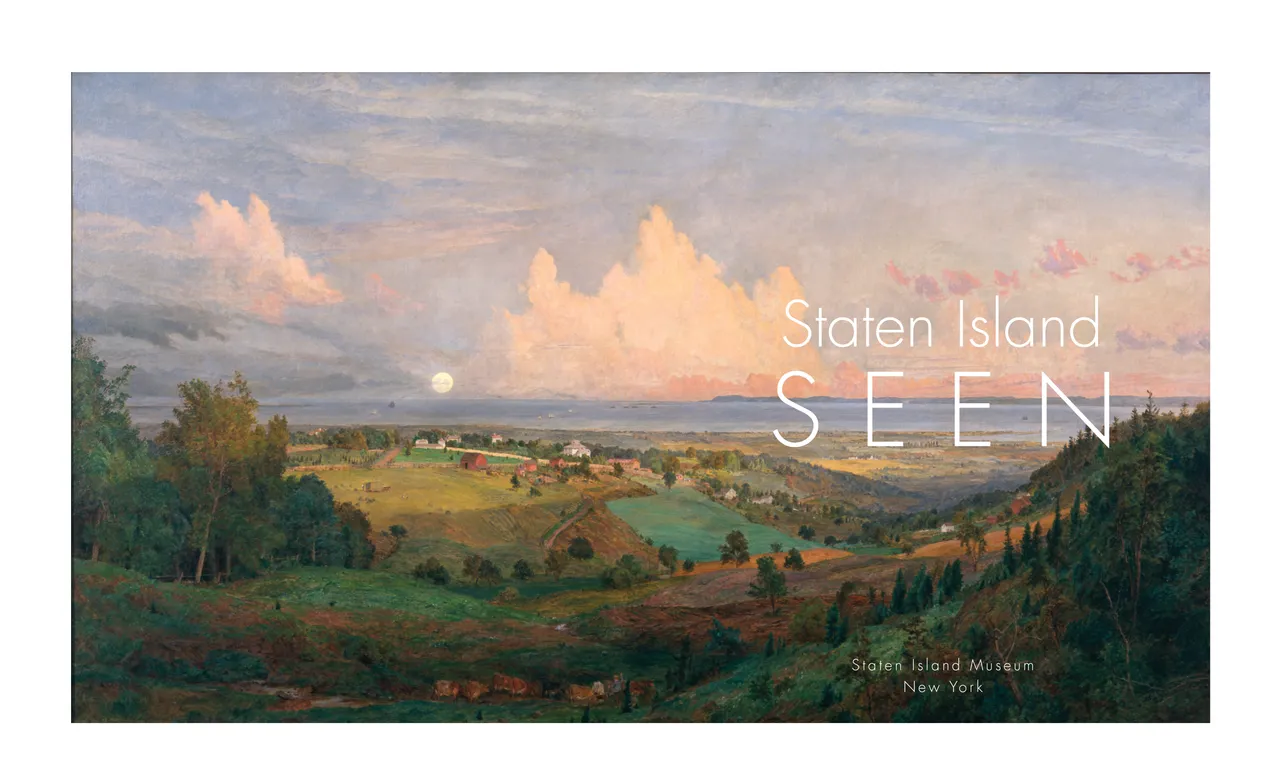
- Staten Island SEEN exhibition catalog, pages 4-5
- Client: Staten Island Museum
- Visit figure page
- Type: portfolio
- Portfolio Type: publication_design
- Portfolio Role: design_layout
Staten Island: Seen — Pages 40–41
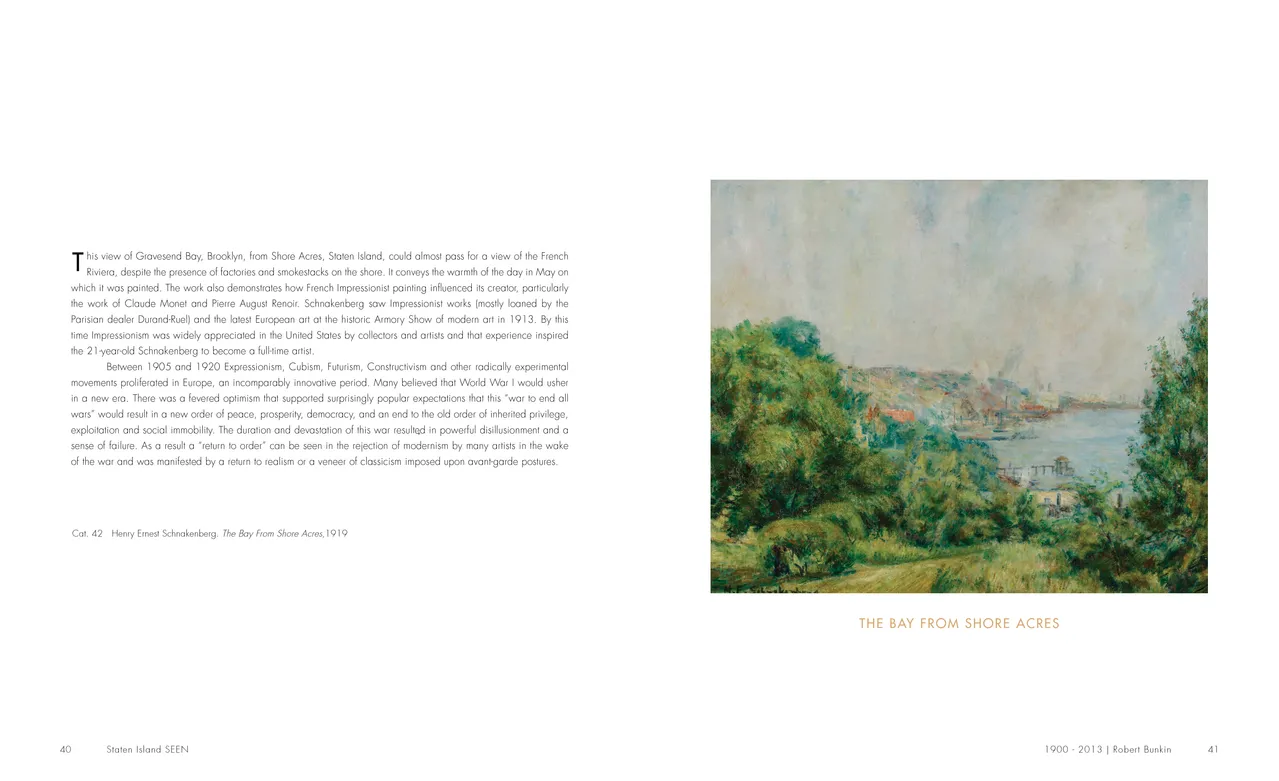
- Staten Island SEEN exhibition catalog, pages 40-41
- Client: Staten Island Museum
- Visit figure page
- Type: portfolio
- Portfolio Type: publication_design
- Portfolio Role: design_layout
Staten Island: Seen — Pages 42–43
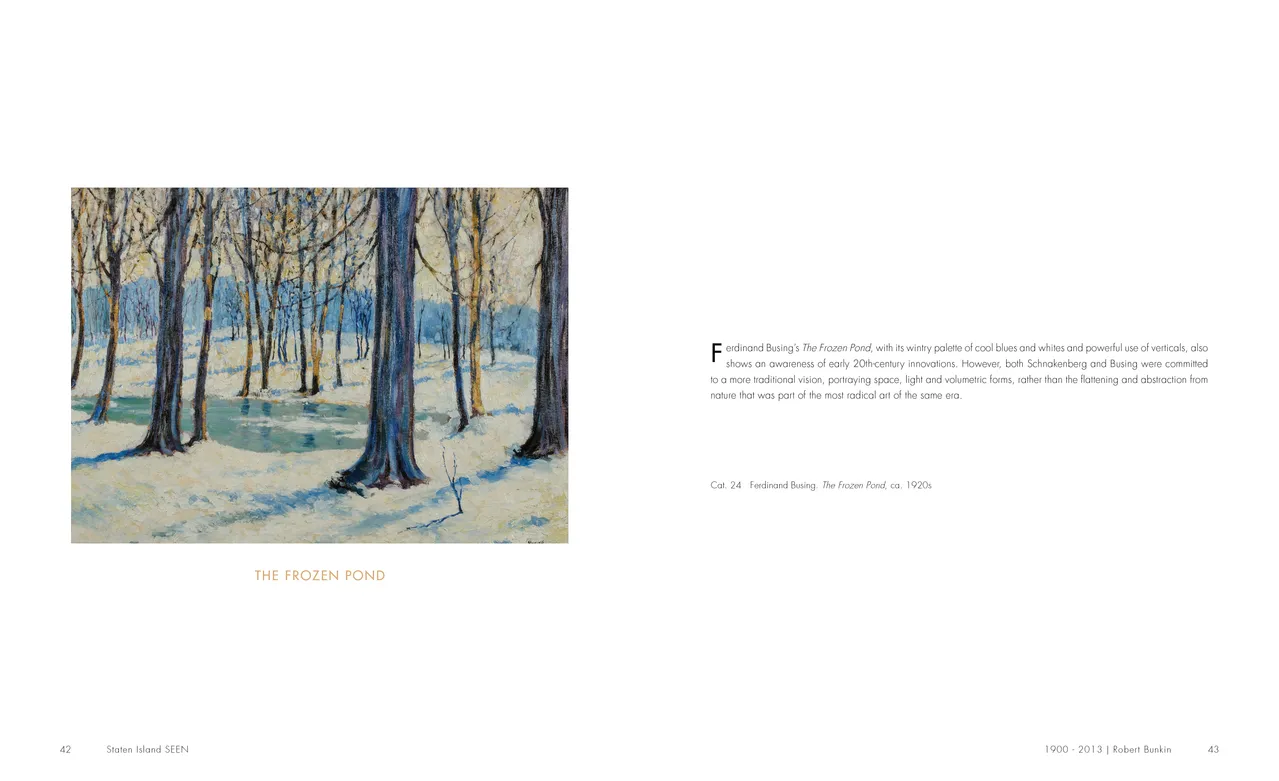
- Staten Island SEEN exhibition catalog, pages 42-43
- Client: Staten Island Museum
- Visit figure page
- Type: portfolio
- Portfolio Type: publication_design
- Portfolio Role: design_layout
Staten Island: Seen — Pages 44–45
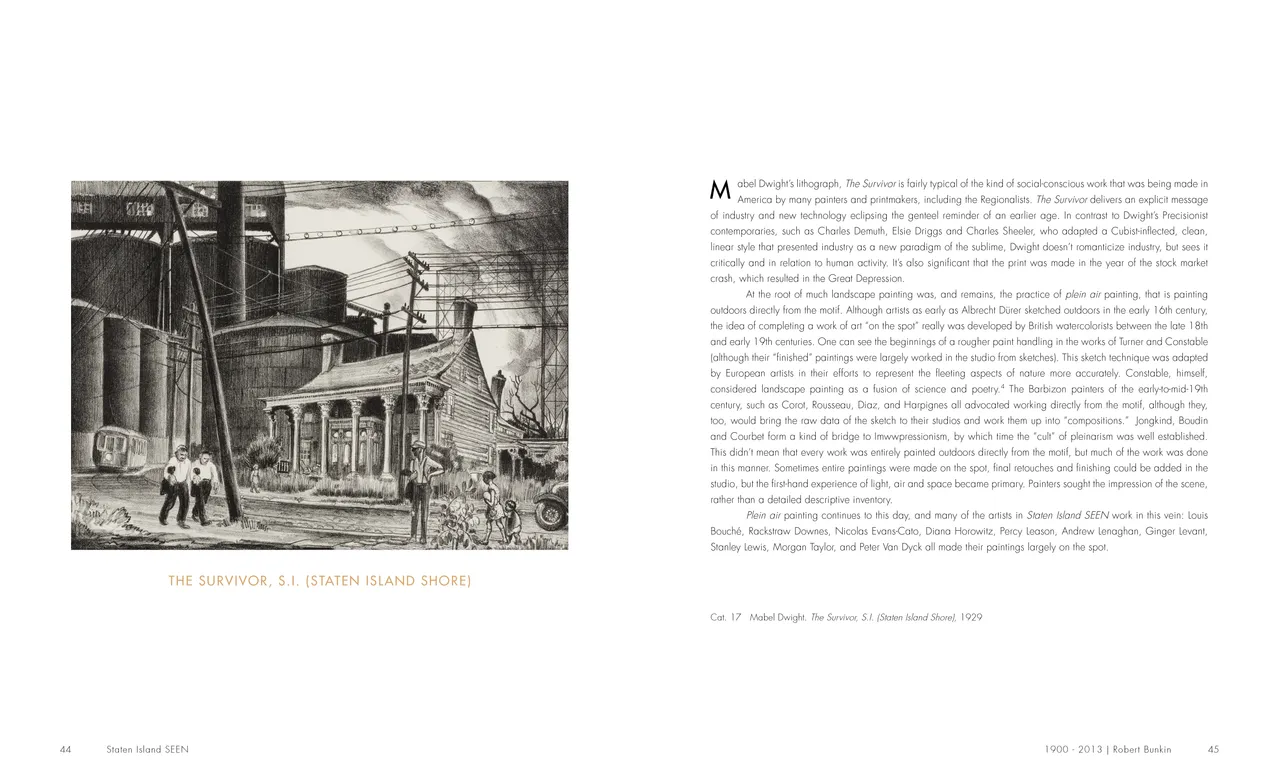
- Staten Island SEEN exhibition catalog, pages 44-45
- Client: Staten Island Museum
- Visit figure page
- Type: portfolio
- Portfolio Type: publication_design
- Portfolio Role: design_layout
Staten Island: Seen — Pages 46–47
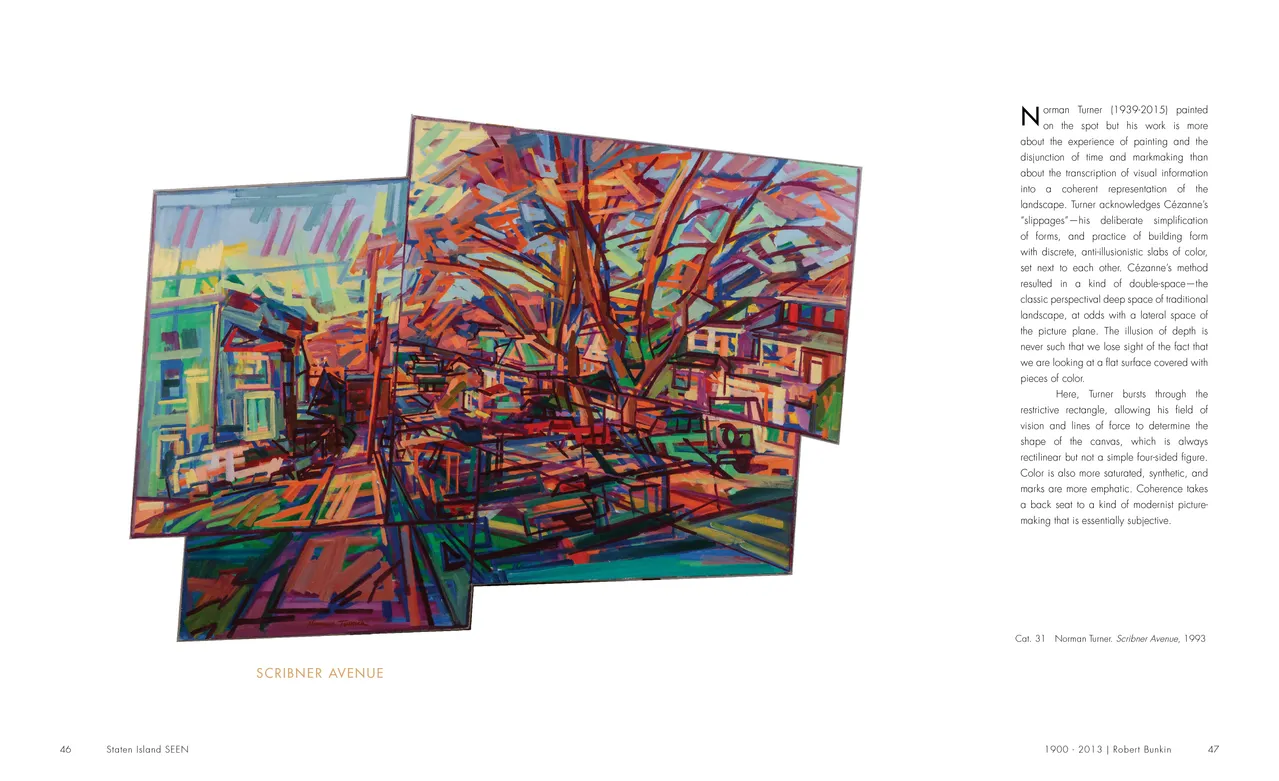
- Staten Island SEEN exhibition catalog, pages 46-47
- Client: Staten Island Museum
- Visit figure page
- Type: portfolio
- Portfolio Type: publication_design
- Portfolio Role: design_layout
Staten Island: Seen — Pages 48–49
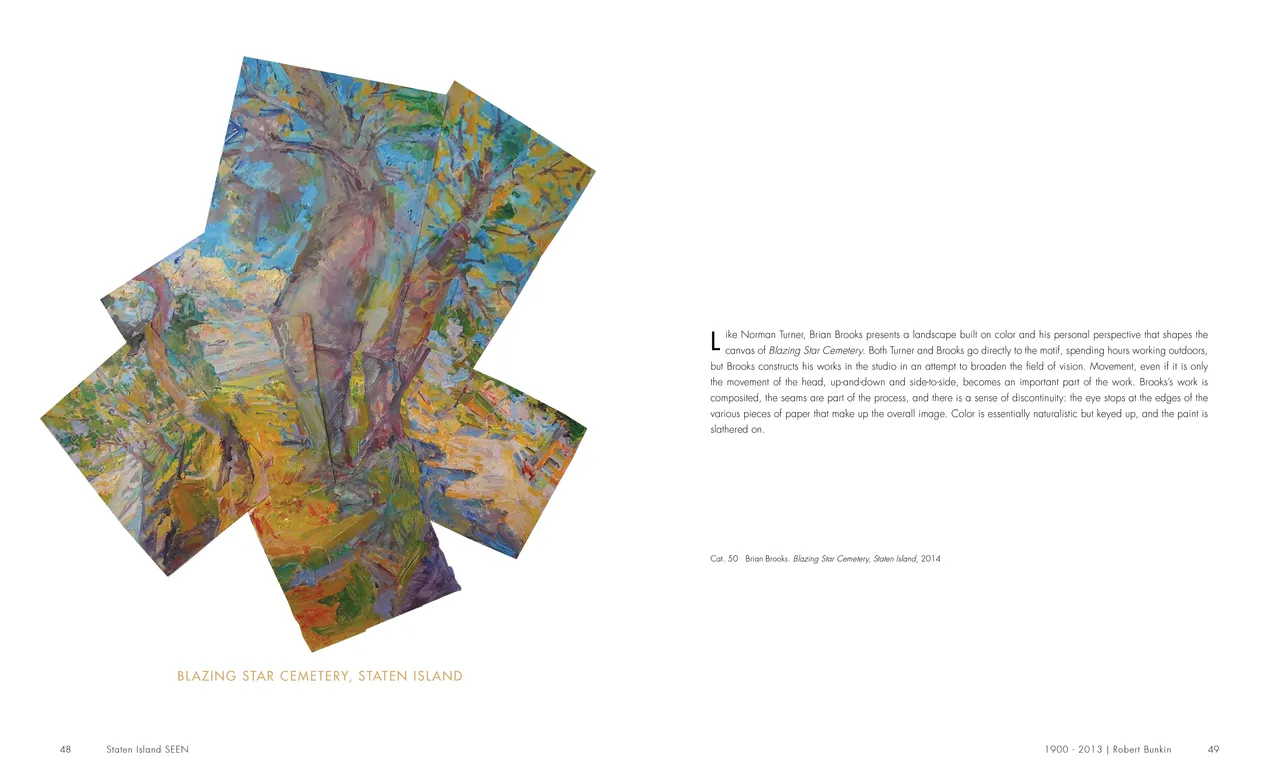
- Staten Island SEEN exhibition catalog, pages 48-49
- Client: Staten Island Museum
- Visit figure page
- Type: portfolio
- Portfolio Type: publication_design
- Portfolio Role: design_layout
Staten Island: Seen — Pages 50–51
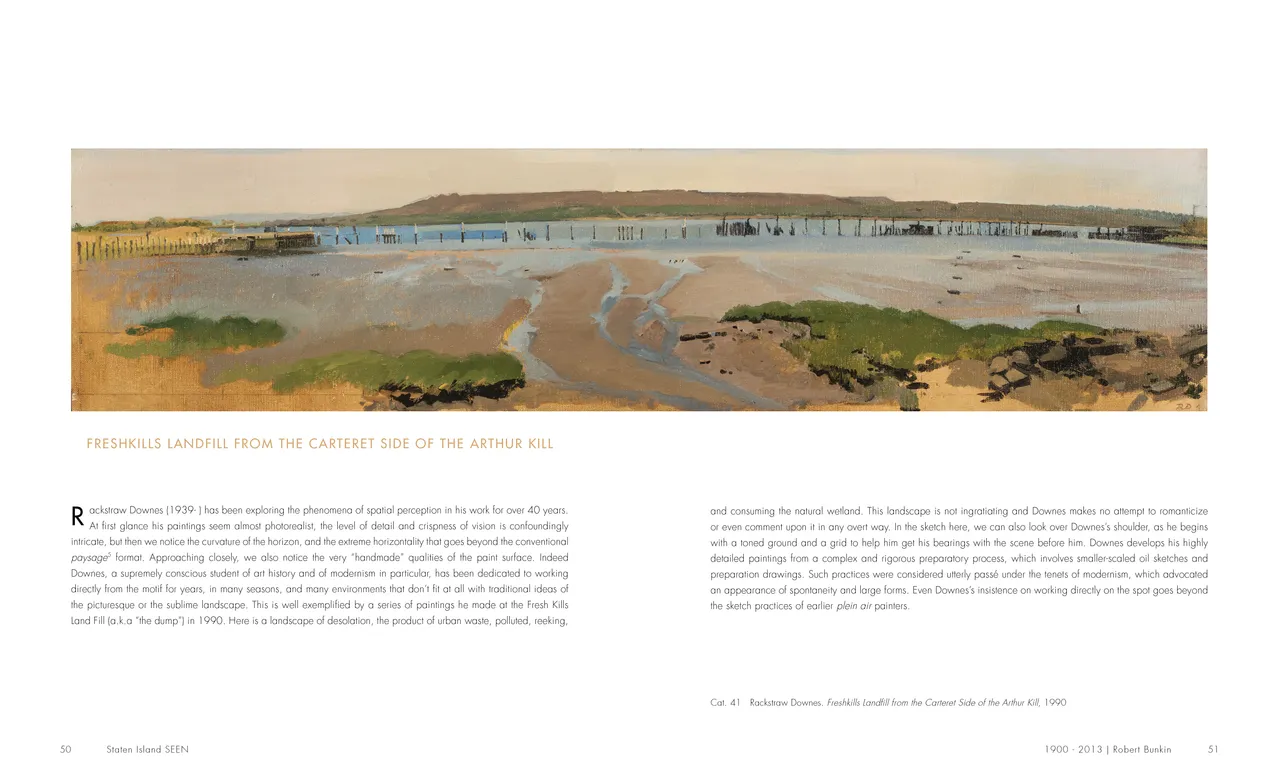
- Staten Island SEEN exhibition catalog, pages 50-51
- Client: Staten Island Museum
- Visit figure page
- Type: portfolio
- Portfolio Type: publication_design
- Portfolio Role: design_layout
Staten Island: Seen — Pages 52–53
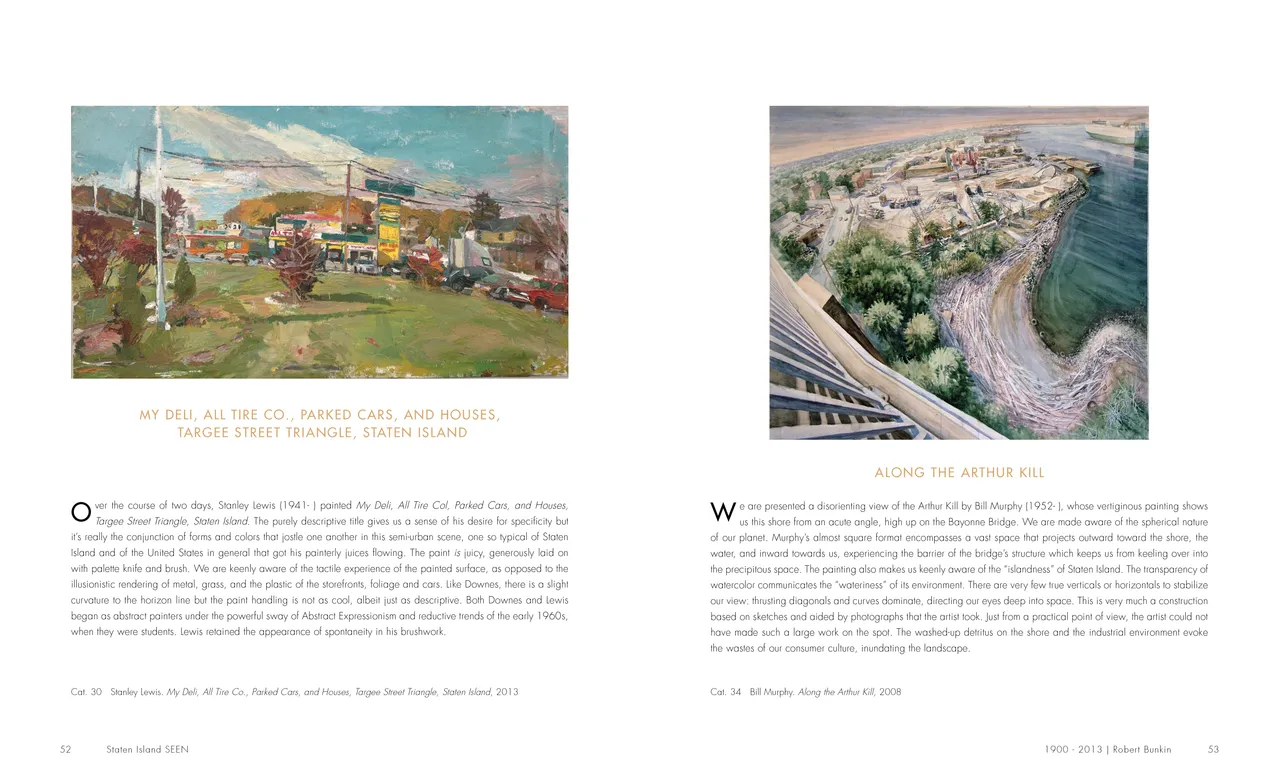
- Staten Island SEEN exhibition catalog, pages 52-53
- Client: Staten Island Museum
- Visit figure page
- Type: portfolio
- Portfolio Type: publication_design
- Portfolio Role: design_layout
Staten Island: Seen — Pages 54–55
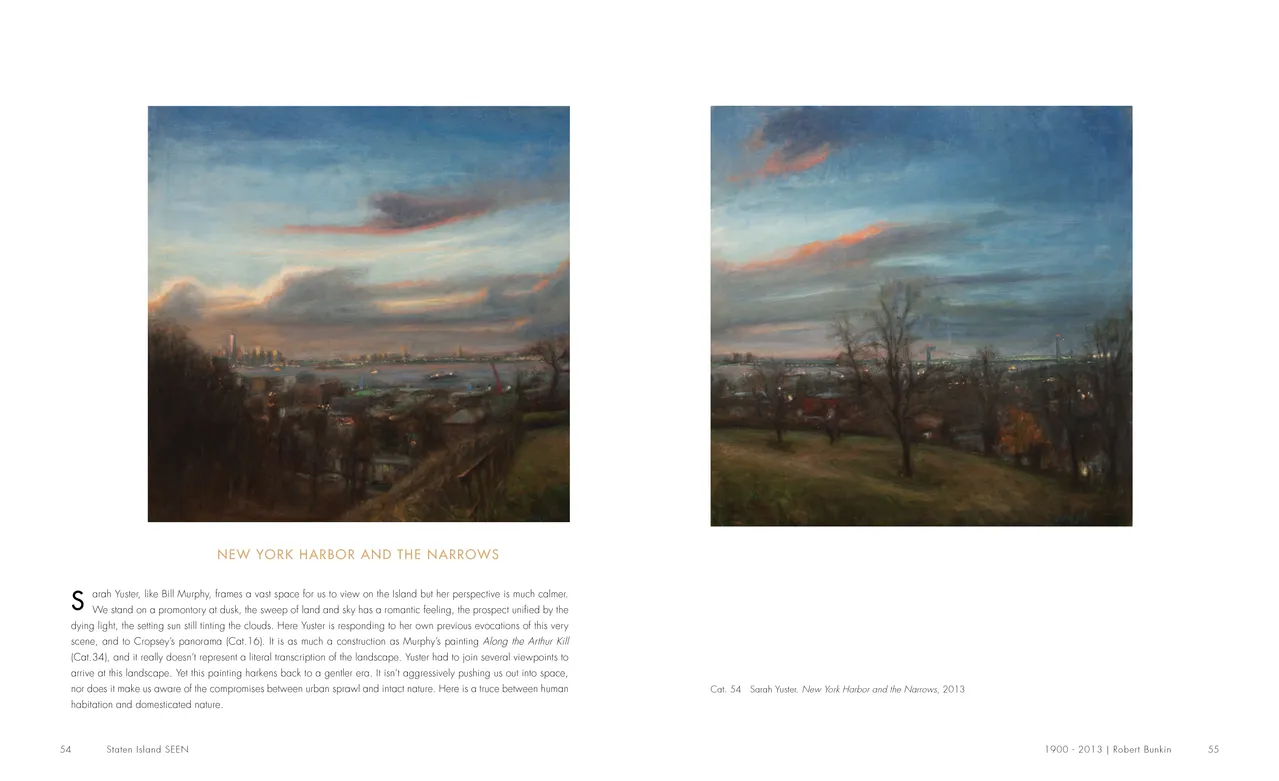
- Staten Island SEEN exhibition catalog, pages 54-55
- Client: Staten Island Museum
- Visit figure page
- Type: portfolio
- Portfolio Type: publication_design
- Portfolio Role: design_layout
Staten Island: Seen — Pages 56–57
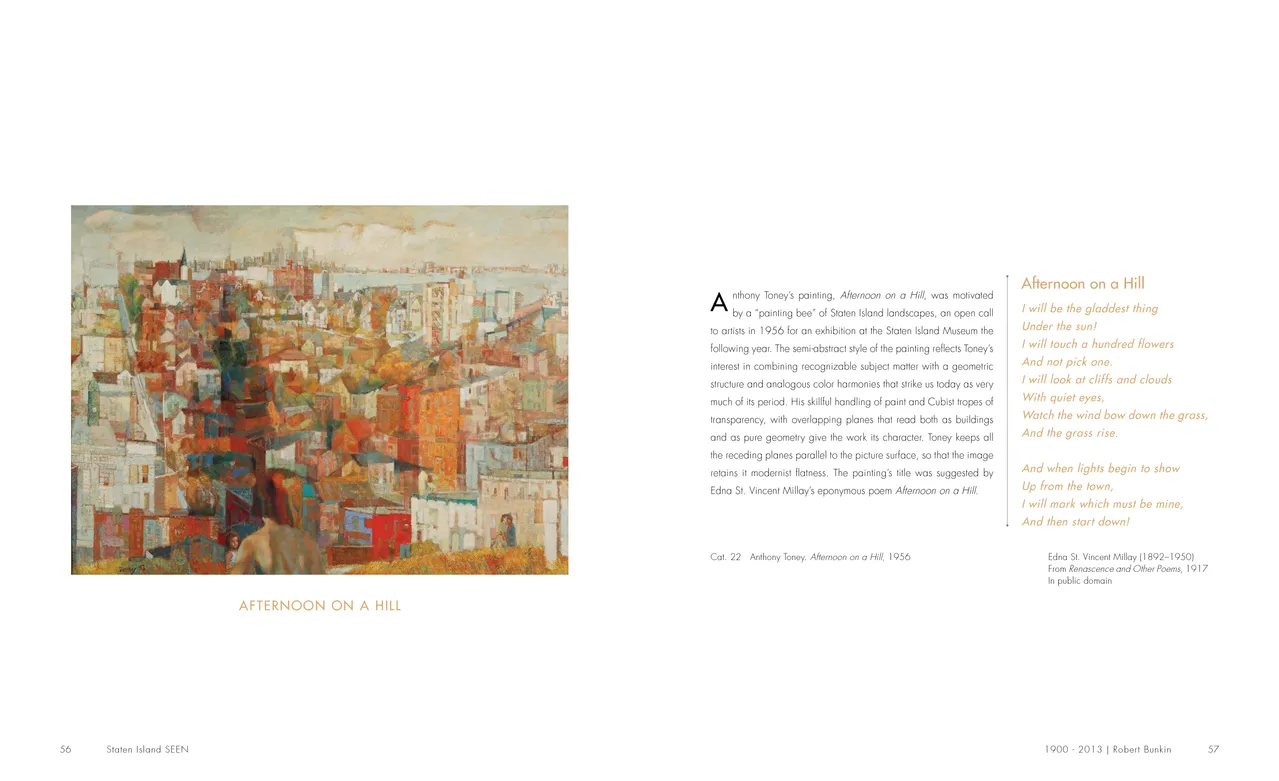
- Staten Island SEEN exhibition catalog, pages 56-57
- Client: Staten Island Museum
- Visit figure page
- Type: portfolio
- Portfolio Type: publication_design
- Portfolio Role: design_layout
Staten Island: Seen — Pages 58–59
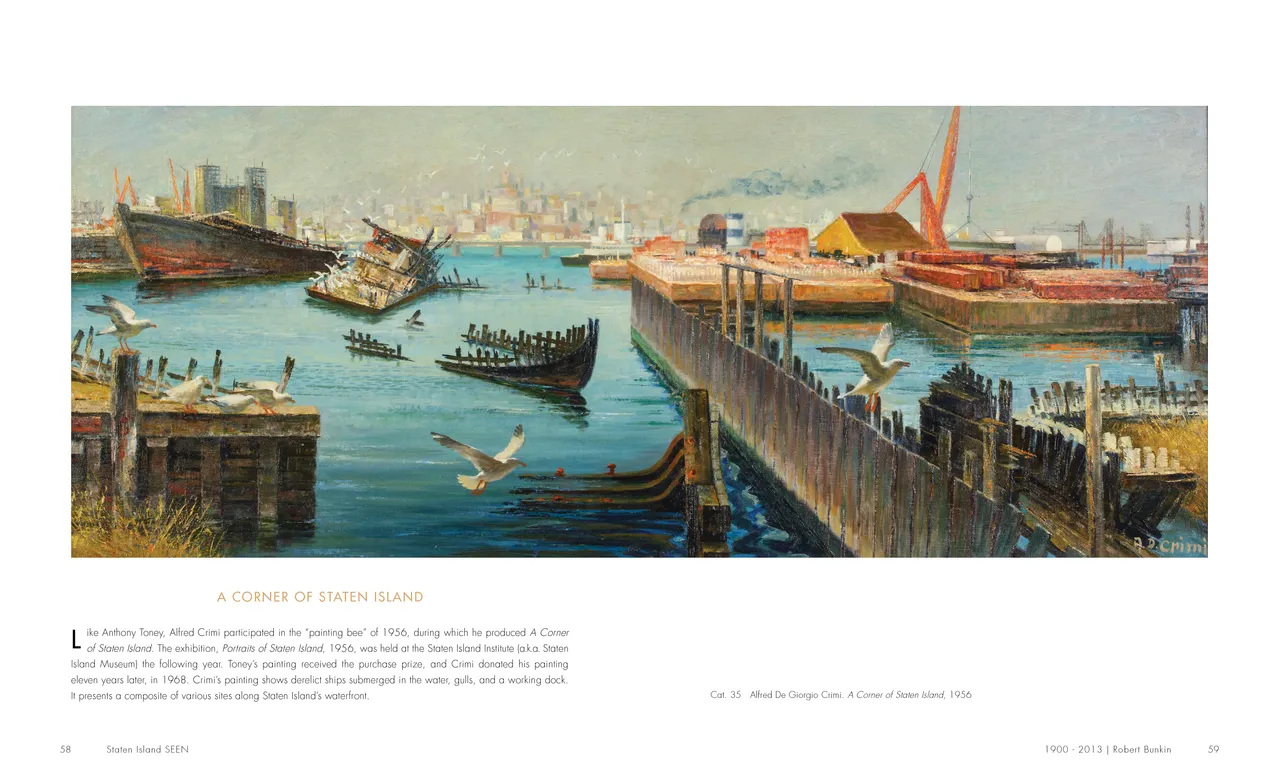
- Staten Island SEEN exhibition catalog, pages 58-59
- Client: Staten Island Museum
- Visit figure page
- Type: portfolio
- Portfolio Type: publication_design
- Portfolio Role: design_layout
Staten Island: Seen — Pages 6–7
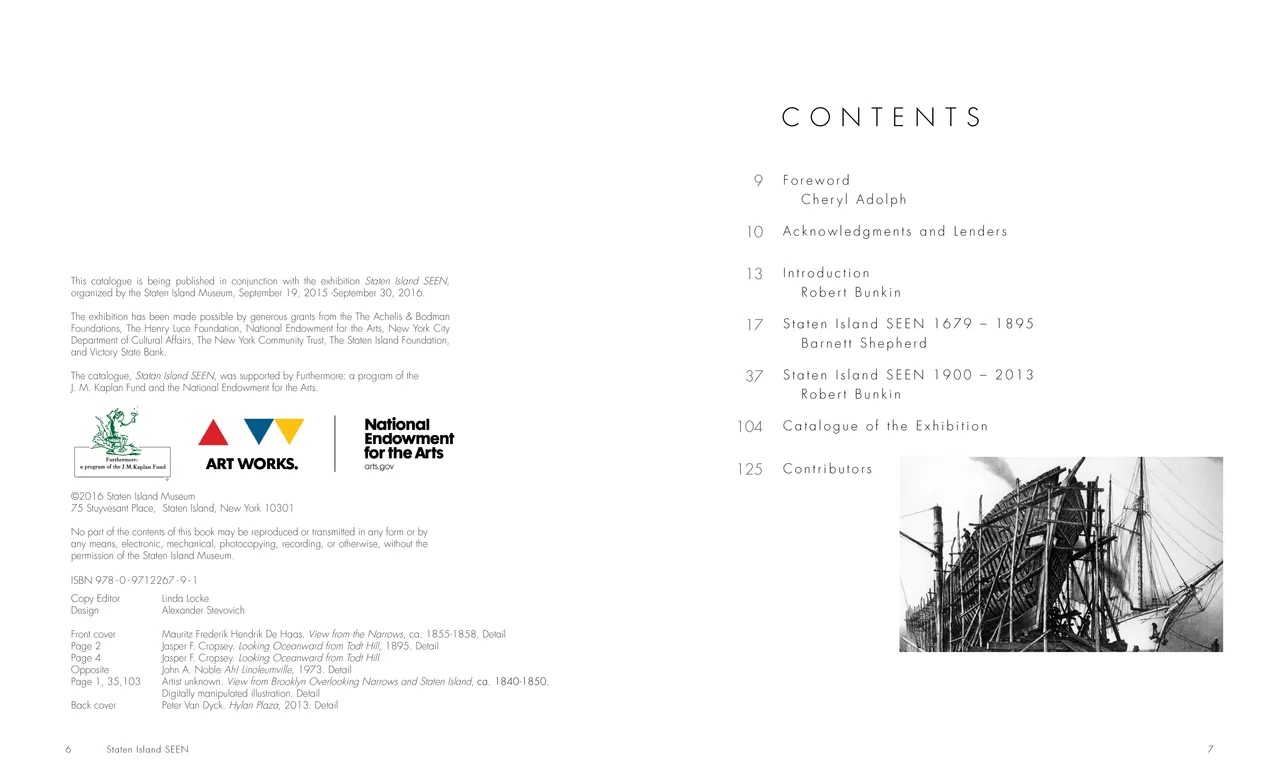
- Staten Island SEEN exhibition catalog, pages 6-7
- Client: Staten Island Museum
- Visit figure page
- Type: portfolio
- Portfolio Type: publication_design
- Portfolio Role: design_layout
Staten Island: Seen — Pages 60–61
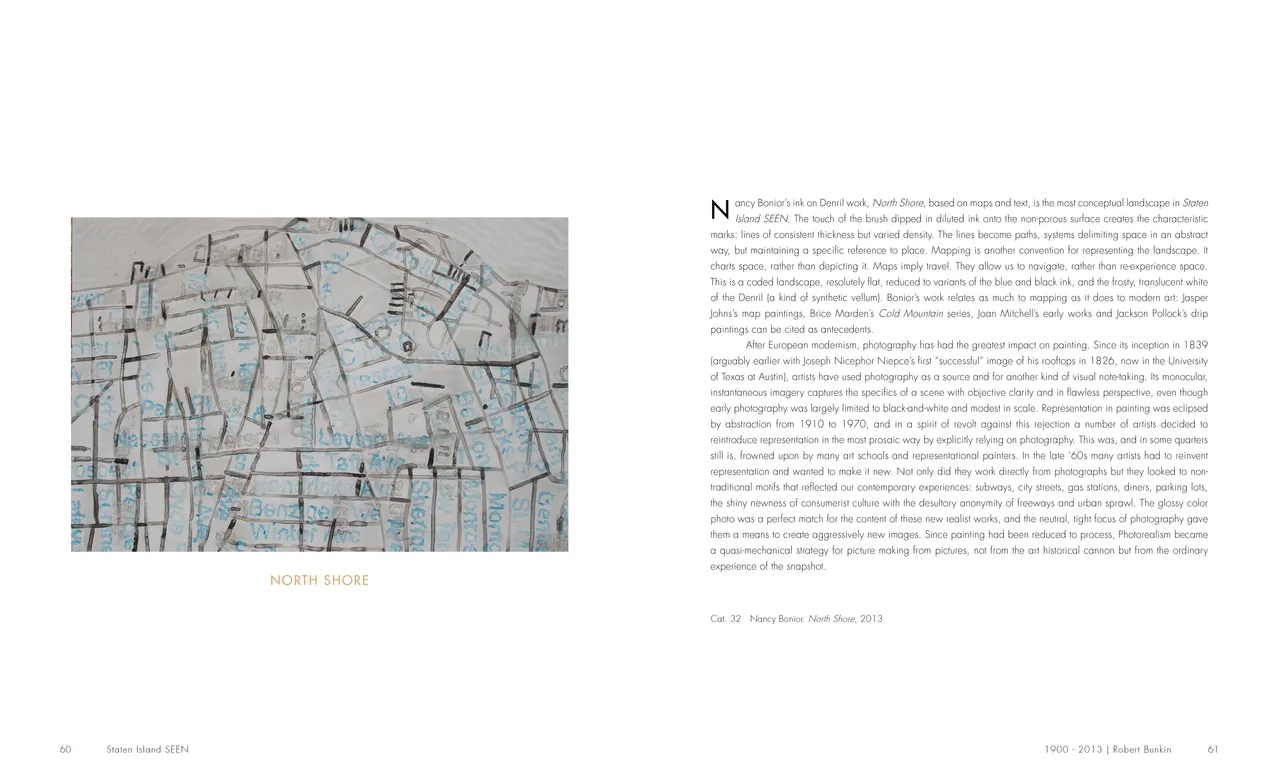
- Staten Island SEEN exhibition catalog, pages 60-61
- Client: Staten Island Museum
- Visit figure page
- Type: portfolio
- Portfolio Type: publication_design
- Portfolio Role: design_layout
Staten Island: Seen — Pages 62–63
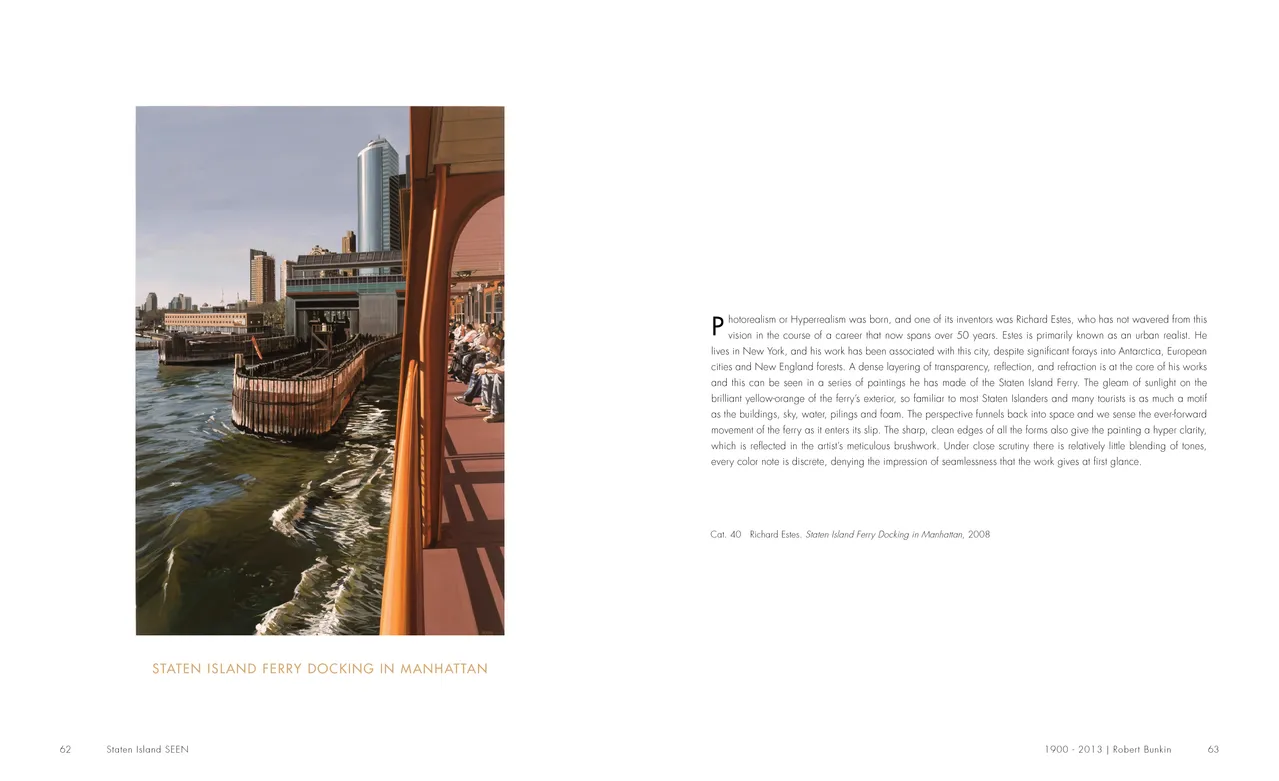
- Staten Island SEEN exhibition catalog, pages 62-63
- Client: Staten Island Museum
- Visit figure page
- Type: portfolio
- Portfolio Type: publication_design
- Portfolio Role: design_layout
Staten Island: Seen — Pages 64–65
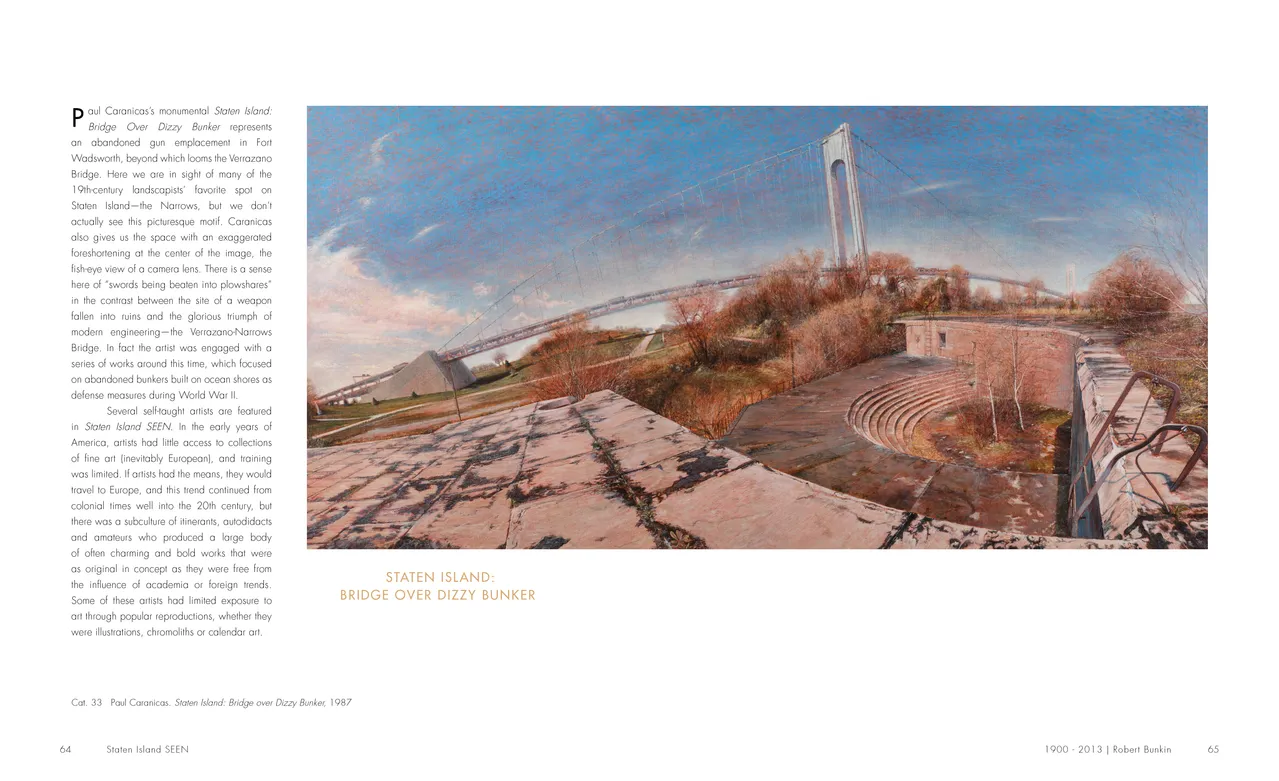
- Staten Island SEEN exhibition catalog, pages 64-65
- Client: Staten Island Museum
- Visit figure page
- Type: portfolio
- Portfolio Type: publication_design
- Portfolio Role: design_layout
Staten Island: Seen — Pages 66–67
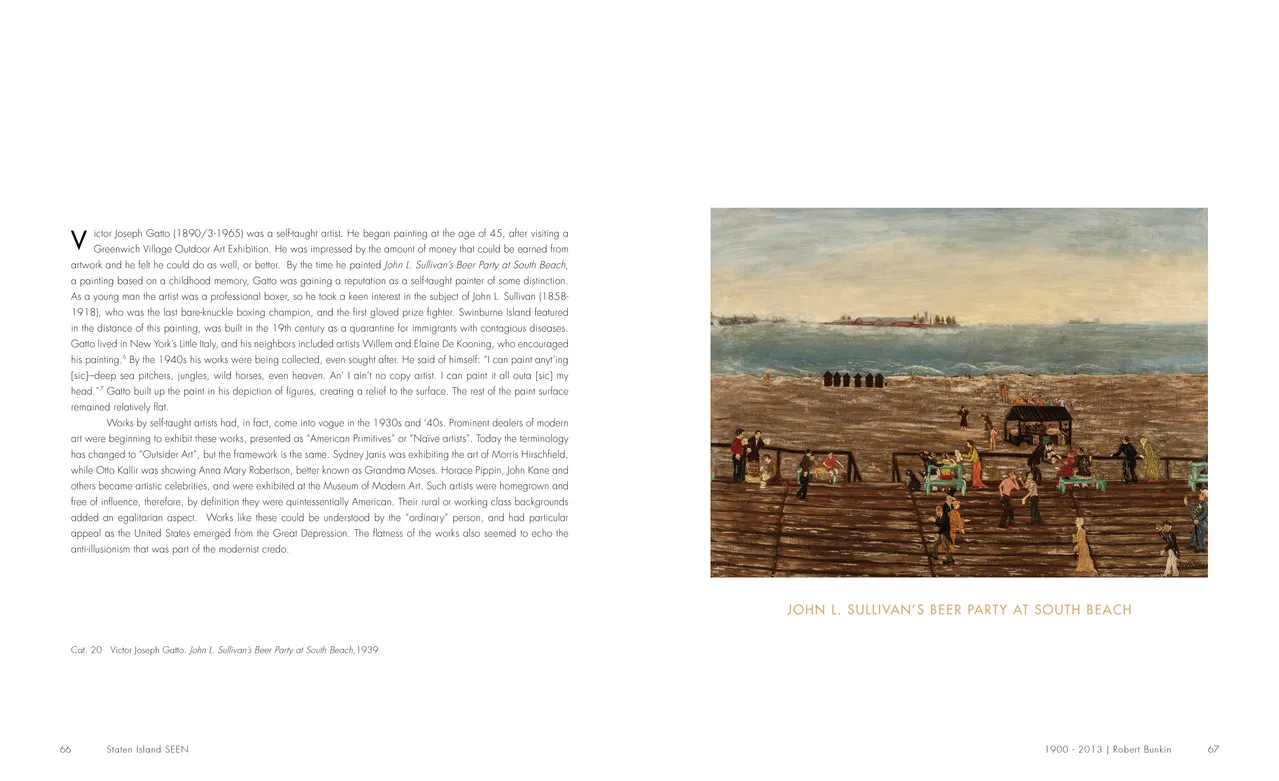
- Staten Island SEEN exhibition catalog, pages 66-67
- Client: Staten Island Museum
- Visit figure page
- Type: portfolio
- Portfolio Type: publication_design
- Portfolio Role: design_layout
Staten Island: Seen — Pages 68–69
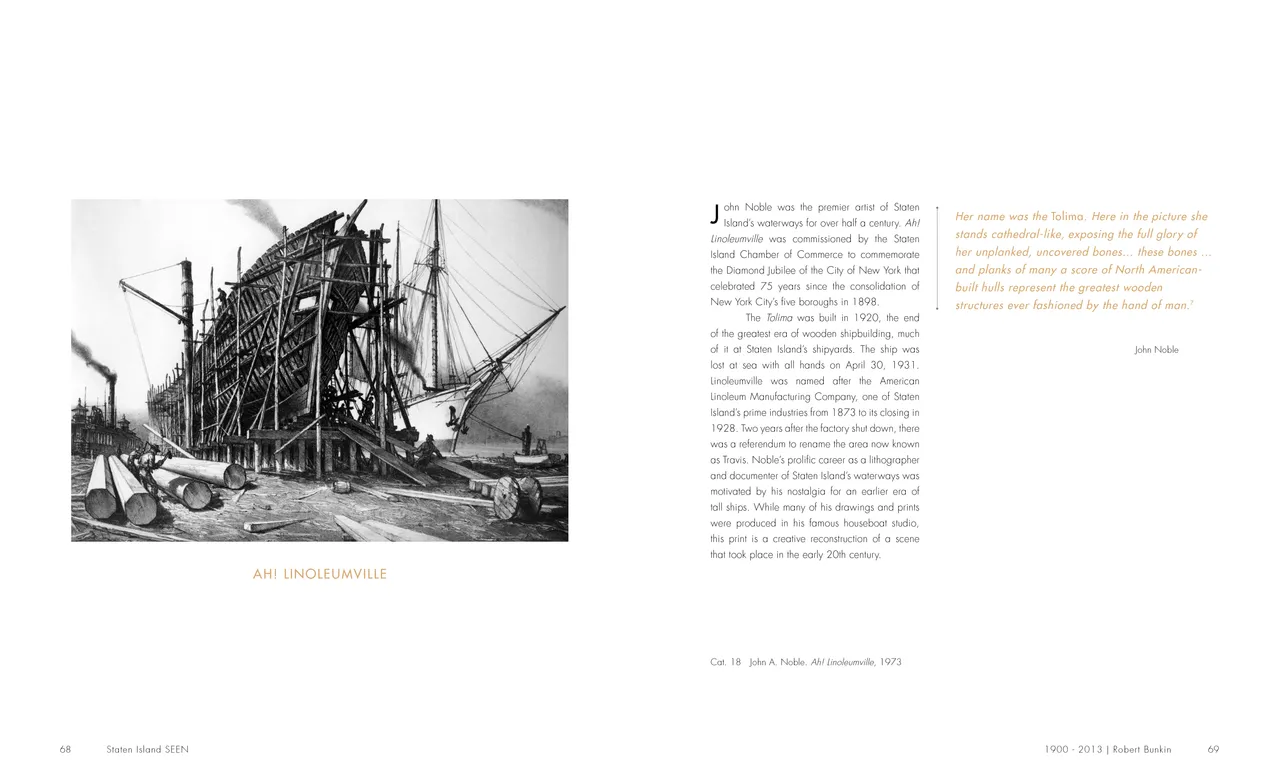
- Staten Island SEEN exhibition catalog, pages 68-69
- Client: Staten Island Museum
- Visit figure page
- Type: portfolio
- Portfolio Type: publication_design
- Portfolio Role: design_layout
Staten Island: Seen — Pages 70–71
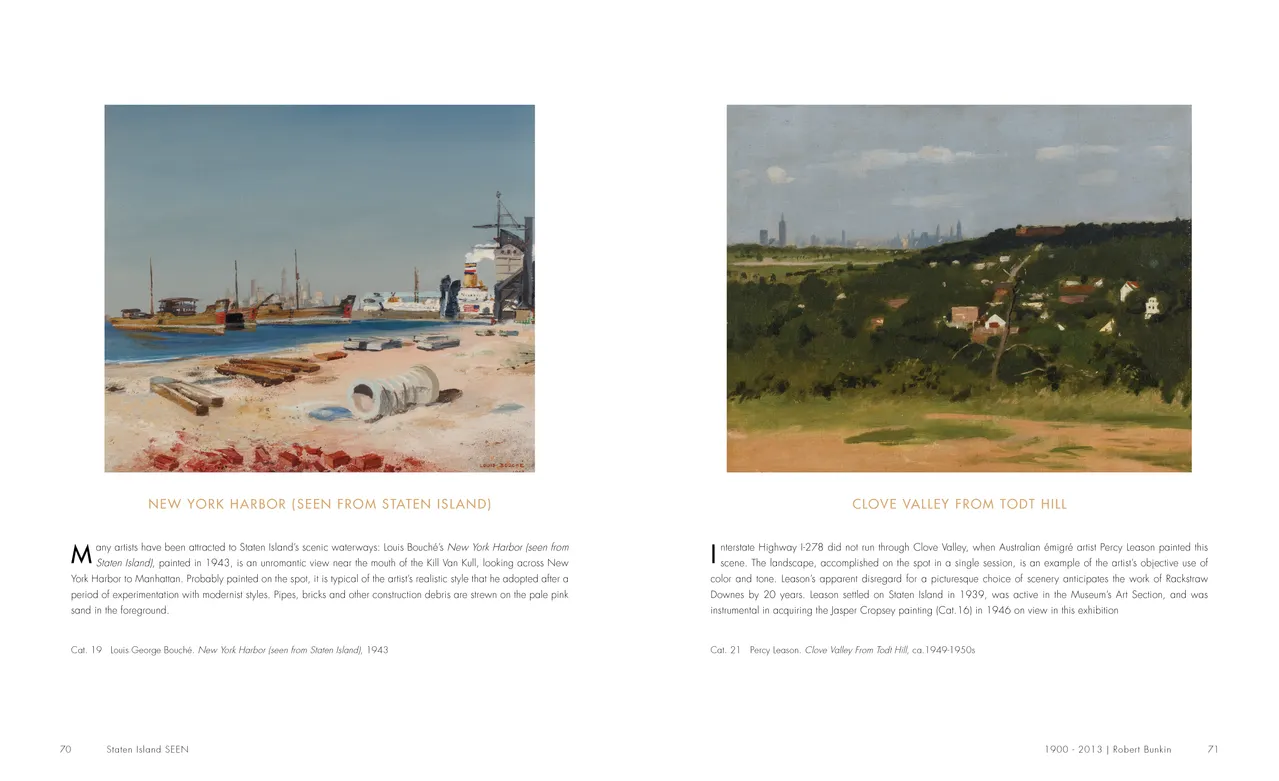
- Staten Island SEEN exhibition catalog, pages 70-71
- Client: Staten Island Museum
- Visit figure page
- Type: portfolio
- Portfolio Type: publication_design
- Portfolio Role: design_layout
Staten Island: Seen — Pages 72–73
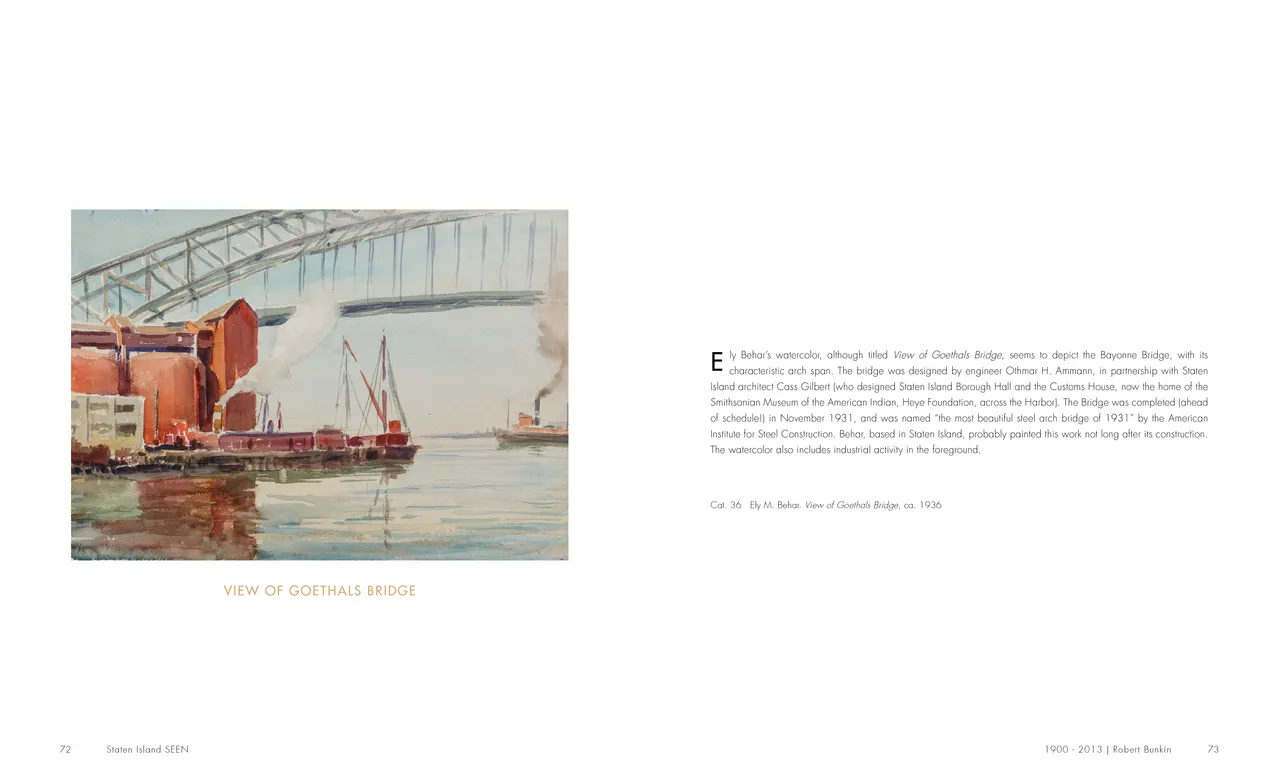
- Staten Island SEEN exhibition catalog, pages 72-73
- Client: Staten Island Museum
- Visit figure page
- Type: portfolio
- Portfolio Type: publication_design
- Portfolio Role: design_layout
Staten Island: Seen — Pages 74–75
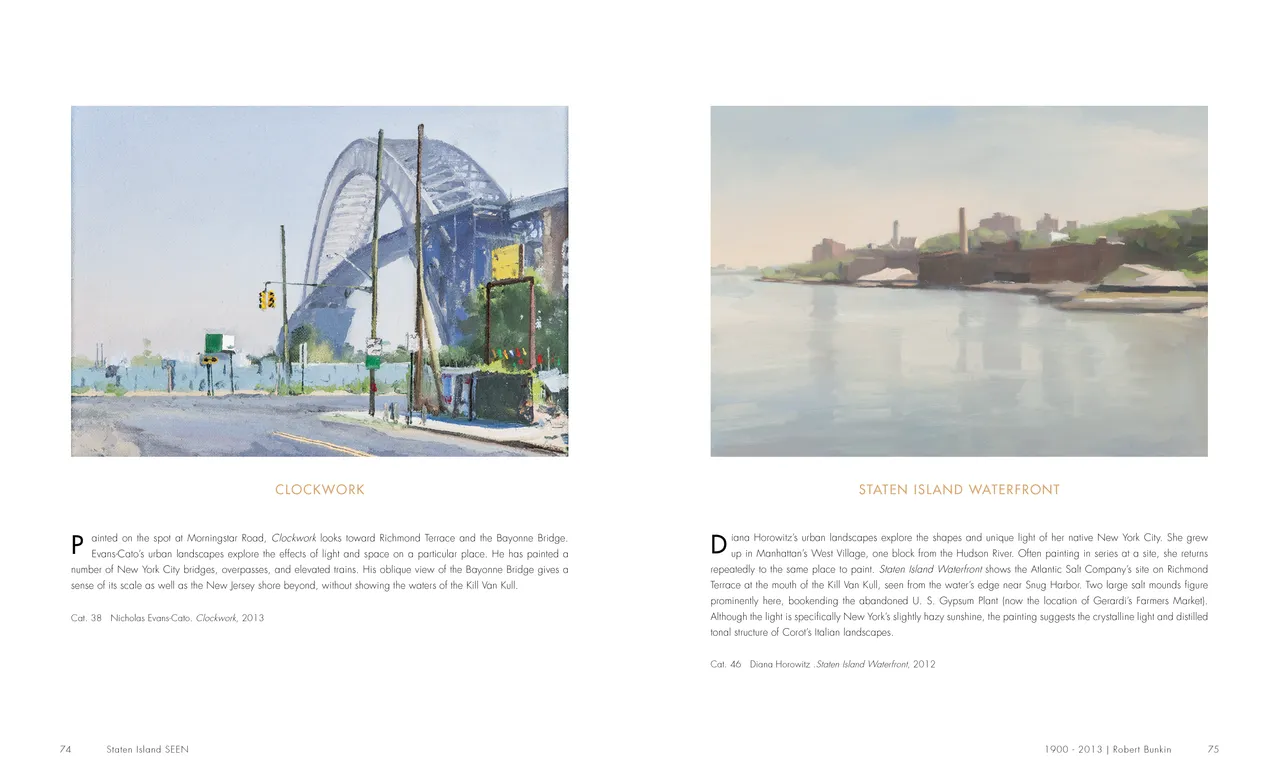
- Staten Island SEEN exhibition catalog, pages 74-75
- Client: Staten Island Museum
- Visit figure page
- Type: portfolio
- Portfolio Type: publication_design
- Portfolio Role: design_layout
Staten Island: Seen — Pages 76–77
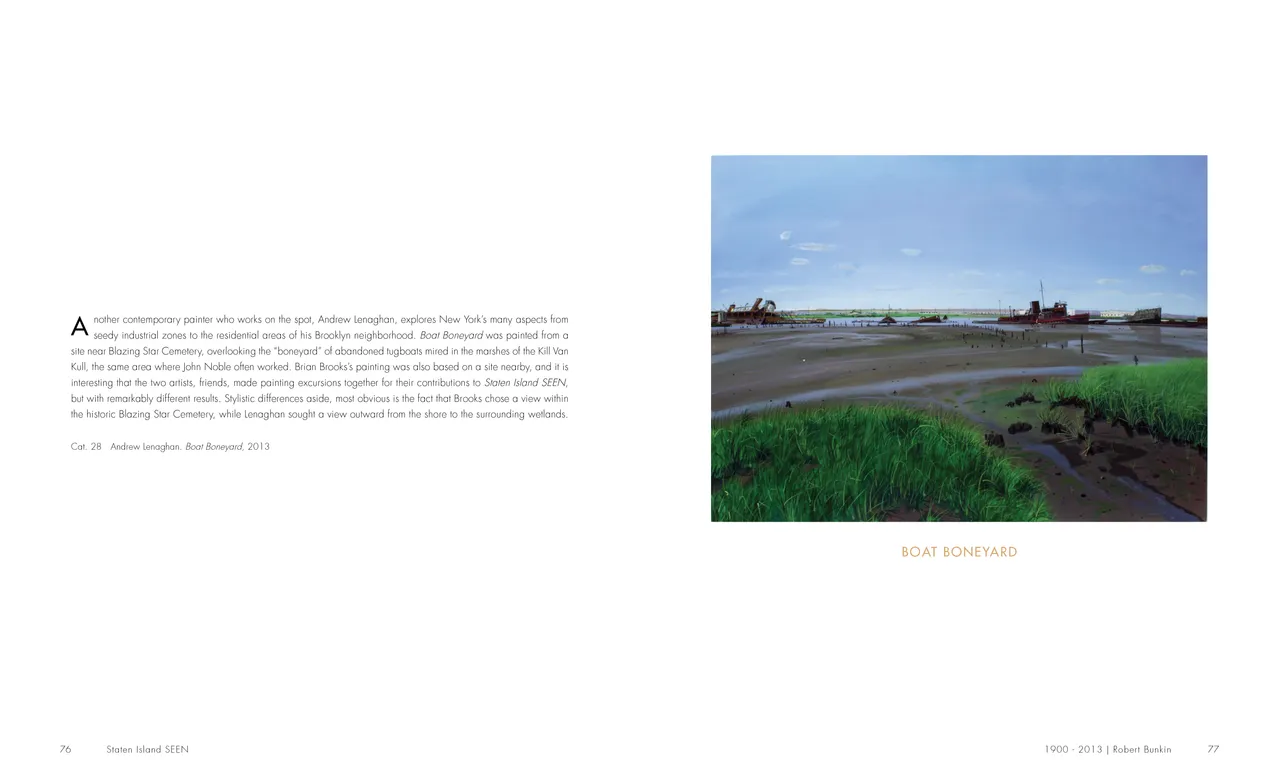
- Staten Island SEEN exhibition catalog, pages 76-77
- Client: Staten Island Museum
- Visit figure page
- Type: portfolio
- Portfolio Type: publication_design
- Portfolio Role: design_layout
Staten Island: Seen — Pages 78–79
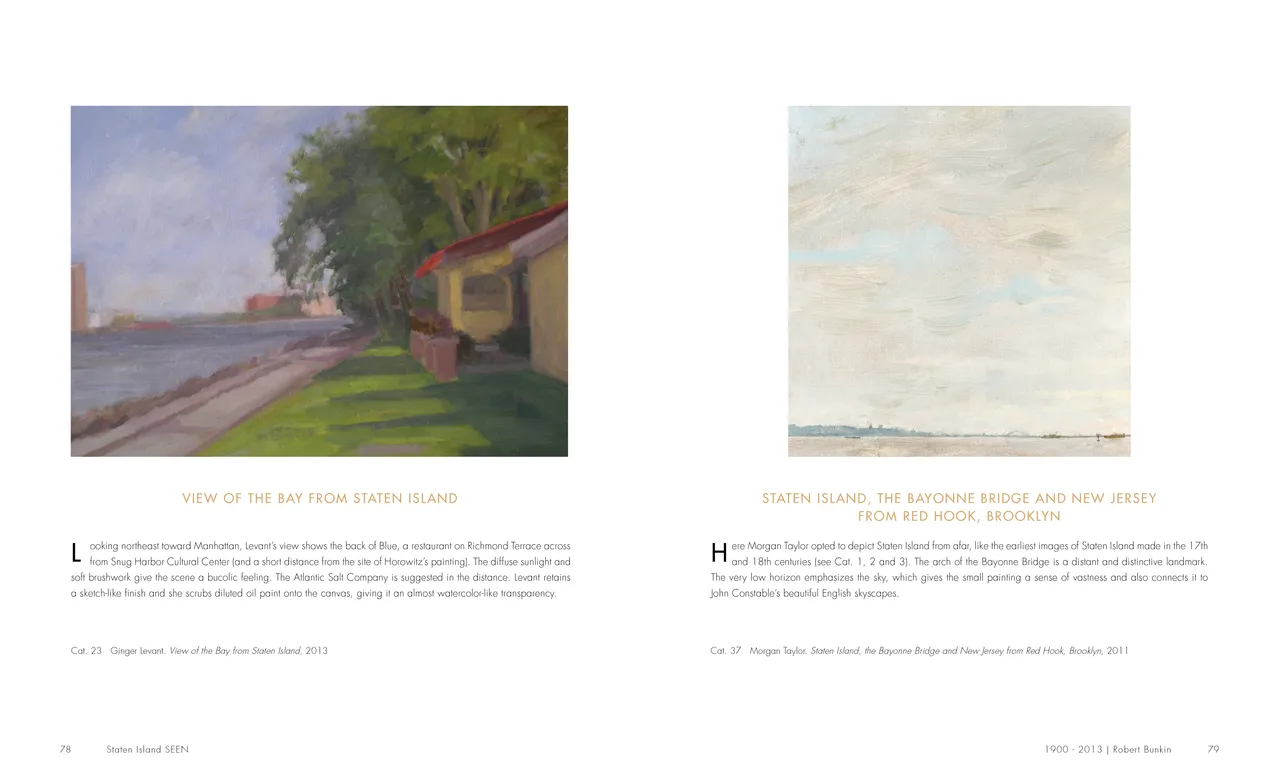
- Staten Island SEEN exhibition catalog, pages 78-79
- Client: Staten Island Museum
- Visit figure page
- Type: portfolio
- Portfolio Type: publication_design
- Portfolio Role: design_layout
Staten Island: Seen — Pages 8–9
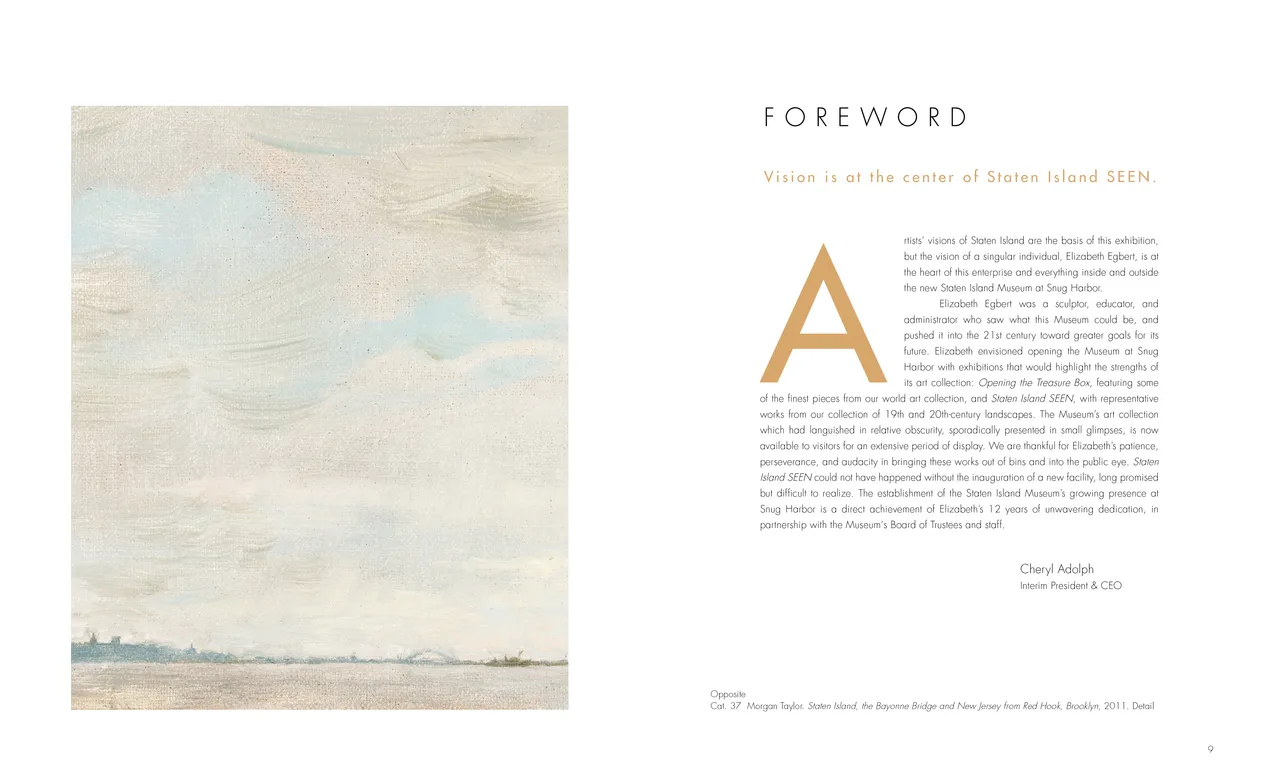
- Staten Island SEEN exhibition catalog, pages 8-9
- Client: Staten Island Museum
- Visit figure page
- Type: portfolio
- Portfolio Type: publication_design
- Portfolio Role: design_layout
Staten Island: Seen — Pages 80–81
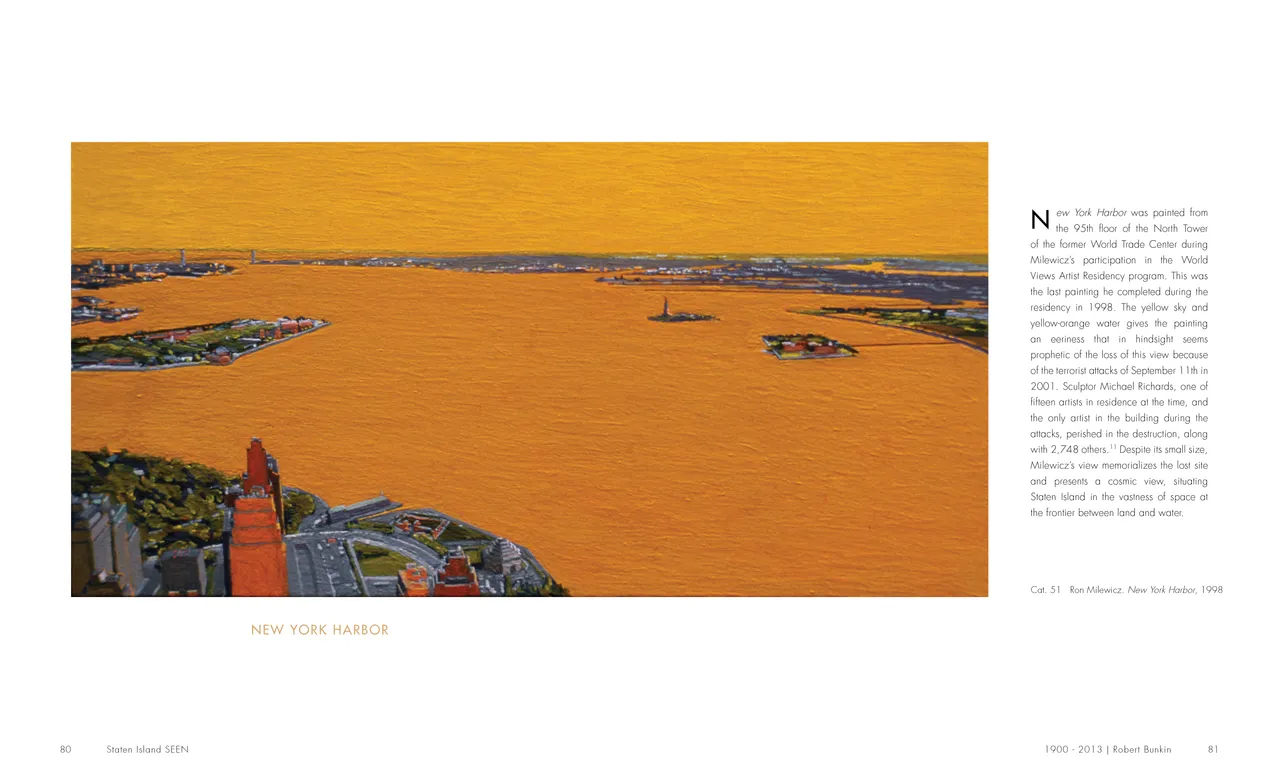
- Staten Island SEEN exhibition catalog, pages 80-81
- Client: Staten Island Museum
- Visit figure page
- Type: portfolio
- Portfolio Type: publication_design
- Portfolio Role: design_layout
Staten Island: Seen — Pages 82–83
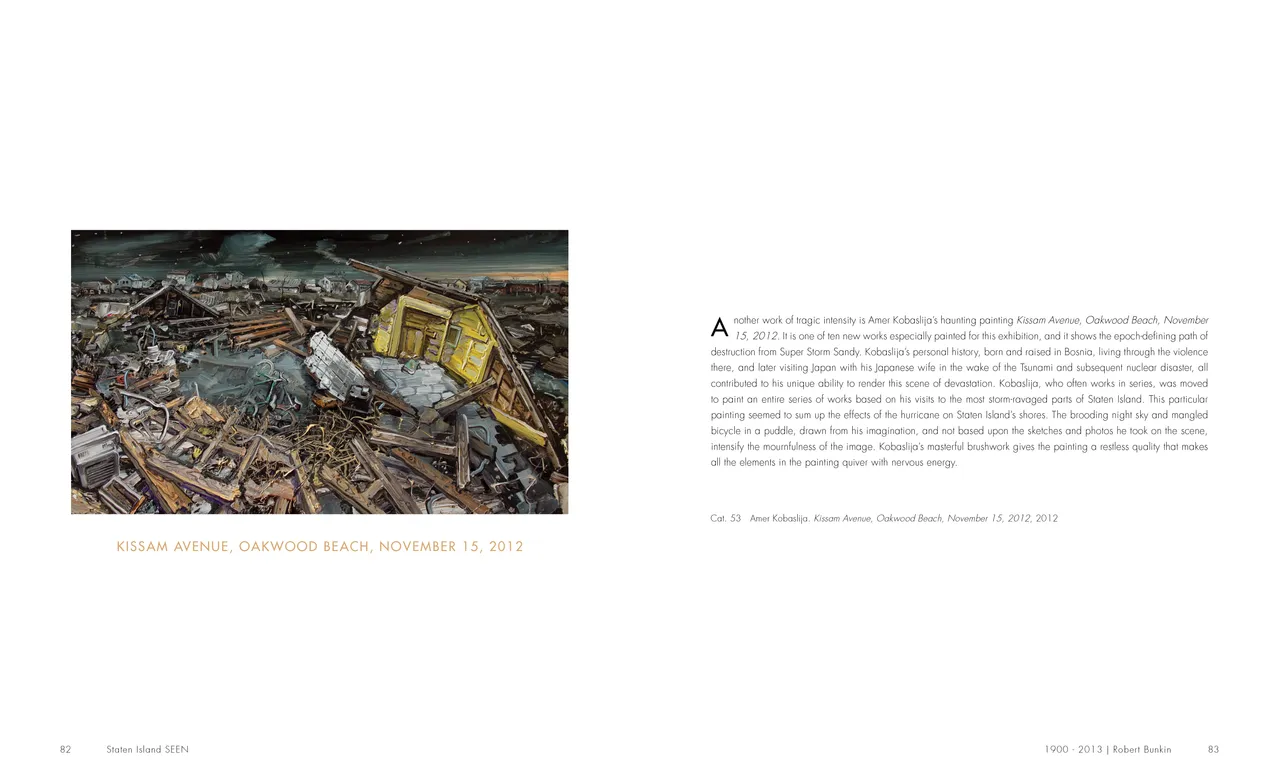
- Staten Island SEEN exhibition catalog, pages 82-83
- Client: Staten Island Museum
- Visit figure page
- Type: portfolio
- Portfolio Type: publication_design
- Portfolio Role: design_layout
Staten Island: Seen — Pages 84–85
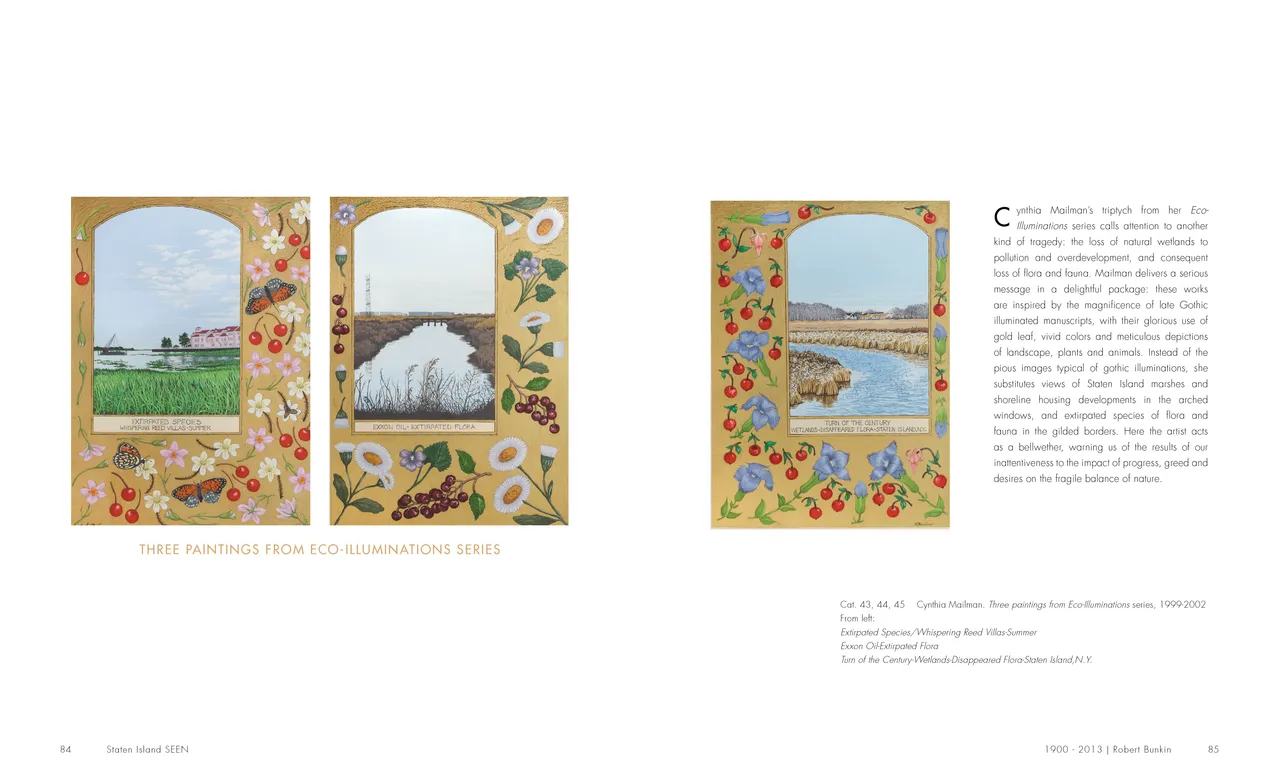
- Staten Island SEEN exhibition catalog, pages 84-85
- Client: Staten Island Museum
- Visit figure page
- Type: portfolio
- Portfolio Type: publication_design
- Portfolio Role: design_layout
Staten Island: Seen — Pages 86–87
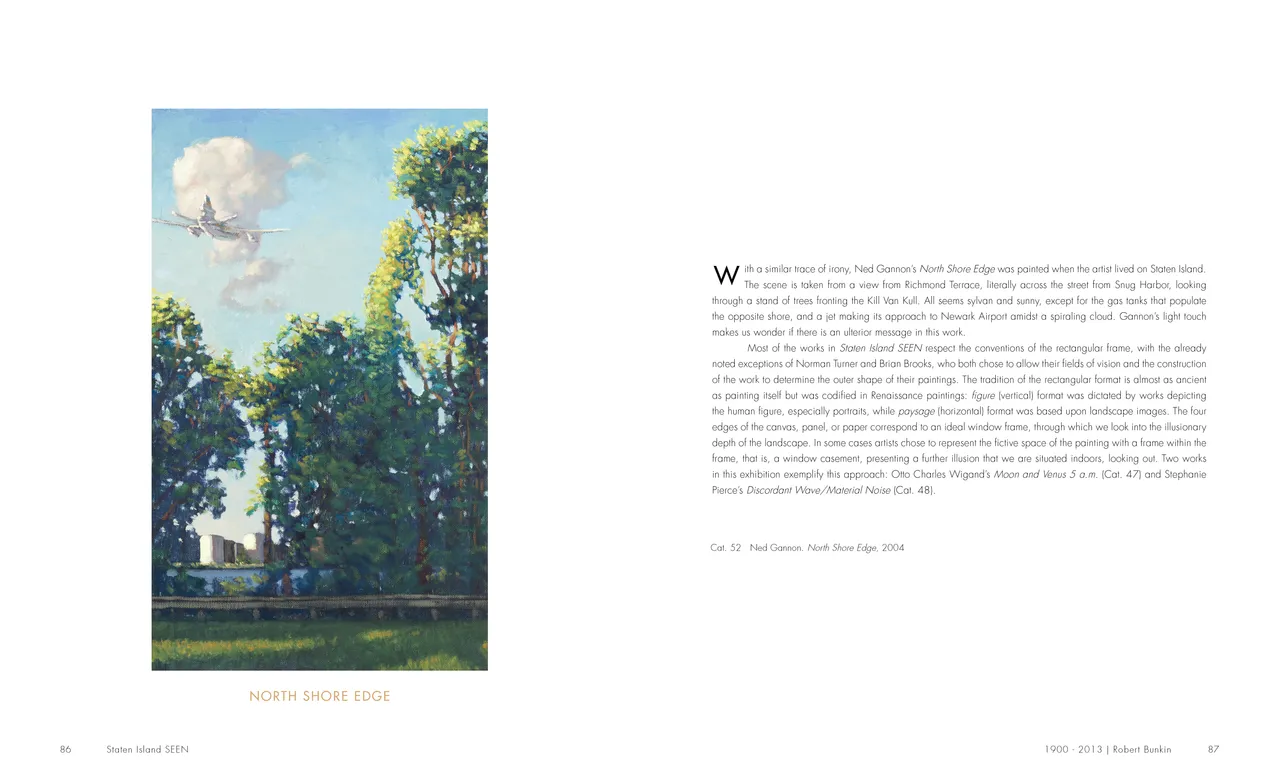
- Staten Island SEEN exhibition catalog, pages 86-87
- Client: Staten Island Museum
- Visit figure page
- Type: portfolio
- Portfolio Type: publication_design
- Portfolio Role: design_layout
Staten Island: Seen — Pages 88–89
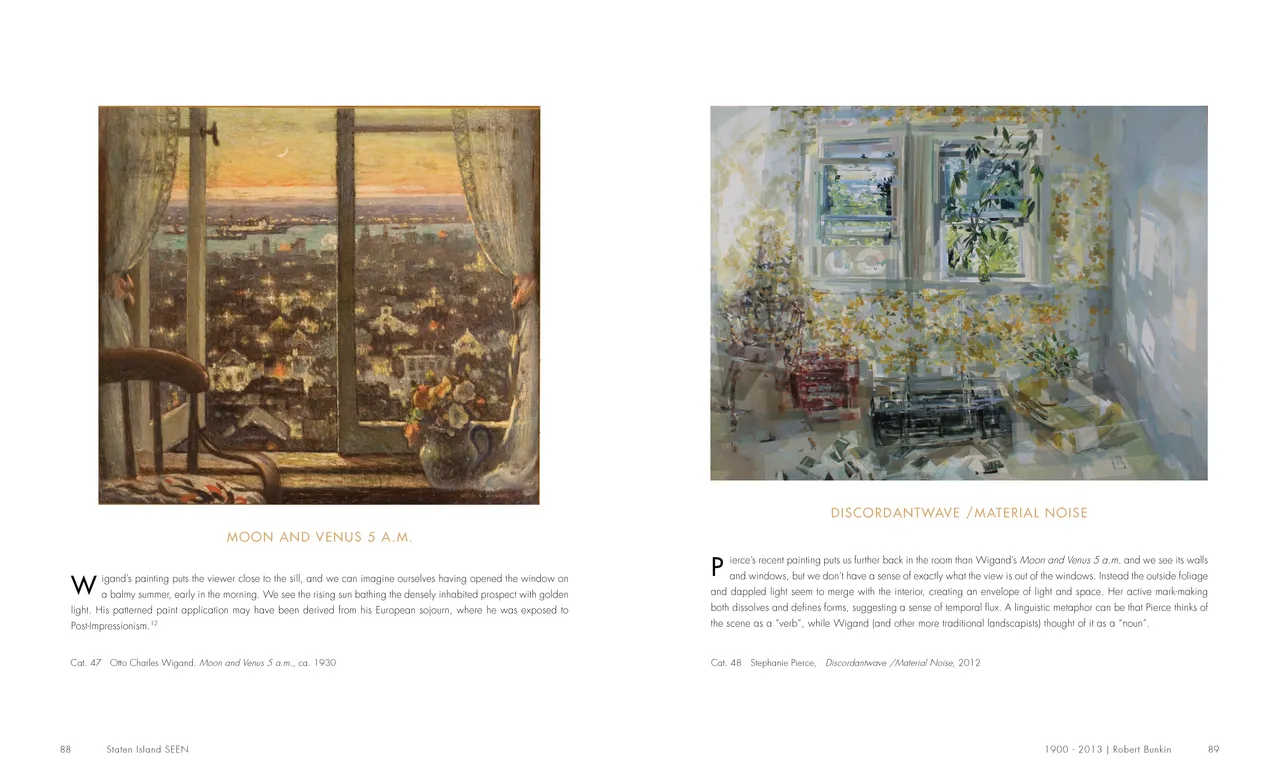
- Staten Island SEEN exhibition catalog, pages 88-89
- Client: Staten Island Museum
- Visit figure page
- Type: portfolio
- Portfolio Type: publication_design
- Portfolio Role: design_layout
Staten Island: Seen — Pages 90–91
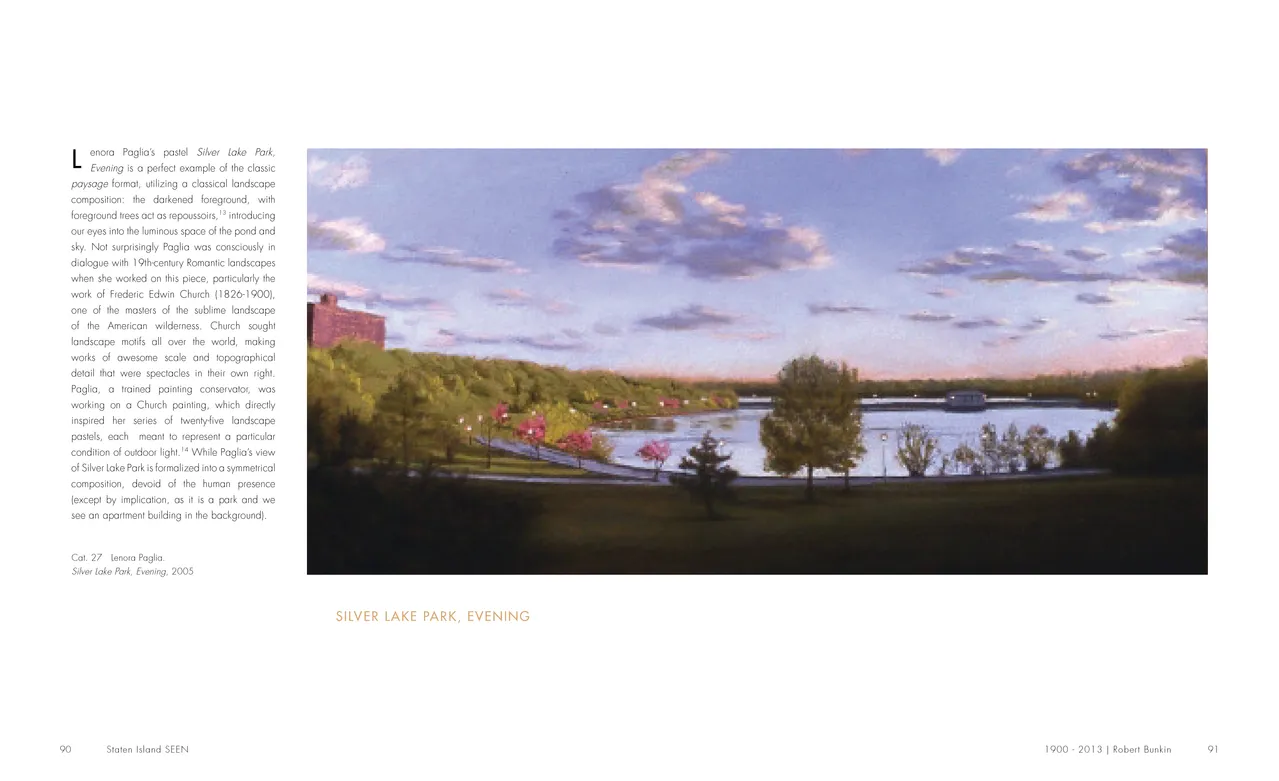
- Staten Island SEEN exhibition catalog, pages 90-91
- Client: Staten Island Museum
- Visit figure page
- Type: portfolio
- Portfolio Type: publication_design
- Portfolio Role: design_layout
Staten Island: Seen — Pages 92–93
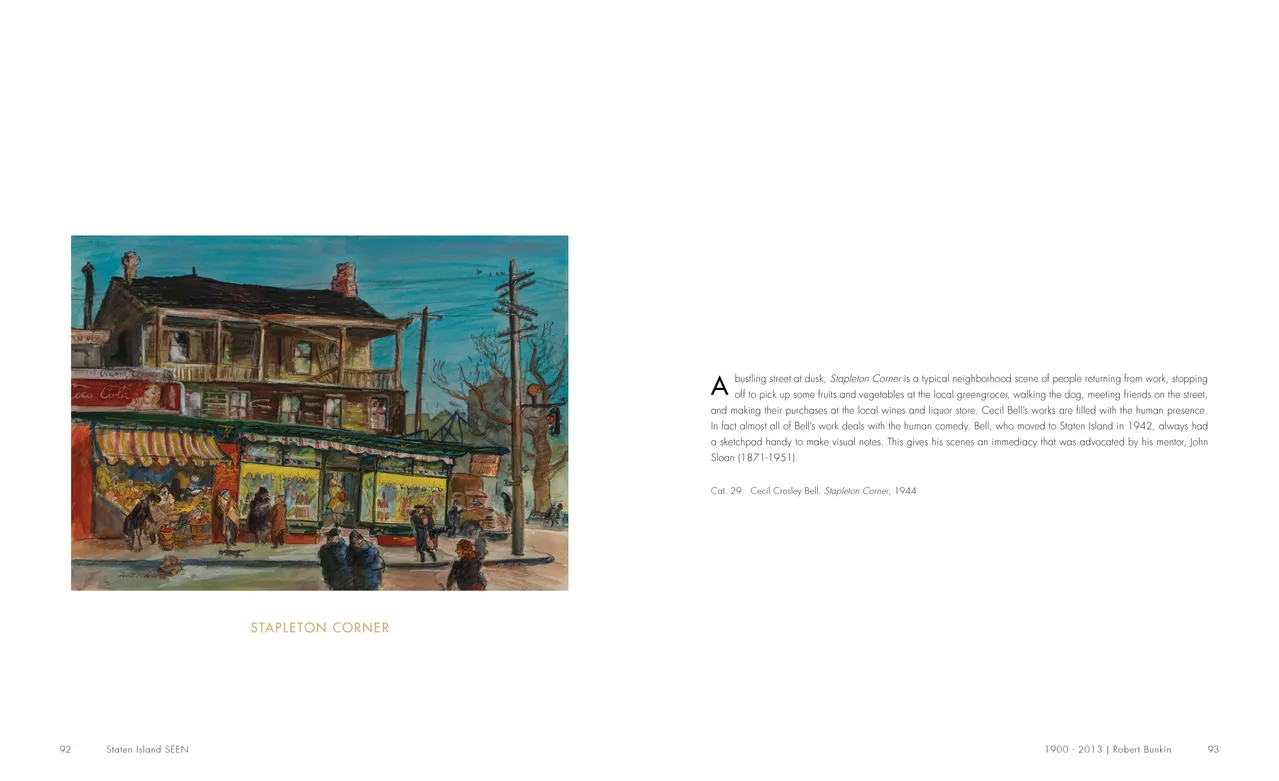
- Staten Island SEEN exhibition catalog, pages 92-93
- Client: Staten Island Museum
- Visit figure page
- Type: portfolio
- Portfolio Type: publication_design
- Portfolio Role: design_layout
Staten Island: Seen — Pages 94–95
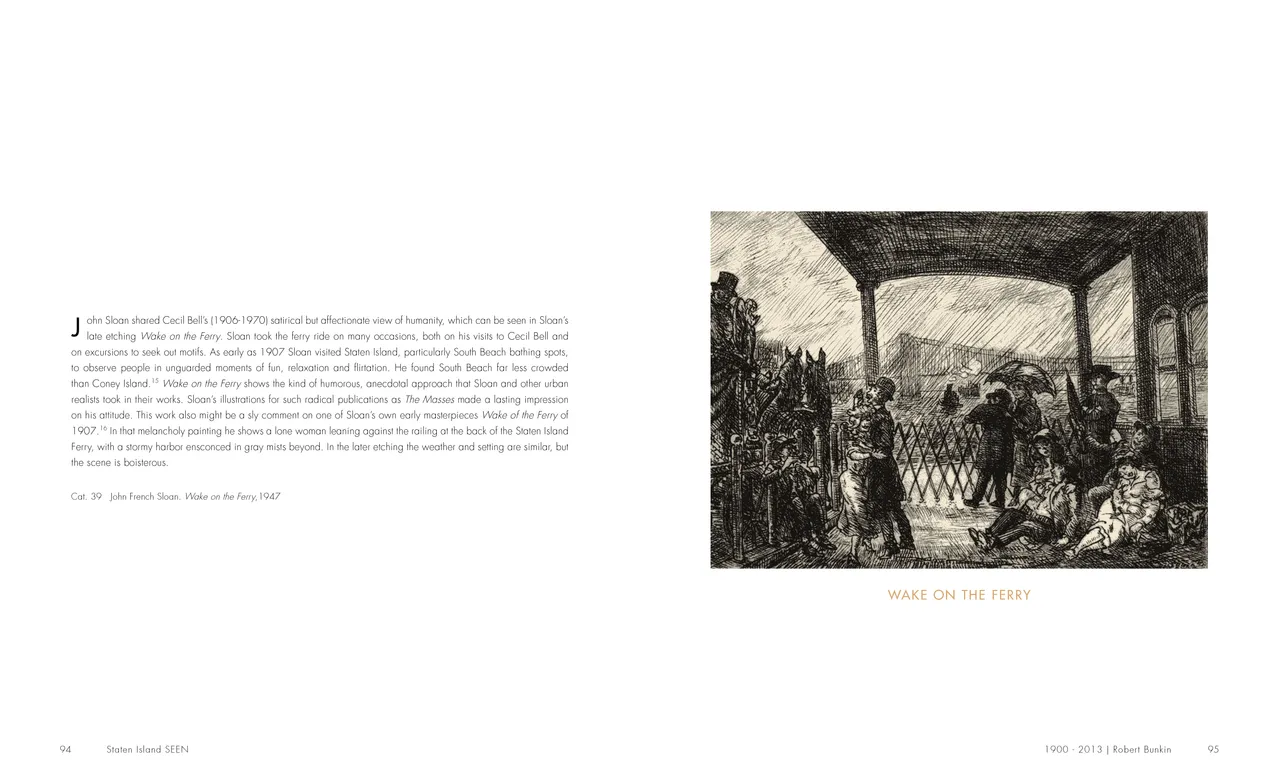
- Staten Island SEEN exhibition catalog, pages 94-95
- Client: Staten Island Museum
- Visit figure page
- Type: portfolio
- Portfolio Type: publication_design
- Portfolio Role: design_layout
Staten Island: Seen — Pages 96–97
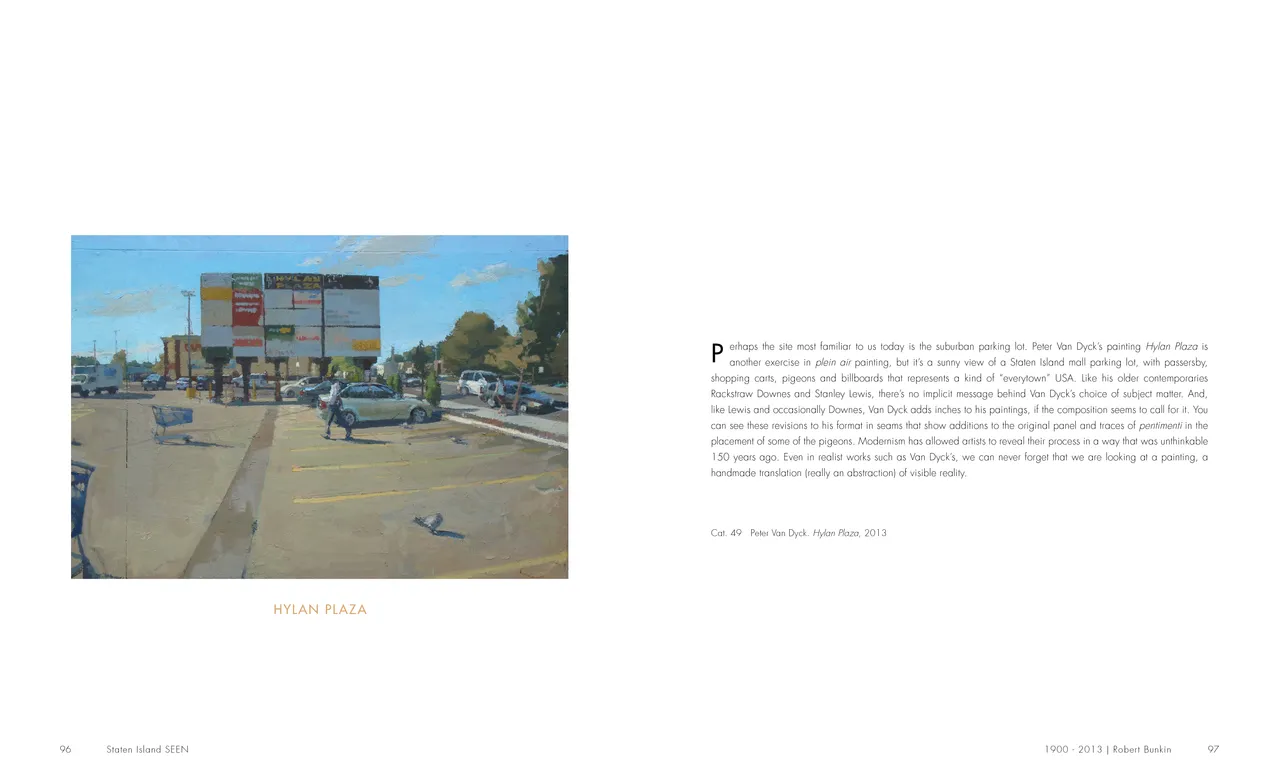
- Staten Island SEEN exhibition catalog, pages 96-97
- Client: Staten Island Museum
- Visit figure page
- Type: portfolio
- Portfolio Type: publication_design
- Portfolio Role: design_layout
Staten Island: Seen — Pages 98–99

- Staten Island SEEN exhibition catalog, pages 98-99
- Client: Staten Island Museum
- Visit figure page
- Type: portfolio
- Portfolio Type: publication_design
- Portfolio Role: design_layout
Strut Exhibition Banner
- Banner for STRUT: The Peacock and Beauty in Art exhibition
- Client: Hudson River Museum
- Visit figure page
- Type: portfolio
- Portfolio Type: advertising
- Portfolio Role: design_layout
Strut Exhibition Intro Panel
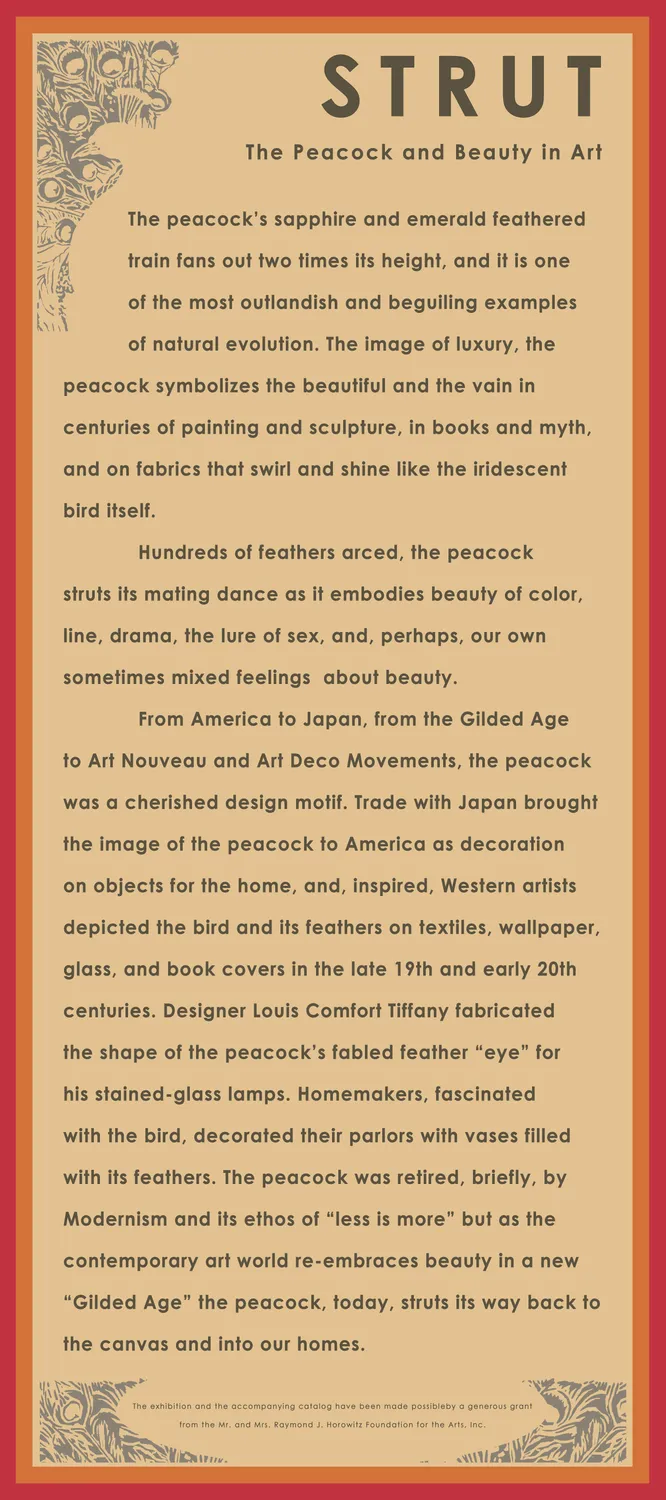
- Introduction panel for STRUT: The Peacock and Beauty in Art exhibition
- Client: Hudson River Museum
- Visit figure page
- Type: portfolio
- Portfolio Type: advertising
- Portfolio Role: design_layout
Strut Exhibition Invitation Presentation
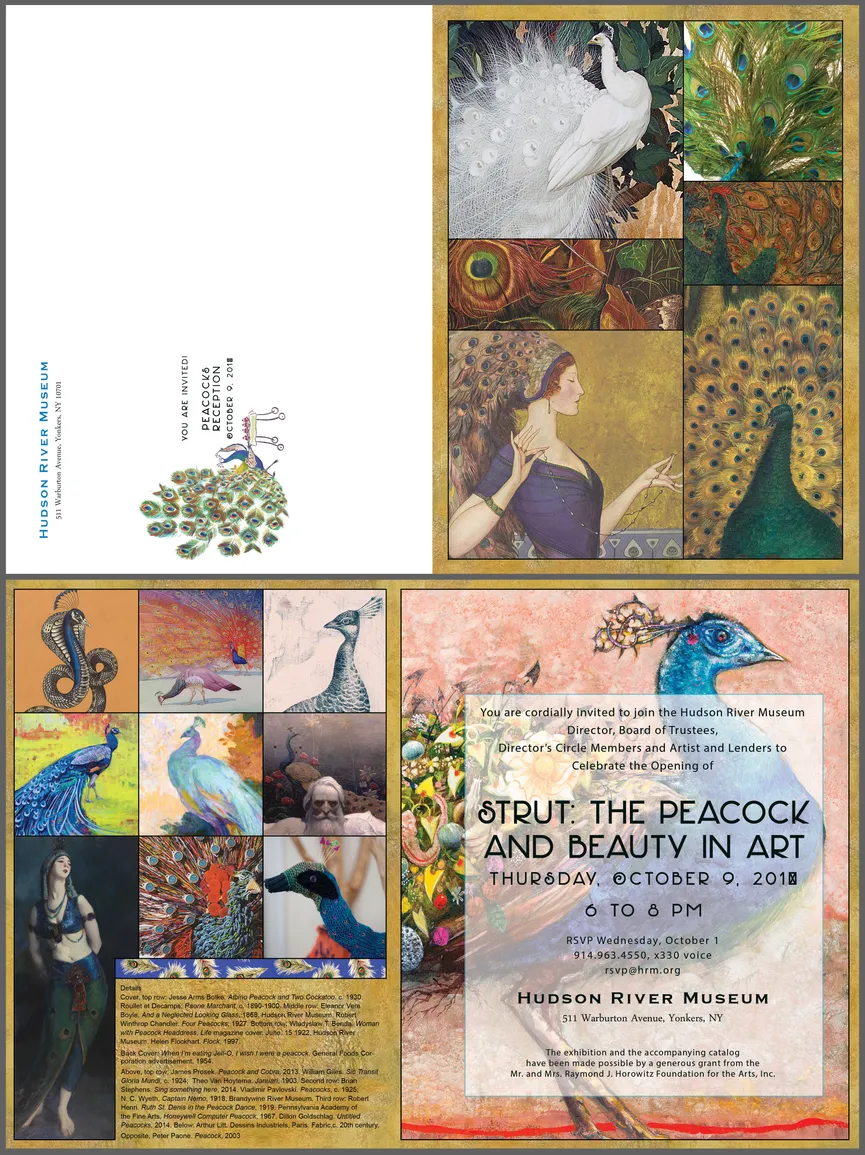
- Folding invitation for the STRUT: The Peacock and Beauty in Art exhibition
- Client: Hudson River Museum
- Visit figure page
- Type: portfolio
- Portfolio Type: advertising
- Portfolio Role: design_layout
Strut Exhibition Theme Panel 01

- Theme Panel 1 for STRUT: The Peacock and Beauty in Art exhibition
- Client: Hudson River Museum
- Visit figure page
- Type: portfolio
- Portfolio Type: advertising
- Portfolio Role: design_layout
Strut Exhibition Theme Panel 02
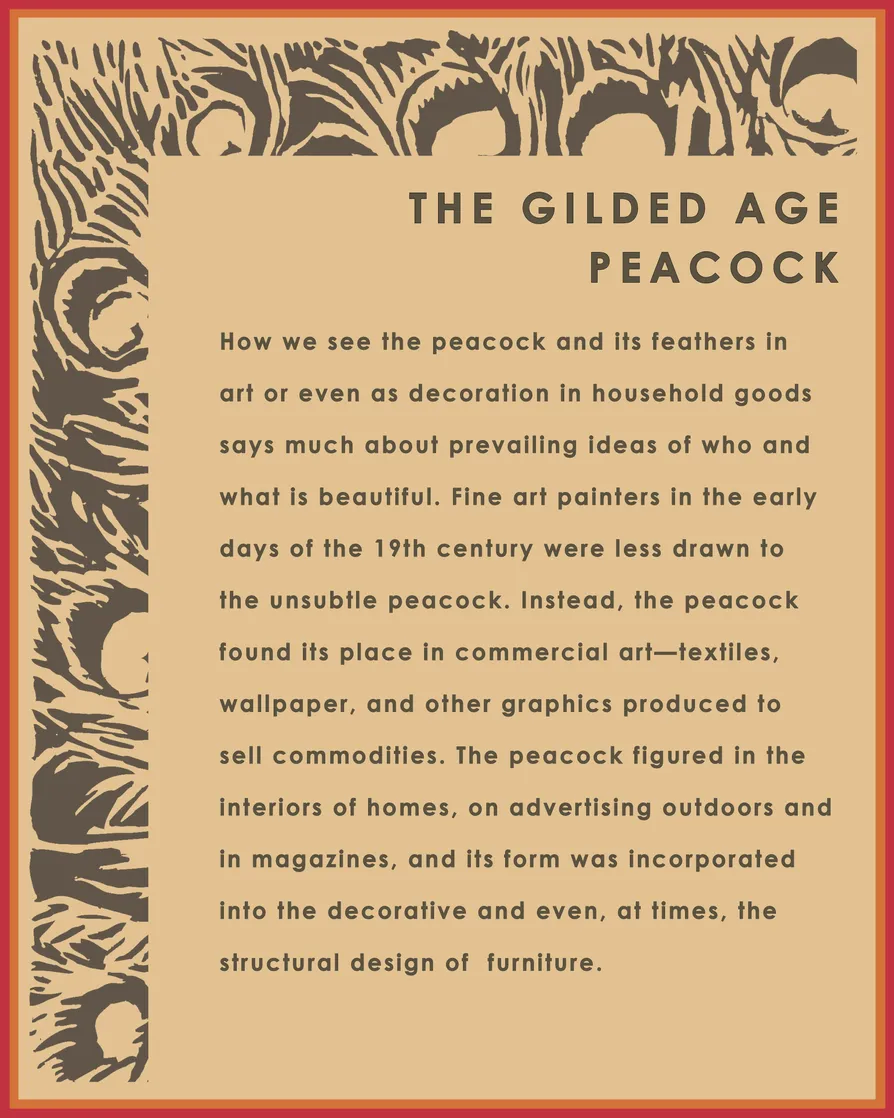
- Theme Panel 2 for STRUT: The Peacock and Beauty in Art exhibition
- Client: Hudson River Museum
- Visit figure page
- Type: portfolio
- Portfolio Type: advertising
- Portfolio Role: design_layout
Strut Exhibition Theme Panel 03
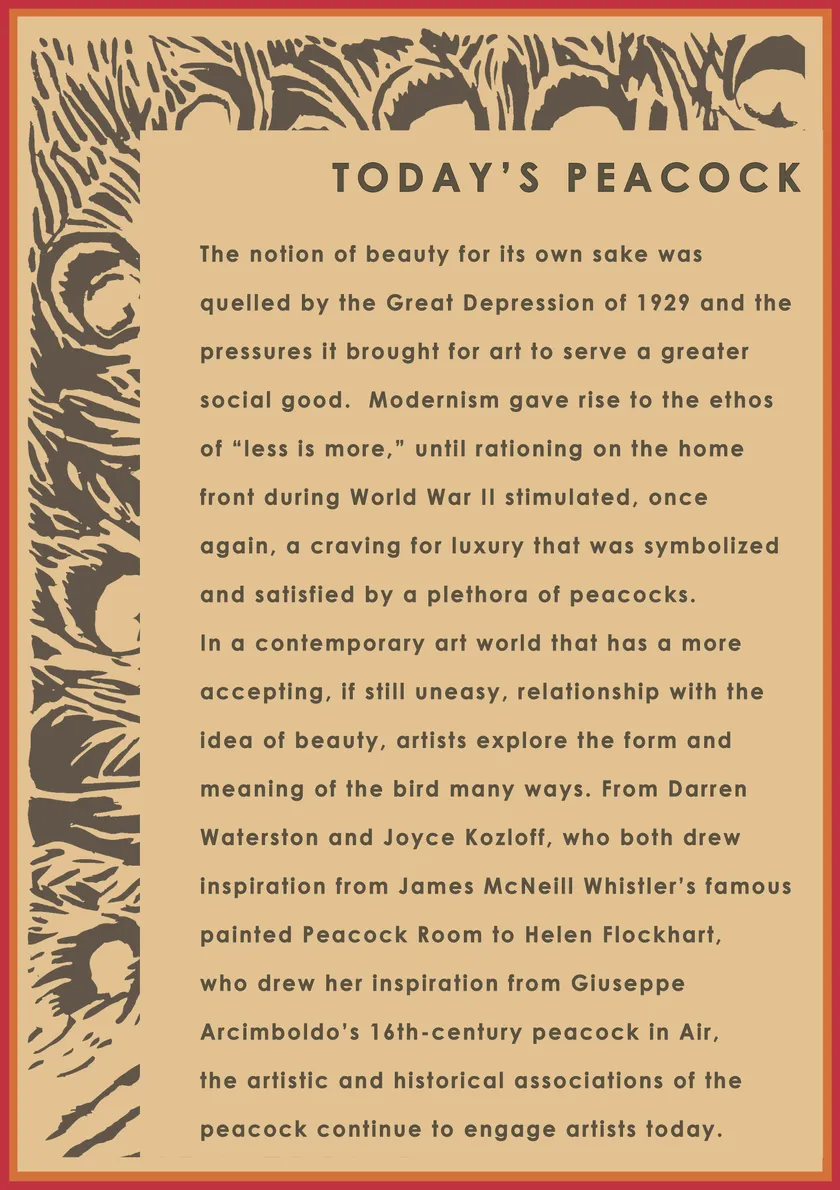
- Theme Panel 3 for STRUT: The Peacock and Beauty in Art exhibition
- Client: Hudson River Museum
- Visit figure page
- Type: portfolio
- Portfolio Type: advertising
- Portfolio Role: design_layout
Strut Exhibition Theme Panel 04
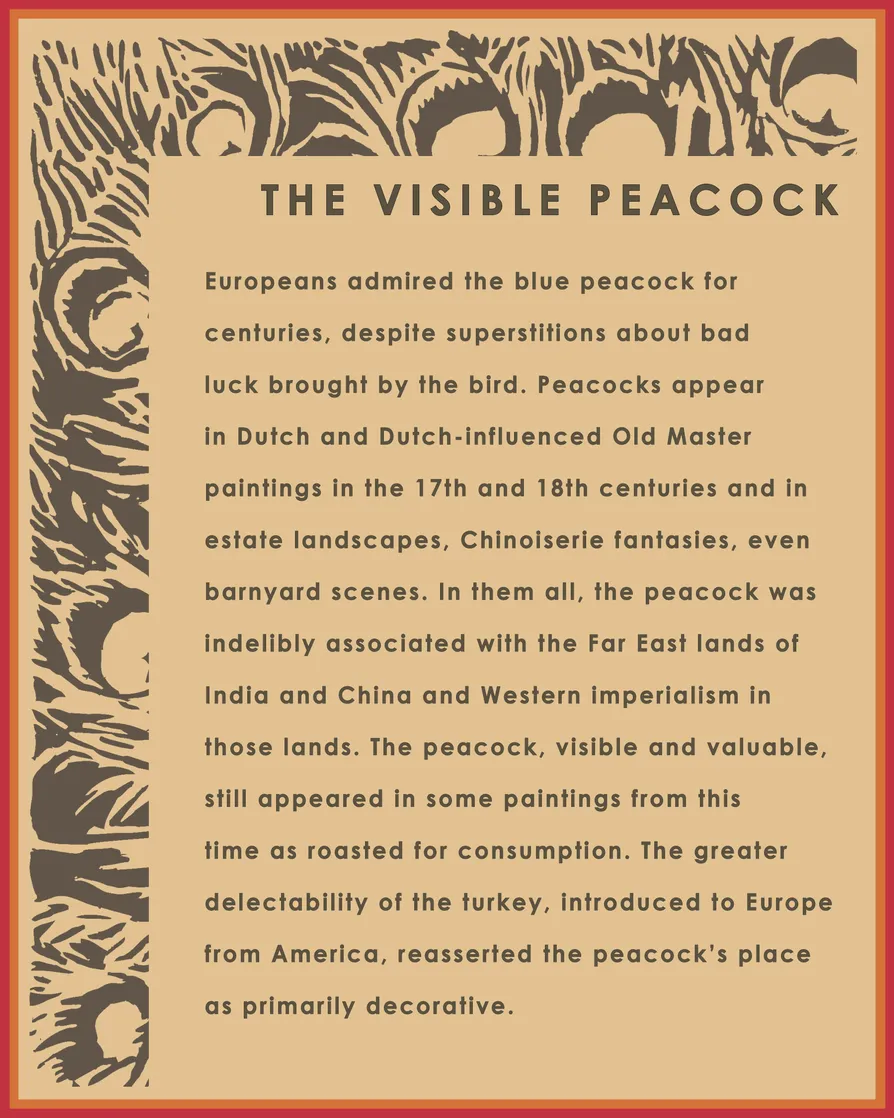
- Theme Panel 4 for STRUT: The Peacock and Beauty in Art exhibition
- Client: Hudson River Museum
- Visit figure page
- Type: portfolio
- Portfolio Type: advertising
- Portfolio Role: design_layout
Strut Exhibition Theme Panel 05
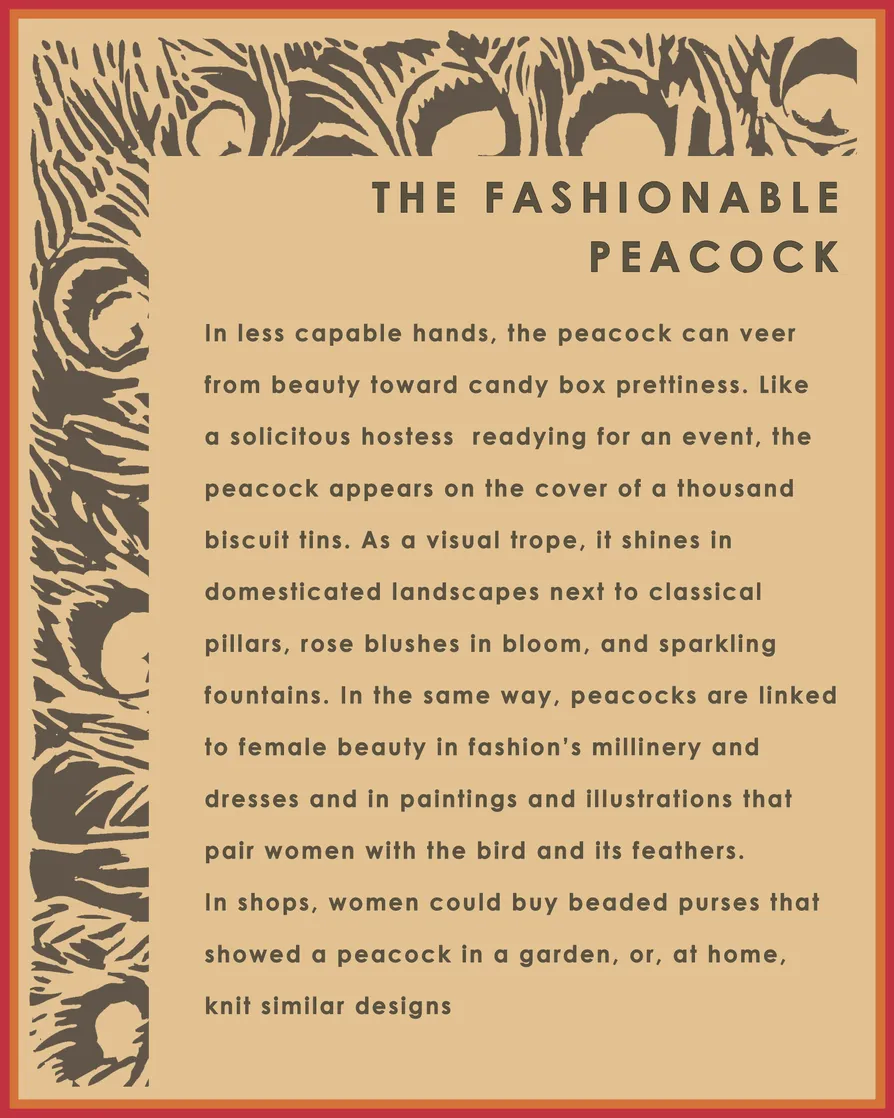
- Theme Panel 5 for STRUT: The Peacock and Beauty in Art exhibition
- Client: Hudson River Museum
- Visit figure page
- Type: portfolio
- Portfolio Type: advertising
- Portfolio Role: design_layout
Strut Exhibition Theme Panel 06

- Theme Panel 6 for STRUT: The Peacock and Beauty in Art exhibition
- Client: Hudson River Museum
- Visit figure page
- Type: portfolio
- Portfolio Type: advertising
- Portfolio Role: design_layout
Strut Exhibition Theme Panel 07
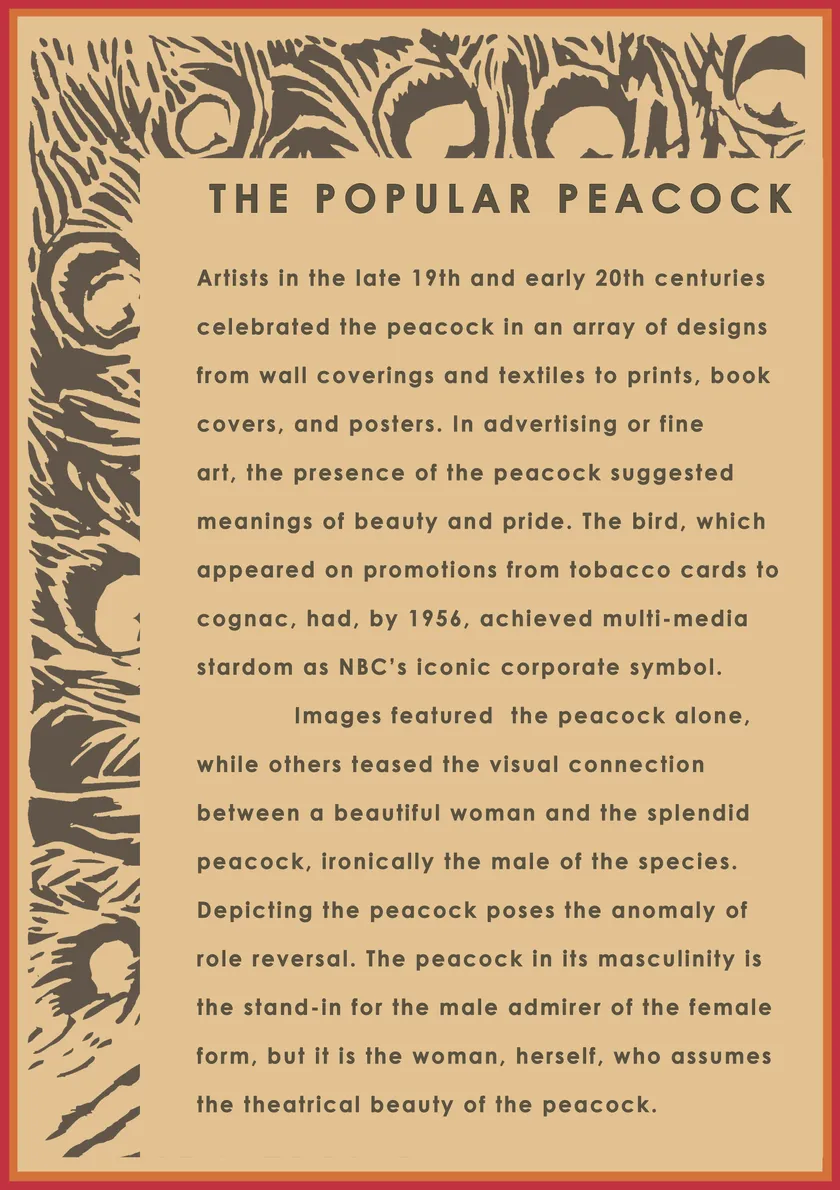
- Theme Panel 7 for STRUT: The Peacock and Beauty in Art exhibition
- Client: Hudson River Museum
- Visit figure page
- Type: portfolio
- Portfolio Type: advertising
- Portfolio Role: design_layout
Strut Exhibition Wordmark

- Wordmark for STRUT: The Peacock and Beauty in Art exhibition
- Client: Hudson River Museum
- Visit figure page
- Type: portfolio
- Portfolio Type: advertising
- Portfolio Role: design_layout
Strut Mta Poster

- STRUT: The Peacock and Beauty in Art MTA promotional poster
- Client: Hudson River Museum
- Visit figure page
- Type: portfolio
- Portfolio Type: advertising
- Portfolio Role: design_layout
Strut The: Peacock And Beauty In Art — Cover

- Strut: The Peacock and Beauty in Art exhibition catalog, cover
- Client: Hudson River Museum
- Visit figure page
- Type: portfolio
- Portfolio Type: publication_design
- Portfolio Role: design_layout
Strut The: Peacock And Beauty In Art — Inside Front Cover
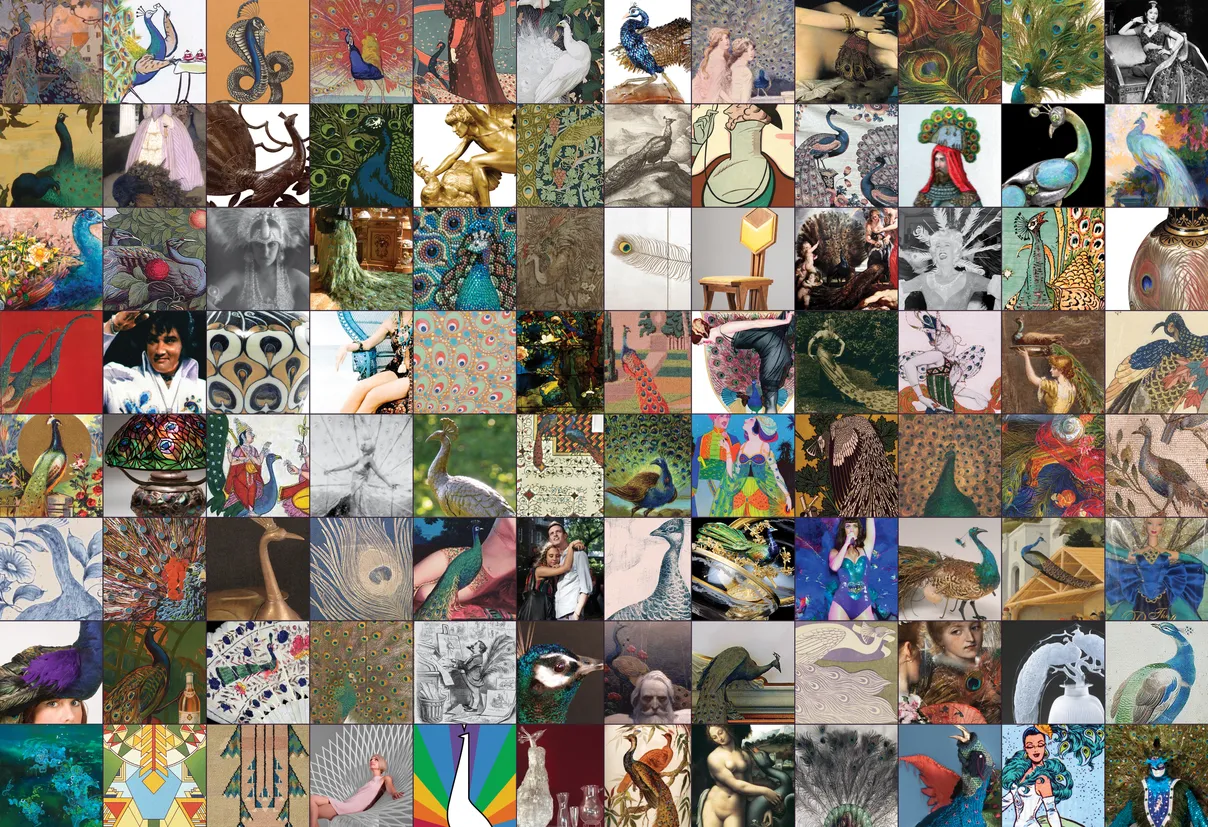
- Strut: The Peacock and Beauty in Art exhibition catalog, inside front cover
- Client: Hudson River Museum
- Visit figure page
- Type: portfolio
- Portfolio Type: publication_design
- Portfolio Role: design_layout
Strut The: Peacock And Beauty In Art — Pages 10–11
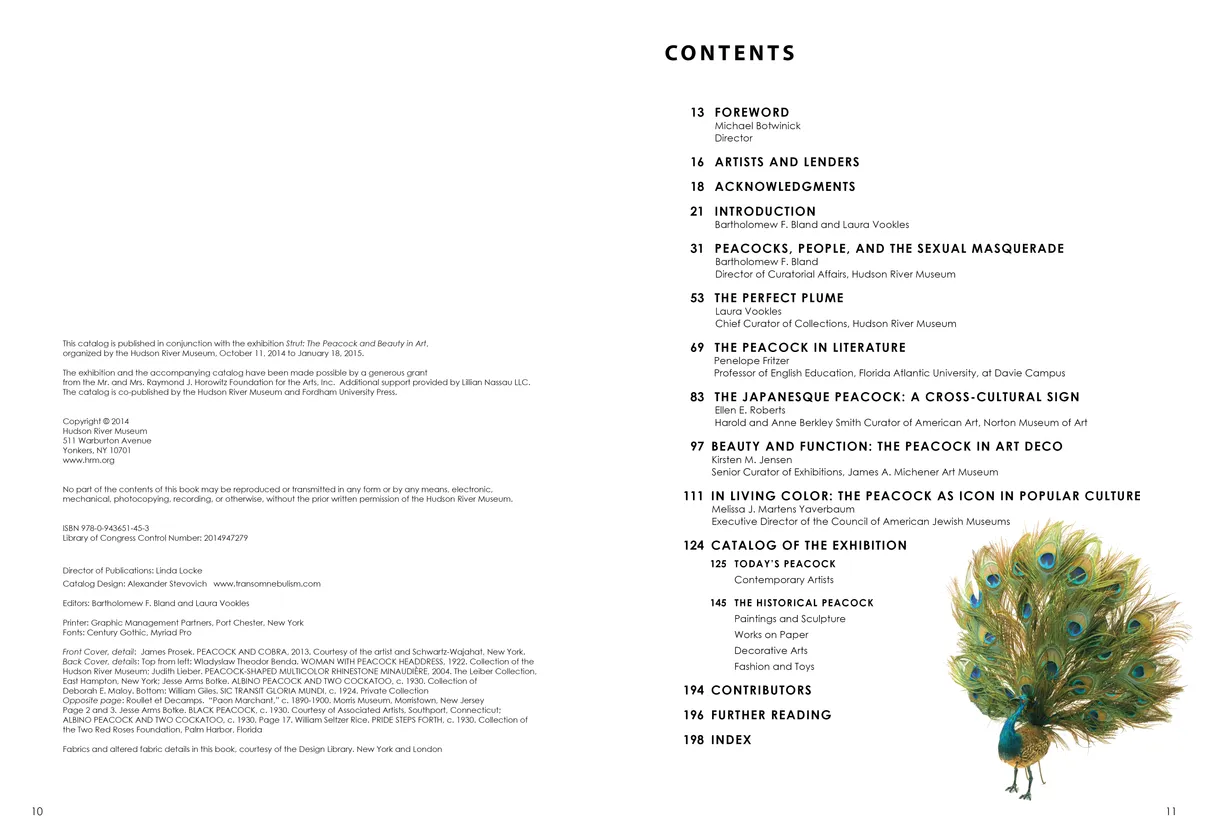
- Strut: The Peacock and Beauty in Art exhibition catalog, pages 10-11
- Client: Hudson River Museum
- Visit figure page
- Type: portfolio
- Portfolio Type: publication_design
- Portfolio Role: design_layout
Strut The: Peacock And Beauty In Art — Pages 100–101

- Strut: The Peacock and Beauty in Art exhibition catalog, pages 100-101
- Client: Hudson River Museum
- Visit figure page
- Type: portfolio
- Portfolio Type: publication_design
- Portfolio Role: design_layout
Strut The: Peacock And Beauty In Art — Pages 102–103
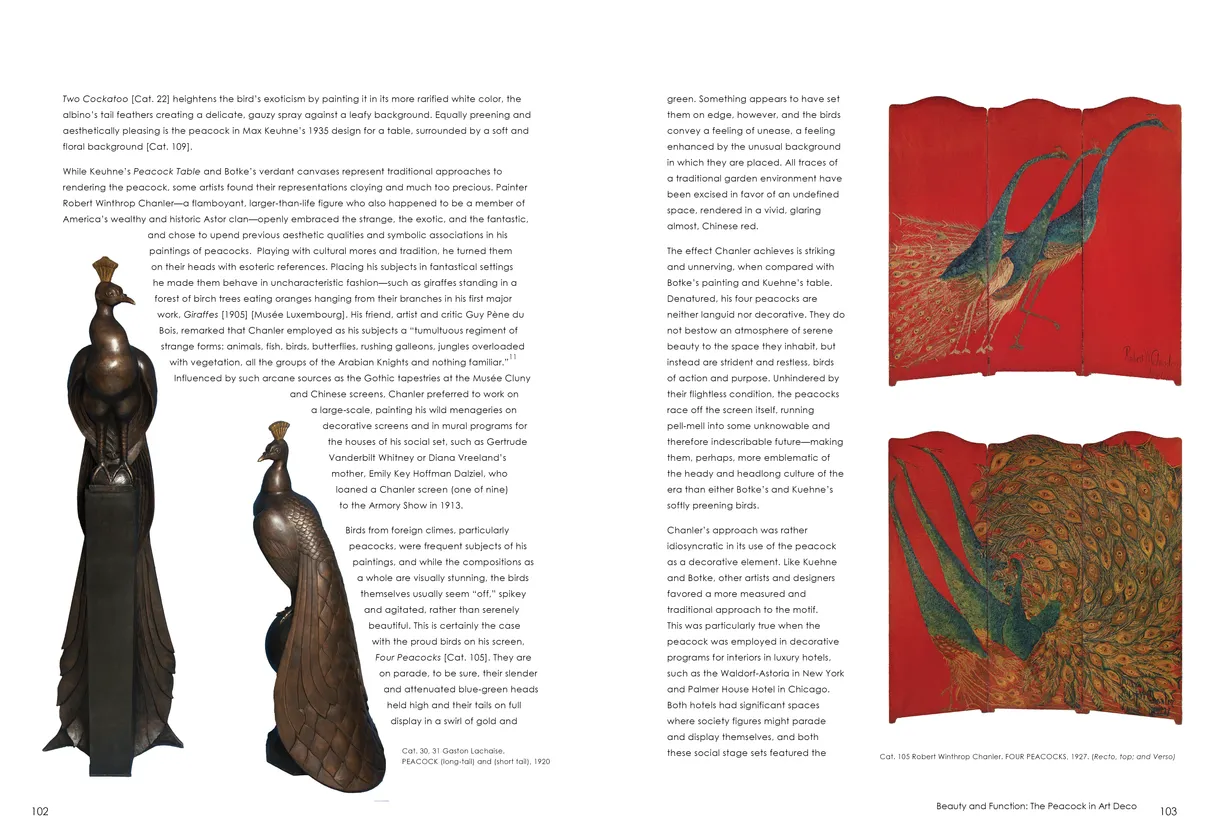
- Strut: The Peacock and Beauty in Art exhibition catalog, pages 102-103
- Client: Hudson River Museum
- Visit figure page
- Type: portfolio
- Portfolio Type: publication_design
- Portfolio Role: design_layout
Strut The: Peacock And Beauty In Art — Pages 104–105
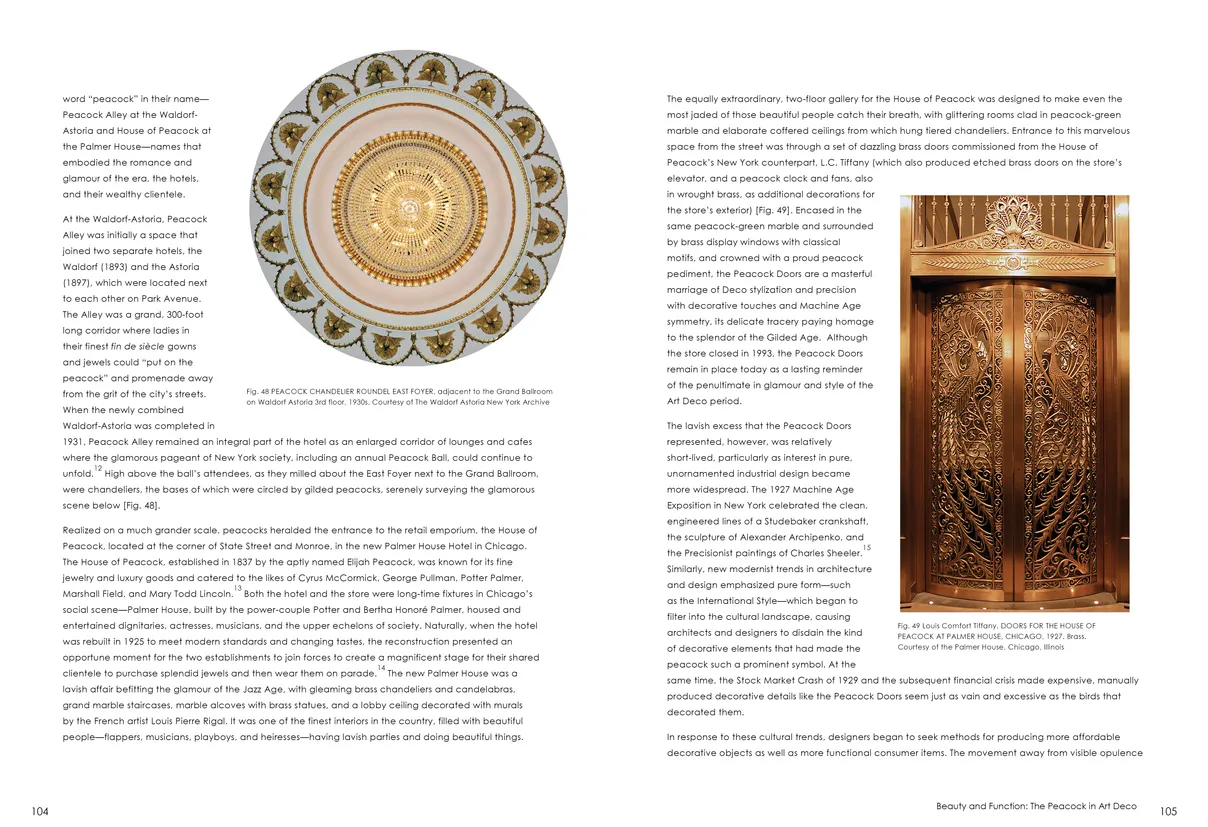
- Strut: The Peacock and Beauty in Art exhibition catalog, pages 104-105
- Client: Hudson River Museum
- Visit figure page
- Type: portfolio
- Portfolio Type: publication_design
- Portfolio Role: design_layout
Strut The: Peacock And Beauty In Art — Pages 106–107

- Strut: The Peacock and Beauty in Art exhibition catalog, pages 106-107
- Client: Hudson River Museum
- Visit figure page
- Type: portfolio
- Portfolio Type: publication_design
- Portfolio Role: design_layout
Strut The: Peacock And Beauty In Art — Pages 108–109
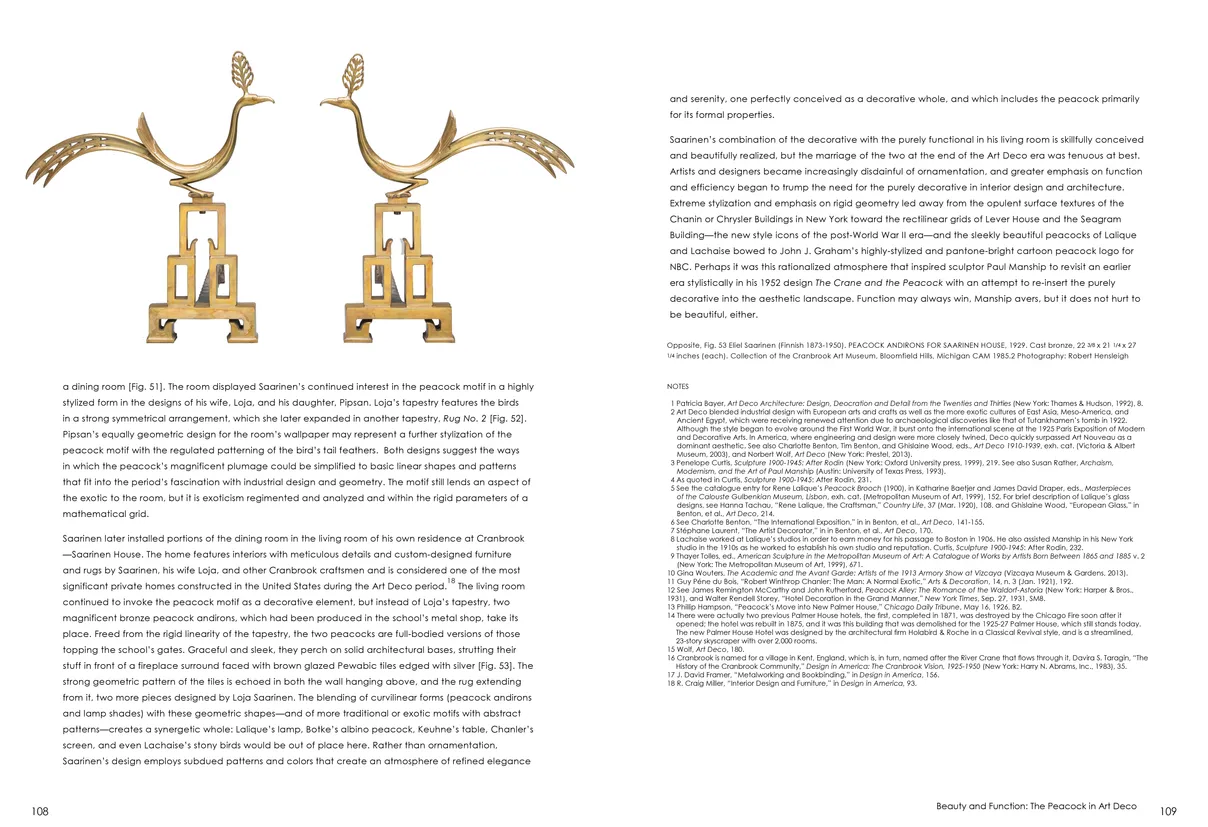
- Strut: The Peacock and Beauty in Art exhibition catalog, pages 108-109
- Client: Hudson River Museum
- Visit figure page
- Type: portfolio
- Portfolio Type: publication_design
- Portfolio Role: design_layout
Strut The: Peacock And Beauty In Art — Pages 110–111
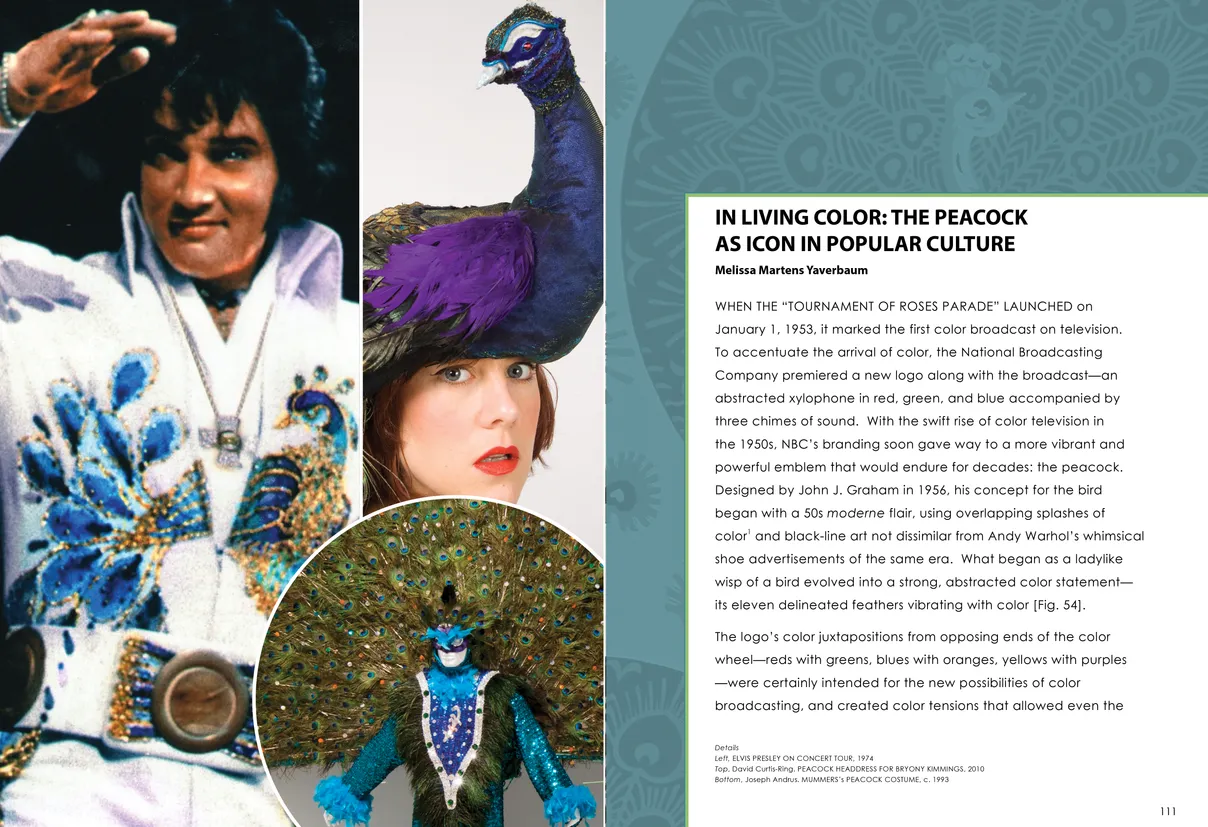
- Strut: The Peacock and Beauty in Art exhibition catalog, pages 110-111
- Client: Hudson River Museum
- Visit figure page
- Type: portfolio
- Portfolio Type: publication_design
- Portfolio Role: design_layout
Strut The: Peacock And Beauty In Art — Pages 112–113
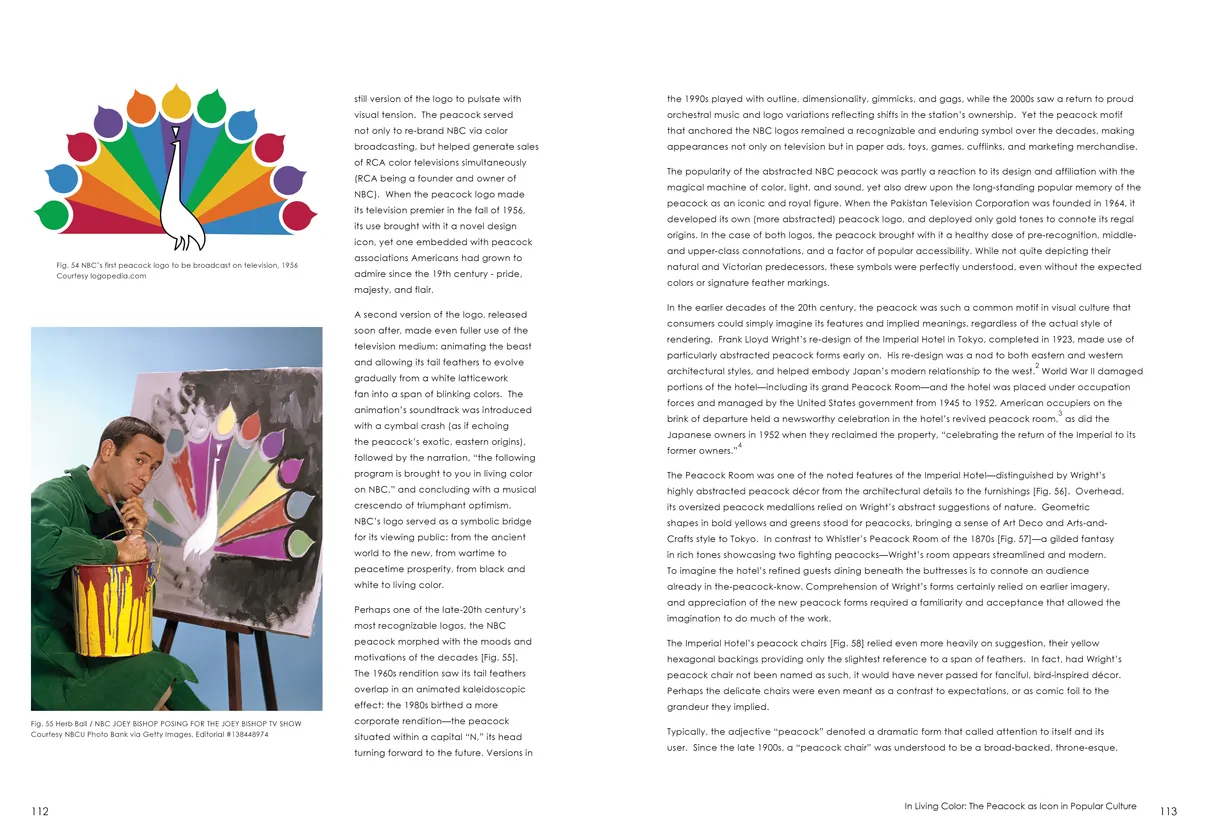
- Strut: The Peacock and Beauty in Art exhibition catalog, pages 112-113
- Client: Hudson River Museum
- Visit figure page
- Type: portfolio
- Portfolio Type: publication_design
- Portfolio Role: design_layout
Strut The: Peacock And Beauty In Art — Pages 114–115
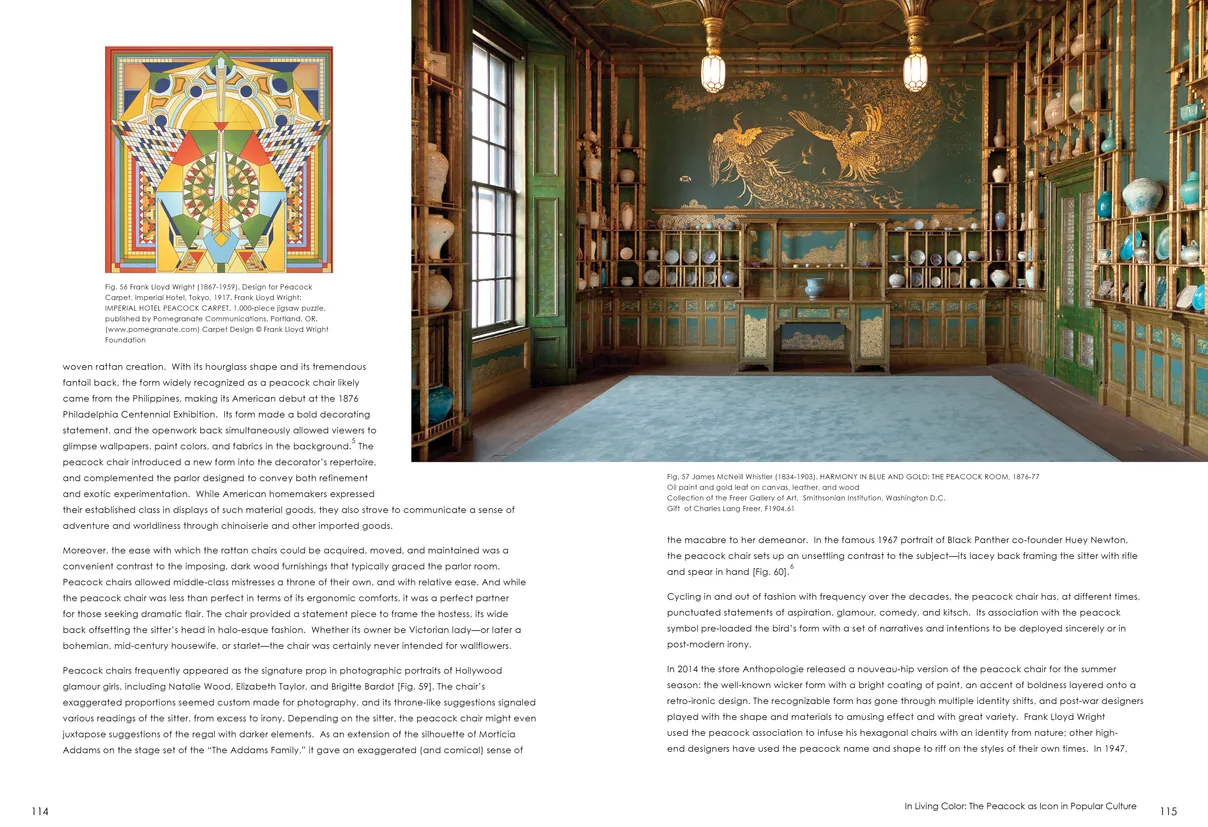
- Strut: The Peacock and Beauty in Art exhibition catalog, pages 114-115
- Client: Hudson River Museum
- Visit figure page
- Type: portfolio
- Portfolio Type: publication_design
- Portfolio Role: design_layout
Strut The: Peacock And Beauty In Art — Pages 116–117
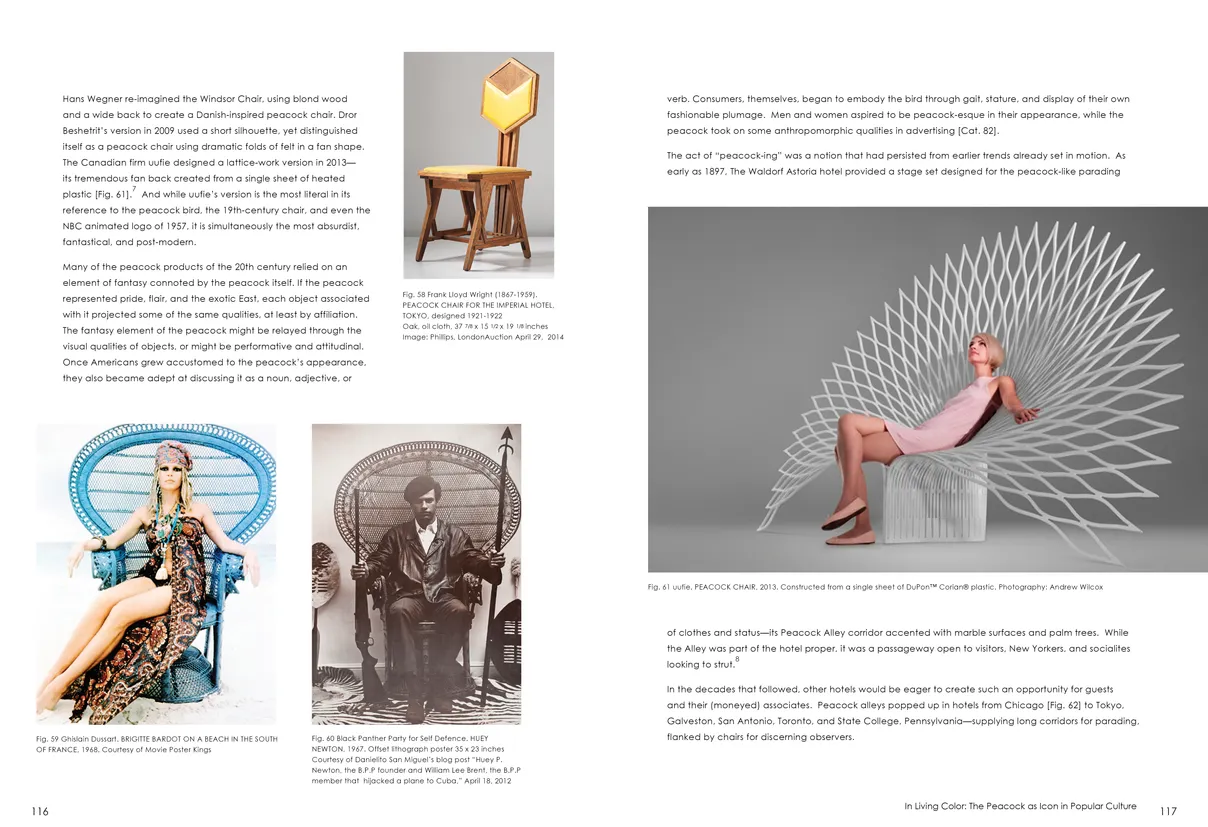
- Strut: The Peacock and Beauty in Art exhibition catalog, pages 116-117
- Client: Hudson River Museum
- Visit figure page
- Type: portfolio
- Portfolio Type: publication_design
- Portfolio Role: design_layout
Strut The: Peacock And Beauty In Art — Pages 118–119
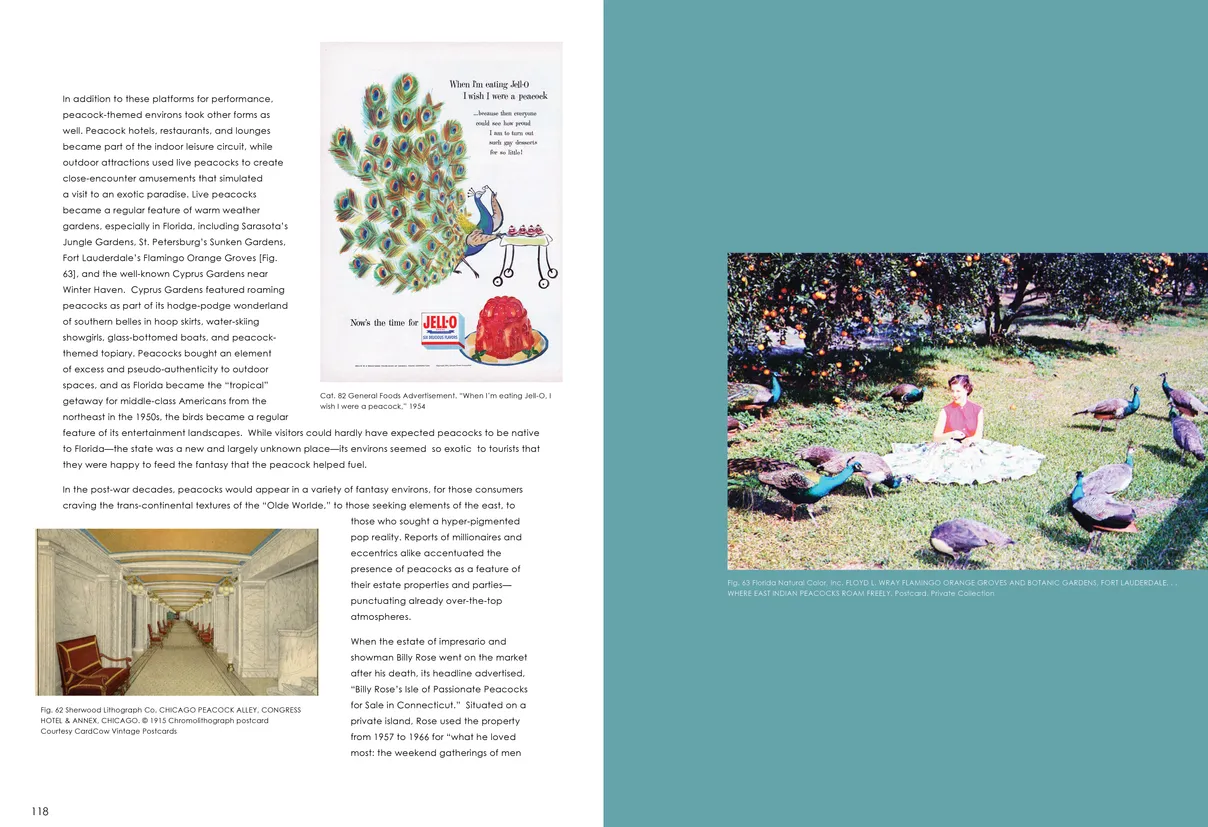
- Strut: The Peacock and Beauty in Art exhibition catalog, pages 118-119
- Client: Hudson River Museum
- Visit figure page
- Type: portfolio
- Portfolio Type: publication_design
- Portfolio Role: design_layout
Strut The: Peacock And Beauty In Art — Pages 12–13
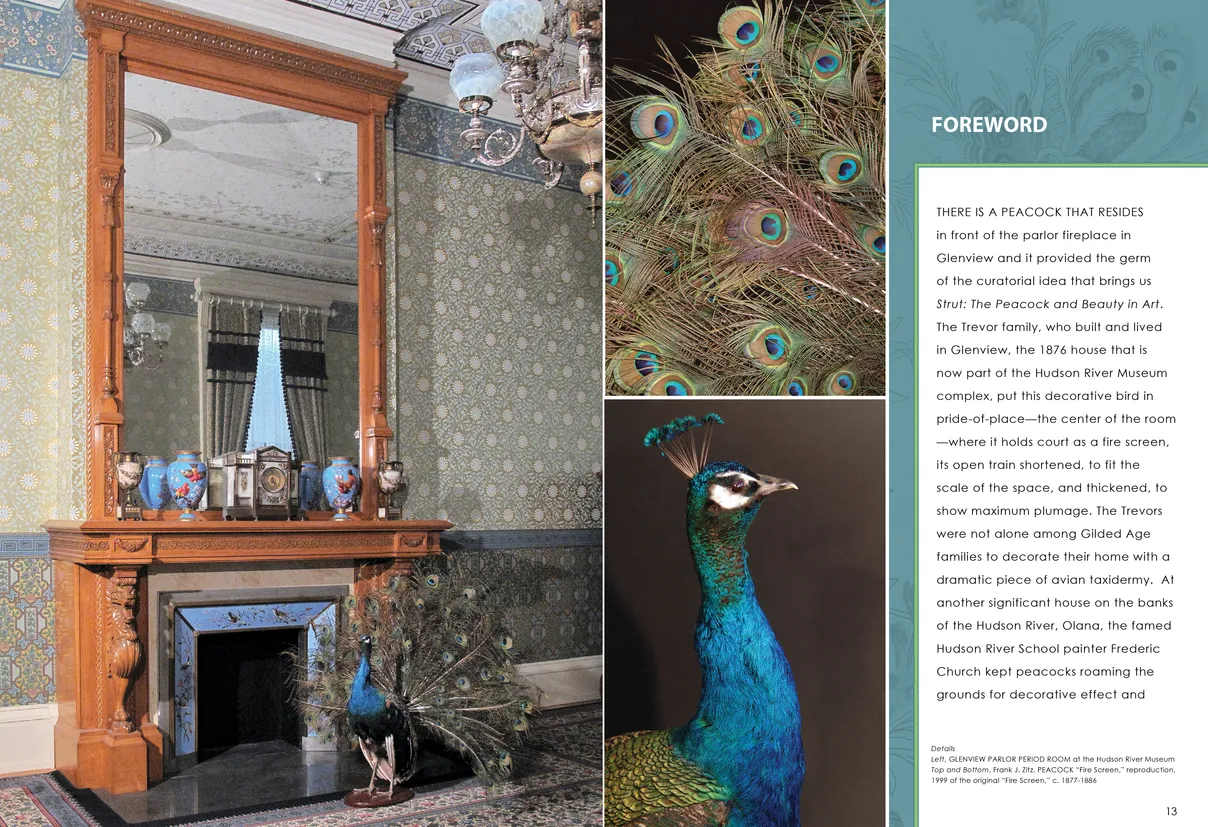
- Strut: The Peacock and Beauty in Art exhibition catalog, pages 12-13
- Client: Hudson River Museum
- Visit figure page
- Type: portfolio
- Portfolio Type: publication_design
- Portfolio Role: design_layout
Strut The: Peacock And Beauty In Art — Pages 120–121
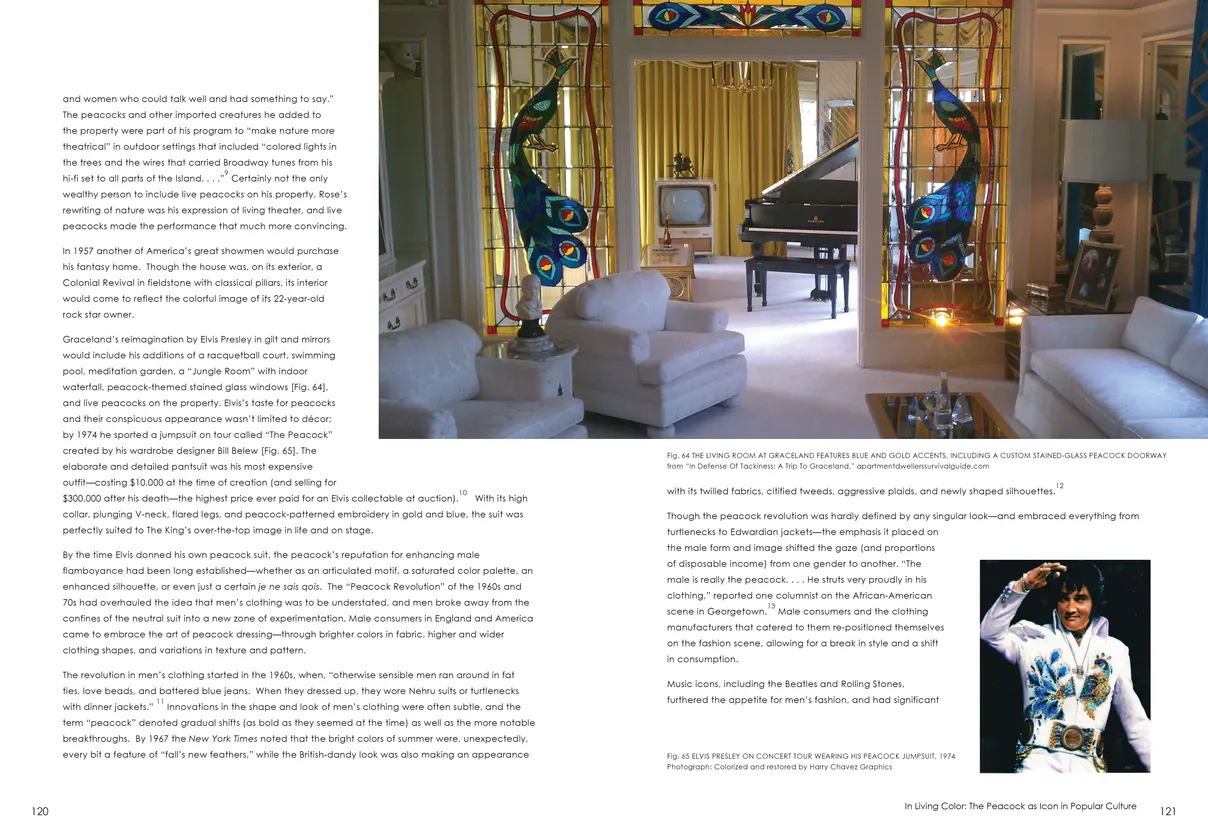
- Strut: The Peacock and Beauty in Art exhibition catalog, pages 120-121
- Client: Hudson River Museum
- Visit figure page
- Type: portfolio
- Portfolio Type: publication_design
- Portfolio Role: design_layout
Strut The: Peacock And Beauty In Art — Pages 122–123
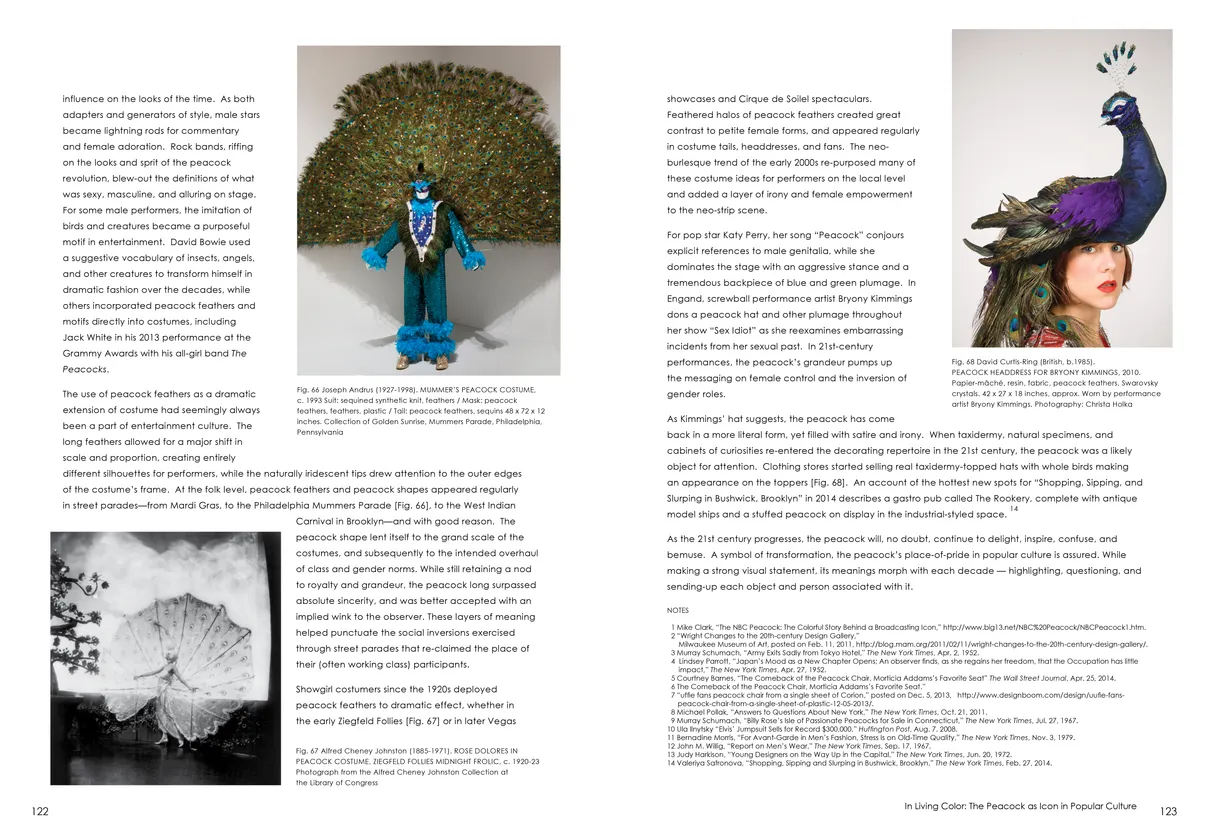
- Strut: The Peacock and Beauty in Art exhibition catalog, pages 122-123
- Client: Hudson River Museum
- Visit figure page
- Type: portfolio
- Portfolio Type: publication_design
- Portfolio Role: design_layout
Strut The: Peacock And Beauty In Art — Pages 124–125
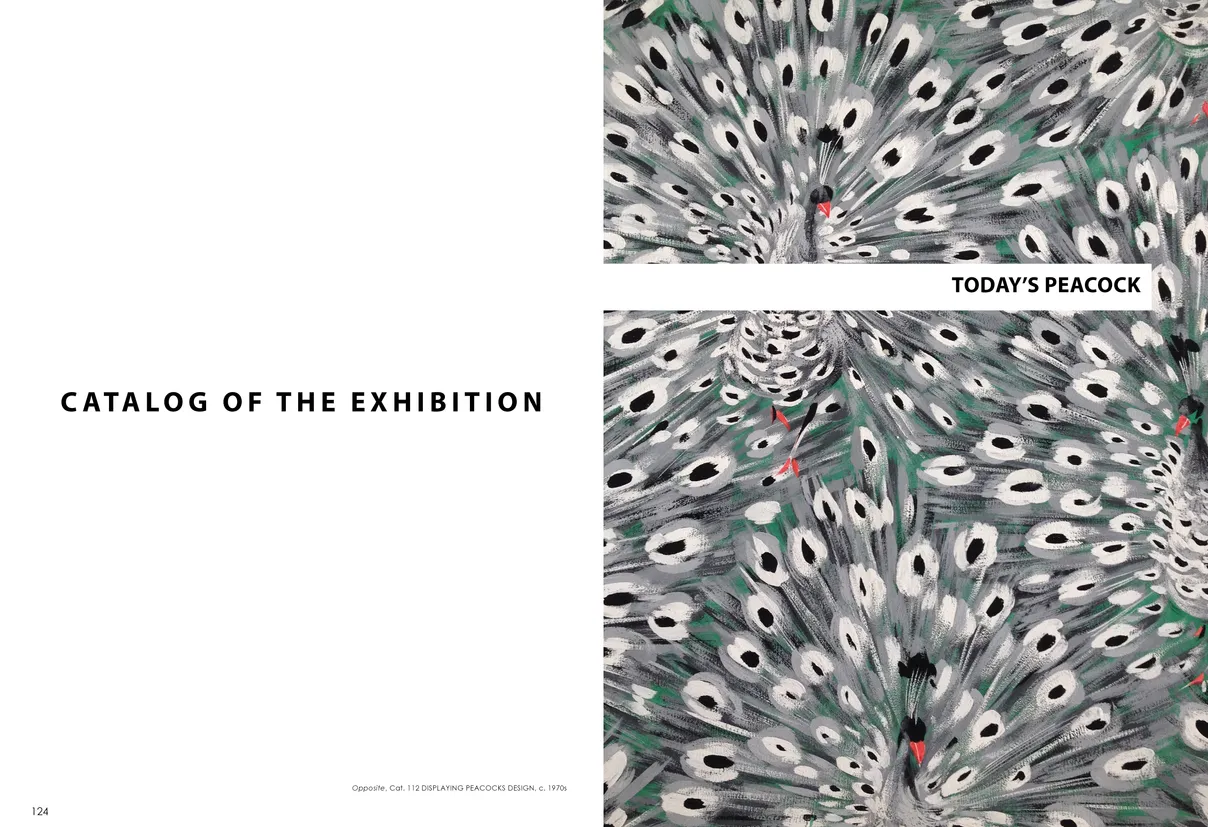
- Strut: The Peacock and Beauty in Art exhibition catalog, pages 124-125
- Client: Hudson River Museum
- Visit figure page
- Type: portfolio
- Portfolio Type: publication_design
- Portfolio Role: design_layout
Strut The: Peacock And Beauty In Art — Pages 126–127
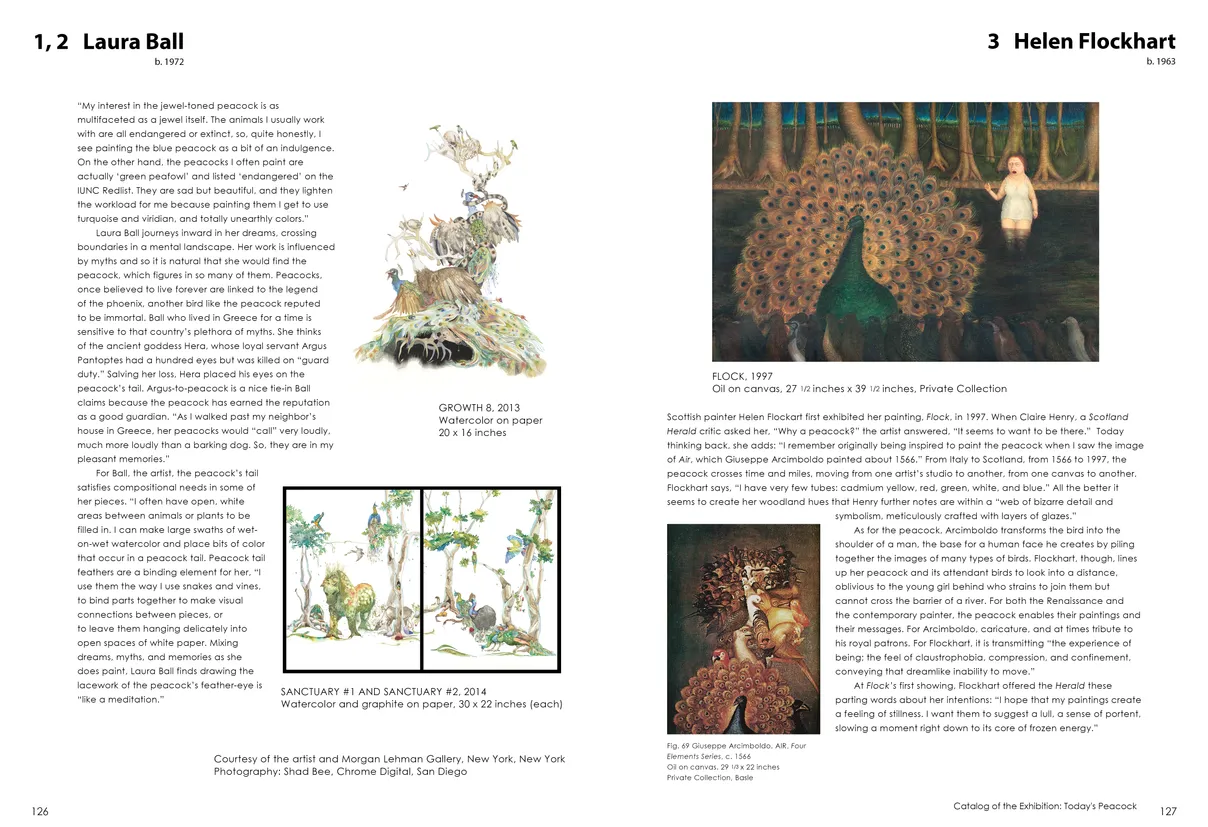
- Strut: The Peacock and Beauty in Art exhibition catalog, pages 126-127
- Client: Hudson River Museum
- Visit figure page
- Type: portfolio
- Portfolio Type: publication_design
- Portfolio Role: design_layout
Strut The: Peacock And Beauty In Art — Pages 128–129
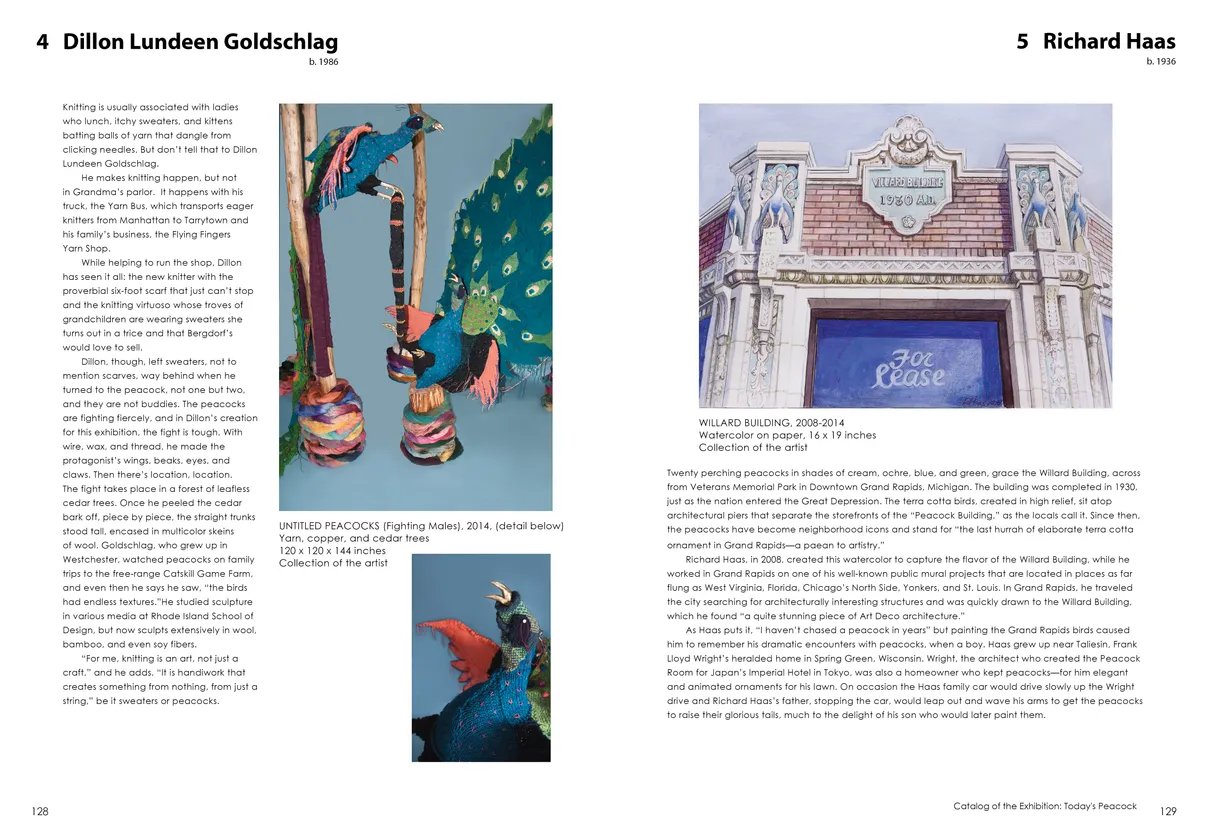
- Strut: The Peacock and Beauty in Art exhibition catalog, pages 128-129
- Client: Hudson River Museum
- Visit figure page
- Type: portfolio
- Portfolio Type: publication_design
- Portfolio Role: design_layout
Strut The: Peacock And Beauty In Art — Pages 130–131
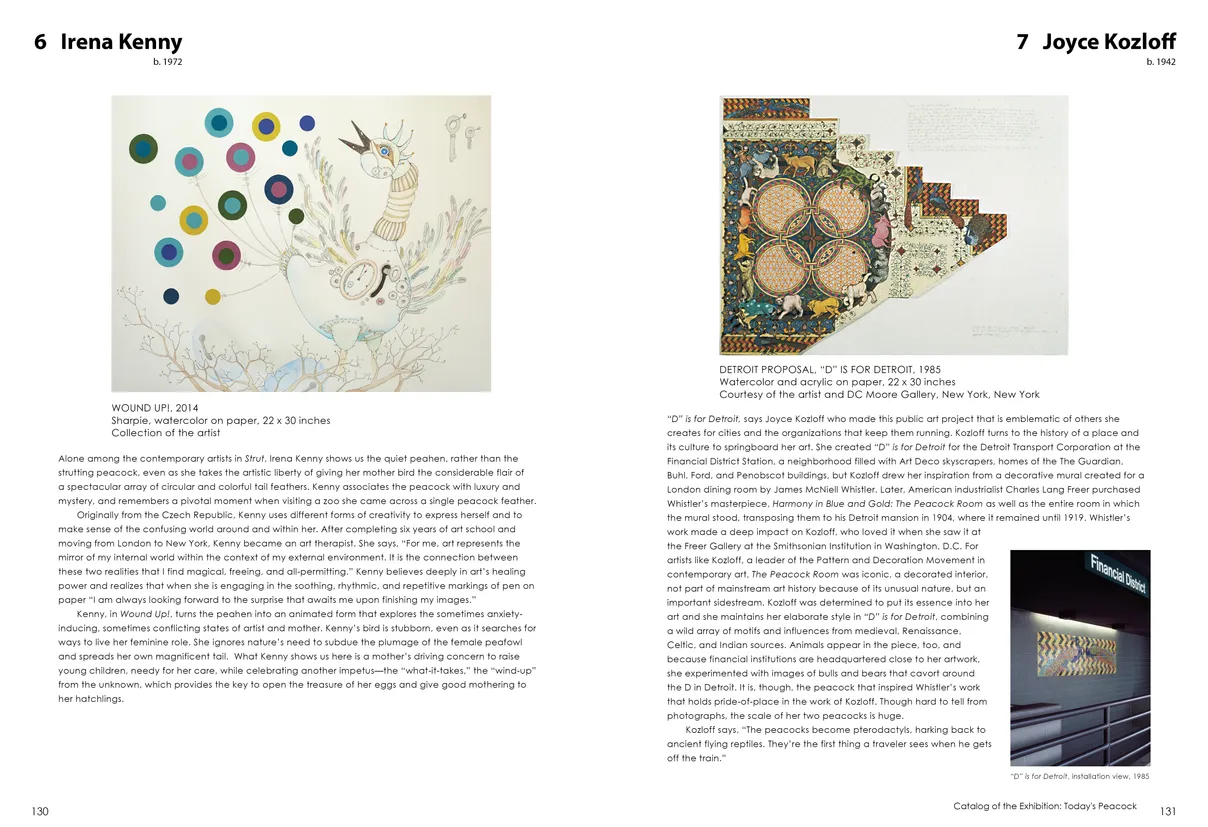
- Strut: The Peacock and Beauty in Art exhibition catalog, pages 130-131
- Client: Hudson River Museum
- Visit figure page
- Type: portfolio
- Portfolio Type: publication_design
- Portfolio Role: design_layout
Strut The: Peacock And Beauty In Art — Pages 132–133
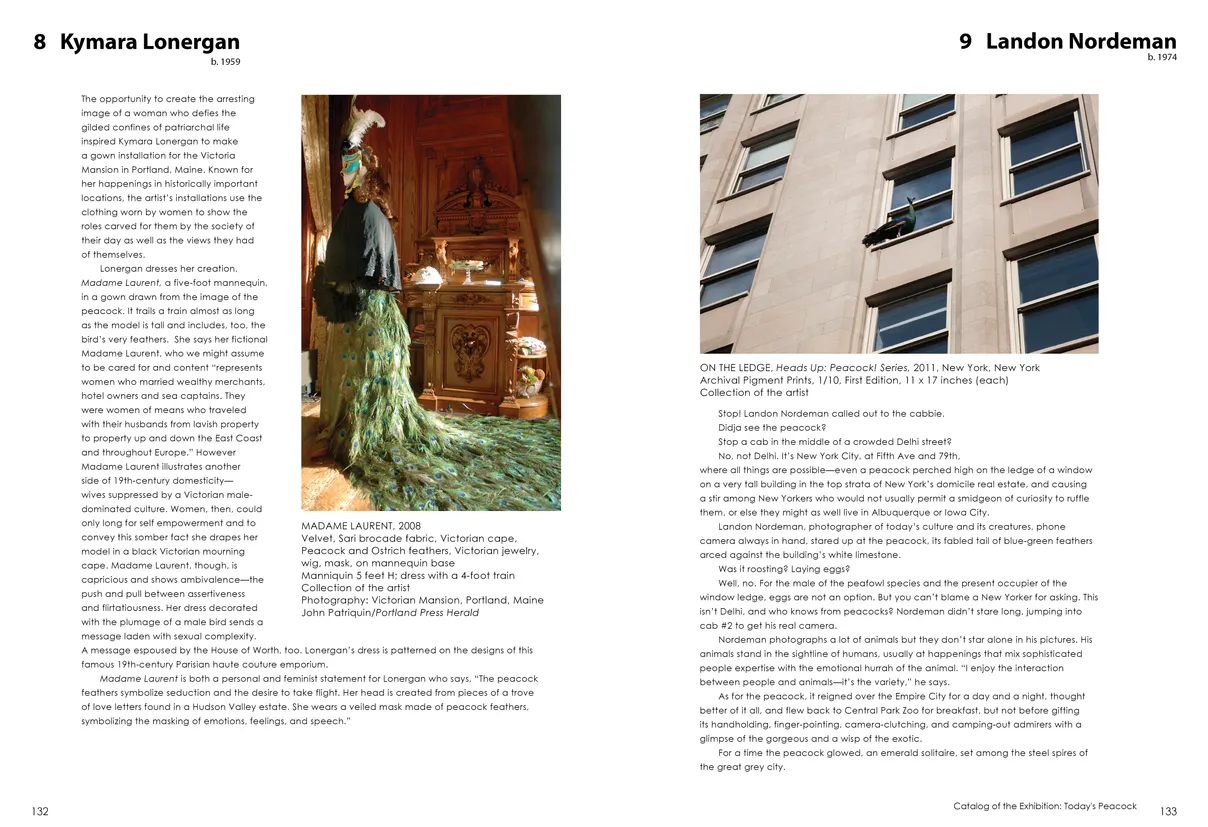
- Strut: The Peacock and Beauty in Art exhibition catalog, pages 132-133
- Client: Hudson River Museum
- Visit figure page
- Type: portfolio
- Portfolio Type: publication_design
- Portfolio Role: design_layout
Strut The: Peacock And Beauty In Art — Pages 134–135
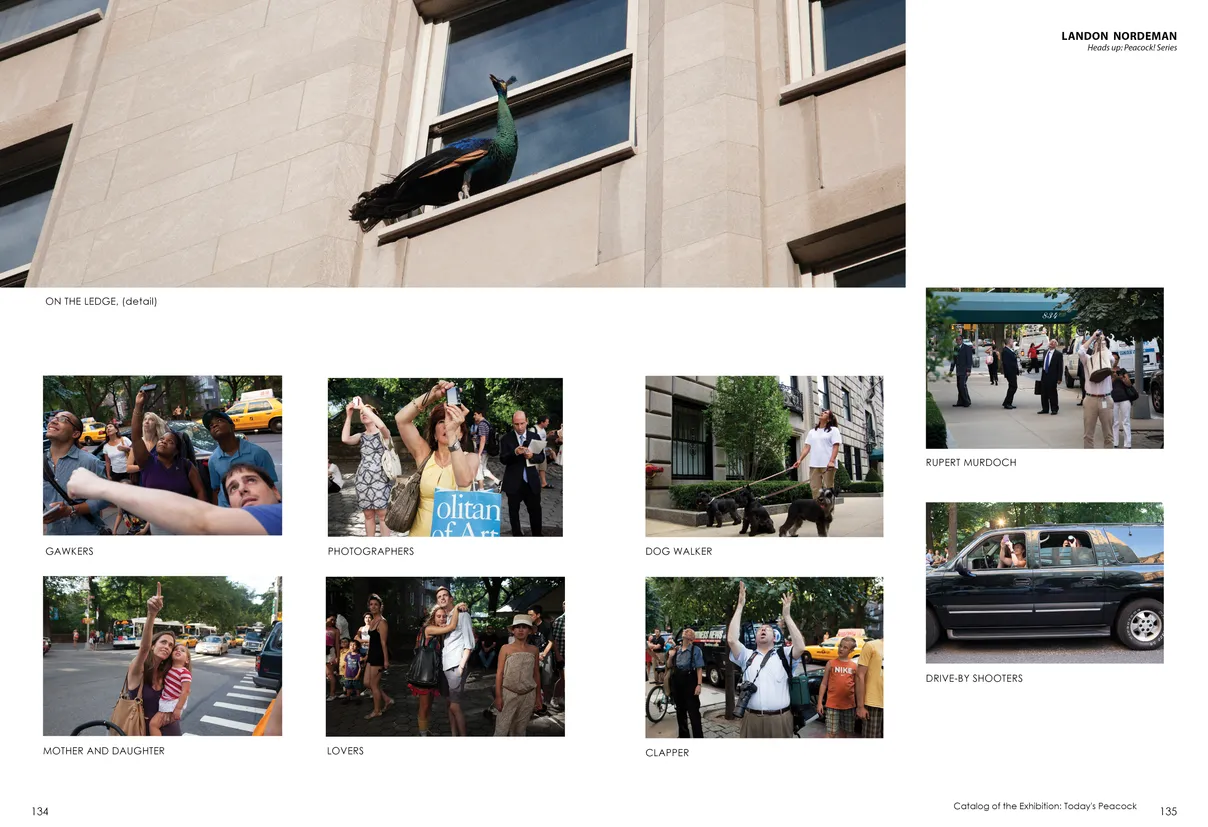
- Strut: The Peacock and Beauty in Art exhibition catalog, pages 134-135
- Client: Hudson River Museum
- Visit figure page
- Type: portfolio
- Portfolio Type: publication_design
- Portfolio Role: design_layout
Strut The: Peacock And Beauty In Art — Pages 136–137

- Strut: The Peacock and Beauty in Art exhibition catalog, pages 136-137
- Client: Hudson River Museum
- Visit figure page
- Type: portfolio
- Portfolio Type: publication_design
- Portfolio Role: design_layout
Strut The: Peacock And Beauty In Art — Pages 138–139
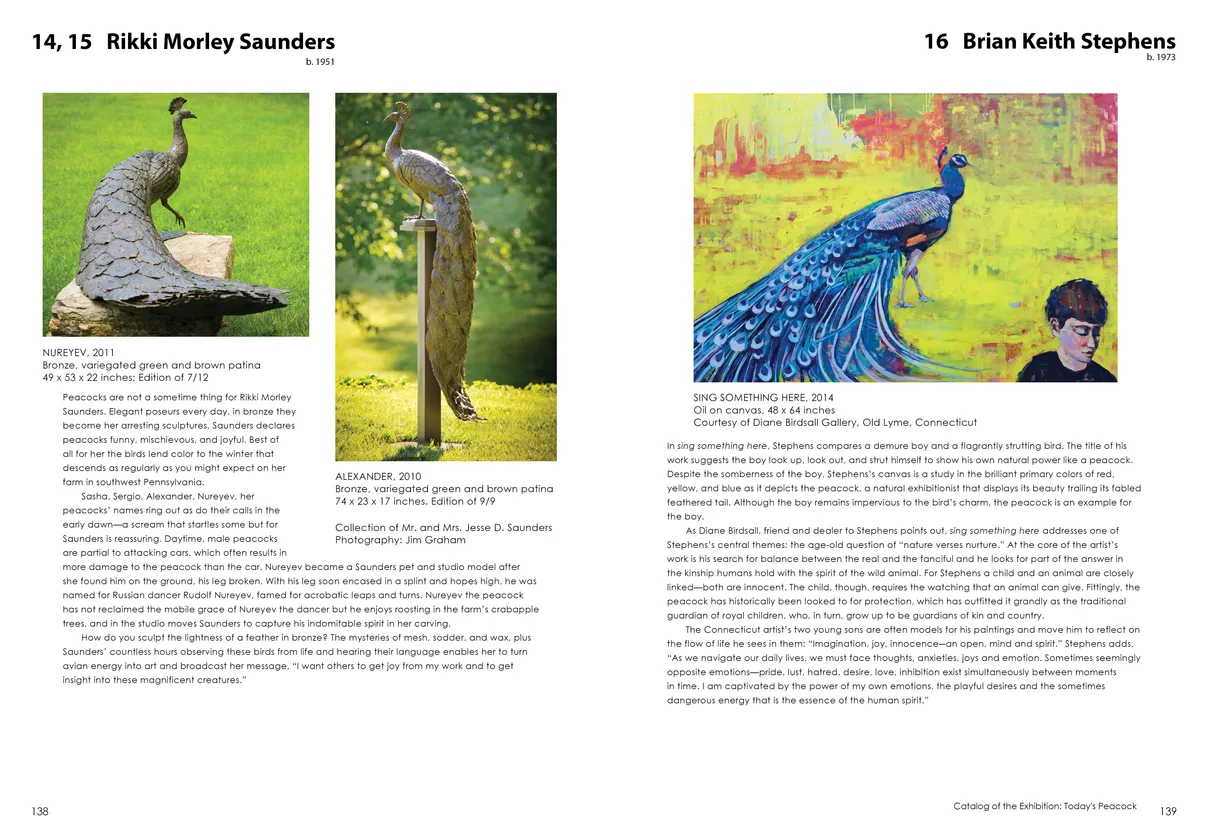
- Strut: The Peacock and Beauty in Art exhibition catalog, pages 138-139
- Client: Hudson River Museum
- Visit figure page
- Type: portfolio
- Portfolio Type: publication_design
- Portfolio Role: design_layout
Strut The: Peacock And Beauty In Art — Pages 14–15
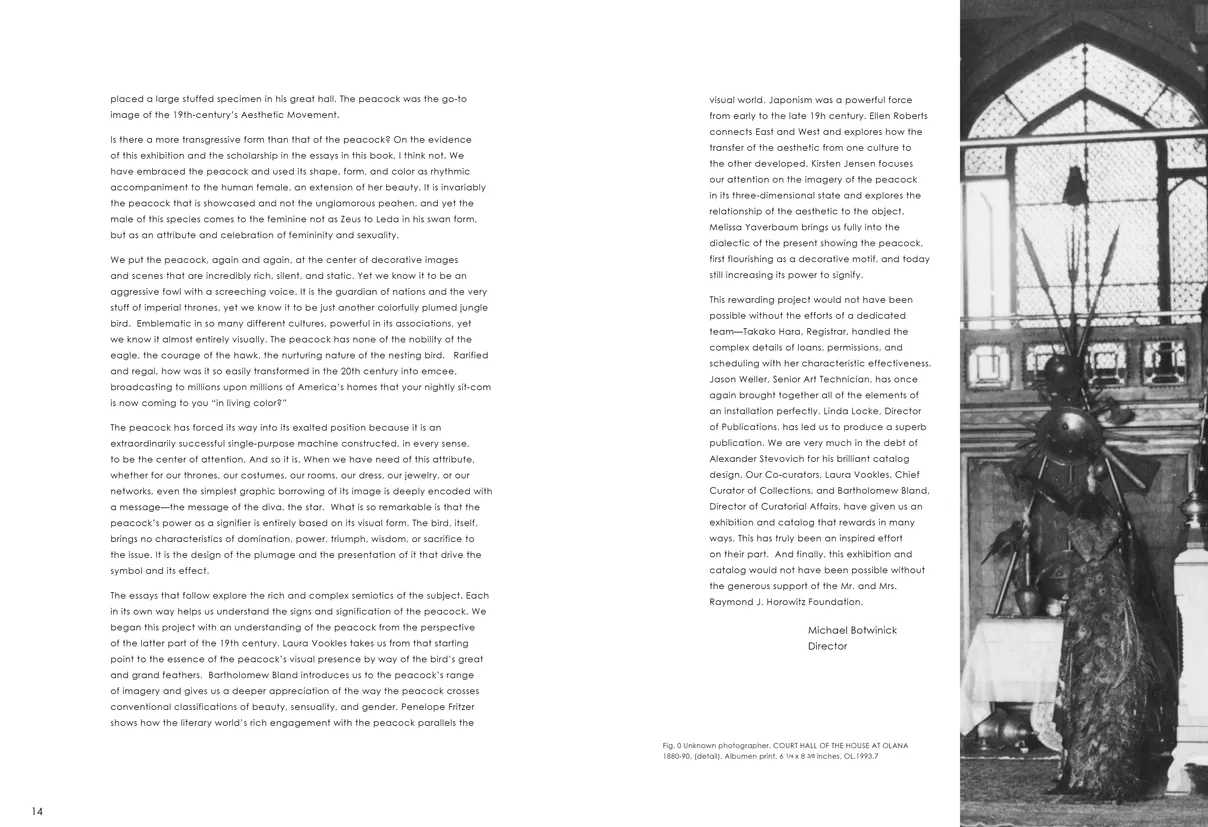
- Strut: The Peacock and Beauty in Art exhibition catalog, pages 14-15
- Client: Hudson River Museum
- Visit figure page
- Type: portfolio
- Portfolio Type: publication_design
- Portfolio Role: design_layout
Strut The: Peacock And Beauty In Art — Pages 140–141
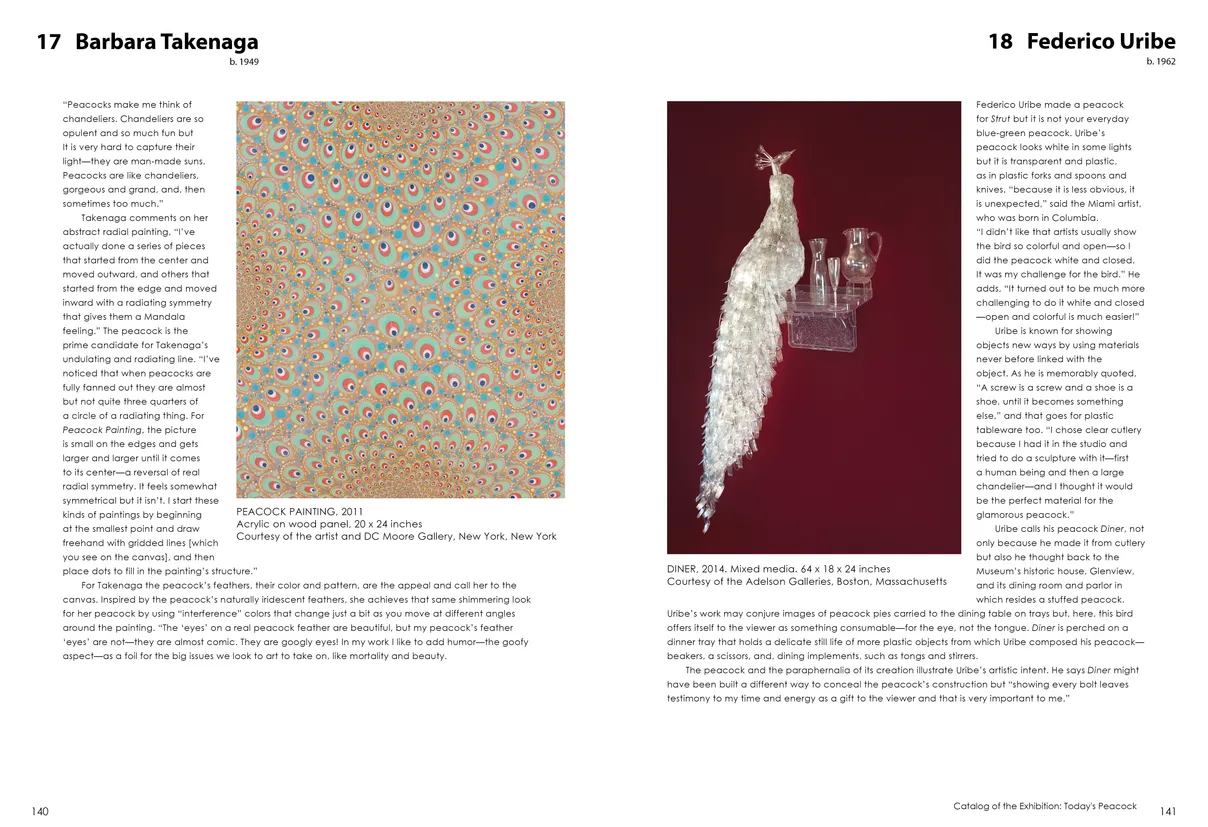
- Strut: The Peacock and Beauty in Art exhibition catalog, pages 140-141
- Client: Hudson River Museum
- Visit figure page
- Type: portfolio
- Portfolio Type: publication_design
- Portfolio Role: design_layout
Strut The: Peacock And Beauty In Art — Pages 142–143
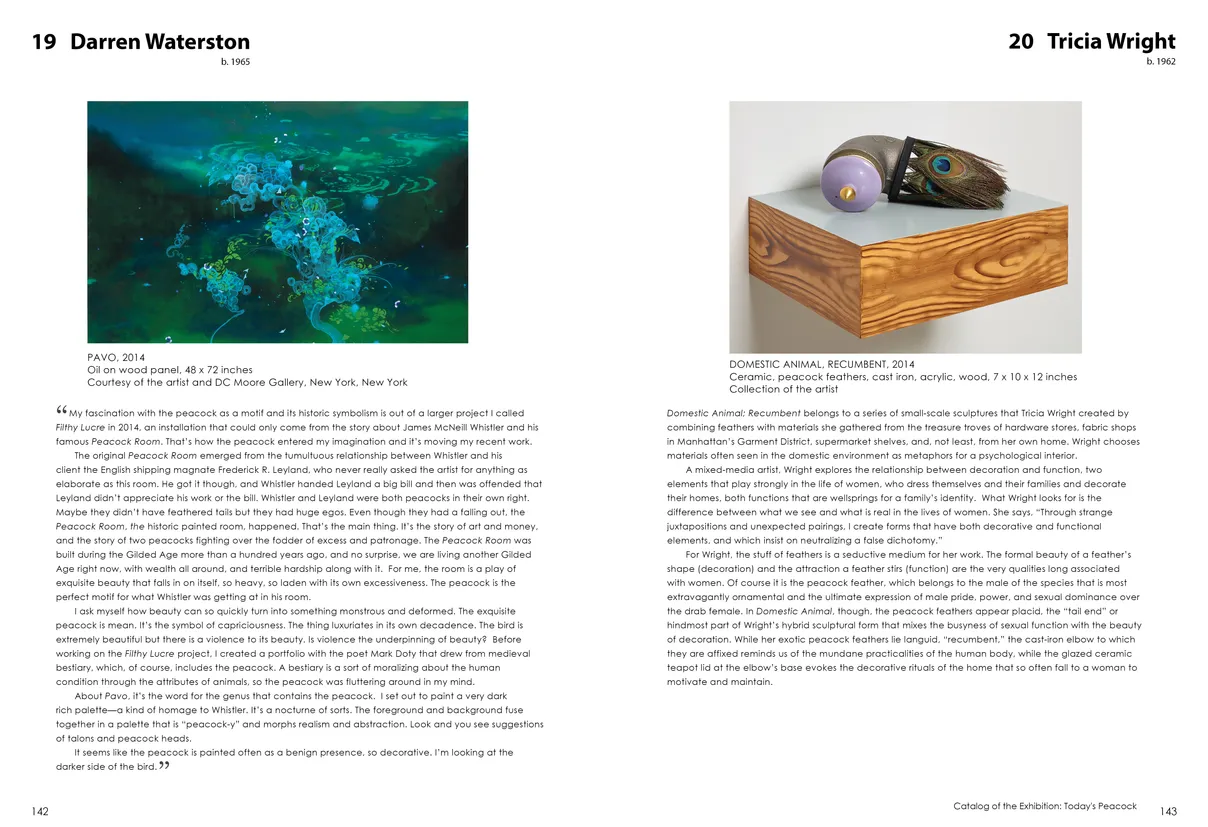
- Strut: The Peacock and Beauty in Art exhibition catalog, pages 142-143
- Client: Hudson River Museum
- Visit figure page
- Type: portfolio
- Portfolio Type: publication_design
- Portfolio Role: design_layout
Strut The: Peacock And Beauty In Art — Pages 144–145
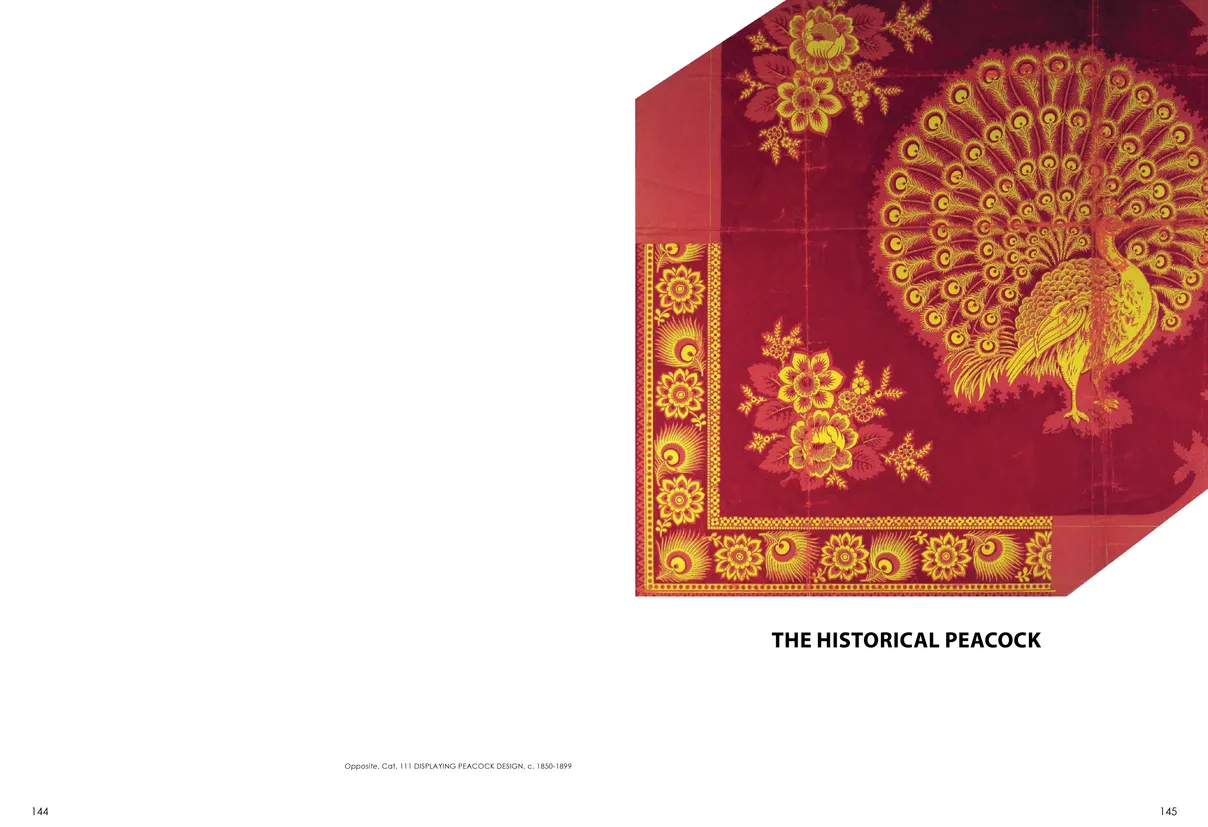
- Strut: The Peacock and Beauty in Art exhibition catalog, pages 144-145
- Client: Hudson River Museum
- Visit figure page
- Type: portfolio
- Portfolio Type: publication_design
- Portfolio Role: design_layout
Strut The: Peacock And Beauty In Art — Pages 146–147
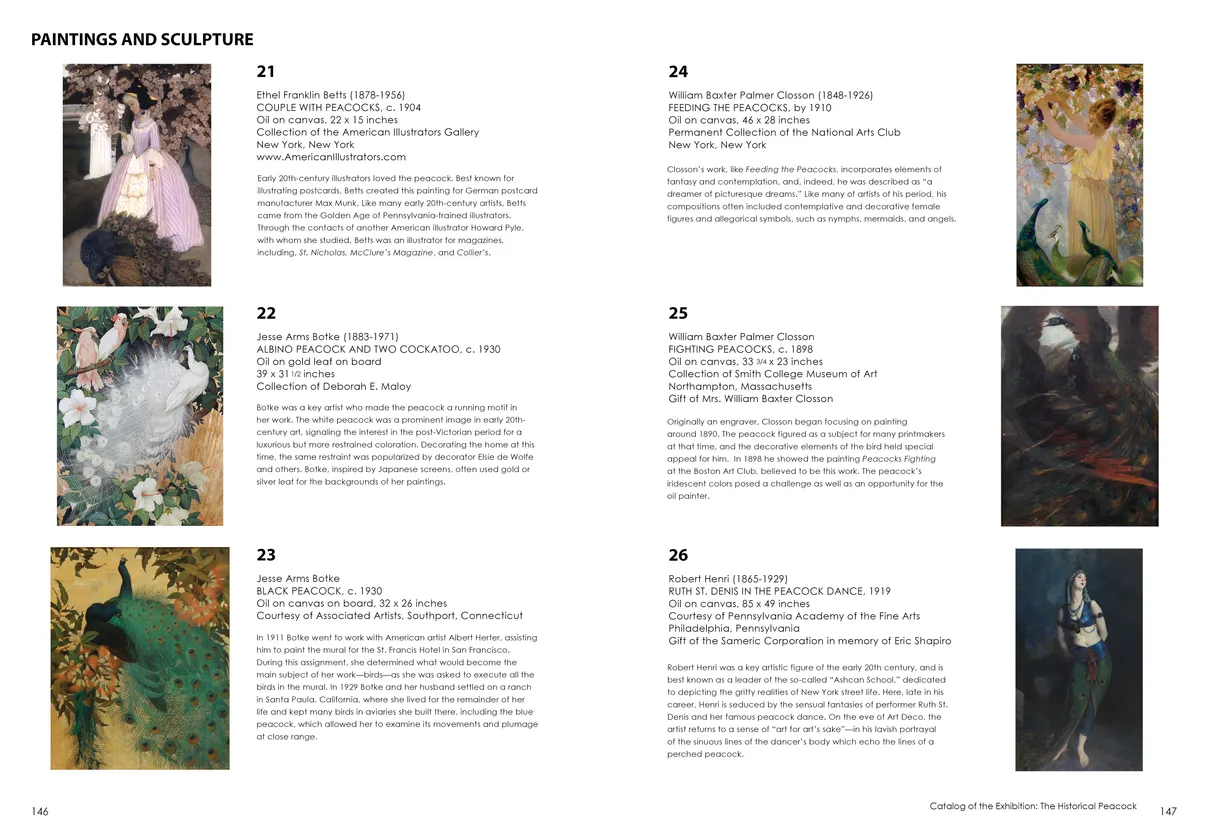
- Strut: The Peacock and Beauty in Art exhibition catalog, pages 146-147
- Client: Hudson River Museum
- Visit figure page
- Type: portfolio
- Portfolio Type: publication_design
- Portfolio Role: design_layout
Strut The: Peacock And Beauty In Art — Pages 148–149

- Strut: The Peacock and Beauty in Art exhibition catalog, pages 148-149
- Client: Hudson River Museum
- Visit figure page
- Type: portfolio
- Portfolio Type: publication_design
- Portfolio Role: design_layout
Strut The: Peacock And Beauty In Art — Pages 150–151
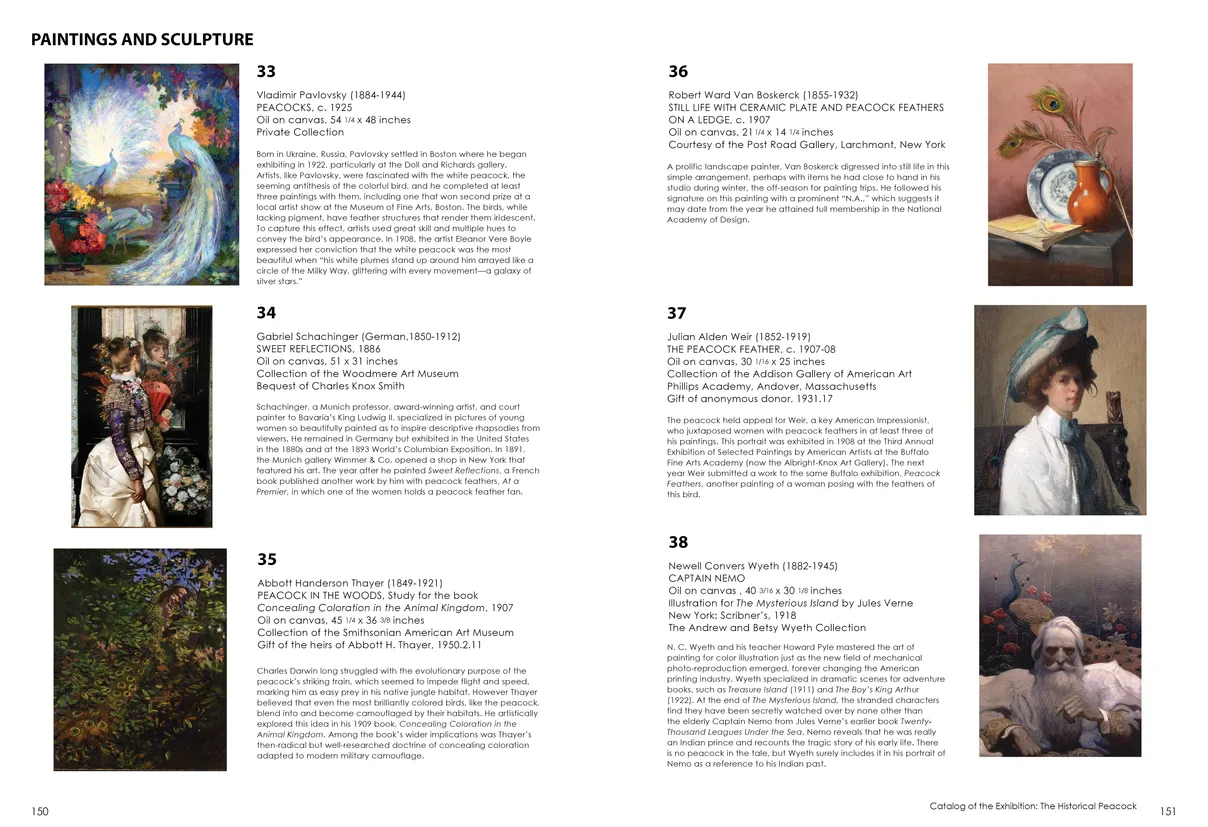
- Strut: The Peacock and Beauty in Art exhibition catalog, pages 150-151
- Client: Hudson River Museum
- Visit figure page
- Type: portfolio
- Portfolio Type: publication_design
- Portfolio Role: design_layout
Strut The: Peacock And Beauty In Art — Pages 152–153
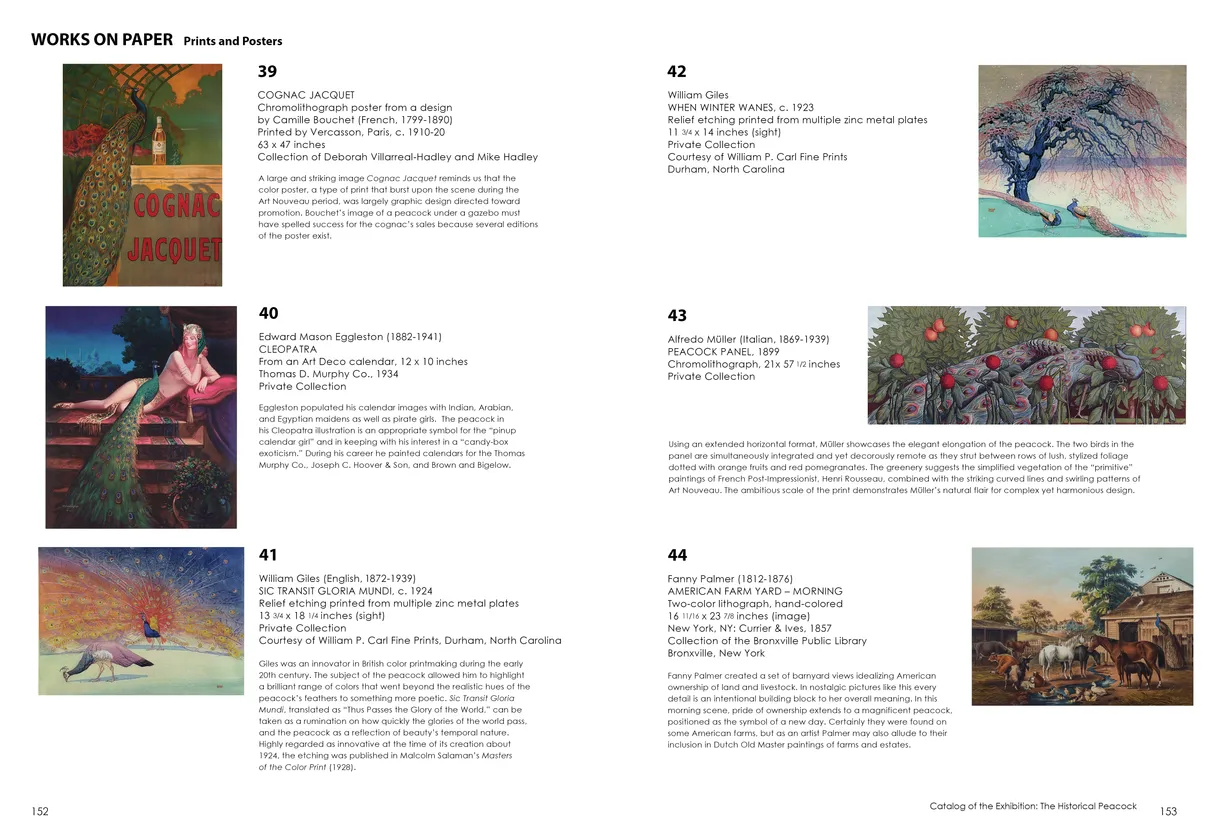
- Strut: The Peacock and Beauty in Art exhibition catalog, pages 152-153
- Client: Hudson River Museum
- Visit figure page
- Type: portfolio
- Portfolio Type: publication_design
- Portfolio Role: design_layout
Strut The: Peacock And Beauty In Art — Pages 154–155
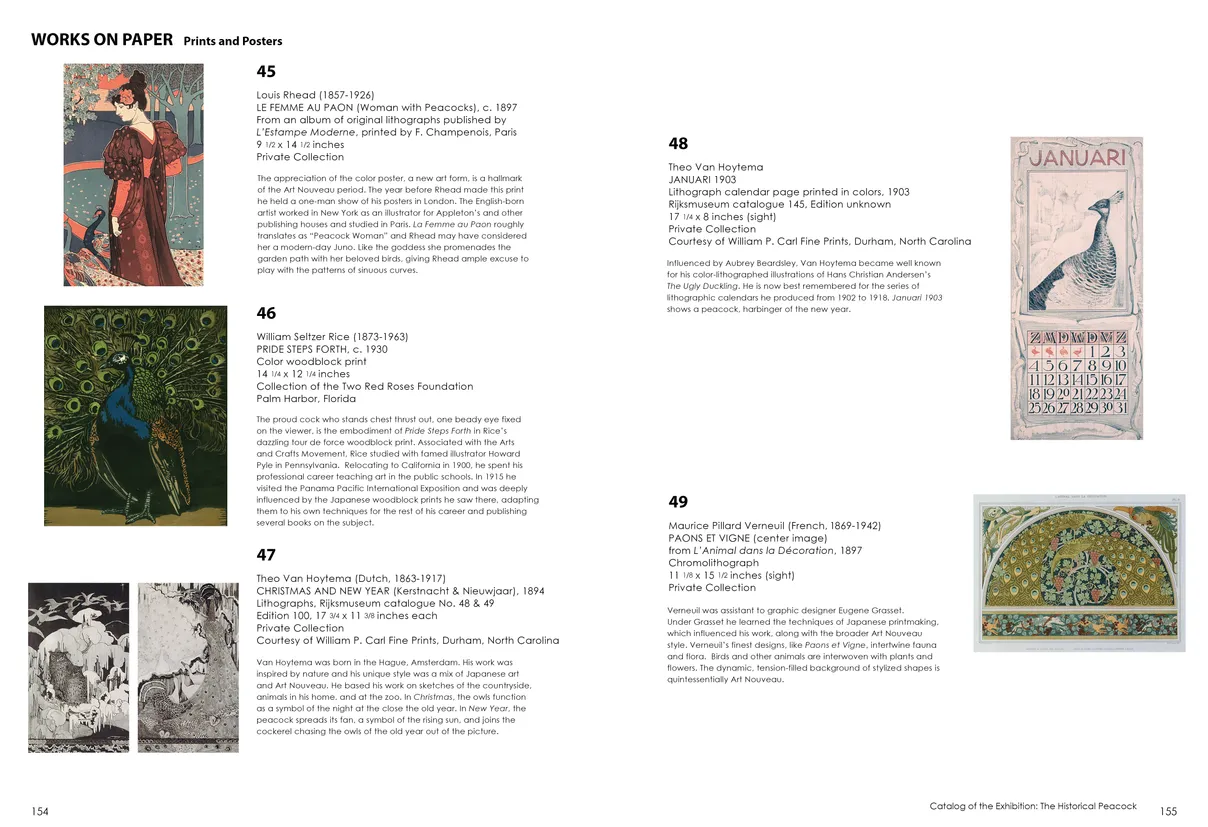
- Strut: The Peacock and Beauty in Art exhibition catalog, pages 154-155
- Client: Hudson River Museum
- Visit figure page
- Type: portfolio
- Portfolio Type: publication_design
- Portfolio Role: design_layout
Strut The: Peacock And Beauty In Art — Pages 156–157
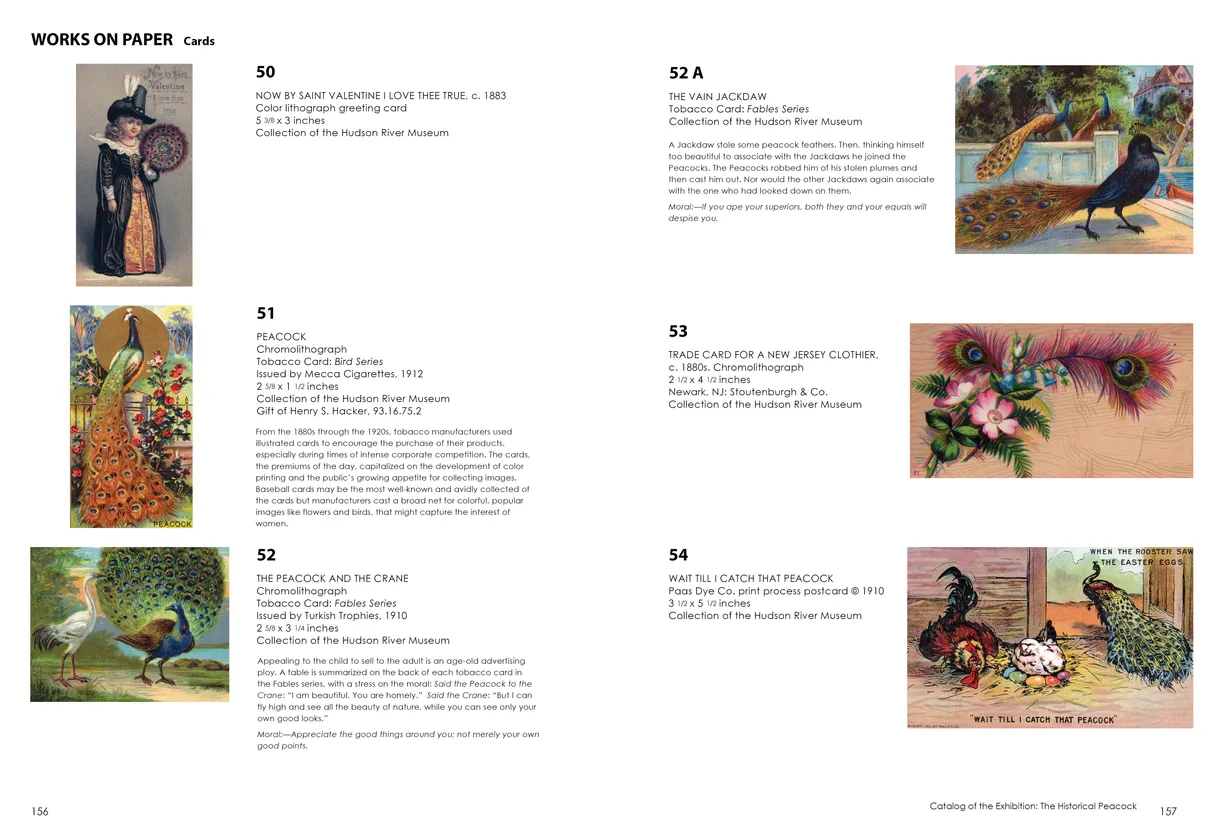
- Strut: The Peacock and Beauty in Art exhibition catalog, pages 156-157
- Client: Hudson River Museum
- Visit figure page
- Type: portfolio
- Portfolio Type: publication_design
- Portfolio Role: design_layout
Strut The: Peacock And Beauty In Art — Pages 158–159
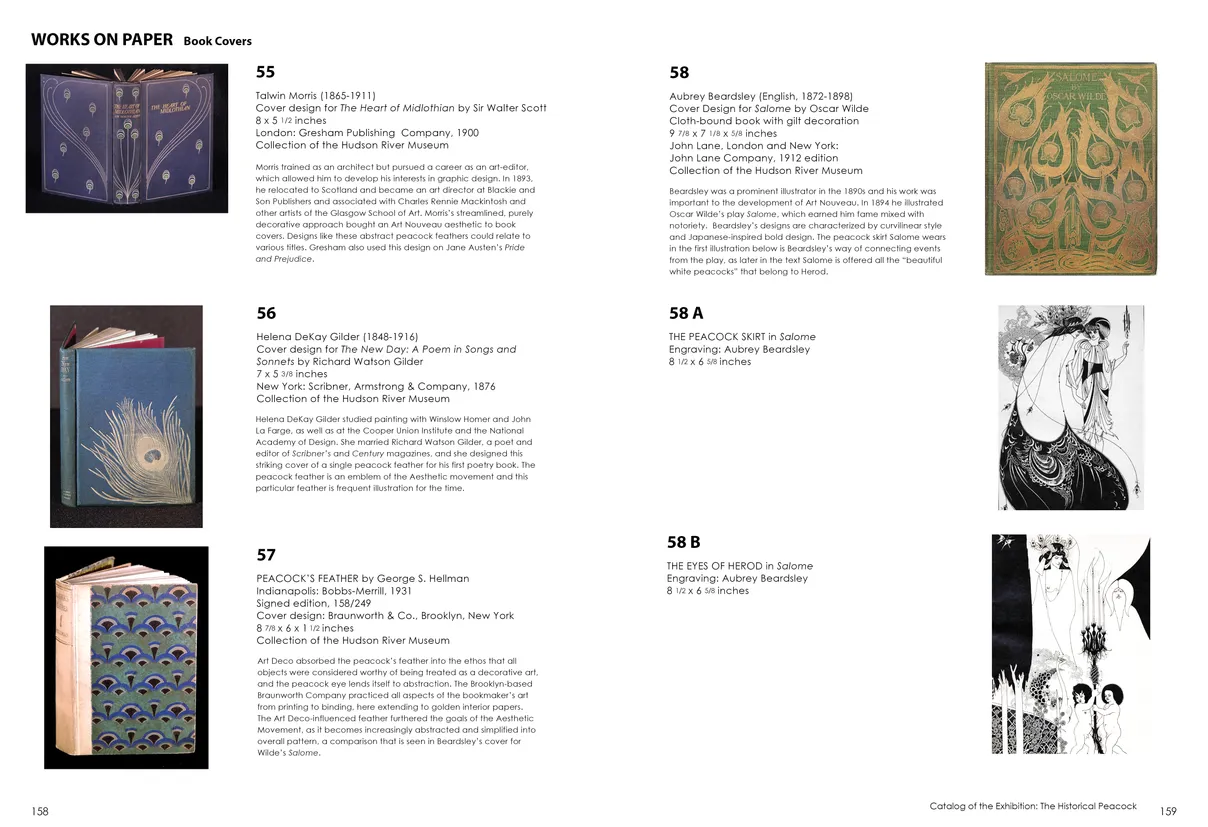
- Strut: The Peacock and Beauty in Art exhibition catalog, pages 158-159
- Client: Hudson River Museum
- Visit figure page
- Type: portfolio
- Portfolio Type: publication_design
- Portfolio Role: design_layout
Strut The: Peacock And Beauty In Art — Pages 16–17
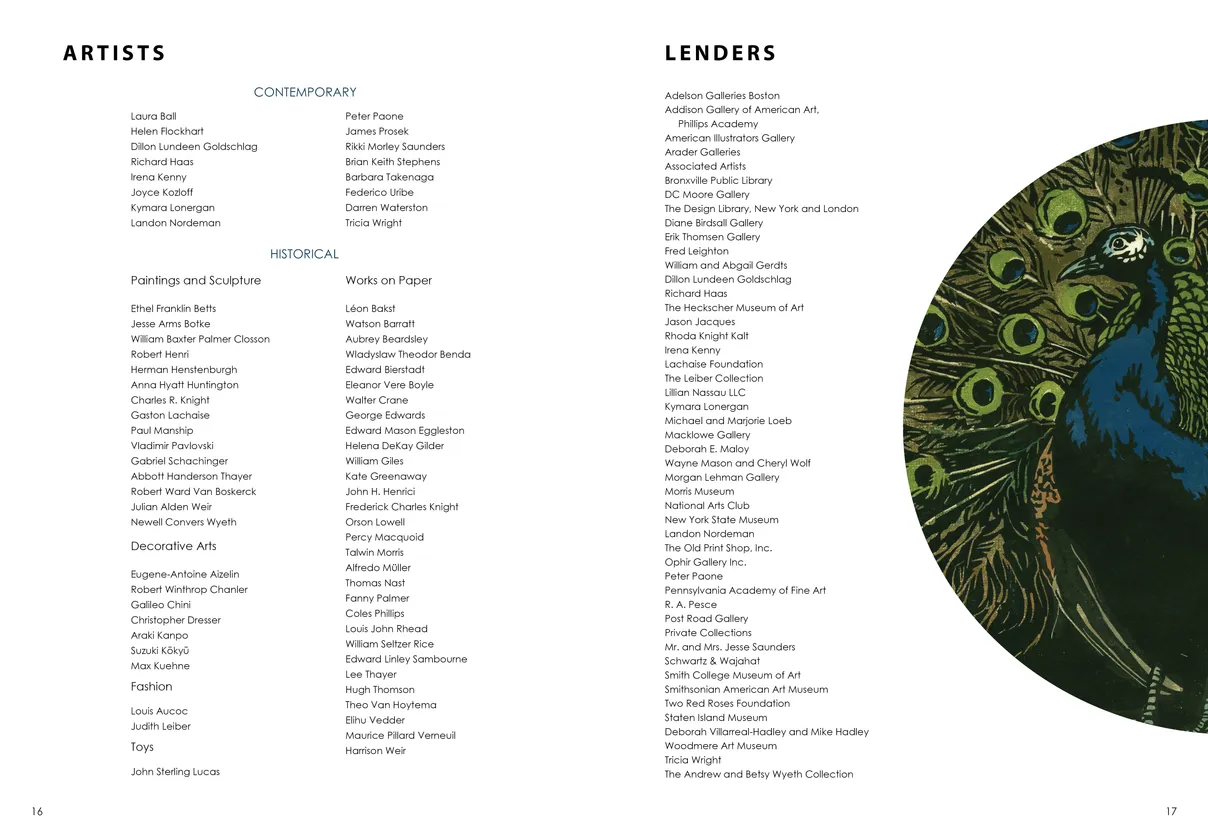
- Strut: The Peacock and Beauty in Art exhibition catalog, pages 16-17
- Client: Hudson River Museum
- Visit figure page
- Type: portfolio
- Portfolio Type: publication_design
- Portfolio Role: design_layout
Strut The: Peacock And Beauty In Art — Pages 160–161
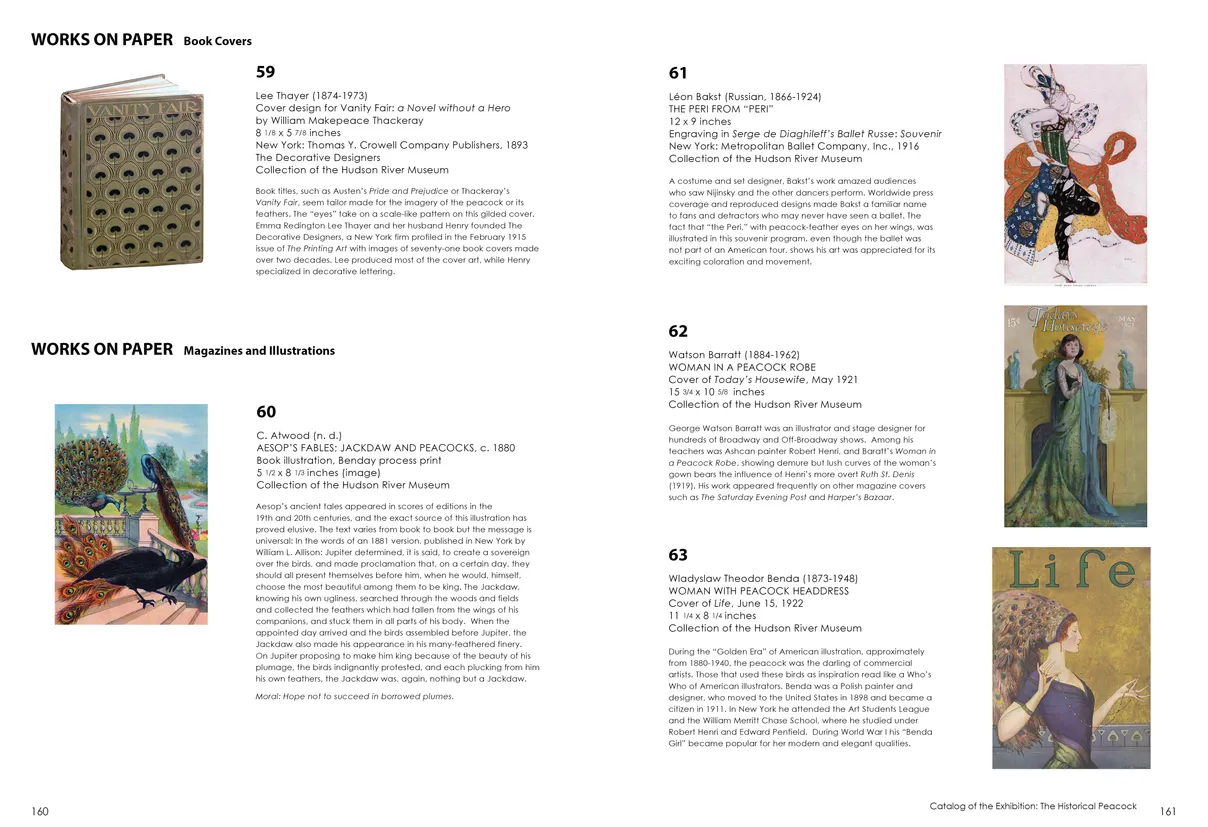
- Strut: The Peacock and Beauty in Art exhibition catalog, pages 160-161
- Client: Hudson River Museum
- Visit figure page
- Type: portfolio
- Portfolio Type: publication_design
- Portfolio Role: design_layout
Strut The: Peacock And Beauty In Art — Pages 162–163
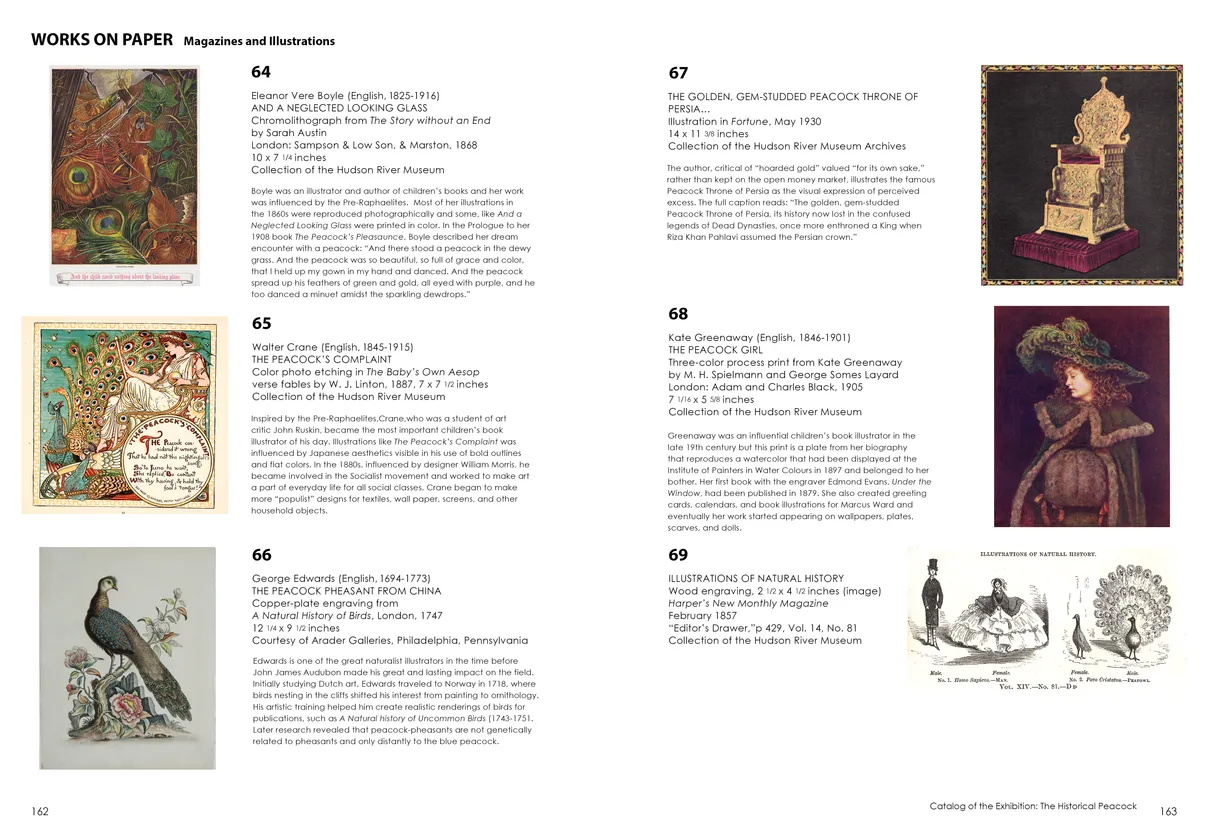
- Strut: The Peacock and Beauty in Art exhibition catalog, pages 162-163
- Client: Hudson River Museum
- Visit figure page
- Type: portfolio
- Portfolio Type: publication_design
- Portfolio Role: design_layout
Strut The: Peacock And Beauty In Art — Pages 164–165
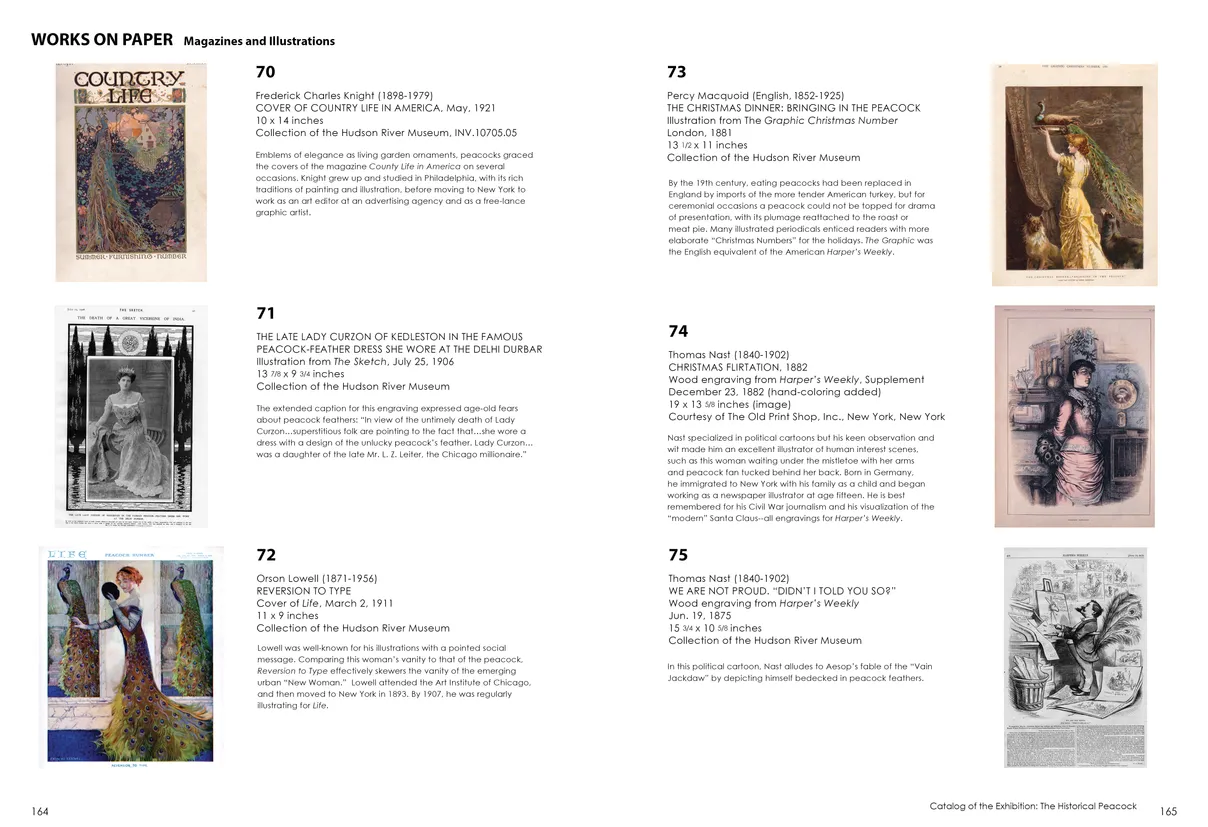
- Strut: The Peacock and Beauty in Art exhibition catalog, pages 164-165
- Client: Hudson River Museum
- Visit figure page
- Type: portfolio
- Portfolio Type: publication_design
- Portfolio Role: design_layout
Strut The: Peacock And Beauty In Art — Pages 166–167

- Strut: The Peacock and Beauty in Art exhibition catalog, pages 166-167
- Client: Hudson River Museum
- Visit figure page
- Type: portfolio
- Portfolio Type: publication_design
- Portfolio Role: design_layout
Strut The: Peacock And Beauty In Art — Pages 168–169
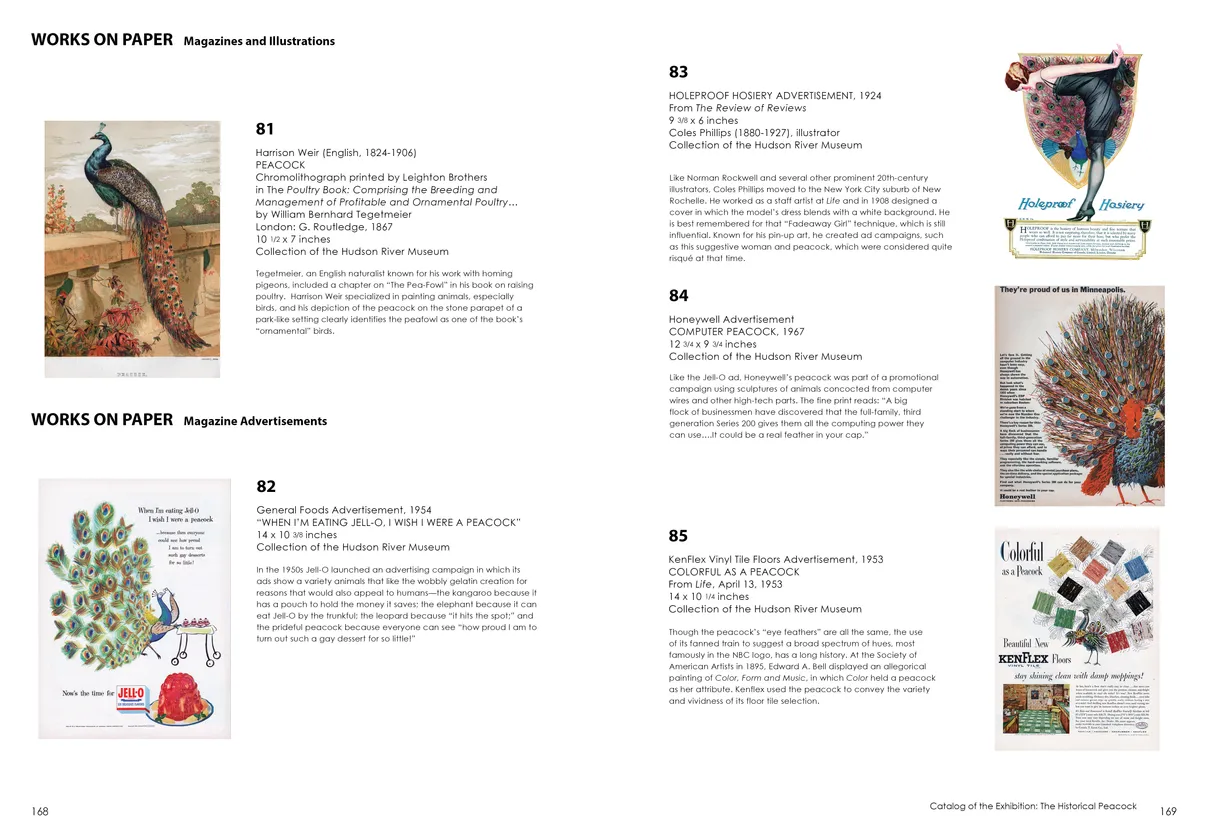
- Strut: The Peacock and Beauty in Art exhibition catalog, pages 168-169
- Client: Hudson River Museum
- Visit figure page
- Type: portfolio
- Portfolio Type: publication_design
- Portfolio Role: design_layout
Strut The: Peacock And Beauty In Art — Pages 170–171
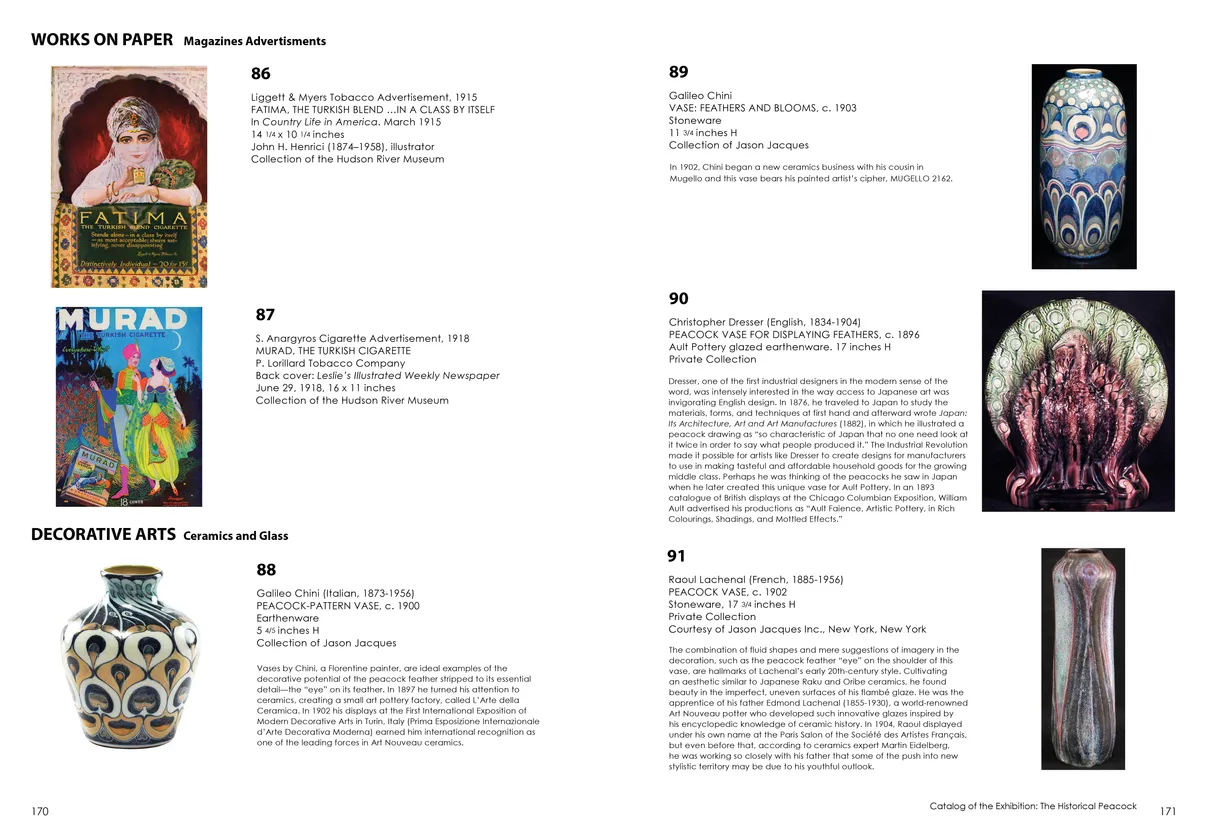
- Strut: The Peacock and Beauty in Art exhibition catalog, pages 170-171
- Client: Hudson River Museum
- Visit figure page
- Type: portfolio
- Portfolio Type: publication_design
- Portfolio Role: design_layout
Strut The: Peacock And Beauty In Art — Pages 172–173
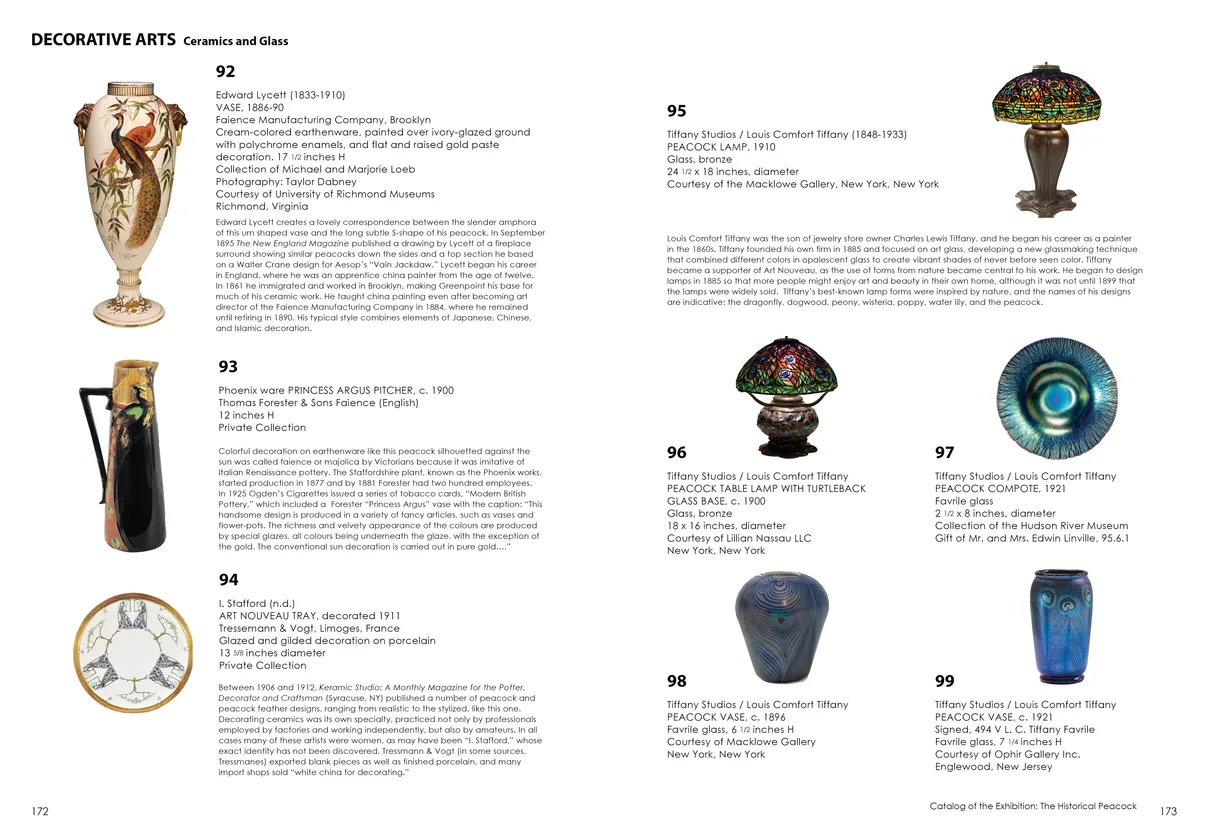
- Strut: The Peacock and Beauty in Art exhibition catalog, pages 172-173
- Client: Hudson River Museum
- Visit figure page
- Type: portfolio
- Portfolio Type: publication_design
- Portfolio Role: design_layout
Strut The: Peacock And Beauty In Art — Pages 174–175
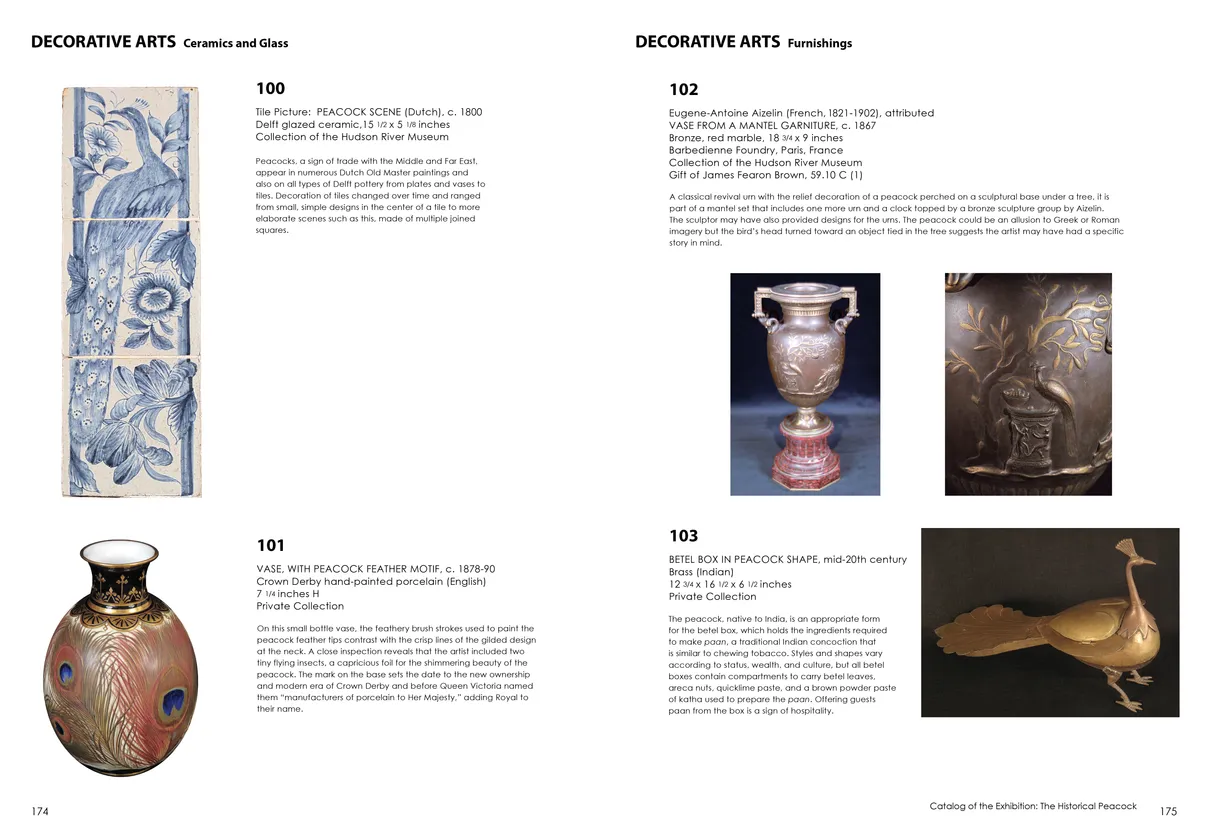
- Strut: The Peacock and Beauty in Art exhibition catalog, pages 174-175
- Client: Hudson River Museum
- Visit figure page
- Type: portfolio
- Portfolio Type: publication_design
- Portfolio Role: design_layout
Strut The: Peacock And Beauty In Art — Pages 176–177
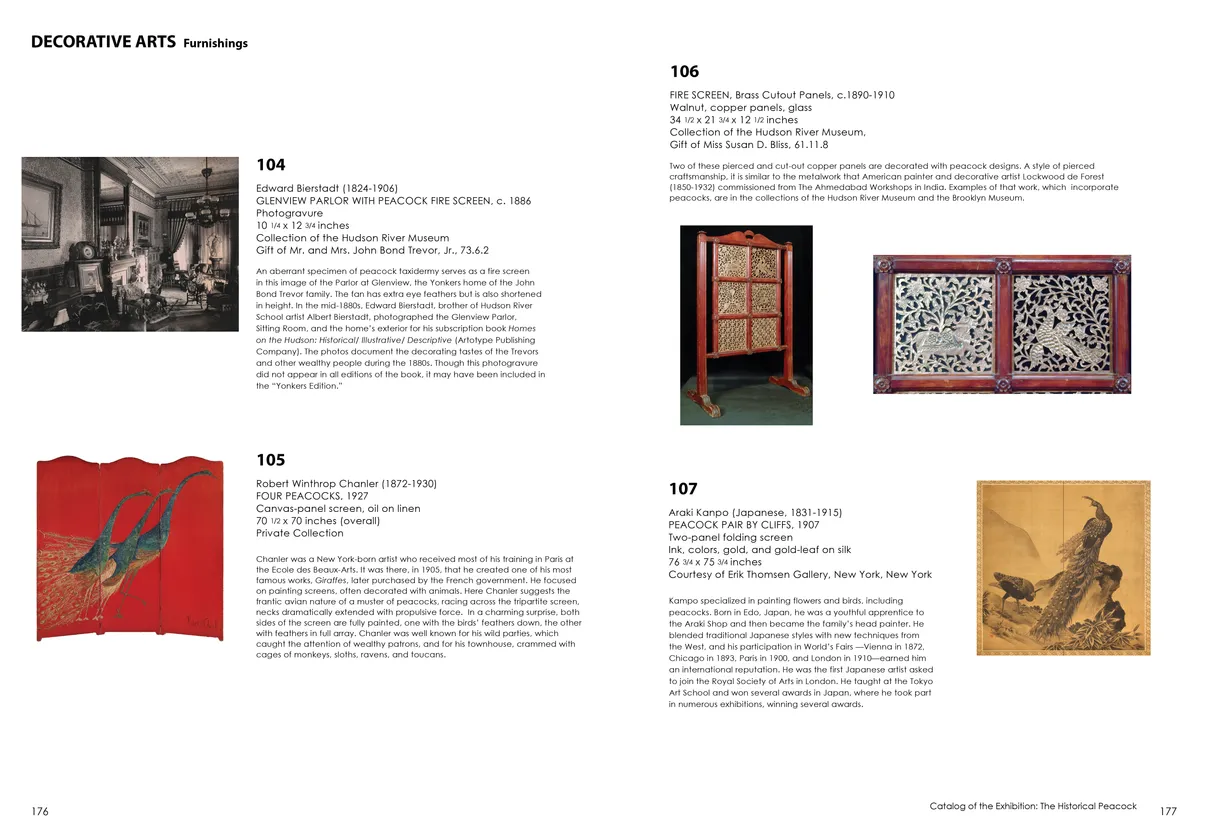
- Strut: The Peacock and Beauty in Art exhibition catalog, pages 176-177
- Client: Hudson River Museum
- Visit figure page
- Type: portfolio
- Portfolio Type: publication_design
- Portfolio Role: design_layout
Strut The: Peacock And Beauty In Art — Pages 178–179
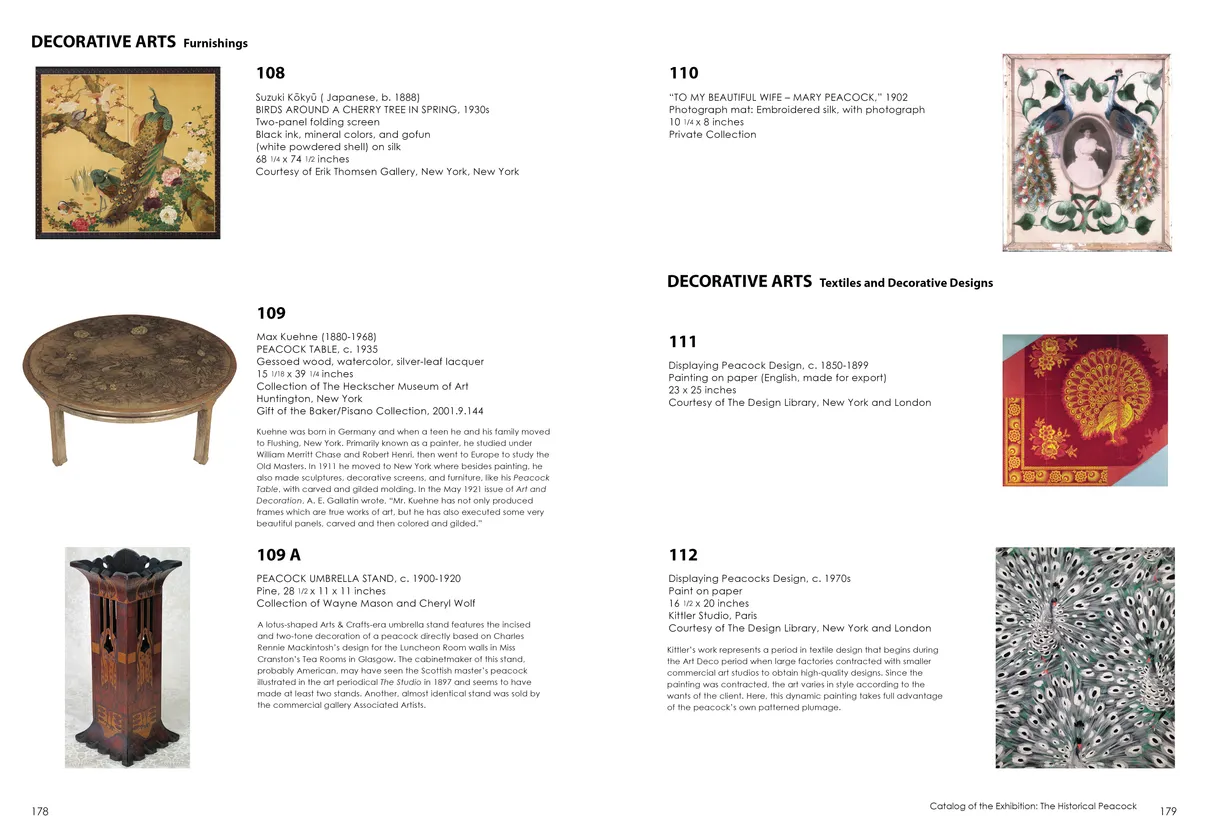
- Strut: The Peacock and Beauty in Art exhibition catalog, pages 178-179
- Client: Hudson River Museum
- Visit figure page
- Type: portfolio
- Portfolio Type: publication_design
- Portfolio Role: design_layout
Strut The: Peacock And Beauty In Art — Pages 18–19
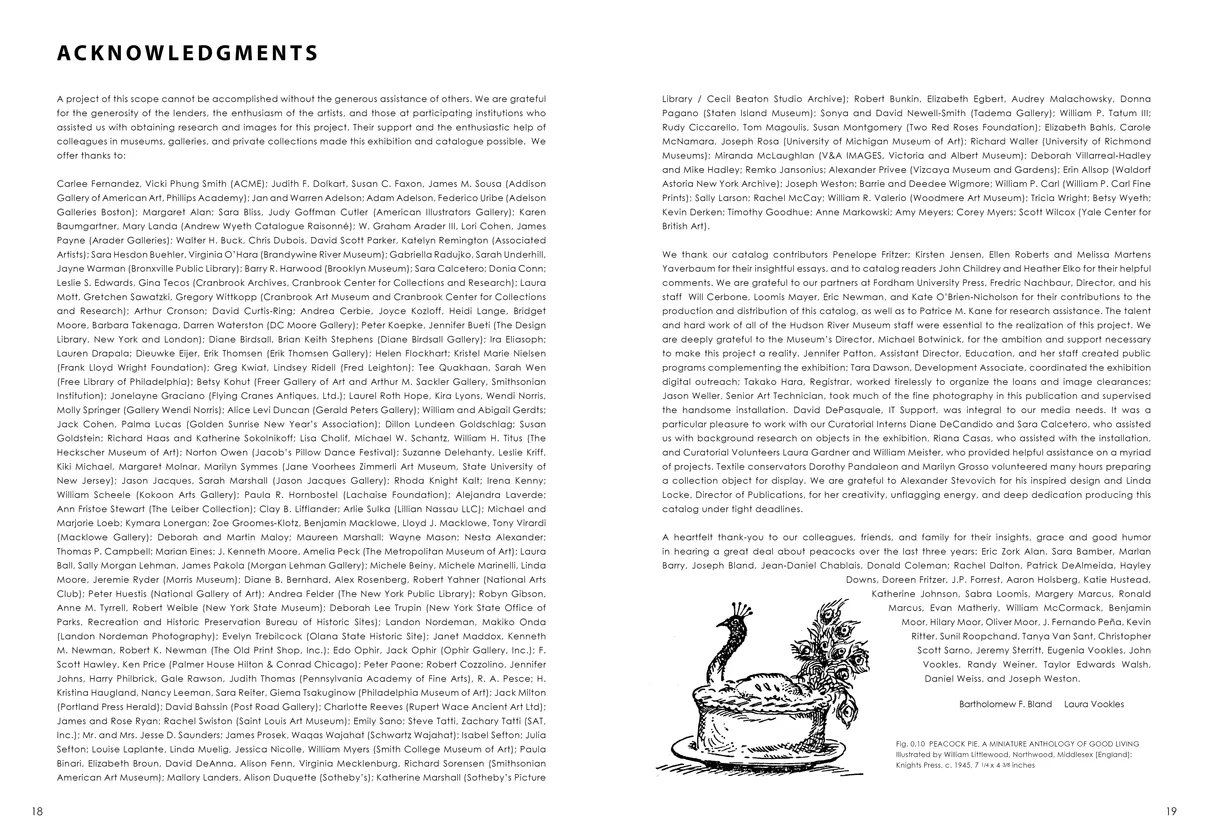
- Strut: The Peacock and Beauty in Art exhibition catalog, pages 18-19
- Client: Hudson River Museum
- Visit figure page
- Type: portfolio
- Portfolio Type: publication_design
- Portfolio Role: design_layout
Strut The: Peacock And Beauty In Art — Pages 180–181
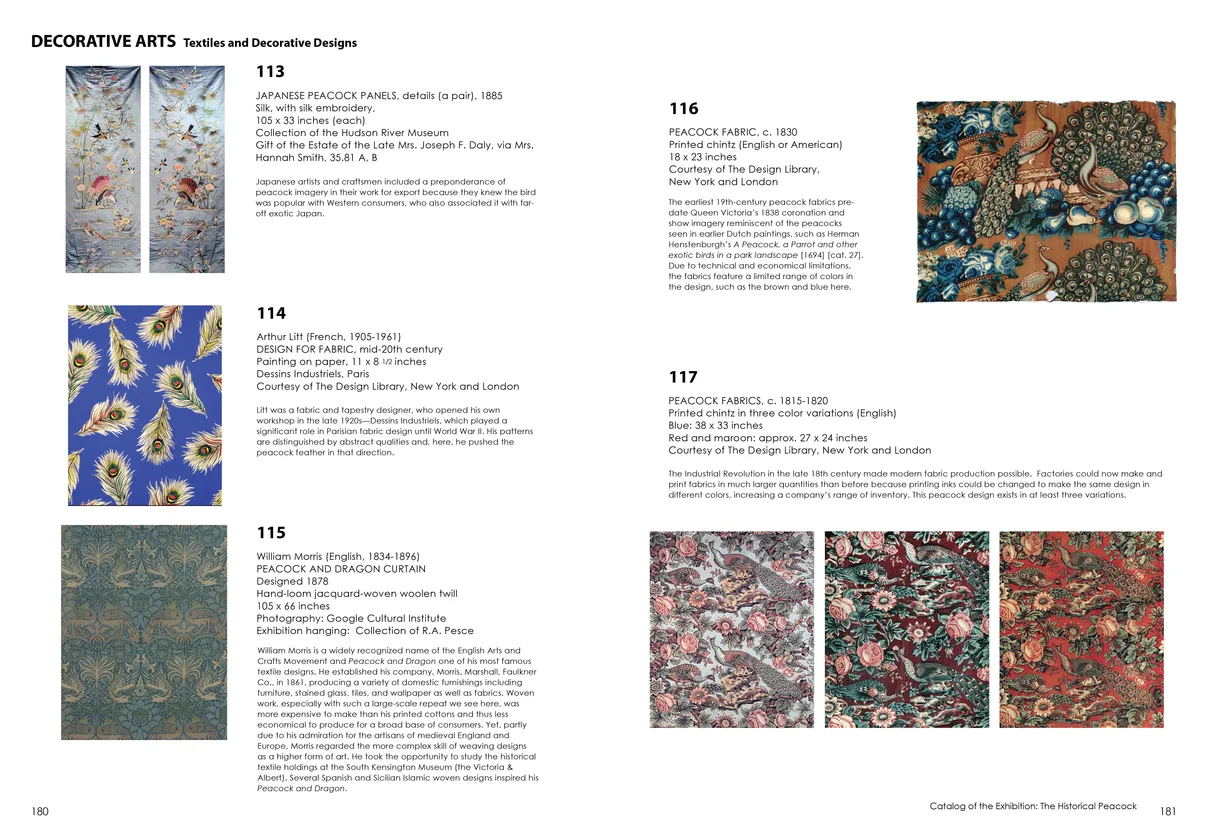
- Strut: The Peacock and Beauty in Art exhibition catalog, pages 180-181
- Client: Hudson River Museum
- Visit figure page
- Type: portfolio
- Portfolio Type: publication_design
- Portfolio Role: design_layout
Strut The: Peacock And Beauty In Art — Pages 182–183
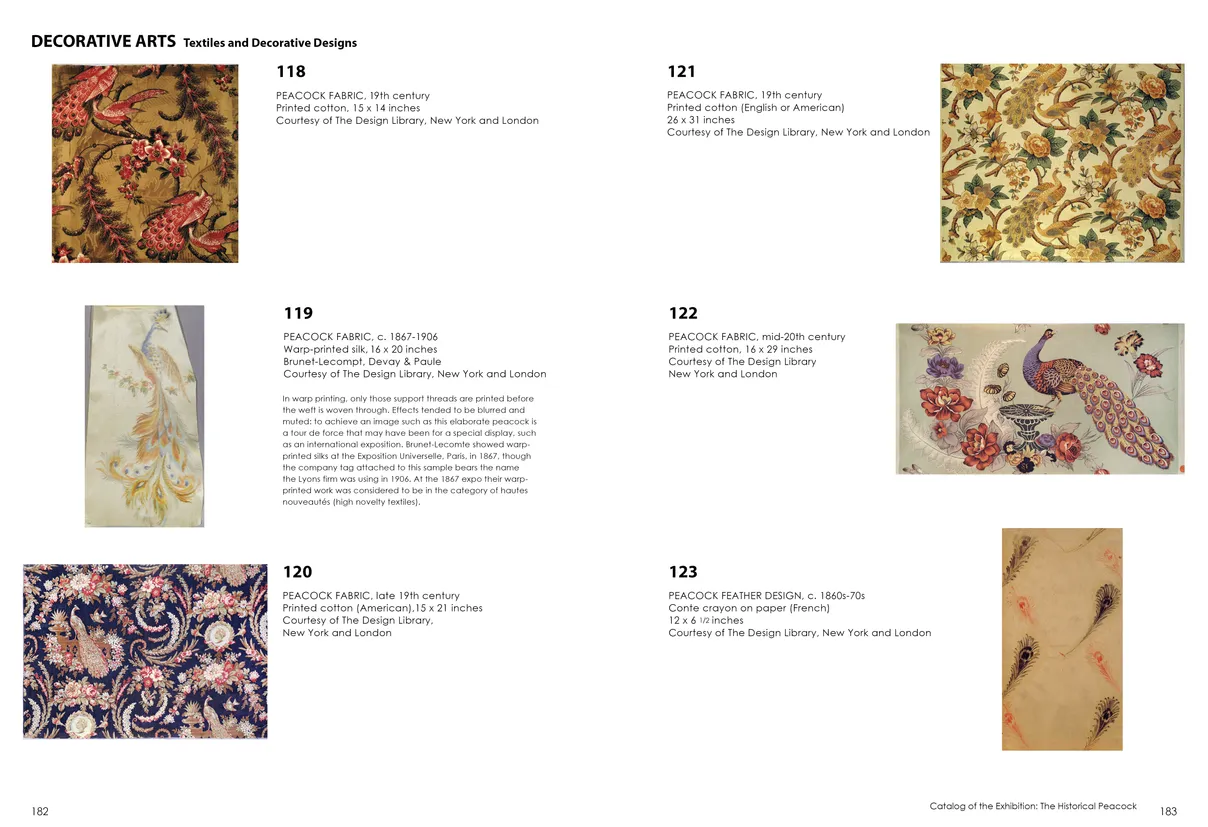
- Strut: The Peacock and Beauty in Art exhibition catalog, pages 182-183
- Client: Hudson River Museum
- Visit figure page
- Type: portfolio
- Portfolio Type: publication_design
- Portfolio Role: design_layout
Strut The: Peacock And Beauty In Art — Pages 184–185
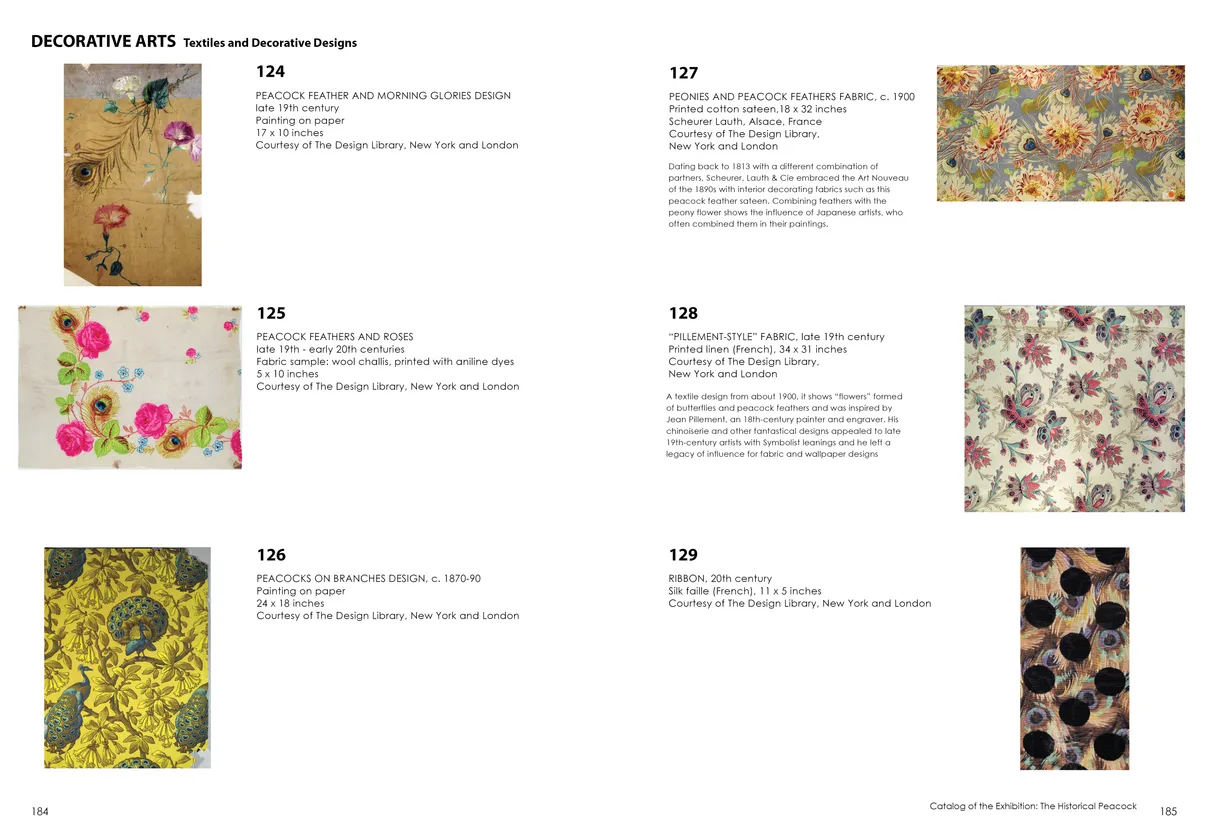
- Strut: The Peacock and Beauty in Art exhibition catalog, pages 184-185
- Client: Hudson River Museum
- Visit figure page
- Type: portfolio
- Portfolio Type: publication_design
- Portfolio Role: design_layout
Strut The: Peacock And Beauty In Art — Pages 186–187

- Strut: The Peacock and Beauty in Art exhibition catalog, pages 186-187
- Client: Hudson River Museum
- Visit figure page
- Type: portfolio
- Portfolio Type: publication_design
- Portfolio Role: design_layout
Strut The: Peacock And Beauty In Art — Pages 188–189
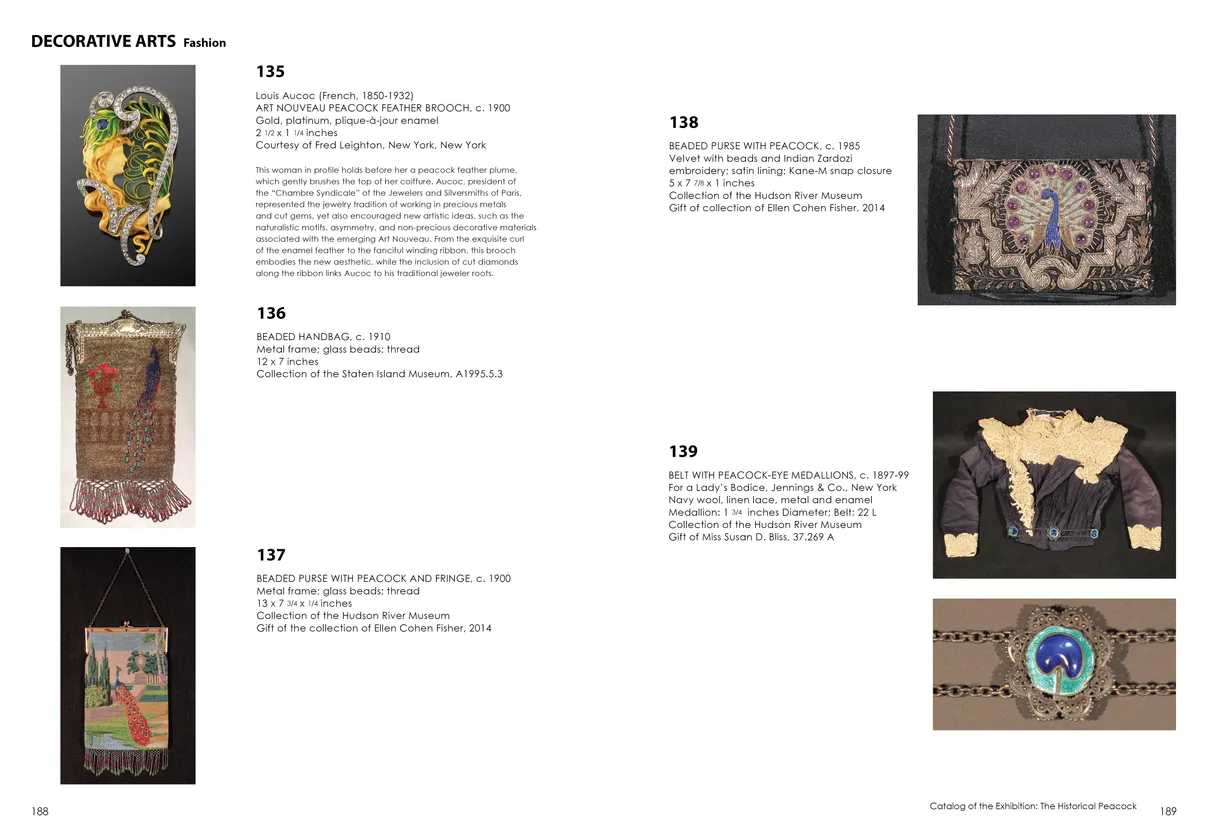
- Strut: The Peacock and Beauty in Art exhibition catalog, pages 188-189
- Client: Hudson River Museum
- Visit figure page
- Type: portfolio
- Portfolio Type: publication_design
- Portfolio Role: design_layout
Strut The: Peacock And Beauty In Art — Pages 190–191
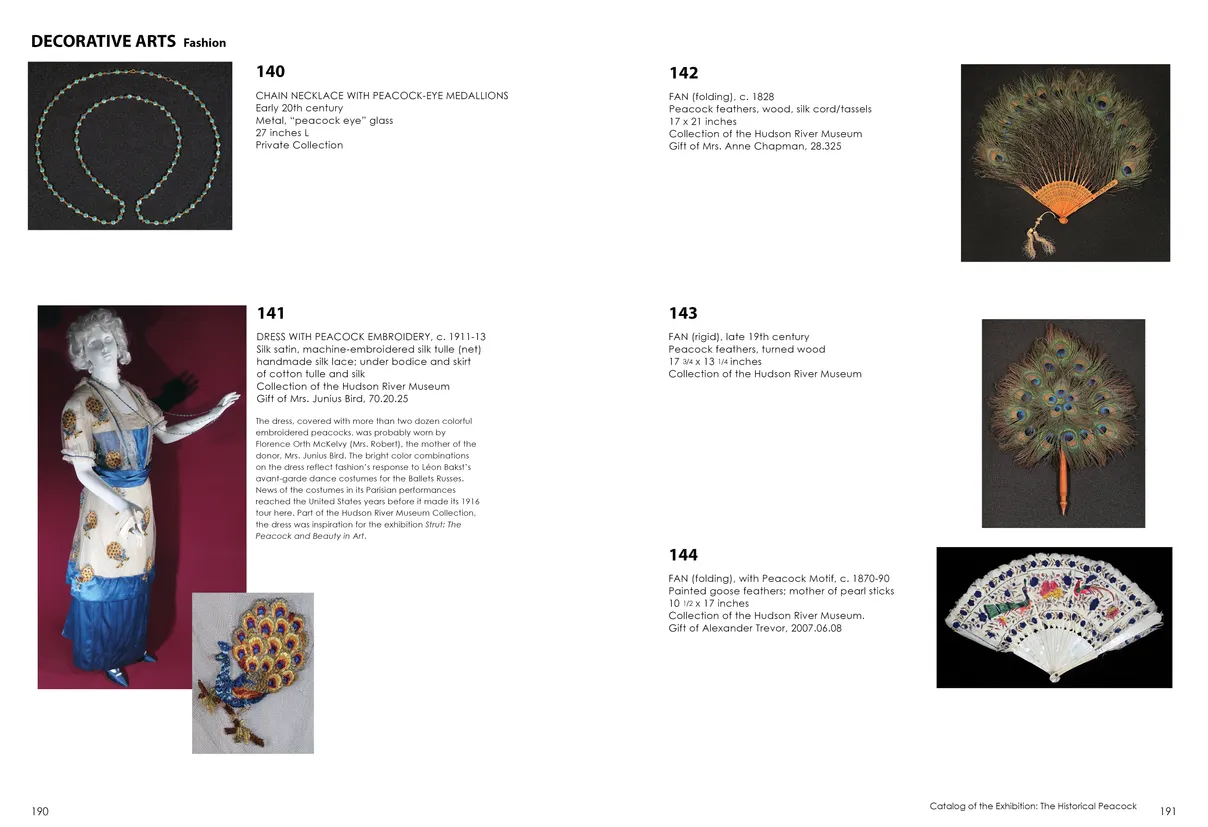
- Strut: The Peacock and Beauty in Art exhibition catalog, pages 190-191
- Client: Hudson River Museum
- Visit figure page
- Type: portfolio
- Portfolio Type: publication_design
- Portfolio Role: design_layout
Strut The: Peacock And Beauty In Art — Pages 192–193
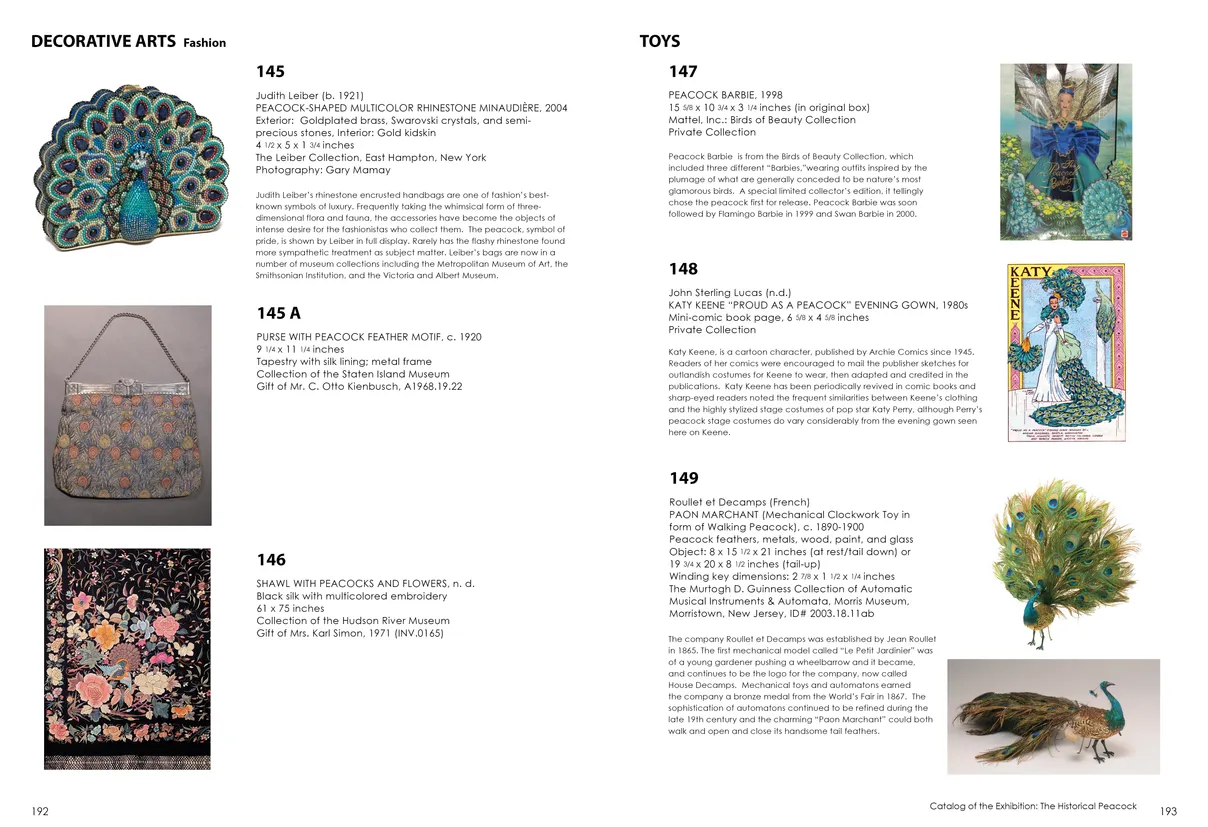
- Strut: The Peacock and Beauty in Art exhibition catalog, pages 192-193
- Client: Hudson River Museum
- Visit figure page
- Type: portfolio
- Portfolio Type: publication_design
- Portfolio Role: design_layout
Strut The: Peacock And Beauty In Art — Pages 194–195
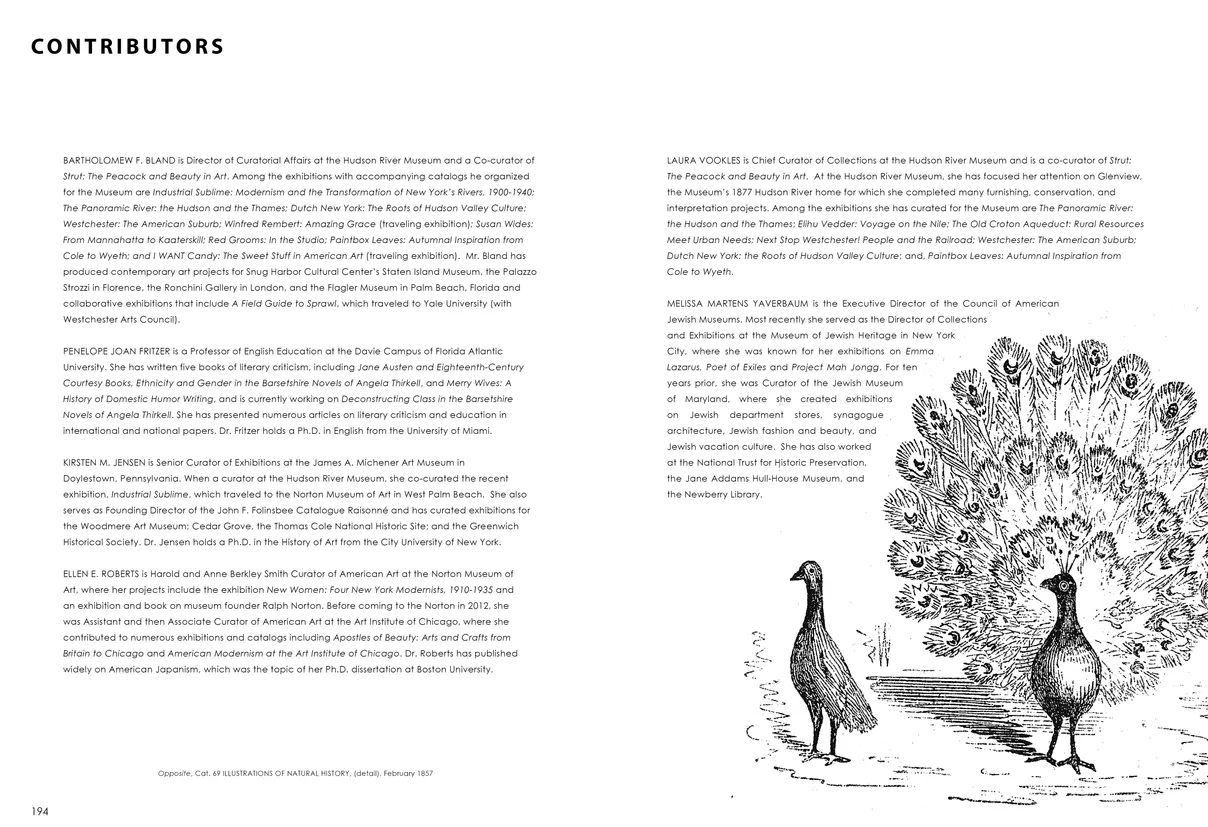
- Strut: The Peacock and Beauty in Art exhibition catalog, pages 194-195
- Client: Hudson River Museum
- Visit figure page
- Type: portfolio
- Portfolio Type: publication_design
- Portfolio Role: design_layout
Strut The: Peacock And Beauty In Art — Pages 196–197
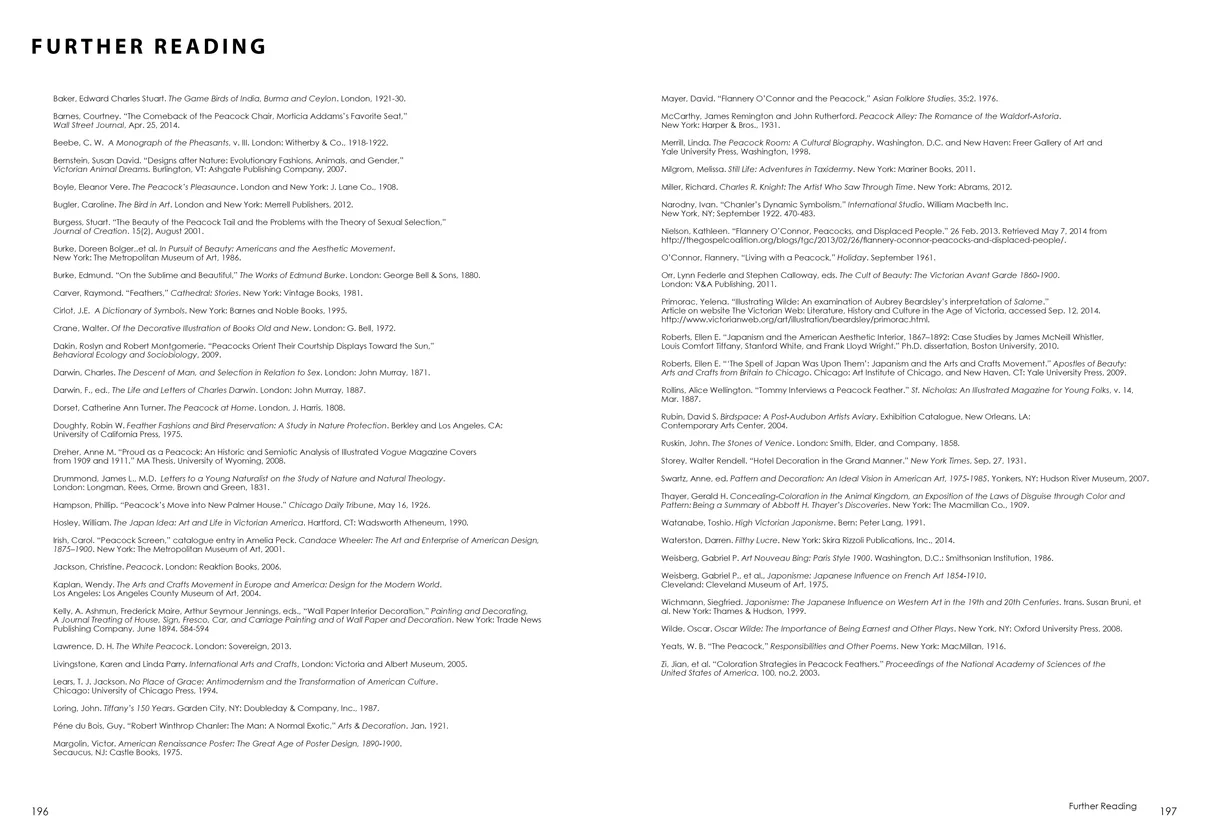
- Strut: The Peacock and Beauty in Art exhibition catalog, pages 196-197
- Client: Hudson River Museum
- Visit figure page
- Type: portfolio
- Portfolio Type: publication_design
- Portfolio Role: design_layout
Strut The: Peacock And Beauty In Art — Pages 198–199
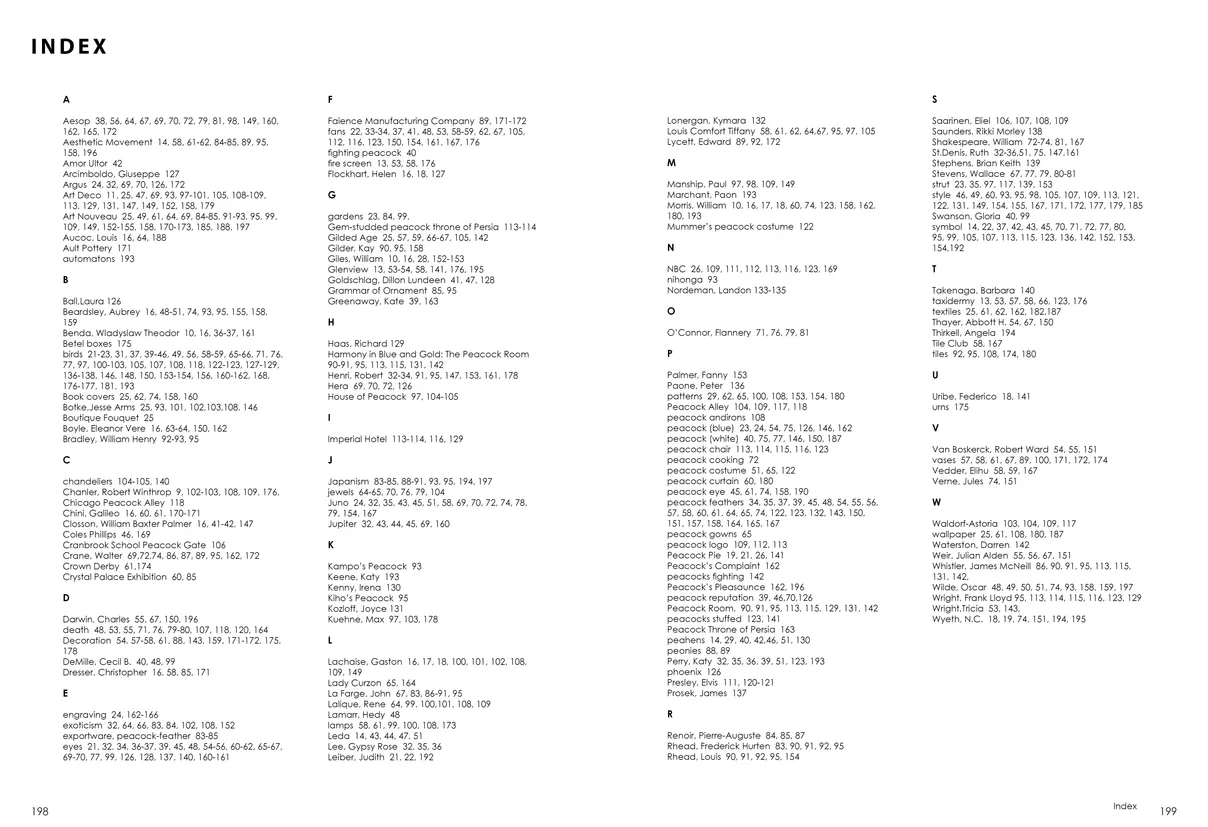
- Strut: The Peacock and Beauty in Art exhibition catalog, pages 198-199
- Client: Hudson River Museum
- Visit figure page
- Type: portfolio
- Portfolio Type: publication_design
- Portfolio Role: design_layout
Strut The: Peacock And Beauty In Art — Pages 2–3
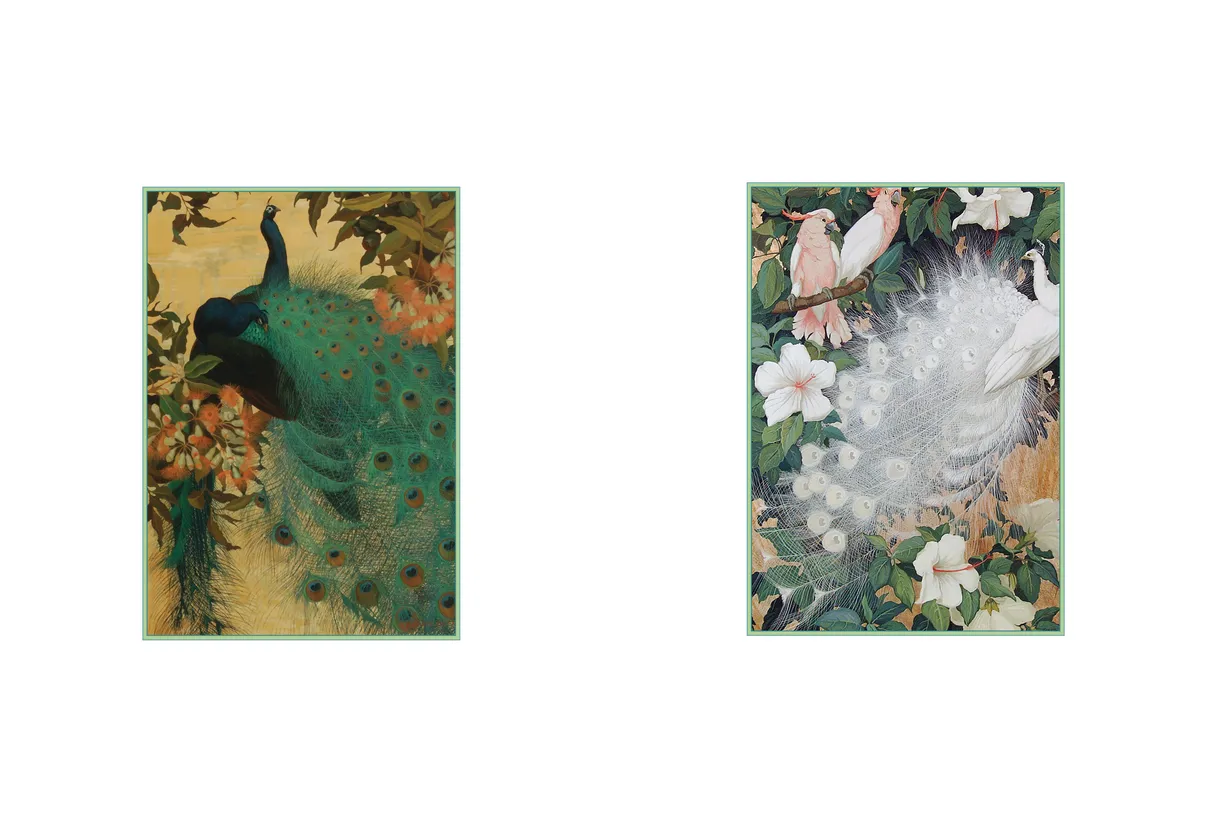
- Strut: The Peacock and Beauty in Art exhibition catalog, pages 2-3
- Client: Hudson River Museum
- Visit figure page
- Type: portfolio
- Portfolio Type: publication_design
- Portfolio Role: design_layout
Strut The: Peacock And Beauty In Art — Pages 20–21
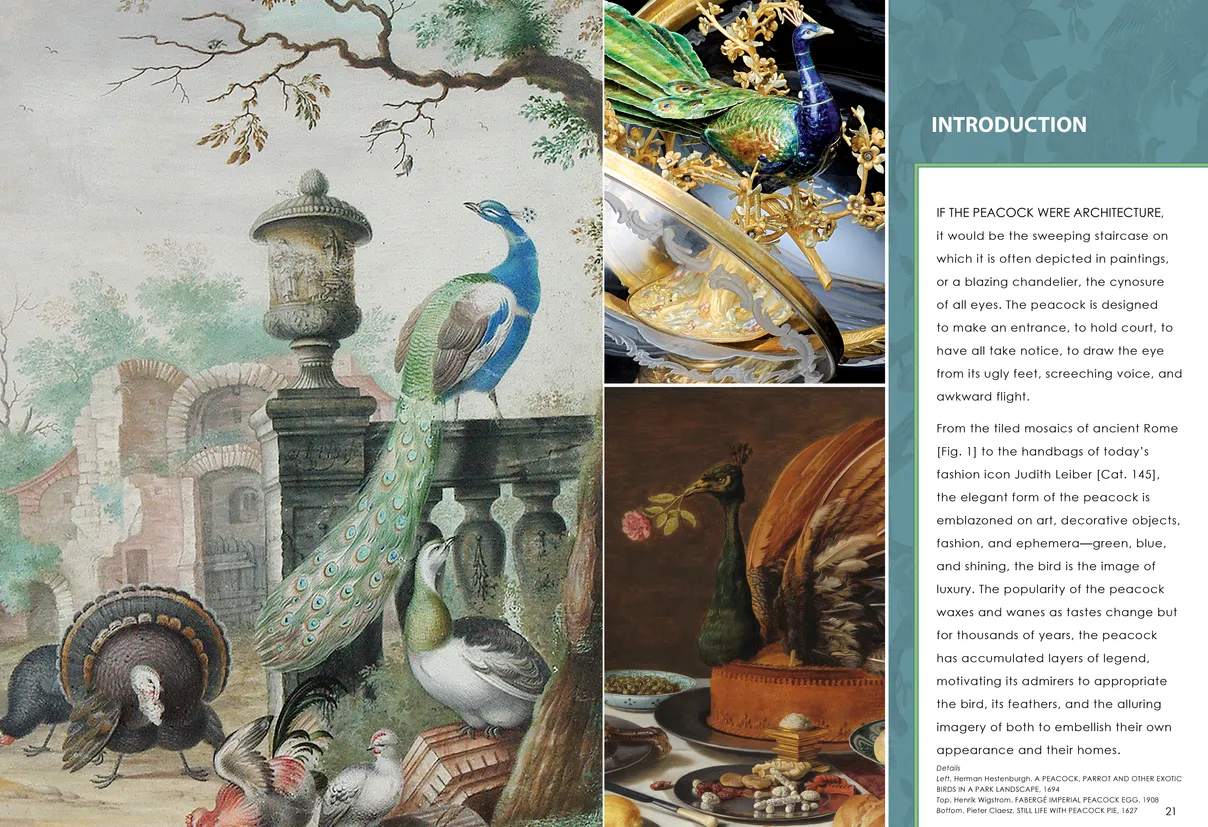
- Strut: The Peacock and Beauty in Art exhibition catalog, pages 20-21
- Client: Hudson River Museum
- Visit figure page
- Type: portfolio
- Portfolio Type: publication_design
- Portfolio Role: design_layout
Strut The: Peacock And Beauty In Art — Pages 22–23

- Strut: The Peacock and Beauty in Art exhibition catalog, pages 22-23
- Client: Hudson River Museum
- Visit figure page
- Type: portfolio
- Portfolio Type: publication_design
- Portfolio Role: design_layout
Strut The: Peacock And Beauty In Art — Pages 24–25
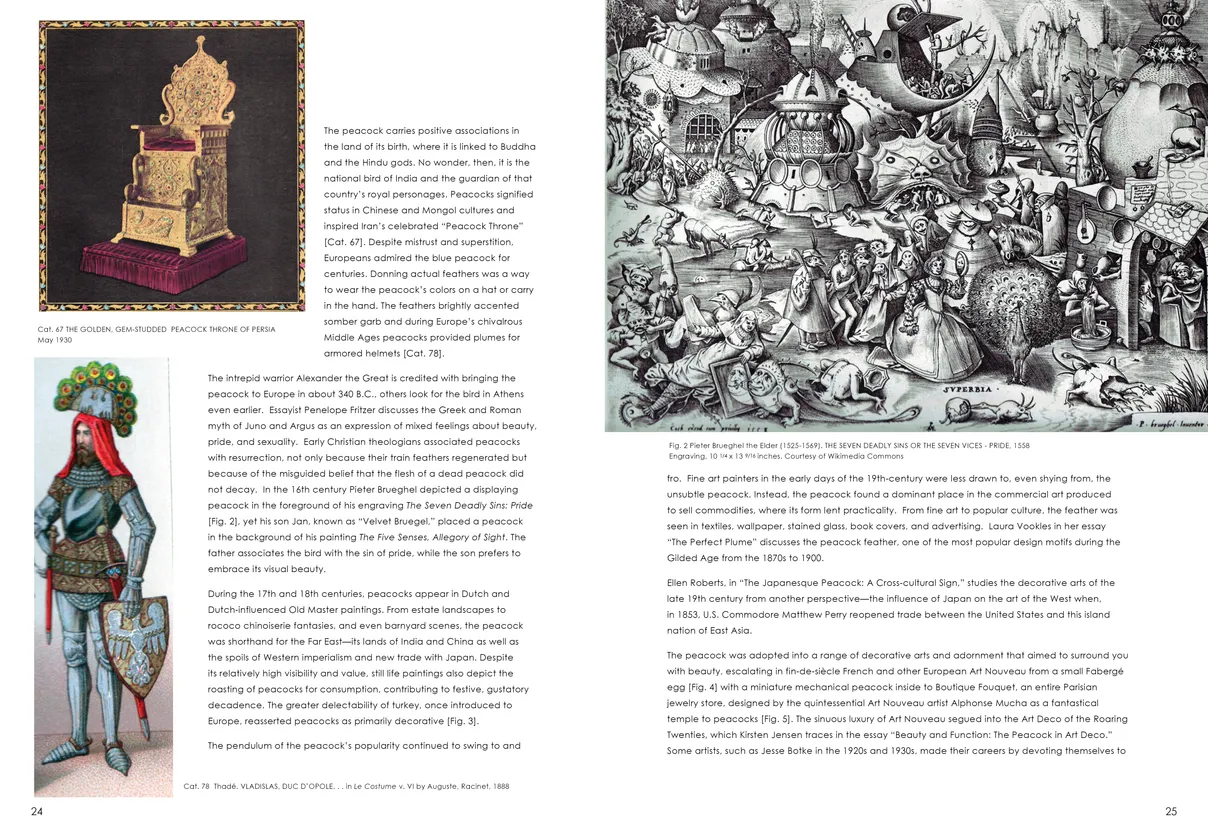
- Strut: The Peacock and Beauty in Art exhibition catalog, pages 24-25
- Client: Hudson River Museum
- Visit figure page
- Type: portfolio
- Portfolio Type: publication_design
- Portfolio Role: design_layout
Strut The: Peacock And Beauty In Art — Pages 26–27
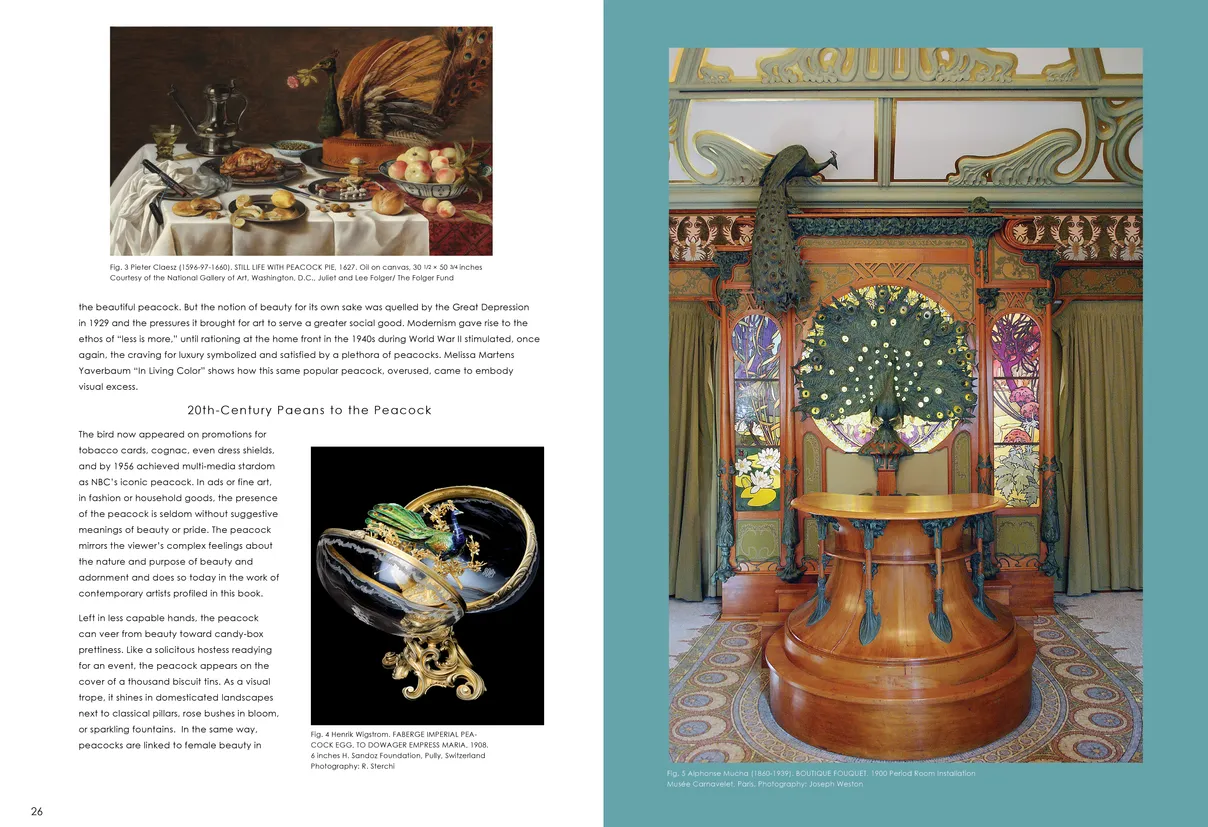
- Strut: The Peacock and Beauty in Art exhibition catalog, pages 26-27
- Client: Hudson River Museum
- Visit figure page
- Type: portfolio
- Portfolio Type: publication_design
- Portfolio Role: design_layout
Strut The: Peacock And Beauty In Art — Pages 28–29

- Strut: The Peacock and Beauty in Art exhibition catalog, pages 28-29
- Client: Hudson River Museum
- Visit figure page
- Type: portfolio
- Portfolio Type: publication_design
- Portfolio Role: design_layout
Strut The: Peacock And Beauty In Art — Pages 30–31
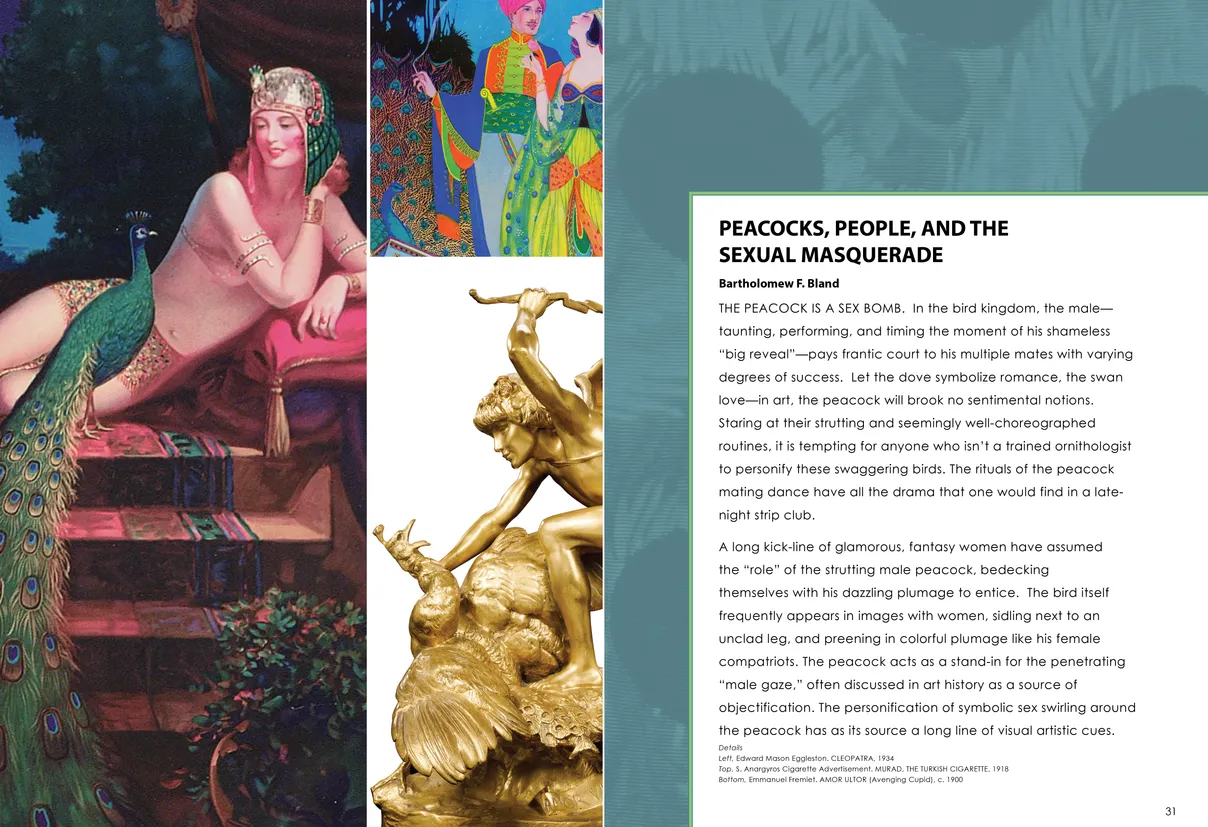
- Strut: The Peacock and Beauty in Art exhibition catalog, pages 30-31
- Client: Hudson River Museum
- Visit figure page
- Type: portfolio
- Portfolio Type: publication_design
- Portfolio Role: design_layout
Strut The: Peacock And Beauty In Art — Pages 32–33

- Strut: The Peacock and Beauty in Art exhibition catalog, pages 32-33
- Client: Hudson River Museum
- Visit figure page
- Type: portfolio
- Portfolio Type: publication_design
- Portfolio Role: design_layout
Strut The: Peacock And Beauty In Art — Pages 34–35
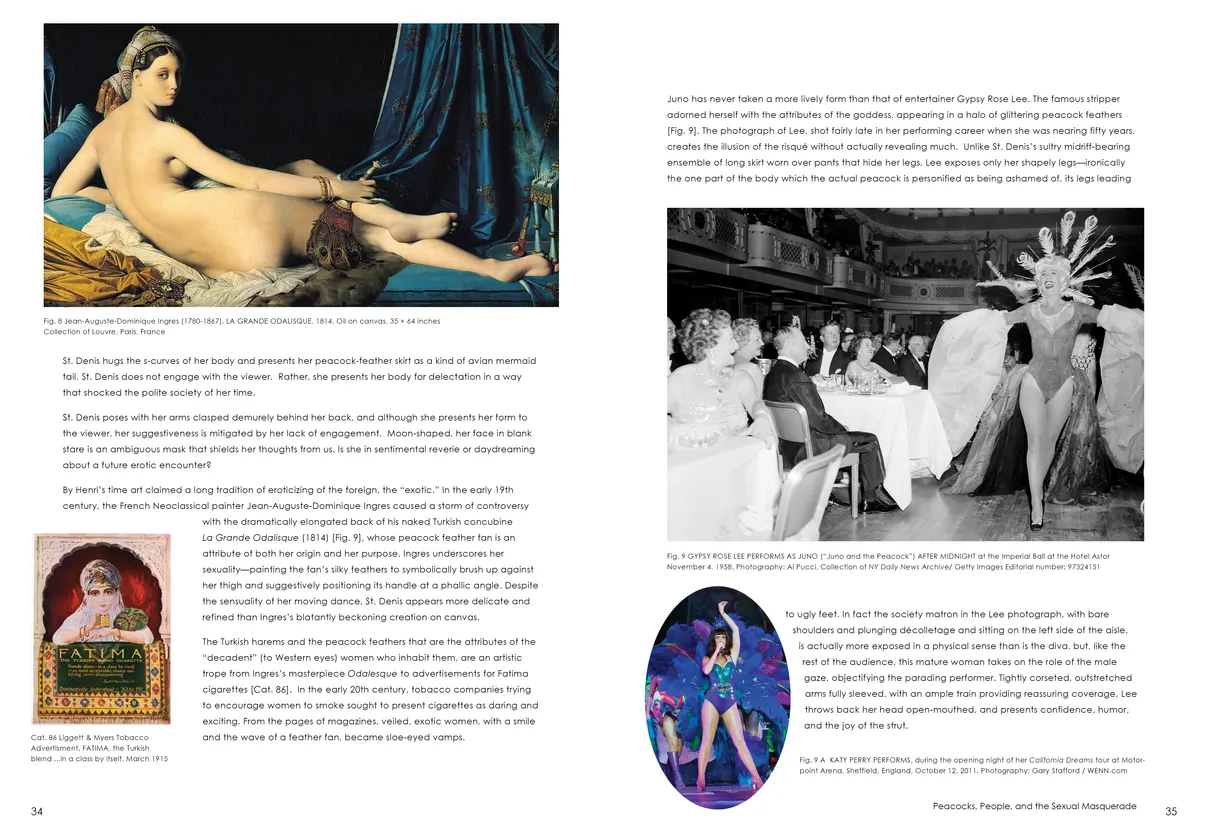
- Strut: The Peacock and Beauty in Art exhibition catalog, pages 34-35
- Client: Hudson River Museum
- Visit figure page
- Type: portfolio
- Portfolio Type: publication_design
- Portfolio Role: design_layout
Strut The: Peacock And Beauty In Art — Pages 36–37
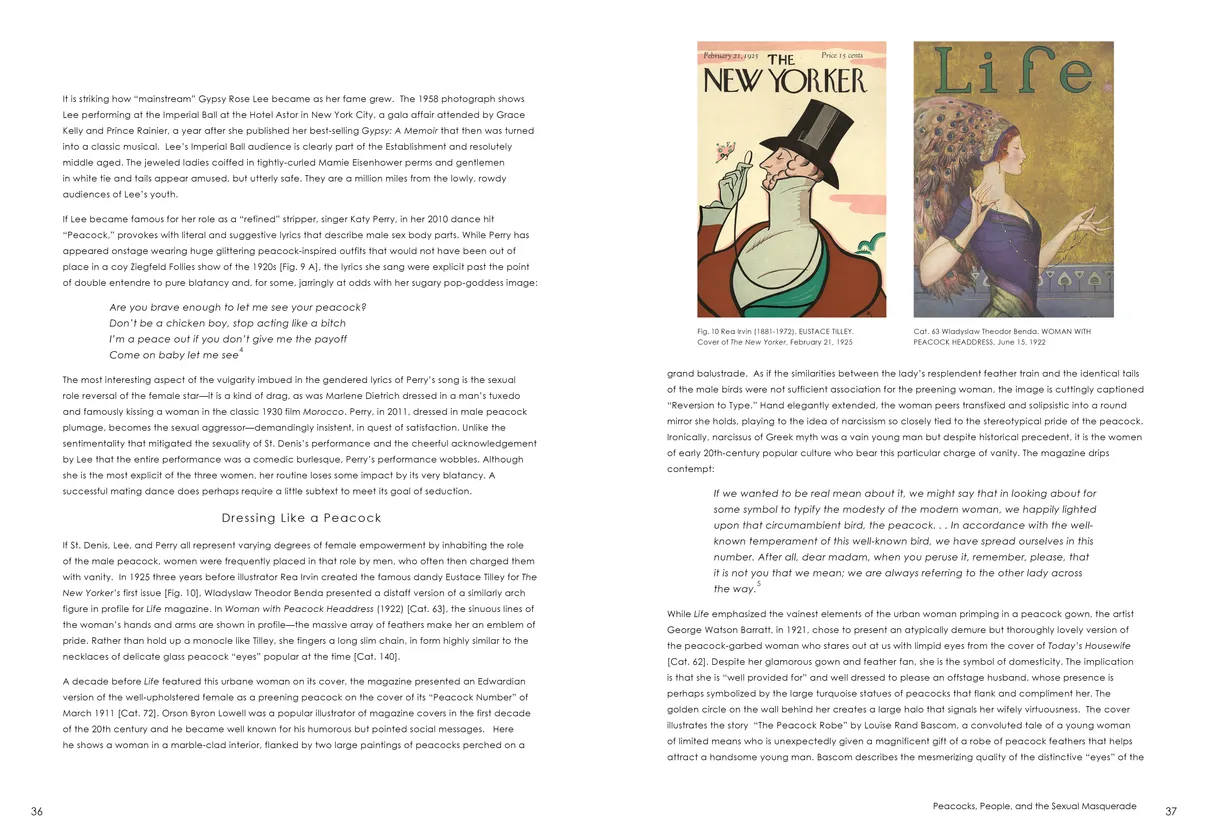
- Strut: The Peacock and Beauty in Art exhibition catalog, pages 36-37
- Client: Hudson River Museum
- Visit figure page
- Type: portfolio
- Portfolio Type: publication_design
- Portfolio Role: design_layout
Strut The: Peacock And Beauty In Art — Pages 38–39
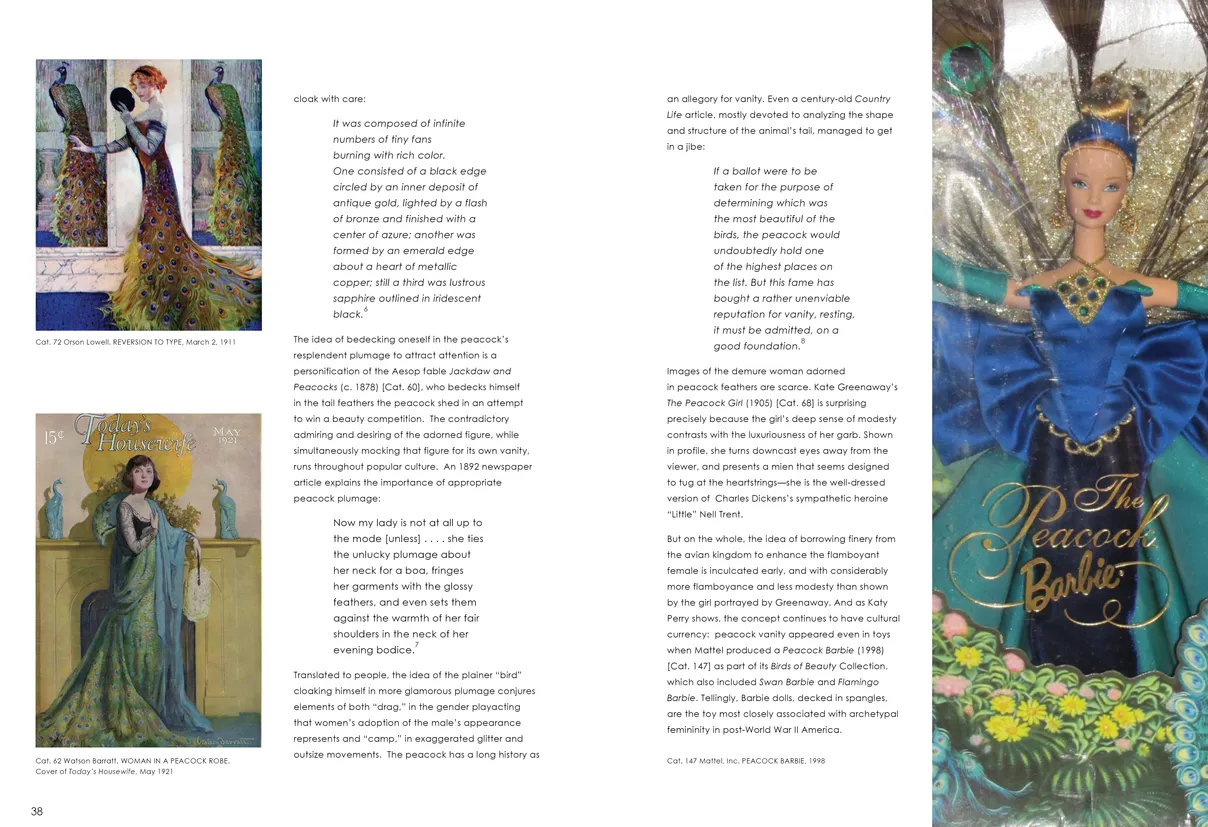
- Strut: The Peacock and Beauty in Art exhibition catalog, pages 38-39
- Client: Hudson River Museum
- Visit figure page
- Type: portfolio
- Portfolio Type: publication_design
- Portfolio Role: design_layout
Strut The: Peacock And Beauty In Art — Pages 4–5
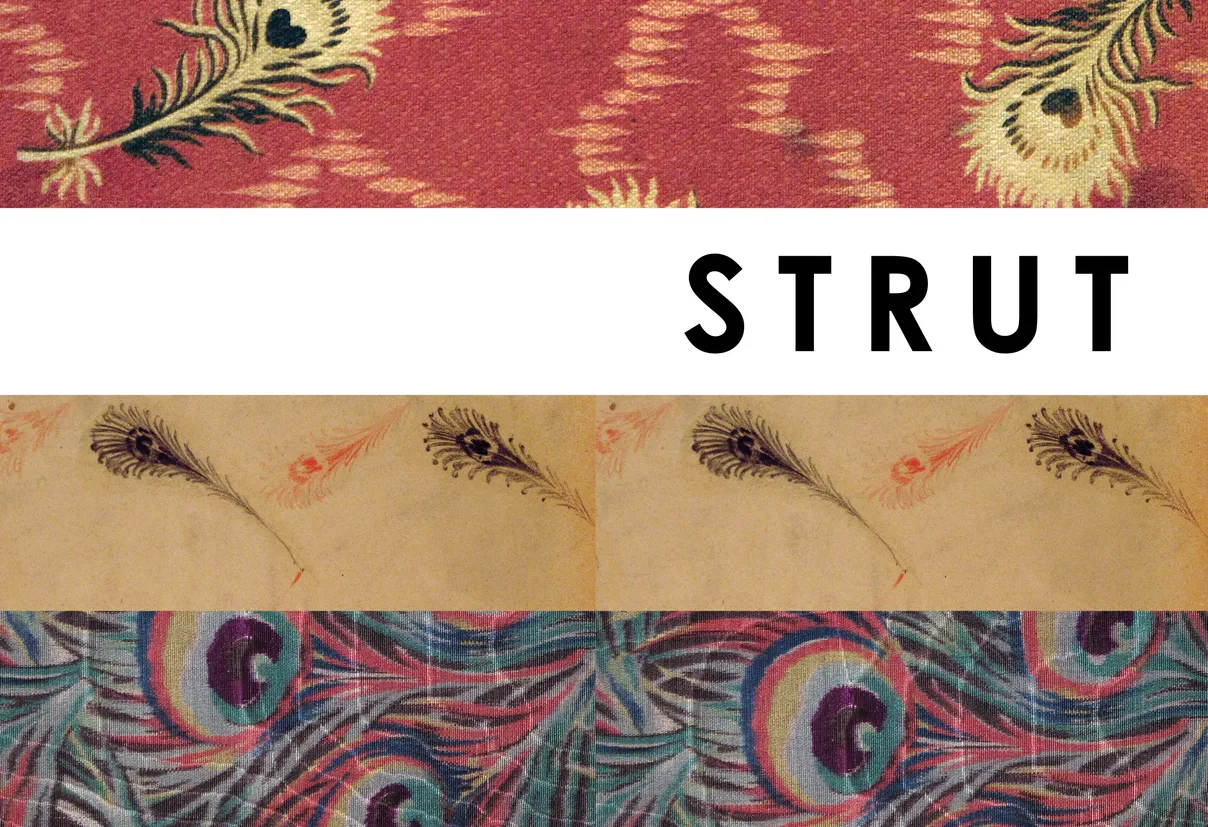
- Strut: The Peacock and Beauty in Art exhibition catalog, pages 4-5
- Client: Hudson River Museum
- Visit figure page
- Type: portfolio
- Portfolio Type: publication_design
- Portfolio Role: design_layout
Strut The: Peacock And Beauty In Art — Pages 40–41
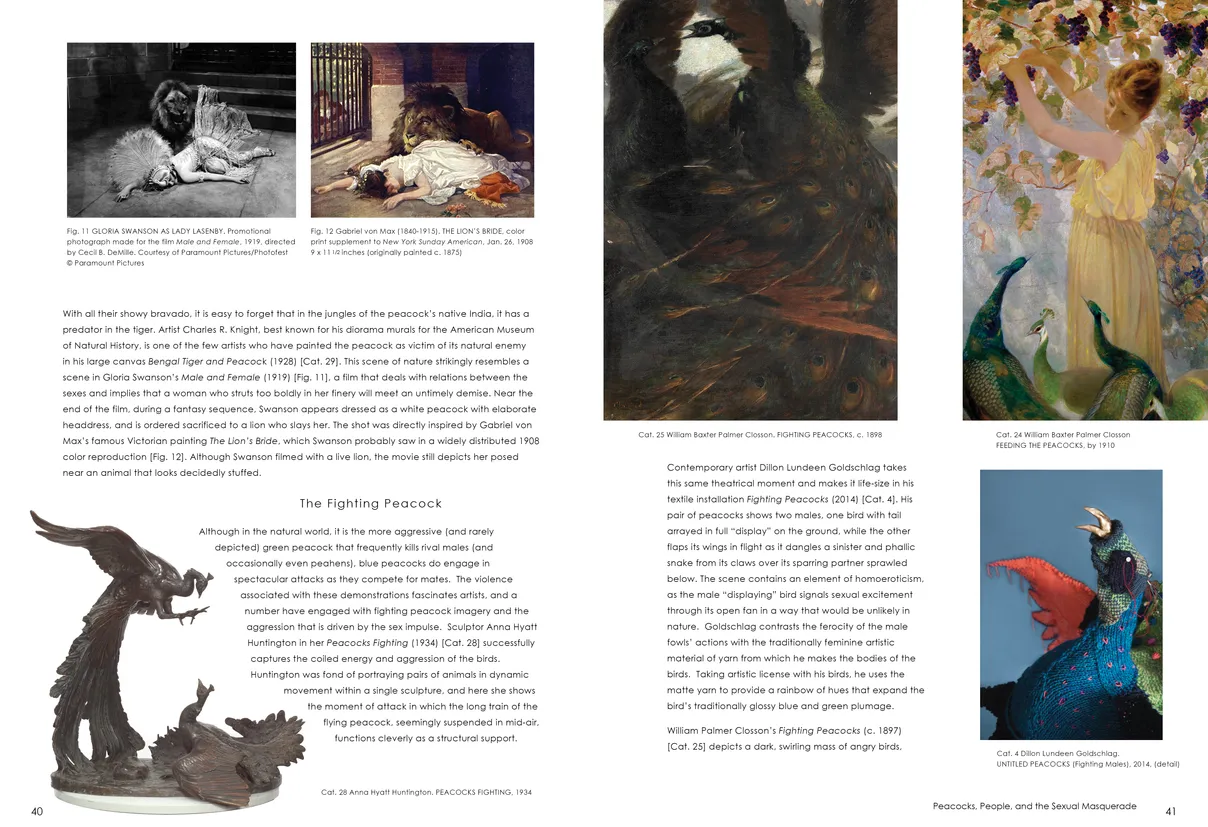
- Strut: The Peacock and Beauty in Art exhibition catalog, pages 40-41
- Client: Hudson River Museum
- Visit figure page
- Type: portfolio
- Portfolio Type: publication_design
- Portfolio Role: design_layout
Strut The: Peacock And Beauty In Art — Pages 42–43

- Strut: The Peacock and Beauty in Art exhibition catalog, pages 42-43
- Client: Hudson River Museum
- Visit figure page
- Type: portfolio
- Portfolio Type: publication_design
- Portfolio Role: design_layout
Strut The: Peacock And Beauty In Art — Pages 44–45

- Strut: The Peacock and Beauty in Art exhibition catalog, pages 44-45
- Client: Hudson River Museum
- Visit figure page
- Type: portfolio
- Portfolio Type: publication_design
- Portfolio Role: design_layout
Strut The: Peacock And Beauty In Art — Pages 46–47
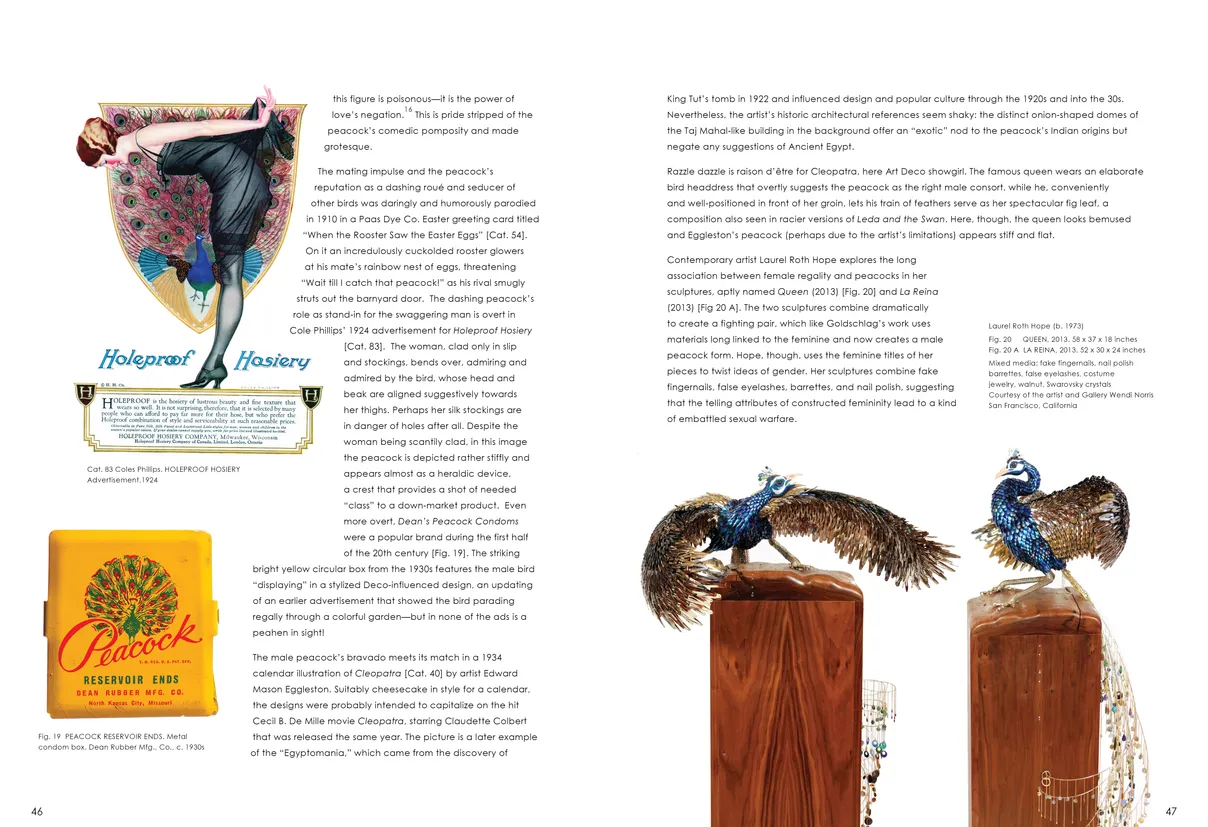
- Strut: The Peacock and Beauty in Art exhibition catalog, pages 46-47
- Client: Hudson River Museum
- Visit figure page
- Type: portfolio
- Portfolio Type: publication_design
- Portfolio Role: design_layout
Strut The: Peacock And Beauty In Art — Pages 48–49
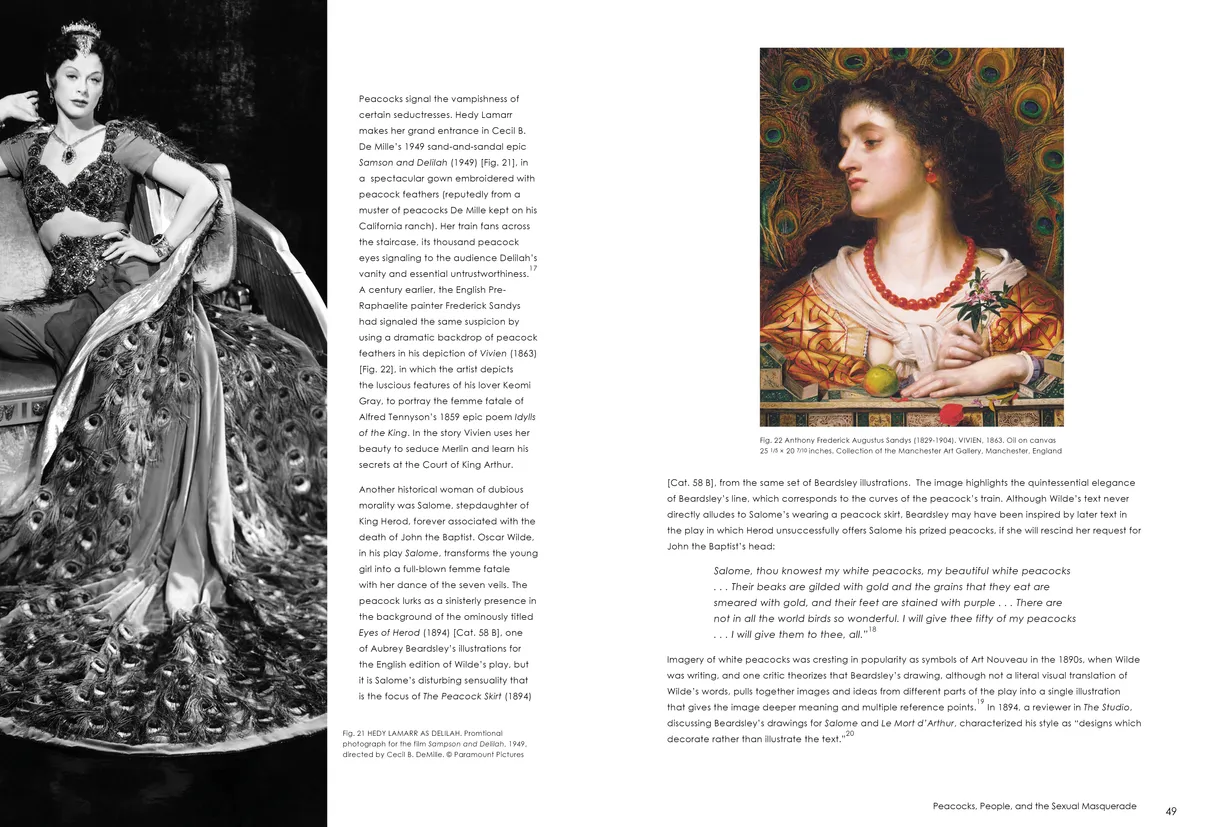
- Strut: The Peacock and Beauty in Art exhibition catalog, pages 48-49
- Client: Hudson River Museum
- Visit figure page
- Type: portfolio
- Portfolio Type: publication_design
- Portfolio Role: design_layout
Strut The: Peacock And Beauty In Art — Pages 50–51
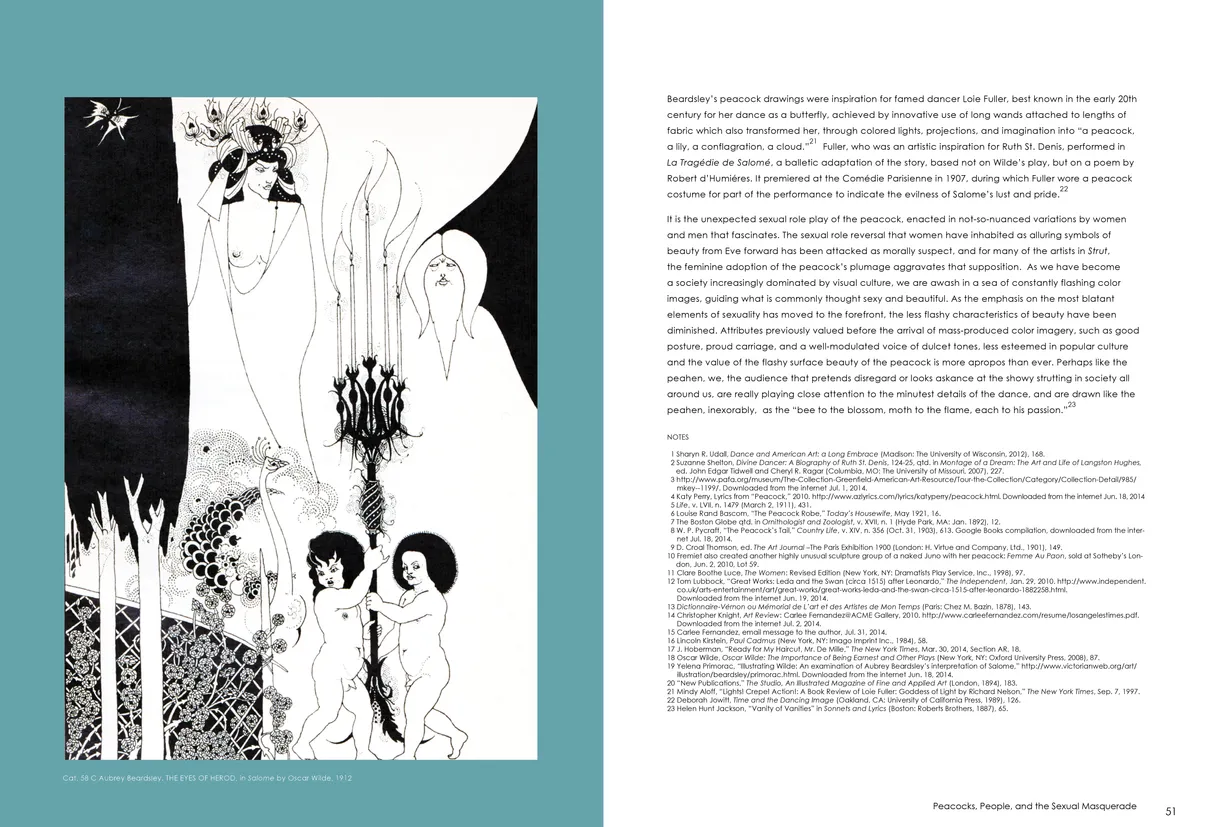
- Strut: The Peacock and Beauty in Art exhibition catalog, pages 50-51
- Client: Hudson River Museum
- Visit figure page
- Type: portfolio
- Portfolio Type: publication_design
- Portfolio Role: design_layout
Strut The: Peacock And Beauty In Art — Pages 52–53

- Strut: The Peacock and Beauty in Art exhibition catalog, pages 52-53
- Client: Hudson River Museum
- Visit figure page
- Type: portfolio
- Portfolio Type: publication_design
- Portfolio Role: design_layout
Strut The: Peacock And Beauty In Art — Pages 54–55
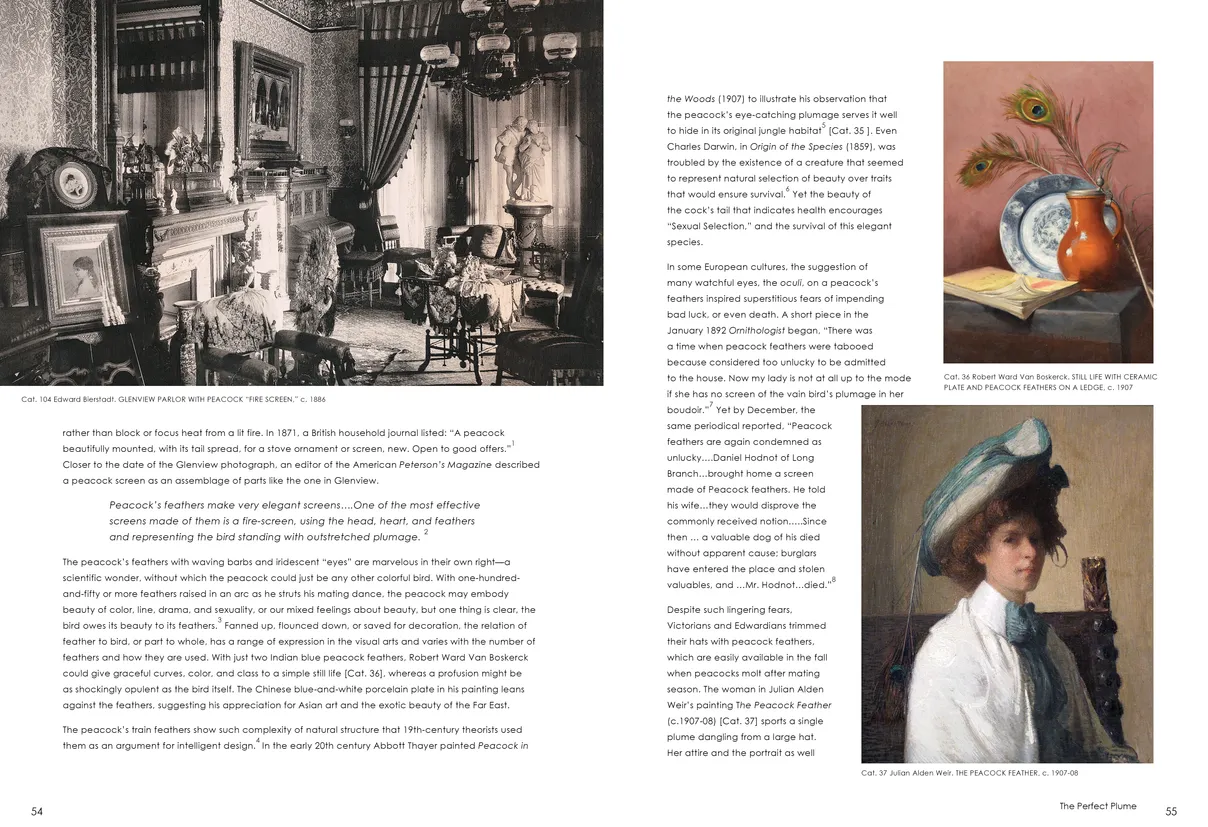
- Strut: The Peacock and Beauty in Art exhibition catalog, pages 54-55
- Client: Hudson River Museum
- Visit figure page
- Type: portfolio
- Portfolio Type: publication_design
- Portfolio Role: design_layout
Strut The: Peacock And Beauty In Art — Pages 56–57
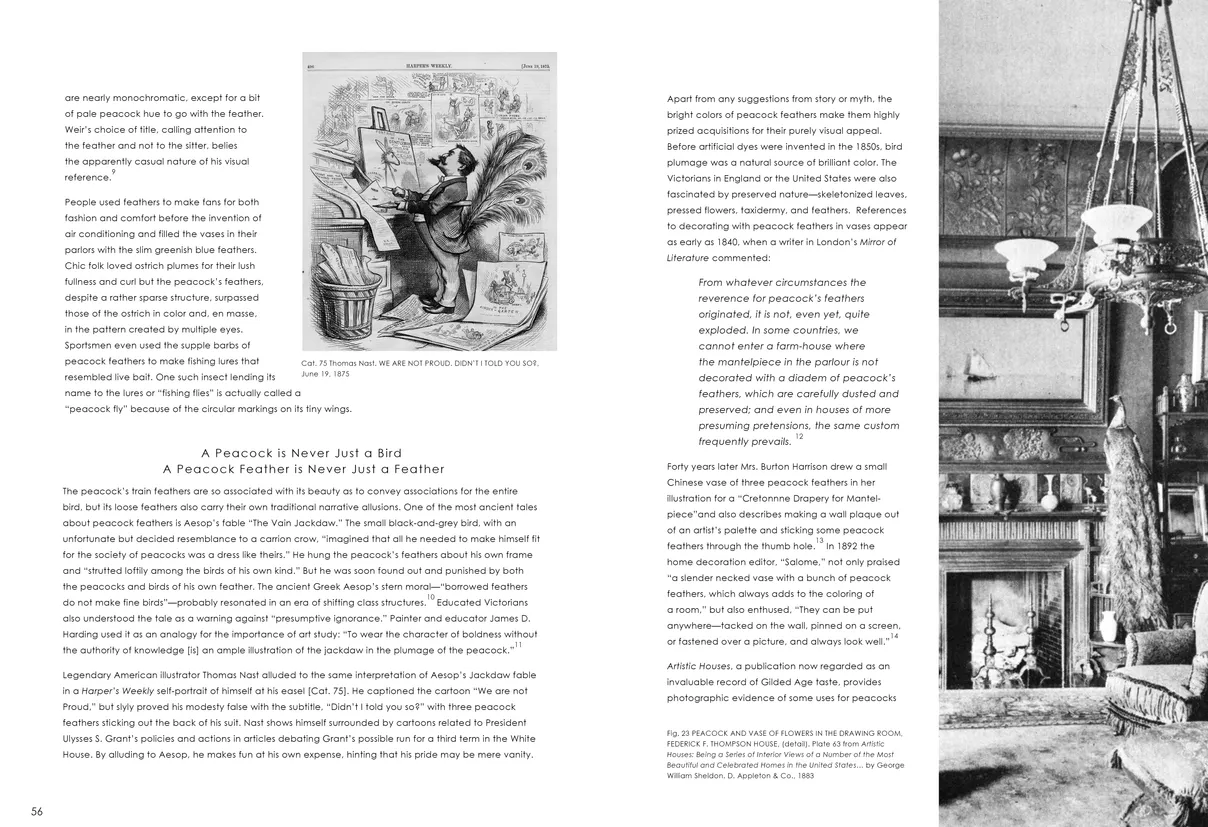
- Strut: The Peacock and Beauty in Art exhibition catalog, pages 56-57
- Client: Hudson River Museum
- Visit figure page
- Type: portfolio
- Portfolio Type: publication_design
- Portfolio Role: design_layout
Strut The: Peacock And Beauty In Art — Pages 58–59
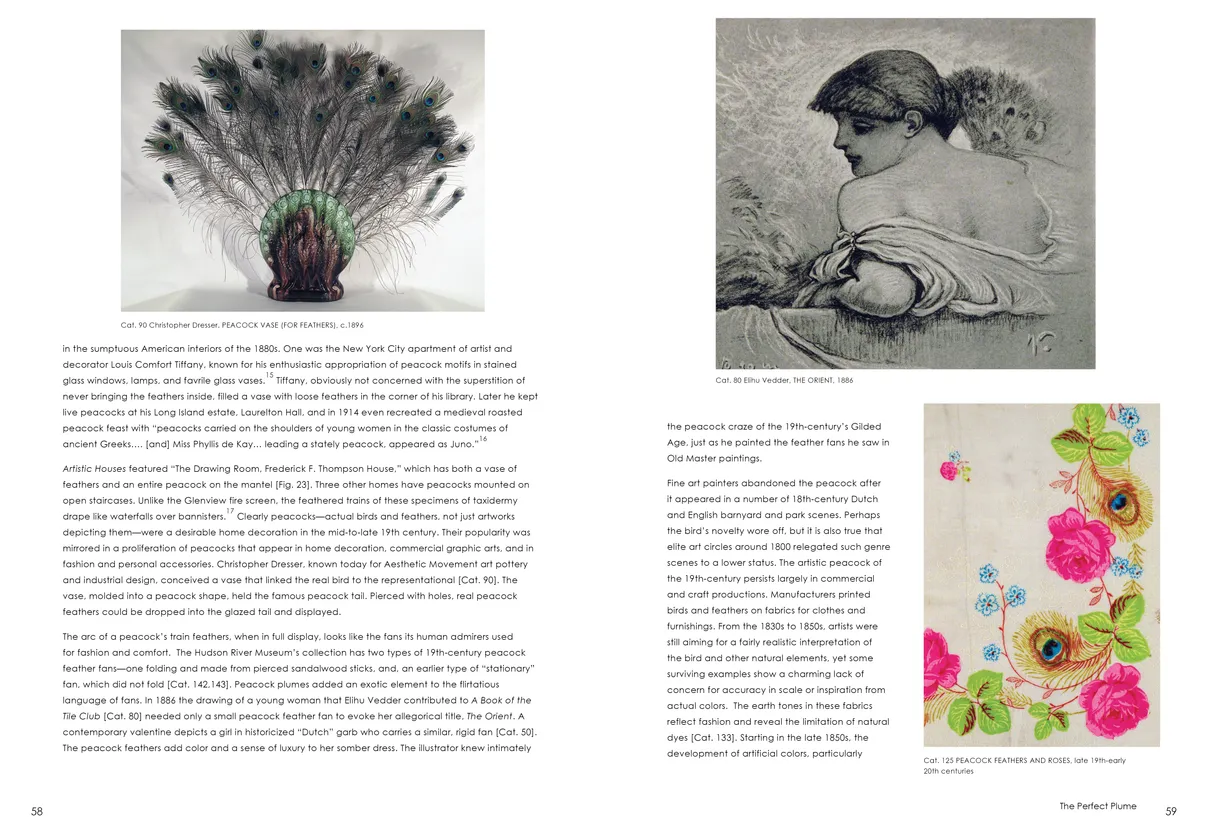
- Strut: The Peacock and Beauty in Art exhibition catalog, pages 58-59
- Client: Hudson River Museum
- Visit figure page
- Type: portfolio
- Portfolio Type: publication_design
- Portfolio Role: design_layout
Strut The: Peacock And Beauty In Art — Pages 6–7
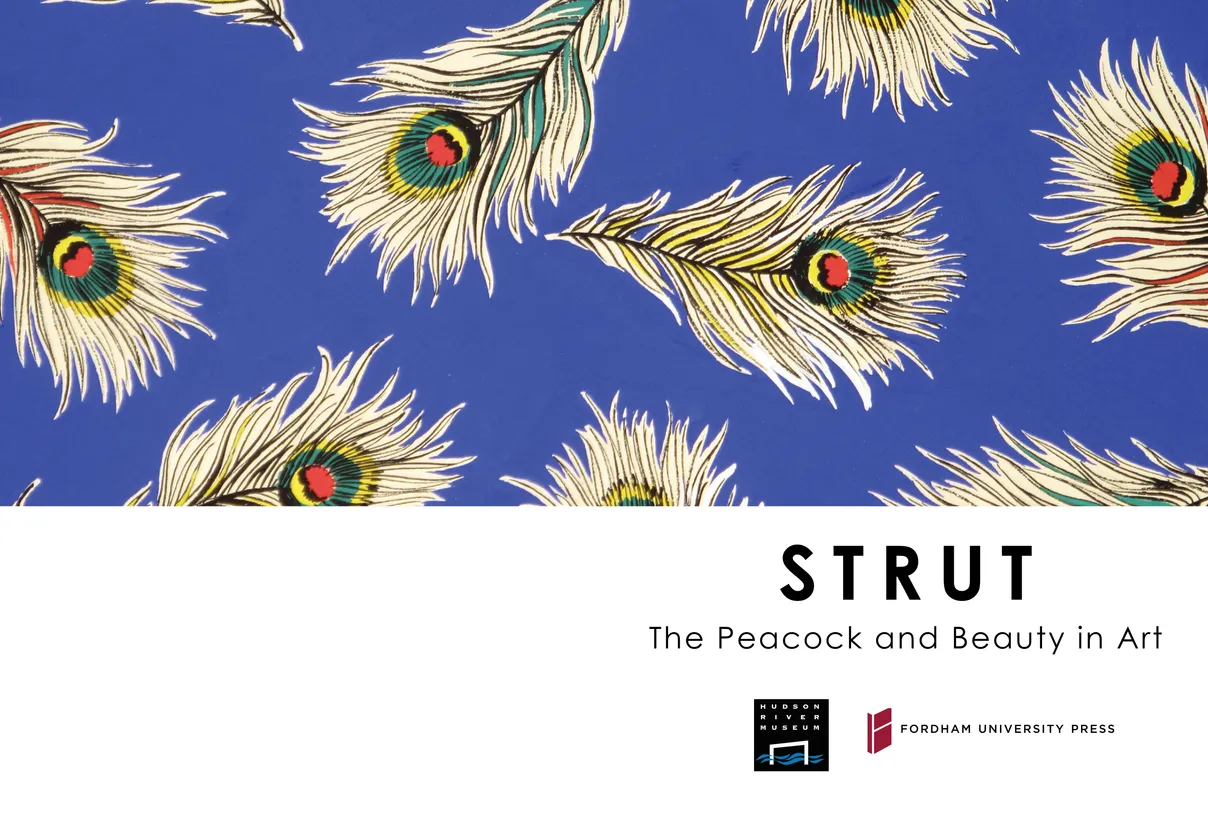
- Strut: The Peacock and Beauty in Art exhibition catalog, pages 6-7
- Client: Hudson River Museum
- Visit figure page
- Type: portfolio
- Portfolio Type: publication_design
- Portfolio Role: design_layout
Strut The: Peacock And Beauty In Art — Pages 60–61
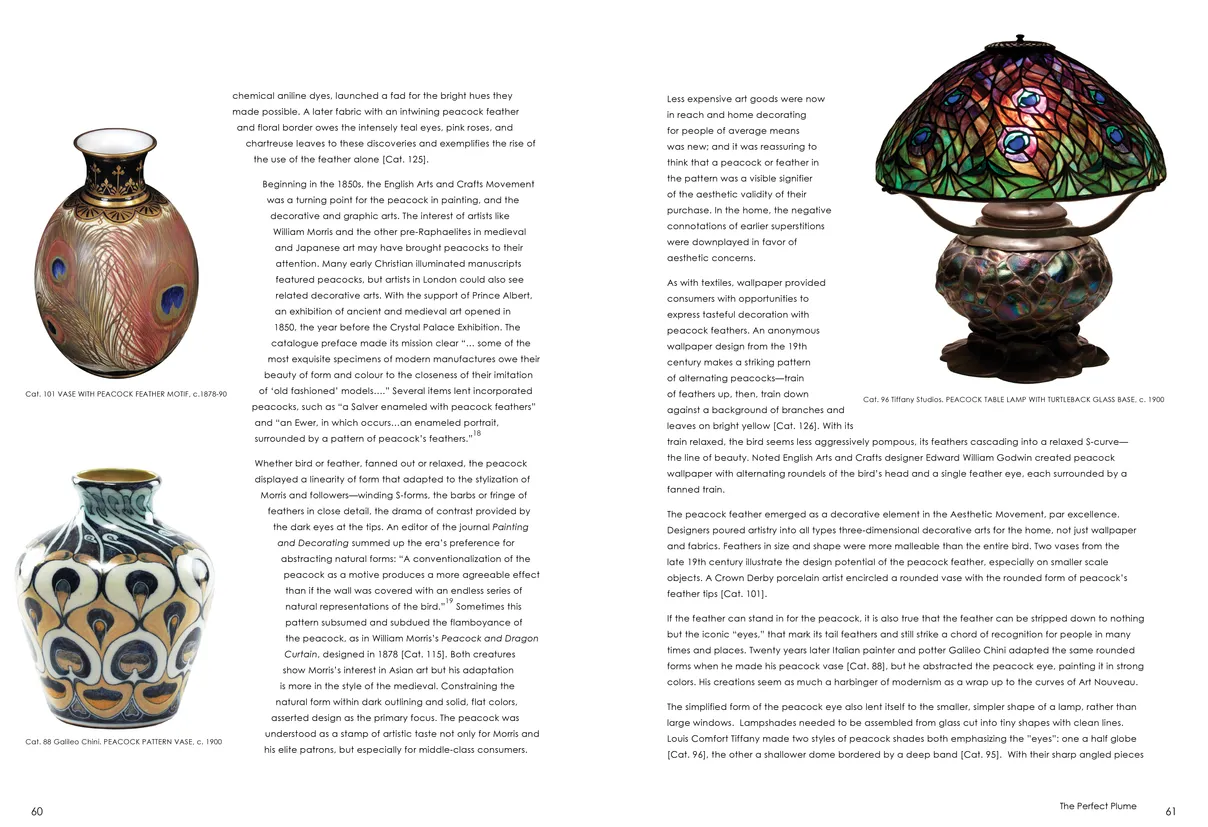
- Strut: The Peacock and Beauty in Art exhibition catalog, pages 60-61
- Client: Hudson River Museum
- Visit figure page
- Type: portfolio
- Portfolio Type: publication_design
- Portfolio Role: design_layout
Strut The: Peacock And Beauty In Art — Pages 62–63
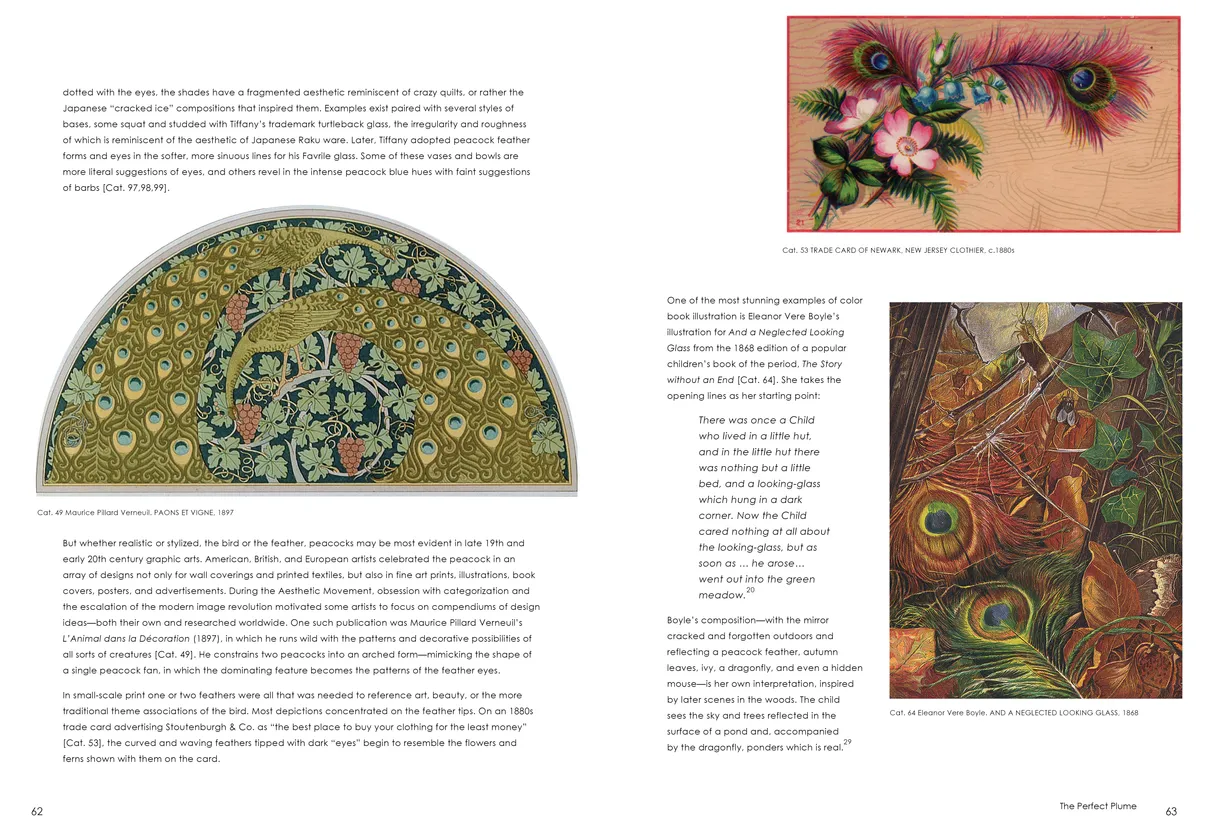
- Strut: The Peacock and Beauty in Art exhibition catalog, pages 62-63
- Client: Hudson River Museum
- Visit figure page
- Type: portfolio
- Portfolio Type: publication_design
- Portfolio Role: design_layout
Strut The: Peacock And Beauty In Art — Pages 64–65
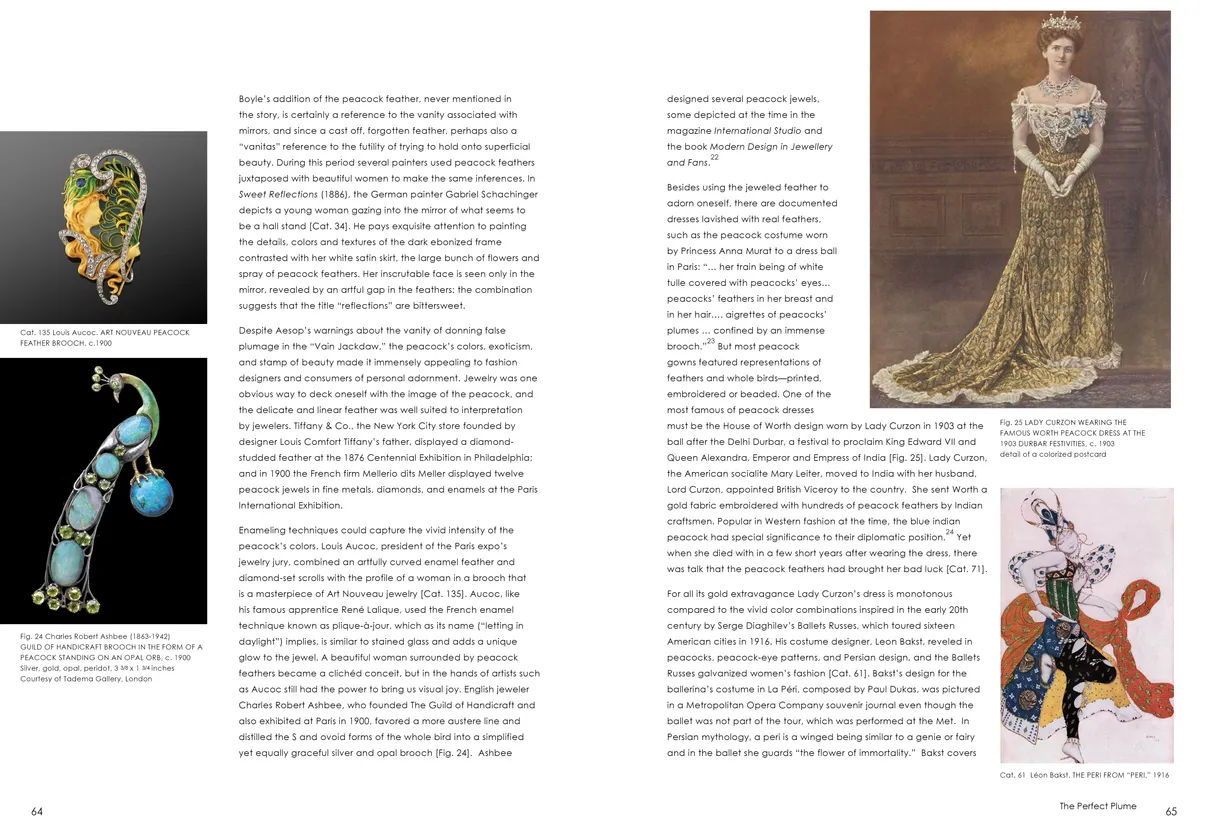
- Strut: The Peacock and Beauty in Art exhibition catalog, pages 64-65
- Client: Hudson River Museum
- Visit figure page
- Type: portfolio
- Portfolio Type: publication_design
- Portfolio Role: design_layout
Strut The: Peacock And Beauty In Art — Pages 66–67

- Strut: The Peacock and Beauty in Art exhibition catalog, pages 66-67
- Client: Hudson River Museum
- Visit figure page
- Type: portfolio
- Portfolio Type: publication_design
- Portfolio Role: design_layout
Strut The: Peacock And Beauty In Art — Pages 68–69
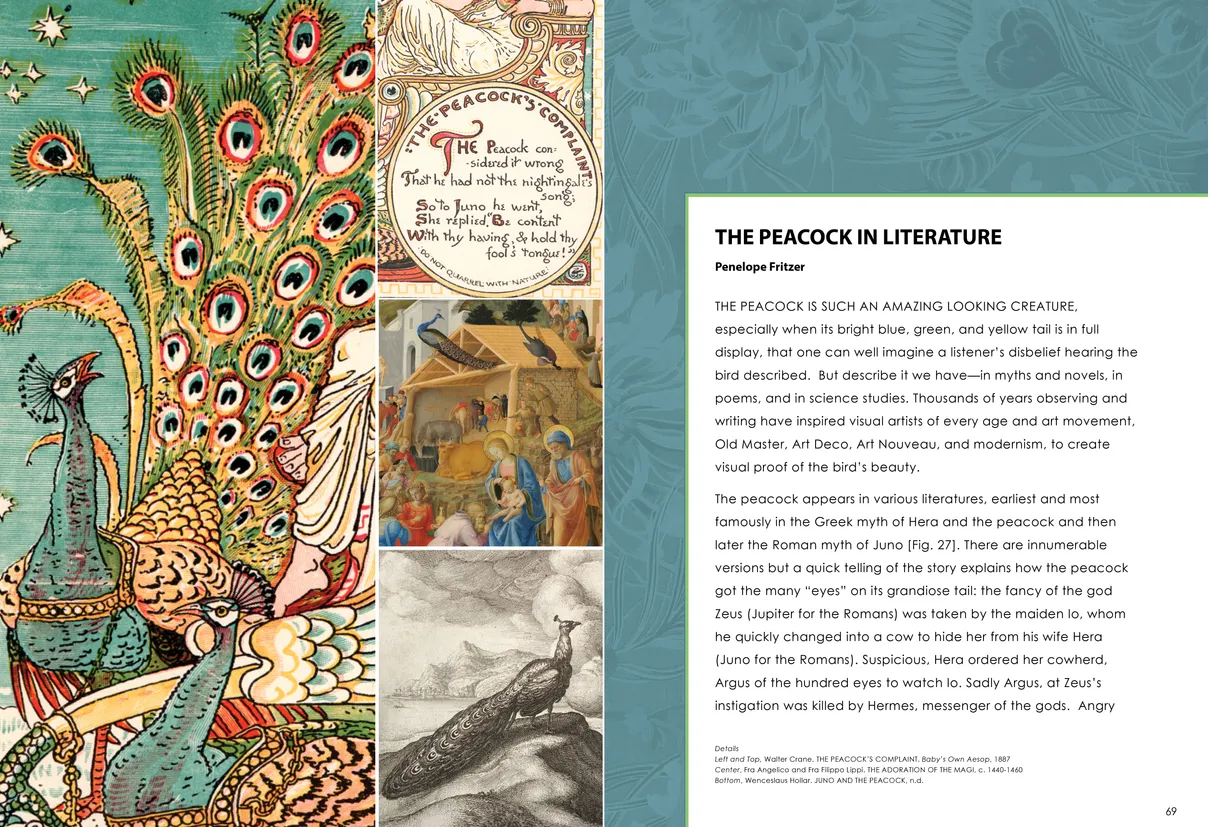
- Strut: The Peacock and Beauty in Art exhibition catalog, pages 68-69
- Client: Hudson River Museum
- Visit figure page
- Type: portfolio
- Portfolio Type: publication_design
- Portfolio Role: design_layout
Strut The: Peacock And Beauty In Art — Pages 70–71
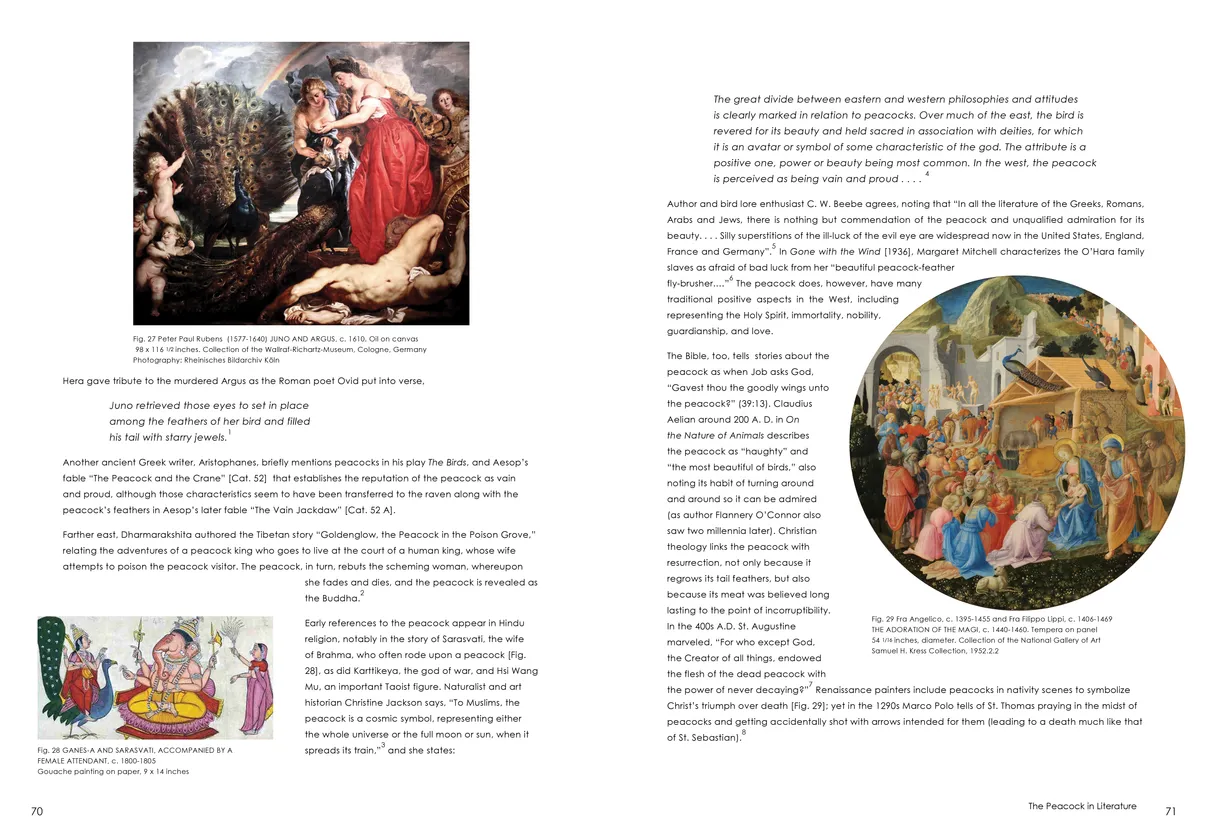
- Strut: The Peacock and Beauty in Art exhibition catalog, pages 70-71
- Client: Hudson River Museum
- Visit figure page
- Type: portfolio
- Portfolio Type: publication_design
- Portfolio Role: design_layout
Strut The: Peacock And Beauty In Art — Pages 72–73
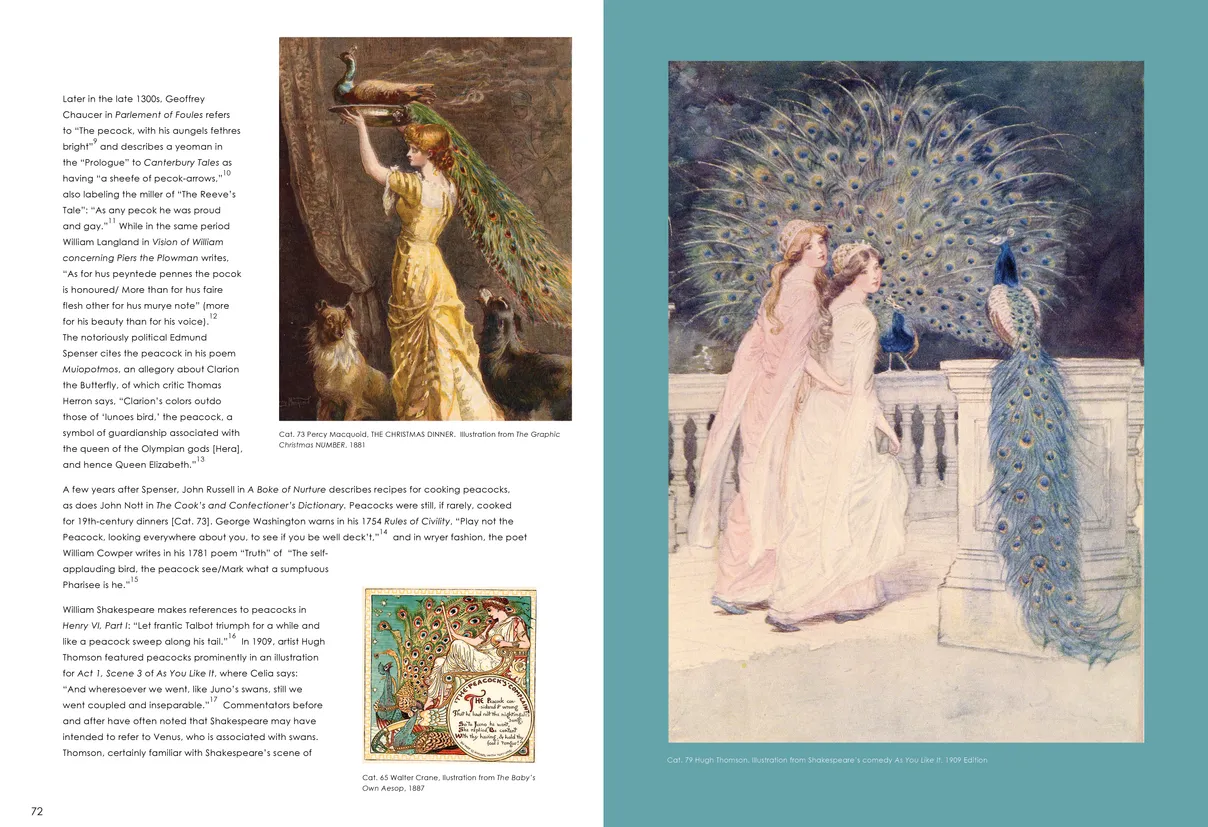
- Strut: The Peacock and Beauty in Art exhibition catalog, pages 72-73
- Client: Hudson River Museum
- Visit figure page
- Type: portfolio
- Portfolio Type: publication_design
- Portfolio Role: design_layout
Strut The: Peacock And Beauty In Art — Pages 74–75

- Strut: The Peacock and Beauty in Art exhibition catalog, pages 74-75
- Client: Hudson River Museum
- Visit figure page
- Type: portfolio
- Portfolio Type: publication_design
- Portfolio Role: design_layout
Strut The: Peacock And Beauty In Art — Pages 76–77
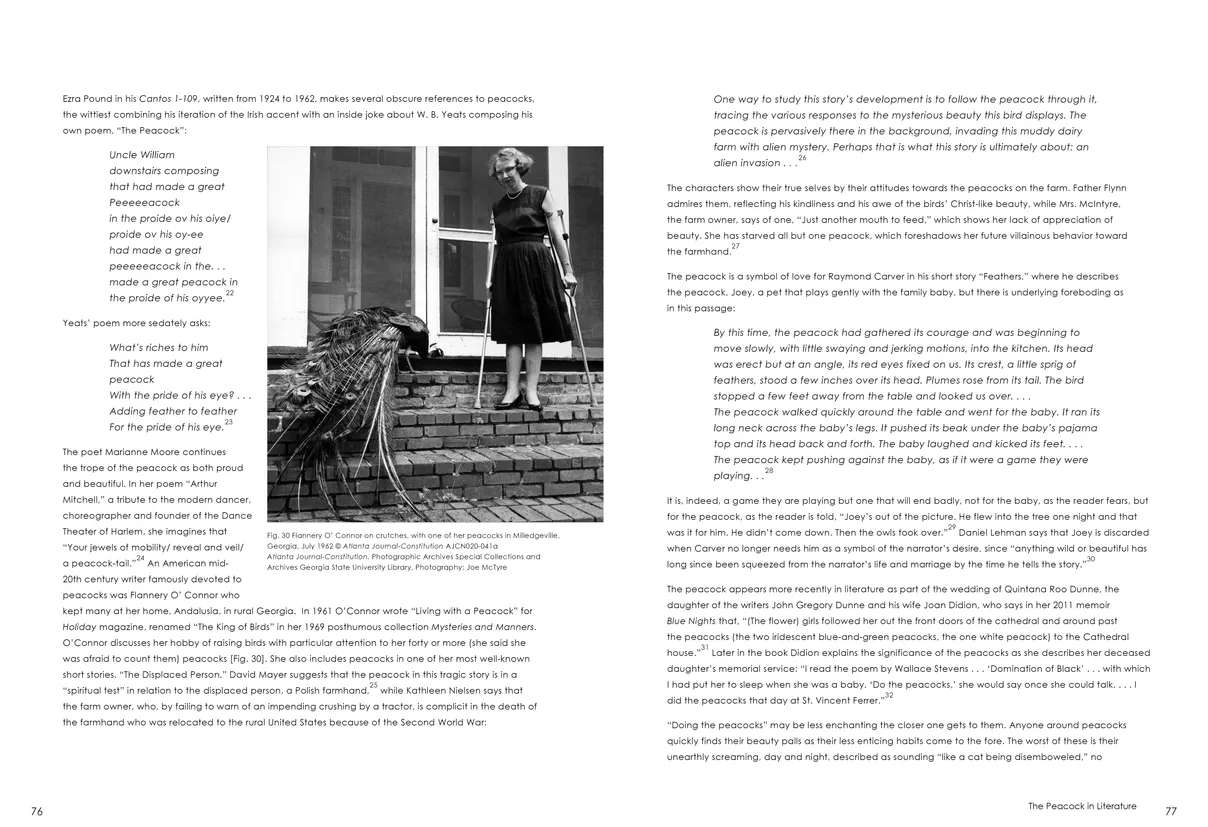
- Strut: The Peacock and Beauty in Art exhibition catalog, pages 76-77
- Client: Hudson River Museum
- Visit figure page
- Type: portfolio
- Portfolio Type: publication_design
- Portfolio Role: design_layout
Strut The: Peacock And Beauty In Art — Pages 78–79
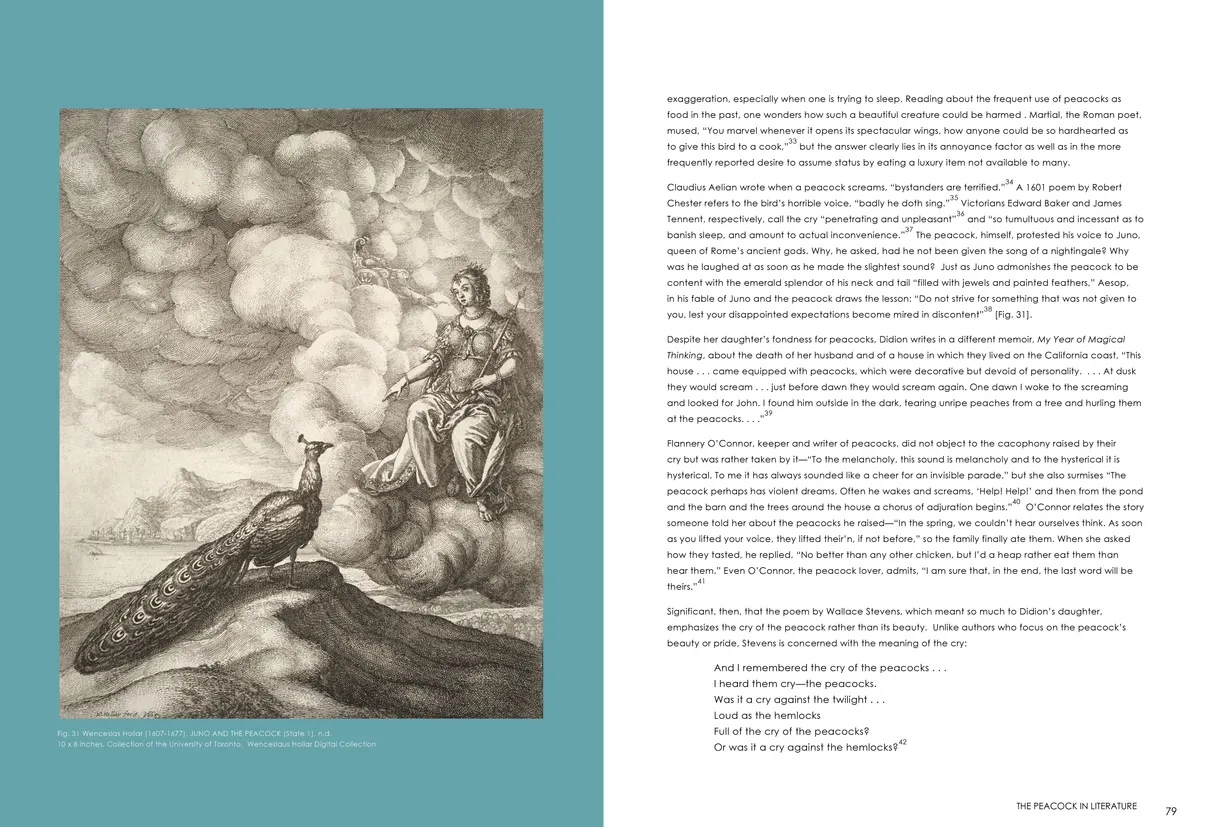
- Strut: The Peacock and Beauty in Art exhibition catalog, pages 78-79
- Client: Hudson River Museum
- Visit figure page
- Type: portfolio
- Portfolio Type: publication_design
- Portfolio Role: design_layout
Strut The: Peacock And Beauty In Art — Pages 8–9
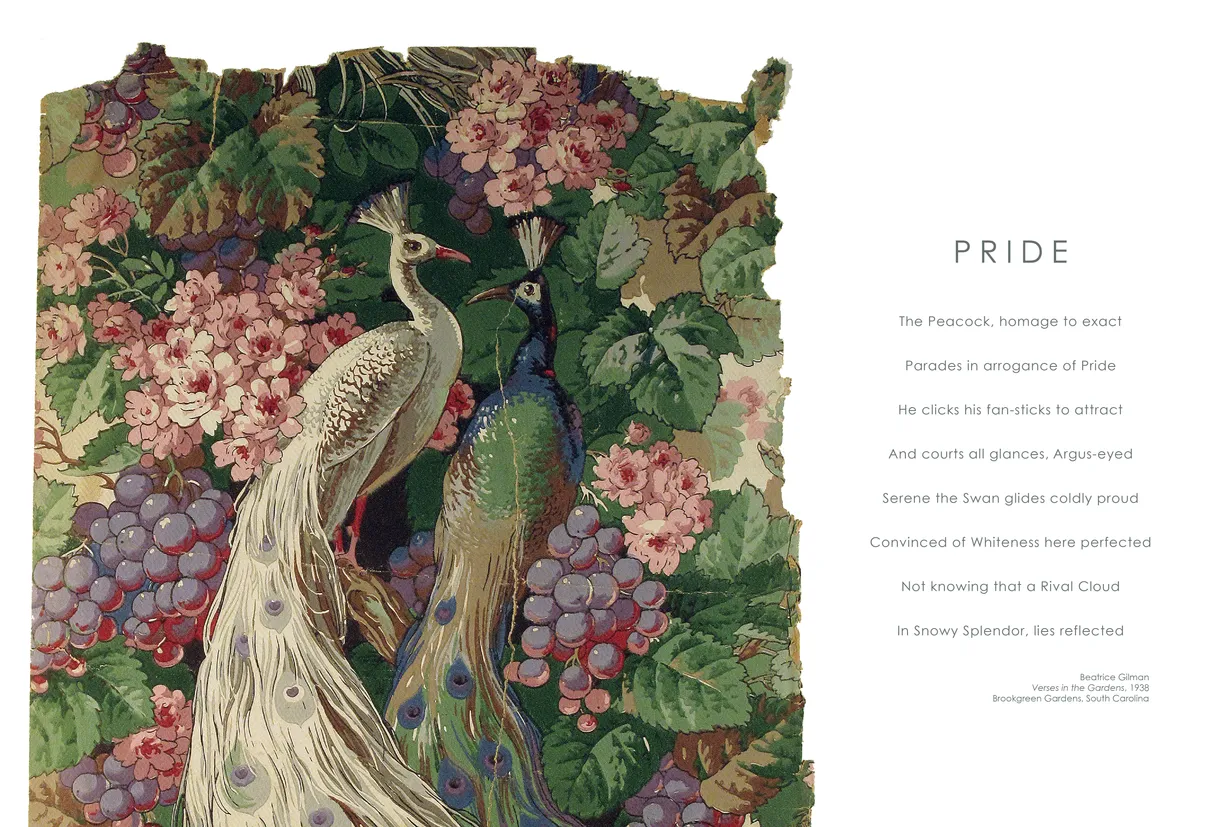
- Strut: The Peacock and Beauty in Art exhibition catalog, pages 8-9
- Client: Hudson River Museum
- Visit figure page
- Type: portfolio
- Portfolio Type: publication_design
- Portfolio Role: design_layout
Strut The: Peacock And Beauty In Art — Pages 80–81
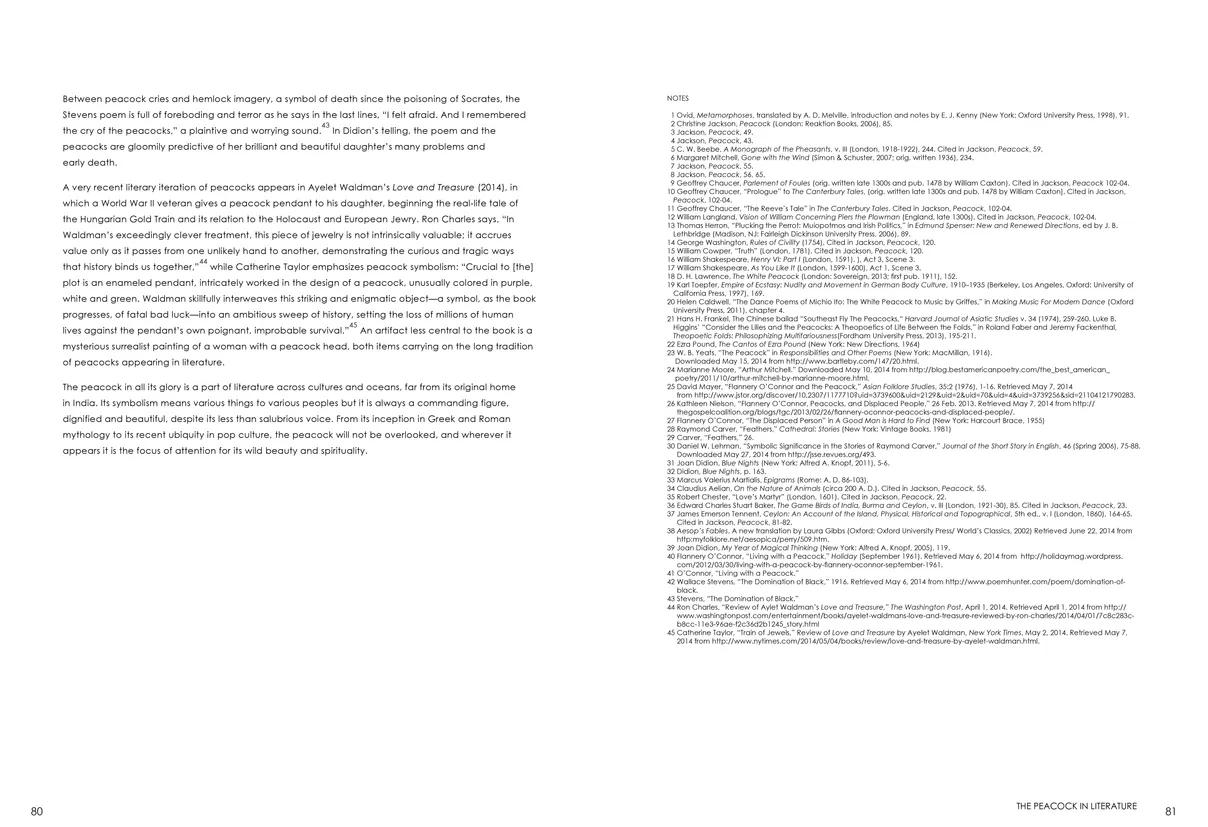
- Strut: The Peacock and Beauty in Art exhibition catalog, pages 80-81
- Client: Hudson River Museum
- Visit figure page
- Type: portfolio
- Portfolio Type: publication_design
- Portfolio Role: design_layout
Strut The: Peacock And Beauty In Art — Pages 82–83

- Strut: The Peacock and Beauty in Art exhibition catalog, pages 82-83
- Client: Hudson River Museum
- Visit figure page
- Type: portfolio
- Portfolio Type: publication_design
- Portfolio Role: design_layout
Strut The: Peacock And Beauty In Art — Pages 84–85
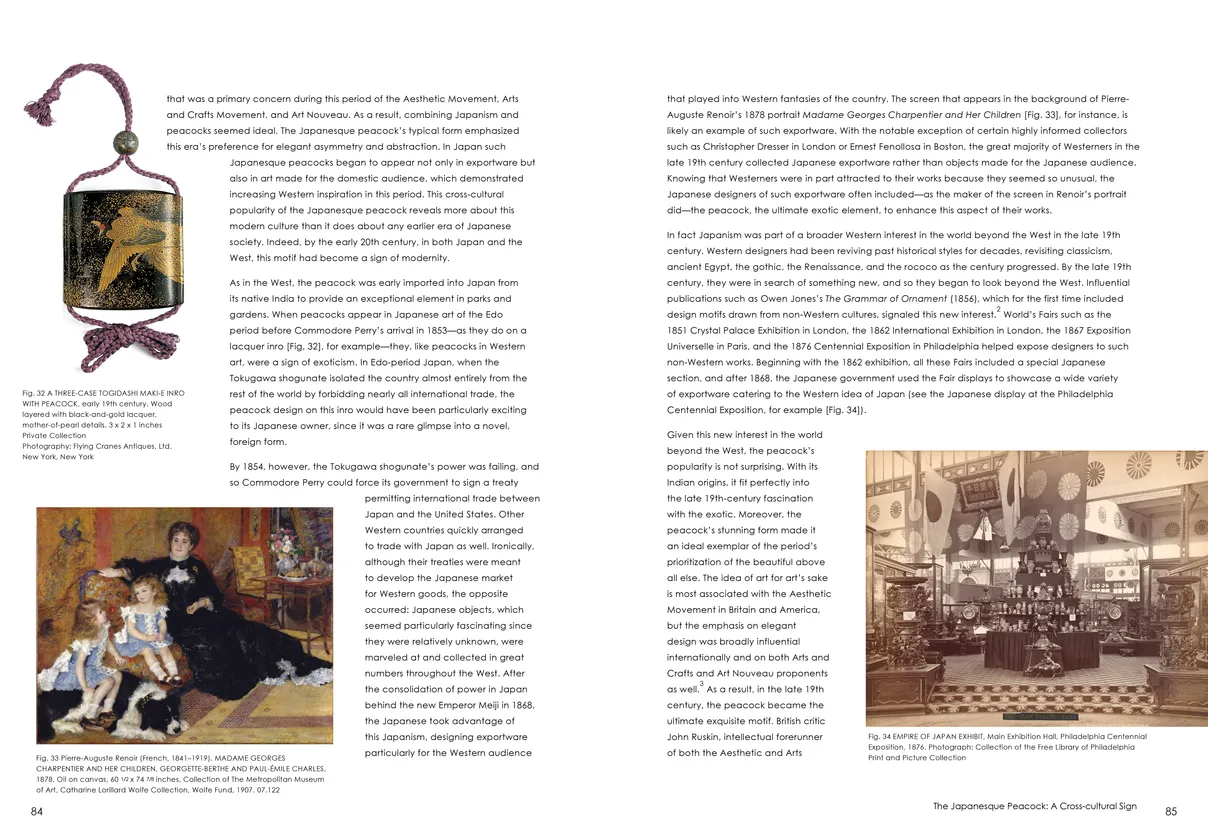
- Strut: The Peacock and Beauty in Art exhibition catalog, pages 84-85
- Client: Hudson River Museum
- Visit figure page
- Type: portfolio
- Portfolio Type: publication_design
- Portfolio Role: design_layout
Strut The: Peacock And Beauty In Art — Pages 86–87
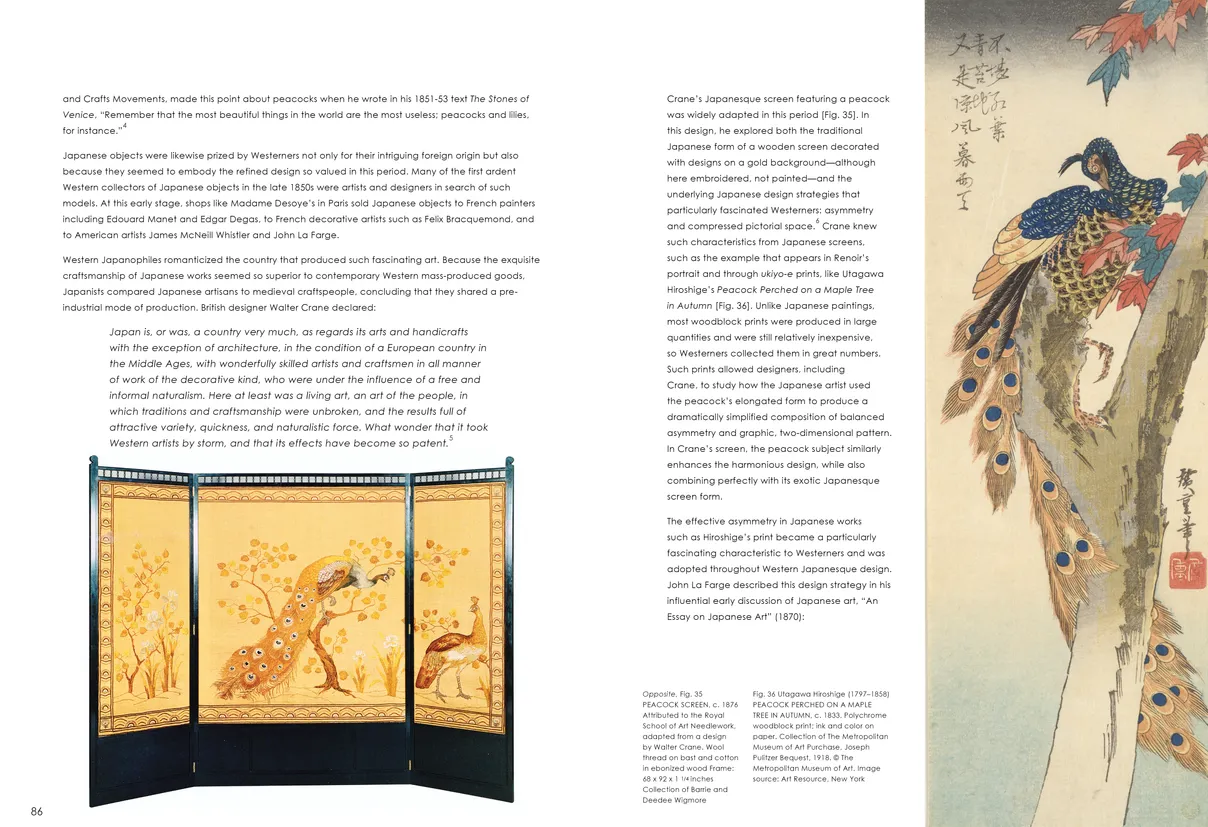
- Strut: The Peacock and Beauty in Art exhibition catalog, pages 86-87
- Client: Hudson River Museum
- Visit figure page
- Type: portfolio
- Portfolio Type: publication_design
- Portfolio Role: design_layout
Strut The: Peacock And Beauty In Art — Pages 88–89
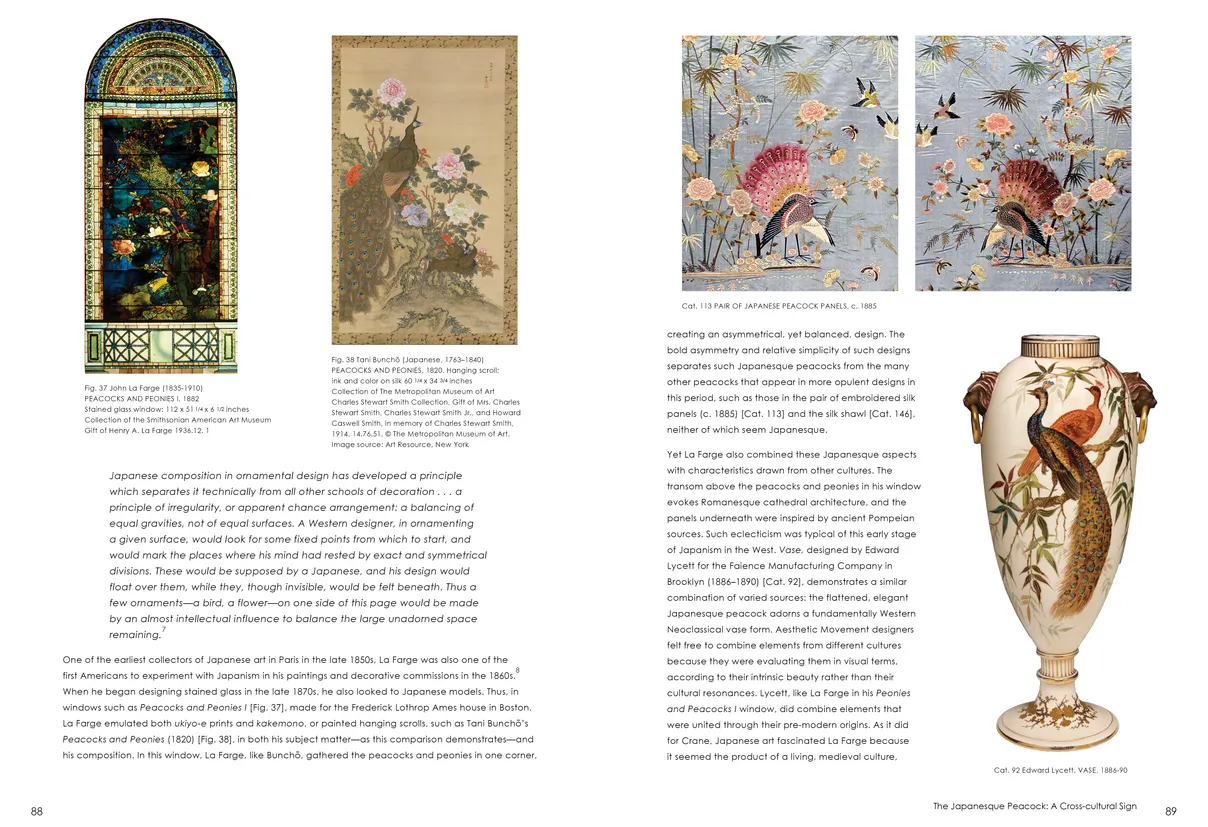
- Strut: The Peacock and Beauty in Art exhibition catalog, pages 88-89
- Client: Hudson River Museum
- Visit figure page
- Type: portfolio
- Portfolio Type: publication_design
- Portfolio Role: design_layout
Strut The: Peacock And Beauty In Art — Pages 90–91
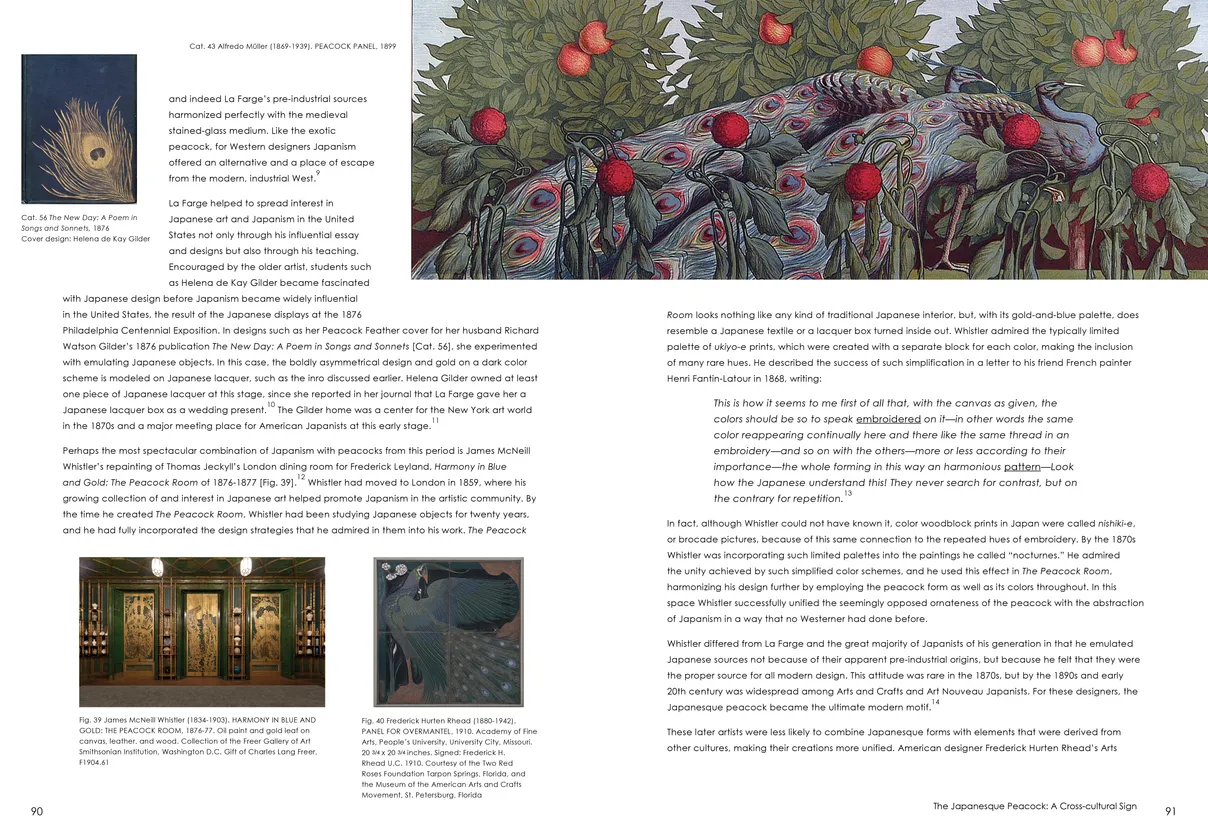
- Strut: The Peacock and Beauty in Art exhibition catalog, pages 90-91
- Client: Hudson River Museum
- Visit figure page
- Type: portfolio
- Portfolio Type: publication_design
- Portfolio Role: design_layout
Strut The: Peacock And Beauty In Art — Pages 92–93
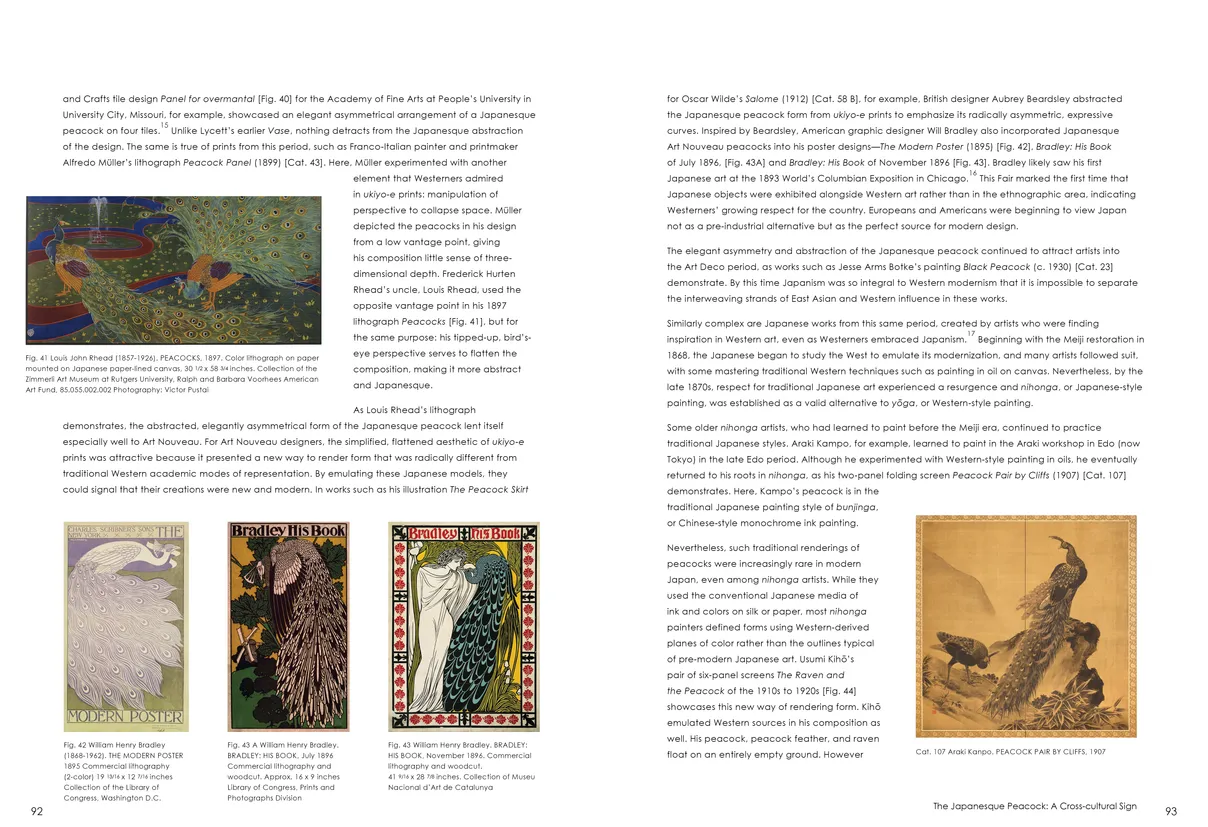
- Strut: The Peacock and Beauty in Art exhibition catalog, pages 92-93
- Client: Hudson River Museum
- Visit figure page
- Type: portfolio
- Portfolio Type: publication_design
- Portfolio Role: design_layout
Strut The: Peacock And Beauty In Art — Pages 94–95
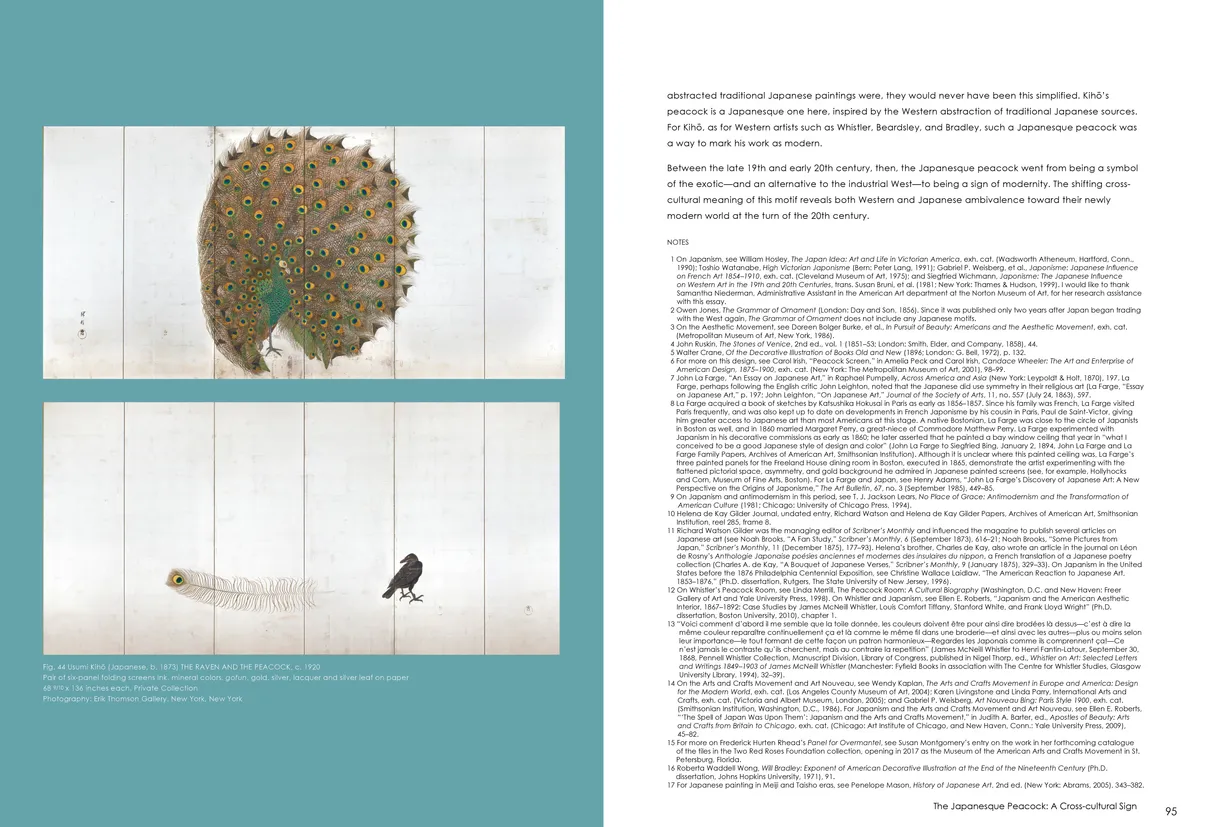
- Strut: The Peacock and Beauty in Art exhibition catalog, pages 94-95
- Client: Hudson River Museum
- Visit figure page
- Type: portfolio
- Portfolio Type: publication_design
- Portfolio Role: design_layout
Strut The: Peacock And Beauty In Art — Pages 96–97
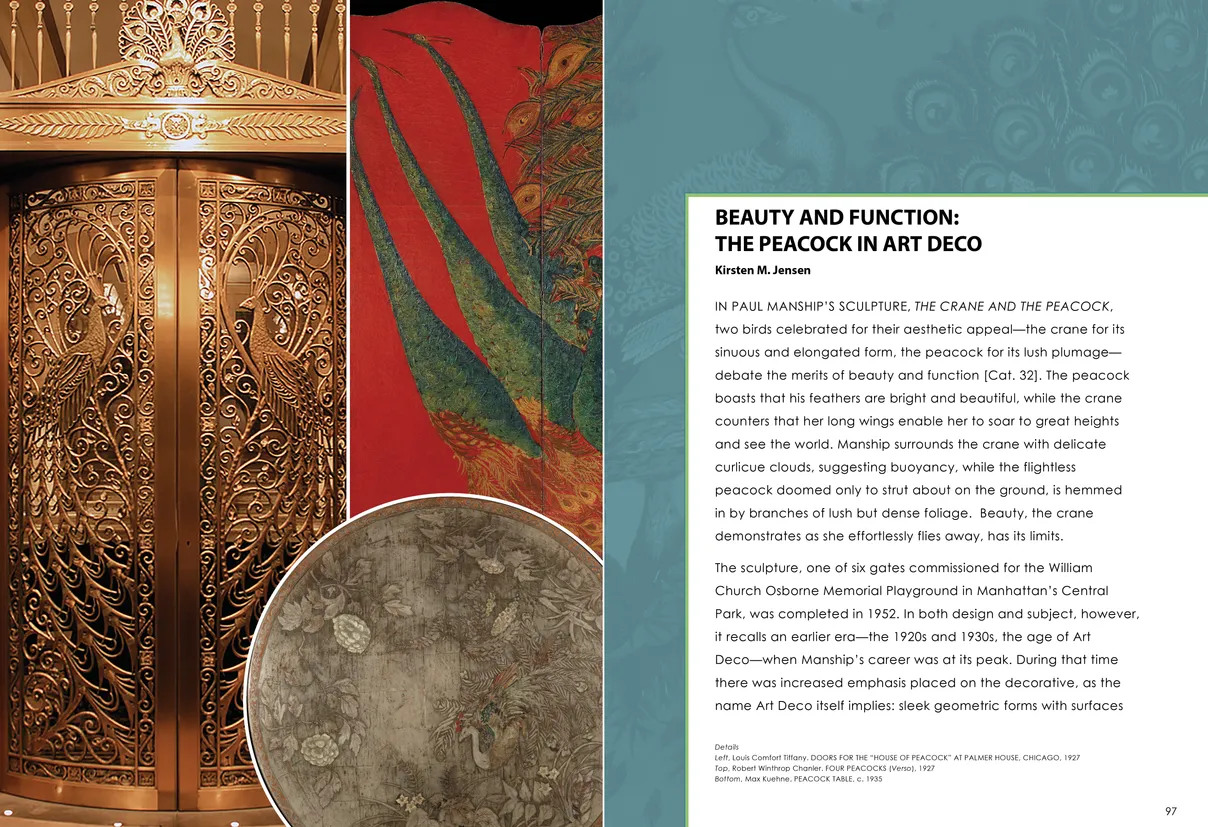
- Strut: The Peacock and Beauty in Art exhibition catalog, pages 96-97
- Client: Hudson River Museum
- Visit figure page
- Type: portfolio
- Portfolio Type: publication_design
- Portfolio Role: design_layout
Strut The: Peacock And Beauty In Art — Pages 98–99
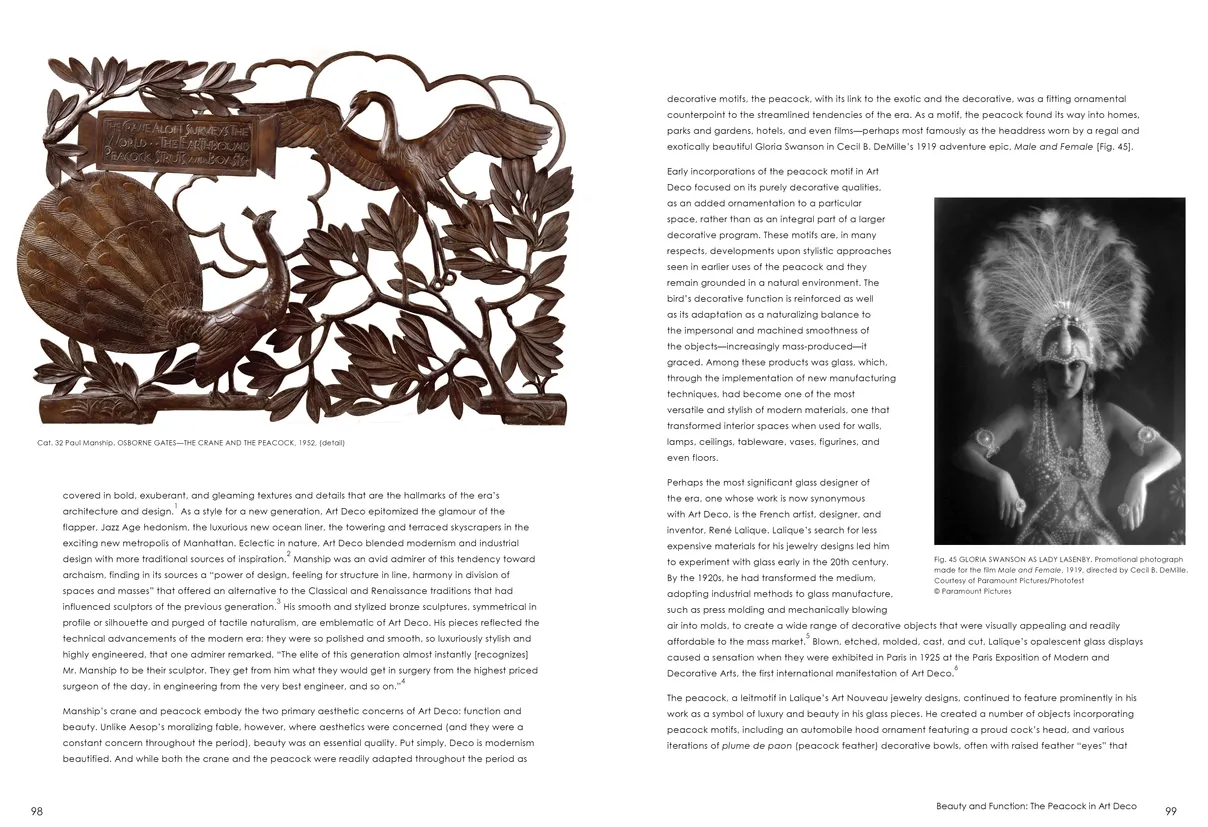
- Strut: The Peacock and Beauty in Art exhibition catalog, pages 98-99
- Client: Hudson River Museum
- Visit figure page
- Type: portfolio
- Portfolio Type: publication_design
- Portfolio Role: design_layout
Stylized Paper Currency Soldiers
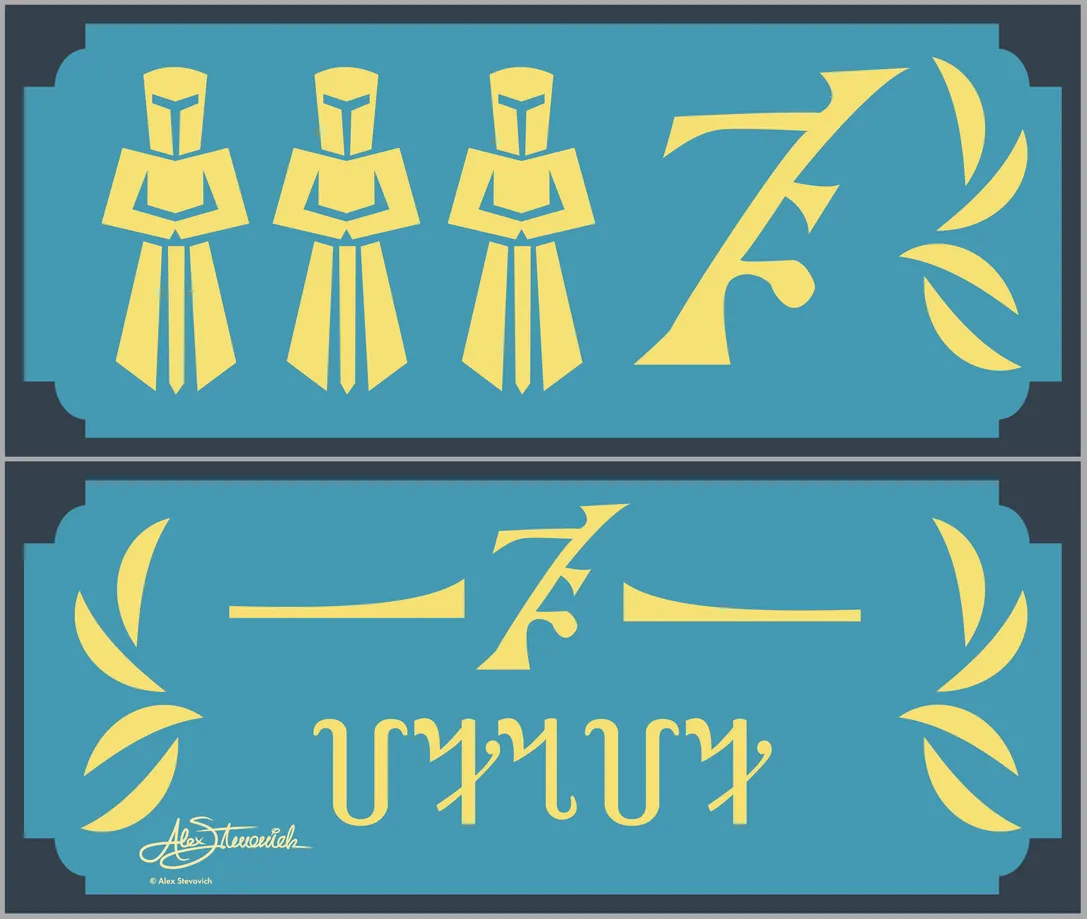
- Stylized Paper Currency Bill (Blue Soldiers)
- Artwork by Alex Stevovich
- © Alex Stevovich
- Visit figure page
- Type: portfolio
- Portfolio Type: advertising
- Portfolio Role: design_layout
- Portfolio Original Art: true
Super Miko Enchanted Getaways Poster Clear Skies Ahead Square Detail
- Super Miko Enchanted Getaways franchises poster Clear Skies Ahead (#3)
- Artwork by Alex Stevovich
- © Alex Stevovich
- Visit figure page
- Type: portfolio
- Portfolio Type: advertising
- Portfolio Role: design_layout
- Portfolio Original Art: true
Super Miko Enchanted Getaways Poster Clear Skies Ahead Square Detail Vector Split
- Super Miko Enchanted Getaways franchises poster Clear Skies Ahead (#3) — Vector Artwork Split Display
- Artwork by Alex Stevovich
- © Alex Stevovich
- Visit figure page
- Type: portfolio
- Portfolio Type: advertising
- Portfolio Role: design_layout
- Portfolio Original Art: true
Ten Artists Exhibition Artscope Ad
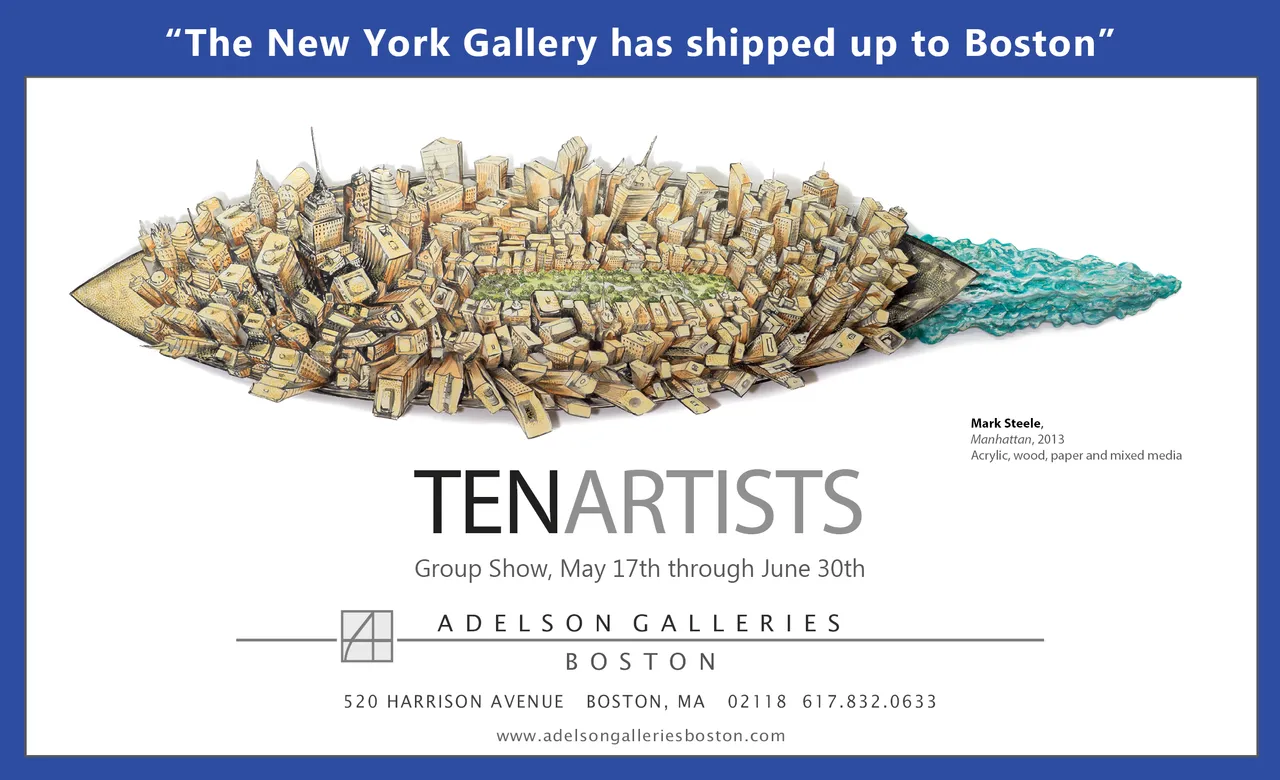
- Ten Artists exhibition advertisemen in Artscope magazine
- Client: Adelson Galleries Boston
- Visit figure page
- Type: portfolio
- Portfolio Type: advertising
- Portfolio Role: design_layout
The Eyes Have It Evite
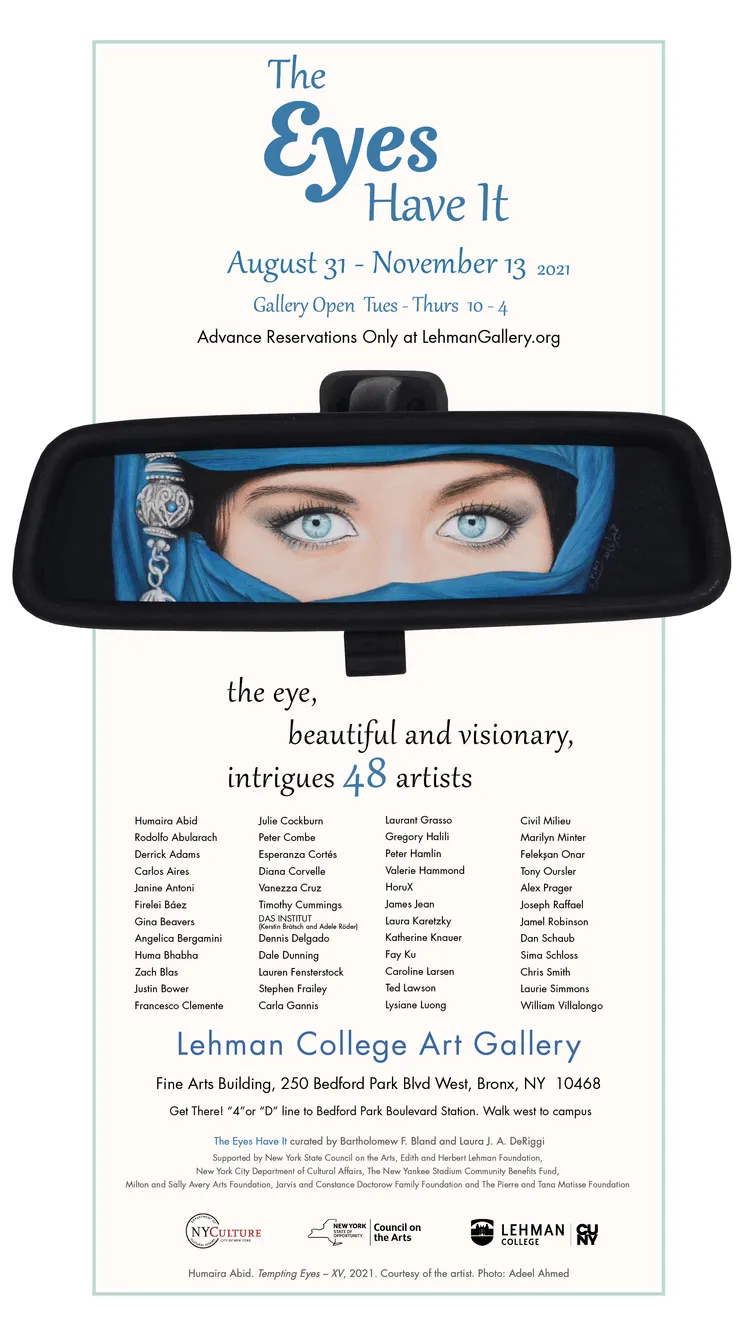
- The Eyes Have It — exhibition email campaign
- Client: Lehman College Art Gallery
- Visit figure page
- Type: portfolio
- Portfolio Type: advertising
- Portfolio Role: design_layout
The Eyes: Have It — Cover
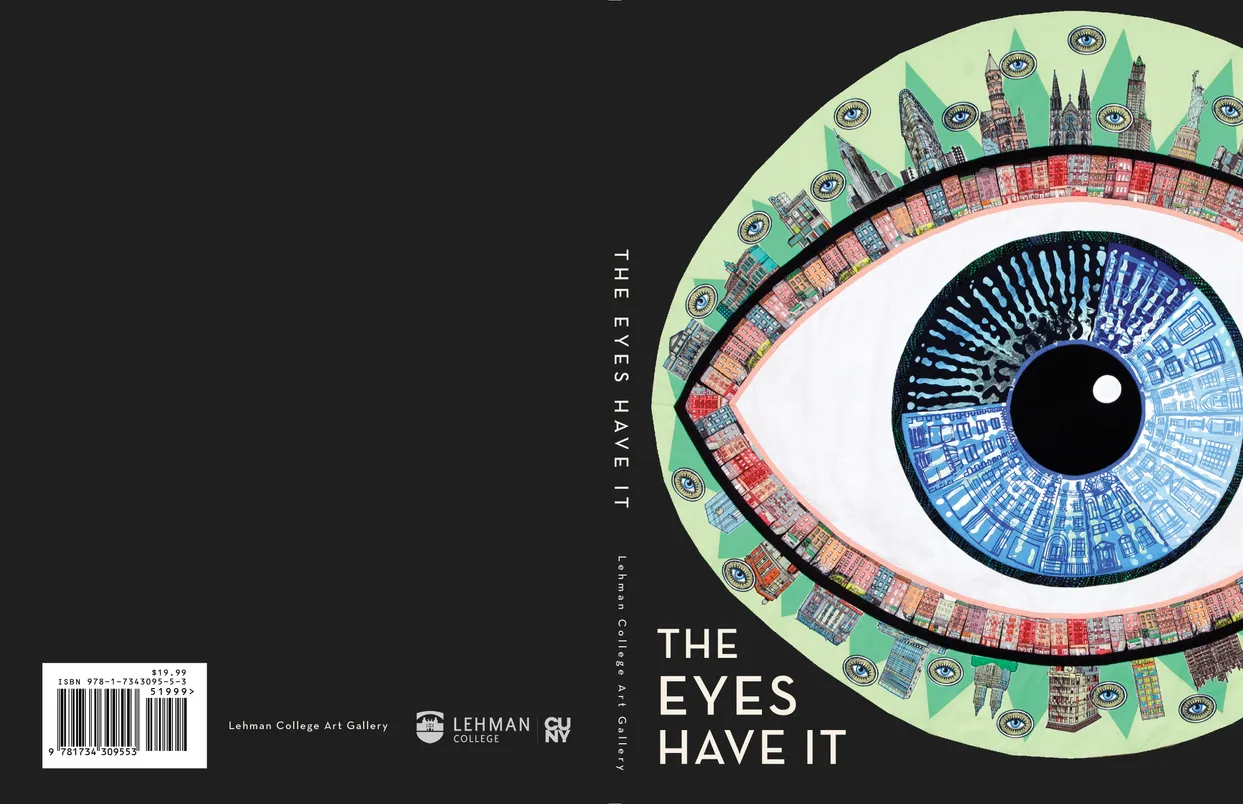
- The Eyes Have It exhibition catalog, cover
- Client: Lehman College Art Gallery
- Visit figure page
- Type: portfolio
- Portfolio Type: publication_design
- Portfolio Role: design_layout
The Eyes: Have It — Inside Front Cover

- The Eyes Have It exhibition catalog, inside back cover
- Client: Lehman College Art Gallery
- Visit figure page
- Type: portfolio
- Portfolio Type: publication_design
- Portfolio Role: design_layout
The Eyes: Have It — Inside Front Cover

- The Eyes Have It exhibition catalog, inside front cover
- Client: Lehman College Art Gallery
- Visit figure page
- Type: portfolio
- Portfolio Type: publication_design
- Portfolio Role: design_layout
The Eyes: Have It — Pages 10–11
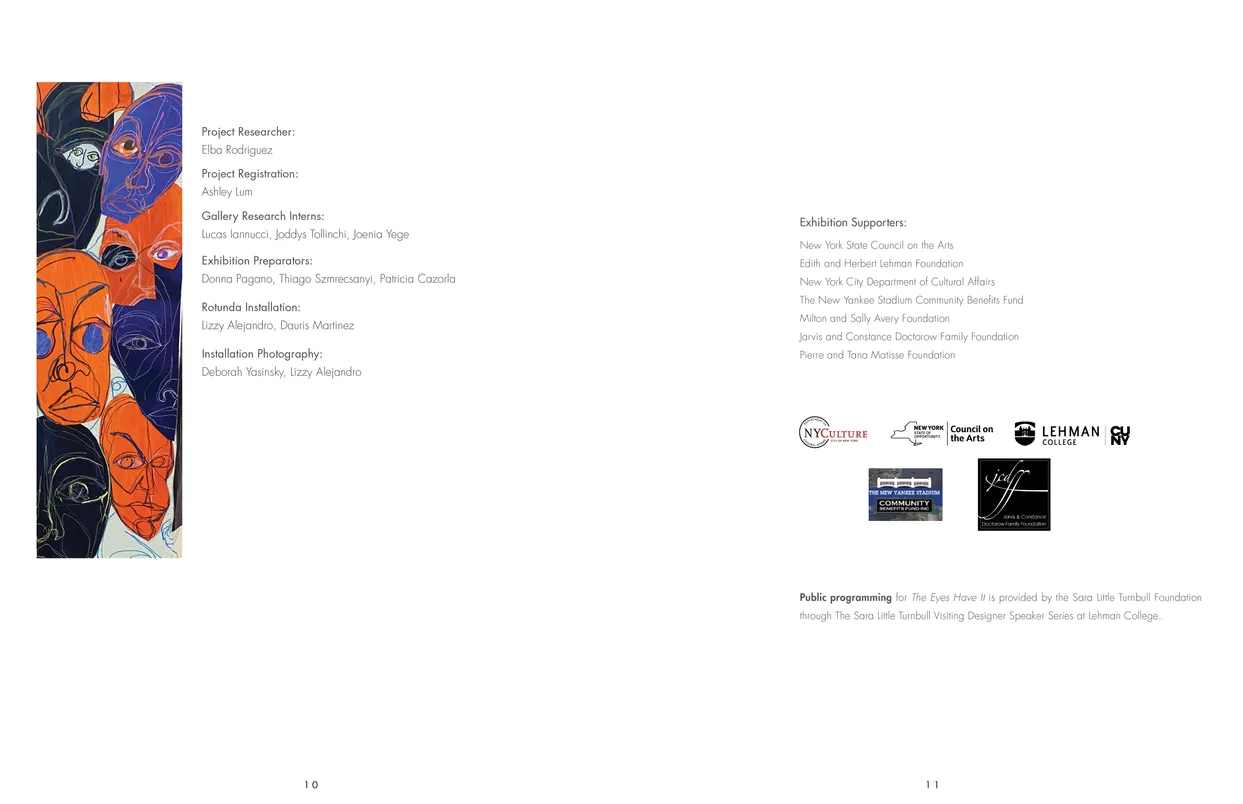
- The Eyes Have It exhibition catalog, pages 10-11
- Client: Lehman College Art Gallery
- Visit figure page
- Type: portfolio
- Portfolio Type: publication_design
- Portfolio Role: design_layout
The Eyes: Have It — Pages 100–101
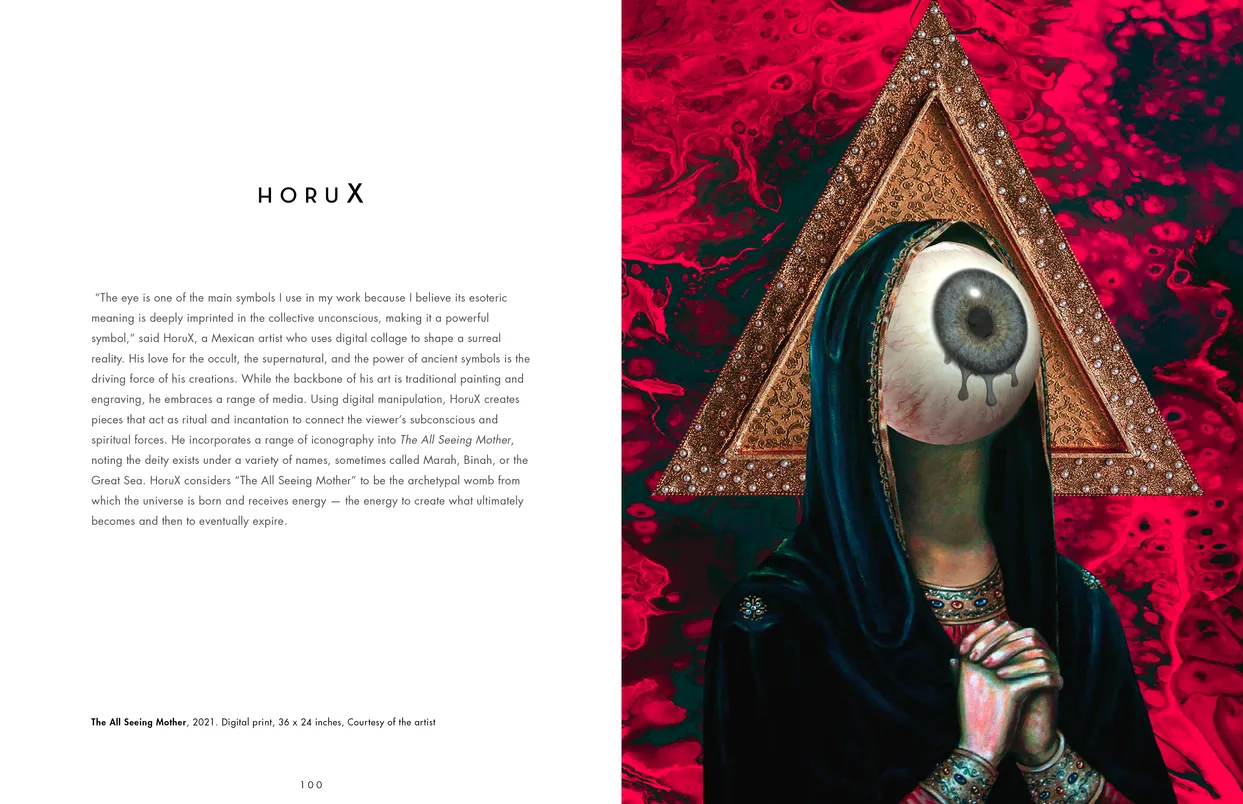
- The Eyes Have It exhibition catalog, pages 100-101
- Client: Lehman College Art Gallery
- Visit figure page
- Type: portfolio
- Portfolio Type: publication_design
- Portfolio Role: design_layout
The Eyes: Have It — Pages 102–103
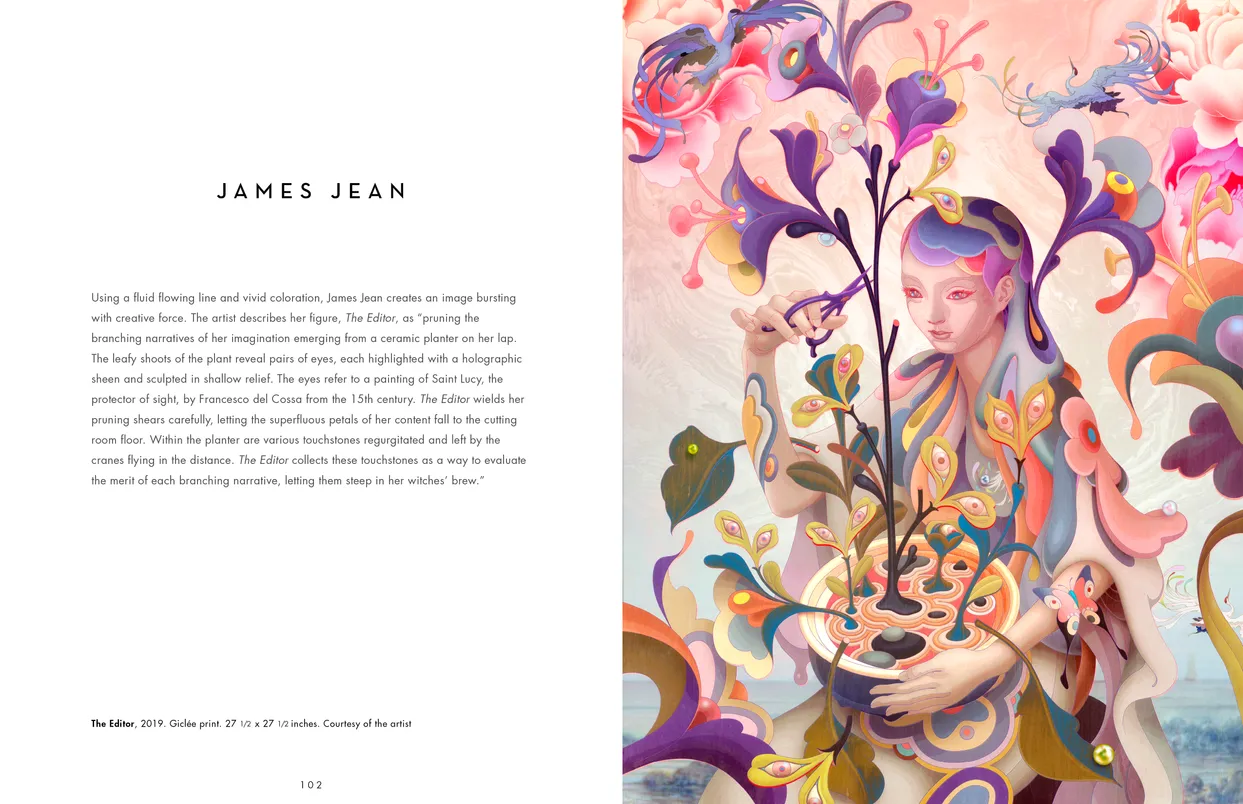
- The Eyes Have It exhibition catalog, pages 102-103
- Client: Lehman College Art Gallery
- Visit figure page
- Type: portfolio
- Portfolio Type: publication_design
- Portfolio Role: design_layout
The Eyes: Have It — Pages 104–105
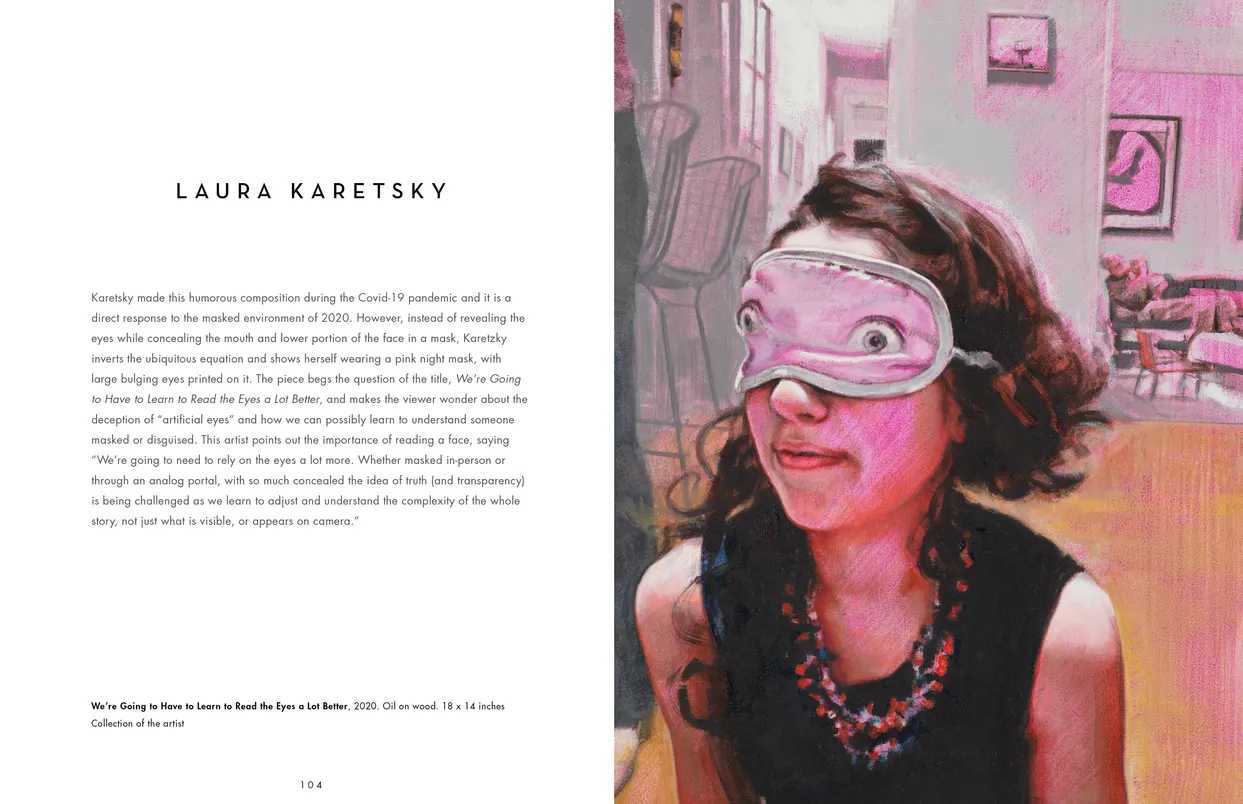
- The Eyes Have It exhibition catalog, pages 104-105
- Client: Lehman College Art Gallery
- Visit figure page
- Type: portfolio
- Portfolio Type: publication_design
- Portfolio Role: design_layout
The Eyes: Have It — Pages 106–107
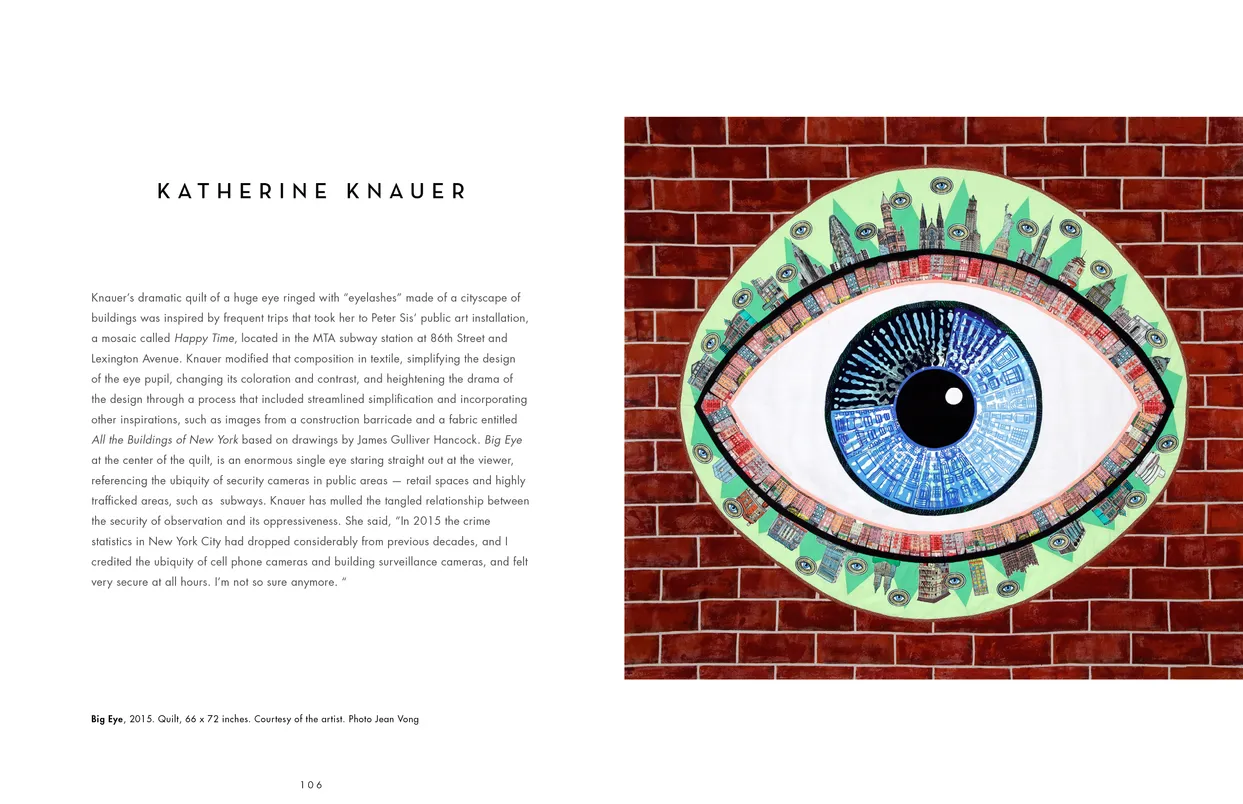
- The Eyes Have It exhibition catalog, pages 106-107
- Client: Lehman College Art Gallery
- Visit figure page
- Type: portfolio
- Portfolio Type: publication_design
- Portfolio Role: design_layout
The Eyes: Have It — Pages 108–109
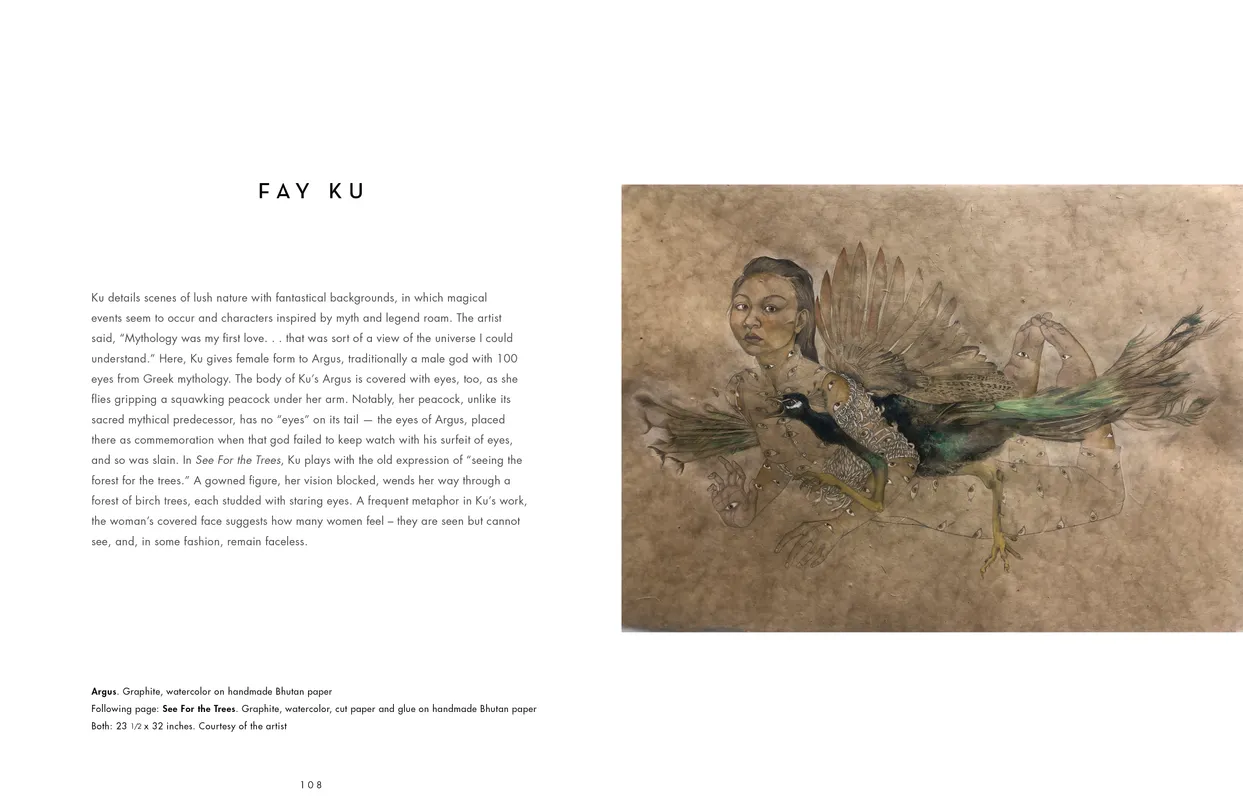
- The Eyes Have It exhibition catalog, pages 108-109
- Client: Lehman College Art Gallery
- Visit figure page
- Type: portfolio
- Portfolio Type: publication_design
- Portfolio Role: design_layout
The Eyes: Have It — Pages 110–111
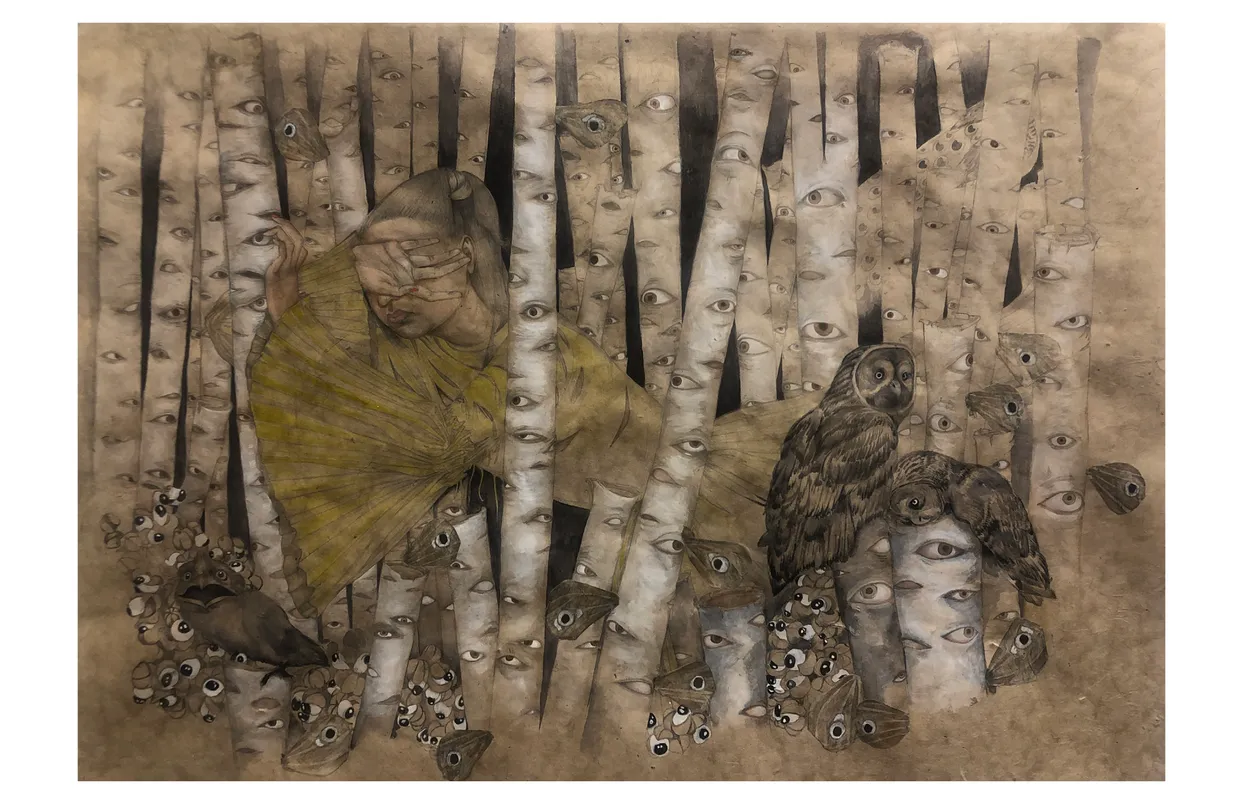
- The Eyes Have It exhibition catalog, pages 110-111
- Client: Lehman College Art Gallery
- Visit figure page
- Type: portfolio
- Portfolio Type: publication_design
- Portfolio Role: design_layout
The Eyes: Have It — Pages 112–113
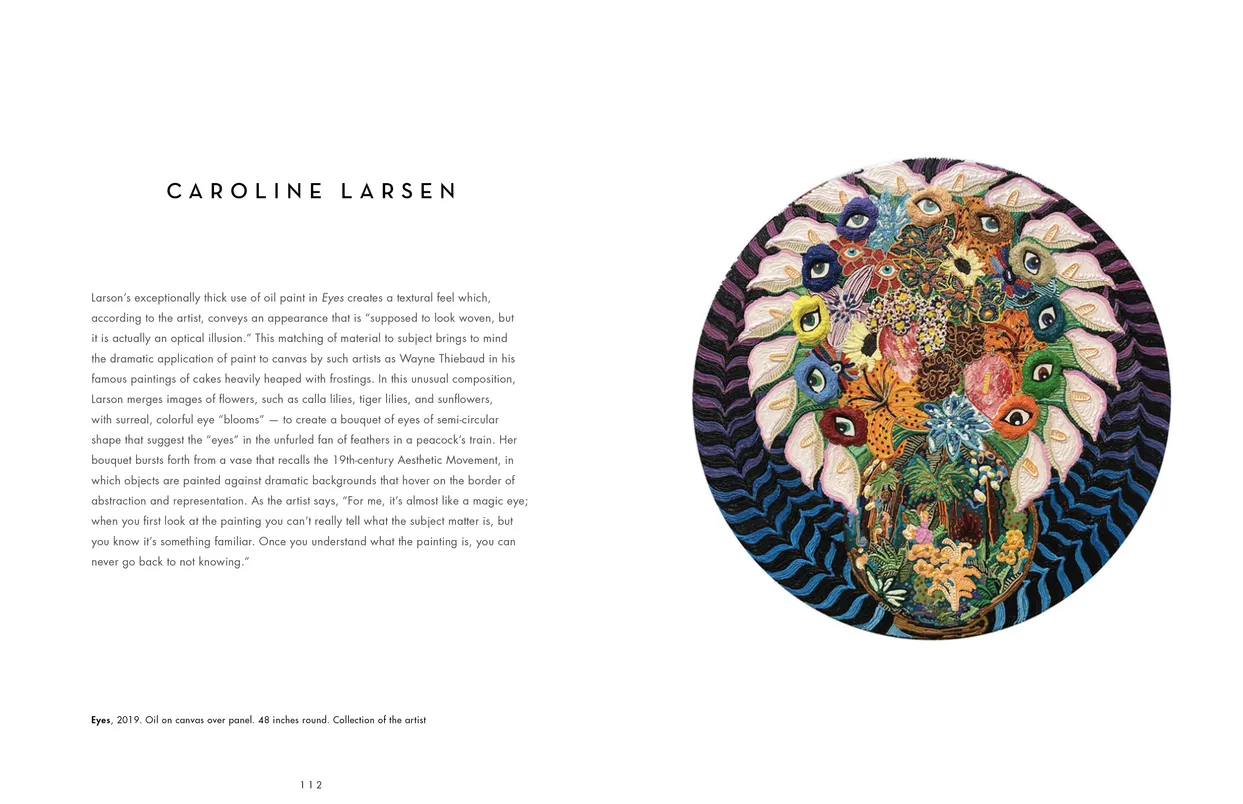
- The Eyes Have It exhibition catalog, pages 112-113
- Client: Lehman College Art Gallery
- Visit figure page
- Type: portfolio
- Portfolio Type: publication_design
- Portfolio Role: design_layout
The Eyes: Have It — Pages 114–115
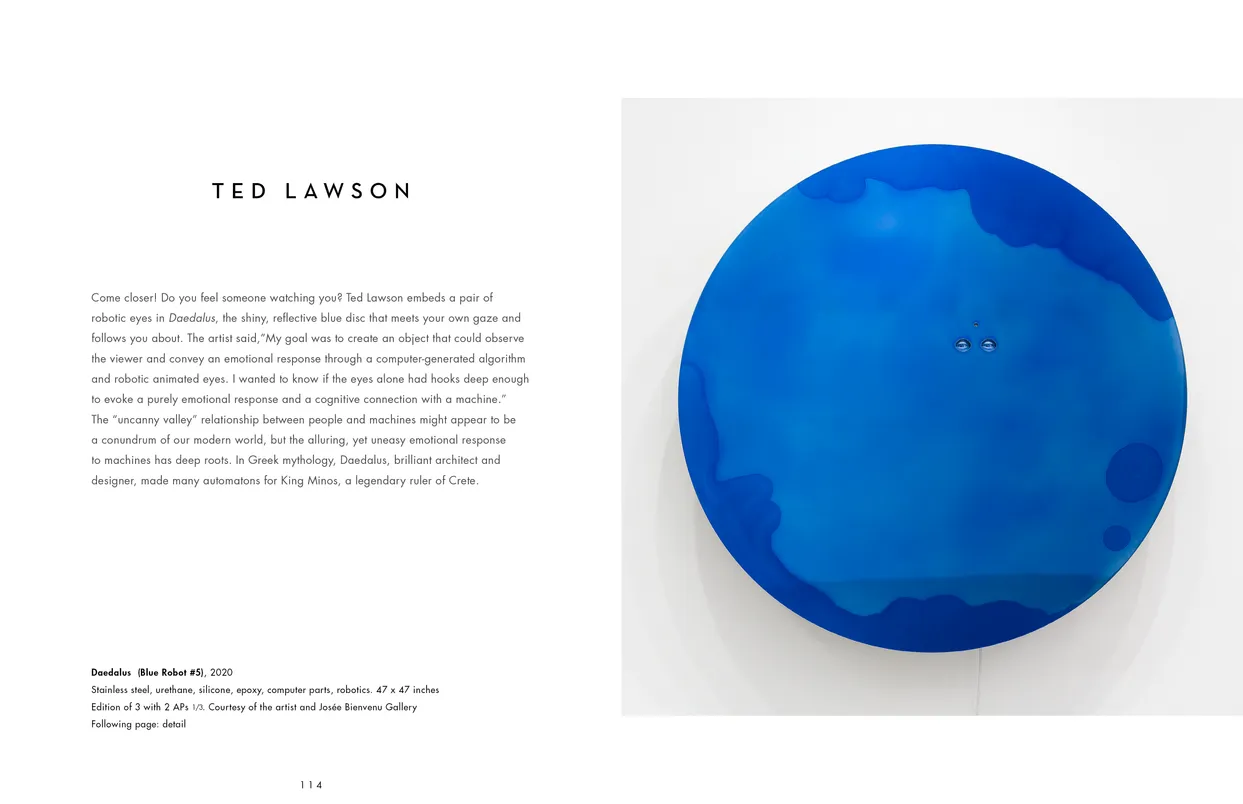
- The Eyes Have It exhibition catalog, pages 114-115
- Client: Lehman College Art Gallery
- Visit figure page
- Type: portfolio
- Portfolio Type: publication_design
- Portfolio Role: design_layout
The Eyes: Have It — Pages 116–117
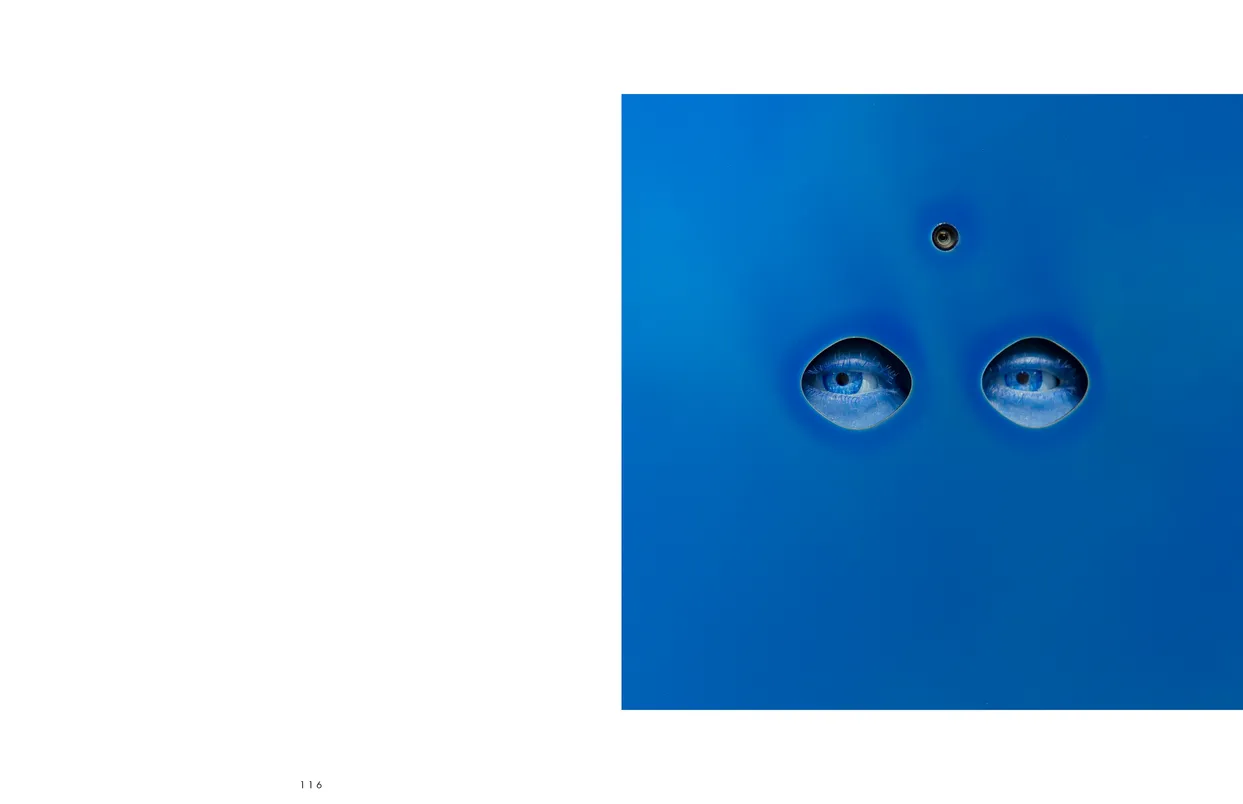
- The Eyes Have It exhibition catalog, pages 116-117
- Client: Lehman College Art Gallery
- Visit figure page
- Type: portfolio
- Portfolio Type: publication_design
- Portfolio Role: design_layout
The Eyes: Have It — Pages 118–119
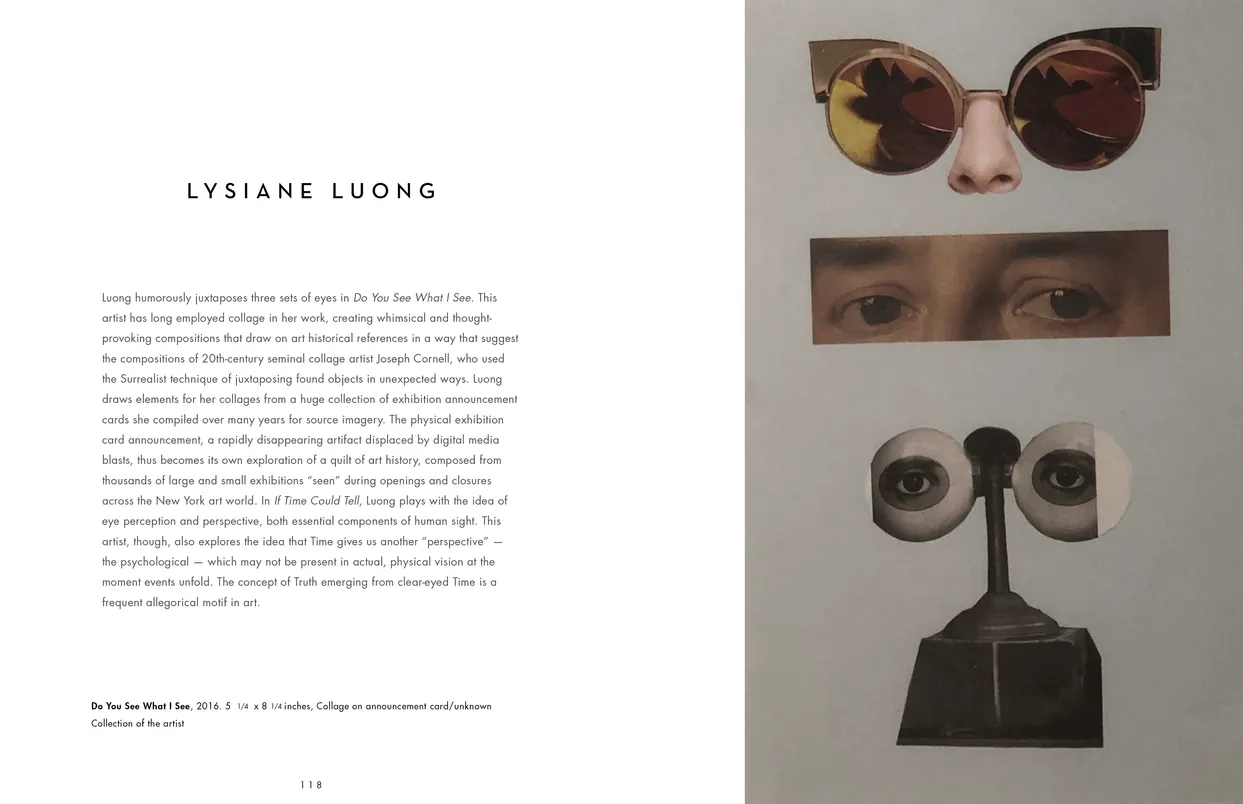
- The Eyes Have It exhibition catalog, pages 118-119
- Client: Lehman College Art Gallery
- Visit figure page
- Type: portfolio
- Portfolio Type: publication_design
- Portfolio Role: design_layout
The Eyes: Have It — Pages 12–13
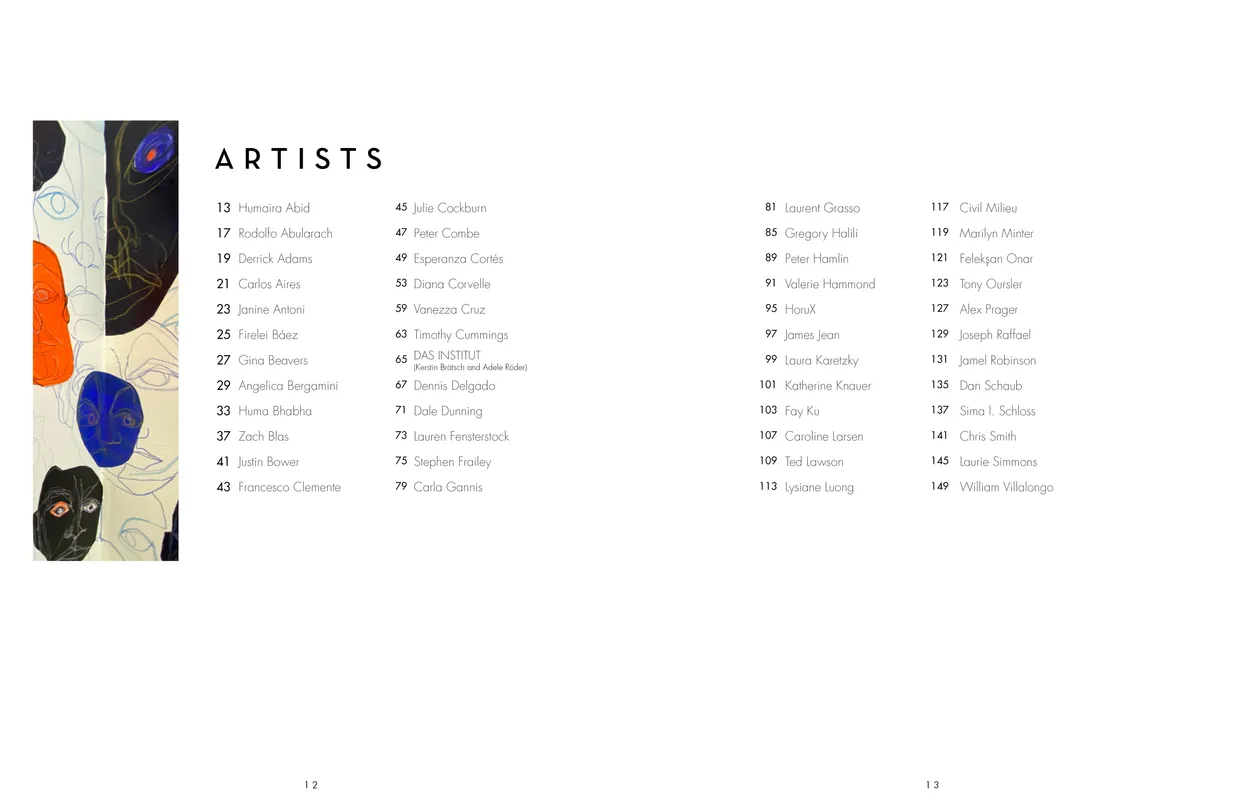
- The Eyes Have It exhibition catalog, pages 12-13
- Client: Lehman College Art Gallery
- Visit figure page
- Type: portfolio
- Portfolio Type: publication_design
- Portfolio Role: design_layout
The Eyes: Have It — Pages 120–121
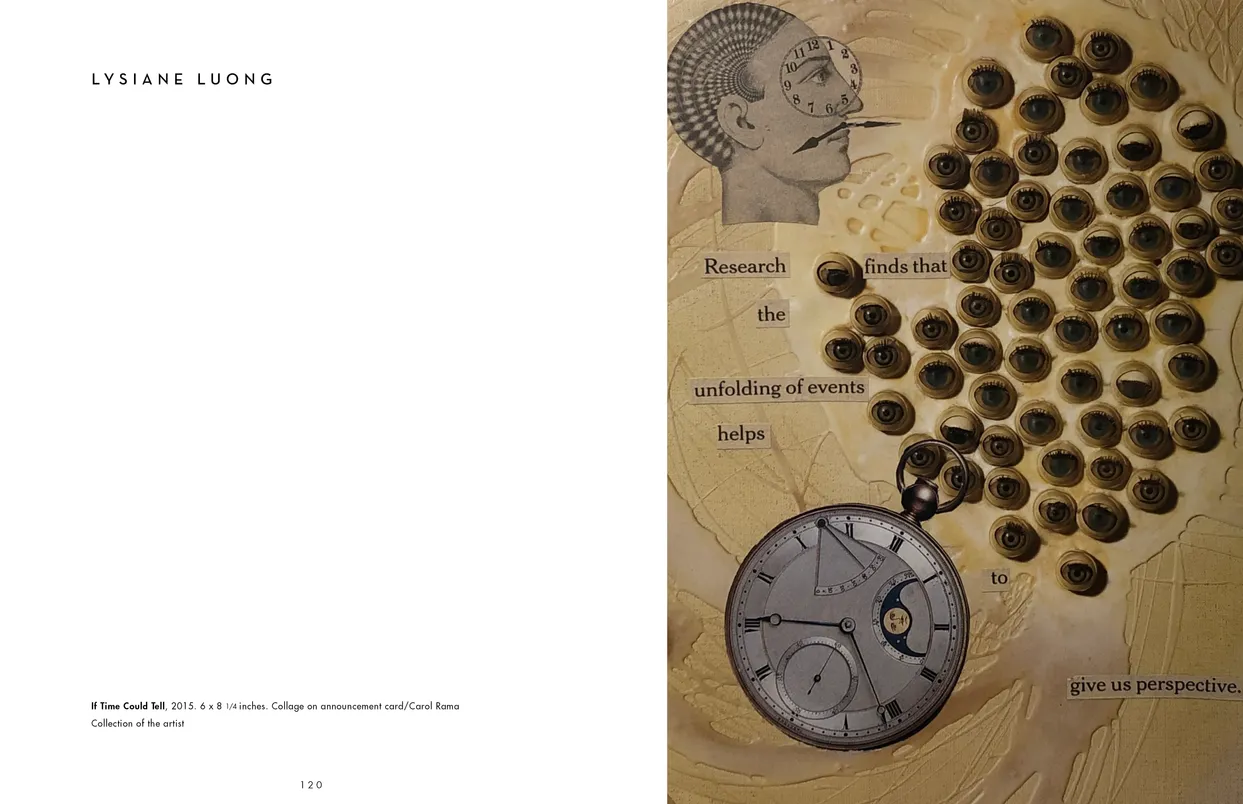
- The Eyes Have It exhibition catalog, pages 120-121
- Client: Lehman College Art Gallery
- Visit figure page
- Type: portfolio
- Portfolio Type: publication_design
- Portfolio Role: design_layout
The Eyes: Have It — Pages 122–123
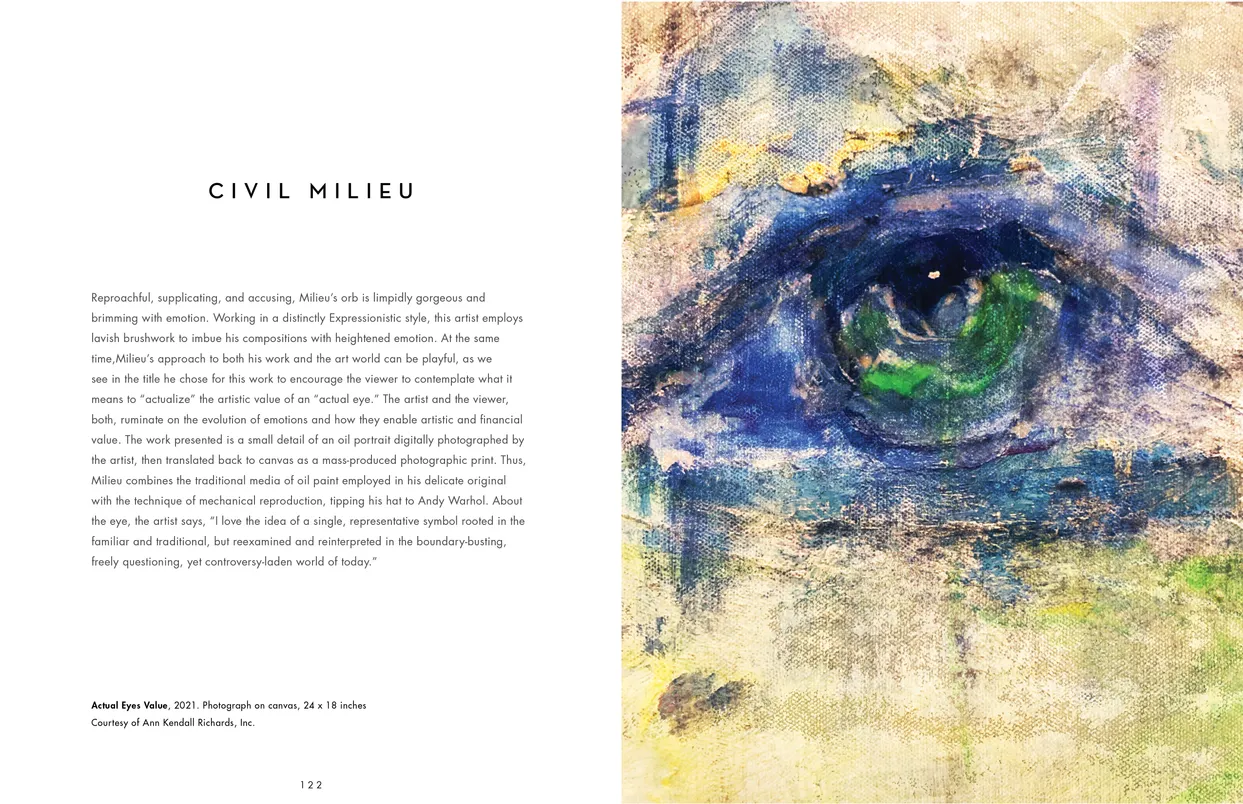
- The Eyes Have It exhibition catalog, pages 122-123
- Client: Lehman College Art Gallery
- Visit figure page
- Type: portfolio
- Portfolio Type: publication_design
- Portfolio Role: design_layout
The Eyes: Have It — Pages 124–125
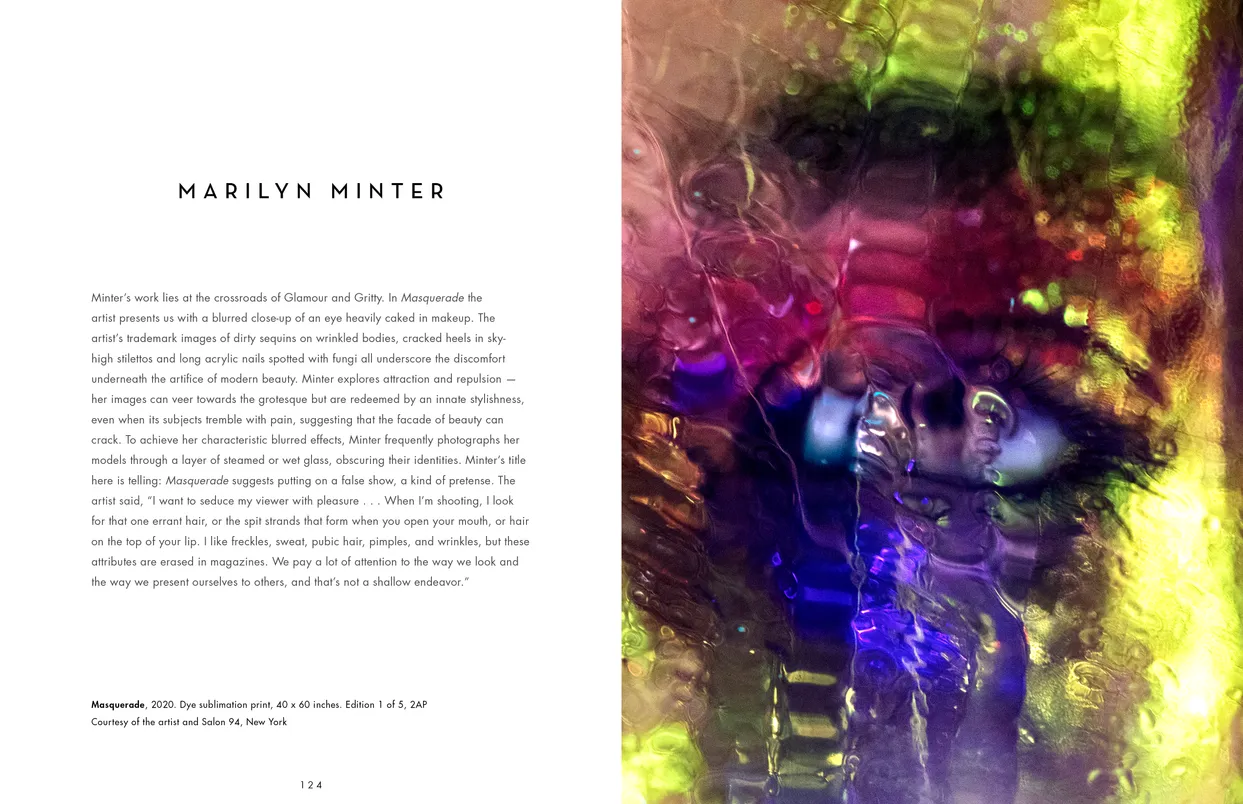
- The Eyes Have It exhibition catalog, pages 124-125
- Client: Lehman College Art Gallery
- Visit figure page
- Type: portfolio
- Portfolio Type: publication_design
- Portfolio Role: design_layout
The Eyes: Have It — Pages 126–127
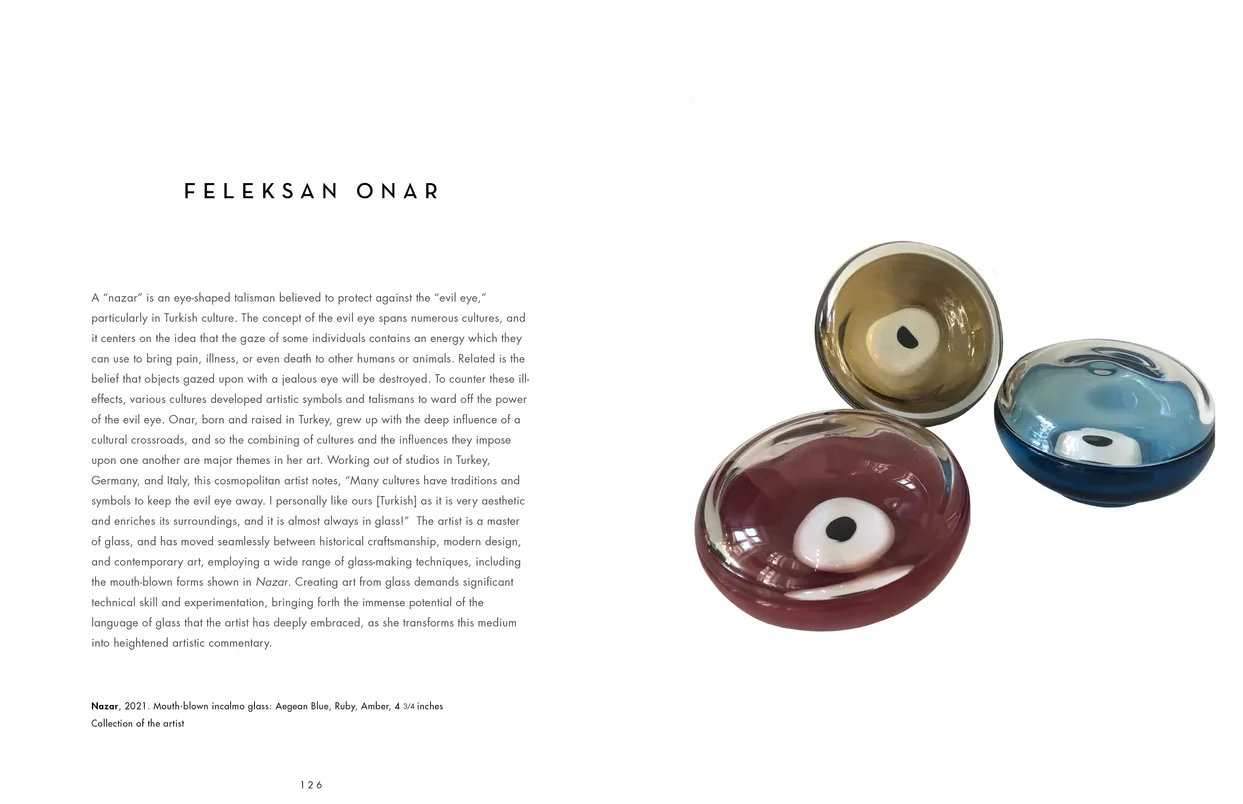
- The Eyes Have It exhibition catalog, pages 126-127
- Client: Lehman College Art Gallery
- Visit figure page
- Type: portfolio
- Portfolio Type: publication_design
- Portfolio Role: design_layout
The Eyes: Have It — Pages 128–129
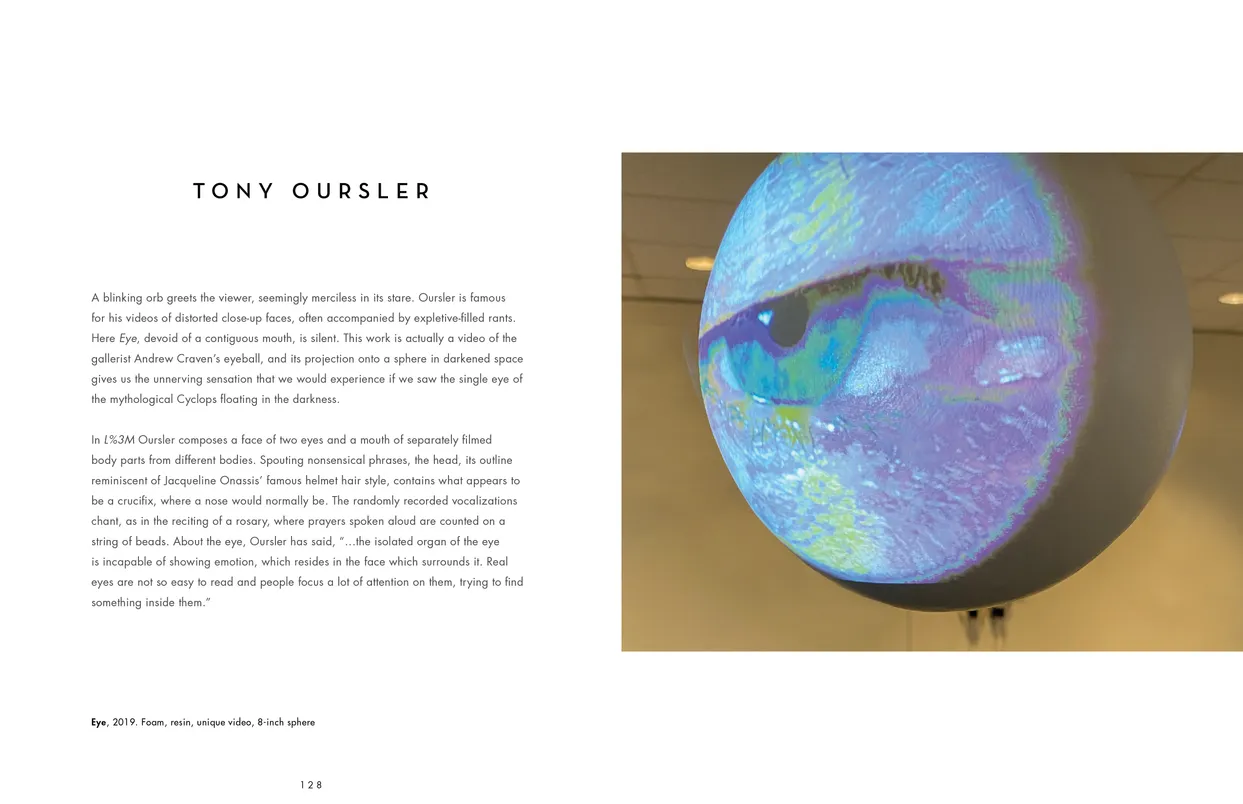
- The Eyes Have It exhibition catalog, pages 128-129
- Client: Lehman College Art Gallery
- Visit figure page
- Type: portfolio
- Portfolio Type: publication_design
- Portfolio Role: design_layout
The Eyes: Have It — Pages 130–131
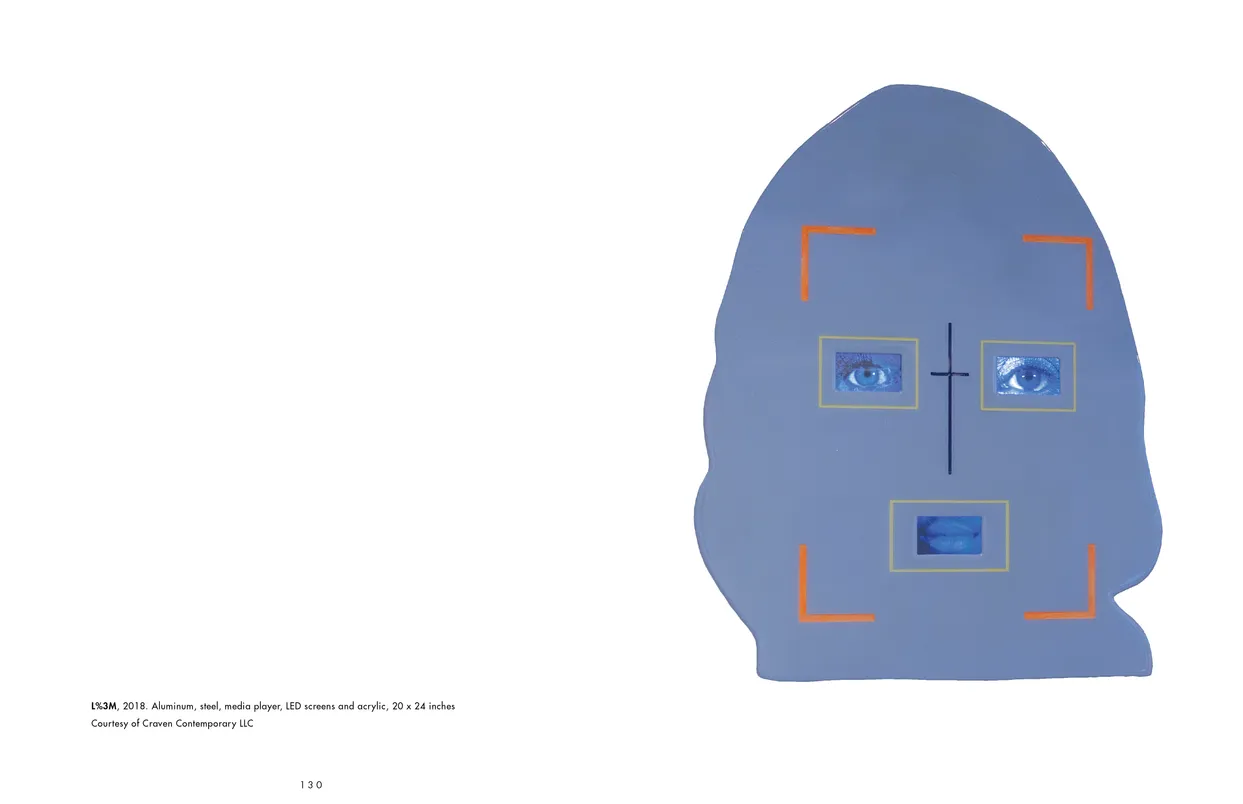
- The Eyes Have It exhibition catalog, pages 130-131
- Client: Lehman College Art Gallery
- Visit figure page
- Type: portfolio
- Portfolio Type: publication_design
- Portfolio Role: design_layout
The Eyes: Have It — Pages 132–133
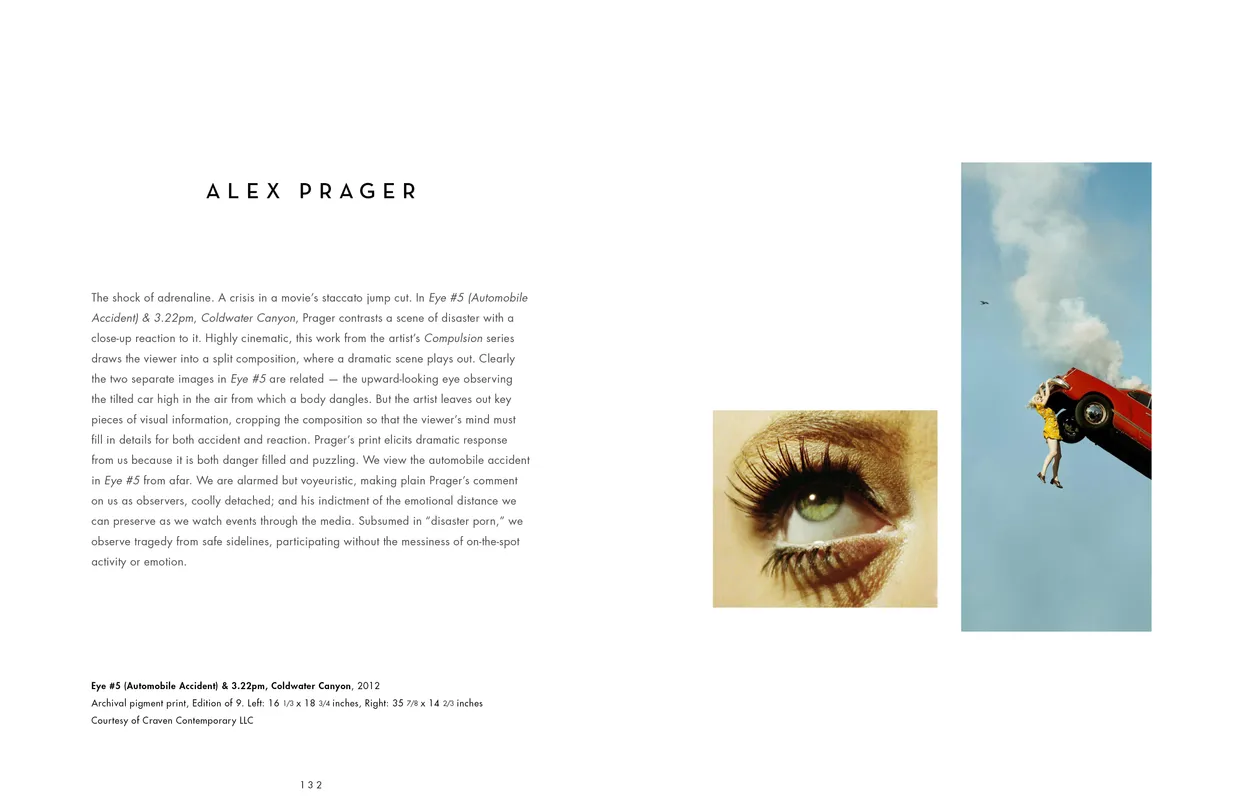
- The Eyes Have It exhibition catalog, pages 132-133
- Client: Lehman College Art Gallery
- Visit figure page
- Type: portfolio
- Portfolio Type: publication_design
- Portfolio Role: design_layout
The Eyes: Have It — Pages 134–135
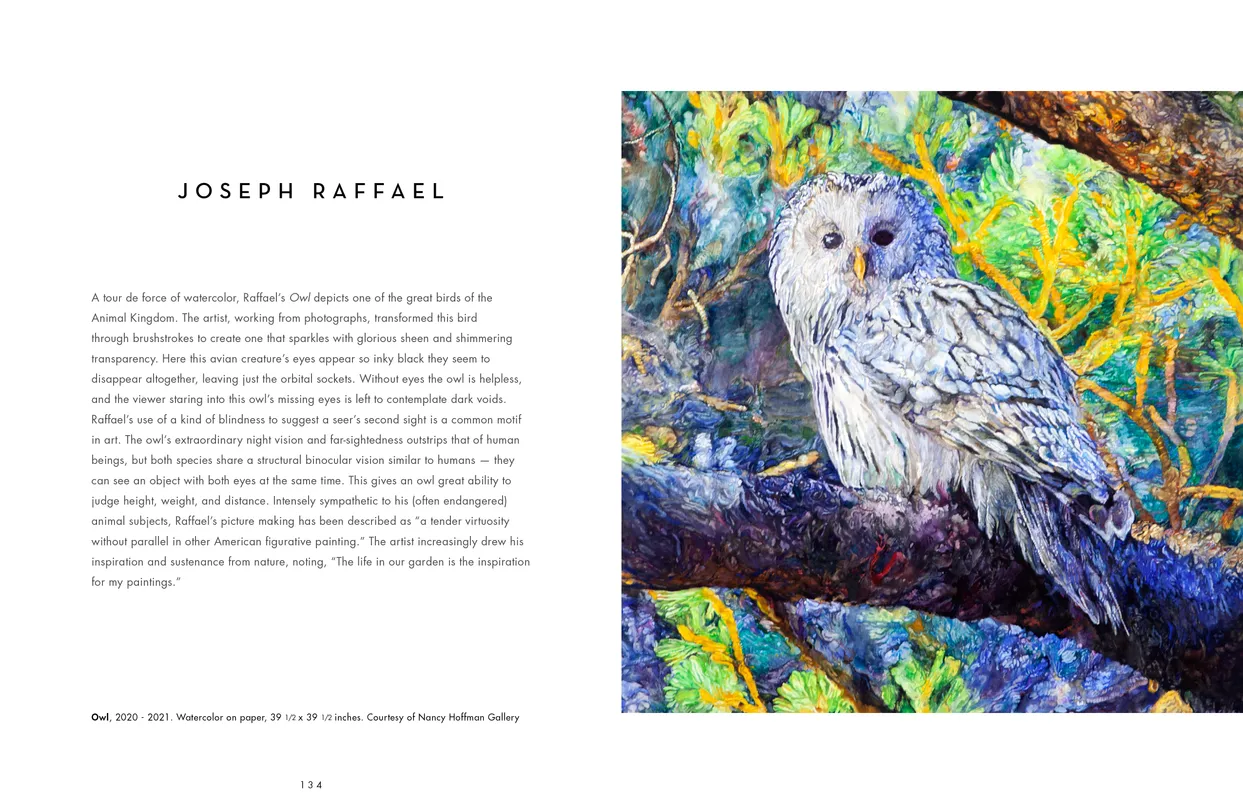
- The Eyes Have It exhibition catalog, pages 134-135
- Client: Lehman College Art Gallery
- Visit figure page
- Type: portfolio
- Portfolio Type: publication_design
- Portfolio Role: design_layout
The Eyes: Have It — Pages 136–137
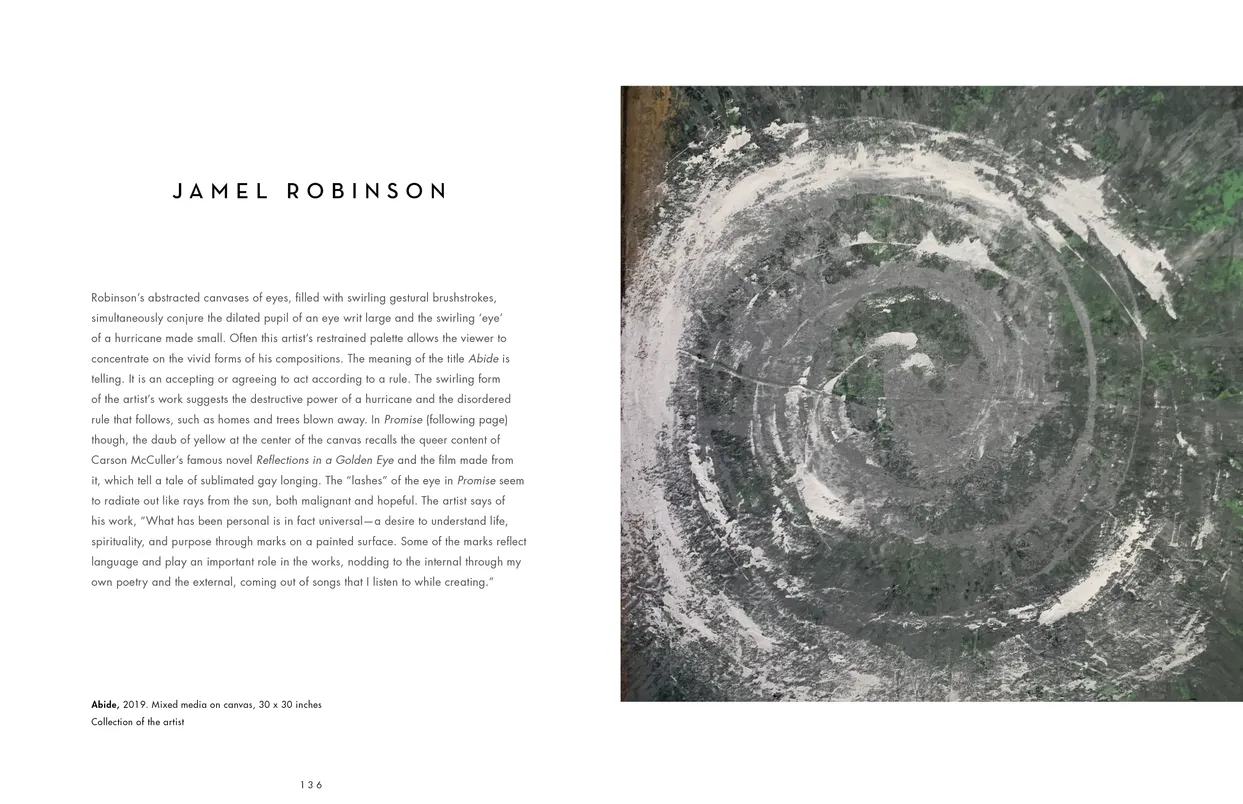
- The Eyes Have It exhibition catalog, pages 136-137
- Client: Lehman College Art Gallery
- Visit figure page
- Type: portfolio
- Portfolio Type: publication_design
- Portfolio Role: design_layout
The Eyes: Have It — Pages 138–139
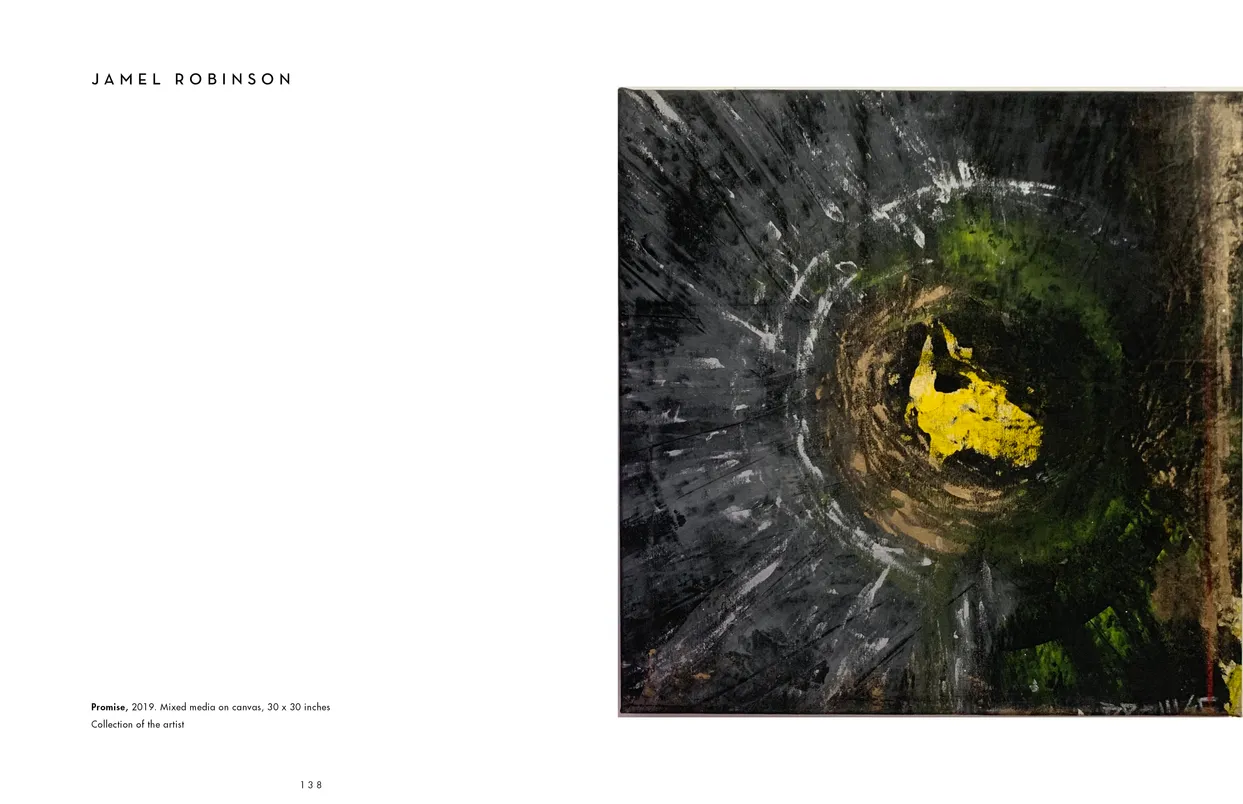
- The Eyes Have It exhibition catalog, pages 138-139
- Client: Lehman College Art Gallery
- Visit figure page
- Type: portfolio
- Portfolio Type: publication_design
- Portfolio Role: design_layout
The Eyes: Have It — Pages 14–15
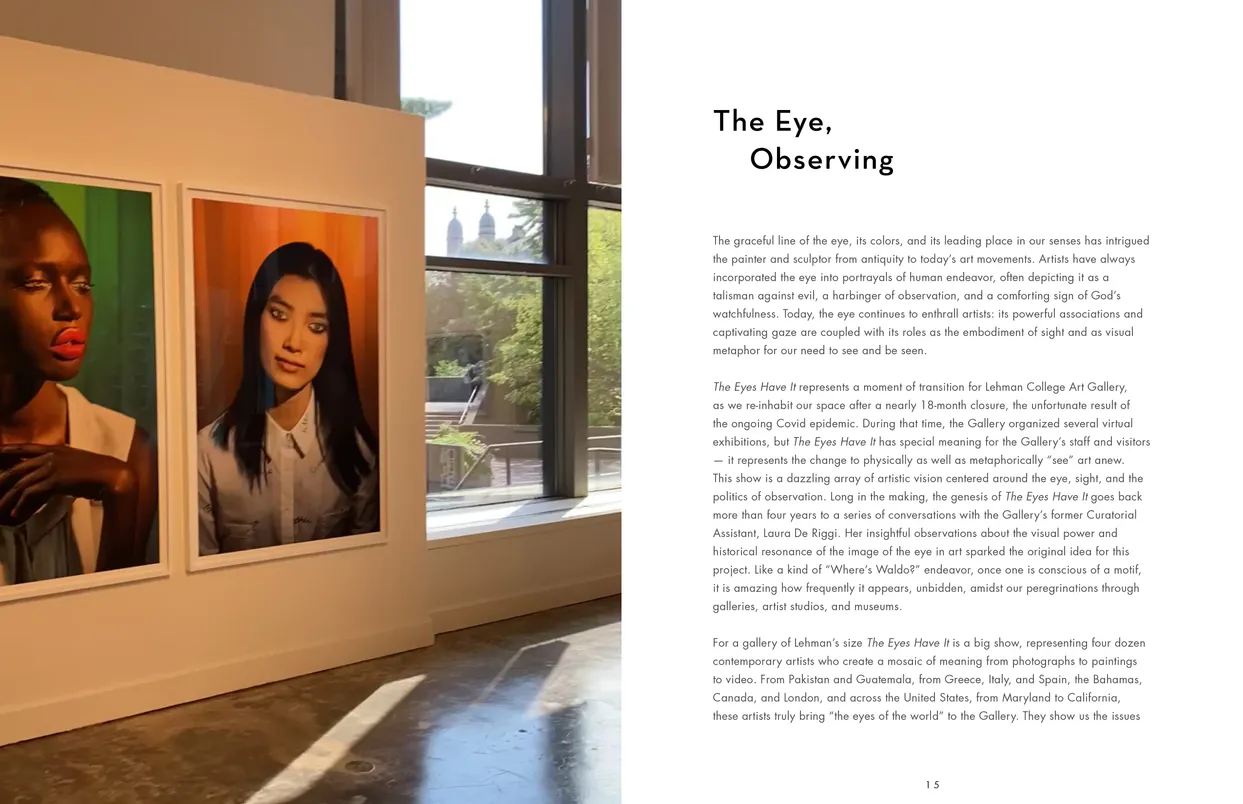
- The Eyes Have It exhibition catalog, pages 14-15
- Client: Lehman College Art Gallery
- Visit figure page
- Type: portfolio
- Portfolio Type: publication_design
- Portfolio Role: design_layout
The Eyes: Have It — Pages 140–141
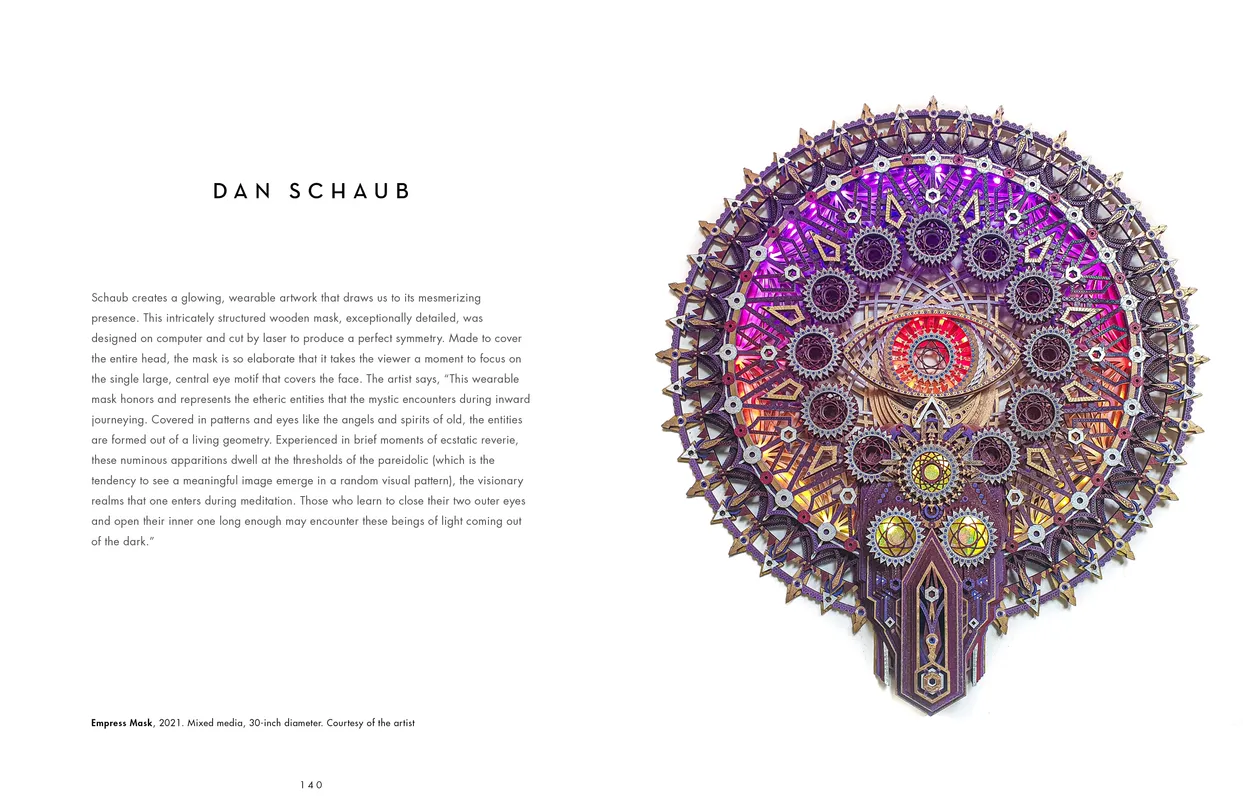
- The Eyes Have It exhibition catalog, pages 140-141
- Client: Lehman College Art Gallery
- Visit figure page
- Type: portfolio
- Portfolio Type: publication_design
- Portfolio Role: design_layout
The Eyes: Have It — Pages 142–143
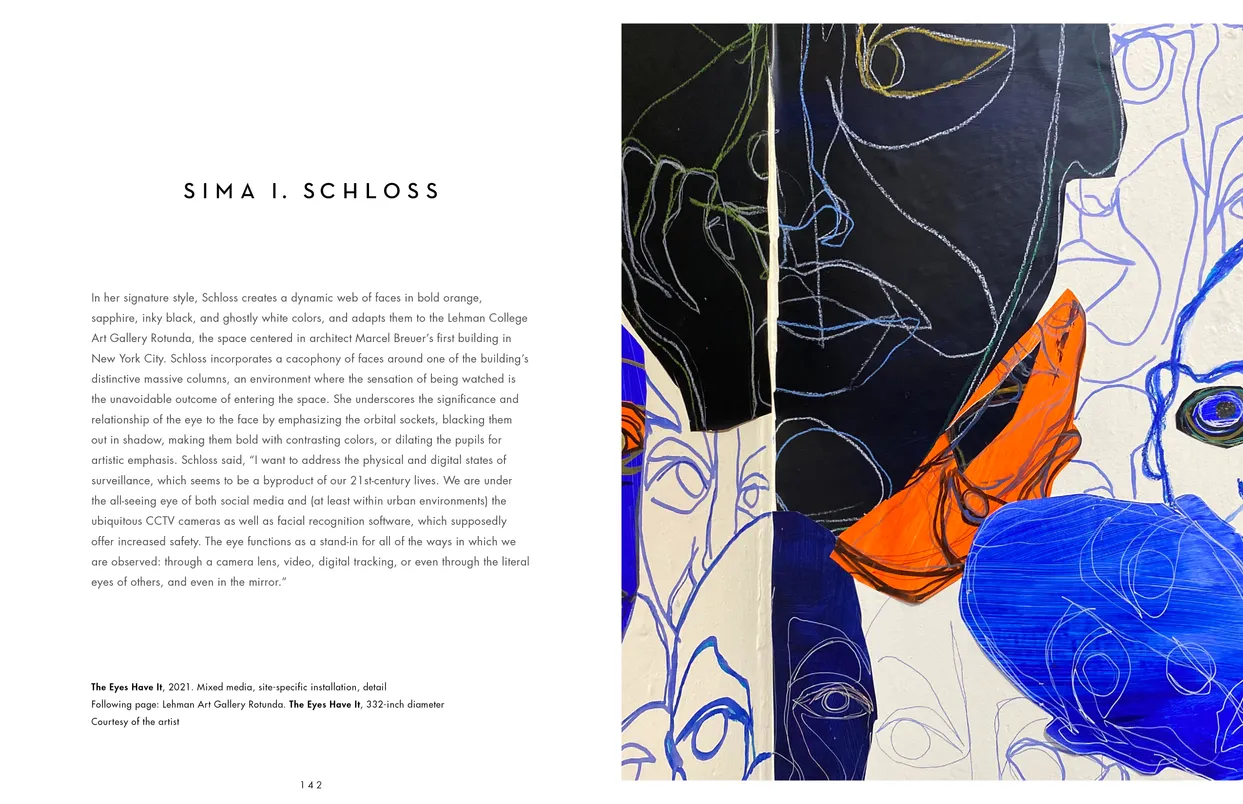
- The Eyes Have It exhibition catalog, pages 142-143
- Client: Lehman College Art Gallery
- Visit figure page
- Type: portfolio
- Portfolio Type: publication_design
- Portfolio Role: design_layout
The Eyes: Have It — Pages 144–145
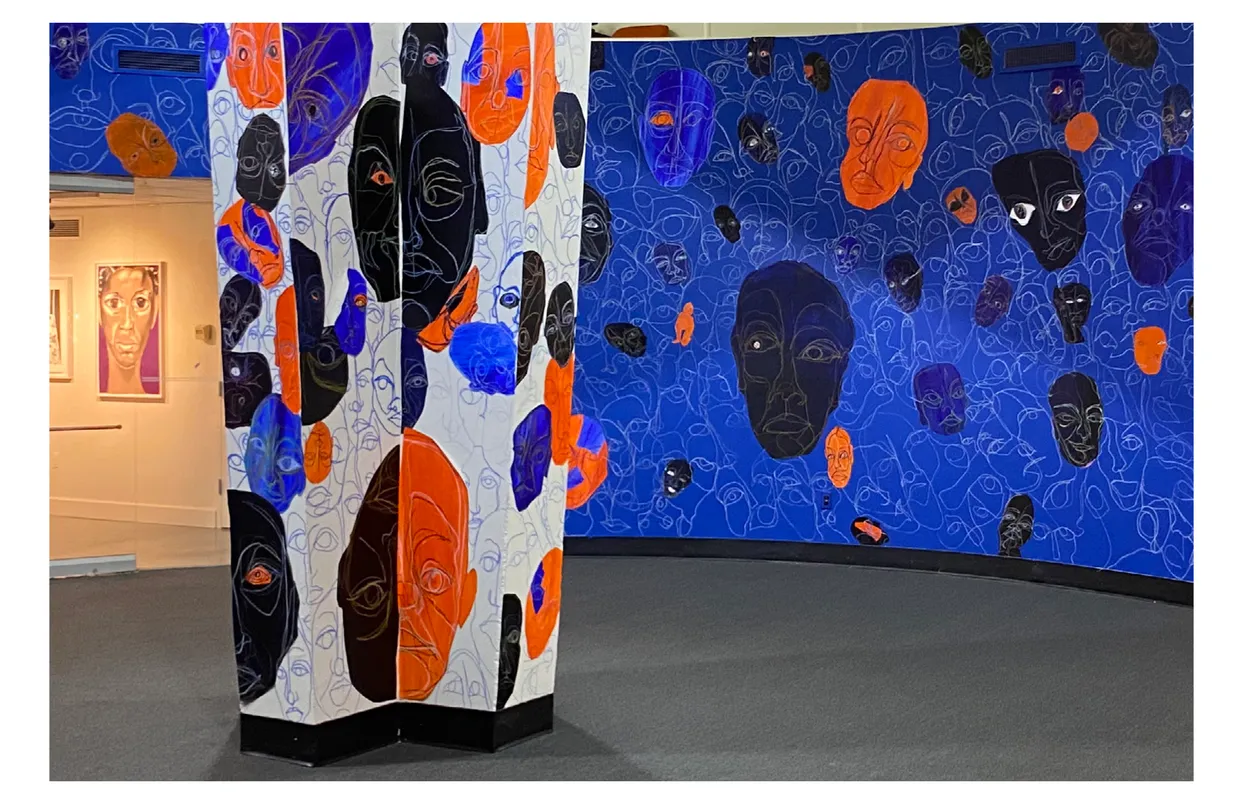
- The Eyes Have It exhibition catalog, pages 144-145
- Client: Lehman College Art Gallery
- Visit figure page
- Type: portfolio
- Portfolio Type: publication_design
- Portfolio Role: design_layout
The Eyes: Have It — Pages 146–147
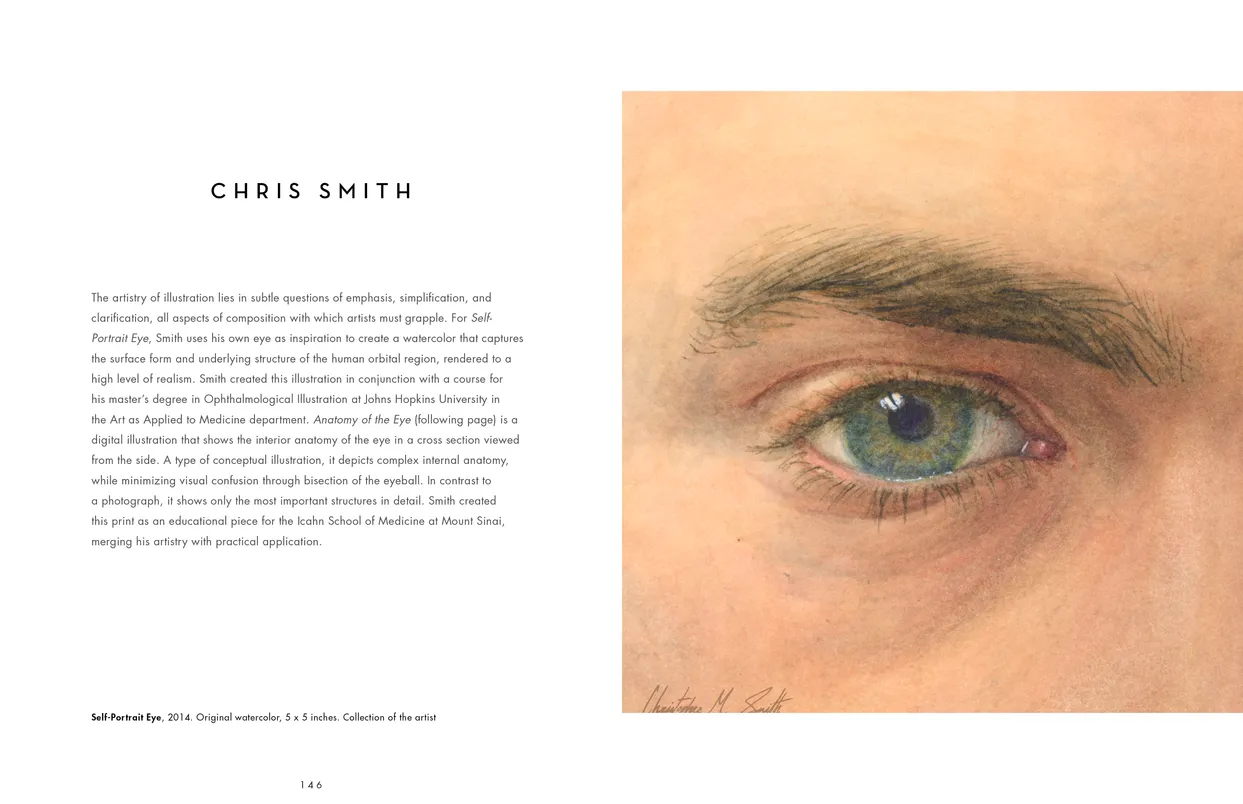
- The Eyes Have It exhibition catalog, pages 146-147
- Client: Lehman College Art Gallery
- Visit figure page
- Type: portfolio
- Portfolio Type: publication_design
- Portfolio Role: design_layout
The Eyes: Have It — Pages 148–149
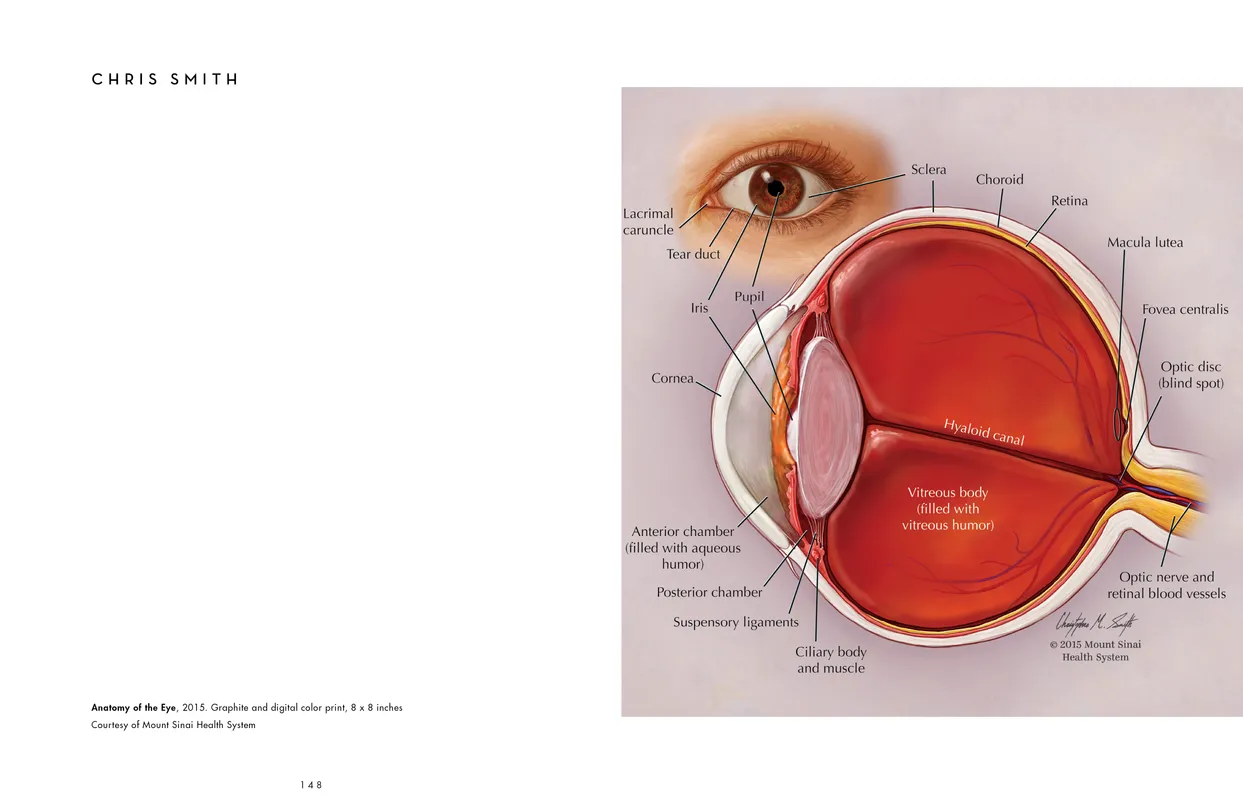
- The Eyes Have It exhibition catalog, pages 148-149
- Client: Lehman College Art Gallery
- Visit figure page
- Type: portfolio
- Portfolio Type: publication_design
- Portfolio Role: design_layout
The Eyes: Have It — Pages 150–151
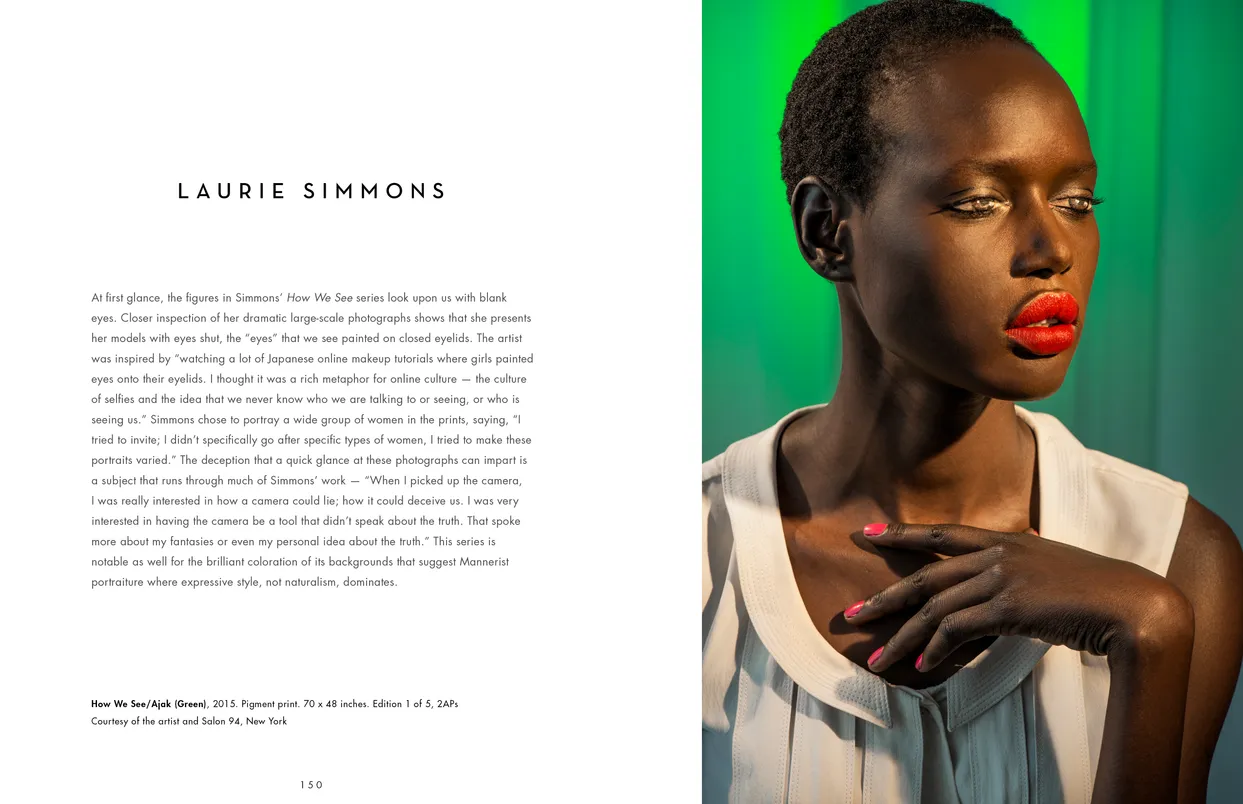
- The Eyes Have It exhibition catalog, pages 150-151
- Client: Lehman College Art Gallery
- Visit figure page
- Type: portfolio
- Portfolio Type: publication_design
- Portfolio Role: design_layout
The Eyes: Have It — Pages 152–153

- The Eyes Have It exhibition catalog, pages 152-153
- Client: Lehman College Art Gallery
- Visit figure page
- Type: portfolio
- Portfolio Type: publication_design
- Portfolio Role: design_layout
The Eyes: Have It — Pages 154–155
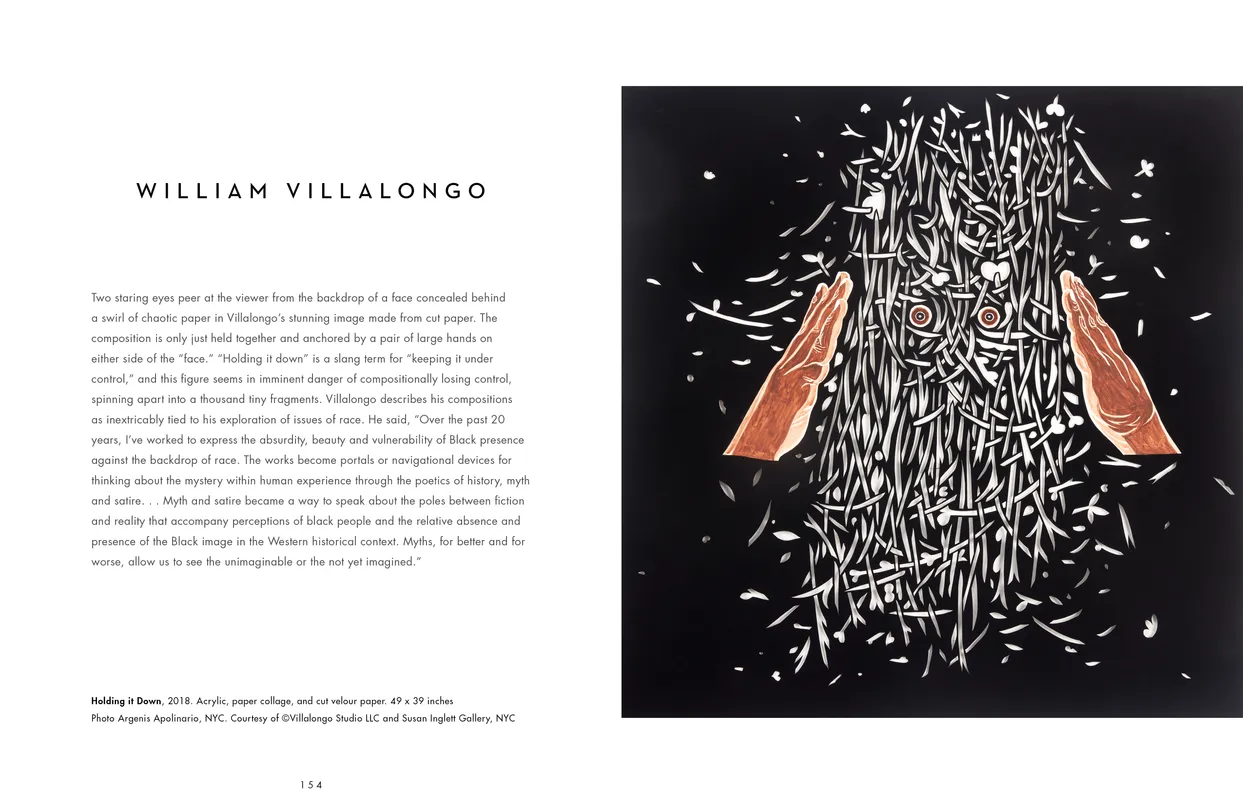
- The Eyes Have It exhibition catalog, pages 154-155
- Client: Lehman College Art Gallery
- Visit figure page
- Type: portfolio
- Portfolio Type: publication_design
- Portfolio Role: design_layout
The Eyes: Have It — Pages 16–17

- The Eyes Have It exhibition catalog, pages 16-17
- Client: Lehman College Art Gallery
- Visit figure page
- Type: portfolio
- Portfolio Type: publication_design
- Portfolio Role: design_layout
The Eyes: Have It — Pages 18–19
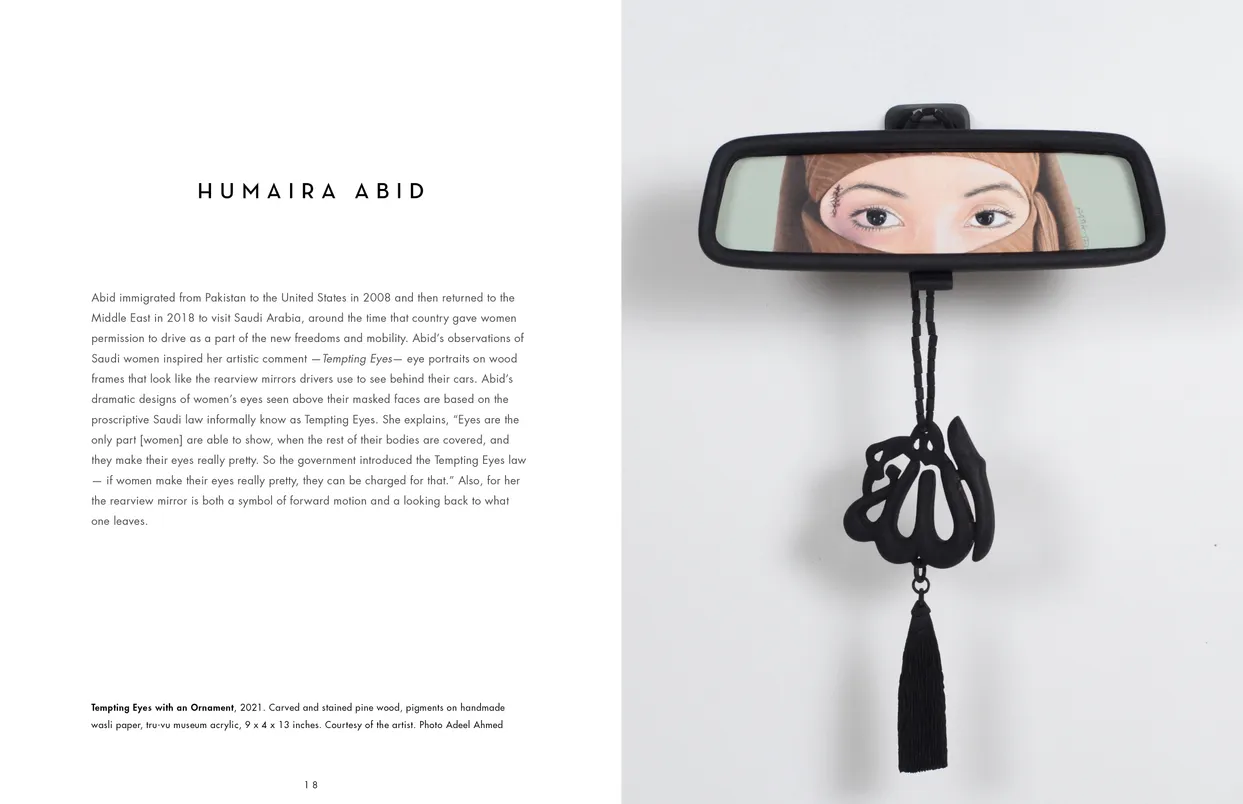
- The Eyes Have It exhibition catalog, pages 18-19
- Client: Lehman College Art Gallery
- Visit figure page
- Type: portfolio
- Portfolio Type: publication_design
- Portfolio Role: design_layout
The Eyes: Have It — Pages 2–3

- The Eyes Have It exhibition catalog, pages 2-3
- Client: Lehman College Art Gallery
- Visit figure page
- Type: portfolio
- Portfolio Type: publication_design
- Portfolio Role: design_layout
The Eyes: Have It — Pages 20–21
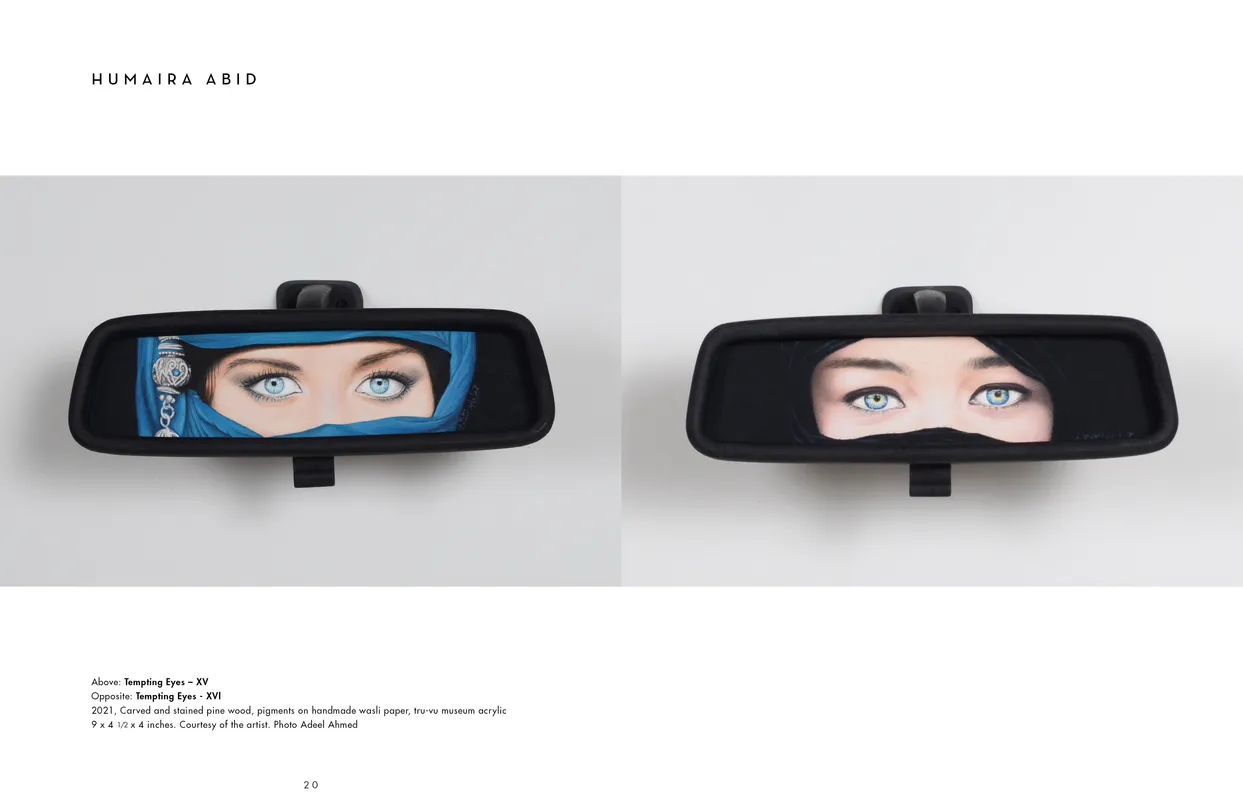
- The Eyes Have It exhibition catalog, pages 20-21
- Client: Lehman College Art Gallery
- Visit figure page
- Type: portfolio
- Portfolio Type: publication_design
- Portfolio Role: design_layout
The Eyes: Have It — Pages 22–23
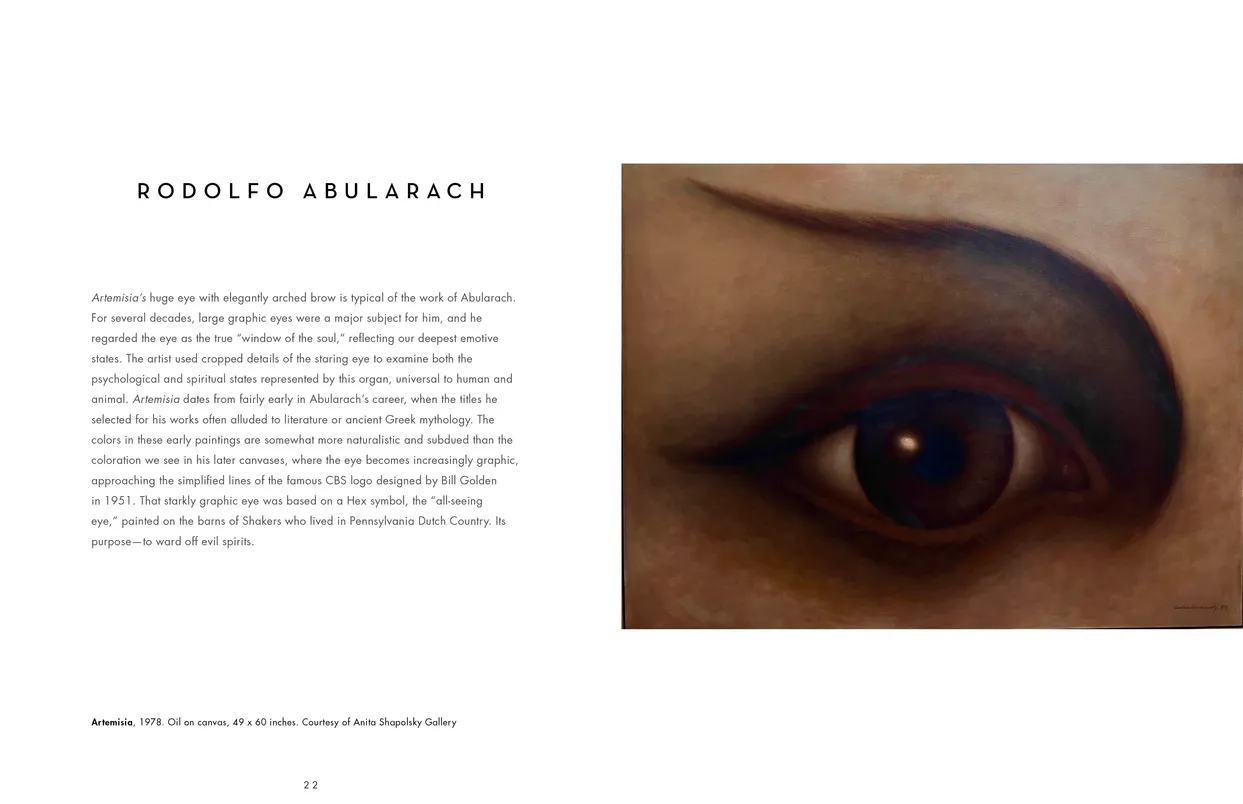
- The Eyes Have It exhibition catalog, pages 22-23
- Client: Lehman College Art Gallery
- Visit figure page
- Type: portfolio
- Portfolio Type: publication_design
- Portfolio Role: design_layout
The Eyes: Have It — Pages 24–25
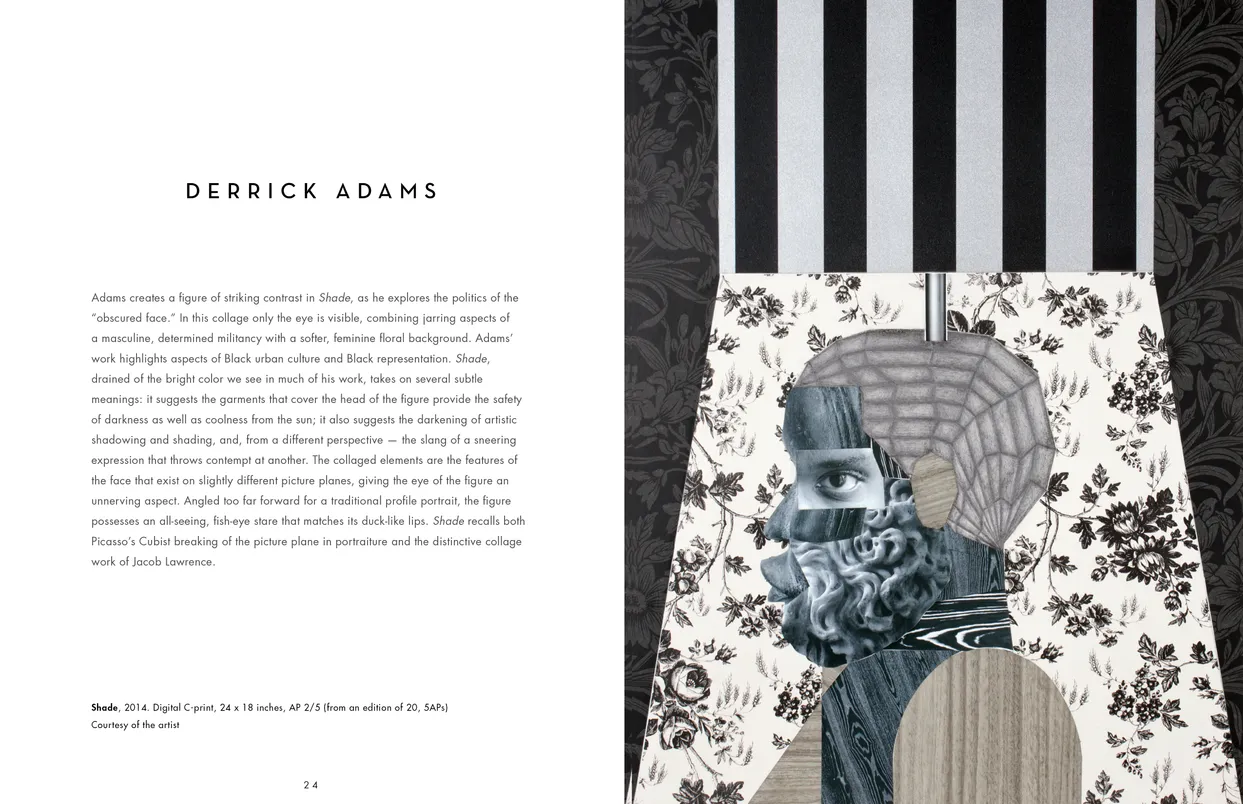
- The Eyes Have It exhibition catalog, pages 24-25
- Client: Lehman College Art Gallery
- Visit figure page
- Type: portfolio
- Portfolio Type: publication_design
- Portfolio Role: design_layout
The Eyes: Have It — Pages 26–27
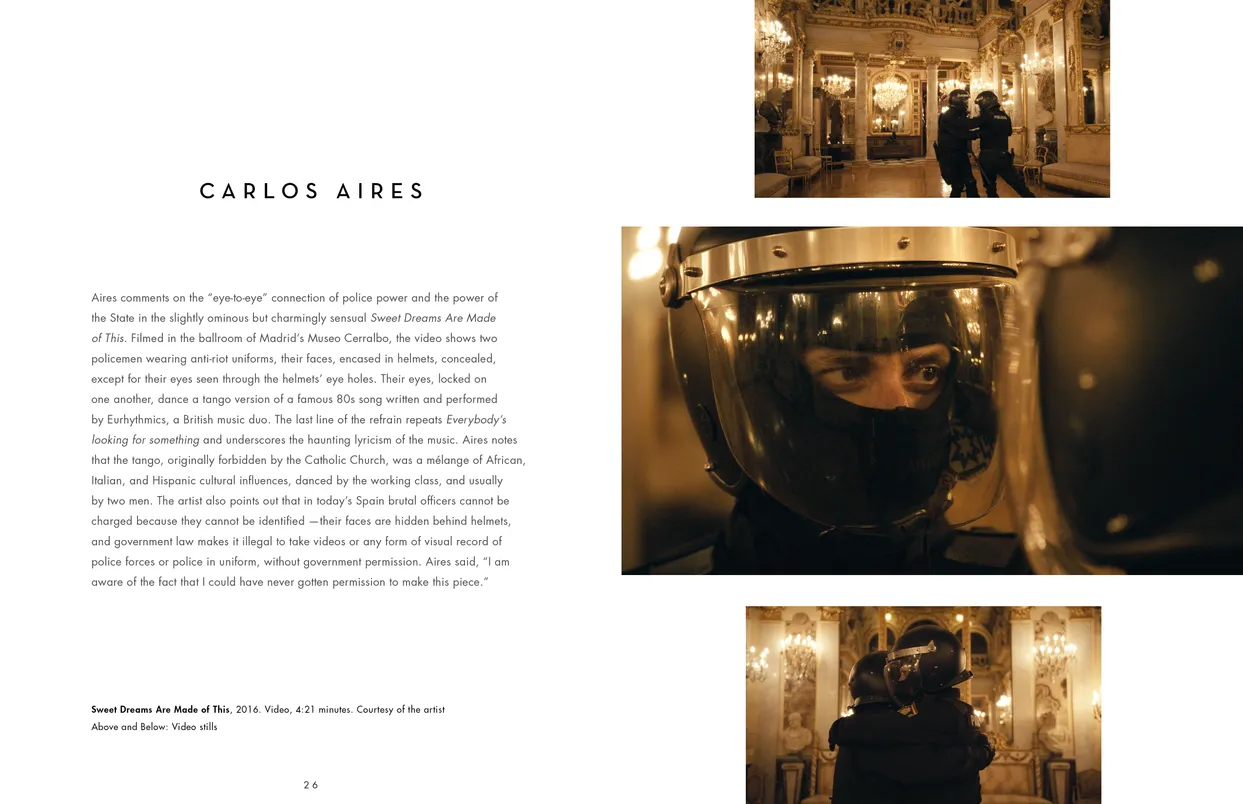
- The Eyes Have It exhibition catalog, pages 26-27
- Client: Lehman College Art Gallery
- Visit figure page
- Type: portfolio
- Portfolio Type: publication_design
- Portfolio Role: design_layout
The Eyes: Have It — Pages 28–29
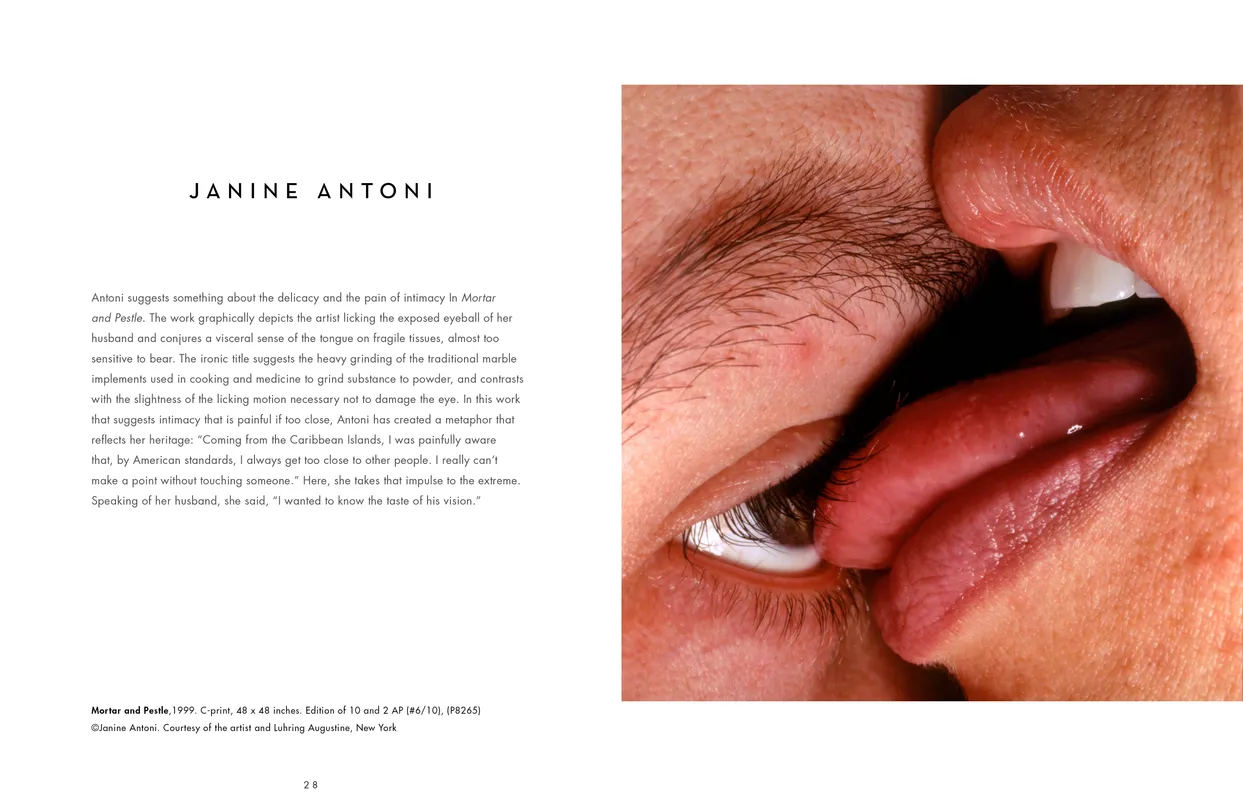
- The Eyes Have It exhibition catalog, pages 28-29
- Client: Lehman College Art Gallery
- Visit figure page
- Type: portfolio
- Portfolio Type: publication_design
- Portfolio Role: design_layout
The Eyes: Have It — Pages 30–31
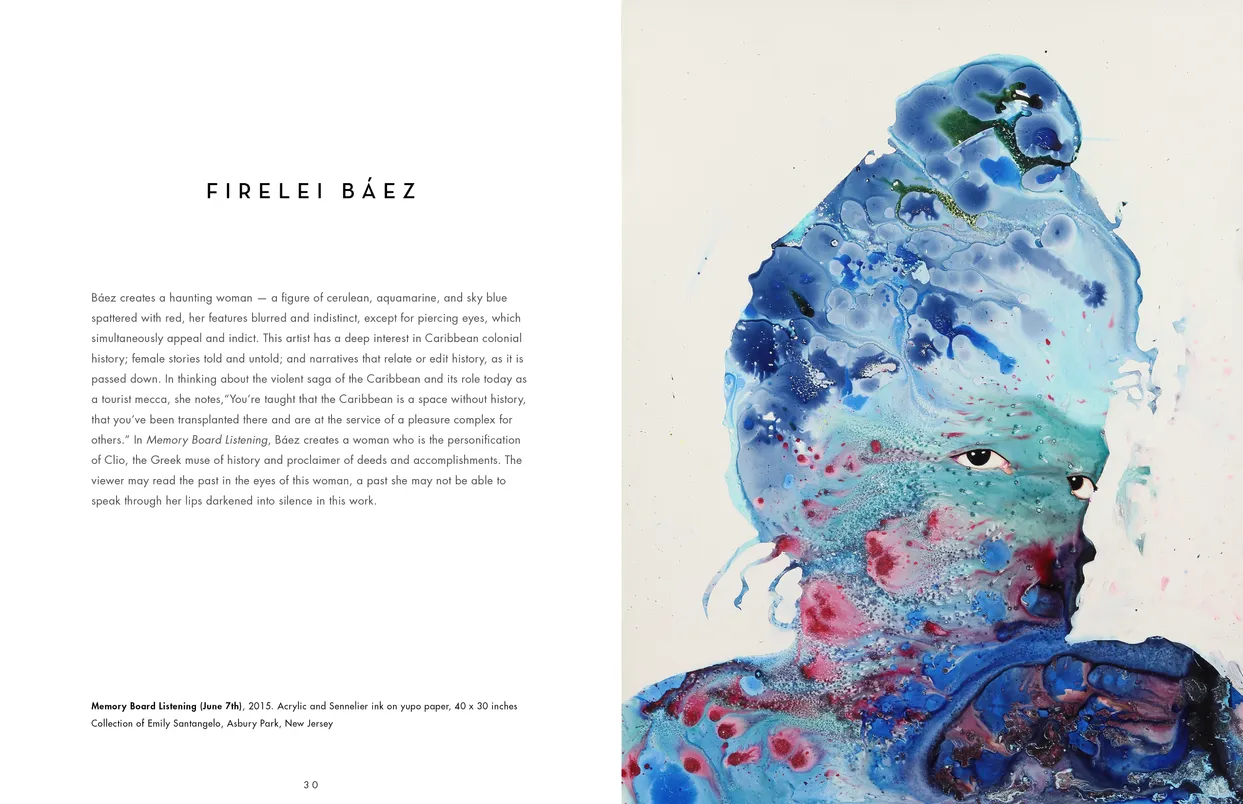
- The Eyes Have It exhibition catalog, pages 30-31
- Client: Lehman College Art Gallery
- Visit figure page
- Type: portfolio
- Portfolio Type: publication_design
- Portfolio Role: design_layout
The Eyes: Have It — Pages 32–33
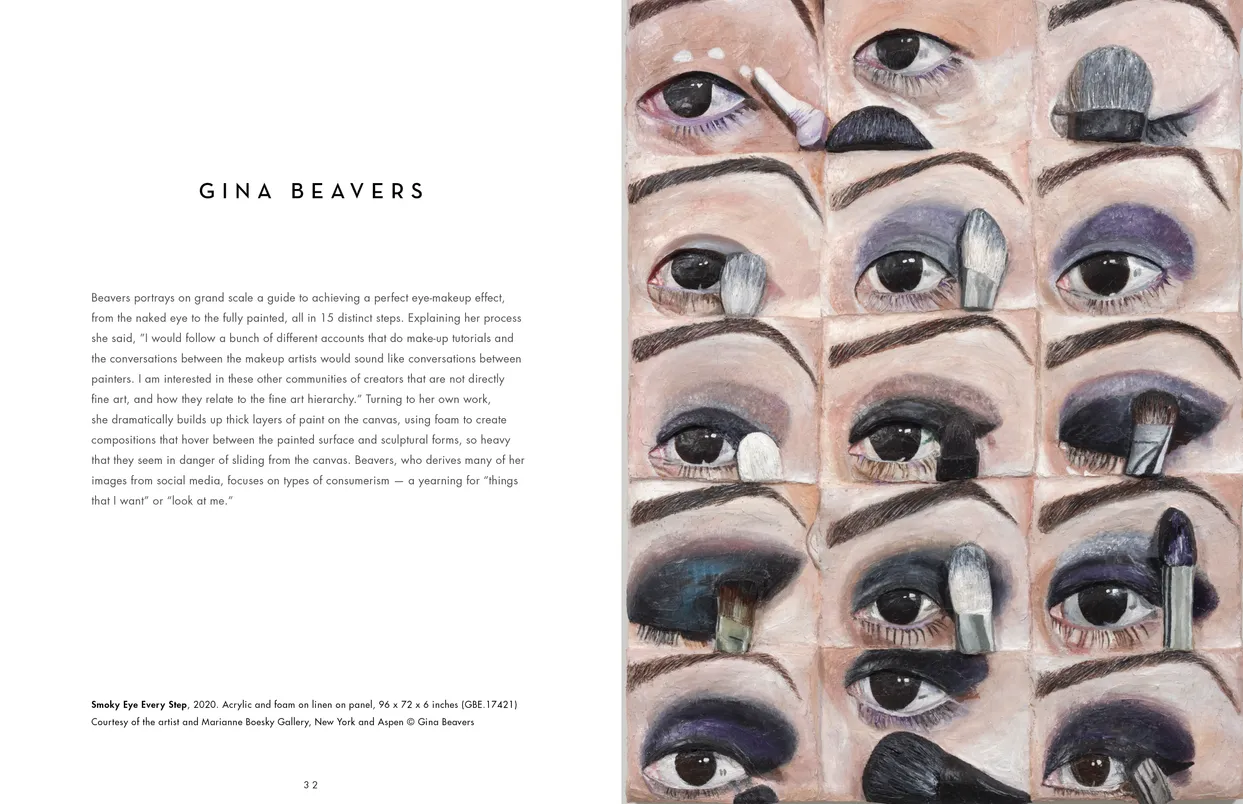
- The Eyes Have It exhibition catalog, pages 32-33
- Client: Lehman College Art Gallery
- Visit figure page
- Type: portfolio
- Portfolio Type: publication_design
- Portfolio Role: design_layout
The Eyes: Have It — Pages 34–35
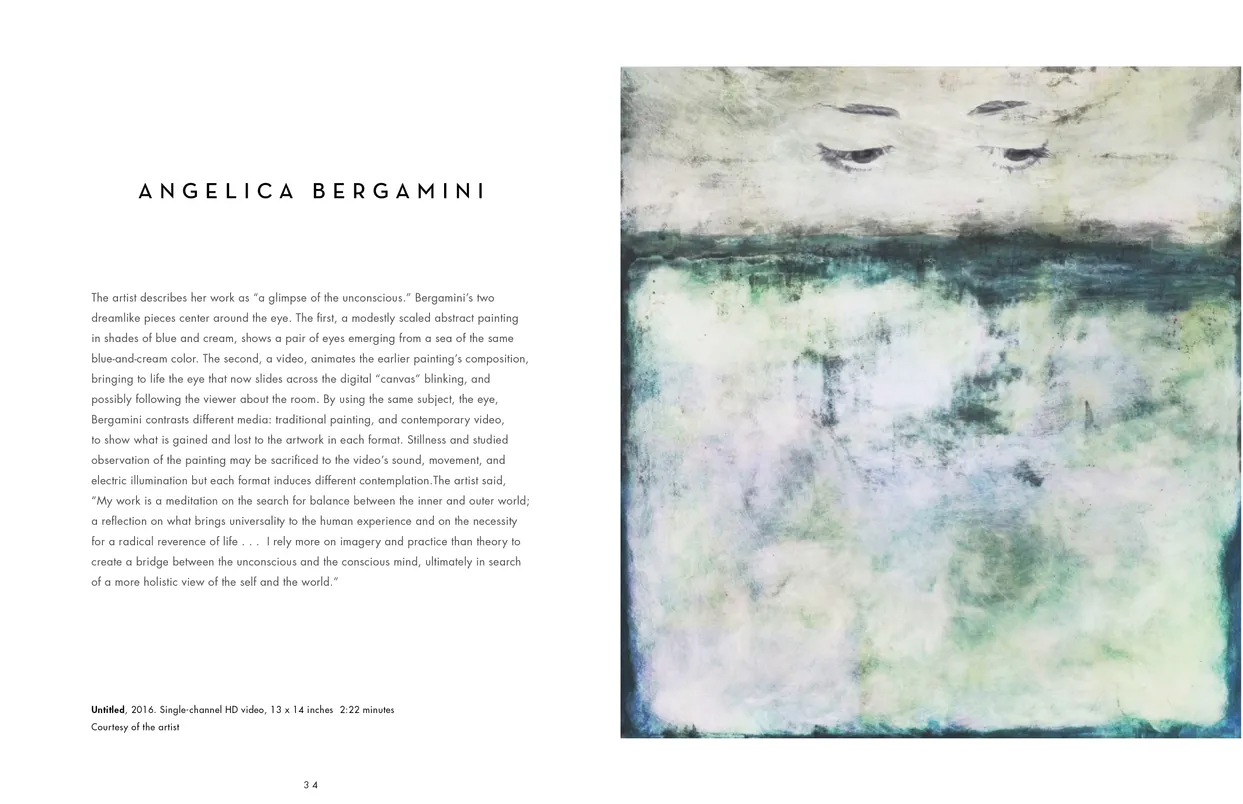
- The Eyes Have It exhibition catalog, pages 34-35
- Client: Lehman College Art Gallery
- Visit figure page
- Type: portfolio
- Portfolio Type: publication_design
- Portfolio Role: design_layout
The Eyes: Have It — Pages 36–37
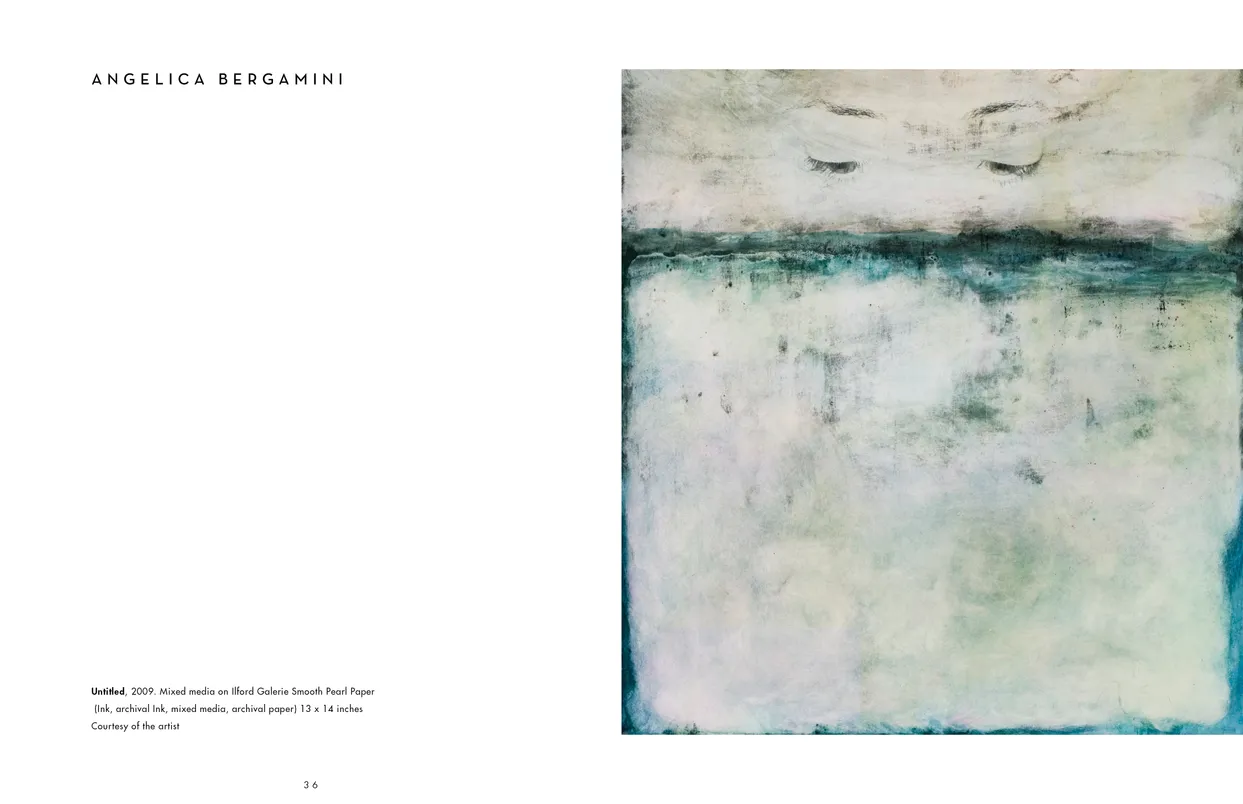
- The Eyes Have It exhibition catalog, pages 36-37
- Client: Lehman College Art Gallery
- Visit figure page
- Type: portfolio
- Portfolio Type: publication_design
- Portfolio Role: design_layout
The Eyes: Have It — Pages 38–39
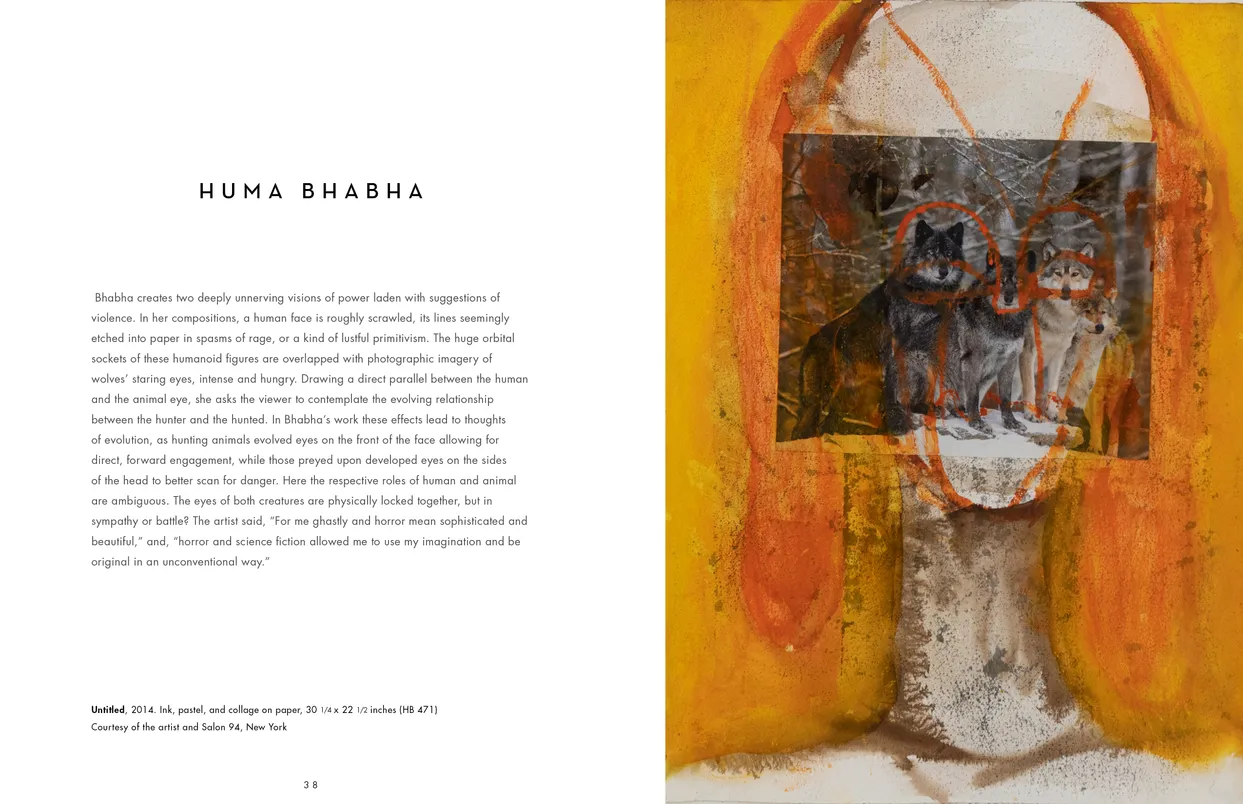
- The Eyes Have It exhibition catalog, pages 38-39
- Client: Lehman College Art Gallery
- Visit figure page
- Type: portfolio
- Portfolio Type: publication_design
- Portfolio Role: design_layout
The Eyes: Have It — Pages 4–5
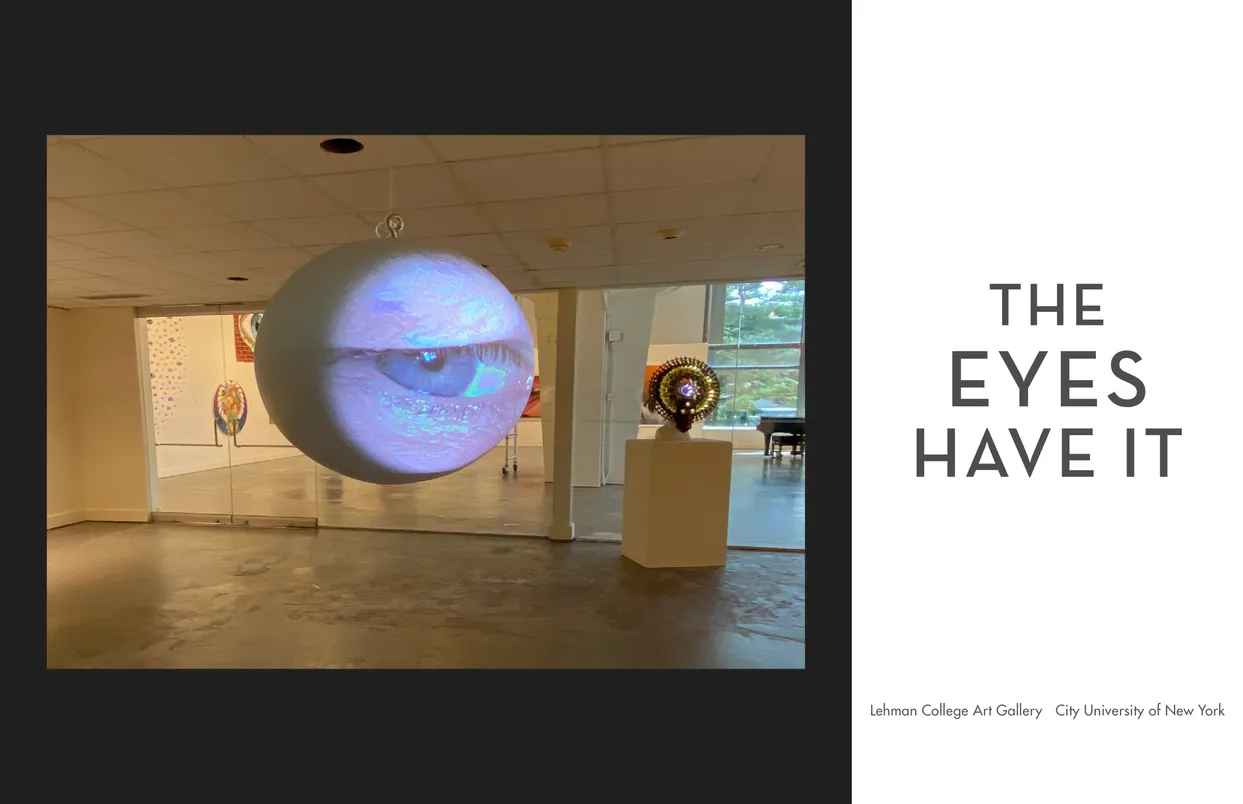
- The Eyes Have It exhibition catalog, pages 4-5
- Client: Lehman College Art Gallery
- Visit figure page
- Type: portfolio
- Portfolio Type: publication_design
- Portfolio Role: design_layout
The Eyes: Have It — Pages 40–41
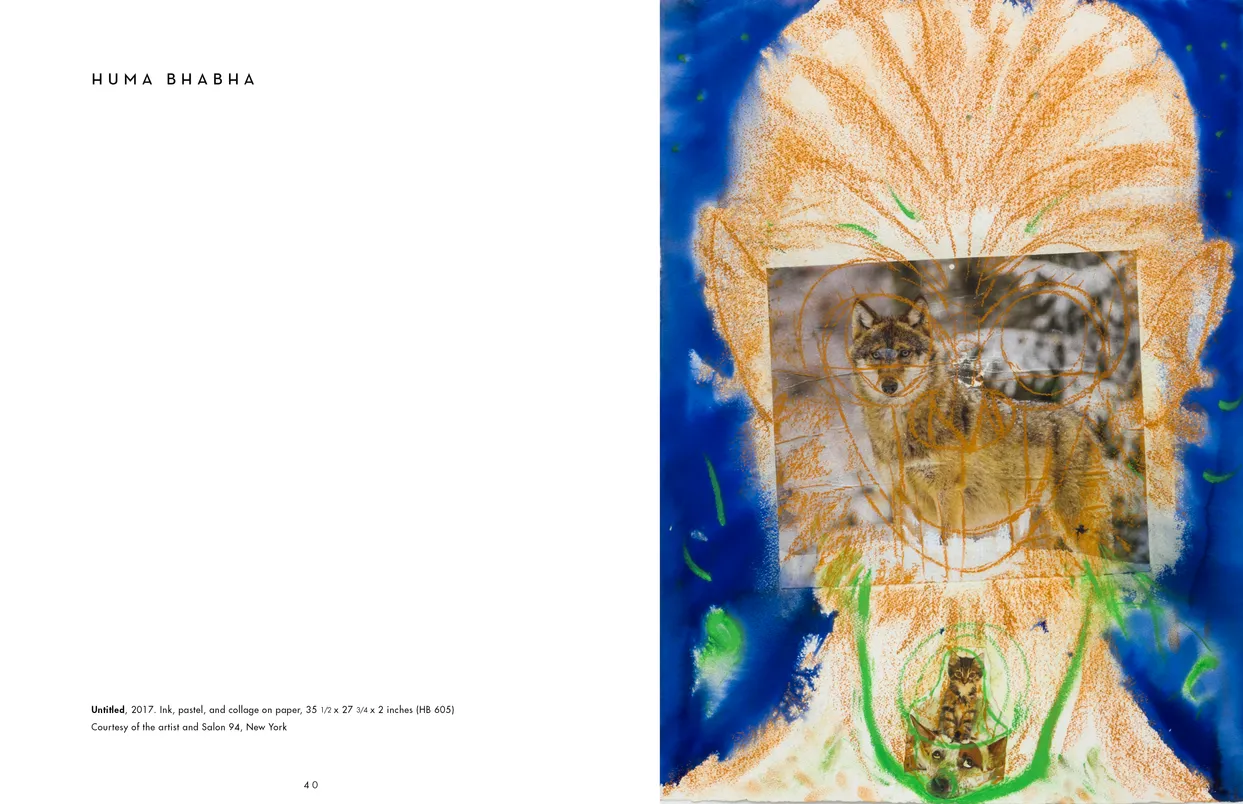
- The Eyes Have It exhibition catalog, pages 40-41
- Client: Lehman College Art Gallery
- Visit figure page
- Type: portfolio
- Portfolio Type: publication_design
- Portfolio Role: design_layout
The Eyes: Have It — Pages 42–43

- The Eyes Have It exhibition catalog, pages 42-43
- Client: Lehman College Art Gallery
- Visit figure page
- Type: portfolio
- Portfolio Type: publication_design
- Portfolio Role: design_layout
The Eyes: Have It — Pages 44–45
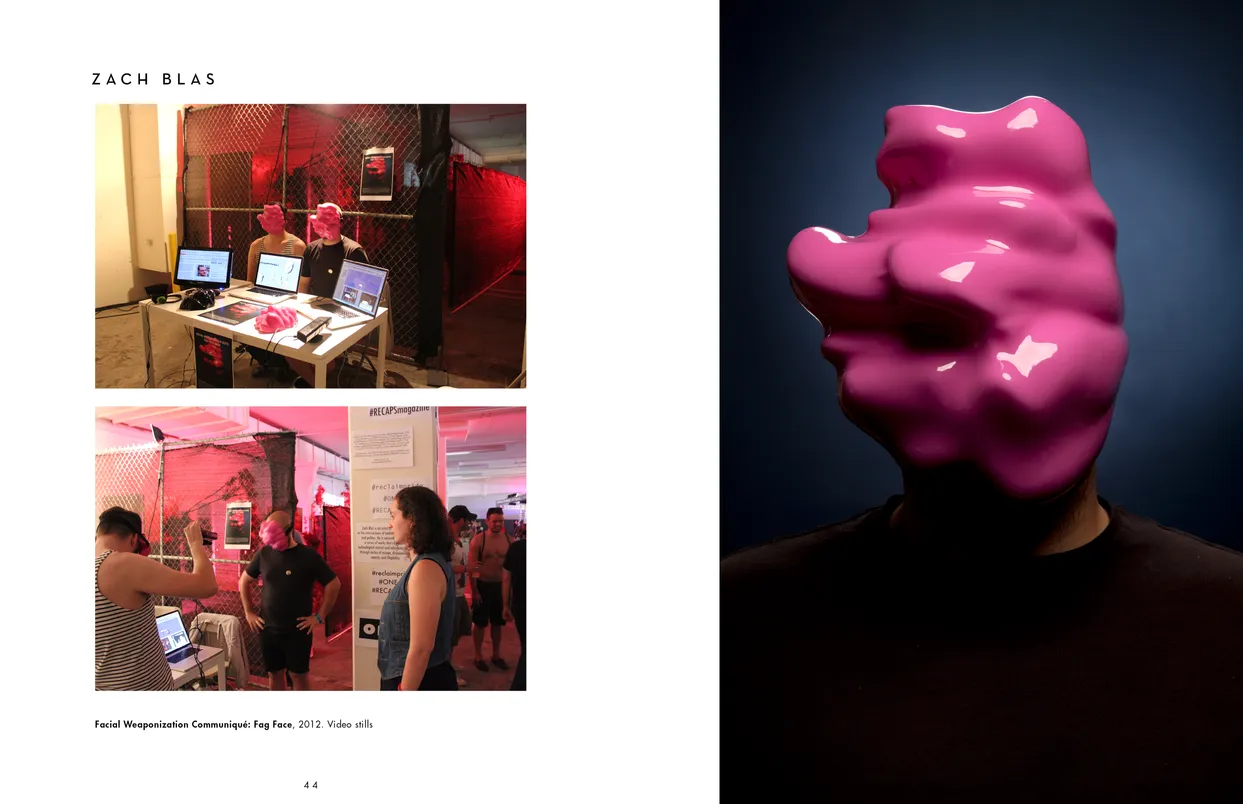
- The Eyes Have It exhibition catalog, pages 44-45
- Client: Lehman College Art Gallery
- Visit figure page
- Type: portfolio
- Portfolio Type: publication_design
- Portfolio Role: design_layout
The Eyes: Have It — Pages 46–47
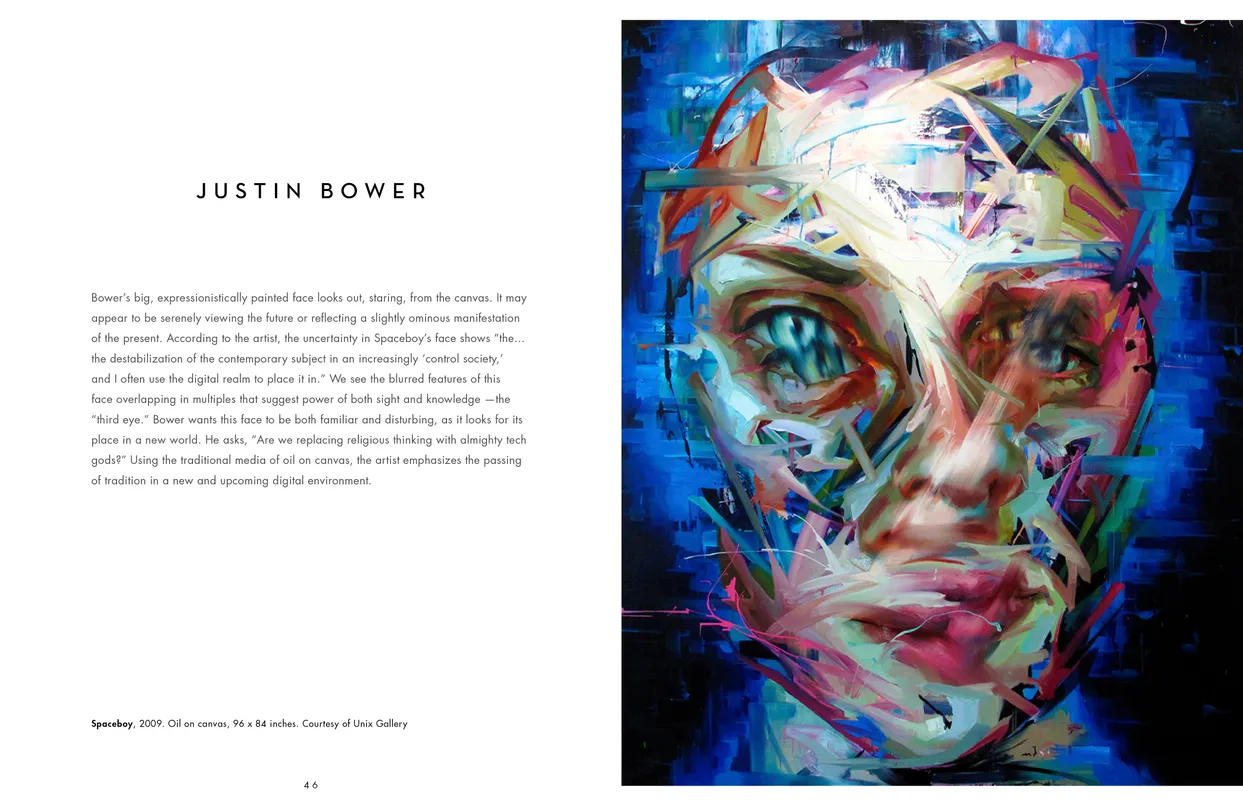
- The Eyes Have It exhibition catalog, pages 46-47
- Client: Lehman College Art Gallery
- Visit figure page
- Type: portfolio
- Portfolio Type: publication_design
- Portfolio Role: design_layout
The Eyes: Have It — Pages 48–49
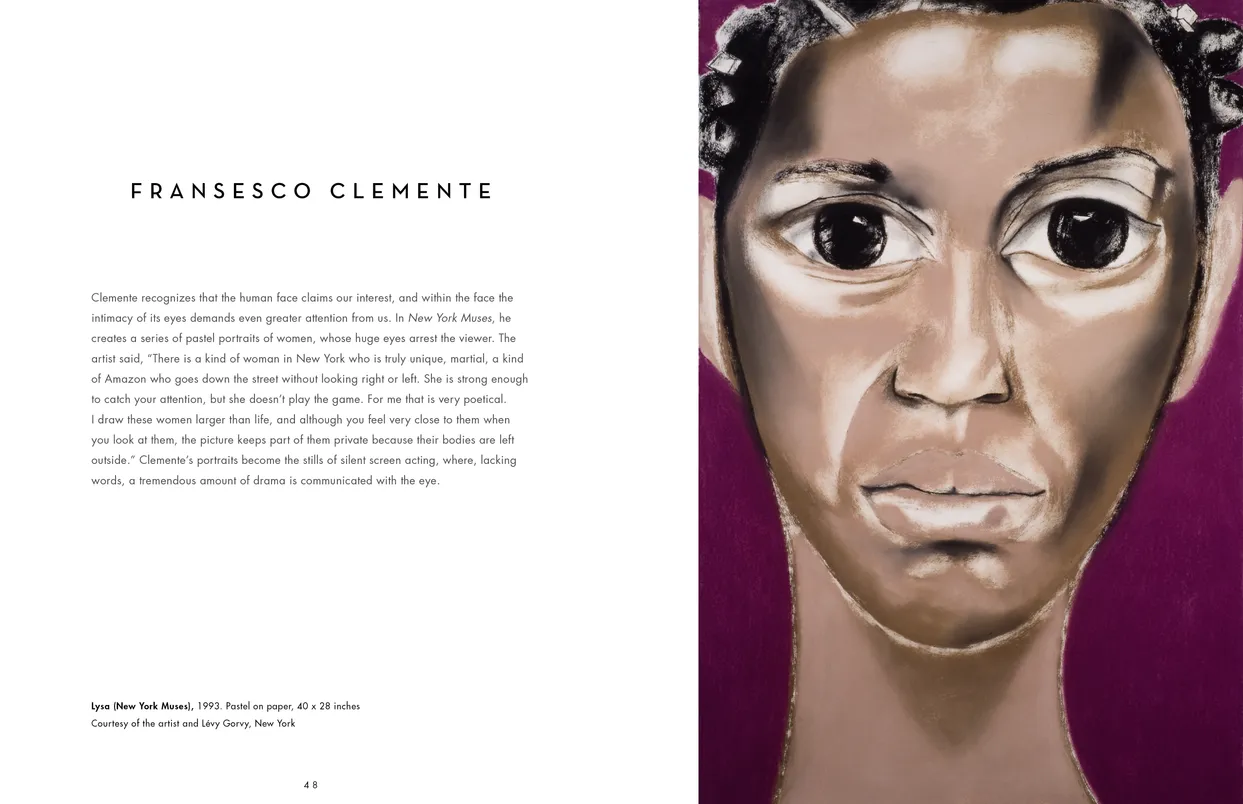
- The Eyes Have It exhibition catalog, pages 48-49
- Client: Lehman College Art Gallery
- Visit figure page
- Type: portfolio
- Portfolio Type: publication_design
- Portfolio Role: design_layout
The Eyes: Have It — Pages 50–51
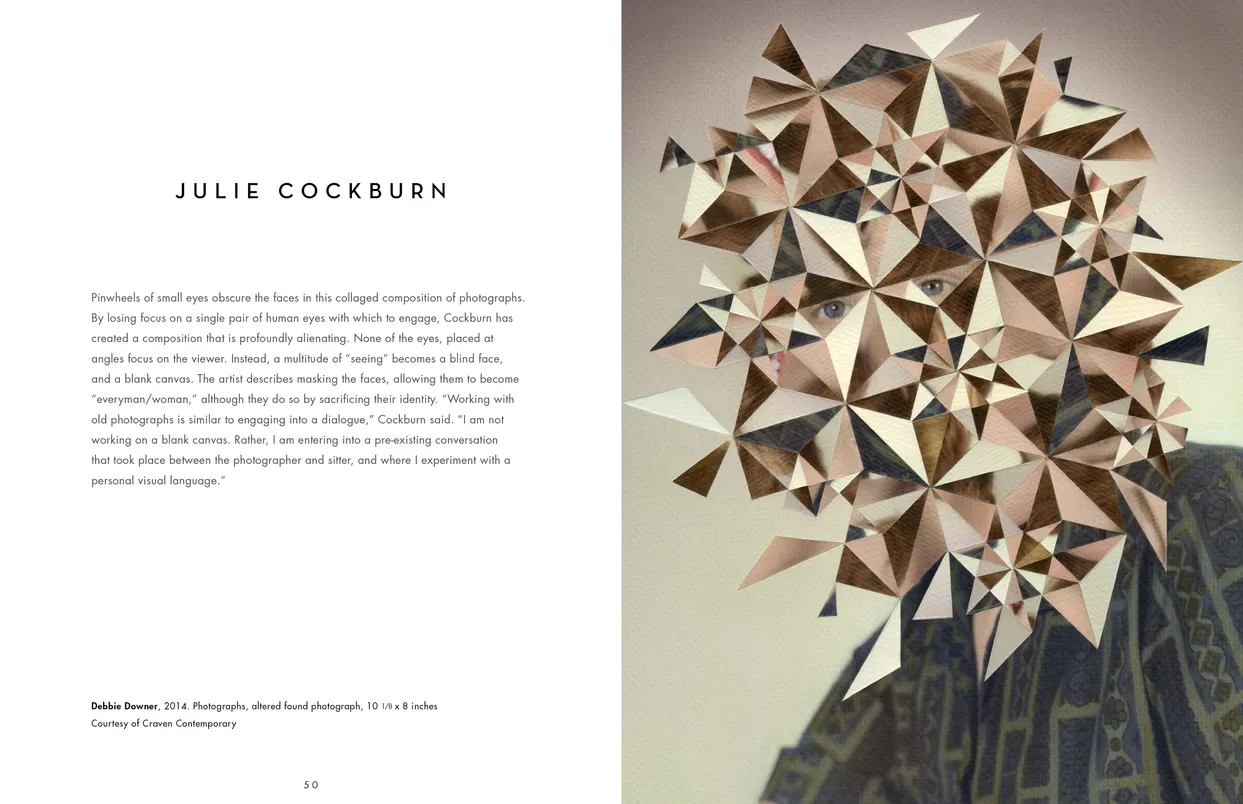
- The Eyes Have It exhibition catalog, pages 50-51
- Client: Lehman College Art Gallery
- Visit figure page
- Type: portfolio
- Portfolio Type: publication_design
- Portfolio Role: design_layout
The Eyes: Have It — Pages 52–53
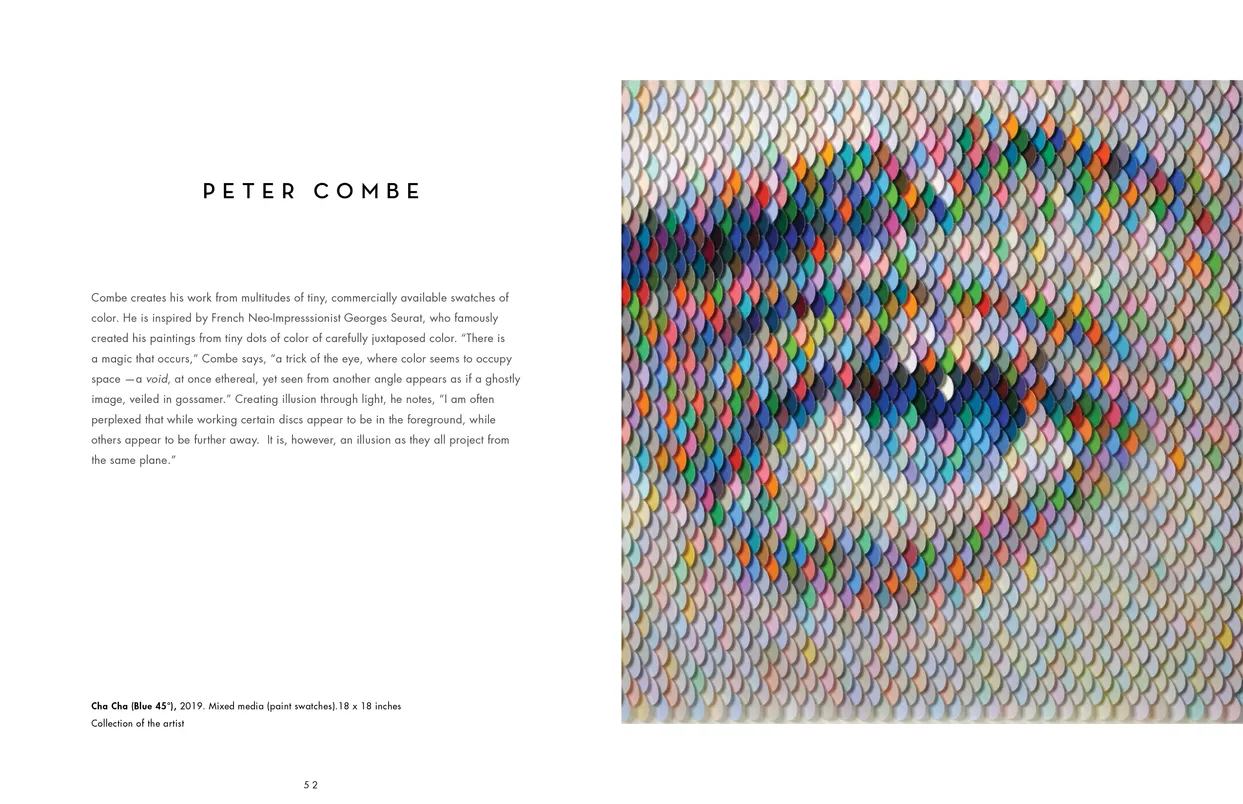
- The Eyes Have It exhibition catalog, pages 52-53
- Client: Lehman College Art Gallery
- Visit figure page
- Type: portfolio
- Portfolio Type: publication_design
- Portfolio Role: design_layout
The Eyes: Have It — Pages 54–55
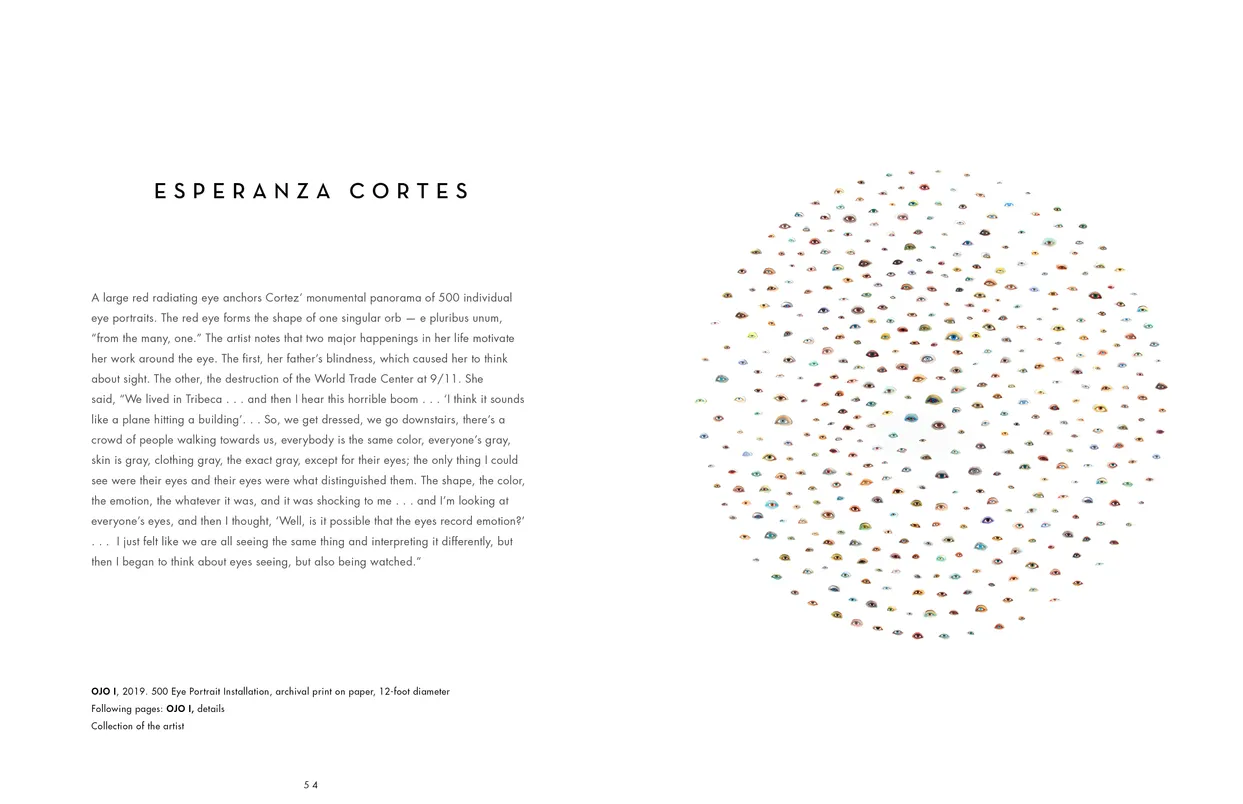
- The Eyes Have It exhibition catalog, pages 54-55
- Client: Lehman College Art Gallery
- Visit figure page
- Type: portfolio
- Portfolio Type: publication_design
- Portfolio Role: design_layout
The Eyes: Have It — Pages 56–57
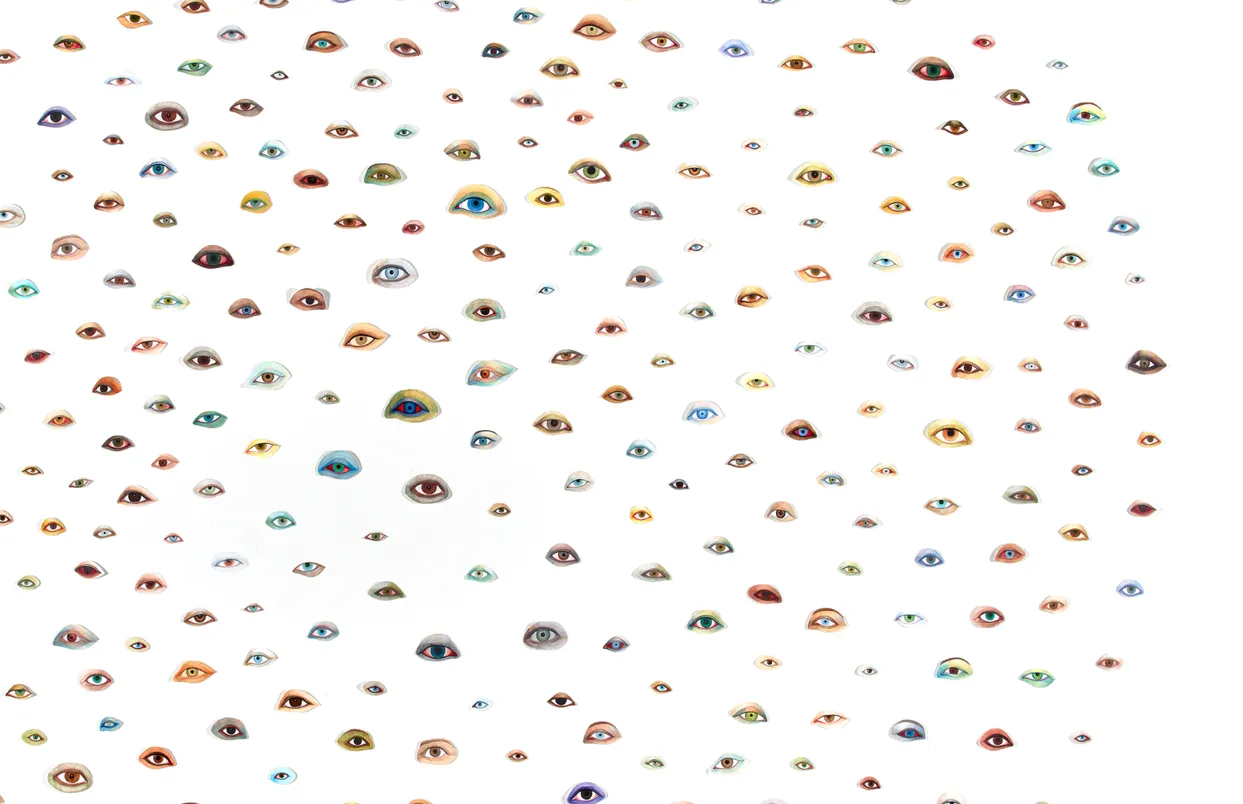
- The Eyes Have It exhibition catalog, pages 56-57
- Client: Lehman College Art Gallery
- Visit figure page
- Type: portfolio
- Portfolio Type: publication_design
- Portfolio Role: design_layout
The Eyes: Have It — Pages 58–59
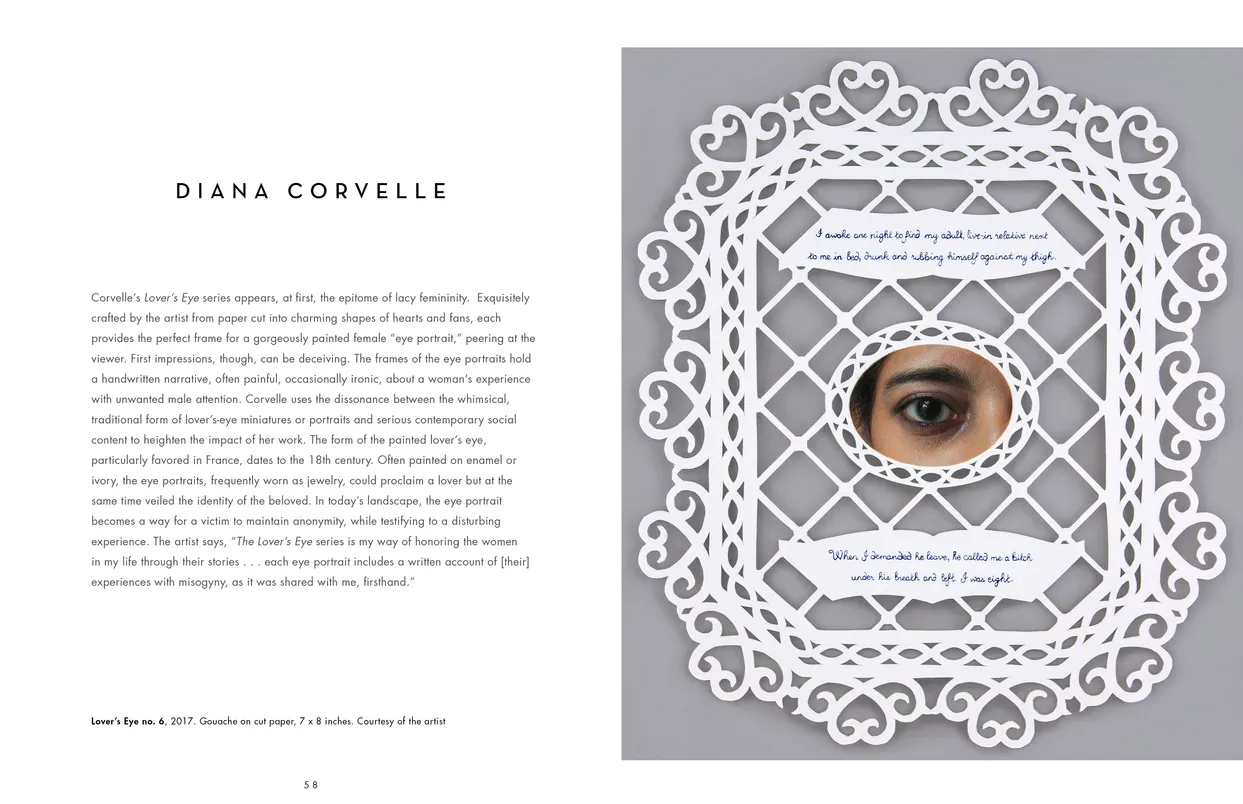
- The Eyes Have It exhibition catalog, pages 58-59
- Client: Lehman College Art Gallery
- Visit figure page
- Type: portfolio
- Portfolio Type: publication_design
- Portfolio Role: design_layout
The Eyes: Have It — Pages 6–7
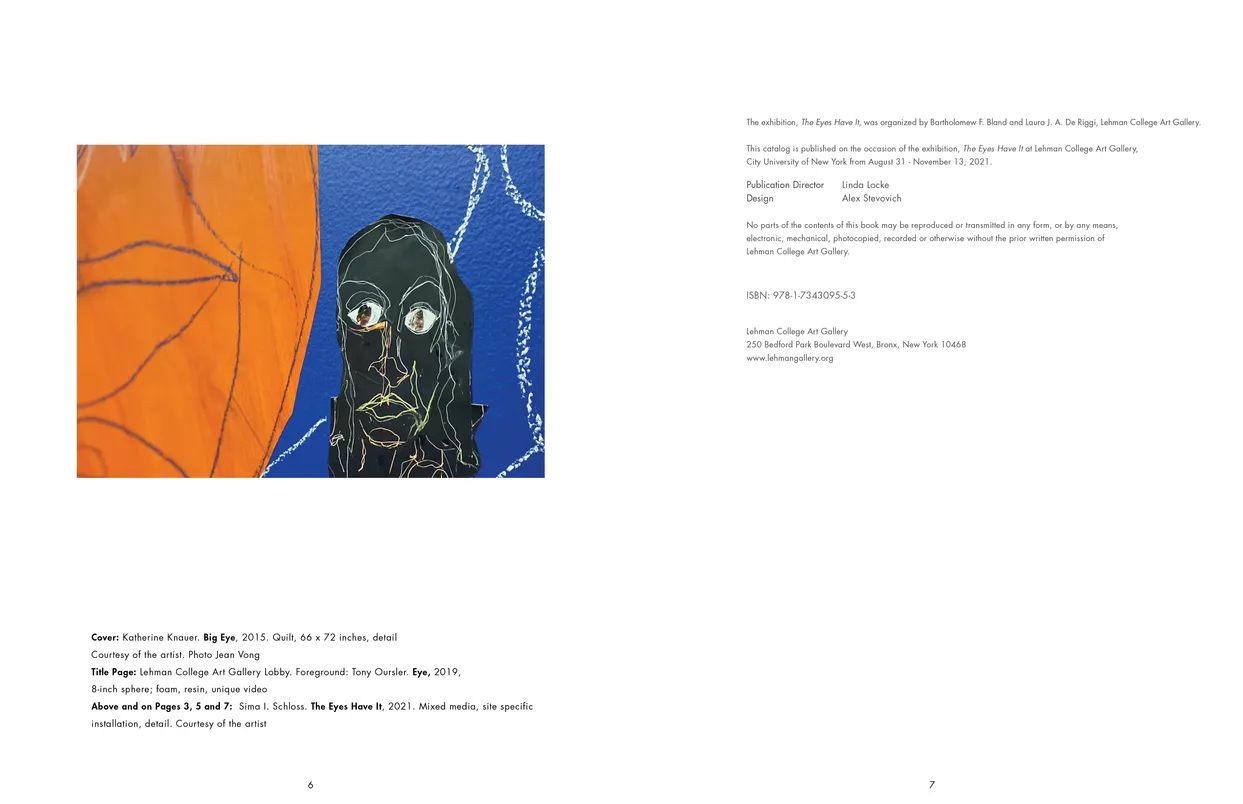
- The Eyes Have It exhibition catalog, pages 6-7
- Client: Lehman College Art Gallery
- Visit figure page
- Type: portfolio
- Portfolio Type: publication_design
- Portfolio Role: design_layout
The Eyes: Have It — Pages 60–61
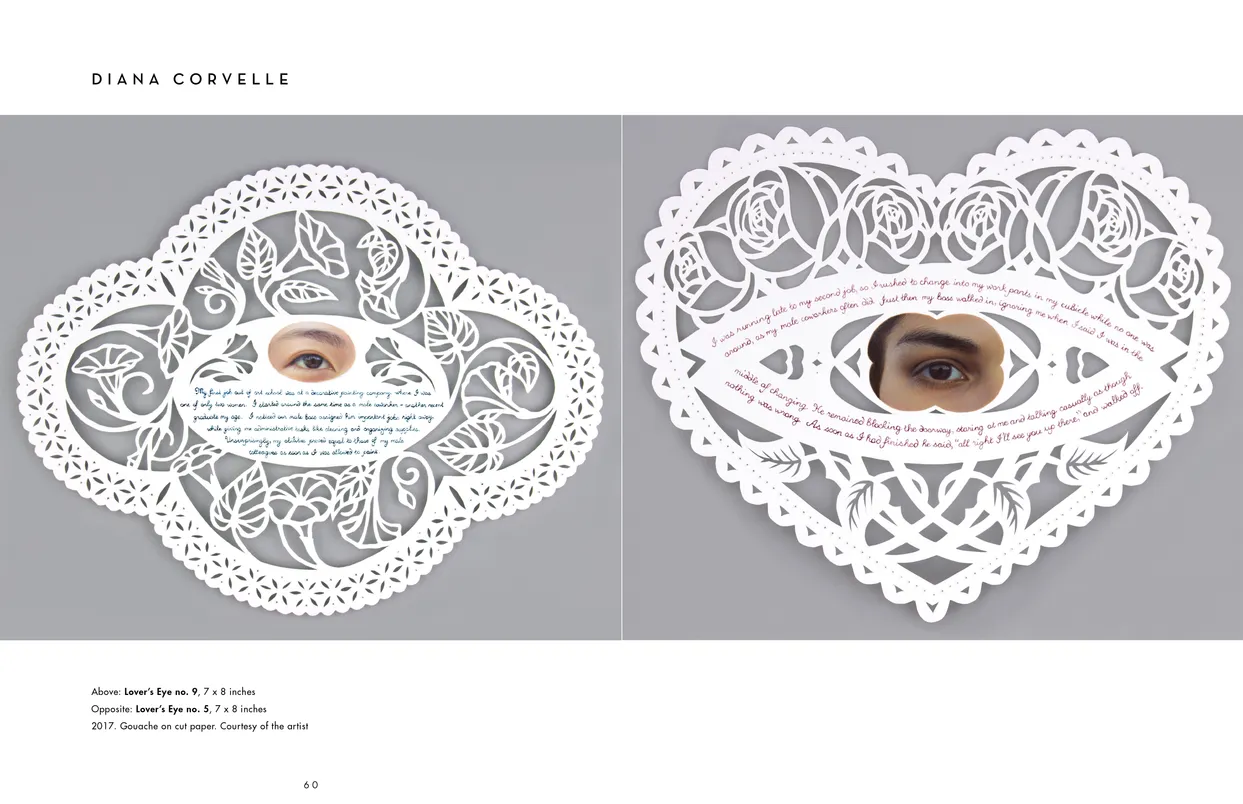
- The Eyes Have It exhibition catalog, pages 60-61
- Client: Lehman College Art Gallery
- Visit figure page
- Type: portfolio
- Portfolio Type: publication_design
- Portfolio Role: design_layout
The Eyes: Have It — Pages 62–63
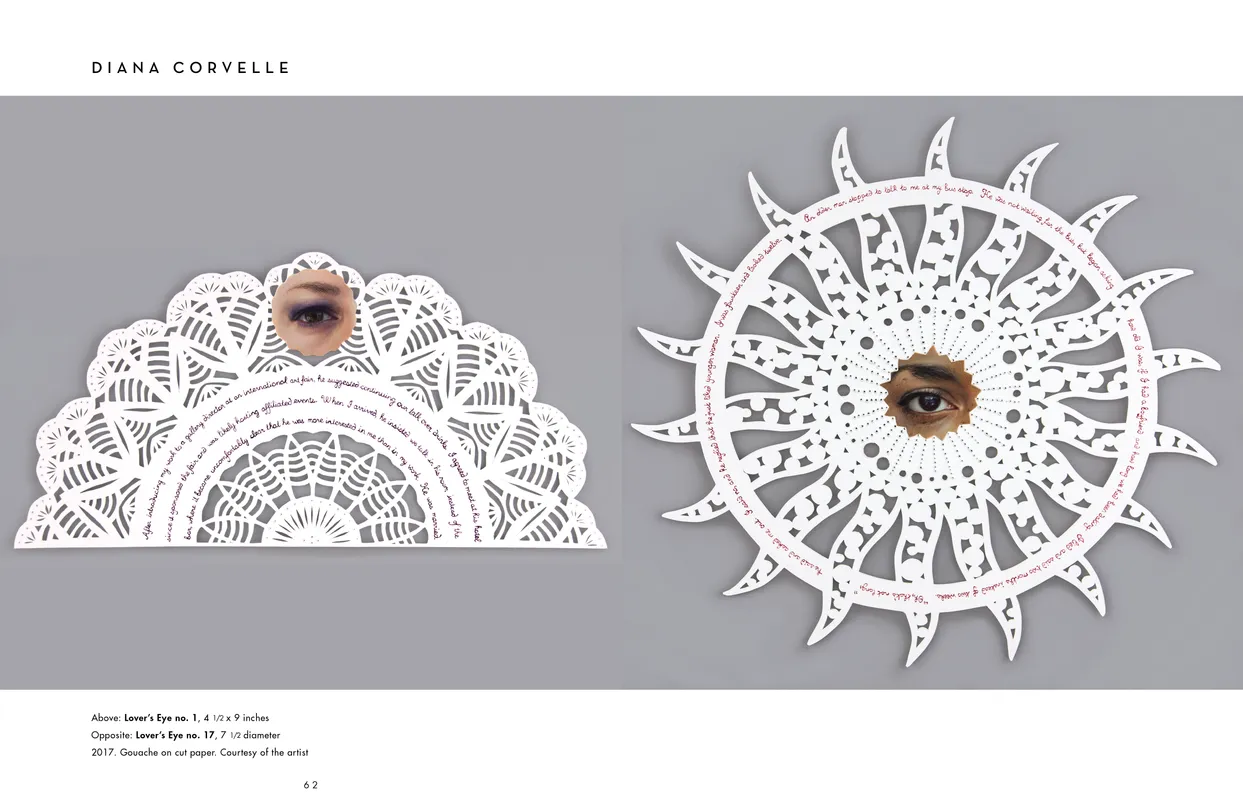
- The Eyes Have It exhibition catalog, pages 62-63
- Client: Lehman College Art Gallery
- Visit figure page
- Type: portfolio
- Portfolio Type: publication_design
- Portfolio Role: design_layout
The Eyes: Have It — Pages 64–65
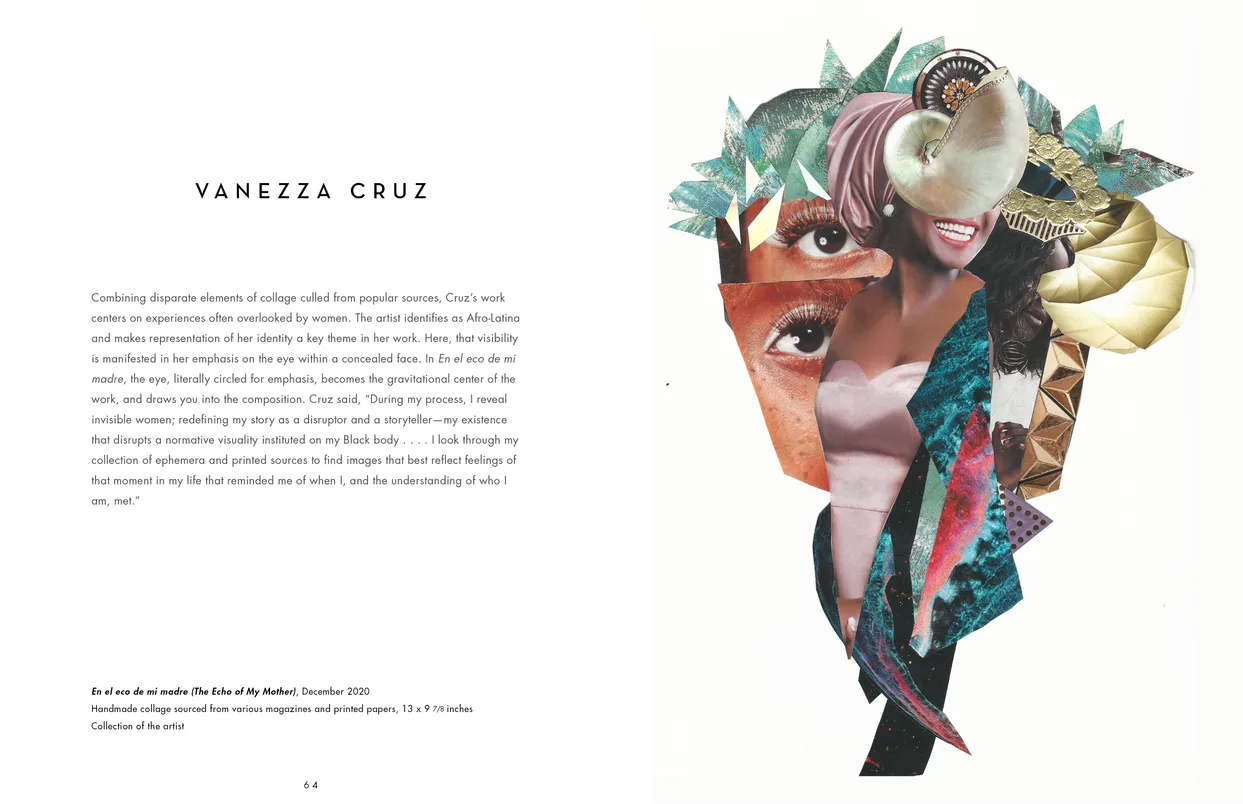
- The Eyes Have It exhibition catalog, pages 64-65
- Client: Lehman College Art Gallery
- Visit figure page
- Type: portfolio
- Portfolio Type: publication_design
- Portfolio Role: design_layout
The Eyes: Have It — Pages 66–67
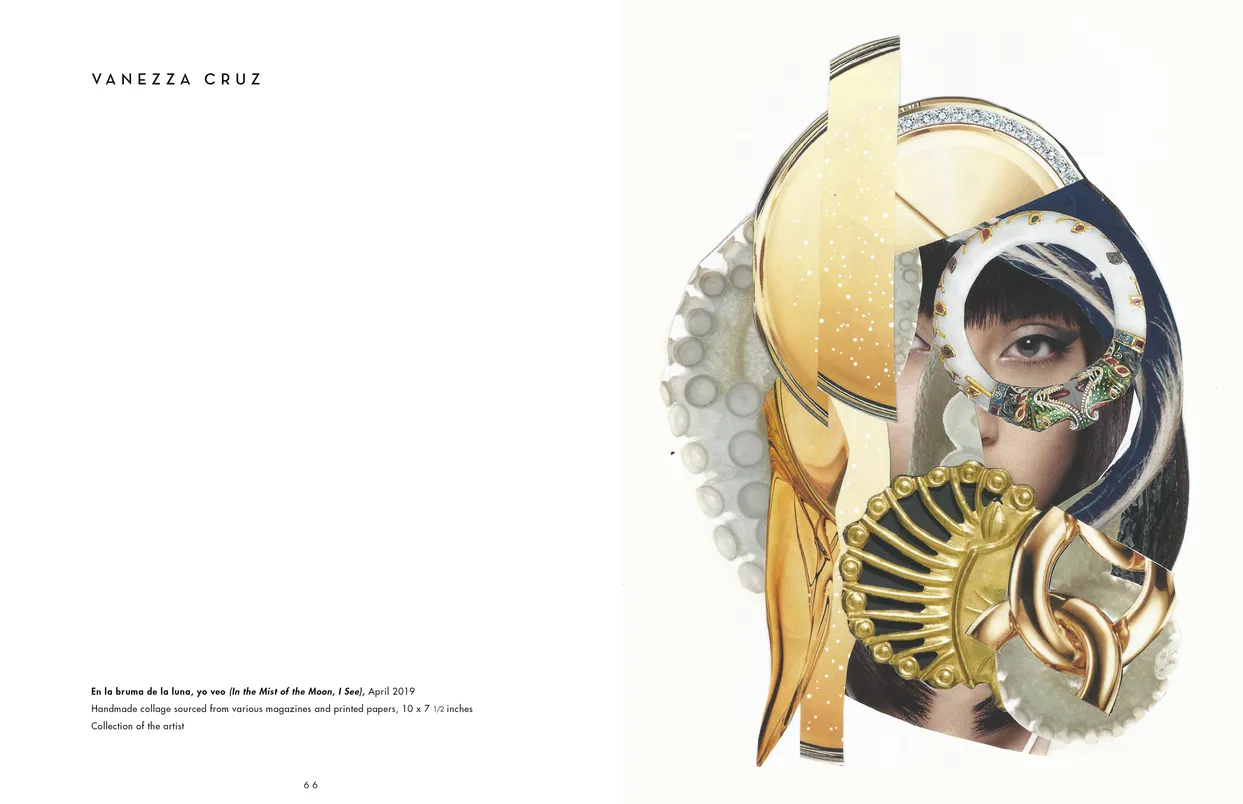
- The Eyes Have It exhibition catalog, pages 66-67
- Client: Lehman College Art Gallery
- Visit figure page
- Type: portfolio
- Portfolio Type: publication_design
- Portfolio Role: design_layout
The Eyes: Have It — Pages 68–69
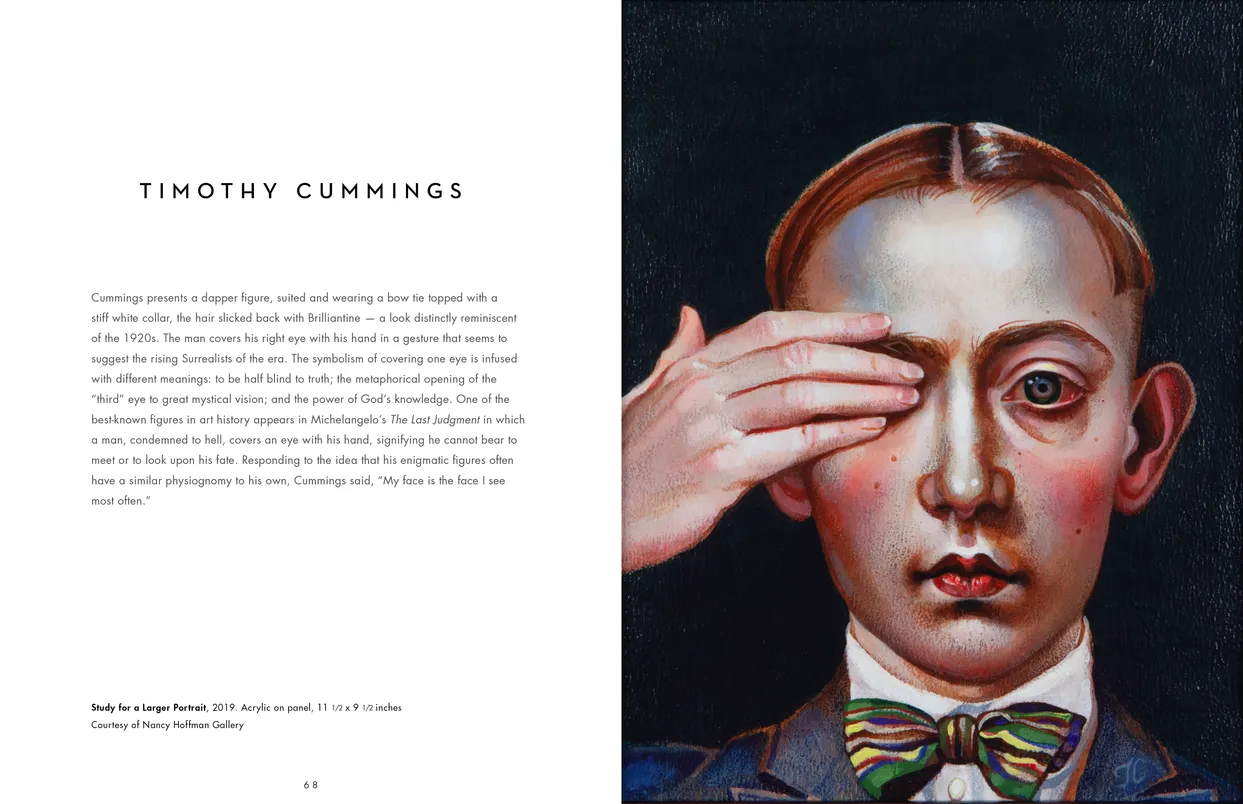
- The Eyes Have It exhibition catalog, pages 68-69
- Client: Lehman College Art Gallery
- Visit figure page
- Type: portfolio
- Portfolio Type: publication_design
- Portfolio Role: design_layout
The Eyes: Have It — Pages 70–71
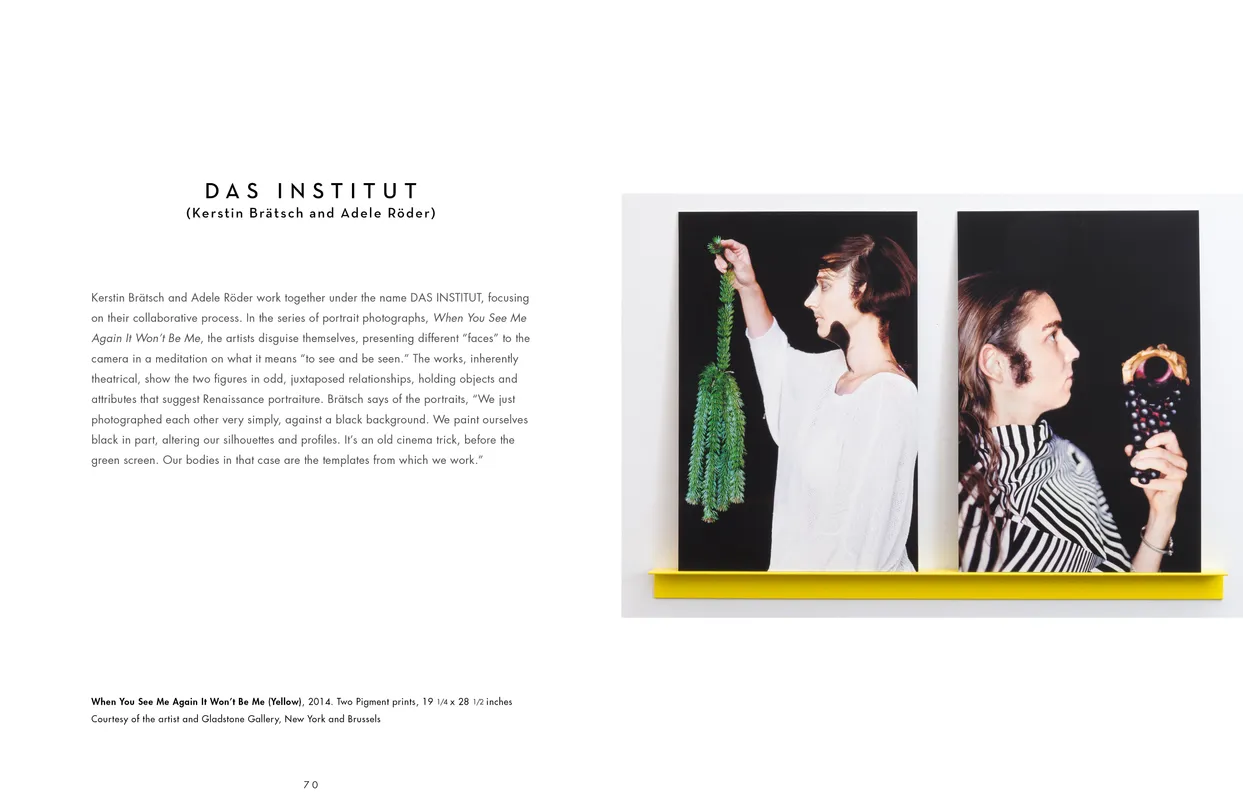
- The Eyes Have It exhibition catalog, pages 70-71
- Client: Lehman College Art Gallery
- Visit figure page
- Type: portfolio
- Portfolio Type: publication_design
- Portfolio Role: design_layout
The Eyes: Have It — Pages 72–73
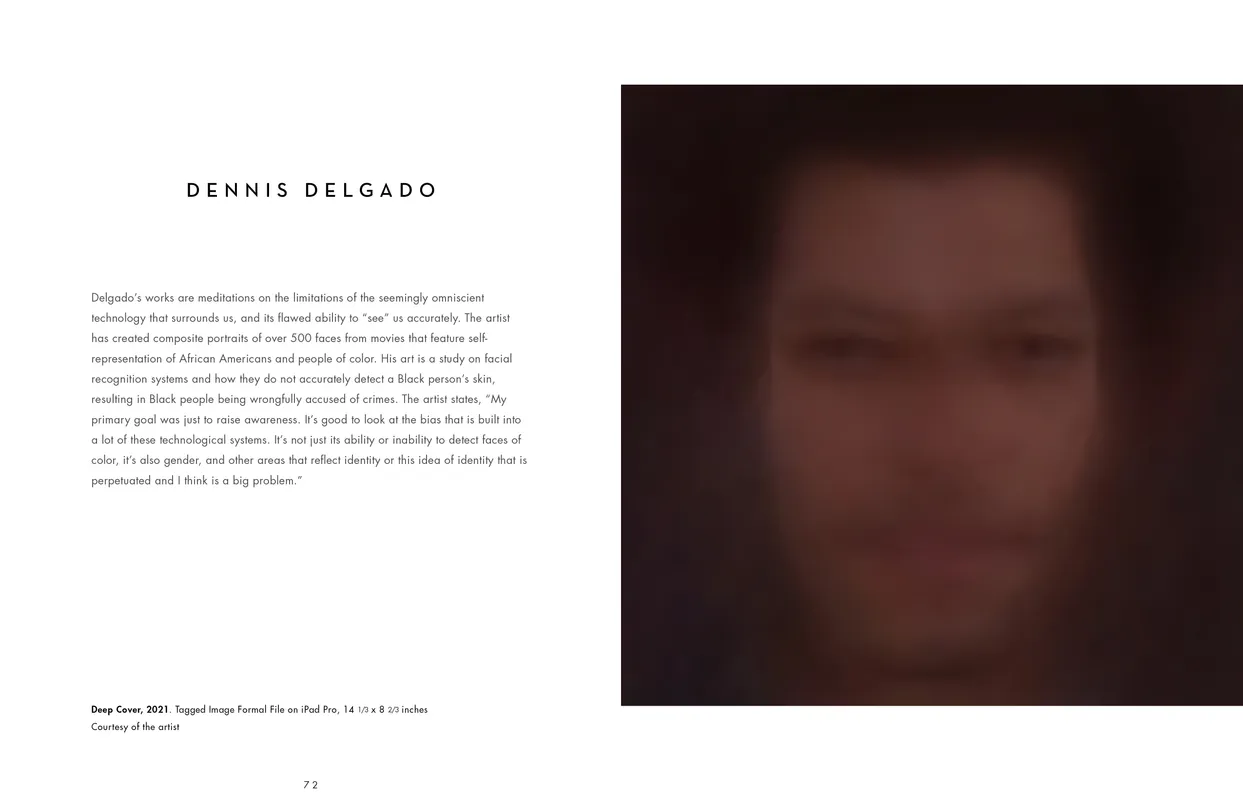
- The Eyes Have It exhibition catalog, pages 72-73
- Client: Lehman College Art Gallery
- Visit figure page
- Type: portfolio
- Portfolio Type: publication_design
- Portfolio Role: design_layout
The Eyes: Have It — Pages 74–75

- The Eyes Have It exhibition catalog, pages 74-75
- Client: Lehman College Art Gallery
- Visit figure page
- Type: portfolio
- Portfolio Type: publication_design
- Portfolio Role: design_layout
The Eyes: Have It — Pages 76–77
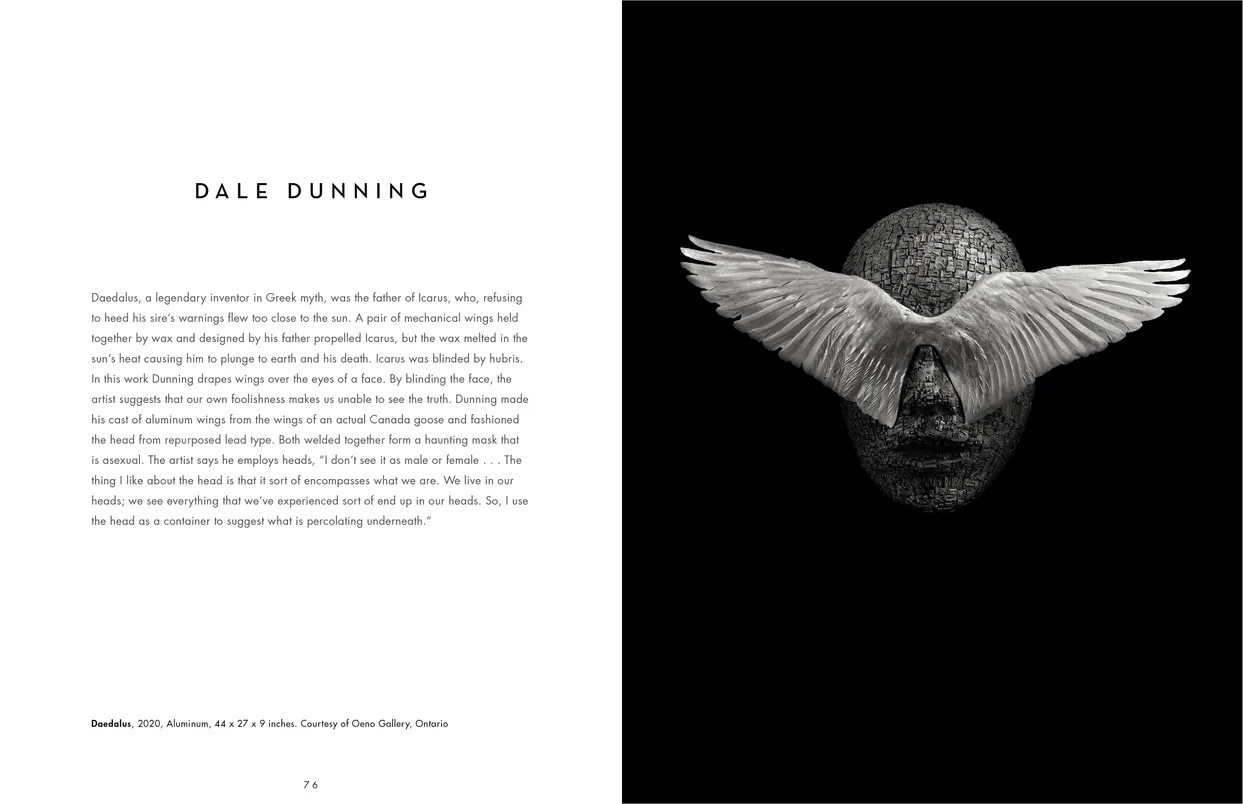
- The Eyes Have It exhibition catalog, pages 76-77
- Client: Lehman College Art Gallery
- Visit figure page
- Type: portfolio
- Portfolio Type: publication_design
- Portfolio Role: design_layout
The Eyes: Have It — Pages 78–79

- The Eyes Have It exhibition catalog, pages 78-79
- Client: Lehman College Art Gallery
- Visit figure page
- Type: portfolio
- Portfolio Type: publication_design
- Portfolio Role: design_layout
The Eyes: Have It — Pages 8–9
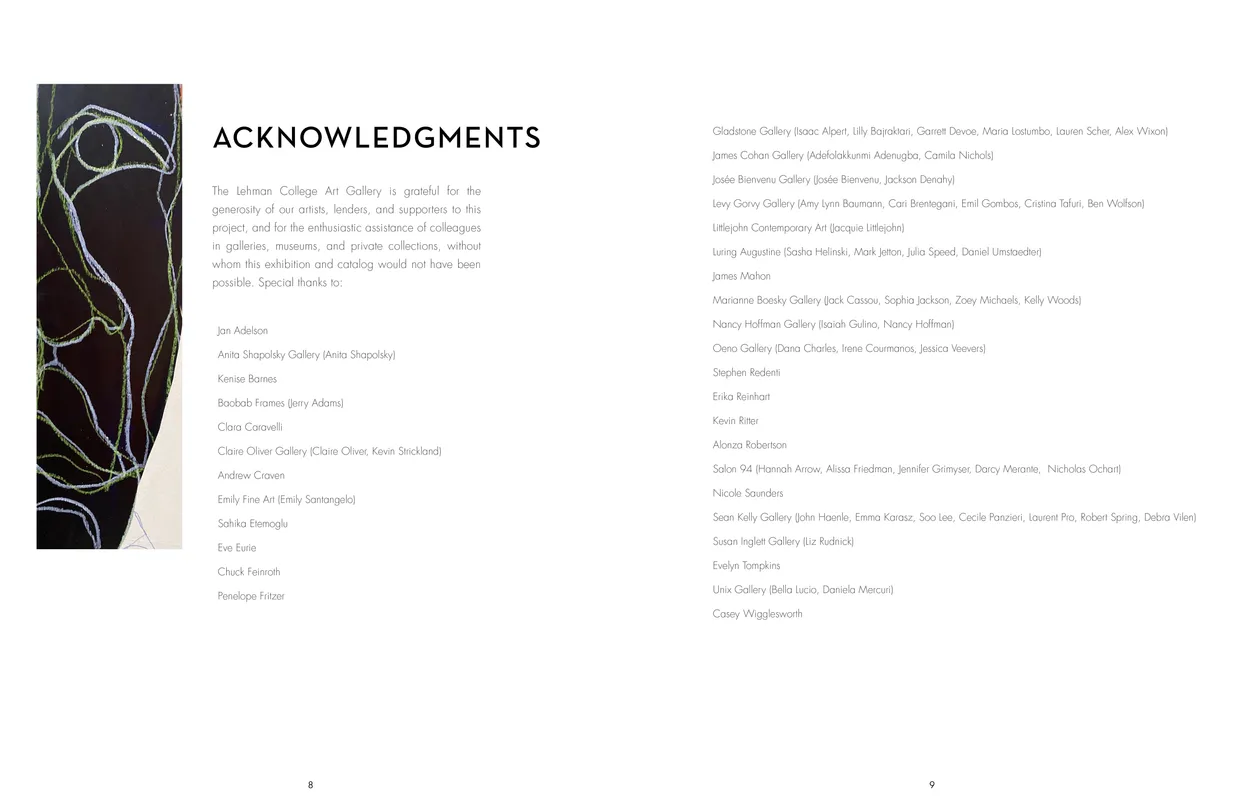
- The Eyes Have It exhibition catalog, pages 8-9
- Client: Lehman College Art Gallery
- Visit figure page
- Type: portfolio
- Portfolio Type: publication_design
- Portfolio Role: design_layout
The Eyes: Have It — Pages 80–81

- The Eyes Have It exhibition catalog, pages 80-81
- Client: Lehman College Art Gallery
- Visit figure page
- Type: portfolio
- Portfolio Type: publication_design
- Portfolio Role: design_layout
The Eyes: Have It — Pages 82–83
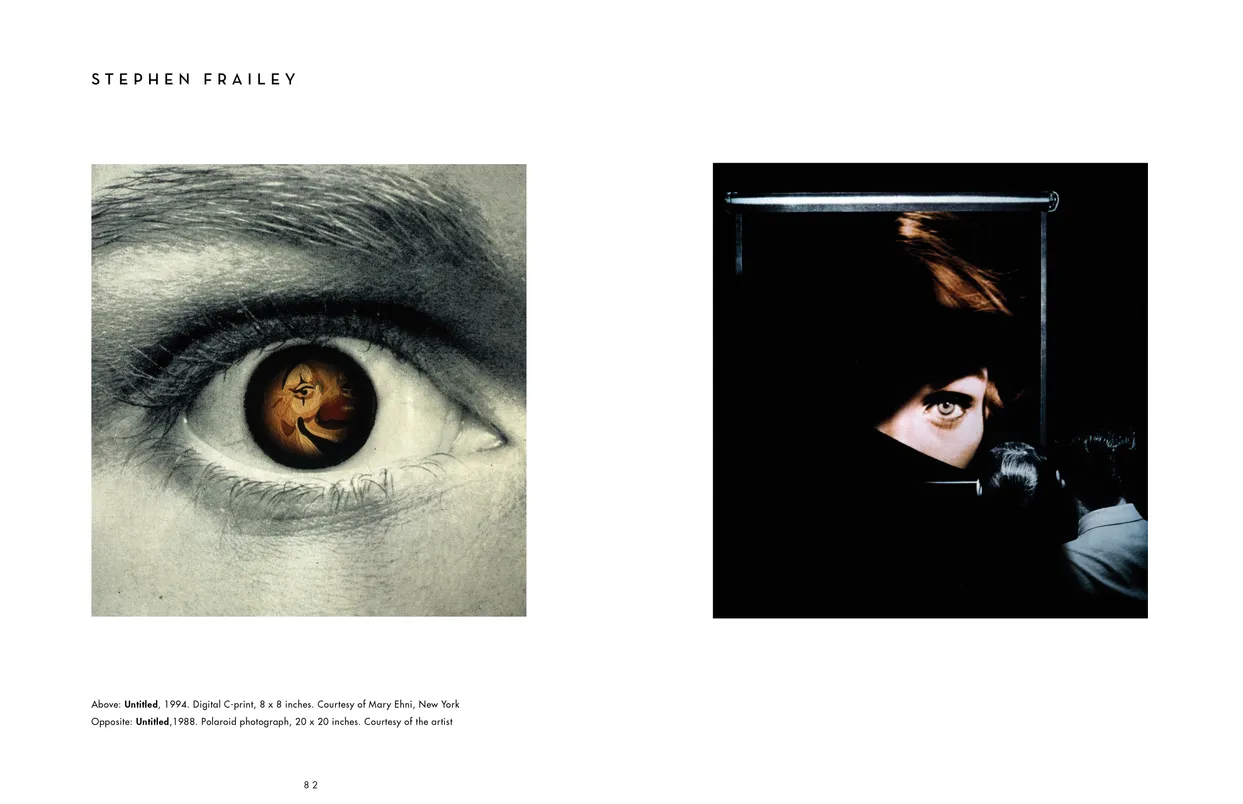
- The Eyes Have It exhibition catalog, pages 82-83
- Client: Lehman College Art Gallery
- Visit figure page
- Type: portfolio
- Portfolio Type: publication_design
- Portfolio Role: design_layout
The Eyes: Have It — Pages 84–85
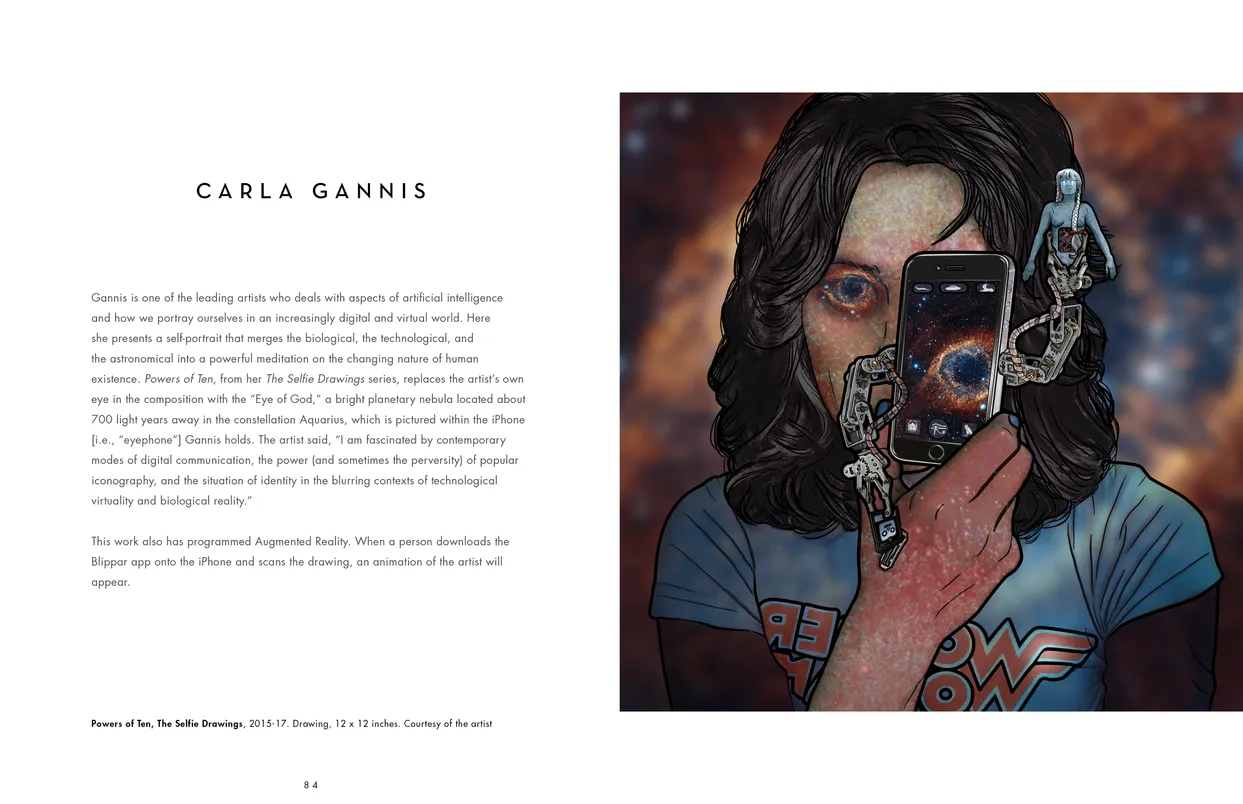
- The Eyes Have It exhibition catalog, pages 84-85
- Client: Lehman College Art Gallery
- Visit figure page
- Type: portfolio
- Portfolio Type: publication_design
- Portfolio Role: design_layout
The Eyes: Have It — Pages 86–87

- The Eyes Have It exhibition catalog, pages 86-87
- Client: Lehman College Art Gallery
- Visit figure page
- Type: portfolio
- Portfolio Type: publication_design
- Portfolio Role: design_layout
The Eyes: Have It — Pages 88–89
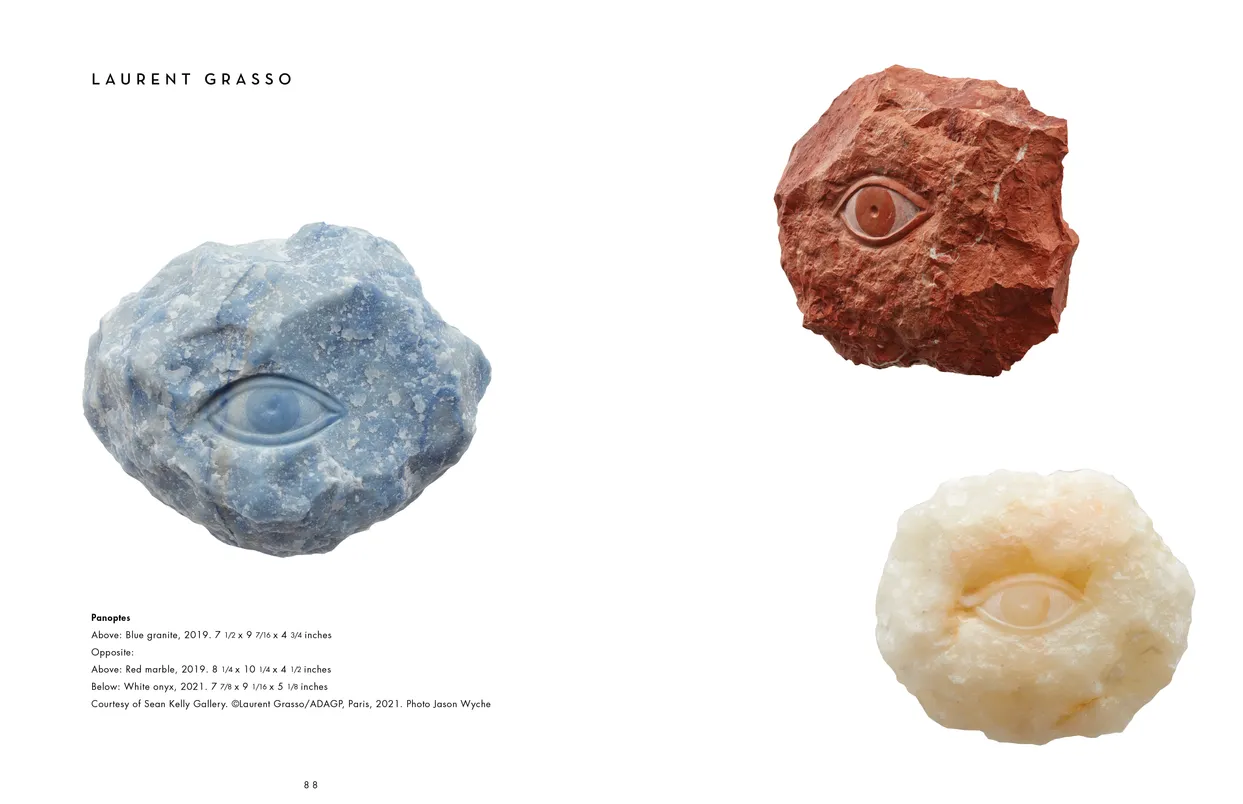
- The Eyes Have It exhibition catalog, pages 88-89
- Client: Lehman College Art Gallery
- Visit figure page
- Type: portfolio
- Portfolio Type: publication_design
- Portfolio Role: design_layout
The Eyes: Have It — Pages 90–91
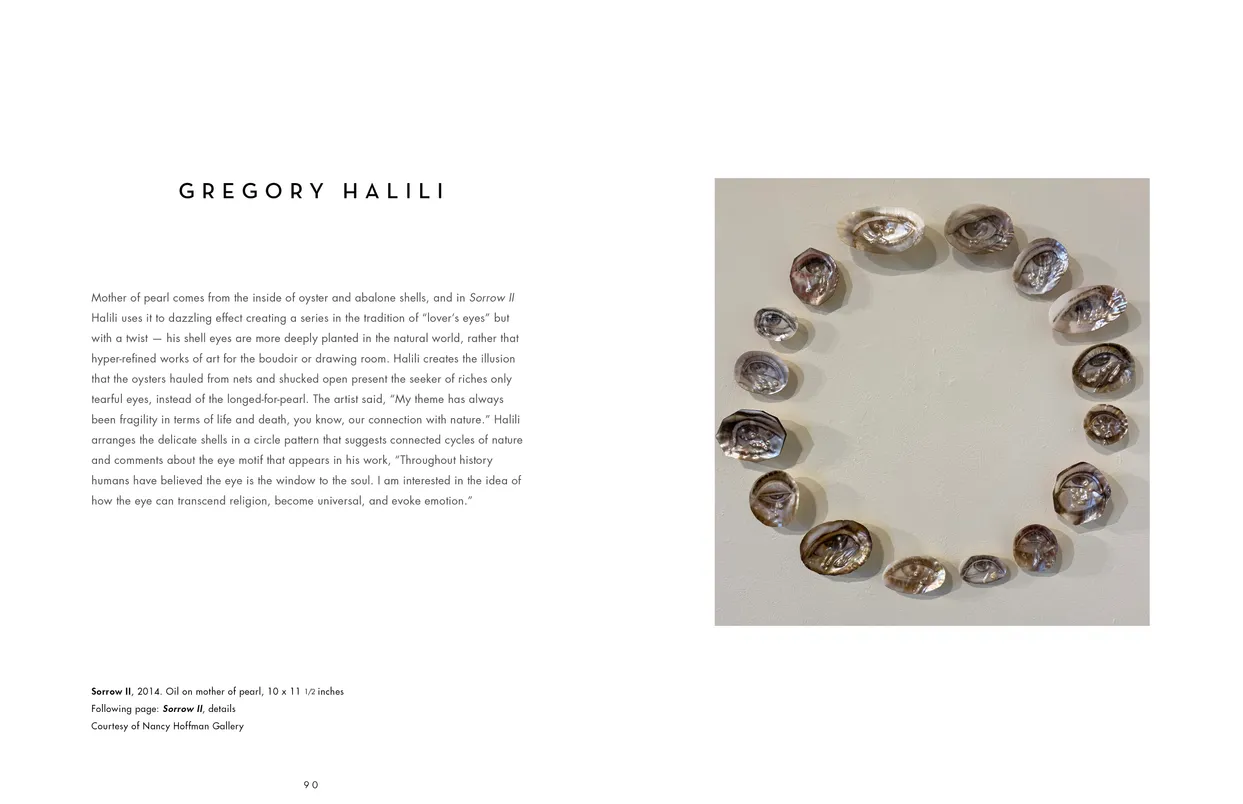
- The Eyes Have It exhibition catalog, pages 90-91
- Client: Lehman College Art Gallery
- Visit figure page
- Type: portfolio
- Portfolio Type: publication_design
- Portfolio Role: design_layout
The Eyes: Have It — Pages 92–93
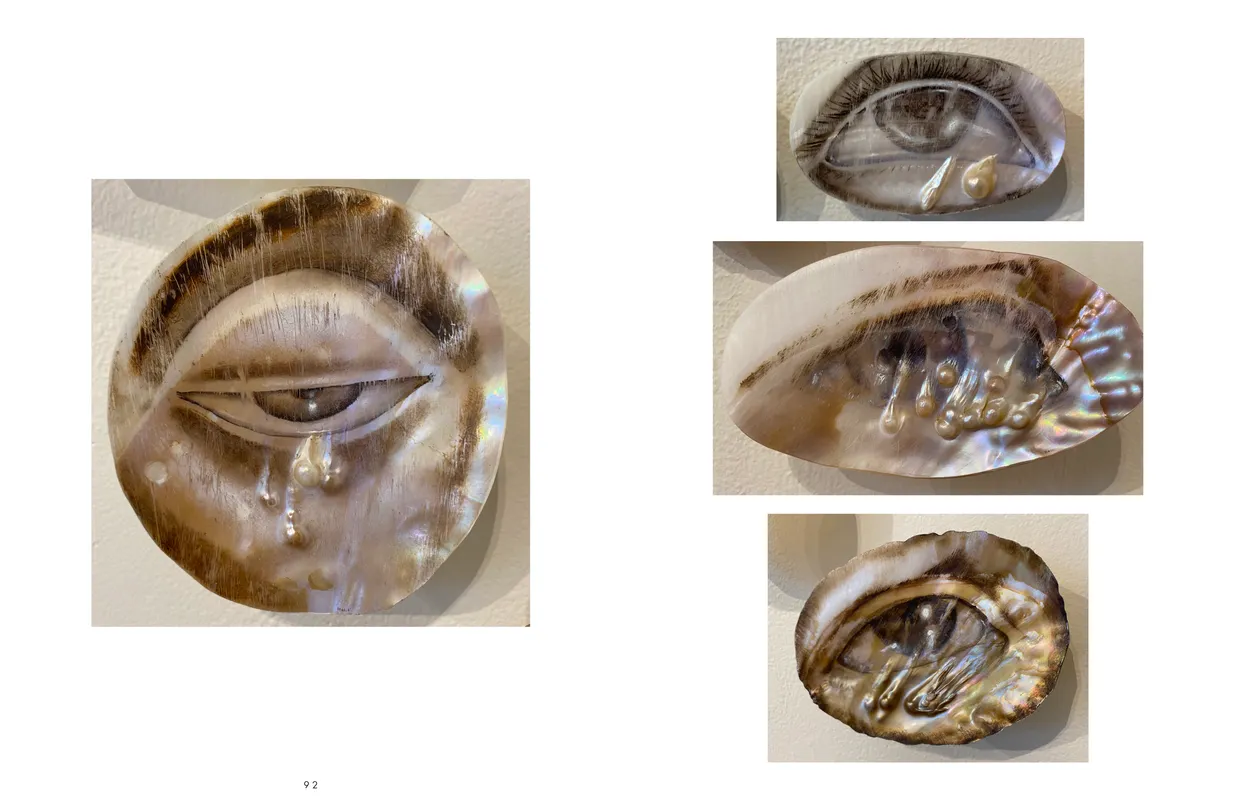
- The Eyes Have It exhibition catalog, pages 92-93
- Client: Lehman College Art Gallery
- Visit figure page
- Type: portfolio
- Portfolio Type: publication_design
- Portfolio Role: design_layout
The Eyes: Have It — Pages 94–95
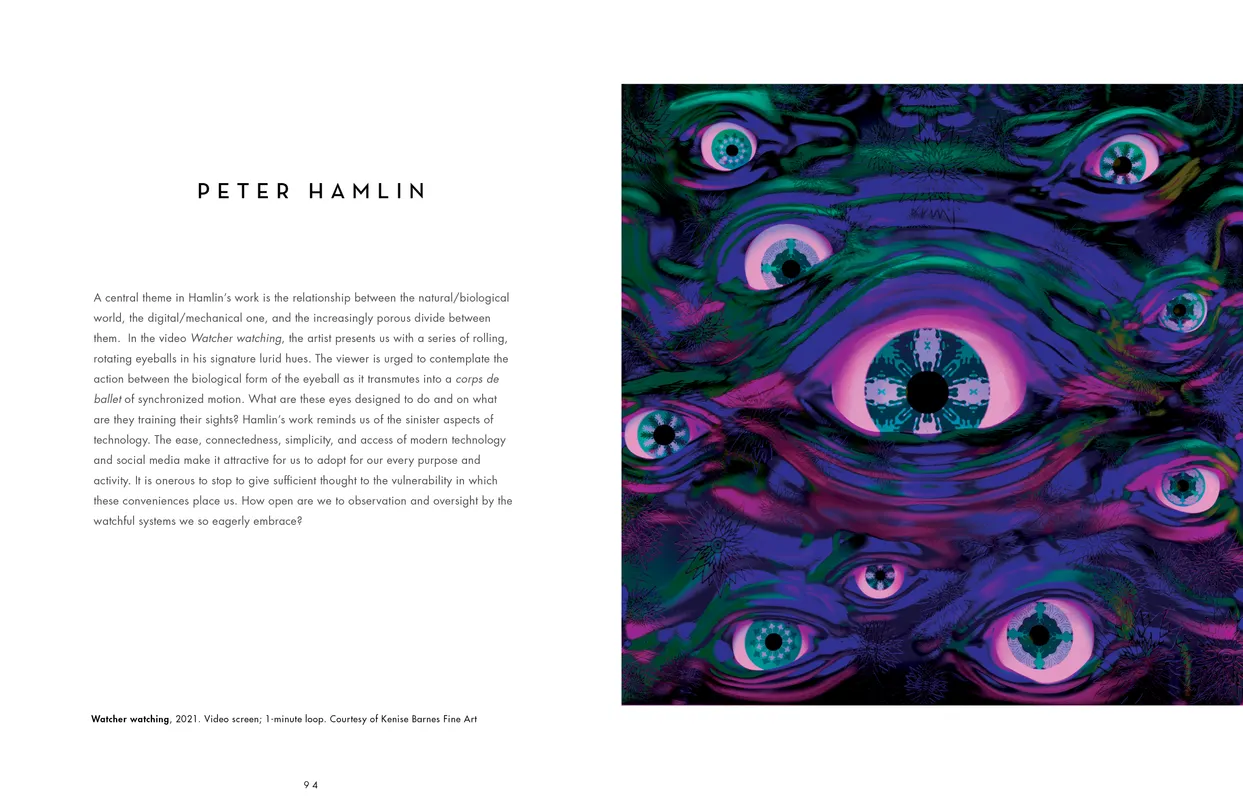
- The Eyes Have It exhibition catalog, pages 94-95
- Client: Lehman College Art Gallery
- Visit figure page
- Type: portfolio
- Portfolio Type: publication_design
- Portfolio Role: design_layout
The Eyes: Have It — Pages 96–97
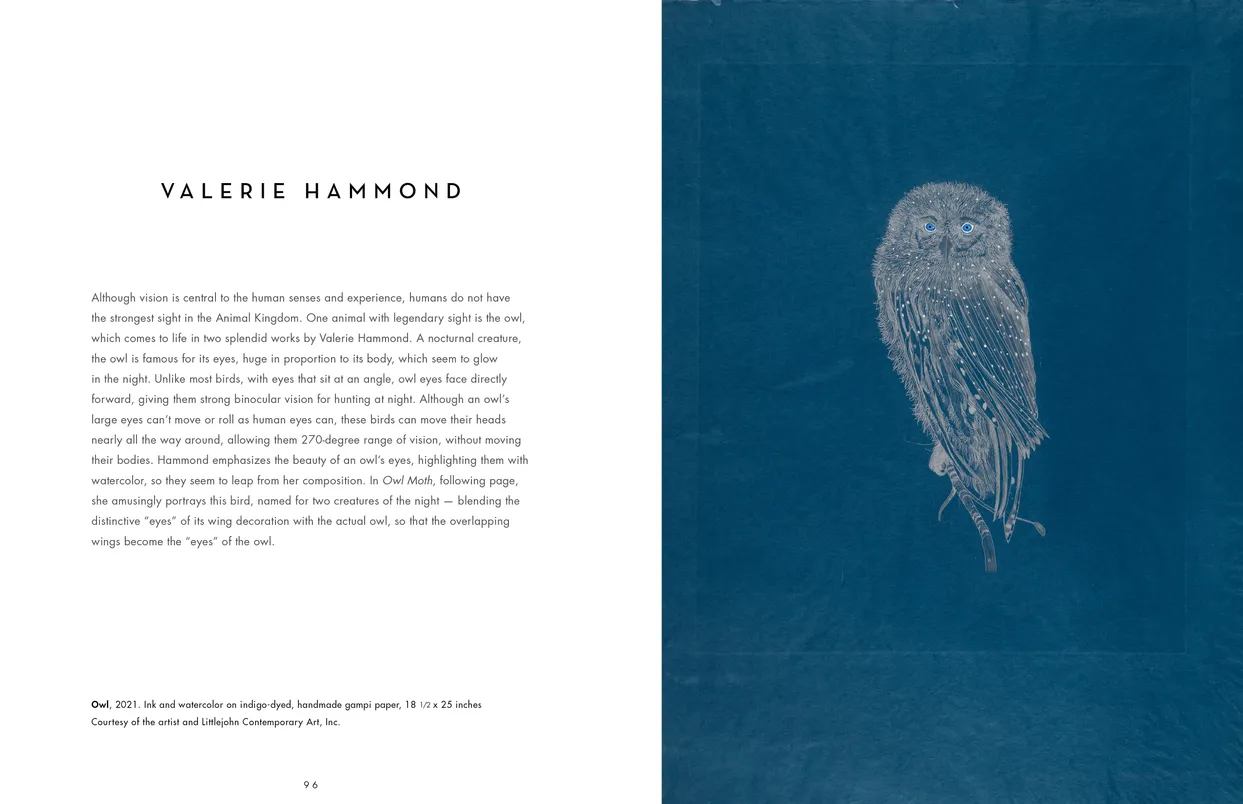
- The Eyes Have It exhibition catalog, pages 96-97
- Client: Lehman College Art Gallery
- Visit figure page
- Type: portfolio
- Portfolio Type: publication_design
- Portfolio Role: design_layout
The Eyes: Have It — Pages 98–99
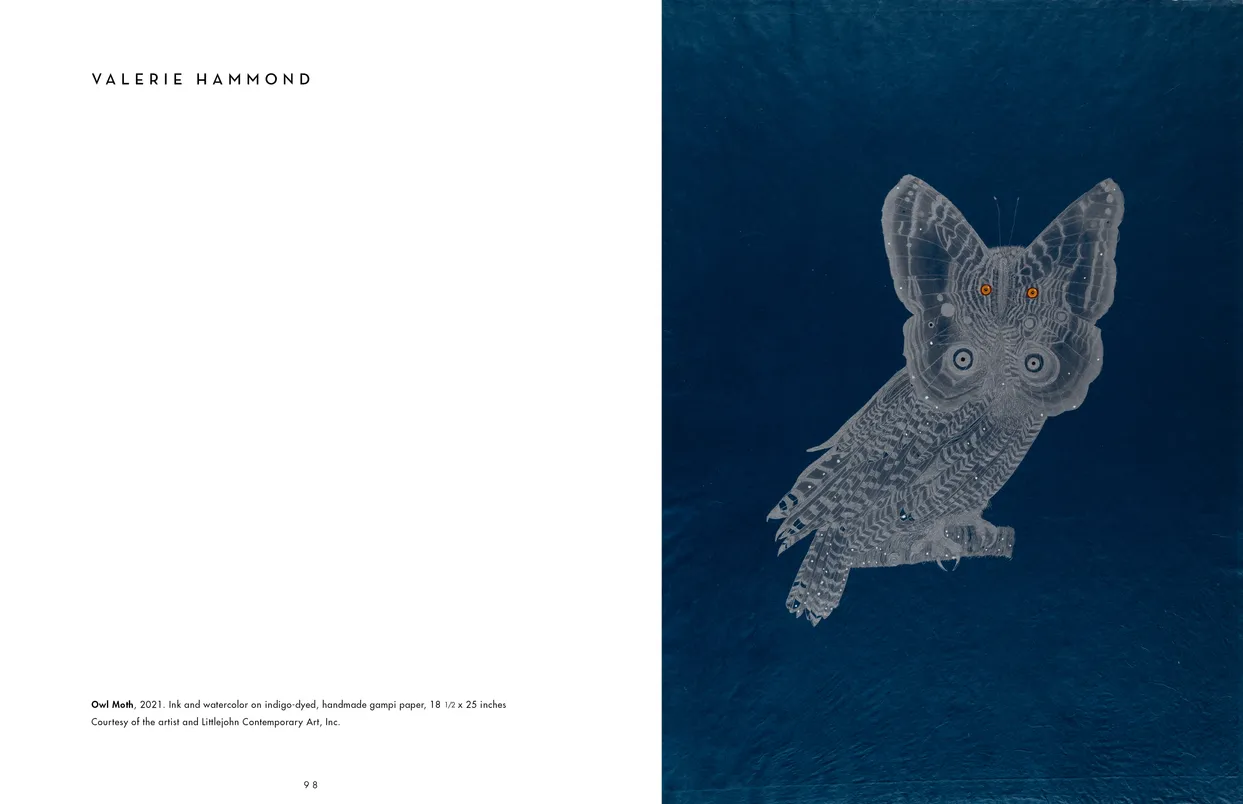
- The Eyes Have It exhibition catalog, pages 98-99
- Client: Lehman College Art Gallery
- Visit figure page
- Type: portfolio
- Portfolio Type: publication_design
- Portfolio Role: design_layout
Thomas Doyle If The Creek Dont Rise Artist Panel
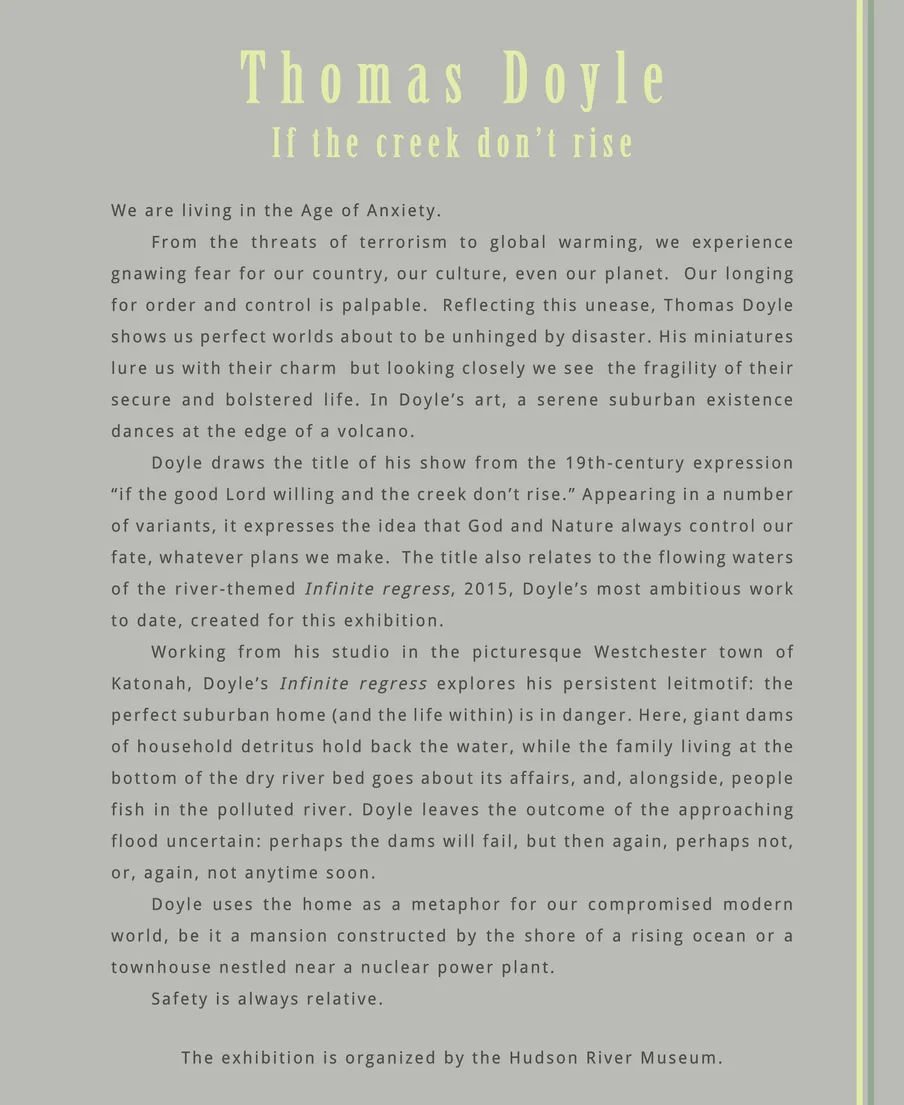
- Artist wall panel for the Thomas Doyle: If the Creek Don't Rise exhibition
- Client: Hudson River Museum
- Visit figure page
- Type: portfolio
- Portfolio Type: advertising
- Portfolio Role: design_layout
Thomas Doyle If The Creek Dont Rise Cole Panel
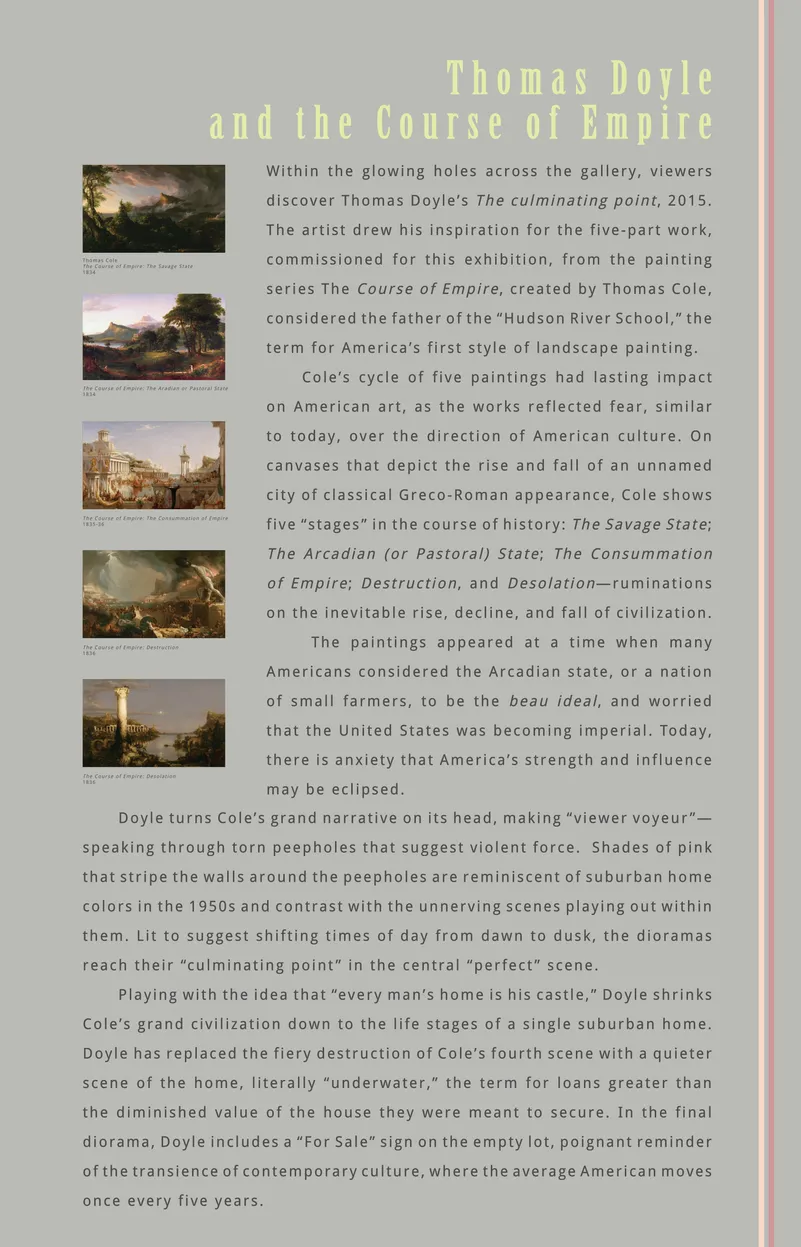
- Thomas Cole connection panel for the Thomas Doyle: If the Creek Don't Rise and Thomas Cole exhibition
- Client: Hudson River Museum
- Visit figure page
- Type: portfolio
- Portfolio Type: advertising
- Portfolio Role: design_layout
Thomas Doyle If The Creek Dont Rise Exhibition Brochure Presentation
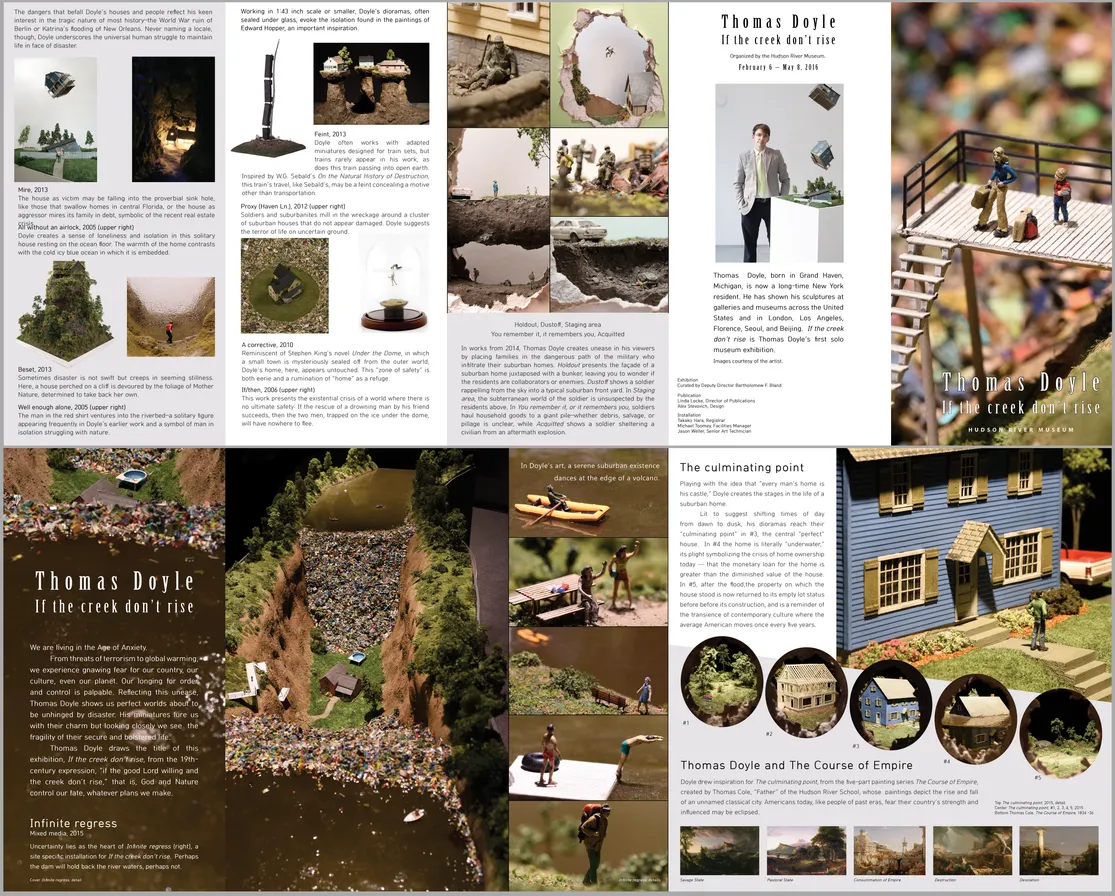
- 5-panel folding brochure for the Thomas Doyle: If the Creek Don't Rise exhibition
- Client: Hudson River Museum
- Visit figure page
- Type: portfolio
- Portfolio Type: advertising
- Portfolio Role: design_layout
Thomas Doyle If The Creek Dont Rise Intro Panel

- Intro wall panel for the Thomas Doyle: If the Creek Don't Rise exhibition
- Client: Hudson River Museum
- Visit figure page
- Type: portfolio
- Portfolio Type: advertising
- Portfolio Role: design_layout
Thomas Doyle If The Creek Dont Rise Mta Poster

- Thomas Doyle: If the Creek Don’t Rise MTA promotional poster
- Client: Hudson River Museum
- Visit figure page
- Type: portfolio
- Portfolio Type: advertising
- Portfolio Role: design_layout
Tick Tock Exhibition Artists Panel
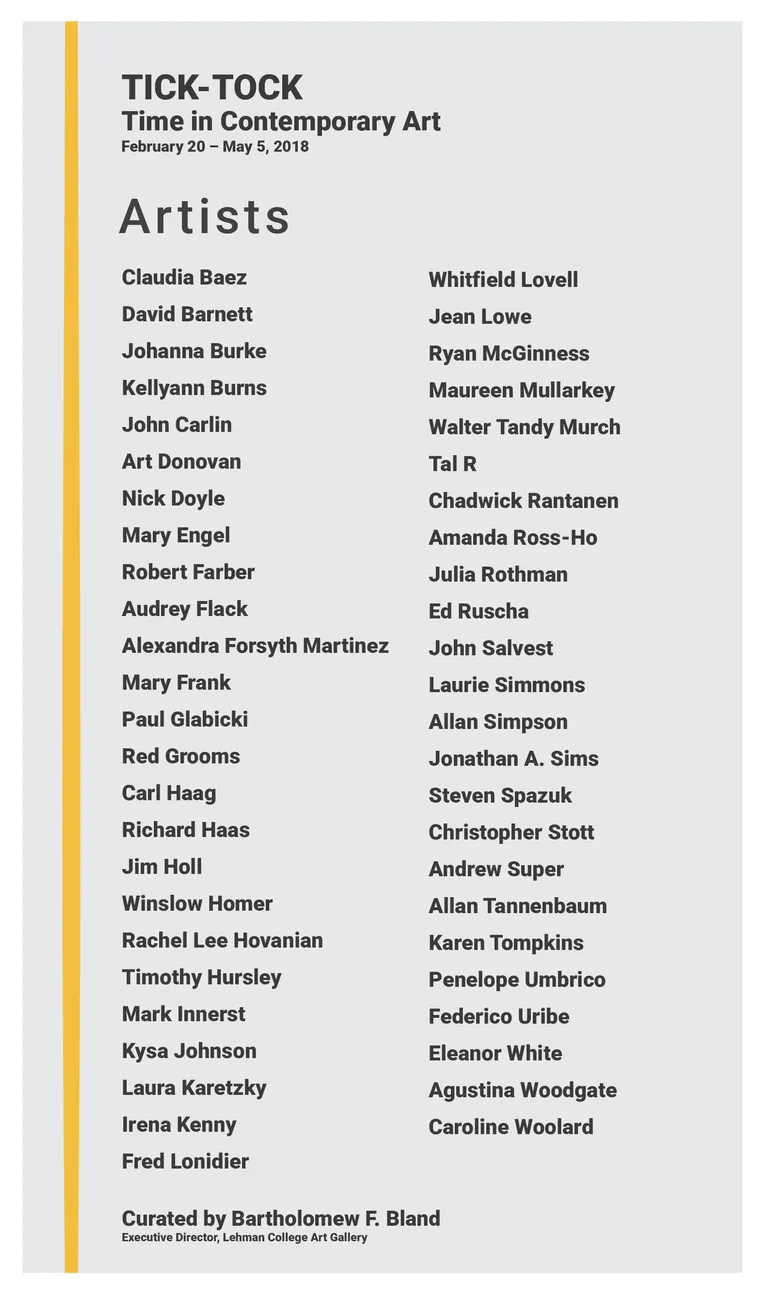
- Artists wall panel for the Tick Tock: Time in Contemporary Art exhibition
- Client: Hudson River Museum
- Visit figure page
- Type: portfolio
- Portfolio Type: advertising
- Portfolio Role: design_layout
Tick Tock Exhibition Intro Panel

- Introduction wall panel for the Tick Tock: Time in Contemporary Art exhibition
- Client: Hudson River Museum
- Visit figure page
- Type: portfolio
- Portfolio Type: advertising
- Portfolio Role: design_layout
Tick Tock Exhibition Poem Panel

- Poem wall panel for the Tick Tock: Time in Contemporary Art exhibition
- Client: Hudson River Museum
- Visit figure page
- Type: portfolio
- Portfolio Type: advertising
- Portfolio Role: design_layout
Tick Tock Exhibition Supporters Panel
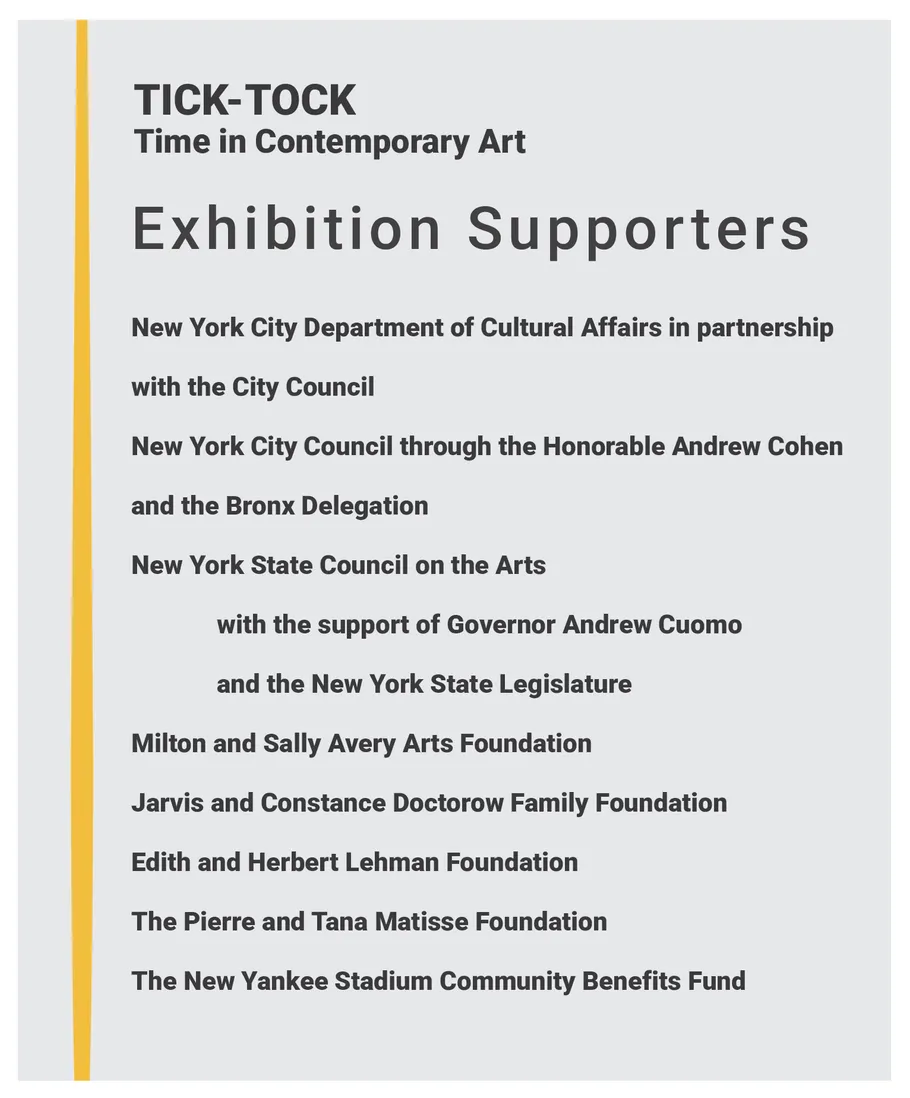
- Supporters wall panel for the Tick Tock: Time in Contemporary Art exhibition
- Client: Hudson River Museum
- Visit figure page
- Type: portfolio
- Portfolio Type: advertising
- Portfolio Role: design_layout
Transomnebulism Brand Graphicmark
- Transomnebulismn brand graphicmark
- Client: Transomnebulism
- Visit figure page
- Type: portfolio
- Portfolio Type: advertising
- Portfolio Role: design_layout
Transomnebulism Dropcap Font A Glyph
- Transomnebulism dropcap font 'A' character glyph
- Client: Transomnebulism
- Visit figure page
- Type: portfolio
- Portfolio Type: advertising
- Portfolio Role: design_layout
Transomnebulism Dropcap Font T Glyph
- Transomnebulism dropcap font 'T' character glyph
- Client: Transomnebulism
- Visit figure page
- Type: portfolio
- Portfolio Type: advertising
- Portfolio Role: design_layout
Transomnebulism Dropcap Font W Glyph
- Transomnebulism dropcap font 'W' character glyph
- Client: Transomnebulism
- Visit figure page
- Type: portfolio
- Portfolio Type: advertising
- Portfolio Role: design_layout
Transomnebulism Dropcap Font W Glyph Vector
- Transomnebulism dropcap font 'W' character glyph (Vector Display)
- Client: Transomnebulism
- Visit figure page
- Type: portfolio
- Portfolio Type: advertising
- Portfolio Role: design_layout
Transomnebulism Web Home Page
- Transomnebulism — Home Page
- Client: Transomnebulism
- Visit figure page
- Type: portfolio
- Portfolio Type: advertising
- Portfolio Role: design_layout
Trifield Impact Data Visualization
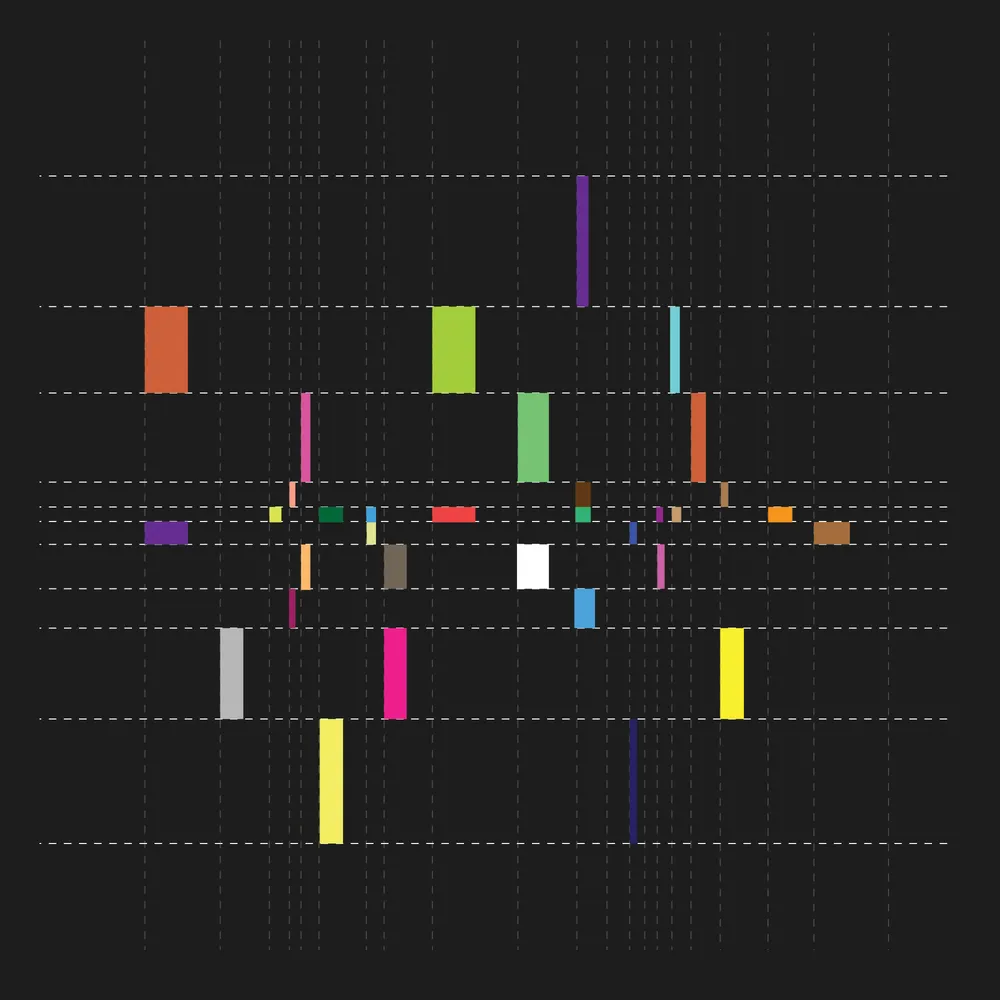
- Tri-Field Impact Data Visualization
- Visit figure page
- Type: portfolio
- Portfolio Type: advertising
- Portfolio Role: design_layout
Triform 005
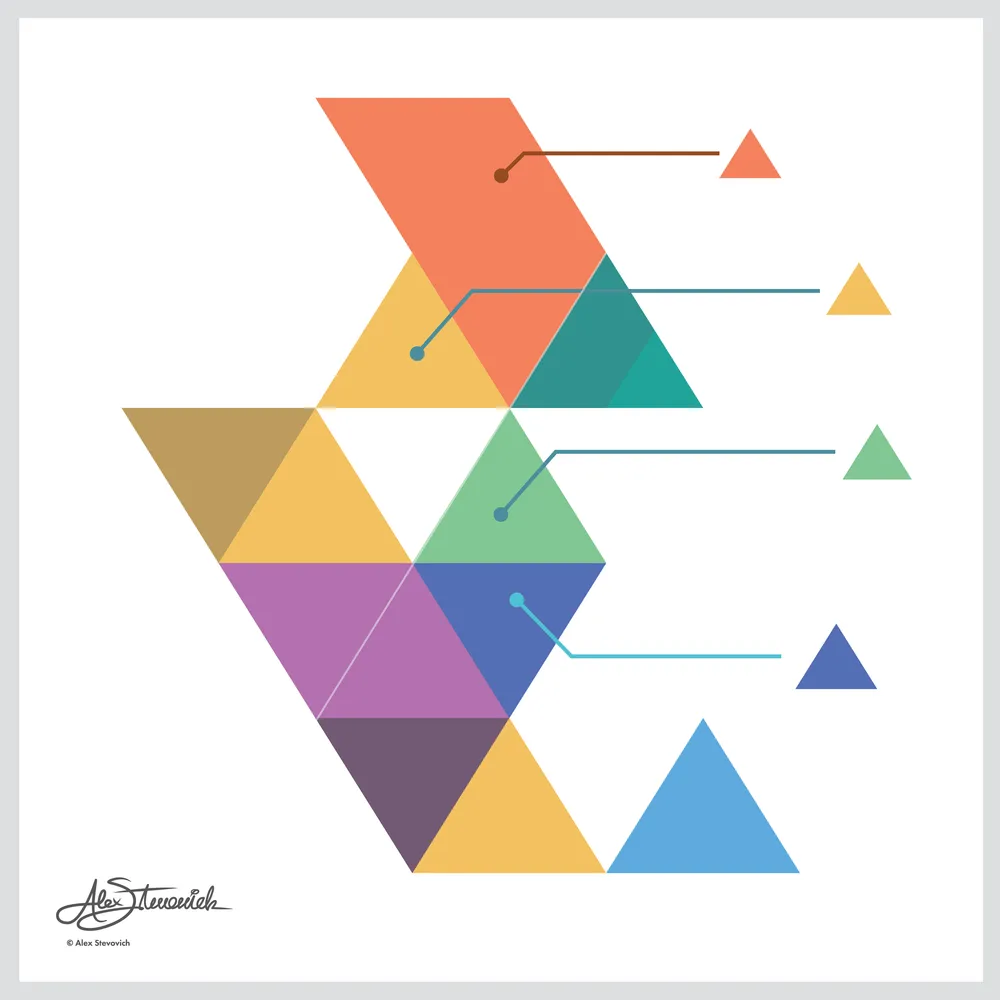
- Triform #5
- Artwork by Alex Stevovich
- © Alex Stevovich
- Visit figure page
- Type: portfolio
- Portfolio Type: advertising
- Portfolio Role: design_layout
- Portfolio Original Art: true
Triform 016
- Triform #16
- Artwork by Alex Stevovich
- © Alex Stevovich
- Visit figure page
- Type: portfolio
- Portfolio Type: advertising
- Portfolio Role: design_layout
- Portfolio Original Art: true
Triform 018

- Triform #18
- Artwork by Alex Stevovich
- © Alex Stevovich
- Visit figure page
- Type: portfolio
- Portfolio Type: advertising
- Portfolio Role: design_layout
- Portfolio Original Art: true
Triform 021
- Triform #18
- Artwork by Alex Stevovich
- © Alex Stevovich
- Visit figure page
- Type: portfolio
- Portfolio Type: advertising
- Portfolio Role: design_layout
- Portfolio Original Art: true
Triform 022

- Triform #22
- Artwork by Alex Stevovich
- © Alex Stevovich
- Visit figure page
- Type: portfolio
- Portfolio Type: advertising
- Portfolio Role: design_layout
- Portfolio Original Art: true
Triform 028
- Triform #28
- Artwork by Alex Stevovich
- © Alex Stevovich
- Visit figure page
- Type: portfolio
- Portfolio Type: advertising
- Portfolio Role: design_layout
- Portfolio Original Art: true
Triform 030
- Triform #30
- Artwork by Alex Stevovich
- © Alex Stevovich
- Visit figure page
- Type: portfolio
- Portfolio Type: advertising
- Portfolio Role: design_layout
- Portfolio Original Art: true
Triform 032
- Triform #32
- Artwork by Alex Stevovich
- © Alex Stevovich
- Visit figure page
- Type: portfolio
- Portfolio Type: advertising
- Portfolio Role: design_layout
- Portfolio Original Art: true
Un Our Rights Our Freedoms Always Exhibition Intro Panel

- Introduction panel for Our Rights, Our Freedoms, Always exhibition
- Client: Lehman College Art Gallery
- Visit figure page
- Type: portfolio
- Portfolio Type: advertising
- Portfolio Role: design_layout
Un Our Rights Our Freedoms Always Exhibition Wordmark

- Wordmark panel for Our Rights, Our Freedoms, Always exhibition
- Client: Lehman College Art Gallery
- Visit figure page
- Type: portfolio
- Portfolio Type: advertising
- Portfolio Role: design_layout
Willard Traub Brand Brandmark

- Willard Traub Photography web header logo
- Client: Willard Traub
- Visit figure page
- Type: portfolio
- Portfolio Type: advertising
- Portfolio Role: design_layout
Willard Traub Web Home Page
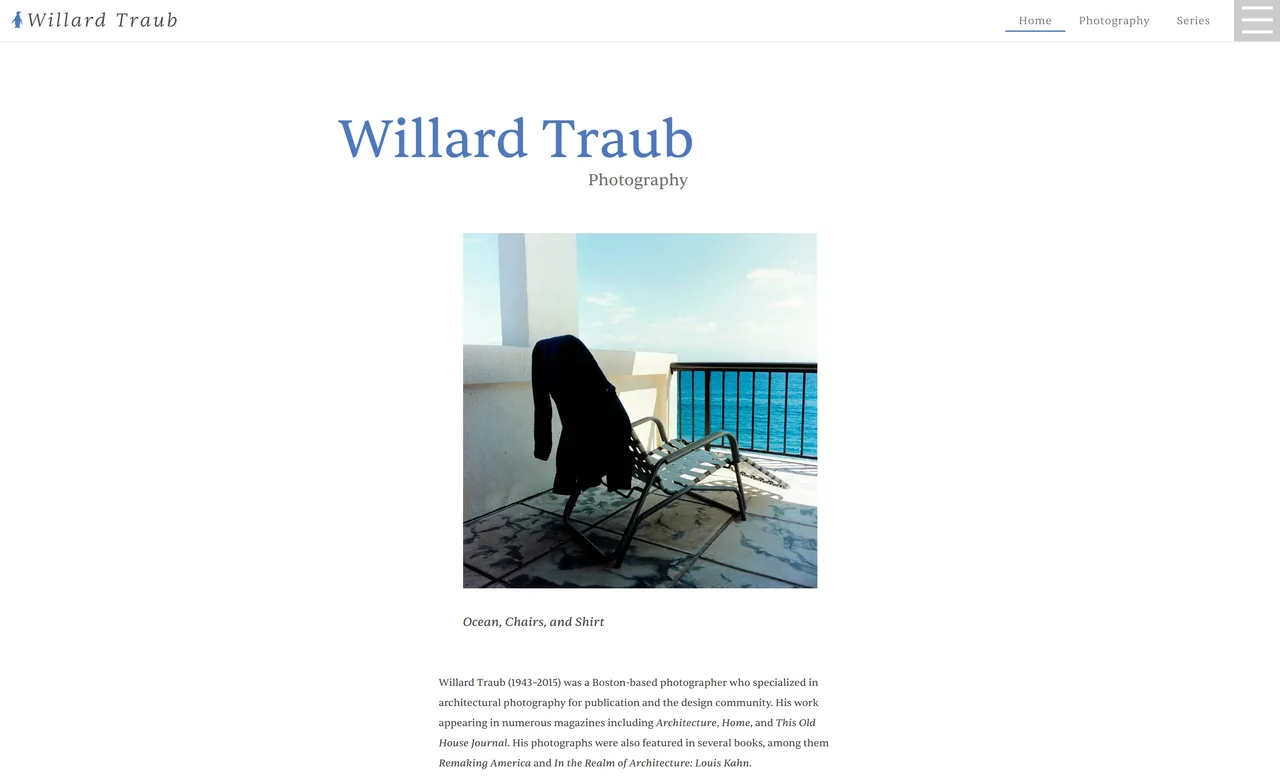
- Willard Traub Website — Home Page
- Client: Willard Traub
- Visit figure page
- Type: portfolio
- Portfolio Type: advertising
- Portfolio Role: design_layout
Woodcreek Horses Web About Page
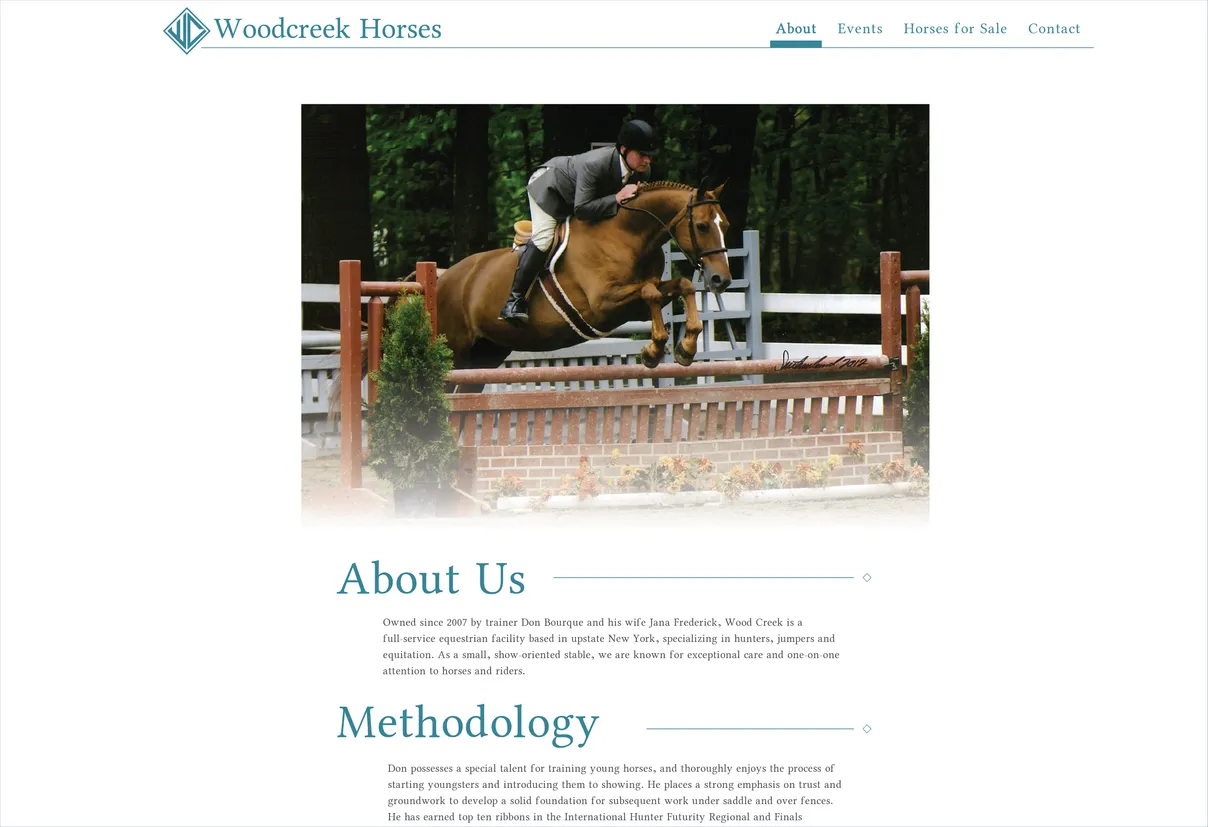
- Woodcreek Horses Website — About Page
- Client: Woodcreek Horses
- Visit figure page
- Type: portfolio
- Portfolio Type: advertising
- Portfolio Role: design_layout
Woodcreek Horses Web About Page Mobile
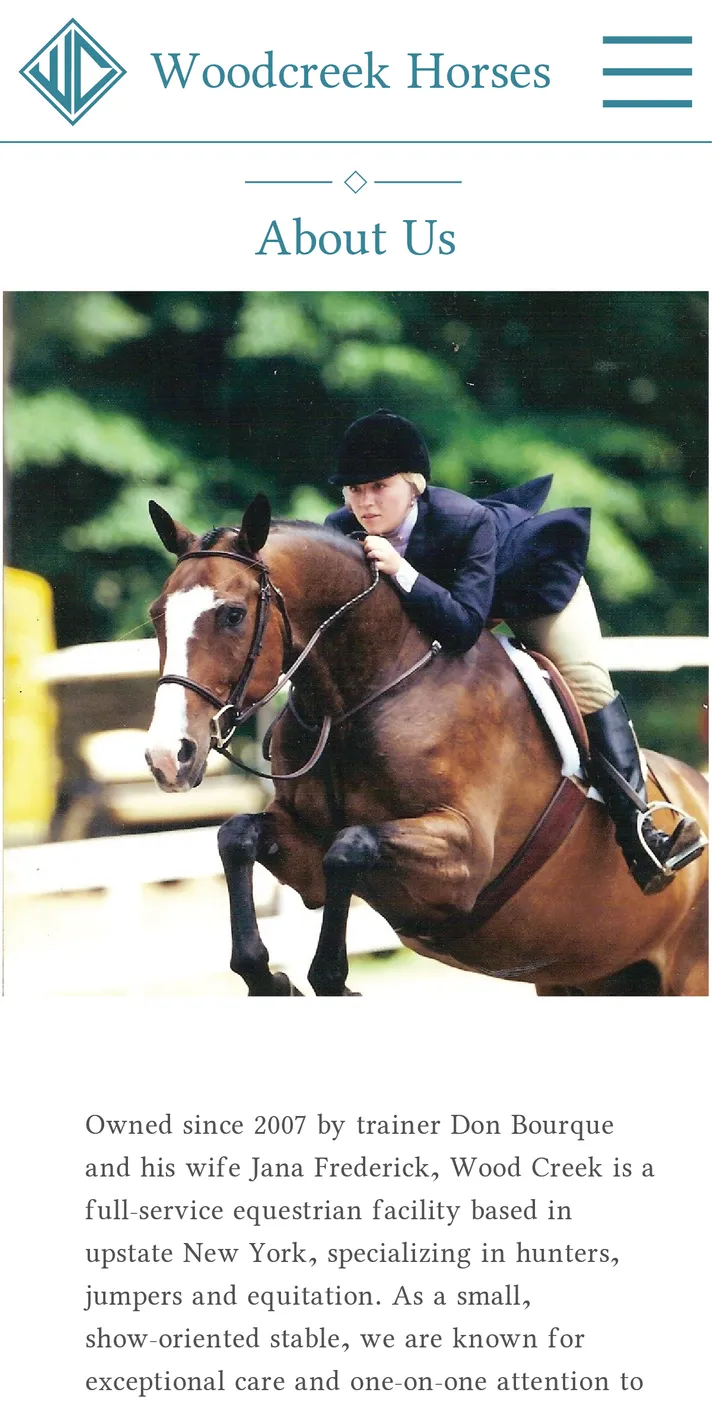
- Woodcreek Horses Website — About Page (Mobile)
- Client: Woodcreek Horses
- Visit figure page
- Type: portfolio
- Portfolio Type: advertising
- Portfolio Role: design_layout
Zero Signature

- Zero signature graphic
- Client: Zero
- Artwork by Alex Stevovich
- © Alex Stevovich
- Visit figure page
- Type: portfolio
- Portfolio Type: advertising
- Portfolio Role: design_layout
- Portfolio Original Art: true